
Technical Guide to
Working with PDF
Documents
Prepared by the
Ninth Circuit Appellate Lawyer
Representaves
Published November 23, 2020
N
I
N
T
H
C
I
R
C
U
I
T
U
N
I
T
E
D
S
T
A
T
E
S
C
O
U
R
T
O
F
A
P
P
E
A
L
S

TABLE OF CONTENTS
Page
INTRODUCTION ........................................................................................................ 3
I. Basics: creating PDFs...................................................................................... 5
A. PDF creation methods. ........................................................................ 5
1. Converting your brief to a PDF. ................................................. 5
2. Scanning paper documents. ...................................................... 6
Avoid scanning documents wherever possible. .............. 6
Option 1: Free scanning software. .................................. 6
Option 2: Scanning using Adobe Acrobat Pro
DC.
................................................................................... 6
B. Making your PDF text-searchable. ....................................................... 7
II. Managing PDFs: combining documents and organizing pages. ..................... 9
A. Combining multiple documents into a single PDF. .............................. 9
B. Deleting a page. ................................................................................. 11
C. Adding a page. ................................................................................... 12
D. Replacing a page. ............................................................................... 14
III. Compiling the addendum and excerpts of record. ...................................... 15
A. Converting your addendum to PDF. .................................................. 15
1. Using Websites to Obtain Electronic Copies of Legal
Authorities. .............................................................................. 16
2. Converting electronic sources to PDF. ..................................... 16
Option 1 (preferred method): Create addendum
with word processing program, and convert to
PDF. ............................................................................... 16

2
Option 2: Convert webpages to PDF by printing
to PDF. ........................................................................... 18
B. Creating electronic Excerpts of Record. ............................................. 19
1. Contents of the Excerpts of Record. ........................................ 20
2. Collecting your documents. ..................................................... 22
3. Adding page numbers (Bates stamping). ................................. 23
IV. Bookmarking a PDF. ..................................................................................... 27
A. General advice on bookmarks. .......................................................... 27
B. Creating bookmarks. .......................................................................... 27
1. Option 1: Create bookmarks in Microsoft Word. .................... 27
2. Option 2: Creating bookmarks in Adobe Acrobat Pro
DC. ........................................................................................... 28
C. Editing bookmarks. ............................................................................ 29
D. Moving bookmarks. ........................................................................... 30
E. Nesting bookmarks. ........................................................................... 30
V. Handling redactions and sealed materials. .................................................. 31
A. Redacting using a word processor. .................................................... 32
B. Redacting using Adobe Acrobat Pro DC. ............................................ 32
VI. Filing tips. ..................................................................................................... 34
A. Reducing the size of the PDF file. ...................................................... 34
B. Ensure compliance with CM/ECF requirements. ............................... 34
C. Choosing the correct document description in CM/ECF. ................... 35
3
INTRODUCTION
This Ninth Circuit Guide to Electronic Briefs is designed to help attorneys,
self-represented parties, and law firm staff prepare briefs and accompanying
documents in portable document format (PDF) for electronic filing. Judges and
other court staff increasingly review briefs and accompanying documents
exclusively electronically. By preparing documents that are easy to navigate,
search, and annotate, you will help the judges and court staff get the most from
your filings.
This Guide covers:
• The basics of creating PDFs
• Managing PDFs, including combining documents and organizing pages
• Compiling the Addendum and Excerpts of Record
• Adding page numbers and bookmarks
• Special considerations for redactions and sealed materials
• Filing tips
* * *
This Guide shows the steps and screenshots for the current versions of
Microsoft Office 365 and Adobe Acrobat Reader DC at the time the Guide was
prepared (November 2020). Future updates to the software may change how to
perform these tasks. The Court does not endorse any particular product.
Some tasks cannot be completed using the free version of Adobe Acrobat
Reader DC. In those circumstances, the Guide refers to Adobe Acrobat Pro DC. In
many instances, free or low-cost software is also available to perform the tasks.
* * *
4
Several other resources are available, including:
• FRAP and Circuit Rules
• Forms and Instructions
• CM/ECF User Guide
• Appellate Lawyer Representatives’ Guide
• Shell Brief
• Excerpts of Record shell
* * *
This Guide was prepared by the following Appellate Lawyer Representatives
and court staff:
Eric M. Fraser, Brian P. Goldman, Nancy M. Olson, Christopher Pooser, and
Cynthia A. Stein, and was advised by Molly Dwyer, Clerk of Court, and Susan
Gelmis, Chief Deputy Clerk. Portions of this Guide were drawn from the
Massachusetts Appeals Court Clerk’s Guide to Electronic Briefs.
This Guide is a work in progress, and we welcome any suggestions for its
improvement. Please email any suggestions or comments to
ALRPracticeGuide@ca9.uscourts.gov. We will do our best to keep the guide up to
date, but the Court’s rules, general orders, electronic filing systems, and CM/ECF
User Guide can and do change. In the event of conflict or possible confusion, the
Court’s official rules, orders, and guidelines control.

5
I. Basics: creating PDFs.
A. PDF creation methods.
1. Converting your brief to a PDF.
Your brief must be generated from the original word processing file to
permit the electronic version of the document to be searched and copied.
Cir. R. 25-5(d). PDF files created by scanning paper documents are
prohibited, except in certain situations. Id. Thus, do not print your brief to
paper and scan it. Instead, convert it to PDF format directly from your
word processing software, or convert it to PDF format using Adobe Acrobat.
This section shows how to do so using Word.
Step 1: Go to the File tab.
Step 2: Select Save as Adobe PDF.
Step 3: In the dialog box, click Save. Be sure you save a copy in Word
as well.

6
2. Scanning paper documents.
Avoid scanning documents wherever possible.
Any document that exists in electronic form should be converted
directly into a PDF. Documents that exist in electronic form should not be
scanned. Occasionally you may need to scan a document that exists only in
paper form (e.g., a trial exhibit). This section addresses how to manage
scanned documents.
Option 1: Free scanning software.
Your scanner may have come with software to scan documents to PDF.
If so, you may use that. You may also search online for various free
applications that support scanning paper documents to PDF.
Option 2: Scanning using Adobe Acrobat Pro DC.
One commonly used PDF creation application is Adobe Acrobat Pro
DC. To scan a paper document into a PDF with Adobe:
Step 1: Go to the File tab > select Create > select PDF from
Scanner.
Step 2: In the Scan & OCR dialog box, go to Scan using and click on the
Settings icon next to Default Settings > under Resolution,
select 300 dpi > under Output, check the Recognize Text (OCR)
box > select Save Settings at the top right corner of the screen
to maintain these settings as your default.

7
Step 3: Place the document in your scanner > select Scan.
B. Making your PDF text-searchable.
All documents submitted for electronic filing (including briefs, excerpts
of record, motions, and forms) must be in text-searchable format. See Cir.
R. 25-5(d). Text-searchable PDFs allow users to search for keywords,
highlight text, insert notes, and copy and paste material within the PDF.
Making your Brief, Addendum, and Excerpts of Record OCR searchable is a
critical step because it allows judges and court staff to effectively and
efficiently review and annotate the documents. The Clerk may reject your
electronic filing if it is not OCR compliant.
Some PDFs—including those generated directly from the Microsoft
Word file (see supra § I.A.1)—already contain searchable text. For PDFs
that do not contain searchable text, you must run an OCR (optical character
recognition) process. This section describes how to run OCR on your
documents.

8
This function is not available in the free version of Adobe Acrobat
Reader. Various free websites and applications will add searchable text to a
PDF. Alternatively, the steps below apply to Adobe Acrobat Pro DC.
Step 1: Go to the Tools menu > select Scan & OCR > select Scan &
OCR or Enhance Scans > click Open.
Step 2: In the Enhance Scans toolbar, select Recognize Text > select In
This File.
Step 3: Under the Pages dropdown, select All Pages > click on
Settings, we recommend setting the Downsample To box
to 300 dpi > click OK.

9
Step 4: If an alert appears stating that Acrobat could not perform
OCR because the page contains renderable text, this
means the page is already searchable.
Step 5: Click Ignore future errors in this document > click OK > click
Save.
II. Managing PDFs: combining documents and organizing pages.
You may need to combine multiple documents into one PDF, or add,
delete, or replace pages—for example, when assembling PDFs of district
court filings into the excerpts of record. This section addresses how to do
these tasks.
The free version of Adobe Reader does not support performing some
of these operations. This section refers to Adobe Acrobat Pro DC. There is
also a selection of free and low-cost software that offers this functionality
that may be found online.
A. Combining multiple documents into a single PDF.
Your brief, required certificates, and any appendix must be submitted
as one document. Each volume of the excerpts of record should be
submitted as one document. (See § III.B below.) This section discusses how
to combine multiple PDFs into one document.
Step 1: Choose File > Create > Combine Files Into a Single PDF.

10
Step 2: Select Add Files to select files from a folder on your
computer. If the documents you wish to combine are
currently open, you can select Add Open Files instead.
Step 3: In the dialog box, highlight all the files or folder of files that
you want to combine into a single PDF. The files can be a mix
of formats (i.e. Word, Excel, PDF, etc.). Click Open.
Step 4: Choose between Thumbnail View and List View .
Arrange the files in the order that you want them to appear
using the Move Up and Move Down buttons or by dragging
and dropping the file names.
Step 5: If you forgot a file, you can add it using the Add Files
button.
Step 6: Select the Combine button in the dialog box and save the
resulting combined file to your computer.

11
B. Deleting a page.
Step 1: Select Tools > Organize Pages.
Step 2: Click the thumbnail of the page or pages you want to
delete, then click on the Trashcan button to delete.
Step 3: Click OK to remove the pages.

12
C. Adding a page.
Step 1: Select Tools > Organize Pages.
Step 2: Select Organize Pages > Insert > From File to select files from a
folder on your computer.

13
Step 3: In the dialog box, highlight the file you want to add, then click
Open. If the file you select has multiple pages, all pages will be
added. You can delete any unwanted pages following the
instructions to delete a page above.
Step 4: In the next dialog box, select Before or After from the
Location option, then select from the Pages option where
you want the new page(s) to be added. Then click OK.

14
D. Replacing a page.
Step 1: Select Tools > Organize Pages.
Step 2: Click the thumbnail of the page(s) you want to replace, then
click Replace.
Step 3: In the dialog box, highlight the file that contains the
replacement page(s), then click Open.

15
Step 4: In the next dialog box, under Original, verify that the
page(s) you want to replace are correct. Next, under
Replacement, type the page number that corresponds to
the first page to be used as the replacement. Acrobat will
automatically select a page range that mirrors the number
of pages you chose to be replaced in the original. For
example, suppose you elected to replace pages 5 through
7 (three pages) of the original file. If you elect to start with
page 2 of the replacement file, Acrobat will automatically
select a range of pages 2 through 4 (three pages) in the
replacement file. Click OK when you are done.
III. Compiling the addendum and excerpts of record.
A. Converting your addendum to PDF.
Some briefs will include an addendum. Immigration cases require
specific documents to be included in an addendum. See Circuit Rule 28-2.7.
And in all cases, pertinent constitutional provisions, treaties, statutes,
ordinances, regulations and rules may be included in an addendum
containing a table of contents, which may be bound with the brief or filed
separately. Id. (The text of those provisions may also be provided verbatim

16
within the brief, directly after the statement of issues presented for
review.)
1. Using Websites to Obtain Electronic Copies of Legal
Authorities.
To begin, you should collect the pertinent statutes, rules, etc. in
electronic format. Do not scan materials for the addendum unless you
cannot obtain them in electronic format. Scanning results in file sizes that
may be too large for the Court’s filing system, and often results in illegible
documents. If you must scan a document that is unavailable online, please
make it OCR searchable, as detailed below in § I.B. See Circuit Rule 25-5(d).
Many federal authorities are available online. For example, the
following resources may be useful.
• U.S. Code search tool: https://uscode.house.gov/search/criteria.shtml
• Federal Rules of Procedure, Evidence, etc.:
https://www.uscourts.gov/rules-policies/current-rules-practice-
procedure
• Various primary sources, including state law materials, through Cornell
Legal Information Institute: https://www.law.cornell.edu/
• Online legal search databases such as Westlaw and Lexis
2. Converting electronic sources to PDF.
Option 1 (preferred method): Create addendum with
word processing program, and convert to PDF.
To provide a clean copy of all required addendum materials, the Court
suggests copying and pasting the text of pertinent materials into a word
processing program, which will also allow you to add the required table of
contents, and then convert the document into PDF.
Step 1: Open a blank document in your word processing program.
Step 2: Conduct an internet search for the legal authorities needed for
your addendum.

17
Step 3: For example, if one of the pertinent legal authorities for your
brief is the Tenth Amendment, after finding the text of that
amendment online, copy the text. Do not include
accompanying material such as commentary.
Step 4: Move to your word processing program. Start a new page for
each source included in your addendum. On a new page, right-
click and mouse over Paste Special, selecting Unformatted
Unicode Text, or if the version of the word processing program
you are using provides paste icons, select the third icon, Keep
Text Only.

18
Step 5: Continue this process until you have copied and pasted each
pertinent authority into your addendum.
Step 6: Adjust the typeface, spacing, margins, indentation, and other
formatting to ensure that your addendum is easy to read and
use.
Step 7: When you are finished adding authority, add the required
table of contents at the beginning of your addendum.
Step 8: After you have added a table of contents and applied required
formatting, convert your addendum into PDF, as described
above in § I.A.1.
Option 2: Convert webpages to PDF by printing to PDF.
If you are unable to create your addendum by pasting pertinent
authority into a word processing program, you may also print each
electronic authority to PDF, and then combine the authorities into a single
PDF.
This option is not preferred because it often results in a longer and
less-organized Addendum, and often includes extraneous material.

19
Step 1: After finding your pertinent authority online, right-click and
select Print (or using your keyboard, type Ctrl + p).
Step 2: When the print dialog box opens, set the printer destination to
Save as PDF or Print to PDF, depending on your browser.
Step 3:
Repeat steps 1 and 2 for all pertinent authorities. After you have
finished finding pertinent authorities and printing to PDF, create
a table of contents and print that to PDF. Finally, combine the
table of contents along with the authorities into a single PDF, as
detailed above in § II.A.
B. Creating electronic Excerpts of Record.
Before creating your electronic Excerpts of Record, you should review
in detail the current version of Circuit Rule 30-1. Notably, the Ninth Circuit
requires Excerpts of Record rather than an Appendix as described in
FRAP 30. You must follow this rule closely or risk having your excerpts
rejected by the Court. If your excerpts are rejected, you will have to correct
them and refile the corrected version. In addition, consider reviewing the
Excerpts of Record shell.
You should compile your excerpts by using electronic documents (e.g.,
the relevant portions of the district court record downloaded from PACER).
Avoid scanning paper copies to PDF, which creates larger and often illegible

20
files. If you must scan a document that is unavailable online, please make it
OCR searchable, as described above in § I.B. See Circuit Rule 25-5(d).
The excerpts must be submitted electronically, separately from the
brief, and in one or more volumes, depending on size.
Notes: In social security appeals, the complete certified administrative
record should be submitted by the appellant under an entirely separate
CAR filing event at the time the opening brief and any other excerpts are
filed.
Neither party need file an Excerpts of Record in any petition for review
challenging an order of removal in an immigration case.
1. Contents of the Excerpts of Record.
The excerpts must contain the following, and be ordered in the
following manner.
Volume I:
• Each volume must contain a caption (cover) page, as described in
FRAP 32(a), and the cover page shall include the volume number
(e.g., Volume 2 of 6). See Circuit Rule 30-1.5(d).
• Volume I must contain all decisions being appealed. See Rule 30-
1.4(a) for a description of what to include in Volume I.
• Unless the entire set of excerpts will not exceed 300 pages, the
decisions being appealed are the only materials that should be placed
in Volume I.
• If the entire excerpts will not exceed 300 pages, then include a table
of contents, the decisions being appealed, and the other relevant
parts of the record, generally arranged by file date in reverse
chronological order.

21
Volume II and subsequent volumes:
• Cover page (as described above)
• The subsequent volumes should include all other parts of the record
relevant to deciding the appeal, generally arranged in reverse
chronological order.
• No volume may contain more than 300 pages, including the caption
(cover) page.
• The notice of appeal and lower court docket sheet shall be included
at the end of the last volume in the non-sealed Excerpts of Record.
• All volumes of multi-volume Excerpts of Record (except the index
volume described below) must be numbered consecutively across all
volumes in a set, beginning with the caption page of the first volume
as page number 1. Every page (including blank pages, cover pages,
etc.) must be numbered.
Trial Transcript Volume:
• If your excerpts will include a complete trial transcript, you may
submit the trial transcript as a separate volume(s), paginated
consecutively to the other ER volumes.
• All documentary and other exhibits capable of production in PDF
format may also be placed in this volume at the end of the transcript,
at the end of the final volume of the unsealed Excerpts of Record,
just before the notice of appeal and docket sheet, or, if appropriate,
in the final volume of sealed Excerpts of Record.
Separate Index Volume:
• For multi-volume Excerpts of Record, you must submit a table of
contents, as a separate PDF file, that covers all volumes of your
excerpts. The Index Volume must be paginated separately from the
numbered volumes, and all other volumes must not include a table
of contents. See Circuit Rule 30-1.5(a) for detailed instructions.

22
Separate Sealed Volume:
• Documents that need to be sealed must be submitted in a separate,
final volume. See Circuit Rule 30-1.4(d). For additional discussion
about sealed documents, see § V, below.
2. Collecting your documents.
After you have determined what to include in your Excerpts of Record
and how many volumes will be needed based on the 300-page-per-volume
limit, you should organize your documents before combining them into a
single PDF.
It is helpful to place all of the necessary PDF files into a folder,
numbering them to match the order in which they will appear in the
excerpts, so you can visually check to ensure you are not forgetting
something, and to make sure the documents appear in the correct order.
In the below example, all documents will be in Volume I because they
do not exceed 300 pages. Refer to § II.A, above, for instructions on how to
combine multiple PDF files into a single file.
Note that the table of contents PDF is a placeholder until you apply
pagination. After applying pagination, as explained immediately below,
return to your table of contents document in the word processing program
where you created it, add the applicable Excerpts of Record starting page

23
number to each item in the excerpts, save or print it to PDF, and then
replace the relevant page(s), as described above in § II.D.
3. Adding page numbers (Bates stamping).
When you have combined all of the files into a single PDF, you may
now apply ER page numbers to the entire file. The free version of Acrobat
Reader does not support this task. This section describes how to use Adobe
Acrobat Pro DC, but there are also free or low-cost options available.
Step 1: Click on Tools and then Stamp.
Step 2: On the ribbon at the top of the document, additional Stamp
options will appear. Click on Bates Numbering and choose
Add.
Step 3: Select your document and click OK. (Note that for creating
multi-volume Excerpts of Record, at this step, you may click
Add Files and add all of the volumes you would like to
consecutively Bates stamp, except the index volume.)

24
Step 4: A box will appear with two options: Replace Existing or Add
New. When adding Bates Stamps for the first time, click Add
New. (Note: if you are correcting Bates Stamps that were
previously applied using this feature, you may click Replace
Existing.)
Step 5: Click on the Output Options button. Under File Naming, click
the Add to original file names radio button and add text in the
Insert Before or Insert After dialog box. See example below
(_Bates). By taking this step the Bates numbering will appear in
a copy of your PDF, leaving the original PDF untouched.
25
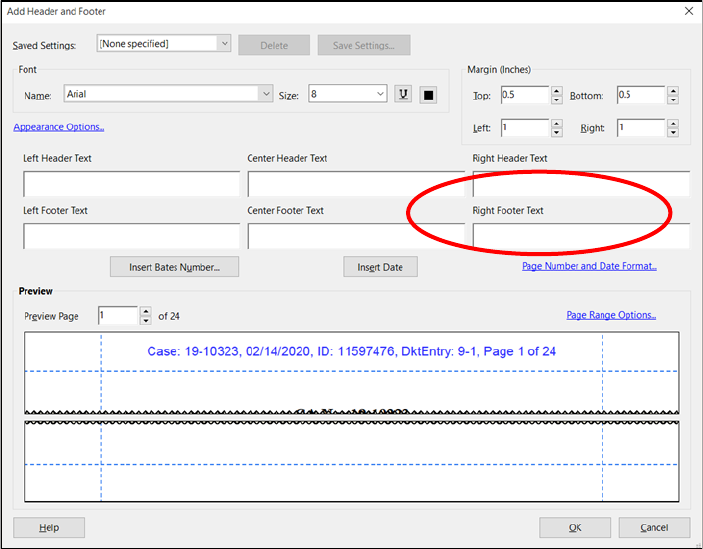
Step 6: When the Add Header and Footer box appears, you may
change the font, size, style, color, margins, etc. in the upper
boxes.
Step 7: To place your ER Bates Stamps in the bottom right corner, click
inside the cursor box below Right Footer Text, then click the
button labeled Insert Bates Number.
Step 8: Enter the Number of Digits, Start Number, and Prefix.
• The Number of Digits will vary depending upon how voluminous your
Excerpts of Record will be.
• For Start Number, choose 1 if you are numbering your first volume.
For subsequent volumes, a Start Number that is one page higher
than the last page in the preceding volume.
• For Prefix, use “ER” for the Excerpts of Record (ER), which
accompany the opening brief. Use “SER” for the Supplemental
Excerpts of Record (SER), which accompany the answering brief. Use
“FER” for a Further Excerpts of Record (FER), which may accompany a
reply brief.

26
• Leave Suffix blank, and click OK.
Step 9: You should now see a preview of your Bates Stamp on the
bottom right corner of the preview pane. You can adjust the
position (if needed) by changing the Margin (Inches) settings
near the top right of the dialog box.
Step 10: Click OK, and your Bates Stamps will be added to the
document(s) you selected.
27
IV. Bookmarking a PDF.
A. General advice on bookmarks.
Although bookmarks are not required for electronically filed Briefs,
Addendums, Excerpts of Record, and other filings, the Court strongly
encourages parties to add bookmarks. Bookmarks are a type of link visible
in the Bookmarks pane of PDF viewers. They allow a judge to quickly locate
different areas of your argument or particular documents in the record.
Judges frequently comment that bookmarks are helpful and encourage
their use in a brief and excerpts of record.
If you choose to bookmark your document, you should use descriptive
labels (i.e., Table of Contents, Table of Authorities, Issues Presented, etc.)
rather than simply indicating page numbers. The Shell Brief accompanying
the Court’s Appellate Practice Guide has a helpful Table of Contents that
should give you an idea of what sections to bookmark separately. See
https://cdn.ca9.uscourts.gov/datastore/uploads/guides/Shell_Brief.pdf.
If a section heading is very long, consider shortening the bookmark to
summarize the heading. Long headings frequently get truncated in the
bookmarks pane. For example, consider the heading “The government’s
argument fails because the Court lacks jurisdiction to consider it.” In a
narrow bookmarks pane, that might get truncated to “The government’s
argument fails bec...” Instead, leave the long section heading in the brief,
but shorten the PDF bookmark to something like “Lack of jurisdiction.”
B. Creating bookmarks.
1. Option 1: Create bookmarks in Microsoft Word.
Using Word, you can automatically generate bookmarks in your PDF if
you use the Styles feature to label headings within your document. The
document will automatically include bookmarks based on the headings
when you generate the PDF using the built-in Adobe Acrobat features in
Word. The Shell Brief uses styles that will automatically generate
bookmarks.
To use Word to create bookmarks, you must follow certain instructions
when converting the Word file to PDF.
28
Step 1: See the instructions above at § I.A.1 for converting a Word
document to a PDF.
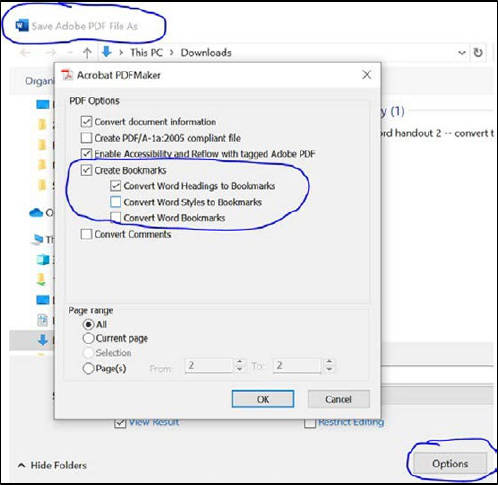
Step 2: Once you have selected Save As Adobe PDF, select the Options
button at the bottom of the dialog box.
Step 3: In the Options dialog box, go to PDF Options > check the
Create Bookmarks box > check Convert Word Headings to
Bookmarks under Create Bookmarks > click OK.
Step 4: Click Save.
2. Option 2: Creating bookmarks in Adobe Acrobat Pro DC.
When using the Combine Documents feature, Adobe Acrobat
automatically creates bookmarks by merging file names of the PDFs. When
naming your files, choose short names that allow them to be easily
identified so that you will not have to do the extra work of renaming your
bookmarks (e.g., Notice of Appeal, Judgment, etc.)
To manually add bookmarks, use the following steps.
Step 1: Click on the Bookmarks button on the left to open the
Bookmarks panel. Tip: if you do not see the bookmarks panel,

29
click the small arrow on the left-hand side of your PDF to
expand the Bookmarks panel.
Step 2: Navigate to the section you would like to bookmark. Using
your mouse cursor, click to highlight the heading you want to
bookmark
Step 3: In the Bookmarks panel, click on the Options pulldown >
select New Bookmark > or click on the New Bookmark
button. If you would like to add a new bookmark in relation to
an existing bookmark, select the bookmark under which you
want the new bookmark to appear. If you don’t select a
bookmark, the new bookmark will appear at the end of the list.
OR
Step 4: Go to the new bookmark that appears in the Bookmarks
panel > if you selected text, the text becomes the name of the
new bookmark > edit the name as necessary.
C. Editing bookmarks.
To edit the name of a bookmark, double click the bookmark > retype
the name > click outside the bookmark or press the Enter or Return keys on
your keyboard.
To delete a bookmark, select the bookmark > press the Delete button
at the top of the Bookmarks panel.

30
D. Moving bookmarks.
Step 1: In the Bookmarks panel, click and hold on the Bookmark icon
next to the bookmark’s name > drag the Bookmark icon to the
desired location. For example, clicking and dragging the first
bookmark icon to the bottom of the bookmarks list will move
that bookmark to the end.
Step 2: A Line icon will appear to show the new location.
Step 3: Release the Bookmark icon and drop the bookmark in its
new location.
E. Nesting bookmarks.
A list of bookmarks can be “nested” beneath other bookmarks to
create “tiers” and show a relationship between topics. Use this function to
make the structure of your bookmarks match the structure of your brief
and Excerpts of Record.
Step 1: In the Bookmarks panel, click and hold on the Bookmark icon
next to the bookmark’s name.

31
Step 2: Drag the Bookmark icon to the parent bookmark under which
you would like it nested > release the Bookmark icon once
the Line icon appears indented below the parent bookmark.
V. Handling redactions and sealed materials.
The Ninth Circuit requires parties to redact any personal identifying
information—including, but not limited to, social security numbers,
financial account numbers, birthdates, and the names of any individuals
known to be minors—in publicly accessible filings. Fed. R. App. P. 25(a)(5) &
Fed. R. Civ. P. 5.2. This is different from filing documents under seal. Briefs
and excerpts of record may be filed under seal—meaning the entire
document is inaccessible to the public—only in limited circumstances. A
motion to seal is usually required. For Rules governing filing under seal, see
Cir. R. 27-13. Note that if the Excerpts of Record contain documents that
need to be sealed, they must be placed in a separate, final volume, as
explained above in § III.B.1.
Parties should generally try to avoid including personally identifying or
confidential material wherever possible. Where personally identifiable
information must be included, the best option is to redact using a word
processor to change the original text. If the document cannot be edited in a
word processor, you can redact a PDF using PDF editing software like

32
Adobe Acrobat Pro DC. There are also some free and low-cost PDF editing
software options that offer this functionality.
Important: Do not attempt to redact by changing text color to white
or using black highlighter over the text. These methods are not secure
because the text can still be copied and pasted. See, e.g., Eugene Volokh,
Avoid Super-Embarrassing Redaction Failures (Jan. 7, 2020),
https://reason.com/2020/01/07/avoid-super-embarrassing-redaction-
failures.
A. Redacting using a word processor.
When preparing your brief, the best way to redact sensitive
information is to do so in the original text file by locating the information
and replacing it with “xxx,” an initial, or “beginning with” or “ending with”
where appropriate.
Example: Jodie’s SSN is 555-55-5555. Her redacted number may be
written as “xxx-xx-5555,” or “the SSN ending in 5555.”
Example: Jodie Smith is a minor. Her redacted name is “J. S.”
B. Redacting using Adobe Acrobat Pro DC.
Step 1: Select Tools > Redact > Open.

33
Step 2: Select Mark for Redaction > Text & Images. You can also
select Find Text to search for words or phrases and mark them
for redaction.
Step 3: Highlight the text you would like to redact. When you release
your mouse, your blue highlight should turn into a red box.
Step 4: Place your cursor over the word to preview what the redaction
will look like.
Step 5: Select Apply, then click OK.
34
VI. Filing tips.
A. Reducing the size of the PDF file.
Each PDF that you attach to a filing may not exceed 100 MB. Cir.
Rule 25-5(d).
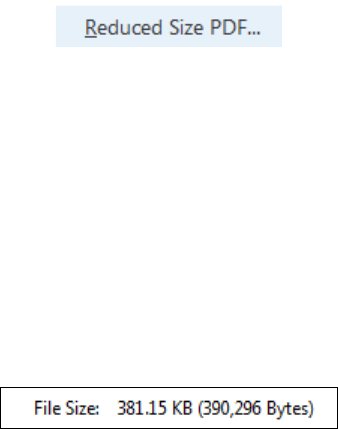
The fastest way to reduce PDF file size is to go to File > Save as Other >
Reduced Size PDF > OK. The process will pause for you to provide a new
name for your PDF, or if you keep the old name, you will be warned that
you are writing over the existing file. Click Save.
If that doesn’t make the file small enough, go to File > Save As >
Optimized PDF. Click the Audit Space Usage button to see which elements
of the PDF are taking up the most space. Use that information to adjust the
settings on the PDF Optimizer dialog box. Click OK.
Before beginning this process, check the original file size so that you
can compare your reduced file size. To check your file size, right-click
anywhere inside the PDF and select Document Properties. In the Advanced
section toward the bottom, you will see File Size:
B. Ensure compliance with CM/ECF requirements.
The CM/ECF system will reject PDF files with the following content:
• Documents that do not comply with PDF format standards
• Documents that contain JavaScript
• Encrypted or password-protected documents
• Documents containing scripts that can launch an external application
• Documents with internal attachments
• Documents with audio or video content

35
• Documents created with MacOS using a fillable form in the Safari
browser (use an alternate browser instead)
• Documents with MacOS using Microsoft Word with the “Best for
printing” option (instead, use the “Best for Electronic Distribution
option).
C. Choosing the correct document description in CM/ECF.
To avoid the Clerk rejecting the filing, be sure to follow the instructions
in CM/ECF about selecting the appropriate Type of Document for your
transaction. For example, to file a brief, select “Brief on the Merits” and
upload the brief as the “main document.”

36
Then in a separate transaction, select “Excerpts of Record” and follow
the prompts to upload your ER volumes. The document descriptions
should be ER Vol 1, ER Vol 2, etc.
