
Animated Sea Aquarium/PowerPoint (Project #7)
Directions: Power Point is a presentation graphics application program you use to organize
and present information. Whether you are giving a sales pitch or promoting a product, a
presentation graphics application can help make your presentation effective and
professional. The first activity you will complete will deal with animated graphics. You will
learn how to use transitions to animate objects on one slide.
Power Point 2007 Instructions:
Open PowerPoint Microsoft Office PowerPoint 2007
PowerPoint should open as a presentation. If not click the Office button and
select New .
Select Blank Presentation
Save Your Presentation
Click the Office button again and select Save As from the drop down menu
and name your file Under the Sea. See the information below on how you want to
save your document.

Set your Slide Layout to Blank
Because you are going to be creating the appearance of sea aquarium you will just be using
graphics, not text. You will need to replace the title slide layout to blank.
On the Home tab select Layout then select Blank.
Place a Background on Your Slide:
Click on the background. You can search for pictures of sea backgrounds and save them to
your pictures folder. To save a picture from the internet, right click on the picture and
select “Save Picture as:…” Be sure you rename the picture so it will be easier to find it
later, also make sure you know where the picture is being saved on your computer.
To place the background graphic on your slide with the Design tab selected click
Background Styles then select Format Background.
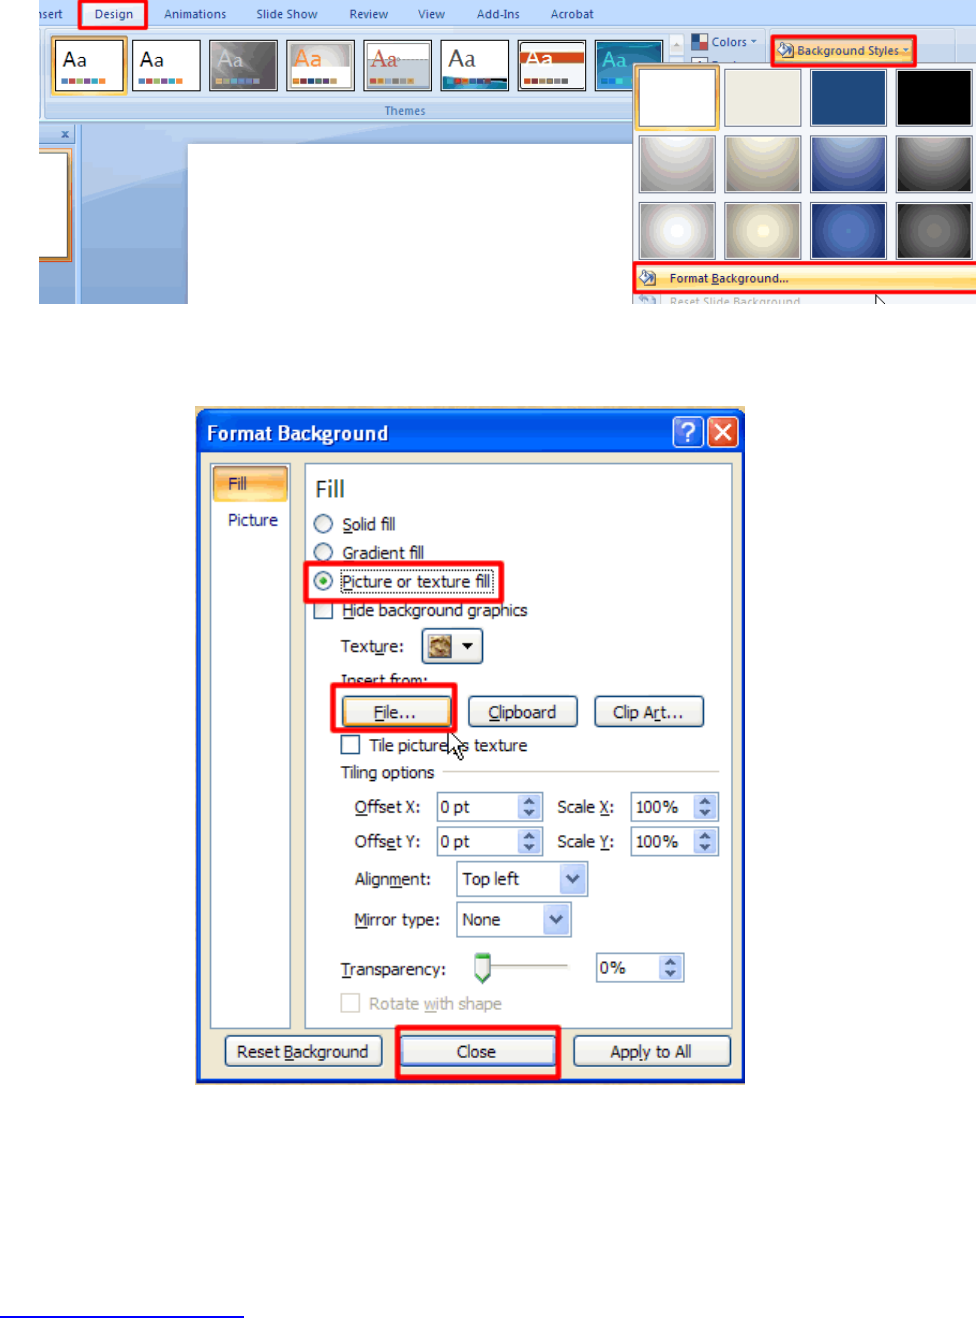
This opens the Format Background dialog box. Select Picture or texture fill, click
File under the Insert from section and browse to find your background picture, then
click Close to apply the background to your slide.
Insert Animated Fish Graphics to Your Slide:
Now it is time for you to collect fish and other underwater animated graphics to add to
your aquarium. Save them to your picture folder. To search for animated graphics, use
Google images, but look for ones that move or are animated. (These will usually be .gif
files.) (There is a link on our website online for additional graphics. You will need to right
click and save the picture to your picture folder.)
Animated Sea Graphics
Insert the Animated Graphics:
With the Insert Tab selected click the Picture icon to open the My Pictures folder on
your computer. Navigate to your student folder and double click on the animated
graphic to place the graphic on your slide.

Click off the picture to deselect it. Notice that the Ribbon Changes when you
deselect the picture.
Play the Slide Show to see the animations by selecting the Slide Show tab and
clicking From Beginning at the Start Slide Show section on the Ribbon.
Click the Escape key (the top left hand side of your keyboard) to return to your
Slide Show editing.
Add Custom Animation:
Realistically fish aren't stationary when they are swimming so you need to add movement
to your graphic. This is done with custom animation.
Click on the graphic you want to apply animation to.
With the Animations Tab selected click Custom Animation.
This opens the custom animation dialog box that will appear at the right of your
document. Click the Add Effect button and select from four types of animation;
Entrance, Emphasis, Exit, or Motion Paths.

You will most likely be dealing with Entrance, Exit, or Motion Paths.
First you will apply an Entrance (crawl or fly) animation to the graphic you just
inserted onto your slide. While your fish is still selected click Add Effect > Entrance
> More Effects.
The Add Entrance Effect dialog box opens.
Click on Crawl In. Make sure the Preview Effect check box is checked. Notice the
fish is moving up from the bottom. I want my fish to move in the direction it is
facing. Don't worry about this for now. Click OK to close the Add Entrance Effect
dialog box.

First place your fish where you want it to stop. The way my fish shown below is
facing to the right so I want it to move from left to right:
In the Custom Animation Pane select the options that you want to apply to your
animation. Since you are later going to make the slide show run on its own I would
change Start from Mouse click to either With Previous or After Previous. The
Direction will depend on how your animation will appear on the slide and select the
speed that you want.
Again play your Slide Show (Slide Show > From Beginning) and see if it the way you
want it. You can change the Modify settings or simply click the Remove animation

button to start all over. Press escape to return to your Editing Slide
Show mode.
Try the different animation effects to make your Under the Sea Aquarium look
realistic. Also include at least one Motion Path animations.
Continue adding animations to the rest of your graphics. Remember to include at
least one Motion Path animation.
Add Midi/Music File to Your Slide Show:
When you insert a sound on a slide, an icon that represents the sound file appears. To
play the sound while you give your presentation, you can set the sound to start
automatically when the slide is displayed, start on a mouse-click, start automatically but
with a time delay, or play as part of an animation sequence. You will set your sound to
start automatically when the slide is displayed. You will need to go to Rocklin Independent
School website to find the sound files, or you may use some of your own if you have them.
(The link shown below contains several Midi files you can choose from for your
background sound. Click on the link to open the zip folder then drag the file you want to
use to your student folder. (Check Rocklin Independent School website for sound files.)
Music/Midi Background Sound Files
Since we have only created one slide for this activity the sound will be placed on this
slide. For other presentations that contain more than one slide you will need to have
the slide you want to include the sound on active.
On the Insert tab, in the Media Clips group, click the arrow under Sound and select
Sound from File.
Navigate to your student folder and double click the sound you will use.
You will then see a prompt box that ask "How do you want the sound to start in the
slide show?"
Click Automatically.
Next you need to change the animation order so that the sound will play at the
beginning of your Slide Show. You will need to move it up in the Custom Animation
dialog box.
Open the Custom Animation Pane by clicking the Animation tab and selecting
Custom Animation.

Click on the music file to select it then click the up arrow to move it to the start of
your custom animation list.
Make Sure Your Slide Show Runs on its Own - No Mouse Clicks
Play your slide show to make sure you do not need to click a mouse to move to the
next animation. Remember you need to view your custom animations to make sure
mouse click is not selected.
Save your work and then turn it in for grading. Make sure you look over it with your
grading rubric!
Name:
Teacher:
Apply a background to the presentation.
25

Clipart/Pictures are included and go along with the theme.
50
Custom animations are included on several of the graphics.
25
Midi file is included in presentation.
25
Total
125
Point Value for Grade
113-125
A
100-112
B
88-99
C
75-87
D
0-74
F
