
1 | razer™
Arcade gaming has come a long way since its glory days – an era woven into the fabric
of gaming history as one that paved the way for innovation, and also one that brought
us bittersweet nostalgia. Hours spent at the arcade honed the gamer in you; for every
coin you inserted, every combo you executed, every hit you took, and every ultra you
unleashed in return – you became a better player. And this is the approach we took
when designing the Razer Atrox Arcade Stick.
Years upon years of collective gaming experience from pro-gamers and you, the Razer
community, have culminated in the ultimate Arcade Stick for the Xbox 360. Engineered
and refined to perfection through countless prototypes and an extensive beta testing
phase, the Razer Atrox Arcade Stick is crafted to allow advanced modification – With
internals and storage easily accessible at the touch of a button, the joystick, all 10
buttons and the top panel are fully interchangeable for full customizability. And that’s
just the beginning.
Featuring genuine Sanwa Denshi™ hardware and an ergonomically authentic arcade
layout, the Razer Atrox represents the pinnacle of precision and reliability and is the
definitive Arcade Stick for tournament-grade gaming.
Forged from the fires of an arcade gaming legacy, the Razer Atrox is, in the most
primeval sense, Bred to Fight.
2 | For gamers by gamers™
TABLE OF CONTENTS
1. PACKAGE CONTENTS / SYSTEM REQUIREMENTS ...................................... 3
2. REGISTRATION / TECHNICAL SUPPORT ..................................................... 4
3. DEVICE LAYOUT ........................................................................................ 5
4. SETTING UP YOUR RAZER ATROX ............................................................. 7
5. CUSTOMIZING YOUR RAZER ATROX ....................................................... 11
6. USING YOUR RAZER ATROX .................................................................... 29
7. SAFETY AND MAINTENANCE .................................................................. 33
8. LEGALESE ............................................................................................... 35

3 | razer™
1. PACKAGE CONTENTS / SYSTEM REQUIREMENTS
PACKAGE CONTENTS
Razer Atrox Arcade Stick
13 ft. Detachable Cable
Breakaway Cable
Magnetized Flat Tip and Cross Tip Screwdriver
Ball Top Grip
Bat Top Grip
Removable Top Panel
SYSTEM REQUIREMENTS
Xbox 360® / Xbox 360® S
OR
PC (Windows® XP / Windows Vista® / Windows® 7 / Windows® 8)
A free USB port
4 | For gamers by gamers™
2. REGISTRATION / TECHNICAL SUPPORT
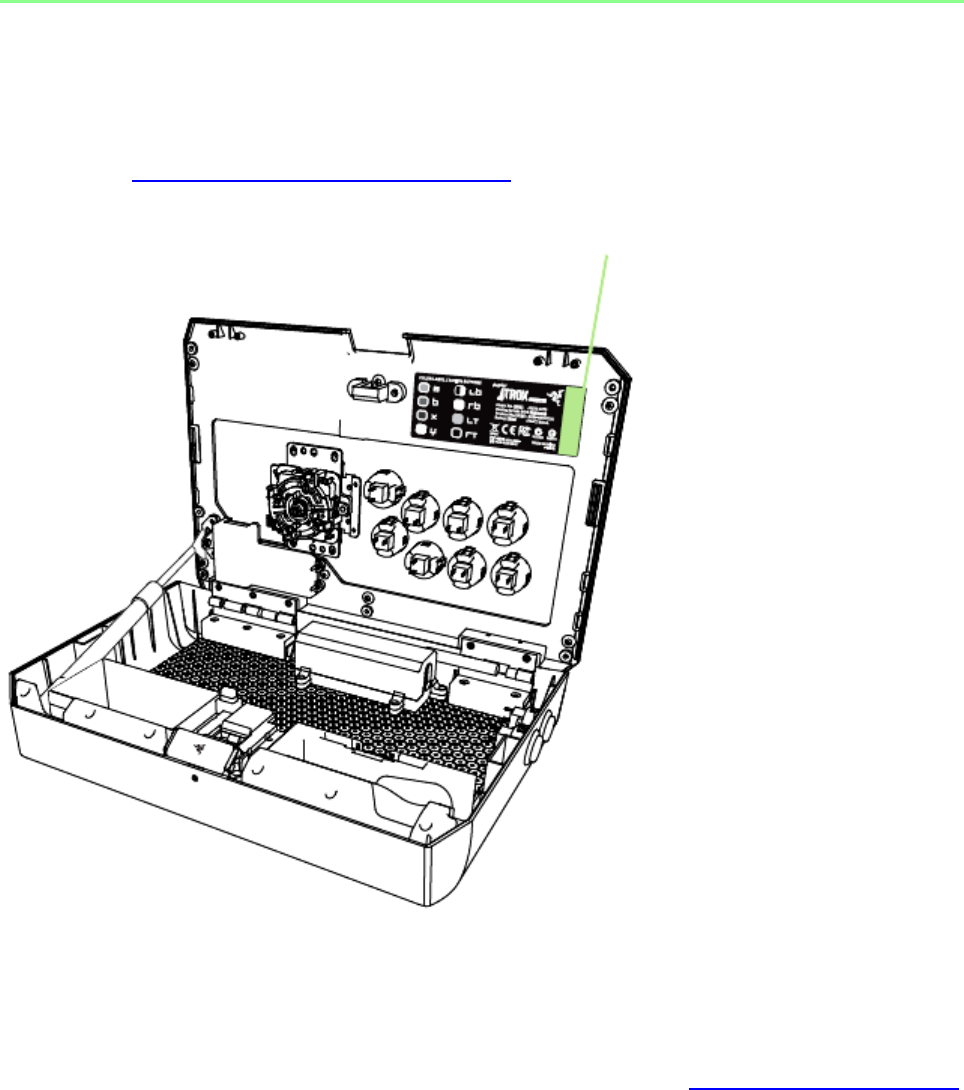
REGISTRATION
Please visit www.razerzone.com/registration for online product registration.
Your Product’s serial number can be found here
TECHNICAL SUPPORT
What you’ll get:
1 year limited manufacturer’s warranty.
Access to manual and free online technical support at www.razersupport.com.

5 | razer™
3. DEVICE LAYOUT
A. Ball Top Grip
B. Authentic Sanwa Denshi™ Joystick
C. Authentic Sanwa Denshi™ Action Buttons
D. Removable Top Panel
E. Compartment Button
F. 2.5mm Headset Port
G. Start Button
H. Back Button

6 | For gamers by gamers™
I. Control Stick Switch
J. Lock / Unlock Switch
K. Turbo Mode Buttons
L. Xbox Guide Button
M. 13 ft. Detachable Cable + Breakaway Cable
N. Magnetized Flat Tip and Cross Tip Screwdriver
O. Bat Top Grip
SAFETY STATEMENT
IMPORTANT! Before using the Xbox 360® with this product, read the Xbox 360®
instruction manual for safety, health, and other information regarding the use of the
Xbox 360®.

7 | razer™
4. SETTING UP YOUR RAZER ATROX
1. Press the Compartment Button to unlock the lid.
2. Lift the lid to access the multipurpose compartment.

8 | For gamers by gamers™
3. Take out the Detachable Cable with the attached Breakaway Cable.
4. To close and lock the lid, place both hands on the edge of the lid, and push down.

9 | razer™
5. Connect your Xbox 360® Headset* to the 2.5mm Headset Port. (Optional)
6. Ensure that the marking is facing up when inserting the cable.

10 | For gamers by gamers™
7. Connect the Detachable Cable to the back of your Razer Atrox.
To remove the Detachable Cable, hold the cable grip firmly, and then pull.

11 | razer™
5. CUSTOMIZING YOUR RAZER ATROX
CAUTION! Please remove the Detachable Cable before opening the multipurpose
compartment or doing any modifications to your Razer Atrox.
CHANGING THE JOYSTICK GRIP
1. Press the Compartment Button to unlock the lid.
2. Lift the lid to access the multipurpose compartment.

12 | For gamers by gamers™
3. Take the screwdriver and hold its flat tip firmly into the joystick’s screw.
4. Rotate the Ball Top Grip until it is removed from the joystick shaft.

13 | razer™
5. Remove the shaft cover from the joystick shaft.
6. Rotate the Bat Top Grip onto the joystick shaft until it is securely fastened.

14 | For gamers by gamers™
7. Place the Ball Top Grip inside the compartment and close the lid.

15 | razer™
CHANGING THE ACTION BUTTONS
1. Press the Compartment Button to unlock the lid.
2. Lift the lid to access the multipurpose compartment.

16 | For gamers by gamers™
3. Carefully remove the cables from the action button.
4. While holding the action button’s fastener, push the action button out.

17 | razer™
5. Repeat steps 3 and 4 for all the buttons you want to change.
6. Insert your desired action buttons or the button covers* into the slots.
*not included

18 | For gamers by gamers™
7. Reattach the cables to the action buttons.
8. Ensure that all the cables are properly connected then close the lid.

19 | razer™
CHANGING THE TOP PANEL ARTWORK
1. Press the Compartment Button to unlock the lid.
2. Lift the lid to access the multipurpose compartment.

20 | For gamers by gamers™
3. Take the screwdriver and hold its flat tip firmly into the joystick’s screw.
4. Rotate the Ball Top Grip until it is removed from the joystick shaft.

21 | razer™
5. Remove the shaft cover and dust washer from the joystick shaft.
6. Carefully remove the cables from the action button.

22 | For gamers by gamers™
7. While holding the action button’s fastener, push the action button out.
8. Repeat steps 6 and 7 until all the action buttons are removed.

23 | razer™
9. Place your finger on the metal stopper then remove the screw using the cross tip.
10. Repeat step 9 until all screws and metal stoppers are removed.

24 | For gamers by gamers™
11. Gently remove the top panel and artwork from the lid.
12. Close and lock the lid.


26 | For gamers by gamers™
15. Reinsert the action buttons into their respective slots.
16. Press the compartment button then gently lift the lid.

27 | razer™
17. Screw the metal stoppers into the lid until all 6 holes are covered.
18. Reinsert the dust washer, shaft cover, and joystick grip to the joystick shaft.

28 | For gamers by gamers™
19. Reattach the cables to the action button.
20. Ensure that all the cables are properly connected then close the lid.
29 | razer™
6. USING YOUR RAZER ATROX
Control Stick Switch
The Control Stick Switch allows you to change the functionality of the joystick to
emulate the Left Analog Stick, Right Analog Stick or Directional Pad of the standard
controller.
Note: To navigate the Xbox 360 Dashboard, set the Control Stick Switch to Directional Pad (DP).
Lock / Unlock Switch
Setting this switch to Lock ( ) will disable the Start, Back, Xbox Guide and Turbo
Buttons. However, all previously assigned turbo functions will remain active.

30 | For gamers by gamers™
Turbo Buttons
The Turbo Buttons allow you to hold down a button instead of tapping that button
repeatedly. There are 2 levels of turbo:
Turbo 1: To activate Turbo 1, press the turbo button once. The turbo button will have a
steady light to indicate that turbo 1 is activated. When held down, the corresponding
action button will perform an action four times (4x) every second.
Turbo 2: To activate Turbo 2, press the turbo button twice. The turbo button will blink
to indicate that turbo 2 is activated. When held down, the corresponding action button
will perform an action eight times (8x) every second.
While in Turbo 1 or Turbo 2, press the respective turbo button once to cancel the turbo
mode.

31 | razer™
REASSIGNING THE TURBO BUTTONS
1. Press and hold Turbo Button 1, Turbo Button 8 and the Start button.
2. Upon activation, Turbo Button 1 will start to blink.
3. While the turbo button is blinking, you can either:
Press the action button you wish to assign.
OR
Press Start to skip the button assignment.

32 | For gamers by gamers™
4. The turbo button will be lit if assigned to an action button or unlit if skipped.
5. Once a turbo button has been assigned, the next turbo button will blink.
6. Repeat step 3 until all the turbo buttons have been assigned or skipped.
7. Once done, the turbo buttons will blink twice and you can continue gaming.

33 | razer™
7. SAFETY AND MAINTENANCE
SAFETY GUIDELINES
In order to achieve maximum safety while using your Razer Atrox, we suggest that you
adopt the following guidelines:
1. Should you have trouble operating the device properly and troubleshooting does
not work, unplug the device and contact the Razer hotline or go to
www.razersupport.com for support. Do not attempt to service or fix the device
yourself at any time.
3. Do not take apart the device (doing so will void your warranty) and do not
attempt to operate it under abnormal current loads.
4. Keep the device away from liquid, humidity or moisture. Operate the device only
within the specific temperature range of 0°C (32°F) to 40°C (104°F). Should the
temperature exceed this range, unplug and switch off the device in order to let
the temperature stabilize to an optimal level.
COMFORT
Research has shown that long periods of repetitive motion, improper positioning of
your computer peripherals, incorrect body position, and poor habits may be associated
with physical discomfort and injury to nerves, tendons, and muscles. Below are some
guidelines to avoid injury and ensure optimum comfort while using your Razer Atrox.
1. Position the Razer Atrox directly in front of you and within easy reach.
2. Adjust the height of your chair and/or table so that the Razer Atrox is at or
below elbow height.
3. Keep your feet well supported, posture straight and your shoulders relaxed.
4. During gameplay, relax your wrist and keep it straight. If you do the same tasks
with your hands repeatedly, try not to bend, extend or twist your hands for long
periods.
34 | For gamers by gamers™
5. Do not rest your wrists on hard surfaces for long periods. Use a wrist rest to
support your wrist while gaming.
6. Do not sit in the same position all day. Get up, step away from your desk and
do exercises to stretch your arms, shoulders, neck and legs.
7. If you should experience any physical discomfort while using your Razer Atrox,
such as pain, numbness, or tingling in your hands, wrists, elbows, shoulders, neck
or back, please consult a qualified medical doctor immediately.
MAINTENANCE AND USE
The Razer Atrox requires minimum maintenance to keep it in optimum condition. Once
a month we recommend you unplug the device from the USB port and clean it using a
soft cloth or cotton swab with a bit of warm water to prevent dirt buildup. Do not use
soap or harsh cleaning agents.

35 | razer™
8. LEGALESE
COPYRIGHT AND INTELLECTUAL PROPERTY INFORMATION
© 2013 Razer Inc. All rights reserved. Razer, For Gamers By Gamers, and the triple-
headed snake logo are trademarks or registered trademarks of Razer Inc. and/or
affiliated companies in the United States or other countries. All other trademarks are
the property of their respective owners. Actual product may differ from pictures.
Information is correct at time of printing.
Razer Inc. (“Razer”) may have copyright, trademarks, trade secrets, patents, patent
applications, or other intellectual property rights (whether registered or unregistered)
concerning the product in this Master Guide. Furnishing of this Master Guide does not
give you a license to any such copyright, trademark, patent or other intellectual
property right. The Razer Atrox (the “Product”) may differ from pictures whether on
packaging or otherwise. Razer assumes no responsibility for such differences or for any
errors that may appear. Information contained herein is subject to change without
notice.
LIMITED PRODUCT WARRANTY
For the latest and current terms of the Limited Product Warranty, please visit
www.razerzone.com/warranty.
LIMITATION OF LIABILITY
Razer shall in no event be liable for any lost profits, loss of information or data, special,
incidental, indirect, punitive or consequential or incidental damages, arising in any way
out of distribution of, sale of, resale of, use of, or inability to use the Product. In no
event shall Razer’s liability exceed the retail purchase price of the Product.
36 | For gamers by gamers™
COSTS OF PROCUREMENT
For the avoidance of doubt, in no event will Razer be liable for any costs of
procurement unless it has been advised of the possibility of such damages, and in no
case shall Razer be liable for any costs of procurement liability exceeding the retail
purchase price of the Product.
GENERAL
These terms shall be governed by and construed under the laws of the jurisdiction in
which the Product was purchased. If any term herein is held to be invalid or
unenforceable, then such term (in so far as it is invalid or unenforceable) shall be given
no effect and deemed to be excluded without invalidating any of the remaining terms.
Razer reserves the right to amend any term at any time without notice.
