
1
USER GUIDE
S.O.S. | MESSAGE | TRACK | CHECK IN | SOCIAL

TABLE OF CONTENTS
WELCOME
What’s in the Box....................................................................................................................................................................... 1
Charging your SPOT X ............................................................................................................................................................... 1
ACTIVATING YOUR SPOT X
Configuring your SPOT X ............................................................................................................................................................ 1
Electronic Serial Number (ESN), Authorization Code and Mobile Device Number (MDN) ............................................................ 2
Activating Your SPOT X and Selecting a Service Plan ................................................................................................................ 2
SPOT X Firmware Update Required ............................................................................................................................................ 2
SPOT X AT A GLANCE
Device Overview ........................................................................................................................................................................ 3
Main Menu Actions .................................................................................................................................................................... 3
Device Overview Functions ........................................................................................................................................................ 4
Status Bar Icons ....................................................................................................................................................................... 5
Menu Display Icons .................................................................................................................................................................. 5
SPOT X Directional Pad ............................................................................................................................................................. 6
Screen Lock ............................................................................................................................................................................... 6
Keyboard and Display Backlighting ........................................................................................................................................... 6
SPOT X APP AT A GLANCE
Connect the App with your Mobile Device .................................................................................................................................. 6
GETTING STARTED
Important SPOT X Tips ............................................................................................................................................................... 7
SPOT X Operating Temperatures ................................................................................................................................................ 7
CONTACTS
Manually Adding a Contact ....................................................................................................................................................... 8
Deleting a Contact .................................................................................................................................................................... 9
2-WAY MESSAGING
Creating & Sending Messages ................................................................................................................................................ 10
Predefined Messages .............................................................................................................................................................. 11
Social Media ........................................................................................................................................................................... 11
Viewing All Messages ..............................................................................................................................................................11
Viewing Individual Messages .................................................................................................................................................. 12
Deleting Individual Message Threads ..................................................................................................................................... 12
Replying to a Message ............................................................................................................................................................ 12
CHECK IN
Sending a Check In Message .................................................................................................................................................. 13
How to View Your Sent Check In Messages .............................................................................................................................. 13
Cancel Messages .................................................................................................................................................................... 13
SPOT S.O.V. (SAVE OUR VEHICLE)
Initiating SPOT S.O.V. .............................................................................................................................................................. 14
S.O.S.
Initiating S.O.S. ...................................................................................................................................................................... 15
Canceling S.O.S. ..................................................................................................................................................................... 16
TRACKING
Select Tracking Interval ........................................................................................................................................................... 17
Initiating Tracking ................................................................................................................................................................... 17
Canceling Tracking ................................................................................................................................................................. 18
Suspended Tracking Mode ....................................................................................................................................................... 18
MESSAGE FETCHING
Selecting a Message Fetching Rate ........................................................................................................................................ 19
Manually Fetching New Messages ........................................................................................................................................... 19
NAVIGATION
Calibrating the Compass ........................................................................................................................................................ 20
Trip Information Data Fields .................................................................................................................................................... 21
Configuring Trip Information Data Fields ................................................................................................................................ 21
WAYPOINTS
Creating a Waypoint ................................................................................................................................................................22
Navigating to a Waypoint ........................................................................................................................................................ 22
SYSTEM SETTINGS
Viewing Data Usage ................................................................................................................................................................ 23
Viewing Service Plan Details ................................................................................................................................................... 23
Language Settings .................................................................................................................................................................. 24
Time and Date Settings ........................................................................................................................................................... 24
Distance Unit Settings ............................................................................................................................................................ 25
Display Settings ...................................................................................................................................................................... 25
SPOT X Information ................................................................................................................................................................. 25
Restore Factory Settings ......................................................................................................................................................... 25
Demo/Retail Mode ................................................................................................................................................................... 25
Regulatory Information ........................................................................................................................................................... 25
Sounds .................................................................................................................................................................................... 25
Security ................................................................................................................................................................................... 26
SPOT MY ACCOUNT
My Account Overview ............................................................................................................................................................... 26
MY ACCOUNT – MY DEVICES
SPOT X My Devices Overview ................................................................................................................................................... 27
MY ACCOUNT - DEVICE NAME TAB
Personalize the Device Name .................................................................................................................................................. 29
MY ACCOUNT – TRACKING TAB
Tracking .................................................................................................................................................................................. 30
MY ACCOUNT – MOVEMENT ALERT TAB
Configuring Movement Alerts ................................................................................................................................................. 31
MY ACCOUNT – THIRD PARTY GPS FORWARDING TAB
Enter a Third Party Identification Code ................................................................................................................................... 32
MY ACCOUNT – DUPPLICATE SETTINGS TAB
Copy Device Setting to Another SPOT X ................................................................................................................................... 33
MY ACCOUNT – S.O.S. TAB
Enter the Primary and Secondary Emergency Contacts ........................................................................................................... 34
MY ACCOUNT – CONTACTS TAB
Create New Contact ................................................................................................................................................................ 35
Create New Contact Group ...................................................................................................................................................... 35
Adding Contacts to the SPOT X ............................................................................................................................................... 35
Delete Contacts ...................................................................................................................................................................... 36
MY ACCOUNT – SPOT S.O.V. TAB
SPOT S.O.V. (Save Our Vehicle) ............................................................................................................................................... 37
SPOT S.O.V. Assist Features..................................................................................................................................................... 37
MY ACCOUNT – SOCIAL MEDIA TAB
Twitter ..................................................................................................................................................................................... 38
MY ACCOUNT – MESSAGE BLOCKER TAB
Selecting a Blocking Mode ..................................................................................................................................................... 39
Add to the Blacklist ................................................................................................................................................................ 39
Add to the Whitelist ................................................................................................................................................................ 39
Delete from the Blacklist ........................................................................................................................................................ 40
Delete from Whitelist .............................................................................................................................................................. 40
MY ACCOUNT – PREDEFINED MESSAGES TAB
Creating a Predefined Message .............................................................................................................................................. 41
Deleting a Predefined Message .............................................................................................................................................. 41
Editing a Predefined Message ................................................................................................................................................ 42
Synching Predefined Messages to the SPOT X ........................................................................................................................ 42
MY ACCOUNT – CHECK IN TAB
Configuring the Check In Message ......................................................................................................................................... 43
Editing an Email Address or Mobile Number .......................................................................................................................... 44
Deleting an Email Address or Mobile Number ........................................................................................................................ 44
MY ACCOUNT – UNDELIVERED MESSAGE NOTIFICATION TAB
Enable or Disable Undelivered Message Notification .............................................................................................................. 45
MY ACCOUNT – WAYPOINTS TAB
Creating a Waypoint ...............................................................................................................................................................46
Deleting a Waypoint ................................................................................................................................................................46
Editing a Waypoint .................................................................................................................................................................. 46
Synching Waypoints to the SPOT X .........................................................................................................................................46
MY ACCOUNT – MY LOCATIONS
Tracking .................................................................................................................................................................................. 47
Set Filters ............................................................................................................................................................................... 48
Locate ..................................................................................................................................................................................... 49
MY ACCOUNT – SHARE & GET SPOTTED PAGES
Create a Share Page ............................................................................................................................................................... 50
Create a Get Spotted Page ...................................................................................................................................................... 51
MY ACCOUNT – SETTINGS AND BILLING
Settings & Billing Overview ..................................................................................................................................................... 52
SPOT X Message Usage ........................................................................................................................................................... 53
SYNCHING AND UPDATING FIRMWARE WITH MY ACCOUNT
Synching SPOT X .................................................................................................................................................................... 54
SPOT X Firmware Update ........................................................................................................................................................ 54
Troubleshooting ....................................................................................................................................................................... 54
SPOT X SPECIFICATIONS
SPOT X Specifications ............................................................................................................................................................. 55
CERTIFICATIONS
FCC Compliance Statement .................................................................................................................................................... 56
FCC Regulatory ....................................................................................................................................................................... 56
Réglementation de la FCC ....................................................................................................................................................... 56
ISED RSS-GEN Notice .............................................................................................................................................................. 56
Industry Canada Regulatory .................................................................................................................................................... 57
Canada Regulatory ................................................................................................................................................................. 57
Réglementation du Canada .................................................................................................................................................... 57
Declaration of Conformity for European Customers ................................................................................................................. 57
GENERAL WARNINGS
General Warnings ....................................................................................................................................................................58

1
WELCOME
ACTIVATING YOUR SPOT X
Thank you for purchasing your SPOT X. Now you can stay connected with family, friends, co-workers,
and Search & Rescue services whenever you’re off the grid.
WHAT’S IN THE BOX?
• SPOT X Device
• Strap and Carabiner
• 18” Micro USB Data/Power Cable
• Quick Start Guide
IMPORTANT: YOUR SPOT X REQUIRES AN ACTIVE SPOT SERVICE PLAN SUBSCRIPTION TO COMMUNICATE.
SPOT X FEATURES, INCLUDING S.O.S., WILL NOT WORK WITHOUT FIRST ACTIVATING YOUR DEVICE.
IF YOU ENCOUNTER ISSUES DURING ACTIVATION, PLEASE VISIT FINDMESPOT.COM/SPOTXSUPPORT FOR ASSISTANCE.
CONFIGURING YOUR SPOT X
1. Power on the SPOT X by quick pressing the Power button.
2. You can start the configuration process by selecting your desired language, time and date setting and follow all
onscreen instructions.
3. The device ESN and Auth code will now be displayed for your reference during activation.
• Warranty Card
• GEOS Reference Guide
• S.O.S. Mirrored Sticker
CHARGING YOUR SPOT X
Connect the Micro USB Data/Power Cable to the SPOT X USB Data/Power Port and connect to either a computer or
an AC Power Adapter. The battery with the lightning bolt icon will be visible while charging.
Once the battery icon indicates a full charge, disconnect the USB Cable from the SPOT X. Make sure the USB cover
is firmly sealed to ensure the device’s waterproof capability.
USB Data/Power Port
2
ACTIVATING YOUR SPOT X AND SELECTING A SERVICE PLAN
1. Go to FindMeSPOT.com/Activate
2. New SPOT customers should select Begin Activation to create a new account. Existing SPOT customers should
login to their current SPOT account and select Add New SPOT Device.
NOTE: ELECTRONIC SERIAL NUMBER (ESN), AUTHORIZATION
CODE, AND MOBILE DEVICE NUMBER (MDN)
The ESN and Authorization Code can be found on the SPOT X device by selecting System Settings and scrolling to and selecting
SPOT X Info. The ESN can also be found on the bottom of your SPOT X retail box or on the back of your device. You will need both the
ESN and Authorization code when setting up your SPOT MY ACCOUNT.
Your MDN will be assigned after you complete the SPOT MY ACCOUNT activation process. Share this number with others so they can
message you directly!
3. Follow the onscreen instructions to create an account, choose a service plan and additional services for your
SPOT X. Confirm your order to finish the SPOT MY ACCOUNT activation process.
SPOT X FIRMWARE UPDATE REQUIRED
ONCE YOU COMPLETE THE SPOT MY ACCOUNT ACTIVATION, MAKE SURE YOUR DEVICE IS
UPDATED WITH THE LATEST FIRMWARE. SYNCING SPOT X WITH YOUR SPOT MY ACCOUNT WILL
BE REQUIRED FOR SEVERAL FEATURES SUCH AS CONTACTS AND PREDEFINED MESSAGES TO
APPEAR ON YOUR DEVICE.
VISIT FINDMESPOT.COM/FIRMWARE TO DOWNLOAD THE LATEST SPOT X FIRMWARE UPDATER.

3
SPOT X AT A GLANCE
DEVICE OVERVIEW
Power/Backlight Button
Power LED
Display Screen
S.O.S. Button
Directional Pad
Select Button
Track Button
Back Button
QWERTY Keyboard
USB Power/Data Port
1
2
3
4
5
6
7
8
9
10
1
2
3
4
55
6
7
8
MAIN MENU ACTIONS
Opens Messages Screen
Creates New Messages
Opens Contacts Screen
Sends Check In Message
Opens Track and Fetch Intervals Screen
Fetches New Messages
Opens Navigation Screen
Opens System Settings
1
2
3
4
5
6
7
8
9
10
1
2
3
4
5
6 7
8
Time
Status Bar
Main Menu

4
DISPLAY SCREEN
S.O.S. BUTTON
POWER BUTTON
DIRECTIONAL PAD
TRACKING BUTTON
BACK BUTTON
QWERTY KEYPAD
USB POWER/DATA PORT
While the SPOT X is powered ON, quick
press the Power button to toggle the
screen and keyboard backlight on and off.
Long press the S.O.S. button for 3
seconds or until S.O.S. screen is
displayed to initiate an S.O.S. with
GEOS IERCC.
While S.O.S. is active, long press the
S.O.S. button for 3 seconds to cancel the
S.O.S. with GEOS IERCC.
Long press the Track button for 3
seconds to initiate tracking mode at
your set interval rate.
While Tracking Mode is active, long
press the Track button for 3 seconds to
cancel Tracking.
Press up, down, left and right to
navigate to and highlight a section
on the screen.
Quick press the Back button to
navigate to the previous screen.
Use the keyboard to create messages, contact names and other manual entries
as required.
The SPOT X Display screen allows for interaction with the Main Menu,
sub-menus, and other onscreen features.
Used to connect a Micro USB Cable to the SPOT X USB Port to charge the
SPOT X device and to sync with SPOT MY ACCOUNT.
POWER LED
BLINKING GREEN BLINKING RED NO LED
SPOT X is powered
on and battery life is
above 20%.
SPOT X is powered
on and battery life
is below 20%.
Press the Select button to make
a selection.
Press and hold the Back button to
go back to the Main Menu screen.
Press the Power button to power on
the SPOT X. Long press the Power
button for 3 seconds to power OFF.
SPOT X has either entered
power saving mode due to
no button press or the unit
is powered off.
DEVICE OVERVIEW FUNCTIONS

5
STATUS BAR ICONS
BATTERY
Battery Strength
Low Battery
Battery Charging
GPS SIGNAL
GPS Signal Available
GPS Signal Unavailable
DEVICE
Sync Required
MESSAGES
New Received Messages
Fetching New Messages
Pending Queued Messages
Sending Check In Message
MODES
S.O.S. Active
Tracking Active
Suspended Tracking
TIME
12-Hour Format
24-Hour Format
17:00
MENU DISPLAY ICONS
MESSAGES
Create New Message
Send Message
Reply to Message
Predefined Messages
CONTACTS
Contact List
Create New Contact
GPS
Include Elevation with Message
Include GPS Coordinates with Message
Create New Waypoint
Navigate to Location
OTHER
Delete
Save
Back
CONTACTS
Email Contact
Mobile Contact
Group Contact
Twitter
SENT MESSAGE STATUS
Message Delivered
Message Failed
Message Sent to Queue
Message Sent - Delivery Unconfirmed
5:00 PM

6
SPOT X DIRECTIONAL PAD
The SPOT X Main Menu screen displays icons/buttons that you can
select to send messages, activate navigation, and manage other
features. After making an initial selection, sub-menu screens may
be displayed.
Use the Directional Pad (Up – Down – Left – Right) to highlight your
selection and then press the Select button. Use the Back button to
cancel or go back to the previous screen.
SCREEN LOCK
To prevent the accidental transmission of data, you can enable the
screen lock feature on the SPOT X.
Simply press the key followed by the Select button.
To disable the screen lock, press the key followed by the
Select button.
SELECT UP RIGHT
LEFT DOWN BACK
KEYBOARD AND DISPLAY BACKLIGHTING
Press the Power/Backlight Button to turn on/off keyboard and screen illumination.
7
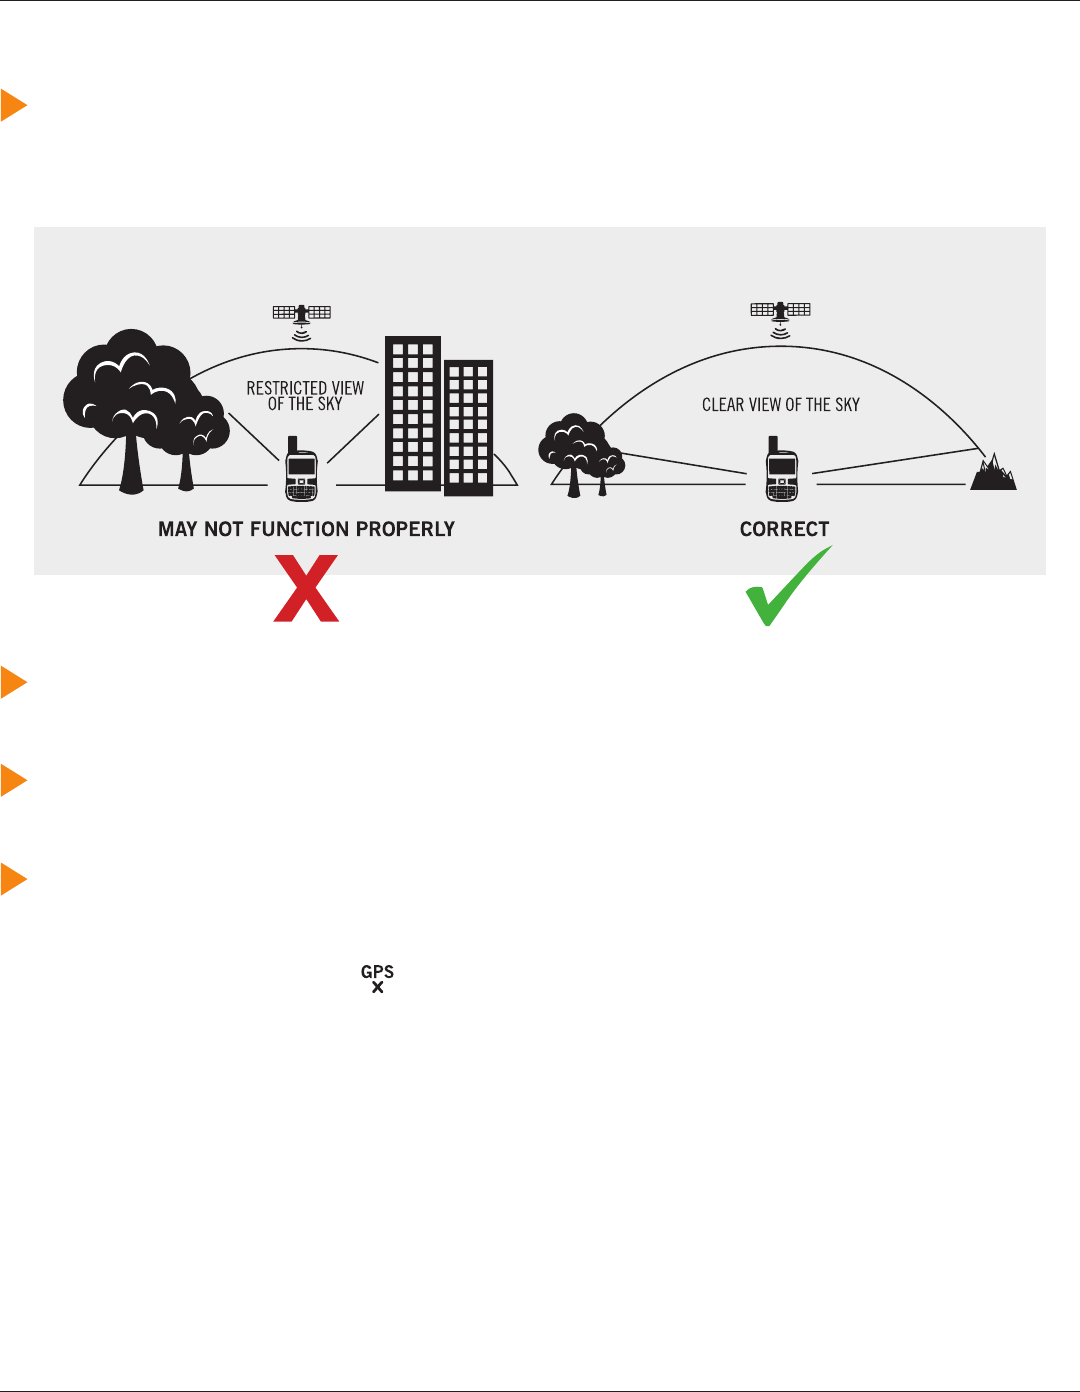
IMPORTANT SPOT X TIPS
SPOT X needs a clear view of the sky with no obstructions (buildings, roof overhangs, trees, etc.) to obtain a
GPS signal to provide the most accurate location information and send messages. SPOT X may not function
properly at the bottom of a deep canyon, in a cave, or in very dense woods.
Orienting SPOT X vertically with the antenna facing towards the sky will improve performance as the antenna is
located on the top portion of the device.
Since SPOT X has the ability to receive messages, messages sent from the device can be acknowledged
shortening the transmission time.
Before heading off the grid, we strongly recommend that you send a test message to ensure your device was
activated properly. You can view your sent messages in your account at FindMeSPOT.com/MyAccount
NOTE: If no GPS signal is found the will display on the screen. If possible, you should move to a
location with a clearer view of the sky. You can check the status of your messages in the message thread.
SPOT X OPERATING TEMPERATURES
Prolonged use or storage of your SPOT X in direct sunlight or in a vehicle may cause the device to overheat and/or
damage its battery. SPOT X can withstand operating in temperatures of -4F to +140F (-20C to +60C).
GETTING STARTED

8
CONTACTS
SPOT X can hold up to 70 contacts and/or contact groups. Contacts can be manually added through the SPOT X or
through SPOT MY ACCOUNT. If added through SPOT MY ACCOUNT, syncing is required using the SPOT X Firmware
Updater in order for the contacts to display on the SPOT X.
Contacts supported:
• Mobile Number
• Email
• Contact Groups
MANUALLY ADDING A CONTACT
1. On the Main Menu screen, select to display the contacts list.
2. On the Contacts screen, select to display the New Contact screen
3. Enter the required information and select to save the contact to your SPOT X device.
If both Email and SMS/TEXT fields are filled in, the SPOT X will create two separate contacts, one for each field.
4. Additionally, the sync required icon will appear next to the new contact’s name and in the Status Bar.
This indicates that the SPOT X will need to sync with SPOT MY ACCOUNT if you would like the contact to be
uploaded to your contact list in SPOT MY ACCOUNT.
NOTE: Contacts can also be saved when typing a message. To do this, select New SMS Contact or New email
Contact, then enter the information and the will be highlighted. Select the icon and enter the appropriate
information and select and press the Select button to save the contact to your SPOT X device.

9
DELETING A CONTACT
1. On the Main Menu screen, select
and then scroll down and highlight the contact you want to delete. Press
the Select button.
2. Select to delete the contact and follow the onscreen instructions to remove it from your SPOT X
device permanently.
3. Additionally, if the SPOT X device had been previously synced with SPOT My Account and the contact was
present in both locations, once a new sync is performed the deleted contact will be also removed from the
contact list in SPOT My Account.

10
2-WAY MESSAGING
Send and receive 140 character text messages and emails with family and friends from virtually anywhere in
the world. SPOT even provides you with your own mobile device number so others can reach you anytime.
CREATE & SEND A MESSAGE
1. On the Main Menu screen, select and the message composing screen will be displayed.
2. Select to add contacts.
NOTE: When sending a message to more than one person, the contacts will have to be added individually.
3. Once you have selected a contact, select the Message: field to display the New Message screen. Enter a
message of up to 140 characters and select Done. You can include your Elevation and/or GPS Coordinates
by clicking on the box next to the and icons.
NOTE: The altitude will not be displayed on the device, but the recipient will receive this information.
Additionally, the SPOT X does not support displaying altitude from messages.
4. Select to send your message.
OR
1. On the Main Menu screen, select
and the message composing screen will be displayed. Then follow steps 3-4
from the instructions above.
PREDEFINED

11
PREDEFINED MESSAGES
Make messaging even easier by sending a Predefined Message. These messages can only be edited in your
SPOT MY ACCOUNT and up to 14 Predefined Messages can be stored on your SPOT X. Syncing SPOT X with
your SPOT MY ACCOUNT is required for Predefined Messages to appear on your device.
To send a Predefined Message, simply create a new message and select the Predefined Messages button
.
Syncing your SPOT X with SPOT My Account is required for the changes to reside on your SPOT X.
SOCIAL MEDIA
Link your social media accounts to your SPOT X directly from your SPOT My Account.
Once you’ve linked your accounts, you will be able to send 140 character updates to those accounts from
your SPOT X at any time. Syncing SPOT X with your SPOT account is required for social media to appear as a
contact on your device.
Simply create a new message, select to access your contact list, and choose your linked social media as
a contact.
VIEWING ALL MESSAGES
1. On the Main Menu screen, select to display the main Messages screen, then select Messages to view
all of your message threads.
2. Highlight and select the message thread you wish to open.

12
VIEWING INDIVIDUAL MESSAGES
To view the entire message, highlight and select the message you want to see.
DELETING INDIVIDUAL MESSAGE THREADS
To delete the individual message thread, go to the thread and select and follow the onscreen instructions.
REPLYING TO A MESSAGE
To reply to the message, go to the thread and select .
13
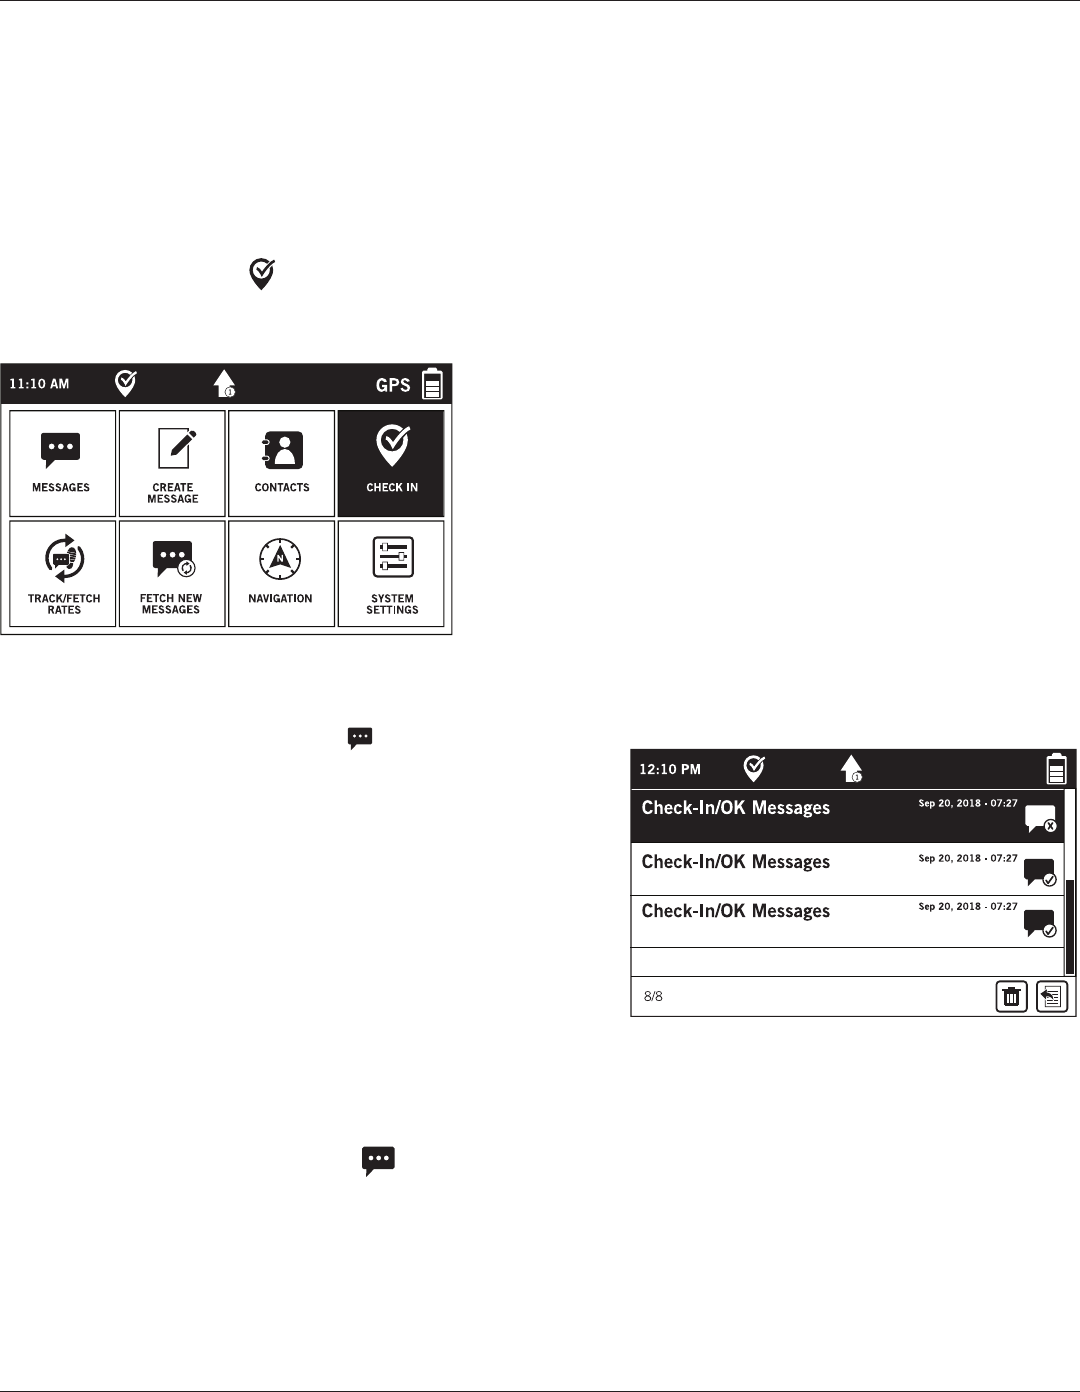
CHECK IN
Check In with friends and family by quickly sending a pre-programmed message and/or email along with your GPS
coordinates. The Check In message will include a link to Google Maps™ showing the SPOT X’s location. Make sure
you set up this feature before you go off the grid.
The Check In message can be edited and assigned to contacts via SPOT MY ACCOUNT at any time.
SENDING A CHECK IN MESSAGE
On the Main Menu, select and the pre-programmed message created in SPOT MY ACCOUNT will automatically
be sent to the pre-assigned contacts in your Check In contact list.
HOW TO VIEW YOUR SENT CHECK IN MESSAGES
1. On the Main Menu screen, select to display the
Message screen, and then select Messages.
2. On the list of messages, select the Check In.
3. Select the Check In message you would like to view.
NOTE: The Check-In Message will not display the texts sent,
but only the GPS coordinates and date/time it was sent.
CANCEL MESSAGES
Cancels all outbound Check In and other messages that are queued up.
1. On the Main Menu screen, select
and then select Cancel Messages.
2. A message will be displayed asking if you want to cancel all pending outbound messages. Select Yes or No.

14
SPOT S.O.V. can be used during non-life threatening situations and allows you to send 2-Way text messages
to Nation Safe Drivers. SPOT S.O.V. services provided by Nation Safe Drivers, are only available to subscribing
customers in the U.S., Puerto Rico, Washington, D.C. and Canada. Visit FindMeSPOT.com/SPOTSOV to learn more.
INITIATING SPOT S.O.V.
If Nation Safe Drivers service was added to the plan, this contact will automatically be listed under the SPOT X
contact list.
1. On the Main Menu screen select to display the main Message screen, then select Messages.
2. Select .
3. Select Nation Safe Drivers from your contact list.
4. Select the Message field to display the New Text screen. From here you can choose to create a new message.
Select Done to continue.
5. Include your Elevation by checking next to and/or include your GPS Coordinates by checking next .
6. Select to send your message.
OR
1. On the Main Menu screen select and the message composing screen will be displayed.
Then follow steps 3-6 from the instructions above.
SPOT S.O.V. (SAVE OUR VEHICLE)

15
S.O.S
IMPORTANT NOTICE: S.O.S. MODE SHOULD ONLY BE USED DURING LIFE THREATENING EMERGENCIES.
SENDING FALSE S.O.S. MESSAGES MAY SUBJECT YOU TO LIABILITY FOR ADDITIONAL CHARGES.
Activate the S.O.S. mode to begin communicating and sending alerts directly to GEOS International Emergency
Response Coordination Center (IERCC). GEOS IERCC will notify the appropriate emergency responders based on
the SPOT X’s GPS location and your emergency situation. Responders may include local police, Coast Guard, or
Search and Rescue teams. For full details about GEOS IERCC, please visit FindMeSPOT.com/GEOS
INITIATING S.O.S.
1. Power on device, lift cover, long press the S.O.S. button for 3 seconds or until S.O.S. screen is displayed, and
follow the onscreen instructions.
2. The S.O.S. icon should appear on the Status Bar to indicate that S.O.S. has been initiated.
3. Once S.O.S. is initiated, GEOS IERCC will be notified of your emergency. SPOT will continuously send S.O.S.
notifications with your GPS position to GEOS IERCC every 5 minutes until S.O.S. is cancelled or the SPOT X is
powered off.
4. SPOT X will then allow you to communicate 2-Way, via message, with GEOS IERCC by selecting the Text GEOS button
S.O.S
Button

16
5. Upon activating S.O.S., the device will terminate all previously queued messages waiting to be transmitted as
well as Navigation, Check In, and Tracking if active. The SPOT X device will be locked down on S.O.S. Mode
and you will not be able to send messages to anyone other than GEOS IERCC until S.O.S. is cancelled.
6. While S.O.S. is active, the SPOT X should remain outside in clear view of the sky with no obstructions in order to
maintain network connectivity.
CANCELLING S.O.S.
Lift cover, long press the S.O.S. button for 3 seconds and follow the onscreen instructions, or select Cancel S.O.S.
from the S.O.S. screen.

17
TRACKING
With SPOT X, your friends and family can track your progress in near real-time using SPOT Share Page with
Google Maps™ giving them a virtual breadcrumb trail of your adventure.
SELECTING A TRACKING INTERVAL
The SPOT X default tracking interval is 10 minutes. Depending upon your service plan, you can select from tracking
intervals of 2½, 5, 10, 30, or 60 minutes.
On the Main Menu, select , then scroll to and select Current Tracking Interval and choose from the list of available
intervals. All non-subscribed tracking intervals will be grayed out.
INITIATING TRACKING
1. Power on the SPOT X and long pressthe Track button on the SPOT X device for 3 seconds or until the tracking
icon appears in the Status Bar.
2. Once your GPS position is acquired, SPOT X will send your tracks in accordance with the tracking interval you have
selected until you manually stop tracking, the SPOT X detects no movement, or you power off the SPOT X device.
3. While Tracking is active, SPOT X should remain outside in clear view of the sky with no obstructions in order to
maintain network connectivity.
Track
Button

18
CANCELLING TRACKING
Long press the Track button on the device for 3 seconds and the track icon will disappear from the Status Bar.
SUSPENDED TRACKING MODE
SPOT X only sends tracks when Tracking mode is active and the device is moving. When the device is stationary for
more than 5 minutes, SPOT X will enter Suspended Tracking mode and you will see in the Status Bar.
SPOT X will automatically send one more track from your resting location. While at rest, SPOT X will not send tracks.
Tracking will automatically resume after the accelerometer detects the unit has begun moving again.
Tracking
Button

19
MESSAGE FETCHING
Every time SPOT X sends a track and/or a message, SPOT X will also retrieve and download any incoming
messages. When you’re not Tracking or sending a message, the Message Fetching function will check for messages
for you.
SELECTING A MESSAGE FETCHING INTERVAL
The SPOT X default message fetching interval is Off/Manual Fetching. Depending upon your service plan, you can
select from fetching intervals of 2½, 5, 10, 30, 60 minutes, 4 hrs, 24 hrs, or Off/Manual fetching.
On the Main Menu, select , then scroll to and select Current Fetch Interval and choose from the list of available
intervals. All non-subscribed fetching intervals will be grayed out.
MANUALLY FETCHING NEW MESSAGES
To manually check for new incoming messages, simply select from the Main Menu screen.
If any new incoming messages are received, will be displayed in the Status Bar letting you know how many
new messages are waiting for you.

20
SPOT X has a built-in compass that comes with several navigational features and trip information to help you navigate.
To access the Compass from the Main Menu screen, select followed by Compass.
CALIBRATING THE COMPASS
Your SPOT X uses a Digital Compass to give accurate Heading and Bearing information. The SPOT X automatically
checks compass calibration and will tell you to calibrate when necessary.
1. On the Main Menu, select then select Settings and scroll to and select the Calibrate Compass button.
2. The Calibrate Compass screen will be displayed. Select Start Calibration to begin and follow the onscreen
instructions.
NOTE: Use the figure 8 movement to calibrate the unit.
NAVIGATION

21
TRIP INFORMATION DATA FIELDS
The SPOT X Compass screen is able to display four Trip Info Data Fields at a time. Each data field can be easily
configured and changed by selecting from seven different choices:
• Location (Lat/Lon)
• Destination (Lat/Lon)
• Distance to Destination
• Heading
• Bearing
• Course
• Elevation
• Speed
CONFIGURING TRIP INFORMATION DATA FIELDS
1. On the Compass screen, select Trip Info. If a calibration has never been done before, the Calibrate Compass
screen will be displayed. Select Start Calibration to begin and follow the onscreen instructions.
2. Using the Navigation Pad, highlight and select the Data Field you wish to change.
3. The Trip Info Data Field screen will be displayed. Highlight and select the appropriate navigational data you wish
to be displayed in that field.

22
WAYPOINTS
SPOT X allows you to designate important locations and landmarks as Waypoints on your device and
navigate to them.
CREATING A WAYPOINT
1. On the Main Menu screen, select then select Waypoint followed by to create a new waypoint.
2. Select either:
• Current Location – creates a new waypoint based on the current GPS coordinates of the SPOT X
• Create Waypoint – creates a new waypoint by manually entering GPS coordinates
• The Waypoint screen will be displayed. If Current Location was selected, the Location field will input the
current GPS coordinates automatically. If Create Waypoint was selected, the GPS coordinates will have to be
input manually.
3. To change the name of a waypoint, enter your selected waypoint name in the Waypoint Name field.
4. Selecting the Notes field will display the Waypoint Notes screen allowing you to enter up to 300 characters.
Select DONE to save the notes.
5. When finished, select to save the waypoint.
NAVIGATING TO A WAYPOINT
1. On the Main Menu screen, select then select Waypoint and chose the specific waypoint you’d like to travel
towards.
NOTE: For best results, while navigating, hold the SPOT X with the antenna at about a 135 degree angle.
2. The selected Waypoint screen will be displayed. Select the Navigate To button.
3. The Compass screen will appear displaying the Compass and the following Data Fields:
• Destination – with the selected Waypoint coordinates
• Distance to Destination – in a straight line
• Lat/Lon – current GPS location
• Course – direction towards selected Waypoint

23
From the System Settings screen, you can manage all different aspects of your SPOT X device from viewing your
data usage to selecting your preferred language.
VIEWING DATA USAGE
The Data Usage screen allows you to monitor your SPOT X data usage and your SPOT X Service Plan details.
On the Main Menu screen, select
then scroll to and select Data Usage.
The Data Usage screen displays the following:
• Total messages sent since the last data reset
• Total incoming messages since the last data reset
• Total outgoing predefined Messages
• Total outgoing tracks since the last data reset
Selecting the Reset Data button will erase and reset all counters to zero.
VIEWING SERVICE PLAN DETAILS
Selecting Plan Details allows you to see the Service Plan Details screen displaying the following:
• Current SPOT X Service Plan name
• The number of Free Predefined Messages
• The number of included messages for the active SPOT X Service Plan
• The minimum tracking interval for the active SPOT X Service Plan
• The cost per message you will be charged if you go over your allotted messages
SYSTEM SETTINGS

24
LANGUAGE SETTINGS
You can change the language setting on your SPOT X to one of the following:
• English
• Español
• Français
• Portuguêse
• Italiano
• Deutsch
TIME AND DATE SETTINGS
The Time/Date Settings screen allows you to configure how the time and date are displayed on your SPOT X device.
Select Time Format and choose between 12 hour or 24 hour format.
Select Set Time/Date to manually set the time and date displayed on your SPOT X device.

25
DISTANCE UNIT SETTINGS
The Distance Unit screen allows you to configure the
SPOT X display measurements by selecting from
the follow options:
• Metric (Meters)
• Imperial/US (Feet)
• Nautical
DISPLAY SETTINGS
The Display Settings screen allows you to configure the SPOT X to turn on or turn off the Poor Sky View Warning,
Antenna Position Warning as well as Invert Display.
• The Poor Sky View Warning: The warning will be displayed when there are incoming messages that are not
fully received after 5 minutes.
• Antenna Position Warning: The warning will be displayed when the SPOT X is not being held upright.
• Invert Screen Display: This function will switch the background to black and the white text.
SPOT X INFORMATION
The SPOT X Information screen allows you to see the following SPOT X information:
• SPOT X Unique Mobile Device Number
• ESN
• Auth Code
• Firmware Version
• Date of last My ACCOUNT Sync
RESTORE FACTORY SETTINGS
The Restore Factory Settings screen resets the SPOT X to its default factory settings.
NOTE: Resetting the SPOT X to the out-of-the-box Factory Settings will erase all data on the SPOT X including all
contacts, account information, waypoints, and message threads.
DEMO/RETAIL MODE
Enabling Demo/Retail Mode causes the SPOT X to display preset marketing images when the device is powered off.
REGULATORY INFO
The Regulatory Information shows the manufacturer, model and certifications.
SOUNDS
This screen will allow you to turn on or off incoming message sounds.

26
SPOT MY ACCOUNT
Your My Account website is a quick and easy way to configure SPOT X. From My Account you can access the
following:
• Getting Started
• My Devices
Enable/Disable Movement Alerts
Duplicate SPOT X Settings
Edit S.O.S. Emergency Contacts
Create and Manage Contacts
Configure Help/SPOT Assist
Configure Social Media Accounts
Configure Message Blocker
Create and Edit Predefined Messages
Configure Check In/OK
Enable/Disable Undelivered Message Notifications
• My Locations
• Share
• Setting & Billing
SECURITY
Security allows to add a password or PIN to secure your device. Selecting PIN simply locks the keyboard in number
entry mode. The password or PIN can be 4-12 characters in length.
When password/PIN is enabled, pressing the key followed by the Select button will lock an unlocked SPOT X,
and then when locked, the key followed by the Select button will prompt for a password/PIN.
NOTE: If you forget the password/PIN, simply connect your SPOT X to the updater and sync.

27
MY ACCOUNT – MY DEVICES
SPOT X MY DEVICES OVERVIEW
Device Type - Displays the SPOT device type, i.e. SPOT X
Renewal Date - Displays the date the SPOT X Service plan will automatically be renewed
ESN - Displays Electronic Serial Number that identifies the SPOT X
Auth Code - Displays Authorization Code for the SPOT X
Mobile Device Number - Displays telephone number assigned to the SPOT X
Services - Displays all of the services that are associated with the current SPOT X Service plan
Text Messages Used – Displays the total number of text messages sent/received, and the number of text
messages allowed for the current SPOT X Service plan (red numbers indicate overages)
Date of Last Sync – Displays the date the last time the SPOT X was synced with My Account
1
2
3
4
5
6
7
8

28
Device Name Tab – Used to change the name of the SPOT X
Tracking Tab – Displays the tracking interval available in accordance with the current SPOT X Service plan
Movement Alerts Tab – Used to Enable/Disable and configure Movement Alert Messages
Third Party GPS Forwarding Tab – Used to Enable/Disable and configure the forwarding of your coordinates to
a 3rd party application or web service
Duplicate Settings Tab – Used to copy Contact, Message Profiles and
Navigation settings between SPOT X devices on the same account
S.O.S. Tab – Used to change Primary and Secondary Emergency Contact information
My Contacts Tab – Used to create contacts and contact groups – SPOT X can have up to 70 contacts residing
on the device
SPOT S.O.V. Tab – Used to edit your S.O.V. contact phone numbers
Social Media Tab – Used to link the SPOT X to social media accounts
Message Blocker Tab – Used to control who can send messages to the SPOT X – Defaults to Accept All
Predefined Messages Tab – Used to create predefined messages that can be sent at no cost from the SPOT X
– Up to 14 predefined messages can be stored on the SPOT X
Check In Tab – Used to create and configure a free message to be sent to up to 10 recipients when Check In/
OK is selected on the SPOT X
Undelivered Message Notification Tab – Used to enable/disable undelivered message notifications – If
the SPOT X is turned off, incoming messages will not be delivered, enabling this feature will send an email
notification allowing for the viewing of these messages
Waypoints Tab – Used to create and edit waypoints to easily sync to the SPOT X
9
10
11
12
13
14
15
16
17
18
19
20
21
22

29
DEVICE NAME TAB
Give a unique name to the SPOT X. For accounts with multiple SPOT X’s or other SPOT devices, giving a unique
name to the device will make it easier to identify and select the SPOT X.
Simply enter a new name in the Name field and select Save.

30
TRACKING TAB
The Tracking Tab displays the Tracking and Message Fetching intervals in accordance with the current purchased
SPOT X Service Plan. Bolded intervals indicate available intervals and grayed out intervals indicate intervals that are
not currently available.
Tracking and Message Fetching intervals are configured directly on the SPOT X.

31
MOVEMENT ALERTS TAB
The Movement Alerts tab allows for the configuration of the movement notification alerts when the SPOT X vibration
sensor detects new movement.
CONFIGURING MOVEMENT ALERTS
1. Click Enable and the Movement Alerts tab will expand displaying more information.
2. Select the amount of time the SPOT X must be stationary before a Movement Alert will be sent.
3. In the Message to Send field, enter the message to be sent when a Movement Alert is initiated.
4. Select Add Email and/or Add Mobile Number and either an Email or Mobile Number popup will be displayed.
5. Enter the appropriate Email or Mobile Number and click OK.
6. Repeat Step 5 for additional recipients (up to 10 recipients).

32
THIRD PARTY GPS FORWARDING TAB
Third Party GPS Forwarding sends the SPOT X’s GPS coordinates to a designated third-party web-based
application; by default this ability is disabled.
If a third party application provider has partnered with SPOT:
1. Request the Third Party Identification Code from your third party provider.
2. Enter the Third Party Identification Code in the Third Party field.
3. Select Enable.

33
DUPLICATE SETTINGS TAB
The Duplicate Settings tab allows for the copying and transferring Contact, Message and Navigational settings
between SPOT X devices within My Account.
COPY DEVICE SETTINGS TO ANOTHER SPOT X
1. Select Copy Device Settings to Another SPOT X and the Copy Device Settings to Another SPOT X popup
will be displayed.
2. In the Settings section, select the settings to be copied.
3. In the Copy to section, select the SPOT X to copy the settings to and click on Copy.
4. Sync the SPOT X with My Account.
NOTE: All settings selected will copy over previous settings in the selected SPOT X.
34
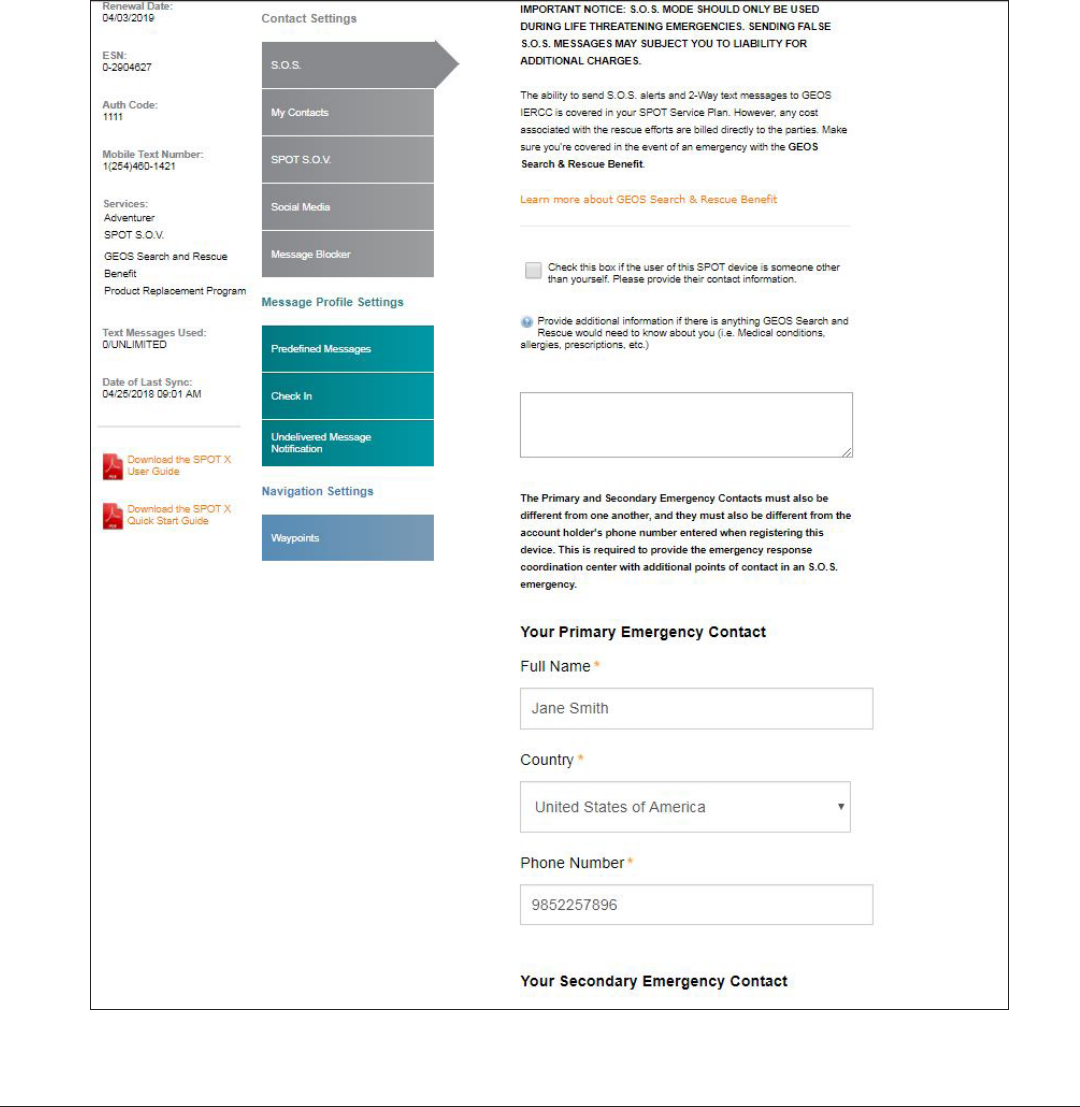
S.O.S. TAB
While S.O.S. is active, 2-way communication with GEOS International Emergency Response Coordination Center
(IERCC) is available directly from your SPOT X.
The S.O.S. Tab is used to change your Primary and Secondary Emergency Contact names and telephone numbers
that GEOS contacts when an S.O.S. is initiated.
The Primary Emergency Contact information must be different from the Secondary Emergency Contact information.
This is required to provide GEOS with additional points of contact in case of an S.O.S./911 emergency.

35
MY CONTACTS TAB
This feature allows you to create contacts and contact groups and sync your contacts to your SPOT X device using
My Account. Your SPOT X can hold up to 70 contacts, including contact groups. A separate contact will be created
based off of the contact type entered, so if an email address & a phone number is added for a single person, that
person will count as two contacts instead of one. Each contact group can hold up to 10 contacts. When sending a
message from your SPOT X, only 10 individual contacts or 1 contact group can be selected per message.
CREATE NEW CONTACT
1. Select Create New Contact and the Add a New Contact popup will be displayed.
2. Enter the appropriate information and select Save. If both Email Address and Mobile Number fields are filled in,
two contacts will be created, one for Email and one for Text. You must select the country code and include the
area code before saving a contact phone number.
3. The new contact will be displayed in the Contact Name field.
CREATE NEW CONTACT GROUP
1. Select Create New Contact Group and the Add a New Contact Group popup will be displayed.
2. Enter the Group Name, select up to 10 contacts, and select Save.
3. The new contact group will be displayed in the Contact Name field.
ADDING CONTACTS TO THE SPOT X
Syncing SPOT X with SPOT My Account is required for contacts and contact groups to appear on your device.
1. In the Contact Name field, select a contact by clicking on the appropriate checkbox – up to 70 contacts can be selected.
2. Select the contacts that you would like to sync by clicking on the checkbox next to the contact (up to 70 contacts
can be synced) and select Save.
3. Click Confirm Changes
4. Sync the SPOT X with My Account.
5. Sync & update your device using the SPOT X Firmware Updater.

36
DELETING CONTACTS
Syncing SPOT X with SPOT My Account is required for contacts and contact groups to be removed from your device.
1. In the Contact Name field, select Delete next to the name you want to remove.
2. A pop-up message will display asking to confirm the action requested.
3. Confirm Changes at the top of the page.
4. Sync the SPOT X with My Account.
5. Sync & update your device using the SPOT X Firmware Updater.

37
SPOT S.O.V. (SAVE OUR VEHICLE)
SPOT S.O.V. is our 24/7 vehicle assistance feature that gets help for you and your car, SUV, ATV, RV, trailer or
motorcycle. It doesn’t matter how far off the grid you go or even if you have zero bars of cell service, you can count
on us to get you out of a jam.
SPOT has partnered with Nation Safe Drivers (NSD) to provide a vehicle assistance program like no other. NSD is
one of the largest suppliers of towing and roadside assistance, even on the most obscure and hard to travel roads
imaginable. It doesn’t matter if the roads are paved, dirt or gravel, NSD partners will be there to save your vehicle.
SPOT S.O.V. is an additional service offered for as low as $30.00 per year that allows you to send your GPS locations
to NSD so you can be located quickly.
SPOT S.O.V. ASSIST FEATURES:
• Up to 5 tows per year
• Up to 50 miles each tow
• Winching/Extrication Services
• Accident assistance
• Gas & oil delivery
• Emergency tire service
• Emergency battery service
• Lost key and lockout service
• Service is available in 50 U.S. states, as well as Puerto Rico, Washington, D.C. and Canada
38
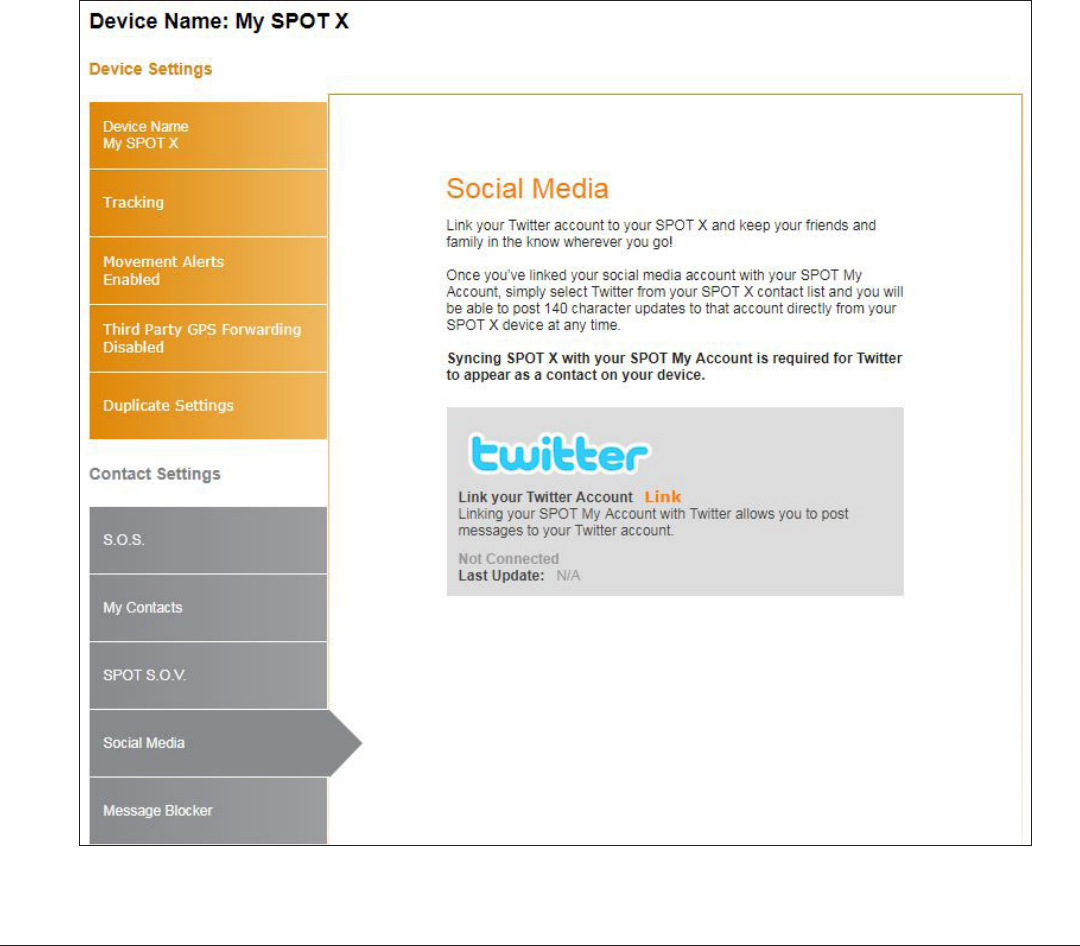
SOCIAL MEDIA TAB
The Social Media tab is used to link your social media accounts with the SPOT X. Once you’ve linked your accounts
you will be able to send 140 character updates to those accounts from your SPOT X at any time.
TWITTER
1. In the Twitter section, click on Link.
2. Follow all on-screen directions.

39
MESSAGE BLOCKER TAB
By updating these settings, you can easily control who you receive messages from.
SELECTING A BLOCKING MODE
1. Select the appropriate blocking mode:
• Blacklist Mode – Blocks only incoming messages listed in the blacklist
• Whitelist Mode – Blocks all incoming messages that are not on your whitelist or listed as a contact in My
Account
• Synced Contacts Only – Block all numbers and emails that have not been synced to your SPOT X device.
• Block All - Blocks all incoming messages
• Accept All – Accept all incoming messages
2. Click Save.
ADD TO THE BLACKLIST
1. In the Blocking Mode section, select Add and
the Add to Blacklist popup will be displayed.
2. Enter the Mobile # or Email address you wish
to block, along with an associated name, and
click Save.
ADD TO THE WHITELIST
1. In the Blocking Mode section, select Add and
the Add to Whitelist popup will be displayed.
2. Enter the Mobile # or Email address you wish
to add, along with an associated name and
click Save.

40
DELETE FROM THE BLACKLIST
1. In the Blocking Mode section, select View/Edit
and the Delete from Blacklist pop-up will
be displayed.
2.Check the boxes of the contacts you wish to
remove from the Blacklist and click Delete.
DELETED FROM THE WHITELIST
1. In the Blocking Mode section, select View/Edit
and the Delete from Whitelist pop-up will
be displayed.
2.Check the boxes of the contacts you wish to
remove from the Whitelist and click Delete.

41
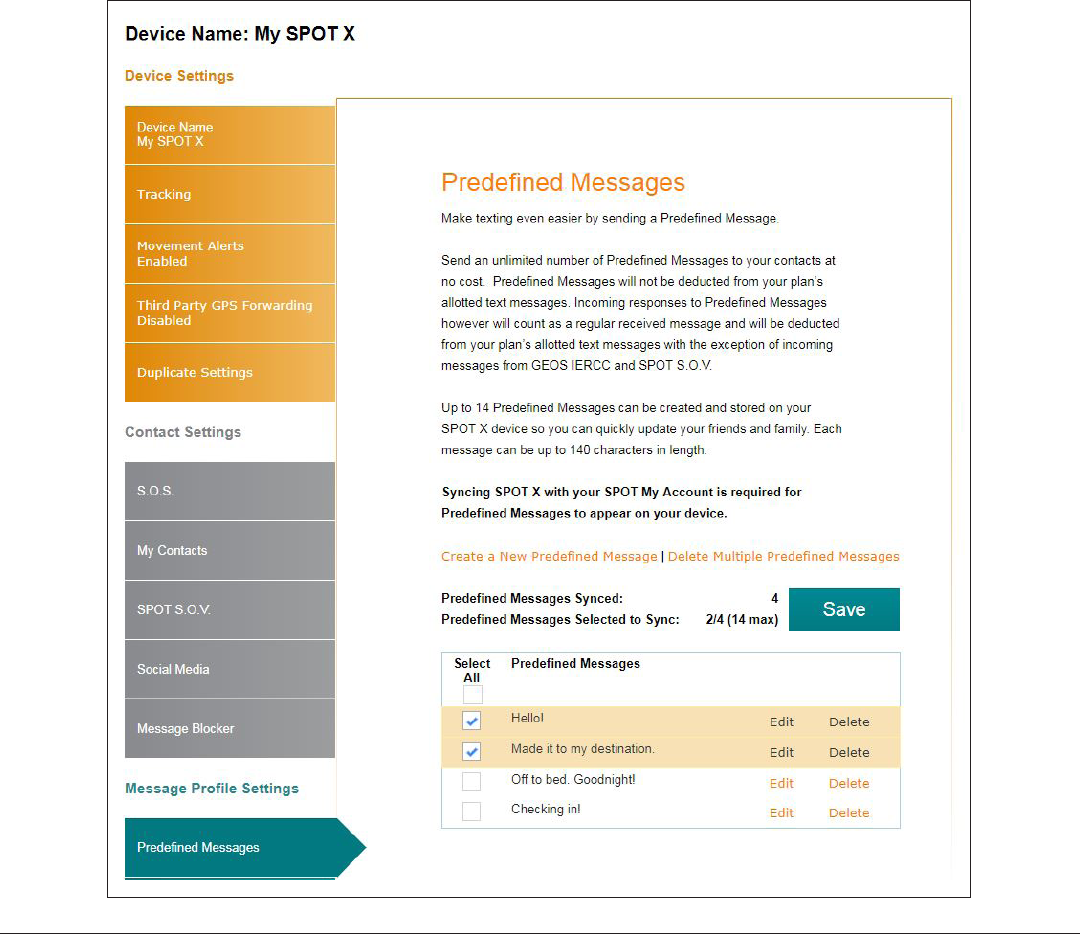
PREDEFINED MESSAGES TAB
Make texting even easier by sending a Predefined Message. Send an unlimited number of Predefined Messages to
your contacts at no cost.
Up to 14 Predefined Messages can be created and stored on your SPOT X device so you can quickly update your
friends and family. Each message can be up to 140 characters in length.
NOTE: Syncing your SPOT X with SPOT My Account is required for the changes to reside on your SPOT X.
CREATING A PREDEFINED MESSAGE
1. Select Create a New Predefined Message and
the Create a New Predefined Message popup
will be displayed.
2. In the Message field, enter a maximum of 140
character message and click Save.
DELETING A PREDEFINED MESSAGE
1. In the Predefined Message section, Select Delete
next to the message to be edited and the Delete
this Predefined Message popup will be displayed.
2. Select Yes to Delete.
42
EDITING A PREDEFINED MESSAGE
1. In the Predefined Message section, select Edit next to the message to be edited and the Edit/View a Predefined
Message popup will be displayed.
2. In the Message field, edit the Predefined Message and click Save.
SYNCHING PREDEFINED MESSAGES TO THE SPOT X
Syncing SPOT X with your SPOT My Account is required for Predefined Messages to appear on your device.
1. Select the Predefined Messages that you would like to sync to your SPOT X device by clicking on the appropriate
checkbox(s), click Save and then Confirm Changes. Up to 14 Predefined Messages can be selected.
2. Sync the SPOT X with My Account.

43
CHECK IN TAB
Check In with friends and family by quickly sending a pre-programmed message and/or email along with your GPS
coordinates to up to 10 contacts at no cost to you. The Check In message will include a link to Google Maps™ showing
the SPOT X’s location. The Check In feature cannot be used unless it is setup before going on your adventure off the grid.
A default message will be used unless a custom message is set up.
The Check In message can be created and assigned to contacts via SPOT My Account at any time.
CONFIGURING THE CHECK IN MESSAGE
1. In the Message to Send field, enter the Check In/OK message to send.
2. Select Add Email and/or Add Mobile Number, enter the appropriate contact information, and click OK.
3. Repeat Step 2 for additional recipients (up to 10).
4. Click Save.
NOTE: The messages can also be posted to your social media accounts.

44
EDITING AN EMAIL ADDRESS OR MOBILE NUMBER
1. In the Check In section, select Edit next to the email or mobile number to be edited and the Edit the Mobile Number
or Email Address popup will be displayed.
2. In the Mobile Number or Email Address field, edit the information and click OK.
DELETING AN EMAIL ADDRESS OR MOBILE NUMBER
1. In the Check In, section, select Delete next to the Email or Mobile number to be removed.
2. Click Save.

45
UNDELIVERED MESSAGE NOTIFICATION TAB
If the SPOT X is turned off or has not communicated with the SPOT Satellite Network, incoming messages will not
be delivered. All incoming messages will be queued for up to 72 hours from the time they were sent and will only
be delivered if the SPOT X is turned on and has a satellite connection. If the SPOT X remains turned off, all queued
messages will not be delivered and permanently deleted.
To receive these emails before they are deleted, select Enable and the messages will be delivered to the email
address displayed.
To change the email address:
1. Select the email address field and enter a new email address.
2. Click Save.

46
WAYPOINTS TAB
The Waypoints tab is used to mark important locations or points of interest to navigate to using the SPOT X.
Waypoints can easily be created and loaded on to the SPOT X.
CREATING A WAYPOINT:
1. Select to enlarge the map screen.
2. Zoom to the specific area on the map where you
want to create a waypoint for. Left click and the
Create Waypoint popup will be displayed.
3. The Latitude, Longitude and Elevation will be displayed. In
the Name field, enter a name for the Waypoint.
4. In the Notes field, enter any pertinent information.
5. Click Save.
DELETING A WAYPOINT:
1. In the Waypoints section, Select Delete
next to the waypoint and the Delete this Waypoint Message
popup will be displayed.
2. Select Yes to Delete
EDITING A WAYPOINT:
1. In the Waypoints section, Select Edit next to the waypoint and the
Edit Waypoint popup will be displayed.
2. Edit the information that needs to be changed.
3. Select Save.
SYNCHING WAYPOINTS TO THE SPOT X
1. In the Waypoints section, select Waypoints by clicking on the
appropriate check box.
2. Select Save to save the Waypoints settings.
3. Sync the SPOT X with My Account.

47
MY ACCOUNT – MY LOCATIONS
TRACKING
SPOT Tracking provides an easy way to share your outdoor adventures and is also a great safety feature. To view the
tracks made while using the SPOT X, simply click on the My Locations tab.

48
SET FILTERS
Devices – Select the devices you would like to display on the map.
Message Type – Select the type of message you want to see on the map such as Check In, New Movement and
S.O.S.
Date and Time Range – Select the Start and End date of the tracks or message types to display on the map.
Apply Filters – Once the above filters have been set, the Apply Filters option will display on the map with the
information requested.
Map It – Select the message type one by one or all to display them on the map.
Hide – Select one or more message types to hide it from Shared Page.
Unhide – Select this function to make the hidden message type visible on the Share Page.
Delete – Select this function to delete a message type from the map.
Download – Store your SPOT X’s tracking information as a GPX, CSV or KML format.

49
LOCATE
Find the last known location of the SPOT X by Selecting the Device, then click Locate.
The Last Known Reporting Interval is based on either the Tracking interval or Message Fetching rate set on each
individual SPOT X device. Locating the SPOT X may take longer than the Last Known Reporting Interval due to several
factors: the SPOT X is turned off or has not communicated with the SPOT Satellite Network, the SPOT X does not have
a clear line of sight to the satellites, and/or reporting intervals may have been changed directly on the device.

50
MY ACCOUNT – SHARE
CREATE A SHARE PAGE
Share your messages and locations with friends, family and coworkers by creating a SPOT Share Page. Anyone with
a link to your Share Page can see your GPS location and messages online in near real-time. Make your page public
or private by password protecting it, and create or delete pages at any time. You can create up to 10 Share Pages
per SPOT device. You have complete control on your SPOT Share Pages!
1. Click on the Share icon .
2. Click on Create a Share Page.
3. Enter the appropriate information and click Create.

51
CREATE A GET SPOTTED PAGE
Allow friends, family and coworkers to request your location by creating a Get Spotted Page. Make your page private
by password protecting it, and create or delete pages at any time. Anyone with a private link to your Get Spotted
Page can request your GPS location online in near real-time. You can create up to 10 Get Spotted Pages per SPOT
device. You have complete control of on your Get Spotted pages!
1. Click on the Share icon .
2. Click on Create a Get Spotted Page.
3. Enter the appropriate information and click Create.

52
OVERVIEW
The Settings & Billing page
• Username Settings – Select Update to change username.
• Password Settings – Select Update to change account password.
• Time Zone Preference – Select Update to select the time zone that will be displayed on all messages from the SPOT X.
• Language Preference – Select Update to change your preferred language.
• Credit Card Information – Select View/Edit to update or change credit card information.
• Customer Information – Select View/Edit to update primary contact information.
• Monitor Message Usage – Select View to display the current billing cycle SPOT X message usage.
• Billing History – Select View to see billing history/invoices and basic customer information.
MY ACCOUNT – SETTINGS & BILLING

53
SPOT X MESSAGE USAGE
The SPOT X Message Usage section displays the following message usage information for the current billing period:
• Device Name – Displays the name of the SPOT X.
• Text Used – Displays the current total text messages (sent & received) used and the maximum number of text
messages allowed before overages will be incurred.
Example: 35/50 where 35 is the current total of text messages used and 50 is the maximum number allowed
before overages will be incurred.
• Text Sent – Displays the total free-form texts sent by the SPOT X.
• Text Received – Displays the total texts received by the SPOT X.
• Predefined Sent – Displays the total Predefined Messages sent by the SPOT X. Sending Predefined Messages
are free and do not count as free-form text messages.
• Text Overages – Displays the total text messages (sent & received) that exceed the maximum number of text
messages allowed by the SPOT X Service Plan.
• Overage Total – Displays the total cost of text messages that have exceeded the number of text messages
allowed by the SPOT X Service Plan. The Overage Total will appear on your next invoice.
• Next Billing Date – Displays the date when the next billing cycle begins.

54
SYNCING SPOT X WITH MY ACCOUNT
To sync your SPOT X from My Account, visit SPOT
Firmware Updater to download the latest firmware update.
1. Open the Find Me SPOT updater.
2. Log in with your My Account credentials.
3. Turn off your SPOT X.
4. Connect the USB cable to your SPOT X and
plug into a USB port on your computer.
5. Click on Connect.
6. Click on Sync.
7. Once the Sync is finished, click Disconnect.
SPOT X FIRMWARE UPDATE
To perform an update on your SPOT X, visit SPOT Firmware updater to download the latest updater.
1. Open the Find Me Spot updater.
2. Log in with your My Account credentials.
3. Turn off your SPOT X.
4. Connect the USB cable to your SPOT X and plug it to a USB port on your computer.
5. Click on Connect.
6. Click on Update to Latest Firmware.
7. Once the Update is finished, click Disconnect.
NOTE: Please do not disconnect the SPOT X while the firmware update or sync is in progress. Interrupting this
process may cause your device to malfunction.
TROUBLESHOOTING:
If the SPOT X becomes unresponsive, you may have to do a hard reset. Simply press and hold the Select and
Power Button for 12 seconds until the user interface flashes off, then release the buttons. The SPOT X logo should
be displayed on the screen
NOTE: After 3 seconds of holding the Power Button, you will be asked if you want to power off. Disregard the
message and continue to hold both buttons down.

55
SPOT X SPECIFICATIONS
HEIGHT 6.54”
WIDTH 2.9”
THICKNESS 0.94”
WEIGHT 7.0 oz
BATTERY TYPE Rechargeable Lithium Polymer Battery
WATERPROOF RATING IP67 – Tested for submersion in 1 meter of water for 30 minutes
IMPACT RESISTANCE Mil-STD-810G for shock, IP67 for dust
OPERATIONAL
TEMPERATURE -4° F to 140° F (-20° C to +60° C)
STORAGE
TEMPERATURE
-4° F to 140° F (-20° C to +60° C)
OPERATING
ALTITUDE*
-328 ft to 21,320 ft (-100 m to 6,500 m)
*SPOT X Only. (A/C Adapter not rated above 6561 ft / 2000 meters )

56
CERTIFICATIONS
FCC COMPLIANCE STATEMENT
FCC Interference Statement (Part 15.1059b)
This equipment has been tested and found to comply with the limits for a Class B digital device, pursuant to Part
15 of the FCC Rules. These limits are designed to provide reasonable protection against harmful interference in a
residential installation. This equipment generates, uses and can radiate radio frequency energy and, if not installed
and used in accordance with the instructions, may cause harmful interference to radio communications. However,
there is no guarantee that interference will not occur in a particular installation. If this equipment does cause
harmful interference to radio or television reception, which can be determined by turning the equipment off and on,
the user is encouraged to try to correct the interference by one of the following measures:
Reorient or relocate the receiving antenna.
Increase the separation between the equipment and receiver.
Connect the equipment into an outlet on a circuit different from that to which the receiver is connected.
Consult the dealer or an experienced radio/TV technician for help.
FCC REGULATORY
FCC ID: L2V-SPOTX
FCC regulatory information is accessible on the SPOTX (e-label). The steps to access the information is as follows:
• From the main (home) screen, click on System Settings
• From the System Settings screen, Click on Regulatory Info
• The regulatory screen appears with FCC and Canada regulatory information.
RÉGLEMENTATION DE LA FCC:
FCC ID: L2V-SPOTX
Les informations réglementaires de la FCC sont accessibles sur le SPOTX (étiquette électronique). Veuillez suivre les
étapes suivantes pour accéder à ces informations :
• Sur l’écran principal, cliquez sur Configurations du système.
• Sur l’écran de Configurations du système, cliquez sur Informations réglementaires.
• L’écran de réglementation apparait avec les informations réglementaires de la FCC, et celles du Canada.
ISED RSS-GEN NOTICE
(1) This device may not cause interference; and (2) This device must accept any interference, including
interference that may cause undesired operation of the device.
(1) l’appareil ne doit pas produire de brouillage; (2) l’appareil doit accepter tout brouillage radioélectrique subi,
même si le brouillage est susceptible d’en compromettre le fonctionnement

57
INDUSTRY CANADA CERTIFICATION
This Class B digital apparatus complies with Canadian ICES-003.
This device complies with Industry Canada license-exempt RSS standard(s). Operation is subject to the following
two conditions: (1) this device may not cause interference, and (2) this device must accept any interference,
including interference that may cause undesired operation of the device.
CANADA REGULATORY
IC: 3989A-SPOTX
CAN ICES-3(B)/NMB-3B
Canadian regulatory information is accessible on the SPOTX (e-label). The steps to access the information is as follows:
• From the main (home) screen, click on System Settings
• From the System Settings screen, Click on Regulatory Info
• The regulatory screen appears with FCC and Canada regulatory information.
RÉGLEMENTATION DU CANADA:
IC: 3989A-SPOTX
CAN ICES-3(B)/NMB-3B
Les informations réglementaires du Canada sont accessibles sur le SPOTX (étiquette électronique). Veuillez suivre
les étapes suivantes pour accéder à ces informations :
• Sur l’écran principal, cliquez sur Configurations du système.
• Sur l’écran de Configurations du système, cliquez sur Informations réglementaires.
• L’écran de réglementation apparait avec les informations réglementaires de la FCC, et celles du Canada.
DECLARATION OF CONFORMITY FOR EUROPEAN CUSTOMERS
Hereby, SPOT LLC declares that this SPOT X, is in compliance with the Directive 2014/53/EU. The full text of the EU
Declaration of Conformity may be consulted at FindMeSPOT.com/Regulatory.
Transmit frequencies: 1611.25, 1613.75, 1616.25 and 1618.75 MHz. (1610-1620 MHz)
Maximum EIRP: 22.35 dBm
Rated Voltage: 5 VDC, Rated Maximum Current: 550mA
This device complies with the requirements for Radio Astronomy Site avoidance as specified by the Globalstar
National Science Foundation agreement of 2001. It is compliant with CFR25.213.
This device automatically adjusts its transmission frequency according to its location and is compliant with
international regulatory requirements.

58
GENERAL WARNINGS
Warning – Modifications: Changes or modifications not expressly approved by the party responsible for
compliance could void the user's authority to operate the equipment.
Warning – Internal Battery: The rechargeable battery inside the SPOT X is not designed to be replaced by the
consumer. If replacement is needed, have an authorized service person replace the battery with one of the
same size and type.
Warning – Blasting Area: To avoid interference with blasting operations, turn your SPOT X off when in a
“Blasting Area” or in areas posted “Turn off two-way radio.” Obey all signs and instructions.
Warning – Potential Explosive Atmosphere: Turn off the SPOT X when in any area with a potentially explosive
atmosphere and obey all signs and instructions.
Warning – Driving: Always follow safe driving practices and local rules and regulations regarding the use of
wireless devices while driving. Always park safely prior to sending or using the SPOT X.
Warning – Pacemakers: The Health Industry Manufacturers Association recommends that a minimum
separation of six (6”) inches be maintained between the SPOT X and a pacemaker to avoid potential
interference with the pacemaker.
Warning – Pacemakers: Some digital wireless devices may interfere with some hearing aids. In order to prevent
such interference, you may want to consult the manufacturer of your hearing aid.
Warning - Specific Absorption Rate (SAR):
FCC / Canada: The SPOT X has been shown to be compliant to localized Specific Absorption Rate (SAR) for
uncontrolled environment/ general exposure limits specified in ANSI/IEEE STD C95.1-1992 and has been
tested in accordance with measurement procedure specified in IEEE 1528-2013 and IEC 62209- 2.2010 using
a separation distance of 0mm.
European Union (CE RED): The SPOTX has been shown to be compliant for localized specific absorption rate
(SAR) for uncontrolled environment / general exposure limits specified in ANSI/IEEE Std. C95.1-1999 and
has been tested in accordance with the measurement procedures specified in EN50566:2017 and EN62209-
2:2010 using a separation distance of 0 mm.
NOTE: If concerned about RF exposure during use, place the SPOTX anywhere it is not directly touching
your body after functions have been activated. The RF exposure level drops off dramatically with distance
from the SPOTX.

59
ADDITIONAL SPOT X SUPPORT
This SPOT X User Guide is based on the production version of SPOT X. Hardware and firmware
changes may have occurred after this release. SPOT LLC reserves the right to make changes to
technical and product specifications without prior notice.
Visit FindMeSPOT.com/SPOTXSupport to access the latest version of the SPOT X
User Guide and for additional information on how to use SPOT X.
SPOT X
®
is a registered trademark of Globalstar Inc.
Google Maps™ is a trademark of Google
®
Incorporated.
All other trademarks and registered trademarks are properties of their respective owners.
© 2019 SPOT LLC. All Rights Reserved. All SPOT products described on FindMeSPOT.com are
the products of SPOT LLC and its affiliates, which are not affiliated in any manner with SPOT
Image of Toulouse, France or SPOT Image Corporation of Chantilly, Virginia.
SPOT LLC • 1351 Holiday Square Blvd. • Covington, LA 70433
FindMeSPOT.com/SPOTX
