

Published by:
CrystalKiwi Ltd
P O Box 101009
NSMC
Auckland 0745
New Zealand
Web Site: www.crystalkiwi.com
Email: [email protected]
2 Of 60

Table of Contents Overview
1 Common Features.............................................................................................................7
2 CrystalKiwi Explorer.........................................................................................................21
3 CrystalKiwi Bursting.........................................................................................................29
4 CrystalKiwi Scheduler......................................................................................................35
5 CrystalKiwi Engine...........................................................................................................49
6 Service Manager..............................................................................................................51
7 Field Objects....................................................................................................................53
8 Advanced Features..........................................................................................................57
9 Useful Web Sites..............................................................................................................59
10 Index...............................................................................................................................60
3 Of 60

Table of Contents Details
1 Common Features.............................................................................................................7
1.1 Introduction to Common Features..............................................................................7
1.2 Getting Started - Installation.......................................................................................7
1.3 Business Calendar......................................................................................................8
1.4 Database Connection.................................................................................................9
1.5 Domain Shortcuts.....................................................................................................11
1.6 Email Settings...........................................................................................................11
1.7 Compression and Encryption Settings.....................................................................13
1.8 History Settings.........................................................................................................15
1.9 View History..............................................................................................................16
1.10 Time Zones.............................................................................................................16
1.11 Activation Codes.....................................................................................................17
1.12 Test Settings...........................................................................................................18
1.13 Refresh Options......................................................................................................18
1.14 Shortcuts.................................................................................................................18
2 CrystalKiwi Explorer.........................................................................................................21
2.1 Introduction to Report Viewing.................................................................................21
2.2 Report Viewing – Main Form....................................................................................22
2.3 Report Viewer Menu.................................................................................................23
2.4 Report Viewer Toolbar..............................................................................................24
2.5 Report Security.........................................................................................................24
2.6 Dynamic Parameters................................................................................................24
2.7 Command Line Options............................................................................................25
2.8 Command File Options.............................................................................................26
3 CrystalKiwi Bursting.........................................................................................................29
3.1 Introduction to Report Bursting.................................................................................29
3.2 Scheduled Report Bursting.......................................................................................29
3.3 Report Bursting Application......................................................................................30
3.4 Report Bursting – Main Form...................................................................................30
3.5 Report Bursting Files................................................................................................32
3.6 Bursting Detail File....................................................................................................33
3.7 Parameter Requirements for Bursting......................................................................34
3.8 Database Requirements for Bursting.......................................................................34
4 CrystalKiwi Scheduler......................................................................................................35
4.1 Introduction to Report Scheduling............................................................................35
4.2 What can Scheduling do?.........................................................................................35
4.3 Run on Desktop or as a Windows Service...............................................................35
4.4 Schedule Administration...........................................................................................36
4.5 Schedule Files..........................................................................................................36
4.6 Schedule Menus.......................................................................................................36
4.7 Schedule Toolbars....................................................................................................39
4.8 Properties Form........................................................................................................40
4.9 Where Form..............................................................................................................41
4.10 Schedule Options...................................................................................................42
4 Of 60
4.11 Schedule When ......................................................................................................43
4.12 Schedule Filters......................................................................................................45
4.13 Notify Settings.........................................................................................................46
4.14 Item Statistics.........................................................................................................46
4.15 Item Parameters.....................................................................................................47
4.16 Number Parameter Values.....................................................................................48
5 CrystalKiwi Engine...........................................................................................................49
5.1 Service Based Scheduling........................................................................................49
5.2 Installing the service.................................................................................................49
5.3 Monitoring the service...............................................................................................49
5.4 CrystalKiwi Engine troubleshooting..........................................................................50
6 Service Manager..............................................................................................................51
6.1 Installing the Service.................................................................................................52
7 Field Objects....................................................................................................................53
7.1 Field Objects Overview.............................................................................................53
7.2 Report Properties {=PropertyName}.........................................................................53
7.3 Parameter Fields {?xxx}............................................................................................53
7.4 Date Fields {*xxx}.....................................................................................................53
7.5 Date Field Adjustments.............................................................................................54
7.6 Date Mask Fields {!xxx}............................................................................................54
7.7 Date Mask Fields (with override date) {{month start}xxx}.......................................55
7.8 Tag File Fields {$xxx}................................................................................................55
7.9 Use a report to save tag values................................................................................55
7.10 Domain Shortcut Fields {.xxx}................................................................................56
7.11 List Files {+xxx} and {&xxx}.....................................................................................56
8 Advanced Features..........................................................................................................57
8.1 Shared Folder Location............................................................................................57
8.2 Work Groups.............................................................................................................58
8.3 Clipboard...................................................................................................................58
9 Useful Web Sites..............................................................................................................59
10 Index...............................................................................................................................60
5 Of 60
6 Of 60

1 Common Features
1.1 Introduction to Common Features
The CrystalKiwi suite of utilities includes CrystalKiwi Explorer, CrystalKiwi Bursting,
CrystalKiwi Scheduler and the ServiceManager. They share many features and code so
this section covers the forms and features shared by these applications.
Note that in many cases if you modify a setting for one application, the same change
applies to the other applications.
This section also includes information about installation, email settings, business calendar,
time zones, domain shortcuts, history settings and database login settings.
1.2 Getting Started - Installation
There are three install files needed to install the Explorer report viewer, Bursting and/or
Scheduling:
Crystal Reports Run Time includes all the Business Objects Run Time files needed to
view and process Crystal Reports. Currently we are using the Crystal Reports 2010 run
time for Visual Studio as this is the latest version available from SAP. Internally this is
version 14. it can process reports written in a later version in most cases. Contact us if
you have any questions abour version compatibility.
If you are evaluating multiple 3
rd
party Applications, you may already have the Crystal
Reports Run Time files installed on your machine.
Dot Net Framework 4.0 includes all the Microsoft development libraries we used to
develop our applications. This may already be included in many recent versions of
windows. If there is a later version of the framework on your machine, this install module
can be ignored.
Select one of the three MSI files available to install this suite. They are the default install
file for each application. It could be CrystalKiwi Explorer.msi, CrystalKiwi Bursting.msi or
CrystalKiwi Scheduler.msi. Note that CrystalKiwi Bursting includes a menu item for the
Explorer and that the Scheduler includes menu items for Report Viewing, Bursting and the
Service Manager.
The Service Manager also includes control of some useful settings for the Explorer report
viewer, so it is now included as part of the CrystalKiwi Explorer.msi
Make sure any database drivers and ODBC settings are configured on the install machine.
Note that 64 bit versions of Windows still require 32 bit ODBC settings. The Crystal
Reports run time is 32 bit so requires a 32 bit DSN connection. If that is not directly
available on the control panel navigate to C:\Windows\SysWOW64\odbcad32.exe and set
up your ODBC connection information there.
A Windows 10 Control Panel upgrade recently expanded to offer both a 32 bit and 64 bit
Data Sources on the control panel form. Perhaps Microsoft got tired of people who
couldn't find it.
7 Of 60

CrystalKiwi Explorer is our report viewer and is also included in the Bursting and
Scheduler Installs. Use the viewer to see if you can view a report. If you are prompted for
a database login use the menu File/Settings/Database Connection to save the password
for the report database. See 1.4 below for details on this.
Report Bursting can be run as a stand alone application or integrated into the report
scheduler. Select a report on the main form and modify values on the bursting form.
Report Scheduling requires a little more set up. Use the Service Manager to install the
CrystalKiwi Engine as a windows service and then you can insert reports into the
schedule.
With Report Bursting and Scheduling it is useful to configure the Email Settings and the
Business Calendar. The Email settings also apply to the Explorer Report Viewer when you
want to email your report to another user.
1.3 Business Calendar
Use the menu item File/Settings/Business Calendar to display the Business Calendar
form. This is only used by the Scheduler.
You can set your scheduler so it is always offsett by one or more days for all scheduling.
The default setting of a Today Adjustment of 0 should work for most sites.
The Week Start and Business Week settings are used in the Business Day frequency for
scheduling reports. Reports scheduled for Business Day will skip weekends and public
holidays for report processing.
The Business Day Start and End are used with the Business Hour report frequency. A
report can run every hour from 8:30am to 5:00pm with the above settings and resume the
next day at the next time after 8:30.
8 Of 60

Accounting Period can be Full Month, 4 Weeks or 4-4-5 Weeks. These are used in the
date ranges for parameters for Monthly options.
The Month Start Option is useful where you want the scheduler to reserve the first few
days of a new month for processing the previous month. The above setting of 6 calendar
days means that for the 1
st
to 6
th
September, the month for processing will still remain at
August. Likewise for subsequent months.
Holiday List requires a file name. This contains a list of public holiday dates to apply to the
schedule. The dates in the file must be in UNC format (yyyy/MM/dd – e.g. 2017/04/25 for
New Zealand Anzac Day in 2017). Days in the holiday list are processed as a weekend.
Start of Financial Year are set so the Financial Date Ranges can be calculated.
1.4 Database Connection
Use the menu item File/Settings/Database Connection to display the Database form. All
three applications save their settings in the same database.xml file in the Shared Folder.
This means once you set the password information for a database connection in the report
viewer, the same setting is used by scheduling and bursting.
The Settings File option is for a future feature. Ignore at this time.
The Server and Database settings are extracted from the report when you process it. You
should not change these. Also note that the server and database are case sensitive so
you might find the same connection there in slightly different forms as the fields are case
sensitive..
When a report is processed against the database, you can authenicate in one of two ways.
Click the “Use Trusted Connection” box to tell the report engine to use your windows
credentials. This is the default. Some databases encourage this. Note that the
9 Of 60

CrystalKiwi Engine runs as a service under it's own windows credentials . Make sure the
account running the service has valid database connection permissions if you set this
option.
Other database connections require a user and password. Enter these and remember to
confirm the password. This information is saved as readable text in the database.xml file.
If that causes a security concern you can tick the “Encrypt” button to encrypt the password
field values that are saved in the database.xml file. The password is encrypted using DES
and you cannot undo the Encryption option to recover the password. You can however
remove the encryption by manually editing the database.xml file. Then you have to re-
enter the unencrypted password.
The Set Alternate Location button allows you to move the database connection when the
report runs.
In the above example, any report that uses the “Xtreme Sample Database 10” will be
redirected to use a connection called “Xtreme 11”. This works great if the Server or
Database in the report has moved to a new location.
This feature was originally designed for file based databases where the source report was
designed to use “c:\This Folder\My.MDB” and you want report viewing, bursting and
scheduling to use “d:\That Folder\your.MDB”.
We have extended this feature to now support OLEDB and ODBC connection information.
This setting applies to all reports running on a machine. The connect.xml is shared
between viewing, bursting and scheduling, so the thought was if the database has been
moved then surely all processing should use the new location.
But there is another more complicated requirement we also support. This is available for
report viewing via the command line.
You can temporarily set an alternate location via the command line. This could be used
where an application supports multiple individual database files for different customers or
users. So one command line runs reports using the database files in FolderA while a
second command line runs reports using the files in FolderB. It also works with ODBC or
OLEDB database connectiions.
10 Of 60

1.5 Domain Shortcuts
This is just a simple feature to make administration life a little easier. One client was
getting tired in typing out lots of long domain names for the people getting his reports.
Another had a field limit in her database that wouldn't let her enter long email addresses.
Use the menu item File/Settings/Domain Shortcuts to see the form below.
When you click New you will be asked for the shortcut ID. Then you can enter and save
the description for that ID.
In report viewing, bursting or scheduling where there is an email account field you can
include the shortcut field using {.code}. So an address of bruce@{.ck} will expand to
1.6 Email Settings
In the old days a developer would create an object inside their application to link to
Microsoft Outlook to enable it to send an email message. This is no longer ideal as new
security settings within Outlook disourage such activity and Outlook might not even be
installed on the machine where you are running our applications. We send email
messaages with attached report files directly to the mail server using the SMTP protocol..
Processing can be in one of three states. Production will be set to “SMTP Server” where
you specify the other settings.
11 Of 60
“Suspended” says do all the other report processing but when it comes to sending an
email, skip that step. That is great for testing the scheduling or bursting without sending a
bunch of unwanted messages.
A third testing option is available if you select “Use Test Address”. Instead of sending
messages to those in the schedule or bursting, the message is sent to your test address.
Remember to set back to SMTP Server when testing is completed. Otherwise no
messages will be sent to where they were supposed to go.
SMTP server field is the name or ip address of your mail server. Your mail administrator
will be able to tell you this. Some servers are configured to use an alternate port, so you
can also specify this. The default SMTP port setting is 25.
From field is a valid sender of messages on that mail server. Some servers support any
sending address from their mail domain. Others require a valid user account.
Shadow Copy is a mechanism where all messages have a duplicate sent to another
address. This does not appear as a CC or Bcc on the main message. A separate
message is sent. Leave blank under normal use.
Test Message To is the Test address. It makes sense to use your own address for this.
You should test both with an address in your domain, and an address with an external
domain.Some Mail Server security support applications sending to a local address but
block external addresses.
Error Messages to can be the same as the test address or another address.
Message Pause is if your mail server doesn't want messages sent too frequently. A large
value here will slow down your report processing.
If your mail server requires SMTP authentication, tick the box and the enter the user and
password fields. These can be stored in plain text in the smtpsetting.xml file or you can
encrypt the fields if you prefer.
Save will save these values to the smptsetting.xml file in the shared folder. Close will close
the form without saving the form changes.
Test will send a brief test message to the Test Address. It should arrive within a few
minutes. If it doesn't then no production messages will arrive correctly until this is
investigated and fixed.
The most common cause of email problems is outside the scope of these applications. By
defaul most mail servers block unwanted mail. So you need to talk nicely to your mail
server administrator to “Enable Relay” from the machine you have installed the suite on.
In some cases you might need to tell them your ip address so they lock the security to the
machine you are running
12 Of 60

1.7 Compression and Encryption Settings
With the report schduler you select the output file name and format and this works as
required. Sometimes the file created can be a little on the large size. So wouldn't it be
great if you could compress this output do it takes up less space on your disk or your email
message attachment?
There are various methods to do this. As it is fairly universal, we have decided to use the
ZIP compression algorithm. This is available as a native form at on many windows
machines but each site can select any ZIP compatible utility to process the file.
You can access this from using the main menu items File/Settings/Compression and
Encryption
By default there are no Encryption or Compression settings. So create a new setting and
give it a name like "Compress". Make sure you leave the Code field blank as if you enter a
value here you are setting an encrypted on your file.
To apply compression to your output, Select the "Compress" option on the "Where" form
.
If you no longer require the compression for this schedule item,Just select the Encryption
field back to blank value.
13 Of 60

As technology and the Internet evolve we find security becomes more and more of a
concern. Some of the reports we automate are very important and often confidential.
One of the features of the ZIP utility we've incorporated into our application is that we can
now encrypt the files in the ZIP file. While this might not be the most complex encryption
around it should be sufficient for most users.
At one level, encryption has been around for thousands of years. The ancient Romans
could take a message and scramble it so that only the recipient could unscramble it. As
long as you know the method used, and the "Key" needed to decode the message
everything works as it should.
To enable encryption, you need to create a new entry in the Encryption and Compression
Settings form.
The key to invoking encryption is to enter a code phrase on the form, and remember to
save it. That code phrase will be the password to decrypt the file when the user tries to
unzip the file.
You then need to find a safe way to send the password to your recipients.
You can have as many encrytpion settings as you wish. You will select the name from the
list of encryption names when you set the destination fields for the output.
You can remove settings on this form, but only they are not being used. Make sure the
setting is no longer in use and then it can be deleted.
Compression and Encryption are available in The Send Mail form and Report Scheduling.
It is not currently available with report bursting as we don't think it's a good idea to send
potentially thousands of messages with encrypted attachments that all use the same
password. We will look at a secure way to support this in bursting in the future.
14 Of 60

1.8 History Settings
When you do things with the report viewer, bursting or scheduler, a history item is created
in a history file. There were problems in the past where these files got quite large, so the
history settings help you control this.
The Next Processing Date indicates the next time the history files on this machine will be
checked. Note that multiple users on the same machine (such as a Citrix Server allowing
multiple users runing report viewers) will have personal history files. The scheduler and
bursting create their own history files.
Frequency decides how often the history files are processed. Monthly is usually fine, but
on large busy sites Daily or Weekly could be usefu;
Action is used to decide what you want to do with the History files. You can decide to just
delete the history entries and not do anything else with them. You can also move them to
another folder for archiving. This can result in lots of files. So on one of your machines set
the “Merge” option to combine the history files into one large combined history file.
Why would you want to do this? The history files are all in a structured xml format, so a
simple Crystal Report can take that combined file to report on which reports are being run
when and by which users.
The Email to form will email a message with the history information to that address. This
will be done even if the action is set to “Delete”. Use an administrator who would like to
see that information.
Lock allows you to set a password on this form. This allows an administrator on a server
to set the History Settings for all users and to stop any other user from changing them.
The process now button is to do the history processing now.
Save and Close buttons will work as you would expect.
15 Of 60

1.9 View History
What is the point of keeping all that history inforation if you can't look at it when you need
to? The Main forms for Report Viewing, Bursting and Scheduling all include a menu item
for “View History”.
This displays the View History form.
The first combo box lets you select a history file. It will only display the history files that
are currently on your machine, so the list will change as different history entries are written
to each of the files.
The second combo box will let you select a period. The default is today, but you can also
look at yesterday, the previous seven days, This Week (which starts on the previous
Sunday) or all history events in that file.
There are three buttons on the toolbar. The first lets you save the Current History view as
a csv file. Perhaps you want to view a large history table in Excel, so use this option. The
second button will send the history to an email address. The third button will take you to
the History Settings form.
1.10 Time Zones
When we look at the clock on the wall or on our iPhone we can see the local time in our
office. The iPhone has a great world clock feature, so we can see the times in different
cities around the world. Some countries like the USA have multiple time zones, while
others like China have only one.
16 Of 60
The scheduler uses the local time for processing all reports. You can assign dynamic
dates to a parameter value using date fields like today-3 or previousmonth start this year.
These are by default based on the local date and time. They will usually calculate the
current value at midnight.
The Time Zone feature was originally developed for users with data that came from GPS
systems. By defaul the dynamic dates used for parameter values run from midnight to
midnight. So a date value of today-2 would run from 00:00 two days ago to the same time
a day later (yesterday). Great for running a daily report with yesterday's data.
GPS satellites are orbiting around the world and have to co-ordinate their clocks to a base
time. The GPS data arrives with time set to UTC (Universal Time Co-ordiantes) which is
based in Grenwich, UK.UTC is different to the local UK users when Daylight Saving Time
applies.
A report run in New Zealand on 05-April-2016 for Today-1 would use parameter values of
04-April-2016 00:00 to 05-April-2016 00:00 local time and the GPS data we would get is
from midday on the 5
th
to miday on the 6
th
(UTC time). What we would need to get
yesterdays GPS data would be 03-April-2016 12:00:00 to 04-April-2016 12:00:00 (midday
in both cases)..
You can apply a time zone to any report. But this feature only appears once at least one
time zone is configured. These are saved in the timezone.xml file in the shared folder.
Create a New Time Zone, enter the hour and minutes you want to apply to the dynamic
date.We include a minutes option because there are parts of the world that are not a whole
hour offset from London. Check out Adelaide (Australia), Kabul (Afghanistan) or the
Chatham Islands (New Zealand) among others.
Remember to adjust the timezone settings if daylight saving time changes occur. We do
not currently adjust this automatically.
1.11 Activation Codes
The applications are installed as a trial version. This is a fully functional application with
one restriction. You normally have 30 days to evaluate the software, and after that it will
stop working. If you need a little more time to investifate our software or to process an
order, contact us and we are happy to send an activation code to extend the trial period.
On confirmation of a sale, you will be sent an activation code to unlock the features you
have purchased. You can purchase additional features such as additional viewer licenses
when needed.
The activation codes are saved in the activation.xml file in the shared folder You can copy
this file to a backup machine if needed. You cannot reset the trial period by deleting the
activation.xml file. Doing that will reset back to an expired system.
17 Of 60
1.12 Test Settings
We don't know how the machines at your site are configured. The security settings can
vary widely and some of these can stop our applications from working properly.
We now have a menu item in each application that will check the settings not getting in the
way of optimal processing.
Use the menu item File/Settings/Test Settings. A form will display. Click the “Test
Settings” button and the settings will be tested. A log file will be created and emailed to
your test address. If that hasn't been set up yet. You can still view the settings on the test
form. If there are problems, recommendations will be included in the analysis. We will be
extending this as new issues arise.
1.13 Refresh Options
When you view a report it processes against your data at that point in time. With the report
scheduler, you can rerun the report at a regular interval. But there are a couple of other
options within the report viewer.
If you have a report displayed in the viewer panel, you can use a menu item or a function
key to refresh the report. F5 will refresh using the current parameter values, while F6 will
prompt you for new parameter values.
A more advanced option is to set the report to refresh on a regular interval. Use the menu
item Refresh/Auto Refresh to set this on. The default timer is every 30 seconds, but this
could cause problems if the report takes more than 30 seconds to processs. You can use
the Refresh Menu to set the default timer to another value.
The report viewer supports multiple forms open against different reports. Each of these
can be set to Auto Refresh. Use the menu item Refresh/Set AutoRefresh Local Timer to
allow one form to use a different timer value.
If multiple forms are active, the most recent refreshed report will appear on the top of other
report forms.
1.14 Shortcuts
You might notice that the CrystalKiwi Explorer.exe appears to be the main Executable for
report viewing, bursting and scheduling. Almost true.Shortcuts will have been installed to
take you to the main form for viewing, bursting and scheduling
Running CrystalKiwi Explorer.exe will invoke the report viewer main form.
CrystalKiwi Explorer.exe *bursting will open the report bursting form
CrystalKiwi Explorer.exe *schedule will open the main schedule administration form.
CrystalKiwi Explorer.exe * will display the Application Selection form. From here you can
select viewing, bursting or scheduling.
There are other executables included in the installs.
Service Manager.exe will open a form to enable you to install the CrystalKiwi Engine
service, stop and start it, reset the viewer main form location, redirect the shared folder.
18 Of 60
As these are advanced management functions the Service Manager should usually be run
as Administrator.
CrystalKiwi Engine.exe is the windows service. Use the Service Manager to install it as a
windows service. You can then use the Windows Services application to control the user
account the Engine runs under and the Manual/Automatic service setting.
CrystalKiwi Common.dll is a set of standard functions, libraries and forms shared by other
applications in the CrystalKiwi Suite.
When the Compression and Encryption feature was added in early 2021, we needed a 3
rd
party component to perform these functions. The DotNetZip.dll does this.
19 Of 60
20 Of 60

2 CrystalKiwi Explorer
2.1 Introduction to Report Viewing
The most common way to design a report is to select some fields from tables from your
database, join them with the appropriate fields and join types. This makes optimal use of
the report design time. The report designer can use parameters to change record
selection, modify design elements and export these reports to other formats.
It is a lot more fun to design new reports and modify existing reports than it is to spend the
whole day processing production reports for others in your organisation.
There are two approaches to solving this resource issue and making the report designer
more productive. It all depends on who is in control. This section talks about the staff
member who needs a report with some information to help them with their job, The
Scheduling section of this manual has an administrator in control of when a report runs,
what parameters it needs, and where the output goes.
Each staff member who wants to view reports needs the CrystalKiwi Explorer report viewer
installed on their machine. It is also possible to install the report viewer on a shared
resource like a Citrix server or Terminal Server. They can then select a report from a list,
and run that report, answer any question the report needs and display the redsults.
The report wll preview on the main form. They can then rerun the report with new
parameter values, print the report, or export to other formats.
A full log of their report viewing is stored locally in a personal history file.
The Report Viewer can also be invoked from a command line. See later in this section for
information about how to do this. The command line feature allows you to select the rpt
file, set parameter values and send output.
The CrystalKiwi Explorer Report Viewer can be installed on a Citrix Server. This allows
you to have a machine or cluster that all the users in your organisation to view reports
without having to install Crystal Reports or a stand alone report viewer on each user
machine.
There is a free report viewer available from SAP. The catch is that this application can
only view reports with data saved in the rpt file, but cannot refresh that against live data. It
also cannot process on demand subreports.
If the rpt file contains saved data our CrystalKiwi Explorer report viewer can display the
report with that data. It also can process any on demand subreports in the report against
the live database. You can then refresh the report against live data.
We recommend you design your Crystal Reports to NOT include saved data. While it is
great to see some real numbers when you open the report, in a few months time those
numbers become obsolete.
Another potential use of a rpt file with saved data is to use the CrystalKiwi Scheduler to
process the report and export as a Crystal Report to an external user. They can then use
CrystalKiwi Explorer to open that as a local rpt file and view, export and drilldown into the
21 Of 60

report. They cannot however process on demand subreports as this requires a connection
back to the original database.
2.2 Report Viewing – Main Form
The report viewer is designed to be simple to use.It has several design elements on the
main viewer form.
There is a menu and toolbar, and several large windows with content. The left most
window is the “Report Navigator” - a list of report files in the current folder. If the list is
empty, or you require a report file from another folder, use the menu File/Open and
navigate to the report file you want to process. You can suppress the display of the Report
Navigator window with the menu item View/Report Navigator. This can be toggled on or
off.
The remainder of the form is the Crystal Reports viewer window and it contains it's own
controls. The Group Tree, Preview Window, Drill Down tabs, and subreport tabs.
The Group Tree is on the left and displays the groups in the report. If you have multiple
levels of groups then this will display as a multi level hierarchy.
There are two ways to control the display of the form: There is a button
(see right) on the crystal window that can turn the group tree on or off.
But be careful turnning it off totally. The group tree window can display the groups or the
parameter values used in the report.
On the main form is a combo control that can select None, Group
Tree or Parameters. The None option will also supress the group
tree on the form. Group Tree displays the Groups and
Parameters display the report parameters. If there are no
parameters then the window will be blank.
22 Of 60
2.3 Report Viewer Menu
The Report View has a simple menu with File, View, Tools and Help items on the top line.
The File Menu includes
• Open Report File – use this to select an RPT or RPTR file you have read access to.
It the file contains saved data it will display that. Otherwise it will refresh against the
live database. Other reports in the folder will display in the navigator window.
• Select Folder – will let you navigate and select a folder. The contents of that folder
will display in the Navigator windows
• Refresh displays a submenu where you can refresh the report display or you can
set an AutoRefresh.See 1.12 for details
• New Viewer Window – will open another copy of the main form. This lets you
display more than one report on your screen at once. Closing the original form will
close all subsequent viewer windows.
• Settings will display a sub menu
The Settings Menu includes
• Database Settings will display the database form. Save any connection passwords
here. See section 1.4 for more details
• Email will display the Email settings form see 1.6 for details on this
• History Settings will display the History Settings form. See 1.7 for this.
• Save Viewer Settings lets you take the current form location, size, toolbar settings
and save then in a Viewer.xml file in the shared folder. Then all users on this
machine will start with the same settings. Delete the Viewer.xml file to undo this.
• Dynamic Parameters are really usefull, but can have performance overhead. See
2.6 for details on this.
• Test Settings displays the testing form to check your folders and security. This is
more useful with Scheduling and Bursting than report viewing.
The View Menu has three menu items
• View Report takes the rpt file selected in the navigator and will process it into the
main report part of the form. Double click the bane in the navigator window to do
the same thing.
• View History will display the History Form. See 1.8 for details
• View Navigator is a check option. If unchecked, the navigator part of the form that
displays other rpt files will disappear. Select again to make it reappear.
The Tools Menu tells you what the folder settings are, and you can reset the form location
if it has moved to an awkward location and/or size.
The Help Menu displays the help files, the activation form and vesion information.
23 Of 60

2.4 Report Viewer Toolbar
The report viewer toolbar is there to provide some shortcuts. The full toolbar looks like
To Open a File use
To Select a Folder use
The Folder list is designed to navigate the folders on your machine. From the current
folder you can move up or down, or select another folder at the current level.
To export the current report to disk or an application use
To export directly to email use
To refresh the report objects use
To go to the database form use
The combo box displays “Group Tree”, “Parameters” or “None”. This controls the contents
of the Group Tree section of the main form.
2.5 Report Security
Some web based report viewers create a complex security mechanism to control who can
see what reports. The approach we have taken is that you already have a security
mechanism to control the folders and your report files.. So why duplicate that security?
Your site has users and folders and reports in those folders. Use Windows security to
control which users can see which report files. Usually this is controlled at folder level.
If you are an application developer, there is considerable intellectual property contained in
the design of a report. You can protect this by saving the RPT as a RPTR file. The
CrystalKiwi Explorer report viewer can process both report file types.
The main restrictions on an RPTR file are that you cannot open these in the Crystal
Reports designer, and you cannot export to a Crystal Report (RPT) format to see how the
report was designed.
2.6 Dynamic Parameters
When a report is designed it can be useful to provide a list of values for parameters. This
however can quickly become out of date as the original list was saved inside the rpt file.
A dynamic parameter feature was introduced a few versions ago, but if can be difficult to
control. It also requires reports to be designed with that version (or later).
The CrystalKiwi Explorer fully supports the internal static and dynamic pick lists, but there
is an additional option that doesn't require an upgrade to Crystal Reports.
When a report is opened the parameter list is examined. Then the viewer software looks
for a parametername.prm file in the same folder as the report. It also checks higher level
24 Of 60
folders from that base folder. The prm file is then used to reload the pick list for that
parameter.
So what does the prm file look like? It is a text file, that is the same format that you would
get with a Parameter/Export. Each line has a parameter value and a description field
separated by a tab.
One way to interpret this mechanism is that we have automated the Parameter
Import/Export inside the viewer.
The major disadvantage of this mechanism is that this additonal processing can create a
noticible delay before the report is displayed..
You can turn this feature off by the menu item File/Settings/Dynamic Parameters.
2.7 Command Line Options
Normal installation of the CrystalKiwi Explorer report viewer is to install a menu item to
start the application. An administrator can also create a desktop icon to open the report
viewer.
If you only ever view one or a couple of reports, you can create a desktop icon to open
each report directly. Use a desktop icon that points to
“c:\Program Files(x86)\CrystalKiwi\CrystalKiwi Explorer\CrystalKiwi Explorer.exe”
“D:\Test\My Folder\This.rpt”
Note the quotes are needed because the path to the exe and rpt contain a space.
This can be expanded further. We decided the command line was too limited so the next
features extends to:
“c:\Program Files(x86)\CrystalKiwi\Explorer\Crystal Explorer.exe” “@D:\Test\My
Folder\This.txt”
where This.txt is a text file with command line instructions on separate lines. This.txt can
be any file the user has read access to. The @ indicates it is a command file rather than a
report file to view.
So could you combine this mechanism with the Windows Task Scheduler to create a quick
and easy report automation? Well, yes, you could. But we wouldn't recommend it. Apart
from avoiding a purchase of our scheduler, this approach would be far more difficult to
manage. Adding new items, modifying existing schedule items and investigating how the
reports have processed would be challenging. For that reason we would recommend the
CrystalKiwi Scheduler.
25 Of 60
2.8 Command File Options
There are many commands you can use in the text file to control the processing.
A command file is invoked using the @ character, followed by the command file
name. This is a simple text file with processing commands on separate lines.
The commands may be in any sequence and are not case sensitive.
The following commands are supported:
Basic Commands
report=filename (indicates which rpt file you want to process)
comment=description (you can include comments in the file)
logfile=filename (can change the name of the log file)
disk=diskfilename (saves the output to the disk file)
format=fileformat (specify the output file format)
email=emailaddress (sends the output to the email address)
emailcc=emailaddress (you can include a cc address)
emailbcc=emailaddress (can also have a bcc)
emailsubject=subjectline (the subject on the email message)
printer=printername (sends the output to that printer)
output=viewer (select the viewer for output)
burst=burstcontrolfile (processes the report as a bursting run)
There are some restrictions on what combinations are valid. For example you
can specify the disk file name as well as the email address to send the file to.
You must have an email to send the message to or the emailcc and emailbcc
addresses will be ignored.
Disk and Email output must include a format command line. If no format is
specified, the default output is a rpt file with saved data. Valid formats are
Crystal Report, RPTR Locked Crystal Report, Excel, Excel Record, Excel
Workbook, Acrobat File, Rich Text, Editable Rich Text, CSV File, Tab File, HTML
Document, DHTML Document, MS Word and XML
Parameter Values
You can specify a parameter value using the command
{?parametername}=parametervalue
Multiple values can be entered on the line separated by a pipe (|) character.
For Example: {?Region}=Alaska|New York|Oregon
A Range value can be entered on the line using a tilde (~)
{?parameter}=fromvalue~tovalue
Formula Control
You can modify a formula in your report using
{@formulaname}=newformulatext
The new formula must fit on one line. We may extend this in the future.
26 Of 60
Table Mapping
You can invoke table mapping using the command
{:server}=NewServer
Table Mapping can be used to modify the server or database properties of each
table connection. If you need to change both, use a second line.
If this is a new connection, you will need to load the password information on
the database connection form.
To assist with getting the spelling correct for the server or database name, the
table mapping information is saved to tablemap.html in the Shared\Web folder.
Only the most recently invoked table map will be displayed.
Table mapping will work on both reports and subreports but the mapping must
be the same. The source database names and server names are not case
sensitive.
27 Of 60
28 Of 60

3 CrystalKiwi Bursting
3.1 Introduction to Report Bursting
Many years ago one of the users of our report scheduler asked if we could take one report
and run it multiple times with different output for each run. Of course the simple approach
would be to have the report in the schedule for each output destintation, and this would not
be too difficult to set up for a few values. But what if there were lots of values? The
schedule would become unmanageable and it would be difficult to add, modify and remove
instances.
Report bursting was added to the features of the report scheduler and is one of our most
widely used and most popular features. Other report schedulers include report bursting
using one of two mechanisms.
True Report Bursting takes one large set of pages and splits it into different outputs. This
can be difficult to implement as different group values can appear on different pages each
time the report is processed.
A MultiRun report burst uses a parameter in the report to select the data for one report run.
The data is processed and an export file is created.. The report is then rerun with the next
parameter value and a new and hopefully different output file is processed.
We support Multi Run Report Bursting as we believe it is easler to implement and control.
It is such a useful feature we now offer it as a stand alone feature which operates in much
the same way as a scheduled bursting report.
3.2 Scheduled Report Bursting
You can also use bursting within the CrystalKiwi Scheduler. It is simple and easy to
implement this powerful feature if you follow some simple steps.
Inside the scheduler main form, use the menu to insert the crystal report you want to burst.
Note it must meet the parameter requirements mentioned later in this section. Select the
toolbar to specify where the report is to be processed.
29 Of 60
Select Bursting as the destination and you can then click the Edit Bursting button to enter
the other settings. The Main Bursting Form will then appear.
You can specify the Control File here, but it you leave it blank, the default value of the
folder and report file name with the bst extension will be used.
3.3 Report Bursting Application
The report bursting functionality can be accessed as a stand alone application from the
program menu. This is installed as part of the CrystalKiwi Bursting and CrystalKiwi
Scheduler applications. It is not available with the CrystalKiwi Explorer report viewer.
You can also access the main Bursting Form via the Tools menu in Scheduler. If your
license supports bursting and scheduling the Report Viewer also has a link to the Bursting
form.
The Main Form displays Directly inside the application.
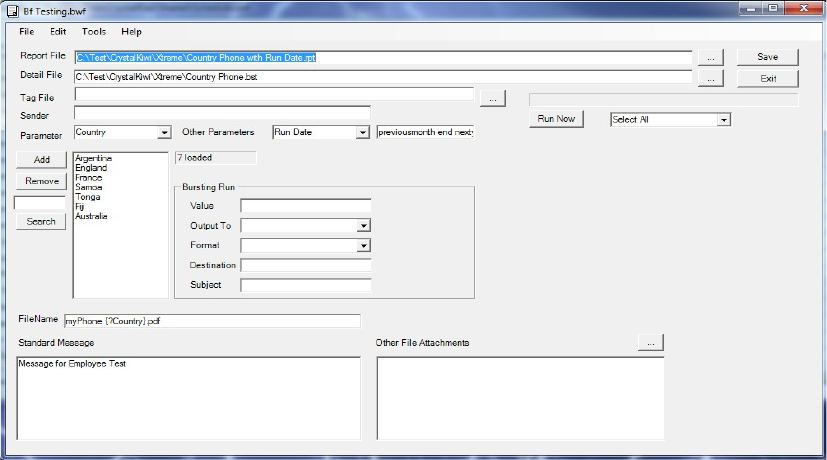
3.4 Report Bursting – Main Form
So how can you tell how you got to the form above? Look at the title line of the form.If it
says Schedule Item xx then you are controlling the Bursting from the report schedule. If it
says filename.bwf then it is a stand alone application with a BWF control file. Think of the
BWF control file as a single schedule item you can run on demand.
The settings on the form need to be saved somewhere.The Scheduler saves this stuff
along with the other schedule item information in the schedule.xml file. The stand alone
application creates a BWF (Bursting Work File) in the same folder as the rpt file. You can
save, copy and modify these bwf files to support multiple bursting runs on your machine.
The Report File item specifies the rpt file use to process the bursting. Once you set up a
bursting run, you can change this if required.
30 Of 60

The Detail file is a bst file that controls the bursting run. It is a 7 column csv file with one
line for each run of the burst. The default filename is the report folder and file name with a
bst extension. This can be changed if required. It can be useful to have several bursting
reports share the same control file.
The detail file is also compatible with the cViewSERVER report scheduler.
Tag files are great if you want to use them, if not, just leave that field on the form blank. A
tag file is an xml file with tags and values that you can use in the file name, message or
subject of the email, or even as the sender.
If the Sender field is blank the default sender from the Email settings form will be used. At
one site we were sending over 2000 monthly customer statements using this bursting
application. The poor staff member in accounts was the default sender, so she got all the
bounces and reply to messages from those messages. A simple formula inside the report
loaded the account managers email address for each statement into the tag file with the
tag “Sender”. Then when the email processed the email message the {$Sender} used the
tag file rather than the accounts address.
The Parameter combo box has been the cause of some complications, so be careful about
changing this. See parameter requirements for more on this
Other Parameters will appear if there are more than one parameter in the report.
The Control File values appear in the above section of the form. Each item in the list is
from one line in the control file, and shows the parameter value. Click Add to create a new
item, or remove to take an item out of the list. On a long list it can be useful to search for a
value. Note the search also searches the email and subject values as well as the
parameter values.
In the example above there are 7 items in the list, and we are on line 4. The first item is
number zero so sorry for any confusion here. The value for Tonga is to email a report to
[email protected] with the title “Tonga Report”
Output can be to Email, Disk or Printer. The format are the usual Crystal export formats
including Excel, Excel Data, Acrobat File, CSV, etc.
Filename is the default file of the email attachment. You can, and should include things
like date stamps in the file name. Use {!yyyy-MM-dd} to use the current date in the file
name in a sortable format. You can also use tags {$tagname}. If you want to show the
parameter value use {?parametername}
31 Of 60

Standard Message is the message to send to each email recipient. You can use tags in
the message.
Other File attachments gives you the option to include other attachments to the message.
Note that all recipients get the same attachments here, so use it for a Merry Christmas
message, invitation to a client function or standard terms and conditions. Do not use it for
additional personalised file attachments. Click the … button to select more files to attach.
On the top right of the form are Save and Exit Buttons. Note if you only click Exit your
changes may not be saved.
The Run Now button gives you the option of running the bursting run now. Be careful as if
there are thousands of items in the control file, they will all be run before you can stop
processing.
You can also select a range of items in the bursting run. Note the first item is numbered 0
This “Select Range” can be used to recover an interrupted bursting run.
Another problem we found on our local site with thousands of customer statements is that
the local mail server choked after trying to process 750 or more messages. So we broke
the run down to a select range of 0 to 700. After a ten minute break or a pleasant cup of
coffee, the next run was for line numbers 701 to 1400 and a final run later in the day to
process the final lines.
3.5 Report Bursting Files
There are two main files required to implement report bursting. Stand alone bursting needs
a BWF file (Bursting Work File) to store the major report bursting settings. You can have
multiple BWF files any where on your machine or network. There is no practical limit.
Scheduled bursting needs to save the same information. It saves these settings in the
schedule.xml file which is in the Shared Folder.
In addition both need a BST Bursting Detail File. See 3.6
32 Of 60

3.6 Bursting Detail File
The Bursting Detail file is a simple csv layout file. You can edit this with notepad or use the
Schedule Management User Function Library inside a report to automate values. We also
had users editing a large file with Excel, manually removing the rows they didn't want to
process and then saving back in CSV format.
Note you should not edit the file with NotePad or Excel if you have the Bursting form open.
When you save the form, your NotePad changes may be overwritten by the values from
the bursting form.
The BST file should look like..
The first column is the parameter name with the curly brackets and question mark. This
should be the same value on every line.
The second column is the value of the parameter. A single value is easy. If you want one
bursting run for a multivalue parameter enter the values on the line separated by pipe (|)
characters. So “England|France|Germany” will load those three values into the {?Country}
parameter for that run. The parameter must be multivalue for this to work properly.
A range parameter and multivalue range parameter are also supported although not
recommeded. We think it makes the process and adminsitration confusing. Keep
everything simple is a good rule to follow.
Use the tilde (~) for a range and you can combine this with a pipe to support multivalue
range. “A~J|P|Q|U~X” will select A to J, P, Q and U to X for the selection.
Date values should be entered in universal date format (yyyy-MM-dd). So use 2018-02-05
to use a date value of 5-Feb-2018.
The third value in the row is the destination. EMail is the most common but we also
support Disk and Printer.
The Fourth column is the Format. This matches all the other support export formats.
The fifth and sixth depend on the fourth column. For an Email output these are the
recipient and the message subject. Multiple email addresses can be entered with semi
colons and no spaces.
For Disk Output, the fifth column is the output file name, and the sixth column is ignored
For Printer Output the fifth column is the printer name and the sixth column is ignored.
33 Of 60
3.7 Parameter Requirements for Bursting
Bursting requires a report file with at least one parameter in the main report. It will, not
work if the main report file has no parameters. One user tried bursting with a report with
six subreports and although the subreports had parameters, the report wouldn't process as
bursting.
Bursting and Scheduling ignore subreport parameters as they expect those parameters
will be controlled by Links from the main report.
Subreports with parameters are okay, but they must have their values loaded via Linked
fields from the main report.
The report cannot include any unused parameters. Inside the code we can see all
parameters and will try to load values again them all, but will generate a run time error if
it's unused. We have tried to trap this but older versions of the rpt file format are unreliable
in reporting if a parameter is used or not.
3.8 Database Requirements for Bursting
It is possible to process a report with Bursting that uses one database in the main report
and other database connections in subreports. Make sure you save any connection
passwords on the Database Connection form. If you can run the report via CrystalKiwi
Explorer report viewing this information will be all set up.
34 Of 60

4 CrystalKiwi Scheduler
4.1 Introduction to Report Scheduling
Designing reports can be fun. Running a report for other users in your organisation is a
little less fun and becomes tedious if it becomes a regular task. You don't want to spend
every Monday or First of the Month running a regular set of reports.
Report Scheduling solves this problem and frees up your time to design more reports.
You create a list of reports in a schedule, when to run them and where to send them.This
leaves you more time improve and extend the reporting at your organisation.
4.2 What can Scheduling do?
Lots of things. You can set up individual reports or clusters of reports to process at specific
times in the future. As the machine is running most of the time, iI can run reports overnight
while you are out of the office.
4.3 Run on Desktop or as a Windows Service
CrystalKiwi Scheduler can run as a desktop application or as a Windows Service.
As a desktop application, the main administration form must be open on the desktop (it
can be minimised) and left running on the machine.. The catch is that if you want reports
to run overnight,you have to leave the machine running and logged in for reports to
process.
For that reason running as a windows service makes more sense. A service is an
application that runs in the background. It shows nothing on the desktop. The machine
must still be running, but it doesn't need to be logged in. Installing as a service is a little
more complicated. There is a “Service Manager.exe” application to help you with this.
Note that Windows Services run under their own account permissions. Check these if you
have any security problems processing reports.
One other important thing to note is that a Windows Service cannot see mapped drives. It
can see your local drives but if you want the schedule to run reports from a networked
folder you need to address the file via a UNC path (\\server\share\folder) and make sure
the account running the CrystalKiwi Engine service has permission to access rpt files in
that folder.
Likewise output files can be saved to network folder but must use a UNC path.
35 Of 60

4.4 Schedule Administration
The main form in CrystalKiwi Scheduler displays an administration form that has a list of
reports and other items. The main form looks like
The columns are all resizable and you can sort and filter the schedule to make it easier to
manage.
There is no real limit on how many items you can have in the schedule. However there is
a practical limit in that if it takes 30 hours to process your daily reports, then there is not
enough time in the day to do this. The solution to that problem is to have more than one
scheduler running at your site. Contact us for pricing on this. Alternatively see if you can
improve the speed of processing your reports. Thee are all sorts of interesting ways to do
this.
4.5 Schedule Files
The basic schedule information is stored in the schedule.xml file in the shared folder. If
your reports have parameters, that information is saved in the parameters.xml file in the
same folder.
The history is saved in ScheduleHistory.xml in the shared folder.
4.6 Schedule Menus
The schedule administration form has several menu items.
The File Menu has the following items
• Open Schedule Database lets you temporarily open another schedule master file.
As the Engine will still be running the original schedule.xml this is mainly so you can
examine a backup database or see how another company has set things up
• Refresh Schedule Database is needed if you are making a bunch of changes while
the schedule is busy running reports in the background. The main form does not
pick up any changes made by the service so you must manually reload the
database.
• Settings displays a sub menu.
36 Of 60
The Settings Menu includes
• Business Calendar lets you specify your calendar settings. This includes when your
working day and week operate and the start of your financial year. See 1.3
• Database Settings will display the database form. Save any connection passwords
here. See section 1.4 for more details
• Domain Shortcuts displays a form where you can specify these. See 1.5
• Email will display the Email settings form see 1.6 for details on this
• Encryption and Compression settings
• TimeZones is where you control your time zone settings. See 1.9
• History Settings will display the History Settings form. See 1.7 for this.
• Test Settings displays the testing form to check your folders and security.
The Insert Menu has some useful items you use to add items to the schedule.
• Insert Crystal Report lets you navigate to find an RPT or RPTR report. It will also
load any parameter information from that report.
• Insert Crystal Report Folder will let you bulk load a folder full of reports. You still
have to set the other settings of those scheduled items, but this does save a lot of
time.
• Insert a Cluster which is a schedule item that contains a group of schedule items.
You can then schedule this cluster as one item. See Clusters later for some other
things they can do.
• Insert Disk Command lets you schedule file operations to copy, move or delete files.
• Insert Mail Message lets the schedule send out a mail message that isn't directly
attached to a report. One use for this is to get the schedule to email you when it
stops or restarts.
• Mapped Drives. By default services cannot see mapped drives. This menu item
lets you set a temporary mapped drive for a schedule item.
The Edit Menu lets you change item settings.
• Schedule Item takes you to the different forms for that schedule item Note there is
also a toolbar icon for most of these.
• Parameters allows you to edit the parameters for that schedule item.
• Remove Item from schedule is the easiest way to permanantly remove an item from
the schedule.
• You can also edit clusters, manage lists and edit tag files
37 Of 60
The View Menu has these items
• View History displays the History Form
• View Statistics/Destination Domains does an analysis of the output destinations of
your reports to show where they are going
The Run Menu has the following items
• Run Report Now on Desktop processes the selected report immediately.
• Run Report Now on Server sends a request to the CrystalKiwi Engine to process
the report
• These two menu items can be used to identify security issues with the Engine. If a
report runs on the Desktop, but not the server then the account running the Engine
has some security issues. If neither run then the settings for that report are the
cause of the problems.
• There is also an option to “Process Remote Folder”. This is a folder where you can
place scheduler commands or email messages. See later for this feature.
The Sort Menu allows you to sort the grid by one of the columns. It can be useful to see
the reports by Next Run, Previous Run, etc. This does NOT sort the data in the
schedule.xml file. It just changes the record sequence of the rows on the main grid in the
Schedule Administration Form.
The Tools menu has some useful administration functions.
• Report Viewer and Report Bursting can be accessed from here. A scheduler
license includes one viewer and one stand alone bursting license.
• You can backup and restore the database from this menu
• Suspend and Resume report processing can be used to pause any scheduling. Use
this if you plan to make bulk changes to the schedule
• Reset Administrator count is needed if you have been using multiple accounts to
administer the schedule.
• Reset Form location is to be used if the report viewer form disappears. This can
happen if display settings change and the viewer is on a no longer active second
monitor. It is difficult to click on a form if you can't see it.
• Refresh Report is if you have made changes to parameters in the selected report.
• Advance Schedule items is useful if you have left the schedule inactive for a while.
Rather than have a bunch of overdue reports suddenly start processing you can
bring an individual schedule item, or all schedule items up to the current date.
The Help menu displays on line help, this user manual, lets you apply a license code and
do some TroubleShooting tasks.
38 Of 60

The Help/TroubleShooting menu inlcudes the following:
• Send Test Message will send a test message to your test email address
• Send Files to CrystalKiwi will send your xml files to us. Only do this if we have
asked you to. With those files we can help identify problems.
• Set Debug allows you to set a disgnosis code. We will tell you the code needed to
work on the problem you have raised.
• Refresh Printer List is used if you have made changes to the printers on your
network. By default the printer list is rebuilt every time the scheduler restarts.
4.7 Schedule Toolbars
The Schedule Toolbar is there to provide quick access to some functions
The first toolbar icon is a wizard to take you though each form needed when you load a
new report into the scheduler. The icon is
To Display the Properties form click
To control Where the schedule is sent click
To select other Options for the schedule item click
To Control Record and Group Selection Filters for the schedule item click
To Control the Notify Messages click
To Control When the Report runs click
To See Monthly Statistics click
To Set Parameter values for the report click
The three combo boxes on the toolbar help you filter the list of schedule items. The first
selects all, or a selected workgroup.
The second applies a filter to a frequency you have applied to schedule items. Perhaps
you just want to see the Weekly or Daily Reports. Note the combo box will only show you
Frequencies you are currently using in your schedule.
The third combo box will show you reports than have run today, will run later today, have
run in the last 7 days, or will run in the next 7 days.
Note if your schedule appears empty, check you haven't set one or more of these filters.
39 Of 60

4.8 Properties Form
The Properties Form displays some general information about the schedule item.
Each schedule item can have a name. By default this is the report file, but if the same
report is in the schedule more than once, this can be used to distinguish them
The file name is a pointer to the source RPT or RPTR report. A local drive is
recommended, but it can be any folder and file you can access on your network. Note that
the service cannot see mapped drives, so use a UNC path for any networked drives.
The Tag file is a mechanism where report specific values can be used in the processing. If
a schedule item is in a cluster, then the cluster tag file is applied first, and then the
schedule item tag file.
WorkGroup is where you can select a work group for the schedule item. To create a new
work group, enter the name of the group into the field. Workgroups enable you to apply
bulk changes to your schedule. For example to set all the “Weekly” reports to Monday
morning at 5:00 am.
Description is a multi line, general purpose description of the schedule item. Use this as a
general notes field for the item. Any special information about processing the report can
be entered here.
This form also lets you se the TimeZone for the reports. This will only appear when you
create at TimeZone. You cannot delete this if a report uses it. To remove the entry set the
value to blank.
40 Of 60

4.9 Where Form
The Where form is one of the more important schedule settings. This controls where the
schedule item goes. The layout will change as different options are selected
Destination can be Email, Disk, Printer or Bursting.
Format is one of the valid export formats. This applies to Disk or Email destinations.
Output is the output file name for the schedule item. Note the file extension will change as
you select different formats. The file name applies to Disk and Email destinations.
The Email settings are displayed above. You can select the To, CC, BCC, Subject and
Message. You can also control the sender.
All of these support fields so you can include domain shortcuts, parameter values, date
fields and tag file values.
Compreassion and Encryption is also set here if you have settings available.
41 Of 60

Disk Destination makes the form a little simpler. You just need to specify a Format and
Output File Name.
Printer Destination is even briefer. The list of printers is built from the printers currently
configured on this machine.
The Bursting destination just needs to know where the detail file is. This is the control file
for the bursting run. If you leave the Detail File blank, and click “Edit Bursting”, a default
bst file name with the same name as the rpt file will be used.
The Edit Bursting button will take you to the main Bursting Form.See 3.3 for details on this.
4.10 Schedule Options
Schedule Options control how the processing works for some options,
The first option is what to do if no records are processed. The previous default was to
send an empty report. Now you can control this.
The default for bursting reports is to NOT send an empty report. You can now control this.
Email reports are normally sent as attachments. For some formats (HTML, Text) we can
send the report as the body of the message. This can be very popular with some users,
while others block any HTML emails.
HTML reports are normally single page, but they can be split into separate pages.
Retain saved data is a check box. Use this for testing a report. If checked the saved data
in the rpt file will be used rather than refreshed against the database.
42 Of 60

4.11 Schedule When
CrystalKiwi Scheduler has lots of powerful options about when to run a report.
The default is a schedule item with “Not Scheduled”. This means the NextRun field for
that item in the schedule is blank.
Set a schedule item to Not Scheduled if you temporarily want to stop processing that item,
or if you want to run it manually using one of the “Run Now” menu items. That way all the
destination and notify settings are set, but the timer won't set the next run of the report.
Reports are normally set for Daily, Weekly, Monthly or some multiple of that. For example
to run a report every two weeks use settings as below:
You can also set the schedule for minutes and hours usually with a multiplier (for example
every 30 minutes). If you dont want that to run every half hour overnight, use Business
Minutes where you can control the start and end of your Business Day.
There is also a Business Day frequency where the report runs Monday to Friday, and
ignores weekends and public holidays. The business day frequency does not use the
Business Hour options so you can schedule a Business Day report for 4am with a
Business Calendar of 8:30 to 17:00.
Note on the form is the previous completed message and the next 6 dates the report
should run. The * button is to refresh those next run dates if you have made a change on
the form. The next run dates are always in the future.
43 Of 60

The Next Run date and time can be anything in your calendar, even if not valid for the
current frequency (for Example, a Sunday date with a frequency of Business Day). If the
next run date and time is in the past, once you have saved the form, the engine will identify
an overdue report and process it immediately.
You can also set a report to run “Once”. Just set a Next Run date and Time. On completion
of processing, the schedule item will revert to “Not Scheduled”.
There is a “Scheduler Start” and “Scheduler Stop” frequency. Use this to send you an
email every time the scheduler is stopped or restarted. Can be a great administration tool.
There is a useful “Last Day of the Month” option. This currently is for Calendar Last Day of
the Month. A recent improvement was to allow “Last Working Day of Month”.
Another powerful option is Days of the Week where you select combinations of different
days. This will only run once of each of those days at the same time
There is a useful Days of Month option where you specify which days of the month the
report should run. The different dates are separated by semi colons. Working Days of the
Month works in a similar way.
44 Of 60

4.12 Schedule Filters
Every Crystal Report has some sort of record selection, even if it is NO selection filter. This
form enables you to modify the record selection when the scheduled report is run.
One potential use of this is to insert multiple copies of the same rpt file into the schedule
and apply different Schedule Filters to select records for a day, week or month.
Note that if your report is from an old version that doesn't support a Saved Data filter, we
can still apply a filter for that data set during processing. While your report may not
support Saved Data record selection, the Crystal Run Time inside the scheduler does
support this feature.
45 Of 60

4.13 Notify Settings
These are used to send an email when the schedule has finished processing an item. You
can set notify messages on success, failure and on each item in a Bursting Run.
The message is a great place to use Report Property Fields. Try field values like
{=ScheduleID}, {=ScheduleName}, {=LastRun}, {=LastRunMsg} or {=NextRun} in the
message.
4.14 Item Statistics
These will build over time, and show a rolling 12 month set of the count and average
processing time of the item. Use this to see if and item on the schedule has had a change
affect the performance of the item.
46 Of 60

4.15 Item Parameters
The scheduler can process reports with built in dynamic record selection. It can also
process reports that have parameters. You control parameter values on the Schedule
Parameters form.
The box on the bottom left of the form is a list of the top level parameters in the report. We
do not examine the parameters from sub reports. We assume that subreport parameter
values will be linked from the main report.
We also do not support parameters that are not used. It is difficult for us to identify those.
Select each parameter in the list an assign a value.
For Date Parameters, our dynamic date feature is recommended, but you can use a hard
coded date if you want. Just Select Calendar from the list and a date.
Because there are so many options for dynamic dates we have split the list. Select
“ThisYear”, “Next Year”, “Last Year” or “Quarter” to see further dates to select.
Multivalues, Ranges and Multi Value Ranges are all supported.
47 Of 60
4.16 Number Parameter Values
A new option for number and string parameters was a new feature in version 1.24.
You can use DayNumber, MonthNumber, YearNumber and FinYearnumber to
automatically calcuate from the current date. If you have used the today adjsutment for the
business calendar, the adjusted date will be used for the calcu;ation.
For example, with an adjustment of -1, when you select monthnumber on the 1
st
of
November, you will get 10 (October). On the 2
nd
of November and later dates that month,
you will get 11 (November).
The FinYearNumber will use the Business Calendar setting for the start of the financial
year. So with a financial year that starts on 1-April, the FinYearNumber will get the current
year in April, May, June, etc and remain with that value through January, February and
March. It will move to the next year in April.
If you want the year of the end of the financial year it is a minor matter to use
“finyearnumber+1”.
The keywords to invoke this feature are not case sensitive, YearNumber, yearnumber and
YeArNumbER will all work.
You can also adjust these so MonthNumber-1 is the previous month number. These also
roll over, so in January that will process as 12.
48 Of 60

5 CrystalKiwi Engine
5.1 Service Based Scheduling
The original report scheduler we developed ran on the windows desktop as a simple
executable. You could watch it processing each report. The major problem was that it had
to be left loggred and running. To process reports overnight meant the machine was
available to anyone who walked past the machine.
If there was a power outage, the machine might restart, but someone had to log in and
restart the program to get the schedule going again.
Services run in the background. The machine needs to be running, but you don't need an
active logged in session to have the schedule process. This is a lot more secure.
If there is a power outage, a machine can be configured to restart, and as part of that
process, all the services set to “Automatic” on that machine can restart as well.
The Windows Service used by the CrystalKiwi Scheduler is called the CrystalKiwi Engine.
5.2 Installing the service
The CrystalKiwi Engine.exe is included (along with CrystalKiwi Explorer.exe and Service
Manager.exe) in the msi files you used for installation. While you can run CrystalKiwi
Explorer (and it's Bursting and Scheduling aliases), you cannot run CrystalKiwi Engine
directly. It runs as a service, so has no user interface.
We can only watch what is happening via various files in the shared folder.
Use the Service Manager.exe to run the script that installs the CrystalKiwi Engine service.
You may need to “Run as Administrator”. Yes I know you might think you have full
administration rights, but Microsoft still locks some admin functions behind another level of
security.
The Engine and the main administration form share schedule information. These are
normally stored in xml files in the shared folder.
5.3 Monitoring the service
As we said in the previous section. We cannot directly run the Engine. We can however
watch what it does. Most of the activity relates to files in the shared folder.
In the shared folder there are a collection of xml files. Most of these are obvious in what
they contain. Schedule.xml contains the main schedule item information. Parameters.xml
contains information about the parameters of those items. SMTPSettings contains
information needed to send messages to your mail server.
While XML files are readable and you could edit them directly with NotePad we do not
recommend. A minor spelling error can freeze the entire system
There is a \Web subfolder in the Shared folder. Every time the Engine does something, it
updates one or more of the HTML files in that folder. The first step to see what is
happening is to examine those files.
49 Of 60
As a report schedule item is processed, the engine also creates a current.xx file in the
shared folder.(where xx is the Schedule ID). This doesn't really say much more than the
engine is currently busy running xxx.
5.4 CrystalKiwi Engine troubleshooting
This is a small simple executable. All the smart stuff happens in CrystalKiwi Common, a
library shared by viewing, bursting and the desktop scheduler. So if a report processes
fine using one of those other applications it should also run fine inside the Engine.
But sometimes it doesn't.
There are a couple of major differences between a service executable and a desktop that
is supposed to do the same thing.
The first is that the service runs under it's own login. You set this up under the Control
Panel/Administration Tools/Service and you specify a user and password. Your Desktop
user might have permission to access that network folder, while the account running the
service can't. That is easy to identify and fix.
Less obvious is that a service cannot see mapped drives. You might keep those reports
on “S:\Reports” but the service cannot find that. Instead use a UNC path and point your
reference in the schedule to “\\OurServer\Common Files\Reports\”. And make sure you
have permission to access that folder.
50 Of 60

6 Service Manager
There were a few tasks that didn't easily fit into the viewer, bursting or scheduler amin
forms. In some cases we needed a way to reset the form location if it wasn't visible on the
screen. In other cases special administration permission was needed.
We prefered to keep those tasks into a separate executable. One of the key settings on
this form is where the scheduling happens. On this form the “Platform” can be
“Supsended”, “Desktop” or “Service'.
See notes later on the Shared Folder. If you dont like the default location, you can change
it here. Make sure the folder has full permission to read and write. Remember to stop and
restart the service to apply the new settings.
Also note you can also assign a default output folder. You can fully code the output
locations for each schedule item, or you can leave the path blank and use the default
Output folder (above). Again check permissions.
51 Of 60
6.1 Installing the Service
There are a couple of key things on the form to control the service. The first thingis that
you must be able to identify the Application. This is normally CrystalKiwi Engine.exe in the
c:\Program Files (x86)\CrystalKiwi\Explorer folder. People sometimes like moving files to
other folders and we don't see why we should stop them.
The InstallService Button will run a script to add CrystalKiwi Engine to the list of services. If
that has been done the button changes to “Remove Service” (as above). In the past we
used the InstallUtil application install the service, but newer versions of windows didn't like
this. So we now use the sc command to install the service.
You can install a service manually with
sc create "CrystalKiwi Engine" binpath= "path to CrystalKiwi Engine.exe"
start= auto obj= "userid" password= "userpassword"
sc description "CrystalKiwi Engine" "Crystal Reports Scheduler"
You can manuall remove a service with the sommand
sc delete “CrystalKiwi Engine”
You can manually start and stop the CrystalKiwi Engine using the Control Panel. Look for
Services on the Administration form. You can also set the account running the service
here.
From a command line:
sc start “CrystalKiwi Engine” or
sc stop “CrystalKiwi Enginer”
will start or stop the service.
52 Of 60

7 Field Objects
7.1 Field Objects Overview
Field Objects give you the ability to use dynamic values for file names, parameters and
messages in your report scheduling and bursting. Fields are indicated by {name of field}.
You can use these in a file name, message subject, message body, parameter value and
various other places in your report,
The first character after the bracket indicates what field type it is.
This makes Field Processing very efficient in terms of the processing inside the scheduler
or burster.
7.2 Report Properties {=PropertyName}
You can include properties of the scheduled report in the email message or subject. All of
the properties of the schedule item are available. Look at the schedule.xml file with
notepad to see what properties are available.
If the report property includes any of the fields above, they will also be interpreted.
7.3 Parameter Fields {?xxx}
Parameter Fields can be extracted from the currently processing report. Parameter Fields
are indicated by {?parameter name} and display in the default format for that field. Use a
Date Mask field to select the format of a date parameter.
7.4 Date Fields {*xxx}
These are all indicated by a {*name of date field}. you may use any of the date fields
below. All support the thisyear, nextyear and lastyear keywords. So in the list below, you
can use {*today}, {*today lastyear} and {*today nextyear} to pick up the appropriate year.
ThisYear is supported for all fields, but is also the default year (so {*today} and {*today
thisyear} will return the current date.
They also all support adjustments, so you could use {*today-1} to process with a value for
yesterday and {*today+1} for a value equal to tomorrow.
Valid Date Fields are
Date Field Values
today
week start and week end
month start and month end
previousmonth start and previousmonth end
nextmonth start and nextmonth end
calendar year start and calendar year end
financial year start and financial year end
53 Of 60
quarter start and quarter end
previousquarter start and previousquarter end
nextquarter start and nextquarter end
firstquarter start and firstquarter end
secondquarter start and secondquarter end
thirdquarter start and thirdquarter end
fourthquarter start and fourthquarter end
Each of these can have a suffix of:
this year, nextyear or lastyear
(if no suffix, then default is "thisyear")
All of these may include a day adjustment
On some forms you do not need to use the {* format. For example on the bursting form in
both CrystalKiwi Scheduler and CrystalKiwi Bursting you can enter a date field as today or
previousmonth end lastyear and the value loaded into the parameter will use the local
format.
7.5 Date Field Adjustments
The date fields covered in 7.4 can all be adjusted by several days or more.
{*today-1) will return yesterday
{*today+1} will return tomorrow
{*week start-7} will return the start of the previous week.
By default the parameter form will allow you to adjust the date by plus or minus ten days
as we thought that should cover most requirements.
You edit the parameters.xml file manually and that will let you put any integer adjustment
against that date. The parameter form will adjust to fit any adjustment made this way. We
would prefer if it wasn't too large a number, but any integer value is acceptable.
If you want to enter an adjustment outside the default bounds, you can use the menu item
File/Settings/Maximum Adjustment. These settings are saved in the User Registry, so you
can remove them if no longer needed.
7.6 Date Mask Fields {!xxx}
A Date Mask Field is used if you want the current date or time as part of the file or folder
name. You can also use Date Fields in the subject or message of the emails sent from
within CrystalKiwi Explorer.
Rather than give you a cryptic list of shorthand values, we let you use your existing
familiarity with crystal reports date formatting. Use {!dd-MMM-yyyy} to display the current
date time as 02-Mar-2021, or {!HHmm} to display as 1437 (assuming today is the 2nd or
March, 2021 at 2:37pm).
All the standard date field formatting from the ToText function are supported. See the
Crystal Reports documentation for details of the formatting masks available.
All Date Mask as at Today/Now. You can use other dates by using an Override date (see
next item).
54 Of 60
7.7 Date Mask Fields (with override date) {{month start}xxx}
There is a special option within the date mask to include a different date to the current
date. You select the Date field from section 7.2 and apply the date formatting from 7.3
(above)
Use {{today-4}dd-MMM-yyyy} to show the date from 4 days ago in that format. You can
also use a parameter field value as {{?report param}yyyy-MM}.
7.8 Tag File Fields {$xxx}
Each report can be allocated a tag file. This is a simple XML file with some xml tags and
values. You can extract a field from that file using {$tag field name}, Tag Fields are specific
to each file, so if a value isn't found, a blank is returned and applied to the field, Tag Files
can be easily modified from within your report with formulas using the Schedule
Management UFL.
If a scheduled item is part of a cluster of reports, the cluster can also be assigned a tag
file. In this case, the cluster tag file will be searched first and then the tag file assigned to
the schedule item.
You can assign multiple tag files by entering several file names separated by a semi
colon. The files will be searched in the order given.
7.9 Use a report to save tag values
Formulas can be included in a report to be used in processing the schedule or a bursting
run.
The formula could look like.
WhilePrintingRecords;
ScheduleTagClear;
ScheduleTagStore ("Name", {Customer.Customer Name} );
ScheduleTagStore ("City", {Customer.City});
ScheduleTagStore ("LYSales",ToText({Customer.Last Year's Sales},0,"","") );
ScheduleTagSave ("C:\Test\CrystalKiwi\Xtreme\Customer Tags.xml")
This could be in the report being processed as all formulas are calculated prior to
exporting the first page, or it could be a report proccessed prior.
The formula above will create a tag file called Customer Tags.xml that looks like
<?xml version="1.0" encoding="utf-8"?>
<!-- XML File Created by cruflschedule -->
<TagDoc>
<Name>Clean Air Transportation Co.</Name>
<City>Conshohocken</City>
<LYSales>$23789</LYSales>
</TagDoc>
Those tags can then be used by assigning the tag file to the report and selecting the tags
using {$Name}, {$LYSales} and {$City}
55 Of 60
7.10 Domain Shortcut Fields {.xxx}
One of our early users had a lengthy domain name and was getting tired of typing in the
full domain name each time he wanted to use a local email address. Another had an email
address field in her database that didn't have enough space for clients with long domain
names. This field type solves both their problems.
Create a domain shortcut using the menu item File/Settings/Domain Shortcuts. Each
domain shortcut has a brief code and then a full description. The code is case sensitive
and cannot contain embedded spaces. The full description can be any length but should
only be a single line. To be a valid domain the description should not contain any spaces
or invalid domain characters, but as a domain shortcut can be used in places like an email
message, that isn't a firm requirement.
We've set our test site up to use {.ck} to refer to any address at crystalkiwi.com. The {.
indicates a domain shortcut is to be used.
Think of domain shortcut as specialized tag file. The domains are saved in the domain.xml
file in the shared folder.
7.11 List Files {+xxx} and {&xxx}
There are times when you need to send several reports to a list of people, and the
membership of this list can frequently change. In this situation, create a text file of the
email addresses, with one address on each line. Use {+filename} as the Send To address,
and each person on the list will receive the same report. Change an address in the file,
and the next time the report runs, the new address will be used.
You can also use this with your email message, where a standard clause needs to be
added to the end of each message, or maybe a seasonal message depending on when
the report runs. Use {&filename} to include the contents of the text file in your message.
This should only be used for email messages, as multiline fields are not valid for use
elsewhere.
56 Of 60

8 Advanced Features
8.1 Shared Folder Location
Most applications need to save some configuration data somewhere. Microsoft keeps
changing the rules and then along comes a new version of windows or service pack and
the rules and locations change again.
If you are running a recent version of Windows, There should be a hidden folder on your
machine called c:\ProgramData where c: is the root drive. This is where we were told to
put our application work files. The install should create a folder of
c:\ProgramData\CrystalKiwi\Shared.
If you are running an older version of Windows that ProgramData folder might be the
original SharedProgramData folder at
c:\Documents and Settings\All Users\Application Data\CrystalKiwi\Shared
Check this folder exists and “Everyone” has “Full Control”. You need to be able to read
and write the files and subfolders to this folder. The Shared folder is used by users
running the Explorer report viewer, Bursting and Scheduler. The Engine service could be
running under a different account permisions, so it needs to be able update files in this
folder as well.
You can use the Service Manager.EXE application to redirect the shared folder to another
location. Do not redirect to a network drive as this may impact on performance. A local
drive that you control the permissions is ideal.
The Service Manager sets an Environment Variable called "CrystalKiwi)SharedFolder" to
that folder location. You can manually edit this if you have to.
If your security settings dont support this, there is a third option. You can use a hard
coded folder of c:\CrystalKiwi\Shared where c: is the drive where the applications are
installed.
So the logic to identify the shared folder location is:
• c:\CrystalKiwi\Shared if present (Where c: is the driver where the executables have
been installed.)
• Enviornment Variable "CrystalKiwi SharedFolder" set by Service Manager or
manually
• Default of c:\ProgramData\CrystalKiwi\Shared
57 Of 60
8.2 Work Groups
These exist to make life easier. Each schedule item can be assigned to a Work Group.
You select the schedule item and on the Properties form you can select any current work
group. To create a new Work Group just type the name in the work group field and save
the form. That workgroup will now be added to the list.
To remove a workgroup, select each of the items in that work group, and assign it to a
blank or another workgroup. A work group with no items will no longer be on the list.
Work Groups are displayed in one of the columns on the main administration form. You
can filter the grid on that form to only display one workgroup. This can make management
easier.
A second use of Work Groups is that some schedule settings can be saved to all members
of the work group. For example, you can set the Next Run Time for all the members of the
“Friday” work group.
Work Groups do NOT have any performance overhead. They just create an additional
field for each schedule item. They help you manage a large schedule.
8.3 Clipboard
This is a simple feature in the scheduler to make edits easier. On some of the forms is a
button to “Save to Clipboard”. When you are next on that form for another schedule item,
you can “Paste From Clipboard” to assign the same settings.
Clipboard settings are reset when you exit the scheduler admin form.
58 Of 60

9 Useful Web Sites
The following Web Sites are useful Resources to help you with your Crystal Reports
www.businessobjects.com
Crystal Reports is now a SAP product, so the product pages for Crystal Reports are now
deep within www.sap.com – rather than give you a lengthy URL to find them, we've found
that the business objects link works fine.
www.tek-tips.com
This web site is a useful technical forum for many IT users. There are several Crystal
Reports forums and a bunch of experts offering free help. This is where you go to see
what you can really do.
www.kenhamady.com
Ken is one of the experts on Tek-Tips. He is an instructor based in West Virginia and does
training and consulting. He publishes a newsletter and blog. Ken also has an extensive
index of 3
rd
party products that extend what Crystal Reports can do.
www.hammerman.com
Another expert from Tek-Tips, Howard Hammerman is based in Maryland. There are
some useful resources available from his site.
www.crystalbook.com
George Peck writes the best Crystal Reports reference book. His web site tells you about
the detailed features
www.crystalkiwi.com
This is our web site. Check out the blog and some of the other utilities we have
developed.
www.chelseatech.co.nz
This is the company Bruce Ferguson and Mo Naughton set up and they did Crystal
Reports Training and Consulting. There is an extensive list of products that help with
Report Viewing and Scheduling. Bruce is now at CrystalKiwi (above). The web site went
dark in 2016 but should be up and running again in 2021.
www.cortexsystems.com.au
These are Crystal Reports instructors and consultants based in Brisbane Australia. They
have a some useful products including Report Analyzer for report documentation and
ReportDiff for report comparison.
59 Of 60

10 Index
Subject Index
Crystal Report.............................................7
Crystal Reports Run Time..........................7
Domain Shortcuts.....................................56
Dot Net Framework....................................7
Field Objects.............................................53
ODBC.........................................................7
Outlook......................................................11
60 Of 60
