
Report Commander 2 User Guide
Report Commander 2.5
Generated 6/26/2017
Copyright 2017 Arcana Development, LLC
Note:This document is generated based on the online help. Some content may not display
fully or correctly. Refer to the online version of the user guide when necessary.
www.arcanadev.com/reportcommander/documentation

Report Commander 2.5 3
Contents
Overview 13
Modes of Operation 13
Command-Line Mode 13
ProjectMode 14
Comparison of Modes 14
Getting Started withReport Commander 16
If you are new to Report Commander 16
If you have been using Report Commander 1.x 16
Report Commander Resources 17
Sales 17
Product Feedback 17
Evaluation Mode Rights and Limitations 18
Temporary License 18
Upgrading from Previous Versions 19
What's New in Report Commander 19
New project-oriented workflow 19
Save settings in CommandLine Builder 19
Support for Crystal Reports 2011 19
E-mail enhancements 19
New syntax for dynamic parameters and file names 20
New program names 20
Backward Compatibility 20
Install Report Commander 2 to old location 21
Use variables 21
Creating Projects from Existing Command Lines 21
Command-LineConversion from the Command Line 21
Command-LineConversion in the Project Editor 22

Report Commander 2.5 4
Command-LineConversion in the Command Line Builder 22
Project Editor 23
Introducing Projects 23
Project Editor 25
Project Workspace 25
Project Navigator 27
Main Toolbar 27
Property Panels 28
Panel Toolbar 28
Working with Projects 28
Testing Your Project 29
Creating Projects from Existing Command Lines 29
Command-LineConversion from the Command Line 29
Command-LineConversion in the Project Editor 29
Command-LineConversion in the Command Line Builder 30
Project Properties Panel 30
General 32
Variables, DistributionLists, E-MailServers, and File Servers 32
Report 33
Updating theProject to Reflect Report Changes 33
Report Properties Panel 33
General 33
Data Sources 34
Output Group 34
Output Group Properties Panel 35
Preview 35
Properties 35
File Output (Export) 36

Report Commander 2.5 5
File Output 36
File Output Property Panel 36
Test Output 36
Properties 36
CSV Export Settings 38
Settings 38
Group Section Export Mode 38
Report Section ExportMode 39
Preserve Date Formatting 39
Preserve Number Formatting 39
Field Separator 39
String Delimiter 39
HTML Export Settings 39
Settings 40
PDF Export Settings 40
Settings 40
Excel Export Settings 40
Settings 40
Editable Word/Rich Text Export Settings 41
Settings 41
Text Export Settings 41
Settings 41
XML Export Settings 41
Settings 41
Print Output 42
Print Output Properties Panel 42
Properties 42
Specifying Additional Printer Options 42

Report Commander 2.5 6
E-Mail Task 43
E-Mail Task PropertiesPanel 43
Message 43
From/To 44
Attachments 45
Upload Task 46
Upload Task PropertiesPanel 46
Settings 46
Files 48
Project Execution Commands 48
Project Runner (adrcexec) 51
Project Runner 51
Command-LineSyntax 51
Overriding Settings 51
Logging and Diagnostics 51
Command-Lne Syntax 52
Syntax 52
General Options 52
Logging Options 54
Command Line Builder 55
Command Line Builder 55
Basic Command Line Workflow 55
Loading Settings from Existing Command Lines 55
Using Project Files 55
Property Pages 56
Report Page 56
CSV Export Options Page 58
Excel Export Options Page 59

Report Commander 2.5 7
HTML Export Options Page 60
PDF Export Options Page 60
Text Export Options Page 60
XML Export Options Page 61
E-Mail Page 61
Parameters Page 63
Database Logins Page 64
Command Line Page 64
Preview Page 66
Preview 66
Execute 67
User Settings Window 67
Command Runner (adcrutil) 68
Command Runner 68
Logging and Diagnostics 68
Command-Line Syntax 68
Command-Line Syntax 68
Syntax 68
Options 69
General Report Options 69
Database Connection Options 70
Printing Options 71
Export Options 72
E-Mail Server Options 73
E-Mail Options 74
Logging Options 76
Parameters 76
Conversion Options 78

Report Commander 2.5 8
Uploading Output 78
FTP or SFTP 78
HTTP 79
HTTP PUT 79
HTTP POST 79
CSV Export Options 80
Excel Export Options 80
Excel Data-Only Export Options 82
HTML Export Options 83
HTML E-Mail 83
HTML Formatting Options 83
PDF, RTF, and Word Export Options 84
Text Export Options 84
XML Export Options 85
Response Files 85
Creating the Response File 86
Window Reference 87
Data Source Properties Window 87
Settings 87
Distribution Lists 88
Distribution List Properties Window 88
File Servers 88
File Server Properties Window 88
E-Mail Servers 89
E-Mail Server Properties Window 89
Multiple Value Editor Window 90
Parameter Editor 91
ParameterTypes 91

Report Commander 2.5 9
Boolean (Yes/No) 91
Currency 91
Date, Time, Date/Time 91
Number 91
String 91
Range Values 91
Specify start [end] value 91
Include starting [ending] value 92
Read Settings from Command Line Window 92
Combining Multiple Commands 93
Text Editor 93
Variables 94
Date/Time 95
Functions 95
Variables and Functions 96
Variables and Functions 96
UsingVariables and Functions 96
Variables 96
Variable Types 97
Managing Variables 97
Complex Variables 97
PredefinedVariables 98
Functions 99
Function Reference 99
FunctionSyntax 99
Argument Types 99
Optional Arguments 100
Combining Functions 100

Report Commander 2.5 10
Date/Time Format 100
Function List 100
Function Reference 101
AdjustDate 101
DateAdd 102
EndOfDay 103
EndOfMonth 103
EndOfQuarter 103
EndOfYear 104
FormatDate 104
MakeDate 105
MostRecentDay 105
NextDay 106
now 107
Examples 107
QuarterNumber 108
StartOfDay 108
StartOfMonth 109
StartOfQuarter 109
StartOfYear 110
Date/Time Formats 110
Standard Formats 110
Custom Formats 111
Function Examples 113
Yesterday'sDate 113
Start/End of Week 113
Start/End of Month 113
The 15th of the CurrentMonth 113

Report Commander 2.5 11
Variables with Functions 114
E-Mail Settings 117
Distribution Lists 117
Distribution List Properties Window 117
E-Mail Servers 117
E-Mail Server Properties Window 118
Importing E-Mail Address Lists 119
Tutorials and How To 120
Basic Project Tutorial 120
Scenario 120
Steps 120
Add a report to the project 121
Set database logins 123
Configure Output Group with parameters for the export 125
Configure PDFexport 132
Configure e-mail message 136
Save and test the Project 142
Schedule the Project 144
Advanced Project Tutorial 144
Scenario 144
Steps 144
Add a report to the project 145
Set database logins 147
Configure Output Group with parameters for first export 149
Configure HTMLexport 158
Configure Output Group with parameters for second export 163
Configure PDFexport 165
Configure e-mail message 166

Report Commander 2.5 12
Save and test the Project 172
Schedule the Project 173
Scheduling Report Execution 173
Important Notes 173
Tutorial:Scheduling Using Windows Task Scheduler 173
Sharing Settings with Another User or Computer 183
Making Settings Available to Another User 184
Copying Settings to Another Computer 184
Shared SettingsPermissions 184
Copying Settings Using Copy/Paste 184
E-mail Report Output 185
Using the CommandLine Builder 185
Using the Project Editor 185
Upload Report Output 186
Using the CommandLine Builder 186
Using the Project Editor 186

Report Commander 2.5 13
Overview
Welcome to Report Commander.
Report Commander is a tool to help you automate printing, exporting, and distributing output
from Crystal Reports reports. Key features include:
l Works with reports created by Crystal Reports 9.0 or later.
l Crystal Reports does not need to be installed on the computer where Report Commander
runs.
l Override database login information at run-time.
l Set parameter values at run-time.
l Export to any format supported by Crystal Reports.
l Print to default or specified printer.
l E-mail export files.
l Upload export files using FTP,SFTP, or HTTP.
Modes of Operation
Report Commander offers two different modes for executing reports:command-line mode
and project mode.
Command-Line Mode
In command-line mode, you give Report Commander all the information it needs to process
a report using command-line options. Because this mode does not use any configuration files,
it is very easy to call Report Commander from an automation tool, batch file, script, or other
application that needs to change parameters dynamically or generate export commands on-
the-fly.
In command-line mode, each execution of a "task" only works with one report at a time, and
can print to a single printer and create a single export file. If you need to export a report to
more than one format, you must run Report Commander separately for each format.
To use Report Commander in command-line mode, you can use the Command Line Builder,
which is a graphical tool that helps you select processing options and construct the command
line that is used to execute your report. Users who are comfortable working directly with
command-line options can skip the Command Line Builder and hand-craft their command lines
with reference to the command-line syntax documentation.
Once you have constructed a command line, you use the CommandRunner to execute the
commands. The Command Runner does not have a graphical user interface and typically is
called from a scheduler or other automation tool.

Report Commander 2.5 14
ProjectMode
In Report Commander version 1, command-line mode was all there was. Beginning with
version 2, Report Commander offers project mode, which uses a project file to store the
settings used to process reports.
In contrast to command-line mode, a Report Commander project can contain any number of
reports, and each report can be exported/printed to any number of destinations using the
same or different parameters. Exports from multiple reports can be combined in a single e-
mail message.
To use Report Commander in project mode, you use the Project Editor to create or modify a
project. From the Project Editor you can also preview your report and test your export
settings.
Once you have constructed a project, you can configure your scheduler or other automation
tool to run the project using the Project Runner.
Comparison of Modes
There is a great deal of overlap between command-line mode and project mode, and in fact
the CommandLineBuilder can read and write projects just like the Project Editor (some
limitations apply).
If you need to process multiple reports and/or produce multiple outputs during a single run,
you must use the Project Editor andProject Runner, as command-line mode does not support
multiple reports or exports.
If you only need to process a single report and produce a single output during each run, you
can choose either command-line mode or project mode, based on which user interface
experience you prefer.
The following table compares and contrasts the two modes of operation.
Feature Command-Line Mode Project Mode
Graphical
user
interface
CommandLineBuilder allows you to configure
most available options. Some uncommon
options are not available in the
CommandLineBuilder and must be added to
the generated command line.
Project Editor allows you to
configure all available options.
Automated
execution
Command Runner executes command line
constructed in Command Line Builder (or
constructed by hand). Can be called from any
batch file, script, scheduler, automation tool, or
other application.
Project Runner executes a
project file. Can be called from
any batch file, script,
scheduler, automation tool, or
other application.
Number of
reports
Each run can process only one report, using one
set of parameters.
Each run can process any
number of reports, and each
report can be processed
multiple times with different
parameters.

Report Commander 2.5 15
Feature Command-Line Mode Project Mode
Number of
outputs
Each run can produce one print output and/or
one export.
Each run can produce any
number of outputs for each
report.
Export
options
Supports most of the export options available in
Crystal Reports, but a few uncommon options
are not available.
Supports all of the export
options available inCrystal
Reports.
Execution
from
another
application
All settings are passed on the command line, so
another application can easily generate a
command line with the required settings and
call Report Commander to produce report
outputs.
Project Runner does not accept
command-line options to
override settings such as
export format and export
options.
Variables can be set on the
command line and so can be
used to override file names,
parameters, login credentials,
etc.

Report Commander 2.5 16
Getting Started withReport Commander
Here are some recommendations to help you get going quickly.
If you are new to Report Commander
l Start with the Overview if you haven't already read it.
l For new users we recommend Project Mode and the Project Editor rather than Command-
Line Mode, but users with simple requirements may prefer the more streamlined interface
of the CommandLine Builder.
l Launch the Project Editor (from the Windows Start menu)and work through the Project
Tutorial to create your first project.
If you have been using Report Commander 1.x
l Read about What's New in Report Commander 2.
l Especially read about the new Project Mode.
l If you want to keep using Report Commander in Command-Line Mode (i.e., the same
workflow as in Report Commander 1), you'll see some enhancements in the Command Line
Builder, but otherwise things will work the same as they always have.
l If you want to start using Project Mode instead, you can create projects from your existing
command lines. Doing that with one of your existing Report Commander command lines is
a good way to see how the Project Editor works and how projects are structured.

Report Commander 2.5 17
Report Commander Resources
The following additional resources are available for getting technical help with Report
Commander:
l The discussion forums let you ask questions and exchange information with other users.
l The Knowledge Base has information on known software issues, usage tips, and more.
If all else fails, you can contact us for support.
Sales
For information on Report Commander pricing, to purchase a license, or for sales-related
questions, please visit www.arcanadev.com/shop or contact us by e-mail at
sales@arcanadev.com.
Product Feedback
If you have comments about a specific topic in this help document, please use the feedback
link found at the bottom of the topic page. This ensures that we receive the information we
need to identify the topic.
For general comments about the help document, you can use the form here.
For feature requests, please visit the feature request forum.

Report Commander 2.5 18
Evaluation Mode Rights and Limitations
You are permitted to run Report Commander for evaluation purposes for up to 30 days without
purchasing a Report Commander license.
In evaluation mode Report Commander has the following limitations:
l When you run a project or report, Report Commander will display a window with an
evaluation message, which you must acknowledge before processing continues.
l If you run Report Commander from a scheduler, script, or other tool that runs it in
"hidden" mode, Report Commander will log an error message and terminate without doing
any processing, because it cannot display an evaluation message when running in a hidden
session.
l E-mail messages sent by Report Commander may have an evaluation notice in the subject
or message body.
You can remove all of these limitations by activating the software with a temporary license as
discussed below.
Temporary License
You can obtain a temporary, 30-day license for Report Commander to remove the limitations
imposed when you run it in evaluation mode without a license.
Use any of the following methods to get a temporary license:
l During installation, select the Request Evaluation License option when presented with
the evaluation message. This method requires that the computer running Report
Commander have an Internet connection.
l After installation, run the License Manager tool from the Report Commander group on the
Start menu, then choose Get Temporary License from the License menu. This method
requires that the computer running Report Commander have an Internet connection.
l Go to www.arcanadev.com/licensing/templicense.aspx and follow the instructions to
request a temporary license file that you can download and copy to the Report Commander
computer if necessary. The computer running Report Commander does not need an
Internet connection.

Report Commander 2.5 19
Upgrading from Previous Versions
What's New in Report Commander
Report Commander version 2 offers several changes from version 1.x, as discussed below.
Your existing command lines from Report Commander 1.x will still work with version 2,
but see the BackwardCompatibility topic for information on changes that may be
required to accommodate the new installation location for Report Commander 2.
New project-oriented workflow
In addition to the Command Line Builder and command-line execution, Report Commander
now supports project files for configuring report processing options. A single project can
process any number of reports and produce any number of outputs. Refer to the modes of
operation topic for more information.
The new Project Editor is used to create and edit complex projects. You can convert your
existing command lines into projects if you want.
Users with simpler needs may prefer to continue using the Command Line Builder, with its
more streamlined user interface and workflow.
Save settings in CommandLine Builder
The Command Line Builder can save and load settings to/from the new project file format.
This means that even if you prefer to continue using the Command Line Builder instead of the
Project Editor, you can save your report settings and retrieve them later if you need to change
some options and regenerate your command line. In Report Commander 1.x there was no
way to save settings, so if you wanted to modify a command you had to edit the command line
directly, or start from scratch in the Command Line Builder.
Even if you don't save your settings as a project, you can now reverse-engineer a command
line to populate settings in the CommandLine Builder.
Support for Crystal Reports 2011
Report Commander 2 uses the Crystal Reports 2011 runtime, which adds support for the
newer Excel XLSX format.
E-mail enhancements
E-mail messages sent by Report Commander can now include exports files from multiple
reports in the same message.
You can now define distribution lists in Report Commander to simplify sending reports to
groups of recipients. Distribution lists can be created for an individual project, or made
available to all projects on the computer.
You can define "shared"mail server settings that are available to all Report Commander
projects run on a computer, so you don't have to include these settings in each
project/command line that you run.

Report Commander 2.5 20
New syntax for dynamic parameters and file names
The syntax for inserting date/time values in parameters and file names has changed. See the
Variable Syntax Changes from Version 1 topic for information on the new format. The
Command Runner will continue to accept the old format, but any projects or command lines
created or edited in the Project Editor or Command Line Builder will use the new format. This
means that if you generate a command line in version 2 that uses date/time tokens, the
command line won't work correctly if you run it on another computer that has version 1.x.
New program names
In Report Commander 1.x, there was only one Report Commander program:adcrutil.exe,
which was used both to invoke the Command Line Builder and to process reports. Now there
are four separate programs:
l The adcrutil.exe program is still here and is still what you run to process reports using
command line options. It's now referred to as the Command Runner. All of your existing
command lines from Report Commander 1.x will still work with the new version.
l The CommandLine Builder is now a separate program, which you can run from the
shortcut on the Start menu.
l The Project Editor is the graphical user interface for editing project files, and is available
from a shortcut on the Start menu.
l The Project Runner is the program that you run to execute a project from a command
prompt, automation tool, etc.
Backward Compatibility
The program name (adcrutil.exe)and command-line syntax for the Report Commander 2
CommandRunner are the same as for Report Commander 1, so your command lines do not
need to be regenerated for version 2.
However, Report Commander 2 is by default installed to a different location that Report
Commander 1 (to allow for parallel operation). This means that your scripts, batch files,
scheduled tasks, etc., will not point to the correct location for adcrutil.exe if you use the
default settings.
The default installation folder for Report Commander 1.x was "C:\Program Files\Arcana
Development\Report Commander" or, on 64-bit computers, "C:\Program Files (x86)\Arcana
Development\Report Commander".
Report Commander 2.x by default is installed in "C:\Program Files\Arcana
Development\Report Commander 2".
Following are suggestions for resolving this problem:

Report Commander 2.5 21
Install Report Commander 2 to old location
If you do not wish to perform parallel testing or have already completed it, you can simply
remove Report Commander 1.x and then install the newer version to the old location. To
specify a custom installation folder, choose the "Custom" installation type in the setup wizard;
this will give you the option to select the target folder.
Use variables
For maximum flexibility, change your configuration to use variables for the Report
Commander path, so that in the future you can easily point to different versions of the
software. The approach for doing this will depend on the automation tool that you are using.
For example, in adTempus you could define a Job Variable pointing to the Report Commander
program folder, and then use that variable in your task configuration instead of hard-coding
the path.
For batch files or automation tools that don't support variables, you could define a system
environment variable that points to the correct location and use that variable in your
execution command.
Creating Projects from Existing Command Lines
So you're excited about the new project file capability of Report Commander, but you have a
lot of command lines that you generated using Report Commander 1.x, and you don't want to
build projects for all those from scratch. We can help! Report Commander can turn those
command lines into projects for you, using any of three methods:
Command-LineConversion from the Command Line
You can create project files from your existing Report Commander command lines by running
the command and adding the -exportproject option to the command line.
For example, suppose you have a scheduled task to run this export command every day:
"c:\program files\report commander\adcrutil.exe" -report="C:\reports\dailysales.rpt" -login!=dbserv1.customerdb:batchuser:pGNXQoGmNboLH/UtHMMong== -suppressempty -exportformat=PDF -exportfile="dailysales.pdf" -removefile -emsender="Report Distribution <distribution@example.com>" -emrecipient="sales_distributionlist@example.com" -emsubject="Daily Sales Report" -emtext="Attached is the daily sales report for {MMM d, yyyy}" -parameters "{yyyy-MM-dd}~{yyyy-MM-dd}"
You can run this command from the command prompt to turn that command line into a project
file:
"c:\program files\report commander\adcrutil.exe" -report="C:\reports\dailysales.rpt" -login!=dbserv1.customerdb:batchuser:pGNXQoGmNboLH/UtHMMong== -suppressempty -exportformat=PDF -exportfile="dailysales.pdf" -removefile -emsender="Report Distribution <distribution@example.com>" -emrecipient="sales_distributionlist@example.com" -emsubject="Daily Sales Report" -emtext="Attached is the daily sales report for {MMM d, yyyy}" -parameters "{yyyy-MM-dd}~{yyyy-MM-dd}" -exportproject="c:\my projects\dailysales.rcproject"
After this runs, you will have a new project file created ("c:\my
projects\dailysales.rcproject"), which you can then edit using the Command LineBuilder or
Project Editor.
Using this approach you can create one project per existing command line.
The source report (.rpt file) must be available when you run the conversion, as Report
Commander needs to read information from the report file. Make sure the -report
option points to the file.

Report Commander 2.5 22
Command-LineConversion in the Project Editor
You can import existing command lines from within the Project Editor, as described in the New
Project from Command Line(s) topic. Using this approach you can combine several command
lines into a single project, and/or add commands from a command line to an existing project.
Command-LineConversion in the Command Line Builder
You can import an existing command line from within the Command Line Builder, as described
in the Loading Settings fromExisting Command Lines topic. You can then update options and
re-generate the command line, or save the settings to a project file.

Report Commander 2.5 23
Project Editor
Introducing Projects
A Report Commander Project is a file that contains all the settings needed to process one or
more reports in Report Commander. Projects are created and edited using the Project Editor
and can be executed using the Project Runner.
A Project can contain the following items:

Report Commander 2.5 24

Report Commander 2.5 25
Project Settings. Contains settings such as variable definitions and mail server settings that
apply throughout the Project.
Reports. Each Report represents a single CrystalReports report and stores the database
login information needed to run it.
Each Report has one or more Output Groups. An Output Group defines the
parameters needed to run the report. If you need to run the same report more than
once, with different parameters each time, you would create a separateOutput
Group for each set of parameters.
Each Output Group has one or more Outputs, which define the settings
Report Commander needs to export (FileOutput)or print
(PrintOutput)your report. For example, if you need to export your report to
PDFand HTMLformat, and print it to a printer, all using the same
parameters, you would have threeOutputs defined for your Output Group.
Output Tasks. An Output Task defines an action that Report Commander should take once
the Outputs have been produced. Report Commander supports the following Tasks:
l The E-Mail Task allows you to e-mail export files.
l TheUpload Task allows you to upload export files to remote servers using FTP, SFTP, or
HTTP.
A Task can operate on files produced by any of your Outputs. For example, an E-MailTask can
send the export files from several different reports in a single e-mail message.
Project Editor
The Project Editor provides the user interface for editing Projects in Report Commander.
After you have created a Project in the Project Editor, you can automate its execution using
the Project Runner.
The Project Editor allows you to edit one Project at a time. If you need to work on more than
one Project at once (for example, to compare or copy settings), you can start more than one
instance of the Project Editor.
See the Project Tutorial for a step-by-step guide to creating a Project in the Project
Editor.
Project Workspace
The Project Editor workspace consists of the following main components:

Report Commander 2.5 26

Report Commander 2.5 27
Project Navigator
The Project Navigator shows the structure of the Project:all of the Reports, Output Groups,
Outputs, and Tasks in the Project.
When you select an item in the Project Navigator, you can right-click to get a menu of
available commands, some of which are also available from the MainToolbar.
To see the properties (settings) for an item, click its name and use any of these actions to
open the Property Panel:
l Double-click the item
l
Click the Properties ( ) button in the MainToolbar
l Right-click the item and select Properties...
Main Toolbar
The Main Toolbar contains buttons that perform actions on the project as a whole or on the
selected item in theProject Navigator.
The standard commands on this toolbar are:
Create a new Project
Open a Project
Save the Project
Show the Property Panel for the item selected in the Project Navigator
Delete the item selected in the Project Navigator
Add a new Report to the Project
Add a new E-Mail Task to the Project
Add a new Upload Task to the Project
Add a new Output Group to the selected Report
Add a new File Output to the selected Output Group
Add a new Print Output to the selected Output Group
Execute the Project

Report Commander 2.5 28
Property Panels
The Property Panels show the properties (settings) for the various components of the Project.
Each item that you open from the Project Navigator will be displayed as a separate panel with
its own tab across the top.
An open panel behaves similarly to a window with an OKbutton:Changes you make on the
panel are not saved until you click the Save button ( )on the Panel Toolbar. If you are
working in a panel and change your mind about the changes you have made, you can click the
Close button ( )on the panel's tab to close the panel without saving the changes.
When you click the Save button on the Main Toolbar (or select Save from theFile menu),
Report Commander saves all open panels before saving the Project.
Panel Toolbar
The Panel Toolbar is a small toolbar at the top of each panel (below the panel tabs). The
buttons on the panel toolbar act only on the open panel.
Working with Projects
When you start the Project Editor, it displays an empty Project that you can begin working
with, or you can use the commands on the File menu to open an existing project or create a
project from a command-line mode command line.
Changes you make to the Project are not saved until you use the Save button ( ) on the Main
Toolbar or the Save command from the File menu.
See the Project Tutorial for a step-by-step guide to creating a Project in the Project
Editor.
The basic workflow for working with a Project is:
1. Add a Report to the Project and set the login information in the ReportProperties.
2. Add an Output Group to the Report and set the report parameters in the Output
GroupProperties.
3. Add an Output to the Output Group and configure the settings in the File Output or
PrintOutput Properties.
4. Repeat step 3 as necessary to add additional Outputs (additional exports or print runs
using the same parameters).
5. Repeat steps 2-4 as necessary to add additional Output Groups (additional outputs using
different parameters for the same report).
6. Repeat steps 2-5 as necessary to add additional Reports.
7. Save and test the project.

Report Commander 2.5 29
Testing Your Project
At any time while you are editing your Project you can click the Run button ( ) on the Main
Toolbar to have Report Commander execute the project. When you click this button, Report
Commander will execute the project exactly as if it were being run in unattended mode:it will
produce all outputs (print and export) and execute any tasks (such as sending e-mail) that are
configured for the Project.
You can preview and test individual Reports and Outputs using the options available on their
property panels.
Creating Projects from Existing Command Lines
So you're excited about the new project file capability of Report Commander, but you have a
lot of command lines that you generated using Report Commander 1.x, and you don't want to
build projects for all those from scratch. We can help! Report Commander can turn those
command lines into projects for you, using any of three methods:
Command-LineConversion from the Command Line
You can create project files from your existing Report Commander command lines by running
the command and adding the -exportproject option to the command line.
For example, suppose you have a scheduled task to run this export command every day:
"c:\program files\report commander\adcrutil.exe" -report="C:\reports\dailysales.rpt" -login!=dbserv1.customerdb:batchuser:pGNXQoGmNboLH/UtHMMong== -suppressempty -exportformat=PDF -exportfile="dailysales.pdf" -removefile -emsender="Report Distribution <distribution@example.com>" -emrecipient="sales_distributionlist@example.com" -emsubject="Daily Sales Report" -emtext="Attached is the daily sales report for {MMM d, yyyy}" -parameters "{yyyy-MM-dd}~{yyyy-MM-dd}"
You can run this command from the command prompt to turn that command line into a project
file:
"c:\program files\report commander\adcrutil.exe" -report="C:\reports\dailysales.rpt" -login!=dbserv1.customerdb:batchuser:pGNXQoGmNboLH/UtHMMong== -suppressempty -exportformat=PDF -exportfile="dailysales.pdf" -removefile -emsender="Report Distribution <distribution@example.com>" -emrecipient="sales_distributionlist@example.com" -emsubject="Daily Sales Report" -emtext="Attached is the daily sales report for {MMM d, yyyy}" -parameters "{yyyy-MM-dd}~{yyyy-MM-dd}" -exportproject="c:\my projects\dailysales.rcproject"
After this runs, you will have a new project file created ("c:\my
projects\dailysales.rcproject"), which you can then edit using the Command LineBuilder or
Project Editor.
Using this approach you can create one project per existing command line.
The source report (.rpt file) must be available when you run the conversion, as Report
Commander needs to read information from the report file. Make sure the -report
option points to the file.
Command-LineConversion in the Project Editor
You can import existing command lines from within the Project Editor, as described in the New
Project from Command Line(s) topic. Using this approach you can combine several command
lines into a single project, and/or add commands from a command line to an existing project.

Report Commander 2.5 30
Command-LineConversion in the Command Line Builder
You can import an existing command line from within the Command Line Builder, as described
in the Loading Settings fromExisting Command Lines topic. You can then update options and
re-generate the command line, or save the settings to a project file.
Project Properties Panel
The Project Properties panel contains settings that apply to the whole project, and also
provides access to settings that can be shared with other projects and users.
To reach this panel, select the project name in the Project Navigator and click the Settings (
) button in the main toolbar.

Report Commander 2.5 31

Report Commander 2.5 32
General
This tab contains general settings for the Project
Logging
Specify a log file for Report Commander to write messages to during report execution.
Check Append to existing log file to add to the existing log file on each run, or uncheck
the box to overwrite the log file on each run.
The default setting uses ${Project.Path}\${Project.Name}.log as the log file name,
which means the log file will be written to the same folder as the project and will have the
same name as the project, with a ".log" extension.
Because Report Commander is designed to run in an automated/unattended mode, it
does not show a user interface when you execute reports. Therefore the only way
you will be able to review error message if something goes wrong is to use a log file.
This field can contain variables and functions that are replaced at runtime. More...
1
Variables, DistributionLists, E-MailServers, and File Servers
Variables, Distribution Lists, E-Mail Servers, and FileServers can be defined at three different
levels, all of which are managed through the Project Properties panel:
l Shared settings apply to all users on the computer. You will only be able to add or modify
Shared items if you have the necessary permissions. If your Project relies on any shared
settings and you plan to run the project on a different computer, be sure to copy the
settings to the other computer.
l User settings apply to all projects and commands run on the computer by the current
user. If you define User settings but then run the Project under a different user account or
on a different computer, you will need to copy the settings.
l Project settings apply only to this Project. They are saved in the project file and are
available regardless of whose account the project runs under or on which computer.
Note that you can copy individual items between lists. For example, if you have defined a
variable for this Project and decide you want to make it a User variable, you can copy it to the
UserVariables list. To copy items between list:
l Select the item in its current location.
l Right-click and select the Copy command.
l Right-click inside the destination list and select the Paste command.
1
Click the {} button to display the text editor, which helps you insert variables and functions
into the text. When you hover your mouse pointer over the field for a second, a preview of the
"expanded" text will be displayed so you can confirm your variables and functions are working
correctly.

Report Commander 2.5 33
You can use copy/paste to copy settings between computers.
Report
A Report represents a single source report (Crystal Reports .rpt file) that you want Report
Commander to process.
To add a new report to a project, click the Add Report button ( ) in the main toolbar, and
browse to select the report. Then use the settings on theReport Properties Panel to configure
basic settings for the report.
You will then add an Output Group to the report and begin configuring file and print outputs for
the report.
Updating theProject to Reflect Report Changes
If you modify the Crystal Reports file and change any of the data sources or parameters for
the report, you need to reload the report in the Project Editor. Otherwise, the connection and
parameter information Report Commander has may not match up with the report at runtime,
resulting in errors.
To reload the report, close all open property panels, then right-click the report name in the
Project Navigator and select the Reload ( ) command. After you do this, be sure to review
the Data Sources on the Report Properties Panel and the Parameters on all theOutput Groups
for the report to make sure they are still correct.
Report Properties Panel
To reach this panel, select the report name in the Project Navigator and click the Settings ( )
button in the main toolbar.
Settings on the Report Properties panel apply to all Outputs that get produced for this report.
General
The General tab contains basic settings for the report.
Report File
The Report File shows the name of the .rpt file. Initially this is set to the full path/name of
the report file you selected. You may want to change the path if the report will not always
be in the same place, or if the Project may be run on another computer.
For example, you could use a variable as a placeholder for the path.
If you change to point to a different report file than you originally used, or a different
version of the original report, be sure to reload the report (see above) so the Project
is updated with the correct data source and parameter information.
Convert to relative path

Report Commander 2.5 34
When you click the Convert to relative path link, Report Commander will replace the
absolute path to the report file with a path relative to the project location. That way even if
you move the project and report to another folder or computer, Report Commander will
still be able to find the report, as long as the relative path remains valid.
Force refresh of report data when printing or exporting
If your report file has data saved in it (in Crystal Reports, the Save data with report
option is checked on the File menu), check the Refresh option to tell Report Commander
to discard the saved data and refresh the report from the database.
If there is saved data and you do not check this box, the output will contain only the saved
data.
If there is no saved data in the report, this option has no effect.
Enabled
Check this box to enable processing for the report. If you want to temporarily stop
processing outputs for this report without deleting it from the project, uncheck the box. All
outputs in the report will be skipped if the Enabled option is not checked.
ID Code
The IDCode is used to identify this item when filtering is applied on the Project Runner
command line.
Data Sources
The Data Sources tab contains information about the data sources found in the report.
If this list does not match what you expect to see, try reloading the report as described
above.
For each data source you can review and override the connection information to set the
database login credentials or override the connection to point to a different database. Click
the Edit button for a data source to open the Data SourceProperties window.
Output Group
AnOutput Group is used to define the parameters that will be passed to a report when it is
executed. Each Report in your Project has one or moreOutput Groups, which allows you to
process the same report multiple times, using different parameters each time.
Each Report must have at least oneOutput Group.
Once you have added the Output Group, you add one or more FileOutputs or Print Outputs to
the group, to tell Report Commander how to export or print your report. Each Output in the
Output Group will use the same set of parameters.
If you need to produce an additional Output using different parameters, you would add an
additional OutputGroup for those parameters, then add the additional Output to that group.

Report Commander 2.5 35
To add a new Output Group to a Report, select the Report in theProject Navigator and click
the Add Output Group button ( ) on the Main Toolbar.
Output Group Properties Panel
To reach this panel, select the OutputGroup name in the Project Navigator and click the
Settings ( ) button in the main toolbar.
Settings on the OutputGroup Properties panel apply to all Outputs that are within this group.
Preview
Once you have set the parameters, you can use the Preview button ( ) on the Panel Toolbar
to display a print preview of the report using these parameters.
If you have correctly configured the parameters and database logins for the report, the
Preview window will not prompt you for any information.
If the Preview window prompts you for parameter values or login information, you have
not provided Report Commander all of the necessary information, and the report will
fail to process when you run the project.
Properties
Group Name
Enter a name for this group. This can be something that describes the parameters (like
"Today'sSales").
Enabled
Check this box to enable processing for the group. If you want to temporarily stop
processing outputs for this group without deleting them from the project, uncheck the box.
All outputs in the group will be skipped if the Enabled option is not checked.
Suppress outputs for these parameters if the report does not return any records
Check this box if you do not want Report Commander to e-mail the report output if it did
not produce any records.
This option works by checking to see if the report contains detail records, regardless
of whether they are displayed, and may not always produce the result you want.
More information.
Report Parameters
The Parameters list shows all the parameters found in the report.
If this list does not match what you expect to see, try reloading the report.
For each parameter, click the Edit button to open the Parameter Editor and set the value
for the parameter.
ID Code
The IDCode is used to identify this item when filtering is applied on the Project Runner
command line.

Report Commander 2.5 36
File Output (Export)
File Output
A File Output is used to export a report to a file using one of the export formats supported by
Crystal Reports.
AFile Output uses the report parameters specified in the Output Group it belongs to. You can
have several File Outputs under one Output Group if you need to export the report to different
formats using the same parameters. You can also have a mix of print and file outputs in the
same OutputGroup.
To add a new File Output to an Output Group, select theOutputGroup in theProject Navigator
and click the Add File Output button ( ) on the main toolbar.
Once you have exported a report using a File Output, you can optionally e-mail the file using
an E-MailTask or upload it to a remote server using an UploadTask.
File Output Property Panel
To reach this panel, select the Outputname in the Project Navigator and click the Settings (
) button in the main toolbar.
Test Output
Once you have configured your output settings you can test this export by clicking the
Generate button ( ) on the panel toolbar. When you click this button Report Commander
will load the report and export it to the specified export file.
When testing the output using the Generate button you should make sure the Export
to temporary file option is not checked; if it is, the export will be deleted after
processing and you will not be able to review it.
Properties
Format
Report Commander supports the same export formats as Crystal Reports, generally with
all the same export options. Consult the Crystal Reports documentation for more
information about formats.
Select the file format to export to:
Crystal Report
Crystal Report format. Similar to using the "Save Data with Report" option in the
Crystal Reports designer.
CSV

Report Commander 2.5 37
CSV (Comma-Separated Values). Additional export settings
HTML 4.0
HTML4.0 standard. Additional export settings
HTML 3.2
HTML 3.2. Provides backward compatibility with older browsers and e-mail
clients that do not support DHTML. Additional export settings
PDF
Adobe Portable Document Format ("Acrobat"). Additional export settings
Excel Workbook (XLSX)
Microsoft Excel Spreadsheet (newer XLSX format with support for larger number
of rows). Additional export settings
Excel 97-2003 Workbook (XLS)
Microsoft Excel 97-2003 Spreadsheet (older format). Additional export settings
Excel Data Only
Microsoft Excel Spreadsheet (Data Only). Additional export settings
Microsoft Word
Microsoft Word
Editable Word/Rich Text
Microsoft Word/RTF - Editable.Additional export settings
Text
Plain text.Additional export settings
XML
XML format.Additional export settings
Name
Enter the name (including path and extension) that the report should be exported to.
l If you do not include a path, the file is written to the working directory that Report
Commander is run from. If you use a relative path, the path is resolved relative to the
working directory.
l If you want to write the file to the folder where the Project is located, use the
Project.Path variable: ${Project.Path}\salesreport.pdf. To write to the folder
where the report is located, use the Report.Path
variable:${Report.Path}\salesreport.pdf.
l If the file already exists, it will be overwritten. If you want to use a unique file name
each time the report is exported, use the now function to include the date and/or time in
the file name:${Project.Path}\salesreport-@now("yyyy-MM-dd").pdf.pdf

Report Commander 2.5 38
This field can contain variables and functions that are replaced at runtime. More...
1
In Report Commander 1.x, you could upload your export file by specifying upload
information as part of the export file name. Beginning with Report Commander 2,
you use a separate UploadTask instead, and the file name should not include the
upload information.
Export to temporary file
Check Export to temporary file if you are e-mailing or uploading the file with a Task,
and don't want to keep a local copy of the file afterward. When you check this option, you
still need to provide a Name for the file, but you do not need to include a path (any path
you include will be ignored anyway). The report will be exported to a file in a temporary
folder, which will be deleted when project execution finishes.
Export Page Range
Select the range of pages to export. This option is not available for all formats.
Enabled
Check this box to enable processing for the output. If you want to temporarily stop
producing this export without deleting it from the project, uncheck the box and the output
will be skipped when the project is executed.
Export Settings
Additional settings are available for most export formats. Follow the "Additional export
settings" links in the export format list above for more information about the additional
settings.
Enabled
Determines whether this task is enabled. If you want to temporarily prevent Report
Commander from executing this task, uncheck the Enabled box.
ID Code
The IDCode is used to identify this item when filtering is applied on the Project Runner
command line.
CSV Export Settings
The CSVExport Settings are available if you select CSVas the export format.
Settings
Group Section Export Mode
Determines how group headers and footers are exported:
1
Click the {} button to display the text editor, which helps you insert variables and functions
into the text. When you hover your mouse pointer over the field for a second, a preview of the
"expanded" text will be displayed so you can confirm your variables and functions are working
correctly.

Report Commander 2.5 39
l Export:Headers and footers are exported as they are encountered in the report.
l ExportIsolated:Headers are written once, at the beginning of the file, and all footers are
written once, at the end of the file.
l DoNotExport:Headers and footers are not exported.
You may need to experiment with settings to get the desired outcome based on how
your report is structured. For example, if you are using grouping in your report and
need the data from the group headers and footers written to the file, you should choose
All sections exported.
Report Section ExportMode
Determines how report headers and footers are exported:
l Export:Headers and footers are exported as they are encountered in the report.
l ExportIsolated:Headers are written once, at the beginning of the file, and all footers are
written once, at the end of the file.
l DoNotExport:Headers and footers are not exported.
Preserve Date Formatting
Determines whether the formatting applied to date fields is preserved on export.
Preserve Number Formatting
Determines whether the formatting applied to number fields is preserved on export.
Field Separator
The Separator is the character that is used to separate the values (columns) on each line of
the export file. To use a tab character as the delimiter, enter {tab}.
String Delimiter
The String Delimiter is the character that is used to enclose string values in the export.
Leave the box empty if you do not want to use a delimiter.
Related Topics
CSV Export Options Page 58
CSV Export Options 80
HTML Export Settings
The HTMLExport Settings are available if you select HTML4.0 or HTML3.2 as the export
format.

Report Commander 2.5 40
Settings
Images in Same Directory
IfTrue, images for the report are placed in the same folder as the HTMLfile(s). IfFalse,
the images are placed in a subfolder called "images".
Include Navigation Bar
IfTrue, a navigation bar is included on each page with links to other pages. Only used if
Separate File for EachPage is True.
Separate File for Each Page
IfTrue, each page of the report is written to a separate HTMLdocument. IfFalse, the
entire report is written to a single HTMLdocument.
Related Topics
HTML Export Options Page 60
HTML Export Options 83
PDF Export Settings
The PDFExport Settings are available if you select PDFas the export format.
Settings
Generate Bookmarks fromHeadings
This option controls whether bookmarks are created based on the heading structure of the
report. Select "Unspecified" to use the default value stored for the report.
Related Topics
PDF Export Options Page 60
PDF, RTF, and Word Export Options 84
Excel Export Settings
The Excel Export Settings are available if you select Excel Workbook (XLSX or XLS)or
Excel Data-Only as the export format.
Settings
The options available depend on whether you are exporting to Excel or Excel Data-Only
format. These options correspond to the options available when exporting from the Crystal
Reports report designer.
Related Topics
Excel Data-Only Export Options 82

Report Commander 2.5 41
Excel Export Options 80
Excel Export Options Page 59
Editable Word/Rich Text Export Settings
The Editable Word/Rich Text Export Settings are available if you select Editable
Word/RTFas the export format.
Settings
Insert Page Breaks
If True, explicit page breaks are inserted in the document. Otherwise page breaks are not
inserted.
Text Export Settings
The Text Export Settings are available if you selectText as the export format.
Settings
Lines per page
Specify the number of lines that should be written to each page of the resulting text
document. A page break character will be inserted to mark the end of each page.
The default value is 60. If you do not want to include page breaks in the file, set Lines per
Page to "0".
Characters per inch
Specify the number of characters per inch to use when formatting lines within the text
document. The default value is 12, and a value between 8 and 16 is recommended.
Related Topics
Text Export Options Page 60
Text Export Options 84
XML Export Settings
The XML Export Settings are available if you select XML as the export format.
Settings
XML Exporting Format
Select the XML Exporting Format that will be used to create the XML document. Exporting
Formats are created in the Crystal Reports report designer and saved in the report. If you
have not created any Exporting Formats, only the default format will be listed.
Export Selection

Report Commander 2.5 42
The selection to export.
Print Output
A Print Output is used to print a report to a physical or virtual printer.
APrint Output uses the report parameters specified in the Output Group it belongs to. You can
have several Print Outputs under one Output Group if you need to print the report to different
printers using the same parameters. You can also have a mix of print and file outputs in the
same OutputGroup.
To add a new Print Output to an Output Group, select theOutputGroup in theProject
Navigator and click the Add Print Output button ( ) on the main toolbar.
Print Output Properties Panel
To reach this panel, select the Outputname in the Project Navigator and click the Settings (
) button in the main toolbar.
Properties
Printer
Select Use default printer to print to the default printer for the user account that the
project is executed under. To print to a specific printer, select or enter the printer name. If
the project will be executed on a different computer than where it is being edited, you may
need to manually enter the proper printer name.
Paper Source
Select the paper source to use when printing.
Copies
Enter the number of copies to print.
Export Page Range
Select the range of pages to print.
Enabled
Check this box to enable processing for the output. If you want to temporarily stop
producing this export without deleting it from the project, uncheck the box and the output
will be skipped when the project is executed.
Print Engine
Select the print engine to use. Use the "Default" engine unless you encounter a printing
problem and the knowledge base indicates that you should use a different setting.
ID Code
The IDCode is used to identify this item when filtering is applied on the Project Runner
command line.
Specifying Additional Printer Options
The Crystal Reports runtime components that Report Commander uses to print reports do not
allow for customization of print settings beyond the settings listed here. If you need to

Report Commander 2.5 43
configure special printing options, the best way to do so is to create a second printer definition
for the printer you are using, and configure that copy to use the settings you need as its
default settings. Then instruct Report Commander to print to that copy of the printer
definition. Refer to this article for additional information.
E-Mail Task
An E-MailTask is used to send an e-mail message containing one or more File Outputs
(export files)from the Project. The outputs can come from any report or output group in the
project (you can send several reports in one e-mail message).
To add a new E-MailTask to a Project, click the Add E-MailTask button ( ) in the main
toolbar.
Before you can send e-mail, you need to configure Report Commander with connection
information for an SMTPmail server. You can do this from the E-MailServers tab on the
Project Properties panel.
E-Mail Task PropertiesPanel
To reach this panel, select the Outputname in the Project Navigator and click the Settings (
) button in the main toolbar.
Message
The Message tab contains the settings for the e-mail message subject and body (message
text).
Subject
Enter the subject for your e-mail message.
This field can contain variables and functions that are replaced at runtime. More...
1
Use HTMLformat for messages
Check this option if you want to send your message with an HTML-formatted message
body. Otherwise the message will be plain text.
l If you are entering the message text directly (Use this text is selected):Report
Commander does not provide anHTMLmessage editor, so if you use this option you
must provide valid HTMLmarkup for the message text, either composed by hand or
pasted from an HTMLeditor. The text you supply should be a complete HTMLdocument.
1
Click the {} button to display the text editor, which helps you insert variables and functions
into the text. When you hover your mouse pointer over the field for a second, a preview of the
"expanded" text will be displayed so you can confirm your variables and functions are working
correctly.

Report Commander 2.5 44
l If you are loading the message body from a file (Use this file at runtime is
selected):The file must be a complete, valid HTMLdocument.
l If you are using an Output for the message body (Use this project output is
selected): This setting is ignored. The message will be HTMLformatted if the selected
output is an HTMLoutput, or plain text if it is a text output.
Use this text
Select this option to enter a fixed (or variable) message. Type in the text that you want to
use as the message body.
If you checked the Use HTMLformat for messages, the text you enter must be valid
HTMLmarkup code.
This field can contain variables and functions that are replaced at runtime. More...
1
Use this project output
Select this option to use an export file produced by the project as the body of the message.
Only HTMLand plain text exports can be used as the message body. Exports in other
formats can be included as attachments.
Use this file at runtime
Use this option to load the message body from an external file.
If you checked the Use HTMLformat for messages, the file must be a valid
HTMLdocument.
This field can contain variables and functions that are replaced at runtime. More...
2
Enabled
Determines whether this task is enabled. If you want to temporarily prevent Report
Commander from executing this task, uncheck the Enabled box.
ID Code
The IDCode is used to identify this item when filtering is applied on the Project Runner
command line.
From/To
TheFrom/To tab contains information about the message sender and recipients.
From
1
Click the {} button to display the text editor, which helps you insert variables and functions
into the text. When you hover your mouse pointer over the field for a second, a preview of the
"expanded" text will be displayed so you can confirm your variables and functions are working
correctly.
2
Click the {} button to display the text editor, which helps you insert variables and functions
into the text. When you hover your mouse pointer over the field for a second, a preview of the
"expanded" text will be displayed so you can confirm your variables and functions are working
correctly.

Report Commander 2.5 45
Enter the address and, optionally, name of the sender of the message. If you do not specify
a sender, the default sender configured for the mail server will be used.
You can enter just the e-mail address, or the e-mail address and name, using one of these
formats:
John Smith <[email protected]>
This field can contain variables and functions that are replaced at runtime. More...
1
To/CC/BCC
Enter the e-mail addresses and, optionally, names of the recipients of this message in the
To, CC, and BCClists. A single message will be sent to all the listed recipients.
If you have a list of e-mail addresses from another program that you want to add, you can
paste in the list rather than adding them one at a time.
If you frequently send messages to a group of people, you should set up a Distribution List
so you don't have to enter the recipients for each new E-MailTask.
To include a Distribution List in the recipient list, enter the name of the list prefixed with
"@":@Sales Managers. You can also select from the defined DistributionLists by right-
clicking the recipient list and selecting the list from the Send to distribution list menu.
Request read receipt for message
Check this box to have Report Commander request a read receipt for your message. Most
users and e-mail clients will ignore this request (and be annoyed by it) but the option is
there if you want it.
Attachments
On the Attachments page you can attach report exports and other files to your message.
Include the output files from these exports
This list shows all file outputs (export files)produced by this project. Check the box next to
each file you want to include as an attachment to the message.
If you already used an output as the body of the message, you don't need to select it
here, too. If you do, it will be the body of the message and will also be included as an
attachment.
Also attach these files
Use this option to attach additional files to the message. For example, you might have a
PDF file with instructions for interpreting the report.
1
Click the {} button to display the text editor, which helps you insert variables and functions
into the text. When you hover your mouse pointer over the field for a second, a preview of the
"expanded" text will be displayed so you can confirm your variables and functions are working
correctly.
Report Commander 2.5 46
When you click Add or Edit, the File to Attach window opens to allow you to specify the file
name.
Upload Task
An Upload Task is used to upload File Outputs (export files)to a remote server using FTP,
SFTP, or HTTP.
To add a new UploadTask to a Project, click the Add UploadTask button ( ) in the main
toolbar.
Upload Task PropertiesPanel
To reach this panel, select the Outputname in the Project Navigator and click the Settings (
) button in the main toolbar.
Settings
The Settings tab contains basic settings for the upload.
Upload Type
Select the kind of upload to perform:
FTP
Files are uploaded to an FTPserver.
SFTP
Files are uploaded to anSFTPserver.
HTTPPOST
Files are uploaded to an HTTP(Web)server using the POSTmethod.
HTTPPUT
Files are uploaded to an HTTP(Web) server using the PUTmethod.
Destination server
Select the server to upload files to.
Clicking the Manage file servers link takes you to the Project Properties panel, where
you can manage the available File Servers.
If the server you reference is a Shared or User file server, be sure to copy the file
server settings over if you plan to execute the project on a different computer or
under a different user account than the one where you create it. See "Sharing
Settings with Another User or Computer" on page183 for more information.
Target folder or path
Enter the path or folder to upload files to.

Report Commander 2.5 47
l For an FTP or SFTPserver, this is the folder to use, relative to the "home" directory that
the server assigns you when you log in. If you begin the folder name with "/", it
becomes an absolute path (relative to the root of the file structure exposed by the
server).
l For an HTTPPOSTor HTTPPUTupload, this is the path and name of the Web page to
POST/PUT to. For example, if you want to upload to the
URL"http://www.example.com/filetransfer/upload.aspx", the File Server will be
configured as http://www.example.com, and you will set the target path to
/filetransfer/upload.aspx.
To include the name of the file being uploaded as part of the path or query string, use
the "${FileName}" variable. For example, when using the PUTmethod you could use a
path like /filetransfer/upload/${FileName}.
The file name used for the file is the file name specified in the File Output settings (without
the path information).
This field can contain variables and functions that are replaced at runtime. More...
1
Variables and functions are re-evaluated for each file that Report Commander
uploads, so it is possible to upload each report output to a different folder on the
same server.
HTTP Options
Report an error if the server response does not include this text
If the Web server returns an error code (such as a 404 Not Found error, or 500 Server
error), the task will log an error message. However, there may be cases where the file
is not uploaded, but the server still returns a success result. For example, if the Web
server redirects the upload attempt to a login page, it may still return a 200 Success
message, so Report Commander will not know there was a problem.
To solve this problem, your upload page can be coded to return a certain message in the
response to indicate that the file was successfully transferred. You can then configure
Report Commander to check for this message in the Response.
For example, your upload handler is programmed to return the message "File accepted"
when the file is successfully transferred. In Report Commander, check the Report an
error if the server response does not include this text option and enter File
accepted as the text to look for. If the response from the Web server does not include
"File accepted,"Report Commander will log an error message.
1
Click the {} button to display the text editor, which helps you insert variables and functions
into the text. When you hover your mouse pointer over the field for a second, a preview of the
"expanded" text will be displayed so you can confirm your variables and functions are working
correctly.

Report Commander 2.5 48
When you specify text to look for, Report Commander looks for the text anywhere in the
response returned by the server, and ignores the case of the text.
For more control over matching you can check the Use Regular Expressions option
and specify a regular expression as the text to match. Report Commander uses
theMicrosoft .NETsyntax for regular expression matching, with case-insensitive
matching. Refer to the Microsoft documentation for more information.
ID Code
The IDCode is used to identify this item when filtering is applied on the Project Runner
command line.
Files
On the Files page you specify the report outputs and other files you want to upload.
Include the output files from these exports
This list shows all file outputs (export files)produced by this project. Check the box next to
each file you want to include as an attachment to the message.
If you already used an output as the body of the message, you don't need to select it
here, too. If you do, it will be the body of the message and will also be included as an
attachment.
Also attach these files
Use this option to attach additional files to the message. For example, you might have a
PDF file with instructions for interpreting the report.
When you click Add or Edit, the File to Attach window opens to allow you to specify the file
name.
Project Execution Commands
The Project Execution Commands window shows you the commands you need to execute
to run your Project from a batch file, scheduler, or other automation tool. You can reach this
window by selecting How to execute project... from the Help menu in the Project Editor.
If you want to run Report Commander from a command prompt or batch file, you can Copy (
)the execution command from the top box and paste it into the batch file or command
prompt.
If you are using the Windows Task Scheduler or another automation tool, you will probably
enter the adrcexec.exe program information and the command line options in separate boxes.
You can Copy ( ) the relevant information from the Program to Run and Program
Argumentsboxes at the bottom of the window.

Report Commander 2.5 49
For example, if you want to schedule your report in theWindows TaskScheduler, you can
copy/paste this information into the BasicTask Wizard as shown below:


Report Commander 2.5 51
Project Runner (adrcexec)
Project Runner
The Project Runner program (adrcexec.exe)is used to execute a Report
CommanderProject (created using the Project Editor)from a command prompt, batch file,
scheduler, script, or other tool.
See the Scheduling Report Execution topic for more information on how to use theProject
Runner with a scheduling tool.
Command-LineSyntax
See the Command-LineSyntax topic for details on how to run the Project Runner.
From within the Project Editor, choose How to run project from the Help menu to display
the execution commands for the project.
Overriding Settings
The Project Runner is designed to execute reports based on the settings stored in project files,
and does not offer the same fine-grained control over processing options from the command
line that the Command Runner does. If you need to call Report Commander from another
application to do on-the-fly processing using ad-hoc settings, you should use the
CommandRunner instead of the Project Runner and project files.
The extensive support of variables and functions throughout the Report Commander project is
intended to eliminate much need for command-line customization of execution.
TheProject Runner does allow you to customize project execution in the following ways:
l You can override the values of variables on the command line.
l You can specify a subset of reports, output groups, outputs, and/or tasks to execute,
rather than the full project.
See the Command-LineSyntax topic for more information.
Logging and Diagnostics
The program runs as a console-mode program. It writes some progress messages and all
warning and error messages to the console (you can use the logging options to adjust the
level of information written to the console).
If errors occur, no error information is displayed other than what is written to the console
(i.e., no error window is displayed). Therefore if you are running the Command Runner
automatically through an automation tool you should configure Report Commander to create a
log file when it runs, so you can review the log for messages if things do not work correctly.
The program returns an exit code as follows:

Report Commander 2.5 52
l Exit code 8 if any errors were reported
l Exit code 4 if any warning messages were reported
l 0 if no warnings or errors were reported.
Command-Lne Syntax
The Project Runner (adcrutil) does not use project files (use the Project Runnerto execute
project files). Instead, all processing is controlled through command-line options. If you don't
want to work directly with command-line options, you can use the CommandLineBuilder to
generate the command line for you.
Syntax
adrcexec -project=projectfilename [-option[=value] ...] [variable="value" ...]
The only required parameters is the -project, which tells Report Commander which project to
execute. Report Commander will process all reports, output groups, outputs, and tasks in the
project, except for those that have been disabled.
General Options
Option Description
-project=
projectfilen
ame
Provide the complete path and name of the project file to execute. This option is
required.
-
report=
reportID
Specifies one or more Reports to process. If no -report option is specified, all
enabled reports in the project are processed. If the -report option is used, only
the specified reports are processed. If you specify a report using this option, it
will be processed even if it is disabled in the project.
To specify more than one report, repeat this option for each report.
The reportID is the name of the report, without the file extension, or the
numeric IDCode shown on the report properties panel.
For example, execute only the "dailysales" and"weeklysales" reports and the
report with IDnumber 4:
-report="dailysales" -report="weeklysales" -report=4
-
group=
groupID
Specifies one or more OutputGroups to process. If no -group option is
specified, all enabled output groups in the project are processed. If the -group
option is used, only the specified groups are processed. If you specify a group
using this option, it will be processed even if it is disabled in the project. The
specified group will be processed even if the -report selections (if present)
exclude the parent report.
To specify more than one group, repeat this option for each group, or combine

Report Commander 2.5 53
Option Description
multiple numeric IDs in a single option.
If the project has output groups with the same name in more than one report,
include the report name as part of the groupID. Alternatively you can use the
numeric IDCode shown on the OutputGroup properties panel.
-group="Sales Trend" -group="Retail Location Sales.Yesterday's Sales" -group="42,18"
(where "Retail LocationSales" is the name of the report that the "Yesterday's
Sales"group is in)
-
output=
outputID
Specifies one or more Outputsto process. If no -output option is specified, all
enabled outputs in the project are processed. If the -output option is used, only
the specified outputs are processed. If you specify an output using this option, it
will be processed even if it is disabled in the project. The specified output will
be processed even if the -report and -group selections (if present)exclude the
parent report or group.
To specify more than one output, repeat this option for each output.
The outputID is the numeric IDCode shown on the properties panel for the
output. You may combine multiple outputIDs using commas.
-output="1" -output="5" -output="3,7"
-
task=
taskID
Specifies one or more Output Tasks to process. If no -task option is specified,
all enabled tasks in the project are processed. If the -task option is used, only
the specified tasks are processed. If you specify a task using this option, it will
be processed even if it is disabled in the project.
The taskID is the numeric IDCode shown on the properties panel for the task.
You may combine multiple taskIDs using commas.
-task="1" -task="2,3,4"
To suppress all output tasks (e.g., to avoid sending e-mail messages
while testing), use
-task=0
variable
=value
You can override any variable defined in the Project by specifying a new value
on the command line.
Variable values must come last on the command line, after all options have
been set.
For example, you have defined a variable named Region in the project, and this
variable is passed to the report as a report parameter. you can set the value on
the command line by using this syntax

Report Commander 2.5 54
Option Description
adrcexec -project="c:\projects\salesreport.rcproject" region="East1"
Logging Options
By default the Project Runner will write informational and higher level messages to the
console. If a log file is configured in the Project Properties, messages of all levels will be
written to that log file.
You can override or supplement logging through the options shown below.
Option Description
-suppressprojectlog[{+|-}] If specified, suppresses the log file (if any)
configured in the Project Properties (the log file
will not be produced). Default:False.
-logfilename=filename Specifies a log file to write to. If you include -
suppressprojectlog, this log will be produced
instead of the log file configured in the Project. If
you do not include -suppressprojectlog, both
logs will be produced.
-appendlog[{+|-}] Determines whether the log file is appended to
(True) or overwritten(False). Default:True. Only
used if -logfilename is specified.
-loglevel=
{debug|verbose|info|warning|error|off}
Determines the lowest-level message that will be
written to the log file. The default is debug, which
means that all messages will be written.
If you have specified -logfilename, this setting
applies to that log file. If you have not specified -
logfilename, the setting applies to the log file
configured in the Project.
-consoleloglevel=
{debug|verbose|info|warning|error|off}
Determines the lowest-level message that will be
written to the console. The default is info, which
means that informational, warning, and error
messages will be written.
-debug Shortcut for -consoleloglevel=debug.
-verbose Shortcut for -consoleloglevel=verbose.
-silent Causes the program to run silently.Has the same
effect as -consoleloglevel=off (no messages
logged to console), plus the banner (program
name and copyright information) is also
suppressed.

Report Commander 2.5 55
Command Line Builder
Command Line Builder
The Command Line Builder helps you create a command line to process a report using the
CommandRunner.
Use the Command LineBuilder and Command Runner when you only need to process a
single report to produce a single output, or if you need to be able to control all aspects
of report processing through command-line parameters. For more complex processing
(such as multiple reports or multiple outputs in a single run), use the Project Editor and
Project Runner instead. See the Modes of Operation topic for more information.
Basic Command Line Workflow
1. When the Command Line Builder starts, open the Crystal Reports report that you want to
process, or a previously-saved project file to work with.
2. Use the settings in the property pages (tabs) of the CommandLine Builder to configure
Report Commander to print, export, and/or e-mail your report.
3. Go to the Preview page to preview the report or test the export.
4. Use the information on the Command Line page to execute your report from a command
prompt, or to configure your scheduler or other automation tool to run the report
automatically. See Scheduling Report Execution for more information
5. Optionally, save your settings to a project file so that you use them again later in the
Command Line Builder or in the Project Editor. See Using Project Files below for more
information.
Loading Settings from Existing Command Lines
If you have an existing command line (created with this or any earlier version of Report
Commander), the Report Commander can read that command line to fill in the settings in the
CommandLine Builder.
To use this feature, choose the Read Settings fromCommand Line command from the
File menu to open the Read Settings from Command Line window. Paste your existing
command line from the clipboard into this window, and Report Commander will extract the
settings from it.
Using Project Files
The Command LineBuilder can read and save the same project file format that is used by the
Project Editor and Project Runner. A project you save from the Command Line Builder can be
opened in the Project Editor and executed using the Project Runner.
Projects saved using the Project Editor can be opened using the Command LineBuilder as long
as they meet these restrictions:

Report Commander 2.5 56
l The project must have exactly one report.
l The report cannot have more than one Output Group.
l The report cannot have more than one File Output.
l The report cannot have more than one Print Output.
l The project cannot have more than one E-MailTask.
If the project does not meet these requirements, the CommandLineBuilder will show an error
message and the project will not be loaded.
Property Pages
Report Page
The Report page includes basic processing options for the report.
Report File
Shows the name of the report file to be processed. To select a different report, select
Open from the File menu.
Note that the Command-Line Builder is not able to open report files via HTTP or FTP
download. If you want to use the Builder with a report that will be downloaded at runtime,
you need to work with a local copy of the report, and then modify the generated command
line to point to the HTTP or FTP target.
Force refresh of report data after loading
This option has an effect only if you checked the Save Data with Report option in the
Crystal Reports Designer before you saved the report. If Save Data with Report was
checked, Force refresh of report data after loading works as follows:
l If Force refresh of report data after loading is not checked, Report Commander
works only with the data saved in the report. The logins and parameters are not used,
because the report is not refreshed from the data source.
l If Force refresh of report data after loading is checked, Report Commander
refreshes the data, producing the same result as if data were not saved in the report.
Skip further processing if report contains no data
When checked, Report Commander will not export, print, or e-mail the report if it does not
contain any data records.
This option works by checking to see if the report contains detail records, regardless
of whether they are displayed, and may not always produce the result you want.
More information.
Print
The Print options are used to print the report to a printer.

Report Commander 2.5 57
Print report
When checked, Report Commander will print the specified number of copies of the
report.
Printer
Select Use default printer to print the report to the default printer for the user under
whose account Report Commander is run. Select Use this printer to print to a specific
printer.
Paper Source
Select a paper source to print using a specific paper source. Only available if you have
selected a specific printer.
Export
The Export options are used to export the report to a file and, optionally, send the exported
report by e-mail.
Export the report
The report is exported to a file.
E-mail the report
The report is exported to a file and then sent by e-mail, using the settings on the E-Mail
page.
If Export the report and E-mail the report are both checked, the report is exported
to a file and sent to the e-mail recipients, and the exported file remains on the computer
in the location specified in the Name box.
If E-mail the report is checked but Export the report is not, the report is exported
to a temporary location and sent to the e-mail recipients. The exported file does not
remain on the computer after it is sent.
Format
Select the file format for the exported data. See the Command Line Syntax topic for a
description of the available formats.
Depending on the format you select, additional formatting options will be available on a
separate page. Click the Set Export Options link to go to the options page.
Name
Specify the path and name of the export file. Use the ... button to browse for the target.
This field can contain variables and functions that are replaced at runtime. More...
1
1
Click the {} button to display the text editor, which helps you insert variables and functions
into the text. When you hover your mouse pointer over the field for a second, a preview of the
"expanded" text will be displayed so you can confirm your variables and functions are working
correctly.

Report Commander 2.5 58
If E-mail the report is checked but Export the report is not, only the file name is
used (not the path); the report is exported to a temporary directory using the specified
file name, then deleted after it is e-mailed.
You can configure Report Commander to upload the export file to an FTP, SFTP, or HTTP
(Web) server by specifying the file name in a special format. See the "Uploading
Output" on page78 topic for more information.
Logging
Specify a log file for Report Commander to write messages to during report execution.
Check Append to existing log file to add to the existing log file on each run, or uncheck
the box to overwrite the log file on each run.
The default setting uses ${TEMP}\${Report.Name}.log as the log file name, which means
the log file will be written to your TEMPfolder and will have the same name as the report,
with a ".log" extension. You could also use ${Report.Path}\${Report.Name}.log to write
the log file to the same folder as the report, or enter any path and name you wish.
Because Report Commander is designed to run in an automated/unattended mode, it
does not show a user interface when you execute reports. Therefore the only way
you will be able to review error message if something goes wrong is to use a log file.
This field can contain variables and functions that are replaced at runtime. More...
1
Manage variables, distribution lists, and mail servers
This link opens the User Settings window, which allows you to manage variables, mail
servers, and distribution lists that are available for all Report Commander
projects/commands you run on this computer.
CSV Export Options Page
The CSVExport Options page is available if you select CSVas the export format.
Delimiter
The Delimiter is the character that is used to enclose string values in the export. Leave
the box empty if you do not want to use a delimiter.
Separator
The Separator is the character that is used to separate the values (columns) on each line
of the export file. You may enter the desired character, or check the Use tab box to have a
tab character inserted between values.
Section Export
1
Click the {} button to display the text editor, which helps you insert variables and functions
into the text. When you hover your mouse pointer over the field for a second, a preview of the
"expanded" text will be displayed so you can confirm your variables and functions are working
correctly.

Report Commander 2.5 59
The Section Export setting determines how report, page, and group sections are exported.
Crystal Reports default
All sections exported. All your headers and footers are exported, exactly as if
the report were being printed.
Export Isolated
All headers are written once, at the beginning of the file, and all footers are
written once, at the end of the file.
None
Only Detail records are exported; no headers or footers are exported.
The same setting is applied to report, page, and group headers and footers. If you
need separate settings for different kinds of headers/footers, use the Project Editor
instead, which offers additional options.
You may need to experiment with this setting to get the desired outcome based on
how your report is structured. For example, if you are using grouping in your report
and need the data from the group headers and footers written to the file, you should
choose All sections exported.
Related Topics
CSV Export Options 80
CSV Export Settings 38
Excel Export Options Page
The ExcelExport Options page is available if you select Excel (XLS or XLSX)or
ExcelDataOnly as the export format.
Page Headers and Footers
Controls how page headers and footers will be exported.
Column Widths
Controls how the column widths will be set in the resulting Excel document.
Automatic
The columns will be sized based on their content. If you want to base the sizing
on the content in a particular section, you can select it here.
Constant column width
All columns will be set to the fixed width you specify.
Formatting
The Formatting section contains additional options to control formatting. The options
available depend on whether you are exporting to Excel or Excel Data-Only format. These
options correspond to the options available when exporting from the Crystal Reports report
designer.
Related Topics

Report Commander 2.5 60
Excel Data-Only Export Options 82
Excel Export Options 80
Excel Export Settings 40
HTML Export Options Page
The HTMLExport Options page is available if you select HTML4.0 or HTML3.2 as the export
format.
Separate HTML file for each page
When exporting to HTML, check this option to have Report Commander generate a separate
HTML file for each page of the report. If this option is not checked, a single HTML page is
created, containing all of the report data, regardless of the number of pages in the original
report.
Include navigation bar on each page
When Separate HTML file for each page is checked, check Include navigation bar
on each page to include simple navigation links at the bottom of each HTML page (for
navigation between pages).
Images in same directory as HTML
When this option is checked, any images for the report are placed in the same directory as
the HTML files. If the option is not checked, the images are placed in a subdirectory called
"images" below the export folder you specify.
Related Topics
HTML Export Options 83
HTML Export Settings 39
PDF Export Options Page
The PDFExport Options page is available if you select PDFas the export format.
Create bookmarks from report headings
If this option is checked, the PDFfile will have bookmarks created from the report
headings. If this option is not checked, the default setting saved in the report will be used.
Related Topics
PDF, RTF, and Word Export Options 84
PDF Export Settings 40
Text Export Options Page
The Text Export Options page is available if you select Text as the export format.
Lines per page
Specify the number of lines that should be written to each page of the resulting text

Report Commander 2.5 61
document. A page break character will be inserted to mark the end of each page.
The default value is 60. If you do not want to include page breaks in the file, set Lines per
Page to "0".
Characters per inch
Specify the number of characters per inch to use when formatting lines within the text
document. The default value is 12, and a value between 8 and 16 is recommended.
Related Topics
Text Export Options 84
Text Export Settings 41
XML Export Options Page
The XMLExport Options page is available if you select XMLas the export format.
XML Exporting Format
Select the XML Exporting Format that will be used to create the XML document. Exporting
Formats are created in the Crystal Reports report designer and saved in the report. If you
have not created any Exporting Formats, only the default format will be listed.
Related Topics
XML Export Options 85
XML Export Settings 41
E-Mail Page
The E-Mail page defines the settings for sending your report output by e-mail. These options
are available only if the E-mail the report option is checked on the Report page.
Message From
Specify the e-mail address from which the message will be sent. You must specify a valid
e-mail address; most mail servers will reject the message if it does not have a valid
sender. If you are using shared settings for your e-mail server (see next section), you can
omit the From address and Report Commander will use the default sender configured for
the mail server.
To include a "display name" in addition to the e-mail address, use this format: Rachel
West <[email protected]>
This field can contain variables and functions that are replaced at runtime. More...
1
1
Click the {} button to display the text editor, which helps you insert variables and functions
into the text. When you hover your mouse pointer over the field for a second, a preview of the
"expanded" text will be displayed so you can confirm your variables and functions are working
correctly.

Report Commander 2.5 62
Mail Server
For Report Commander to send e-mail messages, you must provide information about an
SMTPmail server that it can use to send the messages through. You can click the
Configure link to define shared mail servers that will be available for all Report
Commander commands and projects you run on this computer.
Alternatively, you can explicitly configure the mail server information for this particular
task.
Server Address
Specify the name (address) of the SMTP server through which the mail will be sent. If
the server uses a port other than the standard value of 25, include the port prefixed by a
colon. For example, to deliver mail through Gmail, use smtp.gmail.com:465.
Authentication
If your mail server requires authentication for sending mail, enter your user ID and
password here. For example, to send throughGmail you would enter your full Gmail
If you are unsure what to enter here, check with the administrator of your mail system.
Use TLS(SSL)connection
Check this option if the server requires a TLSor SSLconnection. Generally you do not
need to check this option, as Report Commander can make the correct choice
automatically.
Message To
Specify the e-mail addresses to send the message to. To send to multiple recipients,
separate the recipients with commas. You can also include display names in addition to the
e-mail addresses. For example:
You can specify whether a recipient should be included on the To, CC, or BCClist for the
message by prefixing the recipient with "to:", "cc:", or "bcc:":
to:Rachel West <[email protected]>,cc:[email protected],bcc:Bob
To send the message to members of a Distribution List, specify the name of the distribution
list prefixed with "@": @salesmanagers, cc:@projectmanagers.
This field can contain variables and functions that are replaced at runtime. More...
1
Subject
Specify the subject of the message. If none is specified, a default subject will be used.
1
Click the {} button to display the text editor, which helps you insert variables and functions
into the text. When you hover your mouse pointer over the field for a second, a preview of the
"expanded" text will be displayed so you can confirm your variables and functions are working
correctly.

Report Commander 2.5 63
This field can contain variables and functions that are replaced at runtime. More...
1
Message Text
Specify the body of the message. Note that only a simple one-line message body can be
specified in this way (because anything more complex cannot be passed on the command
line).
There are three ways to specify a complex message body:
l Use a response file to specify this parameter. This will allow you to specify a text-based
message that can span many lines.
l Load the message body from a file. When this option is checked, the message body will
be loaded from the specified file at run time. The file can be a text or HTML file.
l Use the report output as the message body. This option is available only if you have
chosen to export the report in HTML or plain text format. When you check this option,
the HTML export of the report is used as the body of the message; the export file is not
also attached to the message.
This field can contain variables and functions that are replaced at runtime. More...
2
Parameters Page
The Parameters page allows you to define values for the parameters required by your
report. This page lists each parameter defined for the report. To specify the value(s) for a
parameter, select it in the list and click Edit to open the Parameter Edit window.
You cannot add or remove parameters from this list, as it shows all parameters found in the
report (and its subreports).
Use named parameters when generating command line
When this option is checked, the generated command-line will define parameters using
their names (see the namedparameters command-line option for more information).
Otherwise, names are not included.
1
Click the {} button to display the text editor, which helps you insert variables and functions
into the text. When you hover your mouse pointer over the field for a second, a preview of the
"expanded" text will be displayed so you can confirm your variables and functions are working
correctly.
2
Click the {} button to display the text editor, which helps you insert variables and functions
into the text. When you hover your mouse pointer over the field for a second, a preview of the
"expanded" text will be displayed so you can confirm your variables and functions are working
correctly.

Report Commander 2.5 64
Database Logins Page
The Database Logins page shows each database connection that the report uses. Click Edit
to open the Data SourceProperties window, where you can override a database connection to
use a different database or different login credentials.
You cannot add or remove data sources from this list, as it shows all connections found in the
report (and its subreports).
Command Line Page
The Command Line page shows you the command line constructed from the settings you
have specified in the Command Line Builder. Run this command line from a command prompt
or automation tool to perform the actions you have requested for the report.
If you want to run Report Commander from a command prompt or batch file, you can Copy (
)the execution command from the top box and paste it into the batch file or command
prompt.
If you are using the Windows Task Scheduler or another automation tool, you will probably
enter the adcrutil.exe program information and the program options in separate boxes. You
can Copy ( ) the relevant information from the Program to Run and Program
Argumentsboxes at the bottom of the window.

Report Commander 2.5 65
For example, if you want to schedule your report in theWindows TaskScheduler, you can
copy/paste this information into the BasicTask Wizard as shown below:

Report Commander 2.5 66
See the Scheduling Report Execution topic for a complete tutorial.
Preview Page
The Preview page allows you to view a print preview of your report with the parameters and
login information you have specified, and to test the printing and exporting options you have
selected. This feature can be used to verify that you have provided the correct settings.
Preview
Click the Preview button to display a print preview of your report, using the parameter
values and login credentials you have specified.
If you have correctly configured the parameters and database logins for the report, the
Preview window will not prompt you for any information.

Report Commander 2.5 67
If the Preview window prompts you for parameter values or login information, you have
not provided Report Commander all of the necessary information, and the report will
fail to process when you run your execution command.
Execute
Click the Execute button to process your report using the settings you have specified. This
will process the report exactly as if you were running your execution command from the
command line:it will print, export, and e-mail the report, based on your settings.
This option is meant for testing your settings. For regular execution of your report, you will
run the Command Runner using the command line shown on the Command Line page.
User Settings Window
The User Settings window allows you to configure variables, mail servers and distribution
lists that are available for all Report Commander operations run on this computer under your
user account.
In the Command Line Builder you can reach this window from the Report Page (click the
Manage variables, distribution lists, and mail servers link) or the E-Mail page of (click
the Configure link in the MailServer section). The shared variables, servers, and distribution
lists can also be edited from the Project Properties panel of the Project Editor.
These shared settings are only available for projects run on this computer under your
user account. If you create your commands and then execute them under a different
user account or on a different computer, be sure that the shared settings are copied
over to the other account or computer. You can also use the Project Properties panel of
the Project Editor to define settings that apply to all users on this computer.

Report Commander 2.5 68
Command Runner (adcrutil)
Command Runner
The CommandRunner program (adcrutil.exe)allows you to print, export, and e-mail
reports, using command-line options to control all aspects of the export process.
If you really enjoy stringing together command-line arguments for console-mode programs,
you can dive right in with the command-line syntax reference. Many users will prefer to use
the Command Line Builder, which lets you select processing options using a graphical user
interface. It then creates a command line that you can use to execute the report using the
Command Runner. See the CommandLine Workflow topic for more information.
Once you have your command line built, you can run it from a command prompt, batch file,
scheduler, or other automation tool. See the Scheduling Report Execution topic for more
information.
Logging and Diagnostics
The program runs as a console-mode program. It writes some progress messages and all
warning and error messages to the console (you can use the logging options to adjust the
level of information written to the console).
If errors occur, no error information is displayed other than what is written to the console
(i.e., no error window is displayed). Therefore if you are running the Command Runner
automatically through an automation tool you should configure Report Commander to create a
log file when it runs, so you can review the log for messages if things do not work correctly.
The program returns an exit code as follows:
l Exit code 8 if any errors were reported
l Exit code 4 if any warning messages were reported
l 0 if no warnings or errors were reported.
Command-Line Syntax
Command-Line Syntax
The Command Runner (adcrutil) does not use project files (use the Project Runnerto execute
project files). Instead, all processing is controlled through command-line options. If you don't
want to work directly with command-line options, you can use the CommandLineBuilder to
generate the command line for you.
Syntax
adcrutil -report=reportfilename [-option[=value] ...]
General requirements:

Report Commander 2.5 69
l The -report option must be specified
l At least one actionmust be specified: -print, -preview, -export
l Use -parameters or -namedparameters, but not both.
You can use a response file to supply parameter values. But if you are using response files
extensively, you should consider using project files instead, with the Project Editor
andProject Runner.
Options
General Report Options
These options tell Report Commander which report to load and provide general processing
instructions.
Option Description
-report=
reportfilena
me
Provide the complete path and name of the report file to process.
Download Report
Report Commander can download the source report file using HTTP or ftp
using the following syntax:
-report=http://myserver/reports/myreport.rpt
-report=http://userid:password@myserver/reports/myreport.rpt
-report=http://domain\userid:password@myserver/reports/myreport.rpt
-report=ftp://myserver/reports/myreport.rpt
-report=ftp://userid:password@myserver/reports/myreport.rpt
-report=ftp://domain\userid:password@myserver/reports/myreport.rpt
If the server requires authentication, include the user ID and password as
part of the URL, as shown above.
If the Web server uses Windows (integrated) authentication, Report
Commander will automatically authenticate using the credentials of the user
running the program, if credentials are not included as part of the URL.
-refresh Specifies that the report should be refreshed after it is loaded (equivalent to
pressing F5 in the Crystal Reports Designer). If your report has the Save
data with report option checked in Crystal Reports, use this command to
force Report Commander to refresh the data (otherwise the saved data will
be used). This command is unnecessary if the Save data with report option
is not checked for your report.
-
suppressemp
ty
Specifies that processing should terminate if the report does not contain any
data. When this option is included, Report Commander will not print, export,
or e-mail your report if the data source does not return any records.

Report Commander 2.5 70
Option Description
This option works by checking to see if the report contains detail
records, regardless of whether they are displayed, and may not always
produce the result you want. More information.
Database Connection Options
These options are used to specify database connection information.
Beginning with Report Commander 2.2, there is a new syntax for database logins, as
described below. The Command Line Builder will create command lines using this
syntax. However, the syntax used in previous versions of Report Commander will still
work.
Optio
n
Description
-
login=
conne
ction
inform
ation
If database login credentials are required or you need to override the connection to
point to a different data source, use the -login option to provide them.
If the report uses more than one database connection, provide the credentials for
each, in the same order they occur in the report.
Each "login" parameter consists of one or more of the following sections:
{server:servername}
Specify the new server name or address
{database:dbname}
Specify the new database name
{schema:schemaname}
Specify the new schema name
{userid:userID}
Specify the user ID
{password:password}
Specify the unenecrypted password
{encryptedpassword:password}
Specify an encrypted password (generated using the -encrypt option)
All sections are optional. If the password or encryptedpassword section is used, it
must come last. Do not leave a space between sections.
For example:
-login={userid:userid1}{password:password1} -login={userid:userid2}{password:password2}
Override the connection to use a different database on the same server:
-login={database:mynewdb}{userid:userid1}{password:password1} -login={userid:userid2}{password:password2}
If a connection does not require a user ID and password, or you want to use
Report Commander 2.5 71
Optio
n
Description
integrated security for the connection, use "-login=", with no credentials. For
example:
-login={userid:userid1}{password:password1} -login= -login={userid:userid3}{password:password3}
(The second connection does not require credentials)
If you are using Report Commander from a batch file or other tool and do not want
people to be able to see your database login password, you can encrypt the
password for use on the command line. Assuming your password is "mypassword",
you would first run:
adcrutil -encrypt=mypassword
This would return an encrypted value similar to
5vFHQI+NNBsoaZqzG9eJTA==
You would then use the encryptedpassword option in your batch file:
adcrutil -login={userid:myuserid}{encryptedpassword:5vFHQI+NNBsoaZqzG9eJTA==} ...
-
encryp
t=
passw
ord
Encrypts a password for later use with the -login! option.
Printing Options
These options are used to print the report.
Option Description
-print Specifies that the report should be printed. If no printer is specified
using the -printer option, the report is sent to the default printer for
user account under which the program is run.
-printer="printer
name"
Use with the print command to print to a printer other than the
default.
For example:
-print -printer="HPLaserjet 2000000"
This value can contain variables and functions that are replaced at

Report Commander 2.5 72
Option Description
runtime.
-preview Opens the report in a preview window instead of printing it. When this
option is included, the report is not printed or exported, even if print
or export options are specified.
-copies=numcopies Specifies the number of copies to print. If omitted, one copy is
printed.
-printengine=engine Omit this option to use the default engine, which is correct for most
scenarios. Specify a different engine only if you encounter a printing
problem and the knowledge base indicates that you should use a
different setting.
Export Options
These options are used to export the report to a file. The Command Runner can only export to
one format at a time. To produce multiple exports, use the Project Runner instead.
Option Description
-exportfile="file
name"
Export the report to the specified file name. Include the path for the
file, or it will be exported to the current working directory.
If you are using the -removefile option to delete the file after it is e-
mailed, you do not need to include the path, as the file will be
exported to a temporary location.
The output file can be uploaded to remote server using HTTP, FTP, or
SFTP. See the Uploading Output topic for more information.
This value can contain variables and functions that are replaced at
runtime.
-
exportformat=
format
Specify the format to which the report should be exported. Additional
formatting options are available for some export formats.
Valid values for format are:
csv
CSV (Comma-Separated Values). More options for CSV exports
html
HTML 4.0. More options for HTML exports
html32
HTML 3.2. Provides backward compatibility with older browsers
and e-mail clients that do not support DHTML. More options for
HTML exports
msword
Microsoft Word. More options for Word exports
pdf
Adobe Portable Document Format ("Acrobat"). More options for

Report Commander 2.5 73
Option Description
PDF exports
rpt
Crystal Report format. Similar to using the "Save Data with
Report" option in the Crystal Reports designer
rtf
Rich Text Format. More options for RTF exports
editablertf
Microsoft Word/RTF - Editable. More options for editable RTF
exports
text
Plain text. More options for text exports
xls
Microsoft Excel 97-2003 Spreadsheet. More options for Excel
exports
xlsx
Microsoft Excel Spreadsheet (newer XLSX format). More options
for Excel exports
xlsrecord
Microsoft Excel Spreadsheet (Data Only). More options for Excel
Data-Only exports
xml
XML format. More options for XML exports
-removefile Specifies that the export file should be deleted when the program
finishes. Use this option if you want to e-mail the report, but don't
want to retain the file afterwards. If -removefile is omitted, the file
remains.
-uploadmethod This option is used when uploading the export file. More information.
-uploadtarget This option is used when uploading the export file. More information.
E-Mail Server Options
These options tell Report Commander how to connect to an SMTPmail server to e-mail your
report.
If you have defined shared e-mail server settings using the CommandLine Builder or the
Project Editor, you can omit these options and the shared settings will be used. However, be
sure that the shared settings are copied over if you run Report Commander under a different
user account or on a different computer.
Option Description
-
emserver=
serveraddress
[:port]
Specify the name or address and optionally the port for the SMTP
server through which the message will be sent.

Report Commander 2.5 74
Option Description
-emuserid=userid The user ID for your e-mail account, if the SMTP server requires
authentication for sending mail.
-
empassword=
password
The password for your e-mail account, if the SMTP server requires
authentication for sending mail.
-
empassword!=
password
This option is identical to the -password option, except that password
is an encrypted password (generated using the -encrypt option).
-emusetls Use TLS for a secure connection to the mail server. Do not use this
option unless your mail server is configured for TLS, or the e-mail
send will fail. Generally Report Commander will figure out on its own
whether to use TLS, and this option is not necessary.
E-Mail Options
These options are used to send the exported report by e-mail. To e-mail a report you must
also specify the necessary options to export it to the desired format.
When specifying an e-mail address, you can specify just the address, or you can optionally
include the recipient's name, as shown in the following examples:
Some Person <[email protected]>
Opti
on
Description
-
ems
ende
r=
emai
laddr
ess
Specify the e-mail address (and, optionally, name)from which the message will be
sent. If this option is omitted, the default sender specified in the shared e-mail
settings will be used. If no default sender is present, Report Commander will issue an
error and the e-mail message will not be sent.
This value can contain variables and functions that are replaced at runtime.
-
emr
ecipi
ent=
emai
laddr
ess
Specify the e-mail address(es) to which the message will be sent. Multiple recipients
can be specified by using multiple -emrecipient parameters. For example:
[email protected] -emrecipient="Another Person <[email protected]>"
You can prefix a recipient with "TO:", "CC:", or "BCC:"to specify how the recipient
should be added to the message. For example:
-emrecipient="TO:[email protected]" -emrecipient="CC:Another Person <[email protected]>" -emrecipient="BCC:Secret Recipient <[email protected]>"
To send the message to members of a distribution list, specify the name of the

Report Commander 2.5 75
Opti
on
Description
distribution list prefixed with "@":
-emrecipient="TO:@salesmanagers" -emrecipient="CC:@projectmanagers"
This value can contain variables and functions that are replaced at runtime.
-
ems
ubje
ct="
mes
sage
subj
ect"
Specify the subject of the e-mail message. If -emsubject is omitted, a default
subject will be used.
This value can contain variables and functions that are replaced at runtime.
-
emte
xt="
mes
sage
text"
Specify the text of the e-mail message. If -emtext is omitted, a default message will
be used. If HTMLtags are detected in the text, the message will be formatted as an
HTMLmessage.
To load the message body from a file, use
-emtext="@filename"
where filename is the file that the body should be loaded from at runtime. If the file
starts with an HTML tag, the message will be formatted as an HTML message.
Otherwise it will be formatted as a plain text message.
If you are exporting your report to HTMLor plain text format, you can use the export
file as the message body by specifying
-emtext=@
(with no file name specified)
-
attac
hfile
="
filen
ame
"
Attach additional files to the e-mail message when e-mailing the report output. For
example, you may want to attach an HTML page with a standard report key or
overview. Attach multiple files by using multiple -attachfile parameters. For
example:
-attachfile="c:\files\note1.htm" -attachfile="c:\files\note2.htm"
This value can contain variables and functions that are replaced at runtime.
-
emr
ecei
pt
Requests a read receipt for the e-mail message.

Report Commander 2.5 76
Logging Options
Report Commander writes informational and error messages to the console (command
prompt window). You may also want to have it write output to a log file for later review.
Option Description
-
logfile="
filename"
Causes Report Commander to write all progress and error messages to the
specified log file, in addition to writing them to the console.
This value can contain variables and functions that are replaced at runtime.
-
appendlog
If set, output is appended to the existing log file (if it exists). Otherwise the log is
overwritten each time Report Commander runs.
-verbose Causes Report Commander to display additional information as it processes the
report, which may be useful in diagnosing problems.
Parameters
Use the -parameters or -namedparameters option to specify values for the report's
parameters.
Automatically inserting date-based values
You can use variables and functions to use the current date (or a date calculated based on the
current date) as a parameter value.
Option Description
-
parameter
s
Follow with any parameters required by the report.
The -parameters option must come after all other options, and be
followed by the parameters, in the order they are expected by the report.
Parameters that contain spaces or punctuation must be enclosed in quotation
marks.
This value can contain variables and functions that are replaced at runtime.
Multiple Values
For parameters that accept more than one value, use the following syntax:
-parameters "value1,value2,value3"
Note that parameters containing a quotation mark or comma are not supported.
Ranges
For parameters that accept a range of values, use the tilde (~) to separate the
beginning and ending values. For example:
-parameters 3.5~26

Report Commander 2.5 77
Option Description
You may omit the starting and ending value if appropriate:
-parameters 20~
-parameters ~18
By default the starting and ending value will be included in the range. To exclude
a value, prefix it with an exclamation (!). For example:
-parameters 1~!4
This would include all values in the range from 1 to 4, including 1 but not 4.
Example
Your report expects three parameters: A start date (date), end date (date) and
the names of the regions to report on (multi-value string). The parameters
would be specified on the command line as:
-parameters "12/1/2003" "12/31/2003" "Region A,Region B, Region C"
-
namedpar
ameters
Allows you to specify the parameters for the report by name.
This option must be the last option on the command line, followed by the
parameters in the form 'name=value'. This option cannot be used if the -
parameters option is used.
The syntax for specifying parameter values is the same as the syntax when
using the -parameters option.
When using the -namedparameters option you can specify the parameters in
any order, and omit optional parameters.
This value can contain variables and functions that are replaced at runtime.
Example
Your report expects three parameters: "Start Date" (date), an optional "End
Date" (date) and the "Regions" to report on (multi-value string). The
parameters would be specified on the command line as:
-namedparameters "start date"="12/1/2003" "end date"="12/31/2003" region="Region A,Region B, Region C"
You could also omit the option end date and specify the parameters as:
-namedparameters "start date"="12/1/2003" region="Region A,Region B, Region C"
Note: If your parameter name starts with "@" (e.g., "@Parameter1" you must
"escape" the name using the "\" character:

Report Commander 2.5 78
Option Description
-namedparameters \@Parameter1=1234
Conversion Options
Report Commander writes informational and error messages to the console (command
prompt window). You may also want to have it write output to a log file for later review.
Option Description
-
exportproject="
filename"
Creates a new Report Commander project file from the command-line
options you have specified. See Creating Projects from Existing
Command Lines for more information.
If filename does not have include the ".rcproject" extension, Report
Commander will add it.
If the file you specify already exists, Report Commander will return an
error and will not overwrite it.
Uploading Output
Report Commander can upload the export file to a remote server using FTP, SFTP, or HTTP.
When you configureReport Commander to upload the output file, the output file is not
saved locally. If you need to upload the file and also keep a local copy, use the Project
Editor/ProjectRunner instead of the CommandRunner. (In the Project Editor, use a File
Output and an UploadTask.)
FTP or SFTP
To upload the output file using FTP or SFTP, use the following syntax for the -exportfile option:
-exportfile="protocol://userID:password@servername:port/path/filename.ext"
where
protocol
The type of server to connect to:FTP, FTPS, or SFTP.
userID
Optional user ID to use to log in to the server.
password
Optional password to use to log in to the server.
servername
The server name or address.
port

Report Commander 2.5 79
Optional port to connect to.
path
Path or directory on the server
filename.ext
The name of the file to export to/upload.
For example:
Upload to an FTPserver using the specified user ID and password:
-exportfile="ftp://bob392:mypasswordisweak@ftp.example.com/files/uploads/reports/myreport.pdf"
HTTP
Report Commander can upload to a Web server using either the POST orPUTmethod. Use the
-uploadmethod command-line option to specify the method used.
HTTP PUT
When HTTP PUT is used, Report Commander "puts" the file(s) directly to the Web server. This
approach works like FTP: you specify only the URL to which the output should be saved. For
this method to work, the Web server must be specifically configured to accept files using HTTP
PUT.
The command-line syntax for this option is:
-uploadmethod=put -exportfile=http://upload.example.com/outputfiles/myreport.pdf
-uploadmethod=put -exportfile=http://userid:[email protected]/outputfiles/myreport.pdf
HTTP POST
When HTTP POST is used, Report Commander posts the file(s) to a form on the Web server.
To use this method, the necessary form must exist on the server, and must contain the
necessary programming logic to accept the uploaded files and store them in the proper
location.
To upload with HTTP POST, you must specify both the name of the export file and the URL of
the form to which the file should be posted. The -uploadtarget option is used to specify the
URLto upload to.
The command-line syntax for this option is:
-uploadmethod=post -exportfile=myreport.pdf -uploadtarget=http://upload.example.com/uploadforms/upload.aspx
-uploadmethod=post -exportfile=myreport.pdf -uploadtarget=https://userid:[email protected]/uploadforms/upload.aspx

Report Commander 2.5 80
In these examples, Report Commander exports the report to "myreport.pdf" and then posts
the file to the form at upload.example.com/uploadforms/upload.aspx.
CSV Export Options
When you use the CSV export format, everything in your report is interpreted as a record to
be written to the file, so your report should not include any extraneous information such as
headers and footers.
If you want the first row of the file to contain field names, add a report header that contains
the field names, and include the following option on the command line:
-csvstyle=header
The following additional options can be used for CSV exports:
Option Description
-csvstyle=option Determines whether column headings will be exported to the
report. Valid values for option are:
crstyle
Crystal Reports settings determine style
noheader
No column headings are exported
header
The first line of the file contains column headings
-csvchar=character The character used to separate columns when exporting to CSV. To
use a tab character as the separator, specify "{tab}". Default
value: ","
-
csvdelimiter=character
The character used to enclose string values when exporting to CSV.
To use no delimiter, specify "{none}". Default value: double quote
(").
Related Topics
CSV Export Options Page 58
CSV Export Settings 38
Excel Export Options
The following additional options can be used for Excel (XLS and XLSX)exports:
Option Description
-
columnwidthmode=
The method for setting column widths.
Valid values for option:

Report Commander 2.5 81
Option Description
option reportheader
Columns widths are based on objects in the report header
pageheader
Columns widths are based on objects in the page header
groupheader
Columns widths are based on objects in group headers
detail
Columns widths are based on objects in detail sections
groupfooter
Columns widths are based on objects in group footers
pagefooter
Columns widths are based on objects in page footers
reportfooter
Columns widths are based on objects in report footers
wholereport
Columns widths are based on objects in the whole report
fixed
Columns use the fixed width specified using the -columnwidth
parameter
auto
Columns are sized automatically
Default value: fixed
-columnwidth=size The column width, if you want fixed-width columns for an Excel
export. Set to 0 for automatic column width. If a value other than 0 is
specified, the columnwidthmode is treated as "fixed". Default value:
0.
-
pageheaderfooter=
option
Determines how page headers and footers should be exported. Valid
values for option are:
none
Page headers and footers not exported
once
Page headers and footers are exported once at the beginning of
the report
all
Page headers and footers are exported for each page
-
firstpage=
pagenumber
The first page of the page range to export.
-
lastpage=
pagenumber
The last page of the page range to export.
-convertdates
[{+|-}]
Convert dates to strings. Default value: False.

Report Commander 2.5 82
Option Description
-gridlines[{+|-}] Show grid lines. Default value: False.
-tabheadings[{+|-}] Tab has column headings. Default value: True.
-areagroup:index Group number to base column widths on. Default value: 0.
-groupoutlines
[{+|-}]
Show group outlines. Default value: False.
Related Topics
Excel Data-Only Export Options 82
Excel Export Options Page 59
Excel Export Settings 40
Excel Data-Only Export Options
The following additional options can be used for Excel data-only exports:
Option Description
-
pageheaderfooter=
option
Determines how page headers and footers should be exported. Valid
values for option are:
none
Page headers and footers not exported
once
Page headers and footers are exported once at the beginning of
the report
all
Page headers and footers are exported for each page
-exportformatting
[{+|-}]
Export formatting for objects. If not specified, formatting for objects
is not exported. Default:False.
-maintainalignment
[{+|-}]
Maintain column alignment. Default value: True.
-maintainposition
[{+|-}]
Maintain relative object position. Default value: False.
-simplifyheaders
[{+|-}]
Simplify page headers. Default value: True.
-worksheetfunctions
[{+|-}]
Use worksheet functions for summaries. Default value: True.
-exportimages
[{+|-}]
Export images. Default value: True.
Related Topics

Report Commander 2.5 83
Excel Export Options 80
Excel Export Options Page 59
Excel Export Settings 40
HTML Export Options
When you export to HTML, Report Commander by default creates a single HTML file containing
the entire report. Use the -separate option to generate a separate HTML file for each page of
the report. When using this option you will probably want the -navbar option as well, which
includes a simple navigation bar at the bottom of each page.
Any graphics contained in the report will be exported as image files, saved in a subdirectory
below the directory where the HTML pages are placed. Use the -flattenhtmloption to place
the images in the same directory as the HTMLfiles.
When you upload or e-mail the exported report, Report Commander includes all of the pages
and image files.
HTML E-Mail
If you are exporting your report to HTML and then sending the output by e-mail, you can use
the HTML output as the body of the e-mail message, rather than including it as an attachment.
The following command line illustrates this:
adcrutil -report="C:\reports\myreport.rpt" -exportformat=html -exportfile="c:\temp\output.htm" -removefile -emserver=127.0.0.1 -emsender="[email protected]" -emrecipient="[email protected]" -emsubject="Today's sales results" -emtext="@"
HTML Formatting Options
When you export to HTML, the following additional command-line options are valid:
Option Description
-navbar When exporting to HTML, include a navigation bar on each page of the
output.
-separate When exporting to HTML, generates a separate HTML file for each
page of the report.
-flattenhtml When exporting to HTML, "flattens" the directory structure so that
images are in the same directory as the HTML files, rather than a
subdirectory.
-
firstpage=
pagenumber
The first page of the page range to export.
-
lastpage=
pagenumber
The last page of the page range to export.
Related Topics

Report Commander 2.5 84
HTML Export Options Page 60
HTML Export Settings 39
PDF, RTF, and Word Export Options
The following additional options can be used for PDF, RTF, Editable RTF, and Microsoft Word
exports:
Option Description
-
firstpage=
pagenumber
The first page of the page range to export.
-
lastpage=
pagenumber
The last page of the page range to export.
-bookmarks[{+|-}] Applies only to PDF exports. Forces Report Commander to create
bookmarks in the PDF file based on headings in the report. If this
option is not specified, Report Commander uses the default setting
saved with the report. To suppress bookmarks in a report that is
configured to use them by default, use "-bookmarks-".
Related Topics
PDF Export Options Page 60
PDF Export Settings 40
Text Export Options
The following additional options can be used for plain text exports:
Option Description
-
firstpage=
pagenumber
The first page of the page range to export.
-
lastpage=
pagenumber
The last page of the page range to export.
-
linesperpage=number
The number of lines per page (default 60). Specify 0 for no
pagination.
-
charactersperinch=
number
The number of characters per inch (default 12). Recommended to be
between 8 and 16.
Related Topics

Report Commander 2.5 85
Text Export Options Page 60
Text Export Settings 41
XML Export Options
The following additional options can be used for XML exports:
Option Description
-xmlformat:"index" Specifies the XML exporting format to use for the export. Exporting
formats are defined and saved within the report. You may specify the
0-based index of the exporting format, or its name. Be sure to enclose
the name in quotes if it contains spaces or punctuation. Specify "0"
(the default value) to use the default exporting format, which is
present for all reports.
Related Topics
XML Export Options Page 61
XML Export Settings 41
Response Files
A response file can be used to supply all or some of the command-line parameters for Report
Commander. To use a response file, include the response file on the command line as show in
this example:
adcrutil @c:\parameters.xml
where "c:\parameters.xml" is the name of the response file.
The response file may be placed in any position on the command line. For example:
adcrutil -parameter1:value @c:\parameters.xml -parameter2:value2
When a response file is processed, the parameters in the file are inserted into the command
line at the point where the response file command was encountered. If a parameter appears
on the command line and in the response file, the relative positions determine which value is
used. In the example above, if the response file contains values for parameter1 and
parameter2, the value from the file would be used for parameter1, but the value on the
command line would be used for parameter2. For parameters that accept multiple values, the
list of values is taken from both the file and the command line.
If you are using response files extensively, you should consider using a project-based
approach instead of the command-line approach, using the Project Editor andProject
Runner.

Report Commander 2.5 86
Creating the Response File
The response file is defined using XML.
You can create a sample parameter file that lists all of the available parameters and shows
how to define them in the response file. To generate the sample file, use this command:
adcrutil -!xmlparametertemplate:"c:\sample.xml"
where "c:\sample.xml" is the name of the sample file you want to create. You can edit this file
in an XML editor or in a plain text editor like Notepad.
You can also generate a parameter file that contains the values you have specified on the
command line. To do this, add the command "-!xmlparameterfile" to the command line, along
with the parameters you want to save to the response file:
adcrutil -!xmlparameterfile:"c:\response.xml" -parameter1:value -parameter2:value2
The program will create "c:\response.xml", containing the values for parameter1 and
parameter2.

Report Commander 2.5 87
Window Reference
Data Source Properties Window
The Data Source Properties window allows you to view or override the properties of a
report data source (database connection).
You can reach this window from the Data Sources tab of the Report Properties panel in the
Project Editor, or from the Logins page of the Command Line Builder.
When you first load a report, this window will show the connection settings that are stored in
the report. To use those settings, you do not need to make any changes here.
If you need to run the report with different login information than the default, or connect to a
different database, make the changes here.
You can override the report to connect to a different database of the same kind as was
originally used in the report. For example, if you report was developed against your
"Development"database inSQLServer, you can override the report to connect to the
"Production" database inSQLServer instead.
However, you cannot use the override to connect to a different kind of database. For
example, you cannot override the report to connect to anOracle database instead of the
original SQLServer database.
Settings
Connection Information
Shows the database connection information. You can override the server
name/ODBCalias, database name, and/or schema name. Note that not all fields will be
applicable for all database types.
If you want to connect using the same settings that are already stored in the report,
you do not need to supply this information.
Click the Reset link next to a setting to reset that value to the default value configured in
the report.
This field can contain variables and functions that are replaced at runtime. More...
1
Login Information
Shows the database login credentials. Check the Use integrated security box to use
automatic authentication (if supported by the database) or uncheck the box and enter the
user ID and password to use when connecting.
1
Click the {} button to display the text editor, which helps you insert variables and functions
into the text. When you hover your mouse pointer over the field for a second, a preview of the
"expanded" text will be displayed so you can confirm your variables and functions are working
correctly.

Report Commander 2.5 88
Distribution Lists
Distribution Lists inReport Commander work like group mailing lists in your e-mail system:
they give you an easy way to send e-mail messages to a group of people.
For example, if you frequently send reports to your sales managers, you can create a
Distribution List called "Sales Managers" that includes all of your sales managers. Then, when
you are configuring an E-MailTask, you can specify the list as a recipient, and Report
Commander will send the message to all members of the list.
You can use a Distribution List anywhere in Report Commander that you enter e-mail
recipients. Just enter the name of the list, prefixed with an "@" sign:@Sales Managers.
Distribution List Properties Window
You can reach this window from the Distribution Lists tab of the Project Properties Panel in
the Project Editor, or from the User Settings window in the Command LineBuilder.
List Name
Provide a name for the list.
If you create a list with the same name as an existing list (for example, you add a list to
your Project that has the same name as a list in the Shared Settings), Report Commander
will merge the lists at runtime and send e-mail to all members.
Recipients
Enter the addresses and, optionally, names of the members of this list. You can paste a list
of e-mail addresses from the clipboard or enter them one-by-one.
Distribution Lists can contain other DistributionLists as members. For example, if you are
creating a list named "Managers" you can add the Address @Sales Managers and Report
will include all members of the "Sales Managers"list in messages sent to the"Managers"
list.
File Servers
A File Server defines the settings used by a File UploadTask to upload files to an FTP, SFTP,
or HTTP(Web) server.
File server settings are stored centrally rather than individually for each task so that you can
easily change settings (such as the password) without having to edit each project separately.
File Server Properties Window
This window is reached from the Project Properties panel of the Project Editor.

Report Commander 2.5 89
Server Type
Select the kind of server you are connecting to: FTP, SFTP, or HTTP (Web server)
Server Name or Address
Specify the name or address of the server to connect to. For example, ftp.example.com.
For an HTTP (Web) server, specify only the server name, not the complete URLof the
upload page. For example, enter www.example.com, even if the upload will be going to
"www.example.com/uploads/uploadform.htm". You will specify the rest of the URLin the
settings for the UploadTask.
Port
If the server uses a port other than the default value for the server type, enter the port
number.
Use SSL/TLS Connection
Check this box to use a secure connection. This option does not apply for SFTP connections,
which are always encrypted.
Authentication
Enter the user ID and password required to connect to the server.
Test
Click the Test button to test the connection settings. Report Commander will attempt to
connect to the specified server. This option is not available for HTTP servers.
E-Mail Servers
E-MailServers allow you to provide the settings that Report Commander needs in order to
connect to an SMTPserver to send e-mail messages. To send e-mail messages, you must
have at least one mail server configured.
If have more than one server configured, Report Commander will use the first one that it is
able to connect to successfully.
E-Mail Server Properties Window
This window is reached from the Project Properties panel of the Project Editor, or the E-Mail
page of the Command LineBuilder.
Server Name or Address
Specify the name (address) of the SMTP server through which the mail will be sent. For
example, to use Gmail, enter smtp.gmail.com.
Port
If the server uses a port other than the standard value of 25, enter the port number.
Return Address for Messages
Enter the e-mail address to be used as the return address for messages sent through this
server. Enter only the address, not the name. For example,

Report Commander 2.5 90
This value is used by default if you do not specify a return address for a particular e-mail
task.
This field can contain variables and functions that are replaced at runtime. More...
1
Sender Display Name
Enter the name to be used in the return address for messages sent through this server.
Enter only the name, not the address. For example, Report Commander.
This value is used by default if you do not specify a return address for a particular e-mail
task.
This field can contain variables and functions that are replaced at runtime. More...
2
Authentication
If your mail server requires authentication for sending mail, enter your user ID and
password here. For example, to send throughGmail you would enter your full Gmail
If you are unsure what to enter here, check with the administrator of your mail system.
Enabled
Check this box to enable Report Commander to use this mail server. If you want to
temporarily prevent Report Commander from using this server, uncheck the box. If there
is not at least one enabled mail server available in the Shared Settings andProject
Settings, Report Commander will not be able to send any messages.
Test
Click the Test button to send a test message using the settings you have provided.
Multiple Value Editor Window
The Multiple Value Editor window appears when you edit a report parameter that allows more
than one value to be specified. Use the Add, Edit, and Delete buttons to specify the desired
values.
1
Click the {} button to display the text editor, which helps you insert variables and functions
into the text. When you hover your mouse pointer over the field for a second, a preview of the
"expanded" text will be displayed so you can confirm your variables and functions are working
correctly.
2
Click the {} button to display the text editor, which helps you insert variables and functions
into the text. When you hover your mouse pointer over the field for a second, a preview of the
"expanded" text will be displayed so you can confirm your variables and functions are working
correctly.

Report Commander 2.5 91
Parameter Editor
The Parameter Edit window appears when you edit the value for a Report Parameter.
ParameterTypes
Boolean (Yes/No)
Select either Yesor No for the value, or specify a variable or function to evaluate at runtime.
The variable or function must return a value that can be converted to boolean:yes/no,
true/false, or 1/0. Click the {} button to display the text editor, which helps you insert
variables and functions.
Currency
Enter a valid currency value, or specify a variable or function to evaluate at runtime.
The variable or function must return a valid currency value. Click the {} button to display the
text editor, which helps you insert variables and functions.
Date, Time, Date/Time
Enter a valid date, time, or date/time value, or specify a variable or function to evaluate at
runtime. For example, you can use functions to use the date when the report is processed, or
a date based on that date.
The variable or function must return a valid date, time, or date/time value. Click the {}
button to display the text editor, which helps you insert variables and functions.
Number
Enter a valid number value, or specify a variable or function to evaluate at runtime.
The variable or function must return a valid number value. Click the {} button to display the
text editor, which helps you insert variables and functions.
String
Enter a value, or specify a variable or function to evaluate at runtime.
Range Values
If the parameter accepts a range of values, the editor will allow you to specify the Start and
End values, with these additional options:
Specify start [end] value
Check this box if you want to specify a value. If this box is not checked, the range is
unbounded. For example, if you do not check the Specify start value box, no minimum
value will be used.

Report Commander 2.5 92
Include starting [ending] value
Check this box to include the Value in the range, or leave it unchecked to exclude the value.
For example, if you specify a start value of 4 and check this box, the report will select all
values greater than or equal to 4. If you do not check this box, the range will include all values
greater than 4.
Read Settings from Command Line Window
The Read Settings fromCommand Line window allows you to reverse-engineer project
settings from a set of command line options that you use to run the Command Runner.
This window can be reached from the following locations:
l In the CommandLine Builder, from the FileRead Settings from CommandLine menu
command. In this case you may only paste in one command line, and the settings imported
from the command line replace all the current settings in the Command LineBuilder.
l In the Project Editor, from the FileNew » Project from command line(s) menu
command. In this case you may paste in one or more command lines, and the settings
from those commands lines are combined to create a new project.
l In the Project Editor, from the AddReports and tasks from command line menu
command on the context (right-click) menu for the Project node. In this case you may
paste in one or more command lines, and the settings from those commands are used to
add additional reports and e-mail tasks to the currently-open project.
To use this tool, copy a command line that you are currently using to run the Command
Runner (adcrutil) to the clipboard, and then paste it into this window.
For example, if you have a batch file that runs this command every day:
"c:\program files\report commander\adcrutil.exe" -report="C:\reports\dailysales.rpt" -login!=dbserv1.customerdb:batchuser:pGNXQoGmNboLH/UtHMMong== -suppressempty -exportformat=PDF -exportfile="dailysales.pdf" -removefile -emsender="Report Distribution <distribution@example.com>" -emrecipient="sales_distributionlist@example.com" -emsubject="Daily Sales Report" -emtext="Attached is the daily sales report for {MMM d, yyyy}" -parameters "{yyyy-MM-dd}~{yyyy-MM-dd}"
You can copy/paste that entire line into the input box in this window.
You can also paste just the command-line options, without the "adcrutil.exe" part:
-report="C:\reports\dailysales.rpt" -login!=dbserv1.customerdb:batchuser:pGNXQoGmNboLH/UtHMMong== -suppressempty -exportformat=PDF -exportfile="dailysales.pdf" -removefile -emsender="Report Distribution <distribution@example.com>" -emrecipient="sales_distributionlist@example.com" -emsubject="Daily Sales Report" -emtext="Attached is the daily sales report for {MMM d, yyyy}" -parameters "{yyyy-MM-dd}~{yyyy-MM-dd}"
Your command line must be on a single line in the input box, even if it's a very long line.
The source report (.rpt file) must be available when you run the conversion, as Report
Commander needs to read information from the report file. Make sure the -report
option points to the file.
When you click OK, Report Commander will read the settings and create or update a project
from them.

Report Commander 2.5 93
Combining Multiple Commands
If you are currently running several different commands that you would like to combine into a
single project, you can paste all of the command lines into the input box together. Each
command line must be on its own, single line in the box.
This option is not available when this tool is invoked from the Command Line Builder,
because the CommandLineBuilder can only work with one report/output.
When you use this option, each command line is used to add a new target report to the
project, unless the report names (including path) match, in which case the command line will
be used to add a new OutputGroup to the existing report. In this case, the logins specified on
the second command line are ignored.
If the report filename and parameters both match an existing report, the command line will
be used to add a new Output to the existing Output Group.
If the command line is configured to e-mail the report output, a new e-mail task is added to
the project. The conversion tool does not attempt to combine e-mail operations into a single
task.
Text Editor
TheText Editor window allows you to edit values in Report Commander that support
variables and functions.
Throughout Report Commander, when you see a text entry box with a {}button next to it, this
indicates that the field supports variables and tokens. When you click the {} button, the Text
Editor window is displayed to help you select and insert variables and functions.
You do not have to open the Text Editor to add variables and function calls to text
boxes:you can always type or paste in the variable or function call using the
appropriate syntax.
At the top of the Text Editor window is a text edit box where you can type or paste text. Below
this is a preview window that shows you what the text will look like after Report Commander
evaluates the variables and functions it finds in the text.

Report Commander 2.5 94
If there are any errors in the variables or formulas you have entered, you will see an error
message here.
Once you have finished editing your text, click OK to return the value to the field you came
from.
Variables
TheVariables tab lists all Report Commander variables that have been defined for the
computer, your user settings, and the project. You can also show the available Windows
environment variables by checking the Show Windows environment variables box.
To insert a variable into your text, you can click the Insert button ( ) to insert the variable
at the current cursor position, or select the variable in the list and drag it to the location in the
text where you want it to appear.

Report Commander 2.5 95
Date/Time
The options on the Date/Time tab help you insert a call to the now function, which is an easy
way to insert the current date/time, or a value calculated based on the current date/time.
The "current" date/time will be the date/time when the project is executed.
If you want to use a date calculated based on the current date/time, check the Offset the
date/time by box and enter the appropriate offset. For example, if you want to use the
previous day's date, you would set to the offset to -1 Day.
Then select the format that you want the date/time to appear in. Choose one of the predefined
formats, or create your own using formatting patterns. The Preview box will show a preview
of the date/time using your selected calculation and format.
Once you have the value you want, click the Insert button ( ) to insert the function call at
the current cursor position, or select the button and drag it to the location in the text where
you want it to appear.
For more complex date/time operations, use the Functions page.
Functions
The Functions tab helps you insert function calls into your text. On the left is a list of available
functions. The panel on the right shows information about the selected function.
To insert a function call into your text, click the Insert button ( ) to insert the function call at
the current cursor position, or select the function in the list and drag it to the location in the
text where you want it to appear.
Report Commander will insert the function call with placeholders for all of the function
arguments. You then must edit the function call to replace those placeholders with the
appropriate values.

Report Commander 2.5 96
Variables and Functions
Variables and Functions
Variables and functions are related features that allow you to use dynamic content (content
that gets calculated when a report is executed) in parameters, file names, and other text in
your report processing settings. For example, using variables and functions you can:
l Make it easy to move projects between computers that use different paths for reports and
outputs.
l Automatically use the current date/time (or dates calculated based on the current
date/time) in report parameters, file names, etc.
Report Commander version 1 had a similar but much more limited capability called
dynamic file names and parameters. Dynamic text from the old version will be
converted to the new format automatically. See the Variable Syntax Changes from
Version 1 topic for more information.
UsingVariables and Functions
Variables and functions are supported throughout Report Commander in most place where you
need to enter parameters, file names, or other text. Wherever you see a text entry box in the
Project Editor that has a {}button next to it, this indicates that the field supports variables
and functions. When you click the button, the Text Edit window opens. This window provides a
list of available variables and functions, and includes tools to help you insert them into your
text using the correct syntax.
Variables
Variables allow you to insert predefined text into parameters, file names, and other text
boxes in Report Commander.
Suppose that on one computer where you use Report Commander, all the report files are
located in the folder "c:\reports". But you also want to be able to execute your projects on a
second computer, which reads the reports over the network using the UNC path
"\\mycomputer\reports". To avoid having to change the report path for your projects when
you move them from one computer to the other, you can define a variable named
"ReportPath" and set it to "c:\reports" on the first computer, and "\\mycomputer\reports" on
the second. Then, in all your projects, you use the "ReportPath"variable when specifying the
report name, instead of writing in the fixed path.
To do this, you open the Project Properties for one of your projects and go to the Variables
tab. Here you add a User Variable named "ReportPath" with the value c:\reports. (A "user"
variable means that it is available to all projects you work with on the computer, so you only
have to define this variable once.)
Then, in the Report Properties where you specify the report filename, instead of entering
c:\reports\report1.rpt, you enter ${ReportPath}\report1.rpt. When you execute the

Report Commander 2.5 97
project, Report Commander replaces "${ReportPath}" with the value of the ReportPath
variable.
Now on the second computer, you define the same User Variable called "ReportPath", but you
set it to \\mycomputer\reports, and when the project is run on that computer, Report
Commander will use that value instead.
You might also want to define variables for other values that need to be standardized, or that
you want to be able to change easily if the project is run on a different computer. For
example, you could define a "CompanyName" variable to make it easy to insert the company
name in e-mail messages. Or an "OutputPath" variable to standardize where export files get
written.
Variable Types
Report Commander supports four kinds of variables:
l Environment Variables are defined in Windows. You can insert any Windows
environment variable using the ${VariableName} syntax.
l User Variables are defined in Report Commander and are available to all
projects/commands that you run on the computer. Using user variables you can ensure
that settings are standardized across all projects, without having to define those settings in
each project. You can also share your variables with other users on the same computer or
copy them to another computer as described in the Sharing Settings with Another User or
Computer topic.
l SharedVariables are variables that have been made available to all users on the
computer as described in the Sharing Settings with Another User or Computer topic.
l Project Variables are defined only for a particular project and do not affect other
projects.
Managing Variables
In the Project Editor, user and project variables are managed on the Variables tab of the
Project Properties panel. The Command Line Builder does not support project-level variables,
but you can manage user variables through the User Settings window.
When you execute a project using the Project Runner, you can set or override variable values
from the command line.
Complex Variables
Variables can contain other variables. For example, you can define the "ReportDrive"as c:
and the "ReportPath" as ${ReportDrive}\reports. At runtime, the ReportPath variable will
be expanded to c:\reports.
Variables can also include function calls. See the Variables with Functions topic for an
example of defining a variable that includes function calls.

Report Commander 2.5 98
PredefinedVariables
Report Commander automatically defines some variables for you, which can be used
throughout your Project.
Name Description
now The current date/time, in the form "yyyy-MM-dd HH:mm:ss". To specify
a format, or calculate an offset from the current date/time, use the now
function instead.
Project.Name The name of the project (without the path or file extension)
Project.FileName The complete path and filename of the project file
Project.Path The path where the project file is located
Report.Name The name of the report (without the path or file extension)
Report.FileName The complete path and file name of the report
Report.Path The complete path and file name of the report
Group.Name The name of the Output Group
Group.FullName The full name of the Output Group (includes the name of the Report)
Output.Name The name of the Output
Output.FullName The full name of the Output (includes the name of the Report and Output
Group)
Output.n
.PathAndFileName
The complete file name (including path) of the export file produced by
File Output (export) operation number n, where n is the "IDCode" shown
on the properties page for the output. When you are exporting a report
using the Command Runner, the ID will always be "1".
For example, in an e-mail message task you want to insert the file name
created by your export. You can't hard-code the file name in the
message because it's generated dynamically based on the date. Instead
you can insert the variable token ${Output.1.PathAndFileName} to
insert the name at runtime.
Output.
n.FileName
The file name (without path) of the export file produced by File Output
(export) operation number n.
Output.n.Path The path (without file name) of the export file produced by File Output
(export) operation number n.
Parameters.
ParameterName
The value of the ParameterName parameter at runtime. A variable is
defined for each report parameter. For example, if your report has a
parameter named "SalesRegion", you can use
${Parameters.SalesRegion}to insert the value of the parameter.
Note:Any characters other than a-z, 0-9, "-", "_", and "."are removed
from the parameter name when constructing the variable name. For
example, of your parameter name is "Customer Record #", the variable

Report Commander 2.5 99
Name Description
would be named "Parameters.CustomerRecord".
Functions
While variables allow you to easily insert predefined text, functions allow you to insert the
results of calculations (similar to using formulas when designing a report).
For example, suppose that each morning you run a report and want that report to return data
from the previous day, so you need to pass the previous day's date as a parameter to the
report. You don't want to edit your Project each day to change the value of that parameter, so
instead you can use a function to calculate the correct date for you: the now function allows
you to insert a date calculated based on the current date when the report runs.
So instead of setting the report parameter to the date of 2015-01-23 and changing the value
each time you run the report, you could set the parameter to @now("yyyy-MM-dd",-
1,"day"). This tells Report Commander to take the current date/time, subtract 1 day, and
format the resulting date in year-month-day format.
See the FunctionReference for more information on the available functions.
User-defined functions are not currently available in Report Commander.
Related Topics
Function Examples 113
Variables with Functions 114
Reference
Function Reference 99
Date/Time Formats 110
Function Reference
FunctionSyntax
To call a function, prefix the name with the @ symbol:
@now("yyyy-MM-dd",-1,"day")
Argument Types
For string arguments, the argument value must be enclosed in quotes. Other argument types
do not require quotes.
If you are using a variable or another function as an argument, do not use quotes. For
example: @now(${StandardDateFormat}) (assuming you have defined a variable named
"StandardDateFormat" that returns a valid date/time formatting string).

Report Commander 2.5 100
Optional Arguments
In the function reference below, brackets [] around an argument indicate that the argument is
optional.
If you omit an optional argument but need to specify a subsequent argument, you include the
comma after the place where the omitted argument would be. For example, in the EndOfDay
function, the first argument (targetDate)is optional; if you omit it, the current date is used.
So you would call @EndOfDay(,"yyyy-MM-dd HH:mm"). If you omit multiple arguments, there
will be a comma for each skipped argument.
If you omit arguments and don't need to specify subsequent arguments, no comma is needed.
For example, if you want to call the now function and specify a format but not an offset, you
can call @now("yyyy-MM-dd") rather than @now("yyyy-MM-dd",,).
Note that the parentheses for the function call are always required, even if you are not
supplying any arguments. So @EndOfDay() is valid, but @EndOfDay is not
Combining Functions
Function calls can use variables and other function calls as arguments. For example, this call
returns the beginning of the month in which yesterday occurs:
@StartOfMonth(@DateAdd(,-1,"day"))
Date/Time Format
All of the date/time functions return the date/time formatted as yyyy-MM-dd HH:mm:ss by
default. All of the functions accept an optional final argument for specifying a formatting
pattern. Calling @EndOfMonth(,"MMMM d, yyyy") is equivalent to calling @FormatDate
(@EndOfMonth(),"MMMM d, yyyy").
If you are going to use the result of the function as an argument to another function, you
should leave the value in the default format.
Function List
Name Description
AdjustDate Adjusts parts of a date/time value
DateAdd Adds or subtract time increments from a date/time value.
EndOfDay Gets a date/time value representing 11:59:59 PM on the targetDate.
EndOfMonth Gets a date/time value representing 11:59:59 on the last day of the month
in which targetDate occurs.
EndOfQuarter Gets the date of the end of the calendar quarter containing a specified date.
EndOfYear Gets a date/time value representing 11:59:59 on the last day of the year in
which targetDate occurs.
FormatDate Formats a date/time value

Report Commander 2.5 101
Name Description
MakeDate Makes a date/time value from years, months, days, hours, minutes, and
seconds
MostRecentDay Gets the most recent occurrence of the specified day of the week, on or
before the targetDate.
NextDay Gets the next occurrence of the specified day of the week, on or after the
targetDate.
now Returns current date/time, with optional format and offset.
QuarterNumber Gets the number of the calendar quarter (1-4) in which the specified date
occurs.
StartOfDay Gets a date/time value representing 12:00 AM on the targetDate.
StartOfMonth Gets a date/time value representing 12:00 AM on the first day of the month
in which targetDate occurs.
StartOfQuarter Gets the date of the beginning of the calendar quarter containing a specified
date.
StartOfYear Gets a date/time value representing 12:00 AM on the first day of the year in
which targetDate occurs.
Function Reference
AdjustDate
Adjusts parts of a date/time value
Syntax: @AdjustDate([targetDateTime], [year], [month], [day], [hour], [minute], [second],
["format"])
Arguments
targetDateTime
(DateTime) Optional. The date/time value to adjust. If not specified, the current
date/time is used.
year
(Integer) Optional. The year value to use. If not specified, the value from the target
date/time is used.
month
(Integer) Optional. The month value to use. If not specified, the value from the target
date/time is used.
day
(Integer) Optional. The day value to use. If not specified, the value from the target
date/time is used.
hour
(Integer) Optional. The hour value to use. If not specified, the value from the target
date/time is used.
minute

Report Commander 2.5 102
(Integer) Optional. The minute value to use. If not specified, the value from the target
date/time is used.
second
(Integer) Optional. The second value to use. If not specified, the value from the target
date/time is used.
format
(String) Optional. Optional formatting pattern to use for the returned value. Not
necessary if the returned value is being used by another date/time function.
This function can be used to change any of the parts (year, month, day, hour, minute, second)
of a date. For example, if you need a date/time value representing 0 minutes past the current
hour, you can use:
@AdjustDate(,,,,,0,0)
The omitted arguments tell the function to use the current date/time as the starting point, and
retain the year, month, day, and hour values, but set the minute and second to 0.
Note that you can accomplish the same thing as AdjustDate using the now function by using
literal values in the formatting string.
@now("yyyy-MM-dd HH:00:00")
However, AdjustDate is preferred if the result is being used as an argument to another
function or as a report parameter.
DateAdd
Adds or subtract time increments from a date/time value.
Syntax: @DateAdd([value], offset, unit, ["format"])
Arguments
value
(DateTime) Optional. Date/time value to adjust. This can come from another function
that returns a date/time value, or a Variable that provides a date/time value. If not
specified, the current date/time is used.
offset
(Integer) Required. Number of units to add or subtract from current date/time
unit
(Choice) Required. Unit to add or subtract. Valid values:
l year
l month
l month
l day
l hour

Report Commander 2.5 103
l minute
l second
format
(String) Optional. Optional formatting pattern to use for the returned value. Not
necessary if the returned value is being used by another date/time function.
EndOfDay
Gets a date/time value representing 11:59:59 PM on the targetDate.
Syntax: @EndOfDay([targetDate], ["format"])
Arguments
targetDate
(DateTime) Optional. The day to return the end of. If omitted, the current date is used.
format
(String) Optional. Optional formatting pattern to use for the returned value. Not
necessary if the returned value is being used by another date/time function.
EndOfMonth
Gets a date/time value representing 11:59:59 on the last day of the month in which
targetDate occurs.
Syntax: @EndOfMonth([targetDate], ["format"])
Arguments
targetDate
(DateTime) Optional. The day to return the end of the month for. If omitted, the current
date is used.
format
(String) Optional. Optional formatting pattern to use for the returned value. Not
necessary if the returned value is being used by another date/time function.
EndOfQuarter
Gets the date of the end of the calendar quarter containing a specified date.
Syntax: @EndOfQuarter([targetDate], [month], ["format"])
Arguments
targetDate
(DateTime) Optional. The date/time to find the quarter for. If omitted, the current
date/time is used.
month
(Choice) Optional. The month that begins the first quarter of the year. If omitted,
January is used.Valid values:

Report Commander 2.5 104
l january
l february
l march
l april
l may
l june
l july
l august
l september
l october
l november
l december
format
(String) Optional. Optional formatting pattern to use for the returned value. Not
necessary if the returned value is being used by another date/time function.
EndOfYear
Gets a date/time value representing 11:59:59 on the last day of the year in which targetDate
occurs.
Syntax: @EndOfYear([targetDate], ["format"])
Arguments
targetDate
(DateTime) Optional. The day to return the end of the year for. If omitted, the current
date is used.
format
(String) Optional. Optional formatting pattern to use for the returned value. Not
necessary if the returned value is being used by another date/time function.
FormatDate
Formats a date/time value
Syntax: @FormatDate(value, "format")
Arguments
value

Report Commander 2.5 105
(DateTime) Required. Date/time value to format. This can come from another function
that returns a date/time value, or a Variable that provides a date/time value
format
(String) Required. Formatting pattern to use. See the Date/Time Formats help topic for
more information.
MakeDate
Makes a date/time value from years, months, days, hours, minutes, and seconds
Syntax: @MakeDate([year], [month], [day], [hour], [minute], [second], ["format"])
Arguments
year
(Integer) Optional. The year value to use. If not specified, the value from the current
date/time is used.
month
(Integer) Optional. The month value to use. If not specified, the value from the current
date/time is used.
day
(Integer) Optional. The day value to use. If not specified, the value from the current
date/time is used.
hour
(Integer) Optional. The hour value to use. If not specified, the value from the current
date/time is used.
minute
(Integer) Optional. The minute value to use. If not specified, the value from the current
date/time is used.
second
(Integer) Optional. The second value to use. If not specified, the value from the current
date/time is used.
format
(String) Optional. Optional formatting pattern to use for the returned value. Not
necessary if the returned value is being used by another date/time function.
Create a date/time where the month and day are coming from variables for some reason:
@MakeDate(2015,${MonthToUse},${DayToUse),8,15,0)
MostRecentDay
Gets the most recent occurrence of the specified day of the week, on or before the targetDate.
Syntax: @MostRecentDay([targetDate], day, ["format"])
Arguments
targetDate
(DateTime) Optional. The starting date/time. If omitted, the current date/time is used.
day

Report Commander 2.5 106
(Choice) Required. The name of the day of the week to look for.Valid values:
l sunday
l monday
l tuesday
l wednesday
l thursday
l friday
l saturday
format
(String) Optional. Optional formatting pattern to use for the returned value. Not
necessary if the returned value is being used by another date/time function.
This function can be used to find the beginning of the week in which a date occurs. For
example, if you define the first day of the week as Monday, you can call this function to get
the start of the current week:
@MostRecentDay(${now},"monday")
The targetDate argument is optional, so you could also use
@MostRecentDay(,"monday")
to produce the same result
NextDay
Gets the next occurrence of the specified day of the week, on or after the targetDate.
Syntax: @NextDay([targetDate], day, ["format"])
Arguments
targetDate
(DateTime) Optional. The starting date/time. If omitted, the current date/time is used.
day
(Choice) Required. The name of the day of the week to look for.Valid values:
l sunday
l monday
l tuesday
l wednesday
l thursday

Report Commander 2.5 107
l friday
l saturday
format
(String) Optional. Optional formatting pattern to use for the returned value. Not
necessary if the returned value is being used by another date/time function.
This function can be used to find the end of the week in which a date occurs. For example, if
you define the last day of the week as Friday, you can call this function to get the end of the
current week:
@NextDay(${now},"friday")
now
Returns current date/time, with optional format and offset.
Syntax: @now(["format"], [offset], [unit])
Arguments
format
(String) Optional. Formatting pattern to use. See the Date/Time Formats help topic for
more information.
offset
(Integer) Optional. Number of units to add or subtract from current date/time
unit
(Choice) Optional. Unit to add or subtract. Valid values:
l year
l month
l month
l day
l hour
l minute
l second
The now function returns the current date/time, or a date/time based on the current
date/time, optionally using a specific format.
Examples
@now()
Inserts the current date/time in the standard format "yyyy-MM-dd HH:mm:ss".
Equivalent to using ${now}
@now("MMMM d, yyyy")

Report Commander 2.5 108
Inserts the current date/time using the long date format, e.g., "January 3, 2015."
@now("MMMM d, yyyy",-1,day)
Subtracts 1 day from the current date/time and inserts the result using the long date
format, e.g., "January 3, 2015."
QuarterNumber
Gets the number of the calendar quarter (1-4) in which the specified date occurs.
Syntax: @QuarterNumber([targetDate], [month])
Arguments
targetDate
(DateTime) Optional. The date/time to find the quarter for. If omitted, the current
date/time is used.
month
(Choice) Optional. The month that begins the first quarter of the year. If omitted,
January is used.Valid values:
l january
l february
l march
l april
l may
l june
l july
l august
l september
l october
l november
l december
StartOfDay
Gets a date/time value representing 12:00 AM on the targetDate.
Syntax: @StartOfDay([targetDate], ["format"])
Arguments
targetDate
(DateTime) Optional. The day to return the start of. If omitted, the current date is used.

Report Commander 2.5 109
format
(String) Optional. Optional formatting pattern to use for the returned value. Not
necessary if the returned value is being used by another date/time function.
StartOfMonth
Gets a date/time value representing 12:00 AM on the first day of the month in which
targetDate occurs.
Syntax: @StartOfMonth([targetDate], ["format"])
Arguments
targetDate
(DateTime) Optional. The day to return the start of the month for. If omitted, the
current date is used.
format
(String) Optional. Optional formatting pattern to use for the returned value. Not
necessary if the returned value is being used by another date/time function.
StartOfQuarter
Gets the date of the beginning of the calendar quarter containing a specified date.
Syntax: @StartOfQuarter([targetDate], [month], ["format"])
Arguments
targetDate
(DateTime) Optional. The date/time to find the quarter for. If omitted, the current
date/time is used.
month
(Choice) Optional. The month that begins the first quarter of the year. If omitted,
January is used.Valid values:
l january
l february
l march
l april
l may
l june
l july
l august
l september

Report Commander 2.5 110
l october
l november
l december
format
(String) Optional. Optional formatting pattern to use for the returned value. Not
necessary if the returned value is being used by another date/time function.
StartOfYear
Gets a date/time value representing 12:00 AM on the first day of the year in which targetDate
occurs.
Syntax: @StartOfYear([targetDate], ["format"])
Arguments
targetDate
(DateTime) Optional. The day to return the start of the year for. If omitted, the current
date is used.
format
(String) Optional. Optional formatting pattern to use for the returned value. Not
necessary if the returned value is being used by another date/time function.
Related Concepts
Variables and Functions 96
Related Topics
Function Examples 113
Variables with Functions 114
Date/Time Formats
Functions that work with date/time values all accept a format argument that determines how
the date/time will be formatted.
Standard Formats
Standard formats are single-character codes representing common date/time formats. Based
on the code you enter, the date/time is formatted using the standard format for your locale.
For example, if you use the short date format @now("d") in the UnitedStates, this would be
expanded to 1/23/2015, while in the United Kingdom it would be expanded to 2015/01/23.
If you want to make sure the value is formatted the same regardless of the
language/locale of the computer, use a Custom Format as described below. For

Report Commander 2.5 111
example, if you want you date to always appear as "1/23/2015" no matter where it is
run, you would use @now("M/d/yyyy").
Format Meaning Example
d Short date pattern. 6/15/2014
D Long date pattern. Monday, June 15, 2014
f Full date/time pattern (short time). Monday, June 15, 2014 1:45 PM
F Full date/time pattern (long time). Monday, June 15, 2014 1:45:30 PM
g General date/time pattern (short time). 6/15/2014 1:45 PM
G General date/time pattern (long time). 6/15/2014 1:45:30 PM
M, m Month/day pattern. June 15
R, r RFC1123 pattern. Mon, 15 Jun 2014 20:45:30 GMT
s Sortable date/time pattern. 2014-06-15T13:45:30
t Short time pattern. 1:45 PM
T Long time pattern. 1:45:30 PM
u Universal sortable date/time pattern. 2014-06-15 20:45:30Z
U Universal full date/time pattern. Monday, June 15, 2014 8:45:30 PM
Y, y Year month pattern. June, 2014
Custom Formats
Custom formatting pattern is built up from tokens that represent parts of a date/time (year,
month, day, hour, minute, second) in various formats.
Any character is not a special token is included without change.
For example, to format a date as "January 23, 2015"you would use the pattern MMMMd,
yyyy.
The available tokens are described below. Note that tokens are case-sensitive:"M" represents
a month, while "m" represents a minute.
If you want to use a single-character custom format to insert a part of a date/time, you
must prefix the character with "%"so it does not get interpreted as a Standard Format
(see above).
For example, if you use @now("d"), this will be expanded to 1/23/2015. If what you
wanted was to insert just the day of the month without a leading 0, you would use @now
("%d").
If your custom format string is longer than one character, this restriction does not
apply.
Token Meaning
d The day of the month. Single-digit days will not have a leading zero (e.g., "1").

Report Commander 2.5 112
Token Meaning
dd The day of the month. Single-digit days will have a leading zero (e.g., "01").
ddd The abbreviated name of the day of the week (e.g., "Wed").
dddd The full name of the day of the week (e.g., "Wednesday").
M The numeric month. Single-digit months will not have a leading zero.
MM The numeric month. Single-digit months will have a leading zero.
MMM The abbreviated name of the month (e.g., "Jan").
MMMM The full name of the month (e.g., "January").
y The year without the century. If the year without the century is less than 10, the
year is displayed with no leading zero.
yy The year without the century. If the year without the century is less than 10, the
year is displayed with a leading zero.
yyyy The year in four digits, including the century.
gg The period or era. This pattern is ignored if the date to be formatted does not have
an associated period or era string. E.g., "BC" or "AD".
h The hour in a 12-hour clock. Single-digit hours will not have a leading zero.
hh The hour in a 12-hour clock. Single-digit hours will have a leading zero.
H The hour in a 24-hour clock. Single-digit hours will not have a leading zero.
HH The hour in a 24-hour clock. Single-digit hours will have a leading zero.
m The minute. Single-digit minutes will not have a leading zero.
mm The minute. Single-digit minutes will have a leading zero.
s The second. Single-digit seconds will not have a leading zero.
ss The second. Single-digit seconds will have a leading zero.
t The first character in the AM/PM designator.
tt The AM/PM designator.
z The time zone offset ("+" or "-" followed by the hour only). Single-digit hours will
not have a leading zero. For example, Pacific Standard Time is "-8".
zz The time zone offset ("+" or "-" followed by the hour only). Single-digit hours will
have a leading zero. For example, Pacific Standard Time is "-08".
zzzz The full time zone offset ("+" or "-" followed by the hour and minutes). Single-digit
hours and minutes will have leading zeros. For example, Pacific Standard Time is "-
08:00".
: The default time separator defined for the locale.
/ The default date separator defined for the locale.
Related Concepts
Variables and Functions 96

Report Commander 2.5 113
Related Topics
Function Examples 113
Variables with Functions 114
Function Examples
The following examples demonstrate how to use functions to calculate various dates.
You can define variables as shortcuts for functions that you use frequently. See the
Variables with Functions topic for more information.
Yesterday'sDate
For use by another function:@DateAdd(,-1,"day")
To insert the date using a specific format:@now("MMMMd, yyyy",-1,"day")
Start/End of Week
Show the date of the first and last days of the week containing the current date, treating
Monday as the first day of week and Friday as the last day:
l Start of week: @MostRecentDay(,"monday","MMMMd, yyyy")
l End of week: @NextDay(, "friday","MMMM d, yyyy")
Show the date of the first and last days of the week that yesterday was part of, treating
Monday as the first day of the week andSunday as the last day.
We first use DateAdd to get yesterday's date, then find out what week it was in:
l Start of week:@MostRecentDay(@DateAdd(,-1,"day"), "monday","yyyy-MM-dd")
l End of week:@NextDay(@DateAdd(,-1,"day"), "sunday","yyyy-MM-dd")
Start/End of Month
First day of current month:@StartOfMonth(, "yyyy-MM-dd")
Last day of current month: @EndOfMonth(, "yyyy-MM-dd")
The 15th of the CurrentMonth
Get a date/time representing 8:15 AM on the 15th day of the current month:@AdjustDate
(,,,15,8,15,0)
The first comma skips the optional targetDate argument, telling the function to use the current
date/time. The next two commas skip the year and month arguments, telling the function to
use the current year and month. The next four arguments tell the function to use the 15th day
of the month, the eighth hour, 15th minute, and 0 seconds.

Report Commander 2.5 114
Related Concepts
Variables and Functions 96
Related Topics
Variables with Functions 114
Reference
Function Reference 99
Date/Time Formats 110
Variables with Functions
When you define variables in Report Commander, the value of a variable can contain calls to
functions. This makes it possible to create variables as shortcuts for complex function calls so
you don't have to create the function call each time you need to use it.
For example, you may find yourself frequently needing this function call to insert yesterday's
date in a report parameter: @DateAdd(,-1,"day"). Instead of having to remember/type that
in each time you need it, you could define a shared variable named "Yesterday" and set its
value to @DateAdd(,-1,"day"). You can do the same thing for other dates you commonly
need to use, such as StartOfWeek, EndOfWeek, etc (see the FunctionExamples topic for
samples of common function calls like this).
Here we have defined these variables as shared variables so that they will be available to all
projects on the computer (variables are defined on the Project Properties panel):

Report Commander 2.5 115


Report Commander 2.5 117
E-Mail Settings
Distribution Lists
Distribution Lists inReport Commander work like group mailing lists in your e-mail system:
they give you an easy way to send e-mail messages to a group of people.
For example, if you frequently send reports to your sales managers, you can create a
Distribution List called "Sales Managers" that includes all of your sales managers. Then, when
you are configuring an E-MailTask, you can specify the list as a recipient, and Report
Commander will send the message to all members of the list.
You can use a Distribution List anywhere in Report Commander that you enter e-mail
recipients. Just enter the name of the list, prefixed with an "@" sign:@Sales Managers.
Distribution List Properties Window
You can reach this window from the Distribution Lists tab of the Project Properties Panel in
the Project Editor, or from the User Settings window in the Command LineBuilder.
List Name
Provide a name for the list.
If you create a list with the same name as an existing list (for example, you add a list to
your Project that has the same name as a list in the Shared Settings), Report Commander
will merge the lists at runtime and send e-mail to all members.
Recipients
Enter the addresses and, optionally, names of the members of this list. You can paste a list
of e-mail addresses from the clipboard or enter them one-by-one.
Distribution Lists can contain other DistributionLists as members. For example, if you are
creating a list named "Managers" you can add the Address @Sales Managers and Report
will include all members of the "Sales Managers"list in messages sent to the"Managers"
list.
E-Mail Servers
E-MailServers allow you to provide the settings that Report Commander needs in order to
connect to an SMTPserver to send e-mail messages. To send e-mail messages, you must
have at least one mail server configured.
If have more than one server configured, Report Commander will use the first one that it is
able to connect to successfully.

Report Commander 2.5 118
E-Mail Server Properties Window
This window is reached from the Project Properties panel of the Project Editor, or the E-Mail
page of the Command LineBuilder.
Server Name or Address
Specify the name (address) of the SMTP server through which the mail will be sent. For
example, to use Gmail, enter smtp.gmail.com.
Port
If the server uses a port other than the standard value of 25, enter the port number.
Return Address for Messages
Enter the e-mail address to be used as the return address for messages sent through this
server. Enter only the address, not the name. For example,
This value is used by default if you do not specify a return address for a particular e-mail
task.
This field can contain variables and functions that are replaced at runtime. More...
1
Sender Display Name
Enter the name to be used in the return address for messages sent through this server.
Enter only the name, not the address. For example, Report Commander.
This value is used by default if you do not specify a return address for a particular e-mail
task.
This field can contain variables and functions that are replaced at runtime. More...
2
Authentication
If your mail server requires authentication for sending mail, enter your user ID and
password here. For example, to send throughGmail you would enter your full Gmail
If you are unsure what to enter here, check with the administrator of your mail system.
Enabled
Check this box to enable Report Commander to use this mail server. If you want to
temporarily prevent Report Commander from using this server, uncheck the box. If there
1
Click the {} button to display the text editor, which helps you insert variables and functions
into the text. When you hover your mouse pointer over the field for a second, a preview of the
"expanded" text will be displayed so you can confirm your variables and functions are working
correctly.
2
Click the {} button to display the text editor, which helps you insert variables and functions
into the text. When you hover your mouse pointer over the field for a second, a preview of the
"expanded" text will be displayed so you can confirm your variables and functions are working
correctly.

Report Commander 2.5 119
is not at least one enabled mail server available in the Shared Settings andProject
Settings, Report Commander will not be able to send any messages.
Test
Click the Test button to send a test message using the settings you have provided.
Importing E-Mail Address Lists
If you need to add many e-mail recipients to an E-MailTask or Distribution List and already
have a list of those recipients, you can paste the list into Report Commander from the
clipboard.
To do so, right-click an e-mail recipient list in Report Commander and select the Paste
recipient list from clipboard command.
The text on the clipboard must have one recipient per line, and can use any of the following
formats for the address and optional name:
Some Person <[email protected]>
[email protected] SomePerson
Some Person [email protected]
Some Person,[email protected]
When you paste the list, invalid and duplicate lines will be ignored.

Report Commander 2.5 120
Tutorials and How To
Basic Project Tutorial
This tutorial walks through the basic steps for creating a Project in the Project Editor.
Scenario
We have a report that lists sales figures for a given date range. At the beginning of each day
we need to:
l Run the report to produce a report of the previous day's sales in PDFformat.
l Send an e-mail message to various people, attaching the PDF report.
Steps
1. Start theProject Editor and it will show a new, empty project.

Report Commander 2.5 121
Add a report to the project
2. Click the AddReport button ( ) to add a report to the project. You can find the
"SalesExample.rpt" report file in the Report Commander program folder. You can use the
report file to follow this tutorial, but you won't be able to preview or export data since the

Report Commander 2.5 122
report won't be connected to a database. Or you can follow along with a similar report of your
own.

Report Commander 2.5 123
Set database logins
3. After the report is added, the first thing we need to do is set the database login information.
To do this, select the report name in the Project Navigator and click the Properties ( )
button (or double-click the report name) to open the settings page for the report, then select
the Data Sources tab.

Report Commander 2.5 124

Report Commander 2.5 125
4. The Data Sources tab lists all of the database connections found in the report. This report is
configured to use integrated security, but if you needed to run the report under explicit user
credentials instead, or to point to a different database or server, you would click the Edit
button for each connection to open the Data Source Properties window and supply the
necessary information.
Configure Output Group with parameters for the export
5. Report Commander has automatically created the first OutputGroup for the report, called
"Output Group 1." EachOutput Group is a collection of Outputs that use the same parameters
for the report.
Select "Output Group 1"in the Project Navigator and click the Properties ( ) button (or
double-click the group name) to open the settings page for the group.

Report Commander 2.5 126

Report Commander 2.5 127
6. We will use this group to produce the report of yesterday's sales. Change the Group Name
to "Yesterday's Sales."
7. The report takes StartDate and EndDate parameters to tell it which dates to select records
for. First click the Edit button next to the StartDate in the parameter list to open the
Parameter Editor.

Report Commander 2.5 128
8. We don't want to have to update the project every day to give it the correct dates, so we
will make use of functions to automatically insert the date when the report runs. Check the
Use variable or functions box, then paste in this text in the value box:@now("yyyy-MM-
dd",-1,day). Click OK to save the parameter value.


Report Commander 2.5 130

Report Commander 2.5 131
9. Repeat step 8 for the EndDate parameter.
10. Click the Save button ( ) on the Output Group page to save the settings for this group.

Report Commander 2.5 132
11. At this point you can use the Preview button ( ) to preview the report with the specified
parameters and database logins. (It won't work for this tutorial because there is no database
for the report.)
Configure PDFexport
12. Next we need to tell Report Commander how to export the report. With the "Yesterday's
Sales" Output Group selected in the Project Navigator, click the Add File Output button ( )
to add a new File Output to the group. This will open a new File Output page.

Report Commander 2.5 133

Report Commander 2.5 134
13. Change the Format to "PDF," set the Name to salesreport.pdf and check the Export
to temporary file box.
In out scenario we're just e-mailing the export and not saving it for future use. So we
use the Export to temporary file to tell Report Commander not to keep the export
file after it has been e-mailed. We don't need to specify a folder for the export file,
because it will get saved to a temporary location.

Report Commander 2.5 135

Report Commander 2.5 136
14. Click the Save button ( ) on the FileOutput page to save the settings for this output. At
this point you can use the Run button ( ) on the FileOutput page to test the export using the
settings so far. (It won't work for this tutorial because there is no database for the report.)
Configure e-mail message
Next we will create the e-mail message to deliver the export file.
15. Click the Add E-MailTask button ( ) to add a new E-Mail Task to the Project.

Report Commander 2.5 137

Report Commander 2.5 138
16. On the Message tab, configure the message settings as follows:
l Subject:Sales report for @now("MMMM d, yyyy",-1,day). This will insert
yesterday's date in the subject.
l Message Body
l Check Use this text and enter the message body as Here is the sales report for
@now("MMMM d, yyyy",-1,day).

Report Commander 2.5 139
17. On the Attachments tab, under Include the output files from these exports, check
the box next to "Yesterday's Sales."This will attach the exported PDF to the message.

Report Commander 2.5 140
18. On the From/To tab, add one or more recipients to the To list for the message.

Report Commander 2.5 141
19. If you have not already configured a mail server for Report Commander to use, click the
mail server settings link to open the e-mail settings for the Project, where you can do this.

Report Commander 2.5 142
Save and test the Project
20. If you haven't already done so, click the SaveProject button ( ) on the top toolbar to
save the project. Give it the name "sales tutorial"and save it to a convenient location.

Report Commander 2.5 143

Report Commander 2.5 144
21. You can test the entire project by clicking the Run Project ( )button on the top toolbar.
This will run the entire project, creating both export files and sending the e-mail message,
and will show you any problems encountered.
Schedule the Project
The Run Project button lets you run the Project from within the Project Editor, but once
you've finished building the project you probably want to run it automatically. Report
Commander doesn't have a built-in scheduler, but you can easily schedule the project using
your favorite scheduling or automation tool.
On the Help menu, select the How to execute project... link and Report Commander will
show you the command you need to have your automation tool run to execute this project.
Advanced Project Tutorial
This tutorial walks through creation of a more advanced Project than was created in the basic
tutorial.
Scenario
We have a report that lists sales figures for a given date range. At the beginning of each day
we need to:
l Run the report to produce a report of the previous day's sales in HTMLformat.
l Run the report with different parameters to produce a report of week-to-date sales, in PDF
format.
l Send an e-mail message to various people, using the HTMLreport as the body of the e-
mail message, and attaching the PDF report.
Steps
1. Start theProject Editor and it will show a new, empty project.

Report Commander 2.5 145
Add a report to the project
2. Click the AddReport button ( ) to add a report to the project. You can find the
"SalesExample.rpt" report file in the Report Commander program folder. You can use the
report file to follow this tutorial, but you won't be able to preview or export data since the

Report Commander 2.5 146
report won't be connected to a database. Or you can follow along with a similar report of your
own.

Report Commander 2.5 147
Set database logins
3. After the report is added, the first thing we need to do is set the database login information.
To do this, select the report name in the Project Navigator and click the Properties ( )
button (or double-click the report name) to open the settings page for the report, then select
the Data Sources tab.

Report Commander 2.5 148

Report Commander 2.5 149
4. The Data Sources tab lists all of the database connections found in the report. This report is
configured to use integrated security, but if you needed to run the report under explicit user
credentials instead, or to point to a different database or server, you would click the Edit
button for each connection to open the Data Source Properties window and supply the
necessary information.
Configure Output Group with parameters for first export
5. Report Commander has automatically created the first OutputGroup for the report, called
"Output Group 1." EachOutput Group is a collection of Outputs that use the same parameters
for the report.
Select "Output Group 1"in the Project Navigator and click the Properties ( ) button (or
double-click the group name) to open the settings page for the group.

Report Commander 2.5 150

Report Commander 2.5 151
6. We will use this group for our first requirement, which is to produce the report of
yesterday's sales. Change the Group Name to "Yesterday's Sales."
7. The report takes StartDate and EndDate parameters to tell it which dates to select records
for. First click the Edit button next to the StartDate in the parameter list to open the
Parameter Editor.

Report Commander 2.5 152
8. We don't want to have to update the project every day to give it the correct dates, so we
will make use of functions to automatically insert the date when the report runs. Check the
Use variable or functions box, then click the text editor button ({}) to open the Variables
and Functions window, which will help us insert the correct function.

Report Commander 2.5 153
9. In the Variables and Functions window, go to the Date/Time tab. When we run the
report, we want it to pull data for the previous day, so:
l Check the Offset the date/time by box
l Set the adjustment to -1.
l Make sure the adjustment type is Day.
l
Click the Insert Function button ( ) to add the function to the text edit window.

Report Commander 2.5 154
10. The top of the edit window now shows the function code:
@now("yyyy-MM-dd",-1,day)

Report Commander 2.5 155
and below that a preview of what the function call will be replaced with at runtime (the
previous day's date).
11. While you're here, highlight the function code @now("yyyy-MM-dd",-1,day) and press
CTRL-C to copy it to the clipboard. We'll use it again for the EndDate.

Report Commander 2.5 156
12. Click OK to return to the parameter editor, then OKagain to return to the OutputGroup.
The Current Value for the StartDate parameter will now show the function we just created.
13. Click Edit for the EndDate parameter to open the Parameter Editor. We're only running the
report for one day, so the EndDate is the same as the StartDate. Check the Use variables or
functions button and paste in the function code you copied while editing the StartDate. Then
click OK to return to the Output Group, where both parameters are now set to use yesterday's
date.
Click the Save button ( ) on the Output Group page to save the settings for this group.

Report Commander 2.5 157
14. At this point you can use the Preview button ( ) to preview the report with the specified
parameters and database logins. (It won't work for this tutorial because there is no database
for the report.)

Report Commander 2.5 158
Configure HTMLexport
15. Next we need to tell Report Commander how to export the report. With the "Yesterday's
Sales" Output Group selected in the Project Navigator, click the Add File Output button ( )
to add a new File Output to the group.


Report Commander 2.5 160
16. Change the Format to "HTML4.0," set the Name to salesreport.htm, and check the
Export to temporary file box.
In out scenario we're just e-mailing the export and not saving it for future use. So we
use the Export to temporary file to tell Report Commander not to keep the export

Report Commander 2.5 161
file after it has been e-mailed. We don't need to specify a folder for the export file,
because it will get saved to a temporary location.

Report Commander 2.5 162
17. Click the Save button ( ) on the FileOutput page to save the settings for this output. At
this point you can use the Run button ( ) on the FileOutput page to test the export using the
settings so far. (It won't work for this tutorial because there is no database for the report.)

Report Commander 2.5 163
Configure Output Group with parameters for second export
Now we need to export the report a second time, with different parameters and a different
export format.
18. With the report selected in the Project Navigator, click the AddOutput Group button (
)to add a new Output Group.

Report Commander 2.5 164
19. This group will be used to export the report for the week to date, so change the Group
Name to "This Week's Sales."

Report Commander 2.5 165
20. For this export we want to run the report for the week (defined as Monday through
Sunday) that includes yesterday. To do this, edit the StartDate and EndDate parameters,
check the Use variables or functions box, and set the values as follows:
l StartDate:@MostRecentDay(@DateAdd(,-1,"day"), "monday","yyyy-MM-dd")
l EndDate:@NextDay(@DateAdd(,-1,"day"), "sunday","yyyy-MM-dd")
This tutorial is already too long, so see the Function Examples topic for an explanation of
these values. You can also define variables as shortcuts for complex function calls like this.
As before, you could use the Preview button ( ) to preview the report with these
parameters, to verify that it produces the expected output.
Configure PDFexport
21. Now we need to export "This Week's Sales"to PDF. Select the "This Week'sSales" Output
Group in the Project Navigator and click the Add File Output button ( ) to add a new File
Output to the group.
22. Select "PDF" as the Format, set the name to weeklysales.pdfand check the Export to
temporary file box. Then click Save ( ) on the FileOutput page to save the output.
Your project should now look like this:


Report Commander 2.5 167

Report Commander 2.5 168
24. On the Message tab, configure the message settings as follows:
l Subject:Sales report for @now("MMMM d, yyyy",-1,day). This will insert
yesterday's date in the subject.
l Message Body
l Check Use HTMLformat for message.
l Check Use this project output and select "Yesterday's SalesExport."This will use the
report as the body of the e-mail message.

Report Commander 2.5 169
25. On the Attachments tab, under Include the output files from these exports, check
the box next to "This Week's Sales."This will attach the exported PDF to the message.

Report Commander 2.5 170
26. On the From/To tab, add one or more recipients to the To list for the message.

Report Commander 2.5 171
27. If you have not already configured a mail server for Report Commander to use, click the
mail server settings link to open the e-mail settings for the Project, where you can do this.

Report Commander 2.5 172
Save and test the Project
28. If you haven't already done so, click the SaveProject button ( ) on the top toolbar to
save the project. Give it the name "sales tutorial"and save it to a convenient location.

Report Commander 2.5 173
29. You can test the entire project by clicking the Run Project ( )button on the top toolbar.
This will run the entire project, creating both export files and sending the e-mail message,
and will show you any problems encountered.
Schedule the Project
The Run Project button lets you run the Project from within the Project Editor, but once
you've finished building the project you probably want to run it automatically. Report
Commander doesn't have a built-in scheduler, but you can easily schedule the project using
your favorite scheduling or automation tool.
On the Help menu, select the How to execute project... link and Report Commander will
show you the command you need to have your automation tool run to execute this project.
Scheduling Report Execution
Report Commander does not have a built-in scheduler, but you can easily schedule Report
Commander to run using your existing scheduler or other automation tool. The Task Scheduler
built in to Windows will do just fine.
(We would be remiss if we didn't mention that the same team that created Report Commander
also happens to sell quite a nice scheduling and automation tool called adTempus, which you
should take a look at if you're looking for a comprehensive scheduling solution.)
To automate Report Commander execution you will use either the Project Runner (if you used
the Project Editor to create a project) or the CommandRunner (if you used the
CommandLineBuilder).
Important Notes
l If you are running Report Commander in evaluation mode, refer to the evaluation mode
limitations.
l Be sure you have configured a log file for your project/command (in the Project Editor or
CommandLine Builder) so that you can review any error messages produced during
processing. Report Commander will not show an error window or any other user interface
when you run it as a command-line tool.
Tutorial:Scheduling Using Windows Task Scheduler
In this example we will show you how to schedule a project or command using the Windows
Task Scheduler. The reports will be generated and e-mailed Monday throughFriday at 6:00
AM.
This tutorial uses theTask Scheduler in Windows 7. If you are using a different version
of Windows, the screens in the scheduler might look different, or the steps might be
slightly different.
1. Create your project or command using the Project Editor or CommandLine Builder.
2. Get the information you need to run Report Commander automatically:

Report Commander 2.5 174
l In the Project Editor, select How to execute project... from the Help menu to display
the Project ExecutionCommands window.
l In the CommandLine Builder, go to the CommandLine page.
In either tool, Report Commander shows you the program you need to run and the arguments
you need to use. Leave this window/page open; we will come back here in a few steps.

Report Commander 2.5 175
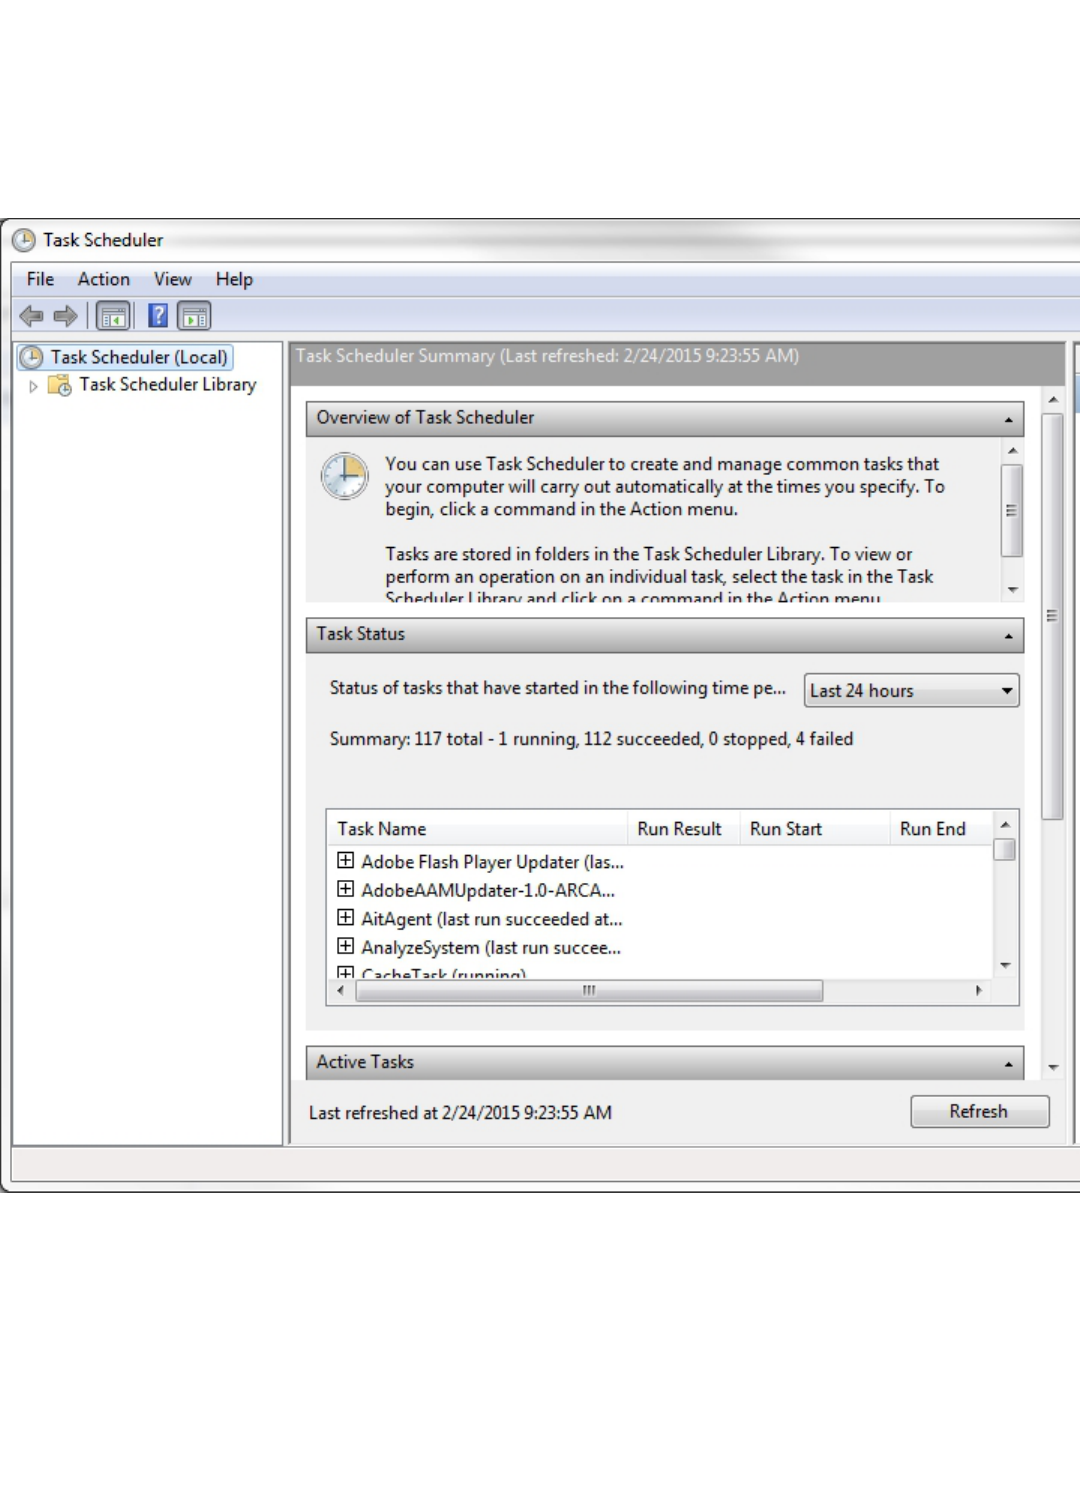
Report Commander 2.5 176
3. Start the Windows Task Scheduler: click the Windows Start button and search for "Task
Scheduler".
4. In the Task Scheduler, click CreateBasic Task.
5. In the Create Basic Task Wizard, give your task a name and, if you want, a description.
Then click Next.

Report Commander 2.5 177
6. On the Trigger page, select Weekly and click Next.

Report Commander 2.5 178
7. On theWeekly page, set the time to 6:00:00 AM and check the boxes for Monday,
Tuesday,Wednesday, Thursday, and Friday. Then click Next.

Report Commander 2.5 179
8. On the Action page select Start a program and click Next.
9. Leave the Start a Program page open in the Task Scheduler and switch back to the
Project Editor or CommandLine Builder to get the execution command as described in Step 2.
Click the Copy button ( ) next to Program to Run.

Report Commander 2.5 180
10. Come back to the Start a Program page in theTask Scheduler. Right-click in the
Program/script box and select Paste to paste in the command.
11. Go back to Report Commander and copy ( ) the Program Arguments.
12. Come back to the Start a Program page in theTask Scheduler. Right-click in the Add
arguments box and select Paste to paste in the arguments.

Report Commander 2.5 181
13. Click Next to reach theSummary screen. Check the Open the Properties dialog for
this task whenIclick Finish box and click Finish.

Report Commander 2.5 182
14. The task properties window will now open. In this window, check the Run whether user
is logged on or not box to ensure that the task will always run, even if you are not logged
in. You can also check the Hidden box, because ReportCommander will not show a user
interface when running in automated mode.

Report Commander 2.5 183
15. Click OK to save the task. The Task Scheduler will prompt you for your Windows
password.
Run the task. If it doesn't work correctly, check the log file for error messages.
Sharing Settings with Another User or Computer
Using the Project Properties panel or the User Settings window you can define variables, mail
servers, file servers, and distribution lists that can be used from any Report Commander
project or command that you run on this computer. If you want to make those settings
available to other users or on a different computer, you need to copy the settings file to the
appropriate location.
For example, if you create Projects while logged in under your own user account, but Projects
are executed under a different user account, you will need to copy the shared settings to that
account or make them available to all users.
Your user settings are saved in the file "%LocalAppData%\Arcana Development\Report
Commander\sharedsettings.xml".

Report Commander 2.5 184
In the procedures below there is no way to merge settings from two files:one set of
settings will always replace another completely. If you are familiar with XML and
promise to be careful, you can edit the files directly and copy over individual pieces as
you require.
Making Settings Available to Another User
If you have the appropriate file permissions, you can directly edit Shared settings on the
Project Properties Panel. These Shared settings are available to all users on the computer.
If you don't have permission to manage Shared settings directly, you can use one of these
approaches to share your settings with other users:
l To make your settings available to all users, an Administrator (or someone else with the
necessary permission)can copy your sharedsettings.xml file into the folder
"%ProgramData%\Arcana Development\Report Commander". This will replace any
current Shared settings (your settings will become the new Shared settings for all users on
the computer.
l To make your settings available to a single user, you can give that user a copy of the
sharedsettings.xml file, and that user can copy the file into their own
"%LocalAppData%\Arcana Development\Report Commander" folder. This will replace
their current user settings.
Copying Settings to Another Computer
If you are editing projects on one computer but need to be able to execute them on another,
you need to make sure all the User andShared settings are available on that computer.
To do this you (or a user with the necessary permissions)can copy either your user settings
file
1
or the computer's shared settingsfile
2
to the other computer. On the other computer you
can place the file either in the computer shared settings folder or in the user settings folder of
the appropriate user account.
Shared SettingsPermissions
Shared settings (shared by all users on a computer)are stored in the file
"%ProgramData%\Arcana Development\Report Commander\SharedSettings.xml". Any user
who has permission to modify that file will be permitted to add, modify, and delete Shared
items in the Project Editor.
Copying Settings Using Copy/Paste
If you need to copy some shared settings from one computer to another but don't want to
copy the entire shared settings file, you can use Copy/Paste on the Windows clipboard to copy
settings.
1
("%LocalAppData%\Arcana Development\Report Commander\sharedsettings.xml")
2
("%ProgramData%\Arcana Development\Report Commander\SharedSettings.xml")

Report Commander 2.5 185
If you have access to both computers at the same time, you can do this directly. For example,
suppose you're using ReportCommander on your desktop and want to copy settings for a Mail
Server to another computer where you're running Report Commander, and you're connected
to that computer using Remote Desktop. On your desktop computer, right-click the Mail
Server and select the Copy command. Then, in your Remote Desktop session, go to the
MailServer settings, right-click, and paste the mail server definition into the settings. You
have now copied the settings to the other computer.
If you can't copy directly like this, you can still copy by using a project file as an
intermediary:
1. On the source computer, copy the shared MailServer to the clipboard, then paste it into
the Project MailServers list (the mail server will now appear twice: in the shared settings
and in the project settings).
2. Save the project file and copy it to the destination computer.
3. On the destination computer, open the project and go to the MailServer settings. The Mail
Server will appear in the Project Mail Servers list only, because it isn't defined on this
computer as a shared setting.
4. Copy the Mail Server to the clipboard and paste it into the SharedFile Servers list to make
it available to all projects on the destination computer.
5. You can now remove the server from the Project Mail Servers list and save the project.
E-mail Report Output
Report Commander can be configured to e-mail report exports after they are produced.
Using the CommandLine Builder
To e-mail an export created with the Command Line Builder, check the E-mail the report
option on the Report page, then configure e-mail settings on the E-Mail page.
Using the Project Editor
To e-mail exports created using the Project Editor, first configure the appropriate FileOutput
(s) to produce the export file(s) for your report(s).
Then add one or more E-MailTasks to the project to e-mail the export files. You can combine
exports from multiple reports into a single e-mail message, or send each report's exports
separately.
See the "Basic Project Tutorial" on page120 for an example of creating a simple project to
export and e-mail a report.

Report Commander 2.5 186
Upload Report Output
Report Commander can be configured to upload report exports to an FTP, SFTP, or HTTP
(Web) server.
Using the CommandLine Builder
To upload an export created with the Command Line Builder, you must enter the export file
name in a special format and/or modify the command line created by the Command
LineBuilder.See the "Uploading Output" on page78 topic for more information
Using the Project Editor
To upload exports created using the Project Editor, first configure the appropriate FileOutput
(s) to produce the export file(s) for your report(s).
Then add one or more Upload Tasks to the project to upload the files.
