
22nd Annual Midas+ User Symposium • June 2–5, 2013 • Tucson, Arizona
Using Excel to Leverage the
Power of DataVision
Tuesday, June 4, 1:00 pm
In this hands-on session, attendees will learn how to use basic Microsoft
Excel functionality to leverage the information in the Midas+
DataVision Toolpacks. Using a workbook to walk through various
scenarios, participants will practice navigation and shortcuts to help
simplify data analysis, attain a basic understanding of creating and
modifying pivot tables, and learn how to use the VLOOKUP function to
add criteria to data retrieved through use of the Toolpacks or Report
Data Transfer.
Presented By:
Barb Schork, Midas+ DataVision Product Specialist

Copyright ©2013 MidasPlus, Inc. All Rights Reserved.
Contact us at:
Midas+ Solutions
4801 East Broadway, Suite 335
Tucson, Arizona 85711
(800) 737 8835
Visit our Web site at: http://www.midasplus.com/

Using Excel
®
to Leverage the
Power of DataVision
Skills for the Beginning Excel User
Barbara Schork
Midas+ DataVision Product Specialist
Objectives
• Understand basic navigation and shortcuts.
• Learn how to filter and sort data.
• Attain a basic understanding of how to create and
modify pivot tables.
• Learn how to use VLOOKUP to add criteria to your
existing data.
-2-2013 Midas+ User Symposium
Using Excel to Leverage the Power of DataVision
22nd Annual Midas+ User Symposium - Tucson, Arizona - June 2-5, 2013
1

If you have questions or need help at
any time during the class, please
don’t hesitate to let us know.
-3-2013 Midas+ User Symposium
Undo and Redo
To undo and redo using the keyboard:
˗ CTRL-Z
˗ CTRL-Y
To undo and redo using the mouse:
-4-2013 Midas+ User Symposium
Using Excel to Leverage the Power of DataVision
2
22nd Annual Midas+ User Symposium - Tucson, Arizona - June 2-5, 2013

Moving Around Your Spreadsheet
• To get to the top left of
your spreadsheet, click
Ctrl-Home.
• To get to the bottom right
of your spreadsheet, click
Ctrl-End.
• To scroll right one column
at a time when your cursor
is in a cell, click Tab.
• To scroll right several
columns at a time, click in
the Navigation bar at the
bottom of the screen.
Copyright B.
Schork 2013
-5-2013 Midas+ User Symposium
Exercise #1: Redo and Undo
1. Open the Report Data Transfer Example
workbook.
2. Select cells A7 to A15.
3. Delete the data in those cells.
4. Select cells E13 to I20.
5. Delete the data in those cells.
6. Undo the last delete using the keyboard.
7. Undo the previous delete using the mouse.
-6-2013 Midas+ User Symposium
Using Excel to Leverage the Power of DataVision
22nd Annual Midas+ User Symposium - Tucson, Arizona - June 2-5, 2013
3

Selecting Cells
Clicking the
column label
selects the
entire column
Clicking the top
left cell selects
the entire
worksheet
-7-2013 Midas+ User Symposium
Ctrl-Click and Right Click
Left click
selects a single
cell. Ctrl-Click
selects more
than one non-
adjacent cell.
Right click brings
up context-
sensitive menus
with some basic
commands.
-8-2013 Midas+ User Symposium
Using Excel to Leverage the Power of DataVision
4
22nd Annual Midas+ User Symposium - Tucson, Arizona - June 2-5, 2013

-9-2013 Midas+ User Symposium
Exercise #2: Using the Mouse
1. Select a single cell in the worksheet.
2. Select an entire column of data.
3. Select the entire worksheet.
4. What are the changes that take place for each
action?
5. Select patient names Bufford, Chen, Ivy, and
Quiroz
6. Change the contents of those cells to bold and
red.
-10-2013 Midas+ User Symposium
Using Excel to Leverage the Power of DataVision
22nd Annual Midas+ User Symposium - Tucson, Arizona - June 2-5, 2013
5

Sizing Columns
Columns can be
resized manually
by clicking and
dragging the edge
of the column.
Columns can also
be resized to fit the
contents by double
clicking the bi-
directional arrow.
-11-2013 Midas+ User Symposium
Sizing Rows
Rows can be
resized
manually by
clicking and
dragging the
lower edge of
the row.
Rows can be
resized to fit the
contents by
double clicking the
bi-directional
arrow.
Rows can be resized by
using the format menu to
change the row to a
designated height or to auto-
fit contents on more than
one line within the cell.
-12-2013 Midas+ User Symposium
Using Excel to Leverage the Power of DataVision
6
22nd Annual Midas+ User Symposium - Tucson, Arizona - June 2-5, 2013

Exercise #3: Sizing Columns and Rows
1. Select Column A.
2. Resize the column to narrow it to the width of the
header in cell A6.
3. Without dragging, resize the column to fit the
contents of cell A2.
4. Using only your mouse, resize Row 6 to a height
of 30.00.
5. Resize Row 7 to a height of 25 using a menu and
your keyboard.
6. Undo your changes.
-13-2013 Midas+ User Symposium
Formatting Cells
Cell contents
can be
reformatted by
clicking on a
tab and
selecting the
characteristic
to be
changed.
-14-2013 Midas+ User Symposium
Using Excel to Leverage the Power of DataVision
22nd Annual Midas+ User Symposium - Tucson, Arizona - June 2-5, 2013
7

Exercise #4: Formatting Cells
1. Select cell O7.
2. Bring up the Format Cells window without using
the top menu bar.
3. Change the format of the date to include the day
of the week and spell out the month.
4. Select column D and adjust the width to 9.
5. Change the alignment to wrap text.
6. Select a cell, change the text to bold italic and
draw a border around it.
7. Undo your changes.
-15-2013 Midas+ User Symposium
-16-2013 Midas+ User Symposium
Using Excel to Leverage the Power of DataVision
8
22nd Annual Midas+ User Symposium - Tucson, Arizona - June 2-5, 2013

Copying and Pasting
1
2
3
Tip: Double-clicking the
square copies the data
down the column until it
hits a blank cell.
Tip: Ctrl-C can also be
used to copy and Ctrl-V
to paste. (Ctrl-X can be
used to cut.)
-17-2013 Midas+ User Symposium
1. Select cell A7.
2. Click and drag down the column to paste. What happens
to the cell contents when they are pasted this way?
3. Undo and select cell A7 again.
4. Copy and paste it onto a range of cells using the menu.
How is this different from what you did in step 2?
5. Undo and select cell A7 again.
6. Double-click the small square to the bottom right of the
cell outline. What happens?
Exercise #5: Copying and Pasting
-18-2013 Midas+ User Symposium
Using Excel to Leverage the Power of DataVision
22nd Annual Midas+ User Symposium - Tucson, Arizona - June 2-5, 2013
9

Pasting to Transpose Data
1. Select the header row of your spreadsheet.
2. Right-click to bring up the context sensitive menu or use
the menu bar or icons and choose Copy.
3. Click on the cell where you want the first data item and
click Paste Special > Transpose.
-19-2013 Midas+ User Symposium
1. Select Row 6.
2. Right-click to copy.
3. Scroll down to Row 47.
4. Open the Paste Special window.
5. Transpose and paste the contents to cell A47.
Exercise #6: Paste Special
-20-2013 Midas+ User Symposium
Using Excel to Leverage the Power of DataVision
10
22nd Annual Midas+ User Symposium - Tucson, Arizona - June 2-5, 2013

Freezing Panes
1. To freeze headers select the cell immediately under the header row.
2. Click on the View tab and then on Freeze Panes.
How does that change your navigation in the spreadsheet?
3. Click on the View tab and then on Unfreeze Panes.
-21-2013 Midas+ User Symposium
Freezing Panes (continued)
1. To freeze row labels select the first cell immediately to the right of the
row you want to freeze.
2. Click on the View tab and then on Freeze Panes.
How is this different from the previous freeze?
3. Click on the View tab and then on Unfreeze Panes.
-22-2013 Midas+ User Symposium
Using Excel to Leverage the Power of DataVision
22nd Annual Midas+ User Symposium - Tucson, Arizona - June 2-5, 2013
11

Freezing Panes (continued)
1. To freeze both headers and row labels select the cell immediately to the
right of the row you want to freeze.
2. Click on the View tab and then on Freeze Panes.
How is this different from the previous freeze?
3. Click on the View tab and then on Unfreeze Panes.
-23-2013 Midas+ User Symposium
-24-2013 Midas+ User Symposium
Using Excel to Leverage the Power of DataVision
12
22nd Annual Midas+ User Symposium - Tucson, Arizona - June 2-5, 2013

Sorting Your Data
Click on any
cell in the
worksheet and
then choose
Sort & Filter.
Choose Sort A to Z
or Sort Z to A to
sort on a single
criterion.
Choose Custom
Sort to sort on
multiple criteria.
-25-2013 Midas+ User Symposium
1. Click on any cell in Column G.
2. Choose Sort & Filter from the top menu.
3. Arrange the data in descending order by patient age.
4. Who is the oldest patient?
Exercise #7: Sorting on a Single
Criterion
-26-2013 Midas+ User Symposium
Using Excel to Leverage the Power of DataVision
22nd Annual Midas+ User Symposium - Tucson, Arizona - June 2-5, 2013
13
1. Click on any cell in the worksheet.
2. Choose Sort & Filter from the top menu.
3. Arrange the data in ascending order by Start
Date and then by Admitting Source.
4. Which patient is now in Row 7?
Exercise #8: Sorting on Multiple
Criteria
-27-2013 Midas+ User Symposium
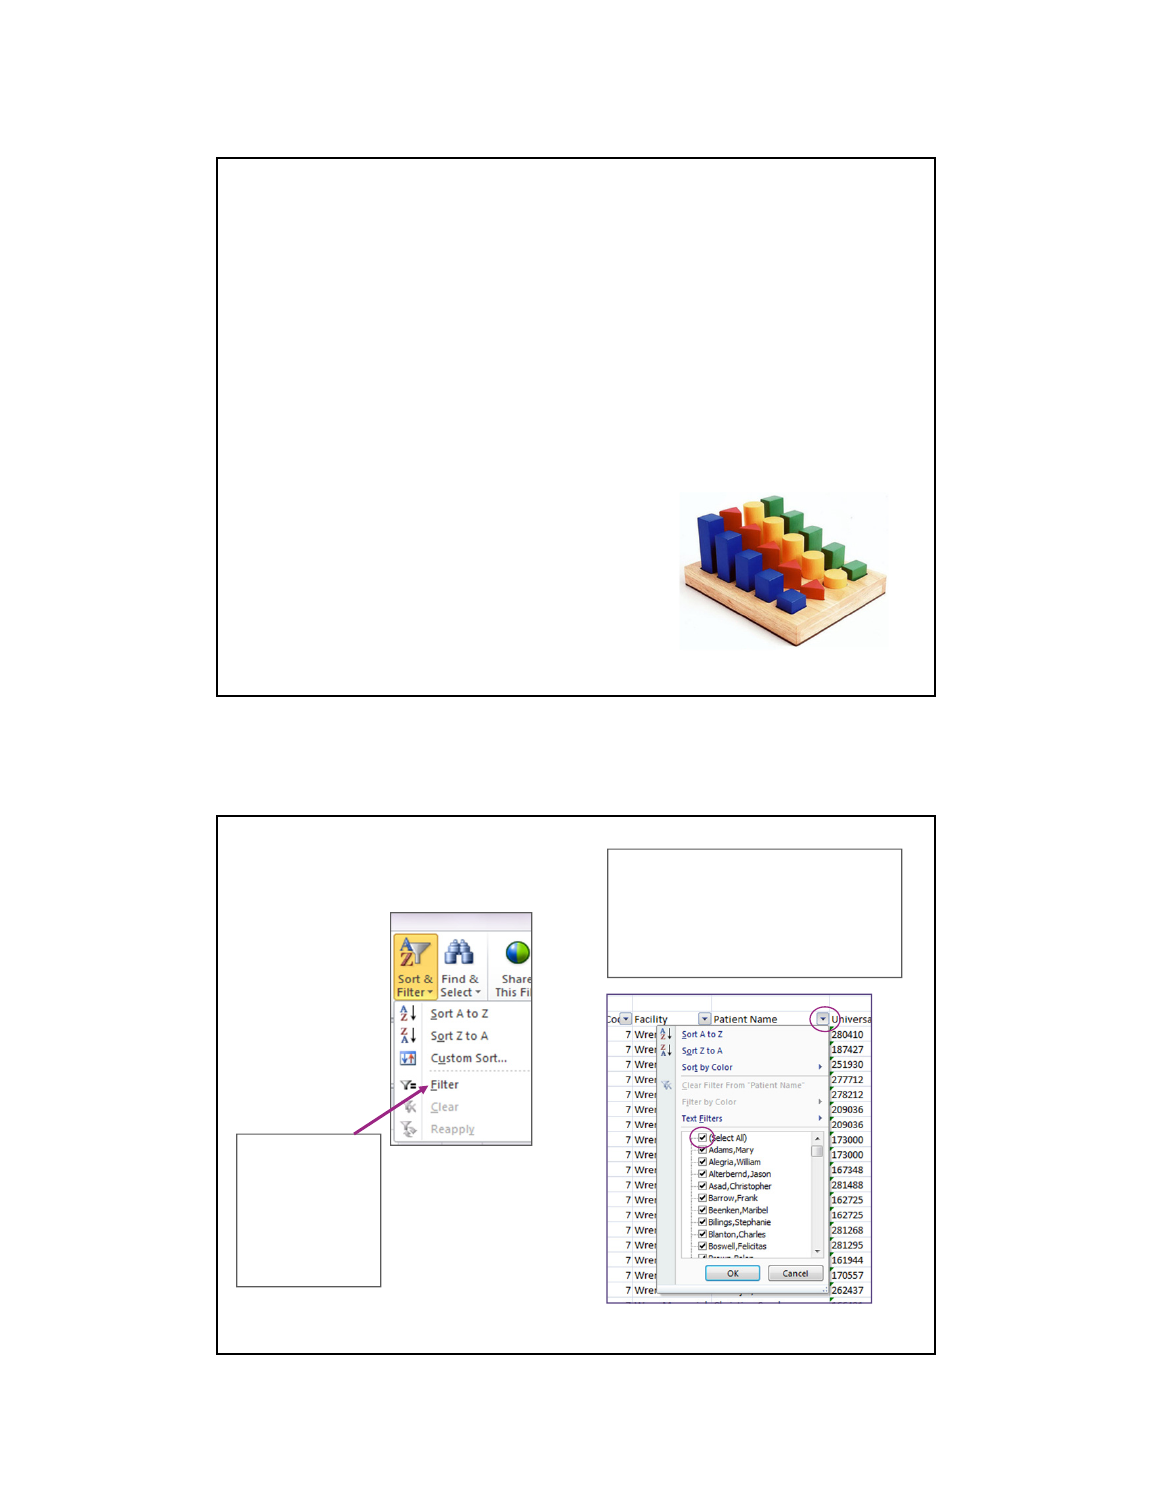
Filtering Your Data
Click on any
cell in the
header row,
click on Sort &
Filter and then
select Filter
Click the drop-down arrow.
Then uncheck the box next to
(Select All) and click the
checkbox(es) next to what you
want to view.
-28-2013 Midas+ User Symposium
Using Excel to Leverage the Power of DataVision
14
22nd Annual Midas+ User Symposium - Tucson, Arizona - June 2-5, 2013

Exercise #9: Filtering
1. Set the worksheet to filter on
the values in row 6.
2. Filter on Start Date.
3. How many patients were
admitted on June 28, 2012?
4. What is the age of the
youngest patient admitted in
July?
-29-2013 Midas+ User Symposium
Creating a Simple Pivot Table
1. Click in any cell in the spreadsheet that contains data.
2. Click on the Insert tab and choose Pivot Table.
3. The cells with data are selected and the range appears in the
Table/Range field.
4. Click OK.
-30-2013 Midas+ User Symposium
Using Excel to Leverage the Power of DataVision
22nd Annual Midas+ User Symposium - Tucson, Arizona - June 2-5, 2013
15

Creating a Simple Pivot Table (continued)
5. A new worksheet
opens up in your
workbook, with a
holding place for the
pivot table, and a field
list to use in selecting
your criteria.
-31-2013 Midas+ User Symposium
Creating a Simple Pivot Table (continued)
6. Click and drag items
from the field list
and place them
under Report Filter,
Column Labels,
Row Labels, and/or
Values to build your
pivot table.
-32-2013 Midas+ User Symposium
Using Excel to Leverage the Power of DataVision
16
22nd Annual Midas+ User Symposium - Tucson, Arizona - June 2-5, 2013

Creating a Simple Pivot Table (continued)
7. Using Account
Number as the
value and
Admitting Status
as the row returns
a simple pivot
table that counts
the number of
CHF patients in
each admit status
category
-33-2013 Midas+ User Symposium
Drilling Down on Pivot Table Data
Double-clicking on any
cell in the pivot table
opens a new worksheet
with patient level data.
-34-2013 Midas+ User Symposium
Using Excel to Leverage the Power of DataVision
22nd Annual Midas+ User Symposium - Tucson, Arizona - June 2-5, 2013
17

Grouping Data
Grouping your data allows you to summarize it into more
meaningful categories. The example below shows a pivot table of
the LOS for each CHF encounter.
TIP: You can change
the default labels to
make them more
meaningful.
-35-2013 Midas+ User Symposium
Grouping Data (continued)
1. To look at all encounters with LOS less than 7 days as a single
group, click and drag to select all charges that qualify.
2. Right-click on the highlighted area and select Group from the
context-sensitive menu.
1
2
-36-2013 Midas+ User Symposium
Using Excel to Leverage the Power of DataVision
18
22nd Annual Midas+ User Symposium - Tucson, Arizona - June 2-5, 2013

Grouping Data (continued)
3. You should now see a new
row displaying a minus
sign and Group1 in bold
with all of the LOS values
you selected underneath.
4. Click the minus sign.
The values are
collapsed and the –
changes to a +.
5. Change the label from
Group1 to LOS <7
Days.
6. Repeat this process for any additional
values you want to group.
-37-2013 Midas+ User Symposium
Exercise #10: Building a Simple
Pivot Table
1. Build a pivot table in a new
worksheet that shows
patients by age.
2. Group the results by age
<45, 45-54, 55-64, 65-74,
75-84, and 85+.
3. How many patients are
65-74?
-38-2013 Midas+ User Symposium
Using Excel to Leverage the Power of DataVision
22nd Annual Midas+ User Symposium - Tucson, Arizona - June 2-5, 2013
19

Modifying Pivot Tables
3. Drag Admitting Status to the Column Labels area to view the
data by both of these criteria.
1. Open the pivot table you created earlier showing CHF
encounters by Admitting Status.
2. To look at the encounters by Admitting Location instead of
Admitting Status, drag Admitting Status out of the Row Labels
area and drag in Admitting Loc.
-39-2013 Midas+ User Symposium
Adding a Report Filter to a Pivot Table
2. On the Top DRG tab, click inside the pivot table to expose the
field list. If it does not display, click on Options and then Field
List on the menu bar (You can also right-click inside the pivot
table to bring up the context sensitive menu.)
1. Open the DataVision Report Toolpack example spreadsheet.
-40-2013 Midas+ User Symposium
Using Excel to Leverage the Power of DataVision
20
22nd Annual Midas+ User Symposium - Tucson, Arizona - June 2-5, 2013

Adding a Report Filter (continued)
3. Click and drag Admitting Status to the Report Filter
area. A window appears, notifying you that adding
this filter will overwrite some cell contents.
4. Click cancel.
-41-2013 Midas+ User Symposium
Adding a Report Filter (continued)
5. Add two lines above the pivot table and below the hospital
name by right-clicking on the row label and choosing Insert
from the menu.
-42-2013 Midas+ User Symposium
Using Excel to Leverage the Power of DataVision
22nd Annual Midas+ User Symposium - Tucson, Arizona - June 2-5, 2013
21

Adding a Report Filter (continued)
6. Now when you click and drag Admitting Status to the
Report Filter area, no cell contents will be overwritten.
-43-2013 Midas+ User Symposium
Adding a Report Filter (continued)
7. Use the drop down arrow next to the report filter to
view your data by a single Admitting Status or by All.
-44-2013 Midas+ User Symposium
Using Excel to Leverage the Power of DataVision
22
22nd Annual Midas+ User Symposium - Tucson, Arizona - June 2-5, 2013

-45-2013 Midas+ User Symposium
Exercise #11: Modifying Pivot Tables
1. Open the Report Toolpack Example.
2. Go to the Top Principal Procedures tab.
3. Add a report filter of PROC1 Provider Name.
4. Make the necessary accommodation to add the report
filter.
5. How many patients had a Principal Procedure of
Thoracentesis performed by Dr. Ember?
6. Add APR-DRG Mortality Risk as a column in the pivot
table. How many patients with a mortality risk of 3 had no
principal procedure?
7. Who was the oldest patient who had thoracentesis as a
principal procedure? How did you find this out?
-46-2013 Midas+ User Symposium
Using Excel to Leverage the Power of DataVision
22nd Annual Midas+ User Symposium - Tucson, Arizona - June 2-5, 2013
23
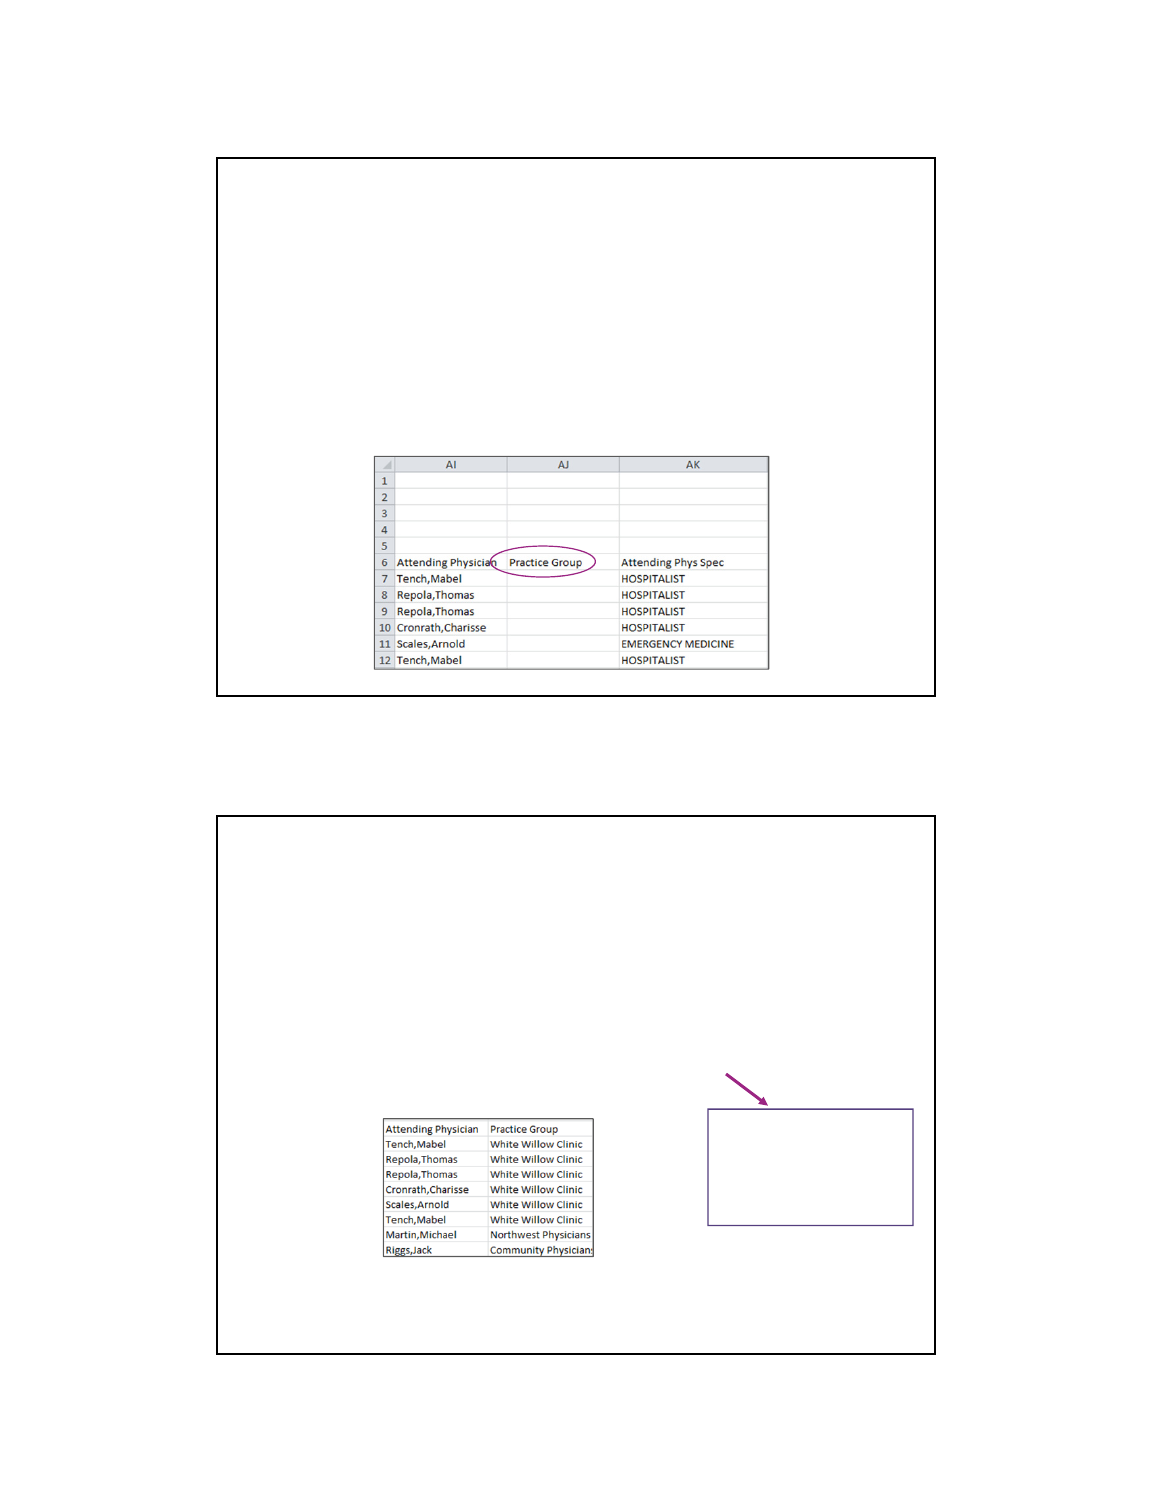
Using VLOOKUP
The VLOOKUP function allows you to add additional data to your
spreadsheets and pivot tables by means of an Excel formula.
We are going to add the practice group for each of our Attending
Physicians to our raw data so we can add that to our pivot table.
1. On the Excel II Data worksheet, scroll over and add a blank
column to the right of Column AI. Enter the heading Practice
Group.
-47-2013 Midas+ User Symposium
Using VLOOKUP (continued)
The formula is expressed as follows: =VLOOKUP(<cell to be
matched>, ‘<location and range of source data>’, <position of data to
be brought over>)
2. Position your cursor in cell AJ7.
3. Enter the formula as follows:
=VLOOKUP(AI7,'Physician Lookup'!$A$1:$B$71,2)
4. Copy the formula down to the last row of data.
TIP: You must enter the
range as an absolute
reference ($) in order
for the formula to copy
correctly.
5. You can now use this data in a pivot table after refreshing the field list.
-48-2013 Midas+ User Symposium
Using Excel to Leverage the Power of DataVision
24
22nd Annual Midas+ User Symposium - Tucson, Arizona - June 2-5, 2013

Exercise #12: Using VLOOKUP
Results to Modify a Pivot Table
1. Create a new Pivot Table that shows LOS as the
rows and Practice Group as the columns.
2. Change the LOS values from count to average.
3. Which practice group has the longest ALOS for
this population?
-49-2013 Midas+ User Symposium
-50-2013 Midas+ User Symposium
Using Excel to Leverage the Power of DataVision
22nd Annual Midas+ User Symposium - Tucson, Arizona - June 2-5, 2013
25

Thank you for attending.
Questions?
Barb Schork
Midas+ DataVision Product Specialist
-51-2013 Midas+ User Symposium
Using Excel to Leverage the Power of DataVision
26
22nd Annual Midas+ User Symposium - Tucson, Arizona - June 2-5, 2013
