
Red Hat Enterprise Linux 9
Getting started with the GNOME desktop
environment
Getting started with the GNOME desktop environment on Red Hat Enterprise Linux
9
Last Updated: 2024-08-05


Red Hat Enterprise Linux 9 Getting started with the GNOME desktop
environment
Getting started with the GNOME desktop environment on Red Hat Enterprise Linux 9

Legal Notice
Copyright © 2024 Red Hat, Inc.
The text of and illustrations in this document are licensed by Red Hat under a Creative Commons
Attribution–Share Alike 3.0 Unported license ("CC-BY-SA"). An explanation of CC-BY-SA is
available at
http://creativecommons.org/licenses/by-sa/3.0/
. In accordance with CC-BY-SA, if you distribute this document or an adaptation of it, you must
provide the URL for the original version.
Red Hat, as the licensor of this document, waives the right to enforce, and agrees not to assert,
Section 4d of CC-BY-SA to the fullest extent permitted by applicable law.
Red Hat, Red Hat Enterprise Linux, the Shadowman logo, the Red Hat logo, JBoss, OpenShift,
Fedora, the Infinity logo, and RHCE are trademarks of Red Hat, Inc., registered in the United States
and other countries.
Linux ® is the registered trademark of Linus Torvalds in the United States and other countries.
Java ® is a registered trademark of Oracle and/or its affiliates.
XFS ® is a trademark of Silicon Graphics International Corp. or its subsidiaries in the United States
and/or other countries.
MySQL ® is a registered trademark of MySQL AB in the United States, the European Union and
other countries.
Node.js ® is an official trademark of Joyent. Red Hat is not formally related to or endorsed by the
official Joyent Node.js open source or commercial project.
The OpenStack ® Word Mark and OpenStack logo are either registered trademarks/service marks
or trademarks/service marks of the OpenStack Foundation, in the United States and other
countries and are used with the OpenStack Foundation's permission. We are not affiliated with,
endorsed or sponsored by the OpenStack Foundation, or the OpenStack community.
All other trademarks are the property of their respective owners.
Abstract
This document describes how to use GNOME, which is the only desktop environment available in
RHEL 9. It explains the basics of using GNOME Shell and certain GNOME applications.

. . . . . . . . . . . . . . . . . . . . . . . . . . . . . . . . . . . . . . . . . . . . . . . . . . . . . . . . . . . . . . . . . . . . . . . . . . . . . . . . . . . . . . . . . . . . . . . . . . . . . . . . . . . . . . . . . . . . . . . . . . . . . . . . . . . . . . . . . . . . . . . . . . . . . . . . . . . . . . . . . . . . . . . . . . . . . . . . . . . . . . . . . . . . . . . . . . . . . . . . . . . . . . . . . . . . . . . . . . . . . . . . . . . . . . . . . . . . . . . . . . . . . . . . . . . . . . . . . . . . . . . . . . . . . . . . . . . . . . . .
. . . . . . . . . . . . . . . . . . . . . . . . . . . . . . . . . . . . . . . . . . . . . . . . . . . . . . . . . . . . . . . . . . . . . . . . . . . . . . . . . . . . . . . . . . . . . . . . . . . . . . . . . . . . . . . . . . . . . . . . . . . . . . . . . . . . . . . . . . . . . . . . . . . . . . . . . . . . . . . . . . . . . . . . . . . . . . . . . . . . . . . . . . . . . . . . . . . . . . . . . . . . . . . . . . . . . . . . . . . . . . . . . . . . . . . . . . . . . . . . . . . . . . . . . . . . . . . . . . . . . . . . . . . . . . . . . . . . . . . .
. . . . . . . . . . . . . . . . . . . . . . . . . . . . . . . . . . . . . . . . . . . . . . . . . . . . . . . . . . . . . . . . . . . . . . . . . . . . . . . . . . . . . . . . . . . . . . . . . . . . . . . . . . . . . . . . . . . . . . . . . . . . . . . . . . . . . . . . . . . . . . . . . . . . . . . . . . . . . . . . . . . . . . . . . . . . . . . . . . . . . . . . . . . . . . . . . . . . . . . . . . . . . . . . . . . . . . . . . . . . . . . . . . . . . . . . . . . . . . . . . . . . . . . . . . . . . . . . . . . . . . . . . . . . . . . . . . . . . . . .
. . . . . . . . . . . . . . . . . . . . . . . . . . . . . . . . . . . . . . . . . . . . . . . . . . . . . . . . . . . . . . . . . . . . . . . . . . . . . . . . . . . . . . . . . . . . . . . . . . . . . . . . . . . . . . . . . . . . . . . . . . . . . . . . . . . . . . . . . . . . . . . . . . . . . . . . . . . . . . . . . . . . . . . . . . . . . . . . . . . . . . . . . . . . . . . . . . . . . . . . . . . . . . . . . . . . . . . . . . . . . . . . . . . . . . . . . . . . . . . . . . . . . . . . . . . . . . . . . . . . . . . . . . . . . . . . . . . . . . . .
. . . . . . . . . . . . . . . . . . . . . . . . . . . . . . . . . . . . . . . . . . . . . . . . . . . . . . . . . . . . . . . . . . . . . . . . . . . . . . . . . . . . . . . . . . . . . . . . . . . . . . . . . . . . . . . . . . . . . . . . . . . . . . . . . . . . . . . . . . . . . . . . . . . . . . . . . . . . . . . . . . . . . . . . . . . . . . . . . . . . . . . . . . . . . . . . . . . . . . . . . . . . . . . . . . . . . . . . . . . . . . . . . . . . . . . . . . . . . . . . . . . . . . . . . . . . . . . . . . . . . . . . . . . . . . . . . . . . . . . .
. . . . . . . . . . . . . . . . . . . . . . . . . . . . . . . . . . . . . . . . . . . . . . . . . . . . . . . . . . . . . . . . . . . . . . . . . . . . . . . . . . . . . . . . . . . . . . . . . . . . . . . . . . . . . . . . . . . . . . . . . . . . . . . . . . . . . . . . . . . . . . . . . . . . . . . . . . . . . . . . . . . . . . . . . . . . . . . . . . . . . . . . . . . . . . . . . . . . . . . . . . . . . . . . . . . . . . . . . . . . . . . . . . . . . . . . . . . . . . . . . . . . . . . . . . . . . . . . . . . . . . . . . . . . . . . . . . . . . . . .
. . . . . . . . . . . . . . . . . . . . . . . . . . . . . . . . . . . . . . . . . . . . . . . . . . . . . . . . . . . . . . . . . . . . . . . . . . . . . . . . . . . . . . . . . . . . . . . . . . . . . . . . . . . . . . . . . . . . . . . . . . . . . . . . . . . . . . . . . . . . . . . . . . . . . . . . . . . . . . . . . . . . . . . . . . . . . . . . . . . . . . . . . . . . . . . . . . . . . . . . . . . . . . . . . . . . . . . . . . . . . . . . . . . . . . . . . . . . . . . . . . . . . . . . . . . . . . . . . . . . . . . . . . . . . . . . . . . . . . . .
. . . . . . . . . . . . . . . . . . . . . . . . . . . . . . . . . . . . . . . . . . . . . . . . . . . . . . . . . . . . . . . . . . . . . . . . . . . . . . . . . . . . . . . . . . . . . . . . . . . . . . . . . . . . . . . . . . . . . . . . . . . . . . . . . . . . . . . . . . . . . . . . . . . . . . . . . . . . . . . . . . . . . . . . . . . . . . . . . . . . . . . . . . . . . . . . . . . . . . . . . . . . . . . . . . . . . . . . . . . . . . . . . . . . . . . . . . . . . . . . . . . . . . . . . . . . . . . . . . . . . . . . . . . . . . . . . . . . . . . .
. . . . . . . . . . . . . . . . . . . . . . . . . . . . . . . . . . . . . . . . . . . . . . . . . . . . . . . . . . . . . . . . . . . . . . . . . . . . . . . . . . . . . . . . . . . . . . . . . . . . . . . . . . . . . . . . . . . . . . . . . . . . . . . . . . . . . . . . . . . . . . . . . . . . . . . . . . . . . . . . . . . . . . . . . . . . . . . . . . . . . . . . . . . . . . . . . . . . . . . . . . . . . . . . . . . . . . . . . . . . . . . . . . . . . . . . . . . . . . . . . . . . . . . . . . . . . . . . . . . . . . . . . . . . . . . . . . . . . . . .
. . . . . . . . . . . . . . . . . . . . . . . . . . . . . . . . . . . . . . . . . . . . . . . . . . . . . . . . . . . . . . . . . . . . . . . . . . . . . . . . . . . . . . . . . . . . . . . . . . . . . . . . . . . . . . . . . . . . . . . . . . . . . . . . . . . . . . . . . . . . . . . . . . . . . . . . . . . . . . . . . . . . . . . . . . . . . . . . . . . . . . . . . . . . . . . . . . . . . . . . . . . . . . . . . . . . . . . . . . . . . . . . . . . . . . . . . . . . . . . . . . . . . . . . . . . . . . . . . . . . . . . . . . . . . . . . . . . . . . . .
. . . . . . . . . . . . . . . . . . . . . . . . . . . . . . . . . . . . . . . . . . . . . . . . . . . . . . . . . . . . . . . . . . . . . . . . . . . . . . . . . . . . . . . . . . . . . . . . . . . . . . . . . . . . . . . . . . . . . . . . . . . . . . . . . . . . . . . . . . . . . . . . . . . . . . . . . . . . . . . . . . . . . . . . . . . . . . . . . . . . . . . . . . . . . . . . . . . . . . . . . . . . . . . . . . . . . . . . . . . . . . . . . . . . . . . . . . . . . . . . . . . . . . . . . . . . . . . . . . . . . . . . . . . . . . . . . . . . . . . .
Table of Contents
PROVIDING FEEDBACK ON RED HAT DOCUMENTATION
CHAPTER 1. OVERVIEW OF GNOME ENVIRONMENTS
1.1. GNOME ENVIRONMENTS, BACK ENDS, AND DISPLAY PROTOCOLS
1.2. GNOME STANDARD
1.3. GNOME CLASSIC
1.4. ENABLING WINDOW OVERVIEW IN GNOME CLASSIC
1.5. GRAPHICS BACK ENDS IN RHEL 9
1.6. SELECTING GNOME ENVIRONMENT AND DISPLAY PROTOCOL
1.7. DISABLING WAYLAND FOR ALL USERS
CHAPTER 2. LAUNCHING APPLICATIONS IN GNOME
2.1. LAUNCHING AN APPLICATION IN THE STANDARD GNOME SESSION
2.2. LAUNCHING AN APPLICATION IN GNOME CLASSIC
2.3. LAUNCHING AN APPLICATION IN GNOME USING A COMMAND
2.4. LAUNCHING AN APPLICATION AUTOMATICALLY ON LOGIN
CHAPTER 3. DISABLING THE HOT CORNER FUNCTIONALITY ON GNOME SHELL
3.1. DISABLING HOT CORNER USING SETTINGS
3.2. DISABLING HOT CORNER USING GSETTINGS
3.3. DISABLING THE HOT CORNER FUNCTIONALITY FOR ALL USERS
CHAPTER 4. SEARCHING FOR FILES IN GNOME
4.1. PERFORMING A BASIC FILE SEARCH
4.2. PERFORMING AN ADVANCED FILE SEARCH
CHAPTER 5. BOOKMARKING FILES AND LOCATIONS
5.1. ADDING A BOOKMARK
5.2. REMOVING A BOOKMARK
5.3. RENAMING A BOOKMARK
5.4. ADDING A BOOKMARK FOR ALL USERS
CHAPTER 6. TYPING EMOJI CHARACTERS
6.1. TYPING EMOJI CHARACTERS IN GTK APPLICATIONS
6.2. TYPING EMOJI CHARACTERS IN ANY APPLICATIONS
CHAPTER 7. ENABLING CHINESE, JAPANESE, OR KOREAN TEXT INPUT
7.1. INPUT METHODS
7.2. AVAILABLE INPUT METHOD ENGINES
7.3. INSTALLING INPUT METHOD ENGINES
7.4. SWITCHING THE INPUT METHOD IN GNOME
7.5. ADDITIONAL RESOURCES
CHAPTER 8. GNOME SCREEN RECORDING
CHAPTER 9. ENABLING AUTHENTICATION WITH ENTERPRISE CREDENTIALS IN GNOME
9.1. CONFIGURING ENTERPRISE CREDENTIALS IN GNOME
9.2. ADDING ENTERPRISE USERS IN GNOME
9.3. LOGGING IN TO GNOME WITH ENTERPRISE CREDENTIALS
9.4. ADDITIONAL RESOURCES
CHAPTER 10. REMOTELY ACCESSING THE DESKTOP AS A SINGLE USER
10.1. ENABLING DESKTOP SHARING ON THE SERVER USING GNOME
10.2. CONNECTING TO A SHARED DESKTOP USING GNOME
4
5
5
5
7
9
11
12
13
14
14
14
15
16
19
19
19
20
21
21
21
25
25
26
26
28
29
29
29
31
31
31
31
31
35
36
37
37
37
38
38
39
39
42
Table of Contents
1

. . . . . . . . . . . . . . . . . . . . . . . . . . . . . . . . . . . . . . . . . . . . . . . . . . . . . . . . . . . . . . . . . . . . . . . . . . . . . . . . . . . . . . . . . . . . . . . . . . . . . . . . . . . . . . . . . . . . . . . . . . . . . . . . . . . . . . . . . . . . . . . . . . . . . . . . . . . . . . . . . . . . . . . . . . . . . . . . . . . . . . . . . . . . . . . . . . . . . . . . . . . . . . . . . . . . . . . . . . . . . . . . . . . . . . . . . . . . . . . . . . . . . . . . . . . . . . . . . . . . . . . . . . . . . . . . . . . . . . . .
. . . . . . . . . . . . . . . . . . . . . . . . . . . . . . . . . . . . . . . . . . . . . . . . . . . . . . . . . . . . . . . . . . . . . . . . . . . . . . . . . . . . . . . . . . . . . . . . . . . . . . . . . . . . . . . . . . . . . . . . . . . . . . . . . . . . . . . . . . . . . . . . . . . . . . . . . . . . . . . . . . . . . . . . . . . . . . . . . . . . . . . . . . . . . . . . . . . . . . . . . . . . . . . . . . . . . . . . . . . . . . . . . . . . . . . . . . . . . . . . . . . . . . . . . . . . . . . . . . . . . . . . . . . . . . . . . . . . . . . .
. . . . . . . . . . . . . . . . . . . . . . . . . . . . . . . . . . . . . . . . . . . . . . . . . . . . . . . . . . . . . . . . . . . . . . . . . . . . . . . . . . . . . . . . . . . . . . . . . . . . . . . . . . . . . . . . . . . . . . . . . . . . . . . . . . . . . . . . . . . . . . . . . . . . . . . . . . . . . . . . . . . . . . . . . . . . . . . . . . . . . . . . . . . . . . . . . . . . . . . . . . . . . . . . . . . . . . . . . . . . . . . . . . . . . . . . . . . . . . . . . . . . . . . . . . . . . . . . . . . . . . . . . . . . . . . . . . . . . . . .
. . . . . . . . . . . . . . . . . . . . . . . . . . . . . . . . . . . . . . . . . . . . . . . . . . . . . . . . . . . . . . . . . . . . . . . . . . . . . . . . . . . . . . . . . . . . . . . . . . . . . . . . . . . . . . . . . . . . . . . . . . . . . . . . . . . . . . . . . . . . . . . . . . . . . . . . . . . . . . . . . . . . . . . . . . . . . . . . . . . . . . . . . . . . . . . . . . . . . . . . . . . . . . . . . . . . . . . . . . . . . . . . . . . . . . . . . . . . . . . . . . . . . . . . . . . . . . . . . . . . . . . . . . . . . . . . . . . . . . . .
. . . . . . . . . . . . . . . . . . . . . . . . . . . . . . . . . . . . . . . . . . . . . . . . . . . . . . . . . . . . . . . . . . . . . . . . . . . . . . . . . . . . . . . . . . . . . . . . . . . . . . . . . . . . . . . . . . . . . . . . . . . . . . . . . . . . . . . . . . . . . . . . . . . . . . . . . . . . . . . . . . . . . . . . . . . . . . . . . . . . . . . . . . . . . . . . . . . . . . . . . . . . . . . . . . . . . . . . . . . . . . . . . . . . . . . . . . . . . . . . . . . . . . . . . . . . . . . . . . . . . . . . . . . . . . . . . . . . . . . .
. . . . . . . . . . . . . . . . . . . . . . . . . . . . . . . . . . . . . . . . . . . . . . . . . . . . . . . . . . . . . . . . . . . . . . . . . . . . . . . . . . . . . . . . . . . . . . . . . . . . . . . . . . . . . . . . . . . . . . . . . . . . . . . . . . . . . . . . . . . . . . . . . . . . . . . . . . . . . . . . . . . . . . . . . . . . . . . . . . . . . . . . . . . . . . . . . . . . . . . . . . . . . . . . . . . . . . . . . . . . . . . . . . . . . . . . . . . . . . . . . . . . . . . . . . . . . . . . . . . . . . . . . . . . . . . . . . . . . . . .
10.3. DISABLING ENCRYPTION IN GNOME VNC
CHAPTER 11. REMOTELY ACCESSING THE DESKTOP AS MULTIPLE USERS
11.1. THE MAPPING OF PORT AND DISPLAY NUMBERS TO USERS IN VNC
11.2. VNC SERVER CONFIGURATION FILES
11.3. ENABLING MULTI-USER VNC ACCESS ON THE SERVER
11.4. CONNECTING TO THE VNC SERVER AS MULTIPLE USERS
CHAPTER 12. REMOTELY ACCESSING AN X11-BASED APPLICATION
12.1. ENABLING X11 FORWARDING ON THE SERVER
12.2. LAUNCHING AN APPLICATION REMOTELY USING X11 FORWARDING
12.3. ADDITIONAL RESOURCES
CHAPTER 13. REMOTELY ACCESSING A WAYLAND-BASED APPLICATION
13.1. ENABLING WAYPIPE ON THE CLIENT AND SERVER
13.2. LAUNCHING AN APPLICATION REMOTELY USING WAYPIPE
13.3. ADDITIONAL RESOURCES
CHAPTER 14. BROWSING FILES ON A NETWORK SHARE
14.1. GVFS URI FORMAT FOR NETWORK SHARES
14.2. MOUNTING A STORAGE VOLUME IN GNOME
14.3. UNMOUNTING A STORAGE VOLUME IN GNOME
14.4. ADDITIONAL RESOURCES (OR NEXT STEPS)
CHAPTER 15. CONFIGURING GNOME TO STORE USER SETTINGS ON HOME DIRECTORIES HOSTED ON AN
NFS SHARE
CHAPTER 16. TABLETS
16.1. PREPARING A TABLET DEFINITION FILE
16.2. ADDING SUPPORT FOR A NEW TABLET
16.3. WHERE IS THE WACOM TABLET CONFIGURATION STORED
16.4. LISTING AVAILABLE WACOM TABLET CONFIGURATION PATHS
44
45
45
46
47
48
49
49
49
50
51
51
51
52
53
53
53
54
54
55
56
57
59
59
60
Red Hat Enterprise Linux 9 Getting started with the GNOME desktop environment
2

Table of Contents
3

PROVIDING FEEDBACK ON RED HAT DOCUMENTATION
We appreciate your feedback on our documentation. Let us know how we can improve it.
Submitting feedback through Jira (account required)
1. Log in to the Jira website.
2. Click Create in the top navigation bar
3. Enter a descriptive title in the Summary field.
4. Enter your suggestion for improvement in the Description field. Include links to the relevant
parts of the documentation.
5. Click Create at the bottom of the dialogue.
Red Hat Enterprise Linux 9 Getting started with the GNOME desktop environment
4

CHAPTER 1. OVERVIEW OF GNOME ENVIRONMENTS
You can switch between several user interfaces and graphics back ends in GNOME.
IMPORTANT
To function properly, GNOME requires your system to support 3D acceleration. This
includes bare metal systems, as well as hypervisor solutions such as VMWare.
If GNOME does not start or performs poorly on your VMWare virtual machine (VM), see
the following solution: Why does the GUI fail to start on my VMware virtual machine?
1.1. GNOME ENVIRONMENTS, BACK ENDS, AND DISPLAY PROTOCOLS
In RHEL 9, there are two available GNOME environments:
GNOME Standard
GNOME Classic
Both environments can use two different protocols as their graphical back ends:
The Wayland protocol, which uses GNOME Shell as the Wayland compositor and display
server.
This solution of display server is further referred as GNOME Shell on Wayland.
The X11 protocol, which uses X.Org as the display server.
The default combination in RHEL 9 is the GNOME Standard environment using GNOME Shell on
Wayland as the display server. However, due to certain Wayland limitations, you might want to switch
the graphics protocol stack to X11. You can also switch from GNOME Standard to GNOME Classic.
Thus, you can select from the following combinations of back ends and environments when logging in:
GNOME Shell on Wayland (the default combination in RHEL 9)
GNOME Shell on X11
GNOME Classic on Wayland
GNOME Classic on X11
Additional resources
For information about how to switch the environments, see Selecting GNOME environment and
display protocol.
1.2. GNOME STANDARD
The GNOME Standard user interface includes these major components:
Top bar
The horizontal bar at the top of the screen provides access to some of the basic functions of
GNOME Standard, such as the Activities Overview, clock and calendar, system status icons, and the
system menu.
CHAPTER 1. OVERVIEW OF GNOME ENVIRONMENTS
5

System menu
The system menu is located in the upper-right corner, and provides the following functionality:
Updating settings
Controlling the sound volume
Accessing your Wi-Fi connection
Switching the user
Logging out
Turning off the computer
Activities Overview
The Activities Overview features windows and applications views that let you run applications and
windows and switch between them.
The search entry at the top allows for searching various items available on the desktop, including
applications, documents, files, and configuration tools.
The horizontal bar on the bottom contains a list of favorite and running applications. You can add or
remove applications from the default list of favorites.
Message tray
The message tray provides access to pending notifications. The message tray shows when you
Red Hat Enterprise Linux 9 Getting started with the GNOME desktop environment
6

The message tray provides access to pending notifications. The message tray shows when you
press Super+M.
The GNOME Standard desktop
1.3. GNOME CLASSIC
GNOME Classic represents a mode for users who prefer a more traditional desktop experience that is
similar to the GNOME 2 environment used with RHEL 6. It is based on GNOME 3 technologies, and at
the same time it includes multiple features similar to GNOME 2.
The GNOME Classic user interface consists of these major components:
Applications and Places
The Applications menu is displayed at the upper-left corner of the screen. It gives you access to
applications organized into categories. If you enable window overview, you can also open the
Activities Overview from that menu.
The Places menu is displayed next to the Applications menu on the top bar. It gives you quick
access to important folders, for example Downloads or Pictures.
Taskbar
The taskbar is displayed at the bottom of the screen, and features:
A window list
A notification icon displayed next to the window list
A short identifier for the current workspace and total number of available workspaces
CHAPTER 1. OVERVIEW OF GNOME ENVIRONMENTS
7

A short identifier for the current workspace and total number of available workspaces
displayed next to the notification icon
Four available workspaces
In GNOME Classic, the number of available workspaces is set to 4 by default.
Minimize and maximize buttons
Window title bars in GNOME Classic feature the minimize and maximize buttons that let you quickly
minimize the windows to the window list, or maximize them to take up all of the space on the desktop.
A traditional Super+Tab window switcher
In GNOME Classic, windows in the Super+Tab window switcher are not grouped by application.
System menu
The system menu is located in the upper-right corner, and enables the following actions:
Updating settings
Controlling the sound volume
Accessing your Wi-Fi connection
Switching the user
Logging out
Turning off the computer
The GNOME Classic desktop with the Favorites submenu of the Applications menu
Red Hat Enterprise Linux 9 Getting started with the GNOME desktop environment
8

1.4. ENABLING WINDOW OVERVIEW IN GNOME CLASSIC
In GNOME Classic, the overview of open windows is not available by default. This procedure enables the
window overview for all users on the system.
IMPORTANT
Enabling the window overview by this procedure is not a permanent change. Each update
of the gnome-classic-session package overwrites the configuration file to the default
settings, which disable the window overview.
To keep the window overview enabled, apply the procedure after each update of gnome-
classic-session.
Procedure
1. Open the /usr/share/gnome-shell/modes/classic.json file as the root user.
2. Find the following line in the file:
"hasOverview": false
3. Change the line to the following:
"hasOverview": true
CHAPTER 1. OVERVIEW OF GNOME ENVIRONMENTS
9

4. Save changes, and close the /usr/share/gnome-shell/modes/classic.json file.
5. Restart the user session.
Verification
1. In your GNOME Classic session, open multiple windows.
2. Press the Super key to open the window overview.
3. In the overview, check that:
The Dash (the horizontal panel on the bottom of the screen) is displayed.
The bottom panel is not displayed.
Window overview with "hasOverview": true
With the default settings ("hasOverview": false), the overview has the following features:
The Dash is not displayed.
The bottom panel is displayed. It includes the Window picker button in its left part and the
workspace switcher in its right part.
Window overview with "hasOverview": false
Red Hat Enterprise Linux 9 Getting started with the GNOME desktop environment
10

1.5. GRAPHICS BACK ENDS IN RHEL 9
In RHEL 9, you can choose between two protocols to build a graphical user interface:
Wayland
The Wayland protocol uses GNOME Shell as its compositor and display server, which is further
referred to as GNOME Shell on Wayland.
X11
The X11 protocol uses X.Org as the display server. Displaying graphics based on this protocol works
the same way as in RHEL 7, where this was the only option.
New installations of RHEL 9 automatically select GNOME Shell on Wayland. However, you can switch to
X.Org, or select the required combination of GNOME environment and display server.
X11 applications
Client applications need to be ported to the Wayland protocol or use a graphical toolkit that has a
Wayland backend, such as GTK, to be able to work natively with the compositor and display server based
on Wayland.
Legacy X11 applications that cannot be ported to Wayland automatically use Xwayland as a proxy
between the X11 legacy clients and the Wayland compositor. Xwayland functions both as an X11 server
and a Wayland client. The role of Xwayland is to translate the X11 protocol into the Wayland protocol
and reversely, so that X11 legacy applications can work with the display server based on Wayland.
On GNOME Shell on Wayland, Xwayland starts automatically at login, which ensures that most X11
legacy applications work as expected when using GNOME Shell on Wayland. However, the X11 and
Wayland protocols are different, and certain clients that rely on features specific to X11 might behave
differently under Xwayland. For such specific clients, you can switch to the X.Org display server.
CHAPTER 1. OVERVIEW OF GNOME ENVIRONMENTS
11

Input devices
RHEL 9 uses a unified input stack, libinput, which manages all common device types, such as mice,
touchpads, touchscreens, tablets, trackballs and pointing sticks. This unified stack is used both by the
X.Org and by the GNOME Shell on Wayland compositor.
GNOME Shell on Wayland uses libinput directly for all devices, and no switchable driver support is
available. Under X.Org, libinput is implemented as the X.Org libinput driver, and you can optionally
enable the legacy X.Org evdev driver if libinput does not support your input device.
Additional resources
You can find the current list of environments for which Wayland is not available in the
/usr/lib/udev/rules.d/61-gdm.rules file.
For additional information about the Wayland project, see Wayland documentation.
1.6. SELECTING GNOME ENVIRONMENT AND DISPLAY PROTOCOL
The default desktop environment for RHEL 9 is GNOME Standard with GNOME Shell on Wayland as
the display server. However, due to certain limitations of Wayland, you might want to switch the graphics
protocol stack. You might also want to switch from GNOME Standard to GNOME Classic.
The change of GNOME environment and graphics protocol stack is persistent across user logouts, and
also when powering off or rebooting the computer.
Procedure
1. From the login screen (GDM), click the gear button in the right bottom corner of the screen.
NOTE
You cannot access this option from the lock screen. The login screen appears
when you first start RHEL or when you log out of your current session.
Red Hat Enterprise Linux 9 Getting started with the GNOME desktop environment
12

2. From the drop-down menu that appears, select the option that you prefer.
In the menu, the X.Org display server is also marked as X11.
1.7. DISABLING WAYLAND FOR ALL USERS
You can disable the Wayland session for all users on the system, so that they always log in with the X11
session.
Procedure
1. Open the /etc/gdm/custom.conf file as the root user.
2. Locate the following line in the [daemon] section of the file:
#WaylandEnable=false
3. Uncomment the line by remove the # character. As a result, the line says:
WaylandEnable=false
4. Reboot the system.
CHAPTER 1. OVERVIEW OF GNOME ENVIRONMENTS
13

CHAPTER 2. LAUNCHING APPLICATIONS IN GNOME
You can launch installed applications using several different methods in the GNOME desktop
environment.
2.1. LAUNCHING AN APPLICATION IN THE STANDARD GNOME
SESSION
This procedure launches a graphical application in the GNOME desktop environment.
Prerequisites
You are using the standard GNOME session.
Procedure
1. Open the Activities Overview screen using either of the following ways:
Click Activities in the top panel.
Press the Super key, which is usually labeled with the Windows logo, ⌘, or .
2. Find the application using either of the following ways:
Click the Show Applications icon in the bottom horizontal bar.
Type the name of the required application in the search entry.
3. Click the application in the displayed list.
2.2. LAUNCHING AN APPLICATION IN GNOME CLASSIC
This procedure launches a graphical application in the GNOME Classic desktop environment.
Prerequisites
Red Hat Enterprise Linux 9 Getting started with the GNOME desktop environment
14

You are using the GNOME Classic session.
Procedure
1. Open the Applications menu in the top panel.
2. Choose the required application from the available categories, which can include:
Favorites
Accessories
Graphics
Internet
Office
Sound & Video
System Tools
Utilities
2.3. LAUNCHING AN APPLICATION IN GNOME USING A COMMAND
This procedure launches a graphical application in GNOME by entering a command.
Prerequisites
You know the command that starts the application.
Procedure
1. Open a command prompt using either of the following ways:
Open a terminal.
Press the Alt+F2 shortcut to open the Enter a Command screen.
CHAPTER 2. LAUNCHING APPLICATIONS IN GNOME
15

2. Type the application command in the command prompt.
3. Confirm the command by pressing Enter.
2.4. LAUNCHING AN APPLICATION AUTOMATICALLY ON LOGIN
You can set applications to launch automatically on login using the Tweaks tool. Tweaks is a tool to
customize the GNOME Shell environment for a particular user.
Prerequisites
You have installed gnome-tweaks on your system. For more details, see Installing software in
GNOME
You have installed the application that you want to launch at login.
Procedure
1. Open Tweaks. For more details see Launching applications in GNOME .
2. Select Startup Applications in the left side bar.
Red Hat Enterprise Linux 9 Getting started with the GNOME desktop environment
16

3. Click the plus sign button (+).
4. Select an application from the list of available applications and click Add.
CHAPTER 2. LAUNCHING APPLICATIONS IN GNOME
17
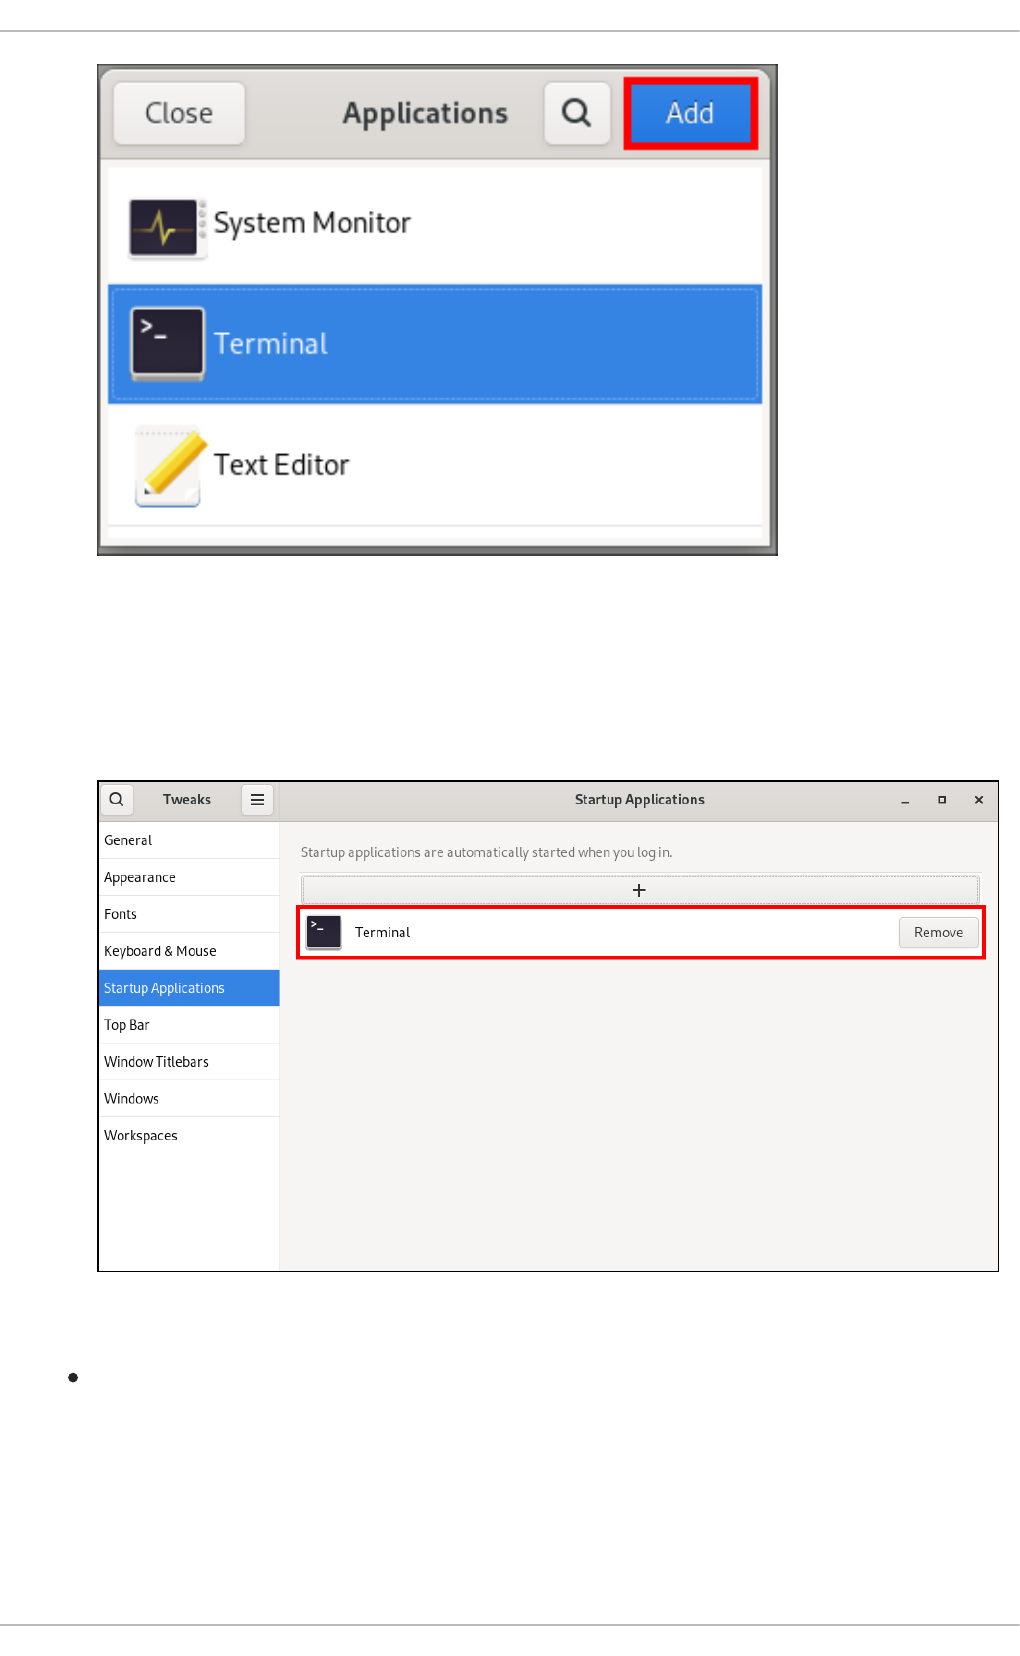
Verification
1. Open Tweaks.
2. Select Startup Applications in the left side bar.
3. List of applications launched at start will be present in the center section.
Additional resources
For more information about lauching applications, see Launching applications in GNOME
Red Hat Enterprise Linux 9 Getting started with the GNOME desktop environment
18

CHAPTER 3. DISABLING THE HOT CORNER FUNCTIONALITY
ON GNOME SHELL
The GNOME environment provides the hot corner functionality, which is enabled by default. This means
that when you move the cursor to the area of the upper-left corner and push the cursor to the screen
corner, the Activities Overview menu opens automatically.
However, you may want to disable this feature to not open Activities Overview unintentionally.
3.1. DISABLING HOT CORNER USING SETTINGS
To disable the hot corner functionality using the Settings application, follow this procedure.
NOTE
This procedure disables the hot corner functionality for a single user.
Procedure
1. Open the Settings application by clicking the gear button.
2. In the Settings application, go to Multitasking.
3. In the General section, disable the Hot Corner button.
Disabling hot corner using the Settings application
3.2. DISABLING HOT CORNER USING GSETTINGS
CHAPTER 3. DISABLING THE HOT CORNER FUNCTIONALITY ON GNOME SHELL
19

To disable the hot corner functionality using the gsettings command-line utility, follow this procedure.
Procedure
Disable the hot corner feature:
$ gsettings set org.gnome.desktop.interface enable-hot-corners false
Verification
Optionally, verify that the hot corner feature is disabled:
$ gsettings get org.gnome.desktop.interface enable-hot-corners
false
3.3. DISABLING THE HOT CORNER FUNCTIONALITY FOR ALL USERS
To disable the hot corner functionality for all users, you need to create a dconf profile.
Procedure
1. Create the user profile in the /etc/dconf/profile/user file.
user-db:user
system-db:local
2. Create the /etc/dconf/db/local.d/locks/00-interface file with the following content.
# Specify the dconf path
[org/gnome/desktop/interface]
# GSettings key names and their corresponding values
enable-hot-corners='FALSE'
3. Create a file in the /etc/dconf/db/local.d/locks directory, for example
/etc/dconf/db/local.d/locks/00-interface, with the following content.
# Prevent users from changing values for the following keys:
/org/gnome/desktop/interface/enable-hot-corners
The configuration file locks down the /org/gnome/desktop/interface/enable-hot-corners key
for all users. This key controls whether the hot corner is enabled.
4. Update the system databases for the changes to take effect.
# dconf update
5. Ensure that all users log out. The changes take effect when users log back in.
Red Hat Enterprise Linux 9 Getting started with the GNOME desktop environment
20

CHAPTER 4. SEARCHING FOR FILES IN GNOME
As a user in the GNOME environment, you can search for files using the Files application.
4.1. PERFORMING A BASIC FILE SEARCH
You can search for files in GNOME. This basic search looks for files in your home directory and all
folders in it, based on a file name.
Procedure
1. Open the Files application.
2. Press the Search button.
3. In the text field, type the file name or a part of the file name that you are searching for.
4. The window now lists all files in your home directory that match the file name.
4.2. PERFORMING AN ADVANCED FILE SEARCH
You can search for files in GNOME. This advanced search looks for files in a specific location, based on a
file name, a time of access, a time of modification, or a file type.
Procedure
1. Open the Files application.
2. Navigate to the folder where you want to search for a file.
The search recursively descends into all folders contained in this location.
3. Press the Search button.
CHAPTER 4. SEARCHING FOR FILES IN GNOME
21

4. Optionally, type the file name or a part of the file name that you are searching for in the text
field.
If you do not provide a file name, the search lists all files that match the other criteria, regardless
of their file names.
5. Click the triangle button next to the text field.
In this menu, you can select other search criteria.
6. To specify the access or modification time, click Select dates… next to the When label. Enter a
Red Hat Enterprise Linux 9 Getting started with the GNOME desktop environment
22

6. To specify the access or modification time, click Select dates… next to the When label. Enter a
date or select a time point from the list.
Below the time list, you can switch between Last modified and Last used.
7. To specify the file type, click Anything next to the What label. Select a file type from the list.
8. To switch between a search based on file content or file names, use the Full Text and File
CHAPTER 4. SEARCHING FOR FILES IN GNOME
23

8. To switch between a search based on file content or file names, use the Full Text and File
Name buttons, respectively.
NOTE
The full-text search only works in indexed locations. You can configure the
indexed locations in the Search section of the Settings application.
9. Click the triangle button next to the text field to hide the menu.
10. The window now lists all files in the specified directory that match your search criteria.
Red Hat Enterprise Linux 9 Getting started with the GNOME desktop environment
24

CHAPTER 5. BOOKMARKING FILES AND LOCATIONS
In GNOME, applications and dialogs that manage files list bookmarks in the left side bar. You can add,
remove, and edit the bookmarks.
5.1. ADDING A BOOKMARK
You can save a reference to a folder by bookmarking it in the Files application.
Prerequisite
Locate the folder in the Files application.
Procedure
Add the folder to bookmarks using either of the following methods:
By dragging:
i. Drag the folder to the left side bar.
ii. Drop it over the New bookmark item.
Using a keyboard shortcut:
i. Open the folder.
ii. Press Ctrl+D.
Using a menu:
i. Open the folder.
ii. In the navigation bar at the top of the window, click the name of the folder.
CHAPTER 5. BOOKMARKING FILES AND LOCATIONS
25

iii. Select Add to Bookmarks.
Verification
Check that the bookmark now appears in the side bar.
5.2. REMOVING A BOOKMARK
You can delete an existing bookmark in the Files application.
Procedure
1. Right-click the bookmark in the side bar.
2. Select Remove from the menu.
Verification
Check that the bookmark no longer appears in the side bar.
5.3. RENAMING A BOOKMARK
You can rename a bookmark to distinguish it from other bookmarks. If you have bookmarks to several
folders that all share the same name, you can tell the bookmarks apart if you rename them.
Renaming the bookmark does not rename the folder.
Procedure
1. Right-click the bookmark in the side bar.
Red Hat Enterprise Linux 9 Getting started with the GNOME desktop environment
26

2. Select Rename….
3. In the Name field, enter the new name for the bookmark.
CHAPTER 5. BOOKMARKING FILES AND LOCATIONS
27

4. Click Rename.
Verification
Check that the side bar lists the bookmark under the new name.
5.4. ADDING A BOOKMARK FOR ALL USERS
As a system administrator, you can set a bookmark for several users at once so that file shares are easily
accessible to all the users.
Procedure
1. In the home directory of each existing user, edit the ~user/.config/gtk-3.0/bookmarks file.
2. In the file, add a Uniform Resource Identifiers (URI) line that identifies the bookmark.
For example, the following lines add bookmarks to the /usr/share/doc/ directory and to the
GNOME FTP network share:
file:///usr/share/doc/
ftp://ftp.gnome.org/
3. Optional: To also add the bookmarks for every newly created user on the system:
a. Create the /etc/skel/.config/gtk-3.0/bookmarks file.
b. Enter the bookmark URI lines in the file.
Red Hat Enterprise Linux 9 Getting started with the GNOME desktop environment
28

CHAPTER 6. TYPING EMOJI CHARACTERS
You can type emoji characters using several different methods in GNOME, depending on the type of the
application.
6.1. TYPING EMOJI CHARACTERS IN GTK APPLICATIONS
This procedure inserts an emoji character in an application that uses the GTK graphical toolkit, such as in
native GNOME applications.
Prerequisites
Make sure that the application is built on the GTK toolkit.
Procedure
1. Open a GTK application.
2. Make sure that a text field is active.
3. Press Ctrl+;.
The emoji selection menu opens.
4. Browse the emoji characters or type a keyword that identifies the emoji character that you want
to insert, such as smile.
For the full list of keywords associated with emoji characters, see the Other Keywords column
on the Emoji List page.
5. Click the selected character, or navigate to it using the cursor keys and press Enter.
Verification
Check that the intended emoji character now appears at your cursor.
6.2. TYPING EMOJI CHARACTERS IN ANY APPLICATIONS
This procedure inserts an emoji character in any application, regardless of the graphical toolkit that the
application uses.
Procedure
1. Open an application.
2. Make sure that a text field is active.
3. Press Ctrl+..
The underscored letter e appears at your cursor.
4. Type a keyword that identifies the emoji character that you want to insert, such as smile.
For the full list of keywords associated with emoji characters, see the Other Keywords column
on the Emoji List page.
5. Repeatedly press Space to browse the emoji characters that match your keyword.
CHAPTER 6. TYPING EMOJI CHARACTERS
29

6. Confirm the selected emoji character by pressing Enter.
Verification
Check that the intended emoji character now appears at your cursor.
Red Hat Enterprise Linux 9 Getting started with the GNOME desktop environment
30

CHAPTER 7. ENABLING CHINESE, JAPANESE, OR KOREAN
TEXT INPUT
If you write with Chinese, Japanese, or Korean characters, you can configure RHEL to input text in your
language.
7.1. INPUT METHODS
Certain scripts, such as Chinese, Japanese, or Korean, require keyboard input to go through an Input
Method Engine (IME) to enter native text.
An input method is a set of conversion rules between the text input and the selected script. An IME is a
software that performs the input conversion specified by the input method.
To input text in these scripts, you must set up an IME. If you installed the system in your native language
and selected your language at the GNOME Initial Setup screen, the input method for your language is
enabled by default.
7.2. AVAILABLE INPUT METHOD ENGINES
The following input method engines (IMEs) are available on RHEL from the listed packages:
Table 7.1. Available input method engines
Languages Scripts IME name Package
Chinese Simplified Chinese Intelligent Pinyin ibus-libpinyin
Chinese Traditional Chinese New Zhuyin ibus-libzhuyin
Japanese Kanji, Hiragana, Katakana Anthy ibus-anthy
Korean Hangul Hangul ibus-hangul
Other Various M17N ibus-m17n
7.3. INSTALLING INPUT METHOD ENGINES
This procedure installs input method engines (IMEs) that you can use to input Chinese, Japanese, and
Korean text.
Procedure
Install all available input method packages:
# dnf install @input-methods
7.4. SWITCHING THE INPUT METHOD IN GNOME
This procedure sets up the input method for your script, such as for Chinese, Japanese, or Korean
CHAPTER 7. ENABLING CHINESE, JAPANESE, OR KOREAN TEXT INPUT
31

This procedure sets up the input method for your script, such as for Chinese, Japanese, or Korean
scripts.
Prerequisites
The input method packages are installed.
Procedure
1. Go to the system menu, which is accessible from the top-right screen corner, and click
Settings.
2. Select the Keyboard section.
3. In the Input Sources list, review the currently enabled input methods.
Red Hat Enterprise Linux 9 Getting started with the GNOME desktop environment
32

4. If your input method is missing:
a. Click the + button under the Input Sources list.
b. Select your language.
CHAPTER 7. ENABLING CHINESE, JAPANESE, OR KOREAN TEXT INPUT
33

NOTE
If you cannot find your language in the menu, click the three dots icon
(More…) at the end of the menu.
c. Select the input method that you want to use. A cog wheel icon marks all input methods to
distinguish them from simple keyboard layouts.
Red Hat Enterprise Linux 9 Getting started with the GNOME desktop environment
34

d. Confirm your selection by clicking Add.
5. Switch the active input method using one of the following ways:
Click the input method indicator on the right side of the top panel and select your input
method.
Switch between the enabled input methods using the Super+Space keyboard shortcut.
Verification
1. Open a text editor.
2. Type text in your language.
3. Verify that the text appears in your native script.
7.5. ADDITIONAL RESOURCES
Installing a font for the Chinese standard GB 18030 character set
CHAPTER 7. ENABLING CHINESE, JAPANESE, OR KOREAN TEXT INPUT
35

CHAPTER 8. GNOME SCREEN RECORDING
GNOME Screen Recording is a built-in feature in the GNOME desktop environment that allows users to
record their desktop or specific application activities. The recordings are saved as video files in the
WebM format.
Procedure
1. To start the recording, press the Ctrl+Alt+Shift+R keyboard shortcut.
Once the recording begins, a red circle indicator appears in the upper-right corner of the
screen, indicating that the recording is active.
2. To stop the recording, press the same Ctrl+Alt+Shift+R keyboard shortcut again.
The red circle indicator disappears, signaling the end of the recording.
The recorded video files are saved in the ~/Videos directory. The filenames of recorded videos start with
Screencast and include the date and time of the recording.
Red Hat Enterprise Linux 9 Getting started with the GNOME desktop environment
36

CHAPTER 9. ENABLING AUTHENTICATION WITH ENTERPRISE
CREDENTIALS IN GNOME
If your workplace uses a system called Active Directory or IPA, and you have an account there, you can
use that account to log into the GNOME desktop environment.
Logging in using enterprise credentials provides centralized account management, streamlines access
to work-related resources, and gives the convenience of Single Sign-On (SSO).
9.1. CONFIGURING ENTERPRISE CREDENTIALS IN GNOME
You can configure your system to use enterprise credentials using Settings.
Procedure
1. Open Settings.
2. Click Online Accounts.
3. Select Enterprise Login (Kerberos).
4. In the Principal field, enter your domain username in the username@domain.com format.
5. Click Connect.
6. Enter your enterprise password and click Continue.
Depending on the configuration of your domain, you might be asked for the domain
administrator credentials.
9.2. ADDING ENTERPRISE USERS IN GNOME
You can add an enterprise user to GNOME using Settings.
Prerequisites
Administrative access.
You have configured Enterprise credentials .
Procedure
1. Open Settings.
2. Click Users.
3. Select the Unlock button and enter your password.
4. Click Add User.
5. Choose Enterprise Login
6. Enter the domain, username, and password for your Enterprise account.
7. Click Add.
CHAPTER 9. ENABLING AUTHENTICATION WITH ENTERPRISE CREDENTIALS IN GNOME
37

Depending on the domain configuration, you might need to enter administrator credentials.
9.3. LOGGING IN TO GNOME WITH ENTERPRISE CREDENTIALS
If your network has an Active Directory or IPA domain available, and you have a domain account, you can
log in to GNOME using your enterprise credentials.
Procedure
At the GNOME login prompt, type your domain username followed by an @ sign and then your
domain name.
username@domain.com
9.4. ADDITIONAL RESOURCES
For troubleshooting, see the realm man page
Red Hat Enterprise Linux 9 Getting started with the GNOME desktop environment
38

CHAPTER 10. REMOTELY ACCESSING THE DESKTOP AS A
SINGLE USER
You can remotely connect to the desktop on a RHEL server using graphical GNOME applications. Only a
single user can connect to the desktop on the server at a given time.
10.1. ENABLING DESKTOP SHARING ON THE SERVER USING GNOME
This procedure configures a RHEL server to enable a remote desktop connection from a single client.
Prerequisites
The GNOME Remote Desktop service is installed:
# dnf install gnome-remote-desktop
Procedure
1. Configure a firewall rule to enable VNC access to the server:
# firewall-cmd --permanent --add-service=vnc-server
success
2. Reload firewall rules:
# firewall-cmd --reload
success
3. Open Settings in GNOME.
4. Navigate to the Sharing menu:
5. Click Screen Sharing.
The screen sharing configuration opens:
CHAPTER 10. REMOTELY ACCESSING THE DESKTOP AS A SINGLE USER
39

6. Click the switch button in the window header to enable screen sharing:
Red Hat Enterprise Linux 9 Getting started with the GNOME desktop environment
40

7. Select the Allow connections to control the screen check box.
8. Under Access Options, select the Require a password option.
9. Set a password in the Password field.
Remote clients must enter this password when connecting to the desktop on the server.
CHAPTER 10. REMOTELY ACCESSING THE DESKTOP AS A SINGLE USER
41

10.2. CONNECTING TO A SHARED DESKTOP USING GNOME
This procedure connects to a remote desktop session using the Connections application. It connects to
the graphical session of the user that is currently logged in on the server.
Prerequisites
A user is logged into the GNOME graphical session on the server.
The desktop sharing is enabled on the server.
Procedure
1. Install the Connections application on the client:
# dnf install gnome-connections
2. Launch the Connections application.
3. Click the + button to open a new connection.
Red Hat Enterprise Linux 9 Getting started with the GNOME desktop environment
42

4. Enter the IP address of the server.
5. Choose the connection type based on the operating system you want to connect to.
6. Click Connect.
Verification
1. On the client, check that you can see the shared server desktop.
2. On the server, a screen sharing indicator appears on the right side of the top panel:
CHAPTER 10. REMOTELY ACCESSING THE DESKTOP AS A SINGLE USER
43

You can control the screen sharing in the system menu.
10.3. DISABLING ENCRYPTION IN GNOME VNC
You can disable encryption in the GNOME remote desktop solution. This enables VNC clients that do
not support the encryption to connect to the server.
Procedure
1. As the server user, set the encryption key of org.gnome.desktop.remote-desktop.vnc
GSettings schema to ['none'].
$ gsettings set org.gnome.desktop.remote-desktop.vnc encryption "['none']"
2. Optional: Red Hat recommends that you tunnel the VNC connection over SSH to your VNC
port. As a result, the SSH tunnel keeps the connection encrypted.
For example:
a. On the client, configure the port forwarding.
# ssh -N -T -L 5901:server-ip-address:5901 user@server-ip-address
b. Connect to the VNC session on the localhost:5901 address.
Red Hat Enterprise Linux 9 Getting started with the GNOME desktop environment
44

CHAPTER 11. REMOTELY ACCESSING THE DESKTOP AS
MULTIPLE USERS
You can remotely connect to the desktop on a RHEL server and open multiple sessions as different
users at the same time.
Prerequisites
Install the VNC server:
# dnf install tigervnc-server
Install the VNC client:
# dnf install tigervnc
11.1. THE MAPPING OF PORT AND DISPLAY NUMBERS TO USERS IN
VNC
With VNC, the client can connect to the desktop sessions of different users on the server. A display
number and a TCP port number are attached to each server user that exports a VNC session. The client
uses the port number to specify which server user it connects to.
If several clients connect using the same port number, they all open a VNC session to the same server
user.
You must configure a mapping for each server user that exports a VNC session. For every such user, you
must pick a unique port and display number.
The recommended mapping
Red Hat recommends that you start with port number 5902 and display number 2 for the first user, and
increment the numbers by one for each additional server user.
Port number 5900 and display number 0 represent the server user that is currently logged into the
graphical session. You cannot start a VNC server for the user who is already logged into the graphical
session.
Table 11.1. Port and display number pairs
Port number Display number Note
5900 0 The logged-in user
5901 1
5902 2 The first recommended VNC user
5903 3
… …
CHAPTER 11. REMOTELY ACCESSING THE DESKTOP AS MULTIPLE USERS
45

IMPORTANT
Red Hat recommends that you do not configure the root user to export a VNC session. A
root VNC session is unsafe and certain elements of the session might not work as
expected.
Firewall rules
You must open the selected ports in your firewall configuration. Allowing the vnc-server service in your
firewall opens ports from 5900 to 5903. If you need to enable access to additional server users, you
must open ports above 5903 by manually specifying the port numbers.
11.2. VNC SERVER CONFIGURATION FILES
Several configuration files affect the behavior of the VNC server. You can configure the user mapping
and various global options.
General options
You can configure general options of the VNC server in the /etc/tigervnc/vncserver-config-defaults
configuration file. The file uses the following format:
option1=value
option2
For example:
session=gnome
alwaysshared
securitytypes=vncauth,tlsvnc
desktop=sandbox
geometry=2000x1200
The priority of configuration files
The VNC server reads the following files for general options, in order from most important to least
important:
1. /etc/tigervnc/vncserver-config-mandatory
This file replaces the default configuration and has a higher priority than the per-user
configuration. It is intended for system administrators who want to enforce particular VNC
options.
2. $HOME/.vnc/config
Individual users can override the default VNC configuration in this file.
3. /etc/tigervnc/vncserver-config-defaults
This file stores the default VNC configuration.
User mapping
You can configure the mapping between users and their associated port and display numbers in the
/etc/tigervnc/vncserver.users configuration file. The file uses the following format:
:number=user
Red Hat Enterprise Linux 9 Getting started with the GNOME desktop environment
46

For example:
:2=test
:3=vncuser
Additional resources
For a list of available configuration options, see the Xvnc(1) man page.
11.3. ENABLING MULTI-USER VNC ACCESS ON THE SERVER
This procedure configures a RHEL server so that multiple users can open VNC sessions on it at the
same time.
Prerequisites
If you previously configured VNC using systemd unit files, remove any outdated VNC
configuration:
[root]# rm /etc/systemd/system/vncserv[email protected]
Procedure
1. Map users to display and port numbers.
In the /etc/tigervnc/vncserver.users configuration file, add a line for each server user that will
export a VNC session:
:user-number=user-name
Replace user-number with the port and display number mapped to the selected existing
user.
Replace user-name with the user name of the selected existing user.
For example:
:2=vncuser
2. Open TCP ports 5900 to 5903 in the firewall:
[root]# firewall-cmd --permanent --add-service=vnc-server
3. Reload the firewall rules:
[root]# firewall-cmd --reload
4. Add the following lines to the /etc/tigervnc/vncserver-config-defaults configuration file:
session=gnome
alwaysshared
This configuration has the following effects:
CHAPTER 11. REMOTELY ACCESSING THE DESKTOP AS MULTIPLE USERS
47

The VNC server starts the GNOME session when a remote user logs in.
Multiple users can connect to the VNC server at the same time.
5. As each server user that exports a VNC session, set the VNC password for the user:
[regular-user]$ vncpasswd
Remote clients must enter this password when connecting to the desktop on the server.
6. If you previously configured VNC for the user, ensure that the configuration files have the
correct SELinux context:
[regular-user]$ restorecon -RFv ~/.vnc
7. Enable and start the VNC server unit for the regular user:
[root]# systemctl enable --now vncserver@:user-number
8. If the server uses the proprietary Nvidia driver, disable Wayland:
a. Uncomment the WaylandEnable=False line in the /etc/gdm/custom.conf configuration
file.
b. Add the DefaultSession=gnome-xorg.desktop option to the [daemon] section of the
configuration file.
c. Reboot the server.
Additional resources
To enable VNC access to more than two server users, open TCP ports above 5903. For details,
see Controlling traffic with predefined services using the CLI or Controlling traffic with
predefined services using the GUI.
11.4. CONNECTING TO THE VNC SERVER AS MULTIPLE USERS
This procedure connects to a remote desktop session using the vncviewer application. You can open
multiple connections to the remote desktop at the same time.
Prerequisites
Remote desktop access for multiple users is enabled on the server. For details, see Section 11.3,
“Enabling multi-user VNC access on the server”.
Procedure
Connect to the VNC server:
$ vncviewer --shared server-ip:display
Replace server-ip with the IP address of the server that you are connecting to.
Replace display with the display number where the server user exports the VNC session.
Red Hat Enterprise Linux 9 Getting started with the GNOME desktop environment
48

CHAPTER 12. REMOTELY ACCESSING AN X11-BASED
APPLICATION
You can remotely launch a graphical X11-based application on a RHEL server and use it from the remote
client using X11 forwarding.
NOTE
This procedure works for legacy X11 applications, that is, applications that support the X11
display protocol.
12.1. ENABLING X11 FORWARDING ON THE SERVER
Configure a RHEL server so that remote clients can use graphical applications on the server over SSH.
Procedure
1. Install basic X11 packages:
# dnf install xorg-x11-xauth xorg-x11-fonts-\* xorg-x11-utils dbus-x11
NOTE
Your applications might rely on additional graphical libraries.
2. Enable the X11Forwarding option in the /etc/ssh/sshd_config configuration file:
X11Forwarding yes
The option is disabled by default in RHEL.
1. Restart the sshd service:
# systemctl restart sshd.service
12.2. LAUNCHING AN APPLICATION REMOTELY USING X11
FORWARDING
Access a graphical application on a RHEL server from a remote client using SSH.
Prerequisites
X11 forwarding over SSH is enabled on the server. For details, see Section 12.1, “Enabling X11
forwarding on the server”.
Ensure that an X11 display server is running on your system:
On RHEL, X11 is available by default in the graphical interface.
On Microsoft Windows, install an X11 server such as Xming.
CHAPTER 12. REMOTELY ACCESSING AN X11-BASED APPLICATION
49

On macOS, install the XQuartz X11 server.
You have configured and restarted an OpenSSH server. For details, see Configuring and
starting an OpenSSH server.
Procedure
1. Log in to the server using SSH:
[local-user]$ ssh -X -Y remote-server
The authenticity of host 'remote-server (192.168.122.120)' can't be established.
ECDSA key fingerprint is SHA256:uYwFlgtP/2YABMHKv5BtN7nHK9SHRL4hdYxAPJVK/kY.
Are you sure you want to continue connecting (yes/no/[fingerprint])?
2. Confirm that a server key is valid by checking its fingerprint.
NOTE
If you plan to log in to the server on a regular basis, add the user’s public key to
the server using the ssh-copy-id command.
3. Continue connecting by typing yes.
Warning: Permanently added 'remote-server' (ECDSA) to the list of known hosts.
4. When prompted, type the server password.
local-user's password:
[local-user ~]$
5. Launch the application from the command line:
[remote-user]$ application-binary
TIP
To skip the intermediate terminal session, use the following command:
$ ssh user@server -X -Y -C binary_application
12.3. ADDITIONAL RESOURCES
Remotely accessing an individual application on Wayland .
Key differences between the Wayland and X11 protocol .
Red Hat Enterprise Linux 9 Getting started with the GNOME desktop environment
50

CHAPTER 13. REMOTELY ACCESSING A WAYLAND-BASED
APPLICATION
You can remotely launch a graphical Wayland-based application on a RHEL server and use it from the
remote client on Wayland using waypipe.
NOTE
The desktop applications shipped with RHEL 9 support both the Wayland and X11 display
protocols. However, Wayland is the preferred option when both are available.
13.1. ENABLING WAYPIPE ON THE CLIENT AND SERVER
To be able to launch an individual application on Wayland, you need to install the waypipe package.
Prerequisite
Both the client and server use the RHEL 9 operating system.
Procedure
1. Install the waypipe package on the local system.
# dnf install waypipe
2. Install the waypipe package on the remote system.
# dnf install waypipe
13.2. LAUNCHING AN APPLICATION REMOTELY USING WAYPIPE
You can accesses a graphical application on Wayland on a RHEL server from a remote client using SSH
and waypipe.
NOTE
This procedure does not work for legacy X11 applications. For X11 applications, see
Remotely accessing an individual application on X11 .
Prerequisites
A Wayland display server is running on your system. On RHEL 9, GNOME as a Wayland
compositor is the default.
The waypipe package is installed on both the client and the remote system.
The application is capable of running natively on Wayland.
Procedure
1. Launch the application remotely through waypipe and SSH.
CHAPTER 13. REMOTELY ACCESSING A WAYLAND-BASED APPLICATION
51

[local-user]$ waypipe -c lz4=9 ssh remote-server application-binary
The authenticity of host 'remote-server (192.168.122.120)' can't be established.
ECDSA key fingerprint is SHA256:uYwFlgtP/2YABMHKv5BtN7nHK9SHRL4hdYxAPJVK/kY.
Are you sure you want to continue connecting (yes/no/[fingerprint])?
2. Confirm that a server key is valid by checking its fingerprint.
3. Continue connecting by typing yes.
Warning: Permanently added 'remote-server' (ECDSA) to the list of known hosts.
4. When prompted, type the server password.
remote-user's password:
[remote-user]$
13.3. ADDITIONAL RESOURCES
Remotely accessing an individual application on X11 .
Key differences between the Wayland and X11 protocol .
Red Hat Enterprise Linux 9 Getting started with the GNOME desktop environment
52

CHAPTER 14. BROWSING FILES ON A NETWORK SHARE
You can connect to a network share provided by a server and browse the files on the server like local
files. You can download or upload files using the file browser.
14.1. GVFS URI FORMAT FOR NETWORK SHARES
GNOME uses the GVFS URI format to refer to network shares and files on them. When you connect to a
network share from GNOME, you provide the address to the network share in the following format.
A URL, or uniform resource locator, is a form of address that refers to a location or file on a network.
The address is formatted like this:
The basic GVFS URI format takes the following syntax:
protocol://server.example.com/folder/file
The scheme specifies the protocol or type of server. The example.com portion of the address is called
the domain name. If a username is required, it is inserted before the server name:
You can also specify the user name or the port number to the network share:
protocol://user@server.example.com:port/folder/file
Table 14.1. Common network share protocols
Protocol GVFS URI example
SSH ssh://us[email protected]xample.com/path
NFS nfs://server/path
Windows SMB smb://server/Share
WebDAV dav://example.server.com/path
Public FTP ftp://ftp.example.com/path
Authenticated FTP ftp://use[email protected]ple.com/path
Additional resources
The GVFS system
The format of the GVFS URI string
14.2. MOUNTING A STORAGE VOLUME IN GNOME
You can manually mount a local storage volume or a network share in the Files application.
CHAPTER 14. BROWSING FILES ON A NETWORK SHARE
53

Procedure
1. Open the Files application.
2. Click Other Locations in the side bar.
The window lists all connected storage volumes and all network shares that are publicly available
on your local area network.
If you can see the volume or network share in this list, mount it by clicking the item.
If you want to connect to a different network share, use the following steps.
3. Enter the GVFS URI string to the network share in the Connect to Server field.
4. Press Connect.
5. If the dialog asks you for login credentials, enter your name and password into the relevant
fields.
6. When the mounting process finishes, you can browse the files on the volume or network share.
14.3. UNMOUNTING A STORAGE VOLUME IN GNOME
You can unmount a storage volume, a network share, or another resource in the Files application.
Procedure
1. Open the Files application.
2. In the side bar, click the Unmount (⏏) icon next to the chosen mount.
3. Wait until the mount disappears from the side bar or a notification about the safe removal
appears.
14.4. ADDITIONAL RESOURCES (OR NEXT STEPS)
Managing storage volumes in GNOME
Mounting NFS shares
Mounting an SMB Share on Red Hat Enterprise Linux
Red Hat Enterprise Linux 9 Getting started with the GNOME desktop environment
54

CHAPTER 15. CONFIGURING GNOME TO STORE USER
SETTINGS ON HOME DIRECTORIES HOSTED ON AN NFS
SHARE
If you use GNOME on a system with home directories hosted on an NFS server, you must change the
keyfile backend of the dconf database. Otherwise, dconf might not work correctly.
This change affects all users on the host, as it alters the way dconf manages user settings and
configurations stored in the home directories.
Procedure
1. Create the /etc/dconf/profile/user file and add the following to it:
service-db:keyfile/user
With this setting, dconf polls the keyfile back end to determine whether updates have been
made, so settings might not be updated immediately.
2. The changes take effect when the users logs out and in.
CHAPTER 15. CONFIGURING GNOME TO STORE USER SETTINGS ON HOME DIRECTORIES HOSTED ON AN NFS SHARE
55

CHAPTER 16. TABLETS
To manage Wacom tablets connected to your system, use the following tools:
The gnome-settings-daemon service
The Wacom Tablet settings panel in the GNOME environment
The Wacom Tablet settings panel for a tablet
The Wacom Tablet settings panel for a grip pen
Red Hat Enterprise Linux 9 Getting started with the GNOME desktop environment
56

Both these tools, as well as the libinput stack, use the libwacom tablet client library, which stores the
data about Wacom tablets.
If you want to add support for a new tablet into the libwacom library, you must ensure that a definition
file for this new tablet exists.
16.1. PREPARING A TABLET DEFINITION FILE
You must prepare a definition file for the tablet you want to add.
Prerequisites
List all local devices recognized by libwacom:
$ libwacom-list-local-devices
Make sure that your device is recognized in the output.
If your device is not listed, the device is missing from the libwacom database. However, the
device might still be visible as an event device in the kernel under /proc/bus/input/devices, and
if you use the X.Org display server, in the X11 session on the xinput list.
Procedure
1. Install the package that provides tablet definition files:
# dnf install libwacom-data
The package installs tablet definitions in the /usr/share/libwacom/ directory.
CHAPTER 16. TABLETS
57

2. Check whether the definition file is available in the /usr/share/libwacom/ directory.
To use the screen mapping correctly, support for your tablet must be included in the libwacom
database and in the udev rules file.
IMPORTANT
A common indicator that a device is not supported by libwacom is that it works
normally in a GNOME session, but the device is not correctly mapped to the
screen.
3. If the definition file for your device is not available in /usr/share/libwacom/, you have these
options:
The required definition file may already be available in the linuxwacom/libwacom upstream
repository. You can try to find the definition file there. If you find your tablet model in the
list, copy the file to the local machine.
You can create a new tablet definition file. Use the data/wacom.example file below, and
edit particular lines based on the characteristics of your device.
Example 16.1. Example model file description for a tablet
[Device]
# The product is the product name announced by the kernel
Product=Intuos 4 WL 6x9
# Vendor name of this tablet
Vendor=Wacom
# DeviceMatch includes the bus (usb, serial), the vendor ID and the actual
# product ID
DeviceMatch=usb:056a:00bc
# Class of the tablet. Valid classes include Intuos3, Intuos4, Graphire, Bamboo, Cintiq
Class=Intuos4
# Exact model of the tablet, not including the size.
Model=Intuos 4 Wireless
# Width in inches, as advertised by the manufacturer
Width=9
# Height in inches, as advertised by the manufacturer
Height=6
# Optional features that this tablet supports
# Some features are dependent on the actual tool used, e.g. not all styli
# have an eraser and some styli have additional custom axes (e.g. the
# airbrush pen). These features describe those available on the tablet.
#
# Features not set in a file default to false/0
[Features]
# This tablet supports styli (and erasers, if present on the actual stylus)
Stylus=true
Red Hat Enterprise Linux 9 Getting started with the GNOME desktop environment
58

# This tablet supports touch.
Touch=false
# This tablet has a touch ring (Intuos4 and Cintiq 24HD)
Ring=true
# This tablet has a second touch ring (Cintiq 24HD)
Ring2=false
# This tablet has a vertical/horizontal scroll strip
VStrip=false
HStrip=false
# Number of buttons on the tablet
Buttons=9
# This tablet is built-in (most serial tablets, Cintiqs)
BuiltIn=false
16.2. ADDING SUPPORT FOR A NEW TABLET
You can add support for a new tablet into the libwacom tablet information client library by adding the
definition file for the tablet that you want to add.
Prerequisites
The definition file for the tablet that you want to add exists.
For more information about ensuring that the definition file exists, see Section 16.1, “Preparing a
tablet definition file”.
Procedure
1. Add and install the definition file with the .tablet suffix:
# cp the-new-file.tablet /usr/share/libwacom/
Once installed, the tablet is part of the libwacom database. The tablet is then available through
libwacom-list-local-devices.
2. Create a new /etc/udev/rules/99-libwacom-override.rules file with the following content so
that your settings are not overwritten:
ACTION!="add|change", GOTO="libwacom_end"
KERNEL!="event[0-9]*", GOTO="libwacom_end"
[new tablet match entries go here]
LABEL="libwacom_end"
3. Reboot your system.
16.3. WHERE IS THE WACOM TABLET CONFIGURATION STORED
CHAPTER 16. TABLETS
59

Location for the Wacom tablet and stylus configuration:
/org/gnome/settings-daemon/peripherals/wacom/machine-id-device-id
The configuration for your Wacom tablet, where machine-id is a D-Bus machine ID, and device-id is
a tablet device ID.
org.gnome.settings-daemon.peripherals.wacom
The configuration schema for Wacom tablets.
/org/gnome/settings-daemon/peripherals/wacom/device-id/tool-id
The configuration for the stylus, where device-id is the tablet device ID and tool-id is the stylus tool
ID. For the consumer ranges with no support for tool-id, a generic identifier is used instead.
org.gnome.settings-daemon.peripherals.wacom.stylus
The configuration schema for stylus.
org.gnome.settings-daemon.peripherals.wacom.eraser
The configuration schema for the eraser.
16.4. LISTING AVAILABLE WACOM TABLET CONFIGURATION PATHS
You can get the full list of tablet configuration paths by using the gsd-list-wacom tool, which is
provided by the gnome-settings-daemon package.`
Prerequisites
Make sure that the gnome-settings-daemon package is installed on your system.
# dnf install gnome-settings-daemon
Procedure
To get the full list of tablet configuration paths used on your machine, run the following
command:
$ /usr/libexec/gsd-list-wacom
IMPORTANT
Using machine-id, device-id, and tool-id in configuration paths allows for shared home
directories with independent tablet configuration per machine. However, when sharing
home directories between Machines, the Wacom settings apply only to one machine.
This is because the machine-id for your Wacom tablet is included in the configuration
path of the /org/gnome/settings-daemon/peripherals/wacom/machine-id-device-id
GSettings key, which stores your tablet settings.
Red Hat Enterprise Linux 9 Getting started with the GNOME desktop environment
60
