
SpeechMiner UI User Manual
8.5.5
Date: 7/11/2018

Table of Contents
Chapter 1: Introduction to SpeechMiner
1
New in this Release 4
SpeechMiner Deployments 15
Topics, Categories and Programs 17
Topics 19
Categories 21
Programs 23
Log into SpeechMiner 26
SpeechMiner Menu Reference 28
Chapter 2: Dashboard
30
Dashboard Menu Reference 31
Create a New Dashboard 32
Working with Dashboards 34
Widgets 36
Working with Widgets 37
Report Widget 40
My Messages Widget 43
Chapter 3: Explore
46
Explore Menu Reference 47
Search Results Grid 48
Working with the Search Results Grid 52
What is an Interaction? 55
Screen Recordings 58
Batch Actions 59
Create a New Search 64
Search Filter 66
Explore Terms 74
Saved Searches 75
Compare Saved Searches 77
Interaction Lists 79
Content Browser 82
Trending 84

Create a Trending Filter 86
Create a Custom Trending Cluster Task 88
Trending Filter Toolbar Description 91
Trending Chart Tool Tip Description 95
Trending Chart Data Description 97
Manage the Blacklist 101
Working with Saved Trending Filters 103
Export Trending Data 107
Chapter 4: Media Player
108
Playback 110
Playback Controls 111
Hidden Confidential Information 115
Dual-Channel Audio 116
Interaction Transcript 117
Interaction Comments 121
Interaction Events 124
Interaction Attributes 126
Media Player Options 127
Chapter 5: Reports
131
Reports Menu Reference 132
Create a New Report 133
Edit a Report 134
Run a Report 135
Analyze Report Data 137
Drill Down a Report 138
Working with Saved Reports 139
Schedule a Report 142
Report Templates 147
Report Template Layout 150
Report Parameters 152
Available Templates 158
Agent Bubble Chart 160
Agent Comparison 162
Agent Comparison by Segment 163
Agent Evaluation Comparison 165
Agent Trend 166

Agent Trend by Segment 167
Auto Fail 168
Calibration Score 169
Capacity Trend 170
Category Bubble Chart 171
Category Distribution 173
Category Trend 175
Coaching Summary 176
Evaluation Summary 177
Evaluator Evaluation Comparison 178
Interaction Evaluation Summary 179
Interactions 180
Metadata Frequency 181
Performance Profile 183
Predictive Elements 185
Program Distribution 187
System Load 188
Team Comparison 190
Team Comparison by Segment 191
Team Evaluation Comparison 193
Top and Bottom Performers 194
Topic Analysis - Audits 196
Topic Analysis -Trends 198
Usage Tracking 200
Chapter 6: Quality Management
201
Quality Management Menu Reference 202
Quality Management Workflow 203
Forms Manager 204
Forms Manager Grid 206
Create a New Form 208
Form Questions 211
Question Library 215
Configure Question Weights 218
Manage a Form 224
Evaluations Manager 227
Evaluations Manager Grid 229
Create an Evaluation 231

Distributed Interaction Evaluation 232
Distributed Agent Evaluation 235
Shared Evaluation 239
Calibration Evaluation 242
Create an Ad-Hoc Evaluation Session 244
Evaluation Sessions 245
Evaluation Sessions Grid 247
Perform an Evaluation Session 250
Open and Edit a Completed Evaluation Session 254
Archive an Evaluation Session 256
Chapter 7: Coaching
258
Coaching Menu Reference 259
Coaching Session Grid 260
Create a New Coaching Session 262
Participate in a Coaching Session 266
Edit a Coaching Session 268
Working with Coaching Sessions 271
Create a Coaching Session Report 274
View Report Details 276
Manage Session Types and Reason Codes 278
Chapter 8: Tools
282
Tools Menu Reference 283
System Admin 284
Preset View 286
Monitor System 290
Manage Interaction Queue 293
Purge System 294
Manage Cache 296
Interactions Admin 298
System Configuration 300
Alerts 304
System Alerts 308
Metadata Manager 310
Export Completed QM Sessions 311
Define Tags 313
Chapter 9: Action Items
314

Create an Action Item 315
Edit an Action Item 316
Change the Action Item Status 317
Chapter 10: Profile Permissions
319
Edit a User Profile 321
Administer Users 323
Administer Groups 329
Administer Roles 331
Permission Definitions 334
Web Site Permissions 335
Reports Permissions 345
SMART Permissions 348
SMConfig Permissions 351
Chapter 11: Permalink
353
Chapter 12: Frequently Asked Questions
355
Chapter 13: Analyze Related Words
357
Chapter 14: Appendix A ‐ Configure the Browser
359
Internet Explorer 360
Chrome 366

Introduction to SpeechMiner
SpeechMiner UI® is the Genesys Telecommunications Laboratories’s speech-analytics platform. It analyzes audio
content and text-based interactions such as email, chat messages and so on. Speech-analytics leverages recorded
customer interactions (from any recording system) and analyzes each interaction for critical business topics and events.
The system analyzes interactions between customers and contact-center agents, precisely identifies the topics that
were discussed, and categorizes the contents of each interaction.
DISCLAIMER: Some features explained throughout this document (specifically anything associated with Text and
Social interactions) are not available in our Cloud offering and are only available on Premise. When a feature is not
available in our Cloud offering, a disclaimer will appear in the feature explanation.
SpeechMiner UI consists of a user interface (UI) and several back-end components that deliver key capabilities
required for various products within the Genesys Workforce Optimization suite. These products include:
SpeechMiner UI UI:
The SpeechMiner UI UI is a component of the SpeechMiner UI package and provides a single User Interface (UI)
for all Genesys Interaction Recording, Quality Management and Genesys Interaction Analytics functionality. Through
the SpeechMiner UI UI users can perform search and playback for voice and screen recordings, perform traditional
quality management tasks such as evaluation of interactions through form based scoring, or advanced speech and text
analytics capabilities such as topic analysis or trending and exploration analysis of transcripts.
SpeechMiner UI UI is comprised of two software components:
SpeechMiner UI browser-based interface''': Offers a variety of ways to access call audio and the results of the
interaction analysis performed by the system (when Analytics mode is in use). Users of the speech-analytics
system interface can do the following:
Find interactions that have specific characteristics or are about particular topics.
Identify and listen to the parts of calls that interest them.
Audit and fine-tune SpeechMiner UI's call processing.
Keep track of a range of system-metrics.
SpeechMiner UI Administration Tool (SMART): Enables users of the speech-analytics system to configure it to
search interactions for specific topics and other characteristics.
Genesys Interaction Recording (GIR):
Genesys Interaction Recording (GIR) provides cradle to grave dual channel voice recording and screen recording for
customer-ivr and customer-agent conversations as they occur within the Genesys Contact Center. Through deep
integration with Genesys SIP and the TLib event model, GIR is able to automatically stitch together call segments and
capture all relevant call meta data to provide the information you need to fulfill important use cases within your
business including Compliance, Dispute Resolution and Workforce Training and Coaching. GIR utilizes components of
the core Genesys Contact Center stack such as SIP Server and Media Server, but brings along its own components to
Chapter 1 Introduction to SpeechMiner
SpeechMiner UI User Manual 1

deliver the full set of features within GIR. Additionally, the GIR User Interace (UI) is provided by the SpeechMiner UI
UI, which is the unified interface for recording, quality management and interaction analytics capabilities within the
Genesys suite.
Quality Management (QM):
Quality Management (QM) enables you to monitor quality and evaluate agent performance on a periodic and
consistent basis while minimizing effort through automated interaction selection to improve customer experience and
engage with your staff. QM includes a robust and feature rich form designer along with a number of evaluation
schedule types to meet the SLAs required by your business in providing core use cases around Quality Management
as well as input to Coaching and Training through form based scoring of interactions. Interactions can be sourced from
GIR or third party recording platforms, depending on the deployment type selected. All QM functionality is provided
through the SpeechMiner UI UI, which is the unified interface for recording, quality management and interaction
analytics capabilities within the Genesys suite.
Genesys Interaction Analytics (GIA):
Genesys Interaction Analytics (GIA) provides automated speech and text analytics capabilities on 100% of
interactions to provide deep insight into customer-agent conversations. For voice interaction, GIA provides automated
transcription and employs Speech-to-Phrase grammar based recognition along with non-linguistic analysis of
recordings to create meaning from otherwise unstructured data. Organizations can use this data to fulfill key use cases
around Agent Performance Improvement (for example, decrease AHT, increase FCR, Sales Conversion, and so on.),
Compliance and Customer Satisfaction (for example, NPS). Additionally, for both voice and text interactions, GIA
employs advanced unsupervised machine learning algorithms to surface salient or unexpected terms to enable use
cases around Uncovering Emerging Trends or Discovery of New Phrases and Intents. All analysis and discovery
functionality is provided through the SpeechMiner UI UI, which is the unified interface for recording, quality
management and interaction analytics capabilities within the Genesys suite.
Note:Each of these products are sold separately and in different combinations based on the specific requirements of
your organization
SpeechMiner UI supports the following deployment modes:
Analytics and Recording UI: Enables search, play back and analysis of interactions recorded using Genesys
Interaction Recording. The QM module is also available is purchased.
Recording UI Only: Enables search and play back of interactions recorded using Genesys Interaction
Recording. The contents of the interactions are not processed by the interactions analytics system. The QM
module is also available if purchased.
Analytics Only: Imports interactions including their recorded call audio from any recording system using a
UConnector. The UConnector is a Professional Services built ETL application that imports interactions and
meta data from a third party recording system. After the interactions are imported, SpeechMiner UI processes
the contents of each interaction for interaction analytics. The QM module is also available if purchased.
Analytics Only with PureConnect: Imports interactions and their recorded call audio from a PureConnect
deployment using the UConnector for PureConnect. This UConnector is a Professional Services built ETL
application that imports interactions and meta data from PureConnect. After the interactions are imported,
SpeechMiner UI processes the contents of each interaction for interaction analytics. The QM module is also
available if purchased.
Chapter 1 Introduction to SpeechMiner
SpeechMiner UI User Manual 2

Chapter 1 Introduction to SpeechMiner
SpeechMiner UI User Manual 3

New in this Release
The following is a list of the new SpeechMiner UI features:
DISCLAIMER: Every language that is not US English is not available in our Cloud offering. It is only available on
Premise. For details, refer to Supported Deployments.
8.5.512 Release
Interaction Search Improvements:
Search Results – Total Matches: When performing a search in the Interactions grid, the search results
now shows the total number of interactions within the system that match the specified filter criteria.
Pop-Out Media Player: Users can now pop out multiple instances of the Media Player in separate
Media Player windows to allow multiple interactions to be accessed at the same time. This allows users
with screen recordings to stretch out the Media Player to see more detail in the screen recording.
Quality Management Improvements:
Improved Scheduling and Distribution Options: A number of changes have been made to the
options available for Evaluation Session scheduling and distribution:
Changes to Recurrence Parameters: Recurrence options are now Days, Weeks and Months.
The Hours and Minutes options have been removed to reduce the chances of creating too many
unneeded evaluation sessions.
Distributed Agent Evaluation Improvement: The Exactly option is now available for
Distributed Agent Evaluation types. This allows a specific number of interactions to be selected for
evaluation for a specific set of agents for a given time (e.g. in a month).
Maximum Values for Exactly: The system now has limits on the maximum value for Exactly,
these are 1000 for Shared and Distributed Interaction Evaluation types and 30 for Distributed
Agent. Note that these values are changeable in the database.
Multiple Evaluators Selection: It is now possible to select multiple Evaluators for Distributed
Interaction, Distributed Agent and Shared Evaluation types. When multiple Evaluators are
selected, the resulting Sessions will be evenly distributed across Evaluators in a round robin
fashion.
Evaluation Session Grid Search: The Search Filter for Evaluation Sessions has been updated and
now users can select the type of sessions (Active, Archived, Expired) and other filter criteria, prior to
submitting a search. Previously, every change resulted in a new search that could cause delays in loading
time.
Evaluation Session PDF Export Improvements: When exporting an Evaluation Session as a PDF
report, it is now possible to see all text that was entered in a Free Form answer field. In addition, all
comments associated with the underlying interaction are displayed in the PDF report.
Default Form to 100%: To reduce clicks and save time when performing an evaluation, users can now
select a toggle to default all answers in all forms within an Evaluation Session to 100% (or the maximum
possible score). The default behavior when initially loading the form is configurable in the database. Also,
Chapter 1 Introduction to SpeechMiner
SpeechMiner UI User Manual 4

a new permission to allow access to this toggle has been added.
Trending Improvements: (In a Genesys Interactions Analytics GIA deployment) A new View Trending
Cluster Task Information permission was added to SpeechMiner Permissions.
Clustering Information Visibility: User now have more flexibility in who can view and edit Clustering
Tasks and their related information on the Trending page. Now, users with the View Clustering Task
Information permission can view information without the need for elevated permissions to edit theses
tasks.
Language Enablement:
Recognition of Russian (ru-RU) and Russian (ru-RU) UI support has been enabled. Genesys Interactions
Analytics (GIA) now operates on voice interactions and text interactions in Russian.
The Turkish Language pack (tr-TR) for interaction analytics has been improved with additional training
material.
8.5.511 Release
Interaction Search Improvements:
Search for Interactions with Screen Recording (In a Genesys Interactions Recording deployment -
GIR): It is now possible to search for interactions that include or exclude screen recordings. Interactions
that have an associated screen recording are tagged with the Screen Recording tag. This feature can be
used in conjunction with Quality Management (QM) to exclusively perform evaluations on interactions
that have screen recordings.
Note: This feature only works under the following conditions:
Only for interactions that have been added to the system after SpeechMiner UI 8.5.511 was
installed.
The system must be configured with an external RWS to enable screen recordings.
The solution requires Recording Web Services (RWS) version 8.5.202.69 or later.
Filter by Minute Granularity: You can now search for interactions within the Interactions and
Events grids with minute granularity. Also, the filter within the QM Evaluations Manger and
Trending can now be specified with minute granularity.
Search E-mail Headers: The search capability has been extended to include additional filters for e-mail
headers. You can now search for e-mails according to header fields including To, From, Cc and Bcc
fields. After upgrading to 8.5.511 you must re-index text interactions in order to be able to use the new
email filters for existing data.
Quality Management Improvements:
Form Weighting: It is now possible to provide up to two decimal places when assigning weights within
forms, both at the group level and the question level.
Export Completed QM Sessions Improvement: The exported data is now organized such that each
question and related score are organized in separate columns for every group and form within the
selected evaluations. Also, the export is limited to up to 10 selected evaluations for the chosen date
range. Previously, all evaluations where exported.
Chapter 1 Introduction to SpeechMiner
SpeechMiner UI User Manual 5

Text Interaction Improvements:
Storage of Text Interactions (In a Text Analytics deployment - GIA): The solution now stores text
interactions in the file system instead of the database. This includes encryption of the file on disk if
configured as well as a unique value for retention policy period for these text interactions. By migrating
new and existing text interactions from the database to the file system, a large amount of database space
can be freed.
Text Attachments (In a Genesys Interactions Analytics deployment - GIA): The solution now stores
and analyzes text attachments that are part of a text interaction. The system will analyze the content of the
attachment in the same way it analyzes text interactions (for example, topic classification, searches and so
on). The text attachment is displayed below the text interaction transcript with Attachment in the title.
Interaction Type: You can now search for interactions according to the new Text interaction type.
Raw Text Interactions Support (In a Text Analytics deployment - GIA): The solution can now analyze
raw text interactions (that is .txt files) in the same way it analyzes audio, e-mail and chat interactions. You
can also search for these interactions using the new Texts interaction type.
In-Line Audit of Topic Events (In a Genesys Interactions Analytics deployment - GIA): Users can now audit
topic events for Interaction Analytics in-line within the transcription viewer from the search page for all
interactions types. This option is only available is the user has the correct privileges assigned.
Trending Improvements:
New Words More Prominent: In Trending reports, when new terms are uncovered they are now
shown more prominently in Top Movers.
Layout Options: User now have more flexibility in how the data is viewed on the Trending page. Users
can now select one of three different layout options: Comination, Chart or Table. Combination shows
the chart and table together, while Chart or Table show only one or the other. Also, the option to '''Ignore
Blacklist''' is included as part of the layout options drop down. The selected option is persistent across
sessions.
Reset Filters: You can now reset the trending filters to the default state in Trending.
Language Enablement:
Recognition of Dutch (nl -NL) and Dutch (nl -NL) UI support has been enabled. Genesys Interactions
Analytics (GIA) now operates on voice interactions and text interactions in Dutch.
The US Spanish Language pack (es-US) has been updated to include improvements for Colombia and
Mexican Spanish dialects.
PureConnect: Product materials have been updated to reflect General Availability of PureEngage
Genesys Interaction Analytics and PureEngage Quality Management with PureConnect.
8.5.510 Release
Interaction Search, Export and Add Improvements:
Sort by Agent: Within the Interactions grid it is now possible to sort by the Agent column. Interactions
with multiple agents will appear after (descending order) or before (ascending order) the alphabetized list
of interactions with one agent. Subsequently, Interactions with multiple agents are sorted by the number
Chapter 1 Introduction to SpeechMiner
SpeechMiner UI User Manual 6

of agents and then relevance.
Search by List of Interaction IDs: It is now possible to search for a specific set of Interactions based
on a semicolon delimited list of Interaction IDs. A list of up to 50 Interaction IDs is supported. This can
be useful when working with a specific set of interactions.
Export All Interaction Meta Data: You can now easily export all the metadata associated with
Interactions from an interaction search, up to the maximum number of listed interactions, without having
to scroll through all interactions in the search results.
Add All Interactions to a List: You can now easily add all Interactions from an interaction search to an
Interaction List without having to scroll through all interactions in the search results.
Quality Management Improvements:
In-Line Rubric / Standards Definition: Forms and Questions within Forms now have an expanded
Description field that can be used to store the standard definition or rubric used by your Quality
Managers to ensure consistency when performing evaluations of Agents.
Form and Evaluation Manager Improvement: The Forms Manager grid and the Evaluations
Manager grid now includes a Description column; if a description is long, the full content is shown in a
tooltip. In addition, when you hover over a Form or Evaluation name, a tooltip with the description of the
specific Form/Evaluation is shown.
Trending Rank for Top Terms: The Top Terms table in the Trending report results now includes a Rank
column for each period. The Rank column displays the relative importance and prominence of the specific
term/phrase in the selected Period.
Manual Text Categorization: You can now manually assign a category to a Text Interaction from the
Attributes page of the interaction.
SMART Improvements:
Option to Re-categorize Interactions: SMART users can now decide to re-categorize all existing
interactions in the system or not when updating Category definitions.
SMART Statistics Date: You can now configure the default Show Calls Since date value in SMART
to determine in advance the date range for the information that will be shown.
Reporting Improvements:
Agent Comparison by Segment report: It is now possible to report on agents performance based on
the Segments within an Interaction instead of just at the Interaction level only. Interactions can have
multiple Segments, each involving a different Agent. Reporting by Segment provides more precise Agent
Comparison information for multi-segment interactions.
Agent Trend by Segment report: It is now possible to report on agent performance trends based on
the Segments within an Interaction instead of just at the Interaction level only. Reporting by Segment
provides more precise Agent Trend information for multi-segment interactions.
Team Comparison by Segment report: It is now possible to report on teams performance based on
the Segments within an Interaction instead of just at the Interaction level only. Interactions can have
multiple Segments, each involving a different Agent from different Teams. Reporting by Segment provides
more precise Team Comparison information for multi-segment interactions as only Segments where that
Chapter 1 Introduction to SpeechMiner
SpeechMiner UI User Manual 7

Team was involved are included in the comparison report.
Language Enablement: Recognition of Canadian French (fr-CA) and Canadian French UI support was
enabled. Speech Analytics and Text Analytics now operate on voice interactions and text interactions in
Canadian French.
SpeechMiner UI UI UI: Windows 10 64-bit Support: SpeechMiner UI UI UI is now supported for all
existing supported browsers (i.e. Chrome and Internet Explorer) on systems running Windows 10 64-bit.
8.5.509 Release
Genesys Logo: The Genesys logo has been updated throughout the product based on new Genesys branding.
Access Control: SpeechMiner UI now supports Configuration Server based Access Control for items within
SpeechMiner UI for Genesys based user accounts. This functionality determines the agents and users that are
visible to a logged in user based on their granted Read permissions. Additionally, access to items within
SpeechMiner UI (For example, Forms, Evaluations, and so on.) is also limited based on read access to the
creator of those items. Access Control is enabled in the following areas of the user interface:
All Agent Hierarchy filters, including those in Search, Evaluation Manager, Evaluation Sessions and
Trending.
All Users filters, including those in Search, Evaluation Manager, Action Items, Saved Reports - Sharing,
Saved Searches – Sharing, Interactions List - Sharing.
Forms, Evaluations and Evaluation Sessions.
Coaching and Alerts.
Improved Tooltips: Tooltips in SpeechMiner UI in various locations now provide more detail; for cases where
even more space is required, clicking on the element loads a modal window with all the information. Affected
areas include: Topics and Categories in the Interactions Grid, Current Filter at the top of the Interactions
Grid, and Action Items details.
Quality Management Improvements:
Evaluation Sessions Grid: You can now filter the Evaluation Sessions grid according to the date on
which the session was created as well as when the session was completed.
Evaluation Session Completion: The workflow to close an Evaluation Session has been optimized to
reduce the number of clicks required.
Language Enablement: Recognition of Cantonese (zh -HK) and Cantonese UI support was enabled. Speech
Analytics and Text Analytics now operate on voice interactions and text interactions in Cantonese.
Topic Analysis – Audits: The header row in the Topic Analysis – Audits report is now fixed so users can
always see the column titles. This functionality is only supported in the Chrome browse.
Trending Export: You can now export all information shown in a Trending report. This capability is enabled
Chapter 1 Introduction to SpeechMiner
SpeechMiner UI User Manual 8

only for users with the appropriate permissions.
Coaching Improvements:
Interaction Comments: It is now possible to add comments from the Media Player that is available in
the Coaching and Operations Search pages.
Session Subtype and Reason Code: You can now add a session subtypes (a secondary or
subordinate session type that falls under the general classification of a specific session type) and a reason
code (the cause, explanation or justification for completing a coaching session) to each Coaching
Session.
Updated Icons: The Coaching Session summary page now includes a Status icon and Status name
that makes it easier to identify the status of a case at a glance.
8.5.508 Release
Events and Comments for Text Interactions:
You can now add in-line comments to text interaction transcripts. Event markers are located throughout
the text interaction based on where the event was detected in the text.
Event navigation is now available in text interaction transcripts from the events and comments list on the
right side of the screen and from the transcript timeline. When clicking on an event marker the event will
be highlighting in the transcript.
The text interaction timeline now contains both event and comment markers.
The new Search filter above the events and comments list now enables you to quickly filter the events
and comments list for all interaction types. This filter can also be made persistent.
Trending:
The Related Words option from the Trending chart, now produces the Related Words chart based on the
Trending page filter selections.
The Trending chart can now include verbs. Previously, the chart only included noun phrases.
Custom Trending Cluster Tasks can now be defined with specific filter criteria, beyond the default cluster
tasks, to ensure that the data and results shown on the Trending bubble chart fully reflect the specific data
set that you are interested in exploring with this tool.
The Header row of the Topic Analysis - Audits report is now static when the report is long and you must
scroll down to view additional details. The static row is only supported when working with Chrome.
SpeechMiner UI no longer supports Internet Explorer 10.
8.5.507 Release
Auto Fail Report: A drill down report that focuses on auto fail Quality Management questions and agents.
Auto Fail Permission: A new Auto Fail permission has been added to enable the user to create, edit and/or
Chapter 1 Introduction to SpeechMiner
SpeechMiner UI User Manual 9

view the Auto Fail report.
Distributed Evaluations Targeted to Specific Agents: Provides supervisors with the ability to evaluate
specific agents repeatedly over time.
Quality Management - Agent Notification: Enables agent collaboration to provide agent feedback against
evaluations and related scores.
Show Evaluation Session Score Permission: Enables a user to turn on/off the evaluation session Show
Score option.
Replace Interaction: Enables a user (based on existing search criteria) to select an alternative interaction due
to the interaction's quality.
Replace an Evaluation Session Interaction Permission: Enables the user to replace the evaluation session
interaction.
Interaction Tags: Enables you to use user defined tags for a variety of uses (for example, compliance or
training).
Define Tags: Enables you to define tags for a variety of uses (for example, compliance or training).
Define Tags Page Permission: Enables a user to define and edit an interaction tag.
Tag Interactions Permission: Enables a user to tag an interaction.
Protect from Deletion: Enables you to prevent an interaction from being deleted.
Protect Interactions from Deletion:A new permission has been added to enable you to protect interactions
from deletion.
Tag Interactions as Evaluated: Automatically adds an Evaluated tag when an evaluation session is
completed.
Ad-Hoc Evaluation: Enables you to launch an evaluation from the player against a specific media asset.
Create Ad-Hoc Evaluation Permission: This permission will enable the user to evaluate interactions from the
Explore page.
Trending Bubble – Drag and Drop: Enables you to move a Trending bubble to a different location on the
screen. This ability is useful in moving apart bubbles that are close together as the system has found that they are
closely related. Once the Trending chart is re-run , the bubble returns to its original place.
Recognition Improvements: Recognition enhancements have been made for improved accuracy and
Chapter 1 Introduction to SpeechMiner
SpeechMiner UI User Manual 10

detection results.
8.5.506 Release
Alpha Numeric Operation IDs: Operation IDs can now contain both letters and numbers.
Export to PDF: Enables users to export a completed evaluation session as a PDF file.
Export Completed QM Sessions: Users can now export completed evaluation sessions according to a
specific date range.
Recognition Improvements: Recognition improvements have been made for Italian.
Installation/Upgrade Prerequisite: Before installing/upgrading SpeechMiner UI .NET 4.6.2 must be
installed.
8.5.505 Release
Improved Trending capabilities: Enables users to monitor and analyze terms and phrases within
conversations in conjunction with a variety of search criteria to better surface and analyze unforeseen or
unexpected trends to improve business outcomes and agent performance.
Configuration Data:
User lists now include only users associated with the context in which they are shown (for example, a list
of evaluators will only include users with QM permissions).
Changes to the Configuration Database have an immediate effect on the system (for example, when a
user is given QM permissions, his/her name will appear in the evaluators list the next time you view the
list).
Preset views are now supported for users with Genesys authentication.
Call List Order: Interaction lists are now sorted in descending order. The newest interaction is listed first.
Database Optimization: Database storage can now be significantly decreased by not storing events that were
not found with a high enough confidence.
8.5.504 Release
Encrypt exported interactions: Enables you to encrypt exported interactions, so that a password is required
to access the interactions.
Export an Interaction List / Saved Search from a Coaching Session: Enables you to export interaction
Chapter 1 Introduction to SpeechMiner
SpeechMiner UI User Manual 11

lists and saved searches directly from a Coaching session.
Retrieve Original Interaction: Enables you to restore an interaction with its original audio or text file
(including all attachments).
Export Coaching Session permission: A new permission has been added to enable or disable the option of
exporting an interaction list and/or saved search from a Coaching Session.
Retrieve Original Interaction permission: A new permission has been added to enable or disable the
option of retrieving original audio or text data for a specific interaction.
Language Support: Support for the Catalan (ca-ES) language has been discontinued.
8.5.503 Release
Predictive Elements Report: A report composed of two bar graphs that show the relationship between
selected Categories and Target Categories.
Interaction Evaluation Summary Report: A report that shows the evaluation score for the last evaluation
session, associated with a specific evaluator and interaction.
Program Distribution Report: A report that graphs the interaction volume for each Program.
Edit Interaction Comments permission: A new permission has been added to control which Users can edit
an interaction comment; this permission is system wide for a given User.
Customer Sensitive Data permission: A new Recording Only permission has been added to enable the user
to display customer sensitive meta data (for example, attached data from CIM) in the SpeechMiner UI GUI.
When this permission is enabled, the data is visible.
Agent Sensitive Data permission: A new Recording Only permission has been added to enable the user to
display agent sensitive meta data (for example, agent name) in the SpeechMiner UI GUI. When this permission
is enabled, the data is visible.
Interaction Evaluation Summary permission: A new permission has been added to enable or disable the
Interaction Evaluation Summary report.
Timestamps in Comments: Interaction display improvements have been made to include a time-stamp in
comments. Users will now see the date and time at which the comment was made/last edited.
Segment Filter: Users can now filter the Search Results grid according to a specific number of segments. In
addition, the search results can be restricted further using the greater than and/or less than options.
Chapter 1 Introduction to SpeechMiner
SpeechMiner UI User Manual 12

Support for MSSQL 2014: SpeechMiner UI now supports MSSQL 2014.
Recognition Improvements: Recognition improvements have been made for the following existing languages:
Arabic (ar-WW), Brazilian Portuguese (pt-BR), German (de-DE), Korean (kr-KO), Japanese (ja-JP).
8.5.502 Release
Recognition Improvements: Recognition improvements have been made to enhance voice analysis for
improved accuracy and detection results for English and Spanish.
Shared Evaluations: Creates evaluation sessions about an agent's performance during customer interactions
without assigning the sessions to a specific evaluator(s). Instead, each evaluator associated with the session can
select and assign himself/herself a specific session from the available pool of sessions.
Edit a Completed Evaluation: Users with the correct permission can open, save, export and close a
completed evaluation session.
Filter Panel: Users can now quickly and easily create retrieve evaluation session information by narrowing
down the evaluation session list.
Export Incomplete Evaluation Session: Users can now export an evaluation session that was saved but not
completed.
Archive Completed Evaluation Sessions: Users can now archive completed evaluation sessions
automatically at a specific period of time or manually.
Interactions Report: A new report that provides a list of all the interactions in the system.
Localization for Turkish: User Interface localization was added for Turkish.
Analytics for Turkish: Speech Analytics and Text Analytics now operate on voice interactions and text
interactions in Turkish.
8.5.501 Release
Enhanced Segment Data and Metadata: The Attributes page now contains data for interaction segments.
Localization for Arabic: User Interface localization was added for Arabic.
QM Evaluation Session Score Visualization: An evaluation session score is visible throughout
the evaluation session.
Chapter 1 Introduction to SpeechMiner
SpeechMiner UI User Manual 13

Screen Column Customization: It is now possible to change the column order in the Interactions, Events and
QM grids per user.
8.5.5 Release
Quality Management - Question Library: When creating a Quality Management form you can now select
an existing group of questions and you can create a new group for future use.
SMUpgrade: The new upgrade process executes faster and no longer requires two databases. This one-step
upgrade procedure can be performed from any version to any version on the customer's database (that is, a
new database is not required).
Note: The new upgrade procedure is not out of the box. If you are interested in this new upgrade
procedure, contact Customer Care and allow for one week to receive the scripts required to
perform the procedure along with instructions about how to use them. For additional details, refer
to the SpeechMiner UI Upgrade Guide.
Chapter 1 Introduction to SpeechMiner
SpeechMiner UI User Manual 14

SpeechMiner Deployments
SpeechMiner UI provides a single User Interface (UI) across most of the solutions within the Genesys Workforce
Optimization suite, including Interaction Recording, Interaction Analytics and Quality Management. Since each of
these solutions are sold separately and the combination your organization uses depends on your specific requirements,
a high-level summary of the different "deployment options" for the SpeechMiner UI UI is provided here.
SMART can be deployed on Premise or part of the Genesys Cloud offering.
For Premise, SpeechMiner UI can be deployed in one of the following three environments:
Recording Only
Analytics Only
Recording and Analytics
For Cloud, SpeechMiner UI can be deployed in one of the following two configurations:
Recording Only
Recording and Analytics
Note: The availability of SpeechMiner UI features is dependent on the deployment you are working in and your
permissions.
Recording Only:
As of version 8.5, SpeechMiner UI is available in a scaled down version referred to as Recording only UI mode. In
this mode, the SpeechMiner UI browser-based interface is used for accessing interactions that were recorded by the
Genesys Interaction Recording system.
In Recording mode, SpeechMiner UI can be used to:
Play back interactions.
Search for interactions.
Manually create an interaction list.
Perform additional basic actions.
In Recording only mode, the audio recognition process and content analytics are not performed on interactions.
As a result, only a subset of the standard SpeechMiner UI features is available.
In Recording only mode with an optional Quality Management (QM) license, you will be able to perform QM tasks
on the recorded interactions.
Analytics Only:
Chapter 1 Introduction to SpeechMiner
SpeechMiner UI User Manual 15

The Analytics Only mode delivers the same functionality as a Recording Only environment, with the addition of
Analytics processing capabilities that allow interactions to be automatically transcribed and analyzed.
Analytics Only does not connect to the Genesys Interaction Recording (GIR) system. Instead, it relies on the
customer's own recording subsystem (validated for compatibility by the Genesys Professional Services department).
In this mode interactions are imported with their their recorded call audio from any recording system using a
UConnector. The UConnector is a Professional Services built ETL application that imports interactions and meta data
from a third party recording system. After the interactions are imported, SpeechMiner UI processes the contents of
each interaction for interaction analytics. The QM module is also available if purchased
QM functionality is optional in this configuration and is enabled with a QM license.
Analytics and Recording UI:
The Recording and Analytics mode enables customers to use Analytics and Genesys Interaction Recording (GIR)
integration. This deployment provides users with the ability to perform Analytics tasks on interactions captured using
the GIR system.
In this deployment GIR integration offers features that are not typically available with other non-Genesys recording
subsystems. Refer to the GIR Release Notes for a full list of its functionality or contact your Genesys professional to
help you decide if you need GIR recording.
QM functionality is optional in this configuration and is enabled with a QM license.
Analytics Only with PureConnect:
Imports interactions and their recorded call audio from a PureConnect deployment using the UConnector for
PureConnect. This UConnector is a Professional Services built ETL application that imports interactions and meta
data from PureConnect. After the interactions are imported, SpeechMiner UI processes the contents of each
interaction for interaction analytics. The QM module is also available if purchased.
Chapter 1 Introduction to SpeechMiner
SpeechMiner UI User Manual 16

Topics, Categories and Programs
Topics Categories and Programs are SMART features that are used when creating a set of instructions designed to
help gather and deliver valuable intelligence that business users readily understand and use.
SMART, the SpeechMiner UI Administration Tool, is a component of SpeechMiner UI, Genesys's award-winning
product for Customer Intelligence and it is used to help reveal the information about cause/effect relationships that
affect performance and business outcomes.
SMART defines the set of instructions that is used by SpeechMiner UI to perform recognition and analysis of
customer data.
The set of instructions managed by SMART are made up of:
Topics: Boosts the recognition of a specific business issue by telling SpeechMiner UI what phrases to look for.
Categories: Group interactions with similar characteristics so that SpeechMiner UI users can find calls associated with
a specific business issue.
Programs: A set of instructions that tell SpeechMiner UI what to recognize in recorded conversations between contact
center agents and customers, in relation to a specific business issue.
Before creating a topic or category, gather information about the business issue you want to investigate and track
interactions that are generated by the specific issue.
1. What is your business goal?
2. Determine the type of interactions generated by the business issue by listening to existing interactions about the
subject or similar subjects, reading e-mails that relate to them, and consulting agents who interact with
customers. For example, for a customer service topic, the set of relevant interactions may only include incoming
interactions about help and assistance.
3. Gather examples of employee scripts and typical phrases used in these interactions.
SpeechMiner UI and SMART are installed and configured by Genesys at the customer's site. For optimal
performance, Genesys researches the customer's business and subsequently defines the initial SMART instructions.
Typically, SpeechMiner UI implementations at customer sites include development and underlying SMART system by
our Client Solutions team, but Advanced SpeechMiner UI users with SpeechMiner UI Administrator privileges can
modify the SMART system themselves to further fine-tune interaction recognition and analysis for their company. The
customer may want to make slight modifications to topics based on the accuracy of the results they are achieving, or
the customer may want to define new programs for new interaction campaigns or procedures based on existing ones.
Advanced SpeechMiner UI users at the customers site can perform the following SMART tasks:
Open and modify existing categories and topics.
Create new categories and/or topics.
Test changes to categories and/or topics.
Apply SMART changes to SpeechMiner UI.
Reprocess selected interactions through the SpeechMiner UI interface.
Chapter 1 Introduction to SpeechMiner
SpeechMiner UI User Manual 17

Rollback to an earlier set of SMART instructions.
Import SMART instructions.
Export SMART instructions.
For additional information about SMART, refer to the SMART User Manual.
DISCLAIMER: SMART is not available in our Cloud offering. It is only available on Premise. For details, refer
to Supported Deployments.
Chapter 1 Introduction to SpeechMiner
SpeechMiner UI User Manual 18

Topics
A topic enables you to boost the recognition of a specific business issue by telling SpeechMiner UI what phrases to
look for. For example, if you want to identify interactions in which the customer wishes to cancel an account, you
could create a topic named Cancellation with the following phrases:
"Close out my account"
"I need to cancel"
Topics can also be used to improve the overall speech recognition of the system in two main ways:
Directly: For example, the word “cinnamon” may appear frequently in calls when “cinema” was actually said.
You could enter a number of phrases in the topic related to “cinema” in order to improve the transcription
results. This assumes that you do not need to report on calls related to “cinema”. That is, because the topic is a
collection of mostly unrelated phrases, it is not very useful for reporting. In order to run reports on “cinema”, it
is recommended to place the phrases in a topic that has a common business meaning.
Indirectly: Consider the scenario in which “account number” is a phrase that is important to capture, but its
accuracy is low due to a number of false positives being generated because “phone number” is recognized as
“account number”. Adding the phrase “phone number” to the topic could potentially draw those false positives
away from “account number”. Placing “phone number” in a topic implies that it is not important to run reports
on “phone number”. For the incorrectly-recognized and undesired “cinnamon” appearing in transcripts, it is
recommended to try to remove it (and therefore correctly recognize “cinema”) by adding “cinnamon” into the
topic with strictness set at 100. Various phrases with additional context (for example, “late night cinnamon”)
may work better than using the single-word phrase “cinnamon”.
More specifically, topics are a collection of phrases defined globally for the SpeechMiner UI system, and included in
one or more programs as required. When a topic is included in a program, SpeechMiner UI searches for all of the
phrases included in the topic's definition, in all the interactions associated with the Program. When one of the phrases
is found, SpeechMiner UI identifies it as a linguistic event and registers the topic as found at a specific time during the
interaction.
Each linguistic event identified by SpeechMiner UI in an interaction has a start time, an end time, a name, and a type.
For example, if a topic called "Loan Offer" is identified by the phrase "can offer you a loan," the start time is when the
agent began saying "can," the end time is when the agent finished saying "loan," the name is "Loan Offer," and the type
of event is "Topic."
Although a topic can contain one phrase, the more phrases you add the more useful the topic.
Once a topic is created, you can always make modifications based on the accuracy of the results that the topic is
achieving.
Chapter 1 Introduction to SpeechMiner
SpeechMiner UI User Manual 19

Chapter 1 Introduction to SpeechMiner
SpeechMiner UI User Manual 20

Categories
SpeechMiner UI extracts interaction content to categorize interactions, so you can better understand why customers
are calling. That is, categorization provides quantitative information (such as an increase in customer complaints or
repeat interactions), as well as qualitative information (such as customers stating that they want to switch vendors
because of better prices) and subsequently, the intelligence you need to build more effective business strategies.
Each category is created with a specific business issue in mind. For example, a category can be created to look for
interactions in which the customer displayed signs of agitation and the contact center supervisor was called in to deal
with the customer. The combination of customer agitation and supervisor involvement may be used to characterize a
category about service complaints.
A category is defined globally for the entire SpeechMiner UI implementation, and interactions are automatically
assigned to it during processing. When changes are made to a category's definition, the entire database of interactions
is re-categorized to ensure that the category assignment of each interaction matches the new definitions.
Categories also enable SpeechMiner UI to:
Find interactions with particular characteristics so that you can analyze and compare them. For example, you
may wish to compare how different agents handled customer agitation during a particular sales campaign.
Perform statistical analysis on interactions. For example, SpeechMiner UI can check the percentage of
interactions in September in which customers exhibited agitation.
Once a category is created, all interactions in the database are scanned, and any interaction that meets the category
definition is automatically assigned to it. An interaction can be assigned to one, several or no categories.
With information derived from categorization, you can enhance self-service operations, leverage new revenue
opportunities, increase process efficiency, enhance customer loyalty and improve first contact resolution. Categories
help identify how employees and customers express themselves in specific interactions.
Four types of categories exist in SpeechMiner UI:
Regular Categories: Categories that have conditions defined in the form of a logical expression. When
SpeechMiner UI processes an interaction, the interaction is automatically assigned to this type of category if it
matches the requirements that are defined in the condition. These categories can be independent (on the top
level of the category hierarchy) or they can be sub-categories of other, parent categories.
Parent Categories: Categories that contain other categories. These categories have a name and description,
but do not include a logical expression. Interactions are assigned to them when they are assigned to any of their
sub-categories. Any category can be converted into a parent category by adding sub-categories to it. When a
regular category is converted into a parent category, the logical expression that defined the category is deleted.
Subcategories: A category can contain one or more subcategories in a multi-tiered category structure. The
parent-category is defined as a container of its subcategory. When SpeechMiner UI identifies an interaction as
belonging to a subcategory, it automatically identifies it as belonging to the parent-category as well. For
example, a 5-60 seconds Interaction Duration category contains three subcategories 10 seconds category, 20
Chapter 1 Introduction to SpeechMiner
SpeechMiner UI User Manual 21

seconds category and 50 seconds category. Any interaction associated with the 10 Minute category is also
associated with the Hour Interaction Duration category. In this case, you receive data about all the interactions
that were between 5 to 60 seconds and specific data about interactions that were specifically 10, 20 and 50
seconds long.
Manual Categories: Categories that include a collection of interactions that do not fit into a predefined
category. This type of category is referred to as a Manual category. A Manual category has no criteria. Instead,
it is a category to which you can manually add any (and as many) interactions as you like without preconditions.
For example, a Manual category could be used as placeholder for interactions the SpeechMiner UI user would
like to review during routine weekly staff meetings.
Chapter 1 Introduction to SpeechMiner
SpeechMiner UI User Manual 22

Programs
A program is a set of instructions that tell SpeechMiner UI what to recognize in recorded conversations between
contact center agents and customers, in relation to a specific business issue.
More specifically, a program's instructions are made up of topic and non-linguistic recognition tasks that contain
guidelines about what SpeechMiner UI should look for, when to look for it and where to look for it in the interaction.
Topics must be defined before you can add them to a program. However, you can change their contents after you add
them to a program. The topic contents that are defined when the program is applied are the contents that will be
sought by SpeechMiner UI in interactions associated with the program. For information about creating and modifying
topics, see Topics.
When SpeechMiner UI identifies a recognition task it registers an event. For more information about events, refer to
the SpeechMiner UI User Manual.
Note: Every interaction that enters the system is automatically assigned to a program.
A program consists of the following:
Content Processing Methods
Non-Linguistic Identification
Structured Diagram
Priority Level
Content Processing Methods
Each program instructs SpeechMiner UI to extract useful information from a recorded conversation using the following
content processing methods:
Speech Recognition: Identifies each word in its lexicon and transcribes it. Transcription enables users to
search for phrases and facilitates certain types of reports that analyze the speech that is recognized for trends. In
addition, a transcription enables you to see a variety of characteristics associated with the interaction and
highlights phrases that can identify specific issues. For example, who said what, unsatisfied customers, etc.
Topic Recognition: Identifies specific phrases associated with a defined topic. A topic represents a specific
intent (for example, cancellation) and each program is associated with one or more topics. That is, topic
recognition enables users to search for interactions containing a particular business issue, and facilitates reports
that analyze the topic data. If Speech Recognition is not performed, topic recognition cannot be performed.
That is, the topics included in the program define the linguistic data that SpeechMiner UI should look for in
interactions that belong to the program.
Chapter 1 Introduction to SpeechMiner
SpeechMiner UI User Manual 23

Non-Linguistic Identification
Non-Linguistic Identification identifies the non-verbal parts of an interaction. For example, silence, busy signal, key
presses and caller agitation (tone).
Every program instructs SpeechMiner UI to automatically identify the following non-linguistic events:
Music: Indicates when music is being played during the interaction. Music generally indicates that the
interaction was on hold.
Cross Talk: Indicates when two or more people are talking at the same time.
Silence: Indicates when there is nothing being said or played. SpeechMiner UI will automatically skip over
these silences when the interaction is played back.
DTMF: Key press on a touch-tone phone. 12 different keys can be identified using DTMF (Dual Tone Multi
Frequency).
Busy Tone: A busy signal.
Dial Tone: A dial tone.
Ringback: A signal used in PSTN (Public Switched Telephone Networks - standard "land lines") to indicate
that the line is being called or an incoming interaction is present.
After call work: Indicates the section of the recording that takes place after the interaction has ended.
Note: Identification standards for Dial Tone, Ringback, Busy Tone and DTMF are based on USA standards. To learn
how to use different identification standards refer to the Configuring SpeechMiner UI > Additional Configurations
>Tone Frequency Configuration tab in the Genesys Interaction Analytics, Genesys Interaction Recording UI
and Quality Management Administration Guide.
In addition, when you configure a program, you can choose whether SpeechMiner UI should also identify agitation
(that is, non-verbal expressions of frustration and anger, such as deep sighs, grunts or rapid changes in pitch).
Each non-linguistic event that is identified by SpeechMiner UI has a start time, an end time, and a type. For example, if
SpeechMiner UI identifies silence in an interaction, this is a non-linguistic event whose start time is the beginning of the
silent period, whose end time is the end of the silent period, and whose type is "Silence."
Structured Diagram
Each program is organized as a structured diagram that links topics in a consecutive string to mimic the expected flow
of the conversations associated with the specific topic. The diagram is used to tell SpeechMiner UI where in an
interaction the content must be found in order to match the requirements. For example, a structured diagram could
show a "Loan Offer" topic at the beginning of an interaction, followed by a "Disclaimer" topic, and, finally, a "Contact
Chapter 1 Introduction to SpeechMiner
SpeechMiner UI User Manual 24

Information" topic.
You can fine tune the structure to increase the efficiency and accuracy of the recognition process using the following
features:
Modify the Program Structure: Specify the order in which the topics must appear in the interaction, and
indicate where branches may occur and which topics are optional, by adding and removing arrows in the
structure diagram.
Create a Program Trigger: Set conditions for the links defined in the program's structure, including
conditions that the topic must meet and metadata conditions that the interaction must meet (for example, the
agent must be from a particular work group, or the interaction must have taken place after a certain date).
Create a Program Recognition Task: Specify that the topic must have taken place at a specific time during
the interaction.
Priority Level
Interactions are sent to SpeechMiner UI from the external recording system. When they are received, they are put into
SpeechMiner UI's processing queue to await their turn for analysis by SpeechMiner UI. Because the processing of
some interactions may be more important than the processing of others, SpeechMiner UI does not automatically
process interactions in the order in which they were placed into the queue.
When you create a program, you assign it a priority level. SpeechMiner UI selects which interaction to process first
based on the priority level of the program it is associated to. SpeechMiner UI processes the highest priority
interactions in the queue first, and then proceeds to interactions with lower priorities, regardless of how long the
interactions have been in the queue.
Chapter 1 Introduction to SpeechMiner
SpeechMiner UI User Manual 25

Log into SpeechMiner
To work with SMART, log into the system with a username and password defined for you by your SpeechMiner UI
System Administrator.
When you log into the system, SpeechMiner UI automatically verifies the roles and groups assigned to your account.
The roles assigned to your account signify what SpeechMiner UI features you are allowed to access.
Only the features you have permissions to view are displayed in the interface when you log into the system.
Before you log into SpeechMiner UI consider the following:
The SpeechMiner UI address will be given to you by your system administrator.
Alternatively, when your account was created you may have received an automated e-mail notification with the
same information.
You can log into SpeechMiner UI from any of the currently supported browsers.
A list of supported browsers can be found in the latest SpeechMiner UI Release Notes.
To log into SpeechMiner UI:
1. In a browser of your choice navigate to the SpeechMiner UI application.
2. Select one of the following:
SpeechMiner UI: When your username and password are managed by SpeechMiner UI.
Windows: When you log into SpeechMiner UI using the same username and password you use to log
into Windows.
Genesys: When you log into SpeechMiner UI using the same username and password you use to log
into additional Genesys products.
3. Enter a username and password in the fields provided.
If you selected Windows in step #2, enter your Windows domain in the Domain field.
4. Click log into log into the system.
Note: If you are having problems viewing SpeechMiner UI, refer to Appendix A - Configure the Browser.
Chapter 1 Introduction to SpeechMiner
SpeechMiner UI User Manual 26

Chapter 1 Introduction to SpeechMiner
SpeechMiner UI User Manual 27

SpeechMiner Menu Reference
Before you begin working with SMART, briefly examine its main features. The following list provides a brief
description of each of the 7 SMART menus:
Dashboard:
Enables you to create one or more dashboards. Each dashboard can contain a selection of one or more widgets.
The widgets show the data SpeechMiner UI has automatically surfaced for you.
This data provides insights into the content and nature of agent-customer interactions.
Explore:
Enables you to drill down and examine information about your system by searching for specific groups of interactions
according to terms, phrases, metadata, a specific date, and so on. With the SpeechMiner UI Media Player and
Interaction Transcript you can drill further down to investigate the potential root causes of the business trends that
appear in the resulting interaction list.
Reports:
Enables you to analyze statistical data about agent-customer interactions according to a specific report (for example,
Agent Comparison, Team Comparison and so on). By analyzing a reports, details and status, you can gain intelligence
about your organization.
Quality:
Enables you to monitor agent-customer interactions, to improve agent productivity as well as customer
satisfaction. The key features such as Forms Manager and Evaluations Manager can be utilized for evaluating agent
productivity, as well as targeted agent training. Quality Management offers insight that has the potential to increase
employee productivity, resolve future customer disputes and subsequently enhance customer service.
Coaching:
Enables you to help managers, supervisors, Quality Management personnel and agents improve their performance by
providing training sessions designed specifically for their professional goals. For example, new employees can be
introduced to their jobs through a coaching session that highlights their position's purpose and responsibilities, and
veterans can be encouraged to fine-tune their techniques with a coaching session that highlights specific aspects of their
jobs.
Tools:
Provides access to an array of global SpeechMiner UI functions and management features. Depending on your
Chapter 1 Introduction to SpeechMiner
SpeechMiner UI User Manual 28

permissions and on your system's mode of operation, you can use Tools to manage user accounts and Permissions,
Preset Views and so on. With Tools you can also monitor and manage the system and its servers and view detailed
information about Topics, Programs and Categories used by SpeechMiner UI to analyze interactions.
Administrator:
Enables you to manage users. With the options in this menu, you can control which interaction and system data that a
specific user can see and activate by assigning the user to one or more group. Individual users can have multiple roles
and belong to multiple groupings.
If your users log in to SpeechMiner UI using a Genesys user account, the SpeechMiner UI User Management options
are performed for their accounts in the Genesys Administrator Extension (GAX).
Chapter 1 Introduction to SpeechMiner
SpeechMiner UI User Manual 29

Dashboard
The SpeechMiner UI Dashboard displays summary information about a specific set of interactions through the use of
dashboards and widgets.
You can customize each dashboard to display interaction details relevant to a particular interaction set. The Dashboard
can have one or more widgets and each widget can contain information about a different set of interactions.
By providing a summary view of the information, the Dashboard allows you to quickly and easily understand the
nature of all interactions within a specific interaction list. That is, Dashboard provides you with the tools that enable
you obtain an overall and complete impression of the business issue you are investigating. For example, you can create
a dashboard with a Report widget (to give you a snapshot of metrics and key performance indicators) and a My
Messages widget (to display stem messages).
A dashboard can contain one or both of the following widgets:
Report: Displays any existing report.
My Messages: Used to schedule a new Coaching session and send and receive messages.
A dashboard can include one or more of the following views:
Preset View: A view created by a manager or system administrator and published to your account. A Preset
view is only available in an Analytics Only environment.
Personal View: A view created in your Dashboard that only you can view. By default, every view is a Personal
View.
Note: You can only create a Personal view if you have the permissions to do so.
Chapter 2 Dashboard
SpeechMiner UI User Manual 30

Dashboard Menu Reference
The following list provides a brief description of each Dashboard menu item:
New Dashboard:
Enables you to create a new dashboard for specific reports, a new coaching session and notes.
Once you create a new dashboard, the new dashboard will be added to the list of dashboard in the Dashboard menu.
<Dashboard Name>:
Displays an existing customized Dashboard. This dashboard
can only be edited by a user with the relevant permissions to do so.
Chapter 2 Dashboard
SpeechMiner UI User Manual 31

Create a New Dashboard
You can add as many new dashboards as you like and each dashboard can contain a different set of widgets.
For example, if you manage two work groups, you can create two dashboards (one for each group), to help keep
track of each group separately.
To create a new personal Dashboard:
1. Select Dashboard > New Dashboard. The Dashboard is opened with all of its existing dashboards.
2. Click the Add New Dashboard icon . A new empty dashboard opens.
The new dashboard appears as a Dashboard tab and the default name is New Dashboard.
3. Click Add Widgets. The list of available widgets appears at the top of the dashboard.
4. Click the link(s) associated with the widget you want to add to the dashboard. The widget automatically
appears in the dashboard.
5. Click Hide Widgets to remove the widget links at the top of the dashboard.
6. Click Change Settings.
7. In the Title field enter the name of the new dashboard and click Save.
8. Under Change Columns select the layout for the dashboard widgets.
The widgets in the dashboard are arranged to fit the column layout you select.
The width of each widget is determined by the width of the column in which it appears.
You can change the width of a column by manually dragging the border line that appears between the widgets (
).
You can also change the column layout by simply dragging the widget to a different location in thedashboard.
9. Click Hide Settings to remove the Change Settings options from thedashboard. The new dashboard is created
and you can edit it at any time.
Chapter 2 Dashboard
SpeechMiner UI User Manual 32

Chapter 2 Dashboard
SpeechMiner UI User Manual 33

Working with Dashboards
The following procedures enable you to modify an existing dashboard:
Rename a Dashboard
Change a Dashboards's Column Layout
Change the order of the Dashboard Tabs
Delete a Dashboard
To rename a dashboard:
1. Select Dashboard and the name of the dashboard you want to change.
2. Click Change Settings.
3. In the Title field change the name of the dashboard.
4. Click Save.
5. Click Hide Settings.
To change the column layout:
1. Select Dashboard and the name of the dashboard you want to change.
2. Click Change Settings.
3. Under Change Columns click the desired layout. The layout is applied to the dashboard.
To change the order of the tabs:
1. Select Dashboard and any dashboard to open the dashboard tabs.
2. Place your mouse over the top corner of the tab you want to move. The mouse pointer changes to a plus.
3. Drag the tab to its new location and release the mouse button. The tab is moved to its new location.
Chapter 2 Dashboard
SpeechMiner UI User Manual 34

To delete a dashboard:
1. Select Dashboard and any dashboard name to open the dashboard tabs.
2. Select the dashboard you want to delete.
3. Click Change Settings.
4. Click Delete dashboard. A confirmation message appears.
5. Click Yes. The dashboard is deleted.
Chapter 2 Dashboard
SpeechMiner UI User Manual 35

Widgets
The SpeechMiner UI Dashboard offers several mini applications called widgets. These widgets give you quick access
to information about the nature of the multitude of interactions within a specific interaction list.
A dashboard can contain one or both of the following widgets:
Report: Displays any existing report.
My Messages: Used to schedule a new Coaching session and send and receive messages.
Chapter 2 Dashboard
SpeechMiner UI User Manual 36

Working with Widgets
Each widget is displayed in the dashboard as a rectangle.
Depending on your permissions you can:
Add a widget.
Move a widget within a dashboard.
Edit a widget's settings.
Minimize a widget within a dashboard.
Manually refresh a widget.
Delete a widget from a dashboard.
To add a new widget:
1. Select Dashboard.
2. Select the dashboard to which you want to add a widget.
3. Click Add Widgets. The available widgets are displayed at the top of the screen (Report widget and My
Messages widget).
4. Click the link associated with the widget you want to add to the dashboard. The widget is added to
the dashboard.
To move a widget within a dashboard:
1. Select Dashboard.
2. Select the dashboard whose widget you want to move.
3. Place your mouse on the widget title bar and click and drag the widget to its new location.
To edit a widget:
1. Select Dashboard.
Chapter 2 Dashboard
SpeechMiner UI User Manual 37

2. Select the dashboard whose widget's you want to change.
3. To Change the widget name click on the name to make it an editable field. Type the new name and click OK.
4. Click Edit and perform any of the following:
Change the widget height: Enter the new height in the field provided.
Change the widget refresh rate: Enter the new refresh rate in the field provided.
Change the report description: Enter the new description in the field provided.
Note: You can format the widget description using HTML tags.
5. Click Save to save your changes.
6. Click Close to close the fields.
To minimize a widget:
1. Select Dashboard.
2. Select the dashboard whose widget you want to minimize / maximize.
3. Click the Minus icon to minimize the widget.
4. Click the Plus icon to maximize the widget.
To manually refresh a widget's data:
1. Select Dashboard.
2. Select the dashboard whose widget you want to refresh.
3. Click the Refresh icon to update the data in the widget.
To delete a widget:
1. Select Dashboard.
2. Select the dashboard whose widget you want to delete.
3. Click the Delete icon to remove the widget from the dashboard.
Chapter 2 Dashboard
SpeechMiner UI User Manual 38

Chapter 2 Dashboard
SpeechMiner UI User Manual 39

Report Widget
Use the Report widget to display any report saved in your system. You can configure it to display information about a
variety of topics.
You can use this configurability to broaden the scope of information in a single dashboard by including more than one
Report widget, where each Report widget displays different data.
From the Report widget you can:
Run a Report.
Drill Down.
Configure a Report Widget.
Edit a Report.
To run a report in the Report widget:
1. Select Dashboard.
2. Select the dashboard in which you want to run the report.
3. Click Edit.
4. From the Select list, chose the report you want to view.
5. Click Save. The report appears in the Report widget.
6. If the report is too large for the widget change the Report version:
a. Click the report link in the bottom left corner of the widget. The report is opened in the Reports > Edit
Report tab.
b. From the Version list select Mini.
c. Click Run report.
d. Click Save.
e. Select Dashboard and the name of the dashboard that contains the Report you are changing. The report
Chapter 2 Dashboard
SpeechMiner UI User Manual 40

is re-sized to match the size of the Report widget.
To drill down on any report:
1. Click within the Report widget on the information for which you want to receive additional data.
The data may be in the form of additional reports or an interaction list (opened in a separate window).
If a different report was accessed, click the Back icon to return to the original report results.
To configure a Report widget:
When configuring a Report widget you can change its height, how often it is updated and what report(s) it includes.
1. In the upper right corner of the Report widget click Edit. The widget's configurable settings are displayed.
2. Change the following settings as required:
Height: The widget height in pixels.
Refresh Rate: The rate (in minutes) at which the data in the report is refreshed.
Report Description: An explanation about the report.
Select: Select the report to display in the widget.
3. Click Save. The widget settings are saved and a link to the specific report is added to the bottom left corner of
the widget.
4. Click Close in the top right corner of the widget to hide the setting options.
To edit the report:
1. Select Dashboard.
2. Select the dashboard that includes the report whose settings you want to change.
3. In the upper right corner of the Report widget, click Edit. The widget's configurable settings are displayed.
4. Click the Edit Report icon . The Report is opened in the Reports > Edit Report tab in a new and separate
window.
Or
Chapter 2 Dashboard
SpeechMiner UI User Manual 41

Click the name of the report in the bottom left corner of the specific widget. The Reports > Edit Report tab is
opened for the specific report in the same window.
5. Modify the report settings as necessary.
Note: You can format the widget description using HTML tags.
6. Click Save Report Settings or Save report settings as.
Note: If the saved report was not in your account, you are prompted to create a copy of the report by giving it
a new name. The new report is saved in your account.
7. If you selected to edit the report in a new and separate window, click X to close the window.
Chapter 2 Dashboard
SpeechMiner UI User Manual 42

My Messages Widget
The My Messages widget is essentially a mailbox where you can:
Receive a message associated with a specific interaction list.
Send a note.
Configure the My Messages Widget
Schedule a new Coaching Session
DISCLAIMER: The option to schedule a new coaching session is not available in a Recording Only environment.
The following messages typescan appear in the My Messages widget:
Interaction: A message containing a link to a specific interaction list. The Interaction type message is created
when another user forwards an interaction(s) from the Interaction grid or Media Player. This type of message is
sent by other users.
Note: A message you send to, or receive from, another user.
Coaching: An automated notice from the system informing you that another user scheduled a Coaching session
for you. When you open the message, the Session Details page opens. For additional information refer
to Coaching.
To access and view an interactions list:
1. Select Dashboard.
2. Select the dashboard that includes the message containing the interaction(s) you want to see.
3. Click the message subject. The interaction list, along with the Media Player opens in a separate window.
To send a note:
1. Select Dashboard.
2. Select the view from which you want to send a My Messages note.
Chapter 2 Dashboard
SpeechMiner UI User Manual 43

3. Click New in the My Messages widget and select Note.
4. Configure the note with the fields provided.
5. Click Send. The note is sent to the user and is listed in the user's My Messages widget.
To configure a My Messages Widget:
When configuring a My Messages widget, you can change its height and how often it is updated.
1. In the upper right corner of the My Messages widget click Edit. The widget's configurable settings are
displayed.
2. Change the following settings as required:
Height: The widget height in pixels.
Refresh Rate: The rate (in minutes) at which the data in the report is refreshed.
3. Click Save.
4. Click Close in the top right corner of the widget to hide the setting options.
To schedule a new Coaching Session:
1. Select Dashboard.
2. Select the view from which you want to create a new Coaching Session.
3. Select the widget in which you want to create the new Coaching Session.
4. Click New in the My Messages widget and select Coaching Session.
5. In the New Coaching Session window configure the following options:
Session Name: The name of the session.
Schedule Date: Click the Calendar icon to select the date and time period in which you want the trainee
to take part in the session.
Coach: Select the coach by either typing the coach's name in the text field provided or by using the
browse button to select the coach from a list of users in the relevant work group.
Chapter 2 Dashboard
SpeechMiner UI User Manual 44

Trainee: Select the user who must take part in this Coaching Session either by typing the user's name in
the text field provided or by using the browse button to select the user from a list of users in the relevant
work group.
Type: Select the type of Coaching Session you are creating.
Public/Private: Select Public if you want the session notes to be visible to anyone who can access the
session, or Private if you do not want anyone other than yourself to view the session details.
Notes: Enter a description of the session to the user about the Coaching Session.
6. Click Save. The Coaching Session is created. It is now listed in the My Messages widget belonging to the user
who the Coaching Session was assigned to.
For additional information about Coaching see: Coaching.
To open and accept a Coaching Session:
To accept a Coaching Session means that you agree to participate in the Coaching Session.
1. Select Dashboard.
2. Select the view from which you want to accept a new Coaching Session.
3. Click Accept under Action. The Coaching Session is removed from the My Messages widget.
Chapter 2 Dashboard
SpeechMiner UI User Manual 45

Explore
You can use several search options to filter massive quantities of interaction data to find interactions that are most
related to the business issue you are investigating.
You can search for interactions using terms and phrases that you believe were used in the interaction between the
agent and the customer.
The search query that you create can be of varying complexity, ranging from a specific agent to sophisticated criteria
that define not only the agent to search for, but also their retrieval conditions (for example, date range, interaction type,
metadata, and so on).
Once SpeechMiner UI generates an interaction list based on your search criteria, you can analyze the list using various
SpeechMiner UI tools and options. The variety of options enables you to obtain in-depth information about your
specific business issue.
Explore enables you to filter and search for interaction data by:
Searching: Enables you to create a set of search criteria. You can save search criteria so that it can be run in the
future. For example, you could search for interactions handled by Work group A, processed with either Group
B or Group C and are assigned to Agent X.
Interaction Lists: Enables you to create a collection of one or more interactions about a specific issue.
Content Browser: Enables you to create search criteria based on a tree structure with specific interaction
characteristics. This method provides a visual overview of the interaction database. With Content Browser you
can browse through the database by expanding nodes to see more detailed interactions, limiting the display of
specific interaction types and by viewing interaction details. For example, you can browse through the
interaction database by dividing it into groups based on the work group you believe handled the interactions.
Trending: Enables you to understand possible correlations between terms to create a meaningful search. That is,
the Trending view enables you to quickly see how terms are related to each other and the contexts in which they
appear.
Chapter 3 Explore
SpeechMiner UI User Manual 46

Explore Menu Reference
The following list provides a brief description of each Explore menu item:
Search:
Enables you to search for interactions about a specific business issue by providing the tools to filter through a massive
interaction database.
Saved Searches:
Enables you to run the same search numerous times on different dates and times.
Interaction Lists:
Enables you to manually create an interaction list by selecting an interaction(s) from the Interactions Grid.
Content Browser:
Enables you to find interactions based on a Category, Agent or Program.
Trending:
Enables you to monitor term trends to surface changes in term trends and subsequently spot unexpected trends.
For instance, Trending enables you to learn about emerging business phenomena, pinpoint important events that may require attention, reveal
critical information that you may not be aware about and identify issues before they escalate.
Saved Trending Filters:
Enables you to run the same Trending filter numerous times on different dates and times.
Chapter 3 Explore
SpeechMiner UI User Manual 47

Search Results Grid
The Search Results grid contains detailed information about each interaction.
Note: Interactions that were imported from a Genesys Interaction Recording system may be divided into
segments. When the interaction is divided into segments the standard interaction icon is replaced by a
+.
The availability of each Search Results gird column depends on the type of search results you selected to view.
In some systems, additional columns can be opened for specific types of metadata. For example, if your system stores
an interaction "Location" field, a Location column can be added whenever interactions are listed in an Search Results
grid.
Since columns are added for all selected fields, some columns may be blank for some interactions. For example,
Duration is only defined for interactions, and Sender is only defined for e-mails. For other types of interactions, these
columns are blank.
DISCLAIMER: Screen Recording is not available in our Cloud offering. It is only available on Premise. For details,
refer to Supported Deployments.
Interactions in the Search Results grid can be:
Played back so you can listen to specific parts of the interaction.
Saved so you can run the search at a later time.
Attached to a Coaching session.
Search Results Grid Columns:
In the left corner of the screen (under the Media Player), select the type of interactions you want to view from the
menu provided.
The following image is an example of this menu . In this example, the user selects to
view a list of all the interactions found for the specific search.
This menu indicates the number of interactions returned out of the number that match the specific search criteria in the
server.
Note: The default maximum number of interactions that can be returned is 1000.
The Search Results grid can contain one or more of the following columns.
Note: Not all of the columns are available in each Search Results grid.
Chapter 3 Explore
SpeechMiner UI User Manual 48

Agent: The name of the agent who handled the interaction (available in: Interactions, Screen Recordings,
Events).
Audit Time: The time that the event was audited (available in: Events).
Auditor: The name of the auditor(available in: Events).
BCC: The users to which the email interaction was sent to secretly (available in: Interactions, Events).
CC: The users to which the email interaction was sent to as a copy (available in: Interactions, Events).
Category: The category or categories that were assigned to the interaction. If only one category is assigned,
the name of the category appears. If multiple categories are assigned, the number of categories appears. Place
your mouse on the value to see a list of the categories (available in: Interactions).
Confidence: A value that indicates the reliability of an event identification. The higher the number, the greater
the degree of certainty.
You can use this information to select interactions for auditing (available in: Events).
Note: The Confidence number is not a percentage. The number is a range from 1 to 100.
Date/Time: The interaction start date and time (in hours:minutes) (available in: Interactions, Events).
Duration: The duration of the interaction (in hours:minutes:seconds) (available in: Interactions, Events).
End Time: The event end time, offset from the start of the interaction (in hours:minutes:seconds) (available in:
Events).
External ID: The event end time, offset from the start of the interaction (in hours:minutes:seconds) (available
in: Interactions, Events).
Interaction ID: A unique number assigned to the interaction in the SpeechMiner UI database (available in:
Interactions, Screen Recordings, Events).
Media: The type of interaction found. For example, interaction, email, video and so on (available in:
Interactions, Screen Recordings).
Number of Segments: The number of segments in an interaction (available in: Interactions).
Open: A Play icon . Clicking the Play icon activates the Media Player (available in: Interactions, Screen
Recordings, Events).
Program: The program that was used by SpeechMiner UI to analyze the interaction (available in: Interactions,
Events).
Chapter 3 Explore
SpeechMiner UI User Manual 49

Receiver: The name of the individual(s) to whom the email interaction was sent (available in: Interactions,
Events).
Segment ID: The segment of the audio interaction associated with the event. Segment ID is only available in
a Recording UI environment and a Recording + Analytics environment (available in: Events).
Sender: The name of the individual who sent the email interaction (available in: Interactions, Events).
Size: The size of the video file (available in: Screen Recordings).
Start Time: The end time of the event within the interaction or segment in hours:minutes:seconds. The start
time of the screen recording in date:hours:minutes:seconds. (available in: Screen Recordings, Events).
Stop Time: The end time of the event within the interaction or segment in hours:minutes:seconds. The stop
time of the screen recording in date:hours:minutes:seconds. (available in: Screen Recordings, Events).
Subject: The subject of the email interaction (available in: Text, Interactions, Events).
Tags: A list of tags associated with this interaction. For more information, refer to Search Filter > Tags
(available in: Interactions).
Term ID: The ID number of the term that was identified in the topic (available in: Events).
Text: (available in: Interactions, Events)
Interaction grid: An excerpt from the interaction text containing a term that was included in a
search. The term must be specified in the SpeechMiner UI filter group. The term is highlighted in the
excerpt
Event grid: Represents the phrase that SpeechMiner UI recognized.
Note: This column is only visible in grids that contain search results from searches that included terms.
Topic: (available in: Text, Interactions, Events)
Interaction grid: The topic or topics SpeechMiner UI identified in the interaction. If only one topic is
identified, the name of the topic appears. If multiple topics were identified, the number of topics appears.
Place your mouse on the value to see a list of topics.
Event grid: Represents the topic associated with the event.
TP / FP: If the event has been audited, one of the following values is selected and the entire cell is color coded.
TP: True Positive, color coded green.
FP: False Positive, color coded red.
SFP: Sense False Positive: color coded pink.
If you have Event Auditor permissions you can select a value in this column.
To select a value, click the value. To clear the selection, click Clear.
Note: If you selected Exclude events that have been audited before you initiated your search, previously
audited events will not appear in the grid.
Chapter 3 Explore
SpeechMiner UI User Manual 50

Type: The video format (available in: Screen Recordings).
Workgroup: The work group associated with the agent who handled the interaction (available in: Interactions).
Chapter 3 Explore
SpeechMiner UI User Manual 51

Working with the Search Results Grid
You can modify the Search Results grid to display a list of interactions with details specific to your inquiry.
From the Search Results grid you can:
Configure grid columns.
Generate the interactions list.
Change the type of interactions displayed in the Interactions list.
Play an interaction.
Open a segmented interaction.
View search criteria.
To configure the grid columns:
1. At the top right corner of the Search Results grid, click the Select Columns icon .
2. Select the columns you want to display and clear those you do not want to display.
3. Click the Select Columns icon to close the list. The list closes and the selected columns are displayed.
Note: To return the grid columns to their default state, click the Select Columns icon and the Reset to defaults link
at the bottom of the list.
You can also change the order of the columns by dragging a column to a new location among the columns you selected
to view.
To generate an interactions list in the Interactions grid:
1. Perform one of the following:
Explore > Search
Explore > Saved Searches > Click the Run icon .
Explore > Content Browser
Note: When you first access Explore > Search, the list that appears includes all the interactions in the system.
Chapter 3 Explore
SpeechMiner UI User Manual 52

To change the type of interactions in the Interaction grid:
1. Access the Interaction grid.
2. Select one of the following from the menu above the Interactions grid (on the left):
Interactions: A list of all the interactions the meet the search criteria.
Events: A list of all the events that meet the search criteria.
Screen Recordings: A list of all the Screen Recording interactions that meet the search criteria.
The following image represents the menu you should open at the top of the list:
To play an interaction from the Search Results grid:
1. To play an interaction from the Search Results grid click Play on the row associated with the interaction
you want to play back.
If you are trying to play back an audio interaction, the interaction is activated in the Media Player.
If the interaction is not an audio interaction, the interaction transcript is opened.
To open a segmented interaction:
Interactions imported from the Genesys Interaction Recording system may be divided into segments. When this
happens a plus sign appears instead of a Play icon .
1. In the Search Results grid click the plus icon associated with the interaction you want to open.
When the interaction row is expanded a list of the interaction's segments is displayed. Each segment is identified
with a Play icon.
Note: The first segment is automatically played in the Media Player. Playback stops when the end of the
segment is reached.
2. To play another segment from the same interaction click its Play icon .
Chapter 3 Explore
SpeechMiner UI User Manual 53

To view search criteria:
If the Search Results grid was generated in response to a specific search, the upper left corner of the grid contains a
summary of the search criteria and settings that were employed during the search.
1. Hover over the summary to see details about the search criteria.
If the grid was generated in response to a search for terms, a Related Search list will appear below the search criteria.
If the system determines that one or more of the search terms was misspelled, it will correct the error and indicate the
correction in a note below the search criteria.
For additional information, see Create a New Search.
Chapter 3 Explore
SpeechMiner UI User Manual 54

What is an Interaction?
An interaction is the communication between an agent and a customer.
SpeechMiner UI can analyze the following interaction types:
Audio: An agent-customer interaction from an audio-based communication channel (phone call).
Text: An agent-customer interaction from a text-based communication channel (email, chat, text and social
interactions).
An interaction can include the following information:
Event
Accuracy Rates (auditing)
Segment
Comment
Transcription
Note: SpeechMiner UI can analyze interaction dynamics such as periods of silence, interaction hold time, time when
the employee and customer are talking
at the same time (talk-over time), who is talking (agent/customer) and so on.
Event:
An event occurs when SpeechMiner UI identifies a topic in an interaction. A topic is a collection of phrases that
SpeechMiner UI looks for when analyzing interactions.
For example, if the "can offer you a loan" phrase associated with the Loan Offer topic is identified, the start of the
event is "can" and the end of the event is "loan".
SpeechMiner UI can also identify non-linguistic events. Non-linguistic events are sounds other than speech (for
example, a dial tone, silence, music or noise, key press and so on).
An event is indicated by a numbered icon in the Media Player and within the interaction's transcript. You can view
details about each event by placing your mouse over the event icon.
In addition, each event has a start time, end time, a name and a type. For additional information, see Interaction
Events.
Event search results are different from a general search results list in the following ways:
Chapter 3 Explore
SpeechMiner UI User Manual 55

The items in the list represent events and not complete interactions. For this reason, the same interaction may
appear more than once in the grid if events matching the search
filter criteria are found multiple times in the same or different interaction.
When you play back an event, the entire interaction containing the event is opened in the Media Player, but
playback begins at the beginning of the specific event.
Events can be audited.
Note: When you search for events you must search for a term, term ID or a topic.
Accuracy Rate (auditing):
Each event recognized in an interaction can be audited. To audit an event, a SpeechMiner UI user rates the accuracy
of the identification.
Auditing fine-tunes the SpeechMiner UI's speech recognition accuracy.
To audit an event, the SpeechMiner UI user (auditor) listens/reads the event and subsequently rates the accuracy of
the event recognition by selecting one of the following values:
TP (True Positive): SpeechMiner UI correctly identifies the event.
FP (False Positive): SpeechMiner UI incorrectly identifies the event.
SFP (Sense False Positive): SpeechMiner UI correctly identifies terms, but their use does not match the topic's
intent.
Note: Analyze summary information about event auditing using the Topic Analysis - Audit report. Manage existing
audit data globally in the Interactions Admin screen.
Segment:
A segment is created when a customer is transferred during an agent-customer audio interaction. If an interaction
includes 4 segments, the customer was transferred 4 times.
For more information about segments, see: Working with the Search Results Grid.
Comment:
Comments are added to interactions to express a thought about the interaction. A comment can be general or
associated with a specific time during the interaction.
User comments are indicated by icons above the audio graph in the Media Player and within the interaction transcript.
Chapter 3 Explore
SpeechMiner UI User Manual 56

There are three types of comments:
Good : Indicates a positive comment.
Bad : Indicates a negative comment.
Neutral : Indicates an unbiased comment.
For more information about how to add a comment to an interaction, see: Interaction Comments.
Transcript:
An interaction transcript is a textual representation of the agent-customer interaction.
For more information about how to work with an interaction transcript, see: Interaction Transcript.
Chapter 3 Explore
SpeechMiner UI User Manual 57

Screen Recordings
A Screen Recording is a video of the agent's screen during the agent-customer interaction. Screen Recording search
results are different from the general search result list since they only contain the screen recording. When you play
back a screen recording interaction only the video of the agent's screen is played back and not the complete
interaction.
Screen recording search results are different from a general list of search results in the following ways:
The items in the list represent screen recordings and not complete interactions.
When you play back a screen recording, only the video of the agent's screen is played back and not the entire
interaction.
To view a specific screen recording from within the interaction it was recorded, switch to the Search Results grid and
search for the interaction ID's associated with the specific screen recording. The interaction ID appears in the ID
column of the Screen Recordings Search Results grid. The Search Results grid contains a list of all the screen
recordings in the system.
Chapter 3 Explore
SpeechMiner UI User Manual 58

Batch Actions
From the Search Results grid, you can perform the following batch actions for selected interactions:
Export Interactions
Forward interaction links
Add interactions to a global interaction list of a Coaching session interaction list
Reprocess an interaction
Delete an interaction
To export an interaction:
Exporting an interaction(s) creates a zip file containing the following files:
A .csv file containing a list of audio interactions that were exported. The file also contains the search results grid
data associated with each interaction.
A .wav file for each audio interaction included in the list (optional).
A text file is created when you export a text interaction.
Note:
Some of the exported interactions may not be associated with an audio file.
You must be assigned the Export Interactions permission to be able to export interactions. For more
information refer to: Profile Permissions.
1. Select Explore > Search.
2. Run a search for the interaction(s) you want to export. See: Create a New Search.
3. In the right hand side of the screen (above the list), click the More icon and select Export.
4. Select Export the selected interactions or Export all the interactions.
Note: If you select Export all the interactions all the interactions in all the search result pages will be
exported.
Chapter 3 Explore
SpeechMiner UI User Manual 59

5. Select the Include audio and text interaction files checkbox if you want to include these files in the .zip file
and click Export.
Note: If the Include audio and text interaction files checkbox is not active, it means that the size of the
Export file exceeds the maximum limit. To include the audio and text interaction files, reduce the number of
selected interactions.
A zip file is created with the exported interactions.
Note: If you selected Export and your system is configured to encrypt exported interactions, an Export
Interactions window appears. In this window, you will be instructed to
create a password required when you attempt to unzip the exported interactions.
a. Enter a password of your choice in the Create Password field.
Or
Click Generate Password to enable the system to generate a password for you in the Create
Password field.
b. Click Export to export the selected interactions.
c. Copy and save the password and click Done.
When you try to unzip the file, you will be prompted for this password.
Note: Windows default zip program does not support encrypted zip files. To unzip the file, you must use
a different zip program.
To forward a link to an interaction(s):
You can send a link to one or more interactions to other users in the system. Each link is sent in a separate message.
Depending on your selection, the message appears
in the My Messages widget or as an email notification. When the recipient clicks the message a SpeechMiner UI
Media Player is activated in a separate window to play back the interaction.
1. Select Explore > Search.
2. Run a search for the interaction(s) you want to export. See: Create a New Search.
3. In the right hand side of the screen (above the list), click the More icon and select Forward.
4. Under Subject modify the subject.
Chapter 3 Explore
SpeechMiner UI User Manual 60

5. Under Select a user select the user to whom you want to send the link from the lists provided.
6. To send notifications to the user's email address as well as to the user's My Messages widget, select Send
Email Notification.
7. Click Send. A message is sent to the recipient's My Messages widget and email address for each audio
interaction you selected.
To add interactions to an interaction list or a Coaching session:
An interaction list is a list of audio interactions that is saved for later use.
SpeechMiner UI supports two types of interactions lists:
Global Interaction List: A group of interactions.
Coaching Session Interaction List: A group of interactions associated with a specific Coaching Session.
Note: Coaching Session interaction lists can only be viewed within the coaching session.
When working with interaction lists you can:
Add interactions to an existing interaction list or a new interaction list.
Select an existing interaction list or a Coaching Session interaction list.
Add a new Coaching Session directly from the Search Results Grid.
To add an interaction(s) to an interaction list:
1. Select Explore > Search.
2. Run a search for the interaction(s) you want to add to an Interaction list. For more information, see: Create a
New Search.
3. Select the interactions you want to add to the Interaction list.
4. In the right hand side of the screen (above the list), click the More icon and select Add To.
5. Select Interaction List.
6. Select the list to which you want to add the selected interactions.
7. Select Export the selected interactions or Export all the interactions.
Chapter 3 Explore
SpeechMiner UI User Manual 61

Note: If you select Export all the interactions all the interactions in all the search result pages will be
exported.
8. Click Add. The selected interactions are added to the selected interaction list.
To add an interaction(s) to a Coaching Session:
1. Select Explore > Search.
2. Run a search for the interaction(s) you want to add to a Coaching Session. See: Create a New Search.
3. Select the interactions you want to add to the Coaching Session.
4. In the right hand side of the screen (above the list), click the More icon and select Add To.
5. Select Coaching Session. A list of Coaching Sessions appears.
6. Under each Coaching Session title you will see a list of the Interaction lists associated with the specific
Coaching Session and a New Static List link.
7. Under the Coaching Session title find the session to which you want to add the selected interactions.
8. Under the session title select the Interaction list to which you want to add the selected interactions.
If the Coaching Session does not contain an Interaction list, click New Static List to create a new list with the
selected interactions for the specific session.
Once you give the list a name and click OK, the list is created. The list will appear in the Interaction Lists tab
and under the specific Coaching Session.
9. Click Add.
To reprocess an interaction:
Reprocessing enables you to reapply the SpeechMiner UI recognition process on selected interactions. This
procedure is helpful when you know that topic definitions have changed.
Note: Reprocessing an interaction can only be performed in an Analytics Only environment.
1. Select Explore > Search.
2. Run a search for the interaction(s) you want to reprocess. See: Create a New Search.
3. In the right hand side of the screen (above the list), click the More icon and select Reprocess
Chapter 3 Explore
SpeechMiner UI User Manual 62

Interactions.
4. Click Yes when asked if you are sure you want to reprocess the interactions. The selected interactions are
reprocessed.
To delete an interaction:
1. Select Explore > Search.
2. Run a search for the interaction(s) you want to delete. See: Create a New Search.
3. In the right hand side of the screen (above the list), click the More icon and select Delete.
4. Click Yes when asked if you are sure you want to delete the interactions. The selected interactions are deleted.
Chapter 3 Explore
SpeechMiner UI User Manual 63
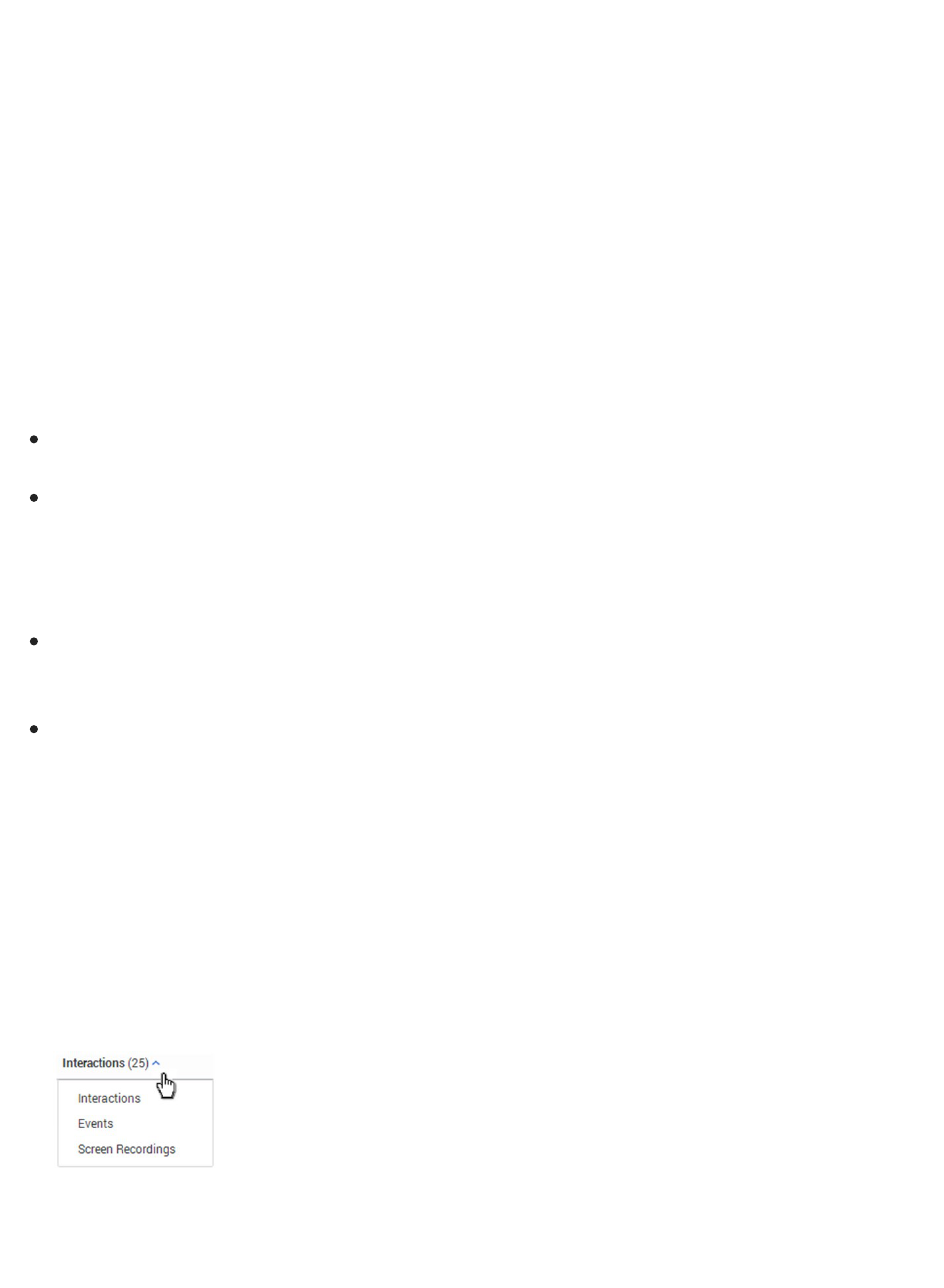
Create a New Search
With SpeechMiner UI you can search for interactions, events and screen recordings.
When creating a search you can use filters to specify the types of interactions, eventsand screen recordings you want
to view.
When you run the search, SpeechMiner UI combs the database for interactions that match your filter selections. The
search results are displayed in the Search Results grid.
When performing a search SpeechMiner UI continues searching for interactions that match your search criteria until
one of the following occurs:
All the interactions in the database are checked for matches with your search criteria.
The processing limit (defined in the system's database configuration settings) is reached. For example, if the
processing limit is 1000 the first
1000 interactions that match the search criteria are retrieved and the search ends.
Note:
A search generated from Trending chart tool tip produces results based on a given time period. The search
process from the Trending chart searches for interactions that are relevant to the search request. The process
does not search for an exact match.
A search generated from Explore > Search produces results based on the search filter. This search process
searches for interactions that are an exact match to the search request.
Once your search for specific interactions is complete, you can export or forward interactions from the list or add
interactions to an existing interactions list. See Batch Actions.
To create a new search:
1. Select Explore > Search. A list of interactions associated with the previous search appears.
2. In the left corner of the screen (under the Media Player), select the type of interactions you want to search for.
Note: To view Screen Recording in Internet Explorer 10 and 11, you must enable the Miscellaneous > Access
data sources across domains in the Security Settings - Trusted Sizes Zone window.
Chapter 3 Explore
SpeechMiner UI User Manual 64

DISCLAIMER: Screen Recording is not available in our Cloud offering. It is only available on Premise. For
details, refer to Supported Deployments.
3. Click the Search Filters icon . For additional information, see Search Filter.
4. Configure the filter options.
5. Click one of the following:
Search: Update the current search results according to the new filter configuration.
Save As: Save the filter configuration as a Saved Search. You can run the saved search at a later time.
Reset: Reset the current filter configuration to its default state.
The search is run according to your selection.
Chapter 3 Explore
SpeechMiner UI User Manual 65

Search Filter
You can refine you search criteria with the options available in the Filter panel.
Click the Filter icon in the Search Results grid to access the Filter panel.
When configuring the Filter panel consider the following:
Only interactions that meet the conditions you set will be retrieved.
The current search criteria is displayed at the top of the Search Results grid. When you make changes to the
filter the display is automatically updated.
All data relevant to call segments is stored and displayed at the interaction level. This includes attached meta
data as well as the agents involved in the interaction. As a result, searching/filtering is only performed at the
interaction level (for example, there is no segment level searching) and all information is displayed in the UI at
the interaction level.
The Add and Remove icons / enable you to add and remove additional filter selections and/or values.
Once you save your filter configurations, the configuration is saved as a Saved Search and can be run in the
future. See Working with Saved Searches.
The Include / Exclude option enables you to define a negative condition. For example, when you select
Exclude, the condition is met when none of the selections or values for the specific filter are found in the
interaction(s).
The View selected only option, enables you to display only the selected items associated with the specific
filter.
The Filter panel is divided into the following groups:
Date Range
Terms & Topics
Categories & Programs
Agents & Workgroups
Metadata
Chapter 3 Explore
SpeechMiner UI User Manual 66

Comments
User Actions
Segment
Tags
Interaction Properties
Audit and Implementation
Email Search
Date Range:
Enables you to filter for the Search Results grid according to a specific date range.
All: The default value that includes all interactions in the database.
Yesterday: Filter interactions recorded on the previous day from 00:00 until 23:59.
Today: Filter interactions recorded on the same day from 00:00 until the exact time the search is performed.
Week to Date: Filter interactions recorded from the beginning of the current week (the last Sunday at 00:00)
until the exact time and date the search is performed.
Note: In the U.S., the week starts on Sundays and ends on Saturdays; for users with Europe-localized versions
of the software the week starts on Mondays and ends on Sundays.
Last 7 Days: Filter interactions from seven days prior to today (at 00:00) until the exact time and date the
search is performed.
Last Week: Filter interactions from the beginning through the end of the previous week.
Month to Date: Filter interactions from the first day of the current month at 00:00 until the exact time and date
the search is performed.
Last 30 Days: Filter interactions from thirty days prior to today (at 00:00) until the exact time and date the
search is performed.
Last Month: Filter interactions from 00:00 on the first day until 23:59 on the last day of the previous month.
Chapter 3 Explore
SpeechMiner UI User Manual 67

Quarter to Date: Filter interactions from 00:00 on the first day of the current quarter until the exact time and
date the search is performed.
Last 90 Days: Filter interactions from 90 days prior to today (at 00:00) until the exact time and date the
search is performed.
Last Quarter: Filter interactions from 00:00 on the first day until 23:59 on the last day of the previous quarter.
Custom: Filter interactions from any date and time range selected from the two drop-down windows
displayed. You can specify the exact day, month, year, hour and minute for both the beginning and end dates.
Note: The times given are directly associated with the time zone at which your Web server is deployed, and
therefore are not necessarily the same as the time where you are physically located.
Terms & Topics:
Enables you to filter for interactions according to a one or more terms or phrases that must be part of the interaction. ,
topic and/or speaker.
Text field: Enter the term(s) or phrase(s) to search for.
Topics: Select one or more topics from the list to search for.
Limit to: Select one or more Speaker Types from the list.
Only interactions found in one of the following situations are included in the search results:
Interactions with only one audio channel (the system cannot identify who is speaking), where at least one
of the selected Speaker Types were involved in the interaction.
For example, the topic Payments was found at least once in the interaction and one of the participants in
the interaction was a speaker of type Agent.
Interactions with more than one audio channel (the system identifies who is speaking at every moment in
the interaction), where at least one of the selected Speaker Types mentioned the required topics and/or
terms at least once in the interaction.
For example, the Agent in the interaction talked about the topic Payments.
Categories & Programs:
Enables you to filter the Search Results grid according to categories and/or programs. Only interactions in which at
least one category/program is identified are included in the search results.
Chapter 3 Explore
SpeechMiner UI User Manual 68

Categories: Select one or more categories that should be associated with the interaction(s) you are searching
for.
Programs: Select one or more programs that should be associated with the interaction(s) you are searching for.
Agents & Work Groups:
From the lists provided select any combination of agents and work groups to include in your search.
You can also choose to search for the "current user" rather than a specific agent or work group. In this case, the
condition changes depending on which user runs the report.
If you select a work group, all the agents in the work group are included in the search condition.
When creating an Agent, if you create a username but you do not enter a firstname and lastname in the fields provided,
the specific Agent's name will appear blank in the Search Filter > Agents & Workgroups list.
Metadata:
Metadata is collected by the recording system and relayed by it to SpeechMiner UI. The types of available metadata
vary from system to system.
The Metadata filter enables you to filter the search results for selected metadata and metadata values.
The search results will only include interactions for which the selected types of metadata have defined values and when
you specify values that match the specified conditions.
Three types of metadata values can be used in the conditions you define:
String of text (for example, "Detroit")
Decimal number (for example, "10" or "32.5")
Date
Dates must be entered manually in the same format used in your SpeechMiner UI UI interface. For example, if your
system represents dates in format: mm/dd/yyyy hh:mm, you would enter Oct 24, 2013 at 10 AM as 10/24/2013
10:00;.
The format used in your system is specified in the webserviceparams table, in the ''globalDateFormat'' parameter.
For additional information, please consult your system administrator.
To define a metadata filter:
1. In the Explore > Search page, under Metadata,select to Include/Exclude the metadata.
Note: If you only want to specify that the interactions must have values for the specific metadata type, but any
value is acceptable, you only need to select the name of the metadata type. You do not have to perform the
Chapter 3 Explore
SpeechMiner UI User Manual 69

remaining steps of this procedure.
2. Select the type of metadata from the list provided.
3. Click Values to configure the metadata.
4. In the first field, select:
Equals to specify a specific value for the metadata type.
Between to define a range of values. When you select Between an additional field is added to the box.
5. To add an additional OR condition, click the Add icon to add a line in the box and fill it in as explained
above.
6. Click outside the box to close the box.
Comments:
Enables you to filter the Search Results grid for interactions that contain comments made by selected users.
Blank text field: The text that must appear in one of the interaction comments. Only interactions that contain
comments in which this text is found are included in the search results.
Note: If you leave the text field blank interactions that contain comments from the selected users are included in
the search results regardless of the comments contents.
User: searches for the user(s) who added a comment to the interaction when playing the interaction. Only
interactions that contain comments from the selected users are included in the search results.
Good : searches for the user(s) who selected Good when adding a comment to the interaction during
playback.
Neutral : searches for the user(s) who selected Neutral when adding a comment to the interaction during
playback.
Bad : searches for the user(s) who selected Bad when adding a comment to the interaction during playback.
User Actions:
Enables you to filter the Search Results grid with interactions that were reviewed (played back or opened) by the
selected user(s).
Chapter 3 Explore
SpeechMiner UI User Manual 70

Segment:
Enables you to filter the Search Results grid according to segment ID's. See What is an Interaction? > Segment.
Under Segment select the number of segments to include in the search results. In the first field, select either Less Than,
Between, or More Than.
In the second text field or fields, fill in the amount of segments within an interaction that you want to search for.
Less Than: Search results include only interactions with a number of segments that is smaller than the value
you specified.
Between: Search results include interactions that include a number of segments that is more than the first value
and less than the second value.
More Than: Search results include only interactions that contain a number of segments that is more than the
value you specified.
Tags:
Tags enable you to label an interaction as a result of a specific action or a user-defined category. That is, a tag is
similar to a keyword that helps you identify an interaction, and enables you to generate better search results.
Tags can also help you indicate which interactions cannot be deleted, which interactions have been evaluated as part of
the Quality Management Evaluation Session and which interactions include a Screen Recording. The following three
tags are not user-defined.
Protect from Deletion / Unprotect from Deletion tag: The Protect / Unprotect from Deletion tag enables
you to search for interactions that cannot be deleted (see, Playback Controls row#13).
Evaluated tag: The Evaluated tag enables you to search for interactions that have already been part of an
evaluation session and subsequently prevents evaluated interactions from being reused (see, Perform an
Evaluation Session step #8).
Screen Recording tag: The Screen Recording tag enables you to search for interactions that include a screen
recording.
DISCLAIMER: The Screen Recording tag is not available in our Cloud offering. It is only available on
Premise. For details, refer to Supported Deployments.
Note: The Tags filter is not available for Event and Screen Recording searches.
For additional information about how to create a tag, see Media Player Options and Define Tags.
To define a tag filter:
1. Select Include/Exclude. Select Exclude to define a negative condition. For example, when you select Exclude,
Chapter 3 Explore
SpeechMiner UI User Manual 71

the condition is met when none of the selections or values for the tag filter are found in the interaction(s).
2. Select one or more tags from the list provided.
3. Click Done.
Interaction Properties:
Enables you to filter the Search Results grid list according to:
Types: Select the type of interaction you are searching for (calls, email, chat, text or social interactions).
DISCLAIMER: The Text type is not available in our Cloud offering. It is only available on Premise. For
details, refer to Supported Deployments.
Note: The Types selection is not offered if your system only includes audio interactions.
Languages: Set the language of the interactions you are searching for.
Note: In some systems some or all of the interactions do not undergo speech-recognition processing. In these
system the option No Speech Recognition appears in the Languages list. Select this value to include
interactions that did not undergo speech recognition.
Duration: Select the duration range of the interaction to include in the data set. In the first field, select either
Less Than, Between, or More Than.
In the second text field or fields, fill in the number of seconds.
Less Than: Search results include only interactions that are shorter than the value you specified.
Between: Search results include interactions whose duration's are longer than the first value and shorter than
the second value.
More Than: Search results include only interactions that are longer than the specified value.
Interaction ID: Search results include only interactions with the value(s) you entered for the ID. In this field,
you can enter up to 50 Interaction IDs.
External ID: Search results include only interactions with the value you entered for the ID. External ID is a
unique number assigned to the interaction by the external recording storage system.
Audit and Implementation:
Enables you to filter the Event Search Results grid according to confidence ratings and auditing results.
Chapter 3 Explore
SpeechMiner UI User Manual 72

Note: This group only appears if the Search Results grid is configured to only show events.
Confidence threshold: Select the minimum confidence value required. Only events whose confidence values
are at least this high are included in the Search Results grid.
Note: The confidence value is generated by SpeechMiner UI when the interactions are processed. It indicates
the reliability of the event identification. The higher the value, the greater the degree of certainty.
Term ID: Searches for the a term ID included in a topic.
Note: This field only appears if you have Event Audit permissions. Also, the term ID for each term found
during the search appears in the Event Search Results grid.
Exclude audited events: Select this check box to exclude interactions that have already been audited from the
search.
TP, FP, SFP: Select the required audit ratings. Only audited events whose ratings match one of the selected
types are included in the search results.
Email Search:
Email filters that enable you to search for email interactions based on information in the email header (for example,
from and to whom the email was sent).
From: The email addresses from where the email was sent.
To: The email addresses to whom the email was sent.
Cc: The email addresses that received a copy of the email.
Bcc: The email addresses that should not to be revealed to other recipients of the email.
Chapter 3 Explore
SpeechMiner UI User Manual 73

Explore Terms
SpeechMiner UI's Explore feature enables you to produce reports that graphically illustrate the distribution of specific
terms in a list of interaction(s).
The Explore feature is completely automated and is based on the analysis of interactions associated with a specific
search criteria.
The process produces a common-terms report that shows the most common term clusters in the generated data set.
When you initiate the Explore feature, the results are sent to you via email. You can also see the reports from the
Reports > Saved Reports tab.
DISCLAIMER:This feature is not available in our Cloud offering and in a Recording Only deployment. It is only
available on Premise. For details, refer to Supported Deployments.
To run the Explore process on a specific search criteria:
1. Select Explore > Search.
2. Click the Search Filters icon to define the data set to use during the Explore process.
3. Select at least one language and only one interaction type. See Search Filter for additional information.
4. Click Explore.
5. Enter a name for the report.
6. Click OK. A message appears informing you that you will receive an email with a link to the report.
Chapter 3 Explore
SpeechMiner UI User Manual 74

Saved Searches
A Saved Search represents a group of interactions selected from a list of interactions that resulted due to a specific
filter criteria (created in the Explore > Filter panel).
Creating a Saved Search enables you to combine a collection of interactions associated with the same topic. You can
run this unique Saved Search whenever the
information the query generates is required.
To access the Saved Searches list:
1. Select Explore > Saved Searches.
The Saved Search tab is opened with the following options:
Drop down list: Find and select the user(s) whose saved searches you want to see.
Text field: Type a letter or sequence of letters that appears in the name of the saved search you want to
find.
Delete : Select one or more searches from the list and click Delete to remove them from the
system.
Compare saved searches : Select two searches to create a report the compares the two search
results.
Table: See column descriptions below.
Columns:
Checkbox : Select the check boxes to delete or compare.
Run: Click the Run icon to run the search and display the results in the Search Results grid. If the specific
search was a search for screen recordings, the Search Results grid will show a list of interactions with screen
recordings.
Delete: Click the Delete icon to delete the specific saved search.
Name: The name of the saved search.
Chapter 3 Explore
SpeechMiner UI User Manual 75

Creator: The name of the user who created the saved search.
Status: The status of the saved search.
Sharing: The names of the user groups and users with whom the search is shared. Click the Sharing icon
to share the saved search with others.
Created on: The date on which the search was created.
Coaching: Click Add to add the search to a Coaching session. See Coaching for additional information.
Permalink: Click Copy to create a Permalink to the specific saved search. You can copy this link to your
clipboard and then paste it elsewhere as necessary.
See Permalink for additional information.
Chapter 3 Explore
SpeechMiner UI User Manual 76

Compare Saved Searches
SpeechMiner UI enables you to compare two saved searches. The result is a report that shows how the two data sets
differ.
For example, you can compare two customer-service agent teams to learn which team has more interactions with
dissatisfied customers.
You can also compare two search results to see whether there are any noticeable differences with regard to the most
common terms in the interaction flows.
Note: You can only compare audio interactions. You cannot compare text interactions.
DISCLAIMER:This feature is not available in our Cloud offering. It is only available on Premise. For details, refer
to Supported Deployments.
To compare two Saved Searches (two data sets):
1. Select Explore > Search.
2. Click to open the Filter panel.
3. Define the search criteria for the data set you want to compare. See Create a New Search for additional
information.
4. In the Filter panel, click Save As to save the new search.
5. Repeat the steps above to define the second data set for the comparison.
6. Select Explore > Saved Searches.
7. Select the check boxes associated with the two Saved Searches you want to compare.
8. Click Compare in the top right corner of the screen.
9. In the Report Name field, enter a name for the comparison report.
10. From the Categories and Topic lists, select the categories and topics you want to compare in relation to the
two Saved Searches you selected.
11. Click Run. The report will appear in the Saved Reports list and you will receive an email with a direct link to
Chapter 3 Explore
SpeechMiner UI User Manual 77

the report.
Chapter 3 Explore
SpeechMiner UI User Manual 78

Interaction Lists
An Interaction list enables you to create a collection of one or more interactions about a specific issue.
The list is made up of interactions that you manually select from the Search Results grid and add to the list.
You can add an interaction to an existing Interaction list or you can create a new Interaction list.
An Interaction list can be created from:
Search Results list
Interaction Lists tab
To create an Interaction list from the Search Results grid:
1. Select Explore > Search.
2. Run a search for the interaction(s) you want to add to the interaction list. See: Create a New Search.
3. Select the interactions you want to add to the new Interaction list.
4. In the title of the check box column click the Batch Actions icon and select Add To.
5. Select Interaction List.
6. Click New Interaction List to create a new list with the selected interactions.
7. Click OK. The selected interactions are added to the selected interaction list.
To create an Interaction list from the Interaction Lists tab:
1. Select Explore > Interaction Lists.
The Interaction Lists tab is opened with the following options:
Drop down list: Find and select the user(s) whose interaction lists you want to see.
Chapter 3 Explore
SpeechMiner UI User Manual 79

Text field: Type a letter or sequence of letters that appears in the name of the interaction list you want to
find.
Delete : Select one or more lists from the interaction list and click Delete to remove them from the
system.
Rename an Interaction list : Select the interaction list whose name you want to change. Click the
Rename icon and give the list a new name.
Table: See column descriptions below:
Checkbox : Select the check boxes to delete or rename.
Run: Click the Run icon to run the interaction list and display the results in the Search Results
grid. If the specific search was a search for screen recordings, the Search Results grid will show a
list of interactions with screen recordings.
Delete: Click the Delete icon to delete the specific interaction.
Name: The name of the interaction.
Creator: The name of the user who created the interaction.
Sharing: The names of the user groups and users with whom the search is shared. Click
the Sharing icon to share the interaction with others.
Created on: The date on which the search was created.
Coaching: Click Add to add the search to a Coaching session. See Coaching for additional
information.
Permalink: Click Copy to create a Permalink to the specific interaction. You can copy this link to
your clipboard and then paste it elsewhere as necessary.
See Permalink for additional information.
2. Click the Create a new Interaction list icon .
3. Enter a name for the new list.
4. Click OK.
5. Add interactions to the new list.
a. Select Explore > Search.
Chapter 3 Explore
SpeechMiner UI User Manual 80

b. Select interactions from the Search Results grid.
c. Click the Batch Actions icon and select Add To.
d. Select Interaction List.
e. Select the list you created at the beginning of this procedure.
f. Click Add.
6. Verify the interactions were added to the new Interaction list.
a. Select Explore > Interaction Lists.
b. Click the run icon to run the new list.
c. Review the Search Results grid and verify that the interactions you selected were added to the list.
Chapter 3 Explore
SpeechMiner UI User Manual 81

Content Browser
Content Browser enables you to view the interactions associated with specific categories, agents and programs. For
example, selecting the category option will produce a list of all the categories and their sub-categories associated with
one or more interactions.
With Content Browser you can filter your selection further by selecting an additional search criterion. For example,
you can select to search for interactions associated with categories and a specific program. If you selected a category
and a program called"debt", the result will be a list of all the categories associated with interactions that are also
associated with the program "debt".
DISCLAIMER: This feature is not available in our Cloud offering and in a Recording Only deployment. It is only
available on Premise. For details, refer to Supported Deployments
To search for interactions associated with a specific category, agent or program:
1. Select Explore > Content Browser.
2. From the Explore list select the type of interaction distribution you are interested in seeing.
3. From the Filter By list select an additional criterion type for the interaction distribution.
4. From the Any list select the specific criterion.
For example, if you select Work group in the Filter By list, you must select the specific work group name. If you
select Any then all work groups associated with a category in the list will be part of the search results.
The Content Browser list is automatically refreshed and updated with every selection you make and is displayed
in a table with the following columns:
Classified Interactions: The list of categories, programs or agents that are associated with an
interaction.
Language: The language the program is associated with when created in SMART.
Last Call: The date and time of the last interaction the specific agent took part in.
Last updated: The last date on which the specific program was updated.
Number of Agents: The number of agents the agent manages.
Number of Interactions: The number of interactions associated with the category, agent or program.
Chapter 3 Explore
SpeechMiner UI User Manual 82

Percentage:
Category percentage: The percentage of interactions associated with the category compared
with all the categories in the list.
Sub-category percentage: The percentage of interactions associated with the sub-category
compared with all the sub-categories within the specific category.
Priority: The priority level given to the program in SMART.
For more information about SMART refer to the SMART User Manual.
Chapter 3 Explore
SpeechMiner UI User Manual 83

Trending
The Trending page is designed to help you monitor and analyze terms and phrases within conversations and identify
and explore familiar and unexpected trends. By analyzing term trends within a specific interaction set over specific time
periods and/or according to a variety of search criteria (for example, agent and/or customer side, metadata, duration,
categories, topics, agents, work groups, language and so on), Trending enables you to better understand emerging
business issues, pinpoint events that may require close attention, identify process or service issues before they escalate
and recognize strengths and weaknesses of the organization’s employees, products, and processes.
The data in the Trending page is based on an automated analysis of interaction transcripts together with the
identification of changes in the frequency with which a term/phrase appears in interactions. Term/phrase frequency is
the number of interactions within which the term/phrase is found divided by the entire set of interactions during a given
time period, expressed as a percentage. For example, if during a specific time period a phrase was used in 350 out of
1000 interactions; the phrase frequency for that given time period is (350/1000)*100% = 35%.
Terms/phrases appear in the Trending chart according to a salience measurement (for example, relative importance
measurement). Terms and phrases with a high salience measurement will be included in the Trending chart. The
purpose of the salience measurement is to filter out common terms/phrases (for example, thank you), to make room
for significant terms and phrases.
Trending requires no input from users about what terms and phrases should be found within the interactions, and for
this reason the information in the Trending page can help you identify issues and trends that are unforeseen or
unexpected.
From the Trending page you can create and save Trending charts that show the distribution of terms and phrases
within a selected interaction set. The relative frequency of terms and phrases is visualized using a bubble chart. The
bubble chart (see image below) provides at-a-glance insight on four dimensions:
Size: The size of the bubble is proportionate to the number of times the term or phrase appears in the
interaction set. The larger the bubble’s radius, the more the term or phrase is used within the interaction set.
Color: The bubbles are shaded red or green and represent the change in frequency. The deeper the shading the
larger the frequency change. Red represents a negative (reduction) in frequency and green represents a positive
(increase) in frequency for that particular term.
Comparison: Bubbles that contain a dotted line circle indicate a term or phrase that appear in the selected
interaction set in both Period 1 and Period 2. For example, if you are viewing the Period 1 tab, the dotted line
represents the term/phrase frequency in Period 2 and vice versa.
Cluster: Bubbles connected with lines represent a collection of terms and phrases within the interaction set that
have a strong semantic similarity.
Bubble Chart Example:
Chapter 3 Explore
SpeechMiner UI User Manual 84

This visual representation enables you to quickly identify the terms and phrases with the highest and lowest frequency,
and any deviation from regular term frequencies. This enables users to surface and analyze trends that might otherwise
go undetected. After recognizing the terms and phrases that have the strongest or weakest correlation, you can refine
your search results accordingly, to search for the interactions most related to the business issue you are investigating.
For detailed information about how to configure and interpret the Trending page, refer to the following:
Create a Trending Filter
Create a Custom Trending Cluster Task
Trending Filter Toolbar Description
Trending Filter Tool Tip Description
Trending Filter Chart Data Description
Analyze Related Words
Manage the Blacklist
Working with Saved Trending Filters
Chapter 3 Explore
SpeechMiner UI User Manual 85

Create a Trending Filter
With the Trending Filter you can create Trending charts (a cloud of bubbles) that are a visual representation of the
relative frequency of terms within a specific interaction set over specific time periods and/or according to a variety of
search criteria.
To create a new Trending Filter:
1. Select Explore > Trending.
2. From the Trending Filter list, select one of the following time frames:
Top terms intra-day: Displays the most frequently used terms and phrases included in all of the
interactions in the system 3 hours prior to the current time.
Top terms today compared to yesterday: Displays the most frequently used terms and phrases
included in all of the interactions in the system 24 hours prior to the current time.
Top terms today compared to the past week: Displays the most frequently used terms and phrases
included in all of the interactions in the system 7 days prior to the current day.
Top terms today compared to the same day a week ago: Displays the most frequently used terms
and phrases included in all of the interactions in the system exactly one week from today. For example, if
you are creating the Trending filter on Monday, September 26th, 2016, the filter will search for terms and
phrases on Monday, September 19th, 2016.
Custom: Displays the most frequently used terms and phrases included in all of the interactions in the
system according to the selected Basic and/or Advanced filter options.
3. Configure one or more of the Basic and/or Advanced filters. For more information, refer to the Trending Filter
Toolbar Description.
Note: If you select one of the top terms filters and then change Relative to Fixed, Monitor and/or Compare,
the Trending Filter list will change to Custom.
4. Click Run. The bubble chart and corresponding chart data appear on the screen. Refer to the following pages
for explanations about how to interpret the Trending chart:
Trending Filter Toolbar Description
Chapter 3 Explore
SpeechMiner UI User Manual 86

Trending Filter Tool Tip Description
Trending Filter Chart Data Description
5. Click Save to save the Trending Filter. The Save Trending Filter window appears.
6. In the Trending Filter Name enter a name for the filter and in the Description (optional) field enter a
description.
Note: You can turn the Trending Filter into a Trending Cluster Task, by selecting the Create a Trending
Cluster Task option.
7. Click Confirm to save the Trending Filter / Trending Cluster Task.
Chapter 3 Explore
SpeechMiner UI User Manual 87

Create a Custom Trending Cluster Task
Similar to a Trending Filter, a custom Trending Cluster Task enables you to create Trending charts (a cloud of bubbles)
that are a visual representation of the relative frequency of terms within a specific interaction set over specific time
periods and/or according to a variety of search criteria. The difference is that the results of a custom Trending Cluster
Task are potentially more accurate than the basic Trending Filter results.
If you create a Trending Cluster Task, keep in mind that the potentially greater accuracy level of the results imposes
the following constraints:
By default you can only create five Trending Cluster Tasks.
This default is a database configuration that can be changed. For details, refer to the Working with
Exploration (Trending) page in the SpeechMiner UI Administration Guide.
Note: A Trending Cluster Task configured with a Fixed time period is not counted toward the five Trending
Cluster Tasks since it is a one-time task. Only a Trending Cluster Task created with a Relative time period is
counted toward the five Trending Cluster Tasks. The number of existing Trending Cluster Tasks is specified
above the Saved Trending Filters grid. If you attempt to create a Trending Cluster Task when your limit has
been reached, the system will inform you that you cannot create an additional Trending Cluster Task until you
remove an existing task.
To manage Trending Cluster Tasks, you must be granted the Manage Trending Cluster Tasks permission.
The first time you run a Trending Cluster Task, it will take longer to process its results than the Trending Filter
task. Subsequent runs should not be longer.
Note: Because accurate Trending Cluster Task results take longer to generate, it is recommended that you first save
the Trending Cluster Task and run it at a later time. When you run the task, periodically monitor the results until you
see a good data offset. The data offset (shown in hours), represents the accuracy deviation of the task results. A
good generic data offset is less than 20% of the selected time period.
To create a new Trending Cluster Task:
1. Select Explore > Trending.
2. Select Create a Trending Cluster Task.
3. From the Trending Filter list, select one of the following time frames:
Top terms intra-day: Displays the most frequently used terms and phrases included in all of the
interactions in the system 3 hours prior to the current time.
Chapter 3 Explore
SpeechMiner UI User Manual 88

Top terms today compared to yesterday: Displays the most frequently used terms and phrases
included in all of the interactions in the system 24 hours prior to the current time.
Top terms today compared to the past week: Displays the most frequently used terms and phrases
included in all of the interactions in the system 7 days prior to the current day.
Top terms today compared to the same day a week ago: Displays the most frequently used terms
and phrases included in all of the interactions in the system exactly one week ago from today. For
example, if you are creating the Trending filter on Monday, September 26th, 2016, the filter will search
for terms and phrases on Monday, September 19th, 2016.
Custom: Displays the most frequently used terms and phrases included in all of the interactions in the
system according to the selected Basic and/or Advanced filter options.
4. Configure one or more of the Basic and/or Advanced filters. For more information, refer to the Trending Filter
Toolbar Description.
Note:
If you select one of the top terms filters and then change Relative to Fixed, Monitor and/or Compare,
the Trending Filter list will change to Custom.
To create a Trending Cluster Task for fixed dates older than two weeks, the default purging fragments
value must be changed. For details, refer to the Purging Fragments Configuration tab in
the Additional Configurations page in the SpeechMiner UI Administration Guide.
5. Click Save to save the Trending Cluster Task and enter a Trending Filter Name and Description in
the Save Trending Filter window.
Since Trending Cluster Task results take longer to generate, it is recommended that you first save the Trending
Cluster Task and run it at a later time.
Note: When you only have a View Trending Cluster Task Information permission, selecting Save As to
save a Cluster filter creates a regular Trending filter. For details refer to the Trending section in the Web Site
Permissions page.
6. Click Confirm and then Close when you see the Saved Successfully message. The Saved Trending Filters
page opens with the list of all the saved Trending Filters and Trending Cluster Tasks.
7. From the Saved Trending Filters list, select the specific Trending Cluster Task and click Run in the Trending
Filter page that opens.
The bubble chart and corresponding chart data appear on the screen. Refer to the following pages for
explanations about how to interpret the Trending chart:
Trending Filter Toolbar Description
Chapter 3 Explore
SpeechMiner UI User Manual 89

Trending Filter Tool Tip Description
Trending Filter Chart Data Description
Note: In the bottom right corner of the bubble chart, you will see the Details icon . Clicking this icon
provides the following details for the comparison or period tab. A Trending Filter that is not a Trending Cluster Task
will not contain these details.
Period 1 / 2: The Time Period for the data tab.
Data offset: Represents the accuracy deviation of the task results in hours. The lower the number the better
the accuracy.
Interactions: The number of interactions represented by the data in the tab.
Last Run: The last time the Trending Cluster Task was run.
Language: The interaction language.
Type: The type of interactions. For example, audio, email, video and so on.
Chapter 3 Explore
SpeechMiner UI User Manual 90

Trending Filter Toolbar Description
You can refine your Trending Filter with the options available in the Explore > Trending page.
Once you select the type of Trending Filter you want to create, you can refine your Trending Filter using the options in
the following areas:
Chart Tools
Basic Filter
Advanced Filter
Trending Filter
Top terms intra-day: Displays the most frequently used terms and phrases included in all of the interactions in
the system 3 hours prior to the current time.
Top terms today compared to yesterday: Displays the most frequently used terms and phrases included in
all of the interactions in the system 24 hours prior to the current time.
Top terms today compared to the past week: Displays the most frequently used terms and phrases included
in all of the interactions in the system 7 days prior to the current day.
Top terms today compared to the same day a week ago: Displays the most frequently used terms and
phrases included in all of the interactions in the system exactly one week from today. For example, if you are
creating the Trending filter on Monday, September 26th, 2016, the filter will search for terms and phrases on
Monday, September 20th, 2016.
Custom: Displays the most frequently used terms and phrases included in all of the interactions in the system
according to the selected Basic and/or Advanced filter options.
Chart Tools
: Opens the Saved Trending Filters page. This option enables you to abort a session at any time. A prompt
enables you to confirm or cancel your decision.
: Manually refreshes the chart view. This fetches the latest data generated by the system in the back end, and
influences the time stamp of the visualization currently being viewed.
Chapter 3 Explore
SpeechMiner UI User Manual 91

: Opens the Blacklist. The blacklist is used to manage a permanent set of excluded terms/phrases in
the Trending data. Users with permissions are able to add and delete items from the list as necessary. For
additional information, refer to Manage the Blacklist.
Create a Trending Cluster Task: Enables you to create a Trending Cluster Task. For additional information,
refer to Create a Custom Trending Cluster Task.
Run: Applies the configured filter to the data set to produce the Trending chart.
Reset: Reset the current filter configuration to its default state.
Chart tabs: Displays three views of the data that visualize trending information for the selected time period.
Comparison: Shows the entire data set for both Period 1 and Period 2.
Period 1: Shows the data set for the dates selected for Period 1.
Period 2: Shows the data set for the dates selected for Period 2.
Note: The Period tabs for a Relative Trending Cluster Task includes Data Offset information. Data Offset
represents the accuracy deviation of the task results in hours. The lower the number the better the accuracy.
Layout: Allows you to control how data is viewed in the Trending page. A user is now able to select one of the
following three layouts.
Combination: Shows both the chart and the chart tables. When the Combination layout is selected, the
user can use the Resize bar to change the size of each area.
Chart: Only shows the Trending chart.
Table: Only shows the Top # Terms and Top Movers tables.
Note: The Ignore Blacklist option in the Layout menu allows the terms and phrases in the Blacklist to be
included in the Trending chart. When this option is turned on, the phrases appear in the Trending view with a
dark border. For additional information, refer to Manage the Blacklist. Top # Terms and Top Movers
Trending Report last referenced on : Displays chart details that tell you when the specific report was
created and last changed.
Show chart data: Shows/hides a panel underneath the Trending chart. The panel shows in-depth information
about the visualization at hand, and changes accordingly based on the user’s selections and activities. For
additional information, refer to Trending Filter Chart Data Description.
Save: Enables you to save (or save and rename) the current Trending filter. For additional information, see
Working with Saved Trending Filters.
Search Term: Enables you to search for a specific term and/or phrase within the Trending chart results.
Details:
Chapter 3 Explore
SpeechMiner UI User Manual 92

Period 1/2: The Time Period for the data tab.
Data offset: Represents the accuracy deviation of the task results in hours. The lower the number the
better the accuracy.
Interactions: The number of interactions represented by the data in the tab.
Last Run: The last time the Trending Cluster Task was run.
Language: The interaction language.
Type: The type of interactions. For example, audio, email, video and so on.
Note: A Trending Filter that is not a Trending Cluster Task will not contain these details.
Basic Filter
Time Period - Relative:
Monitor: Select an amount and time period (for example, 3 days) for which you want to analyze terms
and phrases. Monitor results appear in the Period 1 tab.
Compare: Select one of the following options. Results of your selection will be compared to the Monitor
selection you made and will appear in the Period 2 tab.
Same period as before: Analyze all the terms and phrases in the period before the monitor
period. For example, if you selected 3 minutes in the Monitor option at 22:00, the Compare
period will be 21:57-22:00.
Same period as yesterday: Analyze all the terms and phrases 24 hours before the monitor
period. For example, if you selected 3 hours in the Monitor option at 22:00 on Thursday, March
29, 2016, the Compare period will be from 19:00-22:00 on Wednesday, March 28, 2016.
Same period last week: Analyze all the terms and phrases during the same day exactly a week
before the monitor period. For example, if you selected 3 hours in the Monitor option at 10pm on
Thursday 29, 2016, the Compare period will be from 7pm-10pm on Thursday, March 22, 2016.
Previous week including yesterday: Analyze all the terms and phrases for 7 days prior to the
monitor period. For example, if you select 1 day in the Monitor option on Thursday, March 29,
2016, the Compare period will be the entire data set during the last week, plus one day.
Specific date range: Analyze all the terms and phrases from any date and time range selected
from the two drop-down windows displayed. You can specify the exact day, month, year, hour
and minute for both the beginning and end dates. For example, if you select 7 hours in the Monitor
option on Thursday, March 29, 2016, the system will compare the terms and phrases in those 7
hours to all the terms and phrases that appear during the entire specific date range.
Time Period - Fixed: In the fields provided select the date ranges for which you want to compare terms and
phrases. Results for Period 1 and Period 2, will appear in their respective tabs at the top of the chart.
Note: The Comparison tab includes all the terms and phrases from both periods.
Speakers:
Agent: Show terms and phrases spoken onlyby the agent.
Customer: Show Terms and phrases spoken onlyby the customer.
All Speakers: Show terms and phrases spoken by the agent and/or the customer.
Chapter 3 Explore
SpeechMiner UI User Manual 93

Interaction Properties:
Types: Select the type of interaction whose terms and phrases you want to analyze (calls, emails, chat,
text or social media).
DISCLAIMER: The Text type is not available in our Cloud offering. It is only available on
Premise. For details, refer to Supported Deployments.
Languages: Select the language of the interactions whose terms and phrases you want to analyze.
Duration: Select the duration range of the interactions to include in the data set. In the first field select
either Less Than, Between, or More Than. In the second text field or fields, fill in the number of seconds.
Max terms per period: The maximum number of terms/phrases visible (that is, the number of chart bubbles)
in each Period 1 and Period 2 tabs. The Comparison tab contains the terms/phrases that appear in Period 1
and Period 2 tab.
Advanced Filter
Metatdata: Enables you to filter the results for selected metadata and metadata values. The results will only
include terms and phrases associated with interactions for which the selected types of metadata have defined
values and when you specify values that match the specified conditions.
Terms & Topics: Enables you to filter for interactions according to one or more terms or phrases that must
either be part of the interaction and topic, or excluded from both.
Text field: Enter the term(s) or phrase(s) to search for.
Topics: Select one or more topics from the list to search for.
Include: Select if the term and phrase must be included or excluded from the interaction set.
Categories & Programs: Enables you to filter the interaction set according to categories and/or programs.
Only interactions in which at least one category/program term and/or phrase is identified are included in the
results.
Categories: Select one or more categories that should be associated with the term and/or phrase you
are searching for.
Programs: Select one or more programs that should be associated with the term and/or phrase you are
searching for.
Agents & Workgroups: From the lists provided select any combination of agents and workgroups whose
terms and phrases you want to include/exclude in your results. If you select a workgroup, all the agents in the
workgroup are included in the search condition.
Chapter 3 Explore
SpeechMiner UI User Manual 94

Trending Chart Tool Tip Description
The bubble chart that appears after you run the Trending Filter includes a variety of information that enables you to
better understand the changes and distribution of terms and phrases within a selected interaction set.
Significant information about a specific term/phrase and additional options are available in the term/phrase tool tip.
From the tool tip you can:
View the chart data numerically.
Hide the term/phrase from the chart data.
Add the term/phrase to the Blacklist.
Create an interaction search.
Discover the terms/phrases that are related to the selected term/phrase.
The following image is an example of the Trending chart tool tip. For details about the tool tip refer to the list below.
Name: The term/phrase for which the specific tool tip appears.
Trend: Shows the frequency change for the selected term/phrase. The red arrow indicates that the specific
term/phrase appears less frequently and the green arrow indicates that it appears more frequently.
Total Interactions:
Period 1: Indicates the number of interactions in which the term/phrase appeared, out of the total
number of interactions for the specific Period 1 data set.
Chapter 3 Explore
SpeechMiner UI User Manual 95

Period 2: Indicates the number of interactions in which the term/phrase appeared, out of the total
number of interactions for the specific Period 2 data set.
Search Interactions: Performs a search for all the interactions in which the specific term/phrase appears. The
search is performed for interactions that appear in the specified period's data range. For more information about
searching for interactions, refer to Create a New Search.
Show Related Words: Displays additional analysis of term clusters and their prevalence in the selected time
period. For more information, refer to Analyze Related Words.
Hide: Hides the specific term/phrase from the Trending chart view.
Note: The chart statistics include the hidden term/phrase. Also, refreshing the entire Trending page shows all
the hidden terms/phrases.
Add to Blacklist: Adds the specific term/phrase to the global blacklist for all users, views and languages. For
additional information, refer to Manage the Blacklist.
Chapter 3 Explore
SpeechMiner UI User Manual 96

Trending Chart Data Description
You can further analyze the relevance of a term/phrase, by studying the information panel that accompanies the
Trending bubble chart. By default the information
shown underneath the chart shows data about the current Trending Filter, and changes accordingly based on your
selections and activities in the chart.
You can use the information panel to view statistical information about all interactions, or about a specific subset of
interactions from your search results.
For detailed information about each option refer to:
Top Terms/Phrases
Term/Phrase Drill Down
Top Terms/Phrases:
At the bottom of the bubble chart (as shown in the following image), there are two lists (Top # Terms and Top
Movers). The two lists enable you to view the most
frequently used terms/phrases during the selected time period and the terms/phrases with the highest change in
frequency during the same time. For details, see the table below:
Top Movers: Lists the terms/phrases that had the highest frequency change in the between Period 1 and
Period 2. The red arrow indicates that the specific term/phrase appears less frequently and the green arrow
indicates that it appears more frequently. Enables you to sort the term/phrase list to show all
the terms/phrases, only those with a decrease in frequency, only those with an increase in frequency or only the
terms/phrases that had no change. Enables you to view the frequency change as a percentage or a
number.
Chapter 3 Explore
SpeechMiner UI User Manual 97

Top # Terms: The terms/phrases that stand out among the entire data set for the selected time period.
: Indicates the number of terms/phrases visible, hidden, and filtered (added to the Blacklist)
in the Top # Terms list.
Statistics:
United: Indicates the number of terms/phrases that appear both in Period 1 and Period 2
Unique to Period 1: Indicates the number of terms/phrases that only appear in Period 1.
Unique to Period 2: Indicates the number of terms/phrases that only appear in Period 2.
Total Interactions: Indicates the number of terms/phrases that appear in Period 1 and the number of
terms/phrases that appear in Period 2.
Term List:
Term: Indicates the term/phrase that appears in the interactions for the selected time periods.
Highest: Indicates the highest frequency for the specific term/phrase among all of the interactions for the
selected time periods.
Count (P1): Indicates the number of times the specific term/phrase appeared in Period 1.
Count (P2): Indicates the number of times the specific term/phrase appeared in Period 2.
Rank (P1): Reveals the importance and prominence of the specific term in Period 1. The higher the
number, the more prominent the term.
Rank (P2): Reveals the importance and prominence of the specific term in Period 2. The higher the
number, the more prominent the term.
Visible: Indicates whether or not the specific term/phrase is visible in the bubble chart and information
panel at the bottom of the chart.
: Enables you to add/remove a column from the Term list table.
: Enables you to view statistics about a term/phrase that is not shown in the bubble chart and list because it
was added to the Blacklist. For example, the following image indicates that the term notes and its
corresponding statistics will not appear in or be apart of the Trending chart because it was added to
the Blacklist.
: Enables you to hide or show all the terms/phrases from the chart. For example, if you select the
Period 1 tab and hide all the terms/phrases, in the Comparison tab you will be able to view the terms/phrases
that only appear in Period 2 and not in Period 1.
Note: To hide a specific term/phrase, hover over the term/phrase name. Click the eye icon that appears to hide
the term/phrase.
Chapter 3 Explore
SpeechMiner UI User Manual 98

: Enables you to search for a specific term/phrase within the Top # Terms list .
Term/Phrase Drill Down:
When you click one of the bubbles in the Trending chart, the information panel at the bottom of the screen changes (as
shown in the following image) and shows trend data specifically about the selected term/phrase. For details, see the list
below.
Note: Click outside the bubble chart to return to the previous view.
Note: The top left corner of the information panel contains the specific term/phrase selected from the bubble chart.
For example, in the above image the term tickets was selected.
Interaction Trend: The bar graph shows changes over time in relation to how often the specific term/phrase
was found. The graph shows the percentage of interactions that included the term/phrase in each period.
Total Interactions: Indicates the number of interactions that contain the specific term/phrase out of all the
interactions in the specific period.
Trend: Indicates the frequency change for the selected term/phrase during the specified time
period. The red arrow indicates that the specific term/phrase appears less frequently and the green arrow
indicates that it appears more frequently.
Similar Words: A list of the terms/phrases with the strongest correlation to the selected term/phrase. The list
consists of terms/phrases spoken in the same context and therefore can be helpful in identifying topics in which
the terms have been used. For example, synonyms and antonyms such as: answer, question, respond / calm,
nervous, peaceful / costly, cheap, expensive and so on.
.
Chapter 3 Explore
SpeechMiner UI User Manual 99

Chapter 3 Explore
SpeechMiner UI User Manual 100

Manage the Blacklist
The Blacklist list is a collection of terms/phrases permanently ignored by the system when analyzing Trending data.
The list affects all users, views and languages.
To manage the Blacklist:
1. Click the Blacklist button . The following window opens:
2. Click Add Term to add a term/phrase to the list.
3. In the text field that appears type the term/phrase you want to add to the list and click .
4. To remove a term/phrase from the blacklist, click next to the term/phrase you want to remove from the list.
5. Click Confirm to save your changes.
Chapter 3 Explore
SpeechMiner UI User Manual 101

Note: You can add a term/phrase to the blacklist from the Trending Filter Tool Tip and you can configure the Trending
page to ignore the blacklist using the Ignore Blacklist option, allowing the terms/phrases in the Blacklist to be included
in the Trending chart. When this option is turned on, the phrases appear in the Trending view with a dark border.
Chapter 3 Explore
SpeechMiner UI User Manual 102

Working with Saved Trending Filters
Saving a Trending Filter is useful when you want to analyze historical trends and/or run the same filter during a different
time period. This option prevents you from having to define the filter criteria manually each time you want to run the
same filter.
From the Saved Trending Filters list you can add, edit and delete a Trending Filter.
The following image is an example of Saved Trending Filters list. For details about how to work with saved Trending
Filters, refer to the following sections:
Edit a Saved Trending Filter
Copy a Saved Trending Filter
Delete a Saved Trending Filter
Create a new Trending Filter
Run a Trending Filter
Activate a Trending Cluster Task
Saved Trending Filter Columns
Edit a Saved Trending Filter
Chapter 3 Explore
SpeechMiner UI User Manual 103

1. Select Explore > Saved Trending Filters.
2. In the Trending Filter Name column, click the name of the filter you want to edit. The filter is opened.
3. Change the filter and click Save.
Note: If you have not been given the Manage Trending Cluster Tasks permission, you cannot edit a Trending
Cluster Task filter. Instead, you will have to create a copy of the filter using Save As.
Copy a Saved Trending Filter
1. Select Explore > Saved Trending Filters.
2. Click the checkbox next to the name of the filter you want to copy and click the Clone button . The
Save Trending Filter window appears.
3. Edit the name, description and select whether or not to create a Cluster Task.
4. Click Confirm. A copy of the filter is added to the Saved Trending Filters list.
Delete a Saved Trending Filter
1. Select Explore > Saved Trending Filters.
2. Click the checkbox next to the name of the filter(s) you want to delete and click the Delete button . The
specific filter(s) are deleted from the Saved Trending Filters list.
Create a Trending Filter
1. Select Explore > Saved Trending Filters.
2. Click the New Trending Filter button. The Trending window is opened. For details, see
Create a Trending Filter.
Run a Trending Filter
Chapter 3 Explore
SpeechMiner UI User Manual 104

1. Select Explore > Saved Trending Filters.
2. Click the Trending Filter you want to run. The Trending Filter window is opened.
3. Click Run. The bubble chart and corresponding chart data appear on the screen.
Activate a Trending Cluster Task
1. Select Explore > Saved Trending Filters.
2. Locate the the Trending Filter you want to activate and in the Clustering Task column, turn on the option.
3. Click Activate. The Trending Filter is not a Trending Cluster Task.
Note: If the Trending Cluster Task limit was reached before you tried to activate a Trending Cluster Task, you will be
asked to deactivate an existing task before activating a new one.
Saved Trending Filter Columns
Trending Filter Name: Lists the terms/phrases that had the highest frequency change in the between Period 1
and Period 2. The red arrow indicates that the specific term/phrase appears less frequently and
the green arrow indicates that it appears more frequently. The name of the Trending Filter.
Description: The description given to the filter when it was saved.
Creator: The name of the user who created the Trending Filter.
Created: The date and time when the Trending Filter was created.
Time Period: Relative or Fixed. For details, refer to Basic Filter table in the Trending Filter Toolbar
Description page.
Cluster Task: Indicates if the specific Trending Filter is a Trending Cluster Task and enables you to turn a
Trending Filter into a Trending Cluster Task and vice versa.
Note: There is a limit to the number of Trending Cluster Tasks you can create. The number of existing Trending
Cluster Tasks is specified above the Saved Trending Filters grid. Also, if you attempt to create a Trending
Cluster Task when your limit has been reached, the system will inform you that you cannot create an additional
Trending Cluster Task until you remove an existing task.
Details:
Chapter 3 Explore
SpeechMiner UI User Manual 105

Period 1/2: The Time Period for the data tab.
Data offset: Represents the accuracy deviation of the task results in hours. The lower the number the
better the accuracy.
Interactions: The number of interactions represented by the data in the tab..
Note: The number of interactions in the Details window does not reflect the number of interactions
shown in the Top # Terms area of the Trending Chart. The information in the Trending Chart reflects the
current filter.
Last Run: The last time the Trending Cluster Task was run.
Language: The interaction language.
Type: The type of interactions. For example, audio, email, video and so on.
Note: A Trending Filter that is not a Trending Cluster Task will not contain these details.
Chapter 3 Explore
SpeechMiner UI User Manual 106

Export Trending Data
Exporting Trending data enables you to compare data across different Trending Filter results. The Trending data is
exported to a .csv file.
Before you export Trending data, consider the following:
Only data from the last Trending Filter that was run will be exported to a .csv file.
To view data specific to a Custom Trending Cluster Task, you must have the necessary Trending permissions. If
you do not have the correct permissions, N/A will appear.
The exported Trending data will include hidden terms and phrases, but it will not contain terms and phrases in
the Blacklist.
To export Trending data:
1. Select Explore > Trending / Saved Trending Filters.
2. Click Run.
3. Click Save > Export. A message appears reminding you that only the data from the results of the last time you
clicked Run will be exported to the .csv file.
4. Click Export. The .csv file is created.
5. Save the .csv file in a location of your choice.
Chapter 3 Explore
SpeechMiner UI User Manual 107

Media Player
The SpeechMiner UI Media Player enables you to play back the audio of recorded interactions.
The Media Player provides a range of interaction playback features that can help you to:
Quickly and easily find information associated with the specific interaction.
View events associated with the interaction.
View an interaction's transcript.
Add comments and view comments made by other users.
To activate the Media Player, click the Play icon in the Search Results grid. The Media Player is displayed as a
timeline with various controls and a variety of information. If interactions are recorded with two audio channels (for
example, one for the agent and the other for the customer), the audio channels are shown on both sides of the audio
line (one speaker above and the other below).
Events (both linguistic and non-linguistic) and comments are indicated by icons above the audio graph.
To learn more about how to work with the Media Player refer to the following sections:
Playback: Enables you to listen to a specific interaction.
Interaction Transcript: Enables you to view the words spoken during the interaction.
Interaction Comments: Enables you to view other users ideas and thoughts about the interaction and provides
you with the option of making comments yourself.
Interaction Attributes: Enables you to view specific characteristics about the interaction you are playing.
Media Player Options: Enables you to perform numerous tasks associated with the interaction you are playing.
Event Icons: Shows you when events are detected during the interaction.
Note:
Chapter 4 Media Player
SpeechMiner UI User Manual 108

To view Screen Recordings in Internet Explorer 10 and 11, you must enable the Miscellaneous > Access
data sources across domains in the Security Settings - Trusted Sizes Zone window.
Interaction are re-index when an interaction is played and when a comment is added or changed.
Chapter 4 Media Player
SpeechMiner UI User Manual 109

Playback
The Media Player is activated above the Search Results grid when you select to play back an audio interaction, event
and/or screen recording.
Before you begin working with the Media Player consider the following:
You can play back an interaction from any point in the recording.
Playback always begins from the location of the marker in the audio graph.
When you play back an interaction from the Search Results grid, the marker moves to the beginning of the
interaction.
Playback begins automatically when the interaction is loaded.
The Media Player includes various playback controls that enable you to better analyze the specific interaction.
For additional information, see Playback Controls.
You can hide interaction audio and text to ensure confidentiality. For additional information see Hidden
Confidential Information.
Chapter 4 Media Player
SpeechMiner UI User Manual 110

Playback Controls
The following image and table represent all of the available playback controls:
Note: The Quality Management media player contains fewer controls then the Media Player. For more information
about Quality Management, see Quality Management.
Media Player Options
The player controls:
- Play / Pause
- Play the next and previous event (inner control arrows).
- Play the next or previous interaction.
- Rewind the playback 5 seconds from the current marker location.
Control the speed at which the interaction is played. 1.0 is the default normal speed and every number above is
faster. For example, 2.0 is twice as fast as the normal speed.
Turn on/off the volume and select a volume level.
Show / Hide Screen Recording.
Note: If the screen recording is longer than the available audio an ACW (after call work) icon appears .
Chapter 4 Media Player
SpeechMiner UI User Manual 111

The ACW icon appears on the playback timeline at the time that is equal to the duration of the audio media file. The
screen recording plays beyond the end of the audio file.
A menu with the following options:
Export: Export the interaction to a zip file.
Forward: Send the interaction to another user.
Add To...: Add the interaction to an interaction list or coaching session.
Tag: Add a tag to the interaction to create a connection between the specific interaction and a specific topic. For
more information, refer to Search > Tags.
Evaluate: Create an evaluation session (Ad-Hoc Evaluation) for the selected interaction. For details about how to
create and work with an Ad-Hoc evaluation, see Create an Ad-Hoc Evaluation Session.
Permalink: Copy a link to the specific interaction.
Protect from Deletion / Unprotect from Deletion: Tag the selected interaction with a Cannot Delete tag so that it
cannot be deleted, or conversely, remove the Cannot Delete tag from the selected interaction.
Only users with the Protect Interactions from Deletion permission, can add/remove the Cannot Delete tag.
Delete: Delete the specific interaction.
Retrieve Original Interaction: Restore the interaction with its original audio or text file (including all attachments).
The retrieved interaction is saved in the database as a URL. When this option is selected, a popup containing the URL
appears. The URL is supplied according to your browser's default behavior. If the browser is configured to download
the URL, the URL is provided as a file that you can open and/or save. If the browser is configured to open the URL in
a webpage, the URL will be opened in a separate webpage.
Note: For more information about some of these options, refer to the Batch Actions page.
Opens the player in a new separate window that can be enlarged to cover 2 monitors. Stretching the window
over 2 monitors enables you to view the recording more clearly.
Note:
This option behaves slightly differently in the QM Session Media Player. In the QM Evaluation Session page, the
Media Player in the Evaluation Session page is closed after this option is selected.
In the QM Session page you can open a separate Media Player window once.
From the Search Results page, you can open multiple Media Player windows at the same time.
Chapter 4 Media Player
SpeechMiner UI User Manual 112

When a separate Media Player window is opened from the Search Results page, the following message appears at the
bottom of the screen. When you click this message, the last interaction that was opened in a new Media Player
window is closed.
Change the screen's brightness.
Lock/Unlock the playback with the scroll bar. When this option is turned Off, you can scroll towards the end of
the interaction before the playback reaches the same location. Turn this option On if you want the interaction to
automatically scroll so that the part of the interaction that is currently being played back is always visible. The scroll
bar moves automatically to keep up with the playback.
Indicates the specific interaction ID and agent name.
Return to the search results list. For example, if you are currently in the Interaction Transcript view, this option
will return you to the Search Results list.
These icons appear in the location of the recording where a comment was inserted. For details see
Interaction Comments. Note: These icons are not available for Events.
This icon appears in the location of the recording where an event occurred. For details see Interaction Events.
The following non-linguistic icons may appear on the playback timeline. For details see Interaction Events.
Chapter 4 Media Player
SpeechMiner UI User Manual 113

This chat icon appears in the location of the recording when a chat conversation took place. Note: These icons
are not available for Events.
Note:
When an interaction includes a screen recording a screen will appear at the top of the Media Player. A screen
recording is a video of the agent's screen during the specific agent-customer interaction.
You can enlarge the screen with the Enlarge Screen option:
The Screen Recording option is not available for Events.
Chapter 4 Media Player
SpeechMiner UI User Manual 114

Hidden Confidential Information
Interaction audio and text may be filtered in your system so that it is hidden from the users eyes. This is done to ensure
that confidential information cannot be accessed by users who do not have permission to do so. For this reason,
different users may have different permissions. As a result, certain parts of an interaction may be hidden for some users
but not for others.
The parts of an interaction that are hidden appear in the audio graph in gray rather than black. Likewise, the text
associated with the hidden parts of the interaction is not included in the interaction transcript and the Media Player
skips these areas during playback.
The following content can be hidden:
Sensitive Topics: Some topics may be defined in your system as Sensitive. This attribute is assigned to Topics
in the SMART application and only users with special permissions can hear the audio or see the text.
Numbers: Numbers consisting of more than two digits may be filtered out of interactions to ensure
unauthorized users do not have access to credit card numbers and other confidential information. When you
filter text interactions, the confidential digits appear as asterisks.
Comment-Only permission: Some users may only be able to access the parts of an interaction where
comments were attached.
Note: For additional information about the filter rules in your system, consult your system administrator.
DISCLAIMER: This feature is not available in our Cloud offering. It is only available on Premise. For details, refer
to Supported Deployments
Chapter 4 Media Player
SpeechMiner UI User Manual 115

Dual-Channel Audio
Some recording systems use two audio channels, one for the agent's side of an interaction and the other for the
customer's side of the interaction. If your recording system does this, an energy bar (as shown in the following image)
will appear above and below the line in the audio graph so that you can tell who is speaking at any given moment.
Filtered audio content is still displayed in gray. As a result, you may see as many as three different colors in the audio
graph.
Chapter 4 Media Player
SpeechMiner UI User Manual 116

Interaction Transcript
When working with transcripts you can:
View an interaction's transcript
Search an interaction's transcript
View the words spoken during the interaction
View Events found in the interaction.
Audit Events found in the interaction transcript.
View comments that you and other users added to the interaction
View related words for a selected term.
View who is talking during the interaction.
View an interaction's transcript:
1. Select Explore > Search.
2. Select an interaction.
3. Click the Transcript icon to view the interaction transcript.
Note: Text interactions may include attachments. The attachment can be found at the end of the transcript. The
attachment appears under an Attachment title, icon and the name of the text attachment. For example:
Search an interaction's transcript:
1. Select Explore > Search.
2. Select an interaction.
3. Click the Transcript icon to view the interaction transcript.
Chapter 4 Media Player
SpeechMiner UI User Manual 117

4. In the top right corner of the transcript click the Search icon and in the field that appears type the letter,
word, and/or phrase you are searching for. The specific letter, word and/or phrase will be highlighted in the
transcript if found.
Note: When searching within a transcript, the search process will also search within the text attachment (if
included). The attachment can be found at the end of the transcript. The attachment appears under an
Attachment title, icon and the name of the text attachment. For example:
View the spoken word within the transcript:
When you play back an interaction, the current playback location in the transcript is indicated by a line beneath
the word being spoken.
Once a word is played back, its color changes from gray to black and the typeface of the text reflects the
confidence of the transcription: the darker the text, the higher its accuracy.
View an interaction's events: (see: Interaction Events)
The locations of Events are indicated in the transcript by numbered Event icons .
To view an event, refer to the right side of the Transcript page.
The right side of the Transcript page contains a list of all the comments and events in the interaction.
The numbers match the event numbers that appear in the Events list on the right side of the page.
Audit events found in the interaction transcription: (see: Interaction Events)
When an event is recognized in an interaction transcript, three auditing values appear next to the event (TP, FP, and
SFP).
DISCLAIMER: Auditing an interaction transcription event is not available in our Cloud offering. It is only available
on Premise. For details, refer to Supported Deployments.
To audit an event, a SpeechMiner UI user rates the accuracy of the event by selecting one of the following values next
to the event :
Chapter 4 Media Player
SpeechMiner UI User Manual 118

TP (True Positive): SpeechMiner UI correctly identifies the event.
FP (False Positive): SpeechMiner UI incorrectly identifies the event.
SFP (Sense False Positive): SpeechMiner UI correctly identifies terms, but their use does not match the
topic's intent.
Click the Clear button to remove the audit selection.
Note: To audit events you must have the Audit Events in Interactions Grid permission. Use the Topic Analysis - Audit
report to analyze summary information about event auditing and manage existing audit data globally in the Interactions
Admin screen.
Edit, show or hide comments added by SpeechMiner UI users: (see: Interaction Comments)
To view a comment:
Hover over the Comments icon . A tip appears with the comment.
Refer to the right side of the Transcript page.
The right side of the Transcript page contains a list of all the comments and events in the interaction.
To edit a comment, click the Comment icon. An Edit Comment window opens.
View related words for a selected term: (see: Related Words)
1. Place your mouse cursor on the term/phrase and double-click. A pop-up menu appears.
2. Select Related Words. The related words results are opened in a new window.
View who is talking (agent or customer):
When your system employs multiple audio channels, the speakers are identified in the transcript and
the transcript includes information about when the agent is talking and when the customer is talking.
If your system employs multiple audio channels, the speakers are identified in the transcript, and the text is color-
coded to match the speakers.
Note: In a Recording UI mode, theTranscript page is blank because recognition processing is not performed.
Chapter 4 Media Player
SpeechMiner UI User Manual 119

Chapter 4 Media Player
SpeechMiner UI User Manual 120

Interaction Comments
Comments enable you to add a remark about a thought you have regarding a specific interaction.
A comment can be added:
At a specific time above the audio wave. When a comment is associated with a specific time in the interaction, it
also appears in the transcript at the same time.
In the transcript alone. When a comment is specifically added to the transcript, it is not associated with a
specific time in the interaction.
Note: Comments include a timestamp of the time and date the comment was made/last edited.
There are three types of comments:
Good : Indicates a positive comment.
Bad : Indicates a negative comment.
Neutral : Indicates an unbiased comment.
Interaction comments enable you to:
View a comment(s).
Search for a comment.
Add a comment to an audio interaction.
Add a comment to a text interaction.
Edit an existing comment.
To view a comment in an interaction:
1. Hover over the comment in the Media Player or the transcript . The comment appears in a pop up window.
To search for a comment in an interaction:
Chapter 4 Media Player
SpeechMiner UI User Manual 121

1. Select Explore > Search.
2. Play back the interaction in which you want to view a comment.
3. Click the Transcript icon to view the interaction transcript.
4. Type a word in the Search field above the Comments and Events list in the right side of the screen. The list is
filtered according to what you typed in the field.
To add a comment to an audio interaction:
1. Select Explore > Search.
2. Play back the interaction to which you want to add a comment.
3. Click the Add Comment icon above the Comments and Events list.
4. In the Time field, set a time to add the comment at a specific time during the interaction.
Note: The time in the Time field is automatically set to the time associated with the location of the cursor on the
audio graph.
5. Enter your comment in the field provided.
6. Select one of the following:
Good : Indicates a positive comment.
Bad : Indicates a negative comment.
Neutral : Indicates an unbiased comment.
7. Click Add to add the comment to the interaction.
Note: You can also add a comment from within the transcript itself. Double-click the term(s) to which you want
to add the comment and click the Add Comment icon in the tool tip that appears. To add the comment, follow
the steps described in this section. The comment is added in-line.
To add a comment to an text interaction:
1. Select Explore > Search.
2. Click the Play icon next to the interaction to which you want to add the comment.
Chapter 4 Media Player
SpeechMiner UI User Manual 122

3. Click the Add Comment icon above the Comments and Events list.
4. Enter your comment in the field provided.
5. Select one of the following:
Good : Indicates a positive comment.
Bad : Indicates a negative comment.
Neutral : Indicates an unbiased comment.
6. Click Add to add the comment to the interaction.
Note: When adding a comment to a Chat interaction, you can add the comment from within the transcript itself
to a specific time. Double-click the term(s) to which you want to add the comment and click the Add
Comment icon in the tool tip that appears. To add the comment, enter your comment and time in the Enter
Comment and Time fields and click Add. The comment is added in-line.
To edit an existing comment:
1. Click the comment icon associated with the comment you want to edit either from the Media Player or from the
transcript.
2. Modify the comment as required.
3. If necessary change the comments sentiment (good, bad, neutral).
4. Click Apply to modify the comment.
Chapter 4 Media Player
SpeechMiner UI User Manual 123

Interaction Events
An event occurs when SpeechMiner UI identifies a topic in an interaction. A topic is a collection of phrases that
SpeechMiner UI looks for when analyzing interactions. For example, if the "can offer you a loan" phrase associated
with the Loan Offer topic is identified, the start of the event is "can" and the end of the event is "loan".
SpeechMiner UI can also identify non-linguistic events. Non-linguistic events are sounds other than speech (for
example, a dial tone, silence, music or noise, key press and so on).
Non-Linguistic Identification
Non-Linguistic Identification identifies the non-verbal parts of an interaction. For example, silence, busy signal, key
presses and caller agitation (tone).
Every program instructs SpeechMiner UI to automatically identify the following non-linguistic events:
Music: Indicates when music is being played during the interaction. Music generally indicates that the
interaction was on hold.
Cross Talk: Indicates when two or more people are talking at the same time.
Silence: Indicates when there is nothing being said or played. SpeechMiner UI will automatically skip
over these silences when the interaction is played back.
DTMF: Key press on a touch-tone phone. 12 different keys can be identified using DTMF (Dual Tone
Multi Frequency).
Agent Busy Tone: A busy signal.
Agent Unknown: A dial tone.
Ringback: A signal used in PSTN (Public Switched Telephone Networks - standard "land lines") to
indicate that the line is being called or an incoming interaction is present.
After call work: Indicates the section of the recording that takes place after the interaction has ended.
Note: Identification standards for Dial Tone, Ringback, Busy Tone and DTMF are based on USA standards.
Each non-linguistic event that is identified by SpeechMiner UI has a start time, an end time, and a type. For example, if
SpeechMiner UI identifies silence in an interaction, this is a non-linguistic event whose start time is the beginning of the
silent period, whose end time is the end of the silent period, and whose type is "Silence."
Chapter 4 Media Player
SpeechMiner UI User Manual 124

An event (both linguistic and non-linguistic) is indicated by a numbered icon . Event icons and information about
each event appear above the Media Player audio graph and in the Interaction transcript. For more information,
see Interaction Transcript and What is an Interaction? You can view details about each event by placing your mouse
over the event icon. In addition, each event has a start time, end time, a name and a type.
SpeechMiner UI enables you to:
View an event.
Search for an event.
To view an event in an interaction:
1. Hover over the event in the Media Player or the transcript. The event details appear in a popup window.
To search for an event in an interaction:
1. Select Explore > Search.
2. Select the interaction.
3. Click the Transcript icon to view the interaction transcript.
4. Type a word in the Search field above the Comments and Events list in the right side of the screen. The list is
filtered according to what you typed in the field.
Chapter 4 Media Player
SpeechMiner UI User Manual 125

Interaction Attributes
The Interaction Attributes panel enables you to view characteristics about the interactions in the Search Results grid.
In addition, you can use the Interactions Panel to assign manual Categories to the selected interaction.
Click the Interaction Attributes icon in the Search Results grid to view following information:
Interaction processing time: Indicates the date and time the interaction was processed in the system.
Work groups: Indicates the work group associated with the agent(s) that participated in the interaction.
Agents: Indicates the agent(s) that participated in the interaction.
Metadata values: Indicates the metadata values associated with the interaction.
Tags: Indicates the tags associated with the interaction.
Manually assigned Categories: Enables you to manually associate one or more categories with the specific
interaction.
Automatically assigned Categories: Indicates the categories associated with the interaction.
To manually assign a category to an interaction:
1. Select Explore > Search.
2. Select an interaction.
3. Click the Interaction Attributes icon .
4. Under the Manual Categories heading, select the category that you want to assign to the specific interaction.
Chapter 4 Media Player
SpeechMiner UI User Manual 126

Media Player Options
In addition to playing back an interaction, the Media Player enables you to perform numerous tasks.
In this page you will learn how to:
Export an interaction.
Forward an interaction to another user.
Add an interaction to an interaction list or coaching session.
Delete an interaction from the current interaction list.
Create a permalink to the interaction.
Reprocess an interaction.
Tag an interaction.
To remove a tag from an interaction.
Note: The list of available options is dependent on your permissions. For more information, see Administer Roles.
To export an interaction:
If you want to save an interaction or send it to another user, you can export the interaction as a .zip file that contains
the following:
A CSV file with information about the interaction. This file can be opened using a spreadsheet application such
as Microsoft Excel.
A WAV file. A playable audio file of the interaction (optional).
Note: You must be assigned the Export Interactions permission to be able to export interactions. For more
information refer to: Profile Permissions.
1. Select Explore > Search.
2. Select the interaction(s) that you want to export.
Chapter 4 Media Player
SpeechMiner UI User Manual 127

3. Click More and select Export. A dialog box opens and asks if you want to include the audio files with the
export.
4. Select Export the selected interactions or Export all the interactions.
Note: If you select Export all the interactions, all the interactions in all the search result pages will be
exported.
5. Select the Include audio and text interaction files checkbox if you want to include these files in the .zip file
and click Export.
Note: If the Include audio and text interaction files checkbox is not active, it means that the size of the
Export file exceeds the maximum limit.
6. Select the desired option. If you select Open, the file opens in the application that is configured to open ZIP
files on your computer.
If you select Save, a Save As dialog box opens.
7. Navigate to the folder in which you want to save the file, and then click Save. The file is saved in the selected
location.
To forward a link to a specific interaction:
You can send a link to a specific interaction to other users in the system. The link is sent in an Interaction message that
appears in the recipient's My Messages Widget.
When the recipient clicks the message, a SpeechMiner UI Media Player opens in a new window and the interaction is
played.
In addition, you can also send the recipient an e-mail notification with a link to the interaction. When the recipient
clicks the link, the Media Player opens in a new browser tab or window and plays the interaction.
1. Select Explore > Search.
2. Select the interaction(s) that you want to forward.
3. Select More and click Forward. A dialog box opens.
4. Under Subject, modify the subject text if you wish.
5. Under Please Select the Recipient, select the user you want to send the link to, in one of the following ways:
In the text field type part of the recipient's name or username. Select the recipient from the list that is
generated.
Chapter 4 Media Player
SpeechMiner UI User Manual 128

Click the button beside the text field. In the dialog box select the user from the list of users in the
relevant work group.
6. If you want to send a notification to the user's e-mail address as well as to their My Messages box, select Send
Email Notification.
7. Click Send. An Interaction message is sent to the recipient's My Messages box. If you chose to send the user
an e-mail notification, it is also sent.
To add an interaction to a list:
An interaction list is a list of interactions that is saved for later use.
You can add an interaction to a global interaction list and/or a coaching interaction list.
For additional information, see: Batch Actions.
To delete an interaction from the current interaction list:
1. Select Explore > Search.
2. Select the interaction(s) that you want to delete.
3. Select More and click Delete.
4. Click OK when asked if you are sure you want to delete. The selected interactions are deleted.
To create a permalink to an interaction:
1. Select Explore > Search.
2. Select the interaction(s) that you want to delete.
3. Select More and click Permalink.
4. Copy the link from the dialog box that opens.
To reprocess an interaction:
Use the Reprocess Calls functionality to reanalyze a selected interaction(s).
Chapter 4 Media Player
SpeechMiner UI User Manual 129

Keep in mind that if the definitions in SMART have been modified or interaction auditing has fine-tuned the speech
analysis system since the interaction was originally processed, the system may produce different results when you
reprocess the interaction.
Note: Reprocessing Calls is not available in a Recording UI-mode or Analytics and Recording UI-mode systems.
1. Select Explore > Search.
2. Select the interaction(s) you want to reprocess.
3.
4. Select More and click Reprocess Calls.
To tag an interaction:
1. Perform a search. See Create a New Search for details.
2. From the search results list, select the interaction that you want to tag.
3. Select the More menu and in the media player and click Tag.... The Tag Interaction window appears.
4. In the Tag Interaction window, select one or more tags and click Confirm. The selected interaction is tagged
with the selected tags.
Note: In multiple segment interactions, tags will be associated with the entire interaction and not a specific segment.
Segments will not have their own tags.
To remove a tag from an interaction:
1. Search for the interaction whose tag you want to remove.
2. Select the interaction.
3. Select the More menu and in the media player and click Tag.... The Tag Interaction window appears.
4. In the Tag Interaction window, clear the checkbox associated with the tag you want to remove from the
interaction and click Confirm. The tag is removed from the selected interaction.
Chapter 4 Media Player
SpeechMiner UI User Manual 130

Reports
Reports are summaries and analyses of interaction, speech and external metadata. You can generate reports for
analysis, view report details and status, and share the data with users throughout the enterprise. You can view reports
in your browser, print them or send them via email.
To help you monitor your business, SpeechMiner UI offers a wide range of standard reports that can be customized to
better suit your needs.
Depending on the type of report, the results may be presented as lists or data and/or in graphic form.
In some reports, you can drill down within a report to see additional details.
In this section you will learn how to:
Create and run a report: To review and analyze interaction, speech and external metadata.
Edit saved reports: To modify the report data to suit your needs.
Work with saved reports: To periodically view data for business issues that may reoccur.
Understand report layouts and parameters: To better absorb the report information.
Chapter 5 Reports
SpeechMiner UI User Manual 131

Reports Menu Reference
The following list provides a brief description of each Report menu item:
Templates:
Enables you to select to create a report from a wide variety of report templates.
Saved Reports:
Enables you to run the same report numerous times on different dates and times.
Edit Report:
Enables you to change an existing report.
Chapter 5 Reports
SpeechMiner UI User Manual 132

Create a New Report
New reports are based on an existing template.
To create a new report:
1. Select Explore > Reports.
2. Select Templates.
3. Decide which report template will act as the basis of your new report.
4. Click the Preview link to see an example of the report template.
5. Click the Edit link associated with the template on which you want to base your new report. The Edit Report
tab is opened. The name of the selected template appears in the Template list.
Note: You can change the template by selecting a different template from the Template list.
6. Configure the report as necessary using the available parameters at the top of the screen and under
Interactions Filter on the left side of the screen.
For additional in formation about each parameter refer to Report Parameters.
Note: Not all templates include Interactions Filter on the left side of the screen.
7. Click Run Report. The report appears at the bottom of the screen under that report parameters.
8. Optional: Click Save to save the report.
You do not have to save a report to run it.
To create a report based on a saved report click Save As .
Chapter 5 Reports
SpeechMiner UI User Manual 133

Edit a Report
After a report is created you can change its properties.
Note: The ability to change report properties depends on the permissions you were given.
To edit an existing report:
1. Select Explore > Saved Reports. The Saved Reports tab is opened.
2. Click the Edit icon . The Edit Report tab is opened.
3. Configure the report as necessary using the available parameters at the top of the screen and
under Interactions Filter on the left side of the screen. For additional information about each parameter, refer
to Report Parameters.
Note: Not all templates include Interactions Filter on the left side of the screen.
4. Click Save to save your changes to the existing report.
If you are creating a report based on a saved report click Save As .
5. Click Run Report. The report appears at the bottom of the screen under that report parameters.
Chapter 5 Reports
SpeechMiner UI User Manual 134

Run a Report
You can run a report in a number of ways:
Run the report and view the results in the browser.
Run the report from the Edit Report tab.
Run the report and send the results as an email attachment to selected recipients.
Run the report and export the results using a PDF or Excel file.
Note: You do not have to save a report to run it.
To run the report and view the results in the browser:
1. Select Reports > Saved Reports to run an existing report.
2. From the Saved Reports lis,t click Run . The report results are displayed as you requested in
the SpeechMiner UI Report Viewer window.
To run a report from the Edit Report tab:
1. Select Reports > Saved Reports to run an existing report.
2. From the Saved Reports list, click the Edit icon . The Edit Report tab is opened.
3. Select how to view the report results in the browser:
To view the results in a new browser window, at the top of the form select Open in new window.
To view the results below the template form, clear the Open in new window check box.
4. Click . The report results are displayed.
To run the report and send the results via e-mail:
Chapter 5 Reports
SpeechMiner UI User Manual 135

Note: The results are sent as an MHT file. The .mht file is opened in a browser and is linked to the SpeechMiner UI
system.
1. Select Reports > Saved Reports to run an existing report.
2. From Saved Reports, select the report you want to run. From Edit Report configure the report you want to run.
3. At the top of the form, click Email Report . A dialog box opens.
4. Under To enter the required e-mail addresses.
Separate multiple addresses with semi-colons (;).
5. Under Notes type any text you want to include in the body of the e-mail.
6. Click Send. The report runs and the results are sent to the recipients you specified. A confirmation message
appears when the results are sent.
To run the report and export the results:
1. Select Reports > Saved Reports to run an existing report.
2. From Saved Reports, select the report you want to run. From Edit Report configure the report you want to run.
3. At the top of the form, click . The report is created and appears at the bottom of the screen.
4. Click either the PDF or Excel icon to export the results to a PDF or Excel file. A dialog box opens and asks
you if you want to open or save the file.
5. Select the desired option.
If you select Open, the file is opened in the application that is configured to open files of the selected
type on your computer.
If you select Save, a Save As dialog box opens. Navigate to the folder in which you want to save the
file and click Save.
The file is saved in the selected location.
Chapter 5 Reports
SpeechMiner UI User Manual 136

Analyze Report Data
Report templates that include the Agents Data Set filter can be configured to analyze data for the current user or
work group, rather than a specific user or work group.
When the report runs, the data set used changes depending on which user runs it. For example, if the user is agent 12,
the report will only include interactions that were handled by agent 12.
This feature will only work if the user's profile includes mapping. For instance:
If the user is an agent, the mapping gives the name of the agent. The reports that are filtered for the current user
only include data about that agent.
If the user is a manager, the mapping gives the name of the manager's work group. The reports that are filtered
for the current user include data for the entire work group.
For additional information about user profiles and mapping users to agents or work groups, see Administer Users.
To configure a report to analyze data for the current user:
1. Select Explore > Saved Reports.
2. Click the Edit icon for the report you would like to edit for the current user. The reports opens in the Edit
Report.
3. Under Interactions Filter, select the current user from the Agents list and click Add.
4. Click Done. Once the report is configured, different users can create the report to analyze their own data and
the report can be shared with other users.
Chapter 5 Reports
SpeechMiner UI User Manual 137

Drill Down a Report
Depending on the type of report, the report results may be in the form of a graph, a histogram, or a table.
You can drill down to the underlying data on which any graphic component is based (graph bars, lines, or table
headers).
When you do this, you will be presented with a new report that is based on the data point you clicked on.
To drill down to the underlying data of a report component:
Click the component.
To play back an interaction from a drill-down list:
Under Open, click the icon.
The Media Player opens in a new browser window and begins to play back the interaction.
To close the drill-down list and return to the report results:
If the report was displayed in the Customize Report tab click Back at the bottom of the form.
If the report was opened in a separate window or tab, use the browser's Back button or press Backspace.
To sort data in a table:
Click the heading of the column by which you want to sort the table.
Chapter 5 Reports
SpeechMiner UI User Manual 138

Working with Saved Reports
A saved report is a customized report template that you can run as often as you need. You can run the saved report on
demand or according to a schedule.
Note: The System Alert report is automatically generated and saved by the system. For additional information, see
Alerts.
From the Saved Reports grid you can:
Filter the Saved Reports list.
Drill down to view additional details about the specific report.
Delete a saved report.
The Saved Reports grid contains the following columns:
Column Description
Run
Click the Run icon to run the report and display the results in a new window.
Edit
Click the Edit icon to open the report in the Edit Report tab where you can
change the parameters and settings.
Delete
Click the Delete icon to delete the selected report.
Name The saved report name.
Template The template on which the report is based.
Created By
The name of the user who created the report.
Sharing
A black Sharing icon marks reports that you created.
A faded Sharing icon marks reports that other users created and shared with you.
The names of the groups and users that share the report appear in the table beside
the Sharing icon.
Click the Sharing icon to open a dialog box in which you can select the groups and
individual users with whom you want to share the report.
The members of the selected groups and selected users will see the report listed in
their Saved Reports tab.
Note: You can only edit reports that you created. If you want to edit a report that
you did not create you must first save the report under a new name.
Schedule
Indicates whether the report is scheduled to run at a specific date and time.
Click the Schedule icon to activate, deactivate, create or modify the report's
schedule.
Chapter 5 Reports
SpeechMiner UI User Manual 139

Last Modified The date on which the report was last edited and saved.
Permalink
Click Copy to create a Permalink to the specific report.
To filter the Saved Reports list:
Use the filter options to limit the saved reports that are displayed in the list to those that meet specific criteria.
The following filter controls are located in the top right corner of the list:
Filter Description
Delete
Click the Delete icon to delete the selected report.
Name
Enter a sequence of characters.
Only the saved reports whose name contains the letters you entered are
displayed.
Template
Select the report template to include in the list and click Done to activate the
filter.
Only the saved reports based on the template(s) you selected are displayed.
Created By
Select the users to include in the list and click Done to activate the filter.
Only the saved reports that were created by the selected user(s) are
displayed.
Sharing
Select My Reports to display only those reports that you created or Shared
Reports to display only those reports that were created by other users and
shared with you. Click Done to activate the filter.
To drill down and view additional details about the report:
1. Create a new report or open a saved report.
2. Run the report. The report is opened in the SpeechMiner UI Report Viewer.
3. Click a graphic component in the report to drill down to the underlying data represented by the graphic
component.
To delete a saved report:
1. Select Reports > Saved Reports.
2. Select the report or reports you want to delete.
Chapter 5 Reports
SpeechMiner UI User Manual 140

Note: If you did not create the report you cannot delete it and a check box will not be available for the report.
3. Click the Delete icon .
If you selected to delete one report, click the Delete icon in the report row. If you selected to delete more than
one report click the Delete icon in the top right corner of the screen.
4. Click Yes. The report is deleted.
Chapter 5 Reports
SpeechMiner UI User Manual 141

Schedule a Report
You can schedule a report to run automatically at specified times or in response to specific events. The results are
automatically sent via email to the recipients.
The type of report schedule is indicated in the Schedule column. The following list represents the three types of report
schedules:
Deactivated: The report is not scheduled to run.
Time Based: The report runs automatically at specific times.
Event Based: The report runs automatically when specific events are detected.
Note: You can only create or modify the schedules for the reports you created.
The report scheduling feature enables you to:
Create a report schedule for a specific report.
Create a report schedule for a group of reports.
Send the report to specific recipients.
Schedule a report to run when an event is detected.
Deactivate a report schedule.
To create a report schedule for a single report:
1. Select Reports > Saved Reports.
2. Select the report you want to run according to a specific schedule.
3. Click the Schedule icon .
4. Click Active and select the Schedule tab.
5. From the Schedule Type list select Time Based.
6. From the Date Range fields select the start and end of the schedule.
Chapter 5 Reports
SpeechMiner UI User Manual 142

7. Select the period of time for the scheduled report.
For example, if you want to run the report every weekday, select week. If you want to run the report on
specific days select Day and then the specific days.
The parameters that appear on the right side of the window change according to your time period selection
8. Select the Recipients tab and configure the available parameters.
9. Click Schedule. The report is scheduled to automatically run according to the settings you configured.
To create a report schedule for a group of reports:
1. Select Reports > Saved Reports.
2. Select the group of reports you want to run according to a specific schedule.
3. Click the Schedule icon .
4. Click Active and select the Schedule tab.
5. From the Schedule Type list, select Time Based.
6. From the Date Range fields, select the start and end of the schedule.
7. Select the period of time for the scheduled report.
For example, if you want to run the report every weekday, select week. If you want to run the report on
specific days, select Day and then the specific days.
The parameters that appear on the right side of the window change according to the selected time period.
8. Select the Recipients tab and configure the available parameters.
9. Click Schedule. The reports are scheduled to automatically run according to the settings you configured.
To send the report to specific recipients:
Regardless of the schedule type selected, you must specify one or more recipients for the report.
1. Select Reports > Saved Reports.
2. Select the group of reports you want to run according to a specific schedule.
Chapter 5 Reports
SpeechMiner UI User Manual 143

3. Click the Schedule icon .
4. Select the Recipients tab and configure the fields as follows:
To: The e-mail addresses of the report recipients. Separate multiple addresses with semi-colons (;).
Reply To: The sender's address.
Subject: The text that should appear in the subject line of the e-mail.
Report Format: Select Web archive to create the results in an MHT file that can be opened in Internet
Explorer. Or, select PDF to create the results in a PDF file.
Note: If the Schedule Report does not produce expected results refer to the Configuring the
Reporting Services in the Administration Guide.
Priority: Select the desired priority level for the e-mail message.
5. Click Schedule. The reports are scheduled as specified in the Schedule tab and the recipients are set as
specified in the Recipients tab.
To schedule a report to run when an event is detected:
Event-based scheduling enables you to keep track of potentially significant trends. It also enables you to be alerted
when significant changes in agent or customer behavior occur. In this context, the term event does not refer to an
individual occurrence of an event, but to a specified number or percentage of interactions in which the event was
detected. For example, the detection of caller agitation in more than 10% of interactions could be an event that causes
a report to be generated.
1. Select Reports > Saved Reports.
2. Select the report(s) you want to schedule.
3. Click the Schedule icon .
4. At the top of the scheduling dialog box, select Active.
5. From the ScheduleType list select EventBased. The fields required to configure the schedule are displayed.
6. In the Condition line, under Categories select the categories that must be identified in the interactions. For
additional information, see Search Filter.
Chapter 5 Reports
SpeechMiner UI User Manual 144

7. In the next field, select one of the following:
Exceeds (>): Run the selected reports when the selected categories are identified in more than a
specified number or percentage of interactions.
Equals (=): Run the selected reports when the selected categories are identified in a specified number or
percentage of interactions.
Drops Below (<): Run the selected reports when the selected categories are identified in fewer than a
specified number or percentage of interactions.
8. Under Values, fill in the number or percentage of interactions.
9. In the next field, select Interactions if the value refers to a number of interactions or % of interactions if the
value refers to a percentage of interactions.
10. Under Duration, fill in the number of time periods (of the unit specified in the next field) in which the condition
must be met.
For example, type 2 if the condition must be met within a 2-day period and select Days in the next field.
11. Select the unit of time for the duration value you entered in the previous field.
12. Configure the Recipients tab and save the settings.
To deactivate a report schedule:
1. Select Reports > Saved Reports.
2. Select the report(s) for which you want to deactivate the schedule.
3. Click the Schedule icon .
4. At the top of the scheduling dialog box, clear the Active check box.
Note: If you selected a group of saved reports before you opened the Scheduling window, the Active check
box is not selected.
5. Click Schedule check box.
Chapter 5 Reports
SpeechMiner UI User Manual 145

Chapter 5 Reports
SpeechMiner UI User Manual 146

Report Templates
SpeechMiner UI reports are interactive. That is, you can drill down within the report to view additional details about
any graphic component (for example, graph bars, line or table headers), by simply clicking the component. In addition,
you can play an interaction directly from the Interaction list in the generated report .
Below is a list of all the available SpeechMiner UI reports. For additional information, see Report Parameters.
Before you begin working with reports consider the following:
Some reports offer options not included in the remaining reports. When a report contains additional options,
they will be described in an Actions section in the report description.
Some reports have a number of available versions (for example, Full and Wide). Use the Version parameter to
select the desired version.
The information visible in the reports you create is limited to the data to which you have access.
Some reports may not be available to all users.
You may have access to reports that were not documented, because they were custom-made for your
organization.
Recording templates do not include the Categories option, because recording does not categorize interactions.
The following table lists all of the available report templates and shows which template is included in each deployment.
For example, the Agent Comparison report is available in every SpeechMiner UI deployment, the Agent Bubble
Chart is only available in an Analytics deployment and the Evaluation Summary report is available when you buy a
QM license:
Report
Template
Available in all
SpeechMiner UI
Deployments
Available in an
Analytics
Deployment
Available with a Quality
Management License
Available with a
Coaching License
Agent Bubble
Chart
X
Agent Comparison X
Agent Comparison
by Segment
X
Agent Evaluation
Comparison
X
Agent Trend X
Chapter 5 Reports
SpeechMiner UI User Manual 147

Agent Trend by
Segment
X
Auto Fail X
Calibration Score X
Capacity Trend X
Category Bubble
Chart
X
Category
Distribution
X
Category Trend X
Coaching
Summary
X
Evaluation
Summary
X
Evaluator
Evaluation
Comparison
X
Interaction
Evaluation
Summary
X
Interactions X
Metadata
Frequency
X
Performance
Profile
X
Predictive
Elements
X
Program
Distribution
X
System Load X
Team Comparison X
Team Comparison
by Segment
X
Team Evaluation
Comparison
X
Top and Bottom
Performers
X
Topic Analysis -
Audits
X
Topic Analysis -
Trends
X
Usage Tracking X
Chapter 5 Reports
SpeechMiner UI User Manual 148

Chapter 5 Reports
SpeechMiner UI User Manual 149

Report Template Layout
This section explains the general report template layout. The layout includes:
First Row
Second Row
Third Row
Data Seat Filters
The SpeechMiner UI report template has a maximum of three parameter rows. Each row deals with different functions
in the report.
In addition, most report templates have a Data Set filter section on the left side of the screen.
This section explains the report template layout using the Agent Comparison template as an example. The Agent
Comparison report represents the most common template layout.
First Row:
The first row contains:
Controls for working with report results (see Create a New Report)
Template field, in which you can select the type of report
Report Name field, used to name the report.
Second Row:
The second row contains fields for defining the report title and an optional report description. These items are
displayed at the top of the report results. By default, the name of the report template is used as the report title and you
can modify it as necessary. Some templates also have a Version parameter in this row. The Version parameter can be
used to select the size or format of the report output.
Third Row:
The third row contains the Items on Report parameters. That is, the fields that determine which items will appear
graphically on the report.
In some reports, one or more of the parameters may also have statistical functions.
Chapter 5 Reports
SpeechMiner UI User Manual 150

Data Seat Filters:
The left side of numerous report templates contains Data Set filters. These filters specify which data will be included in
the report's analyses.
For additional information about the filters and how to configure them, see Report Parameters.
The current filter settings are displayed on the right side of the template below the first row.
Chapter 5 Reports
SpeechMiner UI User Manual 151

Report Parameters
Most report parameters have the same function no matter which template you use. Exceptions are briefly explained in
this section, and dealt with in detail in the documentation on individual reports, in the Templates section.
The following is a list of the the most common parameters:
Template
Report Name
Report Title
Description
Version
Data Set Filters
Items on Report
Agents
Categories
Data Type of Compare
Period Type or Period
Top or Display
Template
From the Template list, you can choose or switch to any of the available report templates.
Report Name
Text entered in this field will be used as a file name for the report, if you choose to save the report. This name will
appear under the Saved Reports tab for future access.
Chapter 5 Reports
SpeechMiner UI User Manual 152

Report Title
Text entered in this field will be displayed in large, bold type at the top of the report results. The report title is optional.
The name of the report template appears in this field by default, but can be modified or deleted.
Description
Text entered in this field will be displayed in fine print directly below the Report Title in the report results. The
description is optional.
Version
The output of some reports can be generated in different versions and different sizes or formats.
In this field, select the desired output version from the drop down list.
The available options vary depending on the template.
Depending on your permissions, the following Version options may be available:
Full Report: a full-size report output optimized for printing (either 11" wide x 8.5" high, or 8.5" wide by 11"
high, depending on the template).
Full reports often contain two parts: a graph or chart followed by a summary table which may also contain
additional details.
In some cases, when a Full report contains items that can be expanded to display more details, the version has
two options, Expanded and Collapsed.
When Full Report (Expanded) is selected, all items are initially expanded when the report is displayed.
When Full Report (Collapsed) is selected, all items are initially collapsed.
Mini: a small output for display in the Dashboard view (480px wide x 288px high).
Wide: a wide-width output for display in the wider columns of the Dashboard view (768px wide x 288px
high).
Table Only: a full-size report output that only includes the summary table. Graphs and diagrams are not printed
(either 11" wide x 8.5" high, or 8.5" wide by 11" high, depending on the template).
X-Axis Only: a bubble chart option. Select this option to specify report output in the form of a table, with a
bar graph representing the x-axis values. No bubble-chart is produced and y-axis values are not represented
(Width: 768px).
Y-Axis Only: a bubble chart option. Select this option to specify report output in the form of a table, with a bar
graph representing the y-axis values. No bubble-chart is produced, and x-axis values are not represented
(Width: 768px)
Chapter 5 Reports
SpeechMiner UI User Manual 153

Data Set Filters
The Data Set Filter options allow you to narrow down the data from the entire database, so you can base your report
on a subset of the available data.
All of the Data Set Filters have an "AND" relationship. This means that each filter further restricts the options available
and all interaction events and topics represented in your final data set satisfy all Data Set Filters.
Should you choose options from two different filters that mutually exclude each other (for example, a Date metadata
entered for April 2015 and a date range between February and March 2014), you will have zero data in your report.
Note: Parameters that appear under Items on Report (for example, the third row of parameters) allow you to select
specific information from the database selected under Data Set Filters.
Distributional information presented in the report is calculated for the items selected under Items on Report,and is
built upon the base of data that is selected using the Data Set Filters. The Data Set Filters appear in the Filter Panel on
the left side of the report template for all reports that support them. The filters are divided into groups. The basic filters
appear at the top of the Filter Panel and are always displayed when the panel is displayed. The remaining filter groups
can be expanded or collapsed.
The following groups of filters are available:
Filter
Group
Description
Basic filters
Enables you to filter for interaction types, languages and date range.
Note: A day begins at 0:00 and ends at 23:59.
To Date date filters (All, Today, Week to Date, Last 7 Days, Month to Date. Last
Month, Quarter to Date, Last 90 Days) include the interactions collected in the
system up until the exact time and date the report is generated.
The times given are for the time zone where your Web server is deployed, and
therefore are not necessarily the same as the times where you are physically located.
Chapter 5 Reports
SpeechMiner UI User Manual 154

SpeechMiner
UI
Enables you to filter for interaction categories, programs and the topics.
For each option, select one or more values. Only interactions in which at least one of
the selected values for each option was identified are included in the data set. For
example, if you select three categories and two programs, only interactions belonging
to at least one of the categories and one of the programs are included.
You can add lines to the categories and topics. The logical relationship between each
line is AND. For example, if one line under Categories specifies one category and
another line specifies another category, an interaction must be in both categories to
be included.
To add a line, click .
To create a negative filter, click the Not button beside the field. For example, to
include all categories except Category A, select Category A and select the Not
button beside the Category field.
For additional information about each option, see Search Filter.
Metadata
Enables you to filter according to metadata values.
Metadata is collected by the recording system and is relayed to SpeechMiner UI.
The types of available metadata vary from system to system. You can select any type
of metadata available in your system and, if you wish, you can specify a value for it.
The search results will only include interactions for which the selected type of
metadata has an automatic or manually defined value.
User Actions
Enables you to filter interactions according to:
Specific user comments added to the interaction.
Interactions that were played back.
Forms that were filled out.
Whether or not quality checking was performed.
Under Interaction Comment Text, specify the text that must appear in a comment
that was added to an interaction.
In the other fields, select the users who must have performed the specified actions.
Chapter 5 Reports
SpeechMiner UI User Manual 155

Items on Report
The parameters in this section allow you to select specific information and calculate distributional information on the
data in the data set that was selected using the Data Set Filters.
If you make no selections under Items on Report, default values will determine how the data will appear in the
report.
Since the parameters in Items on Report differ from report to report, this section explains only the most common ones
listed alphabetically. Less common parameters are explained in their respective templates.
Agents
You can select the specific agents or work groups to be analyzed and displayed in your report. The default value
(Any) includes all agents.
If your Data Set Filters are not set to Any, your selections for Agents must match your selections in the Data Set
Filters (for example, the same work groups or agents, belonging to the same interaction types). In other words, the
report output will only include agents who were selected here and who were not excluded from the data set in the
Data Set Filters.
Categoies
You can select specific interaction categories to limit the data set analyzed for your report. Your data set will include
interactions belonging to any of the categories selected.
Use the default value (Any) to include all available categories.
Note: If a single interaction belongs to multiple categories it will be counted as one interaction for each category
selected under this parameter.
Also, bear in mind that the report output will only include interactions in categories that were selected from the
Categories list and were not excluded from the data set in the Data Set Filters.
If you selected specific categories in the Data Set Filters section, only categories that are selected from both the
Categories list and the Data Set Filters will appear.
When used with Percentage of Interactions in the Data Type parameter, the report will display the ratio of the
following as a percentage:
{the number of interactions from the selected Categories in Items on Report} over {the number of interactions
from the Categories selected for analysis in Data Set Filters}
Note: If one or more interactions belong to multiple categories, the sum of the percentages of interactions for all
categories may add up to more than 100%.
Chapter 5 Reports
SpeechMiner UI User Manual 156

Data Type or Compare
You can specify the type of data you wish to display in your report.
The most common choices are:
Number of Interactions: Displays the number of interactions per each report item. Data may vary depending
on the other filters selected.
Percentage of Interactions: Displays the percentage of interactions per report item in your data set.
Average Interaction Duration: Displays the average length, in minutes, of all interactions for each report
item. The entire conversation for the interaction recording session is considered, excluding the wrap time after
the interaction.
Total Resources: Displays the total amount of time, in hours, of all the interactions per report item. It is
essentially the sum of all interaction durations.
Period Type or Period
This parameter is most commonly seen on reports that show trends. The output of the report will be displayed in
increments of the selected Period Type. For each increment, the value of the selected Data Type will be displayed for
each particular report item. For example, if the Data Type is "Number of Interactions" and the Period Type is "Day,"
the number of interactions for each day in the date range included in the report will be shown.
Top or Display
In this parameter, you can choose how many of the highest or lowest values are displayed on the report. The options
may include 5, 10, 15, 20, All, All Sorted, and All Unsorted.
Chapter 5 Reports
SpeechMiner UI User Manual 157

Available Templates
The following is a list of all the available templates:
Agent Bubble Chart
Agent Comparison
Agent Comparison by Segment
Agent Evaluation Comparison
Agent Trend
Agent Trend by Segment
Auto Fail
Calibration Score
Capacity Trend
Category Bubble Chart
Category Distribution
Category Trend
Coaching Summary
Evaluation Summary
Evaluator Evaluation Comparison
Interaction Evaluation Summary
Interactions
Metadata Frequency
Chapter 5 Reports
SpeechMiner UI User Manual 158


Agent Bubble Chart
Description
The Agent Bubble Chart report compares agents and/or work groups by plotting them on a graph according to the
percentage of interactions in the horizontal (x-axis) and vertical (y-axis) Categories.
Each Agent is represented on the graph by a bubble. The size of each bubble represents the average interaction
duration.
The X-Axis Only and Y-Axis Only versions present the data as a histogram indicating percentage of interactions per
agent and/or work group, rather than a bubble chart.
Common Usages
Plot Agents showing average interaction duration plus two customer-experience categories (for example,
Dissatisfaction and Escalation)
Plot Agents showing average interaction duration plus two agent-efficiency categories (for example, Transfer
Rate and Hold Rate)
Plot Agents showing average interaction duration plus two categories that represent metadata (for example,
Customer Satisfaction and Issue Resolution)
Customizing the Report
General Settings:
Version: Available in Full Report (standard size), Mini, Wide, X-Axis Only, and Y-Axis Only versions.
Items on Report:
X-Axis Categories: Select one or more categories to include in the bubble chart's x-axis.
Y-Axis Categories: Select one or more Categories to include in the y-axis of the bubble chart.
Note: Only categories that are not excluded from the data set (that is, using the filter on the right side of the screen),
are included in the report.
For additional information, see Report Parameters.
Chapter 5 Reports
SpeechMiner UI User Manual 160

Actions
Click a bubble in a chart, a bar in a graph, or an item in a table to open a list of interactions included in the item.
In X-Axis Only and Y-Axis Only versions, click to drill down to a Category Trend report.
Chapter 5 Reports
SpeechMiner UI User Manual 161

Agent Comparison
Description
The Agent Comparison report consists of a bar graph comparing Agents' performance against each other, as well as
against the average value of all the agents that are represented.
The numbers in the table and graph represent an interaction count.
Common Usages
Plot agent performance statistics to see who performs above and below the benchmark (the average of a group
is determined by the filter selections).
Drill down on specific agents to play their interactions and find examples about effective agent behavior or areas
that need improvement.
Utilize the data obtained from the report to identify training needs for effective agent coaching.
Customizing the Report
General Settings:
Version: Available in Full Report (standard size), Mini, Wide, X-Axis Only, and Y-Axis Only versions.
For additional information, see Report Parameters.
Actions
Click on a bar in the graph or an item in a table to open a list of interactions included in the specific item.
Chapter 5 Reports
SpeechMiner UI User Manual 162

Agent Comparison by Segment
Description
The Agent Comparison by Segment report consists of a bar graph comparing Agents' performance against each other,
as well as against the average value of all the agents that are represented.
The numbers in the table and graph represent a segment count.
Common Usages
Plot agent performance statistics to see who performs above and below the benchmark (the average of a group
is determined by the filter selections).
Drill down on specific agents to play their interactions and find examples about effective agent behavior or areas
that need improvement.
Utilize the data obtained from the report to identify training needs for effective agent coaching.
Customizing the Report
General Settings:
Version: Available in Full Report (standard size), Mini, Wide, X-Axis Only, and Y-Axis Only versions.
For additional information, see Report Parameters.
Actions
Click on a bar in the graph or an item in a table to open a list of segments included in the specific item.
DISCLAIMER: This report is not available in our Cloud offering. It is only available on Premise. For details, refer
to Supported Deployments.
Chapter 5 Reports
SpeechMiner UI User Manual 163

Chapter 5 Reports
SpeechMiner UI User Manual 164

Agent Evaluation Comparison
Description
The Agent Evaluation Comparison report summarizes the average evaluation score for select agents.
Common Usages
Used to compare agent evaluation scores.
Customizing the Report
General Settings:
Date Range: Enables you to select the period of time on which to base the report.
Form: Enables you to select the specific form to be analyzed and displayed in the report.
Tip: If the Form list does not include the form you want to select, refresh the page.
Agents: Enables you to select the agents that should be analyzed in the report.
Show Form: Enables you to view the complete form(s) associated with the specific report. To view the form
you must select an agent.
For additional information refer to Report Parameters.
Actions
Click an agent in the Y-axis to drill down and view the form scores associated with the selected agent.
DISCLAIMER: This report is not available in our Cloud offering. It is only available on Premise. For details, refer
to Supported Deployments.
Chapter 5 Reports
SpeechMiner UI User Manual 165

Agent Trend
Description
The Agent Trend report is a line graph that displays agent performance in relation to one or more selected categories
over time.
The numbers in the table and graph represent an interaction count.
Common Usages
Use to track an agent's performance progress over time to monitor effectiveness of training programs.
Use to use the graph to measure and compare performance and provide feedback to the agent.
Customizing the Report
General Settings:
Version: Available in Full Report (standard size), Mini, Wide, X-Axis Only, and Y-Axis Only versions.
For additional information, see Report Parameters.
Actions
Click on a line in the graph or an item in the table to open the interaction list included in the item.
Chapter 5 Reports
SpeechMiner UI User Manual 166

Agent Trend by Segment
Description
The Agent Trend by Segment report is a line graph that displays agent performance in relation to one or more selected
categories over time.
The numbers in the table and graph represent a segment count.
Common Usages
Tracks an agent's performance progress over time to monitor effectiveness of training programs.
Measures and compares performance to provide feedback to the agent.
Customizing the Report
General Settings:
Version: Available in Full Report (standard size), Mini, Wide, X-Axis Only, and Y-Axis Only versions.
For additional information, see Report Parameters.
Actions
Click on a line in the graph or an item in the table to open the segment list included in the item.
DISCLAIMER: This report is not available in our Cloud offering. It is only available on Premise. For details, refer
to Supported Deployments.
Chapter 5 Reports
SpeechMiner UI User Manual 167

Auto Fail
Description
The Auto Fail report provides a summary of all the Quality Monitoring evaluation forms that were designated as auto
fail for selected evaluations.
Common Usages
Enables you to monitor evaluation with evaluation forms that were designated as auto fail.
Customizing the Report
General Settings:
Evaluation: Enables you to select from a list of evaluations that contain forms that were assigned as auto fail.
Form: Enables you to select from a list of forms that were assigned as auto fail.
Date Range: Enables you to select the period of time on which to base the report.
Actions
Click on a form name to see a list of all the evaluation session that failed due to the auto fail designation.
From the list that appears, you can click on the Agent Name to view the specific form that failed.
Note: If you select a specific form from the Form list at the top of the report, you will receive the list of the evaluation
sessions that failed for the selected form.
DISCLAIMER: This report is not available in our Cloud offering. It is only available on Premise. For details, refer
to Supported Deployments.
Chapter 5 Reports
SpeechMiner UI User Manual 168

Calibration Score
Description
The Calibration Score summarizes all the evaluation sessions for one Calibration Evaluation and provides a graph that
shows the specific Calibration Evaluation form scores.
Common Usages
Enables you to create a report that compares two or more evaluators performance.
Customizing the Report
General Settings:
Evaluation: Enables you to select the Calibration Evaluation on which to base the Calibration Score report.
Tip: If the Evaluation list does not include the evaluation you want to select, refresh the page.
Baseline Average: Enables you to highlight a score by which evaluators are compared. For example, if you
enter 80% for the Baseline Average you will
be able to see who scored about and below 80%.
For additional information refer to Report Parameters.
Actions
Sort the evaluator names in the Y-axis.
DISCLAIMER: This report is not available in our Cloud offering. It is only available on Premise. For details, refer
to Supported Deployments.
Chapter 5 Reports
SpeechMiner UI User Manual 169

Capacity Trend
Description
The Capacity Trend report contains information that can be used by the system administrator to monitor the system
load and to see the extent to which the system can handle new incoming interactions.
The Capacity Trend report includes the following:
A bar that shows the number of hours of loaded interaction and accumulated interaction for each day in the
selected time period.
A table listing the maximum number of channels each day. For example, the maximum number of agents taking
interactions concurrently at any one time during the day and the maximum number of seats available (for
example, the maximum number of agents who could use the system).
Common Usages
Analyze the number of recent interactions in the system to determine if the current hardware resources meet the
required capacity.
Forecast future hardware needs and allocate resources accordingly.
Customizing the Report
For additional information, see Report Parameters.
DISCLAIMER: This report is not available in our Cloud offering. It is only available on Premise. For details, refer
to Supported Deployments.
Chapter 5 Reports
SpeechMiner UI User Manual 170

Category Bubble Chart
Description
The Category Bubble Chart report compares categories by plotting them on a graph according to the percentage of
interactions in the horizontal (x-axis) and vertical (y-axis) categories. Each Bubble category is represented on the
graph by a bubble. The size of each bubble represents the average interaction duration.
The x-axis value indicates the percentage of interactions that were in both the Bubble Category and any of the selected
x-axis categories.
The y-axis value indicates the percentage of interactions that were in both the Bubble Category and any of the selected
y-axis categories.
The X-Axis Only and Y-Axis Only versions present the data as a bar graph indicating percentage of interactions per
category, rather than a bubble chart.
Note: This template is only available in an Analytics UI deployment.
Common Usages
Plot interaction - Categories show the average interaction duration plus two customer-experience categories
(for example, Dissatisfaction and Escalation).
Plot interaction - Categories show the average interaction duration plus two agent-efficiency categories (for
example, Transfer Rate and Hold Rate).
Plot interaction - Categories showing average interaction duration plus two categories that represent metadata
(for example, Customer Satisfaction and Issue Resolution).
Customizing the Report
General Settings:
Version: available in Full Report (standard size), Mini, Wide, X-Axis Only, and Y-Axis Only versions.
Items on Report:
Bubble Categories: Select the categories to represent as bubbles in the chart.
X-Axis Categories: Select one or more categories to include in the x-axis of the bubble chart.
Y-Axis Categories: Select one or more categories to include in the y-axis of the bubble chart.
Note: Only categories that are not excluded from the data set are included in the report.
Chapter 5 Reports
SpeechMiner UI User Manual 171

For additional information, see Report Parameters.
Actions
Click a bubble in a chart, a bar in a graph, or an item in a table to open the interaction list included in the item.
In X-Axis Only and Y-Axis Only versions, click to drill down to a Category Trend report.
Chapter 5 Reports
SpeechMiner UI User Manual 172

Category Distribution
Description
The Category Distribution report is a graph or chart that shows the distribution of interactions by category for a
specified domain. The distribution can be calculated by percentage of interactions or by percentage of resources (total
duration of all interactions included in the analysis).
Note: This template is only available in an Analytics UI deployment.
Common Usages
Plot the proportion of interactions in specified categories to analyze business trends and customer issues.
Compare the distribution of multiple categories (such as, interaction or cancellation reasons, product popularity,
or competitor mentions), across your body of interactions.
Utilize the comparative data obtained from the report to identify the optimal ways to target customer issues.
Customizing the Report
General Settings:
Version: Available in Full Report (standard size), Mini, Wide, Columns, and Summary versions. Full Report,
Mini, Wide are bar graphs that list the selected categories and showing their proportion in the data set.
Columns: A chart that shows the average interaction duration for each category. These values are displayed
above the total number of interactions in the category.
Summary (Pie): A pie chart indicating the proportion of interactions or resources in the entire data set that are
associated with the selected categories. You can select to base the calculations on the number of interactions or
on the total resources selected under Distributed By.
Items on Report:
Distributed By: Select whether the distribution should be calculated based on percentage of interactions (the
total number of interactions) or percentage of resources (the total duration of all interactions).
For all other parameters, see Report Parameters.
Actions
In Full, Mini, Wide, or Columns versions, click a category or bar to open a list of interactions in the category.
Chapter 5 Reports
SpeechMiner UI User Manual 173

In the Full version, click Trend to drill down to the category's interaction distribution. If the distribution of
the items in the report (see Items on Report above) is the percentage of interactions, the distribution of
interactions is presented according to the percentage of interactions. If the distribution is the percentage of
resources, the distribution of interactions is presented according to the average interaction duration.
Chapter 5 Reports
SpeechMiner UI User Manual 174

Category Trend
Description
The Category Trend report shows changes in categories over a period of time. The trend line can represent the
number of interactions, percentage of interactions, average interaction duration, or total resources. There is one line for
every category selected.
Note: This template is only available in an Analytics UI deployment.
Common Usages
Plot the trends in a particular category or multiple categories chronologically.
Identify peak periods to make informed scheduling and staffing decisions.
Measure the response to new product releases.
Evaluate the effectiveness of recent business changes and agent training.
Customizing the Report
General Settings
Version: Available in Full Report (standard size), Mini, Wide, X-Axis Only, and Y-Axis Only versions.
For additional information, see Report Parameters.
Actions
Click a point in a graph or an item in a table to open the interaction list included in the item.
Chapter 5 Reports
SpeechMiner UI User Manual 175

Coaching Summary
Description
The Coaching Summary report summarizes the current status of coaching sessions in a pie chart and table and lists
active coaching sessions by user.
Items in the list can be expanded to display details about coaching sessions.
Common Usages
Enables you to monitor personnel training.
Customizing the Report
General Settings
Version: Available in Full Report (standard size), Mini, Wide, X-Axis Only, and Y-Axis Only versions.
For additional information, see Report Parameters.
Actions
Click + beside a user/trainee to expand it and view a list of coaching sessions assigned to the user/trainee.
Click + beside a coaching session to expand it and view details about the session.
Click + or - at the top of the table to expand or collapse all of the items in the table.
DISCLAIMER: This report is not available in our Cloud offering. It is only available on Premise. For details, refer
to Supported Deployments.
Chapter 5 Reports
SpeechMiner UI User Manual 176

Evaluation Summary
Description
The Evaluation Summary report summarizes the evaluation performance of one or more evaluators. The report is
shown in a Doughnut chart.
Common Usages
Enables you to monitor evaluator performance.
Customizing the Report
General Settings
Date Range: Enables you to select the period of time on which to base the report.
Evaluators: Enables you to select the evaluators whose performance you would like to compare.
For additional, see Report Parameters.
DISCLAIMER: This report is not available in our Cloud offering. It is only available on Premise. For details, refer
to Supported Deployments.
Chapter 5 Reports
SpeechMiner UI User Manual 177

Evaluator Evaluation Comparison
Description
The Evaluator Evaluation Comparison Report summarizes the average evaluation score for selected evaluators.
Common Usages
Enables you to compare evaluator evaluation scores.
Customizing the Report
General Settings
Date Range: Use to select the period of time on which to base the report.
Form: Use to select the specific form to be analyzed and displayed in your report.
Note: If the Form list does not include the form you want to select refresh the page.
Evaluators: Use to select the specific evaluators to be analyzed and displayed in your report.
For additional settings, see Report Parameters.
Actions
Click an agent in the Y-axis to drill down and view the form scores associated with the selected evaluator.
DISCLAIMER: This report is not available in our Cloud offering. It is only available on Premise. For details, refer
to Supported Deployments.
Chapter 5 Reports
SpeechMiner UI User Manual 178

Interaction Evaluation Summary
Description
The Interaction Evaluation Summary report shows the evaluation score for the last evaluation session, associated with
a specific evaluator and interaction.
Common Usages
Enables you to monitor evaluation session scores for a specific evaluator.
Customizing the Report
General Settings
Form: Enables you to select the specific form to be analyzed and displayed in the report.
Tip: If the Form list does not include the form you want to select, refresh the page.
Interaction ID: Enables you to select the specific internal interaction ID to be analyzed and displayed in the
report.
Evaluator: Use to select the specific evaluator to be analyzed and displayed in your report.
For additional information, see Report Parameters.
DISCLAIMER: This report is not available in our Cloud offering. It is only available on Premise. For details, refer
to Supported Deployments.
Chapter 5 Reports
SpeechMiner UI User Manual 179

Interactions
Description
The Interactions report provides a list of all interactions that were recorded.
Common Usages
Validate recorded interactions.
Customizing the Report
Items on Report
Metadata Field name: Select the metadata field for which you want to run the report.
Note: The field selected must be within the range selected in the Data Set Filters. If it is not within the range,
the report will be empty.
Pattern to Include: Enter a series of one or more characters that must be found in the field value in order for it
to be included in the report (optional; leave the field blank to include all patterns).
Values to Exclude: Enter one or more field values to exclude from the report. If you enter more than one
value, separate the multiple values with commas and do not leave a space after the comma (optional; leave the
field blank to include all values).
For additional information, see Report Parameters.
Actions
Click a row in the table to listen to the selected interaction.
Click the metadata summary to see and playback a list of interactions with the same metadata value.
DISCLAIMER: This report is not available in our Cloud offering. It is only available on Premise. For details, refer
to Supported Deployments.
Chapter 5 Reports
SpeechMiner UI User Manual 180

Metadata Frequency
Description
The Metadata Frequency report is a histogram that shows values for a specific metadata field.
The histogram shows how many interactions in the data set are associated with the selected metadata field.
The Metadata Frequency report includes:
The top of the graph is a summary of the data. It shows how many interactions are associated with each value
and the percentage of all the interactions in the data set that had the values. For example, if the metadata field
"department" is selected, the report shows how many departments (values) were represented in the data set,
and divides the departments into groups based on how many interactions they had.
The bottom of the graph provides details for one of the groups in the top level. It lists the values associated with
the number of interactions represented by the group and shows the amount.
The Wide version of the report includes the most common category associated with the interactions.
Common Usages
Classify and quantify interactions according to a metadata field.
Utilize the comparative data obtained from the report to identify issues that may require attention.
Customizing the Report
General Settings
Version: Available in Full Report (standard size), Mini, Wide, X-Axis Only, and Y-Axis Only versions.
Items on Report
Metadata Field name: Select the metadata field for which you want to run the report.
Note: The field selected must be within the range selected in the Data Set Filters. If it is not within the range,
the report will be empty.
Pattern to Include: Enter a series of one or more characters that must be found in the field value in order for it
to be included in the report (optional; leave the field blank to include all patterns).
Values to Exclude: Enter one or more field values to exclude from the report. If you enter more than one
value, separate the multiple values with commas and do not leave a space after the comma (optional; leave the
field blank to include all values).
Chapter 5 Reports
SpeechMiner UI User Manual 181

Minimum Interaction Count: The minimum number of interactions that must be found for a value, in order for
the value to be included in the report.
For additional information, see Report Parameters.
Actions
At the top of the graph, click a bar in the graph to drill down to the lower level.
At the bottom of the graph:
Click a bar in the graph to search for interactions that have the field value represented by the bar.
Click to drill down to a Category Distribution report.
Chapter 5 Reports
SpeechMiner UI User Manual 182

Performance Profile
Description
The Performance Profile report is a bar graph and table that compares work group or agent performance for a
specified category or a group of categories to the benchmark (the work group or agent’s average). You can choose to
analyze performance based on the number of interactions, the percentage of interactions, average interaction duration,
or total resources. The table includes data about the number of interactions, the difference from the benchmark, and
the percentage above or below the benchmark.
Note: This template is only available in an Analytics UI deployment.
Common Usages
Visualize and compare agent performance for training and feedback.
Utilize the data obtained from the report to increase the efficiency of team and operations management.
Assess the efficacy of training programs by plotting performance before and after the program’s implementation.
Customizing the Report
General Settings
Version: Available in Full Report (standard size), Mini, Wide, X-Axis Only, and Y-Axis Only versions.
Items on Report
Profile: Select the agents or work groups you would like to compare to the average (the benchmark) of
specific categories. Your selection must match the Benchmark Type, but it does not have to match the work
group or agent parameters in the Data Set Filters.
Benchmark Type: Select the type of benchmark to use: Agent or Team (work group). The selection here must
correspond with those in the Data Set Filters. If you selected work groups in the Data Set Filters (rather than
individual agents in the expanded work groups), you must select Team for the Benchmark Type in order to
return results. The Benchmark Type must also match the Profile selected. That is, if agent is selected as the
benchmark type, agents must also be selected in the Profile parameter.
Compare: Select the data type you want to compare.
Categories: Select specific interaction categories to limit the data set analyzed for your report.
Threshold: Specify the minimum percent deviation from the benchmark required for an item to be included in
Chapter 5 Reports
SpeechMiner UI User Manual 183

the report. For example, "40" means only values that are greater or less than the benchmark by at least 40% are
included in the report.
For additional information, see Report Parameters.
Actions
Click + next to an agent or team to expand the tree and view a list of categories.
Click + to collapse and expand an item.
When an item is expanded, click Trend to drill down to a Category Trend report.
Chapter 5 Reports
SpeechMiner UI User Manual 184

Predictive Elements
Description
The Predictive Elements report is composed of two bar graphs that show the relationship between selected Categories
and Target Categories. The first graph has nested pairs. The first bar of the pair is the number of interactions that fall
into the selected Categories, while the second bar of the pair is the number of interactions that fall into both the
selected Categories and the Target Categories (Success Factor). The second graph shows the ratio of the two bars in
each pair. By examining the ratios, you can see how each Category affects the Target and make changes based on
those findings.
Common Usages
Plot the relationship between one or more Categories and the Target Categories to better understand cause-
effect trends in customer behaviork.
Determine which factors increase the likelihood of reaching the desired Target (for example, which of the
several potential Scripts more reliably leads to a closed sale).
Determine which business practices and agent behaviors contribute to an undesired outcome (such as
cancellation).
Utilize the data obtained from the report to optimize agent training.
Analyze the report data to make informed decisions about business practices.
Customizing the Report
General Settings
Version: Available in Full Report (standard size), Mini, Wide, and Columns versions. The Columns version
presents the data in graphs alone, without printing the values in table format. For additional information, see
Report Parameters.
Items on Report
Categories: See Report Parameters.
Target: Select Categories that you would like to include in the Target. Selected categories must match or be
contained within the Categories previously selected in the Data Set Filters.
Chapter 5 Reports
SpeechMiner UI User Manual 185

Actions
Click an item to open a list of interactions in the specified Category (or the specified Category and Target
Categories).
DISCLAIMER: This report is not available in our Cloud offering. It is only available on Premise. For details, refer
to Supported Deployments.
Chapter 5 Reports
SpeechMiner UI User Manual 186

Program Distribution
Description
The Program Distribution report graphs the interaction volume for each Program.
DISCLAIMER: This feature is not available in our Cloud offering. It is only available on Premise in an Analytics UI
deployment. For details, refer to Introduction to SpeechMiner UI.
Common Usages
Visualize and monitor comparative interaction-volume data by Program.
Customizing the Report
General Settings
See Report Parameters.
Data Set Filters
See Report Parameters.
Actions
Click an item to open a list of interactions included in the item.
Chapter 5 Reports
SpeechMiner UI User Manual 187

System Load
Description
The System Load report includes a line graph and a grid displaying the amount of audio hours processed per day or
hour. On the line graph, two lines are displayed, one for processed interactions and one for loaded interactions. The
grid below the graph shows each point (either a date or time) that appears in the line graph, with its corresponding
loaded and processed hours.
Note: A smaller version of this template (MINI_System Load), is also available. It is intended for use in
the Dashboard page.
Common Usages
Enables you to monitor the system's processing load.
Customizing the Report
Dates: Enter a date range for the report.
Granularity: Choose either HOUR or DAY for the scale on the horizontal axis. Make sure your selection is
reasonable for the dates you selected.
Report Title: Type the name of the report.
For additional information, see Report Parameters.
DISCLAIMER: This report is not available in our Cloud offering. It is only available on Premise. For details, refer
to Supported Deployments.
Chapter 5 Reports
SpeechMiner UI User Manual 188

Chapter 5 Reports
SpeechMiner UI User Manual 189

Team Comparison
Description
The Team Comparison report is a bar graph that compares performance between teams and against the average value
of all teams represented.
The numbers in the table and graph represent an interaction count.
Common Usages
Analyze the report data to optimize team and operations management.
Provide clear visual reports for training assessment and feedback.
Customizing the Report
General Settings
Version: available in Full Report (standard size), Mini, Wide, X-Axis Only, and Y-Axis Only versions.
Items on Report
Teams: Select specific work groups to be analyzed and displayed in your report. The default value ("Any")
includes all work groups. You must also make the appropriate selections for the work group or Agent,
Language, and Program filters in the Data Set Filters. If you select individual agents instead of work groups, you
must select the team that contains the agents you selected, otherwise results will not be returned.
Compare: Select the data type you want to compare.
Categories: Select specific interaction categories to limit the data set analyzed for your report.
For additional information, see Report Parameters.
Actions
Click a bar in the graph to open a list of interactions included in the item.
Chapter 5 Reports
SpeechMiner UI User Manual 190

Team Comparison by Segment
Description
The Team Comparison report is a bar graph that compares performance between teams and against the average value
of all teams represented.
The numbers in the table and graph represent a segment count.
Common Usages
Analyze the report data to optimize team and operations management.
Provide clear visual reports for training assessment and feedback.
Customizing the Report
General Settings
Version: available in Full Report (standard size), Mini, Wide, X-Axis Only, and Y-Axis Only versions.
Items on Report
Teams: Select specific work groups to be analyzed and displayed in your report. The default value ("Any")
includes all work groups. You must also make the appropriate selections for the work group or Agent,
Language, and Program filters in the Data Set Filters. If you select individual agents instead of work groups, you
must select the team that contains the agents you selected, otherwise results will not be returned.
Compare: Select the data type you want to compare.
Categories: Select specific interaction categories to limit the data set analyzed for your report.
For additional information, see Report Parameters.
Actions
Click a bar in the graph to open a list of segments included in the item.
DISCLAIMER: This report is not available in our Cloud offering. It is only available on Premise. For details, refer
to Supported Deployments.
Chapter 5 Reports
SpeechMiner UI User Manual 191

Chapter 5 Reports
SpeechMiner UI User Manual 192

Team Evaluation Comparison
Description
The Team Evaluation Comparison report summarizes the average evaluation score for the selected teams.
Common Usages
To compare team evaluation scores.
Customizing the Report
General Settings
Date Range: Use to select the period of time on which to base the report.
Form: Use to select the specific form to be analyzed and displayed in your report.
Note: If the Form list does not include the form you want to select, refresh the page.
Teams: Use to select the specific teams to be analyzed and displayed in your report.
Show Form: Enables you to view the complete form(s) associated with the specific report. To view the form
you must select a team.
For all other settings, see Report Parameters.
Actions
Click a team in the Y-axis to drill down and create an Agent Evaluation Comparison report for the agents in the
selected team.
DISCLAIMER: This report is not available in our Cloud offering. It is only available on Premise. For details, refer
to Supported Deployments.
Chapter 5 Reports
SpeechMiner UI User Manual 193

Top and Bottom Performers
Description
The Top and Bottom Performers report is a bar graph that indicates values for three groups (top performers, bottom
performers, and average performers) across multiple categories.
Use this report, to identify what top performers do differently from the rest, and thereby spread the knowledge of best
practices. This report is only useful if you know ahead of time who your top, bottom, and average agents or teams are.
It is purely a graphical representation of a comparison and it will NOT tell you who the top and bottom agents are.
Instead, it will tell you how they compare in specific areas of performance.
Note: This template is only available in an Analytics UI deployment.
Common Usages
Compare the behavior of top and bottom performers to identify best practices.
Utilize the data obtained from the report to optimize agent training and improve business processes.
Customizing the Report
General Settings
Version: available in Full Report (standard size), Mini, Wide, X-Axis Only, and Y-Axis Only versions.
Items on Report
Top Agents: Specify the top agents (based on prior assessment) to be displayed for each category. The
percentage of interactions handled by the selected top agents will be displayed for each category. Selections
here must be the same as those made in the work group and agent filters in the Data Set Filters.
Bottom Agents: Specify the bottom agents (based on prior assessment) to be displayed for each category.
The percentage of interactions handled by the selected bottom agents will be displayed for each
category. Selections here must be the same as those made in the work group and agent filters in the Data Set
Filters.
Average: Specify the average-performing agents (based on prior assessment) to be displayed for each
category. The percentage of interactions handled by the selected average-performing agents will be displayed
for each category. Selections here must be the same as those made in the work group and agent filters in the
Data Set Filters.
Categories: Select specific interaction categories to limit the data set analyzed for your report.
Chapter 5 Reports
SpeechMiner UI User Manual 194


Topic Analysis - Audits
Description
The Topic Analysis - Audits report is a table that shows the precision with which each topic was identified by
SpeechMiner UI. Precision values are given for one or more confidence levels, as specified in the report parameters.
The Precision values are determined by the TP/FP/SFP (True Positive/False Positive/Sense False Positive) selections
made by the interaction auditor. For additional information, see the Event and Comment sections in the What is an
Interaction? page.
Each line in the table contains auditing and precision information for one topic, including the level of strictness required
for recognizing the topic (as defined in the Topic definition in SMART), how many times the topic was found in the
interactions that were included in the report, how many interactions it was found in and how many of the events found
were audited. In addition, the precision is graded for each threshold included in the report. The grades are calculated
by dividing the number of TP events by the sum of the TP and FP events. The grades are presented as follows:
Grade Value of TP/(TP+FP)
A A >=0.8
B 0.8 > B >=0.7
C 0.7 > C >=0.6
D
0.6 > D >=0.5
F F < 0.5
This report is beneficial because it allows you to fine-tune the system to the correct accuracy level. After learning
about Topic Identification performance you can adjust confidence levels as necessary.
Note: This template is only available in an Analytics UI deployment.
Common Usages
Enables you to monitor the quality of the different topics in the system based on audit information.
Customizing the Report
Items on Report
Topics: Choose the Topics whose audits you want to examine.
Confidence Thresholds: Type in the confidence levels for which you wish to see precision values. Separate
multiple values with commas.
Chapter 5 Reports
SpeechMiner UI User Manual 196

Note: Confidence levels are assigned by the system to each term it identifies. They indicate how closely the term
defined in the topic matches the term that was discovered in the audio segment. Precision in the report means the
percentage of TPs for all the audits in the topic whose confidence levels were equal to or above the given thresholds.
This means that each of the thresholds includes all of the audits in the threshold levels above it.
For additional information, see Report Parameters.
Actions
Click a topic to drill down to the audit information for each of the terms in the topic.
Click to drill down to an item's details. The details show information about the precision as a function of
the confidence level and as a function of elapsed time in interactions.
In the list of terms for a topic, click the name of a term in order to open a list of interactions in which the specific
term is found.
DISCLAIMER: This report is not available in our Cloud offering. It is only available on Premise. For details, refer
to Supported Deployments.
Chapter 5 Reports
SpeechMiner UI User Manual 197

Topic Analysis -Trends
Description
The Topic Analysis - Trends report is a table that compares how often particular Topics were found in the selected
time period with how often they were found in the preceding time period. Each line in the table contains information for
one Topic, including the percent change between the current period and the preceding period, and the number and
percent of interactions in each period in which the Topic was found.
The baseline time period for the report is selected in the Data Set parameters (see Common Parameters). The
preceding time period is automatically set by the system based on the baseline. For example, if the baseline is a two-
month period, the preceding time period used is the two months preceding that baseline period.
The Percent Change is calculated by the number of interactions per topic in the selected period (A) divided by the
total number of interactions in the selected period (B) divided by the number of interactions per topic in the previous
period (C) divided by the total number of interactions in the previous period (D). For example, (A/B)/(C/D) =
(A*D)/(B*C).
Note: This template is only available in an Analytics UI deployment.
Common Usages
Enables you to monitor topic trends within interactions handled by the system.
Customizing the Report
Items on Report
Topics: Choose the topics whose audits you want to examine.
Minimum Number of Interactions: Type the minimum number of interactions in which a topic must be found,
in order for it to be included in the results.
For additional information, see Report Parameters.
Actions
Click a topic to drill down to the trend information for each of the terms in the topic.
In the list of terms for a topic, click the name of a term in order, to open a list of interactions in which the
specific term is found.
DISCLAIMER: This report is not available in our Cloud offering. It is only available on Premise. For details, refer
to Supported Deployments.
Chapter 5 Reports
SpeechMiner UI User Manual 198

Chapter 5 Reports
SpeechMiner UI User Manual 199

Usage Tracking
Description
The Usage Tracking report shows information about user activity over a selected date range.
Common Usages
Monitor the activity of SpeechMiner UI users.
Find out who performed the last system Apply in SMART.
See which interactions have been listened to.
Customizing the Report
For additional information, see Report Parameters.
Actions
Click a user to drill down to a log of the user's actions.
In the user action log, click one of the tabs at the top of the list to filter the list. For example, click Logins to see
a list of when the user logged into or out of the system.
DISCLAIMER: This report is not available in our Cloud offering. It is only available on Premise. For details, refer
to Supported Deployments.
Chapter 5 Reports
SpeechMiner UI User Manual 200

Quality Management
Quality Management (QM) helps organizations move beyond random sampling to gain a deeper understanding of its
agent/customer interactions by monitoring, evaluating, and studying customer interactions. Quality Management not
only helps organizations identify agents who under perform, but it also helps them identify the root cause of an agent's
behavior.
By understanding agent performance and productivity issues at a granular level, Quality Management offers insight into
customer interactions and ways in which agents can improve them. That is, Quality Management offers insight that can
increase employee productivity, resolve future customer disputes and subsequently enhance customer service. It
enables you to ensure consistent and professional service.
The QM module is a tool that helps organizations improve agent productivity as well as customer satisfaction. The key
features such as Forms Manager and Evaluations Manager can be utilized for evaluating agent productivity, as well as
targeted agent training. These features allow easy detection and training of agents who do not adhere to compliance or
specified procedures.
The means to satisfied customers and great service is this cycle of data collection, analysis, training, and improvement.
Quality Management key features include:
Forms Manager: Enables you to create feedback forms to use when evaluating your contact center agents.
Evaluations manager: Enables you to create evaluations to monitor your agents productivity and efficiency.
Evaluation Sessions: Provides a list of existing evaluation sessions.
Reports: Enables you to monitor agent or evaluator progress using predefined reports, identify areas for training,
and calibrate evaluator responses to limit evaluation variations.
Chapter 6 Quality Management
SpeechMiner UI User Manual 201

Quality Management Menu Reference
The following list provides a brief description of each Quality menu item:
Forms Manager:
Enables you to create feedback forms to use when evaluating your contact center agents.
Evaluations Manager:
Enables you to create evaluations to monitor your agents productivity and efficiency.
Evaluation Sessions:
Provides a list of the existing evaluation sessions. From this list you can tell which session was or was not completed.
A completed evaluation session provides a view into how an agent communicates with consumers.
Chapter 6 Quality Management
SpeechMiner UI User Manual 202

Quality Management Workflow
Review the following QM workflow to get an overall idea about the SpeechMiner UI Quality Management process:
Chapter 6 Quality Management
SpeechMiner UI User Manual 203

Forms Manager
With the Quality Management - Forms Manager you can create and manage forms that enable evaluators to provide
feedback about a specific agent. That is, when a form is included in an evaluation, it becomes part of a process that
helps you identify how an agent is functioning, and subsequently what the agent needs to do in order to maximize your
business goals and customer satisfaction.
Before you create a form consider the following:
Each form has a name, optional description and a list of questions.
Forms can contain one or more of the following question types:
Yes/No
Multiple Choice
Choose from List
Free Form
Sliding Scale
Questions are created and contained within groups. A group can contain one or more questions.
Each question can be defined as mandatory or optional.
Multiple Choice, Choose from List, Yes/No and Sliding Scale questions are assigned weights. The given weight
is used to calculate cumulative scores and the overall score of the form.
Yes/No, Multiple Choice, the minimum Sliding Scale value and Choose from List questions can include Auto-
Fail answers.
Forms are inactive until you activate them.
Only active forms can be attached to an evaluation.
Each evaluation can contain one or more forms.
A form used in one or more evaluations cannot be deleted.
Chapter 6 Quality Management
SpeechMiner UI User Manual 204

Each active form can be attached to one or more evaluations.
Chapter 6 Quality Management
SpeechMiner UI User Manual 205

Forms Manager Grid
The Quality Management - Forms Manager grid contains a list of all the inactive and active forms.
From the grid you can quickly see when the form was created, the last time it was modified who created the form and
so on.
The Forms Manager grid contains the following information:
New Form : Used to create a new form.
Filter by name : Enables you to search for a specific form according to the form's
name.
Delete : Deletes the selected form(s).
0 Selected: The number of forms selected in the grid.
Name: The name of the form.
Note: Hover over the form name to view the description of the specific form.
Description: The description added to the Description field about the specific form.
Note: By default, the Description column does not appear in the grid. To add the Description column to the
grid, click the icon and select the Description checkbox.
Creator: The name of the user who created the form.
Created: The date and time the form was created.
Modified: The date and time the form was changed.
Status: Indicates if the form is active or inactive.
: Use to select the columns that appear in the grid.
Note: To return the grid columns to their default state, click Reset to defaults from the Select Columns list().
Chapter 6 Quality Management
SpeechMiner UI User Manual 206

Chapter 6 Quality Management
SpeechMiner UI User Manual 207

Create a New Form
Quality Management forms are included in evaluation sessions. These forms enable evaluators to obtain feedback
about how an agent is functioning, and subsequently determine what the agent needs to do to maximize your business
goals and customer satisfaction.
To create a new quality management form:
1. Click Quality > Forms Manager. The Forms Manager grid appears.
2. Click New Form. A blank form appears.
3. In the Untitled Form field enter a name for the form.
4. In the Description field enter a description about the form you are creating. (optional)
5. Click Insert and select to create a group of questions, add a group with an existing question type or add an
existing question group from the Question Library.
Note: By default one empty group already exists when you create a new form. For example, a form about
agent/customer communication could have a group of questions called Interaction, containing questions about
the interaction and another group called Agent, containing questions about how the agent handled the
interaction.
For details about how to create, edit and use question groups, see: Question Library.
6. In the fields provided, add a group name and group description.
7. Click Insert Question to add a question to the group and select one of the following question types:
For details about each question type refer to: Form Questions.
Question Description
Yes/No or
N/A
A question whose expected answer is either yes, no or not applicable.
Choose
from List
A closed ended question that enables the user to select multiple answers from a list of
choices.
Chapter 6 Quality Management
SpeechMiner UI User Manual 208

Multiple
Choice
A closed ended question that enables the user to select one answer from a list of answers.
Free Form A text box for users to input short answers to the question.
Sliding Scale
A scale with a minimum and maximum value, where the maximum value represents a
stronger association to the question.
8. If a question is mandatory, select the Required check box.
When Required is selected, the user must answer the question before completing the form.
Note: You can move the location of a question using the arrows provided .
9. Repeat steps 5-8 until the form contains all of the groups and questions you want.
Tip: Click Clone Group to create a copy of an existing group of questions.
10. Click Auto-fail for a Yes/No, Multiple Choice, the minimum Sliding Scale value or Choose from List answer,
to create a form that will automatically fail when the user selects an answer to one of these questions.
11. Click Done when you complete a group of questions. All of the group options will disappear and the group will
appear as it will in the final form.
Note: To edit the same group simply click within the group. The group options will reappear.
12. Click Weighting... to assign your questions a weight.
Weights can only be assigned to Multiple Choice, Yes/No, Choose from List and Sliding Scale questions.
The weights indicate the relative importance of each question and are used by the system to calculate the form's
score.
The sum of the weights for each form and each group must be 100%.
Note: Each form must contain at least one question that can be given a weight. For more information see:
Configure Question Weights.
13. Click the Preview Form icon to review the form before you save it.
14. Click the Active/Inactive option to activate/deactivate the form. (optional)
Only an active form can be attached to an evaluation. An inactive form is not available and cannot be associated
with an evaluation.
In addition, an active form cannot be edited.
Chapter 6 Quality Management
SpeechMiner UI User Manual 209

15. Click Save to save the form. The screen reloads with the Forms Manager and the new form appears in the
list.
Chapter 6 Quality Management
SpeechMiner UI User Manual 210

Form Questions
A Quality Management form can contain one or more of the following question types:
Yes/No
Multiple Choice
Choose from List
Free Form
Sliding Scale
Note: Weights are assigned to Multiple Choice, Choose from List, Yes/No and Sliding Scale questions. The weights
indicate the relative importance of each question and are used by the system to calculate the form's score. For more
information, see Configure Question Weights.
Yes/No:
A Yes/No question requires the user to select one answer.
The question offers three answers: Yes, No or Not Applicable (N/A).
To add a Yes/No question:
1. In a new or existing form, click Insert in the form group to which you want to add the Yes/No question.
2. Select Yes/No. The question appears without a title but with the two options (Yes, No).
3. Click the Question Title field and enter the question.
4. Click the Question Description field and enter a description for the question. You can expand the Question
Description field (click and drag the bottom right corner) and enter up to 4096 characters.
5. Click Add N/A to add the not applicable option.
6. If the question is mandatory, select the Required check box.
7. Click Auto Fail next to the answer that will cause the entire form to fail and receive a score of 0 when
Chapter 6 Quality Management
SpeechMiner UI User Manual 211

selected .
8. Click Done.
Multiple Choice:
A Multiple Choice question enables the user to select one answer from a list of answers.
To add a Multiple Choice question:
1. In a new or existing form, click Insert in the form group to which you want to add the Multiple Choice
question.
2. Select Multiple Choice. The question appears without a title and the statement "No answers defined".
3. Click the Question Title field and enter the question.
4. Click the Question Description field and enter a description for the question. You can expand the Question
Description field (click and drag the bottom right corner) and enter up to 4096 characters.
5. Click Add new choice to add the first of a number of choices.
6. Repeat step #5 until you have added all the possible answers.
When the form is saved, a list of radio buttons will appear along with the answers.
7. If the question is mandatory, select the Required check box associated with the specific question.
8. Click Auto Fail next to the answer that will cause the entire form to fail and receive a score of 0 when selected.
9. Click Done.
Choose from List:
A Choose from List question enables the user to select multiple answers from a list of choices.
To add a Choose from List question:
1. In a new or existing form, click Insert in the form group to which you want to add the Choose from List
question.
2. Select Choose from List. The question appears without a title and the statement "No answers defined".
3. Click the Question Title field and enter the question.
Chapter 6 Quality Management
SpeechMiner UI User Manual 212

4. Click the Question Description field and enter a description for the question. You can expand the Question
Description field (click and drag the bottom right corner) and enter up to 4096 characters.
5. Click Add new choice to add the first of a number of answers.
6. Repeat step #5 until you have added all the Choose from List answers.
When the form is saved, a list of check boxes will appear along with the answers.
7. If the question is mandatory, select the Required check box.
8. Click Auto Fail next to the answer that will cause the entire form to fail and receive a score of 0 when selected.
9. Click Done.
Free Form:
A Free Form question enables the user to freely formulate an answer.
To add a Free Form question:
1. In a new or existing form, click Insert in the form group to which you want to add the Free Form question.
2. Select Free Form. The question appears without a title.
3. Click the Question Title field and enter the question.
4. Click the Question Description field and enter a description for the question. You can expand the Question
Description field (click and drag the bottom right corner) and enter up to 4096 characters.
When the form is saved, the question appears with a text field in which the user can write a response.
5. If the question is mandatory, select the Required check box.
6. Click Done.
Sliding Scale:
A Sliding Scale question enables the user to set a scale with a minimum and maximum value, where the maximum value
represents a stronger association to the question.
To add a Sliding Scale question:
1. In a new or existing form, click Insert in the form group to which you want to add the Sliding Scale question.
Chapter 6 Quality Management
SpeechMiner UI User Manual 213

2. Select Sliding Scale. The question appears without a title.
3. Click the Question Title field and enter the question.
4. Click the Question Description field and enter a description for the question. You can expand the Question
Description field (click and drag the bottom right corner) and enter up to 4096 characters.
5. From the menus provided select a minimum and maximum value.
6. In the Minimum text box, provide a name for the minimum value.
7. In the Maximum text box, provide a name for the maximum value.
8. If the question is mandatory, select the Required check box.
9. Click Auto Fail to cause the entire form to fail and receive a score of 0 when the minimum is selected.
10. Click Done.
Chapter 6 Quality Management
SpeechMiner UI User Manual 214

Question Library
A Quality Management form must contain one or more questions. Each question is part of a group.
The question group can be saved for later use in the Question library.
Once a question group is saved in the Question library, you can add it to one or more forms as often as required. You
can also edit a question group either in the Question library or in the form. Once you edit and change a question group
in the form, you can give it a new name and add it to the Question library as a new question group.
With the Quality Management - Question library you can:
Add a question group to a form.
Create a question group.
Edit a question group.
To add a question group to form:
1. Click Quality > Forms Manager. The Forms Manager grid appears.
2. Click New Form or the name of an existing form in the Name column.
3. Click Insert Group > From Library.... The Insert question group window appears.
4. Select the question group(s) you want to add to the form.
5. Click Insert. The question group is added to the form.
To create a question group:
1. Click Quality > Forms Manager. The Forms Manager grid appears.
2. Click New Form or open an existing form.
3. Click Insert Group and select one of the following options:
Insert Group: To create a new empty group.
Yes No: To create a new group with one Yes No question.
Chapter 6 Quality Management
SpeechMiner UI User Manual 215

Multiple Choice: To create a new group with one Multiple Choice question.
Choose from list: To create a new group with one Choose from list question.
Free form: To create a new group with one Free form question.
Sliding scale: To create a new group with one Sliding scale question.
From Library...: To enter an existing question group.
For details about each question type, see Form Questions.
4. Enter a group name in the Untitled Group field.
5. Add one or more questions to the group.
6. Click Add to library.... The Add to Question Library window appears.
7. Click Add. A success message appears.
Note: If a question group with the same name already exists you will be asked to give the question group a new
name.
8. Click View in Question Library. The Question Group Library window is opened and the question group
appears among the list of existing question groups.
9. Click Cancel to close the library.
To edit a question group:
1. Click Quality > Forms Manager. The Forms Manager grid appears.
2. Click New Form or open an existing form.
3. Create a new group and click Add to library... (see: Create a question group) or click Insert Group > From
Library....
4. From the Question Group list, select the question group you want to edit.
5. Click Edit and add/remove questions from the group.
6. Click Save. The question group is saved with your changes.
Chapter 6 Quality Management
SpeechMiner UI User Manual 216

Chapter 6 Quality Management
SpeechMiner UI User Manual 217

Configure Question Weights
Weights are assigned to Multiple Choice, Yes/No, Choose from list and Sliding Scale questions.
The weights indicate the relative importance of each question and are used by the system to calculate the form's score.
Before you create a form consider the following:
The sum of the group weights for each form must be 100%. If the sum of the group weights is not 100%, the
form cannot be activated.
The sum of the questions within each group must be 100%. If the sum of the questions weights within a group is
not 100%, the form cannot be activated.
A question weight can be a value with up to 2 decimal places. For example, 32.25.
When a question is marked as Required it must be answered.
Each Multiple Choice and Choose from List answer should be assigned a weight.
The weight for each answer, question, and/or group is either entered manually or distributed equally among the
following by clicking the Redistribute button:
Answers in a Multiple Choice question.
Answers in a Choose from list question.
All of the groups within a form.
All of the questions within a group.
Below you will find examples and basic scenarios about how weights are calculated for each of the following questions
and answers types:
Yes/No
Multiple Choice
Choose from list
Sliding Scale
Free Form
Not Applicable, Not Required or Not Answered questions
Auto Fail
Yes/No:
Chapter 6 Quality Management
SpeechMiner UI User Manual 218

The score for a Yes/No question is 100 if the answer is Yes and 0 if the answer is No.
Multiple Choice:
Each Multiple Choice answer can receive a weight from 0 to 100.
The score associated with a Multiple Choice question is the weight of the selected answer.
For example: If a Multiple Choice question has four answers, the weights can be:
Answer 1 = 0%
Answer 2 = 40 %
Answer 3 = 70 %
Answer 4 = 100%
Choose from list:
Each Choose from list answer can receive a weight. The sum of all the weights must total 100%.
The score associated with a Choose from list question is the sum of the wights of the selected answers.
For example: If a Choose from list question has four answers, the weights can be:
Answer 1 = 20%
Answer 2 = 40 %
Answer 3 = 40 %
Answer 4 = 0%
If the evaluator selects answers 1 and 3, the Choose from list question score is 60%.
Sliding Scale:
Each Scale question has a low (that is, minimum) value and high (that is, a maximum) value.
The score for the low value is 0 and the score for the high value is 100.
The Scale score is calculated as follows: (chosen value - low value) / (high value - low value) * 100%
For example:
The low value = 0 and the high value = 10.
If the evaluator selects 7, the score is (7 - 0) / (10 - 0) * 100 = 70%
Free Form:
Free form questions do not have a score and therefore they cannot be assigned a weight.
Not Applicable (N/A), Not Required and Not Answered:
A Yes/No question can include a N/A answer.
Chapter 6 Quality Management
SpeechMiner UI User Manual 219

If a question is not marked as required the evaluator does not have to answer the question.
Selecting N/A or not answering a question will not affect the final form score.
Auto Fail:
When an answer marked as Auto Fail is selected, the form will automatically fail.
The Yes/No, Multiple Choice, Choose from list questions can have answers with an Auto Fail answer, and the
minimum Sliding Scale answer can be assigned the Auto Fail value.
If the evaluator selects an Auto Fail answer for one or more questions, the total score of the form will be 0. The scores
of all remaining questions and groups will be calculated normally.
Basic Scenarios:
Scenario 1: A form has 2 groups. One group includes a N/A answer and the other group includes a question
that was not answered.
Scenario 2: A form with 2 groups where all questions are answered.
Scenario 3: A form with 2 groups where all questions are either not answered or answered N/A.
Scenario 4: A form where all the questions are Free Form questions.
Scenario 1: A form has 2 groups. One group includes a N/A answer and the other group includes a question that was
not answered.
Group One:
- 2 questions
- Group weight = 50%
Question Answer
Question Score
(%)
Question
Weight
Score
Max Possible Score
1 80% 60% 24 30
2 N/A - 40% -
-
Group One Score: 24 / 30 = 80%
Group Two:
- 3 questions
- Group weight = 50%
Question Answer
Question Score
(%)
Question
Weight
Score
Max Possible Score
1 50% 60% 15 30
2 20% 20% 2
10
3
Not
Answered
- 20% -
Chapter 6 Quality Management
SpeechMiner UI User Manual 220

Group Two Score: 17 / 40 = 42.5%
Total Form Score: (80% * 50%) + (42.5% * 50%) = 61%
Scenario 2: A form with 2 groups where all questions are answered.
Group One:
- 2 questions
- Group weight = 50%
Question
Question Score
(%)
Question
Weight
Question's Score
Absolute
Question's Score
Max Possible
Score
1 100% 50% 100%*50%*50%=25% 25 25
2 80% 50%
80%*50%*50%=25%
20
25
Group One Score: 45 / 50 = 90%
Group Two:
- 3 questions
- Group weight = 50%
Question
Question Score
(%)
Question
Weight
Question's Score
Absolute
Question's Score
Max Possible
Score
1 50% 60% 50%*60%*50%=15% 15 30
2 20% 20%
20%*20%*50%=2%
2
10
3 100% 20% 100%*20%*50%=10% 10 10
Group One Score: 27 / 50 = 54%
Total Form Score: (90% * 50%) + (54% * 50%) = 72%
Scenario 3: A form with 2 groups where all questions are either not answered or answered N/A. In this case, the
group is removed from the total and will not affect the form score.
Group One:
- 2 questions
- Group weight = 50%
Question Answer Question Score Question Weight Score
1 N/A - 50% -
2 N/A - 50%
-
Group One Score: no score
Group Two:
Chapter 6 Quality Management
SpeechMiner UI User Manual 221

- 3 questions
- Group weight = 50%
Question Answer Question Score Question Weight Score Maximum Possible Score
1 50% 60% 15 30
2 20% 20%
2
10
3 Not Answered - 20%
Group One Score: 17 / 40 = 43%
Total Form Score: 43%
Scenario 4: A form where all the questions in the for are Free Form questions.
Free Form questions do not have a weight. For this reason, this form will not have a score. The message "no score"
will appear and this form will not be included in the reports.
To configure weights for a group, question or answer:
1. Create a form with one or more groups of questions.
2. Click Weighting.... The Weighting for <form name> window appears.
3. Enter a weight for each group in the fields provided or click Redistribute to distribute the weights equally
among each group in the form.
4. Verify that the group weights total is 100.
5. Click the name of each group to see a list of the group's questions.
6. Enter a weight for each question within the group, and verify that the total of the weights for the group's
questions is 100 or click the Redistribute button to distribute the weights equally among each question within
the group.
7. If you included a Multiple Choice or Choose from list question in your group, click the name of the question to
see a list of the question's answer.
8. Enter a weight for each answer associated with the Multiple Choice or Choose from list question or click
the Redistribute button to distribute the weights equally among each answer within the question.
9. Repeat steps 5-8 for each group in the form.
10. Save the form.
Note: When the form is filled out by an evaluator, the form's score and the evaluation score are based on the
values entered during this procedure.
Chapter 6 Quality Management
SpeechMiner UI User Manual 222

Chapter 6 Quality Management
SpeechMiner UI User Manual 223

Manage a Form
Once a Quality Management form is created and appears in the Forms Manager grid, you can:
Save a Form
Edit a Form
Delete a Form
Delete a Question
Copy a Form
Preview a Form
Collapse/Expand a Question Group
Note: Forms associated with one or more evaluations, or an active evaluation, cannot be edited, deleted and/or
deactivated.
To save a form:
Selecting Save enables you to save your form changes.
To save a form, you must give it a name.
1. Create a new form or open an existing form.
2. Configure the form.
3. Click Save > Save. The form is saved.
To change an existing form:
1. Select Quality > Forms Manager. The list of existing forms appears.
2. Click the name of the form you want to edit. The specific form is opened.
3. Change the form.
Chapter 6 Quality Management
SpeechMiner UI User Manual 224

4. Click Save to save your changes.
To delete a form:
You can delete a form(s) in one of two ways.
To delete one or more forms:
1. Select Quality > Forms Manager. The list of existing forms appears.
2. Select the check box associated with the form(s) you want to delete.
3. Above the Forms Manager list click Delete . The form(s) is deleted.
To delete a specific form:
1. Select Quality > Forms Manager. The list of existing forms appears.
2. Click the form you want to delete. The specific form is opened.
3. Click Delete in the top right corner of the form. The form(s) is deleted.
To delete a form question:
1. Select Quality > Forms Manager. The list of existing forms appears.
2. Click the form whose question you want to delete. The specific form is opened.
3. Click Delete next to the question you want to delete. The question is deleted.
4. Click Save > Save to save your changes.
To create a copy of an existing form:
Select Save As to create a copy of the form you are currently creating/editing.
1. Open the form you want to copy.
2. Click Save > Save as.
3. Enter a form name. A copy of the form is created and is listed in the Forms Manager grid.
To preview a form:
As you add questions and question groups to a form, you may want to see how the form appears to users.
1. In a new or existing form, click the Preview Form icon . The form appears in a new window as it will
Chapter 6 Quality Management
SpeechMiner UI User Manual 225

appear when accessed by a user.
2. Click X in the top right corner of the Preview Form window to close the preview.
To collapse/expand all the groups:
As you add questions and question groups to a form, the form can become long. You may want to either collapse all
the groups or see specific groups while hiding others.
To collapse/expand all the groups:
1. In a new or existing form, click the Collapse/Expand questions icon to expand or collapse all the
question groups.
To collapse/expand a specific group:
1. In a new or existing form, click the Collapse/Expand questions icon in the group you want to
expand or collapse.
The number in this option specifies the amount of question in the group.
Chapter 6 Quality Management
SpeechMiner UI User Manual 226

Evaluations Manager
Quality Management evaluations are the best way to evaluate and improve agent behaviors that support your business
goals.
They drive the behaviors that promote a specific agenda by enabling you to assess how well your agents are
performing during customer interactions.
With the knowledge obtained from an evaluation you can create positive customer experiences and exceed customer
expectations by:
Providing agents with objective assessments using specific criteria and customized forms.
Motivating agents with training opportunities and positive feedback.
Recognizing and keeping top employees.
Creating evaluation reports to help managers monitor agents' progress, identify training requirements, and
calibrate evaluator responses to limit variations in evaluations.
Before you create an evaluation consider the following:
Only an administrator or a user with QM Manager Role permissions can create evaluations.
SpeechMiner UI Quality Management enables you to create five types of evaluations (Distributed (Interaction +
Agent), Shared, Calibration and Ad-Hoc).
Once an evaluation is saved, one or more evaluation sessions are created according to a predefined schedule.
If you selected Interactions when working with a One Time schedule, each evaluation creates one evaluation
session for every agent associated with selected interactions and each evaluation session is assigned to each
evaluator. For example, if an evaluation contains 2 evaluators and 3 interactions (each with 1 agent), 6
evaluation sessions will be created. That is, each evaluator will be asked to fill out the evaluation for each of the
3 agents. If an evaluation contains 2 evaluators and 3 interactions (each with a set of 2 agents), 12 evaluation
sessions will be created.
If you selected Criteria when working with a One Time schedule, the interactions are randomly distributed
among the evaluators.
A Shared Evaluation session creates evaluation sessions that are not assigned to a specific evaluator. Instead,
each evaluator associated with the session can select and assign himself/herself a specific session from the
Chapter 6 Quality Management
SpeechMiner UI User Manual 227

available pool of session.
A Calibration Evaluation session is filled out in the same way as a Distributed or Shared evaluation session. But,
unlike a Distributed or Shared evaluation a Calibration evaluation can be used as part of a report that compares
the performance of two or more evaluators.
Chapter 6 Quality Management
SpeechMiner UI User Manual 228

Evaluations Manager Grid
The Quality Manager - Evaluations Manager grid contains a list of all the inactive and active evaluations.
From the grid, you can quickly see when the evaluation was created, the last time it created a session(s), etc.
The Evaluations Manager grid contains the following information and options:
New Evaluation : Use to create a new Distributed, Shared or Calibration evaluation.
Delete : Deletes the selected evaluation.
Note: When you delete an evaluation in the Evaluation Manager list, all the sessions that were created as a
result of the specific evaluation will also be deleted.
Filter by name: Enables you to search for a specific evaluation.
0 Selected: The number of forms selected in the grid.
Name: The name of the evaluation.
Note: Hover over the evaluation name to view the description of the specific evaluation.
Description: The description added to the Description field about the specific evaluation.
Note: By default, the Description column does not appear in the grid. To add the Description column to the
grid, click the icon and select the Description checkbox.
Creator: The name of the user who created the evaluation.
Evaluators: If you selected Interactions when working with a One Time schedule, this parameter indicates the
amount of evaluators associated with the specific evaluation. Each one of these evaluators will be required to
perform the same evaluation sessions. For example, if an evaluation with 3 evaluators is scheduled for over the
course of a month, and is configured to generate 30 sessions, each evaluator will receive 10 different
interactions. If you selected Criteria when working with a One Time schedule, the interactions are randomly
distributed among the evaluators.
Schedule: Indicates whether the evaluation is a one-time evaluation or a recurring evaluation.
Chapter 6 Quality Management
SpeechMiner UI User Manual 229

Type: Indicates whether the evaluation is a Distributed, Shared or Calibration evaluation. For details,
see Evaluations manager.
Form(s): Indicates the number of forms associated with the evaluation.
Last Activity: Indicates the last time the evaluation created one or more evaluation sessions..
Status: Indicates if the evaluation is active or inactive. An inactive evaluation cannot create evaluation sessions.
Created: Indicates the date on which the evaluation was created.
Evaluation Sessions: Indicates the number of evaluation sessions created as a result of the evaluation.
: Use to select the columns that appear in the grid.
Note: To return the grid columns to their default state, click Reset to defaults from the Select Columns list.
Chapter 6 Quality Management
SpeechMiner UI User Manual 230

Create an Evaluation
SpeechMiner UI Quality Management enables you to create five types of evaluations:
Distributed Interaction Evaluation: Creates evaluation sessions about interactions for selected evaluators.
Each evaluator will be assigned an evaluation session for each agent associated with the evaluation. The
evaluation is created about the agents who participated in the interactions that are added to the evaluation. For
example, if you add 2 evaluators and 3 interactions (each with a different agent) to the evaluation, 6 evaluation
sessions will be created. That is, each evaluator will be asked to fill out the evaluation for each one of the 3
agents.
Distributed Agent Evaluation: Creates evaluation sessions about one or more specific agent's performance
during customer interactions for a specific evaluator. The selected evaluator is assigned an evaluation session
associated with the selected agents. For example, if you select 18 agents to be evaluated by a specific
evaluator, 1 evaluation session will be created for each of the 18 agents according to the selected interaction
filter criteria.
Shared Evaluation: Creates evaluation sessions about an agent's performance during customer interactions
without assigning the sessions to a specific evaluator(s). Instead, each evaluator associated with the session can
select and assign himself/herself the Shared session from the available pool of Shared sessions. Once an
evaluator selects a Shared session, the specific session is no longer available to other evaluators.
Calibration Evaluation: Use this evaluation to compare evaluator performance, to ensure consistency across
teams. A Calibration Evaluation is performed on one evaluation in the same way as a Distributed Interaction
Evaluation session, the difference is that the result of these evaluation sessions can be used in a Calibration
Score report (that is, a report that compares how the evaluators filled out the same evaluation session)..
Ad-Hoc Evaluation: Creates an evaluation session for a specific interaction or segment currently being played
in the Media Player.
Refer to Quality Management Workflow for a better understanding about the evaluation process.
Chapter 6 Quality Management
SpeechMiner UI User Manual 231

Distributed Interaction Evaluation
The SpeechMiner UI Quality Management - Distributed Interaction Evaluation creates evaluation sessions about
interactions for selected evaluators. Each evaluator will be assigned an evaluation session for each agent associated
with the evaluation. The evaluation is created about the agents who participated in the interactions that are added to
the evaluation. For example, if you add 2 evaluators and 3 interactions (each with a different agent) to the evaluation, 6
evaluation sessions will be created. That is, each evaluator will be asked to fill out the evaluation for each one of the 3
agents.
Before You Begin:
Create forms to attach to your evaluation(s).
Verify that you have been assigned a QM Manager role. For additional information see: Administer Roles.
To create a Distributed Interaction evaluation:
1. Click Quality > Evaluations Manager. The Evaluations Manager grid appears.
2. Click the drop down arrow next to New Evaluation and select Distributed > Interaction.
3. In the Untitled Evaluation field, enter the name of your evaluation.
4. In the Description field, enter a description of the evaluation.
5. From the Schedule list, select one of the following, and configure the schedule using the options available (see
table in this step):
Recurring: Creates an evaluation that repeatedly produces evaluation sessions for a configurable time
interval.
One Time: Creates an evaluation that only produces evaluation sessions once.
Option Description
Start The date on which the evaluation session(s) should be created.
The time at which the evaluation session(s) should begin.
Occur every The frequency (Days, Weeks or Months) with which the evaluation recurs.
Session
Expires after
The time (Days, Weeks or Months) by which the evaluation session should be
performed after the evaluation is created.
6. Select the Forms tab and from the Forms list, select the forms to add to the evaluation.
Chapter 6 Quality Management
SpeechMiner UI User Manual 232

As soon as you select a form from the list, it appears in the Evaluation Summary under Forms.
Select the form again to remove the form from the Evaluation Summary.
The forms selected consist of the questions that must be answered to complete the evaluation session.
7. Select the Evaluators tab and from the Evaluators list, select the evaluator(s) that should perform the
evaluation session(s).
As soon as you select an evaluator from the list (Note: you can select more than one evaluator), the evaluator
name appears in the Evaluation Summary under Evaluators.
Click on the evaluator name again to remove the evaluator from the Evaluation Summary.
Each evaluator will receive an evaluation session to evaluate the agent(s) associated with the selected
interactions.
When you select more than one evaluator, the resulting Evaluation Sessions are evenly distributed across
evaluators in Round Robin fashion.
8. Select the Interactions tab.
a. Recurring or One Time.
If you selected a Recurring schedule in step #5, you cannot select the interactions yourself. The resulting
interaction list associated with the evaluation, corresponds to what you entered in the search filter.
If you selected a One Time schedule, select one of the following:
Interactions: Enables you to select interactions from the list of interactions created after you click
Search.
Interaction Criteria: Randomly selects interactions from the interaction list resulting from your
specific search. The amount of interactions selected correspond to what you entered in the
Exactly field.
Note: The default value in the Exactly field is 100 and the maximum value is 1000. These values
are configurable.
b. Configure the evaluation filter options on the left side of the screen, to generate a list of interactions.
Your filter selections should be directly related to the business issue for which you want to evaluate an
agent(s).
For additional information, see Search Filter.
c. Click Search.
Chapter 6 Quality Management
SpeechMiner UI User Manual 233

Note: If you selected Interactions in step 8a, from the list provided select the interactions (one at a
time) that you would like to add to the evaluation.
As soon as you select an interaction from the list, it appears in the Evaluation Summary under
Interactions.
Clear an interaction's check box to remove that specific interaction from the Evaluation Summary
Tip: You can play back an interaction to verify its relevance to the purpose of the evaluation. Simply click the
Play icon associated with the interaction you want to hear. For more information about playing an
interaction, see Media Player.
9. Click the Inactive option to activate the evaluation. Only an active evaluation will
create evaluation sessions.
10. Click Save and Activate. Once the evaluation is saved and activated, it will start to create evaluation sessions
according to the schedule configured at the beginning of this procedure.
Note: the Evaluation Session list will automatically refresh when a new set of evaluation sessions is available. To
manually refresh the Evaluation Session list, click the Refresh button .
Chapter 6 Quality Management
SpeechMiner UI User Manual 234

Distributed Agent Evaluation
The SpeechMiner UI Quality Management - Distributed Agent Evaluation creates evaluation sessions about one or
more specific agent performances during customer interactions. The Distributed Agent Evaluation is assigned to one
evaluator. The selected evaluator is assigned an evaluation session associated with the selected agent. For example, if
you select 18 agents to be evaluated by a specific evaluator, 1 evaluation session will be created for each of the 18
agents according to the selected interaction filter criteria.
Before You Begin:
Create forms to attach to your evaluation(s).
Verify that you have been assigned a QM Manager role. For additional information see: Permissions.
To create a Distributed Agent Evaluation:
1. Click Quality > Evaluations Manager. The Evaluations Manager grid appears.
2. Click the drop down arrow next to New Evaluation and select Distributed > Agent.
3. In the Untitled Evaluation field, enter the name of your evaluation.
4. In the Description field, enter a description of the evaluation.
5. From the Schedule list select one of the following, and configure the schedule using the options available (see
table in this step):
Recurring: Use to create an evaluation that repeatedly produces evaluation sessions for a configurable
time interval.
One Time: Use to create an evaluation that only produces evaluation sessions once.
Option Description
Start The date on which the evaluation session(s) should be created.
The time at which the evaluation session(s) should begin.
Occur every The frequency (Days, Weeks or Months) with which the evaluation recurs.
Session
Expires after
The time (Days, Weeks or Months) by which the evaluation session should be
performed after the evaluation is created.
6. Select the Forms tab. From the Forms list, select the forms to add to the evaluation.
Chapter 6 Quality Management
SpeechMiner UI User Manual 235

As soon as you select a form from the list, it appears in the Evaluation Summary under Forms. Select the form
again to remove the form from the Evaluation Summary. The forms selected consist of the questions that must
be answered to complete the evaluation session.
7. Select the Evaluators tab and from the Evaluators list, select the evaluator(s) that should perform the
evaluation session(s).
As soon as you select an evaluator from the list (Note: you can select more than one evaluator), the evaluator
name appears in the Evaluation Summary under Evaluators.
Click on the evaluator name again to remove the evaluator from the Evaluation Summary.
Each evaluator will receive an evaluation session to evaluate the agent(s) associated with the selected
interactions.
When you select more than one evaluator, the resulting Evaluation Sessions are evenly distributed across
evaluators in Round Robin fashion.
For example:
When an evaluation is created with 3 Evaluators, 2 Agents and 10 Interactions
Evaluator 1 - Session 1,4,7,10
Evaluator 2 - Session 2,5,8
Evaluator 3 - Session 3,6,9
Agent A
Agent B
The sessions are distributed as follows:
Evaluator 1 - Session A1, A4, A7, A10, B3, B6, B9
Evaluator 2 - Session A2, A5, A8, B1, B4, B7, B10
Evaluator 3 - Session A3, A6, A9, B2, B5, B8
8. Select the Agents tab. From the Agents list, select the agent(s) whose interactions you want to evaluate.
As soon as you select an agent from the list, the agent's name appears in the Evaluation Summary under
Agents. Select the agent again to remove the agent from the Evaluation Summary.
If you select a manager, the sessions will only be created for the agents associated with the selected manager
and not for the manager.
9. Select the Interactions tab.
Note: You cannot manually select a list of Interactions. The resulting interaction list associated with the
Chapter 6 Quality Management
SpeechMiner UI User Manual 236

evaluation, corresponds to what you entered in the search filter.
a. Recurring or One Time.
If you selected a Recurring schedule in step #5, you cannot select the interactions yourself. The resulting
interaction list associated with the evaluation, corresponds to what you entered in the search filter.
If you selected a One Time schedule, select one of the following:
Interactions: Enables you to select interactions from the list of interactions created after you click
Search.
Interaction Criteria: Randomly selects interactions from the interaction list resulting from your
specific search. The amount of interactions selected correspond to what you entered in the
Exactly field.
b. Configure the evaluation filter options on the left side of the screen, to generate a list of interactions.
Your filter selections should be directly related to the business issue for which you want to evaluate an
agent(s).
For additional information, see Search Filter.
c. In the Exactly field under Interaction Criteria, enter the amount of interactions that should be selected
when the Evaluation is run. Interactions are randomly selected from the interaction list results according
to the amount in the Exactly field.
Note: The default value in the Exactly field is 3 and the maximum value is 30. These values are
configurable.
d. Click Search.
Tip: You can play back an interaction to verify its relevancy to the purpose of the evaluation. Simply
click the Play icon associated with the interaction you want to hear. For more information about
playing an interaction, see Media Player.
10. Click the Inactive option to activate the evaluation. Only an active evaluation will
create evaluation sessions.
11. Click Save and Activate. Once the evaluation is saved and activated, it will start to create evaluation sessions
according to the schedule configured at the beginning of this procedure.
Note: The Evaluation Session list will automatically refresh when a new set of evaluation sessions is available.
To manually refresh the Evaluation Session list, click the Refresh button .
Chapter 6 Quality Management
SpeechMiner UI User Manual 237

Chapter 6 Quality Management
SpeechMiner UI User Manual 238

Shared Evaluation
The SpeechMiner UI Quality Management - Distributed Shared Evaluation creates evaluation sessions about an
agent's performance during customer interactions without assigning the sessions to a specific evaluator. Instead, each
evaluator associated with the session can select and assign himself/herself the Shared session from the available pool of
Shared sessions. Once an evaluator selects a Shared session, the specific session is no longer available to other
evaluators.
Before You Begin:
Create forms to attach to your evaluation(s).
Verify that you have been assigned a QM Manager role. For additional information see: Administer Roles.
To create a Shared Evaluation:
1. Click Quality > Evaluations Manager. The Evaluations Manager grid appears.
2. Click the drop down arrow next to New Evaluation and select Shared.
3. In the Untitled Evaluation field, enter the name of your evaluation.
4. In the Description field, enter a description of the evaluation.
5. From the Schedule list select one of the following, and configure the schedule using the options available (see
table in this step):
Recurring: Use to create an evaluation that repeatedly produces evaluation sessions for a configurable
time interval.
One Time: Use to create an evaluation that only produces evaluation sessions once.
Option Description
Start The date on which the evaluation session(s) should be created.
The time at which the evaluation session(s) should begin.
Occur every The frequency (Days, Weeks or Months) with which the evaluation recurs.
Session
Expires after
The time (Days, Weeks or Months) by which the evaluation session should be
performed after the evaluation is created.
6. Select the Forms tab and from the Forms list, select the forms to add to the evaluation.
Chapter 6 Quality Management
SpeechMiner UI User Manual 239

As soon as you select a form from the list, it appears in the Evaluation Summary under Forms.
Select the form again to remove the form from the Evaluation Summary.
The forms selected consist of the questions that must be answered to complete the evaluation session.
7. Select the Evaluators tab and from the Evaluators list, select the evaluator(s) that should perform the
evaluation session(s).
As soon as you select an evaluator from the list (Note: you can select more than one evaluator), the evaluator
name appears in the Evaluation Summary under Evaluators.
Click on the evaluator name again to remove the evaluator from the Evaluation Summary.
Each evaluator will receive an evaluation session to evaluate the agent(s) associated with the selected
interactions.
When you select more than one evaluator, the resulting Evaluation Sessions are evenly distributed across
evaluators in Round Robin fashion.
8. Select the Interactions tab.
a. Select Recurring or One Time.
If you selected a Recurring schedule in step #5, you cannot select the interactions yourself. The resulting
interaction list associated with the evaluation, corresponds to what you entered in the search filter.
If you selected a One Time schedule, select one of the following:
Interactions: Enables you to select interactions from the list of interactions created after you click
Search.
Interaction Criteria: Randomly selects interactions from the interaction list resulting from your
specific search. The amount of interactions selected correspond to what you entered in the
Exactly field.
Note: The default value in the Exactly field is 100 and the maximum value is 1000. These values
are configurable.
b. Configure the evaluation filter options on the left side of the screen, to generate a list of interactions.
Your filter selections should be directly related to the business issue for which you want to evaluate an
agent(s).
For additional information, see Search Filter.
c. Click Search.
Chapter 6 Quality Management
SpeechMiner UI User Manual 240

Note: If you selected Interactions in step 8a, from the list provided select the interactions (one at a
time) that you would like to add to the evaluation.
As soon as you select an interaction from the list, it appears in the Evaluation Summary under
Interactions.
Clear an interaction's check box to remove that specific interaction from the Evaluation Summary
Tip: You can play back an interaction to verify its relevancy to the purpose of the evaluation. Simply click the
Play icon associated with the interaction you want to hear. For more information about playing an
interaction, see Media Player.
9. Click the Inactive option to activate the evaluation. Only an active evaluation will
create evaluation sessions.
10. Click Save and Activate. Once the evaluation is saved and activated, it will start to create evaluation sessions
according to the schedule configured at the beginning of this procedure.
Note: the Evaluation Session list will automatically refresh when a new set of evaluation sessions is available. To
manually refresh the Evaluation Session list, click the Refresh button .
Chapter 6 Quality Management
SpeechMiner UI User Manual 241

Calibration Evaluation
The SpeechMiner UI Quality Management - Calibration Evaluation creates evaluation sessions that can be used to
compare evaluator performance, to ensure consistency across teams. A Calibration Evaluation is performed on one
evaluation in the same way as a Distributed Interaction Evaluation session, the difference is that the result of these
evaluation sessions can be used in a Calibration Score report (that is, a report that compares how the evaluators filled
out the same evaluation session).
Before You Begin:
Create forms to attach to your evaluation(s).
Verify that you have been assigned a QM Manager role. For additional information see: Permissions.
To create an Calibration Evaluation:
1. Click Quality > Evaluations Manager. The Evaluations Manager grid appears.
2. Click the drop down arrow next to New Evaluation and select Calibration.
3. In the Untitled Evaluation field, enter the name of your evaluation.
4. In the Description field, enter a description of the evaluation.
5. In the Session Expires after field, enter the time (Days, Weeks or Months) by which the evaluation session
should be performed after the evaluation is created.
6. Select the Forms tab and from the Forms list, select the forms to add to the evaluation.
As soon as you select a form from the list, it appears in the Evaluation Summary under Forms. Select the form
again to remove the form from the Evaluation Summary. The forms selected consist of the questions that must
be answered to complete the evaluation session.
7. Select the Evaluators tab and from the Evaluators list, select the evaluator(s) that should perform the
evaluation session(s).
As soon as you select an evaluator from the list (Note: you can select more than one evaluator), the evaluator
name appears in the Evaluation Summary under Evaluators.
Click on the evaluator name again to remove the evaluator from the Evaluation Summary.
Chapter 6 Quality Management
SpeechMiner UI User Manual 242

Each evaluator will receive an evaluation session to evaluate the agent(s) associated with the selected
interactions.
When you select more than one evaluator, the resulting Evaluation Sessions are evenly distributed across
evaluators in Round Robin fashion.
8. Select the Interactions tab, configure the evaluation filter options on the left side of the screen, to generate a
list of interactions and click Search.
Note: A Calibration evaluation has a One Time schedule. It creates an evaluation that only produces one
evaluation session.
A Calibration evaluation cannot be a Recurring evaluation.
Your filter selections should be directly related to the business issue for which you want to evaluate an agent(s).
For additional information, see Search Filter.
a. Select one interaction.
As soon as you select an interaction from the list, it appears in the Evaluation Summary under
Interactions. Clear an interaction's check box to remove that specific interaction from the Evaluation
Summary.
Note: If you select more than one interaction, the Calibration Evaluation session will be not activated.
9. Click the Inactive option to activate the evaluation. Only an active evaluation will
create evaluation sessions.
10. Click Save and Activate. Once the evaluation is saved and activated, it will start to create evaluation sessions
according to the schedule configured at the beginning of this procedure.
Note: the Evaluation Session list will automatically refresh when a new set of evaluation sessions is available. To
manually refresh the Evaluation Session list, click the Refresh button .
Chapter 6 Quality Management
SpeechMiner UI User Manual 243

Create an Ad-Hoc Evaluation Session
The Ad-Hoc evaluation enables you to create an evaluation session for a specific interaction or segment currently
being played in the Media Player.
Before you create and/or perform an Ad-Hoc evaluation, consider the following:
By default, the Ad-Hoc evaluation will expire 24 hours after it is created.
An Ad-Hoc evaluation is only visible to the user who created it and to users with the permission to edit all
evaluation sessions.
An Ad-Hoc evaluation can only be created from the Media Player > More options menu for the interaction
currently being played.
To create an Ad-Hoc evaluation session:
1. Select an interaction and click Play . For more information about playing an interaction, see Media Player.
2. Click More in the Media Player and select Evaluate. The Evaluate Interaction window appears.
3. Enter a name in the Evaluation Name field.
4. From the Form(s) list, select the forms that should be included in the Ad-Hoc evaluation session. For additional
details about Forms, see Forms Manager.
5. Click Create. The new Ad-Hoc evaluation session is opened.
6. Perform the evaluation. For details on how to perform an evaluation session, see Perform an Evaluation
Session.
Chapter 6 Quality Management
SpeechMiner UI User Manual 244

Evaluation Sessions
To help ensure that an agent's participation in an interaction coincides with a specific business agenda, SpeechMiner
UI Quality Management evaluators receive a list of evaluation sessions that they must fill out according to a
configurable schedule.
A completed evaluation session provides a view into how an agent communicates with consumers. Such evaluation
sessions provide consistent and regular feedback that helps surface insightful reports, comments and suggestions that
can lead to formal skills training and action plans to improve an agent's performance.
Before you perform an evaluation consider the following:
Every evaluation session is associated with one interaction. When working with a Recording license, every
evaluation session is associated with one segment.
An evaluation session can be saved and continued at a later time. Only when you select Complete will the
evaluation session end.
You can export an uncompleted evaluation session. When you export an uncompleted evaluation session, an
uncompleted prefix is added to the exported file.
A Shared Evaluation session creates evaluation sessions that are not assigned to a specific evaluator. Instead,
each evaluator associated with the session can select and assign himself/herself a specific session from the
available session pool.
Archived evaluation sessions are removed from the Evaluation Session grid, and will only be visible when you
filter to view archived sessions.
A Calibration Evaluation session is filled out in the same way as a Distributed or Shared evaluation session. But,
unlike a Distributed or Shared evaluation a Calibration Evaluation can be used as part of a report that compares
the performance of two or more evaluators.
If your system includes an Analytics license each evaluation contains the specific interaction's transcript.
When performing an evaluation, you have the option of enabling the evaluator to see their evaluation score when
the evaluation session is completed.
To complete an evaluation session, you must answer all the required questions in all the forms associated with
the specific evaluation session.
Chapter 6 Quality Management
SpeechMiner UI User Manual 245

An evaluation session score is visible throughout the evaluation session.
You can select the Default scores to 100% option to turn on all the default answers in all the forms in the
specific Evaluation Session. When this option is turned on the form score is 100%. Also, when this option is
turned on or off, all the information entered up to this point will be deleted. Once the evaluator chooses to turn
on the Default scores to 100% option, and subsequently answer all the questions in the form, the evaluator
can change the default answers and reduce the score.
Note: The Default scores to 100% option does not exempt you from answering questions marked as
Autofail.
Chapter 6 Quality Management
SpeechMiner UI User Manual 246

Evaluation Sessions Grid
The Quality Manager - Evaluations Sessions grid contains a list of all evaluation sessions an evaluator must fill out.
From the grid you can:
View which evaluation sessions were started, in progress and or completed
View whether or not a session was assigned to an evaluator and which evaluator it was assigned to.
Filter the evaluation session list to quickly find and work with a subset of the list.
The Evaluations Sessions grid contains the following information and options:
: Enables you to delete the selected evaluation session.
: Enables you to refresh the Evaluation Session grid with the latest evaluation sessions.
: Use to archive selected evaluation sessions and remove them from the grid.
Filter by name: Enables you to search for a specific evaluation session according to the session's name.
0 Selected: The number of evaluation session selected in the grid.
Filter: Select one or more of the following filter options to limit the evaluation session list, so you can quickly
find the information you are looking for:
Sessions - Filter the list to show all unarchived evaluation sessions.
Archived - Filter the list to only show archived evaluation sessions.
Expired - Filter the list to only show expired evaluation sessions.
Status - Filter the list to only show sessions that have not been started, are in progress and/or have been
completed.
Types - Filter the list to only show distributed, shared, calibration and/or ad-hoc sessions.
Creation Date - Filter the list to only show sessions that were created on a specific date.
Due Date - Filter the list to only show sessions that should be completed on a specific date.
Completion Date - Filter the list to only show sessions that were completed on a specific date.
Agent - Filter the list to only show sessions associated with a specific agent.
Evaluator - Filter the list to only show sessions associated with a specific evaluator.
Chapter 6 Quality Management
SpeechMiner UI User Manual 247

Unassigned - Filter the list to only show sessions that have not been assigned to an evaluator.
Search - Click Search to create a list of Evaluation Sessions that match your filter selections.
Name: The name of the evaluation session.
Evaluator: The name of the evaluator to whom the evaluation session was assigned.
Note: Unassigned sessions are only associated with Shared Evaluations. Unassigned signifies that you can
select the session and assign it to yourself if you are part of the selected evaluators. Once you assign an
Unassigned session to yourself, your name will appear in the Evaluator column.
Interaction ID: The interaction in which the agent participated.
Agent: The agent for which the evaluation session was created.
Description: Contains an explanation about the specific evaluation session.
Type: Indicates whether the evaluation session is a Distributed, Shared or Calibration session. For details,
see Create an Evaluation.
Form(s): The number of forms associated with the evaluation session.
Created: The date on which the evaluation session was created.
Due: The date on which the evaluation session must be completed.
Completed: The date on which the evaluation session was completed.
Status: Indicates the status of the evaluation:
In Progress: The evaluation has started, but has not been completed.
Ready: The evaluation has not started.
Completed: Th evaluation session has been completed.
Creator: The name of the person who created the evaluation session.
Score: The score the agent received as a result of the evaluation.
: Enables you to select the columns that appear in the Evaluations Manager grid.
Note: To return the grid columns to their default state, click Reset to defaults from the Select Columns list.
Chapter 6 Quality Management
SpeechMiner UI User Manual 248

Chapter 6 Quality Management
SpeechMiner UI User Manual 249

Perform an Evaluation Session
The results of an evaluation session provides data in a way that makes it easier to identify the skill sets of your agents,
as well as any skill gaps that need to be filled by additional training.
Note: When performing an evaluation session
You can always click the Clear Form option at the bottom of the form to clear all of your input.
You can select the Default scores to 100% option to turn on all the default answers in all the forms in the
specific Evaluation Session. When this option is turned on the form score is 100%. Also, when this option is
turned on or off, all the information entered up to this point will be deleted. Once the evaluator chooses to turn
on the Default scores to 100% option, and subsequently answer all the questions in the form, the evaluator
can change the default answers and reduce the score.
Note: The Default scores to 100% option does not exempt you from answering questions marked as
Autofail.
To perform an evaluation session:
1. Click Quality > Evaluation Sessions. The Evaluation Sessions grid appears.
2. Configure the filter parameters (on the left side of the screen), to create a list of Evaluation Sessions that
best match the information you are looking for.
For details about the filter parameters see: Evaluation Sessions Grid.
3. Click Search.
4. Click the name of the evaluation you want to perform.
Note: If you select an Unassigned evaluation session, you will be asked to confirm that the specific
session should be assigned to you.
5. From the Form list at the top of the screen, select the first form you want to fill out.
Once you complete the selected form, continue filling out the remaining forms.
6. Answer the questions provided. If necessary, click +More to view the entire question.
Note: You cannot complete an evaluation session without answering all the required form questions.
Required form questions are marked with a red star *.
Chapter 6 Quality Management
SpeechMiner UI User Manual 250

7. Click the Play icon to playback the interaction to hear the discussion between the agent and the
customer. (optional). For more information about playing an interaction, refer to Media Player.
8. Click the inactive Show score option to enable the evaluator to see the evaluation
session scores during the evaluation and a final score when the evaluation is completed.
For more details about scores see Configure Question Weights.
9. If the interaction is not suitable in any way (for example, poor audio/video quality, irrelevant interaction,
and so on), you can click the Replace Interaction icon to select a different interaction for the
evaluation session (optional).
Note: The Replace Interaction option is only available in evaluation sessions associated with interactions
derived from a search criteria. Evaluation sessions associated with manually selected interactions,
Calibration evaluations and Ad-Hoc evaluations will not include the Replace Interaction option.
Replacing the interaction associated with the evaluation session will reset all the answers in the form(s)
associated with the same evaluation session.
10. Select one of the following options:
Note: When an evaluation session is completed, the interaction associated with the evaluation session is
automatically tagged Evaluated.
The Evaluated tag (visible both in the Search Filters and the Search Results grid) enables you to
recognize interactions that have already been part of an evaluation session and subsequently prevents
evaluated interactions from being reused.
Scroll down to the bottom of the form and click Complete to finalize the evaluation session. A
summary of the completed evaluation session appears.
a. Click Show More Options: for the following options:
Export Session to CSV: Downloads the evaluation session to an Excel (password
protected) document and is saved in a location of your choice.
Export Session to PDF: Downloads the evaluation session to a PDF document
and is saved in a location of your choice.
Notify agent of results: Creates an action item for the agent associated with the
specific evaluation session. See the Notify agent bullet below for further
instructions.
b. Click Complete at the bottom of the window to finalize this process. The process will
continue according to your Show More Options: selection. The evaluation session's status
in the Evaluation Session grid will change to Completed.
Chapter 6 Quality Management
SpeechMiner UI User Manual 251

In the top right corner of the screen, open the Save menu and select one of the following options:
Save: Save your work so you can continue at a later time. If you select to save the
evaluation session, its status in the Evaluation Session grid will be In Progress.
Complete: Finalize the evaluation session. A summary of the completed evaluation session
appears.
a. Click Show More Options: for the following options:
Export Session to CSV: Downloads the evaluation session to an Excel
(password protected) document that is saved in a location of your choice.
Export Session to PDF: Downloads the evaluation session to a PDF
document that is saved in a location of your choice.
Notify agent of results: Creates an action item for the agent associated with
the specific evaluation session. See the Notify agent bullet below for further
instructions.
b. Click Complete at the bottom of the window to finalize this process. The process
will continue according to your Show More Options: selection. The evaluation
session's status in the Evaluation Session grid will change to Completed.
Note: You can edit a session with an expired due date, but you cannot select Complete if
the session due date has passed.
Export to CSV: Create a .csv file that contains evaluation session details in an Excel
worksheet. Since the evaluation session has not been completed, an uncompleted prefix will
be added to the exported file.
Export to PDF: Create a Adobe PDF file that contains evaluation session details.
Close: Close the evaluation session without saving your work.
Notify agent: Send the agent associated with the evaluation an action item about the
specific evaluation. The Add Action Item window appears.
1. In the window that appears, enter a due date by which the specific agent must
perform this action item, enter what you would like the agent to do in the Summary
field and select the Show the agent his/her evaluation score checkbox if you
want the agent to be aware of the score he/she received.
To learn more about scores refer to Configure Question Weights.
Chapter 6 Quality Management
SpeechMiner UI User Manual 252

2. Click Complete. An Evaluator Message is added to the specific agent's Action
Items list. See Action Items for additional details.
Note:
You do not have to wait to complete the evaluation session to select Save >
Notify agent. You can send the action item at anytime during the evaluation
session.
When the agent opens the new Notify Agent action item (Type:
EvaluatorMessage), he/she can review the specific evaluation session and
send a response back to the evaluator. In the Evaluator Message action item,
the Summary instructions are a link to the associated evaluation session.
Chapter 6 Quality Management
SpeechMiner UI User Manual 253

Open and Edit a Completed Evaluation Session
A completed evaluation session provides an overview of the agent's productivity in relation to a specific business goal.
After an evaluation session is completed users assigned to the evaluation session can change the question's answers.
Once this change is saved the evaluation session score is automatically updated.
Note: Users who are given the Edit All Evaluation Sessions permission, can also edit and complete evaluation
sessions not assigned to them, if the session contains interactions they have permission to view.
To open and edit a completed evaluation session:
1. Click Quality > Evaluation Sessions. The Evaluation Sessions grid appears.
2. Click the name of the completed evaluation session you want to review. The completed evaluation opens with
the following options:
Form List: View the different evaluation session forms and the given answers.
Show Score: View the evaluation session score. The score appears next to the Form list and within the
exported Excel worksheet.
The score is automatically updated if a change is made to one or more answers.
Save: Select one of the following options:
Save: Save your work so you can continue at a later time.
Export to CSV: Create a .csv file that contains evaluation session details in an Excel worksheet.
Since the evaluation session has not been completed, an uncompleted prefix will be added to the
exported file.
Export to PDF: Create a Adobe PDF file that contains evaluation session details.
Note: You can select the Export option even if the evaluation session has not been completed. In
this case, a uncompleted prefix will be added to the exported file
Close: Close the evaluation session without saving your work.
Notify agent: Send the agent associated with the evaluation an action item about the specific
evaluation. For details about each of these options, refer to Perform an Evaluation Session.
External ID: A unique number assigned to the interaction in the SpeechMiner UI database.
Media Player: Play back the interaction associated with the evaluation session. For more information
about playing an interaction, refer to Media Player.
Chapter 6 Quality Management
SpeechMiner UI User Manual 254

Session Characteristics: To see when the session was last changed and who changed it, click the
arrow in the top right corner of the screen next to the date and time and notice the information associated
with Last edited by.
Default scores to 100%: Turn on all the default answers in all the forms in the specific Evaluation
Session. When this option is turned on the form score is 100%. Also, when this option is turned on or
off, all the information entered up to this point will be deleted. Once the evaluator chooses to turn on the
Default scores to 100% option, and subsequently answer all the questions in the form, the evaluator can
change the default answers and reduce the score.
Note: The Default scores to 100% option does not exempt you from answer questions marked as
Autofail.
3. Edit the session if required.
4. Click Save to save your changes.
Note: If you do not save your changes when you change an evaluation session's answers, your changes will not effect
the session score.
Chapter 6 Quality Management
SpeechMiner UI User Manual 255

Archive an Evaluation Session
Archiving evaluation sessions, enables you to remove sessions no longer needed online, but which must still be
accessible at a later date if required. That is, archived sessions will be removed from the session grid, and will only be
visible when the user filters to view archived sessions. By limiting the number of sessions that appear, archiving also
enables you to maximize performance by minimizing search and filter response times.
There are two types of archiving options:
Manual Archive - Enables you to select specific sessions to archive.
Automatic Archive - Enables you to schedule archiving after a specific period of time.
Note: You can only archive completed and expired evaluation sessions.
To manually archive an evaluation session:
1. Select Quality > Evaluation Sessions. A list of evaluation sessions appears.
2. Select the evaluation sessions you want to archive.
3. Click the Archive button . The selected sessions are removed from the grid and archived.
Note: if the Archive button is not visible, you do not have the permission required for archiving sessions.
To automatically archive an evaluation session:
Automatic archive is configured when the entire system is installed and configured.
To change how often Automatic archive is run, you must change the default value.
To change the default value refer to SpeechMiner UI Administration Guide > Configuring SpeechMiner UI >
Additional Configurations > Archive QM Evaluation Sessions.
Chapter 6 Quality Management
SpeechMiner UI User Manual 256

Chapter 6 Quality Management
SpeechMiner UI User Manual 257

Coaching
The coaching system is designed so you can create coaching sessions that can help managers, supervisors, quality-
monitoring personnel and agents manage training objectives.
Both novice and experienced personnel can benefit from taking part in a coaching session. New employees can be
introduced to their jobs and veterans can be encouraged to fine-tune their techniques by means of coaching sessions
that highlight specific interactions. For example, the coach and agent can listen to example interactions that highlight
and demonstrate to the agent how to properly interact with a customer.
Coaching sessions consist of lists of interactions that the trainee is asked to listen to, either in part or in their entirety.
The interactions may include notes, Action Items, and links to other sites. While anyone with the required permissions
can open a new coaching session, it is the session's coach who designs the session by defining the Interaction Lists,
Action Items, and links, and by adding notes to guide the trainee through the session.
In this section you will learn how to:
Create a Coaching Session: Manage training objectives.
Participate in a Coaching Session: Learn about new techniques, processes and so on.
Edit a Coaching Session: Adjust your training goals.
Manage Coaching Sessions: View specific information and better understand the session details.
Create a Coaching Session Report: Extract statistical information about the coaching sessions in the Coaching
Session grid.
Manage Coaching Session Types: Classify each session.
DISCLAIMER: This feature is not available in our Cloud offering. It is only available on Premise. For details, refer
to Supported Deployments.
Chapter 7 Coaching
SpeechMiner UI User Manual 258

Coaching Menu Reference
The following list provides a brief description of each Coaching menu item:
Sessions:
Use to create coaching sessions that will help you train your employees.
DISCLAIMER: This feature is not available in our Cloud offering. It is only available on Premise. For details, refer
to Supported Deployments.
Chapter 7 Coaching
SpeechMiner UI User Manual 259

Coaching Session Grid
The Coaching Session grid contains a list of all your coaching sessions. The list contains general information about
each coaching session and offers you a wide variety of tools to manage your sessions.
The left side of the Coaching Session grid contains the session list.
Below the Coaching Session list is a calendar that shows when the sessions in your list are scheduled.
The right side of the screen displays details about the session selected in the grid.
DISCLAIMER: This feature is not available in our Cloud offering. It is only available on Premise. For details, refer
to Supported Deployments.
The Coaching Session grid contains the following information:
Status : The session status. Session statuses are indicated by icons in the session list and by
color-coding in the calendar.
Scheduled: The session has been created, but it has not been started.
In Progress: The trainee is currently taking part in the session.
On Hold: The session was paused after the trainee began taking part in it.
Completed: The trainee completed the session.
Schedule Date: The date and time on which the trainee is expected to start the session
Name: The name of the session.
Coach: The coach's user name.
Trainee: The trainee's user name.
Actions: Click one of the following actions:
Adds the session to the Outlook calendar on your local computer.
Re-sends the email notification about the session to the coach and trainee.
Chapter 7 Coaching
SpeechMiner UI User Manual 260

Creates a permalink to the specific session.
Open the Sessions Details screen in setup mode so that you can add content to the session or
modify the session properties and content.
Note: this action is only available to the coaching session creator and the coach. The trainee cannot open
the Session Details in setup mode.
Generates a report containing statistical information about all of the sessions assigned to the trainee
assigned to the session.
Deletes the specific session.
Chapter 7 Coaching
SpeechMiner UI User Manual 261

Create a New Coaching Session
In this page you will learn how to create a new Coaching Session.
To create a new comprehensive coaching session that will produce the best results, it is recommended that the
following be added to the new session:
Interaction lists
Action Items
Links
DISCLAIMER: This feature is not available in our Cloud offering. It is only available on Premise. For details, refer
to Supported Deployments.
To create a new coaching session:
1. Select Coaching > Sessions.
2. Click the New Sessions icon .
3. Enter the following information:
Session Name: Indicates the name of the session.
Schedule Date: Select the date and time at which the trainee should take part in the session.
Coach: Select the name of the coach who will oversee this coaching session.
Trainee: Select the name of the user who should take part in this coaching session.
Type: Select the type of coaching session that should be performed.
Reason Code: Select the reason why the coaching session should be performed.
Public/Private: When you add notes in the Notes field, select Public if you want the notes to be visible
to others. Select Private if you do not want anyone but yourself to see the notes.
Chapter 7 Coaching
SpeechMiner UI User Manual 262

Notes: Type anything about the session. Public notes can be used to help the coach or trainee with the
session.
4. Click Save.
The coaching session is created and an invitation is sent to the coach and trainee's My Messages widget. If their
user profiles include an email address, notifications are sent to their email. The notification emails include an iCal
file. When the attachment is opened, the session is automatically added to the user's Outlook calendar.
The new session will now appear in the Coaching Session list. When the session is selected in the Coaching
Session list, its details appear to the right of the list.
To add and manage session interactions lists:
Once a coaching session is created, you need to add an interaction list(s) to the session. The interaction list provides
the trainee with the knowledge required for the training objective.
There are two types of interaction lists. One list is created as a result of an interaction search criteria and another list
can be created manually.
For more information, see Interactions Lists.
Note: Interaction lists can be added in the Session Details screen during the setup mode. Once they are added, the
lists can be modified by adding more interactions and removing existing interactions. Modifications that are made to an
interaction list in the Coaching Session do not affect the original interaction list.
To each coaching session you can:
Add an existing interaction.
Create a new interaction list.
To add an existing interaction list to a session:
When an existing interaction list is added to a coaching session, a copy of the original list is made and attached to the
session. The copy becomes part of the specific coaching session and is not linked to the original interaction list. It can
only be viewed from the coaching session. From within the coaching session you can add or remove interactions from
the list and even change the search criteria. These modifications do not affect the original interaction list or the Saved
Searches.
1. Select Coaching > Sessions.
2. Click the Edit icon associated with the coaching session to which you want to add an interaction list.
3. Click the Add interaction list icon next to Interactions.
A list of Interaction Lists and Saved Searches appears.
Chapter 7 Coaching
SpeechMiner UI User Manual 263

Select an interaction list, or a Saved Search, that contains the interaction list you are interested in.
A copy of the interaction list is created and attached to the coaching session. The list appears under the
General Details > Interaction Lists:.
To add a new interaction list to a session:
1. Select Coaching > Sessions.
2. Click the Edit icon associated with the coaching session to which you want to add an interaction list.
3. Click New Search. The search criteria options appear.
4. Fill in the search criteria and click Search. The search results appear to the right of the form.
5. Select the check box next to each interaction that you want to add to the new interaction list.
6. At the top of the list click Batch Actions > Add to and select Coaching.
7. Select the coaching session to which you are adding the new interaction list.
8. Select New Static List.
9. Enter a name for the list and click OK. The new list name appears under the General Details > Interaction
Lists:.
To add and manage action items:
Adding an action item to a coaching session enables you to ask the trainee to perform a particular task.
Note: When you create an action item from within a coaching session, the action item appears both in the coaching
session and in the general Action Items list. The item can be edited from both locations.
1. Select Coaching > Sessions.
2. Click the Edit icon associated with the coaching session to which you want to add an action item.
3. Click the Add Action Item icon in the top corner of the coaching session screen.
4. In the Action Item window, configure the parameters as necessary. For more information, see Action Items.
5. Click Save. The action item is added to the coaching session and appears under the Action Items title.
Chapter 7 Coaching
SpeechMiner UI User Manual 264

To add and manage session links:
A coaching session can contain links to external files, websites and SpeechMiner UI permalinks. For example, if you
want the trainee to learn from content in a website, you can add a link to the specific website. During the coaching
session, when the trainee clicks the link a new window is opened and the link is displayed.
1. Select Coaching > Sessions.
2. Click the Edit icon associated with the coaching session to which you want to add a link.
3. Click the Add link icon next to Links under General Details.
4. Type a description of the link in the Description field.
5. Type the link address in the URL field.
6. Click OK. The Add link to session window closes and the link is added under General Details >
Interaction Lists:.
Note: Click the link under the General Details area and a new browser is opened with the contents of the link.
Chapter 7 Coaching
SpeechMiner UI User Manual 265

Participate in a Coaching Session
Once a coaching session is created, the trainee assigned to the session should begin the session on the scheduled date.
Participating in a coaching session involves listening to interactions, reading notes, opening links, and performing action
items attached to the session.
DISCLAIMER: This feature is not available in our Cloud offering. It is only available on Premise. For details, refer
to Supported Deployments.
To participate in a session:
1. Select Coaching > Sessions.
2. In the Coaching Session grid, click the session you want to participate in. The Session Details screen is
opened.
3. Click Accept Session to indicate that you are knowingly starting the selected session.
4. Click Start. The start time is recorded and the status is changed to In Progress.
Note: Only a coach can click Pause to temporarily stop the session.
5. Work through all the actions items and notes. Use the information in the notes to guide you through the session.
6. Listen to the interactions associated with the session and pay close attention to the parts mentioned in the notes.
7. On the left side of the session screen, under General Details, click the name of the interaction list. The
Interaction list is opened on the right side of the screen.
8. Click Play to playback a specific interaction. The Media Player opens below the grid and begins to play the
interaction. For more information, see Media Player.
9. Click End complete the session.
Chapter 7 Coaching
SpeechMiner UI User Manual 266

Chapter 7 Coaching
SpeechMiner UI User Manual 267

Edit a Coaching Session
After a session is created and saved, you can edit the session details.
Note: A session can be opened from the Coaching Session grid or from the My Messages widget by clicking the
specific session name.
DISCLAIMER: This feature is not available in our Cloud offering. It is only available on Premise. For details, refer
to Supported Deployments.
Once a session is created you can:
Edit a coaching session's details.
Add and/or remove a session's interaction list.
Add or edit a session note.
Edit a session link.
Delete a session link.
To edit coaching session details:
1. Select Coaching > Sessions.
2. Click the Edit icon associated with the coaching session whose properties you want to edit.
3. Click the Edit icon to the far right of the General title. The fields become active.
4. Make the necessary changes.
5. Click the Save icon to the far right of the General title. The changes are saved.
To modify the session Interaction list:
Chapter 7 Coaching
SpeechMiner UI User Manual 268

Interactions can be added to an interaction list from any Interaction grid, Event grid and Media Player. You can also
remove interactions from a list.
Note: If the interaction list was copied from a global list, the global list is not affected by the changes you make to the
coaching session interaction list.
To remove an interaction list from a session:
1. Select Coaching > Session.
2. Click the name of the session from which you want to remove an interaction list.
3. Under General Details click the delete icon . The session is deleted.
To add an interaction to an existing session interaction list:
1. Select Explore > Search.
2. Create a search for the interaction(s) you want to add. For additional information, see Create a New Search.
3. Select the interactions you want to add to the interaction list in the session.
4. Click Batch Actions. For additional information, see Batch Actions.
5. Select Add To....
6. Select Interaction List.
7. Select the list to which you want to add the interaction(s).
8. Click Add. The interactions are added to the list. The interaction list is automatically updated for the specific
coaching session.
To add or edit a session note:
Session notes can be added to a coaching session while it is created and after. Notes can be defined as:
Public notes: Generally intended to help trainees understand the purpose of the coaching session and draw
their attention to those aspects of the interactions that need to be highlighted. Public notes are visible to
everyone who accesses the session.
Private notes: Visible only to the person who wrote them. You can use Private notes to add reminders or
comments to yourself. For example, when you create a session, you can leave yourself a note reminding you to
add a link later on.
Chapter 7 Coaching
SpeechMiner UI User Manual 269

1. Select Coaching > Sessions.
2. Click the Edit icon associated with the coaching session to which you want to add a note.
3. At the bottom of the screen click the Add new note icon to the right of the Notes title.
4. In the field that appears write your new note.
5. From the Visibility list select Public or Private.
6. Click Add. The note is added to the coaching session.
Note: You can always open the session's details and edit the contents of the note by clicking the Edit icon
associated with the specific note, or delete the note by clicking the Delete icon .
To edit a session's link:
1. Click Coaching > Session.
2. Click the name of the session whose associated link you want to edit.
3. Click the Edit icon next to the link you want to edit. The Add link to session window opens.
4. Modify the description and/or link as required and click OK. The link is automatically modified.
To delete a link from a session:
1. Click Coaching > Session.
2. Click the name of the session associated with the link you want to delete.
3. Click the Delete icon next to the link you want to delete.
4. Click Yes if you are sure you want to delete the link. The link is deleted from the Links list.
Chapter 7 Coaching
SpeechMiner UI User Manual 270

Working with Coaching Sessions
You can work with the Coaching Session grid to view specific sessions and details about each session.
DISCLAIMER: This feature is not available in our Cloud offering. It is only available on Premise. For details, refer
to Supported Deployments.
From the Coaching Session grid you can:
Filter the Coaching Session grid.
View sessions on a specific date.
View session details.
Export an Interaction List / Saved Search.
To filter the Coaching Session grid:
You can use the following two filters to limit the sessions that are displayed in the list:
General filter:
Enables you to filter the session list according to a specific user and date. You can also select whether or not to include
completed sessions.
The following general filter controls are located at the top of the session list:
User: Select All Sessions to display all the sessions that you have permission to see. Select My Sessions to
include only sessions in which you are either the creator, coach or trainee.
Date Range (From and To): From the Form list, select the beginning of the period to include in the session
list. From the To list, select the end of the period to include in the list.
Completed: Select this check box to include sessions that were completed in the list. Clear the check box to
only include sessions that were not completed.
Column based filter:
Enables you to filter the session according to session status and trainee.
Status column: from the Status column, select the status you want to include in the list. Select All to view
Chapter 7 Coaching
SpeechMiner UI User Manual 271

sessions with any status.
For more information, see Coaching Session Grid
Trainee column: in the Trainee text field type part of the trainee's name or user name to include in the session
list. As you type names and user names, the letters are displayed in a drop down list. Select the trainee from the
list. Only sessions with the selected trainee are displayed in the session list.
To view sessions on a specific date:
The lower left area of Coaching > Session contains a calendar in which you can see when the sessions that appear in
the list are scheduled to take place.
From the calendar you can:
Choose a time period to display by clicking the month, weekly or daily links in the top right corner of the
calendar.
View the previous and next time periods by clicking the previous and next icons.
Open the Session Details screen for a specific session by clicking the session from within the calendar.
To view session details:
To view session details in the Coaching > Session screen, click the specific session row. The session details are
displayed on the right side of the screen.
The session details display includes the following areas:
Session Controls: Includes a link to the Coaching Session grid, status information and session controls.
General Details: Lists the interaction lists, saved searches and links associated with the session.
General Details: Includes the session properties. If the trainee began the session, the session start time, end
time and duration are displayed in this area. If the trainee did not start the session, only the Due Date appears.
Notes: Lists all the public and private notes attached to the specific session.
Interaction Lists: Lists all the interaction lists associated with the session. This list contains how many
interactions in the list have comments and how many interactions are included in the list. For example, (1,3)
indicates that one interaction in the list has comments and the list contains three interactions. If an interaction has
comments, the comments appear below the summary information.
Action Items: Lists all the action items associated with the session.
Chapter 7 Coaching
SpeechMiner UI User Manual 272

Links: Lists all of the links included in the session and indicates whether or not the trainee opened them.
To export an Interaction List / Saved Search from a Coaching Session:
1. Select Coaching > Sessions and click the name of the session from which you want to export an Interaction
List or Saved Search.
2. Under General Details, click the Export icon next to the Interaction List / Saved Search you want to
export.
3. Click Yes if you want to export the audio with the .csv file or No if you want to only export the .csv file.
A zip file is created with the exported Interaction List and/or Saved Search.
Chapter 7 Coaching
SpeechMiner UI User Manual 273

Create a Coaching Session Report
Coaching Session reports provide statistical information about the coaching session. The report breaks down the
sessions by status and indicates how many sessions have not been started, how many are in progress and how many
have been completed. The Coaching Session report also provides information about how long the trainee participated
in the session on average and in total. Additional details about the sessions appear in the lower half of the report. The
details are divided into groups by trainee. For more information about report details, see View Report Details.
DISCLAIMER: This feature is not available in our Cloud offering. It is only available on Premise. For details, refer
to Supported Deployments.
There are two types of Coaching Session reports:
General Report: Includes all coaching sessions that are included in the set defined by the general filters in the
Coaching Session grid. For example, if the filter specifies My Sessions for September 1st through September
30th, and includes Completed sessions, all sessions that meet this criteria are included in the report.
Note: Column filters do not affect the criteria.
To generate a general report:
1. Select Coaching > Sessions.
2. In the top right corner (above the Coaching Session grid) click the Run Report icon . The report is
generated and displayed in a new browser window.
User Report: Includes all the sessions that are included in the set defined by the general filters in the Coaching
Session grid for a specific user. If the user is creator, coach or trainee, the session is included in the report.
To generate a user report:
1. Select Coaching > Sessions.
2. In the row associated with the user on which you want to base the report, click the Run Report icon
under Actions. A report for all the sessions in which the trainee is either the creator, coach or trainee
is generated and displayed in a new browser window.
Chapter 7 Coaching
SpeechMiner UI User Manual 274

Chapter 7 Coaching
SpeechMiner UI User Manual 275

View Report Details
The lower part of a Coaching Session report lists the sessions that were included in the report. From the report, you
can listen to interactions that the trainee listened to during the session, and open the Session Details screen.
The sessions are grouped by trainee and include the following information:
The name of each session.
The name of the coach.
The date on which the session was scheduled.
The date on which its status was last changed.
The session status.
Whether or not the session was started or completed.
The amount of time the trainee spent on the session.
DISCLAIMER: This feature is not available in our Cloud offering. It is only available on Premise. For details, refer
to Supported Deployments.
To view additional details about a session:
1. From within the report, click the beside the session name.
Notes and resources (links) included in the session are displayed below the session name, as well as links to all
the interactions that the trainee listened to during the session.
To play an interaction that appears in the expanded list:
1. From within the report, click the interaction link.
The Media Player opens in the window and plays the interaction.
Note: To return to the report, press Backspace.
To open a session in the Session Details screen:
1. From within the report, click the name of the session.
The Session Details screen opens in a new browser window.
Chapter 7 Coaching
SpeechMiner UI User Manual 276

Chapter 7 Coaching
SpeechMiner UI User Manual 277

Manage Session Types and Reason Codes
Every coaching session can be assigned a session type, a session sub-type and a reason code.
A session type can help you identify the purpose of a session and the type of trainee intended for the session. We
recommend that the session type name represent a specific intent and objective since the name represents the scope of
the session (for example, training, testing, and so on).
A session sub-type can help you specify a secondary or subordinate session type that falls under the general
classification of a specific session type.
A reason code can help you identify the cause, explanation, or justification for completing a coaching session. A
reason code provides you with the opportunity to specify why the coaching session was completed.
You can add additional session types and reason codes as appropriate for your organization. For more information
about assigning a session type and reason code, see Create a New Coaching Session.
DISCLAIMER: This feature is not available in our Cloud offering. It is only available on Premise. For details, refer
to Supported Deployments.
When working with session types, session subtypes and reason codes you can:
Create a new session type.
Activate / Deactivate a session type.
Modify the name of a session type.
Create a new session subtype.
Activate / deactivate a session subtype.
Modify the name of a session subtype.
Create a new reason code.
Activate / Deactivate a reason code.
Modify the name of a reason code.
Note: Once a session type, subtype and reason code are saved, you cannot delete them. You can only modify the
Chapter 7 Coaching
SpeechMiner UI User Manual 278

name and deactivate it so that it is not available. The General session type cannot be deactivated.
To create a new session type:
1. Select Coaching > Sessions.
2. Click the Configure button and select the Session Types tab.
3. In the New Type field, type the name of the new session type.
4. Click Add. The session type is added to the list and its status is set to Active.
5. Click Save. The new session type is included in the list of available session types.
To activate or deactivate a session type:
1. Select Coaching > Sessions.
2. Click the Configure button and select the Session Types tab.
3. Under Active, select the check box next to a session type to activate it. Clear the check box next to a session
type to deactivate it.
4. Click Save. The change is implemented.
To modify the session type name:
1. Select Coaching > Sessions.
2. Click the Configure button and select the Session Types tab.
3. Modify the name as necessary.
4. Click Save. The change is implemented.
To create a new session subtype:
1. Select Coaching > Sessions.
2. Click the Configure button and select the Session Types tab.
3. Click Add Subtype next to the session type to which you want to add a subtype.
Chapter 7 Coaching
SpeechMiner UI User Manual 279

4. In the Subtype field, type the name of the new subtype.
5. Click Add. The subtype is added to the list and its status is set to Active.
6. Click Save. The new subtype is included in the list of available session subtypes.
To activate or deactivate a session subtype:
1. Select Coaching > Sessions.
2. Click the Configure button and select the Session Types tab.
3. Select the check box next to the subtype that should be active and clear the check box next to the subtype that
should be deactivated.
4. Click Save. The change is implemented.
To modify the session subtype name:
1. Select Coaching > Sessions.
2. Click the Configure button and select the Session Types tab.
3. Modify the name as necessary.
4. Click Save. The change is implemented.
To create a new reason code:
1. Select Coaching > Sessions.
2. Click the Configure button and select the Reason Codes tab.
3. In the New Code field, type the name of the new reason code.
4. Click Add. The new reason code is added to the list and its status is set to Active.
5. Click Save. The new reason code is included in the list of available reason codes.
To activate or deactivate a reason code:
1. Select Coaching > Sessions.
Chapter 7 Coaching
SpeechMiner UI User Manual 280

2. Click the Configure button and select the Reason Codes tab.
3. Under Active, select the check box next to a session type to activate it. Clear the check box next to a session
type to deactivate it.
4. Click Save. The change is implemented.
To modify the reason code name:
1. Select Coaching > Sessions.
2. Click the Configure button and select the Reason Codes tab.
3. Modify the name as necessary.
4. Click Save. The change is implemented.
Chapter 7 Coaching
SpeechMiner UI User Manual 281

Tools
SpeechMiner UI Tools provide access to an array of global SpeechMiner UI functions and management features.
For a list of functions and management features refer to:
System Admin
Export Completed QM Sessions
Define Tags
Depending on your permissions, and on your system's mode of operation, you may be able to use these features to:
Manage user accounts and permissions, categories and Preset Views.
Monitor and manage the system and its servers.
View information about the definitions of Topics, Programs, and Categories that are defined in the system and
used by SpeechMiner UI to analyze interactions.
Chapter 8 Tools
SpeechMiner UI User Manual 282

Tools Menu Reference
The following list provides a brief description of each Tools menu item:
System Admin:
Enables you to monitor and manage the system and its servers as well as some of its global features (for example,
Preset Views and Monitor System).
Export Completed QM Sessions
Enables you to enables you to perform a batch export of QM session data associated with sessions that were
completed during a specific date range.
Define Tags
Enables you to create tags that can be used to establish a connection between a specific interaction and a specific
topic.
Chapter 8 Tools
SpeechMiner UI User Manual 283

System Admin
System Administration tools enable you to monitor and manage the system and its servers, as well as some of its
global features (for example, Preset Views, Monitor System and so on).
Note: Some of the options described in this section are not available in Recording Only or Analytics and Recording
modes.
System Administration tools include:
Preset View: Views designed by administrators and managers and assigned to the View page of a specific
user(s).
Monitor System: Used to monitor the status of SpeechMiner UI modules, start / stop system machines
and view system messages.
Manage Interaction Queue: Used to control the order in which interactions are processed by SpeechMiner UI.
Purge System: Used to safely remove old interactions from the system to reduce the database size and
generate better performance overall.
Manage Cache: Used to reset the cache for all or specific interface elements such as agents, saved reports,
users and groups and so on.
Interactions Admin: Used to manage audit tasks, reprocess interactions and clean the database of information
about terms that were removed from topics.
System Configuration: Used to review system configuration and security information to enable you to better
understand the environment you are working in.
Alerts: Used to send email alerts to specific people when groups of interactions have certain characteristics.
Metadata Manager: Used to change the names of metadata filter options and metadata columns in the search
results so that the names clearly represent the meaning of the data.
Chapter 8 Tools
SpeechMiner UI User Manual 284

Chapter 8 Tools
SpeechMiner UI User Manual 285

Preset View
Preset Views are views designed by administrators and managers and assigned to the View page of one or more
specific users.
The Preset View enables you to create a view that generates information that you think is essential for the user to see.
Note: A View is a set of widgets that displays summary information about a specific set on interactions. For more
information, see Dashboard.
With the Preset View tool you can:
Create a new Preset View.
Publish a Preset View.
Edit a Preset View.
Edit the Preset View layout.
Delete a Preset View.
Move a Preset View.
To create a new Preset View:
1. Select Tools > System Admin > Preset Views.
2. Click the New icon .
3. In the Name field, type the name of the Preset View.
Note: Although you can add Permissions now, it is recommended that you design the view (add widgets and
set the layout) before adding the roles.
4. Click Save. A Dashboard > View tab (with the name you gave) is opened.
5. Use the Add Widgets and Change Settings option to create the view as necessary. For more information,
see Dashboard.
6. Click Back to Preset Views, once you are finished designing the Preset View. The Preset View grid is
displayed.
Chapter 8 Tools
SpeechMiner UI User Manual 286

7. Click the Edit icon under the Permissions column to set the Preset View permissions. The Edit Preset
View window opens.
8. Configure permissions for the Preset View:
a. From the Role Name column select a user role from the list provided. For more information, see
Administer Roles.
b. Click Add. A permission row is added for the selected user role. Check boxes appear in the row for
each type of permission.
c. Select the check box associated with the permission you want to grant the users associated with the
selected user role.
9. Repeat step 8 for each role to which you want to publish this Preset View.
10. Click Publish Preset View to publish the Preset View. For additional information, see Publish Preset View.
To publish a Preset View:
After you create a new Preset View or modify an existing Preset View, you must publish the view for it to appear in
the intended user's Dashboard > View.
Published Preset Views appear for users who have the user role permissions set for the specific Preset View
Note: When you publish a Preset View that was already published, the new version overrides the existing version. In
addition, when you republish a Preset View, all its local changes (made by individual users) are removed. The new
version replaces the existing Preset View.
1. Select Tools > System Admin > Preset Views.
2. Select the check box associated with the Preset View you want to publish.
3. Click the Reset icon . You are prompted to confirm if you want this version of each selected Preset View to
override any previous version of the same view.
4. Click Yes. The Preset View is published to the View page associated with all the users with the roles selected
for the specific Preset View.
To edit a Preset View:
You can edit the name, description and permissions of any Preset View that you created.
The changes are implemented as soon as you save them.
Chapter 8 Tools
SpeechMiner UI User Manual 287

Note: You do not have to republish the Preset View after you change its settings.
1. Select Tools > System Admin > Preset Views.
2. Click the name of the Preset View you want to edit.
3. Modify the name, description and/or permissions as required.
4. Click Save. The changes are saved and published to the user's Dashboard > View page.
If you removed a user role from the Permissions grid, the view is removed from the View page associated with
the user who has the removed role.
To edit a Preset View layout:
You can modify the layout and widget set of any Preset View you created.
Note: After you modify a Preset View layout, you must publish the view again to implement the changes on the users'
Dashboard > View pages. In addition, when you republish a Preset View all it's local changes (made by individual
users) are removed. The new version replaces the existing Preset View.
1. Select Tools > System Admin > Preset Views.
2. Click the Layout icon associated with the Preset View you want to modify. The specific Preset View is
displayed.
3. Modify the layout and widget selection as required. For more information, see Working with Dashboard Views.
4. Click Back to Preset Views when you finish changing the layout.
5. Click Publish the Preset View.
To delete a Preset View:
When you delete a Preset View it is deleted from all the Dashboard > View pages in which it currently appears.
1. Select Tools > System Admin > Preset Views.
2. Select the check box associated with the Preset View you want to delete.
3. Click the Delete icon . You are prompted to confirm that you want to delete the selected Preset View.
4. Click Yes. The Preset View is deleted.
Chapter 8 Tools
SpeechMiner UI User Manual 288

To move a Preset View:
1. Select Dashboard and click the name of the Preset View you want to move.
2. Place your mouse over the top corner of the view you want to move. The mouse pointer changes to a plus.
3. Drag the view to its new location and release the mouse button. The view is moved to its new location among
other views and dashboards.
Chapter 8 Tools
SpeechMiner UI User Manual 289

Monitor System
With the Monitor System tool you monitor the status of SpeechMiner UI modules, start / stop system machines
and view system messages.
With the Monitor System tool you can:
Monitor module status.
View system messages.
Note: The system can be configured to send reports about errors via email to specified recipients whenever errors
occur. For additional information, see Alerts.
To monitor module status:
1. Select Tools > System Admin > Monitor System.
2. Review the following status information:
Status Description
All Interactions Indicates the number of interactions currently in the SpeechMiner UI database.
Not Processed:
Indicates the number of interactions waiting to be processed. This is the number of interactions that
have been added to the system by the fetcher, but have not gone through recognition.
Last Interaction Time:
Indicates the last time an interaction was added to the system.
Chapter 8 Tools
SpeechMiner UI User Manual 290

Statistics
Log Errors: The number of errors that have not been handled.
In Process: The number of interactions currently being processed.
Waiting for Categorization: The number of interactions waiting to be processed, plus
interactions that completed processing but are awaiting categorization.
Waiting for Indexing:
The number of interactions that have not been indexed and therefore will
not appear in the Search Results grid.
Note:
Waiting for Indexing grows exponentially when re-indexing occurs. But, the number quickly
goes down. This does not affect new interactions. Re-indexing occurs when:
- Agent hierarchy changes.
- SMART Topic or Category changes.
- Assigning a Manual Category.
- Playing a single interaction.
- Adding a comment to a single interaction.
Log Warnings: The number of warnings that have not been handled.
Total Processed (24H):
The number of interactions that were processed in the last 24 hours. This
is a good indicator of how well the processing system is functioning.
Total Categorized (24H):
The number of interactions that were categorized in the last 24 hours.
This is a good indicator of how well the categorization system is functioning.
Total Indexed (24H):
The number of interactions that were indexed in the last 24 hours. This is a
good indicator of how well the indexing system is functioning.
Queue table
SpeechMiner UI: The number of interactions that were fetched but were not processed.
Input Folders: The number of interactions that need to be fetched.
Recording System:
The number of interactions in the recording system that have not been
fetched.
Total:
The total of all interactions in all folders that need to be either fetched or processed.
Start / Stop System
Enables you to start or stop some or all of the machines in the system.
In the left panel, select the machine you want to stop/start.
Note:
Stopping the system does not turn off the UPlatform.exe service. To do that, you must run
the SMConfig tool.
Chapter 8 Tools
SpeechMiner UI User Manual 291

Sites
Sites: Indicates the status of all sites.
Folders:
Indicates the status of the Input, Filter and Store folders. If available space is low, a
warning or error is generated.
Computers: Indicates the status of the various computers.
Note: The red and white x indicates the machine was stopped.
Messages Displays system messages for specific machines.
Note: When there are Log Errors the administrator can investigate using the information in the Monitor System
window as well as by running the Monitor System report or by using the ULogger utility directly on a server.
To view system messages:
You can view system messages, as well as additional system-status information by running the Monitor System report.
1. Select Tools > System Admin > Monitor System.
2. Set the filters at the bottom of the screen under the Messages title.
3. Click Show. The messages are displayed below the filters.
4. Place your mouse on the message text to see the full message.
5. Click Mark as Read once you have viewed the message.
Chapter 8 Tools
SpeechMiner UI User Manual 292

Manage Interaction Queue
The Manage Interaction Queue tool enables you to control the order in which interactions are processed by
SpeechMiner UI.
With the options provided in the Manage Interaction Queue tool, you can also change the priority of future interactions
in the queue for a specific program.
DISCLAIMER: This feature is not available in our Cloud offering. It is only available on Premise. For details, refer
to Supported Deployments.
To change the interaction processing order:
1. Select Tools > System Admin > Manage Interaction Queue.
2. From the Process order list select one of the following:
Older interactions first: Indicates that the older interactions will be processed first.
Newer interactions first: Indicates that the latest (new) interactions will be processed first.
The Manage Interaction Queue list is updated automatically.
3. From the Program table, select the Edit link associated with the program whose priority you want to change in
the queue.
4. Select a priority and click OK.
Note: The Interactions in Queue column indicate the amount of interactions associated with the specific
program that are awaiting processing.
Chapter 8 Tools
SpeechMiner UI User Manual 293

Purge System
Safely removing old interactions from the system will reduce the database size and will result in better performance
overall.
You can select to delete all the interactions in the database or you can select to delete a specific group of interactions.
DISCLAIMER: This feature is not available in our Cloud offering. It is only available on Premise. For details, refer
to Supported Deployments.
To purge interactions from the system:
1. Select Tools > System Admin > Purge System.
2. Select the type of interactions you want to purge (calls, email, chat, text and social interactions).
3. Select one of the following:
Delete all interactions in the system: Enables you to select all the interactions in the database.
Delete selected interactions: Enables you to purge interactions associated with a specific date range
and program.
Chapter 8 Tools
SpeechMiner UI User Manual 294

Select the date range to purge only the interactions created within the selected range.
Select one or more programs from the list provided to purge only those interactions associated
with the selected program(s).
4. Click Delete. The interactions are purged.
Note: To set up an automatic purging job, contact Genesys Support.
Chapter 8 Tools
SpeechMiner UI User Manual 295

Manage Cache
SpeechMiner UI enables you to reset the cache for all or specific interface elements such as agents, saved reports,
users and groups and so on.
The contents of the SpeechMiner UI cache are automatically reset at a configured time interval. Also, the cache is
reset when SMART changes are applied to SpeechMiner UI.
When you manage the cache, you can also reset the cache manually. For example, you may wish to manually reset the
cache when a new agent begins working, so that the agent's name will appear in the system.
To reset the cache:
1. Select Tools > System Admin > Manage Cache.
2. In the drop-down list provided select one of the following:
3. Click Reset.
All: Reset the cache for all of the SpeechMiner UI contents.
Info data (Programs, Topics, Scripts, Categories): Reset the cache with current Info data
definitions.
Users and Groups: Reset the cache with updated user and group information.
Agents: Reset the cache with updated agent details.
Searches: Reset the cache with updated saved search definitions.
Metadata fields: Reset the cache with updated metadata fields.
Items on Report: Reset the cache with the current report templates and report template definitions.
Saved reports: Reset the cache with the current saved report definitions.
The cache for the selected element is reset and a confirmation message appears.
4. Click OK.
Chapter 8 Tools
SpeechMiner UI User Manual 296

Chapter 8 Tools
SpeechMiner UI User Manual 297

Interactions Admin
With SpeechMiner UI you can manage audit tasks, clean the database of information about terms that were removed
from topics and reprocess interactions.
Audits are usually performed when a topic is created (see Accuracy Rates (auditing)). When a topic changes or no
longer exists, the audit is no longer relevant. For this reason, it is important to periodically delete or clear orphaned
audits.
With the Interactions Admin tool you can:
Delete audits
Reprocess interactions
Clear orphaned audits
DISCLAIMER: This feature is not available in our Cloud offering. It is only available on Premise. For details, refer
to Supported Deployments.
To delete audits:
1. Select Tools > System Admin > Interactions Admin.
2. Select the Delete Audits tab.
3. From the list provided select the audits you want to delete and click Done.
4. Click Delete.
To reprocess interactions:
Reprocessing interactions enables you to run event analysis on all interactions or specified topics or programs.
Note: Reprocessing interactions is not available in a Recording Only environment and in a Analytics and Recording
environment.
1. Select Tools > System Admin > Interactions Admin.
2. Select the Reprocess Interactions tab.
Chapter 8 Tools
SpeechMiner UI User Manual 298

3. Select the types of interactions you want to reprocess.
4. Select one of the following reprocessing options:
All: Reprocesses all interactions.
Topics: Reprocesses interactions associated with the selected topics.
Programs: Reprocesses interactions associated with the selected programs.
5. If you selected Topics or Programs, open the list associated with your selection.
6. From the multi-select list, select all items you want to reprocess. For additional information, see Search Filter.
7. From the list provided, select the date range associated with the items you want to reprocess.
8. Click Reprocess. The interactions are reprocessed.
To clear orphaned audits (that is, remove deleted terms from term lists):
If you delete terms from topics during the auditing and fine-tuning process, you should also remove them from the term
lists that are tracked in reports and in the Interaction and Event grids.
1. Select Tools > System Admin > Interactions Admin.
2. Select the Clean Orphaned Audits tab.
3. Click Clean. All the deleted terms are removed from the term lists.
Chapter 8 Tools
SpeechMiner UI User Manual 299

System Configuration
With SpeechMiner UI, you can review system configuration and security information that enables you to better
understand the environment you are working in.
Although the configuration information is intended for view purposes only, some of the security settings can be
changed.
With the System Configuration tool you can:
View system information.
Manage security settings.
Manage PCI settings.
Monitor the security log.
To view system information:
You can review a summary of information about the different system components.
1. Select Tools > System Admin > System Configuration.
2. The Default tab is displayed.
3. Review the system configuration information.
To manage security settings:
SpeechMiner UI complies with the security standards defined in the PCI-DSS standard (Payment Card Industry Data
Security Standard). These standards are designed to prevent confidential information from being accessed by
unauthorized individuals. For example, one purpose of SpeechMiner UI security settings is to prevent unauthorized
people from hearing interactions that are stored in the database.
Note: The information in this section is intended to explain how to work with the Security Center interface. It includes
a general overview to the subject of PCI implementation in SpeechMiner UI.
Following these guidelines does not ensure that your entire system is PCI-DSS compliant, or guarantee the
confidentiality of your data. It is your company's responsibility to work with your IT department to ensure that your
hardware and network systems are secure from internal as well as external intrusions. Genesys Telecommunications
Chapter 8 Tools
SpeechMiner UI User Manual 300

Laboratories makes no claims about the security of your network or the extent to which it is PCI-DSS compliant.
Some of the options that must be implemented in SpeechMiner UI in order for it to conform to the PCI-DSS standard
are:
Interaction export is disabled for all users.
Numbers are filtered out of all interaction playback.
All audio files are encrypted.
The password for encrypting audio files has been changed from its default value.
The password for the default user account (Administrator) has been changed from its default value.
Access to the SpeechMiner UI browser-based interface is available using Windows, Genesys or SpeechMiner
UI authentication.
Access to the system is blocked after ten consecutive attempts to log in with an invalid password.
Permissions are set properly for all users and components of the system.
All web services use a secure API, and can only be accessed using a token that is supplied by the system upon
user login.
Secure SSL connections are used for all connections to and between servers in the system.
The SSL certificate is valid and includes all the domains used by the site.
All user events are logged.
Tracing is disabled on all web servers in the system.
Note: Some of the recommendations listed above are not relevant to a Recording only mode, because they relate to
features that are not supported in that mode.
The settings that must be configured in order to implement these options are defined in various locations in the system,
including SMConfig (the SpeechMiner UI configuration tool), the SpeechMiner UI UI interface, and the configuration
files of specific system features. In some cases, more than one setting must be configured in order for a requirement to
be met. For example, SSL connection requirements must be configured separately for different servers in the system.
The Security Center lists all of the PCI-related settings in your system and, whenever possible, automatically checks
the system to see if they conform to the standard. In some cases, the system can correct an issue for you by changing
the relevant settings; in other cases, you must manually correct the settings. You can also choose not to implement
some or all of the PCI requirements and you can manually change the settings as you see fit.
The Security Center also contains a log of all security-related actions that were performed in the system. The log lists
configuration changes and failed login attempts. This information can be used to monitor the system for security
Chapter 8 Tools
SpeechMiner UI User Manual 301

breaches.
To open the security center:
The Security Center is accessed from the System Configuration screen. The upper part of the tab contains PCI-
compliance information. The lower part contains a log of security-related user actions. Both tables can be sorted by
any of the columns they contain.
1. In the System Configuration screen, click the Security Center tab.
To manage PCI settings:
The PCI-DSS recommended configuration section contains a table that lists all of the PCI related settings. The table
contains the following columns:
Setting: The name of the setting.
Explanation: A description of what conditions must be met in order for the setting to conform to the standard.
Note: If the system cannot check whether the setting meets the conditions, "Make sure that ..." appears at the
beginning of the explanation.
Action: Indicates the current setting status and/or the type of action required to correct it.
Fixed: Indicates that the setting conforms to the PCI requirements.
Fix: Indicates that the setting does not conform, but the system can correct it.
Manual: Indicates that either the setting does not conform or the system cannot check whether the setting
conforms.
To correct a setting that can be fixed automatically:
1. Select Tools > System Admin > System Configuration.
2. Select the Security Center tab.
3. Under the Action column, click Fix. You are prompted to confirm that you want to change the setting.
4. Click Yes. The system corrects the setting and changes its Action status to Fixed.
To manually correct a setting:
1. Select Tools > System Admin > System Configuration.
2. Select the Security Center tab.
Chapter 8 Tools
SpeechMiner UI User Manual 302

3. Follow the instructions under the Explanation column to manually correct the problem.
To correct all the settings that can be fixed automatically:
1. Select Tools > System Admin > System Configuration.
2. Select the Security Center tab.
3. Click Reset. You are prompted to confirm that you want to change the settings.
4. Cick Yes. The system corrects the settings and changes their Action status to Fixed.
Note: Settings that require a manual correction are not changed when Reset is selected.
To monitor the security log:
The lower table in the Security Center tab lists system configuration changes and failed logins that occurred during a
specific time period.
Note: System configuration changes are changes that are implemented using SMConfig (the SpeechMiner UI system
configuration tool).
1. Select Tools > System Admin > System Configuration. and select the Security Center tab.
2. Select what should be displayed in the table as follows:
Last: Enter the number of hours or days (prior to the current time) to include in the table.
Time Unit: Select hours or days.
Failed Login: Select to include failed logins in the list.
Configuration Change: Select to include configuration changes in the list.
3. Click Refresh. The table is updated to match the options you selected.
Chapter 8 Tools
SpeechMiner UI User Manual 303

Alerts
SpeechMiner UI can be configured to send email alerts to specific people when groups of interactions have certain
characteristics. For example, you can check for changes in the number of interactions containing agitation within an
interaction or how many interactions each agent handled per week.
The following types of alerts are available:
Change Alert: Indicates when the number of interactions that meet a certain condition has changed significantly
from one time period to the next. For example, you could define a Change Alert to notify you when the number
of interactions dealing with a particular topic is more than ten percent higher then it was the previous week.
Threshold Alert: Indicates when a significant number of interactions meet a certain condition. For example,
you could define a Threshold Alert to notify you when the number of interactions handled by an agent falls
below 1000 in a given week.
Trend Alert: Indicates the occurrence of significant changes over time in the numbers of interactions that meet
a certain condition. For example, you could define a Trend Alert to notify you when the number of interactions
dealing with new accounts decreases significantly for four weeks straight.
On Event Alert: Indicates when a particular type of event takes place in a specific number of interactions. For
example, you could define an On Event Alert to notify you when your competitors are mentioned in more than
ten interactions.
Change, Threshold, and Trend alerts are generated by the system once a day. That is, at a set time every day, the
system checks the preceding day's data to see which of the alert conditions were met, and sends notifications for those
alerts that were generated. On Event Alerts are generated whenever their conditions are met. The same On Event alert
can be generated multiple times in the same day, if the conditions are met multiple times.
With the Alerts tool you can:
Create a new alert.
Edit an alert.
Delete an alert.
DISCLAIMER: This feature is not available in our Cloud offering. It is only available on Premise. For details, refer
to Supported Deployments.
To create a new alert:
1. Select Tools > System Admin > Alerts.
2. Click New below the list of existing alerts. The Alert Type dialog box opens.
Chapter 8 Tools
SpeechMiner UI User Manual 304

3. Select the type of alert you want to create.
4. Click Next. The alert parameters window is opened.
Note: The fields vary slightly depending on the alert you are creating.
5. In the Alert Name field type the name of the alert.
6. Under Trigger the alert if, select the interaction property conditions as follows:
Agent: Enables you to limit the alert to interaction that were handled by particular work groups or
agents, open the Agent list and add the work groups and/or agents to the list of selected agents. Note:
This field is not available for Threshold Alerts.
Categories / Topics: Enables you to limit the alert to interactions that belong to specific categories or
topics. For additional information, see Search Filter.
7. Fill in the fields according to the type of alert you decided to create:
Change Alert:
Change Value: Enter the percentage of interactions or the number of interactions that should
activate the alert. For example, if you want the alerts to be sent out when the number of
interactions that match the conditions during the current time period is 20% lower this week than it
was last week, enter 20. Alternatively, if you want the alerts to be sent out if the number of
interactions matching the conditions during the current time period is lower by 100 this week than
it was last week, enter 100.
Interactions / %: Select interaction if the Change Value is a number of interactions and select
percentage if the change is in percentage.
Time Period: Enables you to select the quantity of days, weeks, or months to include in each time
period. For example, if the time period is two weeks, enter 2. In the second field select the type of
time period: day(s), week(s) or month(s).
Threshold Alert:
Threshold Position: In the first field, select Above if the threshold you want to define is above a
specified value, or Below if it is below a specified value. For example, if you want the alerts to be
sent out if the percentage of interactions matching the conditions during the current time period is
greater than 20%, select Above. Similarly, if you want the alerts to be sent out if the number of
interactions matching the conditions during the current time period is greater than 100, select
Above. In the second field, enter the threshold value (e.g., 20 for 20% or 100 for 100
interactions).
Chapter 8 Tools
SpeechMiner UI User Manual 305

Interactions / %: If the Threshold Position is a number of interactions, select interactions. If it is
a percent change, select percentage.
Time Period: In the first field, enter the quantity of days, weeks, or months to include in the
current time period. For example, if the time period is two weeks, enter 2. In the second field,
select the type of time period: day(s), week(s), or month(s).
Trend Alert:
Trend Direction: Select Up if you want the alerts to be sent out when an upward trend is
identified, or Down if you want to find decreasing trends. For example, if you want to be notified
of an increasing number of interactions involving agitated interactioners, select Up. Alternatively, if
you want to be notified when there is an apparent decrease in interactions about a particular
Topic, select Down.
Time Period: Enter the quantity of days, weeks, or months to include in the trend test. For
example, if you want to test for monthly trends over the past six-months, enter 6.
Consecutive: Select the type of time period: day(s), week(s), or month(s). For example, if you
want to see trends over the past six months, comparing month to month, select month(s).
On Event Alert:
Send alert when: Enter the number of interactions in which the event must occur before an alert
is sent.
8. Under When triggered, send an email to, specify the recipients of the alert by selecting any combination or
roles and groups, and adding individual users and email addresses as follows:
Roles: Select the roles that should receive the email alerts. For example, if you select Administrator and Power
User, any user with either of these roles will receive the alert.
Groups: Select the groups that should receive the email alerts. Any user who belongs to one or more of the
selected groups will receive the alert.
Type email or User name: Enter the email address or user name of the person who should receive the email
alerts. As you type, the system automatically displays a list of all user names that contain the entire sequence of
characters you have typed thus far. If the user name you want to add appears in the list, select it and it is
automatically entered into the field. When the email address or user name appears in its entirety in the field, click
Add to add it to the list of recipients. The email address or user name is added to the list of recipients that
appears below the field.
9. Click Save. The alert is created and is added to the list of alerts. When groups of interactions matching the
conditions you set are identified by the system, email alerts are sent to the recipients you specified.
Chapter 8 Tools
SpeechMiner UI User Manual 306

To edit an alert:
1. Select Tools > System Admin > Alerts.
2. Click the name of the alert you want to edit. The specific alert properties window opens.
3. Configure the alert settings as necessary.
4. Click Save.
To delete an alert:
1. Select Tools > System Admin > Alerts.
2. Select the check box associated with the alert you want to delete.
3. Click Yes. The specific alert is deleted.
Chapter 8 Tools
SpeechMiner UI User Manual 307

System Alerts
A monitoring process runs on every platform computer in the system. The current state of the platform computers in
the system is displayed in the Monitor System page. The system can be configured to send out e-mail notification
messages to specified recipients whenever a monitoring process discovers an error, such as a full disk on one of the
monitored computers. Whenever a new error is discovered, a notification is sent. The notification lists all errors that
are detected in the system at the time it is sent (even if notifications about them have already been sent).
Note: New notifications are sent out only when new errors are discovered. Even if an error has remained uncorrected
for a long period of time, no new notifications are sent out about it unless additional errors are detected.
DISCLAIMER: This feature is not available in our Cloud offering. It is only available on Premise. For details, refer
to Supported Deployments.
To configure System Alert notifications:
1. Select Reports > Saved Reports.
2. In the Saved Reports tab, locate the System alert report and click Schedule .
Note: Only the Recipients tab is displayed. The Schedule tab is not available for this report since it is
configured automatically.
3. Fill in the fields as follows:
To: The email address of the report recipients.
Note: Separate multiple addresses with semi-colons;
From: The email address of the sender.
Subject: The text that should appear in the subject line of the email.
Report Format: Select Web archive to format the results as an MHT file (can be opened in Internet
Explorer). Select PDF to format the results as a PDF file.
Priority: Select the desired priority level for the email message.
4. Click Schedule. The recipients of system alerts are sent as specified.
Chapter 8 Tools
SpeechMiner UI User Manual 308

Chapter 8 Tools
SpeechMiner UI User Manual 309

Metadata Manager
Occasionally, the terminology used for search result column names and metadata filter options is not a clear
representation of the significance of the metadata (sometimes referred to as Key Value Pair). With Metadata
Manager you can change the names of metadata filter options and metadata columns in the search results so that the
names clearly represent the meaning of the data.
Note: To change the names you must have Metadata Manager permissions. In addition, the change occurs for all
SpeechMiner UI users.
To change a search result column and filter option name:
1. Select Tools > System Admin.
2. Select Metadata Manager. A predefined list of metadata names appears.
3. In the UI Term field, type the name that will appear in the SpeechMiner UI application; for the Metadata
Key's name you want to change.
4. Click Save. To undo your changes, click Reset.
Chapter 8 Tools
SpeechMiner UI User Manual 310

Export Completed QM Sessions
The Export Completed QM Sessions tool enables you to perform a batch export of QM session data (for up to 10
selected evaluations), associated with sessions that were completed during a specific date range.
The completed QM sessions data is exported in a .zip file that contains a .csv file.
To export completed QM sessions:
1. Click Tools > Export Completed QM Sessions.
2. From the Date Range list select the date range in which the QM sessions were completed.
3. Select an Evaluation Type:
Regular Evaluations: Regular evaluation sessions are made up of Distributed, Shared and Calibration
Evaluation sessions. For details see Create an Evaluation.
Note: If you select Regular Evaluations, you must select the evaluations you want to export (up to 10), from the
list provided.
Adhoc Evaluations: Ad-Hoc evaluation sessions are created for a specific interaction or segment currently
being played in the Media Player. For details see Create an Ad-Hoc Evaluation Session.
4. Click Export. The following question appears:
Do you want to add a score to the exported evaluation session?
Note: The completed QM sessions are exported in an evaluation Sessions_<username>_<time>.zip file
that contains a evaluation Sessions_<username>_<time>.csv file. Each row in the .csv file represents one
evaluation session.
The exported file contains the fields listed under Exported Fields in the Export Completed QM Sessions
page.
5. Click Yes to add a score to the exported QM sessions or click No to not include the scores. The Export
Completed QM Sessions dialog box appears.
Note: If your system is configured to encrypt exported interactions, an Export Completed QM Sessions
window appears. In this window, you will be instructed to create a password required when you attempt to
unzip the exported interactions. If your system is not configured to encrypt exported interactions, the remaining
steps in this procedure are not required. Simply click Ok, to complete the process.
6. Enter a password of your choice in the Create Password field.
Chapter 8 Tools
SpeechMiner UI User Manual 311

Or
Click Generate Password to enable the system to generate a password for you in the Create Password field.
7. Click Export to export the completed QM sessions.
8. Copy and save the password that appears and click Done.
When you try to unzip the file, you will be prompted for this password.
Note: The Windows default zip program does not support encrypted zip files. To unzip the file, you must use a
different zip program.
Chapter 8 Tools
SpeechMiner UI User Manual 312

Define Tags
With SpeechMiner UI you can mark an interaction with a tag to better focus your searches, protect an interaction from
deletion and indicate that an interaction was evaluated as part of a Quality Management evaluation session. That is, a
tag labels an interaction as a result of a specific action (Cannot Delete or Evaluated) or a user defined category.
The Define Tags tool enables you to create and delete interaction tags.
To define a tag:
1. Click Tools > Define Tags.
2. Click Add a new tag.
3. Enter the tag name in the field provided and click the check-mark button. The new tag is added to the tags list
and will now appear as an option in More > Tag.
Note: If you decide to delete a tag that is associated with an interaction, the tag will no longer be associated with the
specific interaction and it will no longer appear as part of the interaction's details.
DISCLAIMER: This feature is not available in our Cloud offering. It is only available on Premise. For details, refer
to Supported Deployments.
Chapter 8 Tools
SpeechMiner UI User Manual 313

Action Items
Action Items enable you to manage SpeechMiner UI tasks.
To view your Action Items click the Action Items link in the upper right corner of the SpeechMiner UI screen.
The Action Items link contains round brackets. The number within those brackets indicates the amount of Action
Items assigned to you.
A black Action Item link indicates that no items are assigned to you.
A green Action Item link indicates that the list contains items assigned to you.
A bold green Action Item link indicates that new items have not been read or the status of an existing Action
Item has been changed.
With Action Items you can:
Create an Action Item: Used to indicate and specify to a user what should be done.
Edit an Action Item: Used to modify the content and purpose of an action item.
Change the Action Item Status: Used to indicate if the action item has been completed, and whether or not it
was either rejected or accepted.
For example, a supervisor can create an Action Item that asks one of his staff members to create a series of Coaching
sessions. The staff member will see that a new task has been assigned to him when he logs in to SpeechMiner UI.
With Action Item's the staff member can add notes as he progresses with the task and his supervisor can monitor his
progress.
Note: The summary in an Evaluator Message action item is also a link to the Evaluation Session associated with the
action item. If you received this action item type, read the Summary instructions and click the link to the associated
evaluation session, to better understand the action item before you perform and complete it.
Chapter 9 Action Items
SpeechMiner UI User Manual 314

Create an Action Item
An Action Item can be modified by both the creator and the user it is assigned to.
Note: When you add an Action Item to a Coaching session the Action Items appears in the Action Item list. For
additional information, see: Coaching.
To create an Action Item:
1. In the top right corner of your SpeechMiner UI screen, click Action Items.
2. Click New Item.
3. Configure the following Action Item parameters:
Assignee: The user to whom the Action Item will be assigned.
Type: The Action Item subject
Due Date: The date on which the Action Item must be completed.
Summary: a detailed description of what the user must do.
4. Click OK. The Action Item is created and appears in the My Items list.
Chapter 9 Action Items
SpeechMiner UI User Manual 315

Edit an Action Item
When you edit an Action Item you can add a note(s). Notes are used to clarify, describe and point out thoughts and
decisions about the Action Item.
Note: You can view an Action Item's details from the Action Item list. To do so, simply click the Details link.
To edit an Action Item:
1. In the top right corner of your SpeechMiner UI screen, click Action Items.
2. Click Edit.
3. Modify the parameter settings as required.
Note: When you edit an Action Item the Edit Action Item window contains an area for notes.
4. Under Notes add your thoughts (for example, decisions made, limitations, ideas, and so on).
5. Click OK.
Chapter 9 Action Items
SpeechMiner UI User Manual 316

Change the Action Item Status
When an action item is completed, change its status to Completed.
Once the status is changed to Completed, the user who created the action item must either Confirm or Reject the
change.
When it is confirmed that the action item has been completed, the action item will no longer appear in the Action Item
list.
When the Completed status is rejected, the action item remains in the Action Item list and the option to Complete
becomes available again.
When you finish the tasks associated with an Action Item you can:
Select to Complete the Action Item.
Confirm that the Action Item has been completed.
Reject that the Action Item has been completed.
To complete an Action Item:
1. In the top right corner of your SpeechMiner UI screen click Action Items.
2. Under Actions, click the Complete link associated with the Action Item that has been completed.
3. In the Complete Action Item window, add a note that describes why the Action Item is complete.
4. Click OK.
Note: If you add a note in the Note field, the action item will be sent back to the evaluator for review.
To confirm that an Action Item has been completed:
1. In the top right corner of your SpeechMiner UI screen click Action Items.
2. Under Actions, click the Confirm link to approve the Complete status.
3. In the Confirm Action Item window, add a note that describes why you agreed to the complete status.
Chapter 9 Action Items
SpeechMiner UI User Manual 317

4. Click OK.
To reject the decision to complete an Action Item:
1. In the top right corner of your SpeechMiner UI screen click Action Items.
2. Under Actions, click the Reject link to dismiss the Complete status.
3. In the Reject Action Item window add a note that describes why you disagree with the complete status.
4. Click OK.
Chapter 9 Action Items
SpeechMiner UI User Manual 318

Profile Permissions
This section explains how an administrator can manage users in the SpeechMiner UI user-management system.
DISCLAIMER: The configuration of Profile Permissions is not available in our Cloud offering. It is only available on
Premise. For details, refer to Supported Deployments.
Before you begin consider the following:
If users in your system log in to SpeechMiner UI with Genesys user accounts, the operations described here are
performed for their accounts in the Genesys Administrator Extension (GAX).
All users in the SpeechMiner UI system are associated with groupings of various types. These groupings control which
interaction and system data the user can see and which permissions the user has to see and activate system features.
Individual users can have multiple roles and belong to multiple work groups, partitions, and groups. User profiles
specify the roles, groups, and partitions associated with each user.
Depending on your role, you may be able to modify some or all elements of your own profile. You may also be able to
manage other user accounts: creating new users, managing their profiles, managing groups, roles, and permissions. This
section explains how to manage user accounts if you have the required permissions.
In this section, you will learn how to work with the following SpeechMiner UI tools:
Edit User Profile: Use to view and edit your profile details.
Administer Users: Use to manage users. For example, create new users, assign roles, groups and partitions to
users, and so on.
Administer Groups: Use to create and manage user groups.
Administer Roles: Use to set permissions for different types of users.
The following is a list of the SpeechMiner UI user groupings:
User Groups Description
Role
A set of permissions that define what features the user can access and use in the SpeechMiner
UI system.
Work group The call center, or the call center department, to which the user belongs.
Group
A set of work groups and/or partitions that identify the interaction data to which the user has
access.
Chapter 10 Profile Permissions
SpeechMiner UI User Manual 319

Chapter 10 Profile Permissions
SpeechMiner UI User Manual 320

Edit a User Profile
Depending on your permissions, you may be able to view your user profile and edit some or all of its properties.
DISCLAIMER: This feature is is not available in our Cloud offering. It is only available on Premise. For details, refer
to Supported Deployments.
Your user profile includes your:
Username
Password
Roles
Work groups you belong to.
Partitions
Personal information (name, phone number, email address).
To edit your user profile:
1. In the top right corner of the SpeechMiner UI screen, select your user's login.
2. Select Edit Profile.
3. Modify the settings and information as necessary. For more information, see Administer Users.
4. Click Save Changes. The changes are saved.
Chapter 10 Profile Permissions
SpeechMiner UI User Manual 321

Chapter 10 Profile Permissions
SpeechMiner UI User Manual 322

Administer Users
Managing users includes creating new user accounts, assigning roles, groups, and partitions to users, managing user
passwords, maintaining additional user information, and deactivating or deleting existing accounts. This collection of
information and group associations are assigned to a user and are referred to as a user profile.
The following procedures detail how to create user accounts and manage user profiles:
Create a new user account.
Filter the existing user accounts.
Modify a users profile.
Delete users.
DISCLAIMER: This feature is is not available in our Cloud offering. It is only available on Premise. For details, refer
to Supported Deployments.
To create a new user account:
1. In the top right corner of the SpeechMiner UI screen, select your user's login.
2. Click the New icon . A blank Add Profile screen appears.
3. Fill in the fields as follows:
Field Description
Active
Select this check box to make the account active. An account
must be active for the user to log in to it.
User Login
Enter a username for the user.
Chapter 10 Profile Permissions
SpeechMiner UI User Manual 323

Authentication
Select SpeechMiner UI if you want the username and password to be
managed by SpeechMiner UI and stored in SpeechMiner UI's database.
Select Windows if the user logs into SpeechMiner UI using the same
username and password used to log in to Windows. The fields
required to configure the selected option are displayed.
Old Password
This field is not relevant to new accounts. This field only
appears if SpeechMiner UI is selected under Authentication.
New Password
Type a password for the account.
This field only appears if SpeechMiner UI is selected under
Authentication.
Verify Password
Type the password for the account again to ensure it was
typed correctly. This field only appears if SpeechMiner UI is
selected under Authentication.
User must change password
at next login
Select this option to require the user to change their
password the next time they log in to SpeechMiner UI.
This field only appears if SpeechMiner UI is selected
under Authentication.
Windows Domain
Type the name of the Windows domain in which the
user's account is managed. This field only appears if
Windows is selected under Authentication.
User Roles
Select the user roles to associate with the account.
These roles define the permissions the user will
have in SpeechMiner UI. For additional information,
see Administer Roles. If roles appear in the list but
are not active, you do not have the permissions
required to assign these roles to users.
Chapter 10 Profile Permissions
SpeechMiner UI User Manual 324

User Groups
Select the groups to associate with the account.
Each group represents a set of work groups
and/or partitions that identify which interaction
data the user will be able to access. For additional
information, see Administer Groups.
User Partitions
Select the work groups and/or partitions from which
you want to access interaction data.
First Name
Enter the user's first name.
Last Name
Enter the user's last name.
Title
Enter the user's title.
Organization
Enter the organization the user works for.
Phone
Enter the user's phone number.
Email
Enter the user's e-mail address.
Home Page
Enter the address of any page in the SpeechMiner UI
web interface to make that page the user's
homepage. Enter the address in the following
format: /pages/[page location].
You can copy the page address from the end of the
browser's Address field when the page is open.
For example, if you want to use the Templates page
as the homepage, and the address of
the New Search page is:
http://myserver/SpeechMiner
UI/pages/ui/#/reports/templates,
you would remove the base of the address
(enter http://myserver/SpeechMiner UI) and
enter pages/ui/#/reports/templates.
Chapter 10 Profile Permissions
SpeechMiner UI User Manual 325

Comments
Enter any additional comments.
Mapping
If the user is an interaction-center agent, select the
user's name in the call center's recording system.
If the user is an interaction-center manager, select
the name of the work group they manage.
You can select the name or work group in one
of the following ways:
1. In the text field, begin typing the name of the
agent or work group. A drop-down list of names that
contain the combination of letters you type
appears. Keep typing until you see the name,
and then click to select it.
2. Click the Browse icon. A list of work groups opens.
3. Click a work group to select it, or expand the
relevant work group and then click the name of the
agent to select it.
Note: Mapping SpeechMiner UI users to interaction-center
agents makes it possible to create a Saved Report for
the "current user." This means that a single Saved Report
can be run by different users to retrieve report data
about themselves, or their subordinates.
For additional information, see Creating a New Report.
Send Email Notification
Select this check box to inform the new user via an email
message that their account is open. The e-mail message
is sent to the address specified in the Email field.
4. Click Save Changes. The new account is created.
The Edit Profile screen closes and the Administer Users screen is displayed.
If you selected to send the user an e-mail notification, the e-mail is sent.
To filter the user accounts:
1. In the top right corner of the SpeechMiner UI screen, select your user's login.
Chapter 10 Profile Permissions
SpeechMiner UI User Manual 326

2. Select Administer Users.
3. Perform one of the following:
If you want to filter by user name type a letter or combination of letters in the Name field. User accounts
that do not include the specified combination of letters will be hidden from the list.
If you want to filter by role, open the Roles drop-down list and select a role or roles that you want to
include in the list.
If you want to filter by group, open the Groups drop-down list and select the group or groups you want
to include in the list. For more information, see Search Filter.
The filter is activated and accounts that do not match the filter settings are not displayed.
To modify a user's profile:
You can modify user profiles as follows:
Modify an individual user profile:
1. In the Administer Users screen, click the name of the user whose profile you want to change.
2. In the Edit Profile screen, modify the profile as required. For more information, see Create a New User
Account.
Note: The User Login and Authentication fields cannot be modified. You may not be able to modify
additional fields if you do not have the permissions to do so.
3. Click Save Changes. The profile is updated.
Make global changes to selected profiles:
1. In the Administer Users screen, select the check box associated with each profile you want to modify.
2. Above the list click More Actions... and select one of the following options:
Mark as active: Activates the selected accounts.
Mark as inactive: Deactivates the selected accounts. These users will not be able to log in to
their accounts. Inactive accounts can be reactivated later as necessary. When you click OK you
will be able to choose whether to delete all the user's saved searches, reports and scheduled
reports or to stop all scheduled reports.
Chapter 10 Profile Permissions
SpeechMiner UI User Manual 327

Add to Role(s): Opens a list of the roles that exist in the system. Select the roles you want to add
to the users' profiles and click Close.
Add to Group(s): Opens a list of the groups that exist in the system. Select the groups you want
to add to the users' profiles and click Close.
Remove from Role(s): Opens a list of the roles that exist in the system. Select the roles you
want to remove from the users' profiles and click Close.
Remove from Group(s): Opens a list of the groups that exist in the system. Select the groups
you want to remove from the users' profiles and click Close.
3. Make the appropriate selection in the dialog box that appears and click OK.
To delete a user:
You can delete existing user accounts as necessary. When an account is deleted, all saved searches, reports and
scheduled reports created by the user are deleted.
If you want to keep these items, but you do not want the user account to be accessible, you can deactivate the
account. For more information, see Edit User Profile.
When an account is deactivated, a user cannot log in to it, but the profile is saved and saved searches and reports can
be retained.
The account can be reactivated later on as necessary.
1. In the top right corner of the SpeechMiner UI screen, select your user's login.
2. Select Administer Users.
3. Select the check box associated with the user account you want to delete.
4. Click the Delete icon .
5. Click Yes. The account is deleted.
Chapter 10 Profile Permissions
SpeechMiner UI User Manual 328

Administer Groups
Groups identify the interaction data that is associated with specific users. When a user belongs to a particular group,
they have access to the interaction data that is assigned to that group. All Interaction Lists, searches, and reports they
access will only include data about the interactions in their group.
Each group is defined as a list of partitions and work groups:
Partitions identify interaction data using the identification system that was used by the recording system. For
example, a partition might include interactions to phone number x, extension y.
Work groups are based on the structure of the call center and identify the user's place in the enterprise's
hierarchy. For example, a work group might be Denver Center, ABC Bank. In most cases, certain partitions
are associated with specific work groups, so it is sufficient to select work groups and the partitions are
automatically included. At times, it may be necessary to add partitions as well.
With the Administer Groups feature you can:
Create a new user group.
Edit a user group.
Delete a user group.
DISCLAIMER: This feature is not available in our Cloud offering. It is only available on Premise. For details, refer
to Supported Deployments.
To create a new user group:
1. In the top right corner of the SpeechMiner UI screen, select your user's login.
2. Click Administer Groups.
3. Click New. A group New Group dialog box opens.
4. Under Group, type a name for the new group.
5. In the tree below the group name select the partitions and work groups to associate with the group.
Chapter 10 Profile Permissions
SpeechMiner UI User Manual 329

6. Click Save. The group is added to the group list.
To edit a user group:
1. In the top right corner of the SpeechMiner UI screen, select your user's login.
2. Click Administer Groups.
3. Under Name click the name of the group you want to edit. A Edit Group dialog box opens.
4. Under Partitions Selection make the necessary changes to the group.
5. Click Save. The group is updated with the changes you made.
To delete a user group:
1. In the top right corner of the SpeechMiner UI screen, select your user's login.
2. Click Administer Groups.
3. Select the check box associated with the group you want to delete.
4. Click the Delete. The group is deleted.
Chapter 10 Profile Permissions
SpeechMiner UI User Manual 330

Administer Roles
Roles are used to create sets of permissions that are appropriate for different types of users. For example, the role of
Administrator is a set of permissions that enables a user to access most system features, including user and system
management and SMART functionality. By contrast, the role of Regular User is a much more limited set of permissions
that is designed to enable agents to see specific interaction data, take part in coaching sessions, and see the results of
certain reports, but blocks access to many system functions.
Users with different roles see different elements of the SpeechMiner UI interface. For example, a Regular User may
not have permissions to see the Tools page at all. In this case, Tools will not even appear in the Main Menu. By
contrast, a user with an Administrator role will see all the pages and all the tabs and screens that belong to each page.
With the Administer Roles feature you can:
Modify a role.
Add a new role.
Copy and modify a role.
Delete a role.
DISCLAIMER: This feature is is not available in our Cloud offering. It is only available on Premise. For details, refer
to Supported Deployments.
By default the system contains the following eight roles. You can assign one or more roles to each user. The default
permission sets of each role are designed to be appropriate for the majority of SpeechMiner UI users.
Default Role Description
Regular User
A standard set of permissions suitable for most users, this role permits the viewing of most
pages, playing back interactions and adding comments to interactions. It does not permit
any access to SMART.
Power User
An expanded set of permissions that includes the standard set of permissions assigned to
Regular Users, plus permissions for user management.
QM Manager
An expanded set of permissions for all QM features, plus permission to access the Explore
menu and all reports.
QM User
A standard set of permissions that enable the user to view, edit, complete and export an
evaluation session assigned to the specific user. This user will also be able to login to
SpeechMiner UI and access the Explore menu.
SMART User A standard set of permissions suitable for most users of SMART.
Chapter 10 Profile Permissions
SpeechMiner UI User Manual 331

SMART Power
User
An expanded set of SMART permissions that includes the standard SMART permissions,
plus permissions to release a program that is locked by another user, edit global variables
and directives, update program processing priority, activate and deactivate programs and
export import programs.
Event Audit
This role is aimed at the auditing tasks required to check for the system's quality during the
implementation of new topics.
Administrator Aimed at allowing for administrative tasks such as user and permissions management.
To modify a role:
1. In the top right corner of the SpeechMiner UI screen, select your user's login.
2. Select Administer Roles.
3. Click the name of the role you want to modify. The role configuration dialog box opens.
4. In the Grant Roles tab, select the roles that users with the current role can assign to other users.
For example, if you are configuring the Administrator role, you would most likely select all the roles. But, if you
are configuring the Power User role, you most likely not select the Administrator, SMART User or SMART
Power User, since Power Users do not configure SMART user accounts and only an Administrator should be
able to grant an Administrator role.
5. In the Web Site, Reports, SMART and SMConfig tabs, select the permissions that the role should have.
6. Click Save. The modifications are saved and the dialog box closes.
To add a new role:
1. In the top right corner of the SpeechMiner UI screen, select your user's login.
2. Select Administer Roles.
3. Click New.
4. In the Role text field, type a name for the role.
5. In the tabs select the required permissions.
6. Click Save.
To copy and modify a role.
Chapter 10 Profile Permissions
SpeechMiner UI User Manual 332

1. In the top right corner of the SpeechMiner UI screen, select your user's login.
2. Select Administer Roles.
3. Click the Copy link associated with the role you want to copy.
4. Enter a name for the new role and click OK. The new role is added to the list.
5. Click the name of the new role. The role configuration dialog box opens.
6. Modify the permissions as required.
7. Click Save.
To delete a role:
1. In the top right corner of the SpeechMiner UI screen, select your user's login.
2. Select Administer Roles.
3. Click the Delete link associated with the role you want to delete.
4. Click Yes. The role is deleted.
Chapter 10 Profile Permissions
SpeechMiner UI User Manual 333

Permission Definitions
Access to SpeechMiner UI features and information is determined by the permissions a SpeechMiner UI user is
granted.
A SpeechMiner UI user can be given one or more permissions associated with the following permission categories:
Web Site
Reports
SMART
SMConfig
DISCLAIMER: The configuration of Profile Permissions is not available in our Cloud offering. It is only available on
Premise. For details, refer to Supported Deployments.
Chapter 10 Profile Permissions
SpeechMiner UI User Manual 334

Web Site Permissions
The following is a list of all the Web Site permission categories. Refer to each section for a detailed list of permissions
and their definitions:
Action Items
Interactions
Coaching
External
Help
My View
QM
Reports
System
Trending
Users
Miscellaneous
DISCLAIMER: The configuration of Web Site Permissions is not available in our Cloud offering. It is only available
on Premise. For details, refer to Supported Deployments.
Action Items:
Edit Action Items - This permission will enable the user to edit and manage action items (that is, SpeechMiner
UI tasks) assigned by default to the Administrator, QM Manager and Power User roles.
Complete Action Items - This permission will enable the user to complete his/her action items (that is,
SpeechMiner UI tasks) assigned by default to the Administrator, QM Manager, Power User, Regular User and
Chapter 10 Profile Permissions
SpeechMiner UI User Manual 335

QM User roles.
Interactions:
Add Interaction Comment - This permission will enable the user to add a comment to a selected interaction.
The user's comment appears in the interaction transcript.
Agents Filter - This permission will enable the user to filter interactions according to a specific agent(s).
Audit Events in Interactions Grid - This permission will enable the user to audit an event in the Interactions
grid. This is a task required to check the system's quality during the implementation of new topics.
Audit Events in Player - This permission will enable the user to mark an event in the Media Player with an
audit rating (for example, TP, FP and SFP).
Interaction Explorer Page - This permission will enable the user to access the Content Browser page where
you can view the interactions associated with specific categories, agents and programs.
Interaction Search Page - This permission will enable the user to select the Explore > Search option and
search for interactions using the Search Filter.
Interactions Administration - This permission will enable the user to manage audit
tasks, reprocess interactions and clean the database of information about terms that were removed from topics.
Define Tags Page - This permission will enable the user to create or remove new tags.
Delete Interaction List Interactions - This permission will enable the user to remove interactions from an
interaction list.
Delete Interactions - This permission will enable the user to delete interactions.
Edit Interaction Comments - This permission will enable the user to edit an interaction’s comments.
Edit Others' Comment - This permission will enable the user to edit all comments in every interaction, in
addition to the comments he/she created.
Export Coaching Session - This permission will enable the user to export an Interaction List and/or a Saved
Search from a Coaching Session.
Explore Agents - This permission will enable the user to select agents when searching for interactions using the
Content Browser options.
Chapter 10 Profile Permissions
SpeechMiner UI User Manual 336

Explore Menu - This permission will enable the user to access the Explore menu and search for specific
interactions by filtering massive quantities of interaction data.
Export Interactions - This permission will enable the user to export interactions.
Forward Interactions - This permission will enable the user to forward interactions to another user. The
message with the link to the forwarded interaction will appear in the My Messages widget.
Interaction ID Filter - This permission will enable the user to show/hide the Interaction ID search filter option.
Partitions Filter - This permission will enable the user to display/hide the partition filter options.
Reprocess Interactions - This permission will enable the user to run an event analysis on all interactions,
specific programs, and topics.
Retrieve Original Interaction - This permission will enable the user to restore the interaction with its original
audio or text file (including all attachments).
Saved Searches Page - This permission allows the user to reuse saved search queries.
Screen Recordings Grid - This permission will enable the user to view and analyze screen recordings.
Search Interactions - This permission will enable the user to search for interactions.
Search Comparison - This permission allows the user to create a report that compares two saved searches.
The result is a report that shows how the two data sets differ.
Similar Interactions - N/A
Tag Interactions - This permission will enable the user to add or remove a tag from an interaction.
User Actions Filters - This permission will enable the user to display/hide the User Actions search filter
options.
View Call Transcript - This permission will enable the user to view and read the call transcript.
Coaching:
Coaching Menu - This permission will enable the user to create, edit and delete coaching sessions.
Create Session - This permission will enable the user to create a Coaching session.
Delete Session - This permission will enable the user to delete a Coaching session.
Chapter 10 Profile Permissions
SpeechMiner UI User Manual 337

Edit Session Types - This permission will enable the user to change a Coaching session type.
Manage All Coaching Forms - This permission will enable the user to edit and delete coaching sessions
created by other users, plus the coaching sessions he/she created.
Manage My Coaching Forms - This permission will enable the user to only edit and delete the coaching
sessions he/she created.
View All Sessions - This permission will enable the user to display all the sessions that he/she has permissions
to see. That is, session in which the user is the creator, coach or trainee.
External:
External Interaction List - This permission will enable the user to view an interaction list in a separate
browser window.
External Player - This permission will enable the user to open and playback an interaction in a separate
browser window.
Help:
Help Index Page - This permission will enable the user to view and use the SpeechMiner UI Online Help
Index.
Help Menu - This permission will enable the user to view the SpeechMiner UI Online Help.
Send Feedback Page - This permission will enable the user to send Genesys Customer Care an email with
feedback about the application.
My View:
Manage All Preset Views - This permission will enable the user to publish, edit and delete preset views
created by other users, plus the preset views he/she created.
My Messages Widget - This permission will enable the user to add, edit or view the My Messages widget.
My View - This permission will enable the user to create and edit a Dashboard.
Report (Drill Down) - This permission will enable the user to edit, add or view the Report widget in the
Dashboard.
Chapter 10 Profile Permissions
SpeechMiner UI User Manual 338

QM:
Add Evaluations - This permission will enable the user to create Quality Management evaluations.
Archive Evaluation Session - This permission will enable the user to archive an evaluation session.
Complete Evaluation Session -This permission will enable the user to complete an evaluation session.
Create Library Item -This permission will enable the user to create and add a new question to the QM
Question Library.
Create Ad-Hoc Evaluation -This permission will enable you to evaluate interactions from the Explore page.
Create New Form -This permission will enable the user to create a new Quality Management evaluation form.
Delete Evaluation Session I Created -This permission will enable the user to delete a Quality Management
evaluation session that he/she created.
Delete Evaluations -This permission will enable the user to delete Quality Management evaluations.
Delete Evaluation Session -This permission will enable the user to delete Quality Management
evaluation sessions.
Delete Form -This permission will enable the user to delete a Quality Management form.
Delete Library Item -This permission will enable the user to delete a question from the QM Question
Library.
Edit Evaluations -This permission will enable the user to change the properties of a Quality Management
evaluation.
Edit All Evaluation Sessions - This permission will enable the user to view, edit and complete all evaluation
sessions, only when the session contains interactions the user has permission to view. With this permission you
cannot view, edit and complete a Shared evaluation session that is not assigned to a user, unless you are one of
the evaluators associated with the Shared evaluation.
Edit Form -This permission will enable the user to change the properties of a Quality Management form.
Edit Library Item -This permission will enable the user to change an existing question in the QM Question
Library.
Export Evaluation Session -This permission will enable the user to export a QM Evaluation Session in a PDF
or Excel format.
Chapter 10 Profile Permissions
SpeechMiner UI User Manual 339

Export Completed QM Sessions Page -This permission enables enables the user to perform a batch export
of QM session data associated with sessions that were completed during a specific date range.
Evaluations Manager Page -This permission will enable the user to view the list of active/inactive evaluations
and create, edit and delete evaluations.
Evaluation Sessions Page -This permission will enable the user to view a list of existing evaluation session and
perform evaluation sessions assigned to him/her.
Forms Manager Page -This permission will enable the user to create and manage forms that enable evaluators
to provide feedback about a specific agent.
QM Menu - This permission will enable the user to create, edit and delete Quality Management forms,
evaluations and evaluation sessions.
Replace an Evaluation Session Interaction -This permission will enable the user to replace an interaction
within an existing evaluation session.
Set default form score to 100% - This permission will enable the user to set the default form score to 100%.
By default this permission is enabled for the QM Manager role and for the QM User role and it is not enabled
for roles that are not QM.
Show Evaluation Session Score - This permission will enable the user to view the evaluation session score. If
this permission is disabled, the user can only
view the evaluation session score if the Show the agent his/her evaluation score option is selected when the
Notify Agent action item (Type: Evaluator Message) is created.
View Library Item - This permission will enable the user to view one or more question groups.
Reports:
Export to Excel - This permission will enable the user to export a report to an Excel document from the
Reports > Edit Report tab.
My Dashboard Page - This permission will enable the user to display summary information about a specific
set of interactions through the use of Views and Widgets.
Reports Menu - This permission will enable the user to generate and edit reports for analysis, view report
details and status and share the data with users throughout the enterprise.
View All Reports - This permission will enable the user to view all saved reports that were created by the user
regardless of their Sharing definitions.
Chapter 10 Profile Permissions
SpeechMiner UI User Manual 340

System:
Alerts Page -This permission will enable the user to create, edit and delete alerts that inform users about
groups of interactions with specific characteristics. For example, a Change alert indicates when the number of
interactions that meet a certain condition change significantly.
Category Statistics Page -This permission will enable the user to view data about each category defined in
the system. For example,
DISCLAIMER: Category Statistics is not available in our Cloud offering. It is only available on Premise. For
details, refer to Supported Deployments.
Name: The name of the category and its place in the category hierarchy. This information is displayed in
a similar fashion in the Category Explorer.
Description: A description of the specific category.
Locked By: Indicates if the category is locked and which user locked it.
Expression: A category definition summary. Expression provides a quick way to review the definition
and verify that it is correct.
Active: Indicates whether the category is active or inactive.
Elements Explorer Menu -This permission will enable the user to view details about the available
SpeechMiner UI topics, programs and categories.
DISCLAIMER: The Elements Explorer menu is not available in our Cloud offering. It is only available on
Premise. For details, refer to Supported Deployments.
Manage Cache Page -This permission will enable the user to reset the cache for all or specific interface
elements such as agents, saved reports, users and groups and so on.
Manage Interaction Queue Page -This permission will enable the user to control the order in which
interactions are processed by SpeechMiner UI.
Manage Categories Page - N/A
Meta Data Manager -This permission will enable the user to change the names of metadata filter options and
metadata columns in the search results so that the names clearly represent the meaning of the data.
Monitor System Page - This permission will enable the user to monitor that status of SpeechMiner UI
modules, start/stop system machines and view system messages.
Program Statistics Page - This permission will enable the user to view a variety of information about selected
programs. For example, the number of topics in the program, lists of topics in the program, the topic save date,
the name of the user who saved the topic, and the list of terms in the topic.
Chapter 10 Profile Permissions
SpeechMiner UI User Manual 341

DISCLAIMER: Program Statistics is not available in our Cloud offering. It is only available on Premise. For
details, refer to Supported Deployments.
Purge System Page - This permission will enable the user to safely remove old interactions from the system.
This will reduce the database size and will result in better performance overall.
System Admin Menu - This permission will enable the user to monitor the system and its servers as well as
some of its global features (for example, Preset Views and Monitor System).
System Configuration Page - This permission will enable the user to review system configuration and security
information. This permission will enable the user to better understand the environment he/she is working in.
Topic Statistics Page -This permission will enable the user to view data (for example, Topics' Term Count,
Program Count, and so on), about each topic defined in the system.
DISCLAIMER: Topic Statistics is not available in our Cloud offering. It is only available on Premise. For
details, refer to Supported Deployments.
Trending:
Export Trending Information - This permission will enable the user to export the Trending Filter results.
View Trending Cluster Task Information - This permission will enable the user to view Trending Cluster
Tasks information. With this permission you cannot make changes to the Trending Cluster Task. When you only
have a View Trending Cluster Task Information permission, using Save As to save a Cluster filter creates a
regular Trending filter.
Edit Trending Cluster Task - This permission will enable the user to change the Trending Cluster Task filter.
Trending Page - This permission will enable the user to view the Trending page. The Trending page is designed
to monitor interactions and identify and explore unexpected trends and problems.
Users:
Activate and Deactivate Users -This permission will enable the user to make a selected user account
accessible or unavailable.
Administer Groups Page -This permission will enable the user to create a new user group, edit an existing
user group or delete a user group.
Administer Roles Page - This permission will enable the user to provide or remove permissions to features
and tools.
Chapter 10 Profile Permissions
SpeechMiner UI User Manual 342

Administer Users Page - This permission will enable the user to add, remove and/or edit a user profile.
Edit Profile Page - This permission will enable the user to change his/her SpeechMiner UI profile.
Edit User Groups - This permission will enable the user to change SpeechMiner UI user group properties.
When a user belongs to a particular group, they have access to the interaction data that is assigned to that
group. All Interaction Lists, searches, and reports they access will only include data about the interactions in
their group.
Edit User Mapping - This permission will enable the user to map users to interaction-center agents. Mapping
makes it possible to create a Saved Report for a specific user.
Edit User Partitions - This permission will enable the user to edit the partition associated with a specific user.
Partitions identify the interaction data using the identification system used by the recording system.
Edit User Roles - This permission will enable the user to edit the roles associated with a specific user.
Reset Other Users Passwords - This permission will enable the user to change another users password
without the specific users involvement.
Tools Menu - This permission will enable the user to access the tools that enables him/her to monitor and
manage the system and its servers as well as some of its global features.
Miscellaneous:
Customer Sensitive Data - This permission willenable the user to display sensitive customer metadata, such
as data attached from CIM, in the SpeechMiner UI GUI.
Data is visible when this permission is enabled.
Agent Sensitive Data - This permission enables the user to display sensitive agent metadata, such as the agent
name, in the SpeechMiner UI GUI. Data is visible when
this permission is enabled.
Note:
Both the Custom Sensitive Data permission and the Agent Sensitive Data permission will not affect
report results. That is, sensitive data will be included in reports.
If you do not want sensitive data to be included in reports you must disable the relevant report. For additional
information, see Reports Permissions.
For details about configuring user access control to sensitive data, refer to the Configuring permissions,
access control, and privacy > Configuring access control and agent hierarchy > Configuring user access
control section in the GIR Solution Guide.
Chapter 10 Profile Permissions
SpeechMiner UI User Manual 343

Chapter 10 Profile Permissions
SpeechMiner UI User Manual 344

Reports Permissions
The following is a list of all the Reports permission categories. Refer to each section for a detailed list of permissions
and their definitions:
Administration
Agent Analysis
Data Analysis
DISCLAIMER: The configuration of Profile Permissions is not available in our Cloud offering. It is only available on
Premise. For details, refer to Supported Deployments.
Administration:
Capacity Trend - This permission will enable the user to create, edit and/or view the Capacity Trend report.
The report is used to monitor the system load and see the extent to which the system can handle new incoming
interactions.
System Alert - This permission will enable the user to create, edit and/or view the System Alert report. The
report is automatically generated and saved by the system. It is used to alert users of when groups of
interactions have certain characteristics.
System Load - This permission will enable the user to create, edit and/or view the System Load report. The
report is used to monitor the amount of audio hours processed per day or hour.
Usage Tracking - This permission will enable the user to create, edit and/or view the Usage Tracing report.
The report is used to monitor user activity over a selected date range.
Agent Analysis:
Agent Comparison Reports - TThis permission will enable the user to create, edit and/or view the Agent
Comparison report (by Interaction or by Segment). The report is used to compare agents' performance against
each other as well as against the average value of all represented agents.
Chapter 10 Profile Permissions
SpeechMiner UI User Manual 345

Agent Evaluation Comparison - This permission allows the user to enable or disable the Agent Evaluation
Comparison report. The report is used to summarize the average evaluation score for selected agents.
Agent Trend - This permission will enable the user to create, edit and/or view the Agent Trend report (by
Interaction or by Segment). The report displays an agents' performance in relation to one or more selected
categories over time.
Auto Fail - This permission will enable the user to create, edit and/or view the Auto Fail report. The report
displays a list of all the Quality Monitoring evaluation forms that were designated as auto fail for selected
evaluations.
Calibration Score - This permission allows the user to enable or disable the Calibration Score report. The
report shows scores from the Calibration Evaluation form.
Coaching Summary - This permission will enable the user to create, edit and/or view the Coaching Summary
report. The report is used to summarize the current status of coaching sessions in a pie chart and table. The
report also lists active coaching sessions by user. Items in the list can be expanded to display coaching session
details.
Evaluation Summary - This permission will enable the user to create an Evaluation Summary report.
Interaction Evaluation Summary - This permission enables and disables the Interaction Evaluation Summary
report. The report displays the score for specific evaluation sessions.
Evaluator Evaluation Comparison - This permission enables and disables the Evaluator Evaluation
Comparison report. The report is used to summarize the average evaluation score for selected evaluators.
Performance Profile - This permission will enable the user to create a Performance Profile report. The report
compares either work group or agent performance for a specified category/group of categories to the
benchmark. The benchmark consists of either the work group or agent's average.
Team Comparison - This permission will enable the user to create, edit and/or view the Team Comparison
report (by Interaction or by Segment). The report is used to compare performance between teams and against
the average value of all teams represented.
Team Evaluation Comparison - This permission allows the user to enable or disable the Team Evaluation
Comparison report. The report is used to summarize the average evaluation score for select teams.
Top and Bottom Performers - This permission will enable the user to create, edit and/or view the Top and
Bottom Performers report. The report identifies what top performers do differently from the remaining agents. It
is a graphical representation of a comparison of work groups.
Chapter 10 Profile Permissions
SpeechMiner UI User Manual 346

Data Analysis:
Category Comparison Reports - This permission will enable the user to create a report that compares
selected categories.
Category Trend - This permission will enable the user to create, edit and/or view the Category Trend report.
The report is used to show changes in categories over a period of time.
MetaData Frequency - This permission will enable the user to create, edit and/or view the Metadata
Frequency report. The report is used to show for a selected metadata field how many interactions in the data
set had each of the values in the field.
Topic Analysis - Audits - This permission will enable the user to create, edit and/or view the Topic Analysis -
Audits report. The report is used to show the precision with which each topic was identified by SpeechMiner
UI.
Topic Analysis - Trends - This permission will enable the user to create, edit and/or view the Topic Analysis -
Trends report. The report is used to compare how often specific topics were found in the selected time period
with how often they were found in the preceding time period.
Topic Correlation - This permission will enable the user to create, edit and/or view the Topic Correlation
report. The report is used to provide information about the co-occurrence of a topic.
Interactions - This permission will enable the user to view and create the Interactions report.
Chapter 10 Profile Permissions
SpeechMiner UI User Manual 347

SMART Permissions
The following is a list of all the SMART permission categories. Refer to each section for a detailed list of permissions
and their definitions:
Categories
Programs
Scripts
System
Topics
DISCLAIMER: The configuration of SMART Permissions is not available in our Cloud offering. It is only available
on Premise. For details, refer to Supported Deployments.
Categories:
Create Category - This permission will give the user the ability to create a new category.
Delete Category - This permission will enable the user to delete an existing category.
Edit Topic Confidence in Category - This permission will enable the user to edit a Category topic's
confidence level in SMART.
Import and Export Categories - This permission will give the user the ability to import and export a category
definition.
Open Category - This permission will enable the user to open a category and view its details.
Programs:
Create Program - This permission will enable the user to create a program in SMART. This program will be
used by SpeechMiner UI to search for and analyze interactions.
Delete Program - This permission will give the user the ability to delete an existing program.
Chapter 10 Profile Permissions
SpeechMiner UI User Manual 348

Edit Program - This permission will enable the user to edit an existing program's content. For example, the
program topics.
Edit Program Properties - This permission will enable the user to edit a program's properties (for example,
name, confidence level and so on).
Import and Export Programs - This permission will give the user the ability to import and export a program
definition.
Program Priority and Activation Editing - This permission will enable the user to determine a program's
priority as follows:
Whether or not a program should be searched for and analyzed.
The program's recognition priority. SpeechMiner UI selects which interaction to process first based on
the program's priority level.
Scripts:
Strictness Editing - This permission will enable the user to determine the level of strictness for a topic phrase.
Strictness indicates how confident SpeechMiner UI must be to recognize a topic phrase.
System:
Apply Changes - This permission will give the user the ability to apply SMART instructions (that is, topic,
program and category definitions) so that they are implemented in SpeechMiner UI.
Edit History - This permission will enable the user to edit all previous SMART versions or only the version
he/she created. For example, a previous single topic, program and/or category definition or a complete set of
SMART definitions.
Login to SMART - This permission will enable the user to log into SMART.
Map Speakers - This permission will enable the user to define a specific SMART speaker name for each
speaker metadata name.
Override Locks - This permission will enable the user to unlock a category, topic or program locked by a
different user.
Rollback Applies - This permission will enable the user to rollback to an earlier set of SMART instructions.
Topics:
Create Topic - This permission will enable the user to create a topic in SMART. This topic will be used by
SpeechMiner UI to search for and analyze interactions.
Chapter 10 Profile Permissions
SpeechMiner UI User Manual 349

Delete Topic - This permission will enable the user to delete a topic.
Edit Topic - This permission will enable the user to edit a topic in SMART.
Errors in Topic Terms - This permission will enable the user to use phrases that are considered too short in
topic definitions.
Import and Export Topics - This permission will give the user the ability to import and export a topic
definition.
Chapter 10 Profile Permissions
SpeechMiner UI User Manual 350

SMConfig Permissions
The following is a list of all the SMConfig permission categories. Refer to each section for a detailed list of permissions
and their definitions:
DISCLAIMER: The configuration of Profile Permissions is not available in our Cloud offering. It is only available on
Premise. For details, refer to Supported Deployments.
Audio Encryption - This permission will enable the user the ability to encrypt audio files before they are saved
in the Store folder.
Audio Panel - This permission will enable the user to configure the call-audio recognition and playback
formats, retention periods for each format and site and playback rates.
Index Panel - This permission will enable the user to manage index related tasks. For example, backup,
restore, and index optimization.
License Panel - This permission will enable the user to process interactions and enter the licenses received
from Genesys.
Log Parameters Panel - This permission will enable the user to configure the logging output for the following
components: Platform, Web and Client Applications.
Login to SMConfig - This permission will enable the user to log into SMConfig.
Recording Panel - This permission will enable the user to configure Tenant, Application Name and Users
Access Group in the systems Configuration Server. It also enables the user to configure Interaction Receiver,
RP Authorization, MCP Authorization and Playback.
Reports Panel - This permission will enable the user to deploy both the MRS library (a DLL that provides
support for various report features), and all required reports on the report server.
Services Panel - This permission will enable the user to register all the SpeechMiner UI services on each
machine in the system, update the SpeechMiner UI configuration files on each machine and start, restart and
stop services.
Sites & Machines Panel - This permission will enable the user to configure the layout of the system as well as
additional system-wide parameters.
Chapter 10 Profile Permissions
SpeechMiner UI User Manual 351

Chapter 10 Profile Permissions
SpeechMiner UI User Manual 352

Permalink
The Permalink feature enables you to save a network address for a particular item, such as a query or a report. This
makes it easy to access the item again. After you select search criteria for a new interaction search, you can generate
and save a Permalink to the query. After you copy the Permalink you can paste it into the Address field of your
browser. When you press Enter, the search form is opened with all of your search criteria specified. You can save the
Permalink on your computer or as a favorite in your browser, or you can send it to other users by e-mail or IM. When
you or the recipient want to run the search, you need only open the link in a browser.
In some cases, when you generate a Permalink, you can specify whether it can be accessed by anyone who has the
link or only by SpeechMiner UI users who have permissions in the system for the item. In these cases, if you choose
the latter option, users must provide their SpeechMiner UI username and password in order to access the item. When
this option is not available, a SpeechMiner UI username and password are always required.
Permalinks can be created for a variety of item types, including specific interactions, interaction searches, coaching
sessions, and reports. When you choose to generate a Permalink for one of these items, a Permalink dialog box opens
and displays the Permalink URL.
To save a generated Permalink:
1. Select Explore > Interaction Lists.
2. Click the Copy link in the Permalink column for the list whose permalink you want to copy.
3. Copy the link:
When working with Internet Explorer, click Copy & Close.
When working with Chrome, manually select and copy the link and click Close.
4. Paste the link in a text file, the address field of your browser, an email message, and so on, as required.
Note: Most permalinks only enable users to open interactions that belong to partitions for which they have
permissions. Some permalinks point users to interactions from partitions for which they do not have permissions.
When this is the case, a warning message appears in the Permalink dialog box.
Chapter 11 Permalink
SpeechMiner UI User Manual 353

Chapter 11 Permalink
SpeechMiner UI User Manual 354

Frequently Asked Questions
The following is a list of topics that provide answers to a few of the most frequently asked questions:
Quality Management (QM)
Quality Management (QM)
Q: Can the name of a Quality Management form be changed once the form is active?
A: A form cannot be changed once it is activated and added to an evaluation. If the form is active but it was not added
to an evaluation, you can deactivate the form, change it and activate it again.
Q: Can inactive Quality Management forms be archived?
A: Inactive forms cannot be archived.
Q: Can a group of questions have a 0 weight value?
A: A group can have a 0 weight value as long as there are additional question groups that are assigned a weight. The
rule is that the sum of all the group weights must be 100.
Q: What is the best option when you want to create a form with Introduction questions that do not have a weight
value?
A: It is best to use Free Form questions as Introduction questions since they are not assigned a weight value.
Q: What does the Expire status mean in the Evaluation Manager?
A: An Expire status means that the due date for the specific session has passed. An expired evaluation session
appears in the evaluator's Session grid, but it can not be filled by the evaluator. Expired sessions will appear in reports
that display all sessions (for example, Evaluation Summary).
Q: What is the Derivation (that is, Variance) value in the Calibration Score report?
A: Derivation is the difference between a specific score and the average score.
Chapter 12 Frequently Asked Questions
SpeechMiner UI User Manual 355

Q: Does the Evaluator report provide a value for derivation over time?
A: No.
Q: What is the purpose of the Average Quality Score in the Calibration Score report?
A: When you create a Calibration evaluation for a specific interaction, you can determine what the correct score
and/or answers should be. You can then compare the evaluators response (score and answer) to what you determined
was the correct score and answer.
For additional information, see Quality Management.
Chapter 12 Frequently Asked Questions
SpeechMiner UI User Manual 356

Analyze Related Words
The Related Words window displays terms/phrases that are commonly found (that is, co-occur) within the same areas
of the interaction. Use the graphic representation of related words to explore terms and term clusters actively, by
selecting and zeroing in on the terms that are of interest to you.
Note: Related Words can be accessed from both the Trending chart tool tip and the Interaction Transcript.
The Related Words result from the Trending chart is based on the Trending chart filter. The process from the
Trending chart locates related words in interactions that contain a term/phrase that is likely to be relevant to the
specific term/phrase for which you requested related words.
The Related Words result from the Interaction Transcript is based on the Last 7 days associated with the
specific interaction. The process from the interaction transcript locates related words in interactions that contain
the exact term/phrase for which you requested related words.
To open, move and change the Related Words window:
To open the Related Words window:
In the Trending bubble chart hover over a term/phrase in the Term Cluster list and select Show Related
Words from the tool tip that appears.
At the bottom of the Trending page click a term in the common trends graphic and select Related Words.
In the interaction transcript, click a term and select Related Words.
To move a diagram within the Related Words window, hover over the diagram, click and drag your mouse to
the new location. This option is helpful when you expand the diagram and it is too large to fit in the entire
Related Words window.
To change the size of the Related Words diagram roll your mouse wheel up and down over the diagram.
The Related Words window graphically illustrates the following information:
The terms/phrases commonly associated with the term/phrase for which you requested to view related words.
For example, terms/phrases that often co-occur such as, doctors appointment, core value, model citizen, and so
on.
The term/phrase is presented at the center of the chart and its related terms/phrases are displayed around it.
How frequently are the related terms/phrases found near the selected term. The more frequently a term is found,
the larger the term appears in the diagram.
Chapter 13 Analyze Related Words
SpeechMiner UI User Manual 357

For each term/phrase in the Related Words window you can:
Expand the diagram to view additional related words (for example, in image 2 below, related words were
requested for the term "press").
Merge the selected related term with the term for which the window was opened. As a result, the Related
Words window refreshes and creates a new Related Words diagram for the two terms. For example, in image 3
below, the terms "issue" and "service" were merged and the new diagram shows data for the new combination
of terms.
Search for the selected related word. If you select to perform a search, a new window opens with the Search
grid and player. The window lists all the interactions associated with the specific search. If you perform the
search for the central term, SpeechMiner UI finds interactions in the sample in which the term/phrase is found. If
you perform the search for a related term, SpeechMiner UI finds interactions in the sample in which all of the
terms in both the original term and the related term are found. The interaction search opens in a separate
window.
Chapter 13 Analyze Related Words
SpeechMiner UI User Manual 358

Appendix A - Configure the Browser
SpeechMiner UI end users access the SpeechMiner UI browser-based interface from Internet Explorer or Google
Chrome. The selected browser connects to the SpeechMiner UI UI server through the local network.
In order for the SpeechMiner UI interface to work properly, you must configure your browser as explained in the
relevant browser page:
Internet Explorer
Chrome
The required configuration should be performed:
To enable the use to pop-ups from the SpeechMiner UI Domain.
To treat the SpeechMiner UI domain as part of the local intranet (or as a trusted site).
To enable automatic updating of cached web pages.
Note: To run SpeechMiner UI 8.5.5, you must use a minimum resolution of 1280X1024. It is recommended that you
work with a 1680X1050 resolution.
Chapter 14 Appendix A - Configure the Browser
SpeechMiner UI User Manual 359
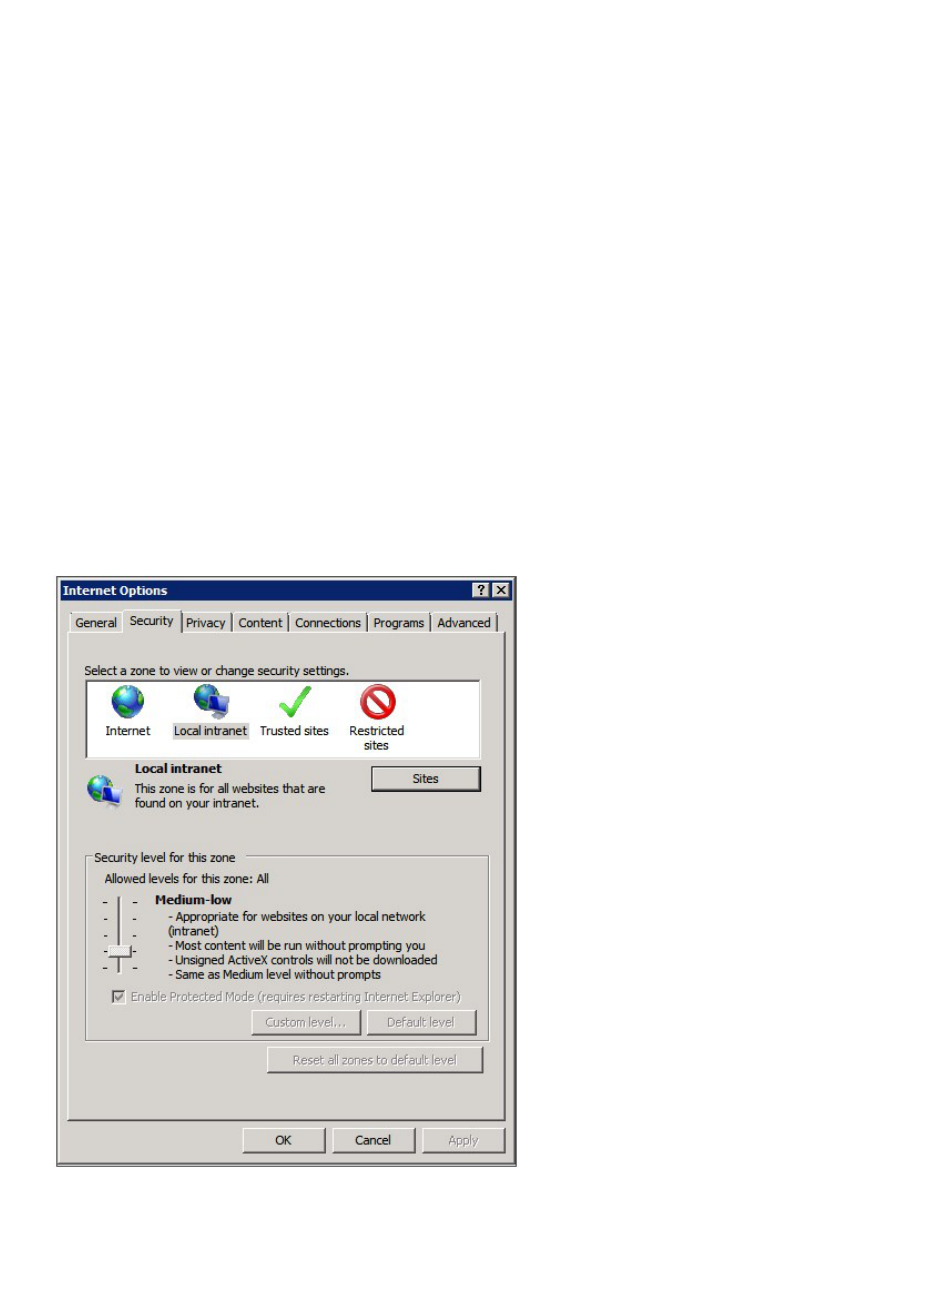
Internet Explorer
Perform the following steps to configure Internet Explorer to work properly with SpeechMiner UI:
Note:
If Internet Explorer is running on a Windows Server 2008 machine or Windows Server 2012 machine, the Enhanced
Security Configuration feature should be turned off.
When working with Internet Explorer 11+, the Online Help documentation may not appear as it should due to your
Internet Explorer compatibility view settings. To view the Online Help properly, go to the Tools menu, select
Compatibility View Settings and verify that Display intranet sites in Compatibility View is not checked.
To configure Internet Explorer to work with SpeechMiner UI:
Refer to the Turning Off the Enhanced Security Configuration Feature on Windows Server 2008 / Windows
Server 2012 section.
1. Open the Internet Options dialog box.
2. Select the Security tab and Local Intranet.
3. Add the SpeechMiner UI domain to the list of web sites in the Local Intranet zone.
Chapter 14 Appendix A - Configure the Browser
SpeechMiner UI User Manual 360

4. Click Sites > Advanced and add the SpeechMiner UI UI server URL to the list of safe websites.
Note: This step is not required if you already turned off the Enhanced Security Configuration Feature.
5. Click Custom Level to customize the local intranet zone security.
Note: When working with Internet Explorer 11+, the Online Help documentation may not appear as it should.
To view the Online Help properly, you must enable Active Scripting in the Internet Options > Security >
Custom Level window.
6. Under Miscellaneous change Access data sources across domains to Enable.
Selecting Enable makes Screen Recording playback possible because it allows access from the browser to
HTCC.
7. In the Privacy tab, add the SpeechMiner UI domain to the list of web sites that are permitted to open pop-ups.
8. In the General tab, under Browsing History, select Settings.
9. Under Check for newer versions of stored pages, select Automatically.
Chapter 14 Appendix A - Configure the Browser
SpeechMiner UI User Manual 361

10. Click OK to save the changes.
Note: If the SpeechMiner UI domain is treated as part of the local intranet, Local Intranet
should appear in the Status Bar at the bottom of the Internet Explorer window whenever the browser displays
a SpeechMiner UI page. In newer versions of Internet Explorer, the same information can be found in File >
Properties.
Turning Off the Enhanced Security Configuration Feature on Windows Server 2008
1. In Server Manager's home page (the top level), expand the Security Information section. The current
settings for the Enhanced Security Configuration feature appear under IE Enhanced Security Configuration
(ESC).
2. If the current settings are not Off for Administrators and Off for Users, click Configure IE ESC. The
Chapter 14 Appendix A - Configure the Browser
SpeechMiner UI User Manual 362

Internet Explorer Adavnced Security Configuration dialog box opens.
3. For both Administrators and Users, select Off.
4. Click OK to save the changes.
Turning Off the Enhanced Security Configuration Feature on Windows 2012
1. In the Server Manager, in the home page (the top level), select Local Server.
Chapter 14 Appendix A - Configure the Browser
SpeechMiner UI User Manual 363
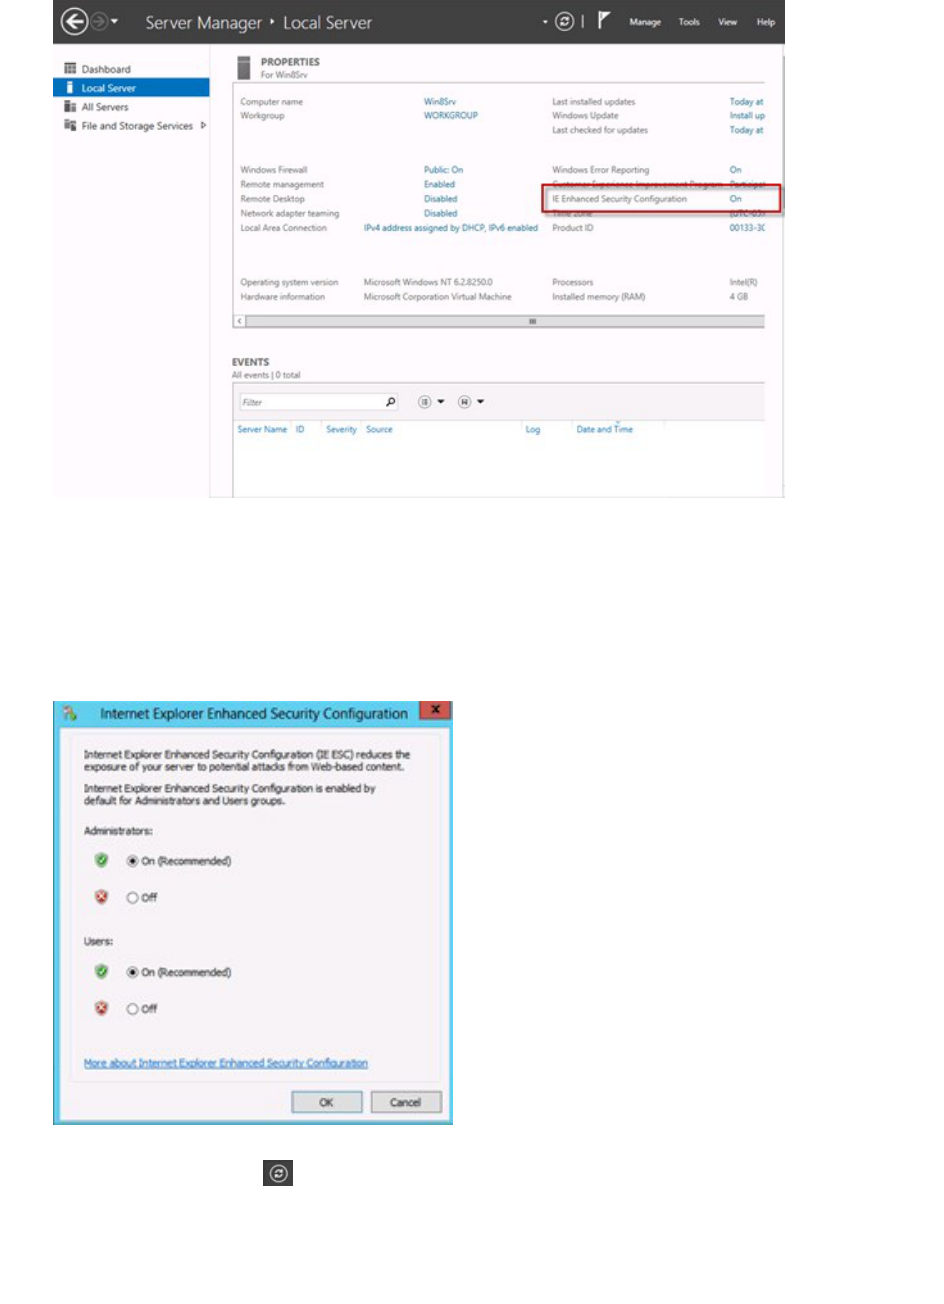
2. In the Server Properties for the Local Server, you will see the option for IE Enhanced Security
Configuration. Click On to change the option.
3. At this point, you will be prompted with the options to turn off Internet Explorer Enhanced Security
Configuration for Administrators and/or Users. After selecting your option, click OK.
4. Click the Refresh button at the top of the Server Manager and the IE Enhanced Security Configuration
should now show as Off.
Chapter 14 Appendix A - Configure the Browser
SpeechMiner UI User Manual 364

Chapter 14 Appendix A - Configure the Browser
SpeechMiner UI User Manual 365

Chrome
By default Chrome disables popups. For this reason, perform the following steps to to configure Chrome to work
properly with the SpeechMiner UI:
1. In the Chrome browser, click the Customize and control Google Chrome menu and select Settings.
2. Click Advanced at the bottom of the page and under Privacy and security, click Content Settings....
3. Click Popups and verify that Allowed is enabled. If it is not enabled click the slide button to enable
popups:
4. To allow popups for the SpeechMiner UI site:
a. Click ADD in the Allow row.
b. In the Add a site window under Site type the address [*.]genesyscloud.com in the field provided.
c. Click ADD to add the site to the list of sites from which you allow popups.
Note: To quickly enable popups for a specific site, click the area to the left of the specific site's address inside the
address bar. Select Allow (default) from the Popups list.
Verify that Java Script is Enabled
1. In the Chrome Browser, navigate to Chrome Settings > Show Advanced Settings > Privacy > Content
Settings.
2. Under Java Script, select Allow all sites to run Java Script (recommended).
For more information about enabling Java Script, see the following
example https://support.google.com/adsense/answer/12654.
Chapter 14 Appendix A - Configure the Browser
SpeechMiner UI User Manual 366
