
4341 State Street Road Skaneateles Falls, NY 13153 USA Phone 1.888.667.8272 www.hillrom.com
© 2019 MIS-11-218-00 Ver B PAGE 1 of 45
Template: 20160314-1
Welch Allyn Diagnostic Cardiology Suite Citrix XenApp Setup Procedure
This procedure is used for setting up the Welch Allyn Diagnostic Cardiology Suite as a Citrix
XenApp App.
Contents
1.0 Requirements: ..................................................................................................................................................... 1
2.0 Citrix XenApp Host Server Software Installation ............................................................................................ 2
2.1 Joint DDC And App Server VMs To The Same Domain ................................................................ 2
2.2 Install XenApp Enterprise Edition 7.18 On The DDC ..................................................................... 2
2.3 Install XenApp License on DDC .................................................................................................... 5
2.4 Create XenApp Site On DDC ...................................................................................................... 10
2.5 Install Virtual Delivery Agent (VDA) On Each App Server VM ...................................................... 14
2.6 Configure Remote Desktop Licensing On App Server ................................................................. 20
2.7 Enable USB Devices In App Server VMs ..................................................................................... 21
2.8 Disable Active Accessibility Hook In Citrix Diagnostics On App Server(s) .................................... 23
2.9 Install Desktop Experience on Server 2012 R2 App Server(s) ..................................................... 25
2.10 Install Welch Allyn Diagnostic Cardiology Suite Application(s) on App Server(s) ......................... 26
2.11 Create Machine Catalog on DDC ................................................................................................ 26
2.12 Create A Delivery Group On DDC And Add Application(s) .......................................................... 28
2.13 Create A StoreFront On The DDC ............................................................................................... 32
2.14 Configure Citrix Policies For Welch Allyn Diagnostic Cardiology Suite Display On DDC .............. 36
2.15 Install Connex Link On Client PCs ............................................................................................... 40
2.16 Test StoreFront On Client PCs .................................................................................................... 41
1.0 Requirements:
Requirements*
Client Machines that will run
Citrix XenApps via Citrix
Receiver
Microsoft® Windows® 7 Professional (64-bit and 32-bit)
Microsoft® Windows® 10 Professional (64-bit)
Citrix Receiver 4.12
Internet Browser – any that is supported by Citrix (see below)
Desktop Delivery Controller
(DDC)
Citrix XenApp Enterprise version 7.18
Any operating system supported by Citrix
Citrix App Servers
Microsoft® Windows® Server 2012 R2 (64-bit)
Microsoft® Windows® Server 2016 (64-bit)

4341 State Street Road Skaneateles Falls, NY 13153 USA Phone 1.888.667.8272 www.hillrom.com
© 2019 MIS-11-218-00 Ver B PAGE 2 of 45
Template: 20160314-1
Requirements*
Citrix Virtual Delivery Agent 7.18
Welch Allyn Diagnostic Cardiology Suite Client software
Welch Allyn Diagnostic Cardiology Suite Manager Client and at
least one of:
Welch Allyn Diagnostic Cardiology Suite ECG
Welch Allyn Diagnostic Cardiology Suite Spirometry
Required for ECG or Spirometry
acquisition
Installation of Connex Link – found on Welch Allyn Diagnostic
Cardiology Suite Manager installation media
Internet Browser
Any browser supported by Citrix:
Internet Explorer 11 or 10 (HTTP connections only)
Safari 7
Google Chrome 73 —
Requires enabling Netscape Plug-in API (NPAPI). See
http://support.citrix.com/article/CTX200889.
Mozilla Firefox 65
2.0 Citrix XenApp Host Server Software Installation
2.1 Joint DDC And App Server VMs To The Same Domain
NOTE: If the App Server(s) are joined to a domain, this same domain MUST be used for
authentication in the StoreFront on the Desktop Delivery Controller (DDC). See section 2.13
below (Create A StoreFront).
2.2 Install XenApp Enterprise Edition 7.18 On The DDC
See https://www.linkedin.com/pulse/how-install-configure-citrix-xenapp-76-publish-
desktops-raza
2.2.1 Logon to the Desktop Delivery Controller (DDC) server as a Domain User with
Administrative rights (NOT a local admin user) and launch the Citrix Installer using Run
As Administrator. The Domain User is necessary for the final steps of configuration after
the reboot.

4341 State Street Road Skaneateles Falls, NY 13153 USA Phone 1.888.667.8272 www.hillrom.com
© 2019 MIS-11-218-00 Ver B PAGE 3 of 45
Template: 20160314-1
2.2.2 Run AutoSelect.exe and click Start for XenApp and then click on Delivery Controller.
2.2.3 Accept the license agreement.

4341 State Street Road Skaneateles Falls, NY 13153 USA Phone 1.888.667.8272 www.hillrom.com
© 2019 MIS-11-218-00 Ver B PAGE 4 of 45
Template: 20160314-1
2.2.4 Select all the Core Components and click Next. You will be using a local license server
installed on your server.
2.2.5 Uncheck Windows Remote Assistance but leave SQL Server 2014 checked.

4341 State Street Road Skaneateles Falls, NY 13153 USA Phone 1.888.667.8272 www.hillrom.com
© 2019 MIS-11-218-00 Ver B PAGE 5 of 45
Template: 20160314-1
2.2.6 Accept the default of Configure Firewall Automatically
2.2.7 At the Summary screen click on Install. Note the server will restart several times.
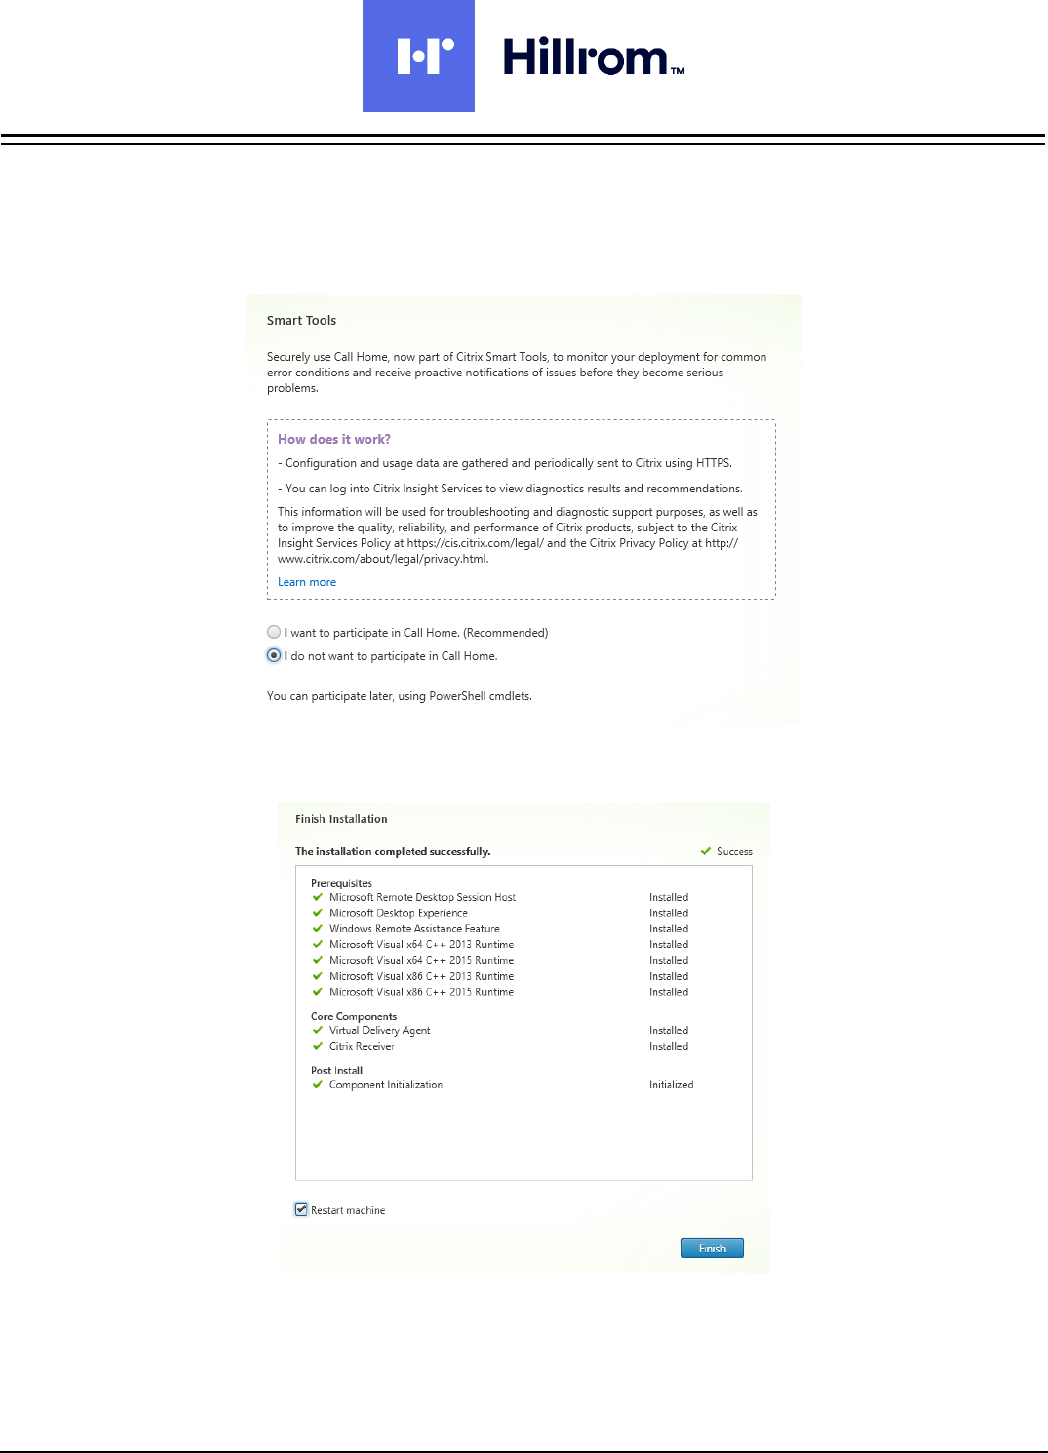
2.2.8 At the Smart Tools screen select I do not want to connect to Smart Tools or Call
Home
2.2.9 Note that if you are logged in as a domain user you will get an additional checkbox at
the bottom to Launch Studio. Check the checkbox and click Finish.
Otherwise you must log out and log back in as a domain user to finish the
configuration.
Any user of Citrix Studio must be made an Administrator within Citrix Studio with appropriate
scope to accomplish the tasks in the remainder of this procedure.
2.3 Install XenApp License on DDC
2.3.1 Open your Mycitrix account and Allocate your license. Enter host name and click
continue.

4341 State Street Road Skaneateles Falls, NY 13153 USA Phone 1.888.667.8272 www.hillrom.com
© 2019 MIS-11-218-00 Ver B PAGE 6 of 45
Template: 20160314-1
2.3.2 Click Confirm
2.3.3 Click OK to download and save your license file.
2.3.4 Back on the DDC server, click on Start > Citrix > License Administration Console
which will open in a web browser pointing to https://localhost:8082/ with an error
message complaining about the site’s security certificate. Click on Continue To This
Web Site.

4341 State Street Road Skaneateles Falls, NY 13153 USA Phone 1.888.667.8272 www.hillrom.com
© 2019 MIS-11-218-00 Ver B PAGE 7 of 45
Template: 20160314-1
2.3.5 Click on Administration and login with Administrative credentials.
2.3.6 Click on Vendor Daemon Configuration

4341 State Street Road Skaneateles Falls, NY 13153 USA Phone 1.888.667.8272 www.hillrom.com
© 2019 MIS-11-218-00 Ver B PAGE 8 of 45
Template: 20160314-1
2.3.7 Click on Import License.
2.3.8 Browse to the license file and click open, then click on Import License. After a
successful import click on OK, then click on Citrix.

4341 State Street Road Skaneateles Falls, NY 13153 USA Phone 1.888.667.8272 www.hillrom.com
© 2019 MIS-11-218-00 Ver B PAGE 9 of 45
Template: 20160314-1
2.3.9 Click on Reread license file. Close the web page when done.
2.3.10 Now you must restart the Vendor Daemon. Open services.msc and restart following two
services. Close the Services applet when done.

4341 State Street Road Skaneateles Falls, NY 13153 USA Phone 1.888.667.8272 www.hillrom.com
© 2019 MIS-11-218-00 Ver B PAGE 10 of 45
Template: 20160314-1
2.4 Create XenApp Site On DDC
2.4.1 Copy the following shortcuts to the desktop from Start > Citrix
Citrix Studio
Citrix StoreFront
Citrix Director
2.4.2 Open Citrix Studio and click on Deliver Applications And Desktops To Your Users
2.4.3 Accept the default of A fully configured, Production-ready Site and enter the Site
Name

4341 State Street Road Skaneateles Falls, NY 13153 USA Phone 1.888.667.8272 www.hillrom.com
© 2019 MIS-11-218-00 Ver B PAGE 11 of 45
Template: 20160314-1
2.4.4 At the Databases screen accept the default database names and locations as well as
the default Create And Setup Databases From Studio.
2.4.5 At Licensing select Use An Existing License and Citrix Virtual Apps and Desktops
Advanced (User/Device)

4341 State Street Road Skaneateles Falls, NY 13153 USA Phone 1.888.667.8272 www.hillrom.com
© 2019 MIS-11-218-00 Ver B PAGE 12 of 45
Template: 20160314-1
2.4.6 At the Connection page select No Machine Management (which is not the default)
and click Next
2.4.7 At the Additional Features page accept the default of no checkboxes checked and click
Next
2.4.8 Click Finish on the Summary page
2.4.9 Back in the Site Setup screen click on Test Site Configuration. Verify all tests pass.

4341 State Street Road Skaneateles Falls, NY 13153 USA Phone 1.888.667.8272 www.hillrom.com
© 2019 MIS-11-218-00 Ver B PAGE 13 of 45
Template: 20160314-1
Note: the installation above installs and configures IIS automatically.
2.4.10 Click on Licensing in the left pane, and then click on Add License. Browse to the
license file you downloaded from MyCitrix.

4341 State Street Road Skaneateles Falls, NY 13153 USA Phone 1.888.667.8272 www.hillrom.com
© 2019 MIS-11-218-00 Ver B PAGE 14 of 45
Template: 20160314-1
2.5 Install Virtual Delivery Agent (VDA) On Each App Server VM
2.5.1 Insert the install media and double-click on AutoSelect.exe. Click on Start for XenApp
and then click on Virtual Delivery Agent for Windows Server OS

4341 State Street Road Skaneateles Falls, NY 13153 USA Phone 1.888.667.8272 www.hillrom.com
© 2019 MIS-11-218-00 Ver B PAGE 15 of 45
Template: 20160314-1
2.5.2 Click "Enable Connections To Server Machine" (which is not the default). Click Next
2.5.3 Citrix Receiver is optional and is not needed. Click Next.

4341 State Street Road Skaneateles Falls, NY 13153 USA Phone 1.888.667.8272 www.hillrom.com
© 2019 MIS-11-218-00 Ver B PAGE 16 of 45
Template: 20160314-1
2.5.4 At Additional Components accept the default (nothing selected) and click Next.
2.5.5 Enter the Fully Qualified Domain Name of the XenApp DDC server and click Test
Connection. Then click Add and Next.

4341 State Street Road Skaneateles Falls, NY 13153 USA Phone 1.888.667.8272 www.hillrom.com
© 2019 MIS-11-218-00 Ver B PAGE 17 of 45
Template: 20160314-1
2.5.6 Optimize Performance is optional.
2.5.7 At the Firewall page click Next to automatically configure the Firewall.
4341 State Street Road Skaneateles Falls, NY 13153 USA Phone 1.888.667.8272 www.hillrom.com
© 2019 MIS-11-218-00 Ver B PAGE 18 of 45
Template: 20160314-1
2.5.8 At the Summary page click Install
2.5.9 Midway through the process the installer will reboot the server. After the reboot the
setup continues. Smart Tools and Call Home are optional. Click on Next.
2.5.10 At the Finish Installation screen click Finish to restart the machine one more time.

4341 State Street Road Skaneateles Falls, NY 13153 USA Phone 1.888.667.8272 www.hillrom.com
© 2019 MIS-11-218-00 Ver B PAGE 19 of 45
Template: 20160314-1
2.5.11 After rebooting, the Citrix Receiver Add Account window will appear (if you installed
Receiver above). Check the Do Not Show This Window Automatically At Logon
checkbox and Close.
2.5.12 Start Control Panel > Windows Firewall > Allow a program or feature through
Windows Firewall. Verify that Citrix Virtual Desktop Agent is listed.

4341 State Street Road Skaneateles Falls, NY 13153 USA Phone 1.888.667.8272 www.hillrom.com
© 2019 MIS-11-218-00 Ver B PAGE 20 of 45
Template: 20160314-1
2.5.13 Back in Windows Firewall click on Advanced Settings to start Windows Firewall
With Advanced Security. Verify that there are 6 Citrix-related exceptions enabled for all
Profiles.
2.6 Configure Remote Desktop Licensing On App Server
Note that installing Citrix VDA enables the Remote Desktop Session Host role in Server
Manager. You must install a Remote Desktop license (either per-user or per-device) or point
to a Remote Desktop Licensing Server within the 90 day grace period or Remote Desktop
Session Host and Citrix VDA will stop working. During the grace period you will be reminded
that “Remote Desktop Licensing Mode Is Not Configured” each time you log into the App
Server.
2.6.1 To install the Remote Desktop Licensing role on the App Server:
2.6.1.1 Open Server Manager on the App Server.
2.6.1.2 Click on Add Roles and Features.
2.6.1.3 Select Role-based or Feature-based
2.6.1.4 At Select Roles, expand the node for Remote Desktop Services. The Citrix
Installer already installed Remote Desktop Session Host. Check the checkbox for
Remote Desktop Licensing. This will trigger some other tools to come along
with it. Click on Add Features and finish the wizard.
2.6.1.5 When done, open Server Manager. Click on Tools > Terminal Services >
Remote Desktop Licensing Manager.
2.6.1.6 In RDP Licensing Manager, right-click on the server node and select Activate
Server.
2.6.1.7 At the end, accept the default Start Install Licenses Wizard Now
2.6.1.8 Follow the licensing wizard and enter your license key (either per-user or per-
device).
2.6.1.9 Close Server Manager and RDP Licensing Manager.
2.6.2 Configure Local Group Policy for Remote Desktop
2.6.2.1 Open an ELEVATED command prompt and type gpedit.msc

4341 State Street Road Skaneateles Falls, NY 13153 USA Phone 1.888.667.8272 www.hillrom.com
© 2019 MIS-11-218-00 Ver B PAGE 21 of 45
Template: 20160314-1
2.6.2.2 Select Computer Configuration > Administrative Templates > Windows
Components > Remote Desktop Services > Remote Desktop Session Host
> Licensing.
2.6.2.3 Set Use The Specified Remote Desktop License Servers to Enabled and
enter the name of the licensing server (use localhost if you installed it locally).
2.6.2.4 Enable Hide Notifications About RD Licensing Problems That Affect The RD
Session Host Server.
2.6.2.5 Enable Set Remote Desktop Licensing Mode and set to either Per User or Per
Device corresponding to your license.
2.7 Enable USB Devices In App Server VMs
2.7.1 In the main vSphere Client window (with the list of all VMs) right-click on the App Server
VM and select Edit Settings.
2.7.2 If a USB 3.0 Controller is present, REMOVE IT by clicking on the ‘X’ to the right.

4341 State Street Road Skaneateles Falls, NY 13153 USA Phone 1.888.667.8272 www.hillrom.com
© 2019 MIS-11-218-00 Ver B PAGE 22 of 45
Template: 20160314-1
2.7.3 If a USB Controller is not listed in the Hardware tab, select a New Device of type USB
Controller and click Add
2.7.4 Set the new USB Controller to USB 2.0. DO NOT use USB 3.0.
2.7.5 Click OK. It will take a few seconds for the VM to detect the change (if it’s running).
Once successful you should be able to select the device (e.g. Wireless Acquisition
Module) from the VM Menu of VM Workstation (if you are using it as a Remote
Console).

4341 State Street Road Skaneateles Falls, NY 13153 USA Phone 1.888.667.8272 www.hillrom.com
© 2019 MIS-11-218-00 Ver B PAGE 23 of 45
Template: 20160314-1
2.7.6 Within the VM you should now see the device within Settings
and Device Manager
2.8 Disable Active Accessibility Hook In Citrix Diagnostics On App Server(s)
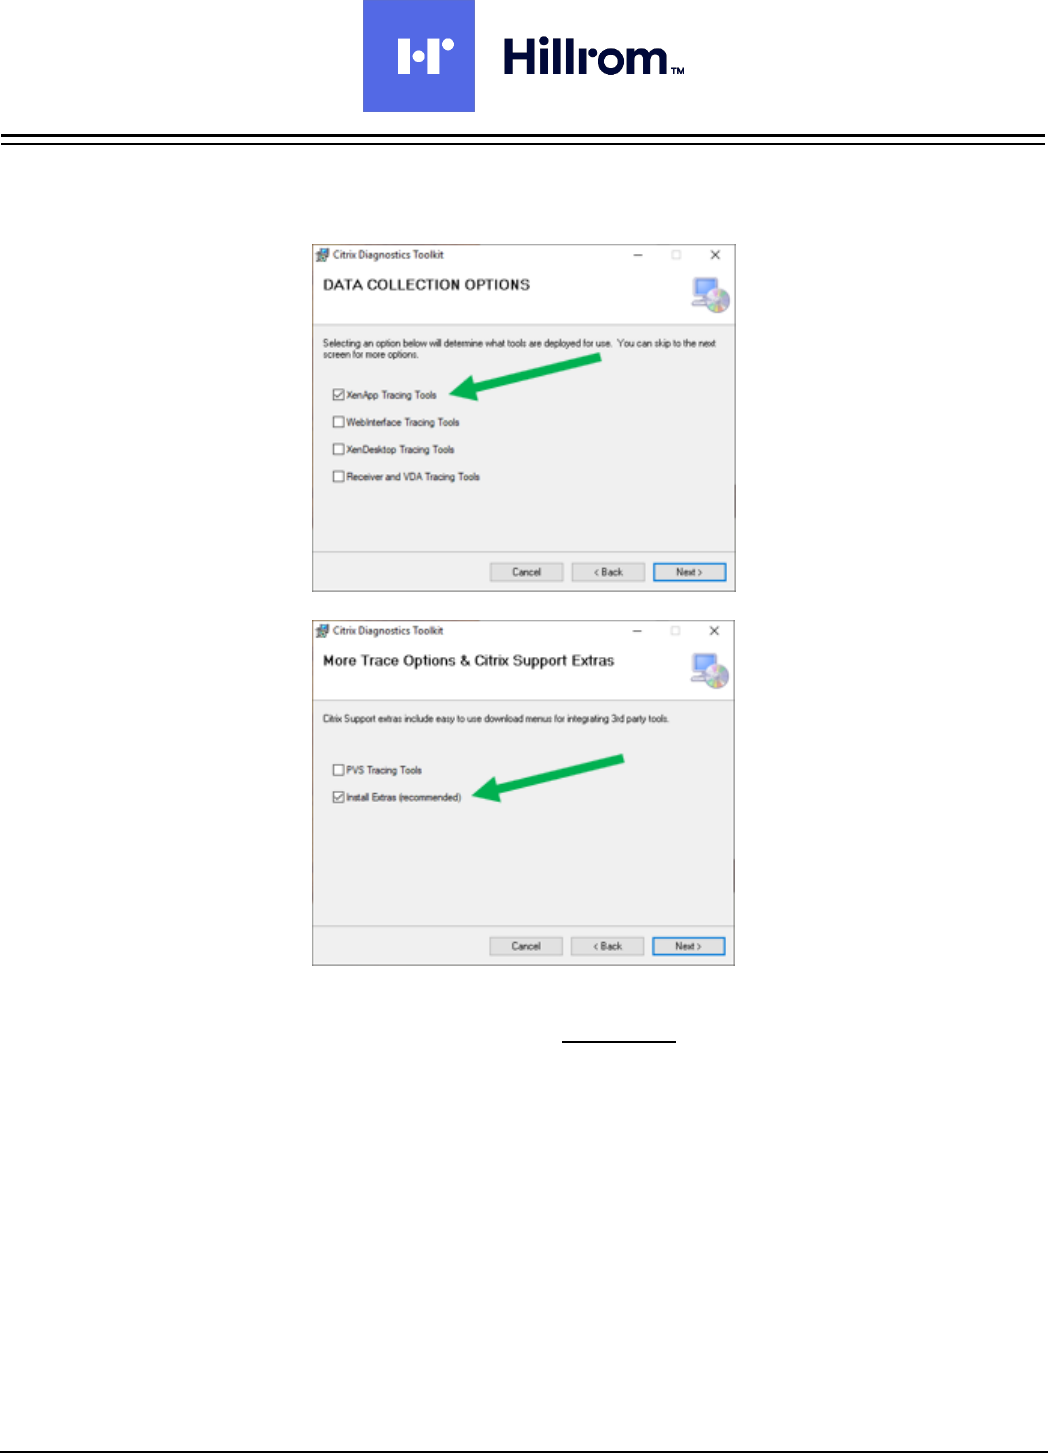
2.8.1 Log into your MyCitrix account and download the Citrix Diagnostics Toolkit from
https://support.citrix.com/article/CTX135075?download
4341 State Street Road Skaneateles Falls, NY 13153 USA Phone 1.888.667.8272 www.hillrom.com
© 2019 MIS-11-218-00 Ver B PAGE 24 of 45
Template: 20160314-1
2.8.2 At a minimum you must select at least XenApp Tracing Tools and Install Extras.
2.8.3 On each App Server, from the Start menu run Citrix Diagnostics > Tools > Debug
Tools > Seamless Config Helper 6.x ELEVATED (As Administrator).
2.8.4 Check the Disable Active Accessibility Hook checkbox and click on Set Values.
Close the app.

4341 State Street Road Skaneateles Falls, NY 13153 USA Phone 1.888.667.8272 www.hillrom.com
© 2019 MIS-11-218-00 Ver B PAGE 25 of 45
Template: 20160314-1
2.9 Install Desktop Experience on Server 2012 R2 App Server(s)
Note: this only applies to App Servers running on Windows Server 2012 R2 that will be
hosting the Spirometry modality. Server 2016 appears to install this by default.
2.9.1 Open Server Manager and click on Add Roles And Features.
2.9.2 In the Features dialog, select User Interfaces And Infrastructure > Desktop
Experience and finish the wizard. You will need to reboot.

4341 State Street Road Skaneateles Falls, NY 13153 USA Phone 1.888.667.8272 www.hillrom.com
© 2019 MIS-11-218-00 Ver B PAGE 26 of 45
Template: 20160314-1
2.10 Install Welch Allyn Diagnostic Cardiology Suite Application(s) on App Server(s)
2.10.1 Remote Desktop into or open a vSphere console to the App Server VM(s) and install the
application(s). Follow the installation instructions for the product regarding security
settings (e.g. Firewall), etc.
2.10.2 Request the appropriate license code from Welch Allyn Technical Support
2.10.3 Note that the Applications must be installed identically on ALL App Servers within the
Citrix Delivery Group used to deploy the Applications.
2.11 Create Machine Catalog on DDC
2.11.1 Open Citrix Studio. Select Machine Catalogs in the left window. Click on Create
Machine Catalog.

4341 State Street Road Skaneateles Falls, NY 13153 USA Phone 1.888.667.8272 www.hillrom.com
© 2019 MIS-11-218-00 Ver B PAGE 27 of 45
Template: 20160314-1
2.11.2 At the Introduction page check the Don’t Show This Again checkbox and click Next.
2.11.3 Accept the default of Server OS (since this server is running a server OS) and click
Next.
2.11.4 Accept the defaults of Machines are not power managed and Deploy Using Another
Service or Technology and click Next

4341 State Street Road Skaneateles Falls, NY 13153 USA Phone 1.888.667.8272 www.hillrom.com
© 2019 MIS-11-218-00 Ver B PAGE 28 of 45
Template: 20160314-1
2.11.5 Click on Add Computers, and then add all App Servers. Click OK and then click Next.
2.11.6 At the Summary screen give the Machine Catalog a name.
2.12 Create A Delivery Group On DDC And Add Application(s)
2.12.1 Back in Citrix Studio select Delivery Groups in the left Window. Click on Create
Delivery Group.
2.12.2 At the Getting Started page check the Don’t Show This Again checkbox and click
Next.

4341 State Street Road Skaneateles Falls, NY 13153 USA Phone 1.888.667.8272 www.hillrom.com
© 2019 MIS-11-218-00 Ver B PAGE 29 of 45
Template: 20160314-1
2.12.3 Select the Machine Catalog created above and the total number of App Server
Machines to use for the Delivery Group
2.12.4 At the Users page, accept the default to Allow any authenticated (domain) users to
use this Delivery Group. You can also limit the Delivery Group to specific users with
the second option. Click Next.

4341 State Street Road Skaneateles Falls, NY 13153 USA Phone 1.888.667.8272 www.hillrom.com
© 2019 MIS-11-218-00 Ver B PAGE 30 of 45
Template: 20160314-1
2.12.5 If your application is already installed, click Add > From Start Menu, and then select the
desired application.
2.12.6 (Optional) You can change the name to be displayed for this application by selecting the
app and clicking Properties

4341 State Street Road Skaneateles Falls, NY 13153 USA Phone 1.888.667.8272 www.hillrom.com
© 2019 MIS-11-218-00 Ver B PAGE 31 of 45
Template: 20160314-1
2.12.7 (Optional) You can assign the application to a folder by clicking on Change
2.12.8 At the Desktops page, click Next
2.12.9 At the Summary page enter a name and description for the Delivery Group and click
Finish.

4341 State Street Road Skaneateles Falls, NY 13153 USA Phone 1.888.667.8272 www.hillrom.com
© 2019 MIS-11-218-00 Ver B PAGE 32 of 45
Template: 20160314-1
2.13 Create A StoreFront On The DDC
2.13.1 Open Citrix Studio and select the Citrix StoreFront node. Click on Create a Store.
2.13.2 At Getting Started click Next.
2.13.3 At Store Name, enter a name for the store. Optionally check the checkbox for Set this
Receiver for Web site as IIS default. Click Next.
2.13.4 At the Delivery Controller page, click Add.
2.13.4.1 Enter a display name
2.13.4.2 Select XenDesktop / XenApp
2.13.4.3 UNCHECK Servers are load balanced
2.13.4.4 Set the Transport Type to HTTP for now (which is not the default). Until you
install an SSL Certificate in IIS you must use HTTP.
2.13.4.5 Click on Add below the Servers list. Enter this server’s name and click OK, and
OK again.

4341 State Street Road Skaneateles Falls, NY 13153 USA Phone 1.888.667.8272 www.hillrom.com
© 2019 MIS-11-218-00 Ver B PAGE 33 of 45
Template: 20160314-1
2.13.4.6 Click Next.
2.13.5 At the Remote Access page leave Remote Access disabled and click on Next.
2.13.6 At the Authentication Methods page accept the default of User Name And Password
(which will authenticate to the domain of this server). Optionally you can use Domain
Pass Through so that the credentials of the currently logged on user on a domain-joined
computer will automatically be used. Click Next.

4341 State Street Road Skaneateles Falls, NY 13153 USA Phone 1.888.667.8272 www.hillrom.com
© 2019 MIS-11-218-00 Ver B PAGE 34 of 45
Template: 20160314-1
2.13.7 At the XenApp Services URL page, UNCHECK the Enable checkbox and click Create.
2.13.8 Click on Finish
2.13.9 Select Citrix StoreFront > Stores in the left pane and make note of the Store URL.

4341 State Street Road Skaneateles Falls, NY 13153 USA Phone 1.888.667.8272 www.hillrom.com
© 2019 MIS-11-218-00 Ver B PAGE 35 of 45
Template: 20160314-1
2.13.10 Select Citrix Studio > Configuration > StoreFront in the left pane and click on Add
StoreFront Server. Enter a name and description and copy the URL from the previous
step. Click on OK.
2.13.11 Select Citrix Studio > Delivery Groups. Select the Delivery Group you created
previously and click on Edit Delivery Group.

4341 State Street Road Skaneateles Falls, NY 13153 USA Phone 1.888.667.8272 www.hillrom.com
© 2019 MIS-11-218-00 Ver B PAGE 36 of 45
Template: 20160314-1
2.13.12 Select the StoreFront tab at the left. Select Automatically and check the checkbox
for the StoreFront you just created. Click on OK.
2.14 Configure Citrix Policies For Welch Allyn Diagnostic Cardiology Suite Display On DDC
Note on USB Redirection in Citrix and Windows Group Policy
You must NOT enable the following Citrix policies
1. Client USB Device Redirection policy within Citrix Studio > Policies on the DDC
2. Any of the items within Computer Configuration\Administrative Templates\Citrix
Receiver\Remoting client devices in the Citrix Local Group Policy template on the
Client PC.
USB device redirection is handled by the Connex Link application which must be installed
on each Client PC (see section 2.15 below). The Citrix policies above conflict with Connex
Link and will cause the devices to not perform correctly.
2.14.1 Open Citrix Studio and select Citrix Studio > Policies in the left pane. Click on Create
Policy in the Actions pane.

4341 State Street Road Skaneateles Falls, NY 13153 USA Phone 1.888.667.8272 www.hillrom.com
© 2019 MIS-11-218-00 Ver B PAGE 37 of 45
Template: 20160314-1
2.14.2 In the All Settings listbox select the Graphics filter. Scroll to the bottom of the settings
list below it and click on Select next to the Use Video Codec For Compression setting.
2.14.3 Select Do Not Use Video Codec from the listbox at the top and click OK

4341 State Street Road Skaneateles Falls, NY 13153 USA Phone 1.888.667.8272 www.hillrom.com
© 2019 MIS-11-218-00 Ver B PAGE 38 of 45
Template: 20160314-1
2.14.4 Back in the Create Policy dialog, scroll down in the All Settings listbox and select ICA
> Visual Display. Scroll to the bottom of the settings list below it and click on Select
next to the Visual Quality setting.
2.14.5 Select Always Lossless from the listbox at the top and click on OK.

4341 State Street Road Skaneateles Falls, NY 13153 USA Phone 1.888.667.8272 www.hillrom.com
© 2019 MIS-11-218-00 Ver B PAGE 39 of 45
Template: 20160314-1
2.14.6 (Optional) Back in the Create Policy dialog, scroll down in the All Settings listbox and
select the following settings:
Disconnected Session Timer – Enabled
Disconnected session timer interval – 1 minute
2.14.7 Back in the Create Policy dialog, click on Next
2.14.8 At the Users And Machines page, select All Objects In The Site and click on Next.
Tip: Users may close
the published
XenApp when
finished with a
session but may
not remember to
log off, preventing
other users from
having access.
The recommended
settings will help to
minimize this
situation.

4341 State Street Road Skaneateles Falls, NY 13153 USA Phone 1.888.667.8272 www.hillrom.com
© 2019 MIS-11-218-00 Ver B PAGE 40 of 45
Template: 20160314-1
2.14.9 Give the policy a reasonable name and then click on Finish.
2.15 Install Connex Link On Client PCs
Connex Link is REQUIRED for all Citrix and Remote Desktop clients of Welch Allyn Diagnostic
Cardiology Suite. It is responsible for redirecting USB device input between the Client PC and
the App Servers.
2.15.1 Insert the Welch Allyn Diagnostic Cardiology Suite Manager install media into each
Client PC.
2.15.2 Run the setup file \ConnexLink\ConnexLink.exe on the install media. This bootstrapper
will automatically detect 64-bit versus 32-bit Client PCs and install the appropriate driver.
NOTE: Connex Link can also be installed using:
Group Policy using the appropriate MSI file from the x64 and x86 subdirectories.
Deployment Tool Services

4341 State Street Road Skaneateles Falls, NY 13153 USA Phone 1.888.667.8272 www.hillrom.com
© 2019 MIS-11-218-00 Ver B PAGE 41 of 45
Template: 20160314-1
2.16 Test StoreFront On Client PCs
2.16.1 Open Citrix Studio on the DDC and select Citrix StoreFront > Stores in the left pane.
Click on the Receiver For Web Sites tab. Make note of the URL. Note do NOT use the
Store URL for this test – it will get Access Denied.
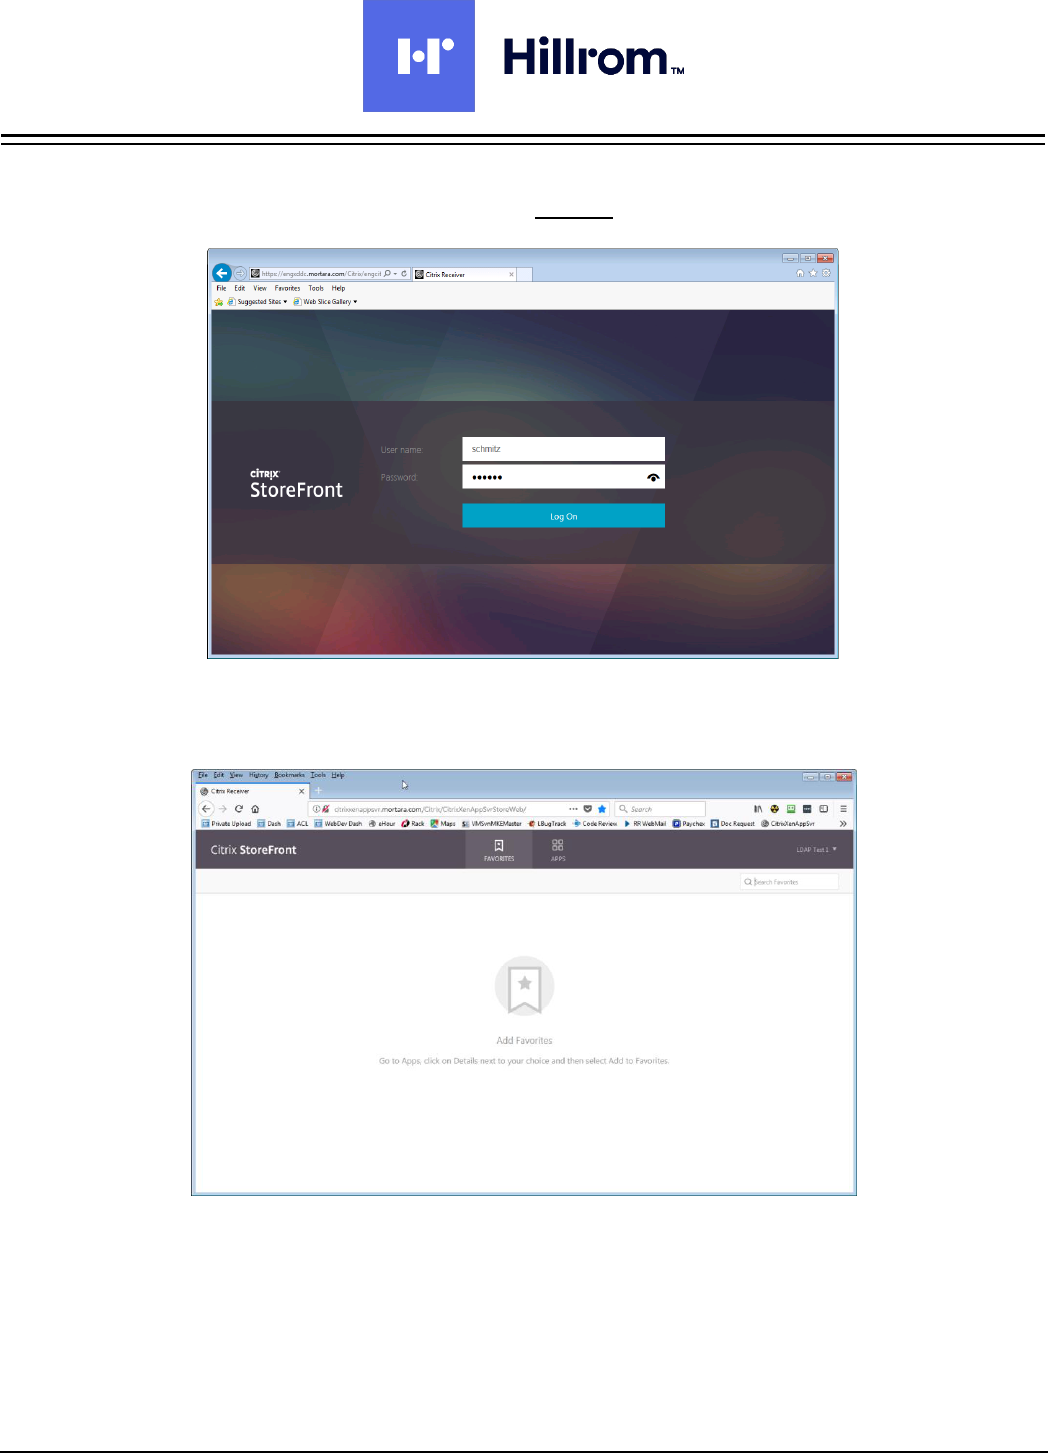
2.16.2 Paste the URL into a browser on a Client PC. Click on Detect Receiver.

4341 State Street Road Skaneateles Falls, NY 13153 USA Phone 1.888.667.8272 www.hillrom.com
© 2019 MIS-11-218-00 Ver B PAGE 42 of 45
Template: 20160314-1
2.16.3 Check I agree and press Install
2.16.4 Click Run when option to download CitrixReceiverWeb.exe appears

4341 State Street Road Skaneateles Falls, NY 13153 USA Phone 1.888.667.8272 www.hillrom.com
© 2019 MIS-11-218-00 Ver B PAGE 43 of 45
Template: 20160314-1
2.16.5 Click Start, then check Agree, Next and Install.
2.16.6 If you enabled both Username And Password and Domain Pass Through authentication
methods and you are logged into a domain-joined machine, you will have a choice of
logon methods. Click Log On to use your existing domain credentials or click Switch To
User Name And Password to enter them manually.
Note: Although “Enable
single sign-on” is
not checked in this
example, it is also
an available option
for the installation.
Details in the
screen shot are
applicable.
4341 State Street Road Skaneateles Falls, NY 13153 USA Phone 1.888.667.8272 www.hillrom.com
© 2019 MIS-11-218-00 Ver B PAGE 44 of 45
Template: 20160314-1
Login with your domain credentials (without the domain name).
2.16.7 Click on the Apps button in the toolbar at the top. The XenApps available to that user
will appear.

4341 State Street Road Skaneateles Falls, NY 13153 USA Phone 1.888.667.8272 www.hillrom.com
© 2019 MIS-11-218-00 Ver B PAGE 45 of 45
Template: 20160314-1
2.16.8 Select an app and verify that it starts and displays correctly. Leave the app running for
the next step.
2.16.9 Back on the App Server, open Task Manager and select the Users tab. You should be
able to see the user session that has logged in via StoreFront with a Session name
similar to ICA-CGP #x. Close the application you just started.
