
1
Configuring Imprivata OneSign®
with 10ZiG NOS Zero clients
OneSign®
Rev. 1.6

Configuring OneSign on 10ZiG NOS Zero clients
2
Document History
1.1
First Draft Release
1.2
Support of Omnikey 5022 CL
Listing of 10ZiG under ProveID (OneSign 5.4)
1.3
Added Direct Citrix API
1.4
Support of Imprivata Low Cost Reader
1.5
Support of Imprivata Fingerprint Reader
1.6 Updated Document Links

Configuring OneSign on 10ZiG NOS Zero clients
3
This document includes information about installing and configuring Imprivata OneSign®ProveID on
10ZiG NOS zero clients.
OneSign® ProveID allows zero clients to access OneSign® authentication services.
This document contains the following sections:
Contents
Document History ................................................................................................................. 2
Introduction ........................................................................................................................... 5
Prepare your Imprivata OneSign® Virtual Appliance ............................................................. 6
Check your OneSign® License .......................................................................................... 6
Enable ProveID API ........................................................................................................... 7
Configure a Computer Policy for zero clients ..................................................................... 8
Create a New Computer Policy ...................................................................................... 8
Configure the Computer Policy for Virtual Desktop Access ............................................ 8
Assign the Computer Policy to 10ZiG NOS Zero clients ................................................. 9
Manually Assigning the Computer Policy ....................................................................... 9
Automatically Assigning the Computer Policy ................................................................ 9
Configure a User Policy for Your Zero client Users .......................................................... 10
Citrix StoreFront additional configuration ......................................................................... 11
10ZiG NOS Zero clients ...................................................................................................... 12
Supported authentication methods .................................................................................. 12
Check firmware version ................................................................................................... 12
Upgrade zero client Firmware ...................................................................................... 13
Setup Imprivata OneSign® on Citrix Zero Clients 4448c 5848qc ..................................... 14
Setup Imprivata OneSign® on VMware Zero Clients 4448v 5848qv ................................ 16
OneSign® Authentication ................................................................................................ 18
Login with credentials .................................................................................................. 19
Login with Proximity Card ............................................................................................ 19
Desktop Lock ............................................................................................................... 20
User Desktop connection Switch .................................................................................. 20
Proximity Card Enrolment ............................................................................................ 20
Login with Fingerprint Reader ...................................................................................... 22
Second level of Authentication ........................................................................................ 23
Pin request, Pin enrolment, Pin change ....................................................................... 23

Configuring OneSign on 10ZiG NOS Zero clients
4
Password as second factor .......................................................................................... 24
Password Help ................................................................................................................ 25
Password Reset ........................................................................................................... 25
Answer or Change security questions .......................................................................... 27
Update security questions ............................................................................................ 28
Import SSL CA certificate ................................................................................................ 29
Get the CA root certificate of the Imprivata appliance .................................................. 29
Import certificate using USB Mass storage ................................................................... 30
Import certificate using 10ZiG Manager ....................................................................... 30
Preventing User Access to Zero client system settings .................................................... 30
Distribute 10ZiG NOS Zero client using 10ZiG Manager ................................................. 30
Create configuration template ...................................................................................... 31
Distribute the template ................................................................................................. 32
GUI Customization .............................................................................................................. 32
Credentials prompt on login window ................................................................................ 32
Self-service password reset ............................................................................................. 33
Proximity Card prompt on login window ........................................................................... 33
Login Banner Image ........................................................................................................ 33
Proximity Card Image ...................................................................................................... 34
Wallpaper ........................................................................................................................ 34
Customizing text strings .................................................................................................. 34
Customizing images ........................................................................................................ 35
Troubleshooting .................................................................................................................. 36
Connection problems ....................................................................................................... 36
Debug log files ................................................................................................................. 36
Send log files to 10ZiG Support ....................................................................................... 36
10ZiG Technical Support Contacts ...................................................................................... 37
Appendix A. Supported Proximity Cards readers ................................................................ 37
Tested Readers ............................................................................................................... 37
HID OmniKey readers listed in the pcsc driver: ................................................................ 38
Generic CCID Readers .................................................................................................... 39
Supported Fingerprint Readers........................................................................................ 40

Configuring OneSign on 10ZiG NOS Zero clients
5
Introduction
Imprivata OneSign®is a single sign-on (SSO) enterprise solution optimized for care
providers. Imprivata OneSign®provides fast and secure access to systems and
clinical/administrative applications, which streamlines clinical workflows and drives EMR
adoption.
10ZiG NOS Zero clients integrate the Imprivata OneSign® technology by consuming
Imprivata ProveID APIs.
This guide helps administrators to configure 10ZiG NOS Zero clients for communication
and authentication with Imprivata OneSign®.
10ZiG NOS Zero clients support Imprivata OneSign® with Citrix XenApp, XenDesktop,
and VMware Horizon connections.

Configuring OneSign on 10ZiG NOS Zero clients
6
Prepare your Imprivata OneSign® Virtual
Appliance
To use the 10ZiG NOS Zero clients with Imprivata OneSign®, the Imprivata appliance must
be correctly licensed and configured.
Check your OneSign® License
To use 10ZiG NOS Zero clients with Imprivata OneSign® you need specific licensed
features from Imprivata:
● ProveID Web API
● Virtual Desktop Access
To check your current license go to the <gear icon>->License page as shown in the
following screenshot (OneSign 5.x):

Configuring OneSign on 10ZiG NOS Zero clients
7
Enable ProveID API
To use 10ZiG NOS Zero clients with Imprivata OneSign® you need to enable the ProveID
API Access (<gear icon>->ProveID) and enable the “10ZiG” in OneSign 5.4 or above (or
“Future 7” in earlier versions) as shown in the following screenshot:

Configuring OneSign on 10ZiG NOS Zero clients
8
Configure a Computer Policy for zero clients
Configure a computer policy for your zero client environment.
Create a New Computer Policy
1. Go to the OneSign® Administrator > Computers > Computer Policies Page.
2. Select an existing computer policy from the list, create a new policy, or make a copy
of the Default Computer Policy as a starting point. If you want to edit an existing
computer policy, click the computer policy name.
3. To copy the Default Computer Policy, select Default Computer Policy, then click
Copy.
4. Click Default Computer Policy (2).
5. Rename the computer policy in the Specify a Name field.
6. Click Save
Configure the Computer Policy for Virtual Desktop Access
You must configure the OneSign® computer policy for access to your virtual desktop
environment.
OneSign® supports Citrix XenApp, XenDesktop and VMware Horizon.
For configuration details, see the following documents:
● To configure the OneSign® connection to a VMware Horizon desktop, see
Configuring Imprivata Virtual Desktop access with VMware Horizon.
● To configure the OneSign® connection a Citrix XenDesktop, see Configuring
OneSign® Virtual Desktop Access with Citrix XenDesktop.
● To configure the OneSign® connection to a Citrix XenApp Published Desktop, see
Configuring OneSign® for Auto-Launching Citrix XenApp Applications.

Configuring OneSign on 10ZiG NOS Zero clients
9
Assign the Computer Policy to 10ZiG NOS Zero clients
After you’ve created the computer policy for your zero clients, you can assign the computer
policy to all zero clients in your environment, either manually or automatically.
Manually Assigning the Computer Policy
1. Go to the Computers > Computers page.
2. Check the checkboxes next to the computers to which you want to apply the
computer policy.
3. Click on “Apply Policy...”.
4. Choose “Choose a policy for the <n> selected computers”.
5. Select one policy in the combobox and click Apply Policy.
Automatically Assigning the Computer Policy
When you configure a computer policy assignment rule, the computer policy will be
automatically assigned at the first zero client connection.
1. Go to the Computers > Computer Policy Assignment page.
2. Click Add New Rule.
3. Name the assignment rule.
4. Click OneSign® Agent Type. In the OneSign® Agent Type box, select ProveID Web.
5. In the field “Apply this computer policy”, select the computer policy you created
previously.
6. Click the Save button.
7.
For more assignment options see Assigning Computer Policies.

Configuring OneSign on 10ZiG NOS Zero clients
10
Configure a User Policy for Your Zero client Users
Configure a user policy to automate OneSign® virtual desktop access for zero client users.
Go to the Virtual Desktops Page from the Computers menu to configure the Citrix
XenDesktop/XenApp and/or VMware Horizon access parameters.
Then configure the user policy to access a specific Virtual desktop farm. To do this, go to the
Virtual Desktop Tab from the user policy page:

Configuring OneSign on 10ZiG NOS Zero clients
11
Citrix StoreFront additional configuration
Additional configuration is required within Citrix StoreFront to permit the direct Citrix API
integrated into firmware to allow authentication with Citrix StoreFront.
• Open Citrix StoreFront
• Locate the Store and Receiver for Web Site which is to be used
• Select Manager Authentication Methods
• Enable ‘HTTP Basic’
• Click ‘OK’
For configuration details, see the following Tech Briefs:
● To configure the OneSign® connection to a VMware Horizon desktop, see
Configuring Imprivata Virtual Desktop access with VMware Horizon.
● To configure the OneSign® connection a Citrix XenDesktop, see Configuring
OneSign® Virtual Desktop Access with Citrix XenDesktop.
● To configure the OneSign® connection to a Citrix XenApp Published Desktop, see
Configuring OneSign® for Auto-Launching Citrix XenApp Applications.

Configuring OneSign on 10ZiG NOS Zero clients
12
10ZiG NOS Zero clients
Supported authentication methods
10ZiG NOS zero clients currently support the following authentication methods:
● Username and password
● Proximity card only
● Proximity card with PIN as a secondary authentication factor
● Proximity card with password as a secondary authentication factor
● Fingerprint reader only
● Fingerprint reader with PIN as a secondary authentication factor
● Fingerprint reader with password as a secondary authentication factor
● Question and answer authentication used to reset the user password
Additional authentication methods will be supported in future 10ZiG firmware releases.
Check firmware version
10ZiG NOS Zero clients support Imprivata OneSign® from version 10.12.145.7. Additionally
Fingerprint authentication is supported from version 10.12.157 onwards.
If you have a firmware older than this, you are required to upgrade client firmware.
Checking client firmware:
● Open the system settings control panel and click on the “System Information” applet
icon. On the right side of the “General” page you see the firmware version.

Configuring OneSign on 10ZiG NOS Zero clients
13
● Using the 10Zig Manager
Upgrade zero client Firmware
To upgrade the firmware you have to use the 10ZiG Manager.
● Connect the zero client to the network
● Run the Manager Console
● Find the zero client in the device tree.
● Right click to the zero client to show the options menu.
● Choose the option “Firmware upgrade”. The Firmware Packages dialog box appears.
● Select the firmware from the list or import the firmware package if the specific version
is not present in the list.
● Once imported, select the firmware and press the “Apply” button.
● At the end of the firmware upgrade procedure, the zero client will reboot.

Configuring OneSign on 10ZiG NOS Zero clients
14
Setup Imprivata OneSign® on Citrix Zero Clients 4448c 5848qc
● Open zero client settings and run the “Citrix Receiver” configuration applet
● In the general page insert the Imprivata OneSign® FQDN in the “Server Address”
input field.
● In the “Imprivata OneSign®” page set the “Use Imprivata:” check box.
● Set the “Reject untrusted” check box to abort the connection when the OneSign®
certificate is not correctly validated. The correct SSL Certificate Authority CA
certificate should be imported in the zero client to validate the OneSign® Certificate.
See Import SSL CA Certificate. You may leave the check box unset only in
exceptional conditions like during quick tests in labs.
● Set the “Imprivata Debug:” check box to generate debug log files. See Enable
generation of debug log files for more details.
● Click OK to confirm the settings and close the Citrix Settings dialog.
● Close Control Panel.
● Reboot the zero client.


Configuring OneSign on 10ZiG NOS Zero clients
16
Setup Imprivata OneSign® on VMware Zero Clients 4448v
5848qv
● Open zero client settings and run the “VMware Horizon Settings” configuration
applet.
● In the general page insert the Imprivata OneSign® FQDN in the “Server Address”
input field.
● Set the “Use Imprivata” check box in the “Imprivata OneSign®” page.
● Set the “Reject untrusted” check box to abort the connection when the OneSign®
certificate is not correctly validated. The correct SSL Certificate Authority certificate
should be imported in the zero client to validate the OneSign® Certificate. See Import
SSL CA Certificate. You may leave the check box unset only in exceptional
conditions like during quick tests in labs.
● Set the “Imprivata Debug:” check box to generate debug log files. See Enable
generation of debug log files for more details.
● Click OK to confirm the settings and close the VMware Horizon Settings dialog.
● Close Control Panel.
● Reboot the zero client.


Configuring OneSign on 10ZiG NOS Zero clients
18
OneSign® Authentication
When the connection settings are correct the client displays the OneSign® authentication
window.
The OneSign® Computer policy authorises the zero client to accept user credentials or
proximity cards to authenticate the user.
A proximity card provides a unique ID used to identify the user after the card enrollment
procedure is completed.
Some contact Smart Cards can be used as proximity card (NHS cards). In this case plugging
the smart card into the smart card reader cause the Imprivata zero client agent to read the
smart card unique serial number and use that as card as it’s unique ID for enrolment and
authentication.
The “Shutdown” link is used to show the shutdown dialog.

Configuring OneSign on 10ZiG NOS Zero clients
19
The “Setting” links will open the system control panel. The control panel access can be
protected by an administration password. See Preventing User Access to Zero client system
settings.
Login with credentials
If allowed by the user policy, the user can enter the AD credentials.
If the password is expired the specific password change dialog box will appear:
Login with Proximity Card
To authenticate the user with a Proximity Card, plug a supported reader into the zero client
and power the zero client on. Once powered on and at the Imprivata login page, tap the
card provided by the OneSign® administrator.
To uniquely identify the user, the card must be enrolled and entitled to that specific user.
Imprivata OneSign® support’s the self enrollment feature. With this feature the user can
enroll a Proximity Card.
If the Proximity Card is already enrolled to the user, by tapping it on the reader the zero
client will authenticate the user and will receive from the Imprivata OneSign® appliance the
information for the VDI connection.
The Citrix (5848qc,4448c) or VMware (5848qv,4448v) connection starts and the user has
access to their Virtual Desktop.

Configuring OneSign on 10ZiG NOS Zero clients
20
Desktop Lock
While the user is authenticated and connected to the Virtual Desktop, a tap of the user card
will lock the user’s Virtual Desktop and client GUI.
From this lock dialog box the user can force the Virtual Desktop disconnection and current
user logout by clicking on the “Logout current session” button.
A second tap using the user card (the same card used to login) will unlock the zero client.
User Desktop connection Switch
Tapping a card enrolled to a user different to the user currently authenticated and
connected, will cause the immediate disconnection of the current user and the authentication
and connection of the new user.
The Virtual Desktop session of the previous user is not logged out. Simply the previous
user’s desktop is disconnected. The applications are still running and they will be ready for
that user as soon as they reconnect by tapping their card on any Proximity Card reader.
Proximity Card Enrolment
1. Tap a new card on the reader. The following dialog box appear:

Configuring OneSign on 10ZiG NOS Zero clients
21
2. Click “Enrol this card now”, insert valid Active Directory credentials, and click next.
3. Confirm enrolment
4. The card is enrolled to the user and the user is authenticated within Imprivata
OneSign®.

Configuring OneSign on 10ZiG NOS Zero clients
22
Login with Fingerprint Reader
Where a Fingerprint reader is connected and User Policy under Imprivata OneSign® is
enabled for Fingerprint authentication the user is prompted to place and hold their finger on
the reader. For instructions on enabling Fingerprint Authentication under User Policies, seek
the online help available within the Imprivata OneSign® Appliance.
Fingerprint User’s are required to enrol their Fingerprints using the Imprivata Agent which is
typically installed to PC and Virtual Desktops.
For enrolling Fingerprints via Citrix or VMware, ensure the Virtual Channel option is enabled.
This option is available under 10ZiG NOS Citrix or VMware settings/Imprivata OneSign. For
further information on enrolling Fingerprints, consult the online help available within the
Imprivata OneSign® Appliance.

Configuring OneSign on 10ZiG NOS Zero clients
23
Second level of Authentication
The Imprivata User Policy can enforce the input of a second level of authentication after the
Proximity Card or Fingerprint has been verified.
10ZiG NOS zero clients currently support two type of second factors:
● OneSign® PIN.
● User Password.
Pin request, Pin enrolment, Pin change
When the User Policy enforces the input of the OneSign® PIN as a secondary factor, the
user is required to enter the OneSign® PIN after verifying the Proximity Card.
If the PIN is not yet enrolled, the user is requested to enter the OneSign® PIN after Proximity
Card tap or Fingerprint being read.
If the OneSign® PIN is expired the user has to update the PIN.

Configuring OneSign on 10ZiG NOS Zero clients
24
Password as second factor
The Imprivata User Policy can enforce the request of the user password as a secondary
factor. After the proximity card or Fingerprint has been verified the user has to enter their
password.
Configuring OneSign on 10ZiG NOS Zero clients
25
Password Help
The “Forgot password?” link on the login page can be used to assist the user in the
password reset. It opens the following dialog box:
The “Reset you primary authentication password” option uses the QnA login (Question &
Answer) to authenticate the user and then allows to reset the user password.
The “Answer or change your security questions” allows to enter the security questions that
can be used for the QnA login.
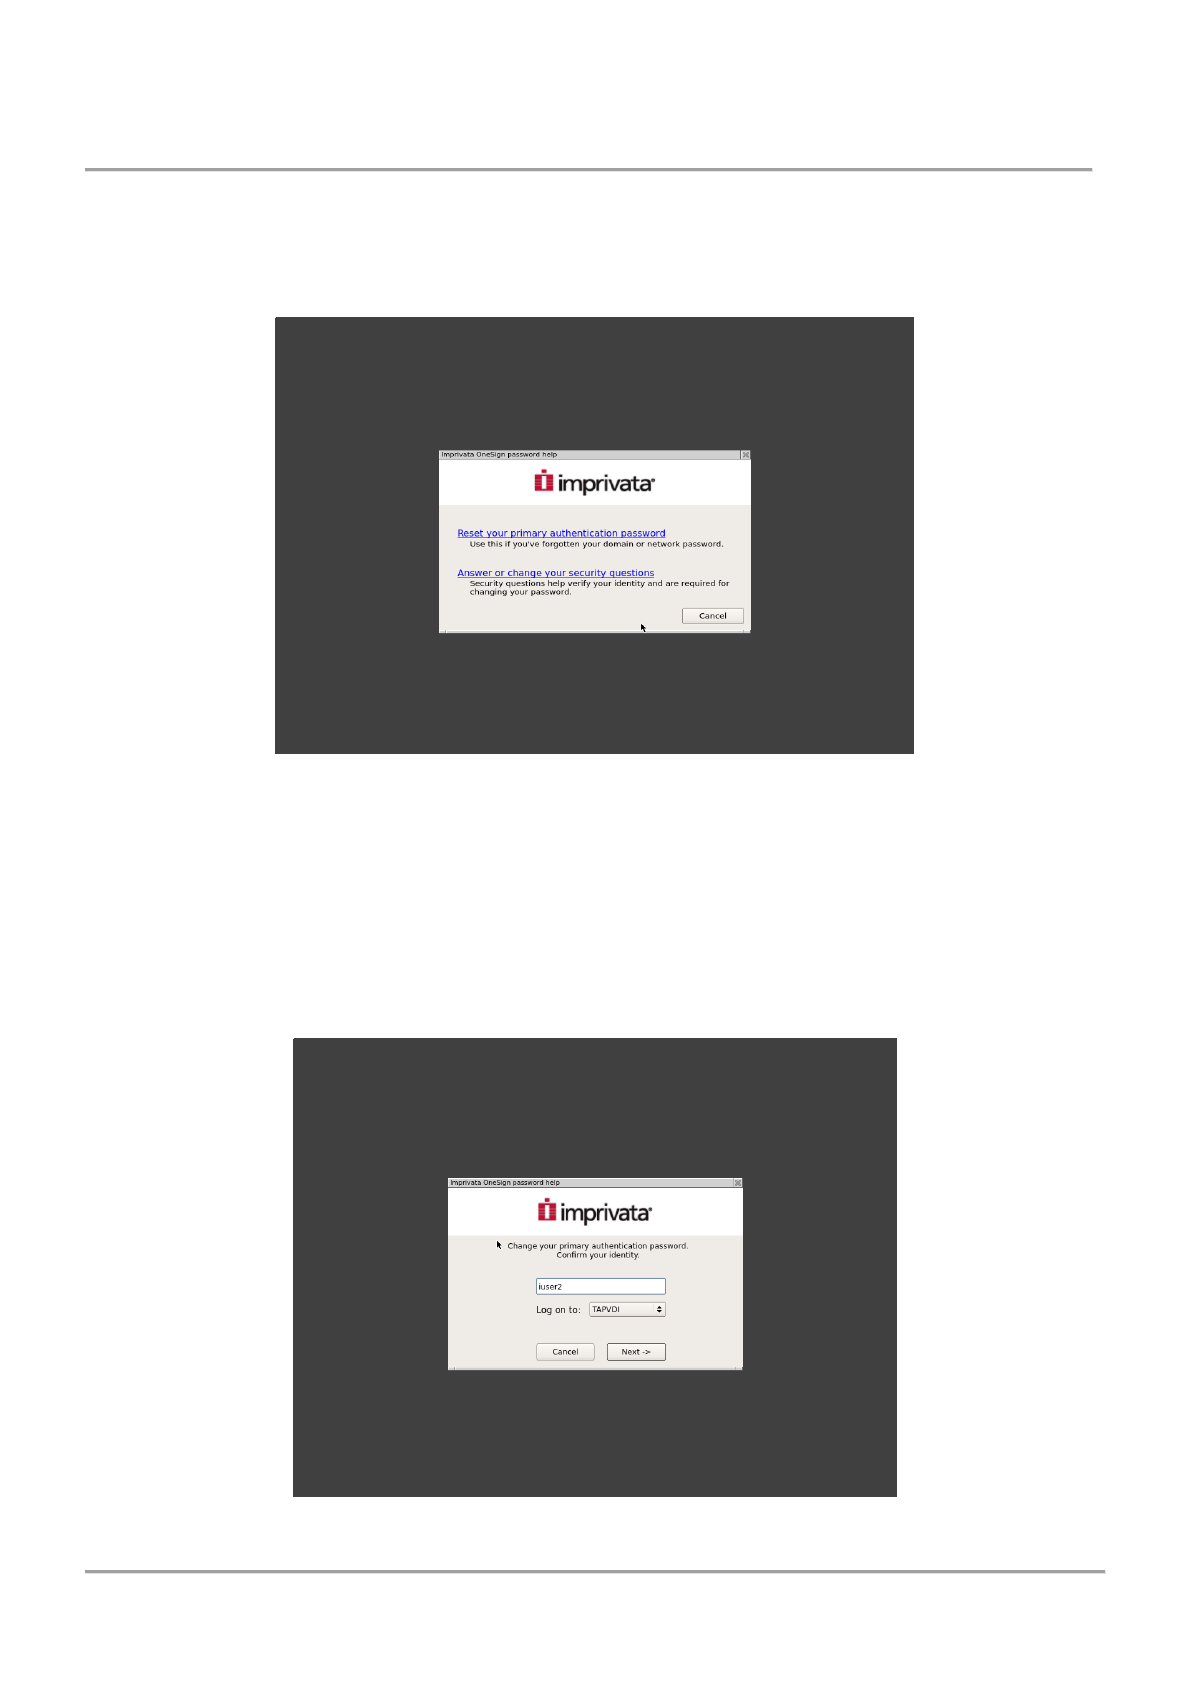
Password Reset
First step to reset the user password is to identify the user name.

Configuring OneSign on 10ZiG NOS Zero clients
26
If the user did not already answered the security questions (QnA enrollment) they will
receive the following error:
If the user previously registered the security questions, then they are invited to ask some of
the questions they previously entered.
If the answers are correct the user can reset their password

Configuring OneSign on 10ZiG NOS Zero clients
27
Answer or Change security questions
First the user identity must be verified. The user is required to enter their credentials.

Configuring OneSign on 10ZiG NOS Zero clients
28
If the user did not register the security questions, they are required to answer enrollment
question’s through the following dialog box:
On the left side the user has the choice of selecting an appropriate question. On the right
side the user is required to provide the answer to that question.
Update security questions
If the user previously provided security questions then the following dialog box is displayed

Configuring OneSign on 10ZiG NOS Zero clients
29
If the user clicks “Cancel” or “OK” without changing any parameters, the questions and
answers remain unchanged.
To change an answer to a question the user has to click on the blue icon on the right of the
specific answer.
If the user changes the question on the left side combo box the answer input field becomes
writable and the new answer can be inserted.
Import SSL CA certificate
In a production environment the 10ZiG NOS zero client should be configured to reject the
unauthorized Imprivata OneSign® SSL certificate.
To correctly validate the OneSign® SSL certificate you have to upload a signed SSL
certificate from an Intermediate Certificate Authority (or root CA equivalent) to the 10ZiG
NOS zero clients. For more information about creating a Certificate Signing Request (CSR)
on the Imprivata appliance, see Imprivata Appliance Security Settings.
Get the CA root certificate of the Imprivata appliance
The root certificate used to sign the SSL certificates can be downloaded from the Imprivata
Admin Console. On the SSL tab of the Security page, click the link Click here to download
the certificate of this CA. Download the file ssoCA.cer.

Configuring OneSign on 10ZiG NOS Zero clients
30
Import certificate using USB Mass storage
To install the SSL certificate on your 10ZiG NOS zero client copy the certificate in the root
directory of a USB storage (Formatted to FAT32). The certificate extensions supported are
.crt or .pem. The do the following:
● Click the “Settings” button to enter the control panel.
● Double click on the security settings icon.
● Click on “Enable installation from USB storage” and click OK.
● Insert the USB storage with the SSL certificate. The zero client will recognise the
thumb drive has a certificate and will prompt the user to install.
● Highlight the certificate and then click on the install button. The USB installer will
install the certificate to the zero client.
● Once installed click Close to exit from the installer dialog and verify that the certificate
is installed by double clicking on the “Certificates” icon. You should see you
certificate. You can view the certificate detail by clicking on the show button
Import certificate using 10ZiG Manager
You can use the 10ZiG Manager to import the SSL certificate on the zero client.
Follow these steps:
● Run the 10ZiG Manager Console and highlight the zero client in the device panel.
● Right click the zero client to access the option menu.
● Select the option Configuration > Edit.
● Double click the “Certificates” icon.
● Click the “Import” button.
● Select the certificate and click OK.
● Click OK to close the Certificates dialog and close zero client configuration dialog.
● Right click the zero client and choose Configuration > Send from the option menu.
Preventing User Access to Zero client system settings
To prevent the user access to the 10ZiG NOS zero client settings it is important to set a
system password. via the Control Panel:
● Open the zero client control panel.
● Click “Security Settings” icon.
● Click on “Lock down control panel”.
● Enter password and password confirm.
● Click on OK and exit control panel.
After these steps, the control panel is password protected.
Distribute 10ZiG NOS Zero client using 10ZiG Manager
To distribute a centralised configuration across multiple 10ZiG NOS zero client’s, you can
use 10ZiG Manager to facilitate this requirement.
10ZiG Manager can capture the configuration of a zero client and use its settings to create a
template, which can then be pushed to other clients either on demand, automatically, or via
scheduled task.

Configuring OneSign on 10ZiG NOS Zero clients
31
Create configuration template
To create a configuration template configure the Imprivata settings on a zero client including
the import of the CA SSL certificate. Then:
● Import the configuration by choosing the option “Configuration” > “Retrieve” from the
zero client option menu.
● Convert the zero client configuration to a template using the option “Configuration” >
“Generate template…”
● Enter a template name and click OK.

Configuring OneSign on 10ZiG NOS Zero clients
32
Distribute the template
10ZiG Manager offers several options to deploy configuration templates to multiple zero
clients.
The most commonly used approach is to automatically assign a configuration template to
zero clients on demand or via a zero client group.
● Create a zero client group
● Assign a name to the group.
● Click on the “Automatic client configuration” check box.
● Define the filters used to add zero clients to the group.
For a complete list of deployment possibilities we suggest to review the 10ZiG Manager
documentation.
GUI Customization
Several aspects of the 10ZiG Imprivata GUI are customizable, including images and text
strings.
Credentials prompt on login window
The text string has a maximum length of 32 characters.

Configuring OneSign on 10ZiG NOS Zero clients
33
Self-service password reset
e
The text string has a maximum length of 32 characters.
Proximity Card prompt on login window
The text string has a maximum length of 32 characters.
Login Banner Image
Image format: PNG
Image size: 500 x 80
If the image is smaller it is centred in the containing frame with white background.

Configuring OneSign on 10ZiG NOS Zero clients
34
If the image is larger it is centred in the destination frame and the exceeding part cropped.
Proximity Card Image
Image format: PNG
Image size: 100 x 185 pixels.
Wallpaper
Image format: PNG JPG GIF BMP
Preferred size: 1900 x 1200 pixels
Customizing text strings
To customize the text string edit the input fields available in the “Imprivata OneSign®” page
of the Citrix/VMware configurators.
The changes are effective following a zero client reboot.

Configuring OneSign on 10ZiG NOS Zero clients
35
Customizing images
To customize the Imprivata wallpaper, login banner, and card images, copy the images in
the root folder of a USB mass storage and plug it into the zero client after you enabled the
“Enable installation from USB storage” check box present in the “Security Settings” control
panel applet.
Once plugged in the following dialog box will appear.
Select on the left side the Imprivata image you want to customize and press the “Install”
button.
The image files are copied in the /tmp/config/files persistent configuration folder and used by
the 10ZiG Imprivata Agent and GUI.
Once installed, reboot the zero client for changes to take effect.

Configuring OneSign on 10ZiG NOS Zero clients
36
Troubleshooting
Connection problems
If the OneSign® connection fails, the following dialog box appears:
Click “Settings” to edit configuration and to retry connection click “Retry connection…”
Debug log files
In the 10ZiG NOS “Citrix Settings” or “VMware Horizon Settings” there is an “Imprivata
Debug” check box in the “Imprivata OneSign®” page.
Setting this check box instructs the zero client Imprivata service to generate two log files:
● /tmp/proveidd.log this is an internal functional debug log file.
● /tmp/proveidxml.log this file includes a trace of the ProveID API data exchanged
with the Imprivata appliance.
Send log files to 10ZiG Support
10ZiG NOS is able to send the Imprivata logs to the 10ZiG support.
● Click the “Settings” to access the control panel.
● Double click the “System Logs” icon.
● Highlight the “Imprivata daemon” and the click the button “Send Log”.
● Highlight the “Imprivata XML” and the click the button “Send Log”.

Configuring OneSign on 10ZiG NOS Zero clients
37
10ZiG Technical Support Contacts
The 10ZiG Technical Support is available to assist you in the configuration and
troubleshooting of the 10ZiG NOS Imprivata OneSign® integrated feature.
US Tech Support - 866-864-5250
UK/EMEA Tech Support - +44 (0) 116 214 8661
Appendix A. Supported Proximity Cards readers
In this appendix the “Smart Cards” term will refer to contact-based smart cards and
“Proximity Cards” refer to contact-less smart cards.
The 10ZiG Imprivata agent supports any contact/contact-less card reader compatible with
the pcsc ccid driver (https://pcsclite.alioth.debian.org/ccid.html ).
Some readers are supported through the specific preinstalled driver.
Tested Readers
The following table include the tested contact/contact-less smart card readers.
Model
Type
Driver type
Notes
OmniKey 5021 CL
proximity
custom
OmniKey 5022 CL
Proximity
custom
OmniKey 5421
dual prox/contact
custom
OmniKey 3021
contact
custom
OmniKey 5321CR
proximity
custom
OmniKey 5321CRv2
proximity
custom
ACS ACR 122U
proximity
generic ccid
ACS ACR 1250U
proximity
generic ccid
RFIDeas/Imprivata HDW-
IMP-80
proximity
custom
RFIDeas/Imprivata HDW-
IMP-75
proximity
Custom
Imprivata ACS ACR1252IMP
1S CL
Proximity
custom
RFIDeas pcProx Plus – P/N
RDR-80582AKU
proximity
custom
Cherry KC 1000 SC
contact
custom
Keyboard with embedded smart
card reader

Configuring OneSign on 10ZiG NOS Zero clients
38
Dell SK 3205
contact
Keyboard with embedded smart
card reader
HID OmniKey readers listed in the pcsc driver:
The 10ZiG NOS Zero client uses the pcsclite technology to handle most of the Smart Card/Proximity
Card readers.
The 10ZiG NOS zero client includes the latest Hid OmniKey driver for pcsc.
The following list includes all the readers theoretically supported by the 10ZiG NOS, but NOT actually
tested.
OMNIKEY CardMan (076B:1021) 1021
OMNIKEY CardMan (076B:0596) 2020
OMNIKEY CardMan (076B:3020) 3020
OMNIKEY CardMan (076B:3620) 3620
OMNIKEY CardMan (076B:7021) 3121
OMNIKEY CardMan (076B:3621) 3621
OMNIKEY CardMan (076B:3623) 3621
OMNIKEY CardMan (076B:3821) 3821
OMNIKEY CardMan (076B:3822) 3821
OMNIKEY CardMan (076B:3823) 3821
OMNIKEY CardMan (076B:5820) 4121 CL
OMNIKEY CardMan (076B:4321) 4321
OMNIKEY CardMan (076B:512D) 5025 PROX CL
OMNIKEY CardMan (076B:502A) 5025 PROX CL
OMNIKEY CardMan (076B:5120) 5120 CL
OMNIKEY CardMan (076B:5121) 5121
OMNIKEY CardMan (076B:C001) 5121
OMNIKEY CardMan (076B:C100) 5121
OMNIKEY CardMan (076B:C101) 5121
OMNIKEY CardMan (076B:5124) 5124 CL
OMNIKEY CardMan (076B:5125) 5125
OMNIKEY CardMan (076B:C104) 5125 CL
OMNIKEY CardMan (076B:C105) 5125
OMNIKEY CardMan (076B:5127) 5127 CK
OMNIKEY CardMan (076B:5220) 5220 Pay CL
OMNIKEY CardMan (076B:5221) 5221 Pay
OMNIKEY CardMan (076B:5311) 5321
OMNIKEY CardMan (076B:5321) 5321
OMNIKEY CardMan (076B:532A) 5321 CLi
OMNIKEY CardMan (076B:532B) 5321 Pay
OMNIKEY CardMan (076B:A521) 5321
OMNIKEY CardMan (076B:5325) 5325
OMNIKEY CardMan (076B:5326) 5326 DFR
OMNIKEY CardMan (076B:1784) 6020
OMNIKEY CardMan (076B:6622) 6121

Configuring OneSign on 10ZiG NOS Zero clients
39
OMNIKEY CardMan (076B:6623) 6121
OMNIKEY CardMan (076B:6310) 6311 CL
OMNIKEY CardMan (076B:6320) 6321 CL
OMNIKEY CardMan (076B:6321) 6321
OMNIKEY CardMan (076B:632A) 6321 CLi
OMNIKEY CardMan (076B:1BD0) 7120
OMNIKEY CardMan (076B:1BD1) 7121
OMNIKEY CardMan (076B:8630) 8630
OMNIKEY CardMan (076B:9621) 9621
CCID SC Reader (076B:A011) Keyboard
CCID SC Reader (076B:A012) Keyboard
CCID SC Reader (076B:A021)
CCID SC Reader (076B:A022)
CCID SC Reader (076B:A023)
CCID SC Reader (076B:A024)
CCID SC Reader (076B:A111) Keyboard
CCID SC Reader (076B:A112) Keyboard
CCID SC Reader (076B:A721)
CCID SC Reader (076B:B000) HID identiCLASS
CCID SC Reader (076B:B001) iCLASS Smart@Link
CCID SC Reader (076B:C000)
CCID SC Reader (076B:C200)
CCID SC Reader (076B:C300)
CCID SC Reader (0BF8:1005) Keyboard
CCID SC Reader (0BF8:1006) Keyboard
CCID SC Reader (0BF8:101B) Fujitsu D321
CCID SC Reader (0BF8:1021) Fujitsu G87 SC Contact Keyboard
Cherry SmartBoard XX44 (046A:0010)
Cherry SmartTerminal XX44 (046A:002D)
Cherry SmartTerminal XX44 (046A:007B)
Cherry SC Reader (046A:0090)
Cherry SC Reader (046A:0091)
Cherry SC Reader (046A:0092)
Cherry SC Reader (046A:00A3)
Generic CCID Readers
As mentioned, the 10ZiG NOS zero clients use the pcsclite technology to handle the
Smart/Prox Card readers.
Most of these readers are compatible with the CCID standard.
The pcsclite package include a generic CCID driver so any reader compatible with this
standard should be supported.
For a list of CCID compatible proximity/contact smart card readers refer to the following web
page : http://pcsclite.alioth.debian.org/ccid/supported.html

