
Supporng FastIron Soware Release 08.0.95
CONFIGURATION GUIDE
RUCKUS FastIron DHCP
Conguraon Guide, 08.0.95
Part Number: 53-1005654-01
Publicaon Date: 11 September 2020
Copyright, Trademark and Proprietary Rights Informaon
©
2020 CommScope, Inc. All rights reserved.
No part of this content may be reproduced in any form or by any means or used to make any derivave work (such as translaon, transformaon,
or adaptaon) without wrien permission from CommScope, Inc. and/or its aliates ("CommScope"). CommScope reserves the right to revise or
change this content from me to me without obligaon on the part of CommScope to provide nocaon of such revision or change.
Export Restricons
These products and associated technical data (in print or electronic form) may be subject to export control laws of the United States of America. It is
your responsibility to determine the applicable regulaons and to comply with them. The following noce is applicable for all products or
technology subject to export control:
These items are controlled by the U.S. Government and authorized for export only to the country of ulmate desnaon for use by the ulmate
consignee or end-user(s) herein idened. They may not be resold, transferred, or otherwise disposed of, to any other country or to any person other
than the authorized ulmate consignee or end-user(s), either in their original form or aer being incorporated into other items, without rst
obtaining approval from the U.S. government or as otherwise authorized by U.S. law and regulaons.
Disclaimer
THIS CONTENT AND ASSOCIATED PRODUCTS OR SERVICES ("MATERIALS"), ARE PROVIDED "AS IS" AND WITHOUT WARRANTIES OF ANY KIND,
WHETHER EXPRESS OR IMPLIED. TO THE FULLEST EXTENT PERMISSIBLE PURSUANT TO APPLICABLE LAW, COMMSCOPE DISCLAIMS ALL
WARRANTIES, EXPRESS OR IMPLIED, INCLUDING, BUT NOT LIMITED TO, IMPLIED WARRANTIES OF MERCHANTABILITY AND FITNESS FOR A
PARTICULAR PURPOSE, TITLE, NON-INFRINGEMENT, FREEDOM FROM COMPUTER VIRUS, AND WARRANTIES ARISING FROM COURSE OF DEALING
OR COURSE OF PERFORMANCE. CommScope does not represent or warrant that the funcons described or contained in the Materials will be
uninterrupted or error-free, that defects will be corrected, or are free of viruses or other harmful components. CommScope does not make any
warranes or representaons regarding the use of the Materials in terms of their completeness, correctness, accuracy, adequacy, usefulness,
meliness, reliability or otherwise. As a condion of your use of the Materials, you warrant to CommScope that you will not make use thereof for
any purpose that is unlawful or prohibited by their associated terms of use.
Limitaon of Liability
IN NO EVENT SHALL COMMSCOPE, COMMSCOPE AFFILIATES, OR THEIR OFFICERS, DIRECTORS, EMPLOYEES, AGENTS, SUPPLIERS, LICENSORS AND
THIRD PARTY PARTNERS, BE LIABLE FOR ANY DIRECT, INDIRECT, SPECIAL, PUNITIVE, INCIDENTAL, EXEMPLARY OR CONSEQUENTIAL DAMAGES, OR
ANY DAMAGES WHATSOEVER, EVEN IF COMMSCOPE HAS BEEN PREVIOUSLY ADVISED OF THE POSSIBILITY OF SUCH DAMAGES, WHETHER IN AN
ACTION UNDER CONTRACT, TORT, OR ANY OTHER THEORY ARISING FROM YOUR ACCESS TO, OR USE OF, THE MATERIALS. Because some jurisdicons
do not allow limitaons on how long an implied warranty lasts, or the exclusion or limitaon of liability for consequenal or incidental damages,
some of the above limitaons may not apply to you.
Trademarks
ARRIS, the ARRIS logo, COMMSCOPE, RUCKUS, RUCKUS WIRELESS, the Ruckus logo, the Big Dog design, BEAMFLEX, CHANNELFLY, FASTIRON, ICX,
SMARTCELL and UNLEASHED are trademarks of CommScope, Inc. and/or its aliates. Wi-Fi Alliance, Wi-Fi, the Wi-Fi logo, Wi-Fi Cered, the Wi-Fi
CERTIFIED logo, Wi-Fi Protected Access, the Wi-Fi Protected Setup logo, Wi-Fi Protected Setup, Wi-Fi Mulmedia and WPA2 and WMM are
trademarks or registered trademarks of Wi-Fi Alliance. All other trademarks are the property of their respecve owners.
RUCKUS FastIron DHCP Conguraon Guide, 08.0.95
2 Part Number: 53-1005654-01

Contents
Preface...................................................................................................................................................................................................................7
Document Convenons.............................................................................................................................................................................................. 7
Notes, Cauons, and Safety Warnings............................................................................................................................................................... 7
Command Syntax Convenons.................................................................................................................................................................................. 7
Document Feedback.................................................................................................................................................................................................. 8
RUCKUS Product Documentaon Resources............................................................................................................................................................. 8
Online Training Resources.......................................................................................................................................................................................... 8
Contacng RUCKUS Customer Services and Support................................................................................................................................................. 9
What Support Do I Need?.................................................................................................................................................................................. 9
Open a Case....................................................................................................................................................................................................... 9
Self-Service Resources........................................................................................................................................................................................9
About This Document...........................................................................................................................................................................................11
What's new in this document.................................................................................................................................................................................. 11
Supported Hardware................................................................................................................................................................................................ 13
Dynamic Host Conguraon Protocol Overview................................................................................................................................................... 15
DHCP overview.........................................................................................................................................................................................................15
DHCP Clients........................................................................................................................................................................................................ 17
DHCP Client.............................................................................................................................................................................................................. 17
DHCP Client Behavior on a Layer 3 Device....................................................................................................................................................... 18
DHCP Over Default Virtual Ethernet Port (Layer 3 Devices)............................................................................................................................. 18
Default Virtual Ethernet Port Creaon (Layer 3 Devices)................................................................................................................................. 18
Possible Reasons for Failure of Virtual Ethernet Port Creaon........................................................................................................................ 18
Enabling the DHCP Client for a Specic VE Port............................................................................................................................................... 19
DHCP Client in Connuous Discovery Mode (Layer 2 and Layer 3 Devices).....................................................................................................19
DHCP Client as a New Device........................................................................................................................................................................... 19
DHCP Client Behavior aer Reboot.................................................................................................................................................................. 21
BootP and DHCP relay parameters...........................................................................................................................................................................21
Conguring an IP helper address............................................................................................................................................................................. 22
Conguring the BOOTP and DHCP reply source address......................................................................................................................................... 22
Changing the IP address used for stamping BootP and DHCP requests................................................................................................................... 22
Changing the maximum number of hops to a BootP relay server........................................................................................................................... 23
DHCP Auto-Provisioning .......................................................................................................................................................................................... 24
Auto-Provisioning Using the booile.bin Opon..................................................................................................................................................... 25
DHCP Auto-Provisioning Using the Manifest File Opon......................................................................................................................................... 26
DHCP Auto-Provisioning Enhancements.................................................................................................................................................................. 27
Conguring DHCP Auto-Provisioning Enhancements...............................................................................................................................................29
DHCP auto-provisioning opons.............................................................................................................................................................................. 30
Disabling or re-enabling the DHCP client ................................................................................................................................................................ 30
DHCP auto-provisioning on Layer 2 and Layer 3 devices......................................................................................................................................... 31
Scenario 1: DHCP auto-provisioning on a Layer 3 device................................................................................................................................. 32
Scenario 2: DHCP auto-provisioning with a TFTP server in a dierent network.............................................................................................. 33
Scenario 3: DHCP client connected through a DHCP snooping device.............................................................................................................33
Scenario 4: DHCP client opon 12................................................................................................................................................................... 34
Scenario 5: DHCP auto-provisioning on a Layer 2 device................................................................................................................................. 34
Conguraon Notes and Feature Limitaons for DHCP Auto-Provisioning............................................................................................................. 35
RUCKUS FastIron DHCP Conguraon Guide, 08.0.95
Part Number: 53-1005654-01 3
High Availability and 802.1BR Consideraons..................................................................................................................................................36
Upgrade Consideraons................................................................................................................................................................................... 36
How DHCP Client-Based Auto-Provisioning and Flash Image Update Works................................................................................................... 36
Validang the IP Address and Lease Negoaon............................................................................................................................................. 36
Flash Image Download and Update ................................................................................................................................................................ 37
Auto-Provisioning Download and Update ....................................................................................................................................................... 37
Disabling or re-enabling auto-provisioning.............................................................................................................................................................. 38
Dynamic DHCP opons conguraon processing.................................................................................................................................................... 38
Discovery of SZ based on DHCP Opon 43 ..............................................................................................................................................................38
Conguraon notes and feature limitaons.................................................................................................................................................... 39
Verifying dynamic DHCP opons for a switch.......................................................................................................................................................... 40
Verifying dynamic DHCP opons for a router.......................................................................................................................................................... 42
DHCP Servers....................................................................................................................................................................................................... 45
DHCP Servers........................................................................................................................................................................................................... 45
Conguraon Consideraons for DHCP Servers.............................................................................................................................................. 46
Conguring the DHCP server and creang an address pool............................................................................................................................ 47
Default DHCP server sengs........................................................................................................................................................................... 50
DHCP server opons................................................................................................................................................................................................ 50
Recommendaons and limitaons.................................................................................................................................................................. 53
Upgrade consideraons................................................................................................................................................................................... 53
Disabling or re-enabling the DHCP server on the management port.......................................................................................................................54
Seng the wait me for ARP ping response............................................................................................................................................................55
DHCP relay agent informaon support (opon 82) ................................................................................................................................................ 55
Enabling relay agent informaon (opon 82).......................................................................................................................................................... 55
Conguring the IP address of the DHCP server........................................................................................................................................................ 56
Conguring the boot image..................................................................................................................................................................................... 56
Deploying an address pool conguraon to the server........................................................................................................................................... 56
Specifying default router available to the client...................................................................................................................................................... 57
Specifying DNS servers available to the client......................................................................................................................................................... 57
Conguring the domain name for the client............................................................................................................................................................ 57
Conguring the lease duraon for the address pool............................................................................................................................................... 58
Specifying addresses to exclude from the address pool.......................................................................................................................................... 58
Conguring the NetBIOS server for DHCP clients.................................................................................................................................................... 58
Conguring the subnet and mask of a DHCP address pool...................................................................................................................................... 59
Conguring the TFTP server..................................................................................................................................................................................... 59
Conguring X Window System Display Manager IP addresses (opon 49)..............................................................................................................59
Vendor specic informaon (opon 43 and opon 60) conguraons................................................................................................................... 60
Conguring vendor details and vendor specic informaon (opon 43 and opon 60) ................................................................................ 60
Enabling stac IP to MAC address mapping............................................................................................................................................................. 61
Conguring Avaya IP telephony (opons 176 and 242)........................................................................................................................................... 62
Conguring WPAD (opon 252)............................................................................................................................................................................... 64
Displaying DHCP server informaon........................................................................................................................................................................ 65
DHCPv4................................................................................................................................................................................................................ 67
DHCPv4 overview..................................................................................................................................................................................................... 67
DHCP Assist conguraon........................................................................................................................................................................................ 67
How DHCP Assist works................................................................................................................................................................................... 68
Conguring DHCP Assist................................................................................................................................................................................... 70
Dynamic ARP Inspecon Overview ......................................................................................................................................................................... 71
ARP Poisoning.................................................................................................................................................................................................. 71
RUCKUS FastIron DHCP Conguraon Guide, 08.0.95
4 Part Number: 53-1005654-01
How Dynamic ARP Inspecon Works............................................................................................................................................................... 71
Conguraon Notes and Feature Limitaons for DAI...................................................................................................................................... 73
Conguring Dynamic ARP Inspecon............................................................................................................................................................... 73
Conguring Dynamic ARP Inspecon on Mulple VLANs................................................................................................................................ 74
Disabling Syslog Messages for DAI................................................................................................................................................................... 75
Displaying ARP Informaon..............................................................................................................................................................................76
Conguring DAI to Support Mul-VRF............................................................................................................................................................. 76
Enabling Trust on a Port for a Specic VRF.......................................................................................................................................................77
DHCP Snooping........................................................................................................................................................................................................ 77
How DHCP Snooping Works............................................................................................................................................................................. 77
System Reboot and the Binding Database....................................................................................................................................................... 79
Conguraon Notes and Feature Limitaons for DHCP Snooping................................................................................................................... 79
Conguring DHCP Snooping............................................................................................................................................................................. 80
Conguring DHCP Snooping on Mulple VLANs.............................................................................................................................................. 81
Displaying DHCPv4 Snooping Informaon....................................................................................................................................................... 82
Conguring DHCPv4 Snooping for Mul-VRF...................................................................................................................................................83
DHCP Relay Agent Informaon and Opon 82 Inseron......................................................................................................................................... 83
Conguraon Notes for DHCP Opon 82......................................................................................................................................................... 84
DHCP Opon 82 Sub-opons........................................................................................................................................................................... 85
DHCP Opon 82 Conguraon.........................................................................................................................................................................86
IP Source Guard........................................................................................................................................................................................................ 91
Conguraon Notes and Feature Limitaons for IP Source Guard.................................................................................................................. 92
Enabling IP Source Guard on a Port or Range of Ports..................................................................................................................................... 93
Dening Stac IP Source Bindings.................................................................................................................................................................... 94
Enabling IP Source Guard for a VLAN............................................................................................................................................................... 94
Enabling IP Source Guard for a LAG Port for a VLAN........................................................................................................................................ 95
Enabling IP Source Guard on Mulple VLANs.................................................................................................................................................. 95
Binding IP Source Guard ACLs to Ports.............................................................................................................................................................96
Displaying Learned IP Addresses...................................................................................................................................................................... 97
DHCPv6................................................................................................................................................................................................................ 99
DHCPv6 overview..................................................................................................................................................................................................... 99
DHCP relay agent for IPv6........................................................................................................................................................................................ 99
Conguring a DHCPv6 relay agent....................................................................................................................................................................99
DHCPv6 relay agent include opons.............................................................................................................................................................. 100
Specifying the IPv6 DHCP relay include opons.............................................................................................................................................101
DHCPv6 Relay Agent Prex Delegaon Nocaon.......................................................................................................................................101
DHCPv6 Relay Agent Prex Delegaon Nocaon limitaons.....................................................................................................................102
Upgrade and downgrade consideraons....................................................................................................................................................... 102
Conguring DHCPv6 Relay Agent Prex Delegaon Nocaon................................................................................................................... 102
Enabling DHCPv6 Relay Agent Prex Delegaon Nocaon on an interface...............................................................................................103
Assigning the administrave distance to DHCPv6 stac routes..................................................................................................................... 103
Displaying DHCPv6 relay agent and prex delegaon informaon................................................................................................................ 104
Clearing the DHCPv6 delegated prexes and packet counters.......................................................................................................................105
DHCPv6 Snooping.................................................................................................................................................................................................. 105
How DHCPv6 Snooping Works....................................................................................................................................................................... 105
Conguraon Notes and Feature Limitaons for DHCPv6 Snooping............................................................................................................. 106
Conguring DHCPv6 Snooping....................................................................................................................................................................... 107
Conguring DHCPv6 Snooping on Mulple VLANs........................................................................................................................................ 108
Conguring DHCPv6 Snooping for Mul-VRF.................................................................................................................................................110
Displaying DHCPv6 Snooping Informaon..................................................................................................................................................... 110
RUCKUS FastIron DHCP Conguraon Guide, 08.0.95
Part Number: 53-1005654-01 5
DHCPv6 Server....................................................................................................................................................................................................... 111
Conguraon Consideraons for DHCPv6 Servers.........................................................................................................................................111
Conguring the Stateless DHCPv6 Server on Layer 3 Soware Images......................................................................................................... 112
Conguring the Stateful DHCPv6 Server on Layer 3 Soware Images........................................................................................................... 114
Conguring the Stateless DHCPv6 Server on Layer 2 Soware Images......................................................................................................... 115
Conguring the Stateful DHCPv6 Server on Layer 2 Soware Images........................................................................................................... 118
Displaying DHCPv6 Server Informaon.......................................................................................................................................................... 120
Vericaon of DHCPv6 Server Status............................................................................................................................................................. 121
Vericaon in Linux Mode............................................................................................................................................................................. 122
Prex Delegaon............................................................................................................................................................................................ 122
Prex Delegaon for ICX DHCPv6 Servers in Layer 3 Soware Images.......................................................................................................... 122
RUCKUS FastIron DHCP Conguraon Guide, 08.0.95
6 Part Number: 53-1005654-01

Preface
• Document Convenons.............................................................................................................................................................. 7
• Command Syntax Convenons...................................................................................................................................................7
• Document Feedback...................................................................................................................................................................8
• RUCKUS Product Documentaon Resources.............................................................................................................................. 8
• Online Training Resources.......................................................................................................................................................... 8
• Contacng RUCKUS Customer Services and Support................................................................................................................. 9
Document Convenons
The following table lists the text convenons that are used throughout this guide.
TABLE 1 Text Convenons
Convenon Descripon Example
monospace
Idenes command syntax examples
device(config)# interface ethernet 1/1/6
bold User interface (UI) components such
as screen or page names, keyboard
keys, soware buons, and eld
names
On the Start menu, click All Programs.
italics Publicaon tles Refer to the RUCKUS Small Cell Release Notes for more informaon.
Notes, Cauons, and Safety Warnings
Notes, cauons, and warning statements may be used in this document. They are listed in the order of increasing severity of potenal hazards.
NOTE
A NOTE provides a p, guidance, or advice, emphasizes important informaon, or provides a reference to related informaon.
ATTENTION
An ATTENTION statement indicates some informaon that you must read before connuing with the current acon or task.
CAUTION
A CAUTION statement alerts you to situaons that can be potenally hazardous to you or cause damage to hardware, rmware,
soware, or data.
DANGER
A DANGER statement indicates condions or situaons that can be potenally lethal or extremely hazardous to you. Safety labels are
also aached directly to products to warn of these condions or situaons.
Command Syntax Convenons
Bold and italic text idenfy command syntax components. Delimiters and operators dene groupings of parameters and their logical relaonships.
Convenon Descripon
bold text Idenes command names, keywords, and command opons.
RUCKUS FastIron DHCP Conguraon Guide, 08.0.95
Part Number: 53-1005654-01 7
Convenon Descripon
italic text Idenes a variable.
[ ] Syntax components displayed within square brackets are oponal.
Default responses to system prompts are enclosed in square brackets.
{ x | y | z } A choice of required parameters is enclosed in curly brackets separated by vercal bars. You must select one of the opons.
x | y A vercal bar separates mutually exclusive elements.
< > Nonprinng characters, for example, passwords, are enclosed in angle brackets.
... Repeat the previous element, for example, member[member...].
\ Indicates a “so” line break in command examples. If a backslash separates two lines of a command input, enter the enre command at
the prompt without the backslash.
Document Feedback
RUCKUS is interested in improving its documentaon and welcomes your comments and suggesons.
You can email your comments to RUCKUS at #[email protected]om.
When contacng us, include the following informaon:
• Document tle and release number
• Document part number (on the cover page)
• Page number (if appropriate)
For example:
• RUCKUS SmartZone Upgrade Guide, Release 5.0
• Part number: 800-71850-001 Rev A
• Page 7
RUCKUS Product Documentaon Resources
Visit the RUCKUS website to locate related documentaon for your product and addional RUCKUS resources.
Release Notes and other user documentaon are available at hps://support.ruckuswireless.com/documents. You can locate the documentaon by
product or perform a text search. Access to Release Notes requires an acve support contract and a RUCKUS Support Portal user account. Other
technical documentaon content is available without logging in to the RUCKUS Support Portal.
White papers, data sheets, and other product documentaon are available at hps://www.ruckuswireless.com.
Online Training Resources
To access a variety of online RUCKUS training modules, including free introductory courses to wireless networking essenals, site surveys, and
products, visit the RUCKUS Training Portal at hps://training.ruckuswireless.com.
Preface
Document Feedback
RUCKUS FastIron DHCP Conguraon Guide, 08.0.95
8 Part Number: 53-1005654-01
Contacng RUCKUS Customer Services and Support
The Customer Services and Support (CSS) organizaon is available to provide assistance to customers with acve warranes on their RUCKUS
products, and customers and partners with acve support contracts.
For product support informaon and details on contacng the Support Team, go directly to the RUCKUS Support Portal using hps://
support.ruckuswireless.com, or go to hps://www.ruckuswireless.com and select Support.
What Support Do I Need?
Technical issues are usually described in terms of priority (or severity). To determine if you need to call and open a case or access the self-service
resources, use the following criteria:
• Priority 1 (P1)—Crical. Network or service is down and business is impacted. No known workaround. Go to the Open a Case secon.
• Priority 2 (P2)—High. Network or service is impacted, but not down. Business impact may be high. Workaround may be available. Go to
the Open a Case secon.
• Priority 3 (P3)—Medium. Network or service is moderately impacted, but most business remains funconal. Go to the Self-Service
Resources secon.
• Priority 4 (P4)—Low. Requests for informaon, product documentaon, or product enhancements. Go to the Self-Service Resources
secon.
Open a Case
When your enre network is down (P1), or severely impacted (P2), call the appropriate telephone number listed below to get help:
• Connental United States: 1-855-782-5871
• Canada: 1-855-782-5871
• Europe, Middle East, Africa, Central and South America, and Asia Pacic, toll-free numbers are available at hps://
support.ruckuswireless.com/contact-us and Live Chat is also available.
• Worldwide toll number for our support organizaon. Phone charges will apply: +1-650-265-0903
We suggest that you keep a physical note of the appropriate support number in case you have an enre network outage.
Self-Service Resources
The RUCKUS Support Portal at hps://support.ruckuswireless.com oers a number of tools to help you to research and resolve problems with your
RUCKUS products, including:
• Technical Documentaon—hps://support.ruckuswireless.com/documents
• Community Forums—hps://forums.ruckuswireless.com/ruckuswireless/categories
• Knowledge Base Arcles—hps://support.ruckuswireless.com/answers
• Soware Downloads and Release Notes—hps://support.ruckuswireless.com/#products_grid
• Security Bullens—hps://support.ruckuswireless.com/security
Using these resources will help you to resolve some issues, and will provide TAC with addional data from your troubleshoong analysis if you sll
require assistance through a support case or RMA. If you sll require help, open and manage your case at hps://support.ruckuswireless.com/
case_management.
Preface
Contacng RUCKUS Customer Services and Support
RUCKUS FastIron DHCP Conguraon Guide, 08.0.95
Part Number: 53-1005654-01 9
RUCKUS FastIron DHCP Conguraon Guide, 08.0.95
10 Part Number: 53-1005654-01

About This Document
• What's new in this document...................................................................................................................................................11
• Supported Hardware................................................................................................................................................................ 13
What's new in this document
The following table describes informaon added or modied in this guide for FastIron 08.0.95.
NOTE
The ICX 7550 Series Switches are not supported in release 08.0.95. Support for the ICX 7550 will be introduced in a later release.
TABLE 2 Summary of Enhancements in FastIronRelease 08.0.95
Feature Descripon Locaon
DHCPv4 and DHCPv6 Snooping Enhancements A number of changes and enhancements have been
introduced for DHCP and DHCPv6 Snooping as a
result of ACL rearchitecture. These inclue the
following:
• DHCP Snooping can be congured for a
VLAN or VLANS even before the VLAN or
VLANS are created. VLANs and DHCP
Snooping conguraons on the VLANS
are not automacally deleted when the
VLAN is deleted.
• When DHCP Snooping is enabled, client
and server packets are not allowed on
same port.
• DHCP Snooping can be congured on a
maximum of 511 VLANs.
• DHCP Snooping cannot be enabled for a
VLAN that is a member of a VLAN group.
• When conguring DHCP Snooping on a
range of VLANs or mul-VLAN, there
cannot not be any VLAN in the range that
is a member of a VLAN group or any
reserved VLAN.
• For default VLAN ID changes,DHCPv4 and
DHCPv6 snooping are not automacally
congured on the new default VLAN, and
must be re-applied on the new default
VLAN. The DHCP Snooping conguraons
are not automacally congured on the
new default VLAN 4000.
• ACLs are supported on member ports of
a VLAN on which DHCP snooping and
Dynamic ARP Inspecon (DAI) are
enabled. In previous releases, these were
mutually exclusive.
Refer to
• DHCP Snooping on page 77
• DHCPv6 Snooping on page 105
RUCKUS FastIron DHCP Conguraon Guide, 08.0.95
Part Number: 53-1005654-01 11

TABLE 2 Summary of Enhancements in FastIronRelease 08.0.95 (connued)
Feature Descripon Locaon
IP Source Guard (IPSG) and SG ACL Enhancements A number of changes and enhancements have been
introduced for IPSG ACLs. These include the
following:
• A new command has been introduced to
bind an IPSG ACL to a port, VLAN, or
interface for incoming trac.
• IPSG and SG ACL can be congured for
the same port. IPSG and ACLs are
supported together on the same device
with certain limitaons.
• IPSG cannot be enabled on a per-port-
per-VLAN basis.
• If IPSG is congured for a specied port
for a VLAN, it cannot be congured
globally for the VLAN.
• IPSG Snooping can be congured on a
maximum of 511 VLANs.
• RUCKUS devices do not support IPSG
with ingress IPv4 ACLs for the same port,
neither at VLAN-level, port-level, or
across dierent levels.
• IPSG and SG ACL can be congured for
the same port.
• To bind an IPSG ACL to an interface for
incoming trace, you must now use the
ip sg-access-group command.
• IPSG is not supported for VLAN groups. If
upgrading from FastIron 08.0.92 to
FastIron 08.0.95, IPSG is not congured
for a VLAN group, even if this was
previously congured.
• IPSG is not supported for VE interfaces.
• When a client moves from one port to
another port in the same VLAN, the old
snoop entry for the client MAC address is
automacally updated. This occurs even
when the client acquires a new IP
address.
• Duplicate IP entries across VLANS are
allowed in the DHCP snooping table.
When a client moves from one VLAN to
another and acquires the same address,
two snooping entries are maintained for
the same MAC address and IP address.
• Opon-82 can be disabled or re-enabled
on mulple VLANs or a range of VLANS
using a single command, ip dhcp
snooping relay informaon disable.
• IPSG can be enabled on tagged ports or
untagged ports in a VLAN.
Refer to IP Source Guard on page 91
DHCP Client on non-default Virtual Ethernet Ports The DHCP client can be enabled for a non-default
Virtual Ethernet (VE) port. By default, the DHCP
client is enabled for the default VE port. The DHCP
client can also be enabled for a non-default VE port.
Refer to Enabling the DHCP Client for a Specic VE
Port on page 19
About This Document
What's new in this document
RUCKUS FastIron DHCP Conguraon Guide, 08.0.95
12 Part Number: 53-1005654-01

TABLE 2 Summary of Enhancements in FastIronRelease 08.0.95 (connued)
Feature Descripon Locaon
Dynamic ARP Inspecon (DAI)Enhancements A number of changes and enhancements have been
introduced for DAI as a result of ACL rearchitecture.
These include the following:
• DAI can be congured on a maximum of
511 VLANs.
• The maximum number of stac DAI
entries that can be congured is 6000.
This value cannot be changed.
Refer to Dynamic ARP Inspecon Overview on page
71
Updates to address defects Minor updates on content throughout to address
defects.
All chapters.
Minor editorial updates Minor editorial updates were made throughout the
Conguraon Guide.
All chapters.
Supported Hardware
This guide supports the following RUCKUS products:
• RUCKUS ICX 7850 Switch
• RUCKUS ICX 7750 Switch
• RUCKUS ICX 7650 Switch
• RUCKUS ICX 7550 Switch
• RUCKUS ICX 7450 Switch
• RUCKUS ICX 7250 Switch
• RUCKUS ICX 7150 Switch
For informaon about what models and modules these devices support, refer to the hardware installaon guide for the specic product family.
About This Document
Supported Hardware
RUCKUS FastIron DHCP Conguraon Guide, 08.0.95
Part Number: 53-1005654-01 13
RUCKUS FastIron DHCP Conguraon Guide, 08.0.95
14 Part Number: 53-1005654-01

Dynamic Host Conguraon Protocol
Overview
• DHCP overview......................................................................................................................................................................... 15
DHCP overview
The Dynamic Host Conguraon Protocol (DHCP) is based on the Bootstrap Protocol (BOOTP) and provides several conguraon parameters stored
in DHCP server databases to DHCP clients upon request.
DHCP enables the automac conguraon of client systems. DHCP removes the need to congure devices individually. Clients can set network
properes by connecng to the DHCP server instead. This protocol consists of two components; a protocol to deliver host-specic conguraon
parameters from a DHCP server to a host, and a mechanism to allocate leased or permanent IP addresses to hosts. DHCP is built on a client-server
model, where designated DHCP server hosts allocate network addresses and deliver conguraon parameters to dynamically congured hosts.
RUCKUS FastIron DHCP Conguraon Guide, 08.0.95
Part Number: 53-1005654-01 15
RUCKUS FastIron DHCP Conguraon Guide, 08.0.95
16 Part Number: 53-1005654-01

DHCP Clients
• DHCP Client.............................................................................................................................................................................. 17
• BootP and DHCP relay parameters........................................................................................................................................... 21
• Conguring an IP helper address..............................................................................................................................................22
• Conguring the BOOTP and DHCP reply source address.......................................................................................................... 22
• Changing the IP address used for stamping BootP and DHCP requests................................................................................... 22
• Changing the maximum number of hops to a BootP relay server............................................................................................23
• DHCP Auto-Provisioning .......................................................................................................................................................... 24
• Auto-Provisioning Using the booile.bin Opon..................................................................................................................... 25
• DHCP Auto-Provisioning Using the Manifest File Opon......................................................................................................... 26
• DHCP Auto-Provisioning Enhancements.................................................................................................................................. 27
• Conguring DHCP Auto-Provisioning Enhancements............................................................................................................... 29
• DHCP auto-provisioning opons.............................................................................................................................................. 30
• Disabling or re-enabling the DHCP client ................................................................................................................................ 30
• DHCP auto-provisioning on Layer 2 and Layer 3 devices..........................................................................................................31
• Conguraon Notes and Feature Limitaons for DHCP Auto-Provisioning..............................................................................35
• Disabling or re-enabling auto-provisioning.............................................................................................................................. 38
• Dynamic DHCP opons conguraon processing.................................................................................................................... 38
• Discovery of SZ based on DHCP Opon 43 .............................................................................................................................. 38
• Verifying dynamic DHCP opons for a switch.......................................................................................................................... 40
• Verifying dynamic DHCP opons for a router...........................................................................................................................42
DHCP Client
A host on an IP network can use BOOTP or DHCP to obtain its IP address from a BOOTP or DHCP server. To obtain the address, the client sends a
BOOTP or DHCP request.
The request is a subnet-directed broadcast and is addressed to UDP port 67. A limited IP broadcast is addressed to IP address 255.255.255.255 and
is not forwarded by the RUCKUS Layer 3 switch or other IP routers. When the BOOTP or DHCP client and server are on the same network, the server
receives the broadcast request and replies to the client. However, when the client and server are on dierent networks, the server does not receive
the client request, because the Layer 3 switch does not forward the request.
You can congure the Layer 3 switch to forward BOOTP or DHCP requests. To do so, congure a helper address on the interface that receives the
client requests, and specify the BOOTP or DHCP server IP address as the address you are helping the BOOTP or DHCP requests to reach. Refer to
Conguring an IP helper address on page 22. Instead of the server IP address, you can specify the subnet directed broadcast address of the IP
subnet the server is in.
The DHCP client supports the dynamic IP address allocaon method, where an IP address is assigned to a client for a limited period of me (or unl
the client explicitly relinquishes the address). Permanent IP address allocaon to the hosts and stacally assigned IP addresses are not supported.
RUCKUS devices support a DHCP client on physical ports, LAG ports, Virtual Ethernet ports, and Control Bridge (CB) ports (802.1BR-enabled). The
DHCP client is not supported on tunnel ports, stacking ports when stacking is enabled, or PE ports in 802.1BR-enabled RUCKUS devices.
NOTE
On a Layer 3 device, DHCP client support for PE ports on 802.1BR-enabled RUCKUS devices includes the ability to parcipate in the inial
DHCP IP discovery phase to create a default Virtual Ethernet port. However, because PE ports are considered Layer 2 switching ports, they
cannot be assigned an IP address.
The DHCP client is enabled by default at bootup on all RUCKUS devices.
RUCKUS FastIron DHCP Conguraon Guide, 08.0.95
Part Number: 53-1005654-01 17
DHCP Client Behavior on a Layer 3 Device
On a layer 3 device, all physical ports act as DHCP clients by default. When a DHCP oer is received, an IP address gets assigned to the port (for
example, ethernet interface 1/1/1) on which the DHCP oer is received. No more DHCP oers are accepted on other ports at this point. If a virtual
ethernet (VE) port is congured on the default VLAN, that VE acts as the DHCP client. VEs congured on non-default VLANs (user created VLANs) do
not act as the DHCP client by default. You can change this behavior by designang one of the non-default VEs as the DHCP client instead of the
default VE.
Therefore, the DHCP client is funconal on the following ports based on the conguraon:
• Physical ports when the user does not congure a default VE, or
• The default VE congured by the user, or
• A non-default VE if the user overrides the default behavior by designang a non-default VE as the DHCP client.
DHCP Over Default Virtual Ethernet Port (Layer 3 Devices)
The following enhancements mimic the behavior of a Layer 2 device when it is running the Layer 3 image:
• The ICX device is managed even during cable movement from one in-band interface port to another.
• Network devices that are connected downstream through an ICX device are managed no maer what ports are connected, as long as the
downstream ports belong to the default Virtual Ethernet port.
• Using DHCP, acquiring an IP address or upgrading the conguraon uses zero-touch provisioning.
• By default, the ICX device allows trac to pass across all ports (reachability).
• A single MAC address per system is used for IP discovery, which allows the same IP address to be used all the me.
Default Virtual Ethernet Port Creaon (Layer 3 Devices)
The DHCP server is reachable through a physical port, and, if opon 43 VSI is congured on the DHCP server, DHCP server exchange opon 43 VSI,
“Create default VE” [not case-sensive], is sent through a DHCPACK message. A RUCKUS device congured as a DHCP client matches the VSI string
and creates the default Virtual Ethernet port.
NOTE
To create a Virtual Ethernet port, at least one port must be a member of the default VLAN of the device.
If Virtual Ethernet port creaon is successful, the IP address that is acquired through the physical port is released, and an IP address will be re-
acquired through the default Virtual Ethernet port.
If default Virtual Ethernet port creaon fails, the IP address acquired will be assigned to the physical interface port or ports connecng the DHCP
server if the connecng ports are Layer 3 ports.
Possible Reasons for Failure of Virtual Ethernet Port Creaon
The member ports of the default VLAN are queried to check for certain conguraons. If any of the items are found, default Virtual Ethernet
creaon fails without other condions being checked. The following congured items result in failure:
• IP roung
• VRF
• IP policy
• Route only
• RPF mode
DHCP Clients
DHCP Client
RUCKUS FastIron DHCP Conguraon Guide, 08.0.95
18 Part Number: 53-1005654-01
• IP mac
Enabling the DHCP Client for a Specic VE Port
The DHCP client can be enabled for a specic Virtual Ethernet (VE) port, either default or non-default. By default, the DHCP client is enabled for the
default VE port.
NOTE
When opon 43 is received as “Create Default VE” while running the DHCP client on the VE, a trap and syslog is generated to ignore
Opon 43.
NOTE
The DHCP client can be congured for only one specic VE port at a me.
NOTE
When this feature is enabled, DHCP-based zero touch provisioning will not be funconal.
The following task enables the DHCP client for a specied VE port.
1. Enter global conguraon mode.
device# configure terminal
2. Enable the DHCP client for a specied VE interface.
device(config)# ip dhcp-client ve 22
The following example enables the DHCP client for a specied VE port.
device# configure terminal
device(config)# ip dhcp-client ve 22
DHCP Client in Connuous Discovery Mode (Layer 2 and Layer 3 Devices)
Beginning with release 08.0.61, the DHCP-client discovery process starts automacally when the system boots up and runs in a connuous manner.
DHCP Discovery is aempted 5 mes based on the exponenal back-o algorithm, as per RFC 2131. Retries occur at these intervals: x+4 seconds,
where x is the starng system me, x+8 seconds, x+16 seconds, x+32 seconds, and x+64 seconds. Aer the DHCP client reaches the maximum
retransmission delay of 64 seconds, it waits 2 seconds and then restarts the discovery process. The ve-interval cycle repeats connuously.
NOTE
Discovery intervals may vary by +1 or -1 seconds, depending on system performance.
DHCP Client as a New Device
When the DHCP client device boots up without an IP address with the Layer 2 switch soware version, the client iniates DHCP discovery, which is a
subnet-directed broadcast. Refer to "DHCP client in connuous discovery mode" for more informaon.
The DHCP discovery broadcast is received by the DHCP servers present in the network. There are three possible responses to this message:
• No response
• Single response
• More than one response
DHCP Clients
DHCP Client
RUCKUS FastIron DHCP Conguraon Guide, 08.0.95
Part Number: 53-1005654-01 19

If the client does not receive a DHCP server response, there is a possibility that the client could be disabled on the device. If the client receives a
response from the server (refer to "DORA process"), the client starts the DHCP request and obtains the IP address lease. If the client receives a
response from more than one server, the client acknowledges the rst response received, which is the default behavior.
NOTE
The DORA process is the standard Discover, Oer, Request, Acknowledge process used by DHCP to allocate IP addresses dynamically to
clients through a lease period. Refer to the following graphic for a descripon of the ICX implementaon.
In the Layer 3 soware image, when the DHCP client device boots up without any IP address, the client iniates the DHCP discovery on all ports.
DHCP discovery packets are sent from all DHCP client-eligible ports in the device. The default discovery mechanism is similar to the switch version.
The following owchart illustrates this discovery mechanism.
FIGURE 1 DHCP client device bootup with no IP address
DHCP Clients
DHCP Client
RUCKUS FastIron DHCP Conguraon Guide, 08.0.95
20 Part Number: 53-1005654-01
DHCP client behavior aer reboot
If the DHCP client device reboots with a previously obtained IP address, the DHCP client sends the DHCP request packet, which is a subnet-directed
broadcast packet from all the operaonally up ports of the device. Once the DHCP server responds posively to the request, the previously
obtained IP address is leased seamlessly. If the DHCP server responds in the negave, the previously obtained IP address will be released, and the
DHCP process restarts.
If the soware version is Layer 3, when the DHCP client comes up aer a reboot with a previously obtained IP address, the DHCP client sends the
DHCP request packets only on the ports where the DHCP client was enabled previously on the device.
DHCP Client Behavior aer Reboot
If the DHCP client device reboots with a previously obtained IP address, the DHCP client sends the DHCP request packet, which is a subnet-directed
broadcast packet from all the operaonally up ports of the device. Once the DHCP server responds posively to the request, the previously
obtained IP address is leased seamlessly. If the DHCP server responds in the negave, the previously obtained IP address will be released, and the
DHCP process restarts.
If the soware version is Layer 3, when the DHCP client comes up aer a reboot with a previously obtained IP address, the DHCP client sends the
DHCP request packets only on the ports where the DHCP client was enabled previously on the device.
BootP and DHCP relay parameters
The following parameters control the Layer 3 switch forwarding of BootP and DHCP requests:
• Helper address - The BootP/DHCP server IP address. You must congure the helper address on the interface that receives the BootP/DHCP
requests from the client. The Layer 3 switch cannot forward a request to the server unless you congure a helper address for the server.
• Gateway address - The Layer 3 switch places the IP address of the interface that received the BootP/DHCP request in the request packet
Gateway Address eld (somemes called the Router ID eld). When the server responds to the request, the server sends the response as
a unicast packet to the IP address in the Gateway Address eld. (If the client and server are directly aached, the Gateway ID eld is
empty, and the server replies to the client using a unicast or broadcast packet, depending on the server.)
By default, the Layer 3 switch uses the lowest-numbered IP address on the interface that receives the request as the Gateway address. You can
override the default by specifying the IP address you want the Layer 3 switch to use.
• Hop count - Each router that forwards a BootP/DHCP packet increments the hop count by one. Routers also discard a forwarded BootP/
DHCP request instead of forwarding the request if the hop count is greater than the maximum number of BootP/DHCP hops allowed by
the router. By default, a RUCKUS Layer 3 switch forwards a BootP/DHCP request if its hop count is four or less but discards the request if
the hop count is greater than four. You can change the maximum number of hops the Layer 3 switch allows to a value from 1 through 15.
NOTE
The BootP/DHCP hop count is not the TTL parameter.
DHCP Clients
BootP and DHCP relay parameters
RUCKUS FastIron DHCP Conguraon Guide, 08.0.95
Part Number: 53-1005654-01 21
Conguring an IP helper address
To forward a client broadcast request for a UDP applicaon when the client and server are on dierent networks, you must congure a helper
address on the interface connected to the client.
Specify the server IP address or the subnet directed broadcast address of the server's IP subnet as the helper address. You can congure up to 16
helper addresses on each interface. You can congure a helper address on an Ethernet port or a virtual interface.
1. Enter the global conguraon mode by issuing the congure terminal command.
device# configure terminal
2. Enter the interface conguraon mode.
device(config)# interface ethernet 1/1/2
3. Add a helper address for the server.
device(config-if-1/1/2)# ip helper-address 1 10.95.7.6
The commands in the example above add a helper address for server 10.95.7.6 to the port. If the port receives a client request for any of
the applicaons that the Layer 3 switch is enabled to forward, the Layer 3 switch forwards the client request to the server.
4. By default, an IP helper does not forward client broadcast requests to a server within the network. To forward a client broadcast request
when the client and server are on the same network, congure an IP helper with the unicast opon on the interface connected to the
client.
device(config-if-1/1/2)# ip helper-address 1 10.10.10.1 unicast
The previous example congures an IP helper unicast opon on unit 1, slot 1, port 2. The IP helper with unicast parameter forwards the
client request to the server 10.10.10.1, which is within the network.
Conguring the BOOTP and DHCP reply source address
You can congure the device so that a BOOTP/DHCP reply to a client contains the server IP address as the source address instead of the router IP
address.
1. Enter the global conguraon mode by issuing the congure terminal command.
device# configure terminal
2. Enter the ip helper-use-responder-ip command.
device(config)# ip helper-use-responder-ip
Changing the IP address used for stamping BootP and
DHCP requests
When a Layer 3 switch forwards a BootP or DHCP request, the Layer 3 switch "stamps" the Gateway Address eld.
The default value the Layer 3 switch uses to stamp the packet is the lowest-numbered IP address congured on the interface that received the
request. If you want the Layer 3 switch to use a dierent IP address to stamp requests received on the interface, use either of the following
methods to specify the address.
DHCP Clients
Conguring an IP helper address
RUCKUS FastIron DHCP Conguraon Guide, 08.0.95
22 Part Number: 53-1005654-01
The BootP/DHCP stamp address is an interface parameter. You can change the parameter on the interface that is connected to the BootP/DHCP
client.
1. Enter the global conguraon mode by issuing the congure terminal command.
device# configure terminal
2. Enter the interface conguraon mode.
device(config)# interface ethernet 1/1/1
3. Change the BootP or DHCP stamp address for requests received on port 1/1/1 to 10.157.22.26.
device(config-if-1/1/1)# ip bootp-gateway 10.157.22.26
The previous example changes the BootP or DHCP stamp address for requests received on port 1/1/1 to 10.157.22.26. The Layer 3 switch
will place this IP address in the Gateway Address eld of BootP or DHCP requests that the Layer 3 switch receives on port 1/1/1 and
forwards to the BootP or DHCP server.
The following example changes the BootP or DHCP stamp address.
device# configure terminal
device(config)# interface ethernet 1/1/1
device(config-if-1/1/1)# ip bootp-gateway 10.157.22.26
Changing the maximum number of hops to a BootP relay
server
Each BootP or DHCP request includes a Hop Count eld. The Hop Count eld indicates how many routers the request has passed through.
When the Layer 3 switch receives a BootP or DHCP request, the Layer 3 switch looks at the value in the Hop Count eld.
• If the hop count value is equal to or less than the maximum hop count the Layer 3 switch allows, the Layer 3 switch increments the hop
count by one and forwards the request.
• If the hop count is greater than the maximum hop count the Layer 3 switch allows, the Layer 3 switch discards the request.
You can change the maximum number of hops the Layer 3 switch allows for forwarded BootP or DHCP requests.
NOTE
The BootP and DHCP hop count is not the TTL parameter.
1. Enter the global conguraon mode by issuing the congure terminal command.
device# configure terminal
2. Modify the maximum number of BootP or DHCP.
device(config)# bootp-relay-max-hops 10
The example allows the Layer 3 switch to forward BootP or DHCP requests that have passed through ten previous hops before reaching
the Layer 3 switch. Requests that have traversed 11 hops before reaching the switch are dropped. Since the hop count value inializes at
zero, the hop count value of an ingressing DHCP Request packet is the number of Layer 3 routers that the packet has already traversed.
DHCP Clients
Changing the maximum number of hops to a BootP relay server
RUCKUS FastIron DHCP Conguraon Guide, 08.0.95
Part Number: 53-1005654-01 23
DHCP Auto-Provisioning
DHCP auto-provisioning allows Layer 2 and Layer 3 devices to automacally obtain leased IP addresses through a DHCP server, negoate address
lease renewal, and obtain ash image and conguraon les. The DHCP client and auto-provisioning are enabled by default on all DHCP client-
eligible ports. Auto-provisioning allows clients to boot up with the latest image and conguraon without manual intervenon. Refer to DHCP
server for details on DHCP server conguraon and opons.
NOTE
DHCP auto-provisioning is plaorm independent and does not dier in behavior or conguraon across plaorms.
DHCP Clients
DHCP Auto-Provisioning
RUCKUS FastIron DHCP Conguraon Guide, 08.0.95
24 Part Number: 53-1005654-01

FIGURE 2 DHCP Client-Based Auto-Provisioning
Auto-Provisioning Using the booile.bin Opon
You can congure the image name with a .bin extension on the server.
DHCP auto-provisioning using the booile.bin uses the following process.
1. Once a lease is obtained from the server, the device uses the informaon from the DHCP server to contact the TFTP server to update the
image le.
DHCP Clients
Auto-Provisioning Using the booile.bin Opon
RUCKUS FastIron DHCP Conguraon Guide, 08.0.95
Part Number: 53-1005654-01 25
2. The device compares the le name of the requested ash image with the image stored in ash memory. In a stacking conguraon, the
device compares the le name with the image stored in the Acve Controller only.
3. If the .bin le names match, then the DHCP client skips the ash image download. If auto-provisioning is enabled, the DHCP client
proceeds with downloading the conguraon les. If the .bin le names are dierent, the DHCP client downloads the new image from a
TFTP server, and then writes the downloaded image to ash memory. In a stacking conguraon, the device copies the ash image to
ash in all stack member units.
4. The code determines which ash (primary or secondary) to use based on how the device is booted or based on the locaon specied in
opon 67. Refer to DHCP Auto-Provisioning Enhancements on page 27 for more details.
5. In a stacking conguraon, the member units use the same ash as the Acve Controller. Once the ash is updated with the newer ash
image, the device is reloaded and all member units in a stacking conguraon are reloaded as well. If auto-provisioning is enabled, the
DHCP client then proceeds to download the conguraon les.
6. If the DHCP client detects that the new image is older than the current running image, the device connues to reload aer a syslog
nocaon that the device is downgrading and may lose the conguraon. The following example shows a syslog nocaon.
Downloaded boot-image ICXR07030F2b1.bin is downgraded version of ICXR08030F2b1.bin.
Device is downgrading and the configuration may be lost.
DHCP Auto-Provisioning Using the Manifest File Opon
Support for DHCP auto-provisioning using the manifest le opon was introduced in FastIron 08.0.40.
The bundle of Image le, boot loader, and PoE rmware can be congured as a .txt le on the DHCP server using opon 67. Auto-provisioning using
the manifest le uses the following process.
NOTE
From FastIron 08.0.90 release onward, if the booted applicaon image is not a Unied FastIron Image (UFI), the DHCP manifest upgrade
will connue even if the image versions in ash image and Boot lename opon image name are same.
1. Once a lease is obtained from the server, the device uses the informaon from the DHCP server to contact the TFTP server to update the
image le.
The manifest le is downloaded.
2. Aer downloading the manifest le, the device unzips the le and compares the le name of the requested ash image (for example,
SPR08040q054.bin) and boot image (for example, spz10106b002.bin) with the images stored in ash memory. In a stacking conguraon,
the device compares the le name with the image stored in the Acve Controller only.
3. If the ash image matches, the DHCP client skips the ash image download. If auto-provisioning is enabled, the DHCP client proceeds with
downloading the conguraon les.
4. If the ash image is dierent, the device downloads the new ash image from the TFTP server and checks for the boot image. If the boot
image matches, the DHCP client skips the boot image. If the boot image does not match, the DHCP client downloads the new boot image
from the TFTP server, and then writes the downloaded image to ash memory. In a stacking conguraon, the device copies the ash and
boot image to ash in all stack member units.
5. The code determines which ash (primary or secondary) to use based on how the device is booted or based on the locaon specied in
opon 67. Refer to DHCP Auto-Provisioning Enhancements on page 27 for more details.
6. In a stacking conguraon, the member units use the same ash as the Acve Controller. Once the ash is updated with the newer ash
image, the device is reloaded and all member units in a stacking conguraon are reloaded as well. If auto-conguraon is enabled, the
DHCP client then proceeds to download the conguraon les aer the reload.
DHCP Clients
DHCP Auto-Provisioning Using the Manifest File Opon
RUCKUS FastIron DHCP Conguraon Guide, 08.0.95
26 Part Number: 53-1005654-01
7. If the DHCP client detects that the new image is older than the current running image, the device connues to reload aer a syslog
nocaon that the device is downgrading and may lose the conguraon. The following example shows a syslog nocaon.
Downloaded boot-image ICXR07030F2b1.bin is downgraded version of ICXR08030F2b1.bin.
Device is downgrading and the configuration may be lost.
DHCP Auto-Provisioning Enhancements
Auto-provisioning allows DHCP clients to boot up with the latest ash image and conguraon without manual intervenon. DHCP auto-
provisioning enhancements have been introduced in FastIron 08.0.80 so that you can override the default behavior. The current behavior is that the
ICX device (DHCP client) is forced to download the applicaon image type based on the current version of the device.
When DHCP auto-provisioning enhancements are congured for opon 67, the applicaon image type (router or switch) and the ash image
locaon (primary or secondary) can be congured as part of opon 67 along with the le name. This means that you can decide the image type and
the ash memory locaon to which the DHCP client should be upgraded. The DHCP client then upgrades to a specic image type and ash locaon
as received by opon 67 from the server.
When opon 67 is received from the server, the DHCP client triggers DHCP auto-provisioning based on the image type and ash locaon specied in
opon 67. If a specied image type and ash locaon is not received from the server, the DHCP client behaves according to the default sengs.
DHCP Clients
DHCP Auto-Provisioning Enhancements
RUCKUS FastIron DHCP Conguraon Guide, 08.0.95
Part Number: 53-1005654-01 27

FIGURE 3 DHCP Auto-Provisioning Enhancements
Conguring DHCP auto-provisioning enhancements for opon 67 is useful if, for example, you want to download a Layer 3 image on a switch
running a Layer 2 image (or download a Layer 2 image on a router running a Layer 3 image) using DHCP auto-provisioning.
DHCP auto-provisioning enhancements allow opon 67 to be congured with up to three ASCII strings, separated by a space, where each ASCII
string congures a specic operaon. The example below congures the “8080_manifest.txt” boot image, router as the image type, and the ash
image as primary.
device(config-dhcp-GenericOption)# option 67 ascii fi8080_manifest.txt router primary
The example below congures the “8080_manifest.txt” boot image, router as the image type, and the ash image as secondary.
device(config-dhcp-GenericOption)# option 67 ascii fi8080_manifest.txt router secondary
The example below congures the “8080_manifest.txt” boot image, switch as the image type, and the ash image as secondary.
device(config-dhcp-GenericOption)# option 67 ascii fi8080_manifest.txt switch secondary
DHCP Clients
DHCP Auto-Provisioning Enhancements
RUCKUS FastIron DHCP Conguraon Guide, 08.0.95
28 Part Number: 53-1005654-01
The example below congures the “8080_manifest.txt” boot image, switch as the image type, and the ash image as primary.
device(config-dhcp-GenericOption)# option 67 ascii fi8080_manifest.txt switch primary
For informaon on conguraon notes and feature limitaons for DHCP auto-provisioning, refer to Conguraon Notes and Feature Limitaons for
DHCP Auto-Provisioning on page 35.
Conguring DHCP Auto-Provisioning Enhancements
The applicaon image type (router or switch), the ash image (primary or secondary), and the le name to be used by the DHCP client can all be
congured as part of opon 67 using one command. The following task congures the “8080_manifest.txt” boot image, router as the image type,
and the ash image as primary as part of opon 67.
1. Use the congure terminal command to enter global conguraon mode.
device# configure terminal
2. Enable the DHCP server.
device(config)# ip dhcp-server enable
3. Create a DHCP server address pool.
device(config)# ip dhcp-server pool GenericOption
4. Congure the DHCP server address pool.
device(config-dhcp-GenericOption)# dhcp-default-router 10.10.70.1
device(config-dhcp-GenericOption)# network 10.10.70.0 255.255.254.0
device(config-dhcp-GenericOption)# lease 1 0 0
device(config-dhcp-GenericOption)# dns-server 10.10.64.1 8.8.8.8
device(config-dhcp-GenericOption)# domain-name office.s-cloud.net
5. Use the opon command with the 67 opon, specifying a le name, the ash image locaon, and the image type, to congure opon 67
with both the image type and ash image locaon.
device(config-dhcp-GenericOption)# option 67 ascii “fi8080_manifest.txt router primary”
In this example, boot image 8080_manifest.txt, router as the image type, and ash image as primary is congured to be used by the
DHCP client.
NOTE
The conguraon of the image type and ash locaon for opon 67 is case insensive.
6. Use the deploy command to acvate the DHCP server address pool.
device(config-dhcp-GenericOption)# deploy
DHCP Clients
Conguring DHCP Auto-Provisioning Enhancements
RUCKUS FastIron DHCP Conguraon Guide, 08.0.95
Part Number: 53-1005654-01 29

The following example congures the “8080_manifest.txt” boot image, router as the image type, and ash image as primary as part of opon 67
using one command.
device# configure terminal
device(config)# ip dhcp-server enable
device(config)# ip dhcp-server pool GenericOption
device(config-dhcp-GenericOption)# dhcp-default-router 10.10.70.1
device(config-dhcp-GenericOption)# network 10.10.70.0 255.255.254.0
device(config-dhcp-GenericOption)# lease 1 0 0
device(config-dhcp-GenericOption)# dns-server 10.10.64.1 8.8.8.8
device(config-dhcp-GenericOption)# domain-name office.s-cloud.net
device(config-dhcp-GenericOption)# option 67 ascii “fi8080_manifest.txt router primary”
device(config-dhcp-GenericOption)# deploy
DHCP auto-provisioning opons
The following opons are supported by the client for auto-provisioning.
TABLE 3 DHCP auto-upgrade supported opons
DHCP opon Descripon
001 Subnet mask
003 Router IP (default route)
006 Domain name server
012 Host name
015 Domain name
043 Vendor-specic informaon
066 TFTP server name
067 Boot le (image)
150 TFTP server IP address
Disabling or re-enabling the DHCP client
The DHCP client is enabled by default. You can disable or re-enable DHCP client on a switch or a router.
1. On a switch, enter the global conguraon mode by issuing the congure terminal command.
device# configure terminal
2. Enter the no ip dhcp-client enable command to disable the DHCP client.
device(config)# no ip dhcp-client enable
3. On a switch, enter the ip dhcp-client enable command to re-enable the DHCP client.
device(config)# ip dhcp-client enable
4. On a router, enter the ip dhcp-client disable command to disable the DHCP client service on all physical interface and virtual interface
level.
device(config)# ip dhcp-client disable
DHCP Clients
DHCP auto-provisioning opons
RUCKUS FastIron DHCP Conguraon Guide, 08.0.95
30 Part Number: 53-1005654-01

5. On a router, enter the no ip dhcp-client disable command to re-enable the DHCP client service on all physical interface and virtual
interface level.
device(config)# no ip dhcp-client disable
6. On a router, enter the interface conguraon mode.
device(config)# interface ethernet 2/1/1
7. Enter the no ip dhcp-client enable command to disable the DHCP client.
device(config-if-e1000-2/1/1)# no ip dhcp-client enable
8. On a router, enter the ip dhcp-client enable command at the interface conguraon level to re-enable the DHCP client.
device(config-if-e1000-2/1/1)# ip dhcp-client enable
9. On a router, enter the ip dhcp-client enable command at the virtual interface level to re-enable the DHCP client.
device(config-if-ve1)# ip dhcp-client enable
DHCP auto-provisioning on Layer 2 and Layer 3 devices
DHCP auto-provisioning enhancements have been introduced for Layer 2 and Layer 3 devices.
• If the non-default VLAN has mulple untagged ports connected to dierent DHCP servers, the rst port that received the IP address oer
will be considered and the other port will not receive an IP address. This behavior applies for default VLANs, too.
• Aer an image update and device reload, the opon 3 (router) installs the default route to maintain the connecvity with the TFTP or
DHCP servers. In releases prior to FastIron 8.0.40, opon 3 was supported only on Layer 2 devices. The default route added by the DHCP
client device from opon 3 (router) will be of the lowest metric (254). If the device has a default route, the DHCP provided route is also
appended to the roung table.
TABLE 4 Dierences between switch and router image DHCP clients
Layer 2 DHCP client Layer 3 DHCP client
IP address is congured on the switch (globally) IP address is congured on the specic client port
IP default gateway is congured as “Default gateway X.X.X.X (opon 3) Default route is congured as “IP route” with distance metric 254
The following scenarios illustrate DHCP auto-provisioning in dierent environments.
DHCP Clients
DHCP auto-provisioning on Layer 2 and Layer 3 devices
RUCKUS FastIron DHCP Conguraon Guide, 08.0.95
Part Number: 53-1005654-01 31

Scenario 1: DHCP auto-provisioning on a Layer 3 device
In this scenario, the DHCP client and server are part of the same network, but the TFTP server is part of a dierent network. Here the DHCP client
device needs a default route for TFTP server reachability.
1. The FastIron router (DHCP client) connected to the DHCP server is booted.
2. The client obtains a dynamic IP address lease from the DHCP server through the untagged member port 2 of the VLAN 2 (which is a non-
default VLAN) along with other DHCP server opons.
3. Once DHCP server opons are enabled, the router opon 3 is processed and installs the default route onto the device. Opons 6,12, 15,
and 150 are processed as well.
4. If auto-provisioning is enabled and the image le comparison is successful, the client downloads the new image using the TFTP server IP
address specied in the DHCP server.
5. If auto-provisioning is enabled, the client downloads the conguraon le aer connecng to the TFTP server and applies the running
conguraon on the device.
DHCP Clients
DHCP auto-provisioning on Layer 2 and Layer 3 devices
RUCKUS FastIron DHCP Conguraon Guide, 08.0.95
32 Part Number: 53-1005654-01
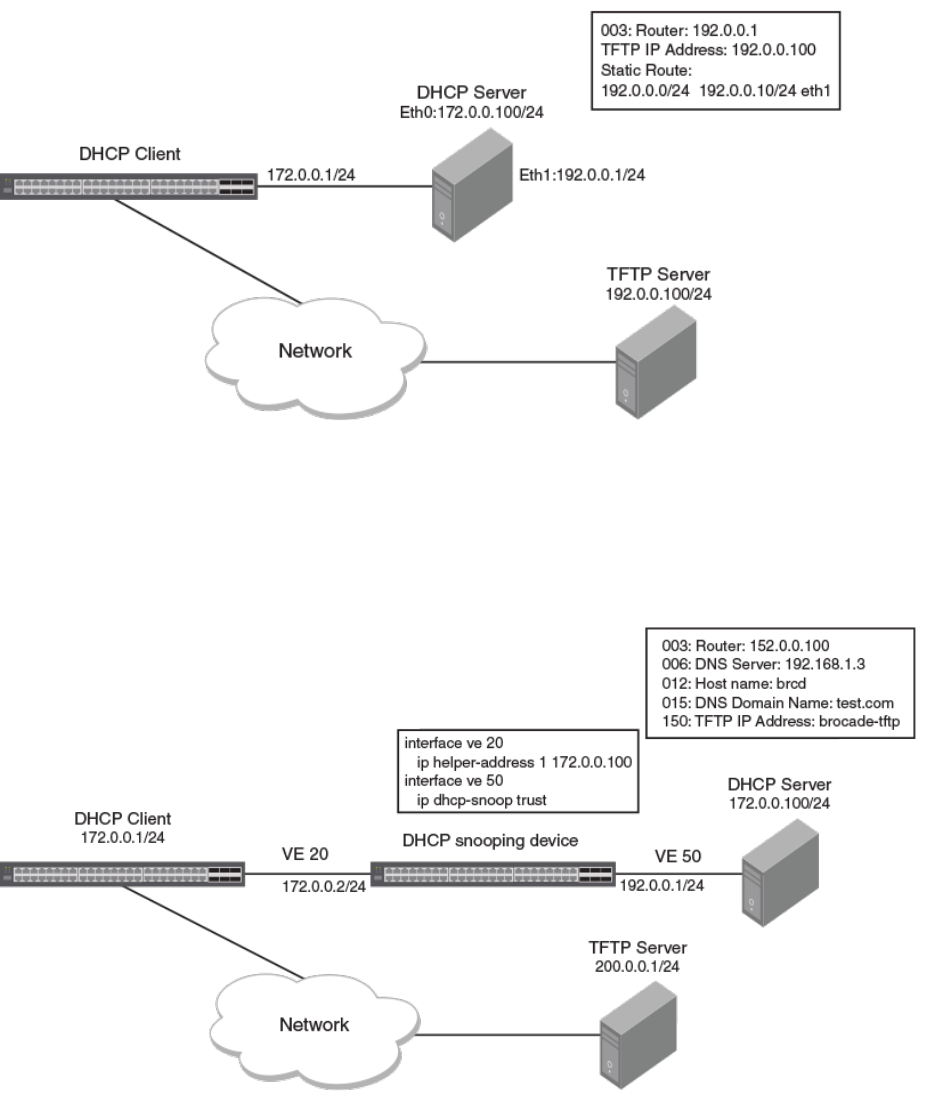
Scenario 2: DHCP auto-provisioning with a TFTP server in a dierent network
In this scenario, the DHCP client and server are connected in the same network, but the TFTP server is connected in a dierent network through the
DHCP server. Here the DHCP client device needs a default route to reach the TFTP server. The steps are the same as in scenario 1, except that the
TFTP server will be reachable aer the new image update as the router opon 3, which is the default gateway IP address 192.0.0.1, is installed.
Scenario 3: DHCP client connected through a DHCP snooping device
In this scenario, the DHCP client and server are connected through ports on which DHCP snooping or relay agent are enabled and are part of non-
default VLANs. The working scenario is the same as Scenario 1.
DHCP Clients
DHCP auto-provisioning on Layer 2 and Layer 3 devices
RUCKUS FastIron DHCP Conguraon Guide, 08.0.95
Part Number: 53-1005654-01 33

Scenario 4: DHCP client opon 12
In this scenario, the DHCP clients 1 and 2 are connected to the DHCP server in the same subnet. Subsequently, both receive the same host name.
The DHCP client 3 is connected to the DHCP server in a dierent subnet and it is assigned with the host name of the second pool.
Scenario 5: DHCP auto-provisioning on a Layer 2 device
DHCP Clients
DHCP auto-provisioning on Layer 2 and Layer 3 devices
RUCKUS FastIron DHCP Conguraon Guide, 08.0.95
34 Part Number: 53-1005654-01
In this scenario, auto-provisioning on a Layer 2 device occurs as follows:
1. The DHCP client device is powered on.
2. The client sends the DHCP discovery packets on all DHCP client-eligible ports that are up.
3. The client obtains the dynamic IP address from the DHCP server along with opon 3.
4. Once the new router image is brought up, the client tries to connect to the TFTP server using the default route.
Conguraon Notes and Feature Limitaons for DHCP
Auto-Provisioning
The following conguraon notes and feature limitaons apply to DHCP auto-provisioning.
• For Layer 2 devices, DHCP auto-provisioning is available for default VLANs and management VLANs.
• Although the DHCP server may provide mulple addresses, only one IP address is installed at a me.
• DHCP auto-provisioning is not supported together with DHCP snooping.
• Beginning with FastIron 08.0.70, POE rmware is bundled with the ICX image le. If the ICX soware is upgraded, the POE rmware is
automacally updated aer the upgrade completes.
• The DHCP client does not iniate auto-provisioning aer a stack switchover. You must disable and re-enable the DHCP client aer a stack
switchover for auto-provisioning to start.
• When the Layer 2 switch acts as a DHCP client, the show ip command does not display the image le name if the booile on the DHCP
server is congured as manifest.txt.
• During the DHCP auto-provisioning process, the client accepts either the TFTP server name or the TFTP server IP address. If the server
name is congured, the client ignores the server IP address.
• During auto-provisioning using the manifest.txt le, the boot image download is skipped if the ash images are the same.
• The DHCP server accepts more than one default router in the address pool if the image is a Layer 2 image.
• The DHCP client contacts the TFTP server to obtain the hostnameMAC-cong.cfg le only ve mes if the TFTP server is busy or not
reachable. If the TFTP server is reachable, the DHCP client contacts the TFTP server only once.
• In a stacking conguraon, the DHCP client ash image download waits ve minutes for all member units to join and update. Aer ve
minutes, the DHCP client downloads the new image from the TFTP server using the TFTP server IP address (opon 150), if it is available. If
the TFTP server IP address is not available, the DHCP client requests the TFTP le from the DHCP server.
• If the enable aaa console command is congured, the DHCP client does not request the conguraon les.
The following conguraon rules apply to DHCP auto-provisioning:
• To enable ash image update (ip dhcp-client auto-update enable command), you must also enable the auto-conguraon (ip dhcp-client
enable command).
• The image le name to be updated must have the extension .bin or .txt.
• The DHCP opon 067 booile name is used for an image update if it has the extension .bin or .txt.
• The DHCP opon 067 booile name is used for the conguraon download if it does not have the extension .bin or .txt.
• If the DHCP opon 067 booile name is not congured or does not have the extension .bin or .txt, then auto-provisioning does not occur.
• In releases prior to FastIron 08.0.40, while updang the image using opon 67, the image types (Layer 2 or Layer 3) must match. For
example, if the DHCP client with a Layer 3 image downloads an updated Layer 2 image using opon 67, the conguraon download fails.
DHCP Clients
Conguraon Notes and Feature Limitaons for DHCP Auto-Provisioning
RUCKUS FastIron DHCP Conguraon Guide, 08.0.95
Part Number: 53-1005654-01 35
The following conguraon rules apply to DHCP auto-provisioning enhancements:
• Only “router” or “switch” can be used for specifying an image type. If any other value is entered, the DHCP client accepts and stores the
values specied in the string. However, these values cannot be used and the DHCP client behavior will not change based on the opon 67
conguraons.
• Only “primary” or “secondary” can be used for specifying the ash image. If any other value is entered, the DHCP client accepts and
stores the values specied in the string. However, these values cannot be used and the DHCP client behavior will not change based on the
opon 67 conguraons.
• For SPX plaorms, the DHCP client downloads the boot images based on opon 67 and the DHCP client is not responsible for SPX
formaon once DHCP auto-provisioning is completed.
• The received opon 67 value for the boot image name is not saved in the DHCP client conguraon.
• Because DHCP auto-provisioning enhancements allow the upgrading of a router image to a switch image, and a switch image to a router
image, all necessary conguraons required as a result of this upgrade must be carried out.
• DHCP auto-provisioning enhancements are only supported beginning with FastIron 08.0.80. If the DHCP client image is downgraded to
that of a prior release, and opon 67 is received by the DHCP client with the image type and ash locaon specied, DHCP auto-
provisioning does not work because the DHCP client expects only a specied le type. Opon 67 must be recongured on the DHCP
server for the format supported for the parcular release.
High Availability and 802.1BR Consideraons
In an ICX stack, aer switchover between acve and standby devices, the DHCP process re-acquires IP addresses and follows the upgrade process.
DHCP is supported on 802.1BR-enabled devices as a normal stacking device. In a Campus Fabric (SPX) conguraon, the DHCP client is able to send
packets through all CB and PE ports. PE ports can be members of the VE.
Upgrade Consideraons
When upgrading from FastIron 08.0.60 or previous releases to FastIron 08.0.61 or later, if the rules to create the default VE are met, the default VE
is created, the DHCP client is enabled over the default VE, and the IP address is acquired.
How DHCP Client-Based Auto-Provisioning and Flash Image Update Works
Auto-provisioning is enabled by default. To disable auto-provisioning, refer to Disabling or re-enabling the DHCP client on page 30 and Disabling or
re-enabling auto-provisioning on page 38 respecvely.
Validang the IP Address and Lease Negoaon
The following steps describe the IP address validaon and lease negoaon process.
1. At bootup, the device automacally checks its conguraon for an IP address.
2. If the device does not have a stac IP address, it requests the lease of an address from the DHCP server:
• If the server responds, it leases an IP address to the device for the specied lease period.
• If the server does not respond (aer four tries), the DHCP client process is ended.
DHCP Clients
Conguraon Notes and Feature Limitaons for DHCP Auto-Provisioning
RUCKUS FastIron DHCP Conguraon Guide, 08.0.95
36 Part Number: 53-1005654-01

3. If the device has a dynamic address, the device asks the DHCP server to validate that address. If the server does not respond, the device
connues to use the exisng address unl the lease expires. If the server responds, and the IP address is outside of the DHCP address pool
or has been leased to another device, it is automacally rejected, and the device receives a new IP address from the server. If the exisng
address is valid, the lease connues.
NOTE
The lease me interval is congured on the DHCP server, not on the client device. The ip dhcp-client lease command is set by
the system, and is non-operaonal to a user.
4. If the exisng address is stac, the device keeps it and the DHCP client process is ended.
5. For a leased IP address, when the lease interval reaches the renewal point, the device requests a renewal from the DHCP server:
• If the device is able to contact the DHCP server at the renewal point in the lease, the DHCP server extends the lease. This process can
connue indenitely.
• If the device is unable to reach the DHCP server aer four aempts, it connues to use the exisng IP address unl the lease expires.
When the lease expires, the dynamic IP address is removed and the device contacts the DHCP server for a new address.
Flash Image Download and Update
NOTE
The ash image download and update process only occurs when the client device reboots, or when the DHCP client has been disabled
and then re-enabled.
Once a lease is obtained from the server, the device compares the le name of the requested ash image with the image stored in ash memory. In
a stacking conguraon, the device compares the le name with the image stored in the Acve Controller only.
• If the .bin le names match, then the DHCP client skips the ash image download. If auto-provisioning is enabled, the DHCP client
proceeds with downloading the conguraon les.
• If the .bin le names are dierent, then the DHCP client downloads the new image from a TFTP server and then writes the downloaded
image to ash memory. In a stacking conguraon, the device copies the ash image to ash in all stack member units.
The code determines which ash (primary or secondary) to use based on how the device is booted. In a stacking conguraon, the member units
use the same ash as the Acve Controller. Once the ash is updated with the newer ash image, the device is reloaded, and any member units in a
stacking conguraon are reloaded as well. If auto-provisioning is enabled, the DHCP client then proceeds to download the conguraon les.
Auto-Provisioning Download and Update
During auto-provisioning, the device requests the conguraon les from the TFTP server in the following order.
1. booile name provided by the DHCP server (if congured).
2. hostnameMAC-cong.cfg (for example: ICX001p-Switch0000.005e.4d00-cong.cfg).
3. hostnameMAC.cfg (for example: ICX002p-Switch0000.005e.4d00.cfg).
4. A new le format has been introduced based on the host name as part of DHCP opon 12 support. For example _router.cfg.
5. When the DHCP client switch looks for the conguraon le in the TFTP server, a conguraon le in the format such as <icx>-<switch |
router>.cfg will be ignored. Instead the following le format is expected.
Old format: ICX7650-router.cfg New format: ICX7650.cfg
< ICX7650>.cfg appends the exisng conguraon.
DHCP Clients
Conguraon Notes and Feature Limitaons for DHCP Auto-Provisioning
RUCKUS FastIron DHCP Conguraon Guide, 08.0.95
Part Number: 53-1005654-01 37
6. ruckus.cfg (applies to all devices), (for example: ruckus.cfg appends the exisng conguraon).
If the device successfully contacts the TFTP server and the server has the conguraon le, the les are merged. If there is a conict, the server le
takes precedence. If the device is unable to contact the TFTP server, or if the les are not found on the server, the TFTP part of the conguraon
download process ends.
Disabling or re-enabling auto-provisioning
DHCP auto-provisioning is enabled by default. You can disable or re-enable DHCP auto-provisioning on a switch or a router.
1. On a switch or a router enter the global conguraon mode by issuing the congure terminal command.
device# configure terminal
2. Enter the no ip dhcp-client auto-update enable command to disable DHCP auto-provisioning.
device(config)# no ip dhcp-client auto-update enable
3. Enter the ip dhcp-client auto-update enable command to enable DHCP auto-provisioning aer it has been disabled.
device(config)# ip dhcp-client auto-update enable
Dynamic DHCP opons conguraon processing
The system can dierenate between manually congured DHCP opons and DHCP opons that were obtained dynamically from the server.
Manually congured DHCP opons are retained even when the dynamic IP address is released.
To help idenfy them, the keyword dynamic is appended to output for all dynamic DHCP opons that are reected in the running conguraon.
NOTE
Only the IP address and the default gateway/default route are persistent across reloads (aer the write memory is executed to save the
conguraon). The remaining DHCP opons that are obtained from the DHCP server are relearned when the ICX device reboots.
It is not possible to manually congure the dynamic opon. If you aempt to congure a dynamic opon manually, an error is displayed stang
“Manual conguraon is not allowed for this opon."
NOTE
If a stac IP Address is congured manually for the device aer obtaining a dynamic IP Address and DHCP opons from the DHCP server,
all DHCP opons are released along with the dynamic IP Address.
Discovery of SZ based on DHCP Opon 43
Beginning with SmartZone release 5.0, the administrator can monitor and manage switches and routers in the ICX 7000 series switches running
FastIron version 08.0.80 or above. ICX (the DHCP client) can parse the value of DHCP opon 43 containing SZ IP addresses received from the DHCP
server and connect to Smartzone.
This feature works in the following manner:
• The DHCP client sends the VCI opon as "Ruckus CPE" to the DHCP Server in every request packet.
• The DHCP client processes the vendor specic informaon (VSI) opon data during the RENEW & REBIND process.
• The SZ IP Address data received through VSI is not displayed in the running conguraon.
DHCP Clients
Disabling or re-enabling auto-provisioning
RUCKUS FastIron DHCP Conguraon Guide, 08.0.95
38 Part Number: 53-1005654-01
• The show ip dhcp-client opons command displays the received VSI data in TLV format. The data can be displayed in two formats based
on data received. Refer to the show ip dhcp-client opons command for more informaon.
• If the DHCP client fails to parse the received VSI data, or is not able to extract the SZ IP addresses from the VSI data received, the SZ IP
addresses are not passed to the FSM API.
The example below shows how a DHCP server can be congured to send SmartZone IP addresses to ICX devices using DHCP Opon 43.
Congure DHCP Opon 43 on the DHCP server, using RKUS.scg-address to idenfy the SmartZone IP addresses. A single SmartZone IP address or a
comma-separated list can be congured. SmartZone IP addresses are sent with a sub-opon value of 6. The ICX device ignores all other data in
DHCP Opon 43 if SmartZone IP addresses are present. The following example shows a DHCP Opon 43 conguraon on a DHCP server. The IP
addresses listed are examples only.
subnet 192.168.12.0 netmask 255.255.255.0 {
range 192.168.12.100 192.168.12.199;
option routers 192.168.12.1;
option subnet-mask 255.255.255.0;
option broadcast-address 192.168.12.255;
option ntp-servers 192.168.11.22;
class "Ruckus AP" {
match if option vendor-class-identifier = "Ruckus CPE";
option vendor-class-identifier "Ruckus CPE";
default-lease-time 86400;
vendor-option-space RKUS;
option RKUS.scg-address "192.168.11.200, 192.168.11.201, 192.168.11.202";
}
}
Conguraon notes and feature limitaons
The following conguraon notes and feature limitaons apply for discovery of SZ based on DHCP opon 43:
• The vendor-specic informaon data received from the DHCP server must be in simple ASCII text format.
• The VCI opon must be congured as “Ruckus CPE” and sent to the to DHCP server during DHCP discovery and renew. The DHCP server
than lls the VSI opon data in the oer packet that is sent to client in response.
• A maximum of 128 characters(bytes) of VSI data can be received and processed by the DHCP client. If the received VSI data size is more
than 128 characters, the DHCP client does not save or process the received data.
• With the excepon of the value “create default ve”, the DHCP client treats any received opon 43 data as TLV format.
• The DHCP client passes the IP address list to the FSM API only when the received VSI data is in TLV format with Sub-opon Code 6, and the
corresponding data is in IP addresses format with commas (,) separang the IP addresses.
DHCP Clients
Discovery of SZ based on DHCP Opon 43
RUCKUS FastIron DHCP Conguraon Guide, 08.0.95
Part Number: 53-1005654-01 39
Verifying dynamic DHCP opons for a switch
You can idenfy dynamically obtained DHCP opons for a switch.
1. On a switch enter the show running-cong command. Examine the output to idenfy dynamically obtained opons. These opons have a
“dynamic” tag appended to them in the running conguraon.
device> show running-config
Current configuration:
!
ver 08.0.61b1T211
!
stack unit 1
module 1 icx7250-24-port-management-module
module 2 icx7250-sfp-plus-8port-80g-module
!
!
!
vlan 1 name DEFAULT-VLAN by port
!
!
!
hostname TestHostName dynamic
ip address 10.10.10.2 255.255.255.0 dynamic
ip dns domain-list ManualDomain.com
ip dns domain-list testStaticDomain.com
ip dns domain-list testDomain.com dynamic
ip dns server-address 20.20.20.8 20.20.20.9 20.20.20.5 10.10.10.5(dynamic)
ip default-gateway 10.10.10.1 dynamic
!
!
!
interface ethernet 1/1/21
disable
!
interface ethernet 1/2/2
speed-duplex 1000-full
!
interface ethernet 1/2/4
speed-duplex 1000-full
!
interface ethernet 1/2/5
speed-duplex 1000-full
!
interface ethernet 1/2/6
speed-duplex 1000-full
!
interface ethernet 1/2/7
speed-duplex 1000-full
!
interface ethernet 1/2/8
speed-duplex 1000-full
!
!
!
lldp run
!
!
end
DHCP Clients
Verifying dynamic DHCP opons for a switch
RUCKUS FastIron DHCP Conguraon Guide, 08.0.95
40 Part Number: 53-1005654-01
2. On a switch enter the show conguraon command. Examine the output to idenfy dynamically obtained opons. These opons have a
“dynamic” tag appended to them in the running conguraon.
device> show configuration
Startup-config data location is flash memory
!
Startup configuration:
!
ver 08.0.61b1T211
!
stack unit 1
module 1 icx7250-24-port-management-module
module 2 icx7250-sfp-plus-8port-80g-module
!
!
vlan 1 name DEFAULT-VLAN by port
!
!
!
!
ip address 10.10.10.2 255.255.255.0 dynamic
ip dns domain-list ManualDomain.com
ip dns domain-list testStaticDomain.com
ip dns server-address 20.20.20.8 20.20.20.9 20.20.20.5
ip default-gateway 10.10.10.1 dynamic
!
!
!
interface ethernet 1/1/21
disable
!
interface ethernet 1/2/2
speed-duplex 1000-full
!
interface ethernet 1/2/4
speed-duplex 1000-full
!
interface ethernet 1/2/5
speed-duplex 1000-full
!
interface ethernet 1/2/6
speed-duplex 1000-full
!
interface ethernet 1/2/7
speed-duplex 1000-full
!
interface ethernet 1/2/8
speed-duplex 1000-full
!
lldp run
!
end
DHCP Clients
Verifying dynamic DHCP opons for a switch
RUCKUS FastIron DHCP Conguraon Guide, 08.0.95
Part Number: 53-1005654-01 41
Verifying dynamic DHCP opons for a router
You can idenfy dynamically obtained DHCP opons for a router.
1. On a router enter the show running-cong command. Examine the output to idenfy dynamically obtained opons. These opons have a
“dynamic” tag appended to them in the running conguraon.
device> show running-config
Current configuration:
!
ver 08.0.61b1T213
!
stack unit 1
module 1 icx7250-24-port-management-module
module 2 icx7250-sfp-plus-8port-80g-module
!
!
vlan 1 name DEFAULT-VLAN by port
!
!
!
hostname TestHostName dynamic
ip dns domain-list ManualDomain.com
ip dns domain-list testDomain.com dynamic
ip dns domain-list testStaticDomain.com
ip dns server-address 20.20.20.8 20.20.20.9 10.10.10.5(dynamic) 20.20.20.5
ip route 0.0.0.0/0 10.10.10.1 distance 254 dynamic
!
!
interface ethernet 1/1/7
ip address 10.10.10.2 255.255.255.0 dynamic
!
interface ethernet 1/1/21
disable
!
interface ethernet 1/2/2
speed-duplex 1000-full
!
interface ethernet 1/2/4
speed-duplex 1000-full
!
interface ethernet 1/2/5
speed-duplex 1000-full
!
interface ethernet 1/2/6
speed-duplex 1000-full
!
interface ethernet 1/2/7
speed-duplex 1000-full
!
interface ethernet 1/2/8
speed-duplex 1000-full
!
!
lldp run
!
!
end
DHCP Clients
Verifying dynamic DHCP opons for a router
RUCKUS FastIron DHCP Conguraon Guide, 08.0.95
42 Part Number: 53-1005654-01
2. On a router enter the show conguraon command. Examine the output to idenfy dynamically obtained opons. These opons have a
“dynamic” tag appended to them in the running conguraon.
device> show configuration
!
Startup-config data location is flash memory
!
Startup configuration:
!
ver 08.0.61b1T213
!
stack unit 1
module 1 icx7250-24-port-management-module
module 2 icx7250-sfp-plus-8port-80g-module
!
!
vlan 1 name DEFAULT-VLAN by port
!
!
!
ip dns domain-list ManualDomain.com
ip dns domain-list testStaticDomain.com
ip dns server-address 20.20.20.8 20.20.20.9 20.20.20.5
ip route 0.0.0.0/0 10.10.10.1 distance 254 dynamic
!
!
!
interface ethernet 1/1/7
ip address 10.10.10.2 255.255.255.0 dynamic
!
interface ethernet 1/1/21
disable
!
interface ethernet 1/2/2
speed-duplex 1000-full
!
interface ethernet 1/2/4
speed-duplex 1000-full
!
interface ethernet 1/2/5
speed-duplex 1000-full
!
interface ethernet 1/2/6
speed-duplex 1000-full
!
interface ethernet 1/2/7
speed-duplex 1000-full
!
interface ethernet 1/2/8
speed-duplex 1000-full
!
!
lldp run
!
!
end
DHCP Clients
Verifying dynamic DHCP opons for a router
RUCKUS FastIron DHCP Conguraon Guide, 08.0.95
Part Number: 53-1005654-01 43
RUCKUS FastIron DHCP Conguraon Guide, 08.0.95
44 Part Number: 53-1005654-01

DHCP Servers
• DHCP Servers............................................................................................................................................................................ 45
• DHCP server opons.................................................................................................................................................................50
• Disabling or re-enabling the DHCP server on the management port....................................................................................... 54
• Seng the wait me for ARP ping response............................................................................................................................ 55
• DHCP relay agent informaon support (opon 82) ................................................................................................................. 55
• Enabling relay agent informaon (opon 82).......................................................................................................................... 55
• Conguring the IP address of the DHCP server........................................................................................................................ 56
• Conguring the boot image......................................................................................................................................................56
• Deploying an address pool conguraon to the server........................................................................................................... 56
• Specifying default router available to the client.......................................................................................................................57
• Specifying DNS servers available to the client..........................................................................................................................57
• Conguring the domain name for the client............................................................................................................................ 57
• Conguring the lease duraon for the address pool................................................................................................................58
• Specifying addresses to exclude from the address pool...........................................................................................................58
• Conguring the NetBIOS server for DHCP clients..................................................................................................................... 58
• Conguring the subnet and mask of a DHCP address pool...................................................................................................... 59
• Conguring the TFTP server..................................................................................................................................................... 59
• Conguring X Window System Display Manager IP addresses (opon 49).............................................................................. 59
• Vendor specic informaon (opon 43 and opon 60) conguraons................................................................................... 60
• Enabling stac IP to MAC address mapping............................................................................................................................. 61
• Conguring Avaya IP telephony (opons 176 and 242)............................................................................................................62
• Conguring WPAD (opon 252)............................................................................................................................................... 64
• Displaying DHCP server informaon........................................................................................................................................ 65
DHCP Servers
All FastIron devices can be congured to funcon as DHCP servers.
DHCP introduces the concept of a lease on an IP address. The DHCP server can allocate an IP address for a specied amount of me or can extend a
lease for an indenite amount of me. DHCP provides greater control of address distribuon within a subnet. This feature is crucial if the subnet has
more devices than available IP addresses. In contrast to BOOTP, which has two types of messages that can be used for leased negoaon, DHCP
provides seven types of messages.
DHCP allocates temporary or permanent network IP addresses to clients. When a client requests the use of an address for a me interval, the DHCP
server guarantees not to reallocate that address within the requested me and tries to return the same network address each me the client makes
a request. The period of me for which a network address is allocated to a client is called a lease. The client may extend the lease through
subsequent requests. When the client is done with the address, the address can be released back to the server. By asking for an indenite lease,
clients may receive a permanent assignment.
DHCP clients can be IP phones, desktops, or network devices, as illustrated in the following gure. The clients can be connected directly or through
other networks using relays. The DHCP server provides informaon such as the DNS server name, TFTP server name, and also the image to pick for
bootup to the DHCP client. Once the client obtains the IP address, TFTP server name, and boot image name, the client can download the image
from the TFTP server and boot with that image.
In some environments, it may be necessary to reassign network addresses due to exhauson of the available address pool. In this case, the
allocaon mechanism reuses addresses with expired leases.
The DHCP server is disabled by default on all FastIron devices.
RUCKUS FastIron DHCP Conguraon Guide, 08.0.95
Part Number: 53-1005654-01 45

FIGURE 4 DHCP server usage
Conguraon Consideraons for DHCP Servers
The following conguraon consideraons apply to DHCP servers, the DHCP binding database, and DHCP address pools:
• The DHCP server is supported in the Layer 2 and Layer 3 soware images.
• The DHCP server is not supported on non-default VRF.
• In the event of a controlled or forced switchover, a DHCP client requests from the DHCP server the same IP address and lease assignment
that it had before the switchover. Aer the switchover, the DHCP server will be automacally re-inialized on the new Acve Controller or
management module.
• For DHCP client hitless support in a stack, the stack mac command must be used to congure the MAC address, so that the MAC address
does not change in the event of a switchover or failover. If stack mac is not congured, the MAC address/IP address pair assigned to a
DHCP client will not match aer a switchover or failover. Furthermore, in the Layer 3 router image, if the stack mac conguraon is
changed or removed and the management port has a dynamic IP address, when a DHCP client tries to renew its lease from the DHCP
server, the DHCP server will assign a dierent IP address.
• If any address from the congured DHCP pool is used, for example, by the DHCP server or TFTP server, you must exclude the address from
the network pool.
• Ensure that DHCP clients do not send DHCP request packets with a Maximum Transmission Unit (MTU) larger than 1500 bytes. RUCKUS
devices do not support DHCP packets with an MTU larger than 1500 bytes.
DHCP binding database
• The IP addresses that have been automacally mapped to the MAC addresses of hosts are found in the DHCP binding database in the
DHCP server.
• An address conict occurs when two hosts use the same IP address. During address assignment, the DHCP server checks for conicts. If a
conict is detected, the address is removed from the pool. The address will not be assigned unl the administrator resolves the conict.
• The following table shows IP DHCP binding scalability for RUCKUS ICX devices for a stand-alone switch or a stack:
DHCP Servers
DHCP Servers
RUCKUS FastIron DHCP Conguraon Guide, 08.0.95
46 Part Number: 53-1005654-01

Device IP DHCP binding scalability
RUCKUS ICX 7150 500
RUCKUS ICX 7250 500
RUCKUS ICX 7450 500
RUCKUS ICX 7550 500
RUCKUS ICX 7650 500
RUCKUS ICX 7750 500
RUCKUS ICX 7850 500
DHCP address pools
• A DHCP address pool can be congured with a name that is a symbolic string (such as "cabo") or an integer (such as 0).
• Conguring a DHCP address pool also puts the router into DHCP pool conguraon mode, where the pool parameters can be congured.
• If the DHCP server address is part of a congured DHCP address pool, you must exclude the DHCP server address from the network pool.
• While in DHCP server pool conguraon mode, the system will place the DHCP server pool in pending mode and the DHCP server will not
use the address pool to distribute informaon to clients. To acvate the pool, use the deploy command.
• DHCP opons are supported on a per-pool basis as required by the DHCP clients to be serviced in the sub-network.
• DHCP denes a process by which the DHCP server knows the IP subnet in which the DHCP client resides, and the DHCP server can assign
an IP address from a pool of valid IP addresses in that subnet.
If the client is directly connected (the giaddr eld is zero), the DHCP server matches the DHCP DISCOVER message with DHCP pools that
contain the subnets congured on the receiving interface. If the client is not directly connected (the giaddr eld of the DHCP DISCOVER
message is not zero), the DHCP server matches the DHCP DISCOVER message with a DHCP pool that has the subnet that contains the IP
address in the giaddr eld.
Conguring the DHCP server and creang an address pool
Perform the following steps to congure the DHCP server. Before you can congure the various DHCP server opons, you must create an address
pool on your FastIron device.
1. Enter global conguraon mode by issuing the congure terminal command.
device# configure terminal
2. Enable the DHCP server.
device(config)# ip dhcp-server enable
3. Create a DHCP server address pool.
device(config)# ip dhcp-server pool cabo
4. Congure the DHCP server address pool.
device(config-dhcp-cabo)# network 172.16.1.0/24
device(config-dhcp-cabo)# domain-name ruckuswireless.com
device(config-dhcp-cabo)# dns-server 172.16.1.2 172.16.1.3
device(config-dhcp-cabo)# netbios-name-server 172.16.1.2
device(config-dhcp-cabo)# lease 0 0 5
DHCP Servers
DHCP Servers
RUCKUS FastIron DHCP Conguraon Guide, 08.0.95
Part Number: 53-1005654-01 47
5. To disable DHCP, enter the no ip ip dhcp-server enable command.
device(config)# no ip dhcp-server enable
6. Use the clear ip dhcp-server binding command to delete a specic lease or all lease entries from the lease binding database.
device(config)# clear ip dhcp-server binding *
The asterisk used in the example above clears all the IP addresses.
DHCP Servers
DHCP Servers
RUCKUS FastIron DHCP Conguraon Guide, 08.0.95
48 Part Number: 53-1005654-01

DHCP server conguraon
The following owchart illustrates the DHCP server conguraon procedure.
FIGURE 5 DHCP server conguraon owchart
DHCP Servers
DHCP Servers
RUCKUS FastIron DHCP Conguraon Guide, 08.0.95
Part Number: 53-1005654-01 49

Default DHCP server sengs
TABLE 5 DHCP server default sengs
Parameter Default Value
DHCP server Disabled
Lease database expiraon me 86400 seconds
The duraon of the lease for an assigned IP address 43200 seconds (one day)
Maximum lease database expiraon me 86400 seconds
DHCP server with opon 82 Disabled
DHCP server unknown circuit ID for opon 82 Permit range lookup
IP distribuon mechanism Linear
DHCP server opons
A FastIron device congured as a DHCP server can support up to 500 DHCP clients.
Where a FastIron device is congured as a DHCP server, you can congure DHCP opons. These opons are passed to the connected DHCP clients
and allow conguraon of parameters such as default router, host name, and domain name server.
The list of supported DHCP opons is shown in the following table:
TABLE 6 DHCP server opons
Opon Number Opon Name Descripon / Notes
1 Subnet Mask Species the client subnet mask (per RFC 950). This is not congurable using the opon command. This opon is
congured using the network (dhcp) command.
Network <router IP> <subnet mask>
3 Router Opon Species an IP addresses of the default router on the client subnet. Only one router can be specied.
NOTE
Opon 3 is not supported on non-default VRFs and management VRFs.
NOTE
Opon 3 funcons only when there is no previously congured route on the DHCP client. If the route
received by the DHCP client from the DHCP server is already congured on the client, the following
syslog message is displayed: DHCP: Failed to congure default gateway.
4 Time Server Species a list of Time Servers available to the client. Time Servers are listed in order of preference.
5 Name Server Species a list of Name Servers available to the client. Name Servers are listed in order of preference.
6 Domain Name Server Species a list of Domain Name System (RFC 1035) name servers available to the client. Servers are listed in order
of preference.
7 Log Server Species a list of UDP log servers available to the client. Servers are listed in order of preference.
8 Quotes Server Species a list of Quotes servers available to the client. Servers are listed in order of preference.
9 LPR Server Species a list of Line Printer Servers available to the client. Servers are listed in order of preference.
10 Impress Server Species a list of Imagen Impress Servers available to the client. Servers are listed in order of preference.
11 RLP Server Species a list of Resource Locaon Servers available to the client. Servers are listed in order of preference.
12 Hostname Congures the host name that can be assigned to the DHCP clients.
15 Domain name Species the domain name the client should use when resolving host names using the Domain Name System.
16 Swap Server Species the IP address of the client Swap Server.
17 Root Path Species the path name (entered as an ASCII character string) that contains the client root disk.
DHCP Servers
DHCP server opons
RUCKUS FastIron DHCP Conguraon Guide, 08.0.95
50 Part Number: 53-1005654-01

TABLE 6 DHCP server opons (connued)
Opon Number Opon Name Descripon / Notes
18 Extension File Species a le, retrievable through TFTP, that contains informaon that can be interpreted in the same way as the
vendor-extension eld within the BOOTP response, with the following excepons:
• the length of the le is unconstrained
• all references to instances of this opon in the le are ignored
21 Policy Filter Species Policy Filters for non-local source roung. The lters consist of a list of IP addresses and masks that specify
desnaon/mask pairs with which to lter incoming source routes. Any source-routed datagram whose next-hop
address does not match one of the lters should be discarded by the client.
28 Broadcast Address Species the Broadcast Address in use on the client subnet.
32 Router Request Species the address to which the client should transmit router solicitaon requests.
33 Stac Route Species a list of Stac Routes that the client should install in its roung cache. If mulple routes to the same
desnaon are specied, they are listed in descending order of priority. The routes consist of a list of IP address
pairs. The rst address is the desnaon address, and the second address is the router for the desnaon. Note
that the default route (0.0.0.0) is an illegal desnaon for a stac route.
40 NIS Domain Species the NIS domain (entered as an ASCII character string) for the client.
41 NIS Servers Species a list of IP addresses for NIS servers available to the client. Servers are listed in order of preference.
42 NTP Servers Species a list of IP addresses for NTP servers available to the client. Servers are listed in order of preference.
43 Vendor Specic Species vendor-specic informaon. This allows clients and servers to exchange vendor-specic informaon. The
vendor is specied in the Vendor Class Idener opon (opon 60).
44 NetBIOS Name Srv Species a list of NetBIOS Name Servers (NBNS) (RFC 1001 and RFC 1002). NBNS servers are listed in order of
preference.
45 NetBIOS Dist Srv Species a list of NetBIOS Datagram Distribuon Servers (NBDD) servers (RFC 1001 and RFC 1002). NBDD servers
are listed in order of preference.
47 NetBIOS Scope Species the NetBIOS over TCP/IP scope parameter (RFC 1001 and RFC 1002) for the client.
48 X Window Font Species a list of IP addresses of X Window System Font servers available to the client. X Window System Font
servers are listed in order of preference.
49 X Window Manager Species a list of IP addresses of X Window System Display Managers available to the client. X Window System
Display Managers are listed in order of preference.
50 Address Request Species an IP address used in a client request (DHCPDISCOVER) to allow the client to request a parcular IP
address be assigned.
56 DHCP Message This opon is used by a DHCP server to provide an error message to a DHCP client in a DHCPNAK message in the
event of a failure. A client may use this opon in a DHCPDECLINE message to indicate the why the client declined
the oered parameters. The message consists ASCII text, which the client may display on an available output
device.
60 Vendor Class Idener Species the Vendor Class Idener. This is used in conjuncon with opon 43 (Vendor Specic informaon),
allowing clients and servers to exchange vendor-specic informaon.
62 NetWare/IP Domain Species the NetWare/IP Domain Name used by the NetWare/IP product.
64 NIS-Domain-Name Species the NIS+ domain (entered as an ASCII character string) for the client.
65 NIS-Server-Addr Species a list of IP addresses for NIS+ servers available to the client. Servers are listed in order of preference.
66 TFTP server hostname or
IP address
Species the address or name of the TFTP server available to the client.
67 Boot File name Species a boot image to be used by the client.
68 Home-Agent-Addrs Species a list of IP addresses for Mobile IP Home Agents available to the client. Agents are listed in order of
priority.
69 SMTP-Server Species a list of Simple Mail Transport Protocol (SMTP) Servers available to the client. Servers are listed in order of
priority.
70 POP3-Server Species a list of Post Oce Protocol (POP3) Servers available to the client. Servers are listed in order of priority.
71 NNTP-Server Species a list ofNetwork News Transport Protocol (NNTP) Servers available to the client. Servers are listed in order
of priority.
DHCP Servers
DHCP server opons
RUCKUS FastIron DHCP Conguraon Guide, 08.0.95
Part Number: 53-1005654-01 51

TABLE 6 DHCP server opons (connued)
Opon Number Opon Name Descripon / Notes
72 WWW-Server Species a list of World Wide Web (WWW) Servers available to the client. Servers are listed in order of priority.
73 Finger-Server Species a list of Finger Servers available to the client. Servers are listed in order of priority.
74 IRC-Server Species a list of Internet Relay Chat (IRC) Servers available to the client. Servers are listed in order of priority.
75 StreetTalk-Server Species a list of StreetTalk Servers available to the client. Servers are listed in order of priority.
76 STDA-Server Species a list of StreetTalk Directory Assistance (STDA)Servers available to the client. Servers are listed in order of
priority.
85 NDS Servers Species the IP addresses for Novell Directory Services (NDS) servers available to the client. Servers are listed in
order of priority.
86 NDS Tree Name Species the name of the Novell Directory Services (NDS) Tree to which the client will connect.
88 BCMCS Domain List Species a list of Broadcast and Mulcast Service (BCMCS) Controller domains.
89 BCMCS IPv4 addr Species a list of IP addresses for Broadcast and Mulcast Service (BCMCS) controllers. Controllers are listed in
order of priority.
94 Client NDI Species the Network Interface Idener (NDI) for the client.
95 LDAP This opon is supported if the opon value type is IP, ASCII, or HEX
98 User-Auth Species a list of URLs, each poinng to a user authencaon service that is capable of processing authencaon
requests encapsulated in the User Authencaon Protocol (UAP).
If a URL does not contain a port component, the normal default port is assumed (port 80 for hp and port 443 for
hps)
If a URL does not include a path component, the path /uap is assumed.
100 Pcode Species the TZ-POSIX string used to provide mezone details.
101 Tcode Species the TZ-Database string used to provide mezone details.
102 - 111 Removed/Unassigned These opons are supported if the value type is dened as IP, ASCII, or HEX
112 Nenfo Address This opon is supported if the opon value type is IP, ASCII, or HEX
113 Nenfo Tag This opon is supported if the opon value type is IP, ASCII, or HEX
114 URL This opon is supported if the opon value type is IP, ASCII, or HEX
120 SIP Servers Species the IP address or, preferably, the DNS fully qualied domain name to be used by the Session Iniaon
Protocol (SIP) client to locate a SIP server.
125 V-I VendorSpeciInfo This opon is supported if the value type is dened as IP, ASCII, or HEX This opon is supported if the value type is
dened as IP, ASCII, or HEX
126 - 127 Removed/Unassigned These opons are supported if the opon value type is IP, ASCII, or HEX
128 - 135 PXE-VendorSpecic These opons are supported if the opon value type is IP, ASCII, or HEX
137 V4_LOST Species the fully qualied domain name (FQDN) to be used by the client to locate a Locaon-to-Service
Translaon (LoST) server.
141 SIP UA Domains Species a list of domain names to search for Session Iniaon Protocol (SIP) User Agent Conguraon.
142 IPv4-ANDSF Species the IP addresses for Access Network Discover and Selecon Funcon (ANDSF) Servers available to the
client. The servers are listed in order of priority.
146 RDNSS Selecon This opon is supported if the opon value type is IP, ASCII, or HEX
147 - 148 Unassigned These opons are supported if theopon value type is IP, ASCII, or HEX
150 TFTP Server Addr Species the address of the TFTP Server available to the client. Note that only one TFTP server IP address can be
dened.
156 dhcp-state This opon is supported if the opon value type is IP, ASCII, or HEX
160 Capve-Portal This opon is supported if the opon value type is IP, ASCII, or HEX
161 - 174 Unassigned These opons are supported if the opon value type is IP, ASCII, or HEX
175 Etherboot This opon is supported if the opon value type is IP, ASCII, or HEX
176 IP Tele-VoiceSrvr Congures the IP telephone voice parameters for Avaya IP phones running as DHCP clients.
DHCP Servers
DHCP server opons
RUCKUS FastIron DHCP Conguraon Guide, 08.0.95
52 Part Number: 53-1005654-01

TABLE 6 DHCP server opons (connued)
Opon Number Opon Name Descripon / Notes
177 PktCable-CableHome This opon is supported if the opon value type is IP, ASCII, or HEX
178 - 206 Unassigned These opons are supported if theopon value type is IP, ASCII, or HEX
209 Cong File Species the conguraon le to be used in a PXELINUX environment.
210 Path Prex Species a path prex for the conguraon le used in a a PXELINUX environment.
213 V4_ACCESS_DOMAIN Species the access network domain name available to the client for the purposes of discovering a Local
Informaon Server (LIS).
214 - 218 Unassigned These opons are supported if the opon value type is IP, ASCII, or HEX
221 VSS This opon is supported if the opon value type is IP, ASCII, or HEX
222 - 223 Unassigned These opons are supported if the opon value type is IP, ASCII, or HEX
224 - 241 Reserved These opons are supported if the opon value type is IP, ASCII, or HEX
242 IP Tele-DataSrvr Congures the IP telephone data parameters for Avaya IP phones running as DHCP clients.
243 - 251 Reserved These opons are supported if the opon value type is P, ASCII, or HEX
252 WPAD Congures the Proxy-Auto Cong (PAC) le locaon string for the Web Proxy Auto-Discovery (WPAD) supported
DHCP clients.
253 - 254 Reserved These opons are supported if the opon value type is IP, ASCII, or HEX
NOTE
Opons not listed in the table are not supported or not congurable using the opon command.
A DHCP server assigns and manages IPv4 addresses from mulple address pools, using dynamic address allocaon. The DHCP server also contains
the relay agent to forward DHCP broadcast messages to network segments that do not support these types of messages.
Recommendaons and limitaons
The list of supported DHCP opons is extensive. However, the number of opons that can be passed to the client is limited by the size of the ACK
packet. It is recommended that you congure essenal opons only for the specic DHCP server address pool.
The following opons (if congured) are priorized, with addional opons added as needed:
• 3 - Router Opon
• 6 - Domain Name Server
• 12 - Hostname
• 15 - Domain name
• 66 - TFTP server hostname or IP address
• 67 - Boot le name
• 60 - Vendor-Specic Informaon
DHCP opons are not validated by the DHCP server. You must ensure the values are congured correctly.
Upgrade consideraons
In FastIron 08.0.61 or earlier releases, it was possible to congure a subset of these DHCP opons using specic commands. For example, dhcp-
default-router allows conguraon of the DHCP default router (which is now also congurable using DHCP opon 3). When upgrading to FastIron
08.0.70, any congured DHCP opons are retained. However, the conguraon is stored and shown in the new opons format. The following table
shows the opons available in earlier releases and a mapping between the new opon format and the corresponding commands available in earlier
releases.
DHCP Servers
DHCP server opons
RUCKUS FastIron DHCP Conguraon Guide, 08.0.95
Part Number: 53-1005654-01 53

Opon number and name Command in release 08.0.70 Command in release 08.0.61 and earlier
1 - Subnet Mask network router-IP subnet mask
Note that this essenal opon is congured using
the network command. It is not congurable using
the opon command.
network router-IP subnet mask
3 - Router Opon opon 3 ip router -IP dhcp-default-router router -IP
6 - Domain Name Server opon 6 ip server-IP-address dns-server server-IP-address
12 - Hostname opon 12 ascii hostname host-name hostname
15 - Domain name opon 15 ascii domain-name domain-name ascii-string-domain-name
47 - NetBIOS over TCP/IP Name Server opon 47 ip Server-IP netbios-name-server Server-IP
49 - X Window System Display Manager opon 49 ip XWindow-manager-IP xwindow-manager XWindow-manager-IP
66 - TFTP server hostname opon 66 ascii TFTP-server-hostname tp-server TFTP-server-hostname
67 - Booile name opon 67 ascii booile-name booile booile-name
150 - TFTP server IP address opon 150 ip TFTP-server-IP tp-server TFTP-server-IP
176 - ip-telephony voice server opon 176 mcipadd mcport,… ip-telephony voice mcipadd mcport,…
242 - ip-telephony data server opon 242 mcipadd mcport,… ip-telephony data mcipadd mcport,…
252 - Proxy-Auto Cong (PAC) opon 252 ascii URL-to-cong-le wpad URL-to-cong-le
60 - Vendor-Specic Informaon opon 60 ascii VCI vendor-class ascii-string-VCI
Note that the exisng commands are sll supported. However, it is recommended that you congure these using the opon command where
appropriate. The conguraon is stored and shown in the opons format, irrespecve of whether the opon is congured using the opon
command or the commands available in previous releases.
Disabling or re-enabling the DHCP server on the
management port
By default, when the DHCP server is enabled on the FastIron device, the server responds to DHCP client requests received on the management port.
If required, you can prevent the response to DHCP client requests received on the management port by disabling DHCP server support on the port.
When the DHCP server is disabled, DHCP client requests that are received on the management port are discarded.
1. Enter global conguraon mode by issuing the congure terminal command.
device# configure terminal
2. Disable the DHCP server funconality on the management port.
device(config)# no ip dhcp-server mgmt
3. Enable the DHCP server funconality on the management port, as required.
device(config)# ip dhcp-server mgmt
DHCP Servers
Disabling or re-enabling the DHCP server on the management port
RUCKUS FastIron DHCP Conguraon Guide, 08.0.95
54 Part Number: 53-1005654-01
Seng the wait me for ARP ping response
You can set the number of seconds to wait for a response to an ARP ping packet on the DHCP server.
At startup, the server reconciles the lease binding database by sending an ARP ping packet out to every client. If there is no response to the ARP
ping packet within a set amount of me (set in seconds), the server deletes the client from the lease binding database. The minimum seng is 5
seconds and the maximum is 30 seconds.
NOTE
Do not alter the default value unless it is necessary. Increasing the value of this mer may increase the me to get console access aer a
reboot.
1. Enter global conguraon mode by issuing the congure terminal command.
device# configure terminal
2. Specify the number of seconds to wait for a response to an ARP ping packet.
device(config)# ip dhcp-server arp-ping-timeout 20
The following example congures a wait ARP ping packet meout response to 20 seconds.
device# configure terminal
device(config)# ip dhcp-server arp-ping-timeout 20
DHCP relay agent informaon support (opon 82)
The DHCP relay agent informaon opon (DHCP opon 82) enables a DHCP relay agent to include informaon about itself when forwarding client-
originated DHCP packets to a DHCP server. The DHCP server uses this informaon to implement IP address assignments, or other parameter-
assignment policies.
In a metropolitan Ethernet-access environment, the DHCP server can centrally manage IP address assignments for a large number of subscribers. If
DHCP opon 82 is disabled, a DHCP policy can only be applied per subnet, rather than per physical port. When DHCP opon 82 is enabled, a
subscriber is idened by the physical port through which it connects to the network.
Enabling relay agent informaon (opon 82)
Complete the following steps to acvate DHCP opon 82.
This opon enables the DHCP server to echo relay agent informaon in all replies.
NOTE
It is not possible to congure relay agent echo (opon 82) using the opon command. The command and syntax to congure opon 82 is
shown below.
1. Enter global conguraon mode by issuing the congure terminal command.
device# configure terminal
2. Acvate DHCP opon 82.
device(config)# ip dhcp-server relay-agent-echo enable
DHCP Servers
Enabling relay agent informaon (opon 82)
RUCKUS FastIron DHCP Conguraon Guide, 08.0.95
Part Number: 53-1005654-01 55
Conguring the IP address of the DHCP server
Complete the following steps to specify the IP address of the selected DHCP server.
1. Enter global conguraon mode by issuing the congure terminal command.
device# configure terminal
2. Specify the server idener.
device(config)# ip dhcp-ser server-identifier 10.1.1.144
Conguring the boot image
The boot image species a boot image name to be used by the DHCP client.
In this task example, the DHCP client should use the boot image called "ICX". This variable can have an extension of .bin, .txt, or .cfg.
1. Enter global conguraon mode by issuing the congure terminal command.
device# configure terminal
2. Create and enter DHCP server pool conguraon mode.
device(config)# ip dhcp-server pool cabo
3. Specify a boot image name to be used by the DHCP client.
device(config-dhcp-cabo)# option 67 ascii icx
Deploying an address pool conguraon to the server
Complete the following steps to send an address pool conguraon to the DHCP server.
1. Enter global conguraon mode by issuing the congure terminal command.
device# configure terminal
2. Create and enter DHCP server pool conguraon mode.
device(config)# ip dhcp-server pool cabo
3. Deploy the address pool to the DHCP server.
device(config-dhcp-cabo)# deploy
DHCP Servers
Conguring the IP address of the DHCP server
RUCKUS FastIron DHCP Conguraon Guide, 08.0.95
56 Part Number: 53-1005654-01
Specifying default router available to the client
Complete the following steps to specify the IP address of the default router for a client.
1. Enter global conguraon mode by issuing the congure terminal command.
device# configure terminal
2. Create and enter DHCP server pool conguraon mode.
device(config)# ip dhcp-server pool cabo
3. Specify the IP address of the default router for the client.
device(config-dhcp-cabo)# option 3 ip 10.2.1.141
NOTE
Specify one default router IP address only. Do not enter mulple router addresses.
Specifying DNS servers available to the client
Complete the following steps to specify the DNS servers available to the client.
1. Enter global conguraon mode by issuing the congure terminal command
device# configure terminal
2. Create and enter DHCP server pool conguraon mode.
device(config)# ip dhcp-server pool cabo
3. Specify the IP addresses of the DNS servers that are available to the DHCP clients.
device(config-dhcp-cabo)# option 6 ip 10.2.1.143 10.2.2.142
Conguring the domain name for the client
Complete the following steps to congure the domain name for the client.
1. Enter global conguraon mode by issuing the congure terminal command.
device# configure terminal
2. Create and enter DHCP server pool conguraon mode.
device(config)# ip dhcp-server pool cabo
3. Specify the domain name for the client.
device(config-dhcp-cabo)# option 15 ascii sierra
DHCP Servers
Conguring the domain name for the client
RUCKUS FastIron DHCP Conguraon Guide, 08.0.95
Part Number: 53-1005654-01 57
Conguring the lease duraon for the address pool
Complete the following steps to specify the lease duraon for the address pool.
You can set a lease duraon for days, hours, or minutes, or any combinaon of the three.
1. Enter global conguraon mode by issuing the congure terminal command.
device# configure terminal
2. Create and enter DHCP server pool conguraon mode.
device(config)# ip dhcp-server pool cabo
3. Set the lease duraon for the address pool.
device(config-dhcp-cabo)# lease 1 4 32
In the example, the lease duraon has been set to one day, four hours, and 32 minutes.
Specifying addresses to exclude from the address pool
Complete the following steps to specify the addresses that should be excluded from the address pool.
You can specify a single address or a range of addresses that should be excluded from the address pool.
1. Enter global conguraon mode by issuing the congure terminal command.
device# configure terminal
2. Create and enter DHCP server pool conguraon mode.
device(config)# ip dhcp-server pool cabo
3. Specify the address that should be excluded from the address pool.
device(config-dhcp-cabo)# excluded-address 10.2.3.44
Conguring the NetBIOS server for DHCP clients
You can specify the IP address of NetBIOS WINS servers that are available to Microso DHCP clients.
1. Enter global conguraon mode by issuing the congure terminal command.
device# configure terminal
2. Create and enter DHCP server pool conguraon mode.
device(config)# ip dhcp-server pool cabo
3. Specify the NetBIOS server for the DHCP client.
device(config-dhcp-cabo)# option 47 ip 192.168.1.55
DHCP Servers
Conguring the lease duraon for the address pool
RUCKUS FastIron DHCP Conguraon Guide, 08.0.95
58 Part Number: 53-1005654-01
Conguring the subnet and mask of a DHCP address pool
You can congure the subnet network and mask of the DHCP address pool.
1. Enter global conguraon mode by issuing the congure terminal command.
device# configure terminal
2. Create and enter DHCP server pool conguraon mode.
device(config)# ip dhcp-server pool cabo
3. Specify the subnet network and mask length of the DHCP address pool.
device(config-dhcp-cabo)# option 1 ip 10.2.3.44/24
Conguring the TFTP server
You can specify the address or name of the TFTP server to be used by the DHCP clients.
NOTE
If DHCP opons 66 (TFTP server name) and 150 (TFTP server IP address) are both congured, the DHCP client ignores opon 150 and tries
to resolve the TFTP server name (opon 66) using DNS.
1. Enter global conguraon mode by issuing the congure terminal command.
device# configure terminal
2. Create and enter DHCP server pool conguraon mode.
device(config)# ip dhcp-server pool cabo
3. Congure a TFTP server by specifying its IP address or server name.
device(config-dhcp-cabo)# option 150 ip 10.7.5.48
device(config-dhcp-cabo)# option 66 ascii tftp.domain.com
The rst example congures a TFTP server by specifying its IP address, while the second example congures a TFTP server by specifying its
server name.
Conguring X Window System Display Manager IP
addresses (opon 49)
Opon 49 of RFC 2132 species a list of IP addresses of systems that are running the X Window System Display Manager and are available to the
client.
The X Window client is a DHCP client in a network that solicits conguraon informaon by broadcasng a DHCP discovery packet on bootup or
when the DHCP client is enabled. The DHCP server provides the IP addresses of systems running the X Window System Display Managers available
in the network in their preferred order as part of the DHCP oer message.
On receipt of a discovery packet from the client, a DHCP oer message must be sent back. Opon 49 must be added with the IP addresses of
systems running the X Window System Display Manager in the network, along with other mandatory opons. You can congure a maximum of
three IP addresses in a DHCP server pool.
DHCP Servers
Conguring X Window System Display Manager IP addresses (opon 49)
RUCKUS FastIron DHCP Conguraon Guide, 08.0.95
Part Number: 53-1005654-01 59
NOTE
Opon 49 is ignored if the client is a non-X Window client.
1. Enter global conguraon mode.
device# configure terminal
2. Congure an address pool in the DHCP server and enter DHCP server pool conguraon mode.
device(config)# ip dhcp-server pool cabo
3. Enter the xwindow-manager command along with the IP addresses of the X Window System Display Managers separated by spaces.
device(config-dhcp-cabo)# option 49 ip 10.38.12.1 10.38.12.3 10.38.12.5
The following example congures the IP addresses of systems running the X Window System Display Manager in the DHCP conguraon pool.
device# configure terminal
device(config)# ip dhcp-server pool cabo
device(config-dhcp-cabo)# option 49 ip 10.38.12.1 10.38.12.3 10.38.12.5
Vendor specic informaon (opon 43 and opon 60)
conguraons
RUCKUS devices running as DHCP servers can be congured with opon 43 and opon 60.
Conguring the DHCP opon 60 helps in idenfying the incoming DHCP client. If the vendor class idener (VCI) adversed by the DHCP client
matches with the DHCP server, the server makes a decision to exchange the vendor-specic informaon (VSI) congured as part of DHCP opon 43.
The RUCKUS ICX DHCP server can recognize the DHCP client device using the VCI (opon 60) and pass specic informaon to this device type only
(using opon 43). However, the DHCP server can be congured to always pass addional informaon using opon 43 (regardless of the client).
In summary:
• Opon 60 denes the vendor type and conguraon value.
• Opon 43 denes vendor specic informaon.
• If opon 60 is congured, the vendor specic informaon (dened in opon 43) is returned to clients that provide the appropriate vendor
type and conguraon value.
• If opon 60 is not congured, the vendor specic informaon is sent to all clients.
Conguring vendor details and vendor specic informaon (opon 43 and opon
60)
RUCKUS devices running as DHCP servers can be congured with opon 43 and opon 60. The following task congures opon 60 and opon 43 for
a device running as a DHCP server.
To congure opon 60 and opon 43.
1. Enter global conguraon mode.
device# configure terminal
DHCP Servers
Vendor specic informaon (opon 43 and opon 60) conguraons
RUCKUS FastIron DHCP Conguraon Guide, 08.0.95
60 Part Number: 53-1005654-01
2. Create a DHCP server pool.
device(config)# ip dhcp-server pool ruckus
NOTE
Save the conguraon to retain the conguraon through warm or cold reboots.
3. Specify (opon 60) the vendor type and conguraon value for the DHCP client using the opon command.
device(ip dhcp-server pool ruckus)# option 60 ascii “Ruckus CPE”
NOTE
If the ascii opon contains a space, you must enter it with double quotes as shown in the previous example.
4. Specify (opon 43) the vendor specic informaon using the opon command.
device(ip dhcp-server pool ruckus)# option 43 hex 0108c0a80a01c0a81401
5. Deploy the conguraon using the deploy command.
device(ip dhcp-server pool ruckus)# deploy
The following example congures opon 60 and opon 43 (hex) for a Ruckus Access Point (AP).
device# configure terminal
device(config)# ip dhcp-server pool ruckus
device(ip dhcp-server pool ruckus)# option 60 ascii “Ruckus CPE”
device(ip dhcp-server pool ruckus)# option 43 hex 010cc0a80a01c0a81401c0a81e01
device(ip dhcp-server pool ruckus)# deploy
The following example congures opon 60 and opon 43 (ASCII) for a Ruckus AP.
device# configure terminal
device(config)# ip dhcp-server pool ruckus
device(ip dhcp-server pool ruckus)# option 60 ascii “Ruckus CPE”
device(ip dhcp-server pool ruckus)# option 43 ascii ruckusconfig
device(ip dhcp-server pool ruckus)# deploy
The following example congures the smartzone (SZ) IP list in TLV format for the DHCP server.
device# configure terminal
device(config)# ip dhcp-server pool ruckus
device(ip dhcp-server pool ruckus)# option 60 ascii “Ruckus CPE”
device(ip dhcp-server pool ruckus)# option 43 hex
0x010b31312e31312e31312e3131030f3131322e3131322e3131322e313132061731302e31302e31302e31302c31322e31322
e31322e3132
device(ip dhcp-server pool ruckus)# deploy
Enabling stac IP to MAC address mapping
Based on the client MAC address, you can stacally congure the IP address to the MAC address in the DHCP server.
This conguraon is useful when you want to have selected clients assigned with parcular IP addresses from the server. Whenever a DHCP
discover message is received from these clients, based on the stac conguraon, the IP address will be assigned with the other required
parameters.
1. Enter global conguraon mode.
device# configure terminal
DHCP Servers
Enabling stac IP to MAC address mapping
RUCKUS FastIron DHCP Conguraon Guide, 08.0.95
Part Number: 53-1005654-01 61

2. Create a DHCP server pool.
device(config)# ip dhcp-server pool cabo
3. Enter the stac-mac-ip-mapping command followed by the IP address and MAC address for mapping.
device(config-dhcp-cabo)# static-mac-ip-mapping 10.10.10.29 0010.9400.0005
The following example enables the stac MAC address to IP address mapping.
device# configure terminal
device(config)# ip dhcp-server pool cabo
device(config-dhcp-cabo)# static-mac-ip-mapping 10.10.10.29 0010.9400.0005
Conguring Avaya IP telephony (opons 176 and 242)
Avaya IP telephones use site-specic opons 176 and 242 as a method to obtain parameters from the DHCP server.
On receipt of a discovery packet from the Avaya IP telephone client, a DHCP oer message must be sent back. Opons 176 and 242 must be added
with the details of IP telephony voice and data servers present in the network, along with mandatory opons.
• Opon 176 is used for voice server representaon.
• Opon 242 is used for data servers.
The following table lists the parameters for each opon:
Opon Paramaters
Opon 176: Voice server opons mcipadd ip-address
Species the IP telephony server port number. The default is 1719.
mcport portnum
Species the IP telephony server port number. The default is 1719.
tpsrvr/hpsrvr/tlssrvr server-ip-address
Species the IP addresses of the TFTP, HTTP, and TLS servers.
l2qaud or l2qsig prio
Species the IP telephony L2QAUD or L2QSIG priority value. The range is from 1 to 6. The default value is 6.
l2qvlan vlan-id
Species the IP telephony L2QVLAN number. The default is 0.
vlantest secs
The number of seconds a phone aempts to return to the previously known voice VLAN. This is not applicable for the
default VLAN.
DHCP Servers
Conguring Avaya IP telephony (opons 176 and 242)
RUCKUS FastIron DHCP Conguraon Guide, 08.0.95
62 Part Number: 53-1005654-01

Opon Paramaters
Opon 242: Data server opons mcipadd ip-address
IP address of the gatekeeper. Atleast one IP address is required.
mcport portnum
Species IP telephony server port number. The default is 1719.
tpsrvr/hpsrvr/tlssrvr server ip-address
Species the IP addresses of the TFP, HTTP, and TLS servers.
l2qaud or l2qsig prio
L2QAUD is the IP telephony L2 audio priority value. L2QSIG is the IP telephony L2 signaling priority value. This range is
from 1 through 6. The default value is 6.
l2qvlan vlan-id
Species the IP telephony L2QVLAN number. The default is 0.
vlantest secs
The number of seconds a phone aempts to return to the previously known voice VLAN. This is not applicable for the
default VLAN.
NOTE
Opons 176 and 242 are ignored for non-Avaya IP telephone clients.
1. Enter global conguraon mode.
device# configure terminal
2. Congure an address pool in the DHCP server and enter DHCP server pool conguraon mode.
device(config)# ip dhcp-server pool cabo
3. Enter the opon command followed by the supported parameters. The parameters you can add for IP telephony data are mcipadd,
mcport, hpsrvr, l2qaud, l2qsig, l2qvlan, tpsrvr, tlssrvr, and vlantest.
The following example species the MCIP address and MCPORT of the data server.
device(config-dhcp-cabo)# option 242 mcipadd 1.1.1.2 mcport 1719
4. Enter the opon command followed by the supported parameters. The parameters you can add for IP telephony voice are mcipadd,
mcport, hpsrvr, l2qaud, l2qsig, l2qvlan, tpsrvr, tlssrvr, and vlantest.
The following example species the MCIP address and MCPORT of the voice server.
device(config-dhcp-cabo)# option 176 mcipadd 1.1.1.2 mcport 1719
DHCP Servers
Conguring Avaya IP telephony (opons 176 and 242)
RUCKUS FastIron DHCP Conguraon Guide, 08.0.95
Part Number: 53-1005654-01 63
5. Enter the show ip dhcp-server address-pools command to view and verify the IP telephony opons.
device(config)# show ip dhcp-server address-pools
Showing all address pool(s):
Pool Name: dhcp
Time elapsed since last save: 00d:00h:00m:00s
Total number of active leases: 0
Address Pool State: pending
Pool Configured Options:
lease: 1 0 0
network: 10.10.10.0 255.255.255.0
option 3 (Default-Router ): ip 10.10.10.1
option 60 (Vendor Class Id ): hex FF
option 176 (IP Tele-VoiceSrvr ): MCIPADD=10.10.10.1,MCPORT=1719
option 242 (IP Tele-DataSrvr ): MCIPADD=10.10.10.1,MCPORT=1719
Conguring WPAD (opon 252)
The Web Proxy Auto-Discovery (WPAD) protocol is used by web browsers to locate a Proxy Auto-Cong (PAC) le automacally.
The WPAD protocol can use a DNS or DHCP server to locate a PAC le. DHCP detecon involves the URL being pushed to the user in the DHCP
assignment, while DNS detecon is based on an informed guess, using known informaon about the DNS. A web browser that supports both
methods checks the DHCP assignment rst, and then aempts the DNS method. If the browser is unable to load a PAC le through the DHCP or DNS
methods, it will allow direct Internet access.
NOTE
The PAC le must have the le name wpad.dat for the DNS method to funcon.
1. Enter global conguraon mode.
device# configure terminal
2. Congure an address pool in the DHCP server and enter DHCP server pool conguraon mode.
device(config)# ip dhcp-server pool cabo
3. Enter the opon command followed by the full network locaon of the PAC le.
device(config-dhcp-cabo)# option 252 ascii http://172.26.67.243:8080/wpad.dat
4. Enter the show ip dhcp-server address-pools command to view the congured network locaon of the PAC le.
device(config)# show ip dhcp-server address-pools
Showing all address pool(s):
Pool Name: test
Time elapsed since last save: 00d:00h:01m:21s
Total number of active leases: 1
Address Pool State: active
Pool Configured Options:
lease: 1 0 0
network: 50.50.50.0 255.255.255.0
option 252 (WPAD ): http://172.26.67.243:8080/wpad.dat
DHCP Servers
Conguring WPAD (opon 252)
RUCKUS FastIron DHCP Conguraon Guide, 08.0.95
64 Part Number: 53-1005654-01
Displaying DHCP server informaon
The following DHCP show commands can be entered from any level of the CLI.
Use one of the commands to view DHCP server informaon. The commands do not need to be entered in the specied order.
• Display a specic acve lease, or all acve leases.
device# show ip dhcp-server binding
Bindings from all pools:
IP Address Client-ID/ Lease expiration Type
Hardware address
192.168.1.2 0000.005d.a440 0d:0h:29m:31s Automatic
192.168.1.3 0000.00e1.26c0 0d:0h:29m:38s Automatic
• Display informaon about a specic address pool or all address pools.
device# show ip dhcp-server address-pools
Showing all address pool(s):
Pool Name: dhcp
Time elapsed since last save: 00d:00h:00m:00s
Total number of active leases: 0
Address Pool State: pending
Pool Configured Options:
lease: 1 0 0
network: 10.10.10.0 255.255.255.0
option 3 (Default-Router ): ip 10.10.10.1
option 6 (Domain Server ): ip 192.168.1.100
option 15 (Domain Name ): ascii example.com
option 44 (NETBIOS Name Srv ): ip 192.168.1.101
option 60 (Vendor Class Id ): hex 00
option 67 (Bootfile-Name ): ascii example.bin
option 150 (TFTP Server Addr ): ip 192.168.1.103
option 176 (IP Tele-VoiceSrvr ): MCIPADD=10.10.10.1,MCPORT=5,HTTPSRVR=20.20.20.1,L2QAUD=5,
option 242 (IP Tele-DataSrvr ): MCIPADD=10.10.10.1,
• Display the lease binding database that is stored in ash memory.
device# show ip dhcp-server flash
Address Pool Binding:
IP Address Client-ID/ Lease expiration Type
Hardware address
192.168.1.2 0000.005d.a440 0d:0h:18m:59s Automatic
192.168.1.3 0000.00e1.26c0 0d:0h:19m:8s Automatic
• Display informaon about acve leases, deployed address pools, undeployed address pools, and server upme.
device# show ip dhcp-server summary
DHCP Server Summary:
Total number of active leases: 2
Total number of deployed address-pools: 1
Total number of undeployed address-pools: 0
Server uptime: 0d:0h:8m:27s
• Display DHCP conguraon informaon on a Layer 2 device.
device(config)# show ip
Switch IP address: 10.44.16.116
Subnet mask: 255.255.255.0
Default router address: 10.44.16.1
TFTP server address: 10.44.16.41
Configuration filename: foundry.cfg
Image filename: None
DHCP Servers
Displaying DHCP server informaon
RUCKUS FastIron DHCP Conguraon Guide, 08.0.95
Part Number: 53-1005654-01 65
• Display IP address informaon for a Layer 2 device.
device(config)# show ip address
IP Address Type Lease Time Interface
10.44.16.116 Dynamic 174 0/1/1
• Display IP address informaon for a Layer 3 device.
device(config)# show ip address
IP Address Type Lease Time Interface
10.44.3.233 Dynamic 672651 0/1/2
10.0.0.1 Static N/A 0/1/15
• Display the Layer 2 device conguraon using the show run command.
device(config)# show run
Current configuration:
!
ver 08.0.40
!
module 1 icx-24-port-base-module
!
!ip dns domain-list englab.ruckuswireless.com
ip dns domain-list companynet.com
ip dns server-address 10.31.2.10
ip route 0.0.0.0/0 10.25.224.1
!ipv6 raguard policy p1
!ipv6 dns server-address 200::1 8000::60 7000::61
!!
end
• Display the Layer 3 device conguraon using the show run command.
device(config)# show run
Current configuration:
!
ver 08.0.40
!
module 1 icx7650-20-qxg-port-management-module
module 2 icx7650-qsfp-6port-qsfp-240g-module
!
vlan 1 name DEFAULT-VLAN by port
!
ip dns server-address 10.44.3.111
interface ethernet 0/1/2
ip address 10.44.3.233 255.255.255.0 dynamic
ip dhcp-client lease 691109
interface ethernet 0/1/15
ip address 10.0.0.1 255.0.0.0
ip helper-address 1 10.44.3.111
!
end
DHCP Servers
Displaying DHCP server informaon
RUCKUS FastIron DHCP Conguraon Guide, 08.0.95
66 Part Number: 53-1005654-01

DHCPv4
• DHCPv4 overview..................................................................................................................................................................... 67
• DHCP Assist conguraon........................................................................................................................................................ 67
• Dynamic ARP Inspecon Overview ..........................................................................................................................................71
• DHCP Snooping.........................................................................................................................................................................77
• DHCP Relay Agent Informaon and Opon 82 Inseron..........................................................................................................83
• IP Source Guard........................................................................................................................................................................ 91
DHCPv4 overview
The Dynamic Host Conguraon Protocol for DHCPv4 enables DHCP servers to pass conguraon parameters such as IPv4 addresses to IPv4 hosts.
On FastIron devices, you can congure Dynamic ARP Inspecon, DHCPv4 snooping, and IP Source Guard together. The RUCKUS implementaon of
these features provides enhanced network security by ltering untrusted DHCP packets.
The Dynamic Host Conguraon Protocol (DHCP) is based on the Bootstrap Protocol (BOOTP) and provides conguraon parameters such as IP
addresses, default routes, DNS server addresses, access control, QoS policies, and security policies stored in DHCP server databases to DHCP clients
upon request. DHCP enables the automac conguraon of client systems. DHCP removes the need to congure devices individually. Clients can set
network properes by connecng to the DHCP server instead. This protocol consists of two components; a protocol to deliver host-specic
conguraon parameters from a DHCP server to a host, and a mechanism to allocate network addresses to hosts.
DHCP is built on a client-server model, where designated DHCP server hosts allocate network addresses and deliver conguraon parameters to
dynamically congured hosts.
DHCP Assist conguraon
DHCP Assist allows a RUCKUS Layer 2 switch to assist a router that is performing mul-neng on its interfaces as part of its DHCP relay funcon.
DHCP Assist ensures that a DHCP server that manages mulple IP subnets can readily recognize the requester IP subnet, even when that server is
not on the client local LAN segment. The RUCKUS Layer 2 switch does so by stamping each request with its IP gateway address in the DHCP
discovery packet.
NOTE
RUCKUS Layer 2 switches provide BOOTP/DHCP assistance by default on an individual port basis. Refer to Changing the IP address used
for stamping BOOTP and DHCP requests in the RUCKUS FastIron Layer 3 Roung Conguraon Guide.
By allowing mulple subnet DHCP requests to be sent on the same wire, you can reduce the number of router ports required to support secondary
addressing, as well as reduce the number of DHCP servers required by allowing a server to manage mulple subnet address assignments.
RUCKUS FastIron DHCP Conguraon Guide, 08.0.95
Part Number: 53-1005654-01 67

FIGURE 6 DHCP requests in a network without DHCP Assist on the Layer 2 switch
In a network operang without DHCP Assist, hosts can be assigned IP addresses from the wrong subnet range because a router with mulple
subnets congured on an interface cannot disnguish among DHCP discovery packets received from dierent subnets.
In the example depicted, a host from each of the four subnets supported on a Layer 2 switch requests an IP address from the DHCP server. These
requests are sent transparently to the router. Because the router is unable to determine the origin of each packet by subnet, it assumes the lowest
IP address or the "primary address" is the gateway for all ports on the Layer 2 switch and stamps the request with that address.
When the DHCP request is received at the server, it assigns all IP addresses within that range only.
With DHCP Assist enabled on a RUCKUS Layer 2 switch, correct assignments are made because the Layer 2 switch provides the stamping service.
How DHCP Assist works
Upon iniaon of a DHCP session, the client sends out a DHCP discovery packet for an address from the DHCP server. When the DHCP discovery
packet is received at a RUCKUS Layer 2 switch with the DHCP Assist feature enabled, the gateway address congured on the receiving interface is
inserted into the packet. This address inseron is also referred to as stamping.
DHCPv4
DHCP Assist conguraon
RUCKUS FastIron DHCP Conguraon Guide, 08.0.95
68 Part Number: 53-1005654-01

FIGURE 7 DHCP requests in a network with DHCP Assist operang on a FastIron switch
When the stamped DHCP discovery packet is then received at the router, it is forwarded to the DHCP server. The DHCP server then extracts the
gateway address from each request and assigns an available IP address within the corresponding IP subnet. The IP address is then forwarded back
to the workstaon that originated the request.
NOTE
When DHCP Assist is enabled on any port, Layer 2 broadcast packets are forwarded by the CPU. Unknown unicast and mulcast packets
are sll forwarded in hardware, although selecve packets such as IGMP, are sent to the CPU for analysis. When DHCP Assist is not
enabled, Layer 2 broadcast packets are forwarded in hardware.
NOTE
The DHCP relay funcon of the connecng router must be turned on.
DHCPv4
DHCP Assist conguraon
RUCKUS FastIron DHCP Conguraon Guide, 08.0.95
Part Number: 53-1005654-01 69

FIGURE 8 DHCP oers are forwarded back toward the requesters
Conguring DHCP Assist
You can associate a gateway list with a port. You must congure a gateway list when DHCP Assist is enabled on a RUCKUS Layer 2 switch.
The gateway list contains a gateway address for each subnet that will be requesng addresses from a DHCP server. The list allows the stamping
process to occur. Each gateway address dened on the Layer 2 switch corresponds to an IP address of the RUCKUS router interface or other router
involved.
When mulple IP addresses are congured for a gateway list, the Layer 2 switch inserts the addresses into the discovery packet in a round-robin
fashion. Up to 32 gateway lists can be dened for each Layer 2 switch.
1. Enter global conguraon mode by issuing the congure terminal command.
device# configure terminal
DHCPv4
DHCP Assist conguraon
RUCKUS FastIron DHCP Conguraon Guide, 08.0.95
70 Part Number: 53-1005654-01
2. Congure the required gateway lists. Up to eight addresses can be dened for each gateway list in support of ports that are mulhomed.
device(config)# dhcp-gateway-list 1 10.95.5.1
device(config)# dhcp-gateway-list 2 10.95.6.1
device(config)# dhcp-gateway-list 3 10.95.1.1 10.95.5.1
3. Enter interface conguraon mode and associate gateway list 1 with interface 1/1/2.
device(config)# interface ethernet 1/1/2
device(config-if-e1000-1/1/2)# dhcp-gateway-list 1
4. Associate gateway list 2 with interface 1/1/8.
device(config)# interface ethernet 1/1/8
device(config-if-e1000-1/1/8)# dhcp-gateway-list 2
5. Associate gateway list 3 with interface 1/1/14
device(config)# interface ethernet 1/1/14
device(config-if-e1000-1/1/14)# dhcp-gateway-list 3
Dynamic ARP Inspecon Overview
For enhanced network security, you can congure the RUCKUS device to inspect and keep track of Dynamic Host Conguraon Protocol (DHCP)
assignments.
Dynamic ARP Inspecon (DAI) enables the RUCKUS device to intercept and examine all ARP request and response packets in a subnet and discard
packets with invalid IP-to-MAC address bindings. DAI can prevent common man-in-the-middle (MITM) aacks such as ARP cache poisoning, and
disallow misconguraon of client IP addresses.
DAI allows only valid ARP requests and responses to be forwarded and supports Mul-VRFs with overlapping address spaces.
ARP Poisoning
ARP provides IP communicaon within a Layer 2 broadcast domain by mapping an IP address to a MAC address. Before a host can talk to another
host, it must map the IP address to a MAC address rst. If the host does not have the mapping in its ARP table, it creates an ARP request to resolve
the mapping. All computers on the subnet receive and process the ARP requests, and the host whose IP address matches the IP address in the
request sends an ARP reply.
An ARP poisoning aack can target hosts, switches, and routers connected to the Layer 2 network by poisoning the ARP caches of systems
connected to the subnet and by intercepng trac intended for other hosts on the subnet. For instance, a malicious host can reply to an ARP
request with its own MAC address, thereby causing other hosts on the same subnet to store this informaon in their ARP tables or replace the
exisng ARP entry. Furthermore, a host can send gratuitous replies without having received any ARP requests. A malicious host can also send out
ARP packets claiming to have an IP address that actually belongs to another host (for example, the default router). Aer the aack, all trac from
the device under aack ows through the aacker computer and then to the router, switch, or host.
How Dynamic ARP Inspecon Works
Dynamic ARP Inspecon (DAI) allows only valid ARP requests and responses to be forwarded.
A RUCKUS device on which DAI is congured completes the following tasks:
• Intercepts ARP packets received by the system CPU
• Inspects all ARP requests and responses received on untrusted ports
DHCPv4
Dynamic ARP Inspecon Overview
RUCKUS FastIron DHCP Conguraon Guide, 08.0.95
Part Number: 53-1005654-01 71

• Veries that each of the intercepted packets has a valid IP-to-MAC address binding before updang the local ARP table, or before
forwarding the packet to the appropriate desnaon
• Drops invalid ARP packets
When you enable DAI on a VLAN, by default, all member ports are untrusted. You must manually congure trusted ports. In a typical network
conguraon, ports connected to host ports are untrusted. You congure ports connected to other switches or routers as trusted.
DAI inspects ARP packets received on untrusted ports. DAI carries out the inspecon based on IP-to-MAC address bindings stored in a trusted
binding database. For the RUCKUS device, the binding database is the ARP table and the DHCP snooping table, which supports DAI, DHCP snooping,
and IP Source Guard. To inspect an ARP request packet, DAI checks the source IP address and source MAC address against the ARP table. For an ARP
reply packet, DAI checks the source IP, source MAC, desnaon IP, and desnaon MAC addresses. DAI forwards the valid packets and discards
those with invalid IP-to-MAC address bindings.
When ARP packets reach a trusted port, DAI lets them through, as shown in the following gure.
FIGURE 9 Dynamic ARP Inspecon at Work
ARP and DHCP Snoop Entries
DAI uses the IP-to-MAC mappings in the ARP table to validate ARP packets received on untrusted ports. DAI relies on the following entries:
• Dynamic ARP: Normal ARP learned from trusted ports.
• Stac ARP: Stacally congured IP address, MAC address, and port mapping.
• Inspecon ARP: Stacally congured IP-to-MAC mapping, where the port is inially unspecied. The actual physical port mapping will be
resolved and updated from validated ARP packets.
• DHCP-Snooping ARP: Informaon collected from snooping DHCP packets when DHCP snooping is enabled on VLANs. DHCP snooping
entries are stored in a dierent table and are not part of the ARP table.
The status of an ARP entry is either valid or pending:
• Valid : The mapping is valid, and the port is resolved. This is always the case for stac ARP entries.
• Pending: For normal dynamic ARP entries before they are resolved. Their status changes to valid when they are resolved, and the port is
mapped. Refer to System Reboot and the Binding Database on page 79.
DHCPv4
Dynamic ARP Inspecon Overview
RUCKUS FastIron DHCP Conguraon Guide, 08.0.95
72 Part Number: 53-1005654-01
Conguraon Notes and Feature Limitaons for DAI
The following conguraon notes and limitaons apply when conguring Dynamic ARP Inspecon (DAI):
• The maximum number of stac DAI entries that can be congured is 6000. This value cannot be changed.
• DAI can be congured on a maximum of 511 VLANs.
• DAI is supported on a VLAN without a VE, or on a VE with or without an assigned IP address.
• DAI is supported on LAG ports.
• For default VLAN ID changes, DAI must be re-applied on the new default VLAN.
• ACLs are supported on member ports of a VLAN on which DHCP snooping and Dynamic ARP Inspecon (DAI) are enabled.
Conguring Dynamic ARP Inspecon
Dynamic ARP Inspecon is disabled by default and the trust seng of ports is untrusted by default.
You must rst congure stac ARP or ARP inspecon entry for hosts congured with a stac IP address. Otherwise, when DAI checks ARP packets
from these hosts against entries in the ARP table, it will not nd any entries for them, and the RUCKUS device will not allow or learn ARP from an
untrusted host.
Complete the following steps to congure DAI.
1. Enter global conguraon mode.
device# configure terminal
2. (Oponal) Congure an ARP inspecon entry only if there are hosts congured with a stac IP address.
device(config)# arp 10.20.20.12 0000.0002.0003 inspection
This command denes an ARP inspecon entry in the stac ARP table and maps the device IP address 10.20.20.12 with its MAC address,
0000.0002.0003. The ARP entry will be moved to the ARP table once the DAI receives a valid ARP packet with the matching IP and MAC
addresses on a device port. Unl then, the ARP entry will remain in Pend (pending) status.
NOTE
Dynamic ARP Inspecon must be enabled to use stac ARP inspecon entries.
3. Enable Dynamic ARP Inspecon on an exisng VLAN.
device(config)# ip arp inspection vlan 2
The command enables DAI on VLAN 2. ARP packets from untrusted ports in VLAN 2 will undergo DAI.
4. Enable trust on any ports that will bypass DAI.
a) To enable trust on a port, enter interface conguraon mode.
device(config)# interface ethernet 1/1/4
b) Enable trust on the port.
device(config-if-e10000-1/1/4)# arp inspection trust
These commands set the trust seng of port 1/1/4 to trusted.
5. Enable DHCP snooping to populate the DHCP snooping IP-to-MAC address binding database.
DHCPv4
Dynamic ARP Inspecon Overview
RUCKUS FastIron DHCP Conguraon Guide, 08.0.95
Part Number: 53-1005654-01 73
The following example congures a DAI table entry, enables DAI on VLAN 2, and designates port 1/1/4 as trusted.
device# configure terminal
device(config)# arp 10.20.20.12 0000.0002.0003 inspection
device(config)# ip arp inspection vlan 2
device(config)# interface ethernet 1/1/4
device(config-if-e10000-1/1/4)# arp inspection trust
Conguring Dynamic ARP Inspecon on Mulple VLANs
Dynamic ARP Inspecon (DAI) can be enabled on mulple VLANs using one command. The following task congures mulple VLANs and enables
DAI on most of the congured VLANs using a single command.
Complete the following steps to congure DAI for mulple VLANs.
NOTE
DAI can be congured on a maximum of 511 VLANs.
1. Enter global conguraon mode.
device# configure terminal
2. Congure the port-based VLANs.
device(config)# vlan 100 to 150
3. Add port Ethernet 1/1/12 as a tagged port.
device(config-mvlan-100-150)# tagged ethernet 1/1/12
4. Use the exit command to return to global conguraon mode.
device(config-mvlan-100-150)# exit
5. Congure more port-based VLANs.
device(config)# vlan 151 to 200
6. Add port Ethernet 1/1/12 as a tagged port.
device(config-mvlan-151-200)# tagged ethernet 1/1/12
7. Use the exit command to return to global conguraon mode.
device(config-mvlan-151-200)# exit
8. Use the ip arp inspecon command with the to keyword, specifying a VLAN range, to enable DAI on mulple VLANs.
device(config)# ip arp inspection vlan 100 to 150 160 170 to 200
The command enables DAI on VLANs 100 through 150, VLAN 160, and VLANs 170 through 200. ARP packets from untrusted ports in this
VLAN range will undergo DAI.
NOTE
The maximum number of VLANS that can be congured using the to keyword is 1024.
DHCPv4
Dynamic ARP Inspecon Overview
RUCKUS FastIron DHCP Conguraon Guide, 08.0.95
74 Part Number: 53-1005654-01
9. Enable trust on any ports that will bypass DAI.
a) To enable trust on a port, enter interface conguraon mode.
device(config)# interface ethernet 1/1/12
b) Enable trust on the port.
device(config-if-e10000-1/1/12)# arp inspection trust
10. Enable DHCP snooping to populate the DHCP snooping IP-to-MAC address binding database. Refer to the RUCKUS FastIron DHCP
Conguraon Guide for more informaon.
The following example congures a DAI table entry, congures mulple VLANs, and enables DAI on most of the congured VLANS. Port 1/1/12 is
designated as trusted.
device# configure terminal
device(config)# arp 10.20.20.12 0000.0002.0003 inspection
device(config)# vlan 100 to 150
device(config-mvlan-100-150)# tagged ethernet 1/1/12
device(config-mvlan-100-150)# exit
device(config)# vlan 151 to 200
device(config-mvlan-151-200)# tagged ethernet 1/1/12
device(config-mvlan-100-150)# exit
device(config)# ip arp inspection vlan 100 to 150 160 170 to 200
device(config)# interface ethernet 1/1/12
device(config-if-e10000-1/1/12)# arp inspection trust
Disabling Syslog Messages for DAI
You can disable syslog messages for Dynamic ARP Inspecon (DAI). Syslog messages are enabled by default on RUCKUS ICX devices.
Complete the following steps to disable DAI messages.
1. Enter global conguraon mode.
device# configure terminal
2. Enter the following command to disable syslog messages.
device(config)# ip arp inspection syslog disable
If you want to re-enable DAI syslog messages, use the no form of the command.
The following example disables DAI syslog messages.
device# configure terminal
device(config)# ip arp inspection syslog disable
The following example re-enables the DAI syslog messages.
device# configure terminal
device(config)# no ip arp inspection syslog disable
DHCPv4
Dynamic ARP Inspecon Overview
RUCKUS FastIron DHCP Conguraon Guide, 08.0.95
Part Number: 53-1005654-01 75
Displaying ARP Informaon
You can use various show commands to view informaon about ARP.
Use the following commands to view ARP-related informaon. The commands do not need to be entered in the specied order, and can be used to
view the ARP table as well as ARP inspecon status and trusted or untrusted ports.
1. Display the ARP table.
device> show arp
Total number of ARP entries: 2
Entries in default routing instance:
No. IP Address MAC Address Type Age Port Status
1 10.1.1.100 0000.0000.0100 Dynamic 0 1/1/1*2/1/25 Valid
2 10.37.69.129 02e0.5215.cae3 Dynamic 0 mgmt1 Valid
2. Display the ARP inspecon entries.
device> show ip arp inspection entries
Total entries : 2
DHCP Snooping Learnt entries: 1
ARP Learnt entries : 1
Static entries : 0
IP Address Mac Address VRF Entry Type
10.177.144.1 02e0.52da.d665 default-vrf arp table entry
1.1.8.197 00c1.0400.0001 default-vrf dhcp snoop entry
Conguring DAI to Support Mul-VRF
DAI supports Mul-VRF. You can deploy mulple Virtual Roung and Forwarding instances (VRFs) on a RUCKUS Ethernet switch. Each VLAN having a
Virtual Ethernet (VE) interface is assigned to a VRF.
You can enable DAI on individual VLANs and assign any interface as the ARP inspecon trusted interface. If an interface is a tagged port in this VLAN,
you can turn on the trusted port per VRF, so that trac intended for other VRF VLANs will not be trusted.
1. Enter global conguraon mode using the congure terminal command.
device# configure terminal
2. Congure DAI on a VLAN.
device(config)# ip arp inspection vlan 2
This example congures DAI on VLAN 2.
3. Add a stac ARP inspecon entry for a specic VRF.
device(config)# vrf one-ipv4
4. Add a stac ARP inspecon entry for the VRF.
device(config-vrf-one-ipv4)# arp 5.5.5.5 00a2.bbaa.0033 inspection
This example creates a stac ARP inspecon entry for the VRF named "one-ipv4."
DHCPv4
Dynamic ARP Inspecon Overview
RUCKUS FastIron DHCP Conguraon Guide, 08.0.95
76 Part Number: 53-1005654-01

Enabling Trust on a Port for a Specic VRF
The default trust seng for a port is untrusted. Leave the trust sengs for ports that are connected to host ports as untrusted.
The VRF must already exist.
1. Enter global conguraon mode using the congure terminal command.
device# configure terminal
2. Enter interface conguraon mode.
device(config)# interface ethernet 1/1/4
3. Enable trust for the specic VRF.
device(config-if-e10000-1/1/4)# arp inspection trust vrf vrf2
This example congures the VRF named "vrf2" as a trusted VRF on port 1/1/4.
DHCP Snooping
DHCP snooping enables the RUCKUS device to lter untrusted DHCP packets in a subnet. DHCP snooping can ward o man-in-the-middle (MIM)
aacks, such as a rogue DHCP server sending false DHCP server reply packets with the intenon of misdirecng other users. DHCP snooping can
also stop unauthorized DHCP servers and prevent errors stemming from user misconguraon of DHCP servers.
DHCP snooping is oen used with Dynamic ARP Inspecon (DAI) and IP Source Guard (IPSG).
How DHCP Snooping Works
When enabled on a VLAN, DHCP snooping stands between untrusted ports (those connected to host ports) and trusted ports (those connected to
DHCP servers). A VLAN with DHCP snooping enabled forwards DHCP request packets from clients and discards DHCP server reply packets on
untrusted ports. DHCP server reply packets on trusted ports to DHCP clients are forwarded, as shown in the following gures.
FIGURE 10 DHCP Snooping at Work on an Untrusted Port
DHCPv4
DHCP Snooping
RUCKUS FastIron DHCP Conguraon Guide, 08.0.95
Part Number: 53-1005654-01 77

FIGURE 11 DHCP Snooping at Work on a Trusted Port
NOTE
Trusted client ports can lead to DHCP starvaon and spoong aacks. When DHCP snooping is enabled, DHCP request packets received
on trusted ports are dropped.
DHCP Snooping Deployment over a LAG
The following gure shows DHCP snooping deployment over a LAG. The LAG is between an access switch and a distribuon switch.
FIGURE 12 DHCP Snooping Deployment over a LAG
DHCP Binding Database
DHCP server reply packets are forwarded to DHCP clients on trusted ports. The DHCP server reply packets collect client IP-to-MAC address binding
informaon, which is saved in the DHCP binding database. This informaon includes MAC addresses, IP addresses, lease me, VLAN numbers, and
port numbers.
Beginning with FastIron 8.0.30b, the DHCP binding database in the RUCKUS device is decoupled from the ARP database. For more informaon, refer
to ARP and DHCP Snoop Entries on page 72.
The lease me is refreshed when the client renews or rebinds its IP address with the DHCP server; otherwise, the RUCKUS device removes the entry
when the lease me expires.
Client IP-to-MAC address mappings
Client IP addresses need not be on directly connected networks, as long as the client MAC address is learned on the client port and the client port is
on the same VLAN as the DHCP server port. In this case, the system learns the client IP-to-MAC port mapping. Therefore, a VLAN with DHCP
snooping enabled does not require a VE interface.
DHCPv4
DHCP Snooping
RUCKUS FastIron DHCP Conguraon Guide, 08.0.95
78 Part Number: 53-1005654-01
In earlier releases, in the Layer 3 soware image, DHCP snooping did not learn the secure IP-to-MAC address mapping for a client, if the client port
was not a Virtual Ethernet (VE) interface with an IP subnet address. In other words, the client IP address had to match one of the subnets of the
client port in order for DHCP to learn the address mapping.
System Reboot and the Binding Database
To allow DHCP snooping, and all dependent features such as IP Source Guard (IPSG) and Dynamic ARP Inspecon (DAI), to work smoothly across a
system reboot, the binding database is saved to a le system inline without any delay.
Conguraon Notes and Feature Limitaons for DHCP Snooping
The following notes, limitaons, and restricons apply to DHCP snooping:
• DHCP snooping is supported on LAG ports. If a LAG port is removed or undeployed, DHCP snooping entries for that LAG are deleted.
• DHCP snooping is supported on Mul-Chassis. Trunking (MCT) clients. DHCP snooping is not supported on the MCT peer for the MCT
VLAN.
• If IP Source Guard (IPSG) is congured, the recommended maximum number of DHCP snooping entries for a stack is 8192. Although the
maximum number of DHCP snooping entries for a stack can exceed 8192, system performance may go down once this number is
exceeded. Refer to Conguraon Notes and Feature Limitaons for IP Source Guard on page 92 for more informaon on the
recommended number of entries for RUCKUS ICX devices.
• DHCP snooping is not supported along with DHCP auto-conguraon.
• When a client moves from one port to another port in the same VLAN, the old snoop entry for the client MAC address is automacally
updated. This occurs even when the client acquires a new IP address. In previous releases, two snoop entries were maintained with both
the old IP address and the new IP address.
• Duplicate IP entries across VLANs are allowed in the DHCP snooping table. When a client moves from one VLAN to another and acquires
the same address, two snooping entries are maintained for the same MAC address and IP address.
• Layer 2 MAC movement is supported.
• ACLs are supported on member ports of a VLAN on which DHCP snooping and Dynamic ARP Inspecon (DAI) are enabled. Refer to Client
IP-to-MAC address mappings on page 78 for more informaon. In previous releases, these were mutually exclusive.
• DHCP snooping supports DHCP relay agent informaon (DHCP opon 82). Refer to DHCP Relay Agent Informaon and Opon 82 Inseron
on page 83 for more informaon.
• For default VLAN ID changes, DHCP snooping must be re-applied on the new default VLAN. DHCP snooping is not automacally congured
on the new default VLAN. Therefore, when DHCP Snooping is congured for the default VLAN (for example, VLAN 1), if the default VLAN is
changed from VLAN 1 to VLAN 4000, the DHCP Snooping conguraons remain congured on the old default VLAN 1. The DHCP Snooping
conguraons are not automacally congured on the new default VLAN 4000. In previous releases, DHCP Snooping conguraons were
automacally removed from the old default VLAN and automacally moved to the new default VLAN.
• DHCP snooping cannot be enabled for a VLAN that is a member of a VLAN group.
• DHCP snooping doesn't depend on MAC learning and MAC collisions. However, the total number of client(s) or host(s) in a system is
limited by the system MAX limits for Layer 2 MAC Addresses.
• DHCP snooping entries learnt on a member port of a VLAN are deleted except for exible authencaon enabled ports, if the port is
removed from the membership of that VLAN.
• DHCP Snooping can be congured for a VLAN or VLANS even before the VLAN or VLANS are created. VLANs and DHCP Snooping
conguraons on the VLANS are not automacally deleted when the VLAN is deleted.
• When DHCP Snooping is enabled, client and server packets are not allowed on same port.
• DHCP snooping can be congured on a maximum of 511 VLANs.
DHCPv4
DHCP Snooping
RUCKUS FastIron DHCP Conguraon Guide, 08.0.95
Part Number: 53-1005654-01 79
• When conguring DHCP snooping on a range of VLANs or mul-VLAN, there cannot not be any VLAN in the range that is a member of a
VLAN group or any reserved VLAN. Otherwise, onguraon will be rejected for the enre range.
Conguring DHCP Snooping
DHCP snooping can be enabled on VLANs, aer which the trust seng of ports connected to a DHCP server must be changed to trusted. DHCP
packets for a VLAN with DHCP snooping enabled are inspected.
NOTE
DHCP snooping is disabled by default. When enabled, the trust seng of ports is "untrusted" by default. DHCP snooping must be enabled
on the client and the DHCP server VLANs.
NOTE
DHCP Snooping can be congured for a VLAN or VLANS even before the VLAN or VLANS are created. VLANs and DHCP Snooping
conguraons on the VLANS are not automacally deleted when the VLAN is deleted.
1. Enter global conguraon mode by using the congure terminal command.
device# configure terminal
2. Enable DHCP snooping on a VLAN.
device(config)# ip dhcp snooping vlan 2
3. Change the trust seng of the ports that are connected to the DHCP server to trusted at the interface conguraon level.
device(config-if-e10000-1/1/1)# dhcp snooping trust
4. If required, disable the learning of DHCP clients on ports at the interface conguraon level. Disabling the learning of DHCP clients can be
congured on a range of ports as well.
device(config-if-e10000-1/1/1)# dhcp snooping client-learning disable
5. Clear the DHCP binding database. You can remove all entries in the database or for a specic IP address only.
The rst command removes all entries from the DHCP binding database and the second removes entries for a specic IP address.
device# clear dhcp
device# clear dhcp 10.10.102.4
The following example congures VLAN 2 and VLAN 20, and enables DHCP snooping on the two VLANs.
device(config)# vlan 2
device(config-vlan-2)# untagged ethernet 1/1/3 to 1/1/4
device(config-vlan-2)# router-interface ve 2
device(config-vlan-2)# exit
device(config)# ip dhcp snooping vlan 2
device(config)# vlan 20
device(config-vlan-20)# untagged ethernet 1/1/1 to 1/1/2
device(config-vlan-20)# router-interface ve 20
device(config-vlan-20)# exit
device(config)# ip dhcp snooping vlan 20
On VLAN 2, client ports 1/1/3 and 1/1/4 are untrusted. By default all client ports are untrusted. Therefore, only DHCP client request packets
received on ports 1/1/3 and 1/1/4 are forwarded. On VLAN 20, ports 1/1/1 and 1/1/2 are connected to a DHCP server. DHCP server ports are set to
trusted.
DHCPv4
DHCP Snooping
RUCKUS FastIron DHCP Conguraon Guide, 08.0.95
80 Part Number: 53-1005654-01
device(config)# interface ethernet 1/1/1
device(config-if-e10000-1/1/1)# dhcp snooping trust
device(config-if-e10000-1/1/1)# exit
device(config)# interface ethernet 1/1/2
device(config-if-e10000-1/1/2)# dhcp snooping trust
device(config-if-e10000-1/1/2)# exit
Thus, DHCP server reply packets received on ports 1/1/1 and 1/1/2 are forwarded, and client IP address and MAC address binding informaon is
collected. The example also sets the DHCP server address for the local relay agent.
device(config)# interface ve 2
device(config-vif-2)# ip address 10.20.20.1/24
device(config-vif-2)# ip helper-address 1 10.30.30.4
device(config-vif-2)# interface ve 20
device(config-vif-20)# ip address 10.30.30.1/24
Conguring DHCP Snooping on Mulple VLANs
DHCP snooping can be enabled on mulple VLANs using one command. The following task congures mulple VLANs and enables DHCP snooping
on most of the congured VLANs using a single command.
NOTE
DHCP snooping can be congured on a maximum number of 511 VLANs at one me.
NOTE
DHCP Snooping can be congured for a VLAN or VLANS even before the VLAN or VLANS are created. VLANs and DHCP Snooping
conguraons on the VLANS are not automacally deleted when the VLAN is deleted.
NOTE
When conguring DHCP snooping on a range of VLANs or mul-VLAN, there cannot not be any VLAN in the range that is a member of a
VLAN group or any reserved VLAN. Otherwise, conguraons fail on the enre range.
1. Enter global conguraon mode.
device# configure terminal
2. Congure the port-based VLANs.
device(config)# vlan 100 to 150
3. Add port Ethernet 1/1/12 as a tagged port.
device(config-mvlan-100-150)# tagged ethernet 1/1/12
4. Use the exit command to return to global conguraon mode.
device(config-mvlan-100-150)# exit
5. Congure more port-based VLANs.
device(config)# vlan 151 to 200
6. Add port Ethernet 1/1/12 as a tagged port.
device(config-mvlan-151-200)# tagged ethernet 1/1/12
DHCPv4
DHCP Snooping
RUCKUS FastIron DHCP Conguraon Guide, 08.0.95
Part Number: 53-1005654-01 81
7. Use the exit command to return to global conguraon mode.
device(config-mvlan-151-200)# exit
8. Use the ip dhcp snooping command with the to keyword, specifying a VLAN range, to enable DHCP snooping on mulple VLANs.
device(config)# ip dhcp snooping vlan 100 to 150 160 170 to 200
9. Change the trust seng of the ports that are connected to the DHCP server to trusted at the interface conguraon level.
a) To enable trust on a port, enter interface conguraon mode.
device(config)# interface ethernet 1/1/12
b) Enable trust on the port.
device(config-if-e10000-1/1/12)# dhcp snooping trust
The following example congures VLANs 100 through 200, and enables DHCP snooping on VLANs 100 through 150, VLAN 160, and VLANs 170
through 200.
device# configure terminal
device(config)# vlan 100 to 150
device(config-mvlan-100-150)# tagged ethernet 1/1/12
device(config-mvlan-100-150)# exit
device(config)# vlan 151 to 200
device(config-mvlan-151-200)# tagged ethernet 1/1/12
device(config-mvlan-100-150)# exit
device(config)# ip dhcp snooping vlan 100 to 150 160 170 to 200
device(config)# interface ethernet 1/1/12
device(config-if-e10000-1/1/12)# dhcp snooping trust
Displaying DHCPv4 Snooping Informaon
You can use various show commands to view informaon about DHCPv4 snooping.
Use one of the following commands to view DHCPv4 snooping informaon. The commands do not need to be entered in the specied order.
1. Display the DHCP snooping learned entries.
device> show ip dhcp snooping info
Dhcp snooping Info
Total Learnt Entries 1
Learnt DHCP Snoop Entries
IP Address Mac Address Port/Lag Vlan lease VRF
1.1.0.4 00c7.0400.0001 1/2/4 1 3597 default-vrf
…
2. Display the DHCP snooping status for a VLAN and the trusted and untrusted ports in the VLAN.
device> show ip dhcp snooping vlan 2
IP DHCP snooping VLAN 2: Enabled
3. Display the DHCP snooping binding database.
device> show ip dhcp snooping
IP DHCP snooping enabled on 24 VLAN(s):
VLAN(s): 1001 to 1024
DHCPv4
DHCP Snooping
RUCKUS FastIron DHCP Conguraon Guide, 08.0.95
82 Part Number: 53-1005654-01
Conguring DHCPv4 Snooping for Mul-VRF
DHCP supports Mul-VRF. You can deploy mulple Virtual Roung and Forwarding instances (VRFs) on a RUCKUS Ethernet switch. Each VLAN with a
Virtual Ethernet (VE) interface is assigned to a VRF.
You can enable DHCP snooping on individual VLANs and assign any interface as the DHCP trust interface. If an interface is a tagged port in this VLAN,
you can turn on the trust port per VRF, so that trac intended for other VRF VLANs is not trusted.
1. Enter global conguraon mode using the congure terminal command.
device# configure terminal
2. Congure DHCP snooping on a specic VLAN.
device(config)# ip dhcp snooping vlan 2
3. Set the port as a trusted port. The trust port seng for DHCP snooping can be specied per VRF.
device(config)# interface ethernet 1/1/4
device(config-if-e10000-1/1/4)# dhcp snooping trust vrf vrf2
The default trust seng for a port is untrusted. For ports that are connected to host ports, leave their trust sengs as untrusted.
4. Congure the IP helper address on the client port if the client and server are in the same VLAN and the client and server ports are Layer 3
interfaces with IP addresses.
device(config)# interface ve 2
device(config-vif-2)# ip helper-address 1 10.1.1.2
If the client and server are in dierent VLANs, congure the server port as the trust port.
5. Clear any entry specic to a VRF instance, as required.
device(config)# clear dhcp 10.3.3.5 vrf one
DHCP Relay Agent Informaon and Opon 82 Inseron
DHCP relay agent informaon, also known as DHCP opon 82, enables a DHCP relay agent to insert informaon about a client's identy into a DHCP
client request being sent to a DHCP server. This opon can be used to assist DHCP servers to implement dynamic address policy.
The RUCKUS device inserts DHCP opon 82 when relaying DHCP request packets to DHCP servers. When DHCP server reply packets are forwarded
back to DHCP clients, and sub-opon 2 as as Remote ID (RID) matches the local port MAC address, then DHCP opon 82 is deleted. The VLAN and
port informaon is used to forward the DHCP reply.
DHCP packets use the following process:
• Before relaying a DHCP discovery packet or DHCP request packet from a client to a DHCP server, the ICX switch adds agent informaon to
the packet.
• Before relaying a DHCP reply packet from a DHCP server to a client, the ICX switch removes relay agent informaon from the packet.
The DHCP relay agent (the FastIron switch) inserts DHCP opon 82 aributes when relaying a DHCP request packet to a DHCP server.
DHCPv4
DHCP Relay Agent Informaon and Opon 82 Inseron
RUCKUS FastIron DHCP Conguraon Guide, 08.0.95
Part Number: 53-1005654-01 83

FIGURE 13 DHCP Opon 82 Aributes Added to the DHCP Packet
The ICX switch deletes DHCP opon 82 aributes before forwarding a server reply packet back to a DHCP client.
FIGURE 14 DHCP Opon 82 Aributes Removed from the DHCP Packet
DHCP opon 82 inseron or deleon is available only when DHCP snooping is enabled on both client and server ports.
Conguraon Notes for DHCP Opon 82
• DHCP snooping and DHCP opon 82 are supported on a per-VLAN basis.
• DHCP opon 82 follows the same conguraon rules and limitaons described for DHCP snooping. For more informaon, refer to
Conguraon Notes and Feature Limitaons for DHCP Snooping on page 79.
• Opon-82 can be disabled or re-enabled on mulple VLANs or a range of VLANS using a single command, ip dhcp snooping relay
informaon disable.
DHCPv4
DHCP Relay Agent Informaon and Opon 82 Inseron
RUCKUS FastIron DHCP Conguraon Guide, 08.0.95
84 Part Number: 53-1005654-01

DHCP Opon 82 Sub-opons
The RUCKUS implementaon of DHCP opon 82 supports the following sub-opons:
• Sub-opon 1: Circuit ID
• Sub-opon 2: Remote ID
• Sub-opon 6: Subscriber ID
Sub-opon 1: Circuit ID
The Circuit ID (CID) idenes the circuit or port from which a DHCP client request was sent. The ICX switch uses this informaon to relay DHCP
responses back to the proper circuit; for example, the port number on which the DHCP client request packet was received.
RUCKUS ICX devices support the general CID packet format. This simple format encodes the CID type, actual informaon length, VLAN ID, slot
number, and port number. This format is compable with the format used by other vendors’ devices. The following gure illustrates the general CID
packet format.
FIGURE 15 General CID Packet Format
Sub-opon 2: Remote ID
The Remote ID (RID) idenes the remote host end of the circuit (the relay agent). RUCKUS devices use the MAC address to idenfy itself as the
relay agent. The following gure illustrates the RID packet format.
FIGURE 16 RID Packet Format
Sub-opon 6: Subscriber ID
The Subscriber ID (SID) is a unique idencaon number that enables an Internet Service Provider (ISP) to perform the following acons:
• Idenfy a subscriber
• Assign specic aributes to that subscriber (for example, host IP address, subnet mask, and domain name server.
DHCPv4
DHCP Relay Agent Informaon and Opon 82 Inseron
RUCKUS FastIron DHCP Conguraon Guide, 08.0.95
Part Number: 53-1005654-01 85

• Trigger accounng
The following gure illustrates the SID packet format.
FIGURE 17 SID Packet Format
The second byte (N in the gure) is the length of the ASCII string that follows. The ICX switch supports up to 50 ASCII characters.
DHCP Opon 82 Conguraon
DHCP opon 82 is automacally enabled when you enable DHCP snooping on a VLAN. There are no addional conguraon steps to enable DHCP
opon 82. Refer to Conguring DHCP Snooping on page 80 to enable DHCP snooping.
When processing DHCP packets, the ICX device applies the following default behavior when DHCP opon 82 is enabled:
• Subjects all ports in the VLAN to DHCP opon 82 processing
• Uses the general CID packet format
• Uses the standard RID packet format
• Replaces relay agent informaon received in DHCP packets with its own informaon
• Does not enable SID processing
When DHCP opon 82 is enabled, you can oponally:
• Disable DHCP opon 82 processing on individual ports in the VLAN, on all ports of the VLAN, or globally on all VLANs.
• Congure the device to drop the DHCP packet with exisng relay agent Informaon, or keep the relay agent informaon in a DHCP packet
instead of replacing it with its own Informaon.
• Congure Subscriber ID (SID), Circuit ID (CID) or Remote ID (RID) processing.
The following table details the supported conguraon and expected funconality for DHCP opon 82.
TABLE 7 DHCP Opon 82 Supported Conguraon
Conguraon Port-Cong VLAN-Cong Global-Cong Funconality
Default. Enable Enable Enable Opon 82 enabled
Disabled globally. Disable Disable Disable Opon 82 disabled
Disabled globally, enabled on
port.
Enable Enable Disable Opon 82 enabled
Disabled globally, enabled on
port, disabled on VLAN.
Enable Disable Disable Opon 82 enabled
Enabled globally, enabled on
port, disabled on VLAN.
Enable Disable Enable Opon 82 disabled
Enabled globally, disabled on
port, disabled on VLAN.
Disable Disable Enable Opon 82 disabled
Enabled globally, disabled on
port, enabled on VLAN.
Disable Enable Enable Opon 82 disabled
DHCPv4
DHCP Relay Agent Informaon and Opon 82 Inseron
RUCKUS FastIron DHCP Conguraon Guide, 08.0.95
86 Part Number: 53-1005654-01

TABLE 7 DHCP Opon 82 Supported Conguraon (connued)
Conguraon Port-Cong VLAN-Cong Global-Cong Funconality
Disabled globally, disabled on
port, disabled on VLAN.
Disable Disable Disable Opon 82 disabled
Disabling or Re-enabling DHCP Opon 82 Processing on an Interface
By default, when DHCP opon 82 is enabled on a VLAN, DHCP packets received on all member ports of the VLAN are subject to DHCP opon 82
processing. You can disable or re-enable this processing on one or more member ports of the VLAN.
DHCP opon 82 is automacally enabled when you enable DHCP snooping on the VLAN.
1. To disable DHCP opon 82, enter global conguraon mode by using the congure terminal command.
device# configure terminal
2. Enter interface conguraon mode.
device(config)# interface ethernet 1/1/4
3. Disable DHCP opon 82 on the interface.
device(config-if-e1000-1/1/4)# no dhcp snooping relay information
4. Re-enable DHCP opon 82 as required at the interface conguraon level.
device(config-if-e1000-1/1/4)# dhcp snooping relay information
5. You can also re-enable DHCP opon 82 aer it has been disabled on a range of ports. First, specify the range of ports at the global
conguraon level and then enter the dhcp snooping relay informaon command.
device(config)# interface ethernet 1/1/1 to 1/1/5
device(config-mif-1/1/1-1/1/5)# dhcp snooping relay information
The following example disables DHCP opon 82.
device# configure terminal
device(config)# interface ethernet 1/1/4
device(config-if-e1000-1/1/4)# no dhcp snooping relay information
The following example re-enables DHCP opon 82 at the interface conguraon level.
device# configure terminal
device(config)# interface ethernet 1/1/4
device(config-if-e1000-1/1/4)# dhcp snooping relay information
The following example re-enables DHCP opon 82 on a range of ports.
device(config)# interface ethernet 1/1/1 to 1/1/5
device(config-mif-1/1/1-1/1/5)# dhcp snooping relay information
Disabling DHCP Opon 82 Globally and Re-enabling It for an Interface
By default, when DHCP opon 82 is enabled on a VLAN, DHCP packets received on all member ports of the VLAN are subject to DHCP opon 82
processing. You can disable or re-enable this processing globally for all VLANs. The following task disables DHCP opon 82 globally for all VLANs so
that it is not enabled when DHCP snooping is congured for VLAN 100. It then re-enables DHCP opon 82 for a specied Ethernet interface.
DHCPv4
DHCP Relay Agent Informaon and Opon 82 Inseron
RUCKUS FastIron DHCP Conguraon Guide, 08.0.95
Part Number: 53-1005654-01 87
DHCP opon 82 is automacally enabled when you enable DHCP snooping on the VLAN.
1. Enter global conguraon mode.
device# configure terminal
2. Use the ip dhcp snooping relay informaon disable command to disable DHCP opon 82 globally for all ports and VLANs.
device(config)# ip dhcp snooping relay information disable
3. Use the ip dhcp snooping command and specify a VLAN to congure DHCP snooping for the VLAN.
device(config)# ip dhcp snooping vlan 100
DHCP opon 82 is not enabled when DHCP snooping is congured for VLAN 100.
4. Enter interface conguraon mode.
device(config)# interface ethernet 1/1/1
5. Re-enable DHCP opon 82 as required at the interface conguraon level.
device(config-if-e1000-1/1/1)# dhcp snooping relay information
The following example disables DHCP opon 82 globally for all ports and VLANs so that it is not enabled when DHCP snooping is congured for
VLAN 100.
device# configure terminal
device(config)# ip dhcp snooping relay information disable
device(config)# ip dhcp snooping vlan 100
The following example disables DHCP opon 82 globally for all ports and VLANS, and re-enables it for interface Ethernet 1/1/1.
device# configure terminal
device(config)# ip dhcp snooping relay information disable
device(config)# ip dhcp snooping vlan 100
device(config)# interface ethernet 1/1/1
device(config-if-e1000-1/1/1)# dhcp snooping relay information
The following example disables DHCP opon 82 for VLAN 100 aer it was automacally enabled when DHCP snooping was congured for VLANs
100, 200, and 300.
device# configure terminal
device(config)# ip dhcp snooping vlan 100 to vlan 300
device(config)# ip dhcp snooping relay information disable vlan 100
Disabling or Re-enabling DHCP Opon 82 Processing on all VLAN Member Ports
You can disable or re-enable DHCP opon 82 processing globally, and disable and re-enable as necessary on specied VLANs. The following task
disables DHCP opon 82 globally. IP DHCP snooping is then enabled for VLANs 100, 200, and 300, but DHCP opon 82 is not automacally enabled
because it has been disabled globally. DHCP opon 82 is then re-enabled on all ports for VLAN 100.
1. Enter global conguraon mode.
device# configure terminal
2. Use the ip dhcp snooping relay informaon disable command to disable DHCP opon 82 globally for all VLANs.
device(config)# ip dhcp snooping relay information disable
DHCPv4
DHCP Relay Agent Informaon and Opon 82 Inseron
RUCKUS FastIron DHCP Conguraon Guide, 08.0.95
88 Part Number: 53-1005654-01
3. Use the ip dhcp snooping command, specifying VLANs as required, to congure DHCP snooping for the specied VLANs.
device(config)# ip dhcp snooping vlan 100 to 300
4. Enable DHCP opon 82 on all ports for VLAN 100.
device(config)# no ip dhcp snooping relay information disable vlan 100
The following example disables DHCP opon 82 globally and enables IP DHCP snooping for VLANs 100 through 300. DHCP opon 82 is then disabled
on all ports for VLAN 100.
device# configure terminal
device(config)# ip dhcp snooping relay information disable
device(config)# ip dhcp snooping vlan 100 to 300
device(config)# no ip dhcp snooping relay information disable vlan 100
The following example automacally enables DHCP opon 82 for VLANs 100, 200, and 300. It then disables DHCP opon 82 globally for all ports on
VLAN 100.
device# configure terminal
device(config)# ip dhcp snooping vlan 100 to 300
device(config)# ip dhcp snooping relay information disable vlan 100
The following example disables DHCP opon 82 globally for all VLANs and ports.
device# configure terminal
device(config)# ip dhcp snooping vlan 100 to 300
device(config)# ip dhcp snooping relay information disable
Warning - DHCP snooping relay information will be disabled on all port(s) & VLAN(s). You can enable it on
individual ports/VLAN(s)
device(config)#
The following example disables DHCP opon 82 globally for all ports and VLANs and re-enables it for VLAN 100.
device# configure terminal
device(config)# ip dhcp snooping vlan 100 to 500
device(config)# ip dhcp snooping relay information disable
Warning - DHCP snooping relay information will be disabled on all port(s) & VLAN(s). You can enable it on
individual ports/VLAN(s)
device(config)# no ip dhcp snooping relay information disable vlan 100
The following example enables DHCP opon 82 for a specied range of VLANs.
device# configure terminal
device(config)# ip dhcp snooping relay information disable vlan 11 to 15
Changing the DHCP Relay Agent Forwarding Policy
When the device receives a message containing relay agent informaon, by default the device replaces the informaon with its own relay agent
informaon. This behavior can be changed if required.
You can congure the device to keep the informaon instead of replacing it, or to drop (discard) messages that contain relay agent informaon.
1. Enter global conguraon mode by using the congure terminal command.
device# configure terminal
2. Congure the device to keep the relay agent informaon contained in a DHCP message.
device(config)# ip dhcp relay information policy keep
DHCPv4
DHCP Relay Agent Informaon and Opon 82 Inseron
RUCKUS FastIron DHCP Conguraon Guide, 08.0.95
Part Number: 53-1005654-01 89
3. Alternately, congure the device to drop the DHCP packet with exisng relay agent Informaon.
device(config)# ip dhcp relay information policy drop
4. Congure the device back to the default behavior if required.
device(config)# ip dhcp relay information policy replace
Conguring DHCP Snooping Relay Informaon Sub-opons
You can congure DHCP relay agent sub-opons such as the Subscriber ID (SID), Circuit ID (CID) or Remote ID (RID) opons.
1. Enter global conguraon mode.
device# configure terminal
2. Enable DHCP snooping and DHCP opon 82 on a VLAN.
device(config)# ip dhcp snooping vlan 1
3. Enter interface conguraon mode for port 1/1/4.
device(config)# interface ethernet 1/1/4
4. Enable interface 1/1/4 to insert the SID, CID, or RID informaon in the DHCP packets.
device(config-if-e1000-1/1/4)# dhcp snooping relay information subscriber-id Brcd01
In the example, the SID is Brcd01.
The following example enables interface 1/1/4 to insert the CID informaon in the DHCP packets.
device(config-if-e1000-1/1/4)# dhcp snooping relay information circuit-id circuit01
The following example enables interface 1/1/4 to insert the RID informaon in the DHCP packets.
device(config-if-e1000-1/1/4)# dhcp snooping relay information remote-id remote01
Displaying DHCP Opon 82 Informaon
You can use various show commands to view informaon about DHCP opon 82 processing.
Use one of the following commands to view DHCP opon 82 processing. The commands do not need to be entered in the specied order.
1. Enter the show ip dhcp relay informaon command to display informaon about the Circuit ID, Remote ID, and forwarding policy for
DHCP Opon 82.
device(config)# show ip dhcp relay information
Relay Agent Information: format: Circuit-ID: vlan-port
Remote-ID : stack mac
Policy : replace
2. Enter the show ip dhcp snooping vlan command to display informaon about the trusted ports, untrusted ports, and ports on which
DHCP opon 82 is disabled.
device# show ip dhcp snooping vlan 1
IP DHCP snooping VLAN 1: Enabled
Trusted Ports : ethe 3
Untrusted Ports : ethe 1 to 2 ethe 4 to 24
Relay Info. disabled Ports: ethe 10
DHCPv4
DHCP Relay Agent Informaon and Opon 82 Inseron
RUCKUS FastIron DHCP Conguraon Guide, 08.0.95
90 Part Number: 53-1005654-01
3. Enter the show interfaces ethernet command.
device# show interfaces ethernet 1/1/1
GigabitEthernet1/1/1 is up, line protocol is up
Port up for 40 minutes 10 seconds
Hardware is GigabitEthernet, address is 0000.0000.0002 (bia 0000.0000.0002)
Configured speed auto, actual 1Gbit, configured duplex fdx, actual fdx
Configured mdi mode AUTO, actual MDI
Member of L2 VLAN ID 1, port is untagged, port state is FORWARDING
BPDU guard is Disabled, ROOT protect is Disabled
Link Error Dampening is Disabled
STP configured to ON, priority is level0
Flow Control is config enabled, oper enabled, negotiation disabled
mirror disabled, monitor disabled
Not member of any active trunks
Not member of any configured trunks
No port name
IPG MII 96 bits-time, IPG GMII 96 bits-time
IP MTU 1500 bytes
300 second input rate: 0 bits/sec, 0 packets/sec, 0.00% utilization
300 second output rate: 264 bits/sec, 0 packets/sec, 0.00% utilization
0 packets input, 0 bytes, 0 no buffer
Received 0 broadcasts, 0 multicasts, 0 unicasts
0 input errors, 0 CRC, 0 frame, 0 ignored
0 runts, 0 giants
0 packets output, 0 bytes, 0 underruns
Transmitted 0 broadcasts, 0 multicasts, 0 unicasts
0 output errors, 0 collisions
Relay Agent Information option: Enabled, Subscriber-ID: Ruckus001
The output shows that DHCP opon 82 is enabled on the device and the congured Subscriber ID is Ruckus001.
NOTE
The port up or down me is required only for physical ports and not for loopback, VE, or tunnel ports.
Conguring the Source IP Address of a DHCP Client Packet on the DHCP Relay Agent
You can enable the DHCP server to know the source subnet or network of a DHCP client packet.
By default, a DHCP relay agent forwards a DHCP client packet with the source IP address set to the IP address of the outgoing interface to the DHCP
server. You can congure ACLs on a DHCP server to provide or block DHCP services to parcular subnets or networks. The ip bootp-use-in-ip
command congures a DHCP relay agent to set the source IP address of a DHCP client packet with the IP address of the incoming interface for the
packet. This reveals the source subnet or network of a DHCP client packet to the DHCP server and enables the DHCP server to process or discard the
DHCP trac according to the congured ACLs.
Enter the ip bootp-use-in-ip command in global conguraon mode of the DHCP relay agent.
device(config)# ip bootp-use-intf-ip
IP Source Guard
You can use IP Source Guard (IPSG) together with Dynamic ARP Inspecon (DAI) on untrusted ports.
The RUCKUS implementaon of the IPSG technology supports conguraon on a port and specic VLAN memberships on a port.
When IPSG is rst enabled, only DHCP packets are allowed, while all other IP trac is blocked. IP Source Guard allows IP trac when the system
learns valid IP addresses. The system learns of a valid IP address from DHCP snooping.
When a new IP source entry binding on the port is created or deleted, an access-list with a permit lter for the IP address is added or deleted. By
default, if IPSG is enabled without any IP source binding on the port, an ACL that denies all IP trac is loaded on the port.
DHCPv4
IP Source Guard
RUCKUS FastIron DHCP Conguraon Guide, 08.0.95
Part Number: 53-1005654-01 91

Conguraon Notes and Feature Limitaons for IP Source Guard
The following conguraon notes and feature limitaons apply to IP Source Guard (IPSG):
• IPSG is supported on LAGs.
• If you change the default VLAN ID when IPSG is enabled on a LAG, then IPSG is not inherited. All IPSG conguraon is lost for the VLAN if
the default VLAN ID is changed.
• IPSG funcons across reload.
• RUCKUS ICX devices do not support IPSG and dynamic ACLs on the same port.
• RUCKUS devices do not support IPSG with ingress IPv4 ACLs for the same port, neither at VLAN-level, port-level, or across dierent levels.
For ports with IPSG enabled, a special ingress IPv4 ACL viz SGACL has been introduced. Therefore, IPSG and SG ACL can be congured for
the same port.
• When IPSG is enabled for a LAG at the VLAN-level or VLAG-interface-level, IPSG entries learned on the LAG ports remain intact if the non-
last member port of lag is removed. However, when the last member port is removed, it causes the LAG to undeploy. In that case, the
IPSG entry is also ushed out.
• IPSG is not supported for VLAN groups. If upgrading from FastIron 08.0.92 to FastIron 08.0.95, IPSG is not congured for a VLAN group,
even if this was previously congured.
• IPSG is not supported for VE interfaces.
• When conguring IPSG on a range of ports, the conguraon succeeds on all valid ports.
• IPSG and IPv6 ACLs are supported for the same port.
• IP Source Guard cannot be enabled on a per-port-per-VLAN basis.
• IPSG can be enabled on tagged ports or untagged ports in a VLAN.
• IPSG snooping can be congured on a maximum of 511 VLANs.
• For router images, IPSG cannot be congured in interface subtype conguraon mode for tagged ports of a VLAN.
• IPSG and ACLs are supported together on the same device, as long as they are not congured on the same port or VLAN. If IPSG is enabled
for a port, VLAN, or interface level, ACLs cannot be applied to inbound trac on the port for the VLAN or interface using the ip access-
group command. When IPSG is congured for a port at the VLAN or interface level, an error will occur if you aempt to apply an ACL to
inbound trac. To bind an IPSG ACL to an interface for incoming trac, use the ip sg-access-group command. Refer to the ip sg-access-
group command in the RUCKUS FastIron Command Reference command for more informaon.
• If IPSG is congured for a specied port for a VLAN, it cannot be congured globally for the VLAN. Beginning with FastIron 08.0.40a, IPSG
can be enabled with Flexible Authencaon using the authencaon source-guard-protecon enable command. Refer to the RUCKUS
FastIron Security Conguraon Guide for more informaon.
• For ICX 7750 plaorms, it is not possible to bind IPSG ACLs for interfaces or VLANs when IPSG ACLs are created with a TCP or UDP protocol
lter that has the “neq” opon on both the source and desnaon addresses.
• Some RUCKUS devices with lesser TCAM (such as the ICX 7150) are limited to 256 IPSG entries. The scaling number of 256 entries per port
in the ICX 7150 and 512 entries per port in the other plaorms is not guaranteed and depends on the rules regarding free TCAM. The
amount of free TCAM determines the number of allowed IPSG entries because IPSG is programmed in the TCAM and there are fewer
TCAM rules.
• The recommended number of entries for RUCKUS ICX devices is outlined in the following table:.
TABLE 8
Recommneded Number of Entries for Ruckus ICX Devices
Devices Recommended Maximum Number of IPSG Entries Per Device
RUCKUS ICX 7150 512
RUCKUS ICX 7250 3072
RUCKUS ICX 7450 2816
DHCPv4
IP Source Guard
RUCKUS FastIron DHCP Conguraon Guide, 08.0.95
92 Part Number: 53-1005654-01

TABLE 8 Recommneded Number of Entries for Ruckus ICX Devices (connued)
Devices Recommended Maximum Number of IPSG Entries Per Device
RUCKUS ICX 7550 2048
RUCKUS ICX 7650 4096
RUCKUS ICX 7750 2048
RUCKUS ICX 7850 1526
The recommended maximum number of IPSG entries for the stacking system for RUCKUS ICX 7250, ICX 7450, ICX 7750, ICX 7650, ICX
7750, and ICX 7850 devices is 8192.
• When IPSG and DHCP snooping are enabled on SPX Virtual (PE) ports and DHCP clients are learned on the port, system performance may
be degraded if more than 256 clients are learned on the same port. This is applicable for all plaorms used as PE ports.
• You can enable IPSG on a range of ports within a given slot only. Enabling IPSG across mulple slots is not supported.
• If you enable IPSG in a network topology that has DHCP clients, you must also enable DHCP snooping. If you do not enable DHCP
snooping, all IP trac, including DHCP packets, is blocked.
• If you enable IIPSG in a network topology that does not have DHCP clients, you must create an IP source binding for each client that is
allowed access to the network. Data packets are blocked if you do not create an IP source binding for each client.
• IPSG protecon enables concurrent support with MAC authencaon.
• IPSG supports mul-VRF instances.
• Rate-liming based on source IP address cannot be combined with IPSG. Thus, a xed rate-limit input cannot be congured when IPSG is
enabled on the port.
Enabling IP Source Guard on a Port or Range of Ports
IP Source Guard is disabled by default. You can enable IP Source Guard on DHCP snooping untrusted ports.
1. Enter global conguraon mode.
device# configure terminal
2. Enter interface conguraon mode.
device(config)# interface ethernet 1/1/1
3. Enable IP Source Guard on the port.
device(config-if-e10000-1/1/1)# source-guard enable
4. To enable IP Source Guard on a range of ports, enter interface conguraon mode and specify the range of ports.
device(config-if-e10000-1/1/1)# interface ethernet 1/1/21 to 1/1/25
When enabling IP Source Guard on a range of ports, you can choose only a range of ports within a given slot.
5. Enable IP Source Guard on the range of ports specied in the previous step.
device(config-mif-1/1/21-1/1/25)# source-guard enable
NOTE
If you try to congure IP Source Guard across dierent modules, the following error message displays.
device(config)# interface ethernet 2/1/10 to 12/1/10
Error - cannot configure multi-ports on different slot
DHCPv4
IP Source Guard
RUCKUS FastIron DHCP Conguraon Guide, 08.0.95
Part Number: 53-1005654-01 93
Dening Stac IP Source Bindings
You can manually enter valid IP addresses in the binding database.
Note that because stac IP source bindings consume system resources, you should avoid unnecessary bindings.
1. Enter global conguraon mode.
device# configure terminal
2. Enter the ip source binding command followed by a valid IP address and the interface number. Entering the VLAN number is oponal.
device(config)# ip source binding 10.10.10.1 ethernet 1/2/4 vlan 4
If you enter a VLAN number, the binding applies to that VLAN only. If you do not enter a VLAN number, the stac binding applies to all
VLANs associated with the port.
Enabling IP Source Guard for a VLAN
You can enable IP Source Guard (IPSG) on a switch or a router for a range of ports in a VLAN or on the enre VLAN.
1. Enter global conguraon mode.
device# configure terminal
2. Congure the port-based VLAN.
device(config)# vlan 12
3. Add ports Ethernet 1/1/5 through 1/1/8 as untagged ports.
device(config-vlan-12)# untagged ethernet 1/1/5 to 1/1/8
4. Add ports Ethernet 1/1/23 through Ethernet 1/1/24 as tagged ports.
device(config-vlan-12)# tagged ethernet 1/1/23 to 1/1/24
5. Enable IPSG on the tagged ports.
device(config-vlan-12)# source-guard enable ethernet 1/1/23 to 1/1/24
The following example congures IPSG on a VLAN.
device# configure terminal
device(config)# vlan 12
device(config-vlan-12)# untagged ethernet 1/1/5 to 1/1/8
device(config-vlan-12)# tagged ethernet 1/1/23 to 1/1/24
device(config-vlan-12)# source-guard enable ethernet 1/1/23 to 1/1/24
The following example congures IPSG on a single port on a VLAN.
device# configure terminal
device(config)# vlan 12
device(config-vlan-12)# untagged ethernet 1/1/5 to 1/1/8
device(config-vlan-12)# tagged ethernet 1/1/23 to 1/1/24
device(config-vlan-12)# source-guard enable ethernet 1/1/23
DHCPv4
IP Source Guard
RUCKUS FastIron DHCP Conguraon Guide, 08.0.95
94 Part Number: 53-1005654-01
The following example congures IPSG on all ports on a VLAN.
device# configure terminal
device(config)# vlan 12
device(config-vlan-12)# untagged ethernet 1/1/5 to 1/1/8
device(config-vlan-12)# tagged ethernet 1/1/23 to 1/1/24
device(config-vlan-12)# source-guard enable
The following example congures IPSG on a LAG interface on a VLAN.
device# configure terminal
device(config)# vlan 12
device(config-vlan-12)# untagged ethernet 1/1/5 to 1/1/8
device(config-vlan-12)# tagged ethernet 1/1/23 to 1/1/24
device(config-vlan-12)# source-guard enable lag 1
Enabling IP Source Guard for a LAG Port for a VLAN
You can enable IP Source Guard for a LAG port for a VLAN.
1. Enter global conguraon mode.
device# configure terminal
2. Congure the port-based VLAN.
device(config)# vlan 12
3. Add port LAG 9 as a tagged port.
device(config-vlan-12)# tagged lag 9
4. Enable Source Guard on the tagged port.
device(config-vlan-12)# source-guard enable lag 9
The following example congures IP Source Guard for a LAG port for a VLAN.
device# configure terminal
device(config)# vlan 12
device(config-vlan-12)# tagged lag 9
device(config-vlan-12)# source-guard enable lag 9
Enabling IP Source Guard on Mulple VLANs
You can enable IP Source Guard (IPSG) on a switch or a router for a range of ports in mulple VLANs or all ports on mulple VLANs. The following
task congures IPSG on a single port on mulple VLANs.
NOTE
IPSG snooping can be congured on a maximum of 511 VLANs.
1. Enter global conguraon mode.
device# configure terminal
2. Congure the port-based VLANs.
device(config)# vlan 100 to 150
DHCPv4
IP Source Guard
RUCKUS FastIron DHCP Conguraon Guide, 08.0.95
Part Number: 53-1005654-01 95
3. Add port Ethernet 1/1/12 as a tagged port.
device(config-mvlan-100-150)# tagged ethernet 1/1/12
4. Enable IPSG on the tagged port for mulple VLANs.
device(config-mvlan-100-150)# source-guard enable ethernet 1/1/12
The following example congures IPSG on a range of ports on mulple VLANs.
device# configure terminal
device(config)# vlan 100 to 150
device(config-mvlan-100-150)# tagged ethernet 1/1/23 to 1/1/24
device(config-mvlan-100-150)# source-guard enable ethernet 1/1/23 to 1/1/24
The following example congures IPSG on a single port on mulple VLANs.
device# configure terminal
device(config)# vlan 151 to 200
device(config-mvlan-151-200)# tagged ethernet 1/1/23
device(config-mvlan-151-200)# source-guard enable ethernet 1/1/23
The following example congures IPSG on all ports on mulple VLANs.
device# configure terminal
device(config)# vlan 151 to 200
device(config-mvlan-151-200)# tagged ethernet 1/1/23 to 1/1/24
device(config-mvlan-151-200)# source-guard enable
Binding IP Source Guard ACLs to Ports
You can bind IPv4 ACLs meant for IP Source Guard (IPSG) ports (SG ACL) to a port or VLAN. IP Source Guard ACLs can then be congured to allow
TCP trac and all UDP trac. The following task binds IPSG ACL sg-acl1 to port 1/1/2.
1. Enter global conguraon mode.
device# configure terminal
2. Congure an Ethernet Interface.
device(config)# interface ethernet 1/1/2
3. Enable IPSG on the port.
device(config-if-e1000/1/1/2)# source-guard enable
4. Bind the IPSG ACL to the port.
device(config-if-e1000/1/1/2)# ip sg-access-group sg-acl1 in
The following example binds IPSG ACL sg-acl1 to port 1/1/2.
device# configure terminal
device(config)# interface ethernet 1/1/2
device(config-if-e1000/1/1/2)# source-guard enable
device(config-if-e1000/1/1/2)# ip sg-access-group sg-acl1 in
The following example unbinds the ACL.
device# configure terminal
device(config)# interface ethernet 1/1/2
device(config-if-e1000/1/1/2)# no ip sg-access-group sg-acl1 in
DHCPv4
IP Source Guard
RUCKUS FastIron DHCP Conguraon Guide, 08.0.95
96 Part Number: 53-1005654-01
The following example binds an IPSG ACL for a VLAN interface.
device# configure terminal
device(config)# vlan 11
device(config-vlan-11)# source-guard enable
device(config-vlan-11)# ip sg-access-group sg-acl1 in
The following example denes IP Source Guard ACL sg123 to allow all TCP trac and all UDP trac.
device# configure terminal
device(config)# ip sg-access-list sg123
device(config-sg-sg123)# permit tcp any any
device(config-sg-sg123)# permit udp any any
device(config-sg-sg123)# exit
device(config)#
The following example denes IP Source Guard ACL sg456 to allow TCP trac desned for any port number from 100 through 200.
device# configure terminal
device(config)# ip sg-access-list sg456
device(config-sg-sg123)# permit tcp any range 100 200
device(config-sg-sg123)# exit
device(config)#
The following example binds IP Source Guard ACL sg-acl1 to port 1/1/2.
device# configure terminal
device(config)# interface ethernet 1/1/2
device(config-if-e1000/1/1/2)# source-guard enable
device(config-if-e1000/1/1/2)# ip sg-access-group sg-acl1
The following example unbinds the ACL.
device# configure terminal
device(config)# interface ethernet 1/1/2
device(config-if-e1000/1/1/2)# no ip sg-access-group sg-acl1
Displaying Learned IP Addresses
To display the learned IP addresses for IP Source Guard ports, use the show ip source-guard ethernet command.
device# show ip source-guard ethernet 1/1/48
Total IP Source Guard entries on port 1/1/48: 33
No Interface Type Flter-mode IP-address Vlan Static
-- --------- ---- ---------- ---------- ---- -------
1 1/1/48 ip active 15.15.15.127 1 Yes
2 1/1/48 ip active 15.15.15.9 1 No
3 1/1/48 ip active 15.15.15.10 1 No
4 1/1/48 ip active 15.15.15.11 1 No
5 1/1/48 ip active 15.15.15.12 1 No
6 1/1/48 ip active 15.15.15.13 1 No
7 1/1/48 ip active 15.15.15.14 1 No
8 1/1/48 ip active 15.15.15.15 1 No
9 1/1/48 ip active 15.15.15.16 1 No
10 1/1/48 ip active 15.15.15.17 1 No
NOTE
All stac entries in the IP source guard table will be populated as "Yes".
DHCPv4
IP Source Guard
RUCKUS FastIron DHCP Conguraon Guide, 08.0.95
Part Number: 53-1005654-01 97
RUCKUS FastIron DHCP Conguraon Guide, 08.0.95
98 Part Number: 53-1005654-01

DHCPv6
• DHCPv6 overview..................................................................................................................................................................... 99
• DHCP relay agent for IPv6.........................................................................................................................................................99
• DHCPv6 Snooping................................................................................................................................................................... 105
• DHCPv6 Server....................................................................................................................................................................... 111
DHCPv6 overview
The Dynamic Host Conguraon Protocol for IPv6 (DHCP) enables DHCP servers to pass conguraon parameters such as IPv6 network addresses to
IPv6 nodes.
The DHCPv6 protocol oers the capability of automac allocaon of reusable network addresses and addional conguraon exibility.
On FastIron devices, you can congure DHCPv6 snooping, the DHCPv6 relay agent, DHCPv6 relay include opons, the DHCPv6 Relay Agent Prex
Delegaon Nocaon, and DHCPv6 Servers.
DHCP relay agent for IPv6
A client locates a DHCPv6 server using a reserved, link-scoped mulcast address. Direct communicaon between the client and server requires that
they are aached by the same link. In some situaons where ease-of-management, economy, and scalability are concerns, you can allow a DHCPv6
client to send a message to a DHCPv6 server using a DHCPv6 relay agent.
A DHCPv6 relay agent, which may reside on the client link, but is transparent to the client, relays messages between the client and the server.
Mulple DHCPv6 relay agents can exist between the client and server. DHCPv6 relay agents can also receive relay-forward messages from other
relay agents; these messages are forwarded to the DHCPv6 server specied as the desnaon.
When the relay agent receives a message, it creates a new relay-forward message, inserts the original DHCPv6 message, and sends the relay-
forward message as the DHCPv6 server.
Conguring a DHCPv6 relay agent
You can enable the DHCPv6 relay agent funcon and specify the relay desnaon (the DHCP server) address on an interface.
1. Enter global conguraon mode by issuing the congure terminal command.
device# configure terminal
2. Enter interface conguraon mode.
device(config)# interface ethernet 1/2/3
3. Specify the relay desnaon (the DHCP server) address on the interface.
device(config-if-e10000-1/2/3)# ipv6 dhcp-relay destination 2001::2
The IPv6 address is the desnaon address to which client messages are forwarded and which enables DHCPv6 relay service on the
interface. You can congure up to 16 relay desnaon addresses on an interface.
RUCKUS FastIron DHCP Conguraon Guide, 08.0.95
Part Number: 53-1005654-01 99
4. Specify the outgoing interface parameter.
device(config-if-e10000-1/2/3)# ipv6 dhcp-relay destination fe80::224:38ff:febb:e3c0 outgoing-
interface ethernet 1/2/5
Use the outgoing-interface parameter when the desnaon relay address is a link-local or mulcast address. Specify the interface type as
ethernet, tunnel interface, or VE. Specify the port-num as the port number.
The following example enables the DHCPv6 relay agent funcon and species the relay desnaon address (i.e. the DHCP server) on an interface.
device(config)# interface ethernet 1/2/3
device(config-if-e10000-1/2/3)# ipv6 dhcp-relay destination 2001::2
device(config-if-e10000-1/2/3)# ipv6 dhcp-relay destination fe80::224:38ff:febb:e3c0 outgoing-interface
ethernet 1/2/5
DHCPv6 relay agent include opons
You can congure the DHCPv6 relay agent to include the client's remote ID, interface ID, or client link layer address as ideners in the relay forward
DHCPv6 messages.
In some network environments, it is useful for the relay agent to add informaon to the DHCPv6 message before relaying it. The informaon that
the relay agent carries can also be used by the DHCP server to make decisions about the addresses, delegated prexes, and conguraon
parameters that the client should receive. The DHCPv6 relay-forward message contains relay agent parameters that idenfy the client-facing
interface on which the reply messages can be forwarded. You can use either one or all of the parameters as client ideners.
The following opons can be included in the relay-forward messages:
• Interface-ID opon (18)
• Remote-ID opon (37)
• Client link layer (MAC) address opon (79)
The relay agent may send the interface-ID opon (18) to idenfy the interface on which a client message was received. If the relay agent cannot use
the address in the link-address eld to idenfy the interface through which the response to the client will be relayed, the relay agent must include
an interface-ID opon in the relay-forward message. If the relay agent receives a relay-reply message with an interface-ID opon, the relay agent
relays the message to the client through the interface idened by the opon. The server must also copy the interface-ID opon from the relay-
forward message into the relay-reply message the server sends to the relay agent in response to the relay-forward message.
The remote-ID opon (37) may be added by the DHCP relay agent that terminates switched or permanent circuits and uses a mechanism to idenfy
the remote host end of the circuit. The remote ID must be unique. A DHCPv6 relay agent can be congured to include a remote-ID opon in the
relay-forward DHCPv6 messages.
The client link layer (MAC) address opon (79) can be used along with other ideners to associate DHCPv4 and DHCPv6 messages from a dual-
stack client, and is useful in environments where operators using an exisng DHCPv4 system with the client link layer address as the customer
idener need to correlate DHCPv6 assignments using the same idener.
NOTE
If you enable the client link layer (MAC) opon and save the conguraon, and then downgrade to a version of the soware that does
not support this feature, an error message displays. You must remove any conguraon related to this opon before the downgrade and
add the conguraon aer the upgrade to prevent this error.
DHCPv6
DHCP relay agent for IPv6
RUCKUS FastIron DHCP Conguraon Guide, 08.0.95
100 Part Number: 53-1005654-01

Specifying the IPv6 DHCP relay include opons
You can specify either one or all of the IPv6 DHCP relay include opons in the relay-forward message.
The opons include the interface-ID, remote-ID, or link layer opon. Perform the following steps to include the DHCPv6 relay opons.
1. Enter global conguraon mode by issuing the congure terminal command.
device# configure terminal
2. Enter interface conguraon mode.
device(config)# interface ethernet 1/1/1
3. Enter the ipv6 dhcp-relay include-opons command followed by the required opons: interface-ID, remote-ID or link-layer-opon.
The following example shows specifying the link layer opon.
device(config-if-e1000-1/1/1)# ipv6 dhcp-relay include-options link-layer-option
DHCPv6 Relay Agent Prex Delegaon Nocaon
DHCPv6 Relay Agent Prex Delegaon Nocaon allows a DHCPv6 server to dynamically delegate IPv6 prexes to a DHCPv6 client using the
DHCPv6 Prex Delegaon (PD) opon. DHCPv6 prex delegaon enables an Internet Service Provider (ISP) to automate the process of assigning
prexes to a customer premises equipment (CPE) network. The CPE then assigns IPv6 subnets from the delegated IPv6 prex to its downstream
customer interfaces.
FIGURE 18 DHCPv6 Relay Agent Prex Delegaon Nocaon
DHCPv6
DHCP relay agent for IPv6
RUCKUS FastIron DHCP Conguraon Guide, 08.0.95
Part Number: 53-1005654-01 101
A route is added to the IPv6 route table on the provider edge router (PE) for the delegated prex to be delegated to requesng routers. The DHCP
server chooses a prex for delegaon and responds with it to the CPEx. to the external network, and to enable the correct forwarding of the IPv6
packets for the delegated IPv6 prex. Adding the delegated prex to the IPv6 route table ensures that the unicast Reverse Path Forwarding (uRPF)
works correctly.
Because the PE is also a DHCPv6 relay agent (it relays DHCPv6 messages between the CPE and the DHCP server), it examines all DHCPv6 messages
relayed between the CPE and the DHCP server and gathers informaon about a delegated prex and then manages the adversement of this
delegated prex to the external network.
DHCPv6 Relay Agent Prex Delegaon Nocaon limitaons
The following limitaons apply to DHCPv6 Relay Agent Prex Delegaon Nocaon.
• The PD nocaon fails when the DHCPv6 messages between a DHCPv6 server and a DHCPv6 client containing the PD opon are not
relayed by way of the DHCPv6 relay agent.
• If the delegated prex is released or renewed by the client at the me when the DHCPv6 relay agent is down or reboong, then this
release or renewal of the delegated prex will not be detected by the relay agent. In such a condion, there could be stale stac routes in
the roung table. You must clear the stale routes.
• If there is no sucient disk space on a ash disk, then the system may not store all the delegated prexes in the IPv6 route table.
• The DHCPv6 PD ash operaon depends on the NTP clock synchronizaon. During system bootup, if the NTP is congured, the ash
operaon (dhcp6_delegated_prexes_data ash le read/write) is delayed unl the NTP is synchronized. The NTP synchronizaon is
needed for the correct updang of the prex age. If the NTP is not congured, then the DHCP prex delegaon will sll read the ash, but
the prex age may not be correct.
Upgrade and downgrade consideraons
• When a router is upgraded to the version of soware that supports this feature DHCPv6 Relay Agent Prex Delegaon Nocaon, the
saved informaon about delegated prexes will be examined and if the delegated prex lifeme is not expired, then the prex will be
added to the IPv6 stac route table.
• When a router is downgraded to the version of soware that does not support DHCPv6 Relay Agent Prex Delegaon Nocaon, the
saved informaon about delegated prexes is retained and it cannot be used.
Conguring DHCPv6 Relay Agent Prex Delegaon Nocaon
You can set the number of delegated prexes that can be learned at the global level. By default, DHCPv6 Relay Agent Prex Delegaon Nocaon
is enabled when the DHCPv6 relay agent is enabled on an interface.
You can disable the DHCPv6 Relay Agent Prex Delegaon Nocaon at the system or the interface level by seng the IPv6 DHCP relay maximum
delegated prexes to 0 at the system or interface level as required.
Make sure that there is enough free space in the ash memory to save informaon about delegated prexes in ash on both the Acve and Standby
management processor.
1. Enter global conguraon mode by issuing the congure terminal command.
device# configure terminal
DHCPv6
DHCP relay agent for IPv6
RUCKUS FastIron DHCP Conguraon Guide, 08.0.95
102 Part Number: 53-1005654-01
2. Set the maximum number of prexes that can be learned at the global level.
device(config)# ipv6 dhcp-relay maximum-delegated-prefixes 500
You can limit the maximum number of prexes that can be learned at the global level. The range is from 0 through 512. The default value
is 500. The DHCPv6 prex delegaon default for ICX 7750 and ICX 7850 devices is 50.
The following example sets the maximum number of prexes that can be learned at the global level to 500.
device# configure terminal
device(config)# ipv6 dhcp-relay maximum-delegated-prefixes 500
Enabling DHCPv6 Relay Agent Prex Delegaon Nocaon on an interface
The number of delegated prexes that can be learned can be limited at the interface level.
1. Enter global conguraon mode by issuing the congure terminal command.
device# configure terminal
2. Enter interface conguraon mode.
device(config)# interface ethernet 1/1/1
3. Set the number of delegated prexes that can be learned.
device(config-if-eth 1/1/1)# ipv6 dhcp-relay maximum-delegated-prefixes 100
You can limit the maximum number of prexes that can be delegated. The range is from 0 through 512. The default value is 100. The sum
of all the delegated prexes that can be learned at the interface level is limited by the system max.
The following example sets the number of delegated prexes that can be learned to 100.
device# configure terminal
device(config)# interface ethernet 1/1/1
device(config-if-eth 1/1/1)# ipv6 dhcp-relay maximum-delegated-prefixes 100
Assigning the administrave distance to DHCPv6 stac routes
You can assign the administrave distance to DHCPv6 stac routes installed in the IPv6 route table for the delegated prexes on the interface. This
value must be set so that it does not replace the same IPv6 stac route congured by the user.
1. Enter global conguraon mode by issuing the congure terminal command.
device# configure terminal
2. Enter interface conguraon mode.
device(config)# interface ethernet 1/1/1
3. Set the administrave distance value.
device(config-if-eth-1/1/1)# ipv6 dhcp-relay distance 25
The value parameter is used to assign the administrave distance to DHCPv6 stac routes on the interface. The range is from 1 to 255. The
default value is 10. If the value is set to 255, then the delegated prexes for this interface will not be installed in the IPv6 stac route table.
DHCPv6
DHCP relay agent for IPv6
RUCKUS FastIron DHCP Conguraon Guide, 08.0.95
Part Number: 53-1005654-01 103
The following example sets the administrave distance to the DHCPv6 stac routes on the interface to 25.
device# configure terminal
device(config)# interface ethernet 1/1/1
device(config-if-eth-1/1/1)# ipv6 dhcp-relay distance 25
Displaying DHCPv6 relay agent and prex delegaon informaon
You can use various show commands to view informaon about DHCPv6 relay agent and prex delegaon informaon.
Use one of the following commands to view DHCPv6 relay agent and prex delegaon informaon. The commands do not need to be entered in the
specied order.
1. Enter the show ipv6 dhcp-relay opons command.
device# show ipv6 dhcp-relay options
DHCPv6 Relay Options Information:
Interface Interface-Id Remote-Id Option-79
e 1/1/1 No No No
The output of this command displays informaon about the relay opons available to the prexed delegates for a specic interface.
2. Enter the show ipv6 dhcp-relay command.
device(config)# show ipv6 dhcp-relay
Current DHCPv6 relay agent state: Enabled
DHCPv6 enabled interface(s): e 1/2/3
DHCPv6 Relay Agent Statistics:
Total DHCPv6 Packets, Received:0, Transmitted:0
Received DHCPv6 Packets: RELEASE:0,RELAY_FORWARD:0,RELAY_REPLY:0
OtherServertoClient:0,OtherClinettoServer:0
The output of this command displays the DHCPv6 relay agent informaon congured on the device.
3. Enter the show ipv6 dhcp-relay interface command.
device(config)# show ipv6 dhcp-relay interface ethernet 1/1/1
DHCPv6 Relay Information for interface e 1/1/1:
Destinations:
Destination OutgoingInterface
2001::2 NA
Options:
Interface-Id: No Remote-Id:No Option-79:No
Prefix Delegation Information:
Current:0 Maximum:100 AdminDistance:10
The output of this command displays DHCPv6 relay informaon for a specic interface.
4. Enter the show ipv6 dhcp-relay desnaons command.
device# show ipv6 dhcp-relay destinations
DHCPv6 Relay Destinations:
Interface e 1/2/3:
Destination OutgoingInterface
2001::2 NA
fe80::224:38ff:febb:e3c0 e 1/2/5
The output of this command displays informaon about the delegated prexes' congured desnaons for a specic interface.
DHCPv6
DHCP relay agent for IPv6
RUCKUS FastIron DHCP Conguraon Guide, 08.0.95
104 Part Number: 53-1005654-01
5. Enter the show ipv6 dhcp-relay prex-delegaon-informaon command.
device# show ipv6 dhcp-relay prefix-delegation-information
DHCPv6 Relay Prefix Delegation Notification Information:
Interface Current Maximum AdminDistance
ve 100 20 20000 10
ve 101 4000 20000 10
ve 102 0 20000 10
ve 103 0 20000 10
ve 104 0 20000 10
ve 105 0 20000 10
The output of this command displays addional informaon about the DHCPv6 prex delegaon.
6. Enter the show ipv6 dhcp-relay delegated-prexes command.
device# show ipv6 dhcp-relay delegated-prefixes interface ethernet 1/1/45
Prefix Client Interface ExpireTime
fc00:2000:6:7:1::/96 fe80::210:94ff:fe00:e 1/1/45 29d23h53m0s
The output of this command displays informaon about the delegated prexes.
Clearing the DHCPv6 delegated prexes and packet counters
Use the clear commands to clear the DHCPv6 delegated prexes and packet counters.
1. Clear the DHCPv6 delegated prexes using the clear command at the privileged EXEC level.
device# clear ipv6 dhcp-relay delegated-prefixes vrf VRF1
This command clears the DHCPv6 delegated prexes for VRF1. If you do not provide the VRF name, the informaon for the default VRF is
cleared. You can also use the all or interface keywords. Oponally, you can also clear a specic DHCPv6 delegated prex.
2. Clear all the DHCPv6 packet counters using the clear command at the privileged EXEC level.
device# clear ipv6 dhcp-relay statistics
DHCPv6 Snooping
In an IPv6 domain, a node can obtain an IPv6 address using the following mechanisms:
• IPv6 address auto-conguraon using router adversements
• The DHCPv6 protocol
In a typical man-in-the-middle (MITM) aack, the aacker can snoop or spoof the trac acng as a rogue DHCPv6 server. To prevent such aacks,
DHCPv6 snooping helps to secure the IPv6 address conguraon in the network.
DHCPv6 snooping enables the RUCKUS device to lter untrusted DHCPv6 packets in a subnet on an IPv6 network. DHCPv6 snooping can ward o
MiM aacks, such as a malicious user posing as a DHCPv6 server sending false DHCPv6 server reply packets with the intenon of misdirecng other
users. DHCPv6 snooping can also stop unauthorized DHCPv6 servers and prevent errors due to user misconguraon of DHCPv6 servers.
How DHCPv6 Snooping Works
When enabled on a VLAN, DHCPv6 snooping stands between untrusted ports (those connected to host ports) and trusted ports (those connected to
DHCPv6 servers). A VLAN with DHCPv6 snooping enabled forwards DHCPv6 request packets from clients and discards DHCPv6 server reply packets
on untrusted ports. The VLAN forwards DHCPv6 server reply packets on trusted ports to DHCPv6 clients, as shown in the following gures.
DHCPv6
DHCPv6 Snooping
RUCKUS FastIron DHCP Conguraon Guide, 08.0.95
Part Number: 53-1005654-01 105

FIGURE 19 DHCPv6 Snooping at Work on an Untrusted Port
FIGURE 20 DHCPv6 Snooping at Work on a Trusted Port
NOTE
Trusted client ports can lead to DHCPv6 starvaon and spoong aacks. When DHCPv6 snooping is enabled, DHCPv6 request packets
received on trusted ports are dropped.
DHCPv6 Binding Database
On trusted ports, DHCPv6 server reply packets are forwarded to DHCPv6 clients. The RUCKUS ICX device removes the entry when the valid lifeme,
the me period during which an address is allowed to remain available and usable on a port, expires.
Conguraon Notes and Feature Limitaons for DHCPv6 Snooping
The following conguraon consideraons apply to DHCPv6 snooping:
• DHCPv6 snooping must be enabled on both client and server VLANs.
DHCPv6
DHCPv6 Snooping
RUCKUS FastIron DHCP Conguraon Guide, 08.0.95
106 Part Number: 53-1005654-01
• For default VLAN ID changes, DHCPv6 snooping must be re-applied on the new default VLAN. DHCPv6 snooping is not automacally
congured on the new default VLAN. Therefore, when DHCPv6 Snooping is congured for the default VLAN (for example, VLAN 1), if the
default VLAN is changed from VLAN 1 to VLAN 4000, the DHCPv6 Snooping conguraons remain congured on the old default VLAN 1.
The DHCPv6 Snooping conguraons are not automacally congured on the new default VLAN 4000. In previous releases, DHCPv6
Snooping conguraons were automacally removed from the old default VLAN and automacally moved to the new default VLAN.
• When a client moves from one port to another port in the same VLAN, the old snoop entry for the client MAC address is automacally
updated. This occurs even when the client acquires a new IPv6 address. In previous releases, two snoop entries were maintained with
both the old IPv6 address and the new IPv6 address.
• Duplicate IPv6 entries across VLANs are allowed in the DHCPv6 snooping table. When a client moves from one VLAN to another and
acquires the same address, two snooping entries are maintained for the same MAC address and IP address.
• Layer 2 MAC movement is supported.
• DHCPv6 snooping cannot be enabled for a VLAN that is a member of a VLAN group.
• When DHCPv6 snooping is enabled, replies are prevented from going out on DHCPv6 snooping trusted ports.
• When conguring DHCPv6 snooping on a range of VLANs, no VLAN in the range can be a member of a VLAN group or any reserved VLAN.
Otherwise, the conguraon fails on the enre range.
• If required, disable the learning of DHCPv6 clients on ports at the interface conguraon level.
• DHCPv6 snooping entries learnt on a member port of VLAN are deleted, with the excepon of exible authencaon enabled ports, if the
port is removed from the membership of that VLAN.
• DHCPv6 Snooping can be congured for a VLAN or VLANS even before the VLAN or VLANS are created. VLANs and DHCPv6 Snooping
conguraons on the VLANS are not automacally deleted when the VLAN is deleted.
• When DHCPv6 Snooping is enabled, client and server packets are not allowed on same port.
• DHCP snooping can be congured on a maximum of 511 VLANs.
• When conguring DHCPv6 snooping on a range of VLANs or mul-VLAN, there cannot not be any VLAN in the range that is a member of a
VLAN group or any reserved VLAN. Otherwise, conguraons fail on the enre range.
• ACLs are supported on member ports of a VLAN on which DHCPv6 snooping is enabled. Refer to Client IP-to-MAC address mappings on
page 78 for more informaon. In previous releases, these were mutually exclusive.
Conguring DHCPv6 Snooping
DHCPv6 snooping must be enabled on VLANs, aer which the trust seng of ports connected to a DHCPv6 server must be changed to trusted.
DHCPv6 packets for a VLAN with DHCPv6 snooping enabled are inspected.
NOTE
DHCPv6 snooping is disabled by default and the trust seng of ports is untrusted by default. DHCPv6 snooping must be enabled on the
client and the DHCPv6 server VLANs.
NOTE
DHCPv6 Snooping can be congured for a VLAN or VLANS even before the VLAN or VLANS are created. VLANs and DHCPv6 Snooping
conguraons on the VLANS are not automacally deleted when the VLAN is deleted.
1. Enter global conguraon mode by using the congure terminal command.
device# configure terminal
2. Enable DHCPv6 snooping on a VLAN.
device(config)# ipv6 dhcp6 snooping vlan 2
DHCPv6
DHCPv6 Snooping
RUCKUS FastIron DHCP Conguraon Guide, 08.0.95
Part Number: 53-1005654-01 107
3. Change the trust seng of the ports that are connected to the DHCPv6 server to trusted at the interface conguraon level.
device(config)# interface ethernet 1/1/1
device(config-if-e10000-1/1/1)# dhcp6 snooping trust
Port 1/1/1 is connected to a DHCPv6 server. The commands access the CLI to the interface conguraon level of port 1/1/1 and set the
trust seng of port 1/1/1 to trusted.
4. If required, disable the learning of DHCPv6 clients on ports at the interface conguraon level. Disabling the learning of DHCPv6 clients
can be congured on a range of ports as well.
device(config-if-e10000-1/1/1)# dhcp6 snooping client-learning disable
5. Clear the DHCPv6 binding database. You can remove all entries in the database or for a specic IP address only.
The rst command removes all entries from the DHCPv6 binding database and the second removes entries for a specic IP address.
device# clear ipv6 dhcp6 snooping
device# clear ipv6 dhcp6 snooping 2001::2
The following example congures VLAN 10, and enables DHCPv6 snooping for the congured VLANs.
device(config)# vlan 10
device(config-vlan-10)# untagged ethernet 1/1/1 to 1/1/3
device(config-vlan-10)# exit
device(config)# ipv6 dhcp6 snooping vlan 10
On VLAN 10, client ports 1/1/2 and 1/1/3 are untrusted. By default, all client ports are untrusted. Only DHCPv6 client SOLICIT and REQUEST packets
received on ports 1/1/2 and 1/1/3 are forwarded.
The following example sets the DHCPv6 server port as trusted.
device(config)# interface ethernet 1/1/1
device(config-if-e10000-1/1/1)# dhcp6 snooping trust
device(config-if-e10000-1/1/1)# exit
Port 1/1/1 is connected to a DHCPv6 server. The DHCPv6 server ADVERTISE and REPLY packets received on port 1/1/1 are forwarded.
Conguring DHCPv6 Snooping on Mulple VLANs
DHCPv6 snooping can be enabled on mulple VLANs using one command. The following task congures mulple VLANs and enables DHCPv6
snooping on most of the congured VLANs using a single command.
NOTE
DHCPv6 snooping can be congured on a maximum number of 511 VLANs at one me.
NOTE
DHCPv6 Snooping can be congured for a VLAN or VLANS even before the VLAN or VLANS are created. VLANs and DHCPv6 Snooping
conguraons on the VLANS are not automacally deleted when the VLAN is deleted.
NOTE
When conguring DHCPv6 snooping on a range of VLANs or mul-VLAN, there cannot not be any VLAN in the range that is a member of a
VLAN group or any reserved VLAN. Otherwise, conguraons fail on the enre range.
1. Enter global conguraon mode.
device# configure terminal
DHCPv6
DHCPv6 Snooping
RUCKUS FastIron DHCP Conguraon Guide, 08.0.95
108 Part Number: 53-1005654-01
2. Congure the port-based VLANs.
device(config)# vlan 100 to 150
3. Add port Ethernet 1/1/12 as a tagged port.
device(config-mvlan-100-150)# tagged ethernet 1/1/12
4. Use the exit command to return to global conguraon mode.
device(config-mvlan-100-150)# exit
5. Congure more port-based VLANs.
device(config)# vlan 151 to 200
6. Add port Ethernet 1/1/12 as a tagged port.
device(config-mvlan-151-200)# tagged ethernet 1/1/12
7. Use the exit command to return to global conguraon mode.
device(config-mvlan-151-200)# exit
8. Use the ipv6 dhcp6 snooping command with the to keyword, specifying a VLAN range, to enable DHCPv6 snooping on mulple VLANs.
device(config)# ipv6 dhcp6 snooping vlan 100 to 150 160 170 to 200
9. Change the trust seng of the ports that are connected to the DHCP server to trusted at the interface conguraon level.
a) To enable trust on a port, enter interface conguraon mode.
device(config)# interface ethernet 1/1/12
b) Enable trust on the port.
device(config-if-e10000-1/1/12)# dhcp6 snooping trust
The following example congures VLANs 100 through 200, and enables DHCPv6 snooping on VLANs 100 through 150, VLAN 160, and VLANs 170
through 200.
device# configure terminal
device(config)# vlan 100 to 150
device(config-mvlan-100-150)# tagged ethernet 1/1/12
device(config-mvlan-100-150)# exit
device(config)# vlan 151 to 200
device(config-mvlan-151-200)# tagged ethernet 1/1/12
device(config-mvlan-100-150)# exit
device(config)# ipv6 dhcp6 snooping vlan 100 to 150 160 170 to 200
device(config)# interface ethernet 1/1/12
device(config-if-e10000-1/1/12)# dhcp6 snooping trust
DHCPv6
DHCPv6 Snooping
RUCKUS FastIron DHCP Conguraon Guide, 08.0.95
Part Number: 53-1005654-01 109
Conguring DHCPv6 Snooping for Mul-VRF
DHCPv6 snooping supports Mul-VRF. You can deploy mulple Virtual Roung and Forwarding instances (VRFs) on a RUCKUS Ethernet switch. Each
VLAN with a Virtual Ethernet (VE) interface is assigned to a VRF.
You can enable DHCPv6 snooping on individual VLANs and assign any interface as the DHCPv6 trust interface. If an interface is a tagged port in this
VLAN, you can turn on the trust port per VRF, so that trac intended for other VRF VLANs is not trusted.
1. Enter global conguraon mode by issuing the congure terminal command.
device# configure terminal
2. Congure DHCPv6 snooping on a specic VLAN.
device(config)# ipv6 dhcp6 snooping vlan 2
3. Set the port as a trusted port.
device(config)# interface ethernet 1/1/4
device(config-if-e10000-1/1/4)# dhcp6 snooping trust vrf red
The trust port seng for DHCPv6 snooping can be specied per VRF.
4. Congure the DHCPv6 relay agent on the VE interface if the client and server are not in the same VLAN.
device(config-vif-23)# ipv6 dhcp-relay destination 2001:100::2
5. To clear a DHCPv6 binding database of a specic Mul-VRF, enter the following command.
device(config)# clear ipv6 dhcp6 snooping vrf vrf2
6. To clear a specic DHCPv6 binding belonging to a specic IPv6 address and VRF, enter the following command.
device# clear ipv6 dhcp6 snooping 2001::2 vrf vrf2
7. To clear default VRF DHCPv6 snooping entries, enter the following command.
device# clear ipv6 dhcp6 snooping vrf default
Displaying DHCPv6 Snooping Informaon
You can use various show commands to view informaon about DHCPv6 snooping.
Use one of the following commands to view DHCPv6 snooping informaon. The commands do not need to be entered in the specied order.
1. Enter the show ipv6 dhcp6 snooping command to display informaon about the DHCPv6 snooping status and ports.
device# show ipv6 dhcp6 snooping
IP dhcpv6 snooping enabled on 2 VLAN(s):
VLAN(s): 1 11
2. Enter the show ipv6 dhcp6 snooping info command to display informaon about the DHCPv6 snooping binding database..
device> show ipv6 dhcp6 snooping info
Dhcp snooping Info
Total Learnt Entries 1
Learnt DHCPv6 Snoop Entries
IPv6 Address Mac Address Valid-Time Preferred-Time Port/Lag Vlan VRF
2001::5 00c5.0600.0001 2753 2753 1/2/4 1 default-vrf
…
DHCPv6
DHCPv6 Snooping
RUCKUS FastIron DHCP Conguraon Guide, 08.0.95
110 Part Number: 53-1005654-01
DHCPv6 Server
The Dynamic Host Conguraon Protocol version 6 (DHCPv6) is a network protocol for conguring IPv6 hosts with IP addresses, IP prexes, and
other conguraon data required to operate in an IPv6 network. All FastIron devices can be congured to funcon as DHCPv6 servers.
DHCPv6 Server is the IPv6 equivalent of the Dynamic Host Conguraon Protocol (DHCP) for IPv4 that is documented in the DHCP Server chapter. In
the same manner as DHCP for IPv4, a DHCPv6 server allocates temporary or permanent network IPv6 addresses to clients. When a client requests
the use of an address for a me interval, the DHCPv6 server guarantees not to reallocate that address within the requested me, and tries to return
the same network address each me the client makes a request. When the client is done with the address, the address is released back to the
server. Clients may also receive a permanent assignment. In short, the DHCPv6 server assigns IPv6 addresses to all clients and it keeps track of the
bindings. DHCPv6 Server also allows for greater control of address distribuon within a subnet.
DHCPv6 is supported on the following RUCKUS ICX plaorms for both Layer 2 and Layer 3 soware images:
• RUCKUS ICX 7150
• RUCKUS ICX 7250
• RUCKUS ICX 7450
• RUCKUS ICX 7550
• RUCKUS ICX 7650
• RUCKUS ICX 7750
• RUCKUS ICX 7850
NOTE
For the DHCPv6 server to be enabled, you must upgrade to FI 08.0.90 using the Unied FastIron Image (UFI). Refer to the Soware
Upgrade and Downgrade chapter in the RUCKUS FastIron Soware Upgrade Guide for more informaon.
Conguraon Consideraons for DHCPv6 Servers
The following conguraon consideraons apply to DHCPv6 servers.
• The DHCPv6 server is supported in the Layer 2 and Layer 3 soware images.
• For the DHCPv6 server to be enabled, you must upgrade to FI 08.0.90 using the Unied FastIron Image (UFI). Refer to the Soware
Upgrade and Downgrade chapter in the RUCKUS FastIron Soware Upgrade Guide for more informaon.
• The DHCPv6 server is not supported for non-default VRFs.
• The ICX DHCPv6 server does not assign IPv6 addresses via DHCPv6 relay.
• IPv6 unicast roung must be enabled for Layer 3 soware images.
• For stateless DHCPv6 servers, IPv6 addresses are assigned to the clients through auto-conguraon. The DHCPv6 server is used only to
assign informaon such as domain-names, mulple DNS servers other supported DHCPv6 opons. One ICX interface should be congured
with an IPV6 address that falls in the subnet range congured for the DHCPv6 server.
• Neighbor discovery protocol (NDP) should be congured for stateless DHCPv6 servers.
• A FastIron device congured as a DHCPv6 server can support up to 500 DHCP clients.
• Up to 100 DHCPv6 subnets can be congured for the DHCPv6 server with a Layer 3 soware image only.
• When the rapid commit opon is congured on the server, only Solicit and Reply packets are sent between the client and the server
instead of Solicit, Adverse, Request and Reply. For the rapid commit mode to work, the client should also have the rapid commit opon
enabled.
• Whenever a conguraon change is made with respect to the DHCPv6 server, the conguraon change is wrien to the dhcpd.conf le in
the Linux within 30 seconds. When this occurs, the dhcpd process restarts.
DHCPv6
DHCPv6 Server
RUCKUS FastIron DHCP Conguraon Guide, 08.0.95
Part Number: 53-1005654-01 111
• For a full list of commands supported for DHCPv6 Servers, refer to the What's New secon in the RUCKUS FastIron Command Reference
Conguring the Stateless DHCPv6 Server on Layer 3 Soware Images
Perform the following steps to congure a stateless DHCPv6 server on a Layer 3 soware image.
Consider the following when conguring the stateless DHCPv6 server on Layer 3 soware images:
• For stateless DHCPv6 servers, up to 100 DHCPv6 subnets can be congured with a Layer 3 soware image only.
• In SLAAC (Stateless Address Auto-conguraon), the client does not require the DHCPv6 server to get the IPv6 address. It receives the
prex, prex-length, and the Default Gateway from the RA and the address is auto-congured.
• The DHCPv6 client can only get other informaon, such as DNS and domain-name, from the DHCPv6 server.
• The conguraon of the nd other-cong-ag, using the ipv6 nd other-cong-ag command, is required for the stateless DHCPv6 server to
receive DNS and domain name conguraon. When the ipv6 nd other-cong-ag command is used, the O ag is set to 1.
• When the client sends an Informaon-Request to the server, the server replies with informaon such as domain-name and DNS server.
• Since the IPv6 address is not assigned by the DHCPv6 server, the lease entry is not seen on the server.
1. Enter global conguraon mode by issuing the congure terminal command.
router# configure terminal
2. Enter the ipv6 unicast-roung command to enable the forwarding of IPv6 trac.
router(config)# ipv6 unicast-routing
3. Enter the ipv6 dhcp6-server enable command to enable the DHCPv6 server.
router(config)# ipv6 dhcp6-server enable
4. (Oponal) Enter the domain-name command, entering a domain name, to congure the domain name server (DNS) domain name.
router(config-dhcp6)# domain-name example.com
5. (Oponal) Enter the dns-server command, specifying an IPv6 address, to specify the IPv6 address of the DNS server.
router(config-dhcp6)# dns-server 8fef:400:efdd:301::10 8fef:400:efdd:301::20
6. Enter the renewal-me command, specifying an interval, to set the me interval aer which the client transions to the renewing state
upon receipt of an IPv6 address.
router(config-dhcp6)# renewal-time 50
If the renewal me is not congured, half of the valued of the congured preferred lifeme is considered as the renewal me.
7. Enter the subnet command, specifying an IPv6 prex, to congure a subnet for the DHCPv6 server and enter DHCPv6 subnet conguraon
mode.
router(config-dhcp6)# subnet6 8fef:400:efdd:301::/64
8. Enter the range6 command, specifying IPv6 addresses, to assign IPv6 addresses in the specied range.
router(config-dhcpv6-subnet)# range6 8fef:400:efdd:301::100 8fef:400:efdd:301::200
DHCPv6
DHCPv6 Server
RUCKUS FastIron DHCP Conguraon Guide, 08.0.95
112 Part Number: 53-1005654-01
9. Enter the exit command unl you return to global conguraon mode.
router(config-dhcpv6-subnet)# exit
router(config-dhcp6)# exit
router(config)#
10. Enter the vlan command and enter a VLAN ID to create a VLAN.
router(config)# vlan 100
11. Enter the untagged command and specify a port to add an untagged Ethernet port to the port-based VLAN and specify the port
connected to the client into one VLAN.
router(config-vlan-100)# untagged ethernet 1/1/2
12. Enter the router-interface command, specifying an interface, to aach a router interface to the VLAN.
router(config-vlan-100)# router-interface ve 100
13. Enter the exit command to return to global conguraon mode.
router(config-vlan-100)# exit
14. Enter the interface ve command specifying the congured VLAN.
router(config)# interface ve 100
15. Enter the ipv6 address command, specifying an IPv6 address, to congure an IPv6 address on the server interface in the range of the
congured subnet6.
router(config-vif-100)# ipv6 address 8fef:400:efdd:301::3/64
16. Enter the ipv6 nd other-cong-ag command to enable the hosts to use autoconguraon to get non-IPv6-address informaon.
router(config-vif-100)# ipv6 nd other-config-flag
The following example enables IPv6 unicast roung, congures a stateless DHCPv6 server on a Layer 3 soware image and congures an IPv6
address on the server interface in the range of the congured subnet6. The ipv6 nd other-cong-ag command is used to set the 0 ag to 1.
router# configure terminal
router(config)# ipv6 unicast-routing
router(config)# ipv6 dhcp6-server enable
router(config-dhcp6)# domain-name example.com
router(config-dhcp6)# dns-server 8fef:400:efdd:301::10 8fef:400:efdd:301::20
router(config-dhcp6)# renewal-time 50
router(config-dhcp6)# subnet6 8fef:400:efdd:301::/64
router(config-dhcpv6-subnet)# range6 8fef:400:efdd:301::100 8fef:400:efdd:301::200
router(config-dhcpv6-subnet)# exit
router(config-dhcp6)# exit
router(config)# vlan 100
router(config-vlan-100)# untagged ethernet 1/1/2
router(config-vlan-100)# router-interface ve 100
router(config-vlan-100)# exit
router(config)# interface ve 100
router(config-vif-100)# ipv6 address 8fef:400:efdd:301::3/64
router(config-vif-100)# ipv6 nd other-config-flag
DHCPv6
DHCPv6 Server
RUCKUS FastIron DHCP Conguraon Guide, 08.0.95
Part Number: 53-1005654-01 113
Conguring the Stateful DHCPv6 Server on Layer 3 Soware Images
Perform the following steps to congure a stateful DHCPv6 server on a Layer 3 soware image.
Consider the following when conguring the stateful DHCPv6 server on Layer 3 soware images:
• For stateful DHCPv6 servers, up to 100 DHCPv6 subnets can be congured with a Layer 3 soware image only.
• For stateful DHCPv6 Servers, the client requires the DHCPv6 server to get the IPv6 address and other informaon such as DNS and
domain-name.
• The conguraon of the nd managed address conguraon ag, using the ipv6 nd managed-cong-ag command is required for stateful
DHCPv6 servers. When the ipv6 nd managed-cong-ag command is used, the M ag is set to 1.
• The IPv6 address is assigned by the DHCPv6 server, and the lease entry can be viewed on the server in the output of the show ipv6 dhcp6-
server lease command.
1. Enter global conguraon mode by issuing the congure terminal command.
router# configure terminal
2. Enter the ipv6 unicast-roung command to enable the forwarding of IPv6 trac.
router(config)# ipv6 unicast-routing
3. Enter the ipv6 dhcp6-server enable command to enable the DHCPv6 server.
router(config)# ipv6 dhcp6-server enable
4. Enter the domain-name command, entering a domain name, to congure the domain name server (DNS) domain name.
router(config-dhcp6)# domain-name example.com
5. Enter the dns-server command, specifying an IPv6 address, to specify the IPv6 address of the DNS server.
router(config-dhcp6)# dns-server 8fef:400:efdd:301::10 8fef:400:efdd:301::20
6. Enter the renewal-me command, specifying an interval, to set the me interval aer which the client transions to the renewing state
upon receipt of an IPv6 address.
router(config-dhcp6)# renewal-time 50
If the renewal me is not congured, half of the valued of the congured preferred lifeme is considered as the renewal me.
7. Enter the subnet6 command, specifying an IPv6 prex, to congure a subnet for the DHCPv6 server and enter DHCPv6 subnet
conguraon mode.
router(config-dhcp6)# subnet6 8fef:400:efdd:301::/64
8. Enter the range6 command, specifying IPv6 addresses, to assign IPv6 addresses in the specied range.
router(config-dhcpv6-subnet)# range6 8fef:400:efdd:301::100 8fef:400:efdd:301::200
9. Enter the exit command unl you return to global conguraon mode.
router(config-dhcpv6-subnet)# exit
router(config-dhcp6)# exit
router(config)#
10. Enter the vlan command and enter a VLAN ID to create a VLAN.
router(config)# vlan 100
DHCPv6
DHCPv6 Server
RUCKUS FastIron DHCP Conguraon Guide, 08.0.95
114 Part Number: 53-1005654-01
11. Enter the untagged command and specify a port to add an untagged Ethernet port to the port-based VLAN and specify the port
connected to the client into one VLAN.
router(config-vlan-100)# untagged ethernet 1/1/2
12. Enter the router-interface command, specifying an interface, to aach a router interface to the VLAN.
router(config-vlan-100)# router-interface ve 100
13. Enter the exit command to return to global conguraon mode.
router(config-vlan-100)# exit
14. Enter the interface ve command specifying the congured VLAN.
router(config)# interface ve 100
15. Enter the ipv6 address command, specifying an IPv6 address, to congure an IPv6 address on the server interface in the range of the
congured subnet6.
router(config-vif-100)# ipv6 address 8fef:400:efdd:301::3/64
16. Enter the ipv6 nd managed-cong-ag command to enable the hosts to use autoconguraon to get non-IPv6-address informaon.
router(config-vif-100)# ipv6 nd managed-config-flag
The following example enables IPv6 unicast roung, congures a stateful DHCPv6 server on a Layer 3 soware image and congures an IPv6 address
on the server interface in the range of the congured subnet6. The ipv6 nd managed-cong-ag command is used to set the M ag to 1.
router# configure terminal
router(config)# ipv6 unicast-routing
router(config)# ipv6 dhcp6-server enable
router(config-dhcp6)# domain-name example.com
router(config-dhcp6)# dns-server 8fef:400:efdd:301::10 8fef:400:efdd:301::20
router(config-dhcp6)# renewal-time 50
router(config-dhcp6)# subnet6 8fef:400:efdd:301::/64
router(config-dhcpv6-subnet)# range6 8fef:400:efdd:301::100 8fef:400:efdd:301::200
router(config-dhcpv6-subnet)# exit
router(config-dhcp6)# exit
router(config)# vlan 100
router(config-vlan-100)# untagged ethernet 1/1/2
router(config-vlan-100)# router-interface ve 100
router(config-vlan-100)# exit
router(config)# interface ve 100
router(config-vif-100)# ipv6 address 8fef:400:efdd:301::3/64
router(config-vif-100)# ipv6 nd managed-config-flag
Conguring the Stateless DHCPv6 Server on Layer 2 Soware Images
Perform the following steps to congure a stateless DHCPv6 server on a Layer 2 soware image.
NOTE
For the DHCPv6 server soluon to work on ICX Layer 2 soware image, an IPv6 RA provider in the Layer 2 network is required.
Consider the following when conguring the stateless DHCPv6 server on Layer 2 soware images:
• For stateless DHCPv6 servers, one DHCPv6 subnet can be congured on the management VLAN.
• In SLAAC (Stateless Address Auto-conguraon), the client does not require the DHCPv6 server to get the IPv6 address. It receives the
prex, prex-length, and the Default Gateway from the RA and the address is auto-congured.
• The DHCPv6 client can only get other informaon, such as DNS and domain-name, from the DHCPv6 server.
DHCPv6
DHCPv6 Server
RUCKUS FastIron DHCP Conguraon Guide, 08.0.95
Part Number: 53-1005654-01 115

• The conguraon of the nd other-cong-ag, using the ipv6 nd other-cong-ag command, is required for the stateless DHCPv6 server to
receive DNS and domain name conguraon. When the ipv6 nd other-cong-ag command is used, the O ag is set to 1. Refer to the
Conguring an IPv6 address on the Router Interface on page 117 secon for more informaon.
• When the client sends an Informaon-Request to the server, the server replies with informaon such as domain-name and DNS server.
• Since the IPv6 address is not assigned by the DHCPv6 server, the lease entry is not seen on the server.
The gure below shows an ICX DHCPv6 server working in a Layer 2 session.
FIGURE 21 Layer 2 DHCPv6 Server Session
1. Enter global conguraon mode by issuing the congure terminal command.
switch# configure terminal
2. Enter the ipv6 dhcp6-server enable command to enable the DHCPv6 server.
switch(config)# ipv6 dhcp6-server enable
3. Enter the domain-name command, entering a domain name, to congure the domain name server (DNS) domain name.
switch(config-dhcp6)# domain-name example.com
DHCPv6
DHCPv6 Server
RUCKUS FastIron DHCP Conguraon Guide, 08.0.95
116 Part Number: 53-1005654-01
4. Enter the dns-server command, specifying an IPv6 address, to specify the IPv6 address of the DNS server.
switch(config-dhcp6)# dns-server 8fef:400:efdd:301::10 8fef:400:efdd:301::20
5. Enter the renewal-me command, specifying an interval, to set the me interval aer which the client transions to the renewing state
upon receipt of an IPv6 address.
switch(config-dhcp6)# renewal-time 50
If the renewal me is not congured, half of the valued of the congured preferred lifeme is considered as the renewal me.
6. Enter the subnet6 command, specifying an IPv6 prex, to congure a subnet for the DHCPv6 server and enter DHCPv6 subnet
conguraon mode.
switch(config-dhcp6)# subnet6 8fef:400:efdd:301::/64
7. Enter the range6 command toto assign IPv6 addresses in the specied range.
switch(config-dhcpv6-subnet)# range6 8fef:400:efdd:301::100 8fef:400:efdd:301::200
8. Enter the exit command unl you return to global conguraon mode.
switch(config-dhcpv6-subnet)# exit
switch(config-dhcp6)# exit
switch(config)#
9. Enter the ipv6 address command, specifying an IPv6 address, to congure an IPv6 address in the range of the congured subnet6.
switch(config)# ipv6 address 8fef:400:efdd:301::3/64
The following example congure a stateless DHCPv6 server on a Layer 2 soware image and congures an IPv6 address in the range of the
congured subnet6.
switch# configure terminal
switch(config)# ipv6 dhcp6-server enable
switch(config-dhcp6)# domain-name example.com
switch(config-dhcp6)# dns-server 8fef:400:efdd:301::10 8fef:400:efdd:301::20
switch(config-dhcp6)# renewal-time 50
switch(config-dhcp6)# subnet6 8fef:400:efdd:301::/64
switch(config-dhcpv6-subnet)# range6 8fef:400:efdd:301::100 8fef:400:efdd:301::200
switch(config-dhcpv6-subnet)# exit
switch(config-dhcp6)# exit
switch(config)# ipv6 address 8fef:400:efdd:301::3/64
Follow the steps in the Conguring an IPv6 address on the Router Interface on page 117 secon to congure an IPv6 address on the router
interface.
Conguring an IPv6 address on the Router Interface
Perform the following steps to enable the forwarding of IPv6 trac and congure an IPv6 address on the router interface.
Complete the steps outlined in the Conguring the Stateless DHCPv6 Server on Layer 2 Soware Images on page 115 secon before compleng this
task.
NOTE
The conguraon of the nd other-cong-ag, using the ipv6 nd other-cong-ag command, is required for the stateless DHCPv6 server to
receive DNS and domain name conguraon. When the ipv6 nd other-cong-ag command is used, the O ag is set to 1.
DHCPv6
DHCPv6 Server
RUCKUS FastIron DHCP Conguraon Guide, 08.0.95
Part Number: 53-1005654-01 117
NOTE
The router-interface can be an ICX router or a router from another vendor, for example, Cisco Systems.
1. On the ICX router, enter global conguraon mode by issuing the congure terminal command.
router# configure terminal
2. Enter the ipv6 unicast-roung command to enable the forwarding of IPv6 trac.
router(config)# ipv6 unicast-routing
3. Enter the interface command and specify the port connected to the client.
router(config)# interface ve 100
4. Enter the ipv6 address command, specifying an IPv6 address, to congure an IPv6 address on the router interface of the ICX router.
router(config-vif-100)# ipv6 address 8fef:400:efdd:301::3/64
5. Enter the ipv6 nd nd other-cong-ag command to enable the hosts to use autoconguraon to get non-IPv6-address informaon.
router(config-vif-100)# ipv6 nd nd other-config-flag
The following example enables the forwarding of IPv6 trac and congures an IPv6 address. The ipv6 nd other-cong-ag command is used to set
the 0 ag to 1.
router# configure terminal
router(config)# ipv6 unicast-routing
router(config)# interface ve 100
router(config-vif-100)# ipv6 address 8fef:400:efdd:301::3/64
router(config-vif-100)# ipv6 nd nd other-config-flag
Conguring the Stateful DHCPv6 Server on Layer 2 Soware Images
Perform the following steps to congure a stateful DHCPv6 server on a Layer 2 soware image.
Consider the following when conguring the stateful DHCPv6 server on Layer 3 soware images:
• For stateful DHCPv6 servers, one DHCPv6 subnet can be congured on the management VLAN.
• For stateful DHCPv6 Servers, the client requires the DHCPv6 server to get the IPv6 address and other informaon such as DNS and
domain-name.
• The conguraon of the nd managed address conguraon ag, using the ipv6 nd managed-cong-ag command is required for stateful
DHCPv6 servers. When the ipv6 nd managed-cong-ag command is used, the M ag is set to 1.
• The IPv6 address is assigned by the DHCPv6 server, and the lease entry can be viewed on the server in the output of the show ipv6 dhcp6-
server lease command. Refer to the Conguring an IPv6 address for the Router Interface on page 119 secon for more informaon.
1. Enter global conguraon mode by issuing the congure terminal command.
switch# configure terminal
2. Enter the ipv6 dhcp6-server enable command to enable the DHCPv6 server.
switch(config)# ipv6 dhcp6-server enable
3. Enter the domain-name command, entering a domain name, to congure the domain name server (DNS) domain name.
switch(config-dhcp6)# domain-name example.com
DHCPv6
DHCPv6 Server
RUCKUS FastIron DHCP Conguraon Guide, 08.0.95
118 Part Number: 53-1005654-01
4. Enter the dns-server command, specifying an IPv6 address, to specify the IPv6 address of the DNS server.
switch(config-dhcp6)# dns-server 8fef:400:efdd:301::10 8fef:400:efdd:301::20
5. Enter the renewal-me command, specifying an interval, to set the me interval aer which the client transions to the renewing state
upon receipt of an IPv6 address.
switch(config-dhcp6)# renewal-time 50
If the renewal me is not congured, half of the valued of the congured preferred lifeme is considered as the renewal me.
6. Enter the subnet6 command, specifying an IPv6 prex, to congure a subnet for the DHCPv6 server and enter DHCPv6 subnet
conguraon mode.
switch(config-dhcp6)# subnet6 8fef:400:efdd:301::/64
7. Enter the range6 command to assign IPv6 addresses in the specied range.
switch(config-dhcpv6-subnet)# range6 8fef:400:efdd:301::100 8fef:400:efdd:301::200
8. Enter the exit command unl you return to global conguraon mode.
switch(config-dhcpv6-subnet)# exit
switch(config-dhcp6)# exit
switch(config)#
9. Enter the ipv6 address command, specifying an IPv6 address, to congure an IPv6 address in the range of the congured subnet6.
switch(config)# ipv6 address 8fef:400:efdd:301::3/64
The following example congure a stateful DHCPv6 server on a Layer 2 soware image and congures an IPv6 address in the range of the
congured subnet6.
switch# configure terminal
switch(config)# ipv6 dhcp6-server enable
switch(config-dhcp6)# domain-name example.com
switch(config-dhcp6)# dns-server 8fef:400:efdd:301::10 8fef:400:efdd:301::20
switch(config-dhcp6)# renewal-time 50
switch(config-dhcp6)# subnet6 8fef:400:efdd:301::/64
switch(config-dhcpv6-subnet)# range6 8fef:400:efdd:301::100 8fef:400:efdd:301::200
switch(config-dhcpv6-subnet)# exit
switch(config-dhcp6)# exit
switch(config)# ipv6 address 8fef:400:efdd:301::3/64
Follow the steps in the Conguring an IPv6 address for the Router Interface on page 119 secon to congure an IPv6 address on the router
interface.
Conguring an IPv6 address for the Router Interface
Perform the following steps to enable the forwarding of IPv6 trac and congure an IPv6 address on the router interface.
Complete the steps outlined in the Conguring the Stateful DHCPv6 Server on Layer 2 Soware Images on page 118 secon before compleng this
task.
NOTE
The conguraon of the nd managed address conguraon ag, using the ipv6 nd managed-cong-ag command is required for stateful
DHCPv6 servers. When the ipv6 nd managed-cong-ag command is used, the M ag is set to 1.
DHCPv6
DHCPv6 Server
RUCKUS FastIron DHCP Conguraon Guide, 08.0.95
Part Number: 53-1005654-01 119
NOTE
The router-interface can be an ICX router or a router from another vendor, for example, Cisco Systems.
1. On the ICX router, enter global conguraon mode by issuing the congure terminal command.
router# configure terminal
2. Enter the ipv6 unicast-roung command to enable the forwarding of IPv6 trac.
router(config)# ipv6 unicast-routing
3. Enter the interface command and specify the port connected to the client.
router(config)# interface ve 100
4. Enter the ipv6 address command, specifying an IPv6 address, to congure an IPv6 address on the router interface of the ICX router.
router(config-vif-100)# ipv6 address 8fef:400:efdd:301::3/64
5. Enter the ipv6 nd managed-cong-ag command to set the managed address conguraon ag.
router(config-vif-100)# ipv6 nd managed-config-flag
The following example enables the forwarding of IPv6 trac and congures an IPv6 address. The ipv6 nd managed-cong-ag command is used to
set the M ag to 1.
router# configure terminal
router(config)# ipv6 unicast-routing
router(config)# interface ve 100
router(config-vif-100)# ipv6 address 8fef:400:efdd:301::3/64
router(config-vif-100)# ipv6 nd managed-config-flag
Displaying DHCPv6 Server Informaon
Various show commands can display stascal informaon about DHCPv6 Servers.
Use one or more of the following commands to verify DHCPv6 Server informaon. Using these commands is oponal, and the variaons of the
command can be entered in any order.
1. Enter the show ipv6 dhcp6-server command with the global keyword to display global informaon for the DHCPv6 server.
device> show ipv6 dhcp6-server global
IPV6 DHCP6 SERVER GLOBAL CONFIGURATION SUMMARY:
Preferred lifetime: 111
Valid lifetime: 222
Renewal time(t1%): 0
Rebind time(t1%): 0
Refresh time(t1%): 0
Enable Rapid Commit: No
Domain Name:
2. Enter the show ipv6 dhcp6-server command with the lease keyword to display informaon about the DHCPv6 server lease entries.
device> show ipv6 dhcp6-server lease
IA-NA: Client IP addr: 3ffe:501:ffff:100:dc87:7c42:d4fb:ba7e
Preffered-lifetime: 121
Binding State: active
Valid lifetime : 200
Expires at : 2018/10/09 17:42:42
DHCPv6
DHCPv6 Server
RUCKUS FastIron DHCP Conguraon Guide, 08.0.95
120 Part Number: 53-1005654-01
3. Enter the show ipv6 dhcp6-server command with the subnet6 keyword to display informaon about all the subnets congured on a
device. The rst subnet, “3efd:320:ddee:202::/64”, has range6 congured as a range of ipv6 addresses. The second subnet, “3e:501::
100::/64”, has range6 congured as a prex.
device> show ipv6 dhcp6-server subnet6
******IPV6 DHCP6 SERVER SUBNETS CONFIGURATION SUMMARY *********
---------------------------------------------------
Subnet6 : 3efd:320:ddee:202::/64
Subnet Name :
Preferred lifetime : 0
Valid lifetime : 0
Domain Name :
Range6 prefix : ::/0
Range6: 3efd:320:ddee:202::5
: 3efd:320:ddee:202::15
DNS Servers:
---------------------------------------------------
Subnet6 : 3ffe:501:ffff:100::/64
Subnet Name :
Preferred lifetime : 0
Valid lifetime : 0
Domain Name :
Range6 prefix : 3ffe:501:ffff:100::/64
DNS Servers:
4. Enter the show ipv6 dhcp6-server command with the subnet6 keyword, and specify an IPv6 prex address to display informaon about a
specic subnet congured on a device.
device> show ipv6 dhcp6-server subnet6 3ffe:501:ffff:100::/64
******IPV6 DHCP6 SERVER SUBNETS CONFIGURATION SUMMARY *********
---------------------------------------------------
Subnet6 : 3ffe:501:ffff:100::/64
Subnet Name : testname
Preferred lifetime : 40
Valid lifetime : 100
Domain Name : www.test.com
Range6 prefix : 3ffe:501:ffff:100::/64
Prefix6 : ::/0
DNS Servers:
Vericaon of DHCPv6 Server Status
Various commands can be used for the purpose of verifying the DHCPv6 server status.
Use one or more of the following commands to verify DHCPv6 Server status. Using these commands is oponal, and the variaons of the command
can be entered in any order.
1. Enter the hmon client status command with the all-clients keyword to display details on the operaonal status of Health Monitor clients.
device# hmon client status all-clients
Check the status of the DHCP client in the output. The status shows Up if the server is up and running. If the status is Faulty, this might
indicate some missing conguraon or a port being down. The status is displayed as Faulty when the server is sll not Up aer a series of
retries. Fixing the conguraon or port down issue will bring the server Up again.
DHCPv6
DHCPv6 Server
RUCKUS FastIron DHCP Conguraon Guide, 08.0.95
Part Number: 53-1005654-01 121
2. Enter the hmon client stascs command with the all-clients keyword to display client stascs.
device# hmon client statistics all-clients
Check the status of the DHCP client in the output.
3. Enter the show ip os-interface command with the port-info stascs keyword to display the tap interfaces that are created for the
interfaces and the stascs on the tap interface.
device# show ip os-interface port-info statistics
Check the status of the DHCP client in the output.
Vericaon in Linux Mode
1. Telnet to the remote IP reach Linux mode. Use the ps-aef and grep dhcpd to check if the dhcpd process is running.
2. Verify the conguraon in the dhcpd.conf le in the /etc path in Linux.
3. Verify the dhcpd6.leases le in the /etc path and in the /fast_iron path for the lease le in the ash.
Prex Delegaon
Prex delegaon allows a DHCPv6 server assign prexes chosen from a global pool to DHCPv6 clients. The DHCPv6 client can then congure an IPv6
address on its LAN interface using the received prex. It then sends router adversements that include the prex, allowing other devices to use
auto-conguraon to congure their own IPv6 addresses.
The PD device will be connected to the DHCPv6 server. The DHCPv6 server should have prex6 congured. The PD device receives the prex from
the DHCPv6 server. The hosts connected to the PD device receives the IPv6 address in the prex received by the PD device.
The following example assigns a range of IPv6 prexes to a subnet.
device# configure terminal
device(config)# ipv6 dhcp6-server enable
device(config-dhcp6)# subnet6 3ffe:501:ffff:100::/64
device(config-dhcpv6-subnet)# prefix6 3ffe:501:ffff:100::/64 3ffe:501:ffff:103::/64
Prex Delegaon for ICX DHCPv6 Servers in Layer 3 Soware Images
Prex delegaon allows a DHCPv6 server to assign prexes selected from a global pool to DHCPv6 clients (requesng routers). The DHCPv6 client
can then congure an IPv6 address on its LAN interface using the received prex. The DHCPv6 client then sends router adversements that include
the prex, allowing other devices to use auto-conguraon to congure their own IPv6 addresses. The PD device (requesng routers) is connected
to the DHCPv6 server (ICX box). The DHCPv6 server must have prex6 congured. The PD device receives the prex from the DHCPv6 server. The
hosts connected to the PD device receive the IPv6 address in the prex received by the PD device.
The following illustraon shows delegated prex addressing congured for an ICX device.
DHCPv6
DHCPv6 Server
RUCKUS FastIron DHCP Conguraon Guide, 08.0.95
122 Part Number: 53-1005654-01

FIGURE 22 Delegated Prex Addressing Using DHCPv6
The following example assigns a range of IPv6 prexes to a subnet. The prex6 command is used to congure the prex range for delegaon to sub-
routers.
device# configure terminal
device(config)# ipv6 dhcp6-server enable
device(config-dhcp6)# subnet6 2001:db8:0:1::/64
device (config-dhcp6-subnet)# range6 2001:db8:0:1::129 2001:db8:0:1::254
device(config-dhcpv6-subnet)# prefix6 2001:db8:0:100::/56 2001:db8:0:f00::/56
The following conguraon example shows a sample conguraon for an ICX device with the prex delegaon feature and DHCPv6 server enabled
on a Layer 3 soware image.
!
ipv6 dhcp6-server enable
subnet6 2001:db8:0:1::/64
prefix6 2001:db8:0:100::/56 2001:db8:0:f00::/56
range6 2001:db8:0:1::129 2001:db8:0:1::254
exit
!
ipv6 unicast-routing
!
interface ve 4080
ipv6 address 2001:db8:0:1::100/6
DHCPv6
DHCPv6 Server
RUCKUS FastIron DHCP Conguraon Guide, 08.0.95
Part Number: 53-1005654-01 123

