
5.28.24
FILE CREATION GUIDE
TABLE OF CONTENTS
RESOURCES .................................................................................................................... 3
FONTS .............................................................................................................................. 4
SUBMISSION NOTES ...................................................................................................... 4
NON-SUPPORTED PROGRAMS .................................................................................... 4
COVER TEMPLATE GENERATOR .................................................................................. 5
EBOOK ............................................................................................................................. 6
TEXT FILES ...................................................................................................................... 7
BLACK & WHITE TEXT : QUICK REFERENCE .............................................................. 8
BLACK & WHITE TEXT : REQUIREMENTS .................................................................. 9
COLOR TEXT : QUICK REFERENCE ............................................................................ 10
COLOR TEXT : REQUIREMENTS ................................................................................. 11
TEXT SETUP
BLACK AND WHITE ................................................................................................ 12
COLOR ..................................................................................................................... 13
PERFORATION ........................................................................................................ 14
RTL (RIGHT-TO-LEFT) ............................................................................................ 15
COVER FILES ................................................................................................................... 17
COVER : QUICK REFERENCE .............................................................................. 18
COVER : REQUIREMENTS ................................................................................... 19
PERFECT BOUND, SIMPLEX ................................................................................. 20
PERFECT BOUND, DUPLEX .................................................................................. 22
CASEBOUND .......................................................................................................... 24
DUST JACKET ......................................................................................................... 26
RTL (RIGHT-TO-LEFT) PERFECT BOUND, SIMPLEX .......................................... 28
RTL (RIGHT-TO-LEFT) PERFECT BOUND, DUPLEX ........................................... 30
RTL (RIGHT-TO-LEFT) CASEBOUND / DUST JACKET ....................................... 32
CREATING A PDF FOR SUBMISSION ........................................................................... 35
EXPORTING FROM INDESIGN .............................................................................. 36
OPEN/SAVE A TEMPLATE IN PHOTOSHOP, SIMPLEX ....................................... 37
USING PDF TEMPLATES WITHIN PHOTOSHOP, DUPLEX ................................. 38
TRIM SIZES ...................................................................................................................... 39
TRIM SIZE MATRIX ................................................................................................. 40
This IngramSpark File Creation Guide details the requirements necessary for digital les uploaded into IngramSpark for
both print-on-demand (POD) and EBook distribution. To download the latest copy, please log in to your IngramSpark
account and click “HELP “on your dashboard. The IngramSpark File Creation guide contains much of the same information
found in the Lightning Source File Creation Guide.
We sincerely thank you for your business!
TABLE OF CONTENTS
FILE CREATION GUIDE
RESOURCES
RESOURCES
ALL BOOK TYPES
SUBMISSION NOTES &
NON SUPPORTED PROGRAMS
COVER TEMPLATE GENERATOR

4
FILE CREATION GUIDE
IngramSpark expects to receive print-ready manuscript and cover les, and will not perform work of an editorial nature such
as proofreading, editing for content, typesetting, or making font alterations throughout a book. A digital le must be ‘print
ready’, and sent in accordance with the digital le submission instructions provided–to ensure that no problems will be
encountered during the manufacturing process. Files are processed as received and are not preighted prior to processing.
Due to the complexity of processing and printing COLOR Books, no manipulation/edits can be made by IngramSpark to
any color book le submissions. This includes (but is not limited to) color correction or manipulation of color settings on
les that have been submitted.
IngramSpark allows for a 1/16" (0.0625 in / 2 mm) variance for ALL books printed. Please keep this in consideration when
designing any text and cover les for BLACK & WHITE / COLOR
book titles.
ALL FONTS must be embedded in all PDF les: COLOR / BLACK & WHITE, INTERIOR / COVER. To conrm fonts are
embedded, open the PDF in Acrobat, select the File menu, then Properties. The fonts tab lists the names of all fonts in
the le: (Embedded) or (Embedded Subset) should appear next to all fonts listed. If one of these tags is not listed, the
font is not embedded. Files with unembedded fonts will be rejected, and LS will request a corrected le. Please note the
default Acrobat ‘Standard’ setting does not embed base 14 fonts, and may cause a le to be rejected.
CERTIFICATION LOGOS
The right to ax the initial or any logo of FSC®, SFI®, or PEFC™ to the bookblock or cover of any book manufactured
by Lightning Source is prohibited. The placement of a logo, initial, or any claims of certication cannot be placed in or on a
book by a publisher. If a logo, initial, or any claim of certication is included on the bookblock or cover from a prior printing
it must be removed by the publisher before the book is submitted to Lightning Source’s digital library. If Lightning Source
discovers a logo, initial, or claim of certication in or on a book, Lightning Source will remove the certication claim at the
publisher’s expense.
Microsoft Word* / Microsoft Publisher
Adobe PageMaker
QuarkXPress 6.5 & older versions
InDesign CS2 & older versions
We cannot oer technical support with le creation or provide cover templates for any of these programs
*Microsoft Word: do not use the ‘shortcut’ button/icon in the toolbar to create a PDF of your text le. Please use the ‘print’
menu: for instructions on how to do this, download our walk-through PDF below by clicking on the link. You can also visit our
website, mouse over the ‘File Creation’ menu, and select the option ‘Digital Bookblock Creation (Standard Books)’
SUBMISSION NOTES
FONTS
NON-SUPPORTED PROGRAMS
FONTS
NON-SUPPORTED PROGRAMS
Microsoft Word: PDF Walk-through

FILE CREATION GUIDE 5
FILE CREATION GUIDE
COVER TEMPLATE GENERATOR
COVER TEMPLATE GENERATOR
IngramSpark highly recommend the use of our custom Cover Template Generator. This tool is located on your IngramSpark
dashboard under “My Tools.” Once you complete the required elds a cover template will be emailed to you along with
instructions of how to complete your cover. Heavy tra c in requests may cause occasional delays so please allow up to 2
hours before resubmitting a template request or submitting a help ticket.
• Note that when adhering matte lamination onto covers with heavy ink coverage, minor adhesion
imperfections may be present at the fold areas of the nished book.
• Please do not move items on the template. The barcode centered on the back cover is the only item that can be
repositioned/moved to t with your cover design. Please do not resize the barcode. The guides, guideline elements
and placement of the cover should remain in the original locations on the template: these are already set up for speci c
printing requirements and work ow.
Note: if you opt to receive a PDF le from the template generator, the pink & blue areas should be removed or covered up before
submitting a nal le. If the pink & blue areas are visible in your cover design, they will show up in printed copies. *InDesign templates
have the pink & blue areas on a non-printing layer, so it’s not necessary to remove these.
6
FILE CREATION GUIDE
EBook
EBook Distribution to online e-retailers
For every EBook title you will be uploading 2 les:
• Complete Interior EPUB (formatted as .epub) + Front Cover (formatted as .jpeg or .jpg)
EBook File Submission Requirements
EBook Interior File
• Format: EPUB 3.0 required. - EPUB (formatted as .epub)
• No single image inside an EPUB can be greater than 3.2 million pixels.
• We follow the industry IDPF spec on EPUB formats. You can nd more information at http://idpf.org/epub.
• All EPUBS must be compliant with the most up-to-date validation. You can use the following validation
site to conrm compliance - http://validator.idpf.org/
EBook Cover File
• File is of the front cover only
• Must be a .JPG File - Size must be 100MB or less.
• Minimum of 1873 pixels along the longest side, 1600 pixels on the shortest side (350 dpi).
• All front covers must be RGB.
• The content of the cover image must not infringe another publisher’s or artist’s copyright on the same cover
FILE CREATION GUIDE
TEXT FILES
TEXT FILES
BLACK & WHITE TEXT
QUICK REFERENCE
REQUIREMENTS
COLOR TEXT
QUICK REFERENCE
REQUIREMENTS
TEXT SETUP
BLACK & WHITE
COLOR
PERFORATION
RTL (RIGHT-TO-LEFT)

8
FILE CREATION GUIDE
The following are recommendations and specications that you should know when laying out
text for BLACK AND WHITE BOOKS.
PAGE SIZE/LAYOUT
To determine the correct bleed size of your document with 0.125" (3 mm) bleed (added on the three trim edges), please
refer to the below chart for assistance for your trim size. If bleed has been added through Bleed and Slug settings, the “Use
document bleed settings” should be checked under the Marks and Bleeds tab when exporting the nal PDF.
BLEED CHART : US
BLEED CHART : UK, AUS
BLACK & WHITE TEXT : QUICK REFERENCE
BLACK & WHITE TEXT : QUICK REFERENCE
Resolution:
Color Space:
LPI (lines per inch):
Preferred le format:
PDF producer:
Bleed:
Margins:
File naming:
Accepted Submission Methods:
600 ppi for 1-bit black & white line art
300 ppi for 8-bit grayscale continuous tone images
Grayscale
175 visual
PDF (.pdf) le–dimensions vary by trim size
Acrobat Distiller, Export from InDesign
PDF/X-1a:2001 or PDF/X-3:2002
0.125" (3 mm) except on bind side
Recommended minimum 0.5" (13 mm) on all sides.
Single le naming: isbn_txt.pdf or isbntxt.pdf
web upload for les up to 1.5 GB (zip/stu compression
accepted)
TRIM SIZE BLEED SIZE TRIM SIZE BLEED SIZE
4 x 6 = 4.125 x 6.25 152 x 102 = 159 x 105
4 x 7 = 4.125 x 7.25 178 x 102 = 184 x 105
4.25 x 7 = 4.375 x 7.25 178 x 108 = 184 x 111
4.37 x 7 = 4.5 x 7.25 178 x 111 = 184 x 114
4.72 x 7.48 = 4.845 x 7.73 190 x 120 = 196 x 123
5 x 7 = 5.125 x 7.25 178 x 127 = 184 x 130
5 x 8 = 5.125 x 8.25 203 x 127 = 210 x 130
5.06 x 7.81 = 5.185 x 8.06 198 x 129 = 205 x 132
5.25 x 8 = 5.375 x 8.25 203 x 133 = 210 x 137
5.5 x 8.25 = 5.625 x 8.5 210 x140 = 216 x 143
5.5 x 8.5 = 5.625 x 8.75 216 x 140 = 222 x 143
5.83 x 8.27 = 5.955 x 8.52 210 x 148 = 216 x 151
6 x 9 = 6.125 x 9.25 229 x 152 = 235 x 156
6.14 x 9.21 = 6.265 x 9.46 234 x 156 = 240 x 159
6.5 x 6.5 = 6.625 x 6.75 165 x 165 = 171 x 168
6.625 x 10.25 = 6.75 x 10.5 260 x 168 = 267 x 171
6.69 x 9.61 = 6.815 x 9.86 244 x 170 = 250 x 173
7 x 10 = 7.125 x 10.25 254 x 178 = 260 x 181
7.44 x 9.69 = 7.565 x 9.94 246 x 189 = 252 x 192
7.5 x 9.25 = 7.625 x 9.5 235 x 191 = 241 x 194
8 x 8 = 8.125 x 8.25 203 x 203 = 210 x 206
8 x 10 = 8.125 x 10.25 254 x 203 = 260 x 206
8 x 10.88 = 8.125 x 11.125 276 x 203 = 283 x 206
8.25 x 10.75 = 8.375 x 11 273 x 210 = 279 x 213
8.25 x 11 = 8.375 x 11.25 280 x 210 = 286 x 213
8.268 x 11.693 = 8.393 x 11.943 297 x 210 = 303 x 213
8.5 x 8.5 = 8.625 x 8.75 216 x 216 = 222 x 219
8.5 x 9 = 8.625 x 9.25 229 x 216 = 235 x 219
8.5 x 11 = 8.625 x 11.25 280 x 216 = 286 x 219
FILE CREATION GUIDE 9
FILE CREATION GUIDE
ALL FONTS must be embedded in all PDF les. Please refer to the FONTS section on page 4 for information to
conrm if your le has embedded fonts.
MARGINS/SAFETY: It is recommended that you provide a minimum of 0.5" (13 mm) margin on all sides of your text
block. LS allows for 1/16" (0.0625 in / 2 mm) variance in printing. If text/images are too close to trim edges, they could be
cut in the printing and binding process.
BLEED: A le that contains bleed elements is required to be submitted with 0.125" (3 mm) bleed added to the three trim
edges (top, bottom, outside) of the document. These elements must extend the complete 0.125" (3mm) to the bleed edge
of the document to ensure that the le prints correctly without any white margins when the book is trimmed. Please do not
add bleed to the bind (gutter) edge as this will cause incorrect positioning.
CROP MARKS: Please do not include crop / printer / registration marks in a le. These are not necessary for LS’s
workow. Marks included in a le could show up in printed copies.
RULE LINES: For best results regarding rule or stroke lines in your document, a minimum size of 0.125pt at 100% black
should be used. Smaller point sizes or shades of black less than 100% may not produce consistent print results.
SPREADS/FORMAT: We cannot accept les in spread format (2-up per page). Files should be sent as one,
single-page PDF le. If submissions must be sent as multiple les instead, please refer to the correct le naming
conventions on page 8. Incorrectly-named les could process in the wrong sequential order and cause delays in
receiving a correct proof. (Premium color book submissions must be sent as one PDF.)
PAGE COUNT: All text les will be processed and stored in our digital library with a page count that is divisible by two.
The last page will be blank for insertion of Lightning Source’s manufacturing information. If necessary, Lightning Source will
automatically add additional pages to achieve appropriate page counts.
Books that are 6.14" x 9.21" (234 x 156) and smaller will be printed in either six-page (three front/three back) or 4 page
(two front/two back) single sheet signatures.
Books that are larger than 6.14" x 9.21" (234 x 156) will be printed in four-page (two front/two back) single sheet
signatures.
SPOT COLORS/ICC PROFILES: Please do not include Spot colors or ICC proles in your le as these can produce
unexpected results during processing. ICC proles applied to 100% black text often convert to a shade or percentage of
gray (less than 100% black). This will result in text in your proof that is not solid black. If text is intended to appear as solid
black, including Spot colors or ICC proles can cause delays in receiving a correct proof.
REVISIONS: When sending a revision le, please make sure to send your entire le. Partial revisions (i.e. single-page
changes) will cause your interior to process incorrectly.
TITLES WITH HEAVY INK COVERAGE: For best printing results, titles with interior pages that have heavy ink coverage
on only one side of the page, and little/no ink coverage on the other side, should be printed on heavier weight paper. In
the event LS encounters this issue during printing, LS reserves the right to change the printing of the interior to a heavier
weight paper and adjust the cover to compensate for the new spine width to enable LS to fulll the order.
BLACK & WHITE TEXT : REQUIREMENTS
BLACK & WHITE TEXT : REQUIREMENTS

10
FILE CREATION GUIDE
TRIM SIZE BLEED SIZE TRIM SIZE BLEED SIZE
4 x 6 = 4.125 x 6.25 152 x 102 = 159 x 105
4 x 7 = 4.125 x 7.25 178 x 102 = 184 x 105
4.25 x 7 = 4.375 x 7.25 178 x 108 = 184 x 111
4.37 x 7 = 4.5 x 7.25 178 x 111 = 184 x 114
4.72 x 7.48 = 4.845 x 7.73 190 x 120 = 196 x 123
5 x 7 = 5.125 x 7.25 178 x 127 = 184 x 130
5 x 8 = 5.125 x 8.25 203 x 127 = 210 x 130
5.06 x 7.81 = 5.185 x 8.06 198 x 129 = 205 x 132
5.25 x 8 = 5.375 x 8.25 203 x 133 = 210 x 137
5.5 x 8.25 = 5.625 x 8.5 210 x140 = 216 x 143
5.5 x 8.5 = 5.625 x 8.75 216 x 140 = 222 x 143
5.83 x 8.27 = 5.955 x 8.52 210 x 148 = 216 x 151
6 x 9 = 6.125 x 9.25 229 x 152 = 235 x 156
6.14 x 9.21 = 6.265 x 9.46 234 x 156 = 240 x 159
6.5 x 6.5 = 6.625 x 6.75 165 x 165 = 171 x 168
6.625 x 10.25 = 6.75 x 10.5 260 x 168 = 267 x 171
6.69 x 9.61 = 6.815 x 9.86 244 x 170 = 250 x 173
7 x 10 = 7.125 x 10.25 254 x 178 = 260 x 181
7.44 x 9.69 = 7.565 x 9.94 246 x 189 = 252 x 192
7.5 x 9.25 = 7.625 x 9.5 235 x 191 = 241 x 194
8 x 8 = 8.125 x 8.25 203 x 203 = 210 x 206
8 x 10 = 8.125 x 10.25 254 x 203 = 260 x 206
8 x 10.88 = 8.125 x 11.125 276 x 203 = 283 x 206
8.25 x 10.75 = 8.375 x 11 273 x 210 = 279 x 213
8.25 x 11 = 8.375 x 11.25 280 x 210 = 286 x 213
8.268 x 11.693 = 8.393 x 11.943 297 x 210 = 303 x 213
8.5 x 8.5 = 8.625 x 8.75 216 x 216 = 222 x 219
8.5 x 9 = 8.625 x 9.25 229 x 216 = 235 x 219
8.5 x 11 = 8.625 x 11.25 280 x 216 = 286 x 219
11 x 8.5 = 11.125 x 8.75 216 x 280 = 222 x 283
The following are recommendations and specications that you should know when laying out
text for a COLOR or PREMIUM COLOR BOOKS.
PAGE SIZE/LAYOUT
To determine the correct bleed size of your document with 0.125" (3 mm) bleed (added on the three trim edges), please
refer to the below chart for assistance for your trim size. If bleed has been added through Bleed and Slug settings, the “Use
document bleed settings” should be checked under the Marks and Bleeds tab when exporting the nal PDF.
All sizes available in COLOR
Sizes in light blue also available in PREMIUM COLOR
11 x 8.5 available in PREMIUM COLOR ONLY
COLOR TEXT : QUICK REFERENCE
Resolution:
Color Space:
LPI (lines per inch) :
Required le format:
PDF producer:
Bleed:
Margins:
File naming:
Accepted Submission Methods:
300 ppi
CMYK
175 visual
PDF (.pdf) le–dimensions vary by trim size
Acrobat Distiller, Export from InDesign
PDF/X-1a:2001 or PDF/X-3:2002
0.125" (3 mm) except on bind side
Recommended minimum 0.5" (13 mm) on all sides
isbn_txt.pdf or isbntxt.pdf
web upload for les up to 1.5 GB (zip/stu compression accepted)
COLOR TEXT : QUICK REFERENCE
BLEED CHART : US BLEED CHART : UK, AUS

FILE CREATION GUIDE 11
FILE CREATION GUIDE
PDF COMPLIANCE: Files must be PDF/X-1a:2001 or PDF/X-3:2002 compliant. The PDF/X-1a:2001 setting is found in
the Professional versions of Adobe Acrobat 6 or above (listed as PDF/X-1a in Acrobat 6 Professional). The PDF/X-3:2002
setting is found in the Professional versions of Adobe Acrobat 7 or above.
Text les must be submitted as a single PDF le: submissions with multiple les will be rejected. Zipped/stued
submissions of single les are accepted.
SPREADS/FORMAT: Please do not send les in ‘spread’ format. Files should be sent as a single-page PDF le to
process correctly in our workow. Files sent as spreads will be rejected for a corrected submission.
CROP MARKS: Please do not include crop / printer / registration marks in a le.
RULE LINES: For best results regarding rule or stroke lines in your document, a minimum size of 0.125pt at 100% black
should be used. Smaller point sizes or shades of black less than 100% may not produce consistent print results.
MARGINS/SAFETY: A 0.5" (13 mm) margin is recommended inside the trim for color book interiors. All headers,
footers, page numbers, body text and all non-bleed images need to remain in those margins. Any elements outside of the
safety areas are at risk of being trimmed.
We recommend a 0.125" (3 mm) white strip within the trim area, on the bind side of the page, for perfect bound and
hardcover books: this is in addition to the recommended 0.5" margin. Images and background color should stop 0.125"
(3 mm) from the trim edge of the page.
BLEED: A le that contains bleed elements is required to be submitted with 0.125" (3 mm) bleed added to the three trim
edges (top, bottom, outside) of the document. These elements must extend the complete 0.125" (3mm) to the bleed edge
of the document to ensure that the le prints correctly without any white margins when the book is trimmed. Please do not
add bleed to the bind (gutter) edge as this will cause incorrect positioning.
COLOR: All images in a text le must be CMYK. Images that are less than 72 ppi will be rejected for higher-resolution
submissions. (Resolutions this low are considered too low in quality for printing)
BODY TEXT: For best results for text that is 24 pt. or below, please use 100% black only.
BLACK/RICH BLACK/DENSITY: We recommend a rich black with CMYK values = 60% Cyan / 40% Magenta / 40%
Yellow / and 100% Black. CMYK total value should not exceed 240%. Elements should not be built in ‘Registration’ (100%
of all colors).
*Files sent with densities higher than 240% may be rejected for correction. Files with densities greater than 240% may
process and print without rejection. If these les with densities over 240% encounter print issues in future orders, LS
will require a corrected le from the customer.
TITLES WITH HEAVY INK COVERAGE: For best printing results, titles with interior pages that have heavy ink coverage
on only one side of the page, and little/no ink coverage on the other side, should be printed on heavier weight paper. In
the event LS encounters this issue during printing, LS reserves the right to change the printing of the interior to a heavier
weight paper and adjust the cover to compensate for the new spine width to enable LS to fulll the order.
SPOT COLORS: Please convert all spot colors (PMS / PANTONE) with/without transparencies to CMYK, (even in
supporting .eps les). These may produce unexpected color results when printing. Any dissatisfaction with color shift will
be the publisher’s responsibility to correct.
COLOR TEXT : REQUIREMENTS
COLOR TEXT : REQUIREMENTS
COLOR & PREMIUM COLOR : BIND TYPE INFORMATION
Books that are 6.14" x 9.21" (234 x 156) and smaller will be printed in
either six-page (three front/three back) or 4 page (two front/two back) single sheet signatures.
Books that are larger than 6.14" x 9.21" (234 x 156) will be printed in
four-page (two front/two back) single sheet signatures.

12
FILE CREATION GUIDE
Layout and Margins
When laying out a black and white, non-bleed interior, the pages should be built to re ect the nal trim size of the book (i.e.
6x9”). Within the document a margin of 0.5" (13 mm) is recommended and headers, footers, page numbers, body text and
all images should remain within those margins.
When creating a black and white interior with bleed, create your document to the correct trim size and add an additional
0.125” (3 mm) to the three trim edges of the page. Please do not add bleed to the bind (gutter) edge of the page.
Single Pages
When creating your nal PDF le for submission, please ensure the le is created in a single-page format, and spreads are
turned o /deselected.
Resolution
For best results, images should be of a good quality and have high resolution for printing. Continuous tone images are
recommended for submission as 8-bit, grayscale. Black-and-white images are recommended for submission as 1-bit,
black-and-white.
Grayscale
For best results, all images should be converted to grayscale before submitting. Images submitted in a le as RGB or CMYK
will be converted to grayscale when printing–this can sometimes cause a color shift. Any dissatisfaction with color shift will
be the publisher’s responsibility to correct.
Above spreads are setup as an example of black and white interiors with bleed.
The inside gray box represents the .5” (13 mm) margins and the trim lines are represented by dotted red lines.
If submitting an interior without bleed, please build pages to exact trim size.
Emma
Emma
12
could ever speak of her but with compassion, though it had been
entirely a match of aection, when he was now obliged to part with
Miss Taylor too; and from his habits of gentle selshness, and of
being never able to suppose that other people could feel dierently
from himself, he was very much disposed to think Miss Taylor had
done as sad a thing for herself as for them, and would have been a
great deal happier if she had spent all the rest of her life at Harteld.
Emma smiled and chatted as cheerfully as she could, to keep him
from such thoughts; but when tea came, it was impossible for him
not to say exactly as he had said at dinner,
“Poor Miss Taylor!--I wish she were here again. What a pity it is
that Mr. Weston ever thought of her!” “I cannot agree with you, papa;
you know I cannot. Mr. Weston is such a good-humoured, pleasant,
excellent man, that he thoroughly deserves a good wife;--and you
would not have had Miss Taylor live with us for ever, and bear all my
odd humours, when she might have a house of her own?” “A house
of her own!--But where is the advantage of a house of her own? is
is three times as large.--And you have never any odd humours, my
dear.” “How oen we shall be going to see them, and they coming to
see us!--We shall be always meeting! _We_ must begin; we must go
and pay wedding visit very soon.”
“My dear, how am I to get so far? Randalls is such a distance.
I could not walk half so far.” “No, papa, nobody thought of your
walking. We must go in the carriage, to be sure.” “e carriage!
But James will not like to put the horses to for such a little way;--
and where are the poor horses to be while we are paying our visit?”
“ey are to be put into Mr. Weston’s stable, papa. You know we have
settled all that already. We talked it all over with Mr. Weston last
night. And as for James, you may be very sure he will always like
going to Randalls, because of his daughter’s being housemaid there. I
only doubt whether he will ever take us anywhere else. at was your
doing, papa. You got Hannah that good place.
Jane Austen
Jane Austen
Jane Austen
13
Nobody thought of Hannah till you mentioned her--James is so
obliged to you!” “I am very glad I did think of her. It was very lucky,
for I would not have had poor James think himself slighted upon any
account; and I am sure she will make a very good servant: she is a civil,
pretty-spoken girl; I have a great opinion of her. Whenever I see her,
she always curtseys and asks me how I do, in a very pretty manner;
and when you have had her here to do needlework, I observe she
always turns the lock of the door the right way and never bangs it. I
am sure she will be an excellent servant; and it will be a great comfort
to poor Miss Taylor to have somebody about her that she is used to
see. Whenever James goes over to see his daughter, you know, she
will be hearing of us. He will be able to tell her how we all are.”
Emma spared no exertions to maintain this happier ow of ideas,
and hoped, by the help of backgammon, to get her father tolerably
through the evening, and be attacked by no regrets but her own. e
backgammon-table was placed; but a visitor immediately aerwards
walked in and made it unnecessary. Mr. Knightley, a sensible man
about seven or eight-and-thirty, was not only a very old and intimate
friend of the family, but particularly connected with it, as the elder
brother of Isabella’s husband.
He lived about a mile from Highbury, was a frequent visitor,
and always welcome, and at this time more welcome than usual, as
coming directly from their mutual connexions in London.
He had returned to a late dinner, aer some days’ absence, and
now walked up to Harteld to say that all were well in Brunswick
Square. It was a happy circumstance, and animated Mr. Woodhouse
for some time. Mr. Knightley had a cheerful manner, which always
did him good; and his many inquiries aer “poor Isabella” and her
children were answered most satisfactorily. When this was over, Mr.
Woodhouse gratefully observed, “It is very kind of you, Mr. Knightley,
to come out at this late hour to call upon us. I am afraid you must
have had a shocking walk.” “Not at all, sir. It is a beautiful moonlight
night; and so mild that I must draw back from your great re.” “But
TEXT SETUP : BLACK AND WHITE
TEXT SETUP : BLACK AND WHITE

FILE CREATION GUIDE 13
FILE CREATION GUIDE
TEXT SETUP : COLOR
TEXT SETUP : COLOR
TEXT SETUP : COLOR
The above example of a color interior spread is built with colored sections representing the di erent areas and how each
are to be treated.
Blue (Bleed) Area / Overall Document Size
To determine the nal bleed size of your page use the following equation:
Final Width = Width of book + 0.125" (3 mm) bleed on trim side. No additional bleed is added to the bind edge.
Final Height = Height of book + 0.125" (3 mm) bleed on top + 0.125" (3 mm) bleed on bottom.
For example a 6x9" (229x152mm) book will have a nal interior size of 6.125" (156 mm) wide x 9.25" (235 mm) tall.
If using a background color or image please take those elements to the edge of the bleed area.
Pink (Safety) Area
A 0.5" (13 mm) margin is recommended inside the trim for color book interiors. All headers, footers, page numbers, body
text and all non-bleed images need to remain in those margins. Any elements outside of the safety areas are at risk of
being trimmed.
We recommend a 0.125" (3 mm) white strip within the trim area, on the bind side of the page, for perfect bound and
hardcover books: this is in addition to the recommended 0.5" margin. Images and background color should stop 0.125"
(3 mm) from the trim edge of the page.
Red (Trim) Dotted Line
The dotted red line shown above gives an idea of how the book will be trimmed. The book will be trimmed .125"
(3 mm) on three sides. The bind side will not be trimmed.
Above spreads are setup as an example of perfect bound & hardcover interiors.

14
FILE CREATION GUIDE
TEXT SETUP : PERFORATION
TEXT SETUP : PERFORATION, COLOR 50#
Weekly Class Review
Name: ____________________
Name: ____________________
SUBTRACTION
9
- 8
2
- 1
1
- 1
5
- 4
3
- 1
4
- 2
5
- 2
7
- 4
4
- 3
8
- 3
9
- 3
6
- 5
9
- 2
6
- 1
8
- 8
9
- 5
Perforated interiors are produced with a tiny line of perforation
that allows for pages to easily be removed from the book.
Perforations are available in Black & White and Color products
in limited trim sizes.
This example of a perforated interior page is built with colored
sections representing the di erent areas and how each are to
be treated.
The example page has been layered to allow for the colored
boxes to be visible.
Above page is setup as an example of a right hand perforated page.
A left hand page should be created with measurements reversed.
Inside Margin:
Margins:
Recommended minimum 1" (25 mm)
Recommended minimum 0.5" (13 mm) on
outer three edges.
Perforation is available in limited trim sizes for perfectbound
books printed on Color 50lb.
See Trim Size Matrix for available trim sizes
Blue (Bleed) Area / Overall Document Size
To determine the nal bleed size of your page use the following equation:
Final Width = Width of book + 0.125" (3 mm) bleed on trim side. No additional bleed is added to the bind edge.
Final Height = Height of book + 0.125" (3 mm) bleed on top + 0.125" (3 mm) bleed on bottom.
For example a 6x9" (229x152mm) book will have a nal interior size of 6.125" (156 mm) wide x 9.25" (235 mm) tall.
If using a background color or image please take those elements to the edge of the bleed area.
Pink (Safety) Area
A 0.5" (13 mm) margin is recommended on the 3 trim edges and a 1” (25.4 mm) margin on the bind edge of perforated
interiors. All headers, footers, page numbers, body text and all non-bleed images need to remain in those margins. Any
elements outside of the safety areas are at risk of being trimmed.
We recommend a 0.125" (3 mm) white strip within the trim area, on the bind side of the page, for perfect bound and
hardcover books: this is in addition to the recommended 1" margin. Images and background color should stop 0.125" (3
mm) from the trim edge of the page.
Red (Trim) Dotted Line
The dotted red lines shown above gives an idea of how the book will be trimmed. The book will be trimmed .125"
(3 mm) on three sides. The bind side will not be trimmed.
Purple (Perforation) Dashed Line
The purple dashed line represents the placement of the perforation. This line is .5” (13 mm) from the bind edge of the
page. We recommend that you inset your inside margin an ADDITIONAL .5” (13 mm) from this line. Bleed elements should
extend beyond the perforation line.

FILE CREATION GUIDE 15
FILE CREATION GUIDE
Lightning Source can manufacture books for RTL intended content. RTL (right-to-left) writing starts from the right of the
page and continues to the left. Interior pages should be set-up in reverse page order (last page of text presented as the rst
page) using the same rules and requirements for Black and White, Color, or Premium Color Interior les.
The information provided below explains how to set-up RTL (Right-to-Left) interior les for LS manufacturing process.
TEXT SETUP : RTL (RIGHT-TO-LEFT)
**When submitting a Reverse Bound book to LSI, please include a note in the Special
Instructions eld that will alert cover and bookblock techs to check the le for compliance.**
Perfect Bound Books
For perfect bound books the interior is produced as a standard PDF (i.e. the rst page of the book is the rst
page of the PDF) but is rotated 180º (gure 1).
The cover is built differently than a standard book whereas the back and front covers are reversed. To process
correctly the cover will need to be placed on the LSI template rotated 180º (gure 2). If the cover is not submit-
ted on an LSI template the cover tech will see the notes placed in special
instructions and rotate the cover when processing.
* Please note that when the book is produced, the LSI barcode page will appear on the last page of text but is printed upside down. This
is normal and is a result of the process used in producing reverse bound books.
Case Bound / Jacketed Books
For case bound and jacketed books the interior is produced in a reverse order. The submitted le will have the
last page of text presented as the rst page of the PDF (and the rst page of text as the last page of the PDF).
The text will not be rotated 180º (gure 3).
The cover will not be rotated as with the perfect bound but will need the front and back covers to be reversed
(gure 4).
* Please note that when the book is produced, the LSI barcode page will appear on the rst page of text. This is normal and is a result
of the process used in producing reverse bound books.
gure 1
gure 2
gure 4
Reverse Bound Books
© Copyright 2010
Lightning Source
®
and the Lightning Source Logo are Registered Trade Marks
gure 3
Reverse Binding is used for this text set-up (spine is on the right side of the book when closed and
looking at the front cover). This format is commonly used with the following languages: Arabic, Hebrew,
Kurdish (Sorani), Persian/farsi etc...
Above pages are setup as an example of RTL (Right-to-Left)
RTL Books Interior Set-Up
RTL interiors are produced in reverse order. The
submitted le will have the last page of text presented as
the rst page of the PDF (and the rst page of text as the
last page of the PDF).
PDFs must be submitted with an even number of pages to avoid
an undesired shifting of interior content pagination.
* Please note that when the book is produced, the LS barcode
page will appear on the rst page of text. This is normal and is a
result of the process used in producing reverse bound books.
16
FILE CREATION GUIDE
FILE CREATION GUIDE
COVER FILES
COVER FILES
COVER
QUICK REFERENCE
REQUIREMENTS
COVER SETUP : USING A TEMPLATE
PERFECT BOUND, SIMPLEX
PERFECT BOUND, DUPLEX
CASEBOUND
JACKET
18
FILE CREATION GUIDE
The following are recommendations and specications that you should know
when laying out cover for all book types.
Resolution:
Color Space:
LPI (lines per inch):
Required le format:
PDF producer:
Bleed:
Type Safety:
Spine Type Safety:
Duplex Inside Spine Safety:
Accepted Submission Methods:
File naming:
300 ppi
CMYK
180
PDF (.pdf) le on LS cover template
(template dimensions vary by trim size)
SIMPLEX: 1-page PDF
DUPLEX: 2-page PDF (Perfect Bound ONLY, limited trim sizes)
Acrobat Distiller–PDF/X-1a:2001, PDF/X-3:2002
Export from InDesign–PDF/X-1a:2001, PDF/X-3:2002
0.125" (3 mm) all sides
0.25" (6 mm) recommended minimum on all sides
(LS templates will allow down to 0.125" (3 mm) safety)
0.0625" (2 mm) left/right sides for spines 0.35" and larger
0.03125" (1 mm) left/right sides for spines smaller than 0.35"
NO spine text allowed for Perfect Bound books with
page counts below 48.
spine width must be left blank + additional 0.0625" (2mm) on each
side of the spine
*LS reserves the right to place a white "no-ink" area over the inside
spine + additional 0.0625" area on each side of the spine
web upload for les up to 1.5 GB (zip/stu compression accepted)
isbn_cov.pdf or isbncov.pdf
isbn_cvr.pdf or isbncvr.pdf
isbn_jacket.pdf or isbnjacket.pdf
isbn_jkt.pdf or isbnjkt.pdf
COVER : QUICK REFERENCE
COVER : QUICK REFERENCE

FILE CREATION GUIDE 19
FILE CREATION GUIDE
COVER : REQUIREMENTS
PDF COMPLIANCE: Files must be PDF/X-1a:2001 or PDF/X-3:2002 compliant. The PDF/X-1a:2001 setting is found in
the Professional versions of Adobe Acrobat 6 or above (listed as PDF/X-1a in Acrobat 6 Professional). The PDF/X-3:2002
setting is found in the Professional versions of Adobe Acrobat 7 or above.
TEMPLATE: Cover artwork should be placed within the crop marks on the correct template produced by the template
generator. All templates should be ordered and les built with a mod2 spine calculation (page count divisible by 2). *For
instructions on ordering a template, refer to pages 5 & 6.
Please do not reposition any items on the template (except the barcode) – all items (trim size / crop marks / spine
calculation) are required and placed for LS’s specic printing workow. *Note: The only exceptions are the pink and blue
areas have to be removed or covered up from EPS/PDF templates before submission.
Final PDF should be created at the size it’s received. Artwork should not extend past the crop marks.
BARCODES: mandatory on all covers. Barcodes on LS cover templates CAN be moved or repositioned on the back
cover, but please do not resize the barcode.
–Barcodes created by the publisher should be 100% black only, and placed on a white box/background.
–LS will add/replace barcodes that are unscannable or incorrect. We will add a generic barcode if the
book does not have an ISBN assigned to it. The publisher may not be notied if this manipulation is made.
–If you’re unable to supply a barcode, please leave an area of at least 1.75" wide x 1" high for LS to place
a barcode on the back cover.
BLEED: 0.125" (3 mm) bleed is required on all four sides. Graphics, illustrations, and color intended to print past the edge
of a cover should bleed a full 0.125" past the nal trim size.
SPINE: NO spine text allowed for Perfect Bound books with page counts below 48.
MARGINS: 0.25" (6 mm) recommended margin on all sides from nal trim size. LS templates allow down to 0.125"
(3 mm) safety. This applies to non-bleeding text & art.
COLOR: All images in a cover le must be CMYK. Images that are less than 200 ppi may be rejected for
higher-resolution submissions. (resolutions this low are considered too low in quality for printing)
BODY TEXT: For best results for text that is 24 pt. or below, please use 100% black only.
BLACK/RICH BLACK/DENSITY: We recommend a rich black with CMYK values = 60% Cyan / 40% Magenta / 40%
Yellow / and 100% Black. CMYK total value should not exceed 240%. Elements should not be built in ‘Registration’ (100%
of all colors). *Files sent with densities higher than 240% may be rejected for correction.
Files with densities greater than 240% may process and print without rejection. If these les with densities over 240%
encounter print issues in future orders, LS will require a corrected le from the customer.
SPOT COLORS/RGB: Please convert all spot colors (PMS / PANTONE) with/without transparencies to CMYK,
(even in supporting .eps les). *Note: RGB les received will be converted to CMYK before printing. RGB / spot color with/
without transparency may produce unexpected color results when printing.
Any dissatisfaction with color shift will be the publisher’s responsibility to correct.
COVER : REQUIREMENTS

20
FILE CREATION GUIDE
Pink (Safe) Area
All text, important images, logos and the barcode should all remain inside the pink area. This area lies 0.125" (3 mm) in-
side of the trim area and spine fold area and is safe from being trimmed / wrapped when the book is produced. *For the
best results on the front and back covers, LS recommends keeping text an additional 0.125" (3 mm) inside of the pink
safety boxes (for a full 0.25" / 6 mm safety).
Blue (Bleed) Area
The bleed area is the area which extends 0.125" (3 mm) beyond the trim lines and on each side of the spine.
All background color / images should extend throughout this area. Please note that any important images and text within
the blue areas are at risk of being trimmed or caught within the fold.
White (Template) Area
The template area also contains trim marks, fold marks, book size and spine width information and a barcode for internal
use. Please leave all elements outside of the pink and blue areas unaltered.
Barcode Placement
The barcode may be moved to any location within the pink area of the back cover. The barcode is a live element within
InDesign templates but part of the overall image if using a PDF or EPS. Depending on the software used, when using the
PDF or EPS template the barcode can be copied and pasted onto a new layer with the appropriate tools.
Template Size
Templates are created and distributed at a specic size. This size is listed at the bottom left of the template and should
remain at that size when opening, designing upon and creating a PDF from. Additional crop marks
and/or additional canvas size should not be added.
Pink and blue boxes must be completely covered when cover is submitted.
COVER SETUP : PERFECT BOUND, SIMPLEX
COVER SETUP : PERFECT BOUND, SIMPLEX

FILE CREATION GUIDE 21
FILE CREATION GUIDE
COVER SETUP: PERFECT BOUND, SIMPLEX
Additional information about
using a template
1) Spine safety area
If the cover has a spine width greater than 0.35"
(9 mm), the spine safety is 0.0625" (2 mm).
If the spine width is less than 0.35" (9 mm)
the spine safety is 0.03125" (1mm). The pink
box presented on the template will reect the
correct safety size. Books with a page count
below 48 pages cannot contain spine text.
2) Bleed elements
Elements needing to go to the edge of the
cover should be taken beyond the pink safety
area and to the far edge of the blue bleed area.
All non bleed elements need to remain in the pink
safety area.
3) Borders and straight lines
Lightning Source does not recommend us-
ing borders close to the trim / fold areas of the
books. This is because of the slight variances
that may occur during the printing and binding
process. If you choose to use a border please
keep all straight edges an additional 0.125"
(3 mm) inside of the pink safety areas.
1
3
2
1
2
3

22
FILE CREATION GUIDE
Pink (Safe) Area
All text, important images, logos and the barcode should all remain inside the pink area. This area lies 0.125" (3 mm) inside
of the trim area and spine fold area and is safe from being trimmed / wrapped when the book is produced. *For the best
results on the front and back covers, LS recommends keeping text an additional 0.125" (3 mm) inside of the pink safety
boxes (for a full 0.25" / 6 mm safety).
Blue (Bleed) Area
The bleed area is the area which extends 0.125" (3 mm) beyond the trim lines and on each side of the spine. All background
color / images should extend throughout this area. Please note that any important images and text within the blue areas
are at risk of being trimmed or caught within the fold.
White (Template) Area
The template area also contains trim marks, fold marks, book size and spine width information and a barcode for internal
use. Please leave all elements outside of the pink and blue areas unaltered.
Barcode Placement
The barcode may be moved to any location within the pink area of the back cover. The barcode is a live element within
InDesign templates but part of the overall image if using a PDF or EPS. Depending on the software used, when using the
PDF or EPS template the barcode can be copied and pasted onto a new layer with the appropriate tools.
Template Size
Templates are created and distributed at a specic size. This size is listed at the bottom left of the template and should
remain at that size when opening, designing upon and creating a PDF from. Additional crop marks and/or additional canvas
size should not be added.
No Ink Area - Inside Spine
For the inside cover, the spine area and .0625” (2mm) on each side of the spine must be white and contain no color. This
will allow for proper adhesion when the book is produced. Lightning Source reserves the right to place a white, no-ink area
over the inside spine if color is present.
Pink and blue boxes must be completely covered when cover is submitted.
First page of the template - Outside Cover Second page of the template - Inside Cover
COVER SETUP : PERFECT BOUND, DUPLEX
COVER SETUP : PERFECT BOUND, DUPLEX

FILE CREATION GUIDE 23
FILE CREATION GUIDE
COVER SETUP : PERFECT BOUND, DUPLEX
Additional information about using a template
1) Spine safety area
If the cover has a spine width greater than 0.35" (9 mm), the spine safety is 0.0625" (2 mm). If the spine width is less than
0.35" (9 mm) the spine safety is 0.0325" (1mm). The pink box presented on the template will reect the correct safety
size. Books with a page count below 48 pages cannot contain spine text.
2) Bleed elements
Elements needing to go to the edge of the cover should be taken beyond the pink safety area and to the far edge of the
blue bleed area. All nonbleed elements need to remain in the pink safety area.
3) Borders and straight lines
Lightning Source does not recommend using borders close to the trim / fold areas of the books. This is because of the
slight variances that may occur during the printing and binding process. If you choose to use a border please keep all
straight edges an additional 0.125" (3 mm) inside of the pink safety areas.
4) No Ink - Inside Spine
To allow for proper adhesion when the book is bound, the inside spine area and .0625” (2mm) on each side of the spine
must be white and contain no color. Lightning Source reserves the right to place a white, no-ink area over the inside
spine if color is present.
2
4
2
1
3
2
1
2
3

24
FILE CREATION GUIDE
COVER SETUP : CASEBOUND
Pink (Safe) Area
All text, important images, logos and the barcode should all remain inside the pink area. This area lies 0.125" (3 mm)
inside of the fold lines (around the parameter of the cover) and outside of the lines indicating the gutter area. This area is
completely safe from being wrapped when the book is produced and will not be a ected by the gutter indention. *For the
best results on the front and back covers, LS recommends keeping text an additional 0.125" (3 mm) inside of the pink
safety boxes (for a full 0.25" / 6 mm safety).
Blue (Bleed) Area
The bleed area is the area which extends 0.625" (16 mm) beyond the fold lines, the area inside the gutter and includes a
small safety area on the spine. All background color / images should extend throughout this area. Please note that any
important images and text within the blue areas are at risk of being folded or a ected by the gutter.
White (Template) Area
The template area also contains trim marks, fold marks and book size and spine width information. Please leave all
elements outside of the pink and blue areas unaltered.
Barcode Placement
The barcode may be moved to any location within the pink area of the back cover. The barcode is a live element within
InDesign templates but part of the overall image if using a PDF or EPS. Depending on the software used, when using the
PDF or EPS template the barcode can be copied and pasted onto a new layer with the appropriate tools.
Template Size
Templates are created and distributed at a speci c size. This size is listed at the bottom left of the template and should
remain at that size when opening, designing upon and creating a PDF from. Additional crop marks and/or additional canvas
size should not be added.
Pink and blue boxes must be completely covered when cover is submitted.
COVER SETUP : CASEBOUND

FILE CREATION GUIDE 25
FILE CREATION GUIDE
COVER SETUP : CASEBOUND
Additional information about
using a template
1) Spine safety area
If the cover has a spine width greater than
0.35" (9 mm), the spine safety is 0.0625"
(2.00mm). If the spine width is less than 0.35"
(9 mm) the spine safety is 0.03125" (1mm).
The pink box presented on the template will
reect the correct safety size.
2) Bleed elements
Elements needing to extend to the edge of the
cover should be taken beyond the pink safety
area and to the outside edge of the blue bleed
area. Artwork that extends to the bleed edge
will be folded and wrapped around the case
board during manufacturing.
Any elements that are not to be aected by
folding or the gutter need to remain in the pink
safety area.
3) Borders and straight lines
Lightning Source does not recommend
using borders close to the trim / fold area
of the books. This is because of the slight
variances that may occur during the printing
and binding process. If you choose to use
a border please keep all straight edges an
additional 0.125" (3 mm) inside of the pink
safety areas.
1
2
4
3
1
3
2
4
4) Gutter Area
Casebound books contain an area where the spine board is connected to the front and back cover boards. This area will be
pliable and have a slight indention. To ensure cover elements are not obscured by the indention, please keep all important
elements outside of the gutter bleed area.

26
FILE CREATION GUIDE
COVER SETUP : DUST JACKET
Pink (Safe) Area
All text, important images, logos and the barcode should all remain inside the pink area. This area lies 0.125” (3mm) inside
of the fold lines (to each side of the spine and aps) and outside of the trim lines. This area is completely safe from being
wrapped or trimmed when the book is produced. *For the best results on the front and back covers, LS recommends
keeping text an additional 0.125" (3 mm) inside of the pink safety boxes (for a full 0.25" / 6 mm safety).
Blue (Bleed) Area
The bleed area is the area which extends 0.125" (3mm) beyond the trim lines, an area inside of and to the sides of the spine
and a 0.25" (6mm) strip that connects the front and back covers to the dust jacket aps. All background color / images
should extend throughout these areas. Please note that any important images and text within the blue areas are at risk of
being folded or trimmed.
White (Template) Area
The template area also contains trim marks, fold marks and book size and spine width information. Please leave all
elements outside of the pink and blue areas unaltered.
Barcode Placement
The barcode may be moved to any location within the pink area of the back cover. The barcode is a live element within
InDesign templates but part of the overall image if using a PDF or EPS. Depending on the software used, when using the
PDF or EPS template the barcode can be copied and pasted onto a new layer with the appropriate tools.
Template Size
Templates are created and distributed at a specic size. This size is listed at the bottom left of the template and should
remain at that size when opening, designing upon and creating a PDF from. Additional crop marks and/or additional canvas
size should not be added.
Pink and blue boxes must be completely covered when cover is submitted.
COVER SETUP : DUST JACKET
FILE CREATION GUIDE 27
FILE CREATION GUIDE
COVER SETUP : DUST JACKET
Additional information about using a template
1) Spine safety area
If the cover has a spine width greater than 0.35" (9 mm), the spine safety is
0.0625" (2.00mm). If the spine width is less than 0.35" (9 mm) the spine safety
is 0.03125" (1 mm). The pink box presented on the template will reect the
correct safety size.
2) Bleed elements
Elements needing to go to the edge of the cover should be taken beyond the
pink safety area and onto the far edge of the blue bleed area. To bleed covers
on the side of the front and back covers take the bleed elements through the
wrap area to the line that designates the end of the wrap. Any elements that
are not to be trimmed need to remain in the pink safety area.
3) Borders and straight lines
Lightning Source does not recommend using borders close to the trim / fold
area of the books. This is because of the slight variances that may occur dur-
ing the printing and binding process. If you choose to use a border please
keep all straight edges an additional 0.125" (3 mm) inside of the pink safety
areas.
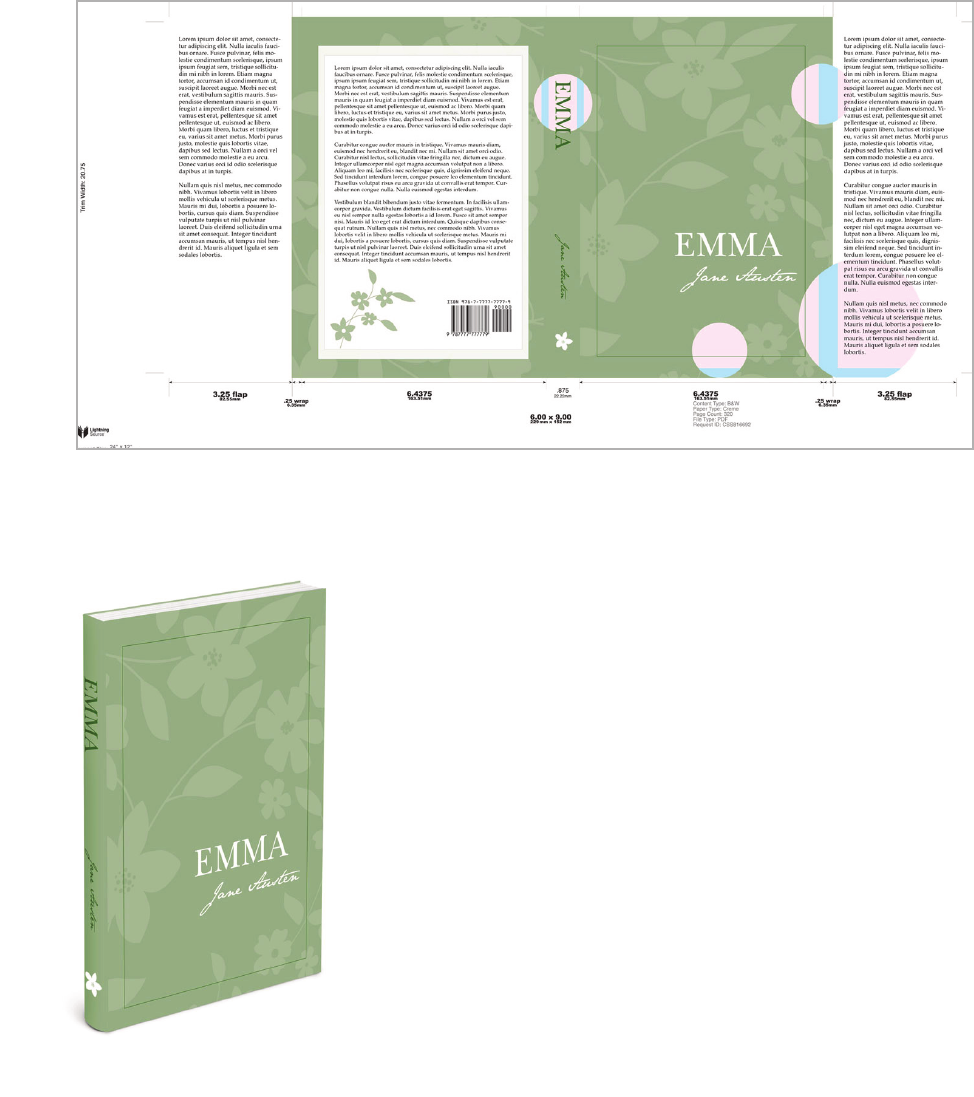
4) Flap Area
Dust jackets have an additional 3.25" (82.55mm) area that wraps around the hardcover book. This area contains the
same safety requirements as the rest of the cover with the addition on a 0.25" (6mm) wrap area between the front/back
covers and aps.
1
2
4
3
1 3
2

28
FILE CREATION GUIDE
COVER SETUP : RTL (RIGHT-TO-LEFT) PERFECT BOUND, SIMPLEX
Pink (Safe) Area
All text, important images, logos and the barcode should all remain inside the pink area. This area lies 0.125" (3 mm) in-
side of the trim area and spine fold area and is safe from being trimmed / wrapped when the book is produced. *For the
best results on the front and back covers, LS recommends keeping text an additional 0.125" (3 mm) inside of the pink
safety boxes (for a full 0.25" / 6 mm safety).
Blue (Bleed) Area
The bleed area is the area which extends 0.125" (3 mm) beyond the trim lines and on each side of the spine.
All background color / images should extend throughout this area. Please note that any important images and text within
the blue areas are at risk of being trimmed or caught within the fold.
White (Template) Area
The template area also contains trim marks, fold marks, book size and spine width information and a barcode for internal
use. Please leave all elements outside of the pink and blue areas unaltered.
Barcode Placement
The barcode may be moved to any location within the pink area of the back cover. The barcode is a live element within
InDesign templates but part of the overall image if using a PDF or EPS. Depending on the software used, when using the
PDF or EPS template the barcode can be copied and pasted onto a new layer with the appropriate tools.
Template Size
Templates are created and distributed at a specic size. This size is listed at the bottom left of the template and should
remain at that size when opening, designing upon and creating a PDF from. Additional crop marks
and/or additional canvas size should not be added.
Pink and blue boxes must be completely covered when cover is submitted.

FILE CREATION GUIDE 29
FILE CREATION GUIDE
Additional information about
using a template
1) Spine safety area
If the cover has a spine width greater than 0.35"
(9 mm), the spine safety is 0.0625" (2 mm).
If the spine width is less than 0.35" (9 mm)
the spine safety is 0.03125" (1mm). The pink
box presented on the template will reect the
correct safety size. Books with a page count
below 48 pages cannot contain spine text.
2) Bleed elements
Elements needing to go to the edge of the
cover should be taken beyond the pink safety
area and to the far edge of the blue bleed area.
All non bleed elements need to remain in the pink
safety area.
3) Borders and straight lines
Lightning Source does not recommend us-
ing borders close to the trim / fold areas of the
books. This is because of the slight variances
that may occur during the printing and binding
process. If you choose to use a border please
keep all straight edges an additional 0.125"
(3 mm) inside of the pink safety areas.
COVER SETUP : RTL (RIGHT-TO-LEFT) PERFECT BOUND, SIMPLEX
The cover is built dierently than a standard book whereas the back and front covers are reversed.
To process correctly the cover will need to be placed on the LS template and reversed (as shown below).
1
3
2
1
2
3

30
FILE CREATION GUIDE
Pink (Safe) Area
All text, important images, logos and the barcode should all remain inside the pink area. This area lies 0.125" (3 mm) inside
of the trim area and spine fold area and is safe from being trimmed / wrapped when the book is produced. *For the best
results on the front and back covers, LS recommends keeping text an additional 0.125" (3 mm) inside of the pink safety
boxes (for a full 0.25" / 6 mm safety).
Blue (Bleed) Area
The bleed area is the area which extends 0.125" (3 mm) beyond the trim lines and on each side of the spine. All background
color / images should extend throughout this area. Please note that any important images and text within the blue areas
are at risk of being trimmed or caught within the fold.
White (Template) Area
The template area also contains trim marks, fold marks, book size and spine width information and a barcode for internal
use. Please leave all elements outside of the pink and blue areas unaltered.
Barcode Placement
The barcode may be moved to any location within the pink area of the back cover. The barcode is a live element within
InDesign templates but part of the overall image if using a PDF or EPS. Depending on the software used, when using the
PDF or EPS template the barcode can be copied and pasted onto a new layer with the appropriate tools.
Template Size
Templates are created and distributed at a specic size. This size is listed at the bottom left of the template and should
remain at that size when opening, designing upon and creating a PDF from. Additional crop marks and/or additional canvas
size should not be added.
No Ink Area - Inside Spine
For the inside cover, the spine area and .0625” (2mm) on each side of the spine must be white and contain no color. This
will allow for proper adhesion when the book is produced. Lightning Source reserves the right to place a white, no-ink area
over the inside spine if color is present.
Pink and blue boxes must be completely covered when cover is submitted.
COVER SETUP : RTL (RIGHT-TO-LEFT) PERFECT BOUND, DUPLEX
First page of the template - Outside Cover Second page of the template - Inside Cover

FILE CREATION GUIDE 31
FILE CREATION GUIDE
2
COVER SETUP : RTL (RIGHT-TO-LEFT) PERFECT BOUND, DUPLEX
Additional information about using a template
1) Spine safety area
If the cover has a spine width greater than 0.35" (9 mm), the spine safety is 0.0625" (2 mm). If the spine width is less than
0.35" (9 mm) the spine safety is 0.0325" (1mm). The pink box presented on the template will re ect the correct safety
size. Books with a page count below 48 pages cannot contain spine text.
2) Bleed elements
Elements needing to go to the edge of the cover should be taken beyond the pink safety area and to the far edge of the
blue bleed area. All nonbleed elements need to remain in the pink safety area.
3) Borders and straight lines
Lightning Source does not recommend using borders close to the trim / fold areas of the books. This is because of the
slight variances that may occur during the printing and binding process. If you choose to use a border please keep all
straight edges an additional 0.125" (3 mm) inside of the pink safety areas.
4) No Ink - Inside Spine
To allow for proper adhesion when the book is bound, the inside spine area and .0625” (2mm) on each side of the spine
must be white and contain no color. Lightning Source reserves the right to place a white, no-ink area over the inside
spine if color is present.
2
4
2
1
3
1
2
3

32
FILE CREATION GUIDE
COVER SETUP : RTL (RIGHT-TO-LEFT) CASEBOUND / DUST JACKET
COVER SETUP : CASEBOUND
CASEBOUND :
DUST JACKET :

FILE CREATION GUIDE 33
FILE CREATION GUIDE
COVER SETUP : RTL (RIGHT-TO-LEFT) CASEBOUND / DUST JACKET
The cover is built dierently than a standard book whereas the back and front covers are reversed.
To process correctly the cover will need to be placed on the LS template and reversed (as shown below).
Additional information about
using a template
1) Spine safety area
If the cover has a spine width greater than
0.35" (9 mm), the spine safety is 0.0625"
(2.00mm). If the spine width is less than 0.35"
(9 mm) the spine safety is 0.03125" (1mm).
The pink box presented on the template will
reect the correct safety size.
2) Bleed elements
Elements needing to extend to the edge of the
cover should be taken beyond the pink safety
area and to the outside edge of the blue bleed
area. Artwork that extends to the bleed edge
will be folded and wrapped around the case
board during manufacturing.
Any elements that are not to be aected by
folding or the gutter need to remain in the pink
safety area.
3) Borders and straight lines
Lightning Source does not recommend
using borders close to the trim / fold area
of the books. This is because of the slight
variances that may occur during the printing
and binding process. If you choose to use
a border please keep all straight edges an
additional 0.125" (3 mm) inside of the pink
safety areas.
1
2
4
3
1
3
2 4
4) Gutter Area
Casebound books contain an area where the spine board is connected to the front and back cover boards. This area will be
pliable and have a slight indention. To ensure cover elements are not obscured by the indention, please keep all important
elements outside of the gutter bleed area.
34
FILE CREATION GUIDE
FILE CREATION GUIDE
CREATING A PDF FOR SUBMISSION
CREATING A PDF FOR
SUBMISSION
EXPORTING FROM INDESIGN
OPEN / SAVE A TEMPLATE IN PHOTOSHOP:
SIMPLEX
USING PDF TEMPLATES WITHIN PHOTOSHOP:
DUPLEX

36
FILE CREATION GUIDE
CREATING A PDF FOR SUBMISSION : EXPORTING FROM INDESIGN
To begin, select FILE > Export
Select a location to save your PDF
Beside “Format” select Adobe PDF (Print)
Click “Save”
For “Adobe PDF Preset” choose PDF/X1a:2001 or
PDF/X3:2002
(Please do not modify any of the default settings)
Select Export and a PDF will be created in the
designated folder
For "Duplex Covers," please verify that "All" is
selected under Pages.
INDESIGN
When using InDesign to layout a cover or interior, exporting has become a viable and recommended way of creating a
compliant PDF. Below are instructions for exporting from the latest Macintosh versions of InDesign.Windows versions
may vary slightly.
CREATING A PDF FOR SUBMISSION : EXPORTING FROM INDESIGN AND QUARK
If bleed has been added through Bleed and Slug settings, the “Use Document Bleed Settings” should be checked under
the Marks and Bleeds tab when exporting the nal PDF.
Selecting the check box will export the document at the bleed size.
Please do not select any additional options in this tab.
Bleed added in the Bleed and Slug settings:

FILE CREATION GUIDE 37
FILE CREATION GUIDE
EXPORTING FILES : INDESIGN AND QUARK
CREATING A PDF FOR SUBMISSION : OPEN/SAVE A TEMPLATE IN PHOTOSHOP, SIMPLEX
To maintain the CMYK values and ensure correct resolution and dimensions, we recommend the following procedure
when opening a PDF Cover Template using Adobe Photoshop CS2 and higher.
To save a compliant PDF from within Photoshop, select File > Save As...
If opening a PDF
Format: Photoshop PDF
Save: As a Copy: optional
Layers: optional
Color: Use Proof Setup: not selected
Embed Color Prole: optional
Adobe PDF Preset: PDF/X-1a:2001 or PDF/X-3:2002.
*Leave all additional options unchanged.
Within Photoshop, select File > Open and select your template le.
CREATING A PDF FOR SUBMISSION : OPEN/SAVE A TEMPLATE IN PHOTOSHOP,
SIMPLEX
Crop To: Media Box
Anti-aliased: not selected
Image size: Info located at the bottom left of
template
Constrain Proportions: selected
Resolution: 300ppi
Mode: CMYK Color
Bit Depth: 8 bit

38
FILE CREATION GUIDE
To maintain the CMYK values and ensure correct resolution and dimensions, we recommend the following procedure
when opening a PDF Cover Template using Adobe Photoshop CS2 and higher.
Duplex books allow for printing on the inside of the cover. Templates for duplex covers are 2 page and should be re-
turned to Lightning Source as a 2 page PDF.
The template will open as two separate documents. Design on each template separately and name each le so that the
outside cover is dierent than the inside cover.
To save a compliant multipage PDF from within Photoshop, select File > Automate > PDF Presentation...
Crop To: Media Box
Anti-aliased: not selected
Image size: Info located at bottom left of template
Constrain Proportions: selected
Resolution: 300ppi
Mode: CMYK Color
Bit Depth: 8 bit
Shift click to select both images
Within Photoshop, select File > Open and select your PDF template le.
Under Source Files select Add Open Files or Browse to locate the Outside and Inside cover PDFs. Verify that only 2 les
are listed and arrange the les listing the outside cover rst.
On the right side of the dialogue box, under Output Options, select Save As: Multi-Page Document (DO NOT select
Presentation)
Select Save and you will be prompted to name your le and select a save location.
Select Save again and select the Adobe PDF Preset: PDF/X-1a:2001* or PDF/X-3:2002*
*Leave all additional options unchanged.
CREATING A PDF FOR SUBMISSION : USING PDF TEMPLATES WITHIN PHOTOSHOP, DUPLEX
CREATING A PDF FOR SUBMISSION : USING PDF TEMPLATES WITHIN PHOTOSHOP, DUPLEX
FILE CREATION GUIDE
TRIM SIZES
TRIM SIZES

40
FILE CREATION GUIDE
TRIM SIZE MATRIX
TRIM SIZE MATRIX
Premium Color
38lb/48gsm
Gr oundwood
50lb/74gsm
Creme
50lb/74gsm
White
70lb/104gsm
White
50lb/74gsm
White
70lb/104gsm
White
70lb/104gsm
White
Page Range
18-900 pgs (PF)
18-840 pgs (HC)
18-1050 pgs 18-1200 pgs
18-900 pgs (PF)
18-840 pgs (HC)
18-1200 pgs
18-900 pgs (PF)
18-840 pgs (HC)
18-900 pgs(PF)
18-840 pgs(HC)
inches mm Bindtype
Premium Color
Available
4 x 6 152 x 102
Perfectbound
4 x 7 178 x 102
Perfectbound
4.25 x 7 178 x 108
Perfectbound
Perfectbound
Perfectbound
Perfectbound
Perfectbound
Case Laminate
Digital Cloth™ Cover (Blue/Gray)
Jacketed Cover
Perfectbound
Perfectbound
Perfectbound
Perfectbound
Perfectbound
Perfectbound
Case Laminate
Digital Cloth™ Cover (Blue/Gray)
Jacketed Cover
Perfectbound
Case Laminate
Perfectbound
Case Laminate
Digital Cloth™ Cover (Blue/Gray)
Jacketed Cover
Perfectbound
Case Laminate
Digital Cloth™ Cover (Blue/Gray)
Jacketed Cover
Perfectbound
Perfectbound
Perfectbound
Case Laminate
Perfectbound
Case Laminate
Perfectbound
Perfectbound
Case Laminate
Perfectbound
Case Laminate
Perfectbound
Case Laminate
Perfectbound
Case Laminate
Perfectbound
Case Laminate
Perfectbound
Perfectbound
Perfectbound
Case Laminate
Perfectbound
Perfectbound
Case Laminate
Perfectbound
Case Laminate
GLOSS or MATTE Lamination
8.268 x 11.693
(A4)
297 x 210
11 x 8.5 216 x 280
8.5 x 8.5 216 x 216
8.5 x 9 229 x 216
8.5 x 11 280 x 216
8 x 10.88 276 x 203
8.25 x 10.75 273 x 210
8.25 x 11 280 x 210
7.50 x 9.25 235 x 191
8 x 8 203 x 203
8 x 10 254 x 203
6.14 x 9.21
(Royal 8vo)
7 x 10 254 x 178
7.44 x 9.69
(cr own 4vo)
246 x 189
4.72 x 7.48 190 x 120
6.69 x 9.61
(pi nched crown)
244 x 170
5.5 x 7.5 191 x 140
5.5 x 8.38 213 x 140
5.5 X 8.5
(Demy 8vo)
216 X 140
5.83 x 8.27
(A5)
234 x 156
6.5 x 6.5 165 x 165
6.625 x 10.25 260 x 168
210 X 148
6 x 9 229 x 152
5 x 7
5.5 x 8.25
5.25 x 8 203 x 133
210 x 140
5.06 x 7.81 198 x 129
178 x 127
5 x 8 203 x 127
B&W Avai l abl e
B&W
Color
178 x 111
Color Available
Pr oduct and
Paper Types
4.37 x 7
TRIM SIZES
GLOSS or MATTE lamination
Max 400 pages
Max 400 pages
TRIM SIZES
Note: Blank white cells indicate non-standard sizes that may be available through Custom Trim
DUPLEX COVERS: Perfect bound titles can be printed 4-color duplex (two-sided) covers.11" x 8.5" is not available for Duplex Printing.
PERFORATION: Perforation of interior pages is available for Color 50lb perfect bound products in limited sizes (US Only):
6" x 9", 7" x 10", 7.5" x 9.25", 8" x 10", 8" x 10.88", 8.5" x 9", 8.5" x 11"
JACKETED COVERS: Where available, Jacketed Covers can be set-up with either Case Laminate or Digital Cloth™ Covers.

FILE CREATION GUIDE 41
FILE CREATION GUIDE
DUPLEX COVERS MATRIX
CUSTOM TRIM SIZES
Custom trim sizes are available for Perfect Bound, Case Laminate and Dust Jacket books with size restrictions
on the nished book shown below.
Perfect Bound
5 x 8
6.14 x 9.252
5 x 8
8.5 x 11
Above 5 x 8, Below 8.5 x 11
279mm x 216mm
White Paper* Crème & Groundwood Paper*
Widths available from: 4” to 8.5” or 102mm to 216mm
Lengths available from: 6” to 11” or 152mm to 279mm
Widths available from: 4” to 6.14” or 102mm to 156mm
Lengths available from: 6” to 9.252” or 152mm to 235mm
*See the diagram below for the available custom trim sizes. The nished book must t within these size ranges.
White Paper* Crème & Groundwood Paper*
Widths available from: 5” to 8.5” or 127mm to 216mm
Lengths available from: 8” to 11” or 203mm to 279mm
Widths available from: 5” to 6.14” or 127mm to 156mm
Lengths available from: 8” to 9.252” or 203mm to 235mm
Case Laminate & Dust Jacket
White Paper
5 x 8
6.14 x 9.252
5 x 8
8.5 x 11
Above 5 x 8, Below 6.14 x 9.252
235mm x 156mm
203mm x 127mm
Creme &
Groundwood Paper
Above 4 x 6, Below 6.14 x 9.252
Above 4 x 6, Below 8.5 x 11
6.14 x 9.252
8.5 x 11
4 x 6
4 x 6
Creme &
Groundwood Paper
152mm x 102mm
235mm x 156mm
White Paper
Above 4 x 6, Below 6.14 x 9.252
Above 4 x 6, Below 8.5 x 11
6.14 x 9.252
8.5 x 11
4 x 6
4 x 6
279mm x 216mm
152mm x 102mm
203mm x 127mm
*See the diagram below for the available custom trim sizes. The nished book must t within these size ranges.
*Note that the dimensions of a Dust Jacket must not exceed the maximum size of 6.14 x 9.21in.

42
FILE CREATION GUIDE
Case Laminate
Dust Jacket
The board size for a custom case laminate is calculated by subtracting: .185" (5mm) from the trim size width and adding:
.25" (6mm) to the trim size height. Board sizes will be used in the formulas below to ensure that the cover le is set-up to
the correct full bleed size.
The front and back cover size for a custom dust jacket is calculated by adding: .4375" (5mm) to the trim size width and
adding: .25" (6mm) to the trim size height. Cover sizes will be used in the formulas below to ensure that the cover le is
set-up to the correct full bleed size.
Bleed Width
Bleed Height
* dotted lines represent the fold lines and gutter margins.
0.5" / 13 mm GUTTER / HINGE
0.5" / 13 mm GUTTER / HINGE
0.625" / 16 mm BLEED / FOLD
0.625" / 16 mm BLEED / FOLD
To determine the width and height of your Casebound cover, use the formula below.
Bleed
width
= .625" (16 mm) + Board Width* + .500" (13mm) + spine + .500" (13 mm) + Board Width* + .625" (16 mm)
Bleed height = .625" (16 mm) + Board Height** + .625" (16 mm)
Casebound
Please refer to the Lightning Source File Creation Guide for Minimum / Maximum page count.
* dotted lines represent the bleed area and fold areas.
To determine the width and height of your Dust Jacket cover, use the formula below.
0.25" / 6 mm FOLD
0.25" / 6 mm FOLD
SPINE
BACK COVERBACK FLAP
3.25" (83 mm) 3.25" (83 mm)
FRONT FLAPFRONT COVER
0.125" / 3 mm BLEED
0.125" / 3 mm BLEED
Dust Jacket
Bleed width =
.125" (3 mm) + 3.25" (83 mm) + .25" (6 mm) + Cover Width* + spine + Cover Width* + 3.25" (83 mm) + .25" (6 mm) + .125" (3 mm)
Bleed height = .125" (3 mm) + Cover Height** + .125" (3 mm)
SPINE
BACK COVER BOARD FRONT COVER BOARD
* dotted lines represent the fold lines and gutter margins.
0.5" / 13 mm GUTTER / HINGE
0.5" / 13 mm GUTTER / HINGE
0.625" / 16 mm BLEED / FOLD
0.625" / 16 mm BLEED / FOLD
To determine the width and height of your Casebound cover, use the formula below.
Bleed width = .625" (16 mm) + Board Width* + .500" (13mm) + spine + .500" (13 mm) + Board Width* + .625" (16 mm)
Bleed height = .625" (16 mm) + Board Height** + .625" (16 mm)
Casebound
Please refer to the Lightning Source File Creation Guide for Minimum / Maximum page count.
* dotted lines represent the bleed area and fold areas.
To determine the width and height of your Dust Jacket cover, use the formula below.
0.25" / 6 mm FOLD
0.25" / 6 mm FOLD
SPINE
BACK COVERBACK FLAP
3.25" (83 mm) 3.25" (83 mm)
FRONT FLAPFRONT COVER
0.125" / 3 mm BLEED
0.125" / 3 mm BLEED
Dust Jacket
Bleed width =
.125" (3 mm) + 3.25" (83 mm) + .25" (6 mm) + Cover Width* + spine + Cover Width* + 3.25" (83 mm) + .25" (6 mm) + .125" (3 mm)
Bleed height = .125" (3 mm) + Cover Height** + .125" (3 mm)
SPINE
BACK COVER BOARD FRONT COVER BOARD
Bleed Width
Bleed Height
* dotted lines represent the fold lines and gutter margins.
0.5" / 13 mm GUTTER / HINGE
0.5" / 13 mm GUTTER / HINGE
0.625" / 16 mm BLEED / FOLD
0.625" / 16 mm BLEED / FOLD
To determine the width and height of your Casebound cover, use the formula below.
Bleed width = .625" (16 mm) + Board Width* + .500" (13mm) + spine + .500" (13 mm) + Board Width* + .625" (16 mm)
Bleed height = .625" (16 mm) + Board Height** + .625" (16 mm)
Casebound
Please refer to the Lightning Source File Creation Guide for Minimum / Maximum page count.
* dotted lines represent the bleed area and fold areas.
To determine the width and height of your Dust Jacket cover, use the formula below.
0.25" / 6 mm FOLD
0.25" / 6 mm FOLD
SPINE
BACK COVERBACK FLAP
3.25" (83 mm) 3.25" (83 mm)
FRONT FLAPFRONT COVER
0.125" / 3 mm BLEED
0.125" / 3 mm BLEED
Dust Jacket
Bleed width =
.125" (3 mm) + 3.25" (83 mm) + .25" (6 mm) + Cover Width* + spine + Cover Width* + 3.25" (83 mm) + .25" (6 mm) + .125" (3 mm)
Bleed height = .125" (3 mm) + Cover Height** + .125" (3 mm)
SPINE
BACK COVER BOARD FRONT COVER BOARD
Bleed Width = .625" (16mm) + Board Width + .5" (13mm) + Spine + .5" (13mm) + Board WIdth + .625 (16mm)
Bleed Height = .625" (16mm) + Board Height + .625" (16mm)
Bleed Width = .125" (3mm) + .325" (83mm) + .25" (6mm) + Cover Width + Spine + Cover Width + .25" (6mm) + .325" (83mm) + .125" (3mm)
Bleed Height = .125" (3mm) + Board Height + .125" (3mm)
