
Analyse your data: Best practices for data cleaning Page 1 | 13
BEST PRACTICES FOR D ATA CLEANING
Table of contents
I. Basic steps for cleaning your data .......................................................................... 1
II. How to clean your data in Excel ............................................................................ 2
II.1. Get rid of extra spaces .................................................................................... 2
II.2. Select and treat all blank cells (missing data) ................................................. 3
II.3. Convert Numbers stored as text into numbers ................................................ 4
II.4. Remove duplicates .......................................................................................... 4
II.5. Highlight and correct errors ............................................................................ 7
II.6. Change text to lower/upper/proper case ........................................................ 9
II.7. Use Text to Columns to parse data in Excel ..................................................... 9
II.8. Delete all formatting ..................................................................................... 11
II.9. Use “find and replace” to clean data in Excel ................................................ 12
The process of data cleaning can be done using different techniques and software (Excel,
STATA, SPSS etc.). This tutorial focuses on general principles of data cleaning, zooming into
how to implement data cleaning in Excel, as this is the most common and versatile tool used
by Tdh.
I. Basic steps for cleaning your data
1
Cleaning up your databases ensures that you always have an up-to-date database that can be
analysed without the risk of producing misinformation for those who will then make decisions.
Database cleaning is primarily logic, analysing the consistency of data and performing
triangulation with other information that may be available.
Remember that the best way of reducing the data cleaning workload is to plan your data
collection carefully from the start
2
, including the analysis you will want to do in the
planning, and testing it with fake data before you deploy!
When cleaning our databases, we are looking for the following inconsistencies and errors:
Percentages (or total of percentages) > or < than 100%
1
Source : https://support.office.com/en-us/article/top-ten-ways-to-clean-your-data-2844b620-677c-47a7-ac3e-
c2e157d1db19
2
https://www.mdc-toolkit.org/design-your-forms/
checking
logical
coherence
checking
reliability
correcting
errors
data
cleaning

Analyse your data: Best practices for data cleaning Page 2 | 13
Sums that do not match (i.e. total number of HH members different from sum of
male/female in the HH...)
Special characters that were transformed when exported
Wrong interpretation of questions by enumerators or interviewees
“0” instead of an empty cell or “N.A.” (i.e. for a numeric question that has not been
answered)
Empty cells that should be filled
Typing errors (“-5” people in the HH)
Unit issues (age in months/years, meters/feet, etc.), date or cell formats
Etc etc.
There are 4 recommended basic steps for cleaning your data:
Before, during and after each of these steps, you should check (visually or by using filters
etc.) that you did not do any changes that you were not expecting!
1. Create a backup copy of the original data in a separate workbook.
What happens if you do not create a backup copy of the original data and you
inadvertently delete a column containing data (or another element) in your
database?
Well, if it is not in Kobo anymore, that data is lost forever and there is no way to
recover it. This is why it is very important to create a backup copy of the original data
in a separate workbook!
2. Ensure that the data is in a tabular format of rows and columns with: similar data in each
column, all columns and rows visible, no merged cells, no multiple answers in one cell and
no blank rows within the range.
3. Carry out tasks that don’t require column manipulation first, such as getting rid of the
extra spaces or using the “Find and replace” dialog box.
4. Next, carry out tasks that require column manipulation.
II. How to clean your data in Excel
3
4
II.1. Get rid of extra spaces
In order to get rid of extra spaces, you can use the TRIM function in Excel. TRIM Function
will remove all spaces from text except for single spaces between words. The function syntax
is TRIM(text), where (text) is a required argument of the function and refers to the text from
which you want spaces removed.
First, type in your formula next to your first text entry. Then drag the formula down to cover
all your text entries as below. All you text entries will then get cleaned from the extra spaces.
3
Sources : https://trumpexcel.com/clean-data-in-excel/ and https://www.youtube.com/watch?v=e0TfIbZXPeA
4
The Excel version that was used for this tutorial is Excel 2011. Also, should you have any issues or questions, do not
hesitate to search for your issue/question on the web as there are a multitude of sources out there likely to help you.

Analyse your data: Best practices for data cleaning Page 3 | 13
II.2. Select and treat all blank cells (missing data)
You might want to detect all blank cells, as it could represent missing data, and replace it with
“Missing Data” for example. In order to do so, select the entire dataset, click on “Find and
Select” and then on “Go to special” where a Go to special dialogue box will open.
In the dialogue box, select the “Blanks” option in order to make your blank cells appear in
grey.
This will select all the blank cells in your dataset at the same time. The first selected cell will
be blank (and not light grey like the others) as this cell is the active cell. In order to input
M/D in all the blank cells (=missing data), type in this text in the active cell and hit
Ctrl+Enter.

Analyse your data: Best practices for data cleaning Page 4 | 13
II.3. Convert Numbers stored as text into numbers
In order to convert a number stored as text into a number, go to the “Formatting box” and
type in “General”. This will transform all numbers stored as text into numbers (i.e. they are
aligned to the right of the cell).
Numbers are always aligned to the right of cell, whereas text gets aligned to the left of the
cell.
II.4. Remove duplicates
You first have to find where the duplicates are. Select the whole dataset, go to “Home” on
“Conditioning formatting”, then on “Highlight Cell Rules” and click on “Duplicate
values”.

Analyse your data: Best practices for data cleaning Page 5 | 13
Excel then gives you the option to highlight duplicates in light red, where you will have to click
on “OK” to approve.
It will then highlight all the duplicated values.
In the example below you can see that the Beneficiary ID 1116 has been highlighted only
in the “Beneficiary ID” column and not in the “Distribution Date” column. This is due to the
fact that those are not true duplicates as the dates of distribution for the two entries are
different: thus they are two different data entries.
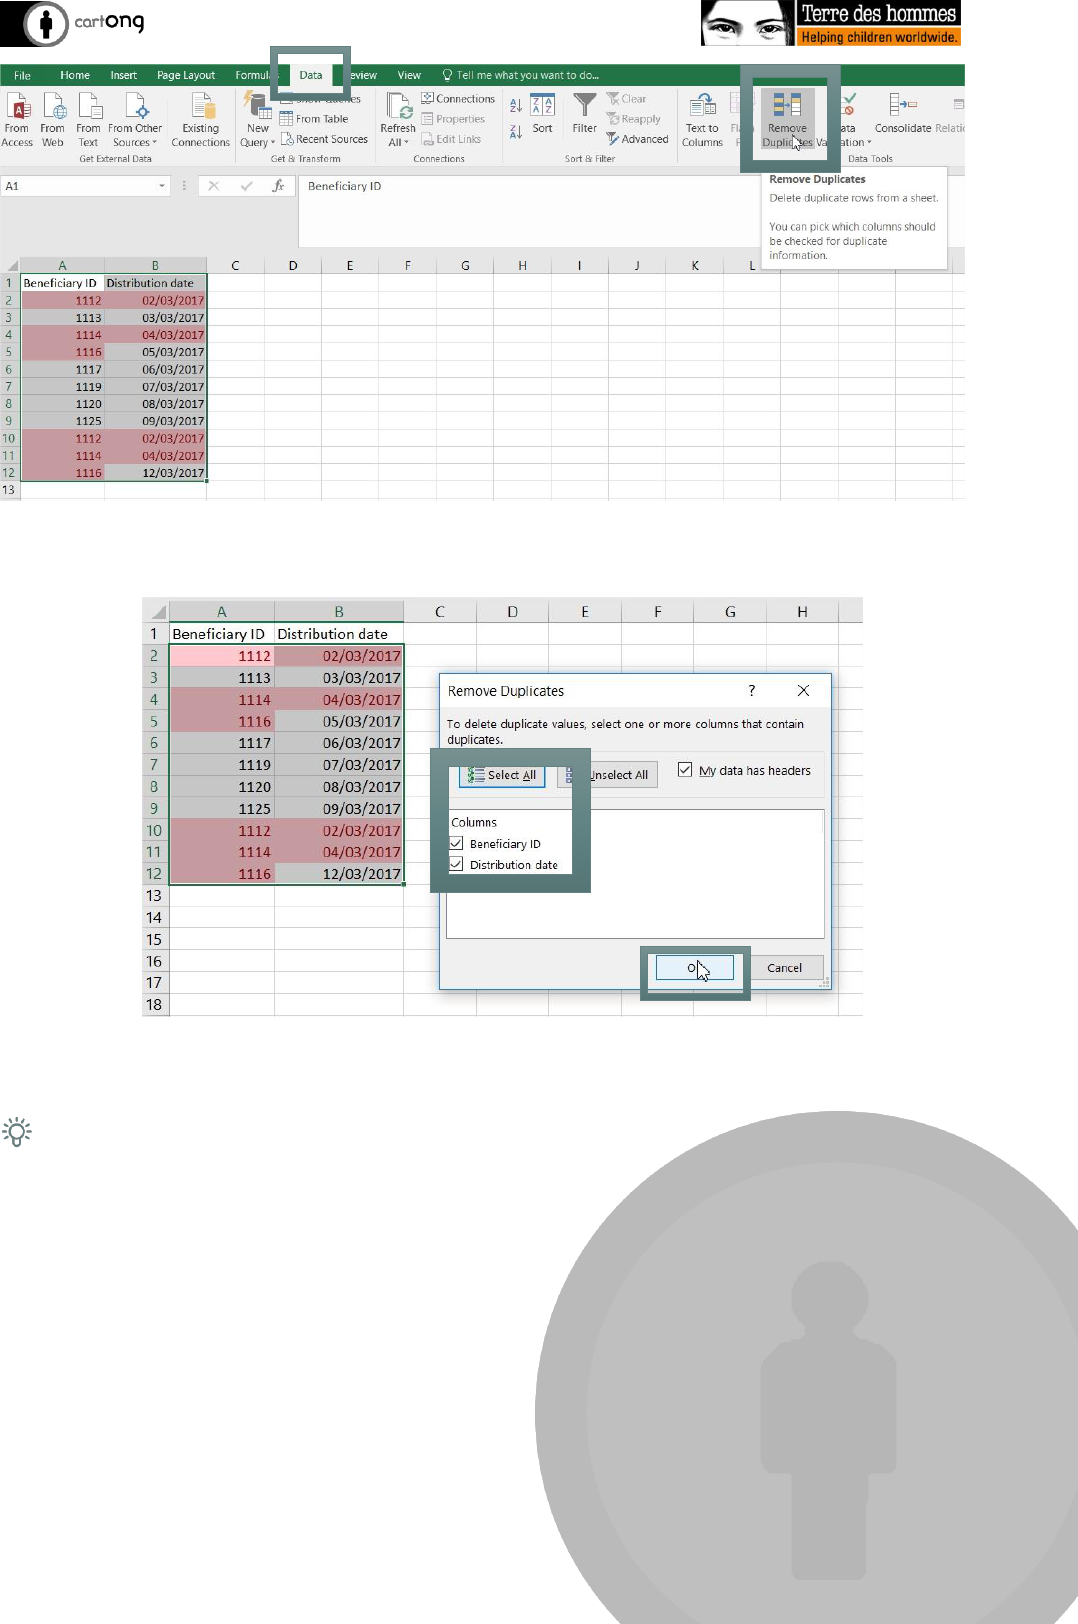
Then, go to “Data” and click on “Remove Duplicates” in order to delete the real duplicates.
Analyse your data: Best practices for data cleaning Page 6 | 13
Excel will then ask you to select the columns that contain the duplicates. Select them all and
click on “OK”.
It then informs you how many duplicates have been deleted and how many data entries
(unique values) have been kept.
As you can see, the 1116 “false” duplication has been kept.

Analyse your data: Best practices for data cleaning Page 7 | 13
II.5. Highlight and correct errors
In the table below, an indicator named “Distributed quantity per household member” has been
computed from the “Quantity distributed” and “Number of people in HH” indicators. However,
some values have errors (as there are some missing values in the “number of people in HH”
indicator).
In order to detect there errors, go to “Home”, “Conditional Formatting” and click on “New
Rule”.

Analyse your data: Best practices for data cleaning Page 8 | 13
In the “New Formatting Rule” box that opens, click on “Format only cells that contain”,
then select “Errors” and choose the colour of the “Format”.
Excel will then highlight all the cells containing an error. You can now therefore filter the
associated columns by colour to work directly on the cells with errors.

Analyse your data: Best practices for data cleaning Page 9 | 13
II.6. Change text to lower/upper/proper case
In the example below, names are written in different ways. You can harmonize them by using
LOWER/UPPER/PROPER functions.
If you want to make them be fully written in lower cases, you can use the LOWER(text)
function, where (text) refers to the text to be modified. Once you have entered your function
for one data entry, drag the formula down to cover all the data entries that you want to
modify.
If you want to make them be fully written in upper cases, you can use the UPPER(text)
function, where (text) refers to the text to be modified. Once you have entered your function
for one data entry, drag the formula down to cover all the data entries that you want to
modify.
If you want to have the first letters of the first and last names be written in upper cases and
the rest in lower cases, you can use the PROPER(text) function, where (text) refers to the
text to be modified. Once you have entered your function for one data entry, drag the formula
down to cover all the data entries that you want to modify.
II.7. Use Text to Columns to parse data in Excel
It might happen that you obtain a .csv version of the database, where all the data is
concentrated in a single column (separated by a coma, tab etc.) such as in the example below.

Analyse your data: Best practices for data cleaning Page 10 | 13
In order to do so, go to “Data” and click on “Text to Columns”.
In the “Convert Text to Columns Wizard” box that opens, select “Delimited” and then
click on “Next”.
Excel will then ask the way in which it should separate your data. As a comma separates your
different data entries in our example here, select “Comma” and then click on “Next”. Other
options could be “Tab”, “semicolon”, “Space” and “Other”.

Analyse your data: Best practices for data cleaning Page 11 | 13
It will then ask the format to which the data should be separated to. Select “General” and
then click on ”Finish”.
Your data entries are now parsed in different columns on Excel.
II.8. Delete all formatting
If you still have a lot of conditional formatting in your data and wish to get rid of it as it is not
useful anymore, you can first select all your dataset, go to “Home”, then “Clear” and click on
“Clear Formatting”.

Analyse your data: Best practices for data cleaning Page 12 | 13
II.9. Use “find and replace” to clean data in Excel
If you have the same data entries in your dataset but written in different ways (i.e. with
different spellings etc.), the “Find and replace” option in Excel can become very useful. In
order to use it, first find all the data to be replaced by going to “Home”, to “Find” and then
click on “Find all”. Check that you will not be replacing data from other columns that you
wouldn’t expect to. Then, select all your data that has to be cleaned, go to “Home”, to “Find
& Select” and click on “Replace”.
In the “Find and Replace” box that opens, enter the values that you want to be replaced in
“Find what”, enter the values that you want to replace them with in “Replace with” and
then click on “Replace all”.
Excel will then inform you of how many values have been replaced/modified.

Analyse your data: Best practices for data cleaning Page 13 | 13
Note of course that this tutorial is not comprehensive as data cleaning can take so many
forms!
