
NiceLabel 2019 Designer User
Guide
Rev-2020-11 ©NiceLabel 2020.
PowerForms Edition
Table of Contents
1. Introduction ..................................................................................................................... 12
1.1. Basic Designer Concepts ...................................................................................... 12
1.1.1. Label .......................................................................................................... 12
1.1.2. Form .......................................................................................................... 13
1.1.3. Solution ..................................................................................................... 13
1.1.4. Object ........................................................................................................ 14
1.1.5. Document .................................................................................................. 14
1.1.6. Design Surface ........................................................................................... 15
1.1.7. Data Sources ............................................................................................. 15
1.1.8. Dynamic Data Manager ............................................................................... 16
1.1.9. Dynamic Data Explorer ............................................................................... 17
1.1.10. Layers ...................................................................................................... 17
1.1.11. Solution Explorer ...................................................................................... 18
1.1.12. Actions Editor ........................................................................................... 18
1.1.12.1. Ribbon .......................................................................................... 19
1.1.12.2. Actions Explorer ............................................................................ 20
1.1.12.3. Editing eld ................................................................................... 21
1.2. Keyboard and Mouse Support ............................................................................... 22
1.2.1. Ecient Use of Keyboard and Mouse .......................................................... 22
1.2.2. Mouse Wheel Support ................................................................................ 23
1.2.3. Keyboard Shortcuts ................................................................................... 23
1.3. Options (Conguring the Program) ......................................................................... 24
2. Workspace Overview ....................................................................................................... 26
2.1. Landing Page ........................................................................................................ 27
2.2. Object and Explorer Panels .................................................................................... 28
2.3. Layers Panel ......................................................................................................... 29
2.3.1. Working with the Layers panel ..................................................................... 30
2.3.2. Positioning your objects using layers ........................................................... 31
2.3.3. For easier designing: layer states ................................................................ 31
2.3.4. Keeping layers organized using the right-click menu .................................... 33
2.4. Objects Panel ........................................................................................................ 34
2.5. Printer and Status Bar ............................................................................................ 35
2.5.1. Status Bar Printer Selection ........................................................................ 36
2.5.2. Windows Printing Mode .............................................................................. 36
2.6. Tabs and Ribbons .................................................................................................. 37
2.6.1. Tabs ........................................................................................................... 37
2.6.2. Ribbon ....................................................................................................... 37
2.6.3. File Tab ...................................................................................................... 38
2.6.3.1. Start ................................................................................................ 39
2.6.3.2. New ................................................................................................ 39
2.6.3.3. Open ............................................................................................... 40
2.6.3.4. File Tab Import ................................................................................. 40
2.6.3.5. Save ................................................................................................ 40
2
2.6.3.6. Save as ........................................................................................... 41
2.6.3.7. Print ................................................................................................ 41
2.6.3.8. Store/Recall Printing Mode ............................................................... 41
2.6.3.9. Protection ....................................................................................... 42
2.6.3.10. Options (Conguring the Program) ................................................. 43
2.6.3.11. About ............................................................................................ 50
2.6.4. Home Tab ................................................................................................... 52
2.6.4.1. Clipboard ........................................................................................ 53
2.6.4.2. Font ................................................................................................ 54
2.6.4.3. Action ............................................................................................. 54
2.6.4.4. Management ................................................................................... 56
2.6.4.5. Align ................................................................................................ 56
2.6.4.6. Objects ........................................................................................... 56
2.6.5. Data Tab ..................................................................................................... 57
2.6.5.1. Step-by-Step Database Wizard ........................................................ 57
2.6.5.2. Data Source Management ................................................................ 58
2.6.6. View Tab .................................................................................................... 59
2.6.6.1. Zoom .............................................................................................. 59
2.6.6.2. Object Markers Visibility .................................................................. 60
2.6.6.3. Alignment and Gridline Guides ......................................................... 60
2.6.6.4. Rotation .......................................................................................... 60
2.6.7. Solution Tab ............................................................................................... 61
2.6.7.1. Clipboard ........................................................................................ 61
2.6.7.2. New ................................................................................................ 62
2.6.7.3. Action ............................................................................................. 62
2.6.7.4. Import and Export ............................................................................ 62
2.6.8. Contextual Tabs ......................................................................................... 63
2.6.8.1. Label-specic Contextual Tabs ........................................................ 63
2.6.8.2. Form-specic Contextual Tabs ......................................................... 77
2.6.8.3. Document Storage .......................................................................... 83
2.6.9. Help Tab ..................................................................................................... 84
2.6.10. RFID Tag ................................................................................................... 85
2.6.10.1. Tag ................................................................................................ 85
2.6.10.2. Content ......................................................................................... 86
2.6.10.3. Security ........................................................................................ 87
2.6.10.4. Settings ........................................................................................ 90
2.6.10.5. RFID Read and Print ....................................................................... 91
2.7. Design Surface ..................................................................................................... 93
2.7.1. Design Surface Elements ............................................................................ 93
2.7.2. Design Surface Editing Actions ................................................................... 94
2.7.3. Visual Aid Elements .................................................................................... 95
2.7.4. Object Properties Window .......................................................................... 95
2.8. Document Properties and Management Dialogs ..................................................... 96
2.8.1. Label Properties ......................................................................................... 96
2.8.2. Form Properties ......................................................................................... 97
2.8.3. Dynamic Data Manager ............................................................................... 98
3
2.8.3.1. Dynamic Data Manager Ribbon ........................................................ 99
2.8.3.2. Dynamic Data Explorer ................................................................... 102
2.9. Object Properties Editor ...................................................................................... 103
2.10. Context Menus .................................................................................................. 103
2.10.1. Design Surface Context Menu ................................................................. 103
2.10.2. Object Context Menu .............................................................................. 104
2.10.3. Group Context Menu .............................................................................. 105
3. Label ............................................................................................................................. 108
3.1. New Label Setup Wizard ...................................................................................... 108
3.1.1. Step 1: Select the Printer .......................................................................... 109
3.1.2. Step 2: Set the Page Size .......................................................................... 111
3.1.3. Step 3: Select the Label Layout ................................................................. 112
3.1.4. Step 4: Specify the Label Dimensions ....................................................... 112
3.1.5. Step 5: Summary ...................................................................................... 112
3.2. Label Properties .................................................................................................. 113
3.2.1. Printer ...................................................................................................... 114
3.2.2. Label Dimensions ..................................................................................... 118
3.2.3. Paper ....................................................................................................... 119
3.2.4. Stocks ..................................................................................................... 120
3.2.5. Style ........................................................................................................ 121
3.2.6. Batch Printing ........................................................................................... 122
3.2.7. Cutter ...................................................................................................... 124
3.2.8. Info .......................................................................................................... 125
3.3. Label Objects ...................................................................................................... 125
3.3.1. Text .......................................................................................................... 126
3.3.1.1. Source .......................................................................................... 126
3.3.1.2. Style ............................................................................................. 127
3.3.1.3. Eects .......................................................................................... 128
3.3.1.4. Position ......................................................................................... 128
3.3.1.5. Relative position ............................................................................ 129
3.3.1.6. General ......................................................................................... 130
3.3.2. Text Box ................................................................................................... 131
3.3.2.1. Source .......................................................................................... 131
3.3.2.2. Style ............................................................................................. 132
3.3.2.3. Text Fit .......................................................................................... 133
3.3.2.4. Eects .......................................................................................... 134
3.3.2.5. Boundaries .................................................................................... 134
3.3.2.6. Position ......................................................................................... 135
3.3.2.7. General ......................................................................................... 136
3.3.3. Rich Text Box ............................................................................................ 137
3.3.3.1. Source .......................................................................................... 137
3.3.3.2. Style ............................................................................................. 138
3.3.3.3. Text Fit .......................................................................................... 139
3.3.3.4. Position ......................................................................................... 139
3.3.3.5. Relative Position ............................................................................ 140
3.3.3.6. General ......................................................................................... 141
4
3.3.3.7. Rich Text Box Editor ....................................................................... 141
3.3.4. Barcode ................................................................................................... 143
3.3.5. Picture ..................................................................................................... 143
3.3.5.1. Source .......................................................................................... 144
3.3.5.2. Base64 encoded graphics .............................................................. 144
3.3.5.3. BLOB elds support ....................................................................... 145
3.3.5.4. Style ............................................................................................. 145
3.3.5.5. Position ......................................................................................... 146
3.3.5.6. General ......................................................................................... 148
3.3.6. Rectangle ................................................................................................. 149
3.3.6.1. Position ......................................................................................... 150
3.3.6.2. General ......................................................................................... 152
3.3.7. Line ......................................................................................................... 153
3.3.7.1. Position ......................................................................................... 154
3.3.7.2. General ......................................................................................... 154
3.3.8. Ellipse ...................................................................................................... 156
3.3.8.1. Position ......................................................................................... 157
3.3.8.2. General ......................................................................................... 159
3.3.9. Inverse ..................................................................................................... 160
3.3.9.1. About ............................................................................................ 160
3.3.9.2. Position ......................................................................................... 160
3.3.9.3. General ......................................................................................... 162
3.3.10. Reports .................................................................................................. 163
3.3.10.1. Report elements .......................................................................... 164
3.3.10.2. Creating new reports ................................................................... 166
3.3.10.3. Adding objects to reports ............................................................ 168
3.3.10.4. Conguring Repeater Denitions .................................................. 169
3.3.10.5. Adding headers and footers ......................................................... 170
3.3.10.6. Adding dynamic objects to headers and footers ........................... 171
3.3.10.7. Adding page numbers .................................................................. 172
3.4. Working with Objects .......................................................................................... 172
3.4.1. Adding Objects ........................................................................................ 173
3.4.2. Adding Objects with Connected Data Source ............................................ 173
3.4.3. Grouping .................................................................................................. 174
3.4.4. Rotating ................................................................................................... 175
3.4.5. Object Resizing ........................................................................................ 175
3.4.5.1. Graphic Object resizing .................................................................. 176
3.4.5.2. Automatic Resizing with Form ......................................................... 176
3.4.5.3. Table Column Resizing ................................................................... 176
3.5. Label Saving ....................................................................................................... 177
3.5.1. Label Files vs. Solution Files ...................................................................... 177
3.5.2. Label Storage ........................................................................................... 177
4. Barcode ......................................................................................................................... 178
4.1. Source ................................................................................................................ 178
4.2. Barcode .............................................................................................................. 178
4.3. Check Digit ......................................................................................................... 179
5
4.4. Human Readable ................................................................................................. 180
4.5. Bearer Bar ........................................................................................................... 181
4.6. Details ................................................................................................................ 181
4.7. Position .............................................................................................................. 181
4.8. Relative Position .................................................................................................. 182
4.9. General ............................................................................................................... 183
4.10. Available Barcodes and Their Settings ............................................................... 185
4.10.1. 2D Barcodes .......................................................................................... 193
4.10.2. GS1 DataBar Subtypes ........................................................................... 195
4.10.2.1. Linear Symbol Types .................................................................... 195
4.10.2.2. Composite Symbol Types ............................................................ 196
4.11. 1D Barcode Details ............................................................................................ 197
4.12. 2D Barcode Details ............................................................................................ 198
4.12.1. Code Page ............................................................................................. 198
4.12.2. Columns ................................................................................................ 199
4.12.3. Compaction Mode .................................................................................. 199
4.12.4. Encoding ................................................................................................ 199
4.12.5. ECI Encoding .......................................................................................... 199
4.12.6. Error Correction Level ............................................................................. 200
4.12.7. Format ................................................................................................... 200
4.12.8. Rows ...................................................................................................... 201
4.12.9. Symbol Version ...................................................................................... 201
4.12.10. Truncated ............................................................................................. 201
4.12.11. Version ................................................................................................ 201
4.13. GS1 DataBar Specics ...................................................................................... 201
4.13.1. GS1 DataBar Source ............................................................................... 201
4.13.2. GS1 DataBar Properties .......................................................................... 202
4.14. Maxicode Barcode Content ............................................................................... 202
4.15. USPS Intelligent Mail Barcode Content ............................................................... 204
5. Printing .......................................................................................................................... 205
5.1. Print Pane (Default Printing Form) ......................................................................... 205
5.2. Edit Printing Form ................................................................................................ 209
5.3. Printing Procedure .............................................................................................. 209
5.4. Store/Recall Printing Mode .................................................................................. 211
5.5. Optimize Printing Speed ...................................................................................... 212
5.6. Printing from Databases ...................................................................................... 213
5.7. Changing Common Printer Settings ..................................................................... 214
5.8. Changing Dithering Options ................................................................................ 215
5.9. Double-sided Printing .......................................................................................... 216
5.10. Dening Unprintable Area .................................................................................. 217
6. Dynamic Data Sources ................................................................................................... 219
6.1. Variables ............................................................................................................. 219
6.1.1. Variable .................................................................................................... 220
6.1.1.1. General ......................................................................................... 220
6.1.1.2. Text ............................................................................................... 224
6.1.1.3. Date .............................................................................................. 225
6
6.1.1.4. Time .............................................................................................. 227
6.1.1.5. Floating Point ................................................................................ 228
6.1.1.6. Currency ....................................................................................... 230
6.1.2. Current Date ............................................................................................ 233
6.1.2.1. General Tab ................................................................................... 233
6.1.2.2. Output Rules ................................................................................. 234
6.1.2.3. Date Formats ................................................................................. 234
6.1.3. Current Time ............................................................................................ 235
6.1.3.1. General Tab ................................................................................... 235
6.1.3.2. Output Rules ................................................................................. 236
6.1.3.3. Time Formats ................................................................................ 236
6.1.4. Counter ................................................................................................... 237
6.1.4.1. General Tab ................................................................................... 237
6.1.5. Prompting ................................................................................................ 241
6.1.6. Printing Form Variables ............................................................................. 241
6.2. Functions ............................................................................................................ 243
6.2.1. Subset ..................................................................................................... 245
6.2.2. Concatenate ............................................................................................ 246
6.2.3. Date Oset .............................................................................................. 247
6.2.4. Linear ...................................................................................................... 248
6.2.5. VBScript .................................................................................................. 249
6.2.6. VBScript Expression ................................................................................. 250
6.2.6.1. Script Editor .................................................................................. 250
6.2.7. Python Script ........................................................................................... 252
6.2.8. HIBC ........................................................................................................ 253
6.2.9. GS1-128 .................................................................................................. 254
6.2.10. ANSI MH10.8.2 (ASC) .............................................................................. 255
6.2.11. Transfer Data Syntax for High Capacity ADC Media .................................. 256
6.2.12. Read from File ........................................................................................ 258
6.2.13. NDEF Message ....................................................................................... 258
6.3. Databases .......................................................................................................... 260
6.3.1. Supported Database Types ....................................................................... 260
6.3.2. Database Connection Options .................................................................. 261
6.3.3. Step-by-Step Database Wizard ................................................................. 262
6.3.3.1. Adding a Database ......................................................................... 262
6.3.3.2. Database Wizard for Excel Files ...................................................... 263
6.3.3.3. Database Wizard for Access Database ........................................... 266
6.3.3.4. Database Wizard for Microsoft SQL Server Database ...................... 269
6.3.3.5. Database Wizard for Text Files ........................................................ 272
6.3.3.6. Database Wizard for Oracle Database ............................................. 274
6.3.3.7. Database Wizard for MySQL Database ............................................ 277
6.3.3.8. Database Wizard for Adding Databases via OLE DB ......................... 280
6.3.3.9. Database Wizard for ODBC Data Sources ....................................... 284
6.3.3.10. Database Editing .......................................................................... 287
6.3.4. Manual Database Connection Setup ......................................................... 290
6.3.4.1. Connect to Microsoft Excel File ...................................................... 290
7
6.3.4.2. Connect to Microsoft Access File ................................................... 293
6.3.4.3. Connect to Microsoft SQL Server Database .................................... 295
6.3.4.4. Connect to Text File ....................................................................... 298
6.3.4.5. Connect to Oracle Database .......................................................... 300
6.3.4.6. Connect to MySQL Database ......................................................... 304
6.3.4.7. Connect to Other Databases (OLE DB) ............................................ 306
6.3.4.8. Connect to ODBC Data Source ....................................................... 310
6.3.4.9. Database Table Conguration ........................................................ 312
6.3.4.10. Database Field Conguration ....................................................... 316
6.3.4.11. Databases with Custom SQL Queries ........................................... 318
6.3.4.12. Database Connection Conguration ............................................. 319
6.3.4.13. Using Text File Structure Wizard ................................................... 320
6.3.4.14. Database Connection Conguration for Text Files ......................... 322
6.4. Internal Variables ................................................................................................. 324
6.5. Global Variables .................................................................................................. 325
6.5.1. Adding Global Variables as Object Data Sources ........................................ 326
6.5.2. Global Variable Conguration .................................................................... 327
6.5.2.1. General Tab ................................................................................... 327
6.6. Adding and Deleting Data Sources ....................................................................... 329
6.7. Groups of Permitted Input Characters .................................................................. 330
6.8. Special Character Shortcuts ................................................................................ 330
7. Solutions ....................................................................................................................... 333
7.1. Create or Edit a Solution ...................................................................................... 333
7.2. Accessing Files in Solution .................................................................................. 334
7.3. Create or Edit a Label in a Solution ....................................................................... 334
7.4. Form ................................................................................................................... 335
7.4.1. Create or Edit a Form ................................................................................ 335
7.4.2. Form Properties ....................................................................................... 336
7.4.2.1. Basic Settings ............................................................................... 337
7.4.2.2. Additional Settings ........................................................................ 339
7.4.2.3. Style ............................................................................................. 339
7.4.2.4. Tab Order ...................................................................................... 340
7.4.2.5. F1 Help .......................................................................................... 340
7.4.2.6. Events ........................................................................................... 340
7.4.2.7. Variable Events .............................................................................. 341
7.4.2.8. Serial Port Data .............................................................................. 341
7.4.2.9. Info ............................................................................................... 343
7.4.3. Adding Objects to a Form ......................................................................... 343
7.4.4. Form Objects ........................................................................................... 343
7.4.4.1. Frame ............................................................................................ 345
7.4.4.2. Text ............................................................................................... 347
7.4.4.3. Picture .......................................................................................... 350
7.4.4.4. Button ........................................................................................... 352
7.4.4.5. Button Group ................................................................................. 356
7.4.4.6. Edit Field ....................................................................................... 360
7.4.4.7. Memo Field .................................................................................... 364
8
7.4.4.8. Combo Box ................................................................................... 367
7.4.4.9. List Box ......................................................................................... 371
7.4.4.10. Radio Group ................................................................................ 375
7.4.4.11. Checkbox .................................................................................... 379
7.4.4.12. Database Table ............................................................................ 382
7.4.4.13. Database Navigator ..................................................................... 387
7.4.4.14. Database Search ......................................................................... 389
7.4.4.15. Label Preview .............................................................................. 391
7.4.4.16. Data Initialization ......................................................................... 394
7.4.4.17. Printer Settings ............................................................................ 400
7.4.4.18. Print Quantity .............................................................................. 402
7.4.5. Run Form ................................................................................................. 405
7.4.6. Form Debugger ........................................................................................ 406
7.5. How To ................................................................................................................ 407
7.5.1. Printing with Forms ................................................................................... 407
7.5.1.1. Simple Printing with Forms ............................................................. 408
7.5.1.2. Printing Labels whose Names are Read from Database .................... 409
7.5.2. Import and Export .................................................................................... 410
7.6. Dene Actions .................................................................................................... 411
7.6.1. Actions Editor ........................................................................................... 412
7.6.1.1. Ribbon .......................................................................................... 413
7.6.1.2. Actions Explorer ............................................................................ 414
7.6.1.3. Editing eld ................................................................................... 414
7.6.2. Available Actions ...................................................................................... 415
7.6.2.1. General ......................................................................................... 417
7.6.2.2. Printer ........................................................................................... 428
7.6.2.3. Form ............................................................................................. 445
7.6.2.4. Variables ....................................................................................... 460
7.6.2.5. Data and Connectivity .................................................................... 468
7.6.2.6. File Operations .............................................................................. 489
7.6.2.7. Flow Control .................................................................................. 496
7.6.2.8. Other ............................................................................................ 503
7.6.3. Combining Values in an Object .................................................................. 519
7.6.4. Access to Shared Network Resources ....................................................... 520
7.6.4.1. User privileges for service mode .................................................... 520
7.6.4.2. UNC notation for network shares .................................................... 520
7.6.4.3. Notation for accessing les in Control Center ................................. 521
7.6.4.4. Printer drivers availability ............................................................... 521
7.6.5. Search Order for Requested Files .............................................................. 521
7.6.6. Spooler Status ID ..................................................................................... 522
8. NiceLabel Print .............................................................................................................. 523
8.1. Managing Document Locations ........................................................................... 523
8.2. Opening the Documents ..................................................................................... 523
8.3. Printing Using NiceLabel Print .............................................................................. 524
9. Reference ...................................................................................................................... 525
9.1. Command File Types ........................................................................................... 525
9
9.1.1. JOB Command File ................................................................................... 525
9.1.1.1. JOB Command File Denition ......................................................... 525
9.1.1.2. JOB Command File Example .......................................................... 531
9.1.2. XML Command File ................................................................................... 531
9.1.2.1. XML Command File Denition ........................................................ 532
9.1.2.2. XML Command File Example .......................................................... 536
9.1.3. CSV Command File ................................................................................... 536
9.1.3.1. CSV Command File Denition ......................................................... 537
9.1.3.2. CSV Command File Example .......................................................... 537
9.2. Variables Export File Denition ............................................................................ 537
9.2.1. .NLVR File Denition .................................................................................. 538
9.2.2. XML Schema Denition (XSD) for Label Specication XML ......................... 540
9.2.3. .NLVR File Example ................................................................................... 544
9.3. Oracle WMS File Denition .................................................................................. 545
9.3.1. XML DTD .................................................................................................. 546
9.3.2. Sample Oracle XML .................................................................................. 546
9.4. Importing Variables from Legacy Labels ............................................................... 547
9.5. Licensing and Printer Usage ................................................................................ 548
9.6. Spell Checking Support ....................................................................................... 549
9.7. Session Printing .................................................................................................. 551
9.8. Tracing Mode ...................................................................................................... 552
9.9. Synchronizing Cutter Settings with Printer ........................................................... 553
10. How To ........................................................................................................................ 555
10.1. Insert Characters with <#hex_code> Syntax ....................................................... 555
10.2. Insert Characters with <Alt>+<ASCII_code> ....................................................... 555
10.3. Automatic Font Replacement ............................................................................. 556
10.3.1. Conguring Font Mapping ...................................................................... 556
10.3.2. Sample Mapping Conguration ............................................................... 557
10.4. Formatting Allergens for Food Ingredients ......................................................... 557
10.4.1. Prerequisites .......................................................................................... 558
10.4.2. Applying formatting to allergens ............................................................. 558
10.4.3. Syntax of Allergen formatting functions ................................................... 560
10.4.3.1. User provided list of allergens ...................................................... 560
10.4.3.2. Allergens from Microsoft Excel spreadsheet ................................. 560
10.4.3.3. Allergens from Microsoft Access database ................................... 561
10.4.3.4. Allergens from Microsoft SQL Database ....................................... 561
10.4.3.5. Allergens from SQL Server ........................................................... 562
10.4.3.6. Allergens from Tags ..................................................................... 563
10.4.4. Syntax of Allergen formatting functions with support for exclusions ......... 563
10.4.4.1. User provided list of allergens ...................................................... 563
10.4.4.2. Allergens from Microsoft Excel spreadsheet ................................. 564
10.4.4.3. Allergens from Microsoft Access Database ................................... 565
10.4.4.4. Allergens from Microsoft SQL Database ....................................... 566
10.4.4.5. Allergens from SQL Server ........................................................... 567
10.5. Designing Labels with Variable Length ............................................................... 567
10.6. Multicolor Printing ............................................................................................. 569
10
10.7. How to Create GS1 Compliant Labels ................................................................. 570
10.8. Printing of Unlimited Data .................................................................................. 571
10.8.1. Label with Connected Database or Counter ............................................. 571
10.8.2. Label without connected Database or Counter ........................................ 572
10.9. Using the Internal Printer Counter ...................................................................... 572
10.10. Installation of Printer Drivers ............................................................................ 573
10.11. Creating Hyperlinks and Sending Emails on Forms ........................................... 574
11. Online Support ............................................................................................................ 576
11

1. Introduction
1.1. Basic Designer Concepts
This section describes the Designer elements that enable you to eciently design label templates or
to create and manage a complex labeling solution that includes multiple labels, dynamic data sources,
and automatically run actions.
PRODUCT LEVEL INFO
Solution building is available in PowerForms.
Listed below are the essential Designer concepts. Being familiar with them provides a perfect starting
point for successful labeling projects.
• Label
• Form
• Solution
• Object
• Document
• Design Surface
• Data Sources
• Dynamic Data Manager
• Dynamic Data Explorer
• Solution Manager
• Action Editor
If you come across any other unfamiliar items while working with Designer, refer to the Help tab.
1.1.1. Label
Label works as a template to add label objects and print using any kind of printing media.
Each object adds a dierent kind of content such as text, line, ellipse, barcode or rectangle to a label.
The content is either xed (manually entered by the user) or dynamic (dened using values from
connected data sources).
12

After nishing with your label design, you can print the labels using any of your installed printers.
PRODUCT LEVEL INFO
Solution building is available in PowerForms.
Designing of a printable label belongs to basic Designer tasks. Designer allows creating and printing
of stand-alone labels and labels that are included in a printing solution.
Read about how to create, design or edit a label here.
1.1.2. Form
PRODUCT LEVEL INFO
This section is applicable to PowerForms.
NiceLabel Designer form serves as a panel for entering, manipulating and viewing the data. The
advantage of using a form are simplied data-entry and label printing process for the end-user.
In NiceLabel Designer, a form is created within a printing solution. This means that a form is usually
built in combination with a predesigned label.
TIP
Forms allow you to build an entire tailor-made data handling system which is
adaptable to current business needs.
Read about how to create, design or edit a form here.
1.1.3. Solution
PRODUCT LEVEL INFO
This section is applicable to PowerForms.
NiceLabel Designer solution acts as a container which includes multiple documents – labels, forms
and shared data sources. A single solution enables dealing with any number of labels, forms and
shared variable data sources.
How do labels and forms cooperate in a solution? A label alone can be designed and printed.
Multiplied manual printing of a single label le is time consuming and dicult if the content needs to
13

be constantly updated. Therefore, NiceLabel introduced the ability to create forms which are
combined with labels in a solution.
As a part of a solution, label document(s) specify the layout of printed labels. Forms make sure the
content of printed labels is easily dened, edited, and updated. Forms also oer the user the control
over a wide range of data- and print-related actions.
The advantages of keeping multiple labels and forms in a single le are:
• Simplied management print outputs.
• Simpler and time ecient label designing and printing.
• Simplied use of shared variable data sources.
Read about how to create or edit a solution here.
1.1.4. Object
PRODUCT LEVEL INFO:
Creation of forms and use of form objects are available in PowerForms.
Object is the basic building block for designing labels and forms. To design a label or form means to
select, add, and position the objects on the design surface.
Example
Each object performs a dierent role. Text object is in most cases used for single-line textual content
that does not need to adapt its font size to the label design. Barcode object adds a barcode whose
type and content can be adapted to the needs of current document. Radio Group object to allow a
user to select a single item from a set of mutually exclusive items.
Label object types and their purpose are listed here.
Form object types and their purpose are listed here.
1.1.5. Document
The term document is used for labels and forms – it can be used interchangeably.
14

NOTE
Be careful not to mistake document with solution. A solution is always a stand-alone
le while a document – be it label or form – may be used as a stand-alone le or as a
part of a solution.
1.1.6. Design Surface
PRODUCT LEVEL INFO:
Creation of forms and use of form objects are available in PowerForms.
Your design surface is a place to create, add, position, and interconnect label and form objects.
To help you design labels and forms as simply and eciently as possible, your design surface uses
usability and functional principles from Microsoft Oce.
TIP
Use View tab to customize your design surface.
• Learn more about design surface elements here.
• Learn more about design surface editing actions here.
• Learn more about design surface visual aid elements here.
1.1.7. Data Sources
PRODUCT LEVEL INFO:
Creation of forms and use of form objects are available in PowerForms.
Data sources are containers that provide content for label or form objects. Available data sources of
NiceLabel Designer are listed and described in the table below:
Fixed data
Fixed content allows you to manually insert a value into an edit box using a
keyboard. The inserted value remains unchanged on every printed label.
All standard Windows editing features are supported for inserting and editing the
xed content (cut, copy, paste, etc.). Special characters are accessible via arrow
button on the right side of the edit elds or via context (right click) menu.
15
Variable If a label or form object is connected to a variable, its current value is always
displayed as the object's content. When the variable's value changes, the change
reects in the appearance of the selected object.
Create and manage multiple types of variables using the Designer's Dynamic Data
Manager tool.
Function Functions process the existing data source values and store the result in function-
generated data sources.
Designer oers multiple types of functions that allow you to transform the variable
object content according to the current needs.
Database Various types of databases can be used as dynamic data source for label or form
objects. Select a database from the list of dened database connections. When
done, select the elds and use them as a data source for an object.
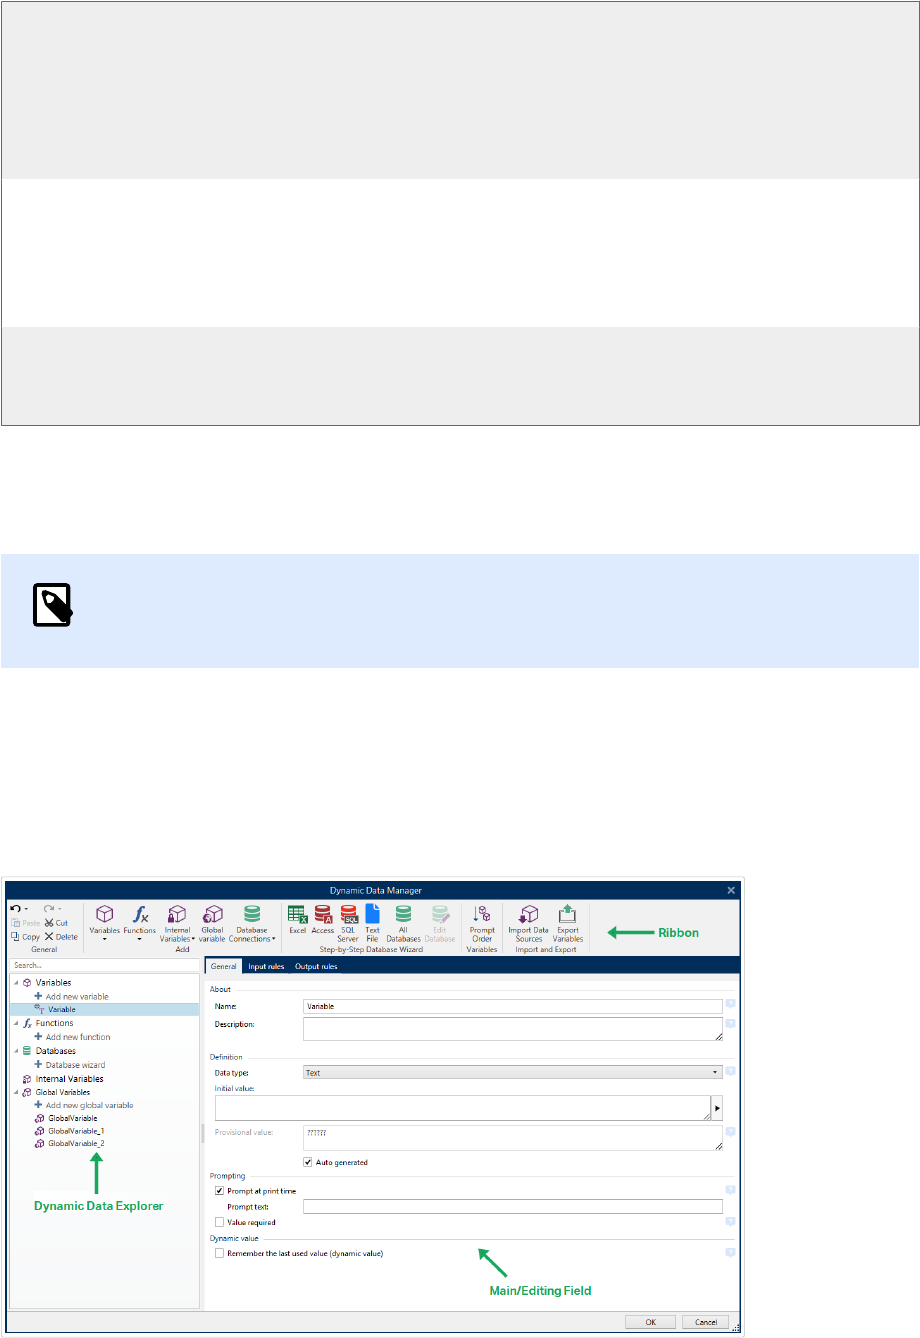
1.1.8. Dynamic Data Manager
PRODUCT LEVEL INFO
This section applies to NiceLabel 2019 Pro and PowerForms editions.
Dynamic Data Manager is a dialog that enables the user to manage the dynamic data sources for
label and form objects.
Label and form objects can be connected to multiple variables, functions and databases.
To open the dialog, click the Dynamic Data Manager button in the Designer ribbon.
Read more about how to dene the data sources in the following sections:
16

• Work with variables.
• Work with functions.
• Use databases as content source.
• Use internal variables as content source.
• Use global variables as content source.
1.1.9. Dynamic Data Explorer
PRODUCT LEVEL INFO
This section applies to NiceLabel 2019 Pro and PowerForms editions.
Dynamic Data Explorer is a Designer tool for managing the data sources that are connected to label
or form objects.
Dynamic Data Explorer is located at the bottom left side of the Designer window. It oers an overview
of existing Variables, Functions and Databases and allows adding new sources.
Read more about the Dynamic Data Explorer and how to work with it here.
1.1.10. Layers
Layers act as transparent surfaces that allow you to place your objects on labels or forms in multiple
levels.
When designing labels or forms that contain a large number of objects, layers help you manage the
positioning and visibility of added objects.
NiceLabel 2019 allows you to use layers when designing labels and forms using the Layers panel. This
helps you design adaptable label templates and create forms that align with your business logic. Read
more in section Layers Panel.
17

1.1.11. Solution Explorer
PRODUCT LEVEL INFO
This section is applicable to PowerForms.
Solution Explorer is the Designer's dedicated tool for managing the labels and forms in a solution.
Solution Explorer is located at the bottom left side of the Designer window. It displays the existing
labels and forms and allows adding new ones.
Solution and Data source buttons toggle between Solution Explorer and Dynamic Data Explorer.
1.1.12. Actions Editor
PRODUCT LEVEL INFO
This section is applicable to PowerForms.
Actions Editor is a dialog for managing actions in a Designer solution.
18

Actions can be dened for:
• Form: these actions are triggered with form events. They are applicable to the following events:
• On form load: action(s) are run after a form is loaded.
• On form close: action(s) are run after a form is closed.
• On form timer: action(s) are run after a specied time interval.
• On Form Inactivity: action(s) are run after the form has been inactive for a given time
interval.
• Form object: these actions are triggered with object-related events.
• Variable: these actions are triggered according to the received values.
1.1.12.1. Ribbon
Actions Editor Dialog ribbon includes commands for adding, removing and ordering the actions. It
also provides a direct access to frequently used actions.
Clipboard group icons activate the following actions:
• Paste: pastes the clipboard data.
• Cut: cuts the selection to the clipboard.
• Copy: copies the selection to the clipboard.
• Delete: deletes the selected items.
Undo & Redo group allows undoing or repeating actions.
• Undo: Designer allows the user to undo the entire sequence of actions since opening the editor.
19

• Redo: repeats the requested range of actions.
Action Order group denes the action execution order of selected actions.
• Up and Down: arrows place the selected action in front or after any other existing action.
• Right: arrow nests the selected action under the previous existing action.
NOTE
Nested action is any action that starts when the parent action is already in progress.
• Left: arrow makes a nested action independent of the preceding action.
NOTE
Certain actions cannot exits independently. If such action is added to the action list, a
warning appears. The warning denes which action should it be nested under.
Add assigns actions to the selected form object.
• All actions button gives access to the entire range of Designer actions. Recently used actions
are listed on the top. Use Search... eld to quickly locate any action by entering its name.
• Four buttons give direct access to the most commonly used actions:
• Open Label: button adds the Open Label action to the event list.
• Print Label: button adds the Print Label action to the event list.
• Set Printer: button adds the Set Printer action to the event list.
• Quit: button adds the Quit action to the event list.
1.1.12.2. Actions Explorer
Actions Explorer is a tool for adding, removing and ordering the assigned actions. Use ribbon
commands to manipulate with existing actions or to add new actions.
The explorer columns provide instant overview of actions' execution options and their descriptions.
• Enabled: enables or disables the included action.
• Condition: display the condition for executing an action (if set).
• Description: displays the information about an action as dened by the user.
Actions Explorer enables you to make a selection of multiple actions, and to perform copy, paste and
delete operations with them. To make a selection, Use Ctrl/Shift + Click on the required actions.
20

NOTE
Multiple actions can only be selected under the same parent action, i.e. all selected
actions must be on the same level. See picture below.
1.1.12.3. Editing eld
Editing eld allows editing the advanced action properties.
• Main properties of the selected action are available for editing on the top of the Main/editing
eld. Main properties dier with each action – read the dedicated action description sections for
details.
• About group allows you to describe all NiceLabel 2019 actions.
• Name: by default, action name is dened by its type and is therefore not unique. Dene a
custom name to make it instantly recognizable among other actions, in logs and in
potential error messages.
• Description: user notes for the selected action. Description is displayed in actions
explorer.
• Action Type: read-only eld which displays the type of action.
NOTE
When upgrading from legacy solutions (created with NiceLabel V6 and back),
update the action names based on the currently selected language. Solution
version becomes updated.
• Hidden properties dene the less frequently dened properties. Hidden properties dier with
each action – read dedicated action description sections for details.
21

1.2. Keyboard and Mouse Support
To eciently perform and complete the Designer tasks, follow the guidelines related to the use of
keyboard and mouse:
• How to eciently use keyboard and mouse
• Keyboard shortcuts
1.2.1. Ecient Use of Keyboard and Mouse
Use the following list of tips to make your work with Designer easier and more ecient.
1. Select object anchoring point. Press <Ctrl> key and click the object placeholders to quickly
dene the anchoring point.
2. Label scrolling and zooming. Use mouse wheel to scroll the label. Holding <Ctrl> when
rotating the wheel, adjusts zoom factor. <Shift> scrolls label left or right.
3. Set label or form properties. Double-click the design surface to open the label or form
properties dialog.
4. Vertical or horizontal object moving. Hold <Shift> while moving an object over the design
surface. The object is moved in straight vertical and horizontal lines.
5. Resize an object with arrow keys. Holding <Shift> while pressing arrow keys resizes the
object.
6. Fine-tune the object position. Hold <Ctrl> while pressing arrow keys.
7. Open contextual menus. Right-click the object or design surface to access the label, form or
design surface contextual menus.
8. Select multiple objects. Hold <Shift> and click the objects to add them to the selected
objects in a group.
9. Quickly add an object with connected data source. Click the object's shortcut handle in the
object toolbox. A list of available data sources appears. Select a data source or add a new
one, and click the design surface to add an object which already has a dynamic data source
connected to it.
PRODUCT LEVEL INFO:
Creation of forms and use of form objects are available in PowerForms.
22

1.2.2. Mouse Wheel Support
Use mouse wheel to speed up design object zooming and design surface scrolling.
• Turning the wheel scrolls the label in a vertical direction.
• Holding <Shift> and turning the wheel scrolls the label left or right.
• Holding <Ctrl> and turning the wheel zooms the label in or out.
1.2.3. Keyboard Shortcuts
Use keyboard shortcuts to reduce the time needed to accomplish frequent tasks with Designer. To
complete these tasks, use a standard combination of keys.
TIP
Keyboard shortcuts are just a faster and more convenient way of choosing
commands. The command itself is executed in the same way as if it was run from the
menu or toolbar.
Action
Press
Select all Ctrl+A
Run the startup form Ctrl+D
Paste Ctrl+V
Cut Ctrl+X
Move up ↑
Move right →
Move down ↓
Move left ←
Close Alt+F4
Zoom to document Ctrl+0
Bold Ctrl+B
Copy Ctrl+C
Italic Ctrl+I
Close solution Ctrl+L
Zoom Out Ctrl+minus sign on numeric keypad
Zoom In/Out Ctrl+mouse scroll up/down
Open Ctrl+O
Print Ctrl+P
23

Action Press
Zoom In Ctrl+plus sign on numeric keypad
Run the currently opened form Ctrl+R
Save Ctrl+S
Open blank label connected to default printer Ctrl+Shift+N
Redo Ctrl+Y
Undo Ctrl+Z
Cancel Esc
Move Focus Tab or Shift+Tab
Run Form Debugger when form is running Ctrl+Shift+F12
Start form and Form Debugger at the same time to
debug the onFormLoad events
Ctrl+Shift+R
Format painter – copy object properties Ctrl+Shift+C
Format painter – paste object properties Ctrl+Shift+V
1.3. Options (Conguring the Program)
PRODUCT LEVEL INFO
Solution building is available in PowerForms.
To customize the general program conguration of Designer, open the Options dialog which is
accessible from the File tab.
Designer conguration options are grouped on the following tabs:
• Folders: allows you to set the default locations for storing the labels, forms (solutions),
databases and picture les.
24
• Language: selects the user interface language. Select the preferred language from the listed
options.
• Global Variables: storage location for global variables.
• Printer usage: locally logged usage of installed printers.
• NiceLabel Control Center: allows you to enable and congure the monitoring of events and print
jobs.
• Automation: enables you to congure NiceLabel Automation settings.
• Designer: enables you to congure opening behavior of NiceLabel 2019.
25

2. Workspace Overview
PRODUCT LEVEL INFO
Data source explorer and Solution manager are available in NiceLabel Designer Pro
and PowerForms.
Your Designer workspace provides a exible and easy-to-use environment for both – simple label
designing and complex solution building.
Your Designer workspace follows widely used application interface guidelines and is equipped with
tools and interface elements familiar to most users.
Designer workspace includes the following:
• Landing page
• Object and Explorer Panels
• Layers panel
• Printer and Status bar
• Tabs and Ribbons
• Design Surface
26

2.1. Landing Page
Your landing page in Designer is an introduction which opens after the application loads. The page
includes the following:
• New document area: create new or open existing Designer documents.
• Create a New Label: create new label documents.
• New Solution: create solutions with labels and forms.
PRODUCT LEVEL INFO
Solution building is available in PowerForms.
• Open from Document Storage: open labels or solutions from Document Storage on your
connected NiceLabel Control Center.
PRODUCT LEVEL INFO
Opening from Document Storage is available when connected to
NiceLabel Control Center, and requires an LMS license.
• Open...: open existing label and solution les from your workstation, cloud or network
locations.
TIP
When you create new labels based on sample templates, Designer creates a
new folder inside your Solutions folder. Your new folder is named after your
sample. It is located at: C:\Users\username\Documents\NiceLabel
\Solutions\newly created folder
• Recent Files: lists recently used Designer les.
TIP
Your landing page and its sections are dierent when you run licensed Designer
editions or trial versions.
• Learning resources: access useful resources to help you create labels and solutions, and learn
more about NiceLabel 2019.
• Training Videos: access your NiceLabel video tutorial library. Video tutorials help you learn
label design basics and solution building in just minutes.
• User Guides: access the entire online library of NiceLabel user guides. User guides provide
you comprehensive descriptions and instructions for using NiceLabel 2019.
27
• Sample Files: access sample label collections and solution les. Use samples to get
familiar with NiceLabel 2019, start building new documents, and to explore software
capabilities. Samples help you create labels compliant with industry standards like GS1
and GHS, and labels equipped with mandatory objects like allergens or nutrition tables.
• Printer Drivers: access NiceLabel printer drivers. Drivers let you optimize your labels to print on
specic printer models.
• Software Information: contains information about your installed copy of NiceLabel 2019 –
license, license key, and installed version. If a newer version of NiceLabel 2019 is available,
notication links appear automatically. Click the link to download and install the latest version.
2.2. Object and Explorer Panels
Object and explorer panels are located at the left-most area of the Designer window. They provide
access to objects, Solution Manager and Dynamic Data Explorer.
• Object Toolbox: Contains available objects. These objects are ready to be used on a label or
form. Click the selected object and drag it to the design surface.
• Solution Manager: The tool for managing the labels and forms in a solution.
• Dynamic Data Explorer: The tool for managing the data sources in a solution.
• Layers Panel: The tool for managing the layers while you design labels or forms.
28

2.3. Layers Panel
PRODUCT LEVEL INFO
This section applies to NiceLabel 2019 Pro and PowerForms editions.
In NiceLabel 2019, the Layers panel is a tool that helps you manage your layers and added objects
while designing labels or forms.
NOTE
Layers act as transparent surfaces that allow you to place your objects on labels or
forms in multiple levels.
• Working with the Layers panel
• Positioning your objects using layers
• For easier designing: layer states
29

• Keeping layers organized using the right-click menu
2.3.1. Working with the Layers panel
• Adding a layer: Click the green plus button to add a new layer. This adds a new layer on top of
the default layer. The number of layers is not limited.
• Setting the layer properties: The Layer Properties window appears automatically when you add
a layer. Use this window to set the properties of the added layer:
• Add Name and Description to make your layers easy to nd and edit later when you add
more layers.
• The Visibility settings allow you to dene if objects on layers are visible when you print the
label, or after you run the form.
NOTE
In comparison with layer states (see section Section 2.3.3, “For easier
designing: layer states”), the visibility settings aect the layout when you
print a label, or when you run a form.
• Visible: denes if the objects on the selected layer appear on the printed label, or are
visible when you run the form.
Condition: the layer is visible if the result of the given condition is "True".
Example
You can create a single label template for labels in multiple languages. Stack the objects
with text in the required languages on the dedicated layers. Use visibility conditions to only
display the layer with the right language – in this case German.
30

• Deleting layers: Select a layer and click the red X button. This deletes the layer with all of its
objects. If the layer is locked, you cannot delete it.
• Moving layers up or down: You can change the stacking order for your existing layers. This
allows you to dene how the objects overlap. If you move one layer above another, you also
place the objects on this layer in front of the objects that belong to the layer below.
2.3.2. Positioning your objects using layers
Layers help you position label or form objects on the z-axis. This means that you can place your
objects on top or beneath the objects on other layers. If you change the stacking order of layers, you
also change the stacking order of objects.
NOTE
When designing labels or forms, the stacking order of layers tells you the vertical
position of each individual layer within all existing layers.
By default, you add all objects on a single layer. If you decide to add more layers, you can move your
objects onto newly added layers, or move objects from one layer to another at any time.
To add objects to a specic layer, click the layer in the Layers panel to make the layer active, and drag
the objects onto the currently active layer.
NOTE
You can only group the objects that belong to the same layer. To group objects from
multiple layers, move these objects onto the same layer rst.
2.3.3. For easier designing: layer states
Layer states allow you to show/hide, lock/unlock, or highlight your layers.
31

NOTE
Layer states only aect the label template or form layout during the design phase.
After printing a label or if you run a form, the layers remain visible even if you set their
state to invisible, locked, or highlighted. Manage the nal visibility of layers using the
Visibility settings in the Layer Properties window.
Layer states allow you to:
• Keep the layer visible or hide the layer. Toggle the states to make all layer objects visible or
hidden while you are designing your label template or form.
NOTE
The ability to show or hide a layer helps you position the objects that appear
above or below other objects.
• Unlock or lock the layer. If you lock a layer, you cannot:
• Add objects to this layer.
• Move objects from other layers to this layer.
• Change the position of the existing objects.
• Delete this layer.
NOTE
Layer locking prevents unwanted layout changes.
• Set focus on the layer. Use this option to determine which objects are on this on this layer by
defocusing the objects that belong to other layers. If you hover over the focus icon with your
mouse pointer, the objects on this layer remain visible, while all other objects become semi
transparent.
32

2.3.4. Keeping layers organized using the right-click
menu
Right-clicking a layer opens the contextual menu which helps you manage the layers of your label or
form:
• New layer adds a layer on top of the existing highest layer.
• Copy makes a copy of the selected layer and all of its objects.
• Paste pastes the copied layer.
• Duplicate allows you to duplicate the selected layer with a single click.
• Rename allows you to change the name of the selected layer.
33

NOTE
By default NiceLabel 2019, names the layers as Layer_"number" where "number"
tells you the initial stacking position of the layer.
• Hide Other Layers makes all layers with their objects invisible, except for the selected layer.
• Show All Layers makes all layers with their objects visible.
• Lock Other Layers makes only the selected object editable. This option locks the objects on all
other layers.
• Unlock All Layers makes all layers editable.
• Move Up/Down allows you to change the stacking order for the selected layer. Note that the
layers panel represents the stacking order of the layers. Use Move Up/Down to change the
position of the highlighted layer.
• Merge Down moves the objects from the selected layer to the layer below. NiceLabel 2019
places the moved objects on top of the existing objects and deletes the merging layer.
• Merge visible unlocked layers moves the objects from all unlocked layers to the lowest unlocked
layer. Objects from the upper layers are placed on top of the objects that belong to the lowest
layer. NiceLabel 2019 deletes the merging unlocked objects.
• Properties opens the Layer Properties window.
2.4. Objects Panel
In Designer, your Objects panel lists every object on your design surface, making it simple to nd and
select exactly the objects you want on your label templates or forms. You can search and organize
your objects within layers, both separately or in groups. Each layer shows your objects and object
groups in a tree structure.
Use your Objects panel to:
• Search for objects by name or by connected data sources.
• Display action indicator icons after object names when your objects have actions assigned.
• Rename objects (when you press F2 on your keyboard).
NOTE
When searching, press Enter on your keyboard, Object panel automatically selects the
rst object within your search parameters.
You can move up and down between objects with your keyboard arrows.
34

Additional options in your object's context menu (right-click on objects or object names) include:
• Copying, cutting, and deleting your objects or object groups.
• Locking or unlocking your objects or object groups.
• Arranging and aligning your objects or object groups.
• Moving your objects and object groups between layers.
NOTE
In Objects panel you can't multi-select your objects and move them with drag.
You can nd your Objects panel on your bottom left, next to your Solution, Data, and Layers panels.
Searching and locating your objects with Objects panel.
When you design complex labels, your Objects panel helps you locate, organize, and update your
label objects.
2.5. Printer and Status Bar
Printer and Status bar stretches over the bottom part of the Designer window. The bar performs
these roles:
• Printer Selection for the current print job. Select your preferred printer from the drop-down list
of installed printers.
TIP
When changing a printer, label and paper size adapt automatically to the dimensions
dened by the printer driver.
35

• Printer Properties: Gives you direct access to the properties dialog of the selected printer driver.
• Design surface zooming.
• Windows mode indication. Windows mode is reported if advanced printer driver interface has
been disabled in Label Properties > Printer.
TIP
Windows mode disables printing optimization methods.
• Document protection indication: Indicates that current document is password protected. To
manage document protection, go to File tab > Protection.
2.5.1. Status Bar Printer Selection
Status Bar Printer Selection dropdown list allows instant printer selection for label printing. The list is
populated with printers, which are installed on the system.
Design surface dimensions adapt to the selected printer automatically – as dened by the printer
driver.
2.5.2. Windows Printing Mode
When designing and printing labels with Designer, it is recommended to use NiceLabel printer drivers
to ensure an optimal printing output.
Although the NiceLabel printer driver is available for your printer, you can still print labels using the
Windows printer driver. To achieve this, open label properties and disable the use of advanced printer
interface.
When printing in Windows mode, the labels print as graphic les. This increases the amount of data
sent for each label and can slow down the printing process.
36

2.6. Tabs and Ribbons
PRODUCT LEVEL INFO:
Creation of forms and use of form objects are available in PowerForms.
Designer uses a standard Windows-based interface.
The Designer's top section interface segments are described below.
2.6.1. Tabs
Tabs represent subsets of Designer features. The tabs contain interrelated commands that are
available to the user in an organized way – grouped, and labeled:
• File (background): opens the print form and document management panel.
• Home: oers commonly used commands such as copy/paste, print, and style commands.
• Data: oers data source related commands.
• View: gives you control over layout tools, zooming options and element markers visibility.
• Solution: allows adding new labels and forms, starts printing actions and enables label le
importing and exporting.
• Contextual tabs: appear after clicking an object. They allow you to dene object-specic
settings. The type of contextual tabs adapts to the selected object.
• Help: besides oering the access to F1 help, this tab leads you to multiple helpful resources that
make your work with Designer easier and more ecient.
2.6.2. Ribbon
Ribbon is a rectangular area that spreads across the top of an application window. Related commands
are divided into ribbon groups. The ribbon changes along with the selected tabs and adapts to the
currently used tools using the contextual tabs.
The following Designer dialog boxes are equipped with a dedicated ribbon:
• Dynamic Data Manager
37

• Actions Editor
• Rich Text Editor
2.6.3. File Tab
File tab serves as document management panel. The following options are available:
• Start: takes you to the Designer landing page.
• New: creates a new stand-alone label or a complete solution.
• Open: allows opening existing label and solution les.
• Import: allows you to import labeling les from non-NiceLabel labeling software.
• Save : saves the active label or solution.
• Save As: allows saving the active label or solution le by dening its name and location.
• Print : opens the printing form.
• Store: stores the current label as a template on the printer to be used in store/recall mode.
• Protection: prevents the label or solution from editing.
• Close: closes the current Designer document.
38

TIP
This note is applicable if you have Open or create documents in new instances
option enabled.
If a document is closed while another document is already open, its instance
(NiceLabel 2019 window) is closed as well.
• Options: opens the dialog for conguring the program defaults.
• About: provides license and software version information.
• Exit: closes the application.
2.6.3.1. Start
Start panel takes you to Designer landing page. Use it to create or open documents, access recently
opened les, preview les and learn more about Designer.
2.6.3.2. New
PRODUCT LEVEL INFO
Solution building is available in PowerForms.
New Label creates a new stand-alone label. New Label Setup Wizard opens after clicking this button.
New Solution creates a complete solution including (multiple) labels and printing forms. Solution
designer opens after clicking this option.
New from Sample Templates creates a document based on a selection of industry‑standard
templates.
NOTE
Adding new labels or forms is also available in the Solution explorer. See section
Solution explorer for more details.
TIP
There are two ways of opening new labels or solutions. You can open each additional
document in a separate instance (window) of Designer. An alternative way is to open
documents within the already opened instance. To select the way that suits you better,
go to File > Options > Designer.
39

TIP
When creating a new label based on a sample template, Designer creates a new folder
inside the Solutions folder. The newly created folder is named after the sample. It is
located at: C:\Users\username\Documents\NiceLabel\Solutions\newly
created folder
2.6.3.3. Open
Open dialog allows opening existing label and solution les.
Browse allows selecting the label or solution les on local or connected network drives.
Document storage opens the document storage location of the connected NiceLabel Control Center.
Recent Files eld lists the latest les that have been edited. Click any of them to open the le.
2.6.3.4. File Tab Import
PRODUCT LEVEL INFO
Solution building is available in PowerForms.
Import allows you to import les into a solution. Supported le formats are:
• Solution le (.nsln)
• Label le (.nlbl)
• Label le (V6) (.lbl)
• Form File (V6) (.x)
When an import command is issued, the Open dialog opens. Select the le you want to import. The
imported le becomes visible in the solution manager.
NOTE
Label .lbl and form .x les are legacy NiceLabel le types used with version 6 and
earlier.
2.6.3.5. Save
Save panel saves the active label or solution using the same le name that was used to open it.
40

NOTE
If a le has been opened for the rst time, Save directs you to the Save as on the File
tab.
2.6.3.6. Save as
Save as allows saving the active label or solution le by dening its name and location.
Recent folders eld lists the folders that were recently used to save the label or solution les.
2.6.3.7. Print
Print opens the print pane. In Designer, print pane hosts a powerful and customizable default printing
form.
Printing form customization options are described here.
2.6.3.8. Store/Recall Printing Mode
Store/Recall printing mode is a method for speeding up the printing process. It increases printer
response by reducing the amount of data that needs to be sent during repetitive printing tasks.
NOTE
Store option becomes visible in File tab if enabled in the label properties printer panel
and supported by the currently selected printer.
With store/recall mode activated, does not need to resend the complete label data for each printout.
Instead, default labels (templates) and internal printer elements (graphics, fonts) are stored in the
printer memory, and only sends recall commands which render the stored label content during the
printing process. Typically, a few bytes of data are sent to the printer as compared to a few kilobytes
in the case of normal printing.
The action consists of two processes:
• Store label. During this process, creates a description of the label template formatted in the
selected printer's command language. When done, sends the created command le to the
printer memory and stores it.
• Recall label. A label stored in the printer memory is printed out immediately. Using the recall
process, creates another command le to instruct the printer which label from its memory
should be printed. The recall label command occupies a few bytes of data only. The actual
amount of data depends on the current situation. For xed labels without any variable contents,
the recall command le only contains the recall label command. For variable labels that contain
41

variable elds, the command le includes the values for these variables and the recall label
command.
NOTE
Before activating this mode, make sure the appropriate printer driver is selected for
the label printer. Not all label printers have the ability to use the store/recall printing
mode.
Follow these steps to activate the Store/Recall printing mode:
1. Double-click the label design surface. Label Properties dialog appears.
2. To enable the mode, select Use store/recall printing mode on Printer tab. Click OK.
3. Dene label template(s). All label objects with variable content must be formatted as internal
printer elements:
• Text object content must only use internal printer fonts (not Truetype!).
• Use internal printer barcodes in barcode objects.
• If using variable objects with Truetype fonts, variable pictures or database elds, the
default values are sent to the printer during the label store process.
4. Click File > Store. Make sure the Store variant points to the correct memory location in the
printer.
Click File > Store. Make sure the Printer memory location points to the correct memory
location in the printer.
5. Insert or select values for variable objects that are not formatted as internal printer objects.
These variables will be given the same value on each label. They will behave as objects with
xed values.
6. Click Store to printer to create the command le with label template description and to send it
to the printer.
7. Insert values for prompted label variables. These variables are linked with internal printer
objects on the label. For this reason, their values can be changed during each printing.
8. Click Print to send variable values and recall label command to the selected label printer.
2.6.3.9. Protection
Protection prevents the label or solution from editing.
• Prevent document from editing: locks the label or solution. Enabling this option prevents any
unauthorized changes on le – only copying and printing is possible.
42

• Requires a password to unlock document: prevents the le editing with a password protection.
Check this option to set a password. A le becomes editable only after entering a correct
password.
2.6.3.10. Options (Conguring the Program)
PRODUCT LEVEL INFO
Solution building is available in PowerForms.
To customize the general program conguration of Designer, open the Options dialog which is
accessible from the File tab.
Designer conguration options are grouped on the following tabs:
• Folders: allows you to set the default locations for storing the labels, forms (solutions),
databases and picture les.
• Language: selects the user interface language. Select the preferred language from the listed
options.
• Global Variables: storage location for global variables.
• Printer usage: locally logged usage of installed printers.
• NiceLabel Control Center: allows you to enable and congure the monitoring of events and print
jobs.
• Automation: enables you to congure NiceLabel Automation settings.
• Designer: enables you to congure opening behavior of NiceLabel 2019.
43

Folders
PRODUCT LEVEL INFO:
Creation of forms and use of form objects are available in PowerForms.
When moving or sharing the documents you create in Designer, the locations of related documents
and les might become inaccessible. To prevent broken references, dene the default search
locations that instruct Designer to search for the documents and les on alternative locations.
Use the Folders tab to dene the default search locations for the documents and les that you work
with in Designer. These folders serve as the default search location if:
• Designer cannot nd labels on the specied locations. In this case, Designer searches for them
in the Labels folder.
• Designer cannot nd solutions on the specied locations. In this case, Designer searches for
them in the Solutions (Forms) folder.
• Designer cannot nd the connected database on the specied location. In this case, Designer
searches for the database in the Database folder.
• Picture object le paths in labels or solutions are incomplete or missing. In this case, Designer
searches for them in the Picture folder.
Example:
A form in your solution includes a picture le named picture.png without a specied path. This is
why Designer cannot locate the requested picture.
Solution: When searching for a graphic le named picture.png, Designer goes to C:\Users\user
\Documents\NiceLabel\Graphics. This is the location dened in the Folders tab.
NOTE
Make sure read/write rights are granted to the account under which the Designer is
running.
TIP
Details about the check algorithm which is used to locate the label and solution les is
described in detail here.
44

NOTE
When opening and saving your documents, Designer remembers the last used
location. The next time you open or save your documents, Designer goes to the last
used location.
Language
Language tab allows selecting the Designer interface language. Select the appropriate language and
click OK.
NOTE
Restart is necessary to make the user interface appear in the selected language.
Make sure you save your work before closing the program.
Global Variables
Global Variables tab allows dening which location with stored global variables should be used:
• Use global variables stored on the server (NiceLabel Control Center): sets the global variable
storage location on the NiceLabel Control Center.
NOTE
Select the NiceLabel Control Center before selecting this option.
NOTE
This option becomes available when using the NiceLabel Label Management Solution
license.
• Use global variables stored in a le (local or shared): sets the global variable storage location in a
local or shared folder. Enter the exact path or click Open to locate the le.
By default, global variables are stored in Globals.tdb le in: C:\ProgramData\NiceLabel\Global
Variables\.
TIP
These two options become useful when designing solutions for multiple customers
with their own sets of global variables.
45

Printer Usage
Printer usage tab displays printers which have been used with NiceLabel 2019.
NOTE
Printer usage logging is available with multi-seat license. Details about printer
licensing is available in section Printer Licensing Mode.
Printer usage information group displays how many of the permitted printer ports are used by printing
on multiple printers.
• Number of printers allowed by license: number of permitted printers to be used with the current
Designer license.
• Number of used printers in the last 7 days: number of printers that have been used with
Designer during the last 7 days.
NOTE
If the used printer count exceeds the permitted number of used printers, NiceLabel
2019 activates the grace period. The software grants the end-user a 30-day time
extension during which the number of licensed printers is doubled. If the doubled
number is also exceeded, printing becomes disabled on the additional printers.
Printing statuses are visible in multiple columns:
• Printer: name or model of the printer that was selected for the print job.
NOTE
If the connected printer is shared, only printer model is displayed.
• Location: name of the computer from which the print job has been sent.
• Port: port used by the printer.
• Last Used: time passed since the last print job.
• Reserved: prevents the printer from being removed after being idle for more that 7 days.
NOTE
If a printer remains unused for more then 7 days, it is removed automatically unless
the Reserved option is enabled.
Permissions group allows you to lock printer usage on local workstation.
46

NOTE
Before activating this option, make sure at least one printer is reserved. With no
printers reserved, an error is reported if you try to edit a label. Printing is disabled as
well.
• This workstation can only use reserved printers: with this option enabled, only reserved printers
are allowed for label editing and printing in NiceLabel 2019.
TIP
Use this option to avoid exceeding the number of available licensed printer seats
by printing on unwanted printers or print-to-le applications. Reserve dedicated
thermal or laser labeling printers and limit printing only to them to ensure
continuous printing of labels with a multi-user licence.
This option can also be enabled using the product.config le:
1. Navigate to the System folder.
Example:
%PROGRAMDATA%\NiceLabel\NiceLabel 2019
2. Make a backup copy of the product.config le.
3. Open product.config in a text editor. The le has an XML structure.
4. Add the following lines:
<Configuration>
<Activation>
<ReservePrinters>Example Printer</ReservePrinters>
</Activation>
<Common>
<General>
<ShowOnlyReservedPrinters>True</ShowOnlyReservedPrinters>
</General>
</Common>
</Configuration>
5. Save the le. The Example Printer is reserved.
NiceLabel Control Center
Control Center tab allows you to enable and congure the monitoring of events and print jobs. The
use of NiceLabel Control Center enables centralized event and print job reporting, and centralized
storage of global variables.
47

This tab is available only if LMS license is activated.
Address
Address group denes which NiceLabel Control Center server should be used.
• Control Center server address: URL of the connected NiceLabel Control Center server. You can
select from the list of automatically discovered servers on the network, or enter a server
address manually.
NOTE
The license keys on the NiceLabel Control Center server and on the workstation must
match to enable the connection.
NOTE
If your connected NiceLabel Control Center uses the application authentication, each
NiceLabel 2019 startup requires you to type in your user name and password. Read
more about the authentication types and user privileges in the NiceLabel Control
Center user guide, section Authentication.
Event Monitoring
Event handling in the NiceLabel Control Center allows central management of labeling workstation
activities. Activities like label printing, errors, alerts, middleware application triggering, etc. are
reported and logged to NiceLabel Control Center.
Event Monitoring group denes what types of events should be logged by the connected NiceLabel
Control Center:
• Print Events: logs the print related events from the workstation.
• Error Events: logs all reported errors.
NOTE
By default, Print Events and Error Events are logged to NiceLabel Control Center.
• Trigger Activity: logs all red triggers.
• Trigger Status Change Events: logs the trigger status changes which have been caused by the
red triggers.
48

Print Job Monitoring
Print Job Monitoring group enables you to log the completed and ongoing print jobs to the NiceLabel
Control Center.
• Enable Print Job Logging to Server: activates print job logging.
• Detailed printing control: enables monitoring of statuses that are reported by the connected
printer.
NOTE
There are two requirements to make this option available:
• The printer must support bidirectional communication.
• NiceLabel printer driver must be used for printing.
Automation
Automation tab enables you to congure NiceLabel Automation settings.
NOTE
This tab becomes visible with NiceLabel PowerForms Desktop and LMS licenses.
Service Communication group denes the communication settings.
• Service communication port: number of the port which is used by the Automation service for
communication.
Log group congures how the below listed messages reported by the Automation Manager are
logged.
NOTE
The default data retention time is 7 days. To minimize log database size on busy
systems, reduce the retention period.
• Clear log entries daily at: selects the time at which the daily log entries are cleared.
• Clear log entries when older than (days): sets the log retention time in days.
• Log messages: selects the message types that are logged.
• All messages: saves all message types in the log.
• Errors and warnings: saves errors and warnings in the log.
49

• Errors: saves errors in the log.
• No log: no messages are logged.
Performance group enables improving the time-to-rst label and general performance of the
Automation service.
• Cache remote les. To improve the time-to-rst label and performance in general, NiceLabel
2019 supports le caching. When you load the labels, images and database data from network
shares, all required les must be fetched before the printing process can begin.
TIP
If you enable local caching, the eect of network latency is reduced as label and
picture les are loaded from the local disk.
Automation service uses the following local folder to cache the remote les: %PROGRAMDATA%
\NiceLabel\\FileCache.
• Refresh cache les (minutes): denes the time interval within which the les in the cache
are be synchronized with les in the original folder. This is the time limit for the system to
use a version which may not be the latest.
• Remove cache les when older than (days): denes the time interval after which all les are
removed from cache.
NOTE
File caching supports label and picture le formats. After you enable le caching,
restart Automation service to make the changes take eect.
Designer
Designer tab enables you to congure opening behavior of Designer.
Opening Mode group denes how your Designer opens new documents.
• Display each document in its own window: If enabled, additionally opened documents appear in
separate windows of Designer. This applies to both – newly created and existing documents.
If you decide to disable this option, additionally opened documents will appear within the
currently active instance of Designer.
2.6.3.11. About
The About dialog page provides information about your NiceLabel product license, enables license
purchasing (when in trial mode) and activation, provides software details, allows you to sign in to your
Label Cloud account, and enables you to change the Designer product level.
50

• Product level tells you the product level you are currently running.
• Change product level: opens the product level selection dialog. When in trial mode, you can
choose and evaluate all product levels. With an activated license, you can change your product
level only to lower levels.
• Trial mode duration: information about the remaining days for product evaluation.
• Purchase License: button directs you to the NiceLabel online store.
• Activate license: button opens the Designer license activation dialog. See NiceLabel 2019
installation guide for details about the license activation process. After activating the license,
this button is renamed to Deactivate License – after clicking it and conrming the deactivation,
your copy of Designer is no longer activated.
NOTE
These segments are no longer visible after purchasing and activating the
product license.
NOTE
Product level changes take eect after you restart Designer.
NOTE
If NiceLabel 2019 has been installed with predened product level (i.e., the level
has been dened by the license key), product level selection is not required
during rst start.
• License type: is the type of license that you are using to run the NiceLabel 2019. If you activated
the Designer by signing into the Label Cloud, here is where you see the Edition of your cloud.
• Upgrade license: opens the product level upgrade dialog. See NiceLabel 2019 installation guide
for details about the license upgrade process.
NOTE
NiceLabel 2019 upgrades automatically if the upgraded license is available on
your network.
• Printer limit: is the maximum number of printers that you can use with your NiceLabel license.
• Account: if you are signed into Label Cloud, Designer displays the name of you cloud account.
• User: if you are signed into Label Cloud, Designer displays your Label Cloud user name.
Software information contains information about the installed copy of NiceLabel 2019 – license,
license key, and installed version. If a newer version of is available, a notication link appears on the
page automatically. Click on the link to download and install the latest version.
51

Working oine (without Label Cloud connection)
PRODUCT LEVEL INFO:
This section is applicable if your NiceLabel 2019 is signed in to the Label Cloud
If your Designer is signed in to the Label Cloud, and you lose the internet connection, you must
reestablish the connection in up to ve days. Without reconnecting with your Label Cloud, Designer
closes automatically.
After losing the internet connection, and if your computer stays oine, a warning appears in 5 days.
Designer closes 5 minutes after you see the warning.
After you reestablish the internet connection, open Designer and sign in to the Label Cloud. This
makes your copy of Designer active again.
WARNING
Save your work to an oine location (your computer) to prevent losing any changes.
2.6.4. Home Tab
PRODUCT LEVEL INFO:
Creation of forms and use of form objects are available in PowerForms.
Home Tab provides access to frequently used commands and settings in the following ribbon groups:
• Clipboard: group temporarily stores the selected elements, objects or groups of objects.
• Font: group lets you dene the font properties.
• Action: group contains the Print button which starts the printing procedure or runs a form.
• Management: group provides direct access to the Dynamic Data Manager and Document
properties – active label or form properties dialog .
• The Align group options dene relative horizontal and vertical positioning for the object content.
52

• Objects: group allows you to align, group or arrange label objects.
2.6.4.1. Clipboard
Clipboard group temporarily stores the selected elements, objects or groups of objects. Use the
selected and stored objects to transfer them from one label or solution to another.
TIP
Copying and pasting of textual (plain text, RTF) and graphical (bitmaps) content
between multiple applications is supported.
• Paste: pastes the clipboard contents on the design surface. Multiple reuse of a single clipboard
item is allowed.
• Cut: removes the selected element(s) from the design surface and adds it to the clipboard to be
pasted elsewhere. Note that the rst element is selected by clicking it. When selecting
additional elements, press and hold <Shift> key while clicking these elements.
• Copy: copies the selected content to the clipboard. Multiple objects can be copied at once –
select them and click Copy.
• Delete: deletes the selected elements or objects. They are not stored in the clipboard.
• Format painter: copies the formatting properties from one object to another. This is how you
multiply the style of your reference object.
Example:
Use the format painter to copy font, font size, font color, alignment and spacing from your
reference Text object to all other Text objects using a single action.
To copy the object style properties:
1. Click your reference object. This is the object you want to copy the properties from.
2. Click the format painter.
3. Click the target object. This object now has the same properties as your reference
object.
When using the format painter for dierent objects, you are copying and pasting the object's
properties from the Style tab. If there are matching Style properties between the objects,
Designer transfers these properties to the target object.
53

Example:
When multiplying the properties from a Rectangle object to Ellipse objects, all Style tab
properties apply, except for the corner radius. This property is only applicable to the Ellipse
object.
NOTE
You can also copy properties between the objects on dierent labels, dierent
forms, or between objects on labels and forms.
2.6.4.2. Font
Font group denes font properties:
• Show/hide printer fonts: button allows you to exclusively display internal printer fonts on the list
of available fonts. Graphical fonts are hidden in this case. After pressing this button again, all
available fonts are visible on the list once more.
• Font: denes the font family to be used in a selected object.
• Font Size: denes the text size in an object. Select the desired point size from the dropdown
selector or enter it manually.
• Font Style: denes the object text stylistic characteristics of text, such as bold or italic.
• Alignment: denes horizontal text positioning in an object: Left, Center or Right.
• Justify: makes a paragraph aligned along the left and right object margins.
TIP
When changing a font during the design process, Designer remembers the last used
font type and size.
2.6.4.3. Action
54

PRODUCT LEVEL INFO:
Creation of forms and use of form objects are available in PowerForms.
Action group creates a printing shortcut, starts the printing procedure, customizes printing, or runs a
form.
Print button opens the Designer Print pane as dened by the Default Printing Form.
Customize Print opens multiple options to adapt the printing options.
• Create Shortcut for Printing: allows you to create a printing shortcut to a label or a form in a
solution. Creating the printing shortcut requires you to save the label or form document rst.
NOTE
When creating shortcut to a solution, the shortcut is named Run [solution name]. After
double-clicking it, the form is run instantly.
• Printing form: denes which form in the solution is used as default printing form.
NOTE
Selection of the default printing form is available when editing a solution.
• Edit Printing Form: allows adding, removing, or rearranging the objects on a printing form. Read
more about the printing form customization here.
NOTE
If the printing form has not been selected yet, the Edit Printing Form option adds a
new form and sets it as the default printing form. If an existing form is selected, the
option opens it for editing.
• Recreate Printing Form: resets the printing form to its default layout and reestablishes the
dynamic content providers after being edited.
• Add New Form: adds a new form to the solution. It can either be a blank form or a form designed
as a printing form. Use Form name to name the newly added form and make it easily
recognizable among other solution documents.
Run Form button runs the currently active form.
55

NOTE
If a label uses a customized printing form, this form remains open as a tab. The tab
cannot be closed.
2.6.4.4. Management
Management ribbon group provides direct access to:
• Dynamic Data Manager dialog. Click the button to start managing the dynamic data sources that
are connected to objects.
• Document Properties opens current label orform properties.
2.6.4.5. Align
The Align group options dene relative horizontal and vertical positioning for the object content:
• Align Objects Left: aligns objects with the left border of the rst selected object or with the
leftmost object.
• Align Objects Center: aligns objects with the horizontal center of the rst selected object or with
horizontal center of the largest object.
• Align Objects Right: aligns objects with the right border of the rst selected object or with the
rightmost object.
• Distribute Horizontally: distributes objects using equal horizontal spacing.
• Align Objects Top: aligns objects with the upper border of the rst selected object or with the
highest object.
• Align Objects Middle: aligns objects with the vertical center of the rst selected object or with
vertical center of the largest object.
• Align Objects Bottom: aligns objects with the bottom border of the rst selected object or with
the lowest object.
• Distribute Vertically: distributes objects using equal vertical spacing.
2.6.4.6. Objects
The Objects group helps you work with mutiple objects.
• Group objects unites the selected objects and makes them behave as a single object.
• Ungroup objects: separates the grouped objects.
Arrange positions the objects so that they appear either in front of or behind each other.
56

• Send Backward: sends the element back one level.
• Send to Back: sends the element behind all other elements on the label.
• Bring Forward: brings the element forward one level.
• Send to Front: sends the element in front of all other elements on the label.
Delete allows you to remove the selected individual or group objects from your label template.
2.6.5. Data Tab
Data tab displays the Designer ribbon with groups that enable you to instantly connect an object with
commonly used data sources, or to dene data connections in more detail:
• Step-by-Step Database Wizard ribbon group opens database wizard for typical database
connection types.
• Data Source Management ribbon group gives direct access to the Dynamic Database Manager
and Prompt Order dialogs.
2.6.5.1. Step-by-Step Database Wizard
Database wizard is a guided process that allows the user to congure a connection to a database and
to select which tables and elds will be used.
Edit Database allows you to edit all existing connected databases using a wizard.
57

The wizard additionally allows you to sort, lter records, and to dene how many label copies will be
printed per database record.
2.6.5.2. Data Source Management
Data Source Management ribbon group provides access to:
• Dynamic Data Manager: dialog for managing and connecting to various data sources.
• Prompt Order: dialog for dening the order of prompted variables on the print form.
Dynamic Data Manager
PRODUCT LEVEL INFO
This section applies to NiceLabel 2019 Pro and PowerForms editions.
Dynamic Data Manager is a dialog that enables the user to manage the dynamic data sources for
label and form objects.
Label and form objects can be connected to multiple variables, functions and databases.
To open the dialog, click the Dynamic Data Manager button in the Designer ribbon.
Read more about how to dene the data sources in the following sections:
• Work with variables.
• Work with functions.
• Use databases as content source.
58

• Use internal variables as content source.
• Use global variables as content source.
Variable Prompt Order Dialog
Variable Prompt order dialog denes the order in which the variable values are prompted at print time.
The dialog displays the entire range of currently dened variables.
To change the prompt order, select a variable from the list and change its position using drag and
drop or Move up and Move down buttons. Repeat this step for each variable, whose prompting
position needs to be changed.
2.6.6. View Tab
View Tab gives you control over document zooming, marker visibility, visual aids and design surface
rotation. It makes the following ribbon groups available:
• Zoom: denes design surface zoom level and Designer window zoom behavior.
• Object Markers Visibility: denes visibility settings for object properties.
• Alignment and Gridlines: sets object positioning behavior and denes properties for design
surface gridlines.
• Rotation: rotates the design surface clockwise for 90 degrees per click.
2.6.6.1. Zoom
Zoom group denes the design surface zoom level.
• Zoom to Document: displays the entire label in the Designer window.
• Zoom to Objects: displays all objects in the Designer window.
• Zoom In: magnies the design surface by a percentage of the currently dened zoom level.
• Zoom Out: decreases the design surface by a percentage of the currently dened zoom level.
• Zoom percentage drop-down menu: allows you to type in or select the exact zooming
percentage for your current document.
59

2.6.6.2. Object Markers Visibility
Objects markers visibility group toggles the visibility for the following object properties:
• Object Name: displays the name of an object.
• Printer Element: indicates that the object will be printed using a printer built-in function. This
options serves as an alternative to sending the object to printer as a graphic.
• Events: indicates that the form object runs assigned Action(s).
• Data Source: indicates that the object is connected to a dynamic data source.
2.6.6.3. Alignment and Gridline Guides
Alignment and Gridlines group sets object positioning behavior and denes properties for design
surface gridlines.
• Display gridline guides: makes the design surface grid dots visible.
• Grid Size X: denes horizontal distance between the grid dots.
• Grid Size Y: denes vertical distance between the grid dots.
• Grid Oset X: denes the horizontal oset of the grid from the design surface center.
• Grid Oset Y: denes the vertical oset of the grid from the design surface center.
• Align to Objects: makes an object align with other objects on the design surface. When an
object is aligned, a line which marks the object alignment appears.
• Align to Gridlines: aligns the selected objects with gridlines.
•
NOTE
Certain continuous inkjet (CIJ) printer models only print on predened label
surface positions. If such printer is currently selected, grid settings are dened
by the printer driver and grayed out for this label. The Align to Gridlines option is
automatically enabled.
• Do Not Align: makes the object position independent of gridlines and position of other object(s).
2.6.6.4. Rotation
Rotate view button rotates the design surface clockwise. Horizontal and vertical rulers adapt to the
current position of the design surface.
60

TIP
Rotation type is dened by the printer driver. Certain drivers support complete 360
degrees rotation (90 degrees per click), while others allow 90 degrees rotation
clockwise (portrait/landscape).
2.6.7. Solution Tab
PRODUCT LEVEL INFO
Solution building is available in PowerForms.
Solution Tab enables quick and easy access to commands that are related to the entire print solution.
The tab makes the following ribbon groups available:
• Clipboard: stores selected objects or groups of objects.
• New: allows adding additional labels or forms to the active solution.
• Action: starts the printing procedure or runs a form.
• Import&Export: allows importing, publishing and exporting the solution les.
2.6.7.1. Clipboard
Clipboard group temporarily stores the selected elements, objects or groups of objects. Use the
selected and stored objects to transfer them from one label or solution to another.
TIP
Copying and pasting of textual (plaint text, RTF) and graphical (bitmaps) content
between multiple applications is supported.
• Paste: pastes a document (label/form) into the solution.
• Cut: removes the selected document from the solution and adds it to the clipboard to be pasted
elsewhere.
• Copy: copies the selected document to the clipboard.
61

• Delete: deletes the selected object from the solution.
2.6.7.2. New
PRODUCT LEVEL INFO:
Creation of forms and use of form objects are available in PowerForms.
New allows adding additional labels or forms to the active solution. Labels and form that are included
in the solution are listed in the Solution explorer.
• New Label: adds a new label to the active solution. After clicking the New Label button the Label
Setup Wizard appears.
• New Form: adds a new form to the active solution. After clicking the New Form button, a blank
design surface appears. The form is ready for editing.
2.6.7.3. Action
Set as Startup Form sets the current form as your default Designer form. Next time you open the
solution, the startup form is open and ready to be run or edited.
2.6.7.4. Import and Export
Import and Export group allows importing, publishing and exporting the solution les.
Import into Solution allows you to import documents into the solution. Supported le formats are:
• Solution le (.nsln)
• Label le (.nlbl)
• Label le (V6) (.lbl)
• Form File (V6) (.x)
When an import command is issued, the Open dialog opens. Select the le you want to import. The
imported le becomes visible in the solution manager.
NOTE
Label .lbl and form .x les are legacy le types used with version 6 and earlier.
Export Label: saves the document to disk and makes it available for use in another solution. After
clicking Export Label the Export label dialog appears. Select a location to save the label to.
62

2.6.8. Contextual Tabs
PRODUCT LEVEL INFO:
Creation of forms and use of form objects are available in PowerForms.
Contextual tab is a hidden tab that becomes visible when a specic label or formobject is selected on
the design surface. Contextual tabs appear on the right side of the standard Designer tab. The
selection of displayed tabs depends on the object that you are currently editing.
• Label-specic contextual tabs are described here.
• Form-specic contextual tabs are described here.
2.6.8.1. Label-specic Contextual Tabs
When editing various label objects, the following contextual tabs appear depending on the selected
object:
• Design tab
• Barcode tab
• Shape tab
• Picture tab
• Text tab
Design Contextual Tab
Design tab serves as a contextual tab that denes the layout and positioning of the selected label
object.
The following groups of settings are available on the Design tab:
63
• General: denes object's visibility and printability on a label.
• Positioning: denes the object's position on the design surface.
• Arrange: positions the object relative to neighboring objects on a label.
General
General group denes the object's visibility and printability on a label.
• Not printable: when enabled, this option prevents the object from being printed on the label. The
object remains visible on the label preview.
• Visible: when disabled, the object neither appears on the print preview nor on the printed label.
The object is treated as if it does not exist.
• Visibility settings: dene if the selected object is going to appear on the printed label or not.
• Condition: an object is enabled and/or visible if the result of the given condition is "True".
• Printing Optimization: allows activating the use of printer elements (available with rectangle,
barcode, line, ellipse and inverse objects).
• Use printer element if supported: speeds up the printing process.
If enabled by the printer model, a share of label element processing is handled directly by
the printer: internal fonts, shapes, barcodes, etc.
• Always print as graphics: sends and prints the objects as graphic les.
• Name: allows you to enter object name and its description.
Positioning
Positioning group sets the object location and size on a label.
Position button opens:
• X and Y: coordinates set the exact position on the design surface.
• Width and Height: object dimensions.
• Keep Aspect Ratio: makes sure both object dimensions change proportionally while resizing.
• Rotation angle: rotates the object clockwise.
Anchoring Point button denes the spot where an object is pinned to the design surface. Variable size
objects increase or decrease their size in the direction that is opposite to the chosen anchoring point.
Relative Position options dene the position of an object when label size or positions of neighboring
objects are changing during the label design process.
• Enable horizontal relative position: activates horizontal relative positioning.
64

• Relative to label border: the position of object is dened relative to the reference label
border. Dene horizontal oset for the object with regard to this border.
• Relative to another object: the position of object is dened relative to the border of a
neighboring object. Dene horizontal oset for the object with regard to this object.
• Object: selects the reference object for horizontal relative positioning.
• Border: neighboring object's reference border or label border (if there are no other objects
on the label) for horizontal relative positioning.
• Oset: horizontal distance from label border or reference object's anchoring point.
• Enable vertical relative position: activates vertical relative positioning.
• Relative to label border: the position of object is dened relative to the reference label
border. Dene vertical oset for the object with regard to this border.
• Relative to another object: the position of object is dened relative to the border of a
neighboring object. Dene vertical oset for the object with regard to this object.
• Object: selects the reference object for vertical relative positioning.
• Border: neighboring object's reference border or label border (if there are no other objects
on the label) for vertical relative positioning.
• Oset: vertical distance from label border or reference object's anchoring point.
NOTE
Object position changes if label size or position of the related object change.
When designing double-sided labels, you can also take objects on the opposite side of the label as
reference objects for relative positioning. In this case, objects on opposite sides move together if you
change their positions.
NOTE
Label sides of reference objects are clearly identied on the Object selection list with
(Front Side) and (Back Side).
Keep Aspect Ratio: makes sure the object is resized proportionally.
Lock prevents the selected object from being moved during the design process.
Arrange
Group objects: adds selected objects to a group.
• Group objects: unites the selected objects and makes them behave as a single object.
65

• Ungroup objects separates previously grouped objects.
Arrange: denes how objects are positioned in a group.
• Bring forward: moves the selected object up one layer.
• Bring to front: moves the selected object to the top of the object stack.
• Send backward: moves the selected object down one layer.
• Send to back: moves the selected object to the bottom of the object stack.
Align group allows setting the alignment and spacing for objects on the design surface. All objects
can be aligned according to the neighboring object or according to the document border.
Horizontal alignment options are:
• Left: aligns the selected objects with the left edge of the leftmost object or with the left edge of
the rst selected object. If a single object is selected, it is placed on the label's left border.
• Center Horizontally: aligns the selected objects with the horizontal center of the largest
selected object or with the horizontal center of the rst selected object. If a single object is
selected, it is placed in the horizontal center of a label.
• Right: aligns the selected objects with the right edge of the rightmost object or with the right
edge of the rst selected object. If a single object is selected, it is placed on the label's right
border.
• Distribute Horizontally: equalizes horizontal spacing between the objects.
Vertical alignment options are:
• Top: aligns the selected objects with the top edge of the topmost object or with the top edge of
the rst selected object. If a single object is selected, it is placed on the label's top border.
• Center Vertically: aligns the selected objects with the vertical center of the largest selected
object or with the vertical center of the rst selected object. If a single object is selected, it is
placed in the vertical center of a label.
• Bottom: aligns the selected objects with the bottom edge of the lowest object or with the
bottom edge of the rst selected object. If a single object is selected, it is placed on the label's
bottom border.
• Distribute Vertically: equalizes vertical spacing between the objects.
TIP
Align to label/form is achieved by holding the <Ctrl> key and clicking the above listed
align icons.
66
Barcode Contextual Tab
Barcode tab serves as a contextual tab that denes the type, layout and positioning of barcode
object.
The following groups of settings are available on the Barcode tab:
• Barcode: denes basic barcode symbol type and its dimensions.
• Settings: denes barcode details.
• Arrange: positions the object relative to neighboring objects on a label.
Barcode Tab
Barcode group allows you to choose the barcode type and to set the dimensions of your barcode
symbol.
NOTE
Settings in Barcode group depend on the selected barcode type.
• Barcode Type: denes the type of the barcode symbol to be used on a label.
TIP
By default, Code128 barcode type is selected. For more details about the available
barcode types, see section Barcode Types and Available Settings.
• DataBar Type: if one of the DataBar barcode types is selected, DataBar Type denes its specic
subtype to be used on the label.
• X dimension: width of the barcode's narrow bar in the selected Unit of measurement.
• Height: vertical dimension of your barcode in the selected Unit of measurement.
• Ratio denes the ratio between the barcode's narrow and wide bar widths.
Each barcode type's range of permitted ratios is limited by the standard. Designer only allows
you to use valid ratios. By default, the ratio is set to 3. This means that the wide bar is 3 times the
width of a narrow bar.
67

NOTE
The available ratios depend on the selected X dimension. If you are changing the
X dimension, this also aects the selection of available ratios.
• Row height denes the height of a single data row in 2D barcodes. Row height is specied as a
multiple over the X dimension.
Settings
Settings group allows you to congure barcode details.
Human Readable button denes the human readable content's layout.
• No human readable: makes the barcode appear without the human readable text.
• Above barcode: locates human readable text above the barcode.
• Below barcode: locates human readable text below the barcode.
Style group allows you to set custom properties for human readable text.
• Custom Font: enables font and font size selection. Internal printer fonts cannot be used as
custom human readable font.
• Auto font scaling: If enabled (default setting), human readable text grows or shrinks
proportionally along with the changing size of the barcode. To set a custom size for human
readable text, disable this option and select the appropriate font size.
• Bold: makes human readable text appear bold.
• Italic: makes human readable text appear italic.
Mask group sets the format of the input data before it is displayed on a label.
• Content mask sets the format of the input data before it is displayed on a label.
• Mask character is a character used in the mask that is replaced with actual data on the printed
label.
Example
A user needs to format a phone number to be more readable on the label. Data input is not formatted
since it is read from a database.
If the input value read from a database is:
+38642805090
and the content mask is:
68

(****) **** - ****
the resulting output is:
(+386) 4280 - 5090
If the data contains the asterisk "*" character, change the Mask character. The character should have
a unique value that does not appear anywhere in the data.
TIP
Barcode Details dier according to the barcode standards. Dene the options that are
given with regard to the currently selected barcode type. Details for 1D and 2D
barcodes are described in dedicated sections:
• 1D barcode details
• 2D barcode details
TIP
Check digit is derived from the preceding barcode digits and is placed as the nal digit
of a barcode.
Color: sets the barcode's line and human readable content color on the printed label.
Arrange
Group objects: adds selected objects to a group.
• Group objects: unites the selected objects and makes them behave as a single object.
• Ungroup objects separates previously grouped objects.
Arrange: denes how objects are positioned in a group.
• Bring forward: moves the selected object up one layer.
• Bring to front: moves the selected object to the top of the object stack.
• Send backward: moves the selected object down one layer.
• Send to back: moves the selected object to the bottom of the object stack.
Align group allows setting the alignment and spacing for objects on the design surface. All objects
can be aligned according to the neighboring object or according to the document border.
Horizontal alignment options are:
69

• Left: aligns the selected objects with the left edge of the leftmost object or with the left edge of
the rst selected object. If a single object is selected, it is placed on the label's left border.
• Center Horizontally: aligns the selected objects with the horizontal center of the largest
selected object or with the horizontal center of the rst selected object. If a single object is
selected, it is placed in the horizontal center of a label.
• Right: aligns the selected objects with the right edge of the rightmost object or with the right
edge of the rst selected object. If a single object is selected, it is placed on the label's right
border.
• Distribute Horizontally: equalizes horizontal spacing between the objects.
Vertical alignment options are:
• Top: aligns the selected objects with the top edge of the topmost object or with the top edge of
the rst selected object. If a single object is selected, it is placed on the label's top border.
• Center Vertically: aligns the selected objects with the vertical center of the largest selected
object or with the vertical center of the rst selected object. If a single object is selected, it is
placed in the vertical center of a label.
• Bottom: aligns the selected objects with the bottom edge of the lowest object or with the
bottom edge of the rst selected object. If a single object is selected, it is placed on the label's
bottom border.
• Distribute Vertically: equalizes vertical spacing between the objects.
TIP
Align to label/form is achieved by holding the <Ctrl> key and clicking the above listed
align icons.
Shape Contextual Tab
Shape tab serves as a contextual tab that denes the appearance of ellipse, rectangle and line
objects.
The following groups of settings are available on the Shape tab:
• Outline: denes how the line of the selected shape should appear.
• Fill: group denes the shape's ll style and color.
• Arrange: positions the object relative to neighboring objects on a label.
70
Outline
Outline group denes how the line of the selected shape should appear.
Outline Style button options are:
• None: makes the object line invisible.
• Solid: makes the object line solid.
• Dot: makes the object line dotted.
• Dash: makes the object line dashed.
• Clear: makes parts of other objects underneath the line invisible.
Outline Color denes the color of the shape's line.
Thickness denes the object line's width.
Corner radius: makes the rectangle corners round. Higher values make the curve broader.
Fill
Fill group denes the shape's ll style and color.
Fill Style options are:
• None: makes the object completely transparent.
• Clear: makes other objects beneath the active one invisible.
• Solid: lls the object with solid color.
• Right Diagonal: lls the object with diagonal lines that ascend toward the right side.
• Left Diagonal: lls the object with diagonal lines that ascend toward the left side.
• Vertical: lls the object with vertical lines.
• Horizontal: lls the object with horizontal lines.
• Cross: lls the object with crossed lines.
• Cross Diagonal: lls the object with diagonally crossed lines.
• 25% of color: sets ll color opacity to 25 %.
• 50% of color: sets ll color opacity to 50 %
• 75% of color: sets ll color opacity to 75 %.
Background Color denes the color of the shape's ll.
71
Arrange
Group objects: adds selected objects to a group.
• Group objects: unites the selected objects and makes them behave as a single object.
• Ungroup objects separates previously grouped objects.
Arrange: denes how objects are positioned in a group.
• Bring forward: moves the selected object up one layer.
• Bring to front: moves the selected object to the top of the object stack.
• Send backward: moves the selected object down one layer.
• Send to back: moves the selected object to the bottom of the object stack.
Align group allows setting the alignment and spacing for objects on the design surface. All objects
can be aligned according to the neighboring object or according to the document border.
Horizontal alignment options are:
• Left: aligns the selected objects with the left edge of the leftmost object or with the left edge of
the rst selected object. If a single object is selected, it is placed on the label's left border.
• Center Horizontally: aligns the selected objects with the horizontal center of the largest
selected object or with the horizontal center of the rst selected object. If a single object is
selected, it is placed in the horizontal center of a label.
• Right: aligns the selected objects with the right edge of the rightmost object or with the right
edge of the rst selected object. If a single object is selected, it is placed on the label's right
border.
• Distribute Horizontally: equalizes horizontal spacing between the objects.
Vertical alignment options are:
• Top: aligns the selected objects with the top edge of the topmost object or with the top edge of
the rst selected object. If a single object is selected, it is placed on the label's top border.
• Center Vertically: aligns the selected objects with the vertical center of the largest selected
object or with the vertical center of the rst selected object. If a single object is selected, it is
placed in the vertical center of a label.
• Bottom: aligns the selected objects with the bottom edge of the lowest object or with the
bottom edge of the rst selected object. If a single object is selected, it is placed on the label's
bottom border.
• Distribute Vertically: equalizes vertical spacing between the objects.
72

TIP
Align to label/form is achieved by holding the <Ctrl> key and clicking the above listed
align icons.
Picture Contextual Tab
Picture tab serves as a contextual tab that denes picture resizing options and object arranging.
The following groups of settings are available on the Picture tab:
• Resize: resizes the object relative to neighboring objects on a label.
• Arrange: positions the object relative to neighboring objects on a label.
Resize
Resize group denes if the picture adapts to the label size at print time or not.
Picture Fit button opens the picture sizing options.
• Resize options: dene how the source le dimensions adapt to the size of object at print time.
• Keep original picture size: disables resizing. The source le is displayed using the object
with its original dimensions.
• Resize proportionally: makes the source le resize proportionally. The aspect ratio of
source le dimensions is preserved.
• Resize to the designed size: resizes the picture horizontally and vertically to make it t into
the bounding box. Using this option will most likely make the picture distorted.
• Original size: displays the picture's Width and Height before resizing.
• Revert to original picture size: removes resizing actions.
Keep Aspect Ratio makes sure both object dimensions change proportionally while resizing.
Arrange
Group objects: adds selected objects to a group.
• Group objects: unites the selected objects and makes them behave as a single object.
• Ungroup objects separates previously grouped objects.
73

Arrange: denes how objects are positioned in a group.
• Bring forward: moves the selected object up one layer.
• Bring to front: moves the selected object to the top of the object stack.
• Send backward: moves the selected object down one layer.
• Send to back: moves the selected object to the bottom of the object stack.
Align group allows setting the alignment and spacing for objects on the design surface. All objects
can be aligned according to the neighboring object or according to the document border.
Horizontal alignment options are:
• Left: aligns the selected objects with the left edge of the leftmost object or with the left edge of
the rst selected object. If a single object is selected, it is placed on the label's left border.
• Center Horizontally: aligns the selected objects with the horizontal center of the largest
selected object or with the horizontal center of the rst selected object. If a single object is
selected, it is placed in the horizontal center of a label.
• Right: aligns the selected objects with the right edge of the rightmost object or with the right
edge of the rst selected object. If a single object is selected, it is placed on the label's right
border.
• Distribute Horizontally: equalizes horizontal spacing between the objects.
Vertical alignment options are:
• Top: aligns the selected objects with the top edge of the topmost object or with the top edge of
the rst selected object. If a single object is selected, it is placed on the label's top border.
• Center Vertically: aligns the selected objects with the vertical center of the largest selected
object or with the vertical center of the rst selected object. If a single object is selected, it is
placed in the vertical center of a label.
• Bottom: aligns the selected objects with the bottom edge of the lowest object or with the
bottom edge of the rst selected object. If a single object is selected, it is placed on the label's
bottom border.
• Distribute Vertically: equalizes vertical spacing between the objects.
TIP
Align to label/form is achieved by holding the <Ctrl> key and clicking the above listed
align icons.
Text Contextual Tab
Text tab serves as a contextual tab that denes formatting of Text and Text box objects.
74

The following groups of settings are available on the Text tab:
• Format: lets you dene the text format.
• Text Settings: lets you dene the layout of any textual content that is added to label object.
• Arrange: positions the object relative to neighboring objects on a label.
Format
Format group lets you dene the text format.
• Show/hide printer fonts: button turns visibility of printer fonts on the font list on/o.
• Font: allows specifying the typeface and its size. Fonts fall into two groups, OpenType fonts and
Printer fonts.
NOTE
If the currently selected printer is a thermal printer, additional fonts will be visible
on the list of available fonts. These are the Printer fonts identied by the printer
icon in front of their names.
• The font may appear Bold, Italic, Underlined or as a Strikethrough text.
• Alignment buttons allow you to align the text to the left, center, right, or evenly.
• Font color: species font and underscore color.
• Increase/decrease font buttons allow you to gradually change the font size.
• Scaling: factor that denes how much the font is stretched from its original proportions.
NOTE
If the stretch factor is set to 100 %, the font has a normal look. If factor is 200 %,
it means that font is twice as wide as normal. If it is 50 %, the font is half as wide.
Text Settings
Text Setting group allows dening the layout of any textual content that is added to the object.
Character and Paragraph button opens line and character spacing options:
• Line spacing: distance between each line in a paragraph.
• Character spacing: distance between individual characters.
75

Eects button displays the available text eects:
• Inverse: inverts the colors of text and background.
• Mirror: mirrors the text.
• RTL printing: prints the text from right to left.
TIP
Most thermal printers automatically print Arabic and Hebrew text from right-to-left.
Enable this option it if the operating system does not provide native RTL support.
Text Fit button opens the automatic text sizing options:
• None: disables the resizing. In this case, text eld dimensions and font size do not adapt to the
amount of inserted content in a text box.
• Ignore excessive content: removes the text content that does not t into the object.
TIP
When enabled, the object only uses the amount of text that can be contained in the
box. The remaining text is discarded.
• Adjust height to t content: adapts the text box height to t the content.
• Fit content by adjusting font size: sets the acceptable label object font size range. Font size
adapts to the text box size automatically.
NOTE
Text Fit button is available when conguring the Rich text box object.
Arrange
Group objects: adds selected objects to a group.
• Group objects: unites the selected objects and makes them behave as a single object.
• Ungroup objects separates previously grouped objects.
Arrange: denes how objects are positioned in a group.
• Bring forward: moves the selected object up one layer.
• Bring to front: moves the selected object to the top of the object stack.
76

• Send backward: moves the selected object down one layer.
• Send to back: moves the selected object to the bottom of the object stack.
Align group allows setting the alignment and spacing for objects on the design surface. All objects
can be aligned according to the neighboring object or according to the document border.
Horizontal alignment options are:
• Left: aligns the selected objects with the left edge of the leftmost object or with the left edge of
the rst selected object. If a single object is selected, it is placed on the label's left border.
• Center Horizontally: aligns the selected objects with the horizontal center of the largest
selected object or with the horizontal center of the rst selected object. If a single object is
selected, it is placed in the horizontal center of a label.
• Right: aligns the selected objects with the right edge of the rightmost object or with the right
edge of the rst selected object. If a single object is selected, it is placed on the label's right
border.
• Distribute Horizontally: equalizes horizontal spacing between the objects.
Vertical alignment options are:
• Top: aligns the selected objects with the top edge of the topmost object or with the top edge of
the rst selected object. If a single object is selected, it is placed on the label's top border.
• Center Vertically: aligns the selected objects with the vertical center of the largest selected
object or with the vertical center of the rst selected object. If a single object is selected, it is
placed in the vertical center of a label.
• Bottom: aligns the selected objects with the bottom edge of the lowest object or with the
bottom edge of the rst selected object. If a single object is selected, it is placed on the label's
bottom border.
• Distribute Vertically: equalizes vertical spacing between the objects.
TIP
Align to label/form is achieved by holding the <Ctrl> key and clicking the above listed
align icons.
2.6.8.2. Form-specic Contextual Tabs
PRODUCT LEVEL INFO:
Creation of forms and use of form objects are available in PowerForms.
77

Contextual tab is a hidden tab that is displayed in the tab row when a specic form object is selected
on the design surface. Contextual tabs appear on the right side of the standard Designer tabs.
The following tabs appear oering easy access to the object-specic commands:
• Object: allows dening object printability, its position, and arrangement.
• Form Control: allows dening form object related specics – its layout and assigned events.
• Picture: gives access to picture-related events and picture resizing options.
Design Contextual Tab
Design tab serves as a contextual tab that denes the layout and positioning of the selected label
object.
The following groups of settings are available on the Design tab:
• General: denes object's visibility and printability on a label.
• Positioning: denes the object's position on the design surface.
• Arrange: positions the object relative to neighboring objects on a label.
General
General group enables/disables the object and denes its visibility on a form.
• Enabled: denes if the object is going to be active (editable) at form startup or not.
• Visible: denes if the selected object is going to appear on the form or not.
• Conditions: an object is enabled and/or visible if the result of the given condition is "True".
• Name: allows you to enter object name and its description.
Positioning
Positioning group sets the object location and size on a form.
Position button opens:
• X and Y: coordinates set the exact position on the design surface (in px).
• Width and Height: object dimensions.
78

Anchoring Point button denes the spot where an object is pinned to the design surface. Variable size
objects increase or decrease their size in the direction that is opposite to the chosen anchoring point.
• Horizontally resize with form and Vertically resize with form: object size automatically adapts to
the changing size of the form.
• Horizontally resize with form: object width adapts to the resized form.
• Vertically resize with form: object height adapts to the resized form.
NOTE
If both options are enabled, object width and height adapt to the resized form
simultaneously.
Keep Aspect Ratio makes sure the object is resized proportionally.
Lock prevents the selected object from being moved during the design process.
Arrange
Group objects: adds selected objects to a group.
• Group objects: unites the selected objects and makes them behave as a single object.
• Ungroup objects separates previously grouped objects.
Arrange: denes how objects are positioned in a group.
• Bring forward: moves the selected object up one layer.
• Bring to front: moves the selected object to the top of the object stack.
• Send backward: moves the selected object down one layer.
• Send to back: moves the selected object to the bottom of the object stack.
Align group allows setting the alignment and spacing for objects on the design surface. All objects
can be aligned according to the neighboring object or according to the document border.
Horizontal alignment options are:
• Left: aligns the selected objects with the left edge of the leftmost object or with the left edge of
the rst selected object. If a single object is selected, it is placed on the label's left border.
• Center Horizontally: aligns the selected objects with the horizontal center of the largest
selected object or with the horizontal center of the rst selected object. If a single object is
selected, it is placed in the horizontal center of a label.
• Right: aligns the selected objects with the right edge of the rightmost object or with the right
edge of the rst selected object. If a single object is selected, it is placed on the label's right
border.
79

• Distribute Horizontally: equalizes horizontal spacing between the objects.
Vertical alignment options are:
• Top: aligns the selected objects with the top edge of the topmost object or with the top edge of
the rst selected object. If a single object is selected, it is placed on the label's top border.
• Center Vertically: aligns the selected objects with the vertical center of the largest selected
object or with the vertical center of the rst selected object. If a single object is selected, it is
placed in the vertical center of a label.
• Bottom: aligns the selected objects with the bottom edge of the lowest object or with the
bottom edge of the rst selected object. If a single object is selected, it is placed on the label's
bottom border.
• Distribute Vertically: equalizes vertical spacing between the objects.
TIP
Align to label/form is achieved by holding the <Ctrl> key and clicking the above listed
align icons.
Contextual Tab Form Control
Form control tab enables you to assign actions to the object, and to set its appearance.
The following groups of settings are available on the Form control tab:
• Events: lets you dene various events that can be run using the selected object.
• Style: denes how the content of a form object should appear. This group adapts to the
currently selected form object. The following variations are in use:
• Style group for textual content (objects: Text, Button, Memo Field, Combo Box, List Box,
checkbox,
• Style group for graphical content (objects: Frame, Label Preview)
• Style group for table content (objects: Database Table)
• Arrange: positions the object relative to neighboring objects on a label.
Events
Events group lets you dene various events that can be run using the selected object.
• Events button opens the list of available events for the selected object.
Example:
80

Typical events in Designer are On Click, On Focus, On Exit, etc.
Each event is run using actions. Actions... button provides access to the Actions editor which serves
as a tool for managing actions in a labeling solution.
Style (for Textual Content)
Style group denes how the textual content of a form object should appear.
Show/hide printer fonts button makes the printer fonts available on the typeface list or hidden.
Font allows specifying the typeface and its size. Fonts fall into two groups, OpenType fonts and
Printer fonts.
NOTE
If the currently selected printer is a thermal printer, additional fonts will be available on
the list of available fonts. They are Printer fonts identied by the printer icon in front of
their names.
The font may appear Bold, Italic, Underlined or as a Strikethrough text.
Scaling is a factor that denes, how much the font is stretched from its original proportions. If the
factor is 100%, the font has a normal look. If factor is 200%, it means that font is twice as wide as
normal. If it is 50%, the font is stretched.
Text alignment denes horizontal positioning of the object content.
• Align Left: places the text on the left border of an object.
• Align Center: places the text at the center of an object.
• Align Right: places the text on the right border of an object.
Font color allows specifying the font and underline colors.
Background Color denes the color of the object background.
Border Color button opens border color settings.
Text Settings denes the text layout.
Style (for Graphical Content)
Style group denes the layout of graphic form objects.
• Show Border denes if the object border is visible or not.
• Border Settings button opens Border color and Border width settings.
81
• Background color denes the color of object background.
Style (for Tables)
Style group denes the appearance of Database Table object on a form.
• Table Style denes visual appearance of the object and its content.
• Cell Style denes visual appearance of the selected cells in Database Table object.
Arrange
Group objects: adds selected objects to a group.
• Group objects: unites the selected objects and makes them behave as a single object.
• Ungroup objects separates previously grouped objects.
Arrange: denes how objects are positioned in a group.
• Bring forward: moves the selected object up one layer.
• Bring to front: moves the selected object to the top of the object stack.
• Send backward: moves the selected object down one layer.
• Send to back: moves the selected object to the bottom of the object stack.
Align group allows setting the alignment and spacing for objects on the design surface. All objects
can be aligned according to the neighboring object or according to the document border.
Horizontal alignment options are:
• Left: aligns the selected objects with the left edge of the leftmost object or with the left edge of
the rst selected object. If a single object is selected, it is placed on the label's left border.
• Center Horizontally: aligns the selected objects with the horizontal center of the largest
selected object or with the horizontal center of the rst selected object. If a single object is
selected, it is placed in the horizontal center of a label.
• Right: aligns the selected objects with the right edge of the rightmost object or with the right
edge of the rst selected object. If a single object is selected, it is placed on the label's right
border.
• Distribute Horizontally: equalizes horizontal spacing between the objects.
Vertical alignment options are:
• Top: aligns the selected objects with the top edge of the topmost object or with the top edge of
the rst selected object. If a single object is selected, it is placed on the label's top border.
82

• Center Vertically: aligns the selected objects with the vertical center of the largest selected
object or with the vertical center of the rst selected object. If a single object is selected, it is
placed in the vertical center of a label.
• Bottom: aligns the selected objects with the bottom edge of the lowest object or with the
bottom edge of the rst selected object. If a single object is selected, it is placed on the label's
bottom border.
• Distribute Vertically: equalizes vertical spacing between the objects.
TIP
Align to label/form is achieved by holding the <Ctrl> key and clicking the above listed
align icons.
Picture Contextual Tab (Form specic)
Picture tab serves as a contextual tab that denes picture resizing options and object arranging.
The following groups of settings are available on the Picture tab:
• Events: lets you dene various events that can be run using the selected picture object
• Resize: denes how the picture source le's dimensions adapt to the size of object when the
form is run.
• Arrange: positions the object relative to neighboring objects on the form.
2.6.8.3. Document Storage
Document Storage contextual tab allows you to perform document storage actions within Designer.
Document Storage is a functionality of NiceLabel Control Center. It enables the NiceLabel Control
Center to perform as a shared le repository on the server, where users can store their les, retrieve
them, and control their revisions.
Document Storage contextual tab enables you to perform document storage actions straight from
Designer. This makes accessing and opening the le in NiceLabel Control Center unnecessary.
NOTE
This contextual tab requires connection with NiceLabel Control Center. LMS
Enterprise license is mandatory for such congurations.
83

Revisioning group allows you to perform the available document storage actions:
• Check Out: checks out the le from NiceLabel Control Center document storage and makes it
available for editing. The checked-out le is marked and locked for editing for any other user. All
other users will see the current revision of the le, while the author (designer) already works on a
new draft.
NOTE
After opening a document from the document storage (File > Open > Document
Storage), the editing commands remain disabled until you check out the document.
• Check In: checks the le to NiceLabel Control Center document storage after the editing is
done. When you check in the le, its revision number increments by one. The entered comment
is added to le log.
• Discard Checkout: discards checkout of the current le and gives other users full access to the
le.
WARNING
If you click Discard Checkout, you irreversibly lose all changes that any of the
users did after checking out the le. To keep the changes, check in the labels or
solutions rst.
• Document Storage: opens document storage location of the connected NiceLabel Control
Center.
2.6.9. Help Tab
Help tab provides direct access to various resources that help you design and use labels and forms
quickly and eciently.
Help ribbon group includes buttons with links to the following resources.
• Help: Designer online help.
• User Guides: online collection of NiceLabel user guides. The collection includes user guides for
the entire product portfolio.
84

• Training Videos: NiceLabel collection of training videos.
• Knowledge Base: online library of articles that describe many technical solutions, tips, and
solved issues for labels, and printing solutions.
• Sample Files: access to the collection of sample label les. Use them to become familiar with
Designer and to explore software capabilities.
• Technical Support: connects you with NiceLabel technical support department.
Product ribbon group includes links to:
• Software About page
• NiceLabel Home Page: www.nicelabel.com
2.6.10. RFID Tag
The RFID Tag dialog allows you to select the appropriate RFID tag type, to dene its content, and to
congure which type of data is going to be encoded on the tag.
NOTE
RFID functionality is available with installed NiceLabel printer driver.
RFID Tag dialog allows you to congure how the tag content is encoded in a tag:
• Select the RFID tag type.
• Congure various tag settings related to its structure and programming.
• Set the RFID security parameters.
• Insert and congure data elds.
2.6.10.1. Tag
The Tag panel of the RFID Tag dialog allows you to select which tag type is going to carry the encoded
data and how the data should be written to the tag.
Tag group includes the tag type selection.
• Tag type dropdown list oers the selection of available RFID tag types. The selection of tag
types is automatically dened by the printer driver.
NOTE
Select the printer (and the corresponding driver) for the label with RFID tag in the
status bar.
85

Usage group denes the RFID Tag data sources and how the data is written to the tag.
• RFID write enabled: Enables or disables data writing to the RFID tag.
TIP
Disabled writing might be useful during the label designing process or during specic
workow phases.
The encodable RFID data elds are added to the Dynamic Data explorer under RFID Tag.
Example
Data Field Possibilities:
• EPC: Data eld with Electronic Product Code
• User Data: Data eld with the content to be encoded on the RFID tag
• TID: Data eld with unique ID of the RFID tag
• GID Code: General identier code for RFID tags
• CID Code: Card identication number
TIP
Drag the appropriate data eld and place it on the label in form of a Text, Text Box, or
Barcode object (dened by the driver).
2.6.10.2. Content
The Content panel of the RFID Tag dialog allows you to dene the content of an RFID tag. To encode
the data in an RFID tag, complete the following steps.
Step 1: Select Data Fields
Data Fields group allows you to select the data elds. These elds are going to contain the encoded
data of the RFID tag.
NOTE
The selection of available Data Fields with corresponding settings depends on the
selected Tag type.
86

Data Field Examples:
• TID: unique ID of the RFID tag
• EPC: syntax for unique identiers assigned to objects, unit loads, locations, or other entities that
are included in business operations
• User Data: payload data to be written in the RFID tag
• RFID Tag Memory: the only data eld available for non-Gen2 RFID tags
Step 2: Select Data Type
Data type denes the method for entering the Data eld content. The availability of data types
depends on the selected Data eld.
• Memory block: the table allows you to enter the data into individual RFID tag memory blocks.
Each table row represents a single block of the selected Tag type.
NOTE
Memory block structure and properties of individual blocks depend on the selected
Tag type.
NOTE
Data type can be dened for each block individually:
• Electronic Product Code (EPC): added elds allow you to enter the RFID data according to the
EPC standard.
• ASCII string: RFID data to be entered as a string of ASCII characters.
• HEX encoded string: RFID data to be entered as a string of hexadecimal pairs.
• Numeric: RFID data to be entered as a string of digits.
Encoding type allow you to select the data encoding format that corresponds to your current Data
type.
Step 3: Insert Value
Insert the value to be encoded in the RFID tag according to the selected Data type.
2.6.10.3. Security
Security tab of the RFID Tag dialog allows you to congure the RFID tag security settings. These
settings allow or deny access to RFID data writing or editing.
87

Security settings depend on the selected printer. There are three major conguration types.
Single Memory Field with Multiple Blocks
Locking group includes an overview of the blocks that are included in the RFID tag memory. Each
block can be locked individually.
To protect the block for editing and writing, enable the Block locked option.
Lock all blocks option allows you to lock all blocks in the memory eld simultaneously or unlock them
if they are already locked.
Multiple Memory Fields
Access Protection group sets a password that must be entered before editing or writing the RFID
data.
Data type denes the method for entering the Password.
• ASCII string:Password should be entered as a string of ASCII characters.
• HEX encoded string:Password should be entered as a string of hexadecimal pairs.
• Numeric:Password should be entered as a string of digits.
Kill code denes the code that disables the RFID tag permanently and irreversibly.
88

TIP
Once the kill code is activated, the data can neither be retrieved from nor written to
the tag.
Data type denes the method for entering the Kill code characters.
• ASCII string:Kill code should be entered as a string of ASCII characters.
• HEX encoded string:Kill code should be entered as a string of hexadecimal pairs.
• Numeric: Kill code should be entered as a string of digits.
Multiple Memory Fields with Block Locking
Additional settings from Multiple Memory Fields allow the user to set the locking for individual blocks
within RFID tag memory elds.
Locking group includes an overview of the memory elds that are included in the RFID tag. Each
memory eld can be locked individually.
Select locking settings allows you to dene how the blocks are locked.
• Preserve original setting: original locking setting cannot be retrieved, but the default option
assumes that the tag setting should remain unchanged.
89

• Lock: block is locked and further changes are prevented.
• Unlock: block is unlocked and editable.
• Relock: RFID tag is unlocked for the changes to be applied. When done, the tag is relocked
immediately.
• Permanent lock, unlock or relock: makes the above described settings permanent. These
settings cannot be undone.
Blocks for locking: denes the individual blocks or range(s) of blocks to be locked.
TIP
Individually locked blocks are dened with an index and separated by a comma (with
or without inserting the space between). Ranges of blocks are dened with a dash.
2.6.10.4. Settings
NOTE
Available settings depend on your selected printer driver. If you do not see your
settings described here, check your Driver User Guide.
90

Settings tab of the RFID Tag dialog allows you to congure various tag settings related to its structure
and programming.
All available settings are listed in a table under the Settings group:
• Antenna oset: denes distance between the top of the label and the embedded RFID inlay.
• Power attenuation: species radio output power. Use it to adjust RF emission power from the
antenna.
• Maximum tags to stop: species how many tags are allowed to be programmed incorrectly
before the printing of labels stops. The option can be used as a precautionary measure because
it prevents endless consumption of erroneous labels. When the programming of the RFID tag
fails, usually the word "VOID" is printed on the label.
• Number of retries: species the number of times the printer tries to program the tag if the initial
attempt fails. The parameter is sent to the printer along with the rest of the data.
• Check for valid tag: before the tag programming begins, printer veries if a proper RFID tag is
available on the smart label. The printer also veries if the tag is programmable.
• Verify data write: once the data has been encoded into the RFID tag, the printer checks if the
written data is equal to the original value.
• Electronic Article Surveillance (EAS): is an anti-theft system used where an electronically-
detectable tag is attached to the item.
• Preserve original EAS setting: original EAS setting cannot be retrieved, but the default
option assumes that the tag setting should remain unchanged.
• Enable EAS: enables surveillance in the RFID tag. If this was the original setting, the tag
would remain unchanged.
• Disable EAS: disable surveillance in the RFID tag. If this was the original setting, the tag
would remain unchanged.
• Permanently lock EAS tag setting: permanently locks the chosen setting for the EAS. This
lock cannot be undone.
NOTE
The selection of available settings depends on the current Tag type.
2.6.10.5. RFID Read and Print
This section describes how to dene which data elds from the RFID tag should be read and printed
on the label using the internal printer elements.
To congure the data eld properties and to make the RFID encoded data on the label, drag it to
design surface. After adding it to design surface, the data eld appears as a normal Text label object
with the following additional properties.
91

Data format denes the format in which the RFID data eld content is written in the label object and
printed.
NOTE
Available data formats and number of permitted characters are dened by the printer
driver and selected tag type.
• HEX encoded string: data eld content is a string of hexadecimal pairs.
• ASCII string: data eld content is a string of ASCII characters.
• Numeric: data eld content is a string of numbers.
NOTE
You must select a printer's native font (those stored internally on the printer) to print.
All other fonts will result in an error.
Preview presents the data eld content as it would appear using the selected Data format. Preview
eld does not include the actual encoded data. Enter the characters manually. By default, the object
contains as many question marks, as given by the length of the RFID data eld.
TIP
The role of Preview eld is to ll the object with dummy content during the label
design process and to give an impression of its layout on the printed label. The object
on the actual printed label displays the content which was read from the RFID tag.
Data Extraction group denes which part(s) of data eld content should be read from the RFID tag and
printed on the label.
TIP
By default, the entire range of encoded data is read from the RFID tag.
• Select bytes: species which bytes of the encoded RFID tag data should appear in the label
object.
• Starting byte: the number of the byte in an encoded string which starts the selection.
• Length in bytes: number of selected bytes which should be extracted from the encoded
data.
• Select blocks: species which blocks of the encoded RFID tag data should appear in the label
object.
92

• Starting block: the number of the block in an encoded string which starts the selection.
• Number of blocks: number of selected blocks which should be extracted from the
encoded data.
2.7. Design Surface
PRODUCT LEVEL INFO:
Creation of forms and use of form objects are available in PowerForms.
Your design surface is a place to create, add, position, and interconnect label and form objects.
To help you design labels and forms as simply and eciently as possible, your design surface uses
usability and functional principles from Microsoft Oce.
TIP
Use View tab to customize your design surface.
• Learn more about design surface elements here.
• Learn more about design surface editing actions here.
• Learn more about design surface visual aid elements here.
2.7.1. Design Surface Elements
PRODUCT LEVEL INFO:
Creation of forms and use of form objects are available in PowerForms.
Design surface consists of the following elements:
• Ruler: Design surface is equipped with horizontal and vertical ruler. Use it to line up the objects
or to properly position the label and its content. Change the unit measurements displayed on
the ruler in Label properties.
• Paper: Yellow area of the design surface displays the current size of paper. The information
about supported paper format is acquired from the printer driver, but you also have the option to
dene custom format. Manual paper size has to be dened when printing on regular oce
sheets of paper. See Paper section for more details.
• Label: White area represents the area for label designing. Red line displays limit of the currently
printable area.
93

• Object Properties Window: Denes the selected label or form object's properties. Double‑click
an object to open the dialog.
• Form: White area represents the area which can be used for designing a form.
• Tabs: Currently active label(s) and form(s) are accessible on separate tabs.
PRODUCT LEVEL INFO:
Tabs appear in PowerForms only.
2.7.2. Design Surface Editing Actions
Below listed are the most relevant common actions for editing the objects on design surface:
• Object arranging: allows the objects to be placed in front of or behind other objects in a group.
Arranging options are described here.
• Objects aligning: allows the objects to be aligned among each other. Aligning options are
described here.
• Zooming: enables the entire design surface to be zoomed in or out. Zooming options are
described here.
• Scrolling: enables sliding the design surface up and down.
• Selecting: enables the objects on design surface to be selected for editing individually or in a
group. Group selection allows any actions to be applied to multiple objects simultaneously.
94

• Rotating: enables object rotation.
2.7.3. Visual Aid Elements
Listed below are the visual aid elements that enable you to work with Designer.
• Gridlines serve as a visual aid during the design process. They can be either visible or hidden.
Their density is customizable. Gridline options are available in the Alignment and Gridlines
ribbon group.
• Snaplines are non-visible alignment lines that help the user align the objects during the design
process. Snap options are available in Designer's Align ribbon group.
• Ruler shows the available design area for label (white colored eld) and le page (gray colored
eld).
• Resize handles appear on the selected (active) objects. They enable you to resize the object
dimensions. X and Y dimensions can be resized simultaneously or separately.
• Margins are the amount of xed space between the edge of an object and the edge of a label.
• Tabs for Active Documents allow the user to toggle between multiple labels and forms in a
solution. Tabs are also used when designing batches of labels – header, body and tail labels are
placed on separate tabs.
2.7.4. Object Properties Window
PRODUCT LEVEL INFO:
Creation of forms and use of form objects are available in PowerForms.
When designing a label or form object, double-click an object to set its properties.
Double-click opens the object properties window. Available object properties window options adapt
to each selected object and its properties.
• Available label objects and their properties are listed and described in detail here.
• Available form objects and their properties are listed and described in detail here.
95

After pressing F4, object properties dialog becomes pinned as object properties editor on the right
side of the design surface.
2.8. Document Properties and Management
Dialogs
Designer oers multiple dialogs that help you congure and manage the active document and
connected data sources. Read the following topics for detailed instructions:
• Label Properties
• Form Properties
• Dynamic Data Manager
2.8.1. Label Properties
Label Properties editor selects the printer, sets label dimensions, and denes the printing paper
properties.
The label properties settings are listed below and appear as dialog tabs:
Label Property
Description
Printer Selects the preferred printer.
Label Dimensions Denes the Unit of measure and label dimensions.
Paper Denes the printing paper properties.
Stocks Selects the stock type.
Style Denes the label style parameters.
Batch Printing Denes details for grouped printing of labels.
96

Label Property Description
Cutter Enables label roll cutting during or after the printing procedure.
Info Inserts the label description.
TIP
To open the Label Properties Editor, double-click the design surface.
2.8.2. Form Properties
PRODUCT LEVEL INFO
This section is applicable to PowerForms.
Form Properties dialog is used for dening various form properties.
TIP
To open the Form Properties dialog, double-click the design surface.
97

The settings are available on the below listed dialog panels.
Form Property
Description
Basic Settings Denes form title, size, initial form state and startup form position.
Additional Settings Selects form scripting language.
Style Denes form background color and picture. It allows picture embedding
and saving as external le.
Tab Order Denes the order of focus Shifting among form objects.
F1 Help Contains form help text which is shown to the user after pressing F1
when the form is running.
Events Denes the events which occur after the form is loaded, closed, and after
a specied time interval completes.
Variable Events Selects the variables that are monitored for changes in their values.
Serial Port Data Adds a variable that stores the data received via serial port.
Info Denes the content which serves as a hint or as a guidance for the form
user.
2.8.3. Dynamic Data Manager
PRODUCT LEVEL INFO
This section applies to NiceLabel 2019 Pro and PowerForms editions.
98

Dynamic Data Manager is a dialog that enables the user to manage the dynamic data sources for
label and form objects.
Label and form objects can be connected to multiple variables, functions and databases.
To open the dialog, click the Dynamic Data Manager button in the Designer ribbon.
Read more about how to dene the data sources in the following sections:
• Work with variables.
• Work with functions.
• Use databases as content source.
• Use internal variables as content source.
• Use global variables as content source.
2.8.3.1. Dynamic Data Manager Ribbon
PRODUCT LEVEL INFO
This section applies to NiceLabel 2019 Pro and PowerForms editions.
Use the Dynamic Data Manager ribbon commands to eciently manage your data sources. If you
want to delete, copy or cut/paste your data sources, always use the commands in Dynamic Data
Manager ribbon.
Dynamic Data Manager ribbon consists of the following functional groups:
General group provides access to the following actions:
99
• Undo: undos the entire sequence of actions since the last le save. The range of actions is
selected from the dropdown list.
• Redo: repeats the requested range of actions. The range of actions is selected from the
dropdown list.
• Copy: copies the selected data source to clipboard.
• Cut: cuts the selected data source to clipboard.
• Paste: pastes the clipboard data.
• Delete: deletes the selected data source.
Add group gives access to dynamic data sources:
• Add New Variable: allows dening multiple types of variables.
• Internal Variables: adds system and user related variables. Their role is to identify the label or
form, system name, user, or a le revision number.
• Add New Function: button opens the selection of available functions. Select the appropriate one
to start editing it.
• Database Connections: button opens the selection of supported database types. The New
Database Connection Properties dialog opens.
Step-by-step Database Wizard group is the entry point for database wizards:
• Add Excel database.
• Add Access database.
• Add SQL Server database.
• Add Text File database.
• All Databases allows adding all types of supported database types.
Variables group gives access to the Prompt Order dialog. This dialog denes the order under which
the variables are prompted at print time.
Import and Export group enables you to import or export the data model used in a NiceLabel 2019
document.
• Import Data Sources: allows you to import data sources from an external label or solution le.
• Export Variables: allows you to export variables from an existing label or solution le into a .NLVR
le.
Import Data Sources
Data model includes all data sources and their relations that are part of a label or solution le. To
import a data model means that you can import the external data sources into an existing label or
100

solution le. These imported data sources can be further used as dynamic content for label or form
objects.
The ability to import data sources helps you keep the data sources in your labels and solutions
uniform and consistent. If you have a standard range of data sources, you can share these data
sources across the company with your label designers. The label designers import the shared data
sources, which ensures that the label templates are equipped with the relevant variables, functions
and databases.
NOTE
Importing data sources which share the same name with your existing data sources
causes conicts.
When importing data sources with the same name you, you can:
• Overwrite existing data source with the imported ones.
• Merge the data sources. Merges your data sources (of the same type). When
merge is not possible (For example, a text variable and a date variable with the
same name), NiceLabel 2019 keeps both data sources and renames the
imported ones (For example, Variable and Variable_1). The denitions of your
imported variables, functions, or databases override the values of your existing
variables, functions or databases.
To import a data model, go to Management ribbon group > Dynamic Data Manager drop down list and
click Import Data Sources.
Import Options: allows you to import data models using multiple le formats. They can either be a
complete label or solution le, or a separate NiceLabel variable export le (.NLVR extension):
• Solution File (*.nsln) imports data sources from a NiceLabel solution le.
• Label File (*.nlbl) imports data sources from a NiceLabel label le.
• Label File (V6) (*.lbl) imports data sources from a NiceLabel V6 legacy label le.
• XFF Form File (*.x) imports data sources from a NiceLabel V6 legacy solution le.
• Variables export les (*.nlvr) imports data sources from a previously exported NiceLabel 2019
variable export le.
• Oracle WMS File (*.xml) imports variables from external Oracle WMS les. These are XML les
generated by Oracle Warehouse Management system that include instructions for 3rd party
label printing software.
TIP
Variables export le is described in section Variables Export File Denition.
101

Export Variables
Variables from an existing label or solution les can be reused in another document. The Export
Variables option allows you to export all variables into a variable export le (.NLVR extension). This
makes the variables reusable in any other NiceLabel 2019 document.
TIP
The exported variables can be included in another NiceLabel label or solution using
the Import Data Sources option.
To export variables, go to Dynamic Data Manager >Import and Export ribbon group and click Export
Variables.
NOTE
Only variables without any references to other data sources can be exported. Each
export ends with a report containing a list of exported and non-exported variables
from the le. The reason for potential variable export failure is always included in the
report.
Denition of variable export (.NLVR) le is available in section Variables Export File Denition.
2.8.3.2. Dynamic Data Explorer
The Dynamic Data Explorer performs two roles. It serves as a shortcut for adding new variables,
functions and data sources and gives an overview of the data sources that are currently in use.
To toggle between the two explorers, click the appropriate tab:
• Dynamic Data tab activates the Dynamic Data Explorer.
• Solution Explorer tab activates the Solution Explorer.
• Add new variable: adds an additional variable to the label or form data sources. There are four
default variable types available. Their values are dened via dialogs described in dedicated
sections
• Variable: a type of variable that obtains value when a label or form is printed.
• Current date: displays current date in the requested format.
• Current time: displays current time in the requested format.
• Counter: displays a counter value.
• New function: adds a new function that serves as a dynamic data source.
• Database wizard: starts the wizard that adds a new database in a guided process.
102

• Internal Variables: displays the list of available internal variables.
• RFID Tag: If you are working with an RFID compatible printer, you can directly add the content
encoded in the RFID tag to your label as Text, Text Box or Barcode objects.
2.9. Object Properties Editor
PRODUCT LEVEL INFO:
Creation of forms and use of form objects are available in PowerForms.
In addition to the object properties available in the Designer ribbon, the property editor opens on the
right side of the design surface.
NOTE
The Object properties toolbar is hidden at start and only appears after pressing F4 or
clicking Properties on the right-click menu.
Available toolbar options adapt to each selected object and its properties:
• Available label objects and their properties are described here.
• Available form objects and their properties are described here.
2.10. Context Menus
In Designer, right-click displays various context menus that contain commonly used commands. The
availability of commands depends on the selected items – design surface or object.
• Design surface context menu commands are described here.
• Object context menu commands are described here.
2.10.1. Design Surface Context Menu
PRODUCT LEVEL INFO:
Creation of forms and use of form objects are available in PowerForms.
When right-clicking the design surface, a context menu appears. The context menu includes
commonly used commands:
103

• Document Properties: opens the label properties or form properties dialog.
• Paste: pastes clipboard contents on the design surface. Multiple reuse of a single clipboard item
is allowed.
• Cut: removes the selected element(s) from the design surface and adds it to the clipboard to be
pasted elsewhere.
• Copy: copies the selected object to the clipboard.
• Select all: selects all objects on the design surface.
• Alignment and Gridlines: allows you to dene how the objects take their positions on the design
surface.
• Align to objects: makes the object on the design surface align with other objects. When
two objects are aligned, a leading line appears linking the edges of the two aligned
objects.
• Align to grid: makes the object on the design surface align with gridlines. When moving the
object, it always snaps to the gridline.
• Do not align: allows you to move the objects freely.
• Display gridline guides: makes the gridlines visible.
• Objects markers visibility: toggles visibility for the object properties. Markers become visible
when moving the mouse pointer over the object.
• Object name: marker shows the name of an object.
• Internal element: marker shows if the selected object belongs to the internal printer
elements.
• Counter: marker shows that the connected variable is Counter.
• Locked object: marker shows that an object's position is locked.
• Events: marker shows that the form object runs assigned Action(s).
• Zoom: denes zooming behavior.
• Zoom to Document: shows the entire label in the Designer window.
• Zoom to Objects: shows all objects in the Designer window.
2.10.2. Object Context Menu
PRODUCT LEVEL INFO:
Creation of forms and use of form objects are available in PowerForms.
104

When right-clicking an object, a context menu appears. The context menu includes the following
commands:
• Properties: opens object properties dialog.
• Copy: copies the selected content to the clipboard.
• Cut: removes the selected element from the design surface and adds it to the clipboard to be
pasted elsewhere.
• Delete: removes the selected object from the design surface.
• Lock/Unlock: prevents the selected object from being moved or re-enables moving.
• Arrange: positions the objects so that they appear either in front of or behind each other.
• Send Backward: sends the element back for one level.
• Send to Back: sends the element behind all other elements on the label.
• Bring Forward: brings the element forward for one level.
• Bring to Front: sends the element in front of all other elements on the label.
• Move to layer: allows you to change the layer to which the selected object belongs. You can only
move the object to the unlocked layers.
NOTE
This option is available only if the layer is unlocked. More details are available in
section Layers Panel.
2.10.3. Group Context Menu
PRODUCT LEVEL INFO:
Creation of forms and use of form objects are available in PowerForms.
When right-clicking a group of objects, a context menu appears. The context menu includes the
following commands:
• Properties: opens common group properties dialog.
• Copy: copies the selected content to the clipboard.
• Cut: removes the selected group from the design surface and adds it to the clipboard to be
pasted elsewhere.
• Delete: deletes the selected object(s) from the design surface.
• Lock/Unlock: prevents the selected group from being moved or re-enables moving.
105

• Group objects: unites the selected objects and makes them behave as a single object.
• Ungroup objects: separates previously grouped objects.
• Arrange group denes how the group position according to other objects or groups.
• Send Backward: moves the selected group down one level.
• Send to Back: moves the selected group to the bottom of the object stack.
• Bring Forward: moves the selected group up one level.
• Bring to Front: moves the selected group to the top of the object stack.
• Align group allows setting the alignment and spacing for objects on the design surface. All
objects can be aligned according to the neighboring object or according to the document
border.
Horizontal alignment options are:
• Left: aligns the selected objects with the left edge of the leftmost object or with the left
edge of the rst selected object. If a single object is selected, it is placed on the label's left
border.
• Center Horizontally: aligns the selected objects with the horizontal center of the largest
selected object or with the horizontal center of the rst selected object. If a single object
is selected, it is placed in the horizontal center of a label.
• Right: aligns the selected objects with the right edge of the rightmost object or with the
right edge of the rst selected object. If a single object is selected, it is placed on the
label's right border.
• Distribute Horizontally: equalizes horizontal spacing between the objects.
Vertical alignment options are:
• Top: aligns the selected objects with the top edge of the topmost object or with the top
edge of the rst selected object. If a single object is selected, it is placed on the label's top
border.
• Center Vertically: aligns the selected objects with the vertical center of the largest
selected object or with the vertical center of the rst selected object. If a single object is
selected, it is placed in the vertical center of a label.
• Bottom: aligns the selected objects with the bottom edge of the lowest object or with the
bottom edge of the rst selected object. If a single object is selected, it is placed on the
label's bottom border.
• Distribute Vertically: equalizes vertical spacing between the objects.
TIP
Align to label/form is achieved by holding the <Ctrl> key and clicking the above
listed align icons.
106

• Move to layer: allows you to change the layer to which the selected object belongs. You can only
move the object to the unlocked layers.
NOTE
This option is available only if the layer is unlocked. More details are available in
section Layers Panel.
Objects markers visibility group toggles the visibility for the following object properties:
• Object Name: displays the name of an object.
• Printer Element: indicates that the object will be printed using a printer built-in function. This
options serves as an alternative to sending the object to printer as a graphic.
• Events: indicates that the form object runs assigned Action(s).
• Data Source: indicates that the object is connected to a dynamic data source.
• Zoom: denes zooming behavior:
• Zoom to Document: shows the entire label in the Designer window.
• Zoom to Objects: shows all objects in the Designer window.
107

3. Label
Label works as a template to add label objects and print using any kind of printing media.
Each object adds a dierent kind of content such as text, line, ellipse, barcode or rectangle to a label.
The content is either xed (manually entered by the user) or dynamic (dened using values from
connected data sources).
After nishing with your label design, you can print the labels using any of your installed printers.
PRODUCT LEVEL INFO
Solution building is available in PowerForms.
Designing of a printable label belongs to basic Designer tasks. Designer allows creating and printing
of stand-alone labels and labels that are included in a printing solution.
Read about how to create, design or edit a label here.
3.1. New Label Setup Wizard
Label Setup Wizard guides you through the process of creating a new label. The wizard consists of
four conguration steps and a summary:
• Step 1: Select the Printer
• Step 2: Set the Page Size
• Step 3: Select the Label Layout
• Step 4: Specify the Label Dimensions
• Step 5: Summary
After nishing these steps, the label is ready for editing and printing.
NOTE
To quit Label Setup Wizard during any step, press <Escape>. The new label properties
are set to default.
108

3.1.1. Step 1: Select the Printer
This step selects the printer to be used for printing the newly created label. It also provides direct
access to printer driver properties.
1. Select the printer from the dropdown list.
2. Use printer properties saved in: This setting allows you to dene where does NiceLabel 2019
take the printer settings from while printing. There are two options available:
• Printer Driver: When printing, NiceLabel 2019 takes the printer properties that you
dene in the printer driver. This means that all labels that share these settings print
equally. E.g., if you change printing darkness in the printer driver dialog to 10, all labels
print with darkness set to 10.
This is the default setting. With this setting selected, the Printer properties button
becomes disabled. Access your printer properties from Windows system dialogs.
• Label: When printing, NiceLabel 2019 takes the printer properties that you save in the
label. This means that the way how this label prints is independent from how you
congure the printer driver. E.g., if you change the darkness for the label to 10, only this
label prints with darkness set to 10.
Read more about how to manage printer settings in knowledge base article Dening
default printer setting for all users (including network users).
Example for settings saved printer driver
The ribbon in your printer is ending its life period. As a result, the quality of printed labels
is decreasing. To enhance the quality before you receive a new ribbon, you must
temporarily increase the printing darkness for all labels at once. Congure darkness
level in your printer driver and all your label print with increased darkness.
109

Example for settings saved in label
If you are designing a label on a remote computer that currently does not have access to
your designated label printer, you can still design your label, save the printer properties
within your label, and take this label to the computer that can access your label printer.
The saved printer settings make your label "portable".
Use printer settings from the printer driver: select this option if you prefer printing using the
printer driver settings.
NOTE
Specic printer models only allow you to set label dimensions using the
printer driver dialog. Among these models are high resolution ink jet coding
and marking systems. If you select such printer model for your label, Designer
automatically detects it and only allows you to take the label settings from the
printer driver. Label dimension settings in the Label Properties dialog are
disabled in this case too.
Use custom printer settings saved in the label: each label may have its own printer settings
dened and saved by the user. Select this option to use the custom settings while printing.
3. Label setup wizard remembers the last selected printer. When creating another new label, the
wizard will automatically select the printer that you selected for your last created label. If this
printer is currently missing, your default printer is selected.
• Always use the default printer: sets the default system printer to be used for the current
print job.
PRODUCT LEVEL INFO
Double-sided printing option is available in NiceLabel Designer Pro and
PowerForms.
• Double-sided printing: enables double-sided printing for the new label.
• Preview eld: displays the label layout according to the currently set properties.
NOTE
For additional information on the installed printer drivers and their settings, read the
NiceLabel Driver Installation Manual.
110

3.1.2. Step 2: Set the Page Size
This step denes how the page size is selected. When using a thermal printer, it is recommended to
set the size automatically. Manual selection proves to be useful if you know the exact stock code or
label format.
NOTE
When changing the printer, the Page Size settings always go to default (automatic).
1. Select print media.
• Print on a roll of labels option prints on the installed roll of labels. Page size for thermal
printers is detected automatically.
NOTE
If a thermal printer is selected in the preceding Select the Printer wizard
step, this option is enabled by default.
• Print on a sheet of paper option prints labels on sheets of paper. It lets you manually
dene the label page size to t the printer.
With this option selected, additional settings appear:
• Unit of measure: denes the unit of measure to be used while designing the label.
• Paper: denes the label page Width and Height.
NOTE
If a regular home/oce printer is selected in the preceding Select Printer
wizard step, Page size is enabled by default.
2. Select stock.
Load settings from a predened stock option sets the page to be dened by the selected
stock type.
With this option selected, additional settings appear:
• Stock: denes which stock type should be used when designing and printing the newly
created label. Stock types are usually associated with printer vendors or stationery
suppliers. Select the exact stock from the dropdown menu.
NOTE
If the selected stock is not compatible with printer, a warning appears.
Label designing and printing is disabled.
• Stock information: displays the selected stock's properties.
111
3.1.3. Step 3: Select the Label Layout
This step denes the label orientation and rotation on a printer:
• Orientation: sets the new label layout as Portrait or Landscape.
• Rotated: rotates the Printer Layout of a label by 180 degrees, if the selected printer supports it.
• Preview eld: displays the label layout according to the currently set properties.
3.1.4. Step 4: Specify the Label Dimensions
This step denes the dimensions of the newly created label, its margins, measurement unit, and
labels across positioning settings:
• Unit of measure: denes the unit to be used while designing the label.
• Label Dimensions: dene the new label's Width and Height.
• Margins: dene the distance between the edge of the printing surface and the edge of the label
(left/right, top/bottom).
• Labels Across: denes the number of labels to be printed on a single label sheet.
• Horizontal count: number of labels in a row.
• Vertical count: number of labels in a column.
• Horizontal gap: sets horizontal distance between the labels on a sheet.
• Vertical gap: sets vertical distance between the labels on a sheet.
• Processing order: denes the direction in which the labels are printed. Set the starting corner
where the printing starts and dene the horizontal and vertical direction of label positioning.
3.1.5. Step 5: Summary
This step summarizes the new label properties as dened using the Label Setup Wizard.
Before clicking Finish to enter the label editing and printing phases, check the displayed settings:
• Printer: selected printer for label printing.
• Label dimensions: dimensions of newly created label.
• Paper dimensions: dimensions of printable paper.
112

3.2. Label Properties
Label Properties editor selects the printer, sets label dimensions, and denes the printing paper
properties.
The label properties settings are listed below and appear as dialog tabs:
Label Property Description
Printer Selects the preferred printer.
Label Dimensions Denes the Unit of measure and label dimensions.
Paper Denes the printing paper properties.
Stocks Selects the stock type.
Style Denes the label style parameters.
Batch Printing Denes details for grouped printing of labels.
Cutter Enables label roll cutting during or after the printing procedure.
Info Inserts the label description.
TIP
To open the Label Properties Editor, double-click the design surface.
113

3.2.1. Printer
Printer tab lets you dene the printer to print the labels on, and to set printing behavior.
Printer dropdown menu lets you select a printer from the currently available printers.
TIP
To set the printer settings, select a printer and click Printer properties. This button
gives direct access to the selected printer's driver and its settings.
NOTE
For additional information on the installed printer drivers and their settings, read the
NiceLabel Driver Installation Manual.
• Always use the default printer: select the default system printer to be used for the current print
job.
• Double-sided printing: enables double-sided label printing.
• Use printer properties saved in: This setting allows you to dene where does NiceLabel 2019
take the printer settings from while printing. There are two options available:
• Printer Driver: When printing, NiceLabel 2019 takes the printer properties that you dene
in the printer driver. This means that all labels that share these settings print equally. E.g., if
you change printing darkness in the printer driver dialog to 10, all labels print with
darkness set to 10.
This is the default setting. With this setting selected, the Printer properties button
becomes disabled. Access your printer properties from Windows system dialogs.
• Label: When printing, NiceLabel 2019 takes the printer properties that you save in the
label. This means that the way how this label prints is independent from how you congure
the printer driver. E.g., if you change the darkness for the label to 10, only this label prints
with darkness set to 10.
114
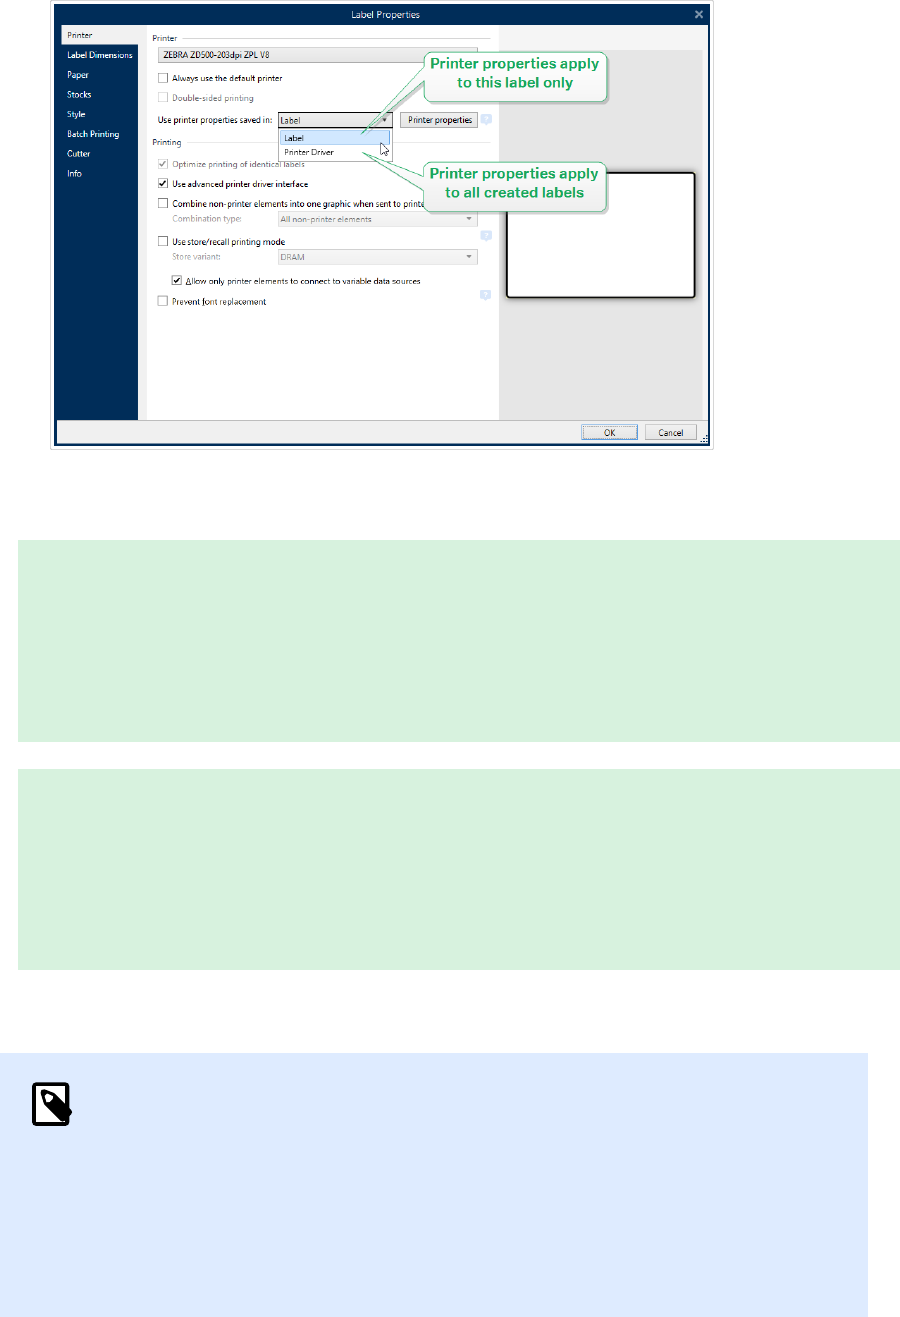
Read more about how to manage printer settings in knowledge base article Dening
default printer setting for all users (including network users).
Example for settings saved in printer driver
The ribbon in your printer is ending its life period. As a result, the quality of printed labels is
decreasing. To enhance the quality before you receive a new ribbon, you must temporarily
increase the printing darkness for all labels at once. Congure darkness level in your
printer driver and all your label print with increased darkness.
Example for settings saved in label
If you are designing a label on a remote computer that currently does not have access to
your designated label printer, you can still design your label, save the printer properties
within your label, and take this label to the computer that can access your label printer. The
saved printer settings make your label "portable".
• Use printer settings from the printer driver: select this option if you prefer printing using the
printer driver settings.
NOTE
Specic printer models only allow you to set label dimensions using the printer
driver dialog. Among these models are high resolution ink jet coding and
marking systems. If you select such printer model for your label, Designer
automatically detects it and only allows you to take the label settings from the
printer driver. Label dimension settings in the Label Properties dialog are
disabled in this case too.
• Use custom printer settings saved in the label: each label may have its own printer settings
dened and saved by the user. Select this option to use the custom settings while printing.
115

Printing group of settings optimizes the printing process.
• Optimize printing of identical labels: if multiple identical labels are printed, the printer does not
need to receive the label le each time. With this option enabled, the printer alone multiplies the
print job.
• Use advanced printer driver interface: speeds up label printing.
TIP
When selected, the optimized printer commands are in use. Deselected option
disables printing optimization. Each label is sent to the printer in form of an
image.
• Combine non-printer elements into one graphic when sent to printer: merges multiple label
objects into a single large graphic and sends it to a printer.
TIP
With disabled merging, Designer sends graphic items to a printer separately
which might in rare occasions cause object positioning issues. Merged graphic
items ensure correct rendering of the label. The downside of merging is
increased amount of data which is sent to printer.
Use one of the below listed combination types to merge the graphics in the most suitable way.
• Combination type: denes which label objects are merged for printing.
• All non-printer elements: all label objects are merged into a single graphic item and
sent to printer.
• All non-printer elements except counters: label objects are merged and sent to
printer as a single item with an exception. Counters are sent separately within the
same print stream.
• Only xed non-printer elements: only label objects without variable content are
merged into a single graphic le and sent to printer.
TIP
Non-printer elements are all items that are sent to printer as graphics.
In opposite, internal printer elements are sent out as internal printer
commands and rendered by the printer.
116

NOTE
To exclude any label objects from combination, your object name or the name of
the data source connected to your objects must include "DONOTCOMBINE":
• Use store/recall printing mode: optimizes printing performance. With store/recall mode
activated, Designer does not need to resend the complete label data for each printout. Instead,
default labels (templates) are stored in the printer memory and the Designer only sends recall
commands to complete the label content during the printing process. For more information,
read Store/Recall Printing Mode.
• Store variant: printer memory location to store the label templates.
Printer memory location: printer memory location to store the label templates.
NOTE
To make sure the stored label samples are not lost after power cycling the
printer, store them at non-volatile locations. Read more about non-volatile
memory here.
• Allow only printer elements to connect to variable data sources. If you connect your
data sources to objects that are not marked as internal printer objects, Designer informs
you with an error message and you also cannot print your label. This prevents variable data
print errors in store/recall printing mode.
• Prevent font replacement: In case of missing fonts for textual label objects, NiceLabel
applications automatically nd replacement fonts and print the labels using fonts that are similar
to the missing ones.
There are two reasons for missing label fonts:
• The font is not installed on the system. This may happen if you design labels on one
computer, and print labels on another computer that does not have these fonts installed.
• Font is not stored in printer memory. This may happen if you design labels for one printer,
and print the labels using another printer that does not store these fonts.
Automatic font replacement can signicantly change text layout and, as a consequence, the
entire label design. If you want to prevent printing of altered labels, enable the Prevent font
replacement option. This option stops label printing if there is a need to replace the missing
label fonts.
117

Prevent font replacement option stops printing if the labels are in print mode. This is when you
are no longer editing labels in NiceLabel, but you are printing the labels using:
• NiceLabel Print application.
• Print label action in NiceLabel Automation congurations.
• Print label action in forms.
• NiceLabel Web Client.
• NiceLabel .NET API.
When designing and printing labels directly from NiceLabel 2019 with Prevent font replacement
option enabled:
• Printing continues if you print a label that you previously opened in Designer. Upon
opening a label, Designer automatically replaces the missing font.
• Printing stops if you use printing form to change the current printer to a device that has no
matching fonts installed.
3.2.2. Label Dimensions
Label Dimensions tab species label dimensions and denes whether its size should adapt to the
changing size of the objects or not.
Unit of measure denes the unit to be used while designing the label. There are four available units:
cm, in, mm, and dot.
Label Dimensions group denes the label's Width and Height. Label dimension settings become
active if manual label dimensions are enabled.
NOTE
When manually inserting the unit of measure, this also changes the currently dened
Unit.
Margins group sets the distance between the edge of the printing surface and the edge of the label
(left/right, top/bottom).
TIP
Most laser and other non-thermal printers cannot print over the entire label surface.
There is usually a non-printable label area of about 5 mm from the border of a page. In
Designer, this area is marked by a red line. Any object on or beyond the red line is not
printed entirely.
Radius group enables you to make the label corners rounded.
118

• Vertical radius: adjusts corner roundness value in vertical direction.
• Horizontal radius: adjusts corner roundness value in horizontal direction.
Labels Across denes the number of labels to be printed on a single label sheet.
• Horizontal count: number of labels in a row.
• Vertical count: number of labels in a column.
• Horizontal gap: horizontal distance between labels on a sheet.
• Vertical gap: vertical distance between labels on a sheet.
• Processing order: denes the direction in which labels are printed. Set the starting corner in
which printing starts, and the horizontal/ vertical directions of label positioning.
Variable Label Size group enables the label size to change in accordance with the size of its objects.
When assigning additional data to label objects, their size increases and occupies more space.
Therefore, the label height must adapt.
• Oset: distance between the last object on a label and the bottom edge of a label.
3.2.3. Paper
Paper tab sets printing paper properties.
Unit selects the Unit of measure to be used in a label.
Paper Type group denes paper dimensioning type – automatic or manual.
• Automatically set page size based on the label dimensions (labels on a roll): page size is dened
by the printer driver.
NOTE
If a thermal printer is selected, this option is enabled by default.
• Manually set page size (sheets of paper): page size is set manually.
NOTE
If a regular oce laser printer is selected in the previous wizard step, this option
is enabled by default.
If the page size is dened manually, additional options appear:
• Paper: selection of standard paper formats.
119

• Width and Height: custom paper dimensions.
Orientation group sets the new label layout as Portrait or Landscape.
• Rotated:Printer Layout is rotated by 180 degrees.
Preview displays current label screen and print layouts.
3.2.4. Stocks
Label stocks are a time-saving alternative to designing labels from scratch. Use stock templates
when designing labels for a specic printer type and when optimizing the label designing process.
Stocks group denes which stock type should be used when designing and printing a label. Stock
types are usually associated with printer vendors or stationery suppliers.
NOTE
Here dened stock properties override the manually set label properties.
Stock denes the exact stock to be used for label designing and printing. Stocks are sorted by
vendors and media formats. Expand stock provider and select a specic stock type.
TIP
Use Search... to easily nd the requested stock. Partial search is available – enter a
sequence of characters and all stocks which contain that sequence will be listed. If the
selected stock is not compatible with the selected printer, a warning appears.
Previously selected stock becomes active again (if it was dened) allowing the printing
to continue.
120

NOTE
If the selected stock is not compatible with the selected printer, a warning appears.
Previously selected stock becomes active again (if it was dened) allowing the printing
to continue.
Stock information displays the selected stock's properties:
• Label dimensions
• Labels across
• Description
• Author
3.2.5. Style
Style tab is used for dening label style properties.
Background color: sets the color of label background.
Background picture: sets the label background picture.
• Picture le name: denes the image le to be used as background picture.
• Embed picture in a document: saves picture into the label le.
• Save embedded picture to le: the embedded label picture is saved to a separate le.
121

• Remove embedded picture: embedded picture is removed from the label le.
• Picture position: sets picture position on the label.
• Center: centers the picture on the label with its original dimensions. A picture larger than
the label will display only the central part leaving the rest out of view.
• Fit: resizes the picture to ll the label while keeping the original aspect ratio.
• Stretch: stretches picture to make it ll the entire label.
NOTE
This option ignores the original aspect ratio of the picture. The picture
might appear distorted on the label.
• Rotation: allows you to rotate the background picture in steps of 90 degrees.
• Print background picture: background picture is printed.
3.2.6. Batch Printing
Batch printing allows grouped printing of labels that belong to the same batch.
TIP
A batch is a set of labels printed within a single print job. Each print job can consist of
a single or multiple batches.
The rst purpose of batch printing is to automate the execution of a predened action after the batch
has been printed.
Example
Label roll is automatically cut after a batch of ve labels has been printed.
The second purpose of batch printing is to enable header and tail label printing with each batch.
Example
A batch of ve labels starts with a header and ends with a tail label. Both of them dier from the main
(body) labels.
122

• Enable batch printing: activates batch printing mode. Batch denition menu becomes active.
• Batch denition: species what a batch of labels should consist of:
• All labels in the print job: all labels in the current print job are assigned to the same batch.
• Batch ends after a specic number of labels: batch is nalized after a specied number
of labels is printed.
• Batch ends when the data source changes value: changed value of the selected variable
is used as a marker for opening a new batch.
Actions group denes the action that executes after a batch has been printed. The availability of
actions depends on the selected printer's driver. If the driver provides no information on the action
availability, the list is empty.
Example
Commonly used batch actions are Cutter, Pause printer, Batch mark, Batch separator, etc. With a
dened web of labels (label template with labels next to each other), an applicable action also
becomes Eject page. These printer commands can be applied dynamically during the printing
process.
Header / Tail Labels group species the properties of header and tail labels in a batch.
• Use header label: header label of a batch.
• Action after header label: action to be taken after the header label has been printed. The
selection of available actions depends on the selected printer's driver.
NOTE
The selection of available actions depends on the selected printer's driver.
123

• Use tail label: last label of a batch.
• Action after tail label: action to be taken after the tail label has been printed.
NOTE
The selection of available actions depends on the selected printer's driver.
TIP
Header, tail and main (body) labels of a single batch are accessible via tabs that are
located under the design surface (gray eld).
3.2.7. Cutter
NOTE
To enable label cutting, your selected printer must be equipped with a cutter.
Cutter enables automated label roll cutting during or after the label printing.
Enable cutter activates label cutter and enables you to congure how to cut o labels.
Cutter mode species when to cut the label roll.
• Cut after the last printed label: cuts label roll after nishing print jobs.
• Cut after a specic number of labels: cuts label roll after printing the selected number of
labels.
• Cut when the data source changes: cuts label roll when the selected data source value
changes.
After you select Cut after a specic number of labels or Cut when the data source changes,
additional options open up:
• Cut if condition is met: allows you to set a condition that tells the printer to cut labels. Use values
from connected data sources to dene under what condition do the labels start to print.
• Always cut after last printed label: tells the printer to cut o the roll after the last label in a print
job.
NiceLabel 2019 synchronizes Cutter settings with the currently selected printer. See section
Synchronizing Cutter Settings with Printer for more details.
124

3.2.8. Info
Info tab includes a Description that serves as a hint or as a guide for the user that is going to work
with the label.
Dene label Description by entering text into the eld.
3.3. Label Objects
After setting the label properties, it's time to start adding content to the label. Label objects are basic
design items that are used for adding and editing various content types. Each object has its own
function as described in the table below.
Label Object Icon Description
Text Container for textual content. It adapts its dimensions to t the
amount of entered characters. When typing, text object grows
horizontally and/or vertically.
Text box Container for textual content. It can either adapt its height to the
content or make the font increase or decrease to t into the
object frame.
Rich text box Container for rich text. It supports formatted text, hyperlinks, line
images, and other rich content created with a word processor.
Barcode Object for adding and editing various types of barcodes on a label.
Picture Object for adding graphic content to a label.
Rectangle Object for creating rectangular shapes on a label.
Line Object for creating lines on a label.
Ellipse Object for creating circular shapes on a label.
125

Label Object Icon Description
Inverse Object for inverting the color of the underlying object.
Report Object for creating reports on a label.
3.3.1. Text
Text object is a container for textual content which adapts its dimensions to t the amount of inserted
characters. When typing, text object grows horizontally and/or vertically.
TIP
Text box object serves as an alternative when designing a label on which the textual
content must t into a eld with predened dimensions.
3.3.1.1. Source
Connected data source denes the content source of the selected object.
• Fixed data: manually entered xed text.
• Variables: predened variable values which are used as object content.
• Functions: input data transformation tools.
• Databases: database values which are used as object content.
• Counter: displays counter value on the label.
Content eld allows you to type the object content.
Content Mask sets the format of the input data before it is displayed on a label.
Mask character is a character used in the mask that is replaced with actual data on the printed label.
Example
A user needs to format a phone number to be more readable on the label. Data input is not formatted
since it is read from a database.
If the input value read from a database is:
+38642805090
126

and the content mask is:
(****) **** - ****
the resulting output is:
(+386) 4280 - 5090
If the data contains the asterisk "*" character, change the Mask character. The character should have
a unique value that does not appear anywhere in the data.
3.3.1.2. Style
Font color sets text font and underline color.
Font selects the typeface. Fonts are divided into two groups: OpenType fonts and Printer fonts.
NOTE
If the currently selected printer is a thermal printer, additional fonts become available.
These are the internal Printer fonts that are installed on the printer. Printer fonts are
identied by the printer icon in front of their names.
The font may appear Bold, Italic, Underlined or as a Strikethrough text.
Font Scaling sets the font stretch factor. If the factor is set to 100 %, font appears in normal scale. If
the factor is set to 200 %, font appears twice as wide. If set to 50 %, font width is shrunk to half its
size.
Alignment denes horizontal positioning of the entered content.
• Left: text aligned with the left object border.
• Center: text positioned in the center of the object.
• Right: text aligned with the right object border.
• Justied: distributes text evenly along both sides.
NOTE
Justied is enabled in Text box only.
Spacing sets the space between text characters and lines.
• Line spacing: space between each line in a paragraph.
• Character spacing: space between individual characters.
127

3.3.1.3. Eects
Inverse: inverted text and object background colors.
Mirror: mirrored text.
RTL printing: right to left text printing.
TIP
Most thermal printers print right-to-left scripts automatically. This option becomes
useful if the operating system does not provide native RTL support.
PRODUCT LEVEL INFO
This segment is applicable to Designer Pro and PowerForms.
Text on ellipse denition enables you to add and display curved text on a label.
• Text on ellipse: enable this option to set the text on a curve.
• Text start: sets text starting point on the ellipse. Default position is 9 o'clock. When increasing
the position value, it moves clockwise by degrees.
• Text length: sets the portion of ellipse to be used for displaying the text. Maximum value (default)
takes the complete ellipse. Reducing the value in degrees shortens the available portion.
3.3.1.4. Position
Position tab denes object positioning and its position-related behavior.
128

Position group denes the object's position.
• X and Y: anchoring point coordinates.
Size group gives information about the object's dimensions.
• Width and Height: horizontal and vertical object dimension.
• Keep aspect ratio: simultaneous changing of object dimensions while scaling.
TIP
In Text object, the size of text is determined by the font size. Object dimensions
and aspect ratio cannot be changed manually and only serve as information
about its current size.
NOTE
If the measurement unit is changed in label properties, the value transforms
automatically.
Rotation angle is the object angle according to the design surface.
TIP
There are multiple ways to set the object's angle: enter the angle manually , drag the
slider or click and drag the
icon on the selected object. Rotation angle and slider
rotates the object around its anchoring point. The icon rotates the object around its
central point.
Anchoring point is the spot where an object is pinned to design surface. Variable size objects
increase or decrease their size in the direction that is opposite to the chosen anchoring point.
Lock prevents the object from being moved during the design process, select under the Design
behavior group.
3.3.1.5. Relative position
Relative Position options dene the position of an object when label size or positions of neighboring
objects are changing during the label design process.
• Enable horizontal relative position: activates horizontal relative positioning.
• Relative to label border: the position of object is dened relative to the reference label
border. Dene horizontal oset for the object with regard to this border.
• Relative to another object: the position of object is dened relative to the border of a
neighboring object. Dene horizontal oset for the object with regard to this object.
129

• Object: selects the reference object for horizontal relative positioning.
• Border: neighboring object's reference border or label border (if there are no other objects
on the label) for horizontal relative positioning.
• Oset: horizontal distance from label border or reference object's anchoring point.
• Enable vertical relative position: activates vertical relative positioning.
• Relative to label border: the position of object is dened relative to the reference label
border. Dene vertical oset for the object with regard to this border.
• Relative to another object: the position of object is dened relative to the border of a
neighboring object. Dene vertical oset for the object with regard to this object.
• Object: selects the reference object for vertical relative positioning.
• Border: neighboring object's reference border or label border (if there are no other objects
on the label) for vertical relative positioning.
• Oset: vertical distance from label border or reference object's anchoring point.
NOTE
Object position changes if label size or position of the related object change.
When designing double-sided labels, you can also take objects on the opposite side of the label as
reference objects for relative positioning. In this case, objects on opposite sides move together if you
change their positions.
NOTE
Label sides of reference objects are clearly identied on the Object selection list with
(Front Side) and (Back Side).
3.3.1.6. General
General tab identies the object and sets its status.
Name sets a unique object ID. It is used for object referencing when dening functions, variables,
scripts, etc.
NOTE
Avoid using spaces or special characters in object names.
Description allows adding notes and annotations for an object. It provides help during the label
design process.
130

Status group denes object visibility on print preview and on printed labels.
• Not printable: prevents the object from being printed. The object still remains visible on the
print preview and aects other objects in relative positioning. This option is useful when printing
on predesigned or stock-specic labels.
• Visible: if the checkbox is not selected, the object neither appears on the print preview nor on
the printed label. The object is treated as if it does not exist.
• Condition: makes an object enabled (editable) if the result of the given condition is "True". This
setting denes object visibility on form startup and when the connected variable's value
changes.
TIP
Equals (=) and slashed equals (≠) signs are allowed to be used in object visibility
condition. Click the Equal/Not equal button select the appropriate sign type.
Option Print Preview Printout Relative positioning
Not printable (selected) YES NO YES
Visible (cleared) NO NO NO
3.3.2. Text Box
Text box object is a container for textual content on a label. Text box object is very similar to the
standard Designer Text object. The dierence between these two is the presentation of textual
content with variable length. Text object is always expanding or shrinking to adapt its size to the
amount of entered characters. In contrast, Text Box can either adapt (expand/shrink) its height to the
content or make the font increase or decrease its size to t into the object frame.
TIP
To ensure that the content ts the predened box is especially useful when working
with variable data. No matter how long the text value is, it is always placed and
displayed on a label within the pre-designed frame.
3.3.2.1. Source
Connected data source denes the content source of the selected object.
• Fixed data: manually entered xed text.
• Variables: predened variable values which are used as object content.
• Functions: input data transformation tools.
131

• Databases: database values which are used as object content.
• Counter: displays counter value on the label.
Content eld allows you to type the object content.
Mask group sets the format of the input data before it is displayed on a label.
• Content mask sets the format of the input data before it is displayed on a label.
• Mask character is a character used in the mask that is replaced with actual data on the printed
label.
Example
A user needs to format a phone number to be more readable on the label. Data input is not formatted
since it is read from a database.
If the input value read from a database is:
+38642805090
and the content mask is:
(****) **** - ****
the resulting output is:
(+386) 4280 - 5090
If the data contains the asterisk "*" character, change the Mask character. The character should have
a unique value that does not appear anywhere in the data.
3.3.2.2. Style
Font color sets text font and underline color.
Font selects the typeface. Fonts are divided into two groups: OpenType fonts and Printer fonts.
NOTE
If the currently selected printer is a thermal printer, additional fonts become available.
These are the internal Printer fonts that are installed on the printer. Printer fonts are
identied by the printer icon in front of their names.
The font may appear Bold, Italic, Underlined or as a Strikethrough text.
132

Font Scaling sets the font stretch factor. If the factor is set to 100 %, font appears in normal scale. If
the factor is set to 200 %, font appears twice as wide. If set to 50 %, font width is shrunk to half its
size.
Alignment denes horizontal positioning of the entered content.
• Left: text aligned with the left object border.
• Center: text positioned in the center of the object.
• Right: text aligned with the right object border.
• Justied: distributes text evenly along both sides.
NOTE
Justied is enabled in Text box only.
Spacing sets the space between text characters and lines.
• Line spacing: space between each line in a paragraph.
• Character spacing: space between individual characters.
3.3.2.3. Text Fit
None makes Text box size and font non-adaptable.
NOTE
If the content amount exceeds the object size, an error message appears. The label is
not printed. To suppress such error and print the text box, enable Ignore excessive
content at print.
Adjust height to t content: automatic adaptation of Text box height.
Fit content by adjusting font size: increases or decreases the font size to make it t inside the Text Box
object.
• Minimum size: minimum permitted font size.
• Maximum size: maximum permitted font size.
Fit content by scaling font: shrinks or stretches the font to make it t inside the Text Box object.
• Minimum font scaling: minimum font stretch factor.
• Maximum font scaling: maximum font stretch factor.
133

Use the same font size for all Text boxes in a group equalizes font size for all Text box objects in a
group. If one of the Text boxes in a group changes its size, the font size adapts. Font sizes of other
Text boxes in a group are automatically set to the same size.
Same size group denes group name.
TIP
This option can be used if Text Fit is enabled. Both Text Fit options are supported – by
adjusting the font size or by scaling the font.
3.3.2.4. Eects
Inverse: inverted text and object background colors.
Mirror: mirrored text.
RTL printing: right to left text printing.
TIP
Most thermal printers print right-to-left scripts automatically. This option becomes
useful if the operating system does not provide native RTL support.
3.3.2.5. Boundaries
Left border group denes the text boundary along the object's left border.
• Shape: selects a customizable basic shape of text boundary.
• Width: extends or shrinks the selected basic left boundary horizontally.
• Height extends or shrinks the selected basic left boundary vertically.
Right border group denes the text boundary along the object's right border.
• Right shape selects the basic shape of the object's right boundary.
• Width extends or shrinks the selected basic right boundary horizontally.
• Height extends or shrinks the selected basic right boundary vertically.
Example
Boundary denes how the text ows inside the object.
134

3.3.2.6. Position
Position tab denes object positioning and its position-related behavior.
Position group denes the object's position.
• X and Y: anchoring point coordinates.
Size group sets the object's dimensions:
• Width and Height: horizontal and vertical object dimension.
• Keep aspect ratio: simultaneous changing of object dimensions while scaling.
NOTE
If the measurement unit is changed in label properties, the value transforms
automatically.
Rotation angle is the object angle according to the design surface.
TIP
There are multiple ways to set the object's angle: enter the angle manually, drag the
slider or click and drag the
icon on the selected object. Rotation angle and slider
rotates the object around its anchoring point. The icon rotates the object around its
central point.
Anchoring point is the spot where an object is pinned to design surface. Variable size objects
increase or decrease their size in the direction that is opposite to the chosen anchoring point.
Lock prevents the object from being moved during the design process.
Relative Position options dene the position of an object when label size or positions of neighboring
objects are changing during the label design process.
135

• Enable horizontal relative position: activates horizontal relative positioning.
• Relative to label border: the position of object is dened relative to the reference label
border. Dene horizontal oset for the object with regard to this border.
• Relative to another object: the position of object is dened relative to the border of a
neighboring object. Dene horizontal oset for the object with regard to this object.
• Object: selects the reference object for horizontal relative positioning.
• Border: neighboring object's reference border or label border (if there are no other objects
on the label) for horizontal relative positioning.
• Oset: horizontal distance from label border or reference object's anchoring point.
• Enable vertical relative position: activates vertical relative positioning.
• Relative to label border: the position of object is dened relative to the reference label
border. Dene vertical oset for the object with regard to this border.
• Relative to another object: the position of object is dened relative to the border of a
neighboring object. Dene vertical oset for the object with regard to this object.
• Object: selects the reference object for vertical relative positioning.
• Border: neighboring object's reference border or label border (if there are no other objects
on the label) for vertical relative positioning.
• Oset: vertical distance from label border or reference object's anchoring point.
NOTE
Object position changes if label size or position of the related object change.
When designing double-sided labels, you can also take objects on the opposite side of the label as
reference objects for relative positioning. In this case, objects on opposite sides move together if you
change their positions.
NOTE
Label sides of reference objects are clearly identied on the Object selection list with
(Front Side) and (Back Side).
NOTE
If the measurement unit is changed, the value transforms automatically.
3.3.2.7. General
General tab identies the object and sets its status.
136

Name sets a unique object ID. It is used for object referencing when dening functions, variables,
scripts, etc.
NOTE
Avoid using spaces or special characters in object names.
Description allows adding notes and annotations for an object. It provides help during the label
design process.
Status group denes object visibility on print preview and on printed labels.
• Not printable: prevents the object from being printed. The object still remains visible on the
print preview and aects other objects in relative positioning. This option is useful when printing
on predesigned or stock-specic labels.
• Visible: if the checkbox is not selected, the object neither appears on the print preview nor on
the printed label. The object is treated as if it does not exist.
• Condition: makes an object enabled (editable) if the result of the given condition is "True". This
setting denes object visibility on form startup and when the connected variable's value
changes.
TIP
Equals (=) and slashed equals (≠) signs are allowed to be used in object visibility
condition. Click the Equal/Not equal button select the appropriate sign type.
Option
Print Preview Printout Relative positioning
Not printable (selected) YES NO YES
Visible (cleared) NO NO NO
3.3.3. Rich Text Box
Rich text box (RTF) is an object for rich text editing. It encloses textual content with hyperlinks, line
images, and other formatting created using an internal Designer's word processor.
3.3.3.1. Source
Connected data source denes the content source of the selected object.
• Fixed data: manually entered xed text.
• Variables: predened variable values which are used as object content.
• Functions: input data transformation tools.
137

• Databases: database values which are used as object content.
• Counter: displays counter value on the label.
Content eld allows you to type the object content.
Rich Text Box Editor is a full-scale text processor.
Edit content button opens the editor.
Supported actions in Rich Text Box Editor:
• Text formatting
• Content nd and replace
• Inserting of images, symbols, tables, and dynamic data sources
• Content zooming
Show RTF code option displays the RTF code.
TIP
Read more about the available Rich Text Box Editor features in a dedicated topic.
3.3.3.2. Style
Rendering group denes the active rendering method for the rich text content. If you experience
diculties while importing formatted text to the Rich text box object, switch to Alternative rendering.
This helps you achieve correct content formatting on the printed labels.
NOTE
Alternative rendering adds support for right-to-left scripts.
NOTE
If you are editing legacy NiceLabel label les (.lbl), Alternative rendering is
automatically active.
NOTE
If you are designing labels with custom fonts, Alternative rendering is the preferred
option .
138

3.3.3.3. Text Fit
None makes Text box size and font non-adaptable.
• None: non-adaptable Rich Text box size and font.
NOTE
If the content amount exceeds the object size, an error message appears. The
label is not printed. To suppress such error and print the text box, enable Ignore
excessive content
• Adjust height to t content: automatic Rich Text box height adaptation.
• Fit content by adjusting font size: adaptable font size.
• Minimum size: minimum font size.
• Maximum size: maximum font size.
3.3.3.4. Position
Position tab denes object positioning and its position-related behavior.
Position group denes the object's position.
• X and Y: anchoring point coordinates.
Size group sets the object's dimensions:
• Width and Height: horizontal and vertical object dimension.
• Keep aspect ratio: simultaneous changing of object dimensions while scaling.
NOTE
If the measurement unit is changed in label properties, the value transforms
automatically.
Rotation angle is the object angle according to the design surface.
TIP
There are multiple ways to set the object's angle: enter the angle manually, drag the
slider or click and drag the icon on the selected object. Rotation angle and slider
rotates the object around its anchoring point. The icon rotates the object around its
central point.
139

Anchoring point is the spot where an object is pinned to design surface. Variable size objects
increase or decrease their size in the direction that is opposite to the chosen anchoring point.
Lock prevents the object from being moved during the design process.
3.3.3.5. Relative Position
Relative Position options dene the position of an object when label size or positions of neighboring
objects are changing during the label design process.
• Enable horizontal relative position: activates horizontal relative positioning.
• Relative to label border: the position of object is dened relative to the reference label
border. Dene horizontal oset for the object with regard to this border.
• Relative to another object: the position of object is dened relative to the border of a
neighboring object. Dene horizontal oset for the object with regard to this object.
• Object: selects the reference object for horizontal relative positioning.
• Border: neighboring object's reference border or label border (if there are no other objects
on the label) for horizontal relative positioning.
• Oset: horizontal distance from label border or reference object's anchoring point.
• Enable vertical relative position: activates vertical relative positioning.
• Relative to label border: the position of object is dened relative to the reference label
border. Dene vertical oset for the object with regard to this border.
• Relative to another object: the position of object is dened relative to the border of a
neighboring object. Dene vertical oset for the object with regard to this object.
• Object: selects the reference object for vertical relative positioning.
• Border: neighboring object's reference border or label border (if there are no other objects
on the label) for vertical relative positioning.
• Oset: vertical distance from label border or reference object's anchoring point.
NOTE
Object position changes if label size or position of the related object change.
When designing double-sided labels, you can also take objects on the opposite side of the label as
reference objects for relative positioning. In this case, objects on opposite sides move together if you
change their positions.
NOTE
Label sides of reference objects are clearly identied on the Object selection list with
(Front Side) and (Back Side).
140

3.3.3.6. General
General tab identies the object and sets its status.
Name sets a unique object ID. It is used for object referencing when dening functions, variables,
scripts, etc.
NOTE
Avoid using spaces or special characters in object names.
Description allows adding notes and annotations for an object. It provides help during the label
design process.
Status group denes object visibility on print preview and on printed labels.
• Not printable: prevents the object from being printed. The object still remains visible on the
print preview and aects other objects in relative positioning. This option is useful when printing
on predesigned or stock-specic labels.
• Visible: if the checkbox is not selected, the object neither appears on the print preview nor on
the printed label. The object is treated as if it does not exist.
• Condition: makes an object enabled (editable) if the result of the given condition is "True". This
setting denes object visibility on form startup and when the connected variable's value
changes.
TIP
Equals (=) and slashed equals (≠) signs are allowed to be used in object visibility
condition. Click the Equal/Not equal button select the appropriate sign type.
Option
Print Preview Printout Relative positioning
Not printable (selected) YES NO YES
Visible (cleared) NO NO NO
3.3.3.7. Rich Text Box Editor
Rich Text Box Editor is a fully featured word processor. It enables you to create, edit and format the
content of a Rich text box label object.
Sections below describe editor's tabs and matching ribbon groups with commands that are available
when creating and editing the Rich Text box content.
Home Tab
File ribbon group enables handling of a document.
141

• Import: importing of textual content to the editor.
• Export: exporting of textual content from the editor.
TIP
Use le browser window to select the export location. By default, the editor
content is exported as a le with .rtf extension. To specify an alternative le
format, select it from the dropdown list.
Clipboard ribbon group activates the following actions:
• Paste: pastes clipboard data.
• Copy: copies current selection to the clipboard.
• Cut: cuts selection to clipboard.
Undo Redo ribbon group undos or repeats editing actions.
Font ribbon group includes typical font style and formatting related commands. These are font
selection, size, font growing and shrinking, bold, italics, etc.
TIP
For additional font related settings, open the Font box in dialog form by clicking the
icon in the bottom right corner of the ribbon group.
Text Box group denes lists and indents, toggles formatting symbols, sets alignment and line spacing,
and enables text shading.
TIP
For additional text related settings, open the Text Box in dialog form by clicking the
icon in the bottom right corner of the ribbon group.
Editing group includes:
• Find searches and locates the inserted string within a text.
• Replace locates and replaces the inserted string with a new text.
Insert
Insert group enables adding editable elements to the rich text object.
• Data Source: adds variable, function or a database eld as a dynamic content source.
142
• Table: opens the Insert Table dialog. Dene Number of columns and Number of rows. After
clicking OK, a table with the dened number of columns and rows is placed in the rich text
editor.
• Picture: inserts a picture the rich text object.
• Symbol: opens Insert Symbol dialog for character selection.
• Search by code: character search by unicode character code.
• Font name: font selection.
• Character set: active set of characters.
• Filter: character search lter.
Frequently used symbols are displayed at the bottom of the dialog box. Click the symbol to
insert it directly in the rich text object.
View
Zoom group allows zooming the text in and out.
3.3.4. Barcode
Barcode object is used for adding various types of barcodes with encoded data to a label.
Details on barcode properties, types, and data encoding methods are available in the dedicated
Barcode section.
3.3.5. Picture
Use Picture object to add graphic content on a label. The following le formats are supported:
• Portable Network Graphic (*.png)
• PDF (*.pdf)
• Adobe Photoshop (*.psd)
• Scalable Vector graphics (*.svg)
• Paintbrush (*.pcx)
• JPEG bitmaps (*.jpg, *.jpeg, *.jpe)
• TIFF bitmaps (*.tif, *.ti)
• Enhanced Windows Metale (*.emf)
143

• Windows Metale (*.wmf)
• Windows bitmap (*.bmp)
• Graphics Interchange Format (*.gif)
3.3.5.1. Source
Connected data source denes the content source of the selected object.
• Variable keyboard input: type of variable that enables the content of a prompted eld to be
dierent for every print job.
• Variables: predened variable values which are used as object content.
• Functions: input data transformation tools.
• Databases: database values which are used as object content.
Content eld is used for entering the object content.
To (re)dene the Picture object Content, click Browse and locate the le to be displayed on the label.
Embed picture in a document stores the picture in the label le. Link to the original picture le is
discarded.
TIP
Picture embedding makes the label le more portable as the user does not have to
include the picture le when sharing the label.
Save embedded picture to le: the embedded label picture is saved as a separate le.
3.3.5.2. Base64 encoded graphics
Base64 is a binary-to-text encoding method that encodes your graphic les into text les. Use
Base64-encoded graphics on your labels or forms when you want to access your graphics directly
from your database, and not with le paths to your hard drive.
Connect your Picture objects to database elds containing Base64 content. Designer automatically
recognizes Base64 text content and displays text content as images on your labels or forms.
144

NOTE
Your Base64 strings must be longer than 250 characters.
NOTE
For testing your label or solution designs, you can use prompt variables as your data
sources in Picture properties. Manually enter your Base64 text content as your
variable value at printing time.
3.3.5.3. BLOB elds support
Binary Large Objects (BLOBs) are collections of binary data. BLOBs are typically images, audio, or
other multimedia objects. Databases store BLOBs as single entities. Advanced databases like SQL,
MySQL, and Oracle support BLOB elds.
Use BLOB database elds on your labels or forms to access your graphics directly from your
database, and not as le paths to graphics on your hard drive.
Connect your Picture objects to your BLOB database eld. Designer automatically recognizes BLOB
content and displays the content as images on your labels or forms.
3.3.5.4. Style
Dithering group allows you to select the most appropriate dithering method to print pictures on labels
in black and white.
145

TIP
When printing pictures in black and white, dithering creates the illusion of multiple
colors and shades by varying the pattern of black dots.
Dithering type selects the dithering method:
• Printer driver default: no dithering method is selected for the picture object. When printing in
black and white, printer driver uses its own dithering method.
NOTE
If no dithering is set for the picture object, the algorithm can also be selected using
the printer properties dialog. The selected dithering algorithm for an object in
Designer overrides the algorithm selected using printer properties dialog. See
Changing dithering options for more detailed information.
• Ordered: achieves dithering by applying a threshold map (matrix with cells) on the pixels
displayed. If the value of the pixel (scaled into the 0-9 range) is less than the number in the
corresponding cell of the matrix, the algorithm plots the pixel black, otherwise, it plots it white.
• Threshold: sets a threshold to which every pixel is compared. If the original pixel value is higher
than the threshold, it renders white. The lower the threshold value, the higher the share of pixels
turned to white.
• Floyd Steinberg: achieves dithering using error dispersion. This algorithm generates the closest
result to the original, but represents the slowest option.
Color group allows you to customize the color of a graphic object.
• Force picture color: recolors the graphic object. Use the dropdown Picture color palette to pick
the appropriate color to be used for the object on the printed label.
NOTE
This option can be used with color printers using the advanced printer driver
interface or Windows printing mode.
3.3.5.5. Position
Position tab denes object positioning and its position-related behavior.
Position group denes the object's position.
• X and Y: anchoring point coordinates.
Size group sets the object's dimensions:
146

• Width and Height: horizontal and vertical object dimension.
• Keep aspect ratio: simultaneous changing of object dimensions while scaling.
NOTE
If the measurement unit is changed in label properties, the value transforms
automatically.
Rotation angle is the object angle according to the design surface.
TIP
There are multiple ways to set the object's angle: enter the angle manually, drag the
slider or click and drag the icon on the selected object. Rotation angle and slider
rotates the object around its anchoring point. The icon rotates the object around its
central point.
Anchoring point is the spot where an object is pinned to design surface. Variable size objects
increase or decrease their size in the direction that is opposite to the chosen anchoring point.
Lock prevents the object from being moved during the design process.
Relative Position options dene the position of an object when label size or positions of neighboring
objects are changing during the label design process.
• Enable horizontal relative position: activates horizontal relative positioning.
• Relative to label border: the position of object is dened relative to the reference label
border. Dene horizontal oset for the object with regard to this border.
• Relative to another object: the position of object is dened relative to the border of a
neighboring object. Dene horizontal oset for the object with regard to this object.
• Object: selects the reference object for horizontal relative positioning.
• Border: neighboring object's reference border or label border (if there are no other objects
on the label) for horizontal relative positioning.
• Oset: horizontal distance from label border or reference object's anchoring point.
• Enable vertical relative position: activates vertical relative positioning.
• Relative to label border: the position of object is dened relative to the reference label
border. Dene vertical oset for the object with regard to this border.
• Relative to another object: the position of object is dened relative to the border of a
neighboring object. Dene vertical oset for the object with regard to this object.
• Object: selects the reference object for vertical relative positioning.
147

• Border: neighboring object's reference border or label border (if there are no other objects
on the label) for vertical relative positioning.
• Oset: vertical distance from label border or reference object's anchoring point.
NOTE
Object position changes if label size or position of the related object change.
When designing double-sided labels, you can also take objects on the opposite side of the label as
reference objects for relative positioning. In this case, objects on opposite sides move together if you
change their positions.
NOTE
Label sides of reference objects are clearly identied on the Object selection list with
(Front Side) and (Back Side).
NOTE
If the measurement unit is changed, the value converts automatically.
Graphic Resizing tab is available if the picture object is connected to a variable. These settings dene
how the Picture object adapts its size to the source le at print time.
• Keep original picture size: disabled picture resizing. Picture size remains unchanged.
• Resize proportionally: proportional picture resizing. Aspect ratio of picture dimension remains
xed.
• Resize to the designed size: horizontal and vertical picture resizing to make it t into the
bounding box. This option will most likely make the picture distorted.
Original size displays the picture's Width and Height before resizing. Revert to original picture size
cancels the resizing actions.
3.3.5.6. General
General tab identies the object and sets its status.
Name sets a unique object ID. It is used for object referencing when dening functions, variables,
scripts, etc.
NOTE
Avoid using spaces or special characters in object names.
148

Description allows adding notes and annotations for an object. It provides help during the label
design process.
Status group denes object visibility on print preview and on printed labels.
• Not printable: prevents the object from being printed. The object still remains visible on the
print preview and aects other objects in relative positioning. This option is useful when printing
on predesigned or stock-specic labels.
• Visible: if the checkbox is not selected, the object neither appears on the print preview nor on
the printed label. The object is treated as if it does not exist.
• Condition: makes an object enabled (editable) if the result of the given condition is "True". This
setting denes object visibility on form startup and when the connected variable's value
changes.
TIP
Equals (=) and slashed equals (≠) signs are allowed to be used in object visibility
condition. Click the Equal/Not equal button select the appropriate sign type.
Option Print Preview Printout Relative positioning
Not printable (selected) YES NO YES
Visible (cleared) NO NO NO
3.3.6. Rectangle
Rectangle object creates a rectangular frame on a label.
Style
Outline group denes line settings:
• Thickness: object line thickness.
• Outline style: object line style.
• Solid: solid line.
• Dot: dotted line.
• Dash: dashed line.
• Erase: parts of neighboring objects become invisible underneath this object.
• Outline color: color of the line.
• Corner radius: makes the rectangle corners round. Higher values make the curve broader.
149

Fill group denes the object ll settings and color.
• Fill style: object ll properties denition:
• None: completely transparent object.
• Erase: makes objects beneath the active one hidden.
• Solid: lls the object with solid color.
• Right Diagonal: lls the object with diagonal lines that ascend toward the right side.
• Left Diagonal: lls the object with diagonal lines that ascend toward the left side.
• Vertical: lls the object with vertical lines.
• Horizontal: lls the object with horizontal lines.
• Cross: lls the object with crossed lines.
• Cross Diagonal: lls the object with diagonally crossed lines.
• 25% of color: ll color opacity 25 %.
• 50% of color: ll color opacity 50 %.
• 75% of color: ll color opacity 75 %.
• Background color: object ll color denition.
NOTE
The system does not allow the Outline style and Fill style to be set to None at the
same time.
TIP
Shape objects (Rectangle, Line and Ellipse) in NiceLabel 2019 remember the last used
setting. Each time you add one of these objects to the label, it has the same outline
and ll settings as the previously added shape object.
3.3.6.1. Position
Position tab denes object positioning and its position-related behavior.
Position group denes the object's position.
• X and Y: anchoring point coordinates.
Size group sets the object's dimensions:
150

• Width and Height: horizontal and vertical object dimension.
• Keep aspect ratio: simultaneous changing of object dimensions while scaling.
NOTE
If the measurement unit is changed in label properties, the value transforms
automatically.
Rotation angle is the object angle according to the design surface.
TIP
There are multiple ways to set the object's angle: enter the angle manually, drag the
slider or click and drag the icon on the selected object. Rotation angle and slider
rotates the object around its anchoring point. The icon rotates the object around its
central point.
Anchoring point is the spot where an object is pinned to design surface. Variable size objects
increase or decrease their size in the direction that is opposite to the chosen anchoring point.
Lock prevents the object from being moved during the design process.
Relative Position options dene the position of an object when label size or positions of neighboring
objects are changing during the label design process.
• Enable horizontal relative position: activates horizontal relative positioning.
• Relative to label border: the position of object is dened relative to the reference label
border. Dene horizontal oset for the object with regard to this border.
• Relative to another object: the position of object is dened relative to the border of a
neighboring object. Dene horizontal oset for the object with regard to this object.
• Object: selects the reference object for horizontal relative positioning.
• Border: neighboring object's reference border or label border (if there are no other objects
on the label) for horizontal relative positioning.
• Oset: horizontal distance from label border or reference object's anchoring point.
• Enable vertical relative position: activates vertical relative positioning.
• Relative to label border: the position of object is dened relative to the reference label
border. Dene vertical oset for the object with regard to this border.
• Relative to another object: the position of object is dened relative to the border of a
neighboring object. Dene vertical oset for the object with regard to this object.
• Object: selects the reference object for vertical relative positioning.
151

• Border: neighboring object's reference border or label border (if there are no other objects
on the label) for vertical relative positioning.
• Oset: vertical distance from label border or reference object's anchoring point.
NOTE
Object position changes if label size or position of the related object change.
When designing double-sided labels, you can also take objects on the opposite side of the label as
reference objects for relative positioning. In this case, objects on opposite sides move together if you
change their positions.
NOTE
Label sides of reference objects are clearly identied on the Object selection list with
(Front Side) and (Back Side).
3.3.6.2. General
General tab identies the object and sets its status.
Name sets a unique object ID. It is used for object referencing when dening functions, variables,
scripts, etc.
NOTE
Avoid using spaces or special characters in object names.
Description allows adding notes and annotations for an object. It provides help during the label
design process.
Status group denes object visibility on print preview and on printed labels.
• Not printable: prevents the object from being printed. The object still remains visible on the
print preview and aects other objects in relative positioning. This option is useful when printing
on predesigned or stock-specic labels.
• Visible: if the checkbox is not selected, the object neither appears on the print preview nor on
the printed label. The object is treated as if it does not exist.
• Condition: makes an object enabled (editable) if the result of the given condition is "True". This
setting denes object visibility on form startup and when the connected variable's value
changes.
152

TIP
Equals (=) and slashed equals (≠) signs are allowed to be used in object visibility
condition. Click the Equal/Not equal button select the appropriate sign type.
Option Print Preview Printout Relative positioning
Not printable (selected) YES NO YES
Visible (cleared) NO NO NO
Printing optimization group allows activating the use of internal printer elements.
TIP
If supported by the selected printer model, a share of label element processing is
handled directly by the printer (e.g., internal fonts, shapes, barcodes). This speeds up
the printing process also due to signicantly reduced data trac.
• Use printer element if supported: prints labels using internal printer elements if the printer
allows it. If a selected printer does not support internal printer elements, the element is sent as a
graphic le.
• Always use printer element: prints labels using printer elements only. If a selected printer does
not support internal printer elements, an error message with explanation is displayed.
• Always print as graphics: sends and prints the objects as graphic les.
When connecting your object to a variable, enable the Use printer element if supported or
Always use printer element option. Printing in graphic mode returns a printing error.
NOTE
Enabled advanced printer driver interface combined with printer driver is required to
print this object as internal printer element.
3.3.7. Line
Line object creates a line on a label.
Style
Outline group denes line settings:
• Thickness: object line thickness.
153

• Outline style: object line style.
• Solid: solid line.
• Dot: dotted line.
• Dash: dashed line.
• Erase: parts of neighboring objects become invisible underneath this object.
• Outline color: color of the line.
TIP
Shape objects (Rectangle, Line and Ellipse) in NiceLabel 2019 remember the last used
setting. Each time you add one of these objects to the label, it has the same outline
and ll settings as the previously added shape object.
3.3.7.1. Position
Position tab denes object positioning and its position-related behavior.
Position group denes the object's position.
• X and Y: anchoring point coordinates.
• Length: sets the line length.
If the measurement unit is changed in label properties, the value transforms automatically.
Rotation angle is the object angle according to the design surface.
TIP
There are multiple ways to set the object's angle: enter the angle manually, drag the
slider or click and drag the icon on the selected object. Rotation angle and slider
rotates the object around its anchoring point. The
icon rotates the object around its
central point.
Lock prevents the object from being moved during the design process.
3.3.7.2. General
General tab identies the object and sets its status.
Name sets a unique object ID. It is used for object referencing when dening functions, variables,
scripts, etc.
154

NOTE
Avoid using spaces or special characters in object names.
Description allows adding notes and annotations for an object. It provides help during the label
design process.
Status group denes object visibility on print preview and on printed labels.
• Not printable: prevents the object from being printed. The object still remains visible on the
print preview and aects other objects in relative positioning. This option is useful when printing
on predesigned or stock-specic labels.
• Visible: if the checkbox is not selected, the object neither appears on the print preview nor on
the printed label. The object is treated as if it does not exist.
• Condition: makes an object enabled (editable) if the result of the given condition is "True". This
setting denes object visibility on form startup and when the connected variable's value
changes.
TIP
Equals (=) and slashed equals (≠) signs are allowed to be used in object visibility
condition. Click the Equal/Not equal button select the appropriate sign type.
Option
Print Preview Printout Relative positioning
Not printable (selected) YES NO YES
Visible (cleared) NO NO NO
Printing optimization group allows activating the use of internal printer elements.
TIP
If supported by the selected printer model, a share of label element processing is
handled directly by the printer (e.g., internal fonts, shapes, barcodes). This speeds up
the printing process also due to signicantly reduced data trac.
• Use printer element if supported: prints labels using internal printer elements if the printer
allows it. If a selected printer does not support internal printer elements, the element is sent as a
graphic le.
• Always use printer element: prints labels using printer elements only. If a selected printer does
not support internal printer elements, an error message with explanation is displayed.
• Always print as graphics: sends and prints the objects as graphic les.
155

When connecting your object to a variable, enable the Use printer element if supported or
Always use printer element option. Printing in graphic mode returns a printing error.
NOTE
Enabled advanced printer driver interface combined with printer driver is required to
print this object as internal printer element.
3.3.8. Ellipse
Ellipse object creates a circular object on a label.
Style
Outline group denes line settings:
• Thickness: object line thickness.
• Outline style: object line style.
• Solid: solid line.
• Dot: dotted line.
• Dash: dashed line.
• Erase: parts of neighboring objects become invisible underneath this object.
• Outline color: color of the line.
Fill group denes the object ll settings and color.
• Fill style: object ll properties denition:
• None: completely transparent object.
• Erase: makes objects beneath the active one hidden.
• Solid: lls the object with solid color.
• Right Diagonal: lls the object with diagonal lines that ascend toward the right side.
• Left Diagonal: lls the object with diagonal lines that ascend toward the left side.
• Vertical: lls the object with vertical lines.
• Horizontal: lls the object with horizontal lines.
• Cross: lls the object with crossed lines.
• Cross Diagonal: lls the object with diagonally crossed lines.
156

• 25% of color: ll color opacity 25 %.
• 50% of color: ll color opacity 50 %.
• 75% of color: ll color opacity 75 %.
• Background color: object ll color denition.
NOTE
The system does not allow the Outline style and Fill style to be set to None at the
same time.
TIP
Shape objects (Rectangle, Line and Ellipse) in NiceLabel 2019 remember the last used
setting. Each time you add one of these objects to the label, it has the same outline
and ll settings as the previously added shape object.
3.3.8.1. Position
Position tab denes object positioning and its position-related behavior.
Position group denes the object's position.
• X and Y: anchoring point coordinates.
Size group sets the object's dimensions:
• Width and Height: horizontal and vertical object dimension.
• Keep aspect ratio: simultaneous changing of object dimensions while scaling.
NOTE
If the measurement unit is changed in label properties, the value transforms
automatically.
Rotation angle is the object angle according to the design surface.
TIP
There are multiple ways to set the object's angle: enter the angle manually, drag the
slider or click and drag the icon on the selected object. Rotation angle and slider
rotates the object around its anchoring point. The icon rotates the object around its
central point.
157

Anchoring point is the spot where an object is pinned to design surface. Variable size objects
increase or decrease their size in the direction that is opposite to the chosen anchoring point.
Lock prevents the object from being moved during the design process.
Relative Position options dene the position of an object when label size or positions of neighboring
objects are changing during the label design process.
• Enable horizontal relative position: activates horizontal relative positioning.
• Relative to label border: the position of object is dened relative to the reference label
border. Dene horizontal oset for the object with regard to this border.
• Relative to another object: the position of object is dened relative to the border of a
neighboring object. Dene horizontal oset for the object with regard to this object.
• Object: selects the reference object for horizontal relative positioning.
• Border: neighboring object's reference border or label border (if there are no other objects
on the label) for horizontal relative positioning.
• Oset: horizontal distance from label border or reference object's anchoring point.
• Enable vertical relative position: activates vertical relative positioning.
• Relative to label border: the position of object is dened relative to the reference label
border. Dene vertical oset for the object with regard to this border.
• Relative to another object: the position of object is dened relative to the border of a
neighboring object. Dene vertical oset for the object with regard to this object.
• Object: selects the reference object for vertical relative positioning.
• Border: neighboring object's reference border or label border (if there are no other objects
on the label) for vertical relative positioning.
• Oset: vertical distance from label border or reference object's anchoring point.
NOTE
Object position changes if label size or position of the related object change.
When designing double-sided labels, you can also take objects on the opposite side of the label as
reference objects for relative positioning. In this case, objects on opposite sides move together if you
change their positions.
NOTE
Label sides of reference objects are clearly identied on the Object selection list with
(Front Side) and (Back Side).
158

NOTE
If the measurement unit is changed, the value transforms automatically.
3.3.8.2. General
General tab identies the object and sets its status.
Name sets a unique object ID. It is used for object referencing when dening functions, variables,
scripts, etc.
NOTE
Avoid using spaces or special characters in object names.
Description allows adding notes and annotations for an object. It provides help during the label
design process.
Status group denes object visibility on print preview and on printed labels.
• Not printable: prevents the object from being printed. The object still remains visible on the
print preview and aects other objects in relative positioning. This option is useful when printing
on predesigned or stock-specic labels.
• Visible: if the checkbox is not selected, the object neither appears on the print preview nor on
the printed label. The object is treated as if it does not exist.
• Condition: makes an object enabled (editable) if the result of the given condition is "True". This
setting denes object visibility on form startup and when the connected variable's value
changes.
TIP
Equals (=) and slashed equals (≠) signs are allowed to be used in object visibility
condition. Click the Equal/Not equal button select the appropriate sign type.
Option
Print Preview Printout Relative positioning
Not printable (selected) YES NO YES
Visible (cleared) NO NO NO
Printing optimization group allows activating the use of internal printer elements.
TIP
If supported by the selected printer model, a share of label element processing is
handled directly by the printer (e.g., internal fonts, shapes, barcodes). This speeds up
the printing process also due to signicantly reduced data trac.
159

• Use printer element if supported: prints labels using internal printer elements if the printer
allows it. If a selected printer does not support internal printer elements, the element is sent as a
graphic le.
• Always use printer element: prints labels using printer elements only. If a selected printer does
not support internal printer elements, an error message with explanation is displayed.
• Always print as graphics: sends and prints the objects as graphic les.
When connecting your object to a variable, enable the Use printer element if supported or
Always use printer element option. Printing in graphic mode returns a printing error.
NOTE
Enabled advanced printer driver interface combined with printer driver is required to
print this object as internal printer element.
3.3.9. Inverse
3.3.9.1. About
Inverse object inverts the underlying object's color.
3.3.9.2. Position
Position tab denes object positioning and its position-related behavior.
Position group denes the object's position.
• X and Y: anchoring point coordinates.
Size group sets the object's dimensions:
160

• Width and Height: horizontal and vertical object dimension.
• Keep aspect ratio: simultaneous changing of object dimensions while scaling.
NOTE
If the measurement unit is changed in label properties, the value transforms
automatically.
Rotation angle is the object angle according to the design surface.
TIP
There are multiple ways to set the object's angle: enter the angle manually, drag the
slider or click and drag the icon on the selected object. Rotation angle and slider
rotates the object around its anchoring point. The icon rotates the object around its
central point.
Anchoring point is the spot where an object is pinned to design surface. Variable size objects
increase or decrease their size in the direction that is opposite to the chosen anchoring point.
Lock prevents the object from being moved during the design process.
Relative Position options dene the position of an object when label size or positions of neighboring
objects are changing during the label design process.
• Enable horizontal relative position: activates horizontal relative positioning.
• Relative to label border: the position of object is dened relative to the reference label
border. Dene horizontal oset for the object with regard to this border.
• Relative to another object: the position of object is dened relative to the border of a
neighboring object. Dene horizontal oset for the object with regard to this object.
• Object: selects the reference object for horizontal relative positioning.
• Border: neighboring object's reference border or label border (if there are no other objects
on the label) for horizontal relative positioning.
• Oset: horizontal distance from label border or reference object's anchoring point.
• Enable vertical relative position: activates vertical relative positioning.
• Relative to label border: the position of object is dened relative to the reference label
border. Dene vertical oset for the object with regard to this border.
• Relative to another object: the position of object is dened relative to the border of a
neighboring object. Dene vertical oset for the object with regard to this object.
• Object: selects the reference object for vertical relative positioning.
161

• Border: neighboring object's reference border or label border (if there are no other objects
on the label) for vertical relative positioning.
• Oset: vertical distance from label border or reference object's anchoring point.
NOTE
Object position changes if label size or position of the related object change.
When designing double-sided labels, you can also take objects on the opposite side of the label as
reference objects for relative positioning. In this case, objects on opposite sides move together if you
change their positions.
NOTE
Label sides of reference objects are clearly identied on the Object selection list with
(Front Side) and (Back Side).
NOTE
If the measurement unit is changed, the value transforms automatically.
3.3.9.3. General
General tab identies the object and sets its status.
Name sets a unique object ID. It is used for object referencing when dening functions, variables,
scripts, etc.
NOTE
Avoid using spaces or special characters in object names.
Description allows adding notes and annotations for an object. It provides help during the label
design process.
Status group denes object visibility on print preview and on printed labels.
• Not printable: prevents the object from being printed. The object still remains visible on the
print preview and aects other objects in relative positioning. This option is useful when printing
on predesigned or stock-specic labels.
• Visible: if the checkbox is not selected, the object neither appears on the print preview nor on
the printed label. The object is treated as if it does not exist.
162

• Condition: makes an object enabled (editable) if the result of the given condition is "True". This
setting denes object visibility on form startup and when the connected variable's value
changes.
TIP
Equals (=) and slashed equals (≠) signs are allowed to be used in object visibility
condition. Click the Equal/Not equal button select the appropriate sign type.
Option Print Preview Printout Relative positioning
Not printable (selected) YES NO YES
Visible (cleared) NO NO NO
Printing optimization group allows activating the use of internal printer elements.
TIP
If supported by the selected printer model, a share of label element processing is
handled directly by the printer (e.g., internal fonts, shapes, barcodes). This speeds up
the printing process also due to signicantly reduced data trac.
• Use printer element if supported: prints labels using internal printer elements if the printer
allows it. If a selected printer does not support internal printer elements, the element is sent as a
graphic le.
• Always use printer element: prints labels using printer elements only. If a selected printer does
not support internal printer elements, an error message with explanation is displayed.
• Always print as graphics: sends and prints the objects as graphic les.
NOTE
Inverse object can only be printed as graphics if advanced printer driver interface is
disabled. Make sure Windows printing mode is on before printing. Double-click the
design surface to open Label Properties dialog and go to Printer panel > Printing >
disable option Use advanced printer driver interface.
3.3.10. Reports
Printing reports with NiceLabel completes your labeling and shipping cycle, helping you go from
product labeling to shipment with the same software. You can print reports from within NiceLabel
without the need for third party applications. Report printing avoids the cost of having to learn,
develop, and maintain third party applications just to print your reports.
163
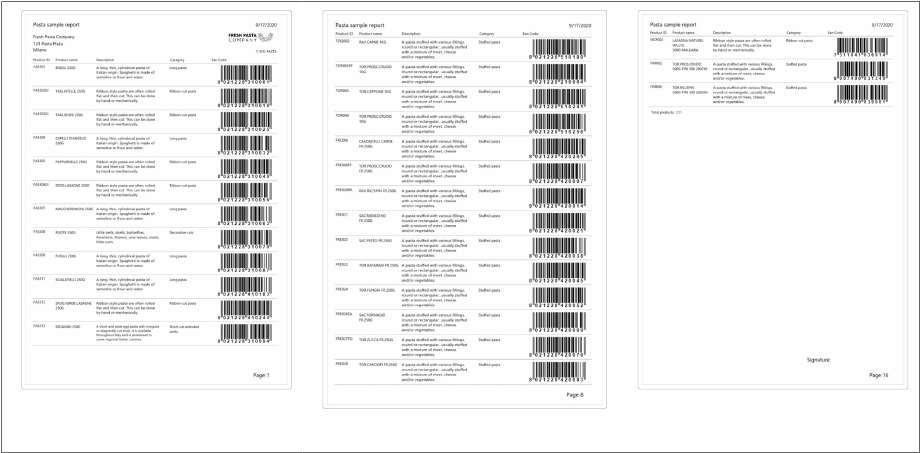
Reports are labels that display database data as custom tables. Report printing organizes your
data into rows. You can add headers and footers to explain more information about your data.
For example, you can create packing lists that accompany shipments from your warehouse:
First page
Middle page
Last page
Designing custom reports in NiceLabel helps you make shipments faster with fewer mistakes.
3.3.10.1. Report elements
Most reports have similar structures. You can include:
• Repeating data from your database. Repeating data appears on every page of your report.
• Headers and footers to explain the repeating data or give more information. Headers and
footers can repeat on some or all pages.
Report objects in Designer include 3 default elements:
164

1. Header
2. Repeater Denition (template for all repeating data). Changes the look and behavior of all
repeating data in every row of your report.
3. Footer
Add additional headers and footers to Report objects to build custom reports. For example, this
packing list contains multiple elements:
165

1. Header for report name and date.
2. Header for logo and contact information. This header appears on the rst page of your report.
3. Header for column descriptions for your data. Column descriptions repeat on every page so
your data is readable.
4. Repeater Denition for repeating data. This is your report data that can repeat on multiple
pages.
5. Footer for report totals. This footer appears on the last page of your report.
6. Footer for signatures. This footer is pinned to the bottom of the last page of your report.
3.3.10.2. Creating new reports
1. Make a new label (Usually A4 or Letter size so your reports can print on oce printers).
2. Click and drag a Report object to your design surface.
166

3. Resize your Report object until it lls most of your design surface. Report objects can be any
size smaller than your design surface.
TIP
Leave room for objects like page numbers which you must place outside
Report objects on your design surface.
4. Connect your database. Reports require database connections to function properly.
a. Open your Report object Properties (Right click > Properties or press F4) and click
Report.
b. Go to Table and use the drop-down list to add your existing database, or use the
Database wizard.
167

c. Your database is connected.
Your new report is ready to design.
3.3.10.3. Adding objects to reports
Drag and drop objects where you need them in your Report headers, Repeater Denitions, and
footers.
Click and drag new objects into your elements:
Moving new objects into report elements.
Click and drag existing objects to move them between elements:
Moving objects between elements. Blue backgrounds appear to help you place objects.
168

TIP
Keep your Objects panel open (on your left) so you can always see which of your
objects are in which elements:
3.3.10.4. Conguring Repeater Denitions
Your Repeater Denition works with the database you connect to your report as a template for how
your data displays. Reports create new lines for each record in your database. Connect objects in
your Repeater Denition to database elds connected to your report. Repeater Denition formatting
applies to every repeating line in your report.
Conguring your Repeater Denition.
Repeater Denitions aect every repeating line of printed
reports.
169

3.3.10.5. Adding headers and footers
Make multiple headers or footers to add more information to your reports. You can congure your
headers and footers to repeat on the rst, last, or every page of your reports.
To add headers or footers:
1. Open Report Properties (right click > Properties or press F4).
2. Go to Structure and click Add Header or Add Footer. Your new element appears in your
Structure.
1. Add headers and footers to Structure.
2. Name your headers and footers. Naming your headers and footers make them easy to
organize in your Objects panel.
3. Choose repeat options to control where headers and footers appear in your reports.
4. Set header and footer height.
• Pin Section to Bottom (Footers only). Enable to always have your footer appear at the
bottom of pages where it repeats. Useful for footers that contain text objects like
signatures.
170

For example, if your repeating data ends in the middle of your last page, you can pin your
signature footer to the bottom of your last page and leave the remaining half page blank.
Unchecked, your signature footer prints immediately after your repeating data ends on
your page.
3.3.10.6. Adding dynamic objects to headers and footers
You can add objects containing dynamic data (like variables and functions) to your report headers
and footers. Variables and repeaters in headers, footers, or outside your Report objects iterate once
per label/page. Your Repeater Denition iterates once per row.
To add dynamic data from databases to headers and footers, you cannot use the same database
table you use in your Repeater Denition. Create a new database table (or new database connection)
for your header and footer objects and make sure you enable Use the same record for entire print
job in your second database table conguration.
For example, you can add an object showing your total report records from your second database
table (Custom SQL here):
1. Add a dynamic Text object to your footer showing your total number of report records.
2. Connect your Text object to a database.
3. Enable Use the same record for the entire print job to congure your database table.
Required.
171
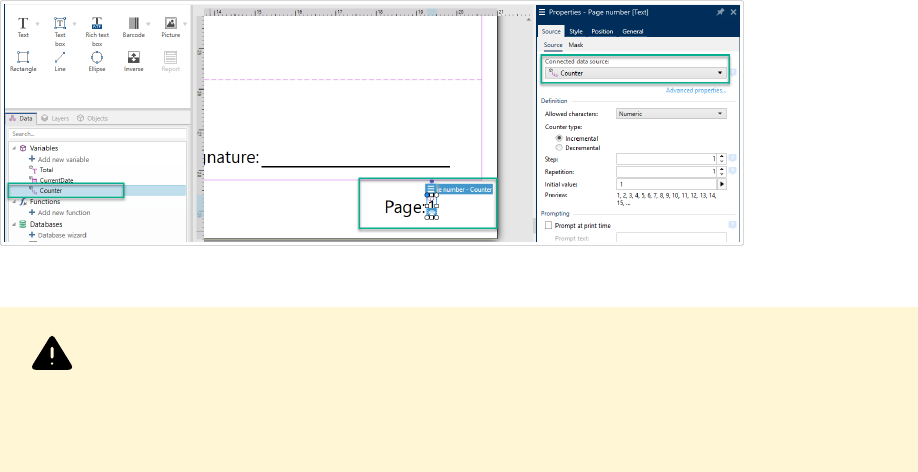
3.3.10.7. Adding page numbers
Adding page numbers with counters on reports.
WARNING
Page numbering with counters only includes your current page. For example, Page 1.
You cannot include total page counts. For example, Page 1 of 5 is not supported.
Most reports use page numbers. To add page numbers to your reports:
1. Create a Text object with a Counter variable.
2. Place your Counter outside your report object on your design surface. Adding counters in
headers and footers disrupts your total page count.
3.4. Working with Objects
This section describes how to work with objects and blend them with the design of a label or form.
Object is a basic building block of any label or solution. Each object is dedicated to a specic type of
content. See the related topics for style and content related object properties.
These are the common actions for multiple object types:
• Adding an object: adds an object to the design surface.
• Adding an object with connected data source: click the down arrow next to the object button
and select an existing or new data source to make the newly added object instantly connected
to a dynamic data source.
• Grouping: makes multiple object behave as a single object.
• Rotating: changes the angle of a selected object.
• Resizing: sets the size of an object.
• Aligning: make the object positions.
172

3.4.1. Adding Objects
There are multiple methods to add an object to a label or form. Use the most convenient one:
• Click and Click: click the object in the object toolbox. Mouse cursor transforms. Click on the
design surface – the selected object appears where clicked.
• Click and Drag: click the object in object toolbox. Mouse cursor transforms. Click on the design
surface and drag to dene the size of the added object.
NOTE
Text object's size cannot be dened using this method – its size is dened
dynamically.
• Drag and Drop: click the object in the object toolbox and drag it to the design surface. The
selected object appears where the mouse button is released.
• Copy and Paste: graphical and textual content can be pasted directly to the design surface. The
following rules apply when copying items and pasting them directly to a label or a form:
• Graphical content from clipboard is pasted as embedded Picture object.
• Rich textual content originating from web pages or word processors is pasted as Rich text
object. When designing a form, rich text is pasted as Text object.
• Single line text is pasted as Text object.
• Multiple line text is pasted as Text box object.
3.4.2. Adding Objects with Connected Data Source
Designer allows you to add an object with instantly connected dynamic data source (variable, function
or database) to the design surface.
There are multiple methods to add an object to a label or form. Use the most convenient one:
• Click the object button down arrow. This opens the dynamic data connection menu. Select from
the existing data sources or add a new one. The newly added object is instantly connected to it
when placed on the design surface.
173

• Click and drag from dynamic data explorer. if you click and drag the data source from Dynamic
Data explorer to the design surface, a Text object appears. This object's content source is the
dragged data source from the explorer.
3.4.3. Grouping
To make multiple objects on a label behave as a single object, add them to a group. To group objects:
• Surround the objects you wish to group using mouse. A rectangle appears marking the selected
objects. Right-click and select Group objects to create a group of objects.
• Hold <Shift> key and click the objects you wish to group. This selects multiple objects – right-
click and select Group objects to create a group of objects.
174

3.4.4. Rotating
There are two ways to set the angle of an object:
• Enter the angle manually in degrees or drag the slider. The object rotates around its anchoring
point. Rotation commands are accessible in two ways:
• Click Position in the Positioning group of the Design tab.
• Go to Object properties -> Position -> Rotation angle.
• Click and drag the
icon next to the selected object. The icon rotates the object around its
central point.
Anchoring point is the spot where an object is pinned to the design surface. Variable size objects
increase or decrease their size in the direction that is opposite to the chosen anchoring point.
3.4.5. Object Resizing
To instantly resize an object, do the following:
1. Select it on the design surface.
2. The selected object becomes framed with a rectangle.
3. Click and drag one of the object holders.
4. The object will resize along with the moving cursor.
Read the below sections to learn about automatic object resizing option and resizing specics.
NOTE
When working with internal printer elements (barcodes, shapes, fonts), object resizing
follows the printer driver-dened values.
175

3.4.5.1. Graphic Object resizing
Graphic resizing is applicable to the picture object on labels and forms.
Resize options group denes how the source le dimensions adapt to the size of object when the
form is run.
NOTE
Resize options are available only if the Picture object is dened dynamically.
• Keep original picture size: disables resizing. The source picture le is displayed in Picture object
with its original dimensions.
• Resize proportionally: makes the source picture le resize proportionally. The aspect ratio of
source le dimensions is preserved.
• Resize to the designed size: resizes the source picture le horizontally and vertically to make it
t into the bounding box. Using this option will most likely distort the image.
Original size group informs the user about the size of source image le.
Revert to original picture size resizes the Picture object to the original dimensions of source image
le.
3.4.5.2. Automatic Resizing with Form
When placed on a form, two options for automatic object resizing become available. Horizontally
resize with form and Vertically resize with form: object size automatically adapts to the changing size
of the form.
• Horizontally resize with form: object width adapts to the resized form.
• Vertically resize with form: object height adapts to the resized form.
If both options are enabled, object width and height adapt to the resized form simultaneously.
PRODUCT LEVEL INFO
This section is applicable to PowerForms.
3.4.5.3. Table Column Resizing
Data initialization form object allows auto-sizing the table column width. Open the object properties
dialog and go to Settings tab.
Columns group sets the width of data initialization table and its Prompt, Value and Formatted value
columns.
176

• Auto-size: automatic column resizing.
• Show fomatted value: visible Formatted value column.
PRODUCT LEVEL INFO
This section is applicable to PowerForms.
3.5. Label Saving
Make sure your work is always saved during the label design process. To save a label, do the following:
1. Go to File tab (background).
2. Click Save As.
3. Click Browse to select the location at which the label le should be stored.
4. After the Save dialog opens, enter the label name. Label name becomes visible in the
application title bar.
3.5.1. Label Files vs. Solution Files
When working with Designer Express and NiceLabel Designer Pro product levels, the label is saved
in .nlbl format. A single .nlbl le includes a single label or a batch of labels (available in NiceLabel
Designer Pro).
When working with PowerForms, the label or form is saved as a .nsln solution le. Such le may
include multiple labels (single documents or batches) and/or forms.
3.5.2. Label Storage
You can dene the folders where les for labels, graphics, stocks, and databases are stored. Default
locations are set in File > Options > Folders. The exact location on the hard disk varies depending on
your Windows operating system, since not every version of Windows uses the same absolute paths.
Designer uses the selected folders as the default location to search for the les and to store them.
Any other folder is permitted to be used as label storage folder. Click Browse to select one.
177

4. Barcode
Designer supports a wide variety of 1D and 2D barcode types to be printed on labels. Each barcode
type is congurable according to specic standards.
TIP
When encoding the barcode content, make sure the used characters, length, and
identiers comply with the barcode standard guidelines.
The following barcode types are available in Designer:
• 1D and 2D Barcodes
• GS1 DataBar Barcode Subtypes
In Designer, barcodes are added to a label using the barcode object. To properly encode the data and
to set the barcode object properties, read the sections below. Each of these sections describes
barcode object properties. To start editing them, double-click the object to open the Object
Properties Window.
4.1. Source
Connected data source denes the content source of the selected object.
• Fixed data: manually entered xed text.
• Variables: predened variable values which are used as object content.
• Functions: input data transformation tools.
• Databases: database values which are used as object content.
• Counter: displays counter value on the label.
Content eld allows you to type the object content.
4.2. Barcode
Barcode Type denes the specic barcode type which should be used to encode the data.
178

TIP
Code128 barcode type is selected by default. For more details about the available
barcode types, see section Barcode Types and Available Settings.
• X dimension: width of the narrowest bar in the barcode.
• Height: barcode's vertical dimension.
• Ratio denes the ratio between the barcode's narrow and wide bar widths.
Each barcode type's range of permitted ratios is limited by the standard. Designer only allows
you to use valid ratios. By default, the ratio is set to 3. This means that the wide bar is 3 times the
width of a narrow bar.
NOTE
The available ratios depend on the selected X dimension. If you are changing the
X dimension, this also aects the selection of available ratios.
• Row height denes the height of a single data row in 2D barcodes. Row height is specied as a
multiple over the X dimension. For example, "3x" means that the row is 3 times the X dimension.
Actual properties based on selected printer displays the X dimension as it would appear printed on a
label using the currently selected printer.
Color denes the color of the barcode.
4.3. Check Digit
Check digit is used by any scanning system to verify that the number scanned from a barcode is read
correctly.
TIP
Check digit is derived from the preceding barcode digits and is placed as the nal digit
of a barcode.
Include check digit determines if check digit is included in a barcode or not.
• Auto-generate check digit: automatic check digit calculation.
NOTE
If the data already includes invalid check digit, Designer replaces it with a proper
value.
179

• Verify the provided check digit: verication of the manually provided check digit. An error
message appears if the check digitis incorrect.
• Display check digit in human readable: check digit included in the human readable barcode text.
4.4. Human Readable
Human Readable text displays readable barcode data content located below or above the barcode. Its
role is to provide backup in case the barcode is damaged or of poor quality.
NOTE
Human Readable tab is visible with supported barcode types.
• No human readable: barcode is rendered without human readable text.
• Above barcode: human readable text is located above the barcode.
• Below barcode: human readable text is located below the barcode.
Style group allows you to set custom properties for human readable text.
NOTE
If you decide to customize human readable text, barcode can no longer be used as
internal printer element. It is sent to printer and printed as a graphic element.
• Custom Font: enables font and font size selection. Internal printer fonts cannot be used as
custom human readable font.
• Auto font scaling: If enabled (default setting), human readable text grows or shrinks
proportionally along with the changing size of the barcode. To set a custom size for human
readable text, disable this option and select the appropriate font size.
• Bold: makes human readable text appear bold.
• Italic: makes human readable text appear italic.
Mask group sets the format of the input data before it is displayed on a label.
• Content mask sets the format of the input data before it is displayed on a label.
• Mask character is a character used in the mask that is replaced with actual data on the printed
label.
180

Example
A user needs to format a phone number to be more readable on the label. Data input is not formatted
since it is read from a database.
If the input value read from a database is:
+38642805090
and the content mask is:
(****) **** - ****
the resulting output is:
(+386) 4280 - 5090
If the data contains the asterisk "*" character, change the Mask character. The character should have
a unique value that does not appear anywhere in the data.
4.5. Bearer Bar
Bearer bar is a border that surrounds the barcode. Its purpose is to protect the barcode image and to
enhance reading reliability.
• Fixed thickness: automatically dened bearer bar width.
• Variable thickness: user-dened bearer bar width.
• Thickness multiplier: bearer bar width factor.
• Show vertical bar: vertical bearer bars displayed or hidden.
4.6. Details
Details dier according to the barcode standards. Dene the options that are given with regard to the
currently selected barcode type. Details for 1D and 2D barcodes are described in dedicated sections:
• 1D barcode details
• 2D barcode details
4.7. Position
Position tab denes object positioning and its position-related behavior.
181

Position group denes the object's position.
• X and Y: anchoring point coordinates.
Size group sets the object's dimensions:
• Width and Height: horizontal and vertical object dimension.
• Keep aspect ratio: simultaneous changing of object dimensions while scaling.
NOTE
If the measurement unit is changed in label properties, the value transforms
automatically.
Rotation angle is the object angle according to the design surface.
TIP
There are multiple ways to set the object's angle: enter the angle manually, drag the
slider or click and drag the
icon on the selected object. Rotation angle and slider
rotates the object around its anchoring point. The icon rotates the object around its
central point.
Anchoring point is the spot where an object is pinned to design surface. Variable size objects
increase or decrease their size in the direction that is opposite to the chosen anchoring point.
Lock prevents the object from being moved during the design process.
4.8. Relative Position
Relative Position options dene the position of an object when label size or positions of neighboring
objects are changing during the label design process.
• Enable horizontal relative position: activates horizontal relative positioning.
• Relative to label border: the position of object is dened relative to the reference label
border. Dene horizontal oset for the object with regard to this border.
• Relative to another object: the position of object is dened relative to the border of a
neighboring object. Dene horizontal oset for the object with regard to this object.
• Object: selects the reference object for horizontal relative positioning.
• Border: neighboring object's reference border or label border (if there are no other objects
on the label) for horizontal relative positioning.
182

• Oset: horizontal distance from label border or reference object's anchoring point.
• Enable vertical relative position: activates vertical relative positioning.
• Relative to label border: the position of object is dened relative to the reference label
border. Dene vertical oset for the object with regard to this border.
• Relative to another object: the position of object is dened relative to the border of a
neighboring object. Dene vertical oset for the object with regard to this object.
• Object: selects the reference object for vertical relative positioning.
• Border: neighboring object's reference border or label border (if there are no other objects
on the label) for vertical relative positioning.
• Oset: vertical distance from label border or reference object's anchoring point.
NOTE
Object position changes if label size or position of the related object change.
When designing double-sided labels, you can also take objects on the opposite side of the label as
reference objects for relative positioning. In this case, objects on opposite sides move together if you
change their positions.
NOTE
Label sides of reference objects are clearly identied on the Object selection list with
(Front Side) and (Back Side).
NOTE
If the measurement unit is changed in label properties, the value transforms
automatically.
4.9. General
General tab identies the object and sets its status.
Name sets a unique object ID. It is used for object referencing when dening functions, variables,
scripts, etc.
NOTE
Avoid using spaces or special characters in object names.
183

Description allows adding notes and annotations for an object. It provides help during the label
design process.
Status group denes object visibility on print preview and on printed labels.
• Not printable: prevents the object from being printed. The object still remains visible on the
print preview and aects other objects in relative positioning. This option is useful when printing
on predesigned or stock-specic labels.
• Visible: if the checkbox is not selected, the object neither appears on the print preview nor on
the printed label. The object is treated as if it does not exist.
• Condition: makes an object enabled (editable) if the result of the given condition is "True". This
setting denes object visibility on form startup and when the connected variable's value
changes.
TIP
Equals (=) and slashed equals (≠) signs are allowed to be used in object visibility
condition. Click the Equal/Not equal button select the appropriate sign type.
Option Print Preview Printout Relative positioning
Not printable (selected) YES NO YES
Visible (cleared) NO NO NO
Printing optimization group allows activating the use of internal printer elements.
TIP
If supported by the selected printer model, a share of label element processing is
handled directly by the printer (e.g., internal fonts, shapes, barcodes). This speeds up
the printing process also due to signicantly reduced data trac.
• Use printer element if supported: prints labels using internal printer elements if the printer
allows it. If a selected printer does not support internal printer elements, the element is sent as a
graphic le.
• Always use printer element: prints labels using printer elements only. If a selected printer does
not support internal printer elements, an error message with explanation is displayed.
• Always print as graphics: sends and prints the objects as graphic les.
When connecting your object to a variable, enable the Use printer element if supported or
Always use printer element option. Printing in graphic mode returns a printing error.
184
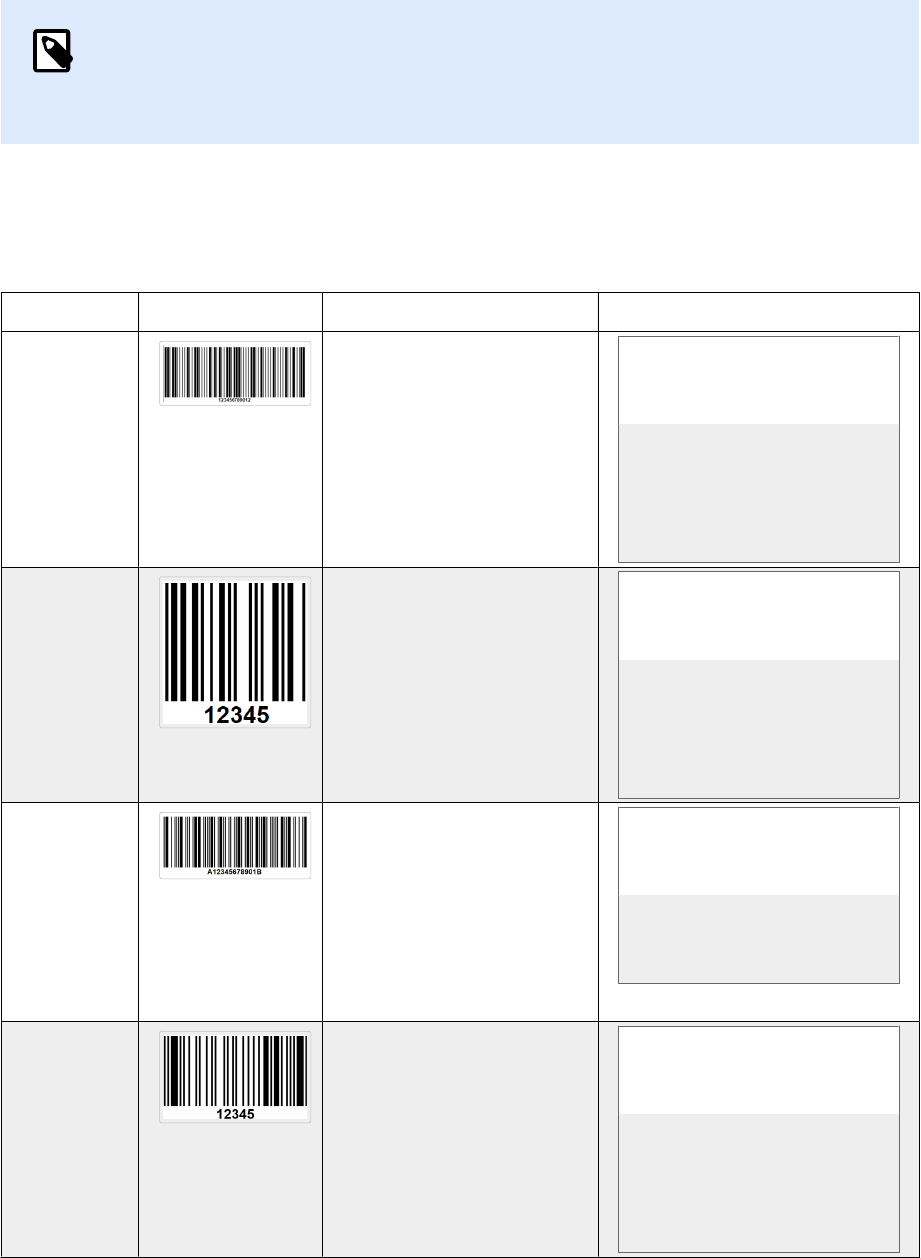
NOTE
Enabled advanced printer driver interface combined with printer driver is required to
print this object as internal printer element.
4.10. Available Barcodes and Their Settings
Barcode Example Info Available Settings
Anker Variation of Plessey
Code. Used for point of
sale systems prior to the
advent of EAN code.
Basic Barcode Settings
Human Readable
Details tab:
Include quiet zones
Space correction
Bookland Type of EAN barcode
used exclusively for
books.
Basic Barcode Settings
Human Readable
Details tab:
Include quiet zones
Space correction
Codabar A self-checking and
binary level linear
barcode symbology with
no check sum digit
appended. Widely used in
libraries and package
delivery systems.
Basic Barcode Settings
Human Readable
Details tab:
Include quiet zones
Code93 43 characters allowed.
ASCII character set
supported by using
combinations of 2
characters.
Basic Barcode Settings
Human Readable
Details tab:
Include quiet zones
Space correction
185

Barcode Example Info Available Settings
Code128 Double density data
encoding, ASCII
character set supported.
Basic Barcode Settings
Human Readable
Details tab:
Include quiet zones
Space correction
Code128-
A
ASCII characters 00 to 95
(0-9, A-Z, and control
codes), special
characters, and FNC 1-4
supported.
Basic Barcode Settings
Human Readable
Details tab:
Include quiet zones
Space correction
Code128-
B
ASCII characters 32 to
127 (0-9, A-Z, a-z), special
characters, and FNC 1-4
supported.
Basic Barcode Settings
Human Readable
Details tab:
Include quiet zones
Space correction
Code128
C
00-99 (encodes each two
digits with one code) and
FNC1.
Basic Barcode Settings
Human Readable
Details tab:
Include quiet zones
Space correction
Code-32 Code-32 has to be used
all over Italy for the
encoding of
pharmaceutical products.
Basic Barcode Settings
Human Readable
Details tab:
Include quiet zones
Inter character gap
Space correction
186

Barcode Example Info Available Settings
Code-39 Fully alphanumeric
barcode for use with
data-entry systems.
Basic Barcode Settings
Check Digit
Human Readable
Details tab:
Include quiet zones
Inter character gap
Space correction
Code-39
full ASCII
28 ASCII character set
including asterisks
supported.
Basic Barcode Settings
Check Digit
Human Readable
Details tab:
Include quiet zones
Inter character gap
Space correction
Code-39
Tri Optic
Computer tape cartridge
marking.
Basic Barcode Settings
Check Digit
Human Readable
Details tab:
Include quiet zones
Inter character gap
Space correction
Dun-14 Numbering system for
shipping containers that
uses other barcode
types.
Basic Barcode Settings
Check Digit
Human Readable
Details tab:
Include quiet zones
Inter character gap
Space correction
187

Barcode Example Info Available Settings
Ean-13 European Article Number,
used for global retail.
Basic Barcode Settings
Check Digit
Human Readable
Details tab:
Include quiet zones
Descender bar
Include EAN white space
Space correction
Ean-13 +
2
Often used on
newspapers and
magazines.
Basic Barcode Settings
Check Digit
Human Readable
Details tab:
Include quiet zones
Descender bar
Include EAN white space
Ean-13 +
5
For books in English
language: the rst digit of
the EAN-5 is the currency
indicator. The four
following digits represent
the price multiplied by
100.
Basic Barcode Settings
Check Digit
Human Readable
Details tab:
Include quiet zones
Descender bar
Include EAN white space
Ean-14 Traded goods.
Basic Barcode Settings
Check Digit
Human Readable
Details tab:
Include quiet zones
Space correction
188

Barcode Example Info Available Settings
Ean-8 Small package marking
where an EAN-13
barcode would be too
large.
Basic Barcode Settings
Check Digit
Human Readable
Details tab:
Include quiet zones
Descender bar
Include EAN white space
Space correction
Ean-8 + 2 Only used if the article is
too small for an EAN-13
code.
Basic Barcode Settings
Check Digit
Human Readable
Details tab:
Include quiet zones
Descender bar
Include EAN white space
Ean-8 + 5 Only used if the article is
too small for an EAN-13
code.
Basic Barcode Settings
Check Digit
Human Readable
Details tab:
Include quiet zones
Descender bar
Include EAN white space
GS1-128 A variant of Code 128 - it
automatically inserts a
FNC1 character after the
initial character.
Basic Barcode Settings
Human Readable
Details tab:
Include quiet zones
Space correction
189

Barcode Example Info Available Settings
Interleave
d 2 of 5
Used on 135 lm, for
ITF-14 barcodes, and on
packaging.
Basic Barcode Settings
Check Digit
Human Readable
Details tab:
Include quiet zones
Space correction
ITF 14 Higher level packaging.
GTIN included.
Basic Barcode Settings
Check Digit
Human Readable
Bearer Bar
Details tab:
Space correction
ITF 16 Higher level packaging.
GTIN included.
Basic Barcode Settings
Check Digit
Human Readable
Bearer Bar
Details tab:
Space correction
MSI Used primarily for
inventory control,
marking storage
containers and shelves in
warehouse environments.
Basic Barcode Settings
Check Digit
Human Readable
Details tab:
Include quiet zones
Space correction
190

Barcode Example Info Available Settings
SSCC Identication in logistics.
The code includes an
extension digit, a GS1
company prex, a serial
reference, and a check
digit.
Basic Barcode Settings
Human Readable
Details tab:
Include quiet zones
Space correction
Plessey One of the rst barcode
symbologies. Still used in
libraries and for shelf tags
in retail stores.
Basic Barcode Settings
Check Digit
Human Readable
Details tab:
Include quiet zones
Space correction
SSCC-18 Identication in logistics.
The code includes an
extension digit, a GS1
company prex, a serial
reference, and a check
digit.
Basic Barcode Settings
Check Digit
Human Readable
Details tab:
Include quiet zones
Space correction
Upc Case
Code
Used for cartons, cases,
or pallets that contain
products with UPC or
EAN product
identication number.
Basic Barcode Settings
Check Digit
Human Readable
Details tab:
Include quiet zones
Space correction
191

Barcode Example Info Available Settings
Upc-A Product identifying at
retail checkout. GTIN
included.
Basic Barcode Settings
Check Digit
Human Readable
Details tab:
Include quiet zones
Descender bar
Space correction
Upc-A + 2 Product identifying at
retail checkout. GTIN
included. Used with
magazines and
periodicals.
Basic Barcode Settings
Check Digit
Human Readable
Details tab:
Include quiet zones
Descender bar
Upc-A + 5 Product identifying at
retail checkout. GTIN
included. Used for book
pricing.
Basic Barcode Settings
Check Digit
Human Readable
Details tab:
Include quiet zones
Descender bar
Upc-E Product identifying at
retail checkout. GTIN
(compressed) included.
Adapted for smaller
packages.
Basic Barcode Settings
Check Digit
Human Readable
Details tab:
Include quiet zones
Descender bar
Space correction
Symbology
192

Barcode Example Info Available Settings
Upc-E + 2 Product identifying at
retail checkout. GTIN
(compressed) included.
Adapted for smaller
packages.
Basic Barcode Settings
Check Digit
Human Readable
Details tab:
Include quiet zones
Descender bar
Upc-E + 5 Product identifying at
retail checkout. GTIN
(compressed) included.
Adapted for smaller
packages.
Basic Barcode Settings
Check Digit
Human Readable
Details tab:
Include quiet zones
Descender bar
USPS
Intelligent
Mail
Barcode
Tracking and sorting of
letters and at packages
in the United States.
USPS Intelligent Mail
Barcode Content
Details tab:
Include quiet zones
4.10.1. 2D Barcodes
Barcode
Example Info Available Settings
Aztec High capacity, symbol
size adjusts automatically
depending on the amount
of input data.
Basic Barcode Settings
Details tab:
Code page
Data layer
Error correction level
193

Barcode Example Info Available Settings
Data
Matrix
High capacity, optimal for
small packages.
Basic Barcode Settings
Details tab:
Format
Encoding
Code page
GS1
DataBar
Marking products that
cross POS applications.
GS1 identication (AIs)
included.
Available settings change
according to the selected GS1
DataBar type.
GS1
Datamatri
x
Added GS1 Application
Identiers and ASC MH10
Data Identiers and
maintenance.
Basic Barcode Settings
Details tab:
Format
Encoding
Code page
GS1 QR
Code
Added GS1 Application
Identiers and ASC MH10
Data Identiers and
maintenance.
Basic Barcode Settings
Details tab:
Symbol version
Error correction level
Encoding
Code page
MaxiCode Used by UPS on shipping
labels for world-wide
addressing and package
sortation.
MaxiCode Content
Basic Barcode Settings
Micro QR Reduced size and
capacity of a normal QR
code. Optimal when the
barcode size needs to be
minimized.
Basic Barcode Settings
Details tab:
Symbol version
Error correction level
Encoding
Code page
194

Barcode Example Info Available Settings
MicroPDF Compact version of
PDF-417.
Basic Barcode Settings
Details tab:
Code page
Compaction mode
Version
PDF-417 Commonly used in
transport, inventory
management, etc. The
code is both self-
checking and bi-
directionally decodable.
Basic Barcode Settings
Details tab:
Code page
Compaction mode
Error correction level
Columns
Rows
Truncated
QR A matrix barcode
readable by QR scanners
and smartphones.
Adaptable size to the
amount of encoded data.
Basic Barcode Settings
Details tab:
Symbol version
Error correction level
Encoding
Code page
4.10.2. GS1 DataBar Subtypes
4.10.2.1. Linear Symbol Types
GS1 DataBar Subtype
Example Info
Omnidirectional Omnidirectional scanning, up to 20 trillion
encodable values.
Stacked Stacked truncated symbol for omnidirectional
scanning with reduced symbol length.
195

GS1 DataBar Subtype Example Info
Stacked Omnidirectional Full height symbol stacked in two rows
separated by a delimiter.
Truncated Height reduced to 13 times the X dimension.
For handheld scanners.
Expanded Omnidirectional scanning, variable content
length.
Expanded Stacked Omnidirectional scanning, variable content
length, reduced length due to stacking (2 to
11 rows). See section "GS1 DataBar
Properties" on page 1.
Limited Limited range of values. For handheld
scanners.
4.10.2.2. Composite Symbol Types
GS1 DataBar Subtype
Example Info
Omnidirectional A linear symbology that supports
omnidirectional scanning of packages. It
encodes 14 digits of numerical data used to
identify GTIN for scanning in the supply chain.
Stacked Stacked truncated symbol for omnidirectional
scanning with reduced symbol length.
Truncated Intended for very small items in healthcare,
not intended for POS scanners.
Expanded Omnidirectional scanning, variable content
length. Used for variable-measure food,
coupons.
Expanded Stacked Omnidirectional scanning, variable content
length, reduced length due to stacking (2 to
11 rows). See section "GS1 DataBar
Properties" on page 1.
196

GS1 DataBar Subtype Example Info
Limited Limited range of values. For handheld
scanners.
EAN-8 A smaller and shortened version of the EAN
code.
EAN-13 EAN codes require 13 digits (12 if the check
digit is calculated automatically).
EAN.UCC 128 & CC-A GS1-128 linear barcode linked to a 2D
barcode called CC-A.
EAN.UCC 128 & CC-C GS1-128 linear barcode linked to a 2D
barcode called CC-C.
UPC-A The linear component encodes the item’s
primary identication. The adjacent 2D
Composite Component encodes
supplementary data, such as a batch number
and expiration date.
UPC-E PC-E compresses a normal UPC-A code into a
six digit code by “suppressing” the number
system digit, trailing zeros in the
manufacturers code and leading zeros in the
product number.
4.11. 1D Barcode Details
Details tab settings vary along with the specic barcode standards.
TIP
Keep in mind the currently selected barcode type as you dene the available barcode
settings.
Designer allows setting the following 1D barcode details:
197

• Include quiet zones: blank space around the printed barcode. Quiet zone ensures the highest
level of scanning reliability.
NOTE
This option ensures optimum readability in case a neighboring object on a label
is located right next to the barcode.
• Inter character gap: the distance between the last bar of a character and the rst bar of the
next character in a barcode.
• Descender bars: makes the bars at the beginning, in the middle, and at the end of certain
barcode types (EAN and UPC) longer.
• Include EAN white space: inserts a special character (< or >) to indicate the EAN barcode width.
• Space correction: adds white pixels to increase the gap width between the bars.
Symbology: UPC barcode Number system:
• 0, 1 , 6, 7 and 8 are for regular UPC codes.
• 2 is for random weight items, e.g., meat, marked in-store.
• 3 is for National Drug Code and National Health related Items.
• 4 is for in-store marking of non-food items.
• 5 and 9 are for coupon use.
• Use asterisk: adds a start and a stop character to your Code 39 Barcodes. When checked,
Designer inserts asterisks as a prex and a sux to your human-readable text.
4.12. 2D Barcode Details
2D barcodes enable multiple type-specic settings under the Details tab. When dening these
settings manually, the dropdown lists oer specic standard-compliant options.
TIP
Designer denes the Details tab settings automatically if the user chooses not to
manually dene them.
4.12.1. Code Page
Code page denes how the mapping of code characters with scanned characters is done. To display
the scanned data accurately, the correct code page must be selected. If none of the code pages is
selected by the user, Designer uses system character encoding.
198

4.12.2. Columns
Columns are basic vertical elements of a PDF 417 barcode. A maximum of 30 columns may be
included in a single PDF 417 symbol.
4.12.3. Compaction Mode
Compaction mode compacts a number of data characters into codewords. The decoding algorithm
uses the individual codewords to place them into a meaningful matrix.
• Binary: all 256 ASCII values (up to 1100 bytes) are allowed.
• Text: all printable ASCII characters 32–126 and ASCII 9, 10 and 13 (up to 1800 characters) are
allowed.
• Numeric: encoding of numeric data (up to 2700 digits).
Data Layer
Data layer denes the number of data layers that encode data in an Aztec barcode. The number of
data layers correlates directly with the barcode data capacity. If the value exceeds the data capacity
provided by the selected Data layer, an error returns. One to four data layers are allowed.
4.12.4. Encoding
Encoding denes character encoding scheme for the selected barcode.
NOTE
If you select the GS1 Datamatrix barcode, NiceLabel 2019 automatically sets the
encoding scheme to ASCII. This makes sure the GS1 Datamatrix barcodes on your
labels are GS1-compliant.
4.12.5. ECI Encoding
Extended Channel Interpretation (ECI) encodes information about used code pages (e.g. UTF8,
Windows-1251) into your Data Matrix and QR barcodes so your scanner knows how to represent the
data. ECI encoding tells barcode readers which "code page" to use to correctly display your barcode
content automatically. Without ECI encoding, barcode scanners require manual conguration to
display the content correctly. Include ECI encoding you need on your labels, usually for non-western
script languages (ex: Arabic, Thai, or Chinese). You can see which code pages support ECI encoding
here.
199

Example:
Without ECI encoding, you create a barcode with a Cyrillic Code page. To display the Cyrillic
characters correctly, an operator in another country who scans your barcode must manually set the
correct code page in his barcode scanner.
With ECI encoding, you create a barcode with a Cyrillic Code page. The operator can see correct
Cyrillic characters without manually conguring his barcode scanner.
NOTE
Smartphone barcode scanning applications do not recognize ECI Encoding.
• To enable ECI Encoding, go to Barcode Properties > Barcode > Details.
• ECI encoding is based on the selected code page.
You can congure Numeric, Alphanumeric, or Binary ECI Encoding (depending on your setup).
Enabling ECI encoding in Barcode Properties.
With ECI encoding enabled, barcode scanners can automatically detect which code page is used on
your QR and Data Matrix barcodes.
4.12.6. Error Correction Level
Error correction level denes the symbol security level. It adds a series of error correction codewords
to the encoded data. These codewords enable the printed symbol to withstand damage without data
loss. The higher the security level, the greater the number of data layers required to contain the
symbol – and hence, its overall size. If none of the Error correction levels is selected, Designer denes
it automatically.
4.12.7. Format
Format denes the symbol size and its capacity using the number of column and row elements.
200

If using Data Matrix barcode on your labels, DMRE (Data Matrix Rectangular Extension) allows you to
use multiple rectangular formats. These additional rectangular sizes increase data encoding capacity
of the barcode.
NOTE
For printers without internal DMRE support, enable Always print as graphics under
General properties to print the Data Matrix barcode successfully.
4.12.8. Rows
Rows – PDF-417 barcode symbol is made of stacks of vertically aligned rows. Such barcode adapts
its size to the amount of the encoded data and may contain from 3 to 90 rows.
4.12.9. Symbol Version
Symbol version denes the symbol data capacity. As the amount of data increases, additional
modules are required to build a QR code. This makes the symbol larger on the printed label.
4.12.10. Truncated
Truncated reduces the PDF-417 barcode size by removing a single codeword and a stop bar from
each symbol row.
4.12.11. Version
Version denes the symbol size based on the number of columns. One-, two-, three-, and four-column
versions of Micro PDF417 barcode are available.
4.13. GS1 DataBar Specics
In addition to the common barcode properties, the specics described below are available for GS1
DataBar.
4.13.1. GS1 DataBar Source
General group species how the databar content is going to be formatted before encoding.
201
• Structured data sets the standard GS1 system data structure as a model for inserting the
barcode data. Use GS1 function to encode the data correctly (for more on GS1 and other
functions, see topic Functions). Composite GS1 barcodes represent structured data in the
composite part of the code.
• Unstructured data allows inserting the data without a model – only character type and number
must comply with the selected barcode type.
Data
• Linear data is the part of the data that is encoded in the linear part of the barcode. The data is
either manually inserted or dened by a predened Data source.
• Composite data is the part of the data that is encoded in the composite part of the barcode.
This part of data is always structured and follows one of the standard system data structures as
dened by the GS1. The data is either manually inserted or dened by a predened Data source.
4.13.2. GS1 DataBar Properties
GS1 DataBar Expanded Stacked subtype encodes the data in the form of symbol segments
sequence. Symbol width is dened by the number of symbol segments in each stacked row. Symbol
height is dened by the number of stacked rows and their height.
• Segments per Row denes the number of segments for each row of a symbol. Up to 22
segments are allowed per symbol.
4.14. Maxicode Barcode Content
Symbology Denition denes the barcode mode of operation (data structuring type).
Designer supports the following modes:
• Mode 2: US carriers with postal codes up to 9 digits in length.
• Postal Code: US Zip Codes using a single eld with 5 or 9 digits, or two elds with 4 or 5
digits.
• Mode 3: international carrier with alpha-numeric postal codes with up to 6 digits.
There are two additional options under Symbology Denition:
• Structured data: automatically selected Mode 2 or Mode 3 modes based on the entered data.
• Unstructured data: barcode mode of operation is set to Mode 4.
202

TIP
This mode encodes general data for purposes other than shipping industry (e.g.,
purchase order number, customer reference, invoice number).
Data Contents
Field Description
SHIP TO Postal Code Mandatory. 5 or 9 alphanumeric characters. Alpha characters
must be uppercase.
4 Digit Extension (enabled with
Postal code eld: Two Fields (5
and 4 digits) type).
Mandatory. 4 numeric digits dening micro location.
SHIP TO ISO Country Code
(Mode 3 only)
Mandatory. 3 numeric digits.
Class of Service Mandatory. 3 numeric digits, a comma must be included to
mark the end of eld.
Transportation Data Mandatory. The 5 characters, including the GS code.
Tracking number Mandatory. 10 or 11 alphanumeric characters. Alpha
characters must be upper case.
UPS SCAC Mandatory. 4 characters followed by the GS code.
Julian Day of Puckup Mandatory. 3 numeric digits.
Shipment ID Number Optional. 0-30 alphanumeric characters. Alpha characters
must be upper case. GS code must always be sent even if no
data is specied.
Package in Shipment Mandatory. 1-3 numeric digits for package number. 1-3
numeric digits for number of shipped items. Forward slash
must separate these two numbers.
Package in Weight Mandatory. 1-3 numeric digits.
Address Validation Mandatory. Single character “Y” or “N”. Upper case
characters.
SHIP TO Address Optional. 0-35 alphanumeric characters. Alpha characters in
upper case. GS code must always be sent even if no data is
specied.
SHIP TO City Mandatory. 1-20 alphanumeric characters. Alpha characters
must be upper case.
SHIP TO State Mandatory. 2 alpha characters. Both characters must be
upper case. RS code marks the end of this eld and the end of
the secondary message data.
203

4.15. USPS Intelligent Mail Barcode Content
Data Contents group denes the input mode for the encoded data.
Input mode denes the structure of the encoded data.
• Structured data: to ensure proper intelligent mail tracking, a string of numbers must be
obtained. This string is referred to as the DataToEncode. The DataToEncode consists of the
Intelligent Mail Data Fields.
• Unstructured data: encoded data follows no predened structure.
Intelligent Mail Data Fields group allows you to encode the barcode data in accordance with the
standard.
Field Description
Barcode
Identier
Specic two-digit identier assigned by the Postal Service.
Service Type
Identier
Three-digit identier denes the mail piece as full-service or basic (Non-
automation) and is also used to determine the disposition of undeliverable-
as-addressed (UAA) mail and the form of address correction that a mailer
desires.
Mailer Identier Unique 6-or 9-digit number that identies a business entity or customer.
Serial Number A serial or sequence number which enables unique identication and
tracking. Depending on the specic barcode construct, this eld can vary
in length from 5-10 digits.
Delivery Point
ZIP Code
Routes the mail to its nal delivery point (length variations: none, 5, 9, or 11
digits).
204

5. Printing
When a label is ready to be printed, Designer helps you print it using a print dialog. It allows you to:
• Preview the label during the design process.
• Insert values for prompted variables.
• Filter and select which records should be printed.
• Dene printer settings.
• Control print quantity.
• Dene additional quantity settings.
PRODUCT LEVEL INFO
This section is applicable to PowerForms.
The Designer print dialog serves as a customizable printing form. It consists of predened form
objects that can be congured, moved, added or removed. More details on how to use the printing
form are available here.
To open the print dialog, click the Print button in the Action group of the Home tab ribbon or press
Ctrl+P.
Step-by-step printing procedure is described here.
TIP
NiceLabel 2019 also allows you to print without opening the Designer application. If
no label editing is required, use NiceLabel Print to open and print label les directly.
5.1. Print Pane (Default Printing Form)
File (background) tab opens the default printing form. In Designer, it serves as the primary print dialog.
205
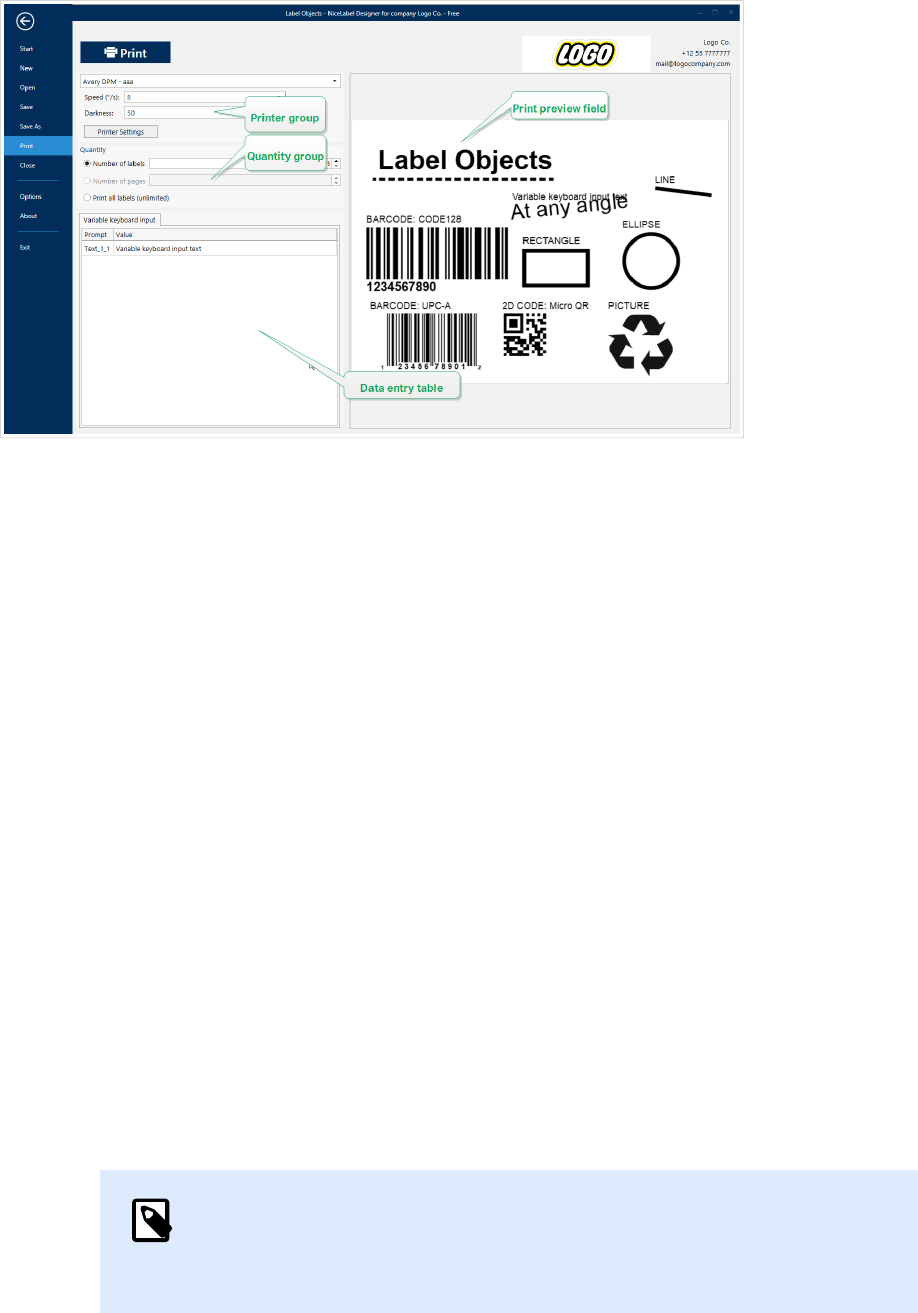
Print button starts the printing procedure. It sends the print job to the selected printer.
Printer group of settings includes:
• Print button: starts the print label action.
• Printer selection combo box: lists the installed printers.
• Printer settings combo boxes: dene printing speed and darkness. The selectable values are
provided by the selected printer driver.
• Speed: speed of printing. Available options are dened by the active printer driver.
• Darkness: sets the intensity of printing. Available options are dened by the active printer
driver.
• Print to le checkbox: redirects the printing to a le.
• Printer Settings button: opens properties printer driver dialog for the currently selected printer.
Quantity group of settings includes:
• Print quantity object: denes the number of labels to be printed.
• Number of labels: number of printed labels.
• Number of pages: number of printed pages with labels.
NOTE
Number of pages option becomes active if more than 1 label per page is
set under label properties > label dimensions.
• Print all labels (unlimited): prints all labels as dened by the label design. More details about
this option are available here.
206

more... link opens the Additional Quantity Settings window.
• Number of labels skipped on rst page: denes how many labels should be left unprinted on the
rst page.
Example
A single page includes ve labels. Number of labels skipped on rst page is set to three. Two
labels are printed on the rst page.
• Identical copies per label: number of identical label copies to be printed.
Example
A single page includes ve labels. Identical copies per label is set to three. There are three
copies of each label printed.
207

• Number of label sets: denes the number of print jobs to be sent to the printer.
Example
A set of printed labels contains three labels: A, B and C.
Number of labels:
Identical copies per label: 2.
Number of label sets: 3.
Print result: [A, A; B, B; C, C] [A, A; B, B; C, C] [A, A; B, B; C, C]
Load... allows you to locate and load the predened variable values for your printed labels. You can
include these predened values in dedicated les with ".defaults" or ".values" extensions and store
them on your computer or an accessible network location.
The two supported formats for ".defaults" or ".values" are:
• XML:
<variables>
<variable name="var1">variable1</variable>
<variable name="var2">variable2</variable>
</variables>
• name-value:
208

var1=variable1
var2=variable2
Data InitializationVariable keyboard input eld (data entry table) allows inserting prompted variable
values at print time.
Print preview eld displays the current label design and content.
5.2. Edit Printing Form
In Designer, the default printing form serves as the basic printing interface for stand-alone and
solution labels.
To start customizing the default printing form, go to Home tab > Action group and click Customize
Print. Available print customization options are described here.
Editing or adding a new printing form automatically creates a group of dedicated Printing form
variables. These variables are connected with the object on the selected printing form. All of these
Details about the printing form variables are available here.
The variables that dene the content of default print form objects become visible and editable in the
Solution Explorer. Open the Dynamic Data Manager to manage these variables.
If you want to discard the printing form customization actions, click Recreate Printing Form. The
default printing form is recreated.
NOTE
Recreate Printing Form discards all editing actions on the default printing form.
5.3. Printing Procedure
PRODUCT LEVEL INFO
Solution building is available in PowerForms.
Use the following steps to successfully print a label using the Designer.
Step 1: Create
Create a new or edit an existing stand-alone label or label in a solution.
Step 2: Preview
209

Label preview eld is a part of default Designer Print dialog. To make the print form appear on screen,
go to Home tab > Action group and click Print or press <Ctrl+P>.
Label preview eld displays current label design. If you decide to customize the default print form or
to make a new one, make sure you add the Label Preview object to the form. The print form will oer
label preview only if the Label Preview object is present.
PRODUCT LEVEL INFO
This segment is applicable to Designer Pro and PowerForms.
TIP
The default printing form is customizable. To adapt it and to create a custom print
dialog, go to Home tab > Action group and click Customize Printing Form. Read more
about printing form customization here.
Step 3: Select printer
Choose the preferred printer from the Printer tab dropdown menu. All currently available printers are
listed. More details on dening the printer are available here.
During this step, printing speed and darkness can be set as well. These two parameters depend on
the selected printer's driver.
Step 4: Set print quantity
Number of labels sets the number of printed labels.
Number of pages sets the number of printed pages. This option becomes active if the labels are
positioned across at least two pages.
Print all labels (unlimited) prints all labels as dened by the label design. More details about this option
are available in "Printing of Unlimited Data".
Click more... to open the Additional Quantity Settings dialog.
• Identical copies per label denes the number of identical label copies in a print job.
• Number of label sets denes how many times the entire label printing process should repeat.
Step 5. Start Printing
Click the Print button.
210

5.4. Store/Recall Printing Mode
Store/Recall printing mode is a method for speeding up the printing process. It increases printer
response by reducing the amount of data that needs to be sent during repetitive printing tasks.
NOTE
Store option becomes visible in File tab if enabled in the label properties printer panel
and supported by the currently selected printer.
With store/recall mode activated, does not need to resend the complete label data for each printout.
Instead, default labels (templates) and internal printer elements (graphics, fonts) are stored in the
printer memory, and only sends recall commands which render the stored label content during the
printing process. Typically, a few bytes of data are sent to the printer as compared to a few kilobytes
in the case of normal printing.
The action consists of two processes:
• Store label. During this process, creates a description of the label template formatted in the
selected printer's command language. When done, sends the created command le to the
printer memory and stores it.
• Recall label. A label stored in the printer memory is printed out immediately. Using the recall
process, creates another command le to instruct the printer which label from its memory
should be printed. The recall label command occupies a few bytes of data only. The actual
amount of data depends on the current situation. For xed labels without any variable contents,
the recall command le only contains the recall label command. For variable labels that contain
variable elds, the command le includes the values for these variables and the recall label
command.
NOTE
Before activating this mode, make sure the appropriate printer driver is selected for
the label printer. Not all label printers have the ability to use the store/recall printing
mode.
Follow these steps to activate the Store/Recall printing mode:
1. Double-click the label design surface. Label Properties dialog appears.
2. To enable the mode, select Use store/recall printing mode on Printer tab. Click OK.
3. Dene label template(s). All label objects with variable content must be formatted as internal
printer elements:
• Text object content must only use internal printer fonts (not Truetype!).
211

• Use internal printer barcodes in barcode objects.
• If using variable objects with Truetype fonts, variable pictures or database elds, the
default values are sent to the printer during the label store process.
4. Click File > Store. Make sure the Store variant points to the correct memory location in the
printer.
Click File > Store. Make sure the Printer memory location points to the correct memory
location in the printer.
5. Insert or select values for variable objects that are not formatted as internal printer objects.
These variables will be given the same value on each label. They will behave as objects with
xed values.
6. Click Store to printer to create the command le with label template description and to send it
to the printer.
7. Insert values for prompted label variables. These variables are linked with internal printer
objects on the label. For this reason, their values can be changed during each printing.
8. Click Print to send variable values and recall label command to the selected label printer.
5.5. Optimize Printing Speed
There are many factors that aect the speed of label printing in Designer. Follow the guidelines below
to dramatically increase the speed of printing.
NOTE
When implementing the following guidelines, ensure they are supported by the
selected printer.
• If the selected printer supports parallel and serial port, use the parallel port. When the computer
sends the data to printer over parallel port, it is much faster than over serial port.
• When designing a label, use internal printer fonts instead of Windows true-type fonts. True-type
fonts are sent to the printer as graphics. This vastly increases the size of data sent to printer
(couple of kilobytes). With internal printer fonts, only the text is sent to printer (couple of bytes).
• Avoid using graphics on labels.
• When using barcodes, ensure the barcodes are used as internal printer elements.
• When using counters, the printer internally increments the numbers if the internal printer fonts
are used. This means, that the printer only needs to receive the rst object number. The printer
later increments this number while printing additional labels. This option also reduces the
amount of data transferred between computer and printer.
212

TIP
With internal printer counter, the printing speed dierence becomes noticeable
with high quantity of labels.
• Set the printing speed to a higher value. Increasing the printing speed usually aects the quality
of printing. The higher the speed, the lower the quality. Find an acceptable compromise.
• Don't print excessive amount of data on labels. If the speed of printing is an important factor,
consider using preprinted labels, and only print the data, that changes with each label.
5.6. Printing from Databases
This section describes how to print the content of database records individually or in groups.
After completing the database wizard, by default, all database records are printed. Each record is
printed once per label.
If you do not want to print the entire database, select which records should be printed. Prior to
printing, the print dialog shows all database records. Use the data initialization eld to select the
records to be printed.
If you would like to print several copies of a label with record data, dene this using:
• Additional Quantity Settings dialog: Use Identical copies per label to set the desired quantity for
the entire range of database records.
• Increase or decrease the value in Copies eld of the data initialization eld to set the number of
printed labels per record individually.
213

• Use Label copies per record step of database wizard to dynamically dene the number of
printed labels per record.
You have a database containing records with your products. It contains a eld with a numeric value.
This value stores the required number of label copies is stored. Select this eld and let the application
print the quantity of labels as specied in this eld.
5.7. Changing Common Printer Settings
When designing a label, you also dene which printer should be used for printing it. Each label le
stores its own printer settings for the selected printer driver.
Changes made in the printer settings dialog box are saved to the label and will be used in future print
actions.
NOTE
Ensure that Use custom printer settings saved in the label option is enabled in Label
properties > Printer. If not, default printer settings are going to be used.
Complete the following steps to change and save common printer settings for a label:
1. Open the label properties dialog.
2. Click Printer properties button on Printer tab. The dialog window with printer driver settings
opens.
3. Open the Printer Options tab.
4. Adjust the Speed and Darkness settings.
NOTE
These settings depend on the selected printer.
5. Click OK.
6. Save the label.
NOTE
Any changes in the printer settings dialog box will be saved to the label and applied to
future print actions.
214

Changes in label printing speed and darkness can also be done at print time. These settings are only
valid while the le remains open. After reopening the le, the settings are reset to those dened in
Printer properties dialog.
Complete the following steps:
1. Open Print dialog.
2. Click Print.
3. Adjust Speed and Darkness values under Printer group.
4. Save the label.
NOTE
Changes to the settings in the Printer tab will not be saved in the label but used only at
print time.
5.8. Changing Dithering Options
NOTE
This option is applicable only if a NiceLabel printer driver is used for label printing.
Dithering is a process of converting color or gray scale pictures to black and white pictures that can
be printed on thermal printers. Thermal printers normally cannot print color images and can either
print a dot on the label or leave the area blank. There are no intermediate shades of gray.
During the dithering process, all colors and shades of gray in the picture are converted to black and
white dots, creating an illusion of new colors and shades by varying the pattern of dots. Dierent
shades of gray are produced by varying the patterns of black and white dots. There are no gray dots
at all. In printing, dithering is usually called half-toning, and shades of gray are called halftones.
To change the dithering settings, do the following:
215

1. Open label properties dialog.
2. Click Printer properties button on Printer tab. The dialog window with printer driver settings
opens.
3. Open Graphic Options tab and use Photo slider to select the preferred dithering type.
NOTE
These settings depend on the selected printer.
4. Change the dithering type option to suit your needs. Look at the preview on the right side how
you can expect the selected type to be applied on the label.
5. Click OK.
6. Save the label.
5.9. Double-sided Printing
Designer supports double-sided printing for oce and thermal printers.
To enable double-sided printing, open Label properties dialog and enable Double-sided printing
option on the Printing tab.
NOTE
The option is available only when the used selected printer driver supports double-
sided printing.
As soon as you enable this option, label sides become visible by clicking the tabs under the design
surface.
216

When printing to an oce printer, these two pages are always printed one after another. They are sent
to the printer in the same order.
TIP
Make sure you enable duplex functionality in the printer driver settings.
When printing with a thermal printer, NiceLabel printer driver takes care of proper label processing
and printing. Use an appropriate NiceLabel printer driver to enable double-sided printing functionality.
5.10. Dening Unprintable Area
Unprintable area is the part of the label where the printer cannot print. Enabling the unprintable area
option in printer driver allows you to virtually increase the label size.
Thermal printers can only print labels that are placed below the printhead. If you have wider labels and
if the printhead does not completely cover the label, the label part which juts out of the printhead
cannot be printed.
TIP
Unprintable area is usually the label area left and right of the printer head.
By setting an unprintable area, you inform the Designer that there is an unusually wide label inserted
into the printer. The software will draw vertical red lines identifying the unprintable area.
NOTE
Do not confuse the unprintable area with label margins! Unprintable area does not
Shift the label objects on the design surface.
To dene the unprintable area:
1. Open the label properties dialog.
217

2. Click Printer properties button on Printer tab. The dialog window with printer driver settings
opens.
3. Go to Printer options tab.
4. Enter the values for Unprintable Area.
Example
You have a printer with 10 cm (4") printer head and a 12 cm wide label. Insert the label centrally in the
printer, so it sticks out of the printhead evenly on both sides. Dene a new label in the labeling
software with 12 cm width. By setting the unprintable area to 1 cm on the left and 1 cm on the right
side, the labeling software knows that the actual label width is 10 cm. There will be two vertical red
lines on the design surface identifying the unprintable area.
TIP
Vertical red lines are also visible when you switch to another printer for the same label.
The original printer may have a wider printhead than the new printer. Maximum widths
of the labels are not the same for both printers. Designer will try to preserve the
original label dimension and automatically dene the unprintable area for the new
printer.
218

6. Dynamic Data Sources
PRODUCT LEVEL INFO:
Creation of forms and use of form objects are available in PowerForms.
Dynamic data sources form an essential part of working with the Designer. They enable the use of
label and form objects that dynamically change their content with each printed label, if necessary.
Example
Typical dynamic content that are automatically updated are counters, serial numbers, date, time,
weight, and article images.
To display and print the dynamic object content properly, Designer uses the following dynamic data
types:
• Variables: display and store dynamic data source values which are dened at print time.
• Functions: transform the dynamic data source values. Functions dene the output format to
adapt the input–output conversion to specic requirements.
• Databases: retrieve and display the database record.
• Internal Variables: display the values that are automatically retrieved from a running application
and system environment.
• Global Variables: a type of variable that can be shared among multiple labels.
TIP
Read about how to navigate and manage dynamic data sources in topic Dynamic Data
Manager.
6.1. Variables
Variables act as containers for storing and passing data between objects, scripts, external
applications, printers, and user inputs. Use variables to print labels where data changes on each label
(e.g., counters, serial numbers, date, time, weight, and product images).
To create labels with changing data, use Designer to easily format your labels using variable data.
Designer includes multiple types of variables:
219

• Variable: changes value at print time or according to conditions you dene.
• Current Date: displays current date as a variable value.
• Current Time: displays current time as a variable value.
• Counter: changes value incrementally or decrementally with each label you print.
TIP
Manage all your label and solution variables in Dynamic Data Explorer.
6.1.1. Variable
Variable (also known as prompt variable) is a type of variable that obtains its value at print time.
6.1.1.1. General
About group of settings identies the variable and sets its denition.
• Name: unique variable name. This name is used as the variable reference during its use.
NOTE
Avoid using non-alphanumerical characters when dening the variable name.
TIP
Enter the name to make the variable easy to nd when listed among other
variables in the Dynamic Data Explorer.
• Description: is a eld that allows adding additional information and suggestions.
Denition group of settings denes which input data types are valid for a variable.
• Data type denes what type of data is stored in a variable.
• Text: variables that contain text.
220

• Date: variables that contain date values.
• Time: variables that contain time values.
• Floating point: representation of real numbers in a variable.
• Currency: variables that contain monetary values.
• Initial value: starting value that is assigned to a variable when created. It is dened using one of
the following methods:
• Manually entering a xed value. Characters from any group of allowed characters are
permitted.
TIP
If you enter full stop (".") as the initial value for a variable with selected Date
or Time data type, it displays current date or time.
Example
Edit eld on a form is connected to a variable with Date selected as Data type. If full stop is
selected as Initial value, the Edit eld displays current date when the form is run. Drop
down button opens Date picker with preselected current date.
221

• Using a dynamic value. Dynamic data sources from the toolbar are supported – two
options are available:
• Enter the source as Name in square brackets, e.g. [CurrentDate], [Counter].
• Enter the source as Name in square brackets.
• Select the dynamic data source from the dropdown list.
• Using a special character:
• Special character can be entered manually using the less than/greater than signs,
e.g. <CR>, <LF> ...
• Special character can be selected from the dropdown list.
NOTE
Designer supports combined values as the initial value. Read more about
combining the values here.
Example
A combined initial value of a variable may contain a xed value, a dynamic data source and
special characters. The order of inserted items can be set randomly. Three options:
1. aaa123[Variable]<CR>
2. <CR>aaa123[Variable]
3. [Variable]<CR>aaa123
TIP
Make sure the inserted initial value meets the criteria dened with Output Rules
for each data type.
Provisional value denes a custom placeholder variable value in an object while designing labels or
forms. In a label object, the provisional value is replaced by the real variable value at print time. In a
form object, the real variable value appears when the form is run.
222

• Auto generated: generates the provisional value automatically. Disable this option to dene and
use a custom provisional value.
TIP
By default, provisional value equals the initial value.
If the provisional value (auto generated or custom) is empty or uses an invalid format, it is generated
based on the selected variable Data type. Default formats of provisional values are listed below.
• Six question marks (??????) for Text data type
• Current date or time for Date data type
• Current time for Time data type
• 9.999.999,99 for Floating point data type
• 9.999.999,99 € for Currency data type
NOTE
If the variable Output rules change, the provisional value format adapts accordingly.
Prompting group of settings denes the print time behavior of a data source. Read more about
prompting here.
Dynamic value group denes how the last used dynamic value of a variable is handled.
• Remember the last used value (dynamic value):Designer stores the last used value of a variable.
The last used value is stored in an external text le at the same location as the label or solution
le. Files that store the last used values have the same lename as the label or solution, followed
by .dvv extension.
NOTE
When sharing labels with dynamic values, make sure not to share only label or
solution les (.nlbl or .nsln), but also les that store last used dynamic values
(.dvv).
NOTE
Label or solution must be saved before enabling this option.
223

Example
The last used value is useful when the continuation of numbering from the last printed label is
required (e.g., serial number). Counter's last value is stored and the numbering is continued from this
point at next use.
6.1.1.2. Text
Text data type is used for variables that store textual content. As a result, only textual input is allowed
as the variable input data type.
Input Rules
Data group denes permitted data properties.
• Allowed characters: denition of permitted variable input characters.
TIP
Groups of allowed characters for data input ltering are described in section
Groups of Allowable Characters.
• Limit length: maximum length of variable value.
• Fixed length: variable must contain the exact number of characters as dened in the Limit
length.
Check range group allows you to enter minimum and maximum permitted value of the variable.
Setting the limits is optional.
• Minimum value: the lowest permitted variable value.
• Maximum value: the highest permitted variable value.
NOTE
If enabled, minimum and maximum values must not be left empty.
Pick list group predenes a list of selectable input values for a variable. No other values can be used
with this variable if a pick list is dened.
Selection of pick list values for a label object is done on the printing form. The user selects one of the
available values and prints the label. If a pick list is used for a form object, it acts as an Edit Field object
– when the form is run, the user selects from the predened values.
• Enable pick list: enable this option to set a limited range of selectable values.
224

• Pick list values: enter the selectable values. Separate individual values by placing them in lines.
Output Rules
Prex and Sux are characters that are added to a variable value.
• Prex: text placed in front of the variable value.
• Sux: text placed behind the variable value.
Pad Character lls an empty character position until the maximum variable length for a variable is
reached. Pad character is enabled only if the Limit variable length in the Input rules tab is enabled.
• Padding: denes the mode of padding.
• Not used: does not use padding.
• On left: adds pad characters on the left side of the data value.
• On right: adds pad characters on the right side of the data value.
• Surrounding value: adds pad characters on both sides of the data value.
• Character: character used for padding.
Example
Pad character is in most cases zero (0) added on the left side of the variable value. If the maximum
variable length is set to 5 characters and the value is 23, the padded result is 00023.
Multiline group divides text into multiple lines.
WARNING
Avoid using this setting if possible. The recommended alternative for presenting
multiline text on a label or form is to use the Text Box object.
• Number of lines: maximum number of lines for a variable value.
• Line length: maximum number of characters in a single line.
• Word wrap: divides the text into multiple lines at space character locations.
6.1.1.3. Date
Date data type stores date-related values in the selected variable. Date eld displays the date value
using various date formats. The date value format can be either selected from the preloaded formats,
or customized to meet the specic local, regulatory or industry related requirements.
225

Input Rules
Input Formatting group denes the allowed date format and displays a preview.
• Input format: allowed date input format.
• Sample value: displays the preview according to the selected input format.
NOTE
Designer supports a range of preloaded or customized date formats.
Check range group allows you to enter minimum and maximum permitted value of the variable.
Setting the limits is optional.
• Minimum value: the lowest permitted variable value.
• Maximum value: the highest permitted variable value.
NOTE
If enabled, minimum and maximum values must not be left empty.
Output Rules
Output formatting sets the output date format.
• Output format: format in which the date is displayed.
• Output language: language selection and regional formatting for days and months.
Output Language becomes relevant when the dates that include months or dates are written in
words. In some cases, data calculations may be aected as well. For example, in US, a new week
begins on Sunday whereas in EU and other countries, a new week begins on Monday.
• Sample value: date preview according to the selected input format.
Prex and Sux group denes characters that are added to a variable value.
• Prex: text placed in front of the variable value.
• Sux: text placed behind the variable value.
Multiline: divides text into multiple lines.
WARNING
Avoid using this setting if possible. The recommended alternative for presenting
multiline text on a label or form is to use the Text Box object.
226

• Number of lines: maximum number of lines for a variable value.
• Line length: maximum number of characters in a single line.
• Word wrap: divides the text into multiple lines at space character locations.
TIP
Input rules help the user when inserting the variable data. They act as a lter that
denes the type, length, and other input data properties.
Output rules set the nal variable formatting – they dene how the variable value is
going to be presented in an object.
6.1.1.4. Time
Time data type stores time values in a variable. Time eld displays the date value using various time
formats. The time value format can be either selected from the preloaded formats, or customized to
meet the specic local, regulatory or industry related requirements.
Input Rules
Input Formatting denes the allowed time format and displays a preview.
• Input format: allowed time input format.
• Sample value: variable preview according to the selected input format.
NOTE
Designer supports a range of preloaded or customized time formats.
Check range group allows you to enter minimum and maximum permitted value of the variable.
Setting the limits is optional.
• Minimum value: the lowest permitted variable value.
• Maximum value: the highest permitted variable value.
NOTE
If enabled, minimum and maximum values must not be left empty.
Output Rules
Output formatting denes the output time format.
227

• Output format: format in which the time is displayed.
• Sample value: time preview according to the selected input format.
Prex and Sux group denes characters that are added to a variable value.
• Prex: text placed in front of the variable value.
• Sux: text placed behind the variable value.
Multiline group divides text into multiple lines.
WARNING
Avoid using this setting if possible. The recommended alternative for presenting
multiline text on a label or form is to use the Text Box object.
• Number of lines: maximum number of lines for a variable value.
• Line length: maximum number of characters in a single line.
• Word wrap: divides the text into multiple lines at space character locations.
TIP
Input rules help the user when inserting the variable data. They act as a lter that
denes the type, length, and other input data properties.
Output rules set the nal variable formatting – they dene how the variable value is
going to be presented in an object.
6.1.1.5. Floating Point
Floating Point data type species the representation settings for numeric values that are stored in a
variable. This Data type is used to set the digit grouping points (separators) according to the regional
specics, and to place the decimal delimiters at the right places.
Input Rules
Input formatting species the allowed input number format.
• Decimal delimiter: species the character that separates the integer part from the fractional
part of a number written in decimal form.
• Decimal places: the number of decimal places to be included in the number.
• Use 1000 separator: separator places the thousands into groups.
228

• Separator: a character that is used as thousands separator.
• Sample value: displays a preview of the current number input format.
• Limit variable length: enables limiting the number of digits to be dened for a variable.
• Length (characters): allowed number digits in a variable.
Check range denes the minimum and maximum number values. Dening the minimum and maximum
limits is optional:
• Minimum value: the lowest allowed input number.
NOTE
If already dened, the initial value is taken as the minimum value.
• Maximum value: denes the highest allowed input number.
Output Rules
Output formatting group species the preferred output number format.
• Decimal delimiter: the character that separates the integer part from the fractional part of a
number written in decimal form.
• Decimal places: the number of decimal places to be included in the number.
• Auto: decimal places are dened by local system settings.
• Use 1000 separator: enabled use of a separator that places the thousands into groups.
• Separator: a character that is used as thousands separator.
• Sample value displays a preview of the current output format.
Prex and Sux are characters that are added to a variable value.
• Prex: text placed in front of the variable value.
• Sux: text placed behind the variable value.
Pad Character lls an empty character position until the maximum variable length for a variable is
reached. Pad character is enabled only if the Limit variable length in the Input rules tab is enabled.
• Padding: denes the mode of padding.
• Not used: does not use padding.
• On left: adds pad characters on the left side of the data value.
• On right: adds pad characters on the right side of the data value.
229

• Surrounding value: adds pad characters on both sides of the data value.
• Character: character used for padding.
Example
Pad character is in most cases zero (0) added on the left side of the variable value. If the maximum
variable length is set to 5 characters and the value is 23, the padded result is 00023.
Multiline group divides text into multiple lines.
WARNING
Avoid using this setting if possible. The recommended alternative for presenting
multiline text on a label or form is to use the Text Box object.
• Number of lines: maximum number of lines for a variable value.
• Line length: maximum number of characters in a single line.
• Word wrap: divides the text into multiple lines at space character locations.
TIP
Input rules help the user when inserting the variable data. They act as a lter that
denes the type, length, and other input data properties.
Output rules set the nal variable formatting – they dene how the variable value is
going to be presented in an object.
6.1.1.6. Currency
Currency data type is used for variables that store numerical values of monetary amounts. Dene
currencies for various regions and set their properties.
Initial Value Denition
Initial value for Currency Data type is dened using one of the following methods:
• Manually entered xed value. The number is delimited according to the Input formatting
settings.
• Use of a dynamic value. Dynamic data sources from the toolbar are supported – two options are
available:
• the source is entered Name in square brackets, e.g. [Variable_1].
230

• dynamic data source selection from the dropdown list.
• Use of a special character:
• Special character can be entered manually using the less than/greater than signs, e.g.
<CR>, <LF> ...
• Special character can be selected from the dropdown list.
NOTE
Designer supports combined values as the initial value. Read more about combining
the values here.
Example
A combined initial value of a variable may contain a xed value, a dynamic data source and special
characters. The order of inserted items can be set randomly. Three options:
1. aaa123[Variable]<CR>
2. <CR>aaa123[Variable]
3. [Variable]<CR>aaa123
Input Rules
• Input formatting group species the allowed input currency format.
• Decimal delimiter is the character that separates the integer part from the fractional part of
value written in decimal form.
• Decimal places is the number of decimal places that is allowed to be included in the value.
• Use 1000 separator enables using a separator that places the thousands into groups.
• Separator: character that is used as 1000 separator.
• Currency symbol is a graphic symbol that represents a currency.
• Placement: position of the currency symbol.
• Sample value displays a preview of the currency input format.
• Limit length enables limiting the number of digits to be dened in a variable.
• Length (characters): allowed number of digits in a variable.
Check range denes the minimum and maximum values expressed in currency. Dening the minimum
and maximum limits is optional.
• Minimum value: the lowest allowed input currency value.
231

NOTE
If already dened, the initial value is taken as the minimum value.
• Maximum value: the highest allowed input currency value.
Output Rules
Output formatting species the preferred output currency format.
• Decimal delimiter: character that separates the integer part from the fractional part of a value
written in decimal form.
• Decimal places: number of decimal places to be included in the value.
• Use 1000 separator: separator that places the thousands into groups.
• Separator: character that is used as 1000 separator.
• Currency symbol is a graphic symbol that represents a currency.
• Placement denes the currency symbol's position. Select it from the dropdown list.
• Sample value displays a preview of the currency input format.
Prex and Sux are characters that are added to a variable value.
• Prex: text placed in front of the variable value.
• Sux: text placed behind the variable value.
Pad Character lls an empty character position until the maximum variable length for a variable is
reached. Pad character is enabled only if the Limit variable length in the Input rules tab is enabled.
• Padding: denes the mode of padding.
• Not used: does not use padding.
• On left: adds pad characters on the left side of the data value.
• On right: adds pad characters on the right side of the data value.
• Surrounding value: adds pad characters on both sides of the data value.
• Character: character used for padding.
Example
Pad character is in most cases zero (0) added on the left side of the variable value. If the maximum
variable length is set to 5 characters and the value is 23, the padded result is 00023.
232

Multiline group divides text into multiple lines.
WARNING
Avoid using this setting if possible. The recommended alternative for presenting
multiline text on a label or form is to use the Text Box object.
• Number of lines: maximum number of lines for a variable value.
• Line length: maximum number of characters in a single line.
• Word wrap: divides the text into multiple lines at space character locations.
TIP
Input rules help the user when inserting the variable data. They act as a lter that
denes the type, length, and other input data properties.
Output rules set the nal variable formatting – they dene how the variable value is
going to be presented in an object.
6.1.2. Current Date
Current Date is a type of variable that displays the current date value. The value is obtained from
system or printer clock.
6.1.2.1. General Tab
About group identies the variable and denes date output format and language.
• Name: unique variable name.
• Description: is a eld that allows adding additional information and suggestions.
Denition group sets output formatting and displays its preview.
• Output format: format in which the date is displayed. Available date formats are listed here.
NOTE
The selected clock source option (see below) denes the range of allowed date
Formats. Printer clock option only allows the use of printer supported date
formats. An error returns if a non-valid format is used. Computer (system) clock
option allows a range of preloaded or customized date formats.
233

• Output language: language selection and regional formatting for days and months.
Example
Output Language becomes relevant when the dates that include months or dates are written in
words. In some cases, data calculations may be aected as well. For example, in US, a new week
begins on Sunday whereas in EU a new week begins on Monday.
• Output preview: displays the printed current date. The range of used characters adapts to the
selected Output language and printer.
Date oset group enables adding a certain number of days, months or years to the current date. The
oset date is displayed in the object instead of the present date.
• Days: date oset in days.
• Months: date oset in months.
• Years: date oset in years.
TIP
To set negative date oset, use the Date Oset function.
Printer Clock group denes which clock should be used as the date value source.
• Always use computer clock: computer (system) clock set as the exclusive Current Date value
source.
• Always use printer clock: printer clock set as the exclusive Current Date value source. An error is
returned if the printer clock is unavailable.
• Use printer clock if supported: printer clock set as the preferred Current Date value source. If
the printer clock is not supported, the computer (system) clock value is used instead.
6.1.2.2. Output Rules
Prex and Sux values may be added to a variable value if required.
• Prex: text placed in front of the variable value.
• Sux: text placed behind the variable value.
6.1.2.3. Date Formats
Designer enables exible use of date elds. When dening the formats, the following notations are
used:
234

Notation Description
d The number of the day in a month. Occupies one or two characters.
dd The number of the day in a month. Always occupies two characters – leading
zeros are added if necessary.
M M is the number of month. Occupies one or two characters.
MM MM is the number of month. Always occupies two characters.
yy or yyyy The year represented with 2 or 4 digit numbers.
ddd The abbreviated name of the day of the week.
dddd The full name of the day of the week.
MMM The abbreviated name of the month.
MMMM The full name of the month.
J The number of days since January 1. Occupies from one to three characters.
JJJ The number of days since January 1. Always occupies three characters.
W The week number in current year. Occupies one or two characters.
WW The week number in current year. Always occupies two characters.
N The weekday number. The value range takes 1–7 characters, where 1 represents
Monday and 7 represents Sunday.
Custom text Any sequence of characters is displayed unchanged. Insert dots, commas, and
other characters to present the date as required.
Date format examples
Format
Printed Date (English)
d.M.yyyy 10.3.2016
dd/MM/yy 10/03/16
dddd, d.MMMM yyyy Thursday, 10.March 2016
JJJWWyyyy 069102005
textd/M/yyyytext text10/3/2016text
6.1.3. Current Time
Current Time is a type of variable that displays the current time value. The value is obtained from
system or printer clock.
6.1.3.1. General Tab
About group of settings identies the variable and denes time output format and language.
235

• Name: unique variable name. This name is used as a variable reference during its use.
• Description: is a eld that allows adding additional information and suggestions.
Denition group sets output formatting and displays its preview.
• Output format: format in which the time is displayed. Available time formats are listed here.
NOTE
The selected clock source option denes the range of supported time Formats.
Printer clock option only allows the use of printer supported time formats. An
error returns if a non-valid format is used. Computer (system) clock option allows
a range of preloaded and customized time formats.
• Output preview displays the printed current time format.
Time oset enables adding or subtracting a certain number of seconds, minutes or hours from the
current time.
• Seconds: time oset in seconds.
• Minutes: time oset in minutes.
• Hours: time oset in hours.
Printer Clock group denes which clock should be used as the time value source.
• Use printer clock if supported: printer clock set as the preferred current time value source. If the
printer clock is not supported, the system clock value is used instead.
• Always use printer clock: printer clock set as the exclusive Current Time value source. An
errorreturns if the printer clock is unavailable.
• Always use computer clock computer (system) clock set as the exclusive Current Time value
source.
6.1.3.2. Output Rules
Prex and Sux values may be added to a variable value if required.
• Prex: text placed in front of the variable value.
• Sux: text placed behind the variable value.
6.1.3.3. Time Formats
Designer enables exible use of time elds. Select a predened time format or create a customized
one. When dening the formats, the following notations are used.
236

Notation Description
h Hours in 12-hour format. AM/PM is added, if selected. Occupies one or two
characters.
hh Hours in 12-hour format. AM/PM is added if selected. Always occupies two
characters. Leading zeros are added, if necessary.
H Hours in 24-hour format. Occupies one or two characters.
HH Hours in 24-hour format. Always occupies two characters.
mm Used for minutes.
ss Used for seconds.
Time Format Examples
Format Printed Date
h:mm {AM/PM} 8:25PM
H:mm 20:25
hh:mm:ss 08:25:36
6.1.4. Counter
Counter is a type of variable whose value increments or decrements along with the changing value of
system or printer counter.
Thermal printers are usually equipped with an internal incremental counter. This is a dedicated
counter that counts the printed labels internally. The printer only receives the rst value and
automatically increases or decreases it on the subsequent labels. This option reduces the amount of
data transferred between computer and printer as only initial value is sent to the printer. Internal
counter speeds up the label production signicantly.
6.1.4.1. General Tab
About group of settings identies the variable and denes serialization details.
• Name: unique variable name. This name is used as variable reference.
• Description: is a eld that allows adding additional information and suggestions.
Denition group of settings denes the counter behavior.
• Counter type: counter value increasing or decreasing.
• Incremental: value increases along with the printed labels.
• Decremental: variable value decreases along with the printed labels.
237

• Step: amount of units that represent the next state of counter value.
• Repetition: number of repetitions for each counter value.
• Initial value: value that is used when the counter starts.
• Preview: displays the counter value sequence.
Example
Counter Step = 3, Repetition = 3 and Initial value = 1 are: 1, 1, 1, 4, 4, 4, 7, 7, 7, 10, 10, 10, 13, 13, 13, ...
Prompting group of settings denes the print time behavior of a data source. Read more about
prompting here.
Dynamic value group denes how the last used dynamic value of a variable is handled.
•
Remember the last used value (dynamic value):Designer stores the last used value of a variable.
The last used value is stored in an external text le at the same location as the label or solution
le. Files that store the last used values have the same lename as the label or solution, followed
by .dvv extension.
NOTE
When sharing labels with dynamic values, make sure not to share only label or
solution les (.nlbl or .nsln), but also les that store last used dynamic values
(.dvv).
NOTE
Label or solution must be saved before enabling this option.
Example
The last used value is useful when the continuation of numbering from the last printed label is
required (e.g., serial number). Counter's last value is stored and the numbering is continued from this
point at next use.
Printer Counter denes which counter should be used as counter variable value source.
• Use printer counter if supported: printer counter is set as the counter of choice if supported by
the active printer. If the printer counter is not supported, system counter is used instead.
• Always use printer counter: printer counter set as the exclusive counter value source. If the
printer counter value is not available, the default (system counter) value is used.
238

NOTE
An error is reported if the selected printer has no support for internal printer
counter. Printing cannot continue.
• Always use computer counter: computer counter set as the only counter value source.
TIP
Input rules help the user when inserting the variable data. They act as a lter that
denes the type, length, and other input data properties.
Output rules set the nal variable formatting – they dene how the variable value is
going to be presented in an object.
To use internal printer counter, follow these rules:
• The variable's maximum length is limited by the printer. The value should be included in the
printer user guide.
TIP
If the exact maximum variable length value is not available, NiceLabel
recommends making a few test prints for determining the value.
• Set variable length to xed.
• Set variable format to numeric.
• Text object that is linked to the variable must be formatted using an internal printer font.
• Enable Always use printer counter option.
• Ensure the Internal Element icon is visible next to the counter text.
• Ensure an internal printer font is used for the counter text.
Input Rules
Data denes the counter input criteria.
• Allowed characters: permitted characters for variable values. Groups of allowed characters for
data input ltering are described in section Groups of Allowed Characters.
Example
Non-numeric characters can also be used as counter values. Alphanumeric sets the sequence
with Step = 3 and Initial value = 1 as 1, 4, 7, A, D, G, J, M, P, S, V, Y, b, e, h, ...
239

• Limit length: maximum length of a variable value.
• Length (characters): species the exact number of characters permitted.
• Fixed length: variable must contain the exact number of characters as dened in the Limit
variable length.
Check range group denes minimum and maximum counter values.
• Minimum value: minimum counter value.
• Maximum value: maximum counter value.
Rollover settings group denes the condition at which the counter automatically resets its value to
default.
• Using min/max: minimum and maximum counter values activates the rollover.
• When the selected data source changes: data source value change activate the rollover.
• When date or time changes: date or time value change activates the rollover.
NOTE
Date/time change is dened by computer clock.
Output Rules
Prex and Sux are characters that are added to a variable value.
• Prex: text placed in front of the variable value.
• Sux: text placed behind the variable value.
Pad Character lls an empty character position until the maximum variable length for a variable is
reached. Pad character is enabled only if the Limit variable length in the Input rules tab is enabled.
• Padding: denes the mode of padding.
• Not used: does not use padding.
• On left: adds pad characters on the left side of the data value.
• On right: adds pad characters on the right side of the data value.
• Surrounding value: adds pad characters on both sides of the data value.
• Character: character used for padding.
Example
Pad character is in most cases zero (0) added on the left side of the variable value. If the maximum
variable length is set to 5 characters and the value is 23, the padded result is 00023.
240

Multiline group divides text into multiple lines.
WARNING
Avoid using this setting if possible. The recommended alternative for presenting
multiline text on a label or form is to use the Text Box object.
• Number of lines: maximum number of lines for a variable value.
• Line length: maximum number of characters in a single line.
• Word wrap: divides the text into multiple lines at space character locations.
6.1.5. Prompting
When designing labels with connected dynamic data sources, a value has to be assigned to them
before printing. Prompted variables have their values manually assigned at print time. The user is
asked for the value of every variable before each print job.
The values are entered manually. The order in which they are entered may be specied using the
Prompt order dialog.
Prompting group asks the user for manual data input – this is done after the print dialog opens.
• Prompt at print time: enabled or disabled prompting form variable value.
NOTE
If a dynamic data source is included in the Initial value, prompting becomes
disabled.
• Prompt text: contains text that prompts the user for value input. This text serves as an
instruction on what kind of values should be entered before printing.
• Value required: variable value status – mandatory or optional. If the prompt text is left empty if
the value is set as mandatory, printing cannot start. An error message appears.
6.1.6. Printing Form Variables
Printing form variables are automatically generated variables that store user-dened values of default
printing form objects when the printing form is run.
Printing form variables are added to a solution in two cases:
• when adding a new printing form (go to Home tab > Customize Print > Add new form > Printing
form)
241

• when editing a printing form (go to Home tab > Customize Print > Edit printing form)
Details about these two operations are described here.
These variables are listed among other connected data sources (named
PrintingForm_[VariableName]). They are all listed in the Dynamic data explorer and therefore become
editable in Dynamic data manager.
All printing form variables belong to the prompted variable type. They can all be edited – renamed and
congured with customized data types, and Input/Output rules.
NOTE
To remain in line with best-practice recommendations, NiceLabel suggests you to
avoid editing the printing form variables. If you nd editing necessary, double check
that the customized data type and Input/Output rules do not interfere with label
printing.
NOTE
If an issue occurs while using a customized printing form, Recreate Printing Form
option allows you to restore the default printing form. All changes are discarded in this
case.
What diers the printing form variables from "normal" user created variables is that they are:
• reused by all other printing forms in a solution.
• after being deleted, they are recreated for any newly added printing form in a solution.
Designer printing form variables include the following:
242
• PrintingForm_IdenticalCopies: stores the quantity of identical labels copies to be printed.
• PrintingForm_LabelName: stores the name of the selected label. This variable tells the printing
form which label in the solution is printed.
• PrintingForm_LabelSets: stores the quantity of print jobs to be sent to the printer.
• PrintingForm_PrinterName: stores the name of the selected printer.
• PrintingForm_PrintToFile: stores the name of the le to which the label is printed.
• PrintingForm_Quantity: stores the quantity of printed labels.
• PrintingForm_SkippedLabels: stores the quantity of skipped labels.
NOTE
Although the objects on the printing form can be connected to any type of user
dened data sources, NiceLabel recommends you to leave the objects connected to
automatically generated printing form variables.
6.2. Functions
The purpose of functions is to manipulate the data that is assigned to label objects. Functions
process the existing data source values and store the result in function-generated data sources.
Each function can be directly connected to an object and used as a part of another function.
TIP
All label or solution functions are listed in the Dynamic Data Explorer and Dynamic
Data Manager.
To add a new function to a label or solution le, click Add new function and select the appropriate
function from the list. As soon as you add a new function, a conguration dialog appears enabling you
to edit the function according to your needs. Conguration options are described in dedicated
sections for each function type.
243

Designer includes the following function types:
• Subset: extracts a specic part of data according to the user-specied rules.
• Concatenate: merges two or more data source values into a single value.
• Date Oset: osets the present date.
• Linear: transforms the current value using multiple types of linear functions.
• VBScript: allows performing complex value transformations.
• VBScript Expression: is a simplied version of VBScript function.
• Python Script: allows performing complex value transformations.
• HIBC: encodes the data in compliance with the health industry barcode standard.
• GS1-128: encodes the data in compliance with the GS-128 barcode standard.
• ANSI MH10.8.2: encodes the data in compliance with ANSI MH10.8.2-2006 standard.
• Transfer Data Syntax for High Capacity ADC Media: enables the ADC users to use a single
mapping utility, regardless of which high-capacity ADC media is employed.
• Read from le: function reads content from a specied le and displays it in an object.
• NDEF Message: function allows you to dene a message encapsulation format for the exchange
of data information over an Near Field Communication (NFC) link.
244

6.2.1. Subset
Subset function extracts a specic part of data according to the user-specied rules.
About group identies the function.
• Name: function ID, initially dened by the function type.
• Description: function's purpose and role as dened by the user.
Input data source denes the existing or newly added input data source (variable, function or
database record). The nal (output) value is extracted from the selected input data source value.
Denition group oers two methods for extracting the data from input data source.
Fixed length extracts a xed number of characters from the input data source.
• Oset: number of characters to be skipped from the beginning of the value.
• Length: length of extracted value.
Example:
Input value: ABCDE
Oset: 0
Length: 3
Subset value: ABC
Example:
Input value: ABCDE
Oset: 2
Length: 3
Subset value: CDE
Delimited is used when extracting the data, separated by the user-specied delimiter.
• Delimiter: character (comma by default) that separates input value elds.
• Text qualier: character that encloses the values within the elds (quotation mark by default).
245

TIP
If a text qualier is used, the delimiter within the text qualiers also belongs to the data
value. Text qualier can be left empty.
• Field number:the eld number that is extracted from the input data source.
Example:
Input value: "A", "B", "C", "D"
Delimiter: ,
Text qualiers: "
Field number: 3
Subset value: C
6.2.2. Concatenate
Concatenate function merges two or more data source values into a single value.
About group identies the function.
• Name: function ID, initially dened by the function type.
• Description: function's purpose and role as dened by the user.
Input data source group denes the existing or newly added input data source (variable, function or
database record) or xed text that will be used in the function.
Output Options group denes the output value format.
Delimiter is a character that is inserted between the concatenated values. The delimiting character
can be entered manually or selected from one of the additional options:
• New Line (CR/LF): new line character.
• Insert special character: special character is entered.
NOTE
Delimiter is an optional value. With no delimiter dened, the concatenated values
are merged without a delimiting space or character.
• Ignore empty values: ignores empty data source values. These values are excluded from
concatenation.
246

TIP
This option is useful if you want to avoid duplicated delimiters if empty values
appear.
Example:
Data source value 1: A, B, C, D
Data source value 2: <empt>
Data source value 3: E, F, G
Delimiter: ,
Concatenated value with vs. without Ignore empty values: A, B, C, D, E, F, G vs. A, B, C, D, E, F, G
NOTE
Ignore empty values option is eective only after executing a print command. When
storing a label in store/recall printing mode or when exporting a label, the empty
values are not ignored. Delimiters appear duplicated.
6.2.3. Date Oset
Date Oset function denes the number of days, months and/or years to be added to or subtracted
from any specied date (might be the current date or any past/future date).
About group identies the function.
• Name: function ID, initially dened by the function type.
• Description: function's purpose and role as dened by the user.
Input data source denes the input data source from which the data will be used in the function.
Oset is the number of days, months or years to be added to or subtracted from the input data
source.
Example:
Current date: March 8 2016
Oset: Days +1; Months +1; Years +1
Result: April 7 2017
247

Output formatting group denes the function’s output.
• Output format: denes the date format to be used in the connected object.
• Sample: current date in the selected Output format.
6.2.4. Linear
Linear function multiplies or divides an input data source value by a dened Multiplier. An optional
value (Addition) can also be added.
About group identies the function.
• Name: function ID, initially dened by the function type.
• Description: function's purpose and role as dened by the user.
Input data source denes the input data source from which the data will be used in the function.
Linear function parameters are:
• Mode: linear function type.
• a: function multiplier.
• b: function addition.
Output formatting group denes the function output format.
Output format is the format of a modied value. more... opens additional formatting options:
• Decimal separator: character that marks the border between integral and fractional parts of a
decimal numeral.
• Decimal places: number of places behind the decimal separator.
• Use 1000 separator: thousands separated or non-separated by a delimiter.
• Delimiter: character that separates the thousands from the rest of the numeral.
• Sample: preview of the formatted output value.
Example:
Input value: 123
a: 2
b: 20
Output value: 2 * 123 + 20 = 266
248

6.2.5. VBScript
VBScript function enables reading, writing, and manipulating the data that belongs to any of the
connected data sources.
About group identies the function.
• Name: function ID, initially dened by the function type.
• Description: function's purpose and role as dened by the user.
• Function type: show which type of scripting is selected.
VBScript group allows dening the script.
• Insert data source: inserts an existing or a newly created data source into the script.
• Verify: validates the entered script syntax.
• Script editor: opens the editor which makes scripting easier and more ecient.
NOTE
The result of the script must be saved in the 'Result'. The value of 'Result' is inserted
into the name of the function. Such function is available as a dynamic data source for
further use.
Example:
The variable NAME provides the rst and the last name of a person. VBScript function should break
the names apart and use only the rst name as the result of the function.
NAME variable initial value: John Doe
Dim Spc
Spc = InStr(NAME, " ")
if NAME <> "" then
Result = Mid(NAME, 1, Spc-1)
end if
Result of VBScript: John
NOTE
To verify if a date variable is empty, use the syntax:
Datevariable.Value == None
249

6.2.6. VBScript Expression
VBScript Expression is a simplied online version of VBScript function. This Designer function allows
you to:
• manipulate existing variables
• extract sub-strings
• perform quick calculations
VBScript Expression reduces the need to write dedicated VBScripts. Instead of writing an entire
script, insert a single-line expression in the edit eld that is validated at print time.
TIP
When compared to VBScript commands, a VBScript expression command does not
require the nal value to be stored in Result.
About
• Name: function ID, initially dened by the function type.
• Description: function's purpose and role as dened by the user.
VBScript Expression
• Insert data source: inserts an existing or a newly created data source into the expression.
• Verify: validation of the entered script syntax.
• Editor: eld for script writing and editing.
6.2.6.1. Script Editor
NiceLabel 2019 provides a script editor which makes your Python or VBScript scripting easier, error-
free and time ecient.
250

The selection of scripting languages that should be used in Script editor diers between NiceLabel
Designer Pro and Automation Builder :
• In Designer , double-click on the form design surface to open Form Properties > Additional
Settings > Form Scripting Language.
• In Automation Builder , go to Conguration items > click Edit to open trigger properties >
Settings > Other > Scripting.
TIP
NiceLabel 2019 uses .NET variant of Python named IronPython. It works as a fully
compatible implementation of Python scripting language which also supports .NET
methods.
Editor Ribbon includes commonly used commands which are distributed over multiple functional
groups.
• Clipboard group oers Cut, Copy, Paste and Delete commands.
• Undo Redo group allows undoing or repeating script editing actions.
• File group allows loading and saving scripts in a le.
• Load from le: loads a script from an external previously saved textual le.
• Save to le: stores the currently edited script in a textual le.
• Editing group allows nding and replacing strings in a script.
251

• Find: locates the entered string in the script.
• Replace: replaces string in the script.
• Insert group: Data Source command inserts existing or newly dened data sources into the
script.
• Script group: Validate script command validates of the entered script's syntax.
Available scripting elements contain all available script items which can be used when building a
script. Double-click the element or click the Insert button to insert the element at cursor position into
the script.
Element description provides basic information about the inserted script element.
Error list includes the errors which are reported after the Validate script command is run.
6.2.7. Python Script
Python script function supports even the most complex data manipulations on a label or a form.
TIP
When compared with VBScript, it proves out to be a more suitable option for 64-bit
systems. It is also proved to be a notably faster scripting alternative.
About group identies the function.
• Name: function ID, initially dened by the function type.
• Description: function's purpose and role as dened by the user.
• Function type: show which type of scripting is selected.
Python Script
• Insert data source: inserts an existing or a newly created data source into the script.
• Verify: validates the entered script syntax.
• Script editor: opens the editor which makes scripting easier and more ecient.
Example:
The variable NAME provides the rst and the last name of a person. Python Script function should
break the names apart and use only the rst name as the result of the function.
NAME variable initial value: John Doe
252

name = NAME.Value
Spc = name.find(' ')
if name != '' and Spc != -1:
Result.Value = name[0:Spc]
else:
Result.Value = name
Result of Python script: John
6.2.8. HIBC
HIBC is a barcode standard used specically in health industry, as directed by the HIBCC
organization. This standard supports composite bar codes and supports the use of multiple items
such as item codes, quantity ,and batch number in a single barcode.
TIP
Visit HIBCC website for more information about the standard.
About group identies the function.
• Name: function ID, initially dened by the function type.
• Description: function's purpose and role as dened by the user.
Structure group selects standard version and one of the three available HIBC barcode Types:
• Version: HIBC version selector. Labels which include legacy HIBC data encoding are opened
using version 2.5. If creating a new label, encoding works depending on selected HIBC version –
2.5 or 2.6.
• Type: data structure type selector.
• Primary: mandatory xed data structure which identies the item and its supplier.
• Secondary: optional data structure which is indicated using the "/" delimiter. It may have a
variable (yet predened) structure to contain serial or batch numbers, quantity, and
expiration date.
• Primary denition: mandatory element when dening the Secondary data structure.
The three Primary data elds of a HIBC function must be added to the Secondary
data structure. Primary denition selects the appropriate existing HIBC function.
• Concatenated: merges the rst two structure types into a single data structure.
Denition group denes the content of HIBC barcode elds:
Primary data structure elds:
253

• Labeler ID code (LIC): eld assigned and maintained by the HIBCC. The rst character of this
eld is always an alphabetic character. The LIC may identify a labeler to the point of separate
subsidiaries and divisions within a parent organization.
• Product or Catalog...: compressed product or catalog number.
• Unit of Measure...: numeric representation of packaging level (0 to 9) with 0 being the lowest
level or “unit-of-use”.
Example:
A company might pack unit-of-use items in a box, boxes in a carton, and cartons in a case. One way of
labeling would be, unit-of-use = 0; Box = 1; Carton = 3; and Case = 5.
Secondary data structure elds:
• Quantity: two- or ve-digit eld describing the number of units-of-use included in the package
identied by the bar code label.
• Date format: preferred date format to be used with a HIBC label. If no date should be included
on a label, select one of the formats that contain "No date".
• Date: displays the present date.
• Lot/Batch: eld can be alphanumeric and may vary in length to up to a maximum of 18
characters. If the eld is not required, it should be left empty.
• Serial number: eld can be alphanumeric and may vary in length to up to a maximum of 18
characters. If the eld is not required, it should be left empty.
• Production date:Data Identier formatted as YYYYMMDD.
6.2.9. GS1-128
GS1-128 function encodes barcode data using the GS1-128 standard. The standard supports
encoding of textual data, numbers, functions, and the entire set of 128 ASCII characters.
GS1-128 encodes the data and denes its meaning by dening a list of Application Identiers (AI).
These identiers dene the content and length of the data they include.
AIs include a data eld that contains a xed or variable number of characters.
TIP
For more information about GS-128 standard and encoding principles, visit the GS1
website.
The list of available AIs is available here.
254

About
• Name: function ID, initially dened by the function type.
• Description: function's purpose and role as dened by the user.
Application Identiers eld displays the selected AIs.
Edit Function Denition button opens a dialog for editing the identiers. Function Denition dialog
allows the user to Add, Delete, Move, and edit the selected identiers. There are four columns with
identier properties:
• Identier: column with identier AI number and description.
• Value: column with a manually or dynamically dened value as given by the selected Data
source.
TIP
Value column makes sure the values are compliant with GS1-128 standard. The
values are automatically reformatted according to AI format and length.
• Options: column with additional identier options (if available).
Delimiter group denes the delimiting characters for separating the AIs.
A single barcode may include multiple AIs. These elds are separated using left and right Delimiter.
By default, rst two digits of AI are used. Custom delimiters may be dened by inserting alphanumeric
characters.
Additional function outputs group denes a subordinate function.
• Create output function with unformatted contents creates a subordinate function that uses
the unformatted data encoded by the parent GS1-128 function.
• Function name: the name of the newly created subordinate function.
6.2.10. ANSI MH10.8.2 (ASC)
ANSI MH10.8.2 (ASC) function encodes barcode data using the ANSI MH10.8.2-2006 standard. This
standard provides a range of MH 10/SC 8 data identiers and GS1 application identiers. It enables
255

the assignment of new data identiers, and denes the correlation, or mapping of data identiers to
application identiers.
TIP
For more information about ANSI MH10.8.2 (ASC) standard, visit the ocial website.
ANSI MH10.8.2 belongs to ISO/IEC 15418 standard, which is accessible here.
About group identies the function.
• Name: function ID, initially dened by the function type.
• Description: function's purpose and role as dened by the user.
Application Identiers enable cross-industry standardized use of data identiers. They are used with
any alphanumeric data carrier.
Edit Function Denition button opens the Function Denition dialog. It allows the user to Add,
Delete, Move, and edit the selected identiers.
There are three columns with identier properties:
• Identier: column with identier ID.
• Value: column with manually inserted value or an automatically dened value as given by the
selected Data source.
NOTE
Each Value column allows a limited number of characters to be entered. The limitation
(format) is dened by the standard and varies according to the selected identier.
6.2.11. Transfer Data Syntax for High Capacity ADC
Media
This function supports international ISO/IEC FDIS 15434 standard for "Information technology –
Automatic identication and data capture techniques – Syntax for high-capacity ADC media".
The standard denes the manner in which data is transferred to high-capacity automatic data capture
(ADC) media from supplier’s information system, and the manner in which the data is transferred to
the recipient’s information system.
The standard uses high-capacity technologies, such as two-dimensional symbols, to encode multiple
elds of data. These elds are usually parsed by the recipient’s information system and mapped to
specic data elds in the recipient’s information system.
256

This function allows you to encode data in the label objects. You can combine several pieces of
information in a single message. Each part begins with a header, and is followed by the message.
Each data eld may have a xed manually entered value, or can be connected to a variable.
NOTE
Make sure the variable has the same data format as required by the data identier.
Data identiers usually have a strict format set by the standard.
About group identies the function.
• Name: function ID, initially dened by the function type.
• Description: function's purpose and role as dened by the user.
• Application Identiers: cross-industry standardized set of data identiers.
TIP
The purpose of identiers is to provide a unique item identication. To manage the
identiers, click Edit Function Denition.
Function Denition dialog allows the user to Add, Delete, and edit the selected identiers.
• Format Envelope: column denes the starting and ending positions for a data item in a given
Format. Each Format Envelope contains a Format Header, data and a Format Trailer.
Example:
• Format envelope 02 represents Complete EDI message/transaction data.
• Format envelope 06 represents data which is encoded using ASC MH 101 Data Identiers.
NOTE
Each identier allows adding multiple elements.
• Data Elements: column denes the identier content. Insert the data to be encoded manually or
dene a data source.
• Format Header Data: denes two mandatory format header elements.
• Version: organization that controls the data structure.
• Release: release number of ADC media standard.
257

6.2.12. Read from File
Read from le function reads content from a specied le. The le can be accessible locally or
remotely via network connection.
About group identies the function.
• Name: function ID, initially dened by the function type.
• Description: function's purpose and role as dened by the user.
Read from le parameters group sets the le connection details.
File name sets the le connection.
Encoding species the encoding type for the sent data.
• Auto: automatically dened encoding .
TIP
If needed, select the preferred encoding type from the dropdown list.
6.2.13. NDEF Message
NDEF Message function allows you to dene a message encapsulation format for the exchange of
data information over a Near Field Communication (NFC) link. Such link is established between two
NFC devices, or between an NFC device and a tag.
TIP
NFC is a set of communication protocols that enable two devices to establish
communication by bringing them within 4 cm (2 in) of each other.
NDEF message encapsulates one or more application-dened records which appear in a variety of
types and sizes. These records are combined into a single message.
NOTE
Output of this function is in HEX format.
About group identies the function.
• Name: function ID, initially dened by the function type.
• Description: function's purpose and role as dened by the user.
258

NDEF Message Structure group displays the NDEF records that are included in the message.
Click Edit Function denition to open the NDEF Message dialog. This dialog allows the user to Add,
Delete, Move, and edit the NDEF records. There are two columns with record properties:
• NDEF Record Type: identies the record type. The listed standard record types are available in
Designer:
• Uri: contains a string of characters that identies a web resource.
• Text: contains textual content with information about text encoding and language code.
• Smart Poster: includes multiple sub-records – URI, title, recommended actions, icon, size
and type.
NOTE
Smart Poster content is represented as a single record content, although
internally the structure is created as multiple (sub)records within a single
record.
• BlueTooth Handover Select: a set of records including various items – handover version,
device address string, complete local string, class of device, and service class.
• Custom: record type which allows encoding the non-native NFC data.
TIP
Drag and drop the records in NDEF Message dialog to quickly change their
position.
TIP
Detailed descriptions of NDEF record types are available in NFC Forum
technical specications.
• Record Denition: settings as dened by the NDEF standard. Available options depend on the
selected record type.
Include capability container adds capability container to the encoded data. Capability container
stores control data for managing the NFC data in a tag or a device. It tells the NFC device that the
received data is an NFC message. In cases when NFC content needs to be encoded into a standard
high frequency (HF) RFID tag, enable the Include capability container option. This signalizes the
reading device that NFC content is stored in the tag. Certain NFC compliant tags already include
capability container in the tag which means that there is no need for including it as a part of the
generated content.
259

6.3. Databases
Databases can be used as dynamic data source for label or form objects. To make the database
content accessible and retrievable from the selected object, the database connection must be
properly established and congured.
The most time ecient and user friendly way of adding a database to your label or solution data
sources is to use the Step-by-Step Database Wizard.
Designer also allows the database connections to be established and congured manually. This way,
the entire range of connection settings becomes congurable. It is recommended that only
experienced users choose this option.
All label or solution databases are listed in the Dynamic Data Explorer.
Designer supports a wide selection of database types. The supported database types are listed here.
Read about how to connect to the supported database types here.
Read about other available object data sources and how to use the Dynamic Data Manager here.
PRODUCT LEVEL INFO:
Creation of forms and use of form objects are available in PowerForms.
6.3.1. Supported Database Types
Designer supports multiple types of databases:
• Microsoft Excel
• Microsoft Access
• Microsoft SQL Server
• Text File databases
• Oracle databases
• MySQL
• OLE databases
• ODBC database
NiceLabel recommends using standard database types such as Text, Excel, Access, SQL Server, and
MySQL. The use of standard database types is easier and more time ecient due to optimized
application performance and user interface. When working with a non-standard database type, use
the OLE and ODBC options.
260

Read about how to connect to the supported database types here.
6.3.2. Database Connection Options
Designer oers two ways for connecting an object to a database. The diagram below shows the two
available options.
1. Step-by-step Database Wizard oers a guided process for:
• connecting a database to a label or form object
• adding a database to the labeling solution's data sources
The process of establishing and conguring a wizard based database connection is
described here.
PRODUCT LEVEL INFO
This segment is applicable to Designer Pro and PowerForms.
2. Manually established and congured database connection.
NOTE
This option is intended for advanced users. It allows detailed conguration and oers
all of the available database connection settings.
261

The process of establishing and conguring a database connection manually is described here.
6.3.3. Step-by-Step Database Wizard
Database wizard is a guided process that allows the user to congure a connection to a database and
to select which tables and elds will be used.
Edit Database allows you to edit all existing connected databases using a wizard.
The wizard additionally allows you to sort, lter records, and to dene how many label copies will be
printed per database record.
6.3.3.1. Adding a Database
To add a database using the Database Wizard, click the preferred database button in Designer Data
tab ribbon > Step-by-step Database Wizard group.
There are three ways to start the Database Wizard:
• Option 1: Click the preferred database button in Designer Data tab ribbon > Step-by-step
Database Wizard group.
• Option 2: Click the preferred database button in Dynamic Data Manager > Step-by-Step
Database wizard ribbon group.
262

• Option 3: Click the +Database wizard command in Dynamic Data Explorer or object properties.
Listed below are the available wizard options. To successfully add a database, follow the steps for
each database type:
• Adding an Excel database
• Adding an Access database
• Adding an SQL Server database
• Adding a Text File database
• Adding an Oracle database
• Adding a MySQL database
• Adding other OLE database
• Adding an ODBC data source
6.3.3.2. Database Wizard for Excel Files
This section describes how to connect Excel database to an object using the Designer Step-by-Step
Database Wizard.
Step 1: Connection Settings
This step denes the database connection parameters.
263

NOTE
The available parameters depend on the selected database type.
File name denes the database le location.
Advanced Setup opens the system conguration dialog. Data Link Properties window allows you to
set the connection properties. Data Link Properties is a Windows system dialog – read more about its
properties here.
Test Connection button starts a connection testing procedure. It checks if Designer can successfully
connect to the database.
Click Next.
Step 2: Tables and Fields
This step denes which database table and which elds of this table should be used as dynamic data
source.
Tables group allows you to select which tables of the connected database should be used as data
source.
• Available tables: available tables in the selected database.
• Selected tables: tables that are used as data source.
Click Add > or < Remove buttons to add or remove the tables from the Selected elds.
NOTE
When editing an existing database, a table cannot be removed if used in a script,
function, action, or connected to a label or form object.
Click Next.
Step 3: Label Copies Per Record
This step species the number of label copies to be printed for each database record.
Fixed number of printed labels lets you insert the number of copies manually.
Dynamically dened number of printed labels sets the number dynamically using a data source value.
Example:
The number of printed records can be dened using a variable value. Its value may be set in another
label or form object.
264

Use the same record for entire print job prints out the single selected record on the entire range of
labels in a print job.
Click Next to proceed or Finish to continue working with the object.
Read more about how to dene the number of printed copies here.
Step 4: Create Objects
This step lets you decide whether new Text objects that display the content retrieved from database
elds should be added to a label/form or not.
Create Objects step is visible when:
• Starting the database wizard from Data tab ribbon and adding a new database by clicking the
database button.
• Starting the wizard in Dynamic Data Explorer or using a generic object Add database selector.
TIP
The Create Objects step diers if you are adding a database while designing a label or
a form. See the dierences below.
Create Objects step for label designing:
• Create a label text object for each eld: adds a Text object that contains database eld content.
• Do not create any label objects: skips adding new objects.
Create Objects step for form designing:
• Create an edit eld object for each eld: adds an edit eld object to the form. The added
object(s) contains database eld content.
• Create a form table object: adds a database table object to a form. The added object(s) contains
database eld content.
• Do not create any label objects: skips adding new objects.
NOTE
The number of added objects depends on the number of elds in the database.
Click Next.
Step 5: Data Preview and Other Table Settings
This step gives a preview of the data retrieved from the database. It also oers additional table
settings such as ltering and sorting.
265

Data tab displays a preview of data retrieved from the database le. You can use search controls at
the top of the preview section to nd a specic record.
NOTE
Data preview shows up to 1000 rows.
Filter tab lters out the database le records. It allows you to dene ltering conditions to be used
when retrieving the data.
• Add condition: species single line condition(s) that lters out the content that meets the set
criteria.
• Add group: species group(s) of conditions that lter out the content that meets the set criteria.
Sorting tab allows you to sort the retrieved data. Sorting is done for all of the elds that are added to
the sorting list. Each eld can be in ascending or descending order.
Data Retrieving tab denes how the data should be retrieved from the connected database le.
Details on data retrieving settings and options are available here.
SQL tab oers a preview of the generated SQL statements.
Read more details about database table conguration here.
Click Finish. The database is ready to be used as label or form object data source.
6.3.3.3. Database Wizard for Access Database
This section describes how to connect Access database to an object using the Designer Step-by-
Step Database Wizard.
Step 1: Connection Settings
This step denes the Access database le connection details.
File name selects the database le.
Authentication requires User name and Password for password protected Access database les.
Test Connection button starts a connection testing procedure. It checks if Designer can successfully
connect to the database.
Advanced Setup opens the system conguration dialog. Data Link Properties window allows you to
set the connection properties. Data Link Properties is a Windows system dialog – read more about its
properties here.
Click Next.
Step 2: Tables and Fields
266

Tables group allows you to select which tables of the connected database should be used as data
source.
• Available tables: available tables in the selected database.
• Selected tables: tables that are used as data source.
Click Add > or < Remove buttons to add or remove the tables from the Selected elds.
NOTE
When editing an existing database, a table cannot be removed if used in a script,
function, action, or connected to a label or form object.
Step 3: Label Copies Per Record
This step species the number of label copies to be printed for each database record.
Fixed number of printed labels lets you insert the number of copies manually.
Dynamically dened number of printed labels sets the number dynamically using a data source value.
Example:
The number of printed records can be dened using a variable value. Its value may be set in another
label or form object.
Use the same record for entire print job prints out the single selected record on the entire range of
labels in a print job.
Click Next to proceed or Finish to continue working with the object.
Read more about how to dene the number of printed copies here.
Step 4: Create Objects
This step lets you decide whether new Text objects that display the content retrieved from database
elds should be added to a label/form or not.
Create Objects step is visible when:
• Starting the database wizard from Data tab ribbon and adding a new database by clicking the
database button.
• Starting the wizard in Dynamic Data Explorer or using a generic object Add database selector.
TIP
The Create Objects step diers if you are adding a database while designing a label or
a form. See the dierences below.
267

Create Objects step for label designing:
• Create a label text object for each eld: adds a Text object that contains database eld content.
• Do not create any label objects: skips adding new objects.
Create Objects step for form designing:
• Create an edit eld object for each eld: adds an edit eld object to the form. The added
object(s) contains database eld content.
• Create a form table object: adds a database table object to a form. The added object(s) contains
database eld content.
• Do not create any label objects: skips adding new objects.
NOTE
The number of added objects depends on the number of elds in the database.
Click Next.
Step 5: Data Preview and Other Table Settings
This step gives a preview of the data retrieved from the database. It also oers additional table
settings such as ltering and sorting.
Data tab displays a preview of data retrieved from the database le. You can use search controls at
the top of the preview section to nd a specic record.
NOTE
Data preview shows up to 1000 rows.
Filter tab lters out the database le records. It allows you to dene ltering conditions to be used
when retrieving the data.
• Add condition: species single line condition(s) that lters out the content that meets the set
criteria.
• Add group: species group(s) of conditions that lter out the content that meets the set criteria.
Sorting tab allows you to sort the retrieved data. Sorting is done for all of the elds that are added to
the sorting list. Each eld can be in ascending or descending order.
Data Retrieving tab denes how the data should be retrieved from the connected database le.
Details on data retrieving settings and options are available here.
SQL tab oers a preview of the generated SQL statements.
Read more details about database table conguration here.
268

Click Finish. The database is ready to be used as label or form object data source.
6.3.3.4. Database Wizard for Microsoft SQL Server Database
PRODUCT LEVEL INFO
This section applies to NiceLabel 2019 Pro and PowerForms editions.
This section describes how to connect a Microsoft SQL Server database to a form or label object
using the Designer Step-by-Step Database Wizard.
Step 1: Connection Settings
This step denes the database le connection details.
Connection Information group denes which server hosts the database you are connecting to.
• Server selects the database server.
Authentication group denes the user authentication type for database server.
• Use Windows authentication. This option denes the Windows authentication as verication
method for connecting to an SQL server. The user connects to a database using domain user
name and password.
• Use SQL Server authentication. This option denes the database user name and password as
the verication method. To establish a connection, enter the user name and password provided
by the database administrator.
Show Connection String displays the current database connection string and allows it to be inserted
or modied.
WARNING
Connection string editing is intended for advanced users only. To congure the
database connection, users are encouraged to use standard inputs in the dialog box.
Database Selection group selects the database on the connected server.
Test Connection button starts a connection testing procedure. It checks if Designer can successfully
connect to the database.
Click Next to proceed.
Step 2: Tables and Fields
Tables group allows you to select which tables of the connected database should be used as data
source.
269

• Available tables: available tables in the selected database.
• Selected tables: tables that are used as data source.
Click Add > or < Remove buttons to add or remove the tables from the Selected elds.
NOTE
When editing an existing database, a table cannot be removed if used in a script,
function, action, or connected to a label or form object.
Step 3: Label Copies Per Record
This step species the number of label copies to be printed for each database record.
Fixed number of printed labels lets you insert the number of copies manually.
Dynamically dened number of printed labels sets the number dynamically using a data source value.
Example:
The number of printed records can be dened using a variable value. Its value may be set in another
label or form object.
Use the same record for entire print job prints out the single selected record on the entire range of
labels in a print job.
Click Next to proceed or Finish to continue working with the object.
Read more about how to dene the number of printed copies here.
Step 4: Create Objects
This step lets you decide whether new Text objects that display the content retrieved from database
elds should be added to a label/form or not.
Create Objects step is visible when:
• Starting the database wizard from Data tab ribbon and adding a new database by clicking the
database button.
• Starting the wizard in Dynamic Data Explorer or using a generic object Add database selector.
TIP
The Create Objects step diers if you are adding a database while designing a label or
a form. See the dierences below.
Create Objects step for label designing:
270

• Create a label text object for each eld: adds a Text object that contains database eld content.
• Do not create any label objects: skips adding new objects.
Create Objects step for form designing:
• Create an edit eld object for each eld: adds an edit eld object to the form. The added
object(s) contains database eld content.
• Create a form table object: adds a database table object to a form. The added object(s) contains
database eld content.
• Do not create any label objects: skips adding new objects.
NOTE
The number of added objects depends on the number of elds in the database.
Click Next.
Step 5: Data Preview and Other Table Settings
This step gives a preview of the data retrieved from the database. It also oers additional table
settings such as ltering and sorting.
Data tab displays a preview of data retrieved from the database le. You can use search controls at
the top of the preview section to nd a specic record.
NOTE
Data preview shows up to 1000 rows.
Filter tab lters out the database le records. It allows you to dene ltering conditions to be used
when retrieving the data.
• Add condition: species single line condition(s) that lters out the content that meets the set
criteria.
• Add group: species group(s) of conditions that lter out the content that meets the set criteria.
Sorting tab allows you to sort the retrieved data. Sorting is done for all of the elds that are added to
the sorting list. Each eld can be in ascending or descending order.
Data Retrieving tab denes how the data should be retrieved from the connected database le.
Details on data retrieving settings and options are available here.
SQL tab oers a preview of the generated SQL statements.
Read more details about database table conguration here.
Click Finish. The database is ready to be used as label or form object data source.
271

6.3.3.5. Database Wizard for Text Files
This section describes how to use a text le as data source in label or form objects. A text le is
connected to an object using the Designer Step-by-Step Database Wizard.
Step 1: Text File Structure Wizard
Text File Structure Wizard window opens if a structure for a text le you are connecting hasn't been
dened previously.
The steps for completing the Text File Structure Wizard are described in a dedicated section.
NOTE
After nishing this procedure, a text denition .sch le with the same name as the text
database le and is created in the same folder. Next time the wizard is used on the
same le, this procedure is no longer required.
Step 2: Connection Settings
This step denes the text le path.
File name denes the location of the Text le to be used. Enter the location manually or click Browse
to locate it in the system.
Test Connection button starts a connection testing procedure. It checks if Designer can successfully
connect to the database.
Click Next.
Step 3: Tables and Fields
Tables group allows you to select which tables of the connected database should be used as data
source.
• Available tables: available tables in the selected database.
• Selected tables: tables that are used as data source.
Click Add > or < Remove buttons to add or remove the tables from the Selected elds.
NOTE
When editing an existing database, a table cannot be removed if used in a script,
function, action, or connected to a label or form object.
NOTE
Table selection is not available when adding a text le as a database. The entire text
le is treated as a single database table.
272

Step 4: Label Copies Per Record
This step species the number of label copies to be printed for each database record.
Fixed number of printed labels lets you insert the number of copies manually.
Dynamically dened number of printed labels sets the number dynamically using a data source value.
Example:
The number of printed records can be dened using a variable value. Its value may be set in another
label or form object.
Use the same record for entire print job prints out the single selected record on the entire range of
labels in a print job.
Click Next to proceed or Finish to continue working with the object.
Read more about how to dene the number of printed copies here.
Step 5: Create Objects
This step lets you decide whether new Text objects that display the content retrieved from database
elds should be added to a label/form or not.
Create Objects step is visible when:
• Starting the database wizard from Data tab ribbon and adding a new database by clicking the
database button.
• Starting the wizard in Dynamic Data Explorer or using a generic object Add database selector.
TIP
The Create Objects step diers if you are adding a database while designing a label or
a form. See the dierences below.
Create Objects step for label designing:
• Create a label text object for each eld: adds a Text object that contains database eld content.
• Do not create any label objects: skips adding new objects.
Create Objects step for form designing:
• Create an edit eld object for each eld: adds an edit eld object to the form. The added
object(s) contains database eld content.
• Create a form table object: adds a database table object to a form. The added object(s) contains
database eld content.
273

• Do not create any label objects: skips adding new objects.
NOTE
The number of added objects depends on the number of elds in the database.
Click Next.
Step 6: Data Preview and Other Table Settings
This step gives a preview of the data retrieved from the database. It also oers additional table
settings such as ltering and sorting.
Data tab displays a preview of data retrieved from the database le. You can use search controls at
the top of the preview section to nd a specic record.
NOTE
Data preview shows up to 1000 rows.
Fields tab displays available and selected database elds. The settings congured in "Label Copies
Per Record" can be redone on this tab.
Data Retrieving tab denes how the data should be retrieved from the connected database le. Read
more about data retrieving here.
Click Finish. The database is ready to be used as label or form object data source.
6.3.3.6. Database Wizard for Oracle Database
PRODUCT LEVEL INFO
This section applies to NiceLabel 2019 Pro and PowerForms editions.
This section describes how to add an Oracle database to a form or label object using the Designer
Step-by-Step Database Wizard.
Step 1: Connection Settings
This step denes the database connection details.
NOTE
Oracle Database Provider is required to establishing a connection with Oracle
database.
274

Data Source denes the Oracle Data Source name.
Authentication provides user name and password for establishing the connection.
Show Connection String displays the current database connection string and allows it to be inserted
or modied.
WARNING
Connection string editing is intended for advanced users only. To congure the
database connection, users are encouraged to use standard inputs or Advanced
Setup dialog.
Advanced Setup button opens the Data Link Properties window allowing the user to dene the
connection properties. Data Link Properties is a Windows system dialog – read more about its
properties here.
Test Connection button starts a connection testing procedure. It checks if Designer can successfully
connect to the database.
Step 2: Tables and Fields
Tables group allows you to select which tables of the connected database should be used as data
source.
• Available tables: available tables in the selected database.
• Selected tables: tables that are used as data source.
Click Add > or < Remove buttons to add or remove the tables from the Selected elds.
NOTE
When editing an existing database, a table cannot be removed if used in a script,
function, action, or connected to a label or form object.
Step 3: Label Copies Per Record
This step species the number of label copies to be printed for each database record.
Fixed number of printed labels lets you insert the number of copies manually.
Dynamically dened number of printed labels sets the number dynamically using a data source value.
Example:
The number of printed records can be dened using a variable value. Its value may be set in another
label or form object.
275

Use the same record for entire print job prints out the single selected record on the entire range of
labels in a print job.
Click Next to proceed or Finish to continue working with the object.
Read more about how to dene the number of printed copies here.
Step 4: Create Objects
This step lets you decide whether new Text objects that display the content retrieved from database
elds should be added to a label/form or not.
Create Objects step is visible when:
• Starting the database wizard from Data tab ribbon and adding a new database by clicking the
database button.
• Starting the wizard in Dynamic Data Explorer or using a generic object Add database selector.
TIP
The Create Objects step diers if you are adding a database while designing a label or
a form. See the dierences below.
Create Objects step for label designing:
• Create a label text object for each eld: adds a Text object that contains database eld content.
• Do not create any label objects: skips adding new objects.
Create Objects step for form designing:
• Create an edit eld object for each eld: adds an edit eld object to the form. The added
object(s) contains database eld content.
• Create a form table object: adds a database table object to a form. The added object(s) contains
database eld content.
• Do not create any label objects: skips adding new objects.
NOTE
The number of added objects depends on the number of elds in the database.
Click Next.
Step 5: Data Preview and Other Table Settings
This step gives a preview of the data retrieved from the database. It also oers additional table
settings such as ltering and sorting.
276

Data tab displays a preview of data retrieved from the database le. You can use search controls at
the top of the preview section to nd a specic record.
NOTE
Data preview shows up to 1000 rows.
Filter tab lters out the database le records. It allows you to dene ltering conditions to be used
when retrieving the data.
• Add condition: species single line condition(s) that lters out the content that meets the set
criteria.
• Add group: species group(s) of conditions that lter out the content that meets the set criteria.
Sorting tab allows you to sort the retrieved data. Sorting is done for all of the elds that are added to
the sorting list. Each eld can be in ascending or descending order.
Data Retrieving tab denes how the data should be retrieved from the connected database le.
Details on data retrieving settings and options are available here.
SQL tab oers a preview of the generated SQL statements.
Read more details about database table conguration here.
Click Finish. The database is ready to be used as a label or form object data source.
6.3.3.7. Database Wizard for MySQL Database
PRODUCT LEVEL INFO
This section applies to NiceLabel 2019 Pro and PowerForms editions.
This section describes how to add a MySQL database to a form or label object using the Designer
Step-by-Step Database Wizard.
Step 1: Connection Settings
This step denes the MySQL database connection details.
• Database: denes the exact database on a server.
• Host: denes the database address.
• Port: denes the port of the database server.
• Authentication: provides user name and password for establishing the connection.
Test Connection button starts a connection testing procedure. It checks if Designer can successfully
connect to the database.
277

Step 2: Tables and Fields
Tables group allows you to select which tables of the connected database should be used as data
source.
• Available tables: available tables in the selected database.
• Selected tables: tables that are used as data source.
Click Add > or < Remove buttons to add or remove the tables from the Selected elds.
NOTE
When editing an existing database, a table cannot be removed if used in a script,
function, action, or connected to a label or form object.
Step 3: Label Copies Per Record
This step species the number of label copies to be printed for each database record.
Fixed number of printed labels lets you insert the number of copies manually.
Dynamically dened number of printed labels sets the number dynamically using a data source value.
Example:
The number of printed records can be dened using a variable value. Its value may be set in another
label or form object.
Use the same record for entire print job prints out the single selected record on the entire range of
labels in a print job.
Click Next to proceed or Finish to continue working with the object.
Read more about how to dene the number of printed copies here.
Step 4: Create Objects
This step lets you decide whether new Text objects that display the content retrieved from database
elds should be added to a label/form or not.
Create Objects step is visible when:
• Starting the database wizard from Data tab ribbon and adding a new database by clicking the
database button.
• Starting the wizard in Dynamic Data Explorer or using a generic object Add database selector.
278

TIP
The Create Objects step diers if you are adding a database while designing a label or
a form. See the dierences below.
Create Objects step for label designing:
• Create a label text object for each eld: adds a Text object that contains database eld content.
• Do not create any label objects: skips adding new objects.
Create Objects step for form designing:
• Create an edit eld object for each eld: adds an edit eld object to the form. The added
object(s) contains database eld content.
• Create a form table object: adds a database table object to a form. The added object(s) contains
database eld content.
• Do not create any label objects: skips adding new objects.
NOTE
The number of added objects depends on the number of elds in the database.
Click Next.
Step 5: Data Preview and Other Table Settings
This step gives a preview of the data retrieved from the database. It also oers additional table
settings such as ltering and sorting.
Data tab displays a preview of data retrieved from the database le. You can use search controls at
the top of the preview section to nd a specic record.
NOTE
Data preview shows up to 1000 rows.
Filter tab lters out the database le records. It allows you to dene ltering conditions to be used
when retrieving the data.
• Add condition: species single line condition(s) that lters out the content that meets the set
criteria.
• Add group: species group(s) of conditions that lter out the content that meets the set criteria.
Sorting tab allows you to sort the retrieved data. Sorting is done for all of the elds that are added to
the sorting list. Each eld can be in ascending or descending order.
279

Data Retrieving tab denes how the data should be retrieved from the connected database le.
Details on data retrieving settings and options are available here.
SQL tab oers a preview of the generated SQL statements.
Read more details about database table conguration here.
Click Finish. The database is ready to be used as a label or form object data source.
6.3.3.8. Database Wizard for Adding Databases via OLE DB
PRODUCT LEVEL INFO
This section applies to NiceLabel 2019 Pro and PowerForms editions.
This section describes how to add various types of databases via OLE DB source to a form or label
object using the Designer Step-by-Step Database Wizard.
The OLE DB extracts data from a variety of OLE DB-compliant relational databases by using a
database table, a view, or an SQL command.
Example:
OLE DB can extract data from tables in Microsoft Access or SQL Server databases.
Step 1: Connection Settings
This step denes the OLE DB connection details.
Provider denes the provider to be used for accessing the data by exposing the OLE DB interfaces.
Authentication provides user name and password for establishing the connection.
Test Connection button starts a connection testing procedure. It checks if Designer can successfully
connect to the database.
Authentication provides user name and password that are used for the connection.
Advanced Conguration options are:
• Automatically browse for tables automatically displays the available OLE database tables. If this
checkbox is cleared, you will have to enter the table name manually.
Show Connection String displays the current database connection string and allows it to be inserted
or modied.
280

WARNING
Connection string editing is intended for advanced users only. To congure the
database connection, users are encouraged to use standard inputs or Advanced
Setup dialog.
Advanced Setup button opens the Data Link Properties window allowing the user to dene the
connection properties. Data Link Properties is a Windows system dialog – read more about its
properties here.
NOTE
When connecting to a password protected database, make sure the Allow saving
password option is selected. If not, even after a successful Test Connection
procedure, database access is not going to be granted.
Test Connection button starts a connection testing procedure to conrm if a connection with
database has been established successfully. A conrmation or error message appears.
Click Next.
Step 2: Tables and Fields
Tables group allows you to select which tables of the connected database should be used as data
source.
• Available tables: available tables in the selected database.
• Selected tables: tables that are used as data source.
Click Add > or < Remove buttons to add or remove the tables from the Selected elds.
281

NOTE
When editing an existing database, a table cannot be removed if used in a script,
function, action, or connected to a label or form object.
Step 3: Label Copies Per Record
This step species the number of label copies to be printed for each database record.
Fixed number of printed labels lets you insert the number of copies manually.
Dynamically dened number of printed labels sets the number dynamically using a data source value.
Example:
The number of printed records can be dened using a variable value. Its value may be set in another
label or form object.
Use the same record for entire print job prints out the single selected record on the entire range of
labels in a print job.
Click Next to proceed or Finish to continue working with the object.
Read more about how to dene the number of printed copies here.
Step 4: Create Objects
This step lets you decide whether new Text objects that display the content retrieved from database
elds should be added to a label/form or not.
Create Objects step is visible when:
• Starting the database wizard from Data tab ribbon and adding a new database by clicking the
database button.
• Starting the wizard in Dynamic Data Explorer or using a generic object Add database selector.
TIP
The Create Objects step diers if you are adding a database while designing a label or
a form. See the dierences below.
Create Objects step for label designing:
• Create a label text object for each eld: adds a Text object that contains database eld content.
• Do not create any label objects: skips adding new objects.
Create Objects step for form designing:
282

• Create an edit eld object for each eld: adds an edit eld object to the form. The added
object(s) contains database eld content.
• Create a form table object: adds a database table object to a form. The added object(s) contains
database eld content.
• Do not create any label objects: skips adding new objects.
NOTE
The number of added objects depends on the number of elds in the database.
Click Next.
Step 5: Data Preview and Other Table Settings
This step gives a preview of the data retrieved from the database. It also oers additional table
settings such as ltering and sorting.
Data tab displays a preview of data retrieved from the database le. You can use search controls at
the top of the preview section to nd a specic record.
NOTE
Data preview shows up to 1000 rows.
Filter tab lters out the database le records. It allows you to dene ltering conditions to be used
when retrieving the data.
• Add condition: species single line condition(s) that lters out the content that meets the set
criteria.
• Add group: species group(s) of conditions that lter out the content that meets the set criteria.
Sorting tab allows you to sort the retrieved data. Sorting is done for all of the elds that are added to
the sorting list. Each eld can be in ascending or descending order.
Data Retrieving tab denes how the data should be retrieved from the connected database le.
Details on data retrieving settings and options are available here.
SQL tab oers a preview of the generated SQL statements.
Read more details about database table conguration here.
Click Finish. The database is ready to be used as a label or form object data source.
283

6.3.3.9. Database Wizard for ODBC Data Sources
This section describes how to work with Designer Step-by-Step Database Wizard when adding an
ODBC data source.
The Microsoft® ODBC Data Source Administrator manages database drivers and data sources. This
application is located in the Windows Control Panel under Administrative Tools.
For information about detailed ODBC Administrator procedures, open the ODBC Data Source
Administrator dialog box and click Help.
Step 1: Connection information
This step denes the database connection details.
Connection Information group denes the type of database that is going to be used with ODBC
connection.
• Data Source: denes the database to retrieve the data from. Databases that are listed in the
dropdown list are managed using the ODBC Administrator.
• Driver: displays the database driver according to the selected data source.
Authentication group includes user name and password elds for the ODBC connection. User
authentication is necessary in certain cases – e.g., if SQL authentication is required when connecting
to an SQL server.
• User name: enter the correct user name to access the ODBC database.
• Password: enter the correct password to access the ODBC database.
NOTE
Username and password are always shown. Their use depends on the database
administration policy.
ODBC Administrator button opens the system ODBC administration dialog. See more details about
the dialog here.
Test Connection button starts a connection testing procedure. It checks if Designer can successfully
connect to the database.
Step 2: Tables and Fields
Tables group allows you to select which tables of the connected database should be used as data
source.
• Available tables: available tables in the selected database.
• Selected tables: tables that are used as data source.
284

Click Add > or < Remove buttons to add or remove the tables from the Selected elds.
NOTE
When editing an existing database, a table cannot be removed if used in a script,
function, action, or connected to a label or form object.
Step 3: Label Copies Per Record
This step species the number of label copies to be printed for each database record.
Fixed number of printed labels lets you insert the number of copies manually.
Dynamically dened number of printed labels sets the number dynamically using a data source value.
Example:
The number of printed records can be dened using a variable value. Its value may be set in another
label or form object.
Use the same record for entire print job prints out the single selected record on the entire range of
labels in a print job.
Click Next to proceed or Finish to continue working with the object.
Read more about how to dene the number of printed copies here.
Step 4: Create Objects
This step lets you decide whether new Text objects that display the content retrieved from database
elds should be added to a label/form or not.
Create Objects step is visible when:
• Starting the database wizard from Data tab ribbon and adding a new database by clicking the
database button.
• Starting the wizard in Dynamic Data Explorer or using a generic object Add database selector.
TIP
The Create Objects step diers if you are adding a database while designing a label or
a form. See the dierences below.
Create Objects step for label designing:
• Create a label text object for each eld: adds a Text object that contains database eld content.
• Do not create any label objects: skips adding new objects.
285

Create Objects step for form designing:
• Create an edit eld object for each eld: adds an edit eld object to the form. The added
object(s) contains database eld content.
• Create a form table object: adds a database table object to a form. The added object(s) contains
database eld content.
• Do not create any label objects: skips adding new objects.
NOTE
The number of added objects depends on the number of elds in the database.
Click Next.
Step 5: Data Preview and Other Table Settings
This step gives a preview of the data retrieved from the database. It also oers additional table
settings such as ltering and sorting.
Data tab displays a preview of data retrieved from the database le. You can use search controls at
the top of the preview section to nd a specic record.
NOTE
Data preview shows up to 1000 rows.
Filter tab lters out the database le records. It allows you to dene ltering conditions to be used
when retrieving the data.
• Add condition: species single line condition(s) that lters out the content that meets the set
criteria.
• Add group: species group(s) of conditions that lter out the content that meets the set criteria.
Sorting tab allows you to sort the retrieved data. Sorting is done for all of the elds that are added to
the sorting list. Each eld can be in ascending or descending order.
Data Retrieving tab denes how the data should be retrieved from the connected database le.
Details on data retrieving settings and options are available here.
SQL tab oers a preview of the generated SQL statements.
Read more details about database table conguration here.
Click Finish. The database is ready to be used as a label or form object data source.
286

6.3.3.10. Database Editing
Edit Database button re-starts the Step-by-Step Database Wizard for conguring an existing
database.
To properly recongure a database that has already been added, follow the below listed steps.
Step 1: Dene Database Table
Use this step select among the existing databases. Select the database and the table you wish to edit.
Click Next to proceed.
Step 2: Connection Settings
This step denes the database connection parameters.
NOTE
The available parameters depend on the selected database type.
File name denes the database le location.
Advanced Setup opens the system conguration dialog. Data Link Properties window allows you to
set the connection properties. Data Link Properties is a Windows system dialog – read more about its
properties here.
Test Connection button starts a connection testing procedure. It checks if Designer can successfully
connect to the database.
Click Next.
Step 3: Tables and Fields
Tables group allows you to select which tables of the connected database should be used as data
source.
• Available tables: available tables in the selected database.
• Selected tables: tables that are used as data source.
Click Add > or < Remove buttons to add or remove the tables from the Selected elds.
NOTE
When editing an existing database, a table cannot be removed if used in a script,
function, action, or connected to a label or form object.
287

Step 4: Label Copies Per Record
This step species the number of label copies to be printed for each database record.
Fixed number of printed labels lets you insert the number of copies manually.
Dynamically dened number of printed labels sets the number dynamically using a data source value.
Example:
The number of printed records can be dened using a variable value. Its value may be set in another
label or form object.
Use the same record for entire print job prints out the single selected record on the entire range of
labels in a print job.
Click Next to proceed or Finish to continue working with the object.
Read more about how to dene the number of printed copies here.
Step 5: Create Objects
This step lets you decide whether new Text objects that display the content retrieved from database
elds should be added to a label/form or not.
Create Objects step is visible when:
• Starting the database wizard from Data tab ribbon and adding a new database by clicking the
database button.
• Starting the wizard in Dynamic Data Explorer or using a generic object Add database selector.
TIP
The Create Objects step diers if you are adding a database while designing a label or
a form. See the dierences below.
Create Objects step for label designing:
• Create a label text object for each eld: adds a Text object that contains database eld content.
• Do not create any label objects: skips adding new objects.
Create Objects step for form designing:
• Create an edit eld object for each eld: adds an edit eld object to the form. The added
object(s) contains database eld content.
288

• Create a form table object: adds a database table object to a form. The added object(s) contains
database eld content.
• Do not create any label objects: skips adding new objects.
NOTE
The number of added objects depends on the number of elds in the database.
Click Next.
Step 6: Data Preview and Other Table Settings
This step gives a preview of the data retrieved from the database. It also oers additional table
settings such as ltering and sorting.
Data tab displays a preview of data retrieved from the database le. You can use search controls at
the top of the preview section to nd a specic record.
NOTE
Data preview shows up to 1000 rows.
Filter tab lters out the database le records. It allows you to dene ltering conditions to be used
when retrieving the data.
• Add condition: species single line condition(s) that lters out the content that meets the set
criteria.
• Add group: species group(s) of conditions that lter out the content that meets the set criteria.
Sorting tab allows you to sort the retrieved data. Sorting is done for all of the elds that are added to
the sorting list. Each eld can be in ascending or descending order.
Data Retrieving tab denes how the data should be retrieved from the connected database le.
Details on data retrieving settings and options are available here.
SQL tab oers a preview of the generated SQL statements.
Read more details about database table conguration here.
Click Finish.
289

6.3.4. Manual Database Connection Setup
PRODUCT LEVEL INFO
This section applies to NiceLabel 2019 Pro and PowerForms editions.
Setting up a database connection manually gives you complete control over database connection
settings and conguration options.
NOTE
This option is intended for advanced users. It allows detailed conguration and oers
all of the available database connection settings. NiceLabel recommends using the
Database Wizard.
Manual database connections are done in three steps:
1. First step sets up the database connection.
2. Second step allows you to choose which database tables will be used.
3. Third step allows you to congure the connected database tables.
To connect to a database manually, follow the procedures described in the below listed topics:
• Connect to Microsoft Excel File
• Connect to Microsoft Access File
• Connect to Microsoft SQL Server File
• Connect to Text File
• Connect to Oracle Database
• Connect to MySQL Database
• Connect to OLE Database
• Connect to ODBC Data Source
6.3.4.1. Connect to Microsoft Excel File
Microsoft Excel databases can be used as a dynamic data source for label objects or form objects.
Before you manually set up a database connection, open the Dynamic Data Manager. This dialog
enables the user to manage the variable data sources for label and form objects.
Click Database Connections button in the Dynamic Data Manager ribbon and select Microsoft Excel
as the preferred database type. New database connection properties window opens.
290

To manually connect to an Excel le database, complete the below listed steps.
Step 1: Connection Setup
Connection type group allows you to dene the type of database connection.
Connection Information group denes database le details.
• File name: denes the database le to be used in the connection.
• Advanced Setup: opens the Data Link Properties window. This window allows you to dene the
connection properties. Data Link Properties is a Windows system dialog – read more about its
properties here.
• Test Connection: button starts a connection testing procedure. It shows if a connection with the
database has been established successfully. A conrmation or error message appears
depending on the connection status.
Click OK when done. Database properties window appears.
Database Connection group denes the connection name and describes it.
• Connection name: denes the name for the connected database le. By default, it displays the
lename of the connected le. Insert a new name to make it easy to be found in the
DesignerDynamic Data Explorer.
• Description: allows adding additional information and suggestions for the connected database.
• Connection: identies the currently connected database le. To replace the currently connected
le, click the Connection Setup button. New Database Connection Properties window reappears
– repeat step 1 to connect to an alternative database le.
291

Step 2: Database Table Selection
Tables group allows you to select which tables of the connected database should be used as data
source.
• Available tables: available tables in the selected database.
• Selected tables: tables that are used as data source.
Click Add > or < Remove buttons to add or remove the tables from the Selected elds.
NOTE
When editing an existing database, a table cannot be removed if used in a script,
function, action, or connected to a label or form object.
Click OK when done.
Step 3: Conguration of Database Tables and Fields
Read about how to congure the connected table here.
Read about how to congure the database elds here.
Click OK when done.
292

6.3.4.2. Connect to Microsoft Access File
Microsoft Access databases can be used as a dynamic data source for label objects or form objects.
Before you manually set up a database connection, open the Dynamic Data Manager. This dialog
enables the user to manage the variable data sources for label and form objects.
Click Database Connections button in the Dynamic Data Manager ribbon and select Microsoft Access
as the preferred database type. New database connection properties window opens.
To manually connect an object to an Access le database, complete the below listed steps.
Step 1: Connection Setup
Connection type group allows you to dene the type of database connection.
Connection Information window denes database le details.
• File name: denes the database le to be used in the connection.
Authentication group provides User name and Password for connecting to a protected le.
• Advanced Setup: opens the Data Link Properties window. This window allows you to dene the
connection properties. Data Link Properties is a Windows system dialog – read more about its
properties here.
• Test Connection: starts a connection testing procedure. It shows if a connection with the
database has been established successfully. A conrmation or error message appears
depending on the connection status.
Click OK when done. Database properties window appears.
293

Database Connection group denes the connection name and describes it.
• Connection name: denes the name for the connected database le. By default, it displays the
lename of the connected le. Insert a new name to make it easy to be found in the
DesignerDynamic Data Explorer.
• Description: allows adding additional information and suggestions for the connected database.
• Connection: identies the currently connected database le. To replace the currently connected
le, click the Connection Setup button. New Database Connection Properties window reappears
– repeat step 1 to connect to an alternative database le.
Step 2: Database Table Selection
Tables group allows you to select which tables of the connected database should be used as data
source.
• Available tables: available tables in the selected database.
• Selected tables: tables that are used as data source.
Click Add > or < Remove buttons to add or remove the tables from the Selected elds.
NOTE
When editing an existing database, a table cannot be removed if used in a script,
function, action, or connected to a label or form object.
294

Click OK when done.
Step 3: Conguration of Database Table and Fields
Read about how to congure the connected table here.
Read about how to congure the database elds here.
Click OK when done.
6.3.4.3. Connect to Microsoft SQL Server Database
Microsoft SQL Server database can be used as a dynamic data source for label objects or form
objects. Before you manually set up a database connection, open the Dynamic Data Manager. This
dialog enables the user to manage the variable data sources for label and form objects.
Click Database Connections button in the Dynamic Data Manager ribbon and select Microsoft SQL
Server as the preferred database type. New database connection properties window opens.
To manually connect an object to a Microsoft SQL Server database, complete the following steps:
Step 1: Connection Setup
Connection type group allows you to dene the type of database connection.
Connection Information group denes database details.
• Server: denes the database server to be used for the connection. The available servers are
listed automatically. To add a non-listed server, insert its name or location manually.
• Authentication: selects the user authentication type.
• Use Windows authentication to login using your Windows domain credential.
• Use SQL Server authentication to login using the SQL server credentials.
Database selection group selects the database on the previously selected server. This database is
going to be used as a data source for the selected label or form object.
• Database: denes the server database to connect to.
Show Connection String displays the current database connection string and allows it to be inserted
or modied.
WARNING
Connection string editing is intended for advanced users only. To congure the
database connection, users are encouraged to use standard dialog inputs in the
dialog box.
295

Test Connection button starts a connection testing procedure. It shows if connection with the
database has been established successfully. A conrmation or error message appears depending on
the connection status.
Click OK when done.
Database Connection group denes the connection name an describes it.
• Connection name: denes the name for the connected database le. By default, it displays the
lename of the connected le. Insert a new name to make it easy to be fond in the
DesignerDynamic Data Explorer.
• Description: allows adding additional information and suggestions for the connected database.
• Connection: identies the currently connected database le. To replace the currently connected
le, click the Connection Setup button. New Database Connection Properties window reappears
– repeat step 1 to connect to an alternative database le.
296

Step 2: Database Table Selection
Tables group allows you to select which tables of the connected database should be used as data
source.
• Available tables: available tables in the selected database.
• Selected tables: tables that are used as data source.
Click Add > or < Remove buttons to add or remove the tables from the Selected elds.
NOTE
When editing an existing database, a table cannot be removed if used in a script,
function, action, or connected to a label or form object.
Click OK when done.
Step 3: Conguration of Database Tables and Fields
Read about how to congure the connected table here.
Read about how to congure the database elds here.
Click OK when done.
297

6.3.4.4. Connect to Text File
Text File database can be used as a dynamic data source for label objects or form objects.
Text les require some additional work before they are transformed into a "real" database. At start, any
text le contains data values but has no information about the data structure, name elds, and
maximum eld lengths. These missing parameters need to be specied before the text le turns into
a database which can be used as an object data source.
Example:
A widely used text database example are .csv les. In a .csv le, a delimiter separates the database
elds. Each line provides the data for a single label – therefore, it can be understood as a "record" in
database nomenclature.
Open the Dynamic Data Manager. This dialog enables the user to manage the variable data sources
for label and form objects.
Click Database Connections button in the Dynamic Data Manager ribbon and select Text File as the
preferred database type.
To manually connect an object to a text le database, complete the below listed steps.
Step 1: Connection Setup
Connection Information window denes the database le details.
• File name denes the le location.
• Test Connection: starts a connection testing procedure. It shows whether or not a connection
with the database has been established. A conrmation or error message appears depending
on the connection status.
298

Click OK when done. Database properties window appears.
Database Connection group denes the connection name and describes it.
• Connection name: denes the name for the connected database le. By default, it displays the
lename of the connected le. Insert a new name to make it easy to be found in the
DesignerDynamic Data Explorer.
• Description: allows adding additional information and suggestions for the connected database.
• Connection: identies the currently connected database le. To replace the currently connected
le, click the Connection Setup button. New Database Connection Properties window reappears
– repeat step 1 to connect to an alternative database le.
299

Step 1a: Text File Structure Wizard
Text File Structure Wizard window opens if a structure for a text le you are connecting hasn't been
dened previously.
The steps for completing the Text File Structure Wizard are described in a dedicated section.
NOTE
After nishing this procedure, a text denition .sch le with the same name as the text
database le and is created in the same folder. Next time the wizard is used on the
same le, this procedure is no longer required.
Step 2: Conguration of Database Tables and Fields
Read about how to congure the connected table here.
Read about how to congure the database elds here.
Click OK when done.
6.3.4.5. Connect to Oracle Database
Oracle database can be used as a dynamic data source for label objects or form objects.
300

Open the Dynamic Data Manager. This dialog enables the user to manage the variable data sources
for label and form objects.
Click Database Connections button in the Dynamic Data Manager ribbon and select Oracle as the
preferred database type. New database connection properties window opens.
NOTE
To connect to Oracle database and use the data in NiceLabel software, you must rst
install and congure the Oracle client software on each computer with installed
NiceLabel 2019. Details are available in this NiceLabel knowledge base article: https://
kb.nicelabel.com/index.php?t=faq&id=291.
Step 1: Connection Setup
Connection type group allows you to dene the type of database connection.
Connection Information group denes database le details.
• Server:denes the database server to be used for the connection. The available servers are
listed automatically. To add a non-listed server, insert its name or location manually.
Authentication group selects user authentication type.
• Use Windows authentication: login using your Windows domain credential.
• Use SQL Server authentication: login using SQL server credentials.
Database selection selects the database on the previously selected server. This database is going to
be used as a data source for the selected label or form object.
• Database denes the server database to connect to.
Show Connection String displays the current database connection string and allows it to be inserted
or modied.
WARNING
Connection string editing is intended for advanced users only. To congure the
database connection, users are encouraged to use standard dialog inputs in the
dialog box.
Test Connection button starts a connection testing procedure. It shows if connection with the
database has been established successfully. A conrmation or error message appears depending on
the connection status.
301

Click OK when done. Database properties window appears.
Database Connection group denes the connection name an describes it.
• Connection name: denes the name for the connected database le. By default, it displays the
lename of the connected le. Insert a new name to make it easy to be fond in the
DesignerDynamic Data Explorer.
• Description: allows adding additional information and suggestions for the connected database.
• Connection: identies the currently connected database le. To replace the currently connected
le, click the Connection Setup button. New Database Connection Properties window reappears
– repeat step 1 to connect to an alternative database le.
302

Step 2: Database Table Selection
Tables group allows you to select which tables of the connected database should be used as data
source.
• Available tables: available tables in the selected database.
• Selected tables: tables that are used as data source.
Click Add > or < Remove buttons to add or remove the tables from the Selected elds.
NOTE
When editing an existing database, a table cannot be removed if used in a script,
function, action, or connected to a label or form object.
Click OK when done.
Step 3: Congure connected database
Read about how to congure the connected table here.
Read about how to congure the database elds here.
Click OK when done.
303

6.3.4.6. Connect to MySQL Database
MySQL database can be used as a dynamic data source for label objects or form objects. Before you
manually set up a database connection, open the Dynamic Data Manager. This dialog enables the
user to manage the variable data sources for label and form objects.
Click Database Connections button in the Dynamic Data Manager ribbon and select MySQL as the
preferred database type. New database connection properties window opens.
To manually connect an object to a MySQL database, complete the following steps:
Step 1: Connection Setup
Connection type group allows you to dene the type of database connection.
Connection Information window denes the database le details.
• Database: denes the exact database on a server. Enter the correct name.
• Host: denes the database server IP address or name.
• Port: denes the port of the database server.
Authentication group provides user name and password to establish the connection.
• Test Connection button starts a connection testing procedure. It checks if Designer can
successfully connect to the database.
Click OK when done. Database properties window appears.
Database Connection group denes the connection name an describes it.
304

• Connection name: denes the name for the connected database le. By default, it displays the
lename of the connected le. Insert a new name to make it easy to be fond in the
DesignerDynamic Data Explorer.
• Description: allows adding additional information and suggestions for the connected database.
• Connection: identies the currently connected database le. To replace the currently connected
le, click the Connection Setup button. New Database Connection Properties window reappears
– repeat step 1 to connect to an alternative database le.
Step 2: Database Table Selection
Tables group allows you to select which tables of the connected database should be used as data
source.
• Available tables: available tables in the selected database.
• Selected tables: tables that are used as data source.
Click Add > or < Remove buttons to add or remove the tables from the Selected elds.
NOTE
When editing an existing database, a table cannot be removed if used in a script,
function, action, or connected to a label or form object.
305

Click OK when done.
Step 3: Conguration of Database Tables and Fields
Read about how to congure the connected table here.
Read about how to congure the database elds here.
Click OK when done.
6.3.4.7. Connect to Other Databases (OLE DB)
Various types of databases can be connected to label objects or form objects via OLE DB source.
Open the Dynamic Data Manager. This dialog enables the user to manage the variable data sources
for label and form objects.
Click Database Connections button in the Dynamic Data Manager ribbon and select Other Databases
(OLE DB) as the preferred database type. New database connection properties window opens.
OLE DB extracts data from a variety of OLE DB-compliant relational databases by using a database
table, a view, or an SQL command.
Example:
OLE DB can extract data from tables in Microsoft Access or SQL Server databases.
To manually connect an object to other databases via OLE DB, complete the below listed steps:
Step 1: Connection Setup
Connection type group allows you to dene the type of database connection.
Connection Information group denes database details.
• Provider: denes the provider to be used for accessing the data by exposing the OLE DB
interfaces.
Authentication provides user name and password for establishing the connection.
Test Connection button starts a connection testing procedure. It checks if Designer can successfully
connect to the database.
306

Advanced Conguration options are:
• Automatically browse for tables (selected by default) automatically displays the available OLE
database tables. Cleared checkbox skips this step.
Show Connection String displays the current database connection string and allows it to be inserted
or modied.
WARNING
Connection string editing is intended for advanced users only. To congure the
database connection, users are encouraged to use standard inputs or Advanced
Setup dialog.
Advanced Setup button opens the Data Link Properties window allowing the user to dene the
connection properties. Data Link Properties is a Windows system dialog – read more about its
properties here.
307

NOTE
When connecting to a password protected database, make sure the Allow saving
password option is selected. If not, even after a successful Test Connection
procedure, database access is not going to be granted.
Test Connection button starts a connection testing procedure to conrm if a connection with
database has been established successfully. A conrmation or error message appears.
Click OK. Database properties window appears.
Database Connection group denes the connection name and describes it.
• Connection name: denes the name for the connected database le. By default, it displays the
lename of the connected le. Insert a new name to make it easy to be found in the
DesignerDynamic Data Explorer.
• Description: allows adding additional information and suggestions for the connected database.
• Connection: identies the currently connected database le. To replace the currently connected
le, click the Connection Setup button. New Database Connection Properties window reappears
– repeat step 1 to connect to an alternative database le.
308

Step 2: Database Table Selection
Click OK when done.
Tables group allows you to select which tables of the connected database should be used as data
source.
• Available tables: available tables in the selected database.
• Selected tables: tables that are used as data source.
Click Add > or < Remove buttons to add or remove the tables from the Selected elds.
NOTE
When editing an existing database, a table cannot be removed if used in a script,
function, action, or connected to a label or form object.
Step 3: Conguration of Database Tables and Fields
Read about how to congure the connected table here.
Read about how to congure the database elds here.
Click OK when done.
309

6.3.4.8. Connect to ODBC Data Source
Various databases can be connected to label objects or form objects via ODBC Data Source
Administrator. Open the Dynamic Data Manager. This dialog enables the user to manage the variable
data sources for label and form objects.
Click Database Connections button in the Dynamic Data Manager ribbon and select ODBC Data
Source as the preferred database type. New database connection properties window opens.
To manually connect an object to a database, using the ODBC, complete the following steps:
Step 1: Connection Setup
Connection Information group denes database details.
• Data Source denes the source to retrieve the data from.
• Driver displays the database driver according to the selected data source.
Authentication group includes user name and password elds for the ODBC connection. User
authentication is necessary in certain cases – e.g. if SQL authentication is required when connecting
to an SQL server.
• User name: enter the correct user name to access the ODBC database.
• Password: enter the correct password to access the ODBC database.
ODBC Administrator button opens the system ODBC administration dialog. Read more details about
the dialog here.
Test Connection button starts a connection testing procedure. It checks if Designer can successfully
connect to the database.
310

Click OK. Database properties window appears.
Database Connection group denes the connection name an describes it.
• Connection name: denes the name for the connected database le. By default, it displays the
lename of the connected le. Insert a new name to make it easy to be fond in the
DesignerDynamic Data Explorer.
• Description: allows adding additional information and suggestions for the connected database.
• Connection: identies the currently connected database le. To replace the currently connected
le, click the Connection Setup button. New Database Connection Properties window reappears
– repeat step 1 to connect to an alternative database le.
Step 2: Database Table Selection
Tables group allows you to select which tables of the connected database should be used as data
source.
• Available tables: available tables in the selected database.
• Selected tables: tables that are used as data source.
Click Add > or < Remove buttons to add or remove the tables from the Selected elds.
311

NOTE
When editing an existing database, a table cannot be removed if used in a script,
function, action, or connected to a label or form object.
Click OK when done.
Step 3: Conguration of Database Tables and Fields
Read about how to congure the connected table here.
Read about how to congure the database elds here.
Click OK when done.
6.3.4.9. Database Table Conguration
Table Conguration group allows you to congure the connected database table. Use the tabs below
to browse through various conguration options.
• Table name: displays the selected database table's name.
• Table alias: gives a unique display name to a table. Table alias is useful when the same table is
added for more than once under the same database connection. Alias identies these tables
when used in the Designer.
312

Fields Tab
Available elds frame lists the available elds of the connected database table. Select the elds from
the list.
Selected elds displays the elds that are used as connected data source.
The elds can be added to or removed from the Selected elds using Add > and < Remove buttons.
To use the entire range of available elds , use Add all >> and << Remove All buttons.
Refresh Fields rereads the connected database table and displays the refreshed available elds.
Filter Tab
Enable lter commands activates the table lter. Use it to lter out the displayed database elds as
dened by a condition or a group of conditions.
Add condition button creates a custom lter. Select standard qualiers: equals, does not equal, is less
than, is less than or equal to, is greater than, is greater than or equal, like, not like, is blank, is not blank.
Add group button activates nesting two or more conditions for a lter. Use a group to build a more
complex ltering condition for a eld. The conditions can be joined using AND (all conditions must be
true in order to display the record) or OR (only one condition must be true in order to display the
record) logical qualiers.
The list of dened conditions and groups is placed below the table. Remove the lter(s) by clicking the
Remove button.
Sorting tab
Field column allows you to decide which eld in a table shuld be used to sort the data.
Sort Order denes whether the records as displayed Ascending or Descending. Select the sort order
from the dropdown menu.
Example:
In Pasta.xlsx sample database, select Prod_desc eld with Ascending order. The data appears sorted
by product description and ordered alphabetically from A to Z.
313

Data Retrieving Tab
Data selection at print time initialization group denes database print time record selection and
printing options.
• Show record selection at print time: enables manual selection of database records before
printing. The content of selected records is displayed in label objects and printed.
TIP
When enabled, this option adds a selection column to the database table on the
print dialog. This column allows individual selection of the records to be printed.
• Default print: denes which database records would be selected in the print dialog by default.
• All records: prints out the entire range of selected records.
• First record: only prints out the rst record in a table.
• Last record: only prints out the last record in a table.
Number of copies per record group sets print quantities for individual database records.
• Copies per record: denes how many labels should be printed per single database record.
• Number of copies can be changed at print time: allows setting the number of printed label
copies for a single database record right before printing.
TIP
When enabled, this option adds a column to the database table in printing form. This
column allows individual setting of print quantity for the selected record.
Advanced options group allows you to set how multiple database records should be displayed.
314

• Collect records: displays the content of multiple records in a single object.
• Delimiter: denes which character should separate the database record values when
displayed in an object.
• Limit number of collected records: enables the maximum number of displayed records in a
single object.
• Records: sets the maximum number of database records to be displayed in an object.
• Span multiple labels: displays collected records in an object on the rst label and
continues displaying collected records which follow over the next labels in the print job.
Example:
By default, Designer prints one label for each database record.
1. With connected Pasta.xlsx database, the result is:
2. With enabled Collect records options (3 records), the result is:
Note that all printed labels contain the same data from the collected table (data
from the rst 3 rows) and an innite number of labels is going to be printed by
default (Print all labels (unlimited) option selected). To limit the number of labels,
enter the number of printed labels.
3. With enabled Collect records option (3 records) and enabled Span multiple labels
option, the result is:
With 3 collected records dened, all labels are printed with content of the 3
collected records. Each label includes data of these three records – if Print all labels
(unlimited) option is enabled, all database records are printed as sorted in the table.
315

• Use the same record for entire print job: prints out the single selected record on the entire range
of labels in a print job.
SQL Tab
SQL tab displays current SQL statements that are used with the connected database. Commands in
SQL statements determine how to obtain the data from the database (elds, lters, data sorting). The
displayed SQL sentence is auto-generated.
By default, SQL statement is read-only. Designer also allows you to modify it or write your own
sentence.
• Edit SQL: converts table object into a query object. This button allows dening custom tables
that are based on SQL queries.
NOTE
This option is for experienced users only. If you make a mistake and create an
invalid SQL statement, the query results become unpredictable. No data will be
returned from the database or connection to the database will become
impossible.
• Export: saves the current SQL statement as an SQL le on a disk.
• Import: allows external SQL statements to be used with the current database.
Data Tab
Data tab displays the connected database le table. Use search eld and eld selector to nd the
records.
6.3.4.10. Database Field Conguration
Details group allows dening the connected database eld properties. Set these properties to make
the use of a database as simple and ecient as possible.
316

• Field name: dened automatically by the source database le.
• Field alias: gives a unique display name to a eld.
WARNING
When using Python or VBScript, use eld alias names that contain alphanumeric and
underscore characters only. The names must not start with a digit.
• Type: identies the data type of a database eld. This property depends on the connected
database eld and cannot be edited.
• Length: (not available for Text File) displays the eld length as dened by the database.
• Code page: provides support for the character sets used in dierent countries or regions. Code
pages are referred to by number – select the appropriate one from the dropdown list.
Data group sets the database eld length limitations.
• Limit eld length (truncate excessive content): enables the maximum eld length limitation. Extra
characters are removed.
• Length (characters): denes the exact maximum eld length using the number of allowed
characters.
317
• Provisional value denes a custom placeholder variable value in an object while designing labels
or forms. In a label object, the provisional value is replaced by the real variable value at print
time. In a form object, the real variable value appears when the form is run.
TIP
In case of connected databases, the rst record's value is taken as the
provisional value.
Output data group enables you to store database record content and use it in actions.
NOTE
Output data can be assigned to a variable with the following form objects: Edit Field,
Memo Field, Combo Box, List Box, and Radio Group.
• Set value to variable: denes the output variable that stores copied value from the database
variable.
Example:
The output variable is useful in the following cases:
1. Certain actions in solutions are triggered when the database content changes. The changed
value is stored in the database variable. Because the database variable value cannot be
directly used to set the action, use the output variable. This variable will obtain and store the
changed value, and trigger the action after its value will change.
2. Changes in database elds are directly reected in the connected database. Use the output
variable to delay such database updates.
3. In certain cases, database updates are done using a custom SQL statement. Also in this case,
the updates are done using the output variable.
6.3.4.11. Databases with Custom SQL Queries
Designer allows dening custom tables that are based on SQL queries. Two methods are available for
creating a custom SQL query:
1. Create a new SQL query.
Go to Dynamic Data Manager > Database Connection Tables and click Create new query in
the Available tables eld.
2. Convert an existing database table into a query object.
Go to Dynamic Data Manager > Table Conguration > SQL Tab and click the Edit SQL button.
This converts the connected database into a Query object.
318

NOTE
This option is for experienced users only. If you make a mistake and create an invalid
SQL statement, the query results become unpredictable. No data will be returned from
the database or connection to the database will become impossible.
NOTE
This option is not available for text database les.
Insert a custom query into the edit eld. Click OK when done.
NOTE
SQL statement eld must not be left empty. An error appears if trying to continue
without dening the statement.
6.3.4.12. Database Connection Conguration
Existing database connections are congurable at any time. To add or remove tables from a
connected database le, open the Dynamic Data Manager and double-click the database in the
Dynamic Data Explorer.
Database Connection group gives information on the connection database.
• Connection name: denes the name for the connected database le.
• Description: allows adding additional information and suggestions for the connected database.
• Connection identies: currently connected database le. To replace the currently connected le,
click the Connection Setup button. New Database Connection Properties window reappears –
repeat step 1 to connect to an alternative database le.
NOTE
You can add the same database table more than once if dierent record ltering or
sorting is required.
Tables group displays the available database tables and the tables that are selected to be used.
• Available tables: frame with available tables of the connected database. Select the tables from
the list.
• Selected tables: tables to be further used as the data source.
319
Tables can be added to or removed from the Selected tables using Add > and < Remove buttons. To
use the entire range of available tables, use Add all >> and << Remove All buttons.
• Refresh Tables: rereads the connected database le and displays the refreshed available tables.
NOTE
Tables that are already used as any object's data source cannot be removed. A
warning appears when trying to remove such table.
6.3.4.13. Using Text File Structure Wizard
A "real" database must contain structured data. Text databases lack data structure, which means that
the structure must be dened before a text le can be used as data source. Dene the structure using
the Text File Structure Wizard.
NOTE
Text File Structure Wizard opens if a text le you are connecting to has not been
previously used as object data source.
To complete the text le structure wizard, complete the below described steps.
Step 1: Welcome
Welcome window displays the text le you are going to convert into a database and use as a data
source of an object. Make sure the correct text le is displayed under Selected text le.
Click Next.
Step 2: Data Encoding
This step sets the Encoding type. The following types are available:
• Auto
• ASCII
• UTF-8
• UTF-16
• UTF-16BE
When in doubt which encoding should be used, select Auto for automatic detection of encoding type.
Auto identies the encoding type by reading the BOM unicode character. If BOM is not included or is
misinterpreted, Auto presumes, the text uses ASCII encoding.
320

Inadequate character type identication might cause the database structure to be displayed
incorrectly.
NOTE
While selecting the encoding type, check the preview eld. Correct values must be
displayed.
Click Next.
Step 3: Data Structure
This step denes the elds to be used in the text database. There are two options:
• Delimited: elds are separated by a delimiter.
• Fixed width: elds with predened (xed) length.
• First row contains eld names: denes if the eld names are included in the rst row of the
database le.
• Start import at row denes the row in the database le from which the data import starts.
This option enables skipping the rows that do not include data.
Check the preview eld. Click Next if the text content is displayed properly.
Step 4: Set Column Breaks
This step depends on the previously selected data structure option – Delimited or Fixed width.
Delimited opens the Fields Delimiterwindow.
• Delimiter: denes the delimiting character. Select among the standard characters or insert a
custom delimiter in Other eld.
• Text qualier: character that indicates textual content. Text qualier should be used if a delimiter
is a part of the text eld content. Text qualier should be used to enclose such eld – the text
between two text qualiers is treated as a single eld although it contains a delimiter.
Fixed width opens the Set Column Breaks window. Use mouse pointer to place the vertical lines where
the data elds are going be separated. The lines indicate where new elds start.
Click Next.
Step 5: Fields
Fields window allows you to manipulate and ne-tune the eld names and the order in which they are
displayed. The below listed settings are also available:
321

• In case of Delimited elds, the Field Name can be customized.
• With Fixed width elds, the following settings are allowed:
• Include: includes a eld in the selection.
• Field name: custom name for the eld.
• Oset: separation line distance from the left table edge.
• Length: eld length.
Click Finish. Text le database structure is set.
6.3.4.14. Database Connection Conguration for Text Files
Connection name denes the name for the connected database le. By default, it displays the
lename of the connected le. Insert a new name to make it easy to be fond in the DesignerDynamic
Data Explorer.
Description is a eld that allows adding additional information and suggestions for the connected
database.
Connection identies the currently connected database le. To replace the currently connected le,
click the Connection Setup button. New Database Connection Properties window reappears – repeat
step 1 to connect to an alternative database le.
Fields Tab
Available Fields frame lists available elds of the connected database le. Select the eld(s) from the
list.
Selected elds displays the elds (columns) to be further used as the data source.
Fields can be added to or removed from the Selected elds using Add > and < Remove buttons. To
use the entire range of available table elds (columns), use Add all >> and << Remove All buttons.
Dene Fields opens the Text File Structure Wizard. This wizard denes the text le database elds.
NOTE
(Re)dening of elds becomes necessary when the elds are edited or when the eld
structure gets changed (inserted column, deleted record, etc.).
Refresh Fields rereads the connected database le and displays the refreshed available elds.
322

Data Retrieving Tab
Data selection at print time initialization group denes database print time record selection and
printing options.
• Show record selection at print time initialization enables you to manually select the database
records before printing. The content of selected records is displayed in label objects and
printed. When enabled, this option adds a selection column to the database table. This column
allows individual selection of the records to be printed.
• Default print denes how many database records should be printed by default.
• All records prints out the entire range of selected records.
• First record only prints out the rst record in a table.
• Last record only prints out the last record in a table.
Number of copies per record sets print quantities for individual database records.
• Copies per record denes how many labels should be printed per single record. The value can
be set manually or dynamically using a data source.
• Number of copies can be changed at print time option allows you to set the number of printed
label copies for a single database record. When enabled, this option adds a column to the
database table. This column allows individual setting of print quantity for the selected record.
Advanced options allow you to set how multiple records can be displayed.
• Collect records displays the content of multiple records in a single object.
• Delimiter denes how the records are separated when displayed in an object. Set New line
(CR/LF) or select a special character from the list.
• Limit number of collected records enables the maximum number of displayed records in a single
object.
• Records sets the maximum number of records to be displayed in an object.
• Span multiple labels enables the records to be displayed in an object over multiple labels.
• Use the same record for entire print job prints out the selected record only.
Data Tab
Data tab provides a preview of the connected database le. It enables eld ltering and record search.
NOTE
Up to 1000 rows are displayed in the preview.
323

6.4. Internal Variables
PRODUCT LEVEL INFO
This section applies to NiceLabel 2019 Pro and PowerForms editions.
An internal variable performs as a dynamic data source which holds a value that is automatically
retrieved from a running application and system environment.
Select internal variables by clicking the Internal Variables button in the Data Sources ribbon. Select
the appropriate variable checkboxes.
NOTE
The variables in this set can neither be edited nor modied. Their value is updated with
every printed label.
List of available internal variables with description:
LabelFileName
The path and le name of the currently opened label le.
ShortLabelName The le name of the currently opened label le.
RequestedQuantity The quantity of labels requested for printing. This is the number of
labels printed.
TotalQuantityPrinted Total quantity of the printed labels. The number is the sum of label
quantities from all label batches.
CurrentBatchQuantity The number of labels reached in the current label batch. The value is
reset at beginning of each label batch in the printing process.
LabelPrinterName The name of the printer driver currently selected for printing.
DefaultPrinterName The name of the default printer driver.
UserName The application use rname of the currently logged-in user. It will have
a value only if in-application authentication is enabled.
SystemUserName The Windows user name of the currently logged-in user.
ComputerName The name of the computer on which the application is running.
SolutionFileName Current solution le name.
ShortSolutionFileName Current short solution le name.
SolutionFilePath Path to solution le name.
324

FormName The path and name of the form application used for label printing
instead of Print dialog box.
ShortFormName Short name of the form application used for label printing instead of
Print dialog box.
EPCData EPCData as read from the RFID tag.
LabelRevision Label Revision Description.
AccessRoles Contains comma-separated lists of every assigned access role for
your users. Enable Authentication in Control Center to use
AccessRoles. Your solution cannot retrieve AccessRoles from
Control Center when you work oine.
6.5. Global Variables
PRODUCT LEVEL INFO
The use of NiceLabel Control Center is applicable to LMS Pro and LMS Enterprise
only.
Global variable is a type of variable that can be shared among multiple NiceLabel 2019 documents.
Once dened, it is stored in a le outside the current label.
The global variable's last value is stored after each conrmation and with each printing action. The
stored values are useful if continued numbering from preceding print jobs is required. Global variable
values are stored in a separate le on a disk or on a NiceLabel Control Center.
TIP
By default, global variable storage location is set to C:\ProgramData\NiceLabel
\Global Variables\. File name is Globals.tdb.
You can create global variables in Designer or in NiceLabel Control Center. After you design a label or
solution that uses global variables, you must dene which global variables are you going to use.
Designer can either work with global variables that are stored locally in the Globals.tdb le, or with
global variables that you created ad stored in the Control Center.
To select the right source of your global variables, go to File > Options > Global Variables.
Details on how to create and congure global variables in Control Center are available in the Control
Center user guide, page 40.
To use the global variables from your Control Center, make sure Designer and Control Center are
connected.
325

When creating a copy of the label le that uses global variables and using it on another computer,
make sure the global variable source is accessible (in a .tdb le or in your NiceLabel Control Center).
• Add and manage global variables.
• Congure global variables.
NOTE
If you skip this step, the labeling application won't nd the corresponding global
variable. A warning message will appear.
TIP
All label or solution global variables are managed in Dynamic Data Explorer.
6.5.1. Adding Global Variables as Object Data Sources
To add a new global variable in the Dynamic Data Manager, use one of the following methods:
• Click Global Variable button in the dialog ribbon. Global variable conguration window appears.
• Click Add new global variable under Global variables in Dynamic Data Explorer. Global variable
conguration window appears.
TIP
A new global variable is listed in the toolbar and ready to be used as a dynamic object
content source. Add an object to the design surface and assign the global variable to
it.
326

6.5.2. Global Variable Conguration
Global variable is a type of variable that can be shared among multiple labels. Once it is dened, it is
stored outside the current label.
NOTE
If a global variable is not dened or inaccessible, a warning appears on the top of the
dialog window. To crate a global variable, click the link inside the warning. Make sure
the correct data source is dened in the Options dialog.
6.5.2.1. General Tab
About group of settings identies the global variable and sets its denition.
• Persistent ID: identier of the global variable. It serves as a unique reference from any
connected source. Allowed values are 10000–99999.
• Name: unique global variable name. This name is used as a user-friendly identier.
NOTE
Avoid using non-alphanumeric characters when dening the variable name.
TIP
Enter the name to make the variable easy to nd when listed among other variables in
the Dynamic Data Explorer.
• Description: is a eld that allows adding additional information and suggestions.
• Current value: value that is assigned to a global variable when created. It is dened using one of
the following methods:
• Manually entering a xed value. Characters from any group of allowed characters are
permitted.
• Using a special character:
• Special character can be entered manually using the less than/greater than signs,
e.g., <CR>, <LF> ...
• Special character can be selected from the dropdown list.
327

TIP
Make sure the inserted current value meets the criteria dened with Output Rules for
each data type.
Counter group settings allow you to congure global variables that perform the role of a counter.
• Do not use a counter: prevents the global variable from being used as a label counter.
• Incremental counter: counter value increases along with the printed labels.
• Decremental counter: counter variable value decreases along with the printed labels.
• Step: amount of units that represent the next state of counter value.
• Repetition: number of repetitions for each counter value.
NiceLabel 2019 allows you to simultaneously design and print multiple labels using the same global
counter variable. Because the purpose of global counter variable is to ensure counter value continuity
among multiple labels, its value gets locked while the global variable le is in use – i.e. a label is
printed. Label preview for all labels displays the last retrieved value from the global variable le (or
from NiceLabel Control Center if used), while the counter values on printed labels obtain and show
their actual values.
Example:
Label A: Current value = 1; print quantity = 5. Global counter printed values are 1, 2, 3, 4, 5.
Label B: Current value after Label A print = 6; print quantity = 5. Global counter printed values are 6, 7,
8, 9, 10.
Input Rules Tab
Data denes the counter input criteria.
• Allowed characters: permitted characters for variable values. Groups of allowed characters for
data input ltering are described in section Groups of Allowed Characters.
Example:
Non-numeric characters can also be used as counter values. Alphanumeric sets the sequence with
Step = 3 and Initial value = 1 as 1, 4, 7, A, D, G, J, M, P, S, V, Y, b, e, h, ...
• Limit length: maximum length of a variable value.
• Length (characters): species the exact permitted number of characters.
328

• Fixed length: variable must contain the exact given number of characters as dened in the Limit
variable length.
Output Rules Tab
Prex and Sux are characters that are added to a variable value.
• Prex: text placed in front of the variable value.
• Sux: text placed behind the variable value.
Pad Character lls empty character position until the maximum variable length for a variable is
reached. Pad character is enabled only if the Limit variable length in the Input rules tab is enabled.
• Padding: denes the mode of padding.
• Not used: does not use padding.
• On left: adds pad characters on the left side of the data value.
• On right: adds pad characters on the right side of the data value.
• Surrounding value: adds pad characters on both sides of the data value.
• Character: character used for padding.
6.6. Adding and Deleting Data Sources
NiceLabel 2019 allows you to add the dynamic data sources in multiple ways:
• in Dynamic Data Explorer
• in Dynamic Data Manager
• using the label or form object properties dialog
• when dragging objects to design surface by clicking the arrow next to the object icon
While you can add data sources in multiple ways, you can delete the data sources in Dynamic Data
Manager.
NOTE
You can only delete the data sources that are not connected to any of the objects that
you use on your label or form.
329

6.7. Groups of Permitted Input Characters
There are multiple variable format that may be used to lter the input. This helps avoiding mistakes
when entering data. The user is only allowed to enter the permitted characters.
All Select this format when there is no need to limit the variable input data. For
example: a variable can be used to dene changes in barcode, text and graphics.
Numeric Use this format for numeric variables such as serial numbers, EAN and UPC
barcodes. Only numeric characters in the range from 0 to 9 can be entered.
Sequence: 0123456789
Alphanumeric Use this format when numbers and characters are mixed in the same variable.
Characters from 0 to 9 and from A to Z can be entered.
Sequence:
0123456789ABCDEFGHIJKLMNOPQRSTUVWXYZabcdefghijklmnopqrstuvwxyz
Letters Use this format for variables that only contain letters.
Sequence: ABCDEFGHIJKLMNOPQRSTUVWXYZabcdefghijklmnopqrstuvwxyz
Digits &
Capitals
Use this format for variables that only contain digits and capital letters.
7-bit ASCII The variable will contain only characters with ASCII code from 0 to 127.
Hex Use this format to allow entering hexadecimal numbers.
Sequence: 0123456789ABCDEF
Custom Use this format to customize the range of allowed characters.
Code 39,
Code 128A,
Code 128B,
Code 128C,
Code 128,
Codabar
Use these formats to only permit the use of characters that are included in the
corresponding barcode standards.
6.8. Special Character Shortcuts
Designer includes several predened control characters – select them from the dropdown menu in
any dialog when text input is enabled. An arrow button on the right side of the edit eld lists the
shortcuts.
330

Example:
FNC1 character can simply be encoded as <FNC1>.
If specic special character is not available on the list of shortcuts, see sections "Entering Characters
with Alt+<ASCII_code>" and "Entering Characters with <#hex_code> Syntax".
ASCII code Abbreviation used in the application Description of the character
1 SOH Start of Heading
2 STX Start of Text
3 ETX End of Text
4 EOT End of Transmission
23 ETB End Transmission Block
25 EM End of Medium
5 ENQ Enquiry
6 ACK Acknowledgment
7 BEL Bell
8 BS Back Space
9 HT Horizontal Tab
11 VT Vertical Tab
13 CR Carriage Return
10 LF Line Feed
12 FF Form Feed
14 SO Shift Out
15 SI Shift In
16 DLE Data Link Escape
17 DC1 XON - Device Control 1
18 DC2 Device Control 2
19 DC3 XOFF - Device Control 3
20 DC4 Device Control 4
28 FS File Separator
29 GS Group Separator
30 RS Record Separator
31 US Unit Separator
21 NAK Negative Acknowledgment
22 SYN Synchronous Idle
24 CAN Cancel
331

26 SUB Substitute
27 ESC Escape
188 FNC Function Code 1
189 FNC Function Code 2
190 FNC Function Code 3
191 FNC Function Code 4
332

7. Solutions
7.1. Create or Edit a Solution
PRODUCT LEVEL INFO
This section is applicable to PowerForms.
To create a Designer solution means to create a complete labeling "kit" which includes labels and
forms.
The main advantage of creating a solution is the ability to use a single compact label printing le that
works as a common frame for labels, connected data sources, actions, and forms. The nal result of
using a Designer solution is greatly enhanced user experience and improved label printing eciency.
TIP
A single solution may include multiple labels and forms. The number of label and form
solution components varies according to the requirements of the current print job.
To start working on a solution, go to File > New and select New Solution.
A new empty solution page opens. The following options are instantly available on the Solution tab:
• Add new label.
• Add new form.
• Import into Solution.
333

7.2. Accessing Files in Solution
When creating a solution, labels and forms do not have to be stored within the same solution le.
Decide where you want to store the le according to the current solution requirements. NiceLabel
recommends the following approaches:
1. Labels and forms contained in a single solution le/document – suitable if:
• Solution contains similar labels with shared data sources.
• Label templates are rarely changed.
• Solution covers a single process.
2. Labels stored at a separate location, forms contained in a solution le – suitable if:
• Regularly changing label templates
• Solution covers a single process and uses shared data sources
3. Labels and forms stored in separate les/documents – suitable if:
• Each label and/or form covers a dierent process
• No shared data sources
7.3. Create or Edit a Label in a Solution
PRODUCT LEVEL INFO
Solution building is available in PowerForms.
To create a new label as a part of a solution, click New Label on the Solution tab of the ribbon, or add it
using the Solution Explorer.
Label Setup Wizard window opens. Follow the wizard steps to set the label.
To start working on a label, consider reading the following sections:
• Get familiar with the workspace.
334

• Set label properties.
• Get familiar with label objects.
• Dene data sources for variable objects.
7.4. Form
PRODUCT LEVEL INFO
This section is applicable to PowerForms.
NiceLabel Designer form serves as a panel for entering, manipulating and viewing the data. The
advantage of using a form are simplied data-entry and label printing process for the end-user.
In NiceLabel Designer, a form is created within a printing solution. This means that a form is usually
built in combination with a predesigned label.
TIP
Forms allow you to build an entire tailor-made data handling system which is
adaptable to current business needs.
Read about how to create, design or edit a form here.
7.4.1. Create or Edit a Form
PRODUCT LEVEL INFO
This section is applicable to PowerForms.
To create a form, open a new or existing solution and click the New Form button in the Solution tab of
the Designer ribbon or in Solution Explorer.
To start working on a form, consider reading the following sections:
• Get familiar with workspace.
• Set form properties.
• Get familiar with form objects.
• Dene data sources for variable objects.
335

• Get familiar with actions.
7.4.2. Form Properties
PRODUCT LEVEL INFO
This section is applicable to PowerForms.
Form Properties dialog is used for dening various form properties.
TIP
To open the Form Properties dialog, double-click the design surface.
The settings are available on the below listed dialog panels.
Form Property
Description
Basic Settings Denes form title, size, initial form state and startup form position.
Additional Settings Selects form scripting language.
Style Denes form background color and picture. It allows picture embedding
and saving as external le.
Tab Order Denes the order of focus Shifting among form objects.
336
Form Property Description
F1 Help Contains form help text which is shown to the user after pressing F1
when the form is running.
Events Denes the events which occur after the form is loaded, closed, and after
a specied time interval completes.
Variable Events Selects the variables that are monitored for changes in their values.
Serial Port Data Adds a variable that stores the data received via serial port.
Info Denes the content which serves as a hint or as a guidance for the form
user.
7.4.2.1. Basic Settings
Basic Settings panel denes title, size and startup behavior of a form after you run it.
Title sets the form window title.
• Show form title bar: window title bar is visible or hidden upon form startup.
• Allow closing form: form close using the window Close button is allowed or not.
TIP
With this option disabled, the form can be closed from taskbar.
• Allow resizing form: form size customizable or xed.
TIP
Disable this option to lock the form size.
•
Minimizing forms
You can enable forms you design to minimize to your taskbar or to your system tray. Minimizing
your forms allows them to run them in the background and reduces inputs and human errors
from your operators. Minimize forms with limited inputs that don't require human interaction.
Allow minimizing form is enabled by default in Form Properties. Allow minimizing form is also
possible when you disable Allow resizing form.
NOTE
When you open older versions in V2019.3, Allow minimizing form option
automatically disables when you disable Allow resizing form.
337
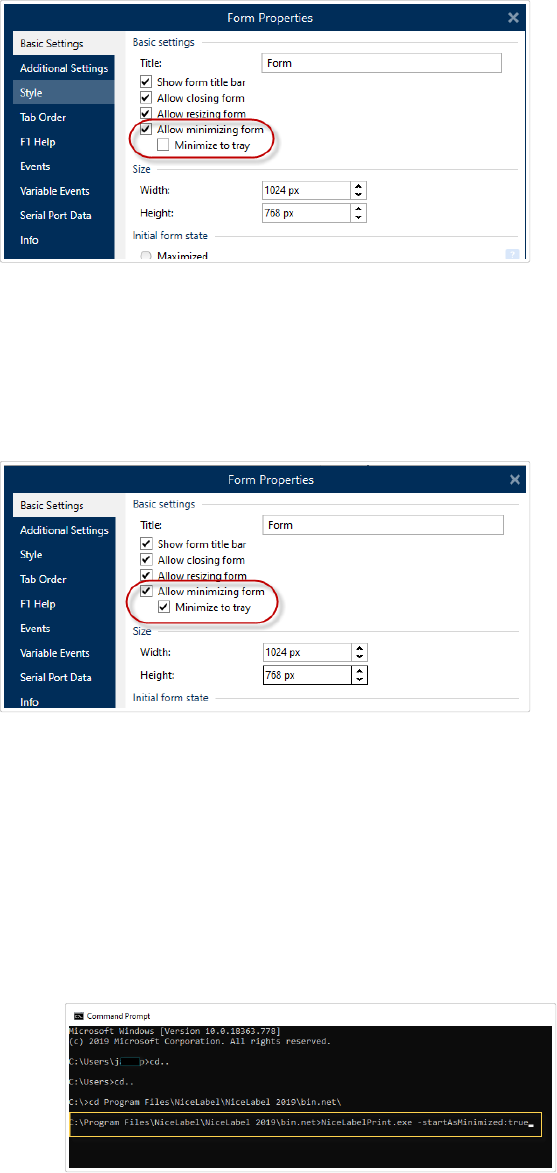
Enabling Allow minimizing form in Form Properties.
Minimize to tray is useful when you want to run your form in the background. For example, if
your form is automated and doesn't need your operators to interact with your form user
interface. Your only form input is barcode scanner data, and all your form actions execute
automatically when operators scan barcodes.
Enabling Minimize to tray in Form Properties.
Enabling Minimize to tray with your command prompt
To run solutions from your Command Prompt, you can minimize your running forms to your
system tray. When minimized, right-click on the system tray icon to open or exit your running
forms.
1. Open Command Prompt (CMD).
2. Navigate to your "NiceLabelWebClient.exe" or "NiceLabelPrint.exe".
3. Type "-startAsMinimized:true" after your lepath.
4. Press Enter.
Your Form loads and immediately minimizes.
Minimizing forms to your taskbar or system tray reduces human errors and prevents your
operators from intervening on your forms.
338

Size group denes the form's Width and Height.
Initial form state group denes form state upon startup.
• Maximized: form opens in full screen mode.
• Default form size: when run, the form appears with manually dened sizes.
Startup form position group denes the on-screen position of a form upon its startup.
• As dened: the form appears at a location dened by the distance in pixels from Left (left edge
of the form) and Top (top edge of the form).
• Screen center: screen center is the startup form position.
Settings in Scroll bars group optimize forms for smaller screens or computers with low screen
resolution. As an alternative to making forms and objects small, and hard to read and use, enable
Show scrollbars and stop resizing form objects at:. This option denes form Width and Height in
pixels. These are minimum dimensions at which:
• The form gets scroll bars. You can continue reducing the form size beyond these dimensions
and make the form area scrollable.
• The objects stop adapting their sizes to the reducing form size. This makes sure the objects
remain usable because they retain their current size beyond minimum dimensions of the form.
NOTE
To make the objects resize along with changing form size, enable horizontal and
vertical resizing with form under Object Properties > Position > Size >
Horizontally/Vertically resize with form.
7.4.2.2. Additional Settings
Additional Settings panel selects form scripting language. There are two scripting languages available
for Designer form objects: VBScript and Python.
• VBScript: scripting for advanced data operations, comparisons and direct calculations on a
form.
• Python: suitable for 64-bit systems. A signicantly faster scripting alternative to VBScript.
7.4.2.3. Style
Style panel denes form background color and/or picture. It also allows picture embedding and
saving as external le.
• Background color is dened by the Standard or Advanced color selection. Switch between
these two options by clicking the Advanced or Basic button.
339

• Browse for the label Background picture or insert the direct path. Once the picture has been
dened, it is possible to:
• Embed the picture to document: makes the picture an integral part of the document.
• Save embedded picture to le: embedded picture is saved to a le.
• Remove embedded picture: embedded picture is removed from the form document.
• Picture position: background picture to be centered, to t the label dimensions, or to be
stretched.
7.4.2.4. Tab Order
Tab order panel denes how focus is moving from one form object to another after pressing the Tab
key.
• ENTER key behaves as TAB key: Enter key gets the same role as the Tab key does. After
pressing Enter, focus moves to the next object as dened on the Tab order list.
• Select the form Object and move it up or down the Tab order list to dene the focus switching
order.
7.4.2.5. F1 Help
F1 Help panel denes custom form help content to help the end-user while designing and/or using a
form. The text becomes visible after pressing F1 key when the form is run.
TIP
Enter custom text in the editing eld and click OK.
7.4.2.6. Events
Events panel allows setting actions for basic form events.
• On Form Load: the action is run upon form load.
• On Form Close: the action is run when the form is closed.
• On Form Timer: the action is run after a given time interval.
• Interval: duration of the time interval (in milliseconds).
• On Form Inactivity: the action is run after the form has been inactive for a given time interval.
Form inactivity is dened as absence of key press, mouse click, or form move user actions. Any
of these user actions resets the inactivity timer.
• Interval: duration of the time interval (in minutes).
340

TIP
Click Actions ... button to set the actions that are run by the listed events.
7.4.2.7. Variable Events
Variable Events panel selects the variables that are monitored for changes in their values. If values of
these variables, the On change event triggers an action.
• Add: adds a variable to the list.
• Delete: removes a variable from the list.
TIP
Click Actions ... to set and manage the actions that are triggered by changed values in
the listed variables.
7.4.2.8. Serial Port Data
Serial Port Data panel selects serial (RS-232) ports to read the data from connected serial devices.
The read data is stored in an existing or a newly created variable.
• Add: adds a serial port to the list connected serial devices.
• Delete: removes port from the list connected serial devices.
TIP
Click Edit to congure serial port communication settings.
Serial Port Data Settings
Serial Port Data window denes connection parameters for the selected serial port. Parameters in
this dialog box have to match with the connected device's settings. Refer to the documentation of
your serial communication device to set the communication parameters properly.
NOTE
If the settings in NiceLabel 2019 and on the device do not match, communication
cannot be established.
Port group denes serial port to read the data from.
341

• Port name: name of the port to which an external device is connected. This can either be a
hardware or a virtual COM port.
Port Settings group denes additional port connection settings.
• Bits per second: speed rate used by the external device to communicate with the PC. The usual
alias used with the setting is "baud rate".
• Data bits: species the number of data bits in each character. 8 data bits are almost universally
used in newer devices.
• Parity: species error detection method during the ongoing transmission. The most common
parity setting, is "none", with error detection handled by a communication protocol (ow control).
• Stop bits: halts the bits sent at the end of every character allowing the receiving signal hardware
to detect the end of a character and to resynchronize with the character stream. Electronic
devices usually use a single stop bit.
• Flow control: serial port may use interface signals to pause and resume the data transmission.
Example:
A slow device might need to handshake with the serial port to indicate that data should be paused
while the device processes received data.
Options group includes the following settings:
• Send initialization data: species the string that is sent to the selected serial port before the
data is read. This option enables the action to initialize the device to be able to provide the data.
The option can also be used for sending a specic question to the device, and to receive a
specic answer. Click the arrow button to enter special characters.
• Use data polling: species that the trigger will actively ask the device for data. Within the
specied time intervals, the trigger will send the commands provided in the Contents eld. This
eld can include binary characters.
Filter group allows you to set the serial port data ltering criteria.
• Use Filter: enables serial data ltering. This option lters any irrelevant characters from the
received data.
• Start position: sets the starting character for extracted data.
• End position: sets the ending character for extracted data.
Example:
Received raw data includes the following characters: q###12345$$$1. After setting Start position to
5 and End position to 9, the extracted data is 12345.
342

Execution Event group species when the trigger should re and start executing actions.
• On number of characters received: species that the event occurs each time the required
number of characters is received. In this case, the third party application can keep a connection
open and continuously send the data. Each chunk of data must be of the same size.
• On sequence of characters received. Species that the event occurs each time the required
sequence of characters is received. Use this option if you know that the 'end of data' is always
identied by a unique set of characters. You can insert special (binary) characters using the
button next to the edit eld.
• Include in data: sequence of characters that is used to determine that the event activator
is not stripped from the data, but remains included in the data. The event receives a
complete received data stream.
• When nothing is received after the specied time interval: event occurs after the specied
time interval (in ms) passes since the last received character.
7.4.2.9. Info
Info panel includes a Description that serves as a hint or as a guidance for the user that is going to
work with the form.
Dene form Description by entering text into the eld.
7.4.3. Adding Objects to a Form
After setting the form properties, it's time to start adding content to the form. Form objects are basic
design items that are used for adding and editing various content types.
Add object to a form by clicking them in the object toolbar and dragging it to the design surface. Each
form may contain multiple object in any combination.
TIP
Use visual aids when positioning an object.
7.4.4. Form Objects
PRODUCT LEVEL INFO
This section is applicable to PowerForms.
Each form object has its own role as described in the table below.
343

Form Object Icon Description
Frame Creates a rectangle shaped area on a form.
Text Object for inserting textual content.
Picture Object for inserting graphic content.
Button Creates a clickable and customizable form object.
Edit Field Object for inserting and editing a single line text.
Memo Field Enables inserting values with multiple lines.
Combo Box Lets the user select an option from a dropdown list or
insert a custom value.
List Box Lets the user select an option from a list without custom
values.
Radio Group Allows a user to select a single item from a set of mutually
exclusive items.
Checkbox Allows the user to make a binary choice – select or
deselect the listed options.
Database Table Displays a selected database table on a form.
Database Navigator Tool for manipulating the database records on a form.
344

Form Object Icon Description
Database Search Search tool for databases on a form.
Label Preview Preview eld that displays the label layout on a form in real
time.
Data Initialization Panel for assigning initial values to the label variables
Printer Settings Enables adjusting printing speed and darkness while the
form is being run.
Print Quantity Denes the number of printed labels and pages while the
form is running.
There are multiple ways of adding a form object to the design surface. Read about the available
methods here.
7.4.4.1. Frame
Frame object creates rectangle shaped areas on a form. Its role is to visually separate areas on a
form.
Style
Style tab denes visual appearance of an object:
• Background color: object background color.
• Transparent: transparent frame.
• Show border: frame border show/hide.
• Border color: object border color selection.
• Border width: border width denition.
• Border style selects the object border style:
• None: invisible border.
• Lowered: the object appears lower than form surface.
345

• Raised: the object appears higher than form surface.
• Lowered border: the border of an object appears lower than form surface.
• Raised border: makes the border of an object appear higher than form surface.
Position
Position tab denes object positioning and its position-related behavior.
Position group denes the object position.
• X and Y: anchoring point coordinates.
• Width and Height: horizontal and vertical object dimension.
• Keep aspect ratio: simultaneous changing of object dimensions while scaling.
• Lock: prevents the object from being moved during the design process.
Size group sets how object's dimensions change when the form is running:
• Resize anchor point: denes the xed distance of an object from the form borders.
TIP
Choose the most appropriate anchor point to ensure the object's visibility
regardless of the current window size.
• Horizontally resize with form and Vertically resize with form: object size automatically adapts to
the changing size of the form.
• Horizontally resize with form: object width adapts to the resized form.
• Vertically resize with form: object height adapts to the resized form.
NOTE
If both options are enabled, object width and height adapt to the resized
form simultaneously.
Rotation angle group sets the object angle according to the design surface.
General
General tab identies the object and denes object state on form startup.
Name sets a unique object ID. It is used for object referencing when dening functions, variables,
scripts, etc.
346

Description allows adding notes and annotations for an object.
Hint (tooltip) helps the form users by briey explaining why or how to use an object. Hint is shown to a
user when the mouse pointer oats over the selected object.
Initial state on form startup group denes the object behavior when the form is run for the rst time:
• Enabled: denes if the object is going to be active (editable) at form startup or not.
• Condition: an object is enabled if the result of the given condition is "True".
• Visible: denes if the selected object is going to appear on the form or not.
• Condition: an object is visible if the result of the given condition is "True".
7.4.4.2. Text
Text is a form object for entering and displaying textual content.
Content
Connected data source denes the content source of the selected object.
• Fixed data: manually entered xed text.
• Variables: predened variable values which are used as object content.
• Functions: input data transformation tools.
• Databases: database values which are used as object content.
• Counter: displays counter value on the label.
Content eld allows you to type the object content.
Settings
Text Settings tab denes if the object size or text should adapt to the amount of entered content.
• Auto size: automatically adapts the object size to the size of entered text.
• Word wrap: wraps the text to make it t into the text box.
TIP
If the text box size is too small, vertical scroll bar appears.
• Right to left text ow enabled (RTL): allows you to type content using right-to-left scripts such as
Arabic or Hebrew. When enabled, this setting right aligns object content and appends letters
from RTL scripts to the left. If you are using letters from left-to-right scripts or any other
347

characters, the content remains right aligned, but the setting appends these letters and
characters to the right.
Style
Style tab denes visual appearance of an object.
Background color denes the object background color.
• Transparent: transparent object background.
Font color denes the font and underline colors.
Font selects the typeface.
The font may appear Bold, Italic, Underlined or as a Strikethrough text.
Alignment denes horizontal positioning of the entered content.
• Left: text aligned with the left object border.
• Center: text positioned centrally.
• Right: text aligned with the right object border.
• Justied: distributes text along both vertical object borders.
Position
Position tab denes object positioning and its position-related behavior.
Position group denes the object position.
• X and Y: anchoring point coordinates.
• Width and Height: horizontal and vertical object dimension.
• Keep aspect ratio: simultaneous changing of object dimensions while scaling.
• Lock: prevents the object from being moved during the design process.
Size group sets how object's dimensions change when the form is running:
• Resize anchor point: denes the xed distance of an object from the form borders.
TIP
Choose the most appropriate anchor point to ensure the object's visibility
regardless of the current window size.
348

• Horizontally resize with form and Vertically resize with form: object size automatically adapts to
the changing size of the form.
• Horizontally resize with form: object width adapts to the resized form.
• Vertically resize with form: object height adapts to the resized form.
NOTE
If both options are enabled, object width and height adapt to the resized
form simultaneously.
Rotation angle group sets the object angle according to the design surface.
Events
Events tab denes the actions that are run by various object-related events.
TIP
See section Actions Editor to read more about this powerful tool.
Available events are:
• On Mouse Enter: action is run on mouse enter.
• On Mouse Leave: action is run on mouse leave.
• On Click: action is run on mouse click.
General
General tab identies the object and denes object state on form startup.
Name sets a unique object ID. It is used for object referencing when dening functions, variables,
scripts, etc.
Description allows adding notes and annotations for an object.
Hint (tooltip) helps the form users by briey explaining why or how to use an object. Hint is shown to a
user when the mouse pointer oats over the selected object.
Initial state on form startup group denes the object behavior when the form is run for the rst time:
• Enabled: denes if the object is going to be active (editable) at form startup or not.
• Condition: an object is enabled if the result of the given condition is "True".
• Visible: denes if the selected object is going to appear on the form or not.
349
• Condition: an object is visible if the result of the given condition is "True".
7.4.4.3. Picture
Picture is a form object for inserting graphic content. The following le formats are supported:
• Portable Network Graphic (*.png)
• PDF (*.pdf)
• Adobe Photoshop (*.psd)
• Scalable Vector graphics (*.svg)
• Paintbrush (*.pcx)
• JPEG bitmaps (*.jpg, *.jpeg, *.jpe)
• TIFF bitmaps (*.tif, *.ti)
• Enhanced Windows Metale (*.emf)
• Windows Metale (*.wmf)
• Windows bitmap (*.bmp)
Source
Connected data source is the dynamic data source that is connected with the object.
• Fixed data: manually entered xed text.
• Variables: predened variable values which are used as object content.
• Functions: input data transformation tools.
• Databases: database values which are used as object content.
Content eld is used for entering the object content.
To (re)dene the object Content, click Browse and locate the le to be displayed on the label.
Embed picture in a document denes the picture as an integral part of the label le.
Save embedded picture to le saves the embedded picture as an external le. Browse for a location
and store it there.
Position
Position tab denes object positioning and its position-related behavior.
Position group denes the object position.
350

• X and Y: anchoring point coordinates.
• Width and Height: horizontal and vertical object dimension.
• Keep aspect ratio: simultaneous changing of object dimensions while scaling.
• Lock: prevents the object from being moved during the design process.
Size group sets how object's dimensions change when the form is running:
• Resize anchor point: denes the xed distance of an object from the form borders.
TIP
Choose the most appropriate anchor point to ensure the object's visibility
regardless of the current window size.
• Horizontally resize with form and Vertically resize with form: object size automatically adapts to
the changing size of the form.
• Horizontally resize with form: object width adapts to the resized form.
• Vertically resize with form: object height adapts to the resized form.
NOTE
If both options are enabled, object width and height adapt to the resized
form simultaneously.
Rotation angle group sets the object angle according to the design surface.
Graphic Resizing tab denes variable source picture resizing.
Resize options group denes how the source le dimensions adapt to the size of object when the
form is run.
NOTE
Resize options are available only if the Picture object is dened dynamically.
• Keep original picture size: disables resizing. The source picture le is displayed in Picture object
with its original dimensions.
• Resize proportionally: makes the source picture le resize proportionally. The aspect ratio of
source le dimensions is preserved.
• Resize to the designed size: resizes the source picture le horizontally and vertically to make it
t into the bounding box. Using this option will most likely distort the image.
Original size group informs the user about the size of source image le.
351

Revert to original picture size resizes the Picture object to the original dimensions of source image
le.
Events
Events tab denes the actions that are run by various object-related events.
TIP
See section Actions Editor to read more about this powerful Designer tool.
Available events are:
• On Mouse Enter: action is run on mouse enter.
• On Mouse Leave: action is run on mouse leave.
• On Click: action is run on mouse click.
General
General tab identies the object and denes object state on form startup.
Name sets a unique object ID. It is used for object referencing when dening functions, variables,
scripts, etc.
Description allows adding notes and annotations for an object.
Hint (tooltip) helps the form users by briey explaining why or how to use an object. Hint is shown to a
user when the mouse pointer oats over the selected object.
Initial state on form startup group denes the object behavior when the form is run for the rst time:
• Enabled: denes if the object is going to be active (editable) at form startup or not.
• Condition: an object is enabled if the result of the given condition is "True".
• Visible: denes if the selected object is going to appear on the form or not.
• Condition: an object is visible if the result of the given condition is "True".
7.4.4.4. Button
Button adds a clickable and customizable object to a form. Its role is to activate various actions.
Source
Connected data source is the dynamic data source that is connected with the object.
352

• Fixed data: manually entered xed text.
• Variables: predened variable values which are used as object content.
• Functions: input data transformation tools.
• Databases: database values which are used as object content.
Content eld is used for entering the object content.
TIP
This is a read-only form object. Connected data source only denes its content.
Settings
Keyboard shortcut denes any keyboard to act as a shortcut. If the dened keyboard key is pressed,
it acts as if the user would use a mouse click for running an action.
Default form button invokes the assigned action when a user presses Enter.
TIP
Only one button is allowed to be dened as the default form button.
Word wrap divides the text into multiple lines. It makes sure the text is not wider than the button.
Use a picture on the button group denes a graphic le to be displayed on a button.
• Picture le name: graphic le selected to be used on a button.
• Embed picture in a document: picture embedded in the document.
TIP
Whenever an embedded picture is needed, it is retrieved from the document and
not from the le system.
• Save embedded picture to le: embedded picture is saved to a le.
• Remove embedded picture: embedded picture is removed from the form document.
TIP
If the picture is embedded, this action enables saving it at a selected location.
The picture is no longer embedded.
353

• Picture position: picture position in relation to the object text.
• Force original size: full-size graphic without resizing is used on a button.
Style
Style tab denes visual appearance of an object.
Background color denes the object background color.
• Transparent: transparent object background.
Font color denes the font and underline colors.
Font selects the typeface.
The font may appear Bold, Italic, Underlined or as a Strikethrough text.
Alignment denes horizontal positioning of the entered content.
• Left: text aligned with the left object border.
• Center: text positioned centrally.
• Right: text aligned with the right object border.
Position
Position tab denes object positioning and its position-related behavior.
Position group denes the object position.
• X and Y: anchoring point coordinates.
• Width and Height: horizontal and vertical object dimension.
• Keep aspect ratio: simultaneous changing of object dimensions while scaling.
• Lock: prevents the object from being moved during the design process.
Size group sets how object's dimensions change when the form is running:
• Resize anchor point: denes the xed distance of an object from the form borders.
TIP
Choose the most appropriate anchor point to ensure the object's visibility
regardless of the current window size.
• Horizontally resize with form and Vertically resize with form: object size automatically adapts to
the changing size of the form.
354

• Horizontally resize with form: object width adapts to the resized form.
• Vertically resize with form: object height adapts to the resized form.
NOTE
If both options are enabled, object width and height adapt to the resized
form simultaneously.
Rotation angle group sets the object angle according to the design surface.
Events
Events tab denes the actions that are run by various object-related events.
TIP
See section Actions Editor to read more about this powerful Designer tool.
Available events for button object is:
• On Click: action is run on mouse click.
General
General tab identies the object and denes object state on form startup.
Name sets a unique object ID. It is used for object referencing when dening functions, variables,
scripts, etc.
Description allows adding notes and annotations for an object.
Hint (tooltip) helps the form users by briey explaining why or how to use an object. Hint is shown to a
user when the mouse pointer oats over the selected object.
Initial state on form startup group denes the object behavior when the form is run for the rst time:
• Enabled: denes if the object is going to be active (editable) at form startup or not.
• Condition: an object is enabled if the result of the given condition is "True".
• Visible: denes if the selected object is going to appear on the form or not.
• Condition: an object is visible if the result of the given condition is "True".
355

7.4.4.5. Button Group
Button Group adds a group of clickable and customizable buttons on a form. Use this object to create
multiple buttons from a list of items in a single move. The created buttons allow you to set value of the
connected variable, and/or execute the assigned actions.
TIP
The number of buttons in the group corresponds to the number of items (values) on
the list.
Source
Connected data source is the dynamic data source that is connected with the object.
• Variables: variable which stores the value selected in Button Group object.
• Databases: database eld which stores the value selected in Button Group object.
Settings
Settings tab denes object content editing specics and displaying of values.
Allow duplicates allows duplicated values to appear in the object.
Is sorted sorts the list of elements in ascending order. Use case sensitive sort additionally determines
if the letter case should aect the sorting order or not.
Values group of settings allows dening the listed elements:
• Items source: denes the source for listed items.
• Custom values: static user-dened values.
• Installed printers: list of installed printers.
• Database eld: retrieved values from a connected database.
• Field: selection of connected database eld to retrieve the content from.
• Use another eld for connected data source option: connects another database eld
to the connected data source. Field values are still shown, but the connected data
source receives the selected value from a eld which is specied in Value eld.
• Value eld: selects the database eld that is sent to the object's Connected data
source and displayed as its content.
356

Example:
1. Button Group object details
Items source:
EAN Code Product ID
12345 ID1
22345 ID2
33345 ID3
2. Text object details
Added Text object should only display matching Product ID values.
Result: The selected EAN Code in Button Group results in the matching Product ID in
Text object.
• File names: lists all les in the selected directory.
• Directory: denes the source folder for les to be listed.
• File mask: species the lter for selecting the listed les.
Example:
*.* lists all les
*.nlbl lists only les with .nlbl extension.
t*.nlbl lists les that start with "t" and have the extension .nlbl.
• Show the le path: entire le path is displayed on the list.
• Show the le extension: le extension visible on the list.
• Font names: lists the installed fonts.
• Labels in solutions: lists all labels within the solution.
• Edit: converts other item sources into a custom values item source.
• Values content list: displays the current object content.
• Set as default: turns the currently active selection into a default value.
357

TIP
Default value is a value that is automatically selected when the form is run.
NOTE
All values except for custom values are populated when the form is run. The values
displayed at design time are sample values retrieved from the system. After clicking
the Edit, Designer makes a copy of values and makes them editable in the Custom
Values dialog.
Layout group allows you to customize the appearance of Button Group object.
Button size group allows you to dene width and height of individual buttons in the group.
• Automatically size buttons: disable this option to set custom Width and Height values.
Button spacing group sets the distance between individual buttons in a group.
• Horizontal: denes horizontal distance between buttons in a group.
• Vertical: denes vertical distance between buttons in a group.
Layout group denes how the buttons are distributed when the form is run.
• Orientation: allows you to stack the buttons Horizontally or Vertically.
• Number of rows: sets the number of rows in which the buttons are located on the form.
• Word wrap: After reaching the end of button, word wrap breaks the tag into multiple lines.
Style
Style tab denes visual appearance of an object.
Background color denes object background color.
358

• Transparent: transparent object background.
Border color sets the color of button border.
Font color denes font and underline colors.
Font selects the typeface.
The font may appear Bold, Italic, Underlined or as a Strikethrough text.
Alignment denes horizontal positioning of the entered content.
• Left: text aligned with the left button border.
• Center: text positioned centrally.
• Right: text aligned with the right button border.
Position
Position tab denes object positioning and its position-related behavior.
Position group denes the object position.
• X and Y: anchoring point coordinates.
• Width and Height: horizontal and vertical object dimension.
• Keep aspect ratio: simultaneous changing of object dimensions while scaling.
• Lock: prevents the object from being moved during the design process.
Size group sets how object's dimensions change when the form is running:
• Resize anchor point: denes the xed distance of an object from the form borders.
TIP
Choose the most appropriate anchor point to ensure the object's visibility
regardless of the current window size.
• Horizontally resize with form and Vertically resize with form: object size automatically adapts to
the changing size of the form.
• Horizontally resize with form: object width adapts to the resized form.
• Vertically resize with form: object height adapts to the resized form.
NOTE
If both options are enabled, object width and height adapt to the resized
form simultaneously.
359

Rotation angle group sets the object angle according to the design surface.
Events
Events tab denes the actions that are run by various object-related events.
TIP
See section Actions Editor to read more about this powerful Designer tool.
Available events are:
• On Click: action is run on mouse click.
General
General tab identies the object and denes object state on form startup.
Name sets a unique object ID. It is used for object referencing when dening functions, variables,
scripts, etc.
Description allows adding notes and annotations for an object.
Hint (tooltip) helps the form users by briey explaining why or how to use an object. Hint is shown to a
user when the mouse pointer oats over the selected object.
Initial state on form startup group denes the object behavior when the form is run for the rst time:
• Enabled: denes if the object is going to be active (editable) at form startup or not.
• Condition: an object is enabled if the result of the given condition is "True".
• Visible: denes if the selected object is going to appear on the form or not.
• Condition: an object is visible if the result of the given condition is "True".
7.4.4.6. Edit Field
Edit eld object is used for inserting and editing a single line of text.
Source
Connected data source is the dynamic data source that is connected with the object.
• Variables: variables which are used as object content source, or variables which store the Edit
eld object content.
360

• Databases: database values which are used as object content. The object may also be used for
adding or editing the database content.
TIP
This is a read-and-write form object. This means that the object is used for displaying
the connected dynamic content, and for entering or editing the connected data
sources.
Settings
Settings tab contains two editable properties:
• Automatically move focus to next control: another object on a form gets focus right after the
Edit Field receives a value of certain length. Dene the length of the value that moves focus
using Limit length in Input rules of the variable.
NOTE
Edit Field must be connected to a variable. Length of the connected variable
value must be limited.
The order in which focus moves from one object to another is dened in Form Properties > Tab
Order.
• Password eld: makes the in Edit Field characters invisible. The characters are masked with
asterisks.
• Spell checking: marks incorrectly spelled words when the form is run. Language is dened by
your currently selected keyboard. The selection of available languages depends on your
operating system.
• Right to left text ow enabled (RTL): allows you to type content using right-to-left scripts such as
Arabic or Hebrew. When enabled, this setting right aligns object content and appends letters
from RTL scripts to the left. If you are using letters from left-to-right scripts or any other
characters, the content remains right aligned, but the setting appends these letters and
characters to the right.
TIP
Edit Field must be connected to a data source and must have a limited length dened.
Style
Style tab denes visual appearance of an object.
Background color denes the object background color.
361

• Transparent: transparent object background.
Font color denes the font and underline colors.
Font selects the typeface.
The font may appear Bold, Italic, Underlined or as a Strikethrough text.
Alignment denes horizontal positioning of the entered content.
• Left: text aligned with the left object border.
• Center: text positioned centrally.
• Right: text aligned with the right object border.
Position
Position tab denes object positioning and its position-related behavior.
Position group denes the object position.
• X and Y: anchoring point coordinates.
• Width and Height: horizontal and vertical object dimension.
• Keep aspect ratio: simultaneous changing of object dimensions while scaling.
• Lock: prevents the object from being moved during the design process.
Size group sets how object's dimensions change when the form is running:
• Resize anchor point: denes the xed distance of an object from the form borders.
TIP
Choose the most appropriate anchor point to ensure the object's visibility
regardless of the current window size.
• Horizontally resize with form and Vertically resize with form: object size automatically adapts to
the changing size of the form.
• Horizontally resize with form: object width adapts to the resized form.
• Vertically resize with form: object height adapts to the resized form.
NOTE
If both options are enabled, object width and height adapt to the resized
form simultaneously.
362

Rotation angle group sets the object angle according to the design surface.
Events
Events tab denes the actions that are run by various object-related events.
TIP
See section Actions Editor to read more about this powerful Designer tool.
Available events for edit eld object are:
• On Focus: action is run when focus is set on the object.
• On Exit: action is run when focus moves to another object.
• On Change: action is run when a change in the Edit Field object occurs.
General
General tab denes the object and denes object settings for form startup.
Name sets a unique object ID. It is used for object referencing when dening functions, variables,
scripts, etc.
Description allows adding notes and annotations for an object.
Hint helps the form users by briey explaining why or how to use the selected object.
Initial state on form setup group denes the object behavior while editing and printing a form:
• Enabled: denes if the object is going to be active (editable) on the print form or not.
• Condition: an object is enabled if the result of the given condition is "True".
• Read-only: prevents connected data source input and content editing.
• Visible: denes if the selected object is going to appear on the form or not.
• Condition: an object is visible if the result of the given condition is "True".
Content after a print action group denes how the object content is handled after each printout.
• Reset content after print: object content reset after printing.
• Clear content: object emptied after printing.
• Reset to initial content: content reset after printing to the initially dened object content.
363

7.4.4.7. Memo Field
Memo eld object is used for inserting textual content in multiple lines.
Source
Connected data source is the dynamic data source that is connected with the object.
• Variables: variables which are used as object content source, or variables which store the object
content.
• Databases: database values which are used as object content. The object may also be used for
adding or editing the database content.
TIP
This is a read-and-write form object. This means that the object is used for displaying
the connected dynamic content, and for entering or editing the connected data
sources.
Settings
Settings group contains two editable properties.
• Automatically move focus to next control: another object on a form gets focus right after the
Memo Field receives a value of certain length. Dene the length of the value that moves focus
using Limit length in Input rules of the variable.
NOTE
Edit Field must be connected to a variable. Length of the connected variable
value must be limited.
The order in which focus moves from one object to another is dened in Form Properties > Tab
Order.
• Password eld option makes the characters in this edit eld invisible. They are masked with
asterisks.
• Spell checking: marks incorrectly spelled words when the form is run. Language is dened by
your currently selected keyboard. The selection of available languages depends on your
operating system.
• Right to left text ow enabled (RTL): allows you to type content using right-to-left scripts such as
Arabic or Hebrew. When enabled, this setting right aligns object content and appends letters
from RTL scripts to the left. If you are using letters from left-to-right scripts or any other
characters, the content remains right aligned, but the setting appends these letters and
characters to the right.
364

Style
Style tab denes visual appearance of an object.
Background color denes the object background color.
• Transparent: transparent object background.
Font color denes the font and underline colors.
Font selects the typeface.
The font may appear Bold, Italic, Underlined or as a Strikethrough text.
Alignment denes horizontal positioning of the entered content.
• Left: text aligned with the left object border.
• Center: text positioned centrally.
• Right: text aligned with the right object border.
Position
Position tab denes object positioning and its position-related behavior.
Position group denes the object position.
• X and Y: anchoring point coordinates.
• Width and Height: horizontal and vertical object dimension.
• Keep aspect ratio: simultaneous changing of object dimensions while scaling.
• Lock: prevents the object from being moved during the design process.
Size group sets how object's dimensions change when the form is running:
• Resize anchor point: denes the xed distance of an object from the form borders.
TIP
Choose the most appropriate anchor point to ensure the object's visibility
regardless of the current window size.
• Horizontally resize with form and Vertically resize with form: object size automatically adapts to
the changing size of the form.
• Horizontally resize with form: object width adapts to the resized form.
• Vertically resize with form: object height adapts to the resized form.
365

NOTE
If both options are enabled, object width and height adapt to the resized
form simultaneously.
Rotation angle group sets the object angle according to the design surface.
Events
Events tab denes the actions that are run by various object-related events.
TIP
See section Actions Editor to read more about this powerful Designer tool.
Available events for memo eld object are:
• On Focus: action is run when focus is set on the object.
• On Exit: action is run when focus moves to another object.
• On Change: action is run when a change in the Edit Field object occurs.
General
General tab denes the object and denes object settings for form startup.
Name sets a unique object ID. It is used for object referencing when dening functions, variables,
scripts, etc.
Description allows adding notes and annotations for an object.
Hint helps the form users by briey explaining why or how to use the selected object.
Initial state on form setup group denes the object behavior while editing and printing a form:
• Enabled: denes if the object is going to be active (editable) on the print form or not.
• Condition: an object is enabled if the result of the given condition is "True".
• Read-only: prevents connected data source input and content editing.
• Visible: denes if the selected object is going to appear on the form or not.
• Condition: an object is visible if the result of the given condition is "True".
Content after a print action group denes how the object content is handled after each printout.
• Reset content after print: object content reset after printing.
366

• Clear content: object emptied after printing.
• Reset to initial content: content reset after printing to the initially dened object content.
7.4.4.8. Combo Box
Combo box is used as an object for user input. Its role is to let the user select an option from a
dropdown list or to add a custom value to the list.
Source
Connected data source is the dynamic data source that is connected with the object.
• Variables: variables which are used as object content source, or variables which store the
selected value in Combo box object.
• Databases: database values which are used as selectable Combo box values. The object may
also be used for adding or editing the database content.
TIP
This is a read-and-write form object. This means that the object is used for displaying
the connected dynamic content, and for entering or editing the connected data
sources.
Settings
Settings tab denes object content editing specics and displaying of values.
Allow input in run mode enables entering custom values when the form is running.
Allow duplicates allows duplicated values to appear in the object.
Is sorted sorts the list of elements in ascending order. Use case sensitive sort additionally determines
if the letter case should aect the sorting order or not.
Values group of settings allows dening the listed elements:
• Items source: denes the source for listed items.
• Custom values: static user-dened values.
• Installed printers: list of installed printers.
• Database eld: retrieved values from a connected database.
• Field: selection of connected database eld to retrieve the content from.
367

• Use another eld for connected data source option: connects another database eld
to the connected data source. Field values are still shown, but the connected data
source receives the selected value from a eld which is specied in Value eld.
• Value eld: selects the database eld that is sent to the object's Connected data
source and displayed as its content.
Example:
1. Combo/List box object details
Items source:
Description Product ID
CASONCELLI ALLA CARNE 250G CAS006
BIGOLI 250G PAS501
TAGLIATELLE 250G PAS502GI
TAGLIOLINI 250G PAS503GI
Database eld: Description
Connected data source: Variable1
2. Text object details
Added Text object should only display matching Product ID values.
Connected data source: Variable1
Result: The selected Description in Combo/List box or Button Group results in the
matching Product ID in Text object.
• File names: lists all les in the selected directory.
• Directory: denes the source folder for les to be listed.
• File mask: species the lter for selecting the listed les.
Example:
*.* lists all les
*.nlbl lists only les with .nlbl extension.
t*.nlbl lists les that start with "t" and have the extension .nlbl.
• Show the le path: entire le path is displayed on the list.
368

• Show the le extension: le extension visible on the list.
• Font names: lists the installed fonts.
• Labels in solutions: lists all labels within the solution.
• Edit: converts other item sources into a custom values item.
• Values content list: displays the current object content.
• Set as default: turns the currently active selection into a default value.
TIP
Default value is a value that is automatically selected when the form is run.
NOTE
All values except for custom values are populated when the form is run. The values
displayed at design time are sample values retrieved from the system. After clicking
the Edit, Designer makes a copy of values and makes them editable in the Custom
Values dialog.
Style
Style tab denes visual appearance of an object.
Background color denes the object background color.
• Transparent: transparent object background.
Font color denes the font and underline colors.
369

Font selects the typeface.
The font may appear Bold, Italic, Underlined or as a Strikethrough text.
Position
Position tab denes object positioning and its position-related behavior.
Position group denes the object position.
• X and Y: anchoring point coordinates.
• Width and Height: horizontal and vertical object dimension.
• Keep aspect ratio: simultaneous changing of object dimensions while scaling.
• Lock: prevents the object from being moved during the design process.
Size group sets how object's dimensions change when the form is running:
• Resize anchor point: denes the xed distance of an object from the form borders.
TIP
Choose the most appropriate anchor point to ensure the object's visibility
regardless of the current window size.
• Horizontally resize with form and Vertically resize with form: object size automatically adapts to
the changing size of the form.
• Horizontally resize with form: object width adapts to the resized form.
• Vertically resize with form: object height adapts to the resized form.
NOTE
If both options are enabled, object width and height adapt to the resized
form simultaneously.
Rotation angle group sets the object angle according to the design surface.
Events
Events tab denes the actions that are run by various object-related events.
TIP
See section Actions Editor to read more about this powerful Designer tool.
370

Available events are:
• On Focus: action is run when focus is set on the object.
• On Exit: action is run when focus moves to another object.
• On Change: action is run when a change in the Edit Field object occurs.
General
General tab denes the object and denes object settings for form startup.
Name sets a unique object ID. It is used for object referencing when dening functions, variables,
scripts, etc.
Description allows adding notes and annotations for an object.
Hint helps the form users by briey explaining why or how to use the selected object.
Initial state on form setup group denes the object behavior while editing and printing a form:
• Enabled: denes if the object is going to be active (editable) on the print form or not.
• Condition: an object is enabled if the result of the given condition is "True".
• Read-only: prevents connected data source input and content editing.
• Visible: denes if the selected object is going to appear on the form or not.
• Condition: an object is visible if the result of the given condition is "True".
TIP
With enabled read-only option, combo box behaves as a regular dropdown list.
Content after a print action group denes how the object content is handled after each printout.
• Reset content after print: object content reset after printing.
• Clear content: object emptied after printing.
• Reset to initial content: content reset after printing to the initially dened object content.
7.4.4.9. List Box
List box serves as a user input object. Its role is to let the user select a predened option from a list.
TIP
Unlike Combo box, List Box does not allow inserting custom values.
371

Source
Connected data source is the dynamic data source that is connected with the object.
• Variables: variables which are used as List box object content source, or variables which store
the selected value in List box object.
• Databases: database which stores the values selected in List box object.
TIP
This is a read-only form object. Connected data source only denes its content.
Settings
Settings tab denes object content editing specics and displaying of values.
Allow duplicates allows duplicated values appear on the dropdown list.
Is sorted sorts the list of elements in ascending order. Use case sensitive sort additionally determines
if the letter case should aect the sorting order or not.
Values group of settings denes which elements are going to be listed in the List box object:
• Items source: denes the source for listed items.
• Custom values: static user-dened values.
• Installed printers: list of installed printers.
• Database eld: retrieved values from a connected database.
• Field: selection of connected database eld to retrieve the content from.
• Use another eld for connected data source option: connects another database eld
to the connected data source. The Values content list still displays the Field values,
but the connected data source receives the selected value from a eld in Value eld.
Example:
Field: ObjectField1
Value eld: ObjectField2
Connected data source: Variable1
Result:
Object connected to Variable1 displays the content from ObjectField1 and sends the
content from ObjectField2 to the Variable1.
372

• Value eld: selects the database eld that is sent to the object's Connected data
source and displayed as its content.
• File names: lists all les in the selected directory.
• Directory: denes the source folder for les to be listed.
• File mask: species the lter for selecting the listed les.
Example:
*.* lists all les
*.nlbl lists only les with .nlbl extension.
t*.nlbl lists les that start with "t" and have the extension .nlbl.
• Show the le path: entire le path is displayed on the list of les.
• Show the le extension: le extension is displayed on the list of les.
• Font names: lists the installed fonts.
• Labels in solutions: lists all labels within the solution.
• Edit: converts other item sources into a custom values item source.
• Values content list: displays the current object content.
• Set as default: turns the currently active selection into a default value.
TIP
Default value is a value that is automatically selected when the form is run.
NOTE
All values except for custom values are populated when the form is run. The values
displayed at design time are sample values retrieved from the current computer.
Style
Style tab denes visual appearance of an object.
Background color denes the object background color.
• Transparent: transparent object background.
Font color denes the font and underline colors.
Font selects the typeface.
373

The font may appear Bold, Italic, Underlined or as a Strikethrough text.
Position
Position tab denes object positioning and its position-related behavior.
Position group denes the object position.
• X and Y: anchoring point coordinates.
• Width and Height: horizontal and vertical object dimension.
• Keep aspect ratio: simultaneous changing of object dimensions while scaling.
• Lock: prevents the object from being moved during the design process.
Size group sets how object's dimensions change when the form is running:
• Resize anchor point: denes the xed distance of an object from the form borders.
TIP
Choose the most appropriate anchor point to ensure the object's visibility
regardless of the current window size.
• Horizontally resize with form and Vertically resize with form: object size automatically adapts to
the changing size of the form.
• Horizontally resize with form: object width adapts to the resized form.
• Vertically resize with form: object height adapts to the resized form.
NOTE
If both options are enabled, object width and height adapt to the resized
form simultaneously.
Rotation angle group sets the object angle according to the design surface.
Events
Events tab denes the actions that are run by various object-related events.
TIP
See section Actions Editor to read more about this powerful Designer tool.
Available events are:
374
• On Focus: action is run when focus is set on the object.
• On Exit: action is run when focus moves to another object.
• On Click: action is run on mouse click.
General
General tab identies the object and denes object settings for form startup.
Name sets a unique object ID. It is used for object referencing when dening functions, variables,
scripts, etc.
Description allows adding notes and annotations for an object.
Hint helps the form users by briey explaining why or how to use the selected object.
Initial state on form setup group denes the object behavior while editing and printing a form:
• Enabled: denes if the object is going to be active (editable) at form startup or not.
• Condition: an object is enabled if the result of the given condition is "True".
• Visible: denes if the selected object is going to appear on the form or not.
• Condition: an object is visible if the result of the given condition is "True".
Content after a print action group denes how the object content is handled after each printout.
• Reset content after print: object content reset after printing.
• Clear content: object emptied after printing.
• Reset to initial content: content reset after printing to the initially dened object content.
7.4.4.10. Radio Group
Use Radio Group object to allow the user to select a single item from a set of mutually exclusive
items.
Source
Connected data source is the dynamic data source that is connected with the object.
• Variables: predened variable values which are used as Radio group object content.
• Databases: database values which are used as Radio group object content.
375

NOTE
The down arrow object button provides direct access to dynamic data sources. Click
the arrow to add a new object on the design surface and to connect it with the
selected data sources simultaneously.
TIP
This is a read-only form object. Connected data source only denes its content.
Settings
Settings tab denes object content editing specics and displaying of values.
Allow duplicates allows duplicated values appear on the dropdown list.
Is sorted sorts the list elements in ascending order. Use case sensitive sort additionally determines if
the letter case should aect the sorting order or not.
Values group of settings allows dening the listed elements:
• Items source: denes the source for listed items.
• Custom values: static user-dened values.
• Installed printers: list of installed printers.
• Database eld: retrieved values from the connected database.
• Field: selection of connected database eld to retrieve the content from.
• Use another eld for connected data source option: connects another database eld
to the connected data source. The Values content list still displays the Field values,
but the connected data source receives the selected value from a eld in Value eld.
Example:
Field: ObjectField1
Value eld: ObjectField2
Connected data source: Variable1
Result:
Object connected to Variable1 displays the content from ObjectField1 and sends the
content from ObjectField2 to the Variable1.
• Value eld: selects the database eld that is sent to the object's Connected data
source and displayed as its content.
376

• File names: lists all les in the selected directory.
• Directory: denes the path from where the labels are going to be listed.
• File mask: species the lter for selecting the listed les.
Example:
*.* lists all les
*.nlbl lists only les with .nlbl extension.
t*.nlbl lists les that start with "t" and have the extension .nlbl.
• Show the le path: entire le path is displayed on the list.
• Show the le extension: le extension visible on the list.
• Font names: lists the installed fonts.
• Labels in solutions: lists all labels within the solution.
• Edit: converts system-dened items on the Values content list into a list of custom values.
• Values content list: displays the current object content.
• Set as default: turns the currently active selection into a default value.
TIP
Default value is a value that is automatically selected when the form is run.
NOTE
All values except for custom values are populated when the form is run. The values
displayed at design time are sample values retrieved from the current computer.
Style
Style tab denes visual appearance of an object.
Background color denes the object background color.
• Transparent: transparent object background.
Font color denes the font and underline colors.
Font selects the typeface.
The font may appear Bold, Italic, Underlined or as a Strikethrough text.
377

Position
Position tab denes object positioning and its position-related behavior.
Position group denes the object position.
• X and Y: anchoring point coordinates.
• Width and Height: horizontal and vertical object dimension.
• Keep aspect ratio: simultaneous changing of object dimensions while scaling.
• Lock: prevents the object from being moved during the design process.
Size group sets how object's dimensions change when the form is running:
• Resize anchor point: denes the xed distance of an object from the form borders.
TIP
Choose the most appropriate anchor point to ensure the object's visibility
regardless of the current window size.
• Horizontally resize with form and Vertically resize with form: object size automatically adapts to
the changing size of the form.
• Horizontally resize with form: object width adapts to the resized form.
• Vertically resize with form: object height adapts to the resized form.
NOTE
If both options are enabled, object width and height adapt to the resized
form simultaneously.
Rotation angle group sets the object angle according to the design surface.
Events
Events tab denes the actions that are run by various object-related events.
TIP
See section Actions Editor to read more about this powerful Designer tool.
Available events are:
• On Focus: action is run when focus is set on the object.
378

• On Exit: action is run when focus moves to another object.
• On Click: action is run on mouse click.
General
General tab identies the object and denes object state on form startup.
Name sets a unique object ID. It is used for object referencing when dening functions, variables,
scripts, etc.
Description allows adding notes and annotations for an object.
Hint (tooltip) helps the form users by briey explaining why or how to use an object. Hint is shown to a
user when the mouse pointer oats over the selected object.
Initial state on form startup group denes the object behavior when the form is run for the rst time:
• Enabled: denes if the object is going to be active (editable) at form startup or not.
• Condition: an object is enabled if the result of the given condition is "True".
• Visible: denes if the selected object is going to appear on the form or not.
• Condition: an object is visible if the result of the given condition is "True".
7.4.4.11. Checkbox
Checkbox is a form object that allows the user to make a binary choice – select or deselect the listed
options.
Source
Source tab denes data sources, data types, values, and prompting rules.
Connected data source is the dynamic data source that is connected with the object.
• Variables: variables which stores the selected checkbox value.
• Databases: database which stores the selected checkbox value.
TIP
This is a read-and-write form object. This means that the object is used for displaying
the connected dynamic content, and for entering or editing the connected data
sources.
379

Settings
Settings tab denes specics for object content editing and displaying of values.
checkbox text is a eld for entering the checkbox text.
• Checked: default checkbox state (selected/cleared) when the form is run.
• Word wrap: text is divided into multiple lines to make sure it does exceed the checkbox width.
State values is the state which is stored in the connected variable's value.
• Checked value: by default set to "True". Checked option conrms the assigned action.
• Unchecked value by default set to "False". Checked option rejects the assigned action.
TIP
Checked and Unchecked values are customizable. These values can be dened
manually or dynamically using a Data source.
Style
Style tab denes visual appearance of an object.
Background color denes the object background color.
• Transparent: transparent object background.
Font color denes the font and underline colors.
Font selects the typeface.
The font may appear Bold, Italic, Underlined or as a Strikethrough text.
Position
Position tab denes object positioning and its position-related behavior.
Position group denes the object position.
• X and Y: anchoring point coordinates.
• Width and Height: horizontal and vertical object dimension.
• Keep aspect ratio: simultaneous changing of object dimensions while scaling.
• Lock: prevents the object from being moved during the design process.
Size group sets how object's dimensions change when the form is running:
380

• Resize anchor point: denes the xed distance of an object from the form borders.
TIP
Choose the most appropriate anchor point to ensure the object's visibility
regardless of the current window size.
• Horizontally resize with form and Vertically resize with form: object size automatically adapts to
the changing size of the form.
• Horizontally resize with form: object width adapts to the resized form.
• Vertically resize with form: object height adapts to the resized form.
NOTE
If both options are enabled, object width and height adapt to the resized
form simultaneously.
Rotation angle group sets the object angle according to the design surface.
Events
Events tab denes the actions that are run by various object-related events.
TIP
See section Actions Editor to read more about this powerful Designer tool.
Available events are:
• On Focus: action is run when focus is set on the object.
• On Exit: action is run when focus moves to another object.
• On Click: action is run on mouse click.
General
General tab identies the object and denes object settings for form startup.
Name sets a unique object ID. It is used for object referencing when dening functions, variables,
scripts, etc.
Description allows adding notes and annotations for an object.
Hint helps the form users by briey explaining why or how to use the selected object.
381

Initial state on form setup group denes the object behavior while editing and printing a form:
• Enabled: denes if the object is going to be active (editable) at form startup or not.
• Condition: an object is enabled if the result of the given condition is "True".
• Visible: denes if the selected object is going to appear on the form or not.
• Condition: an object is visible if the result of the given condition is "True".
Content after a print action group denes how the object content is handled after each printout.
• Reset content after print: object content reset after printing.
• Clear content: object emptied after printing.
• Reset to initial content: content reset after printing to the initially dened object content.
7.4.4.12. Database Table
Database Table object displays the selected database table on a form. Such table allows searching,
ltering and selecting the connected database tables and records.
Settings
Settings tab allows selecting the connected database table.
Table group displays the currently used (active) database table. Select the database table which
should be displayed in the Database table object.
TIP
Add a database by running the Database wizard or select it from the databases that
have been dened using the Dynamic Data Manager.
• Enable multiple row selection allows selecting multiple database records simultaneously.
• Enable selection with checkbox: added selection checkbox in front of database records.
TIP
This option enhances the use of touch screen devices. Selection of
multiple records becomes more user-friendly.
• Show search controls option shows/hides the database search commands on the form.
• Database search eld allows you to enter search strings. If a match is found in the
connected database table, the matching row is highlighted. To clear the database search
eld, click the erase sign which appears in the eld after you enter the string.
382

• Database eld selector allows you to choose the elds in which the strings should be
searched for. By default, all elds are selected. Check or clear the elds using the drop
down list.
NOTE
If a match is found, the currently selected database row is set to the rst
row that matches the search criteria.
NOTE
If the queried database eld is connected to another form object, this
object displays the matching row data.
• Find button starts the search.
• Store selected row number to variable: stores the number of the selected table row to a variable.
TIP
If multiple rows are selected, variable stores the number of the last selected row.
Columns group allows managing the connected database table columns.
• Style: button opens the Column style dialog window. This dialog enables the user to customize
the visual appearance of a selected table column or cell.
• Move up: button places the selected record one position higher.
• Move down: button places the selected record one position lower.
• Field alias: column displays the name of the table eld as dened in the source database.
• Caption: allows dening a custom column name.
• Width: denes table column width.
• Visible: makes the table column visible or hidden on the form.
• Variable: variable which stores the value of a selected database record.
NOTE
Visibility of columns can also be dened when the form is run. Show or hide table
columns using the Set object property action. Below is an example of how the form
should be congured.
383

Example:
1. Add Database Table object to the form and connect it to a database.
2. Add Button object to the form.
3. Congure the added Button object to trigger the Set object property action with a click. Set
the On click event as trigger.
• Go to Button properties > Events tab.
• Click Actions ... to congure the Set object property action.
• Set Object name: name of Database Table form object you wish to hide some of
the columns.
• Select the Property: Visible columns.
• Dene Value: insert comma-separated names of table columns. Use the
“ character if value name includes a comma.
4. Run the form.
5. Click the button. Only selected columns are now visible in the table.
Style
Style tab denes visual appearance of the Database Object table.
• Alignment: alignment of table header row.
• Background color: table background color.
• Font color: table text font color.
• Font: table text typeface and its properties (Bold, Italic and size).
Cell style group denes visual appearance of a cell in a database table.
• Alignment: table cell content alignment.
• Background color: cell background color.
• Font color: cell font and underline colors.
Font group denes the cell text font and its properties (Bold, Italic and size).
Position
Position tab denes object positioning and its position-related behavior.
Position group denes the object position.
384

• X and Y: anchoring point coordinates.
• Width and Height: horizontal and vertical object dimension.
• Keep aspect ratio: simultaneous changing of object dimensions while scaling.
• Lock: prevents the object from being moved during the design process.
Size group sets how object's dimensions change when the form is running:
• Resize anchor point: denes the xed distance of an object from the form borders.
TIP
Choose the most appropriate anchor point to ensure the object's visibility
regardless of the current window size.
• Horizontally resize with form and Vertically resize with form: object size automatically adapts to
the changing size of the form.
• Horizontally resize with form: object width adapts to the resized form.
• Vertically resize with form: object height adapts to the resized form.
NOTE
If both options are enabled, object width and height adapt to the resized
form simultaneously.
Rotation angle group sets the object angle according to the design surface.
Events
Events tab denes the actions that are run by various object-related events.
TIP
See section Actions Editor to read more about this powerful Designer tool.
Available event for Database Table object is:
• On selection change: action is run on form startup and/or after a row (or multiple rows) is
selected or deselected in the table.
General
General tab denes the object and denes object settings for form startup.
385

Name sets a unique object ID. It is used for object referencing when dening functions, variables,
scripts, etc.
Description allows adding notes and annotations for an object.
Hint helps the form users by briey explaining why or how to use the selected object.
Initial state on form setup group denes the object behavior while editing and printing a form:
• Enabled: denes if the object is going to be active (editable) on the print form or not.
• Condition: an object is enabled if the result of the given condition is "True".
• Read-only: prevents connected data source input and content editing.
TIP
Read-only becomes enabled if the selected database is a "real" database. Excel
database cannot be edited and is therefore read-only by denition.
• Visible: denes if the selected object is going to appear on the form or not.
• Condition: an object is visible if the result of the given condition is "True".
Column Style Dialog
Column style dialog allows dening style-related table properties of the Database Table object.
Column style group denes visual appearance of table column.
• Override table default style: enables style customization of the selected column.
• Alignment: denes header row content alignment.
• Background color: denes column background color. Transparent makes the column
background invisible.
• Font color: species the font color.
• Font: allows specifying the typeface and its properties: Size, Bold and Italic.
Cell style group denes visual appearance of individual cells.
• Override table default style: enables style customization of the selected cell.
• Background color: denes the cell background color. Transparent makes the cell background
invisible.
• Font color: species font color.
• Font: allows specifying font type and its properties: Size, Bold and Italic.
386

7.4.4.13. Database Navigator
Database Navigator object is a tool for navigating, adding and deleting the database records on a
form.
Settings
Table denes the database table which should be navigated using the Database navigator object.
TIP
Add a database by running the Database wizard or select it from the databases that
have been dened using the Dynamic Data Manager dialog.
Database navigator commands dier according to the initial state of the selected database table on
form startup: Read-and-Write or Read-only. The rst one allows editing action, whereas the second
one prevents the user from making any changes on the connected database.
Read-and-Write mode commands are (from left to right):
• First record: places you on the rst record of the connected database table.
• Prior record: places you one record back.
• Next record: places you one record further.
• Last record: places you on the last record of the connected database table.
• Insert record: inserts a new record in the connected database table.
• Delete records: deletes a record in the connected database table.
• Post edit: posts the changed record in the connected database table.
• Cancel edit: cancels the record editing and discard any changes done.
• Refresh data: refreshes the displayed data in the connected database table.
Read-only mode includes a reduced set of commands:
• First record: places you on the rst record of the connected database table.
• Prior record: places you one record back.
• Next record: places you one record further.
387

• Last record: places you on the last record of the connected database table.
• Refresh data: refreshes the displayed data in the connected database table.
Position
Position tab denes object positioning and its position-related behavior.
Position group denes the object position.
• X and Y: anchoring point coordinates.
• Width and Height: horizontal and vertical object dimension.
• Keep aspect ratio: simultaneous changing of object dimensions while scaling.
• Lock: prevents the object from being moved during the design process.
Size group sets how object's dimensions change when the form is running:
• Resize anchor point: denes the xed distance of an object from the form borders.
TIP
Choose the most appropriate anchor point to ensure the object's visibility
regardless of the current window size.
• Horizontally resize with form and Vertically resize with form: object size automatically adapts to
the changing size of the form.
• Horizontally resize with form: object width adapts to the resized form.
• Vertically resize with form: object height adapts to the resized form.
NOTE
If both options are enabled, object width and height adapt to the resized
form simultaneously.
Rotation angle group sets the object angle according to the design surface.
General
General tab denes the object and denes object settings for form startup.
Name sets a unique object ID. It is used for object referencing when dening functions, variables,
scripts, etc.
Description allows adding notes and annotations for an object.
388

Hint helps the form users by briey explaining why or how to use the selected object.
Initial state on form setup group denes the object behavior while editing and printing a form:
• Enabled: denes if the object is going to be active (editable) on the print form or not.
• Condition: an object is enabled if the result of the given condition is "True".
• Read-only: prevents connected data source input and content editing.
• Visible: denes if the selected object is going to appear on the form or not.
• Condition: an object is visible if the result of the given condition is "True".
7.4.4.14. Database Search
Database Search object is a search tool for databases which are connected to form objects.
• Database search eld allows you to enter a search string. If a match is found in the connected
database table, the matching row is highlighted.
NOTE
If a match is found, the currently selected database row is set to the rst row that
matches the search criteria.
NOTE
If the queried database eld is connected to another form object, this object
displays the matching row data.
• Find button starts the search.
• Database eld menu allows you to select the elds in which the strings should be searched for.
By default, the table's rst eld is selected.
Settings
Table denes the database to be searched.
389

TIP
Add a database by running the Database wizard or select it from the databases that
have been dened using the Dynamic Data Manager dialog.
• Search on every keypress (incremental search): highlights and selects the row(s) with
matching character sequence after each entered character.
• Select record only when exact match is found: highlights and selects the row(s) with a
complete sequence of characters that matches the entered search term.
Style
Style tab denes visual appearance of an object.
Background color denes the object background color.
• Transparent: transparent object background.
Font color denes the font and underline colors.
Font selects the typeface.
The font may appear Bold, Italic, Underlined or as a Strikethrough text.
Position
Position tab denes object positioning and its position-related behavior.
Position group denes the object position.
• X and Y: anchoring point coordinates.
• Width and Height: horizontal and vertical object dimension.
• Keep aspect ratio: simultaneous changing of object dimensions while scaling.
• Lock: prevents the object from being moved during the design process.
Size group sets how object's dimensions change when the form is running:
• Resize anchor point: denes the xed distance of an object from the form borders.
TIP
Choose the most appropriate anchor point to ensure the object's visibility
regardless of the current window size.
390

• Horizontally resize with form and Vertically resize with form: object size automatically adapts to
the changing size of the form.
• Horizontally resize with form: object width adapts to the resized form.
• Vertically resize with form: object height adapts to the resized form.
NOTE
If both options are enabled, object width and height adapt to the resized
form simultaneously.
Rotation angle group sets the object angle according to the design surface.
General
General tab denes the object and denes object settings for form startup.
Name sets a unique object ID. It is used for object referencing when dening functions, variables,
scripts, etc.
Description allows adding notes and annotations for an object.
Hint helps the print form users by briey explaining why or how to use the selected object.
Initial state on form setup group denes the object behavior while editing and printing a form:
• Enabled: denes if the object is going to be active (editable) on the print form or not.
• Visible: denes if the selected object is going to appear on the form or not.
• Condition: an object is enabled and/or visible if the result of the given condition is "True".
7.4.4.15. Label Preview
Label Preview object oers live print preview with dened print parameters for the selected label.
Settings
Label species the label le whose preview is displayed in the object.
TIP
Click New label to create a new label within the solution. If the label is not supposed to
be a part of the solution, locate it using the Browse button. The label can also be
dened dynamically using a connected data source.
Printer denes the printer whose settings are used for generating the preview.
391

TIP
If no other printer is dened, the printer dened for the active label is used. The printer
can also be dened dynamically using a connected data source.
Content group denes what the Label Preview includes:
• Show a single label: preview of label's printable area.
• Show all labels on the page: preview of the entire page containing the labels.
NOTE
This option is useful when Labels Across is in use or when previewing the label
margins.
Quantity group denes the number of previewed labels.
• Labels: the number of label to be displayed in the Label Preview.
• All (unlimited quantity): prints the entire range of labels depending on the data.
Number of skipped labels denes the numbers of labels to be skipped on the rst page of preview.
TIP
This option is used with Labels Across.
Identical copies per label denes the number of copies for each label in the preview.
Number of label sets species how many times the entire label preview should repeat.
Label Side denes the side of the label to be displayed in the preview.
• Show front side: front side of the label appears in the preview.
• Show back side: back side of the label (if available) appears in the preview.
NOTE
If both options are selected, both label sides appear on the preview.
Style
Style tab denes visual appearance of an object.
392

• Background color: Label Preview background color.
• Transparent: transparent object background.
• Show border: Label Preview object border visible.
• Border color: Label Preview border color.
• Border width: Label Preview border width.
Position
Position tab denes object positioning and its position-related behavior.
Position group denes the object position.
• X and Y: anchoring point coordinates.
• Width and Height: horizontal and vertical object dimension.
• Keep aspect ratio: simultaneous changing of object dimensions while scaling.
• Lock: prevents the object from being moved during the design process.
Size group sets how object's dimensions change when the form is running:
• Resize anchor point: denes the xed distance of an object from the form borders.
TIP
Choose the most appropriate anchor point to ensure the object's visibility
regardless of the current window size.
• Horizontally resize with form and Vertically resize with form: object size automatically adapts to
the changing size of the form.
• Horizontally resize with form: object width adapts to the resized form.
• Vertically resize with form: object height adapts to the resized form.
NOTE
If both options are enabled, object width and height adapt to the resized
form simultaneously.
Rotation angle group sets the object angle according to the design surface.
Events
Events tab denes the actions that are run by various object-related events.
393

TIP
See section Actions Editor to read more about this powerful tool.
Available events are:
• On Mouse Enter: action is run on mouse enter.
• On Mouse Leave: action is run on mouse leave.
• On Click: action is run on mouse click.
General
General tab denes the object and denes object settings for form startup.
Name sets a unique object ID. It is used for object referencing when dening functions, variables,
scripts, etc.
Description allows adding notes and annotations for an object.
Hint helps the print form users by briey explaining why or how to use the selected object.
Initial state on form setup group denes the object behavior while editing and printing a form:
• Enabled: denes if the object is going to be active (editable) on the print form or not.
• Visible: denes if the selected object is going to appear on the form or not.
• Condition: an object is enabled and/or visible if the result of the given condition is "True".
7.4.4.16. Data Initialization
Data Initialization object is a panel for assigning values to variables that are used on the selected
label that belongs to a solution.
Settings
Label selects the label that is going to be used with Data Initialization object.
TIP
If the label is not a part of the solution, it can be located using the Browse button. The
label can also be dened dynamically using a connected Data source.
• Place focus on Data Initialization when label changes: sets focus to the Data Initialization
table when the selected label changes. This makes the table instantly editable.
394

• Show selection of labels from the solution: adds a dropdown list that the enables the user to
select a label from those that are included in the solution.
TIP
This dropdown list allows the user to change the active label that is going to be
printed. If this option remains unchecked, select the label by setting the Label
data source.
Table Initialization group enables selection of records in the connected database.
NOTE
A separate tab is added for each database table that is connected to a label.
Columns group sets the width of data initialization table and its Prompt, Value and Formatted value
columns.
• Auto-size: automatic column resizing.
• Show fomatted value: makes the Formatted value column appear in the object table when the
form is run.
Advanced
The Data Initialization object sets variable values for your solutions. Labels then print with these
values.
• Allow loading variable values: If you enable this option, you can load variable values from les
stored on your computer after you run the form. NiceLabel 2019 automatically initializes the
variables on your label or form with values from the selected le.
Files with variable values have ".defaults" or ".values" extensions. The two supported variable
formats are:
• XML:
<variables>
<variable name="var1">variable1</variable>
<variable name="var2">variable2</variable>
</variables>
• name-value:
var1=variable1
var2=variable2
With the Allow loading variable values option enabled, the active form displays the Load... icon.
Click Load... to locate and load variable values for your forms.
395

NOTE
Three rules apply to loading variable values on forms:
1. If the variable does not exist in the le, the original value remains
unchanged on the printed label.
2. If the variable le contains variables that are not dened on the label,
NiceLabel 2019 ignores these variables.
3. If a value from the variable le is not valid, the original variable value
remains unchanged. Error message appears.
• The Data Initialization object lists all variables used on labels in your solution by default. To
exclude specic variables from the Data Initialization object, select Limit visibility of variables.
Names of variables to show: Type names of variables you wish to keep visible in the Data
Initialization object. Separate names of multiple variables with commas.
Example:
You want to limit variable visibility on sample labels.
Your sample GS1-128 label uses the following variables:
Product_name
SSCC (Serial Shipping Container Code)
Count of Trade Items
Best Before Date
Batch or Lot number
GTIN of Contained Trade Items
You decide to use the Data Initialization object to make only two variable values editable:
Product_name
Best Before Date
1. Create a new label.
2. Open label GS1-128 from samples (go to Help > Sample Files > Labels).
3. Save the label as a solution le (.nsln). This allows you to start adding forms in the same
document.
4. Add a new blank form.
5. Select the label in Data Initialization object Properties > Settings > Label.
396

6. Data Initialization object lets you edit all label variable values by default:
7. To limit editing of variable values to only Product_name and Best Before Date, select
Limit visibility of variables.
8. Type variable names under Names of variables to show.
9. Run the form. Data Initialization object only shows variables Product_name and Best
Before Date.
Style
Style tab denes visual appearance of an object.
Background color denes the object background color.
• Transparent: transparent object background.
397

Font color denes the font and underline colors.
Font selects the typeface.
The font may appear Bold, Italic, Underlined or as a Strikethrough text.
Alignment denes horizontal positioning of the entered content.
• Left: text aligned with the left object border.
• Center: text positioned centrally.
• Right: text aligned with the right object border.
Position
Position tab denes object positioning and its position-related behavior.
Position group denes the object position.
• X and Y: anchoring point coordinates.
• Width and Height: horizontal and vertical object dimension.
• Keep aspect ratio: simultaneous changing of object dimensions while scaling.
• Lock: prevents the object from being moved during the design process.
Size group sets how object's dimensions change when the form is running:
• Resize anchor point: denes the xed distance of an object from the form borders.
TIP
Choose the most appropriate anchor point to ensure the object's visibility
regardless of the current window size.
• Horizontally resize with form and Vertically resize with form: object size automatically adapts to
the changing size of the form.
• Horizontally resize with form: object width adapts to the resized form.
• Vertically resize with form: object height adapts to the resized form.
NOTE
If both options are enabled, object width and height adapt to the resized
form simultaneously.
Rotation angle group sets the object angle according to the design surface.
398

General
General tab denes the object and denes object settings for form startup.
Name sets a unique object ID. It is used for object referencing when dening functions, variables,
scripts, etc.
Description allows adding notes and annotations for an object.
Hint helps the print form users by briey explaining why or how to use the selected object.
Initial state on form setup group denes the object behavior while editing and printing a form:
• Enabled: denes if the object is going to be active (editable) on the print form or not.
• Visible: denes if the selected object is going to appear on the form or not.
• Condition: an object is enabled and/or visible if the result of the given condition is "True".
Preparing Variable Values for NiceLabel Automation
In combination with NiceLabel Automation, Designer allows you to use the values from Data
Initialization object to trigger automated label printing, and to dene the content of printed labels.
To enable such use of values that you type into the Data Initialization object, you must congure your
solution to:
1. Store the variable values from the Data Initialization object in a new dedicated variable.
2. Forward the stored content of this dedicated variable to NiceLabel Automation.
To make the variable values from your solution available for NiceLabel Automation:
1. Add a new variable to your solution.
2. Rename the added variable to
[YourDataInitializationObjectName]_VariableValues.
[YourDataInitializationObjectName] is the name of your Data Initialization object.
• The variable contains values from the data initialization object in XML format.
3. Use the variable in NiceLabel Automation HTTP trigger.
Example:
1. Use an object on your form (e.g. button) to create an HTTP request. When conguring
the action in Designer, type in the variable name
([YourDataInitializationObjectName]_VariableValues) under Content >
Data:.
399

2. When conguring the HTTP Server trigger in Automation Builder, enable the Save data
received by the trigger to le option under Settings > Save Received Data. Dene the
le name and location (e.g. .\tmp.txt).
3. Deploy the Automation conguration. After the trigger res, the variable values from
your solution are saved in the specied le. The le content is:
<Variables>
<variable name="Variable1" >xx</variable>
<variable name="Variable2" >yy</variable>
</Variables>
Variables named Variable 1 and Variable 2 belong to the label that is selected for your
Data Initialization object.
NOTE
Values of internal and global variables cannot be stored in the XML le.
7.4.4.17. Printer Settings
Printer Settings object enables adjusting printing speed and darkness on a form.
NOTE
The object overrides the currently dened driver settings – printing within the active
solution uses properties as dened using this object.
Settings
Label species the label le to be used with Printer Settings object.
TIP
If the label is not a part of the solution, it can be located using the Browse button. The
label can also be dened dynamically using a connected Data source.
Printer denes the printer whose settings are used.
TIP
If no other printer is dened, the printer dened for the active label is used. The printer
can also be dened dynamically using a connected Data source.
400

Show speed settings sets printing speed setting availability.
Show darkness settings sets printing darkness setting availability.
Style
Style tab denes visual appearance of an object.
Background color denes the object background color.
• Transparent: transparent object background.
Font color denes the font and underline colors.
Font selects the typeface.
The font may appear Bold, Italic, Underlined or as a Strikethrough text.
Position
Position tab denes object positioning and its position-related behavior.
Position group denes the object position.
• X and Y: anchoring point coordinates.
• Width and Height: horizontal and vertical object dimension.
• Keep aspect ratio: simultaneous changing of object dimensions while scaling.
• Lock: prevents the object from being moved during the design process.
Size group sets how object's dimensions change when the form is running:
• Resize anchor point: denes the xed distance of an object from the form borders.
TIP
Choose the most appropriate anchor point to ensure the object's visibility
regardless of the current window size.
• Horizontally resize with form and Vertically resize with form: object size automatically adapts to
the changing size of the form.
• Horizontally resize with form: object width adapts to the resized form.
• Vertically resize with form: object height adapts to the resized form.
401

NOTE
If both options are enabled, object width and height adapt to the resized
form simultaneously.
Rotation angle group sets the object angle according to the design surface.
General
General tab denes the object and denes object settings for form startup.
Name sets a unique object ID. It is used for object referencing when dening functions, variables,
scripts, etc.
Description allows adding notes and annotations for an object.
Hint helps the print form users by briey explaining why or how to use the selected object.
Initial state on form setup group denes the object behavior while editing and printing a form:
• Enabled: denes if the object is going to be active (editable) on the print form or not.
• Visible: denes if the selected object is going to appear on the form or not.
• Condition: an object is enabled and/or visible if the result of the given condition is "True".
7.4.4.18. Print Quantity
Print Quantity object denes the number of labels (or pages of labels) to be printed.
Settings
Label species the label le to be used with Print Quantity object.
Print Quantity is dened using a connected variable value.
TIP
The variable must be used as the quantity that is dened for the print action.
Show additional settings group allows dening the following properties:
• Number of skipped labels variable: assigns the selected variable a number of labels to be
skipped on rst page.
402

NOTE
When dening the number of skipped labels, duplicates, or label sets, a new
window appears. This window allows the user to enter the values.
TIP
This option is used with Labels Across.
• Identical copies per label variable: assigns the selected variable a number of copies for each
label in a print job.
• Number of label sets variable: assigns the selected variable a value that species how many
times the entire label printing process should repeat.
WARNING
At least one variable must be dened when the Show additional settings option is
enabled.
Style
Style tab denes visual appearance of an object.
Background color denes the object background color.
• Transparent: transparent object background.
Font color denes the font and underline colors.
Font selects the typeface.
The font may appear Bold, Italic, Underlined or as a Strikethrough text.
Position
Position tab denes object positioning and its position-related behavior.
Position group denes the object position.
• X and Y: anchoring point coordinates.
• Width and Height: horizontal and vertical object dimension.
• Keep aspect ratio: simultaneous changing of object dimensions while scaling.
403

• Lock: prevents the object from being moved during the design process.
Size group sets how object's dimensions change when the form is running:
• Resize anchor point: denes the xed distance of an object from the form borders.
TIP
Choose the most appropriate anchor point to ensure the object's visibility
regardless of the current window size.
• Horizontally resize with form and Vertically resize with form: object size automatically adapts to
the changing size of the form.
• Horizontally resize with form: object width adapts to the resized form.
• Vertically resize with form: object height adapts to the resized form.
NOTE
If both options are enabled, object width and height adapt to the resized
form simultaneously.
Rotation angle group sets the object angle according to the design surface.
General
General tab denes the object and denes object settings for form startup.
Name sets a unique object ID. It is used for object referencing when dening functions, variables,
scripts, etc.
Description allows adding notes and annotations for an object.
Hint helps the print form users by briey explaining why or how to use the selected object.
Initial state on form setup group denes the object behavior while editing and printing a form:
• Enabled: denes if the object is going to be active (editable) on the print form or not.
• Visible: denes if the selected object is going to appear on the form or not.
• Condition: an object is enabled and/or visible if the result of the given condition is "True".
404

7.4.5. Run Form
PRODUCT LEVEL INFO
Solution building is available in PowerForms.
To make the form operable, you have to switch its mode from design to run. When you are done with
designing a form, run the form to activate it or to test if everything works as expected.
There are multiple ways to run a form.
• Click Run form in the Home tab ribbon – Action group
• Press Ctrl+D. This runs the startup form.
NOTE
Startup form is the default form that runs after you open your solution.
• Press Ctrl+R. This runs the form that you are currently editing.
• Use right-click menu in the Solution manager.
The form in rune mode opens in a separate window. To continue designing it, close the form window
and continue with editing.
405

NOTE
You can only return back to design mode if the run mode was started directly from
Designer. Users that open the form using NiceLabel Print in can only use the form in
run mode and cannot edit it.
7.4.6. Form Debugger
NOTE
Form Debugger was included in NiceLabel 2019.1 release as beta version.
Form Debugger is a form testing, reviewing and troubleshooting tool. To open the Form Debugger,
create/open a solution, run a form, and press Ctrl + Shift + F12.
Data sources area provides an overview of the data sources which are used by form objects.
• Category: sorts data source categories (database elds, variables, functions). By default, the
connected data sources are grouped by this column.
• Name: data source name.
• Value (string): string representation of data source value. This eld is editable.
Actions area lists the currently executing (or last executed) set of actions. The currently executing
action is marked with green color. After an action is executed, the area also displays its execution
time.
• Step-by-step execution: makes the Form Debugger stop before an action is executed.
406

• Step button: executes an action that the Form Debugger has stopped at.
• Event type: allows you to lter the events according to their origin. The events can be either
started by:
• user action (click, enter the object, mouse hover, etc.)
• automatically (using timer)
Action execution log eld lists the details of executed actions. These actions are listed using the
following format: [date time] action name value/string.
Datasets lists the tables loaded by form. Select a table to display the data it contains.
NOTE
Form Debugger is not available in production environments. It can only be run during
the solution development with enabled have read/write access to the solution le.
TIP
Form Debugger also allows you to debug the form startup actions. To do so, run the
debugger while designing the form. Press Crtl + Shift + R. The form and Form
Debugger will open simultaneously.
7.5. How To
7.5.1. Printing with Forms
To use forms for printing is a very ecient method to make the printing process faster and aligned
with your business process. Unlike with labels, printing with forms is done using form actions.
TIP
Before creating and designing a form which is going to be used for printing, make sure
your label is properly designed and ready to be printed. Do not forget to select the
appropriate printer in the label properties dialog.
• Simple printing with forms. Use object forms to initiate printing. Printing-related actions can be
assigned to various form objects. The assigned actions are triggered by events – if an event is
triggered, printing process starts.
407

• Printing Labels whose Names are Read from Database. Use a form to dynamically dene a label
which is going to be printed. This method represents an upgrade of simple printing with forms
as it reads the label name from a connected database.
7.5.1.1. Simple Printing with Forms
Follow the below listed steps to use a form object to print a label when a user clicks it.
1. Create a new form.
2. Add a form object to the design surface. Button is the most appropriate object to be clicked.
3. Double-click the button to open its properties.
4. Open the Events tab.
5. In our case, button object already oers the On click event. Click Actions ... to open the
Actions editor.
• Print label action is listed among popular actions in the Actions editor ribbon. Click it to assign
it to the button.
NOTE
Print label is an action that automatically adds Open label action in front of it.
• Click Open label action in the Actions editor to open its properties. Label name denes which
label should be printed.
408

1. Click OK.
2. Run the form and click the button. The label gets printed.
7.5.1.2. Printing Labels whose Names are Read from Database
This label printing method enables you to dynamically dene a label to be printed using a connected
database. Use the form to read the label name from the database and print it.
Follow the below steps to create a basic form for database-dened label printing.
1. Create a new form.
2. Add a form object to the design surface. Button is the most appropriate object for clicking on.
3. Double-click the button to open its properties.
4. Open the Events tab.
5. In our case, button object already oers the On click event. Click Actions ... to open the
Actions editor.
• If you plan to print all labels listed in the database table, or a selection of included labels, add
action named For every record.
• Use all records: prints all records in the database table.
• Use selected records
• Add Print label action. This action is listed among popular actions in the Actions editor ribbon.
Click it to assign it to the button.
NOTE
Print label is an action that automatically adds Open label action in front of it.
409

• Click Open label action in the Actions editor to open its properties. Label name denes which
label should be printed. Select the Data source option to enable the selection of dynamic data
sources.
• Click the dropdown list and select an existing database eld or create a new database
connection using the database connection wizard.
1. Click OK.
2. Run the form and click the button. A label dened by the database gets printed.
7.5.2. Import and Export
Import and Export group allows importing, publishing and exporting the solution les.
Import into Solution allows you to import documents into the solution. Supported le formats are:
• Solution le (.nsln)
• Label le (.nlbl)
• Label le (V6) (.lbl)
• Form File (V6) (.x)
When an import command is issued, the Open dialog opens. Select the le you want to import. The
imported le becomes visible in the solution manager.
NOTE
Label .lbl and form .x les are legacy le types used with version 6 and earlier.
Export Label: saves the document to disk and makes it available for use in another solution. After
clicking Export Label the Export label dialog appears. Select a location to save the label to.
410

7.6. Dene Actions
PRODUCT LEVEL INFO
This section is applicable to PowerForms.
Actions are an essential part of automated labeling solutions. Each action performs a predened
command (or a series of commands) when a dened event happens.
Designer includes a wide range of actions. Their purpose is to eliminate the need to start the solution
programming from scratch.
Manage actions using the Action Editor dialog box.
Basic Action concepts and properties are described below.
• Available Actions: the range of actions that are included in Designer. These actions are grouped
into functional sets.
• Dening actions: an action is dened in Actions Editor by clicking the appropriate action icon in
Add ribbon group. The main ribbon contains commonly used actions and – later – the actions
you dene as common actions. To see all available actions, click All Actions.
• Nested Actions: actions that cannot be used on their own. Their specic characteristics require
them to be nested within another action. Use buttons in Action Order ribbon group to change
action placement. Each action is identied with an ID number that indicates its position in the
list, including its nesting. This ID number is displayed in the potential error message so you can
nd the problematic action faster.
Print Label action is an example of such action. This action is nested under the Open Label action, so
it references the exact label to be printed.
• Action Execution: listed (active) actions are executed once per event. The order of actions is
crucial – the execution begins at the top and moves toward bottom of the list.
• Conditional Actions: conditional actions only run when the provided conditions allow them to be
run. Condition is dened with a single line VBScript Expression or Python script.
• Errors in Actions: if an action is not congured completely, it is marked with a red exclamation
icon. Such action can be included in the event list but cannot be executed.
NOTE
If one of the nested actions reports an error, all parent actions are also colored red.
This serves as an indication for a nested action error.
• Disabling Actions: prevents an action from being executed. By default, each added action is
enabled. Actions that are not needed, can be disabled and still kept in the conguration. The
411

shortcut to action enabling & disabling is the checkbox in front of the action name on the list of
dened actions.
• Copying Actions: any action may be copied and pasted. Use standard Windows keyboard
shortcuts, or right-click the action.
7.6.1. Actions Editor
PRODUCT LEVEL INFO
This section is applicable to PowerForms.
Actions Editor is a dialog for managing actions in a Designer solution.
Actions can be dened for:
• Form: these actions are triggered with form events. They are applicable to the following events:
• On form load: action(s) are run after a form is loaded.
• On form close: action(s) are run after a form is closed.
• On form timer: action(s) are run after a specied time interval.
• On Form Inactivity: action(s) are run after the form has been inactive for a given time
interval.
• Form object: these actions are triggered with object-related events.
• Variable: these actions are triggered according to the received values.
412

7.6.1.1. Ribbon
Actions Editor Dialog ribbon includes commands for adding, removing and ordering the actions. It
also provides a direct access to frequently used actions.
Clipboard group icons activate the following actions:
• Paste: pastes the clipboard data.
• Cut: cuts the selection to the clipboard.
• Copy: copies the selection to the clipboard.
• Delete: deletes the selected items.
Undo & Redo group allows undoing or repeating actions.
• Undo:Designer allows the user to undo the entire sequence of actions since opening the editor.
• Redo: repeats the requested range of actions.
Action Order group denes the action execution order of selected actions.
• Up and Down: arrows place the selected action in front or after any other existing action.
• Right: arrow nests the selected action under the previous existing action.
NOTE
Nested action is any action that starts when the parent action is already in progress.
• Left: arrow makes a nested action independent of the preceding action.
NOTE
Certain actions cannot exits independently. If such action is added to the action list, a
warning appears. The warning denes which action should it be nested under.
Add assigns actions to the selected form object.
• All actions button gives access to the entire range of Designer actions. Recently used actions
are listed on the top. Use Search... eld to quickly locate any action by entering its name.
• Four buttons give direct access to the most commonly used actions:
• Open Label: button adds the Open Label action to the event list.
• Print Label: button adds the Print Label action to the event list.
• Set Printer: button adds the Set Printer action to the event list.
413

• Quit: button adds the Quit action to the event list.
7.6.1.2. Actions Explorer
Actions Explorer is a tool for adding, removing and ordering the assigned actions. Use ribbon
commands to manipulate with existing actions or to add new actions.
The explorer columns provide instant overview of actions' execution options and their descriptions.
• Enabled: enables or disables the included action.
• Condition: display the condition for executing an action (if set).
• Description: displays the information about an action as dened by the user.
Actions Explorer enables you to make a selection of multiple actions, and to perform copy, paste and
delete operations with them. To make a selection, Use Ctrl/Shift + Click on the required actions.
NOTE
Multiple actions can only be selected under the same parent action, i.e. all selected
actions must be on the same level. See picture below.
7.6.1.3. Editing eld
Editing eld allows editing the advanced action properties.
• Main properties of the selected action are available for editing on the top of the Main/editing
eld. Main properties dier with each action – read the dedicated action description sections for
details.
• About group allows you to describe all NiceLabel 2019 actions.
• Name: by default, action name is dened by its type and is therefore not unique. Dene a
custom name to make it instantly recognizable among other actions, in logs and in
potential error messages.
• Description: user notes for the selected action. Description is displayed in actions
explorer.
414

• Action Type: read-only eld which displays the type of action.
NOTE
When upgrading from legacy solutions (created with NiceLabel V6 and back),
update the action names based on the currently selected language. Solution
version becomes updated.
• Hidden properties dene the less frequently dened properties. Hidden properties dier with
each action – read dedicated action description sections for details.
7.6.2. Available Actions
PRODUCT LEVEL INFO
This section is applicable to PowerForms.
The Designer actions are grouped into multiple functional sets. The groups with basic action
descriptions are listed below.
General group contains frequently used label opening and activation related commands:
• Open Label
• Print Label
• Open Document/Program
• Execute Script
• Create Label Variant
Printer group contains actions related to printing:
• Set Printer
• Dene Printer Settings
• Set Print Job Name
• Redirect Printing to File
• Set Print Parameter
• Redirect Printing to PDF
• Printer Status
• Store Label to Printer
• Print PDF Document
415
Form group denes actions related to form objects:
• Open Another Form
• Message
• Quit
• Move Focus
• Get Selected Table Row
• Select Table Row
• Set Object Property
• Translate form
Variables group denes actions related to variables:
• Set Variable
• Save Variable Data
• Load Variable Data
• String Manipulation
Data & Connectivity group denes the actions related to databases, data sending, reading or
receiving, and networking.
• Execute SQL Statement
• Refresh Table
• Import Data into Table
• Send Data to TCP&IP Port
• Send Data to Serial Port
• Read Data from Serial Port
• Send Data to Printer
• HTTP Request
• Web Service
File operations group denes the active le related actions:
• Save Data to File
• Read Data from File
• Delete File
416

• Browse File/Folder
Flow control group denes various sequences of actions:
• For Loop
• For Every Record
• Try
• Group
Other group contains specic actions for running the commands, sending custom commands and
verifying the licenses:
• Run Command File
• Send Custom Commands
• Verify License
• Log Event
7.6.2.1. General
Open Label
Open Label action species the label le that is going to be printed. When the action is executed, the
label template opens in memory cache. The label remains in the cache for as long as the triggers or
events use it.
There is no limit on the number of labels that can be opened concurrently. If the label is already
loaded and is requested again, NiceLabel Automation will rst determine if a newer version is available
and approved for printing, then open it.
In this example, loads the label label.nlbl from folder C:\ProjectA\Labels.
C:\ProjectA\Labels\label.nlbl
If the specied label cannot be found, NiceLabel 2019 tries to nd it in alternative locations. For more
information, see section Search Order for Requested Files in NiceLabelDesigner user guide.
417

About group identies the selected action.
• Name: allows you to dene a custom action name. This makes actions easily recognizable on
the solution's list of actions. By default, action name is taken from its type.
• Description: custom information about the action. Enter a description to explain purpose and
role of action in a solution.
• Action type: read-only information about the selected action type.
Using Relative Paths
NiceLabel 2019 supports the use of relative paths for referencing your label le. Root folder is always
the folder where the solution (or conguration in case the action is used in a NiceLabel Automation
conguration) is stored.
With the following syntax, the label loads relatively from the location of the conguration le.
Automation Builder searches for the label in folder ProjectA, which is two levels above the current
folder, and then in folder Labels.
..\..\ProjectA\Labels\label.nlbl
Settings group selects the label le.
• Label name: species the label name. It can be hard-coded, and the same label will print every
time. The option Data source enables the le name to be dynamically dened. Select or add a
variable that contains the path and/or le name if a trigger is executed or an event takes place.
TIP
Usually, the value to the variable is assigned by a lter.
NOTE
Use UNC syntax for network resources.
Action Execution and Error Handling
Each action in can be set as a conditional action. Conditional actions only run when the dened
conditions allow them to be run. To dene these conditions, click Show execution and error handling
options.
Execution options are:
• Enabled: species if the action is enabled or disabled. Only enabled actions will execute. This
functionality may be used while testing a form.
• Condition: denes one-line programming expression that must provide a Boolean value (true
or false). When the result of the expression is true, the action will execute. Condition oers a
way to avoid executing actions every time.
418

Error handling options are:
• Ignore failure: species whether an error should be ignored or not. With Ignore failure option
enabled, the execution of actions continues even if the current action fails.
NOTE
Nested actions that depend on the current action do not execute in case of a failure.
The execution of actions continues with the next action on the same level as the
current action. The error is logged, but does not break the execution of the action.
Example
At the end of printing, you might want to send the status update to an external application using the
HTTP Request action. If the printing action fails, action processing stops. In order to execute the
reporting even after the failed print action, the Print Label action must have the option Ignore failure
enabled.
• Save error to variable: allows you to select or create a variable to save the error to. The same
cause of error is also saved to internal variables ActionLastErrorId and
ActionLastErrorDesc.
Print Label
This action executes label printing. It must always be nested within the Open Label action. Nesting
allows it to obtain the reference to the label that is going to be printed. This further allows you to keep
multiple labels open at the same time, and enables you to specify which label should be printed.
After issuing this action, the label gets printed using the printer driver that is dened in the label
template. If the dened printer driver is not found on the system, the label is printed using the system
default printer driver. You can override the printer driver selection via Set Printer action.
To achieve high performance label printing, activates two settings by default:
• Parallel processing. Multiple print processes are all carried out simultaneously. The number of
background printing threads depends on the hardware; specically on the processor type. Each
processor core can accommodate a single printing thread. This default can be changed. For
more information, see section Parallel Processing in NiceLabel Automation user guide.
• Asynchronous mode. As soon as the trigger pre-processing completes and the instructions for
the print engine are available, the printing thread takes it over in the background. The control is
returned to the trigger so it can accept the next incoming data stream as soon as possible. If
synchronous mode is enabled, the control is not returned to the trigger until the print process is
nished. This can take a while, but the trigger benets from providing feedback back to data-
providing application. For more information, see the section Synchronous Mode in NiceLabel
Automation user guide.
419

NOTE
Using Save error to variable option in Action Execution and Error Handling
does not yield any result in asynchronous mode, as the trigger does not receive
feedback from the print process. To capture the feedback from the print
process, enable synchronous mode rst.
NOTE
If the Print Label action is nested under a For Loop action, Automation executes it in
session printing mode. This mode acts as a printing optimization mode that prints all
labels in a loop using a single print job le. For details, see Session Printing section in
NiceLabel Automation user guide.
About group identies the selected action.
• Name: allows you to dene a custom action name. This makes actions easily recognizable on
the solution's list of actions. By default, action name is taken from its type.
• Description: custom information about the action. Enter a description to explain purpose and
role of action in a solution.
• Action type: read-only information about the selected action type.
Quantity group denes the number of labels to be printed using the active form.
• Labels: sets the number of printed labels. Data source species or adds a variable that denes
the label print quantity dynamically.
NOTE
Variable value is usually assigned by the Use Data Filteraction and must be
integer.
All (unlimited quantity): depending on the label template design, the labels are printed in various
quantities.
Unlimited Quantity Printing Details
Typically, this option is used in two scenarios.
1. Command the printer to continuously print the same label until it is switched o, or after it
receives a command to clear its memory buer.
WARNING
This scenario requires NiceLabel printer driver to be installed and used for
label printing.
420

If printing a xed label, just a single print job is sent to the printer, with the quantity set to
"unlimited". Label printers have a print command parameter which indicates "unlimited"
printing.
If the label is not xed, but includes objects that change during the printing, such as counters,
the printed quantity is set to maximum quantity supported by the printer. NiceLabel printer
driver is aware of the printer quantity limit and print as many labels as possible.
Example
Maximum supported print quantity is 32,000. This is the amount of labels that are print after
selecting the All (unlimited quantity) option.
2. The trigger doesn't provide any data, but only acts as a signal for "event has happened". The
logic to acquire necessary data is included in the label. Usually, a connection to a database is
congured on the label, and at every trigger the label must connect to the database, and
acquire all records from the database. In this case, the All (unlimited quantity) option is
understood as "print all records from the database".
• Variable quantity (dened from label variable): species a label variable that denes the label
quantity to be printed.
The trigger doesn't receive the number of labels to be print, so it passes the decision to the
label template. The label might contain a connection to a database, which provide the label
quantity, or there is another source of quantity information. A single label variable must be
dened as "variable quantity".
Advanced group denes label printing details. Click Show advanced print options to dene the
Advanced print options:
This section species non-frequently used label quantity related settings.
• Number of skipped labels: species the number of labels that are skipped on the rst page of
labels. The sheet of labels might have been printed once already, but not entirely. You can re-use
the same sheet by osetting the starting position. This option is applicable, if you print labels to
sheets of labels, not rolls of labels, so it's eective for oce printers and not for label printers.
• Identical label copies: species the number of label copies to be printed for each unique label.
For xed labels, this option produces the same result as the main Number of Labels option. For
variable labels, such as labels using counters, you can get the real label copies.
• Label sets: species how many times the entire label printing process should repeat.
Example
Trigger or event receive content with 3 lines of CSV-formatted data, so 3 labels are expected to
be printed (1, 2, 3). If you set this option to 3, the printout is done in the following order: 1, 2, 3, 1,
2, 3, 1, 2, 3.
421

TIP
All Advanced group values can either be hard-coded, or dynamically provided by an
existing or a newly added variable.
Action Execution and Error Handling
Each action in can be set as a conditional action. Conditional actions only run when the dened
conditions allow them to be run. To dene these conditions, click Show execution and error handling
options.
Execution options are:
• Enabled: species if the action is enabled or disabled. Only enabled actions will execute. This
functionality may be used while testing a form.
• Condition: denes one-line programming expression that must provide a Boolean value (true
or false). When the result of the expression is true, the action will execute. Condition oers a
way to avoid executing actions every time.
Error handling options are:
• Ignore failure: species whether an error should be ignored or not. With Ignore failure option
enabled, the execution of actions continues even if the current action fails.
NOTE
Nested actions that depend on the current action do not execute in case of a failure.
The execution of actions continues with the next action on the same level as the
current action. The error is logged, but does not break the execution of the action.
Example
At the end of printing, you might want to send the status update to an external application using the
HTTP Request action. If the printing action fails, action processing stops. In order to execute the
reporting even after the failed print action, the Print Label action must have the option Ignore failure
enabled.
• Save error to variable: allows you to select or create a variable to save the error to. The same
cause of error is also saved to internal variables ActionLastErrorId and
ActionLastErrorDesc.
Open Document/Program
This action provides an interface with an external application and opens it using a command-line.
422

External applications can execute additional processing and provide result back to the NiceLabel
2019. This action allows it to bind with any 3rd party software that can execute some additional data
processing, or acquire data. External software can provide data response by saving it to le, from
where you can read it into variables.
You can feed the value of variable(s) to the program by listing them in the command-line in square
brackets.
C:\Applications\Processing.exe [variable1] [variable2]
NOTE
If you use this action in NiceLabel 2019 solutions, it allows you to open web pages or
create email messages directly from your forms. See section Creating hyperlinks and
sending emails on form in NiceLabel 2019 user guide.
About group identies the selected action.
• Name: allows you to dene a custom action name. This makes actions easily recognizable on
the solution's list of actions. By default, action name is taken from its type.
• Description: custom information about the action. Enter a description to explain purpose and
role of action in a solution.
• Action type: read-only information about the selected action type.
File group denes the le to be opened.
• File name: location and le name of the le or application to be opened.
The selected le name can be hard-coded, and the same le is going to be used every time. If
only a le name without path is dened, the folder with NiceLabel Automation conguration le
(.MISX) is used. You can use a relative reference to the le name, in which the folder with .MISX
le is used as the root folder.
Data source: enables variable le name. Select a variable that contains the path and/or le name
or combine several variables that create the le name. For more information see section Using
Compound Values in NiceLabel Automation User Guide.
NOTE
Use UNC syntax for network resources. For more information, see section
Access to Network Shared Resources in NiceLabel Automation User Guide.
423

Execution Options group sets program opening details.
• Hide window: renders the window of the opened program invisible. Because NiceLabel 2019 is
run as a service application within its own session, it cannot interact with desktop, even if it runs
with the privileges of the currently logged user. Microsoft has prevented this interaction in
Windows Vista and newer operating systems for security reasons.
• Wait for completion: species for action execution to wait for this action to be completed before
continuing with the next scheduled action.
TIP
Enable this option if the action that follows depends on the result of the external
application.
Action Execution and Error Handling
Each action in can be set as a conditional action. Conditional actions only run when the dened
conditions allow them to be run. To dene these conditions, click Show execution and error handling
options.
Execution options are:
• Enabled: species if the action is enabled or disabled. Only enabled actions will execute. This
functionality may be used while testing a form.
• Condition: denes one-line programming expression that must provide a Boolean value (true
or false). When the result of the expression is true, the action will execute. Condition oers a
way to avoid executing actions every time.
Error handling options are:
• Ignore failure: species whether an error should be ignored or not. With Ignore failure option
enabled, the execution of actions continues even if the current action fails.
NOTE
Nested actions that depend on the current action do not execute in case of a failure.
The execution of actions continues with the next action on the same level as the
current action. The error is logged, but does not break the execution of the action.
Example
At the end of printing, you might want to send the status update to an external application using the
HTTP Request action. If the printing action fails, action processing stops. In order to execute the
reporting even after the failed print action, the Print Label action must have the option Ignore failure
enabled.
424

• Save error to variable: allows you to select or create a variable to save the error to. The same
cause of error is also saved to internal variables ActionLastErrorId and
ActionLastErrorDesc.
Execute Script
This action enhances the software functionality by using custom VBScript or Python scripts. Use this
function if the built-in actions don't meet your data manipulation requirements.
Scripts can include the trigger variables – both internal variables and the variables dened or
imported from labels.
Make sure that Windows account under which the service runs has the privileges to execute the
commands in the script.
NOTE
The script type is congured per trigger in the trigger properties. All Execute Script
actions within a single trigger must be of the same type.
About group identies the selected action.
• Name: allows you to dene a custom action name. This makes actions easily recognizable on
the solution's list of actions. By default, action name is taken from its type.
• Description: custom information about the action. Enter a description to explain purpose and
role of action in a solution.
• Action type: read-only information about the selected action type.
Script editor oers the following features:
• Insert data source: inserts an existing or newly created variable into the script.
• Verify: validates the entered script syntax.
• Script editor: opens the editor which makes scripting easier and more ecient.
Action Execution and Error Handling
425

Each action in can be set as a conditional action. Conditional actions only run when the dened
conditions allow them to be run. To dene these conditions, click Show execution and error handling
options.
Execution options are:
• Enabled: species if the action is enabled or disabled. Only enabled actions will execute. This
functionality may be used while testing a form.
• Condition: denes one-line programming expression that must provide a Boolean value (true
or false). When the result of the expression is true, the action will execute. Condition oers a
way to avoid executing actions every time.
Error handling options are:
• Ignore failure: species whether an error should be ignored or not. With Ignore failure option
enabled, the execution of actions continues even if the current action fails.
NOTE
Nested actions that depend on the current action do not execute in case of a failure.
The execution of actions continues with the next action on the same level as the
current action. The error is logged, but does not break the execution of the action.
Example
At the end of printing, you might want to send the status update to an external application using the
HTTP Request action. If the printing action fails, action processing stops. In order to execute the
reporting even after the failed print action, the Print Label action must have the option Ignore failure
enabled.
• Save error to variable: allows you to select or create a variable to save the error to. The same
cause of error is also saved to internal variables ActionLastErrorId and
ActionLastErrorDesc.
Script Editor
NiceLabel 2019 provides a script editor which makes your Python or VBScript scripting easier, error-
free and time ecient.
426

The selection of scripting languages that should be used in Script editor diers between NiceLabel
Designer Pro and Automation Builder :
• In Designer , double-click on the form design surface to open Form Properties > Additional
Settings > Form Scripting Language.
• In Automation Builder , go to Conguration items > click Edit to open trigger properties >
Settings > Other > Scripting.
TIP
NiceLabel 2019 uses .NET variant of Python named IronPython. It works as a fully
compatible implementation of Python scripting language which also supports .NET
methods.
Editor Ribbon includes commonly used commands which are distributed over multiple functional
groups.
• Clipboard group oers Cut, Copy, Paste and Delete commands.
• Undo Redo group allows undoing or repeating script editing actions.
• File group allows loading and saving scripts in a le.
• Load from le: loads a script from an external previously saved textual le.
• Save to le: stores the currently edited script in a textual le.
• Editing group allows nding and replacing strings in a script.
427

• Find: locates the entered string in the script.
• Replace: replaces string in the script.
• Insert group: Data Source command inserts existing or newly dened data sources into the
script.
• Script group: Validate script command validates of the entered script's syntax.
Available scripting elements contain all available script items which can be used when building a
script. Double-click the element or click the Insert button to insert the element at cursor position into
the script.
Element description provides basic information about the inserted script element.
Error list includes the errors which are reported after the Validate script command is run.
7.6.2.2. Printer
Set Printer
This action species the name of the printer to be used for printing the active label.
NOTE
This action overrides the printer selected in the label properties.
This action is useful when printing an identical label on multiple printers. Always nest this action under
the Open Label action to provide the label with the reference for the preferred printer.
This action reads the default settings (such as speed and darkness) from the selected printer driver
and applies them to the label. If you don't use the Set Printer action, the label gets printed using the
printer dened in the label template.
WARNING
Pay attention when switching the printers, e.g. from Zebra to SATO, or even from one
printer model to another model of the same brand. Printer settings might not be
compatible and the label printouts might not appear identical. Also, label design
optimizations for original printer, such as internal counters, and internal fonts, might
not be available on the newly selected printer.
About group identies the selected action.
• Name: allows you to dene a custom action name. This makes actions easily recognizable on
the solution's list of actions. By default, action name is taken from its type.
428

• Description: custom information about the action. Enter a description to explain purpose and
role of action in a solution.
• Action type: read-only information about the selected action type.
Printer group species the printer name to be used for the current print job.
• Printer name: select it from the list of locally installed printer drivers, or manually enter a printer
name. Select Data source to dynamically select the printer using a variable. If enabled, select or
create a variable that contains the printer name which is used if the action is run.
Action Execution and Error Handling
Each action in can be set as a conditional action. Conditional actions only run when the dened
conditions allow them to be run. To dene these conditions, click Show execution and error handling
options.
Execution options are:
• Enabled: species if the action is enabled or disabled. Only enabled actions will execute. This
functionality may be used while testing a form.
• Condition: denes one-line programming expression that must provide a Boolean value (true
or false). When the result of the expression is true, the action will execute. Condition oers a
way to avoid executing actions every time.
Error handling options are:
• Ignore failure: species whether an error should be ignored or not. With Ignore failure option
enabled, the execution of actions continues even if the current action fails.
NOTE
Nested actions that depend on the current action do not execute in case of a failure.
The execution of actions continues with the next action on the same level as the
current action. The error is logged, but does not break the execution of the action.
Example
At the end of printing, you might want to send the status update to an external application using the
HTTP Request action. If the printing action fails, action processing stops. In order to execute the
reporting even after the failed print action, the Print Label action must have the option Ignore failure
enabled.
• Save error to variable: allows you to select or create a variable to save the error to. The same
cause of error is also saved to internal variables ActionLastErrorId and
ActionLastErrorDesc.
429

Dene Printer Settings
This action opens printer driver properties dialog for the selected printer. The settings are saved in
the label le and take eect for the current label only.
NOTE
The modications the user makes using this action are temporary and aect only the
current print job. The modications are not saved in a label or form.
About group identies the selected action.
• Name: allows you to dene a custom action name. This makes actions easily recognizable on
the solution's list of actions. By default, action name is taken from its type.
• Description: custom information about the action. Enter a description to explain purpose and
role of action in a solution.
• Action type: read-only information about the selected action type.
Settings group denes a variable for printer settings.
• Printer settings: selects or creates a variable to store the received output printer settings. If
printer settings are included in the variable, Printer Properties dialog displays them.
Action Execution and Error Handling
Each action in can be set as a conditional action. Conditional actions only run when the dened
conditions allow them to be run. To dene these conditions, click Show execution and error handling
options.
Execution options are:
• Enabled: species if the action is enabled or disabled. Only enabled actions will execute. This
functionality may be used while testing a form.
• Condition: denes one-line programming expression that must provide a Boolean value (true
or false). When the result of the expression is true, the action will execute. Condition oers a
way to avoid executing actions every time.
Error handling options are:
• Ignore failure: species whether an error should be ignored or not. With Ignore failure option
enabled, the execution of actions continues even if the current action fails.
NOTE
Nested actions that depend on the current action do not execute in case of a failure.
The execution of actions continues with the next action on the same level as the
current action. The error is logged, but does not break the execution of the action.
430

Example
At the end of printing, you might want to send the status update to an external application using the
HTTP Request action. If the printing action fails, action processing stops. In order to execute the
reporting even after the failed print action, the Print Label action must have the option Ignore failure
enabled.
• Save error to variable: allows you to select or create a variable to save the error to. The same
cause of error is also saved to internal variables ActionLastErrorId and
ActionLastErrorDesc.
Set Print Job Name
This action species the name of the print job le as it appears in the Windows Spooler. A default
print job name is the name of the used label le. This action overrides it.
NOTE
Always nest the action under the Open Label action, so it applies to the adequate
label le.
About group identies the selected action.
• Name: allows you to dene a custom action name. This makes actions easily recognizable on
the solution's list of actions. By default, action name is taken from its type.
• Description: custom information about the action. Enter a description to explain purpose and
role of action in a solution.
• Action type: read-only information about the selected action type.
Print Job group denes the print job name.
• Name: sets the print job name. It can be hard-coded, and the same name is used for each print
action. Variable enables a variable le name. Select or create a variable that contains the path
and/or le name if the event happens or a trigger res.
NOTE
In Automation Builder module, the variable value is usually assigned by a lter.
Action Execution and Error Handling
Each action in can be set as a conditional action. Conditional actions only run when the dened
conditions allow them to be run. To dene these conditions, click Show execution and error handling
options.
431

Execution options are:
• Enabled: species if the action is enabled or disabled. Only enabled actions will execute. This
functionality may be used while testing a form.
• Condition: denes one-line programming expression that must provide a Boolean value (true
or false). When the result of the expression is true, the action will execute. Condition oers a
way to avoid executing actions every time.
Error handling options are:
• Ignore failure: species whether an error should be ignored or not. With Ignore failure option
enabled, the execution of actions continues even if the current action fails.
NOTE
Nested actions that depend on the current action do not execute in case of a failure.
The execution of actions continues with the next action on the same level as the
current action. The error is logged, but does not break the execution of the action.
Example
At the end of printing, you might want to send the status update to an external application using the
HTTP Request action. If the printing action fails, action processing stops. In order to execute the
reporting even after the failed print action, the Print Label action must have the option Ignore failure
enabled.
• Save error to variable: allows you to select or create a variable to save the error to. The same
cause of error is also saved to internal variables ActionLastErrorId and
ActionLastErrorDesc.
Redirect Printing to File
This action diverts the print job to a le. Instead of sending the created print le to a printer port as
dened in the printer driver, the printout is redirected to a le. You can append data to an existing le,
or overwrite it.
This action enables you to capture printer commands in a separate le.
The action instructs Automation Builder module to redirect printing – as a result, the labels are not
going to be printed. Make sure the action is followed by the Print Label action.
432

NOTE
NiceLabel Automation runs as service under dened Windows user account. Make
sure this user account has privileges accessing the specied folder with read/write
permissions. For more information, see section Access to Network Shared Resources
in the NiceLabel Automation user guide.
Redirect Printing to File action is useful for printing several dierent labels (.NLBL les) to a network
printer while retaining the correct order of labels. If multiple .NLBL les are printed from the same
trigger, Automation Builder sends each label to the printer in a separate print job, even if the target
printer is the same for both labels. If a network printer is used, job of another user can be inserted
between two jobs the trigger must send together. Using this action, you can append print data into
the same le and send its contents to the printer using the Send Data to Printer action.
About group identies the selected action.
• Name: allows you to dene a custom action name. This makes actions easily recognizable on
the solution's list of actions. By default, action name is taken from its type.
• Description: custom information about the action. Enter a description to explain purpose and
role of action in a solution.
• Action type: read-only information about the selected action type.
File group of settings denes how the le selection for redirecting is done.
• File name:species the le name. It can either be hard-coded or dynamically dened using an
existing or a newly created variable.
Use UNC syntax for network resources. For more information, see section Access to Network
Shared Resources in NiceLabel Automation user guide.
NOTE
When using this action, make sure your user account has sucient privileges for
accessing the specied folder with read/write permissions.
File write mode group of settings selects how the le is treated in case of repeated redirects.
• Overwrite the le: if the specied le already exists on the disk, it is going to be overwritten.
• Append data to the le: the job le is added to the existing data in the provided le.
Persistence group controls the continuity of the redirect action. It denes the number of Print Label
actions that are aected by the Redirect Printing to File action.
• Apply to next print action: species for the print redirect to be applicable to the next Print Label
action only (single event).
433

• Apply to all subsequent print actions: species for the print redirect to be applicable to all Print
Label action dened after the current Redirect Printing to File action.
NOTE
The action only redirects printing. Make sure it is followed by the Print Label action.
Action Execution and Error Handling
Each action in can be set as a conditional action. Conditional actions only run when the dened
conditions allow them to be run. To dene these conditions, click Show execution and error handling
options.
Execution options are:
• Enabled: species if the action is enabled or disabled. Only enabled actions will execute. This
functionality may be used while testing a form.
• Condition: denes one-line programming expression that must provide a Boolean value (true
or false). When the result of the expression is true, the action will execute. Condition oers a
way to avoid executing actions every time.
Error handling options are:
• Ignore failure: species whether an error should be ignored or not. With Ignore failure option
enabled, the execution of actions continues even if the current action fails.
NOTE
Nested actions that depend on the current action do not execute in case of a failure.
The execution of actions continues with the next action on the same level as the
current action. The error is logged, but does not break the execution of the action.
Example
At the end of printing, you might want to send the status update to an external application using the
HTTP Request action. If the printing action fails, action processing stops. In order to execute the
reporting even after the failed print action, the Print Label action must have the option Ignore failure
enabled.
• Save error to variable: allows you to select or create a variable to save the error to. The same
cause of error is also saved to internal variables ActionLastErrorId and
ActionLastErrorDesc.
434

Set Print Parameter
This action allows you to ne tune the parameters that relate to the printer driver. These include
parameters such as speed and darkness for label printers, or paper tray for laser printers.
Printer settings are applied to the current printout only and are not remembered during the upcoming
event.
NOTE
If you use Set Printer Parameter action to change the printer name, make sure the Set
Print Parameter action is used right after. Before you can apply the DEVMODE
structure to the printer driver, rst load the default driver settings. This is done by the
Set Printer action. The DEVMODE is only compatible with the DEVMODE of the same
printer driver.
About group identies the selected action.
• Name: allows you to dene a custom action name. This makes actions easily recognizable on
the solution's list of actions. By default, action name is taken from its type.
• Description: custom information about the action. Enter a description to explain purpose and
role of action in a solution.
• Action type: read-only information about the selected action type.
Print Parameters group allows action ne tuning before printing.
• Paper bin: name of the paper bin that contains the label media. This option is usually used with
laser and ink jet printers with multiple paper bins. The provided name of the paper bin must
match the name of the bin in the printer driver. Check the printer driver properties for more
details.
• Print speed: denes printing speed. This setting overrides the setting dened with label. The
provided value must be in the range of accepted values.
Example
The rst printer model accepts a range of values from 0 to 30, while the second printer model
accepts values from -15 to 15. For more information, see printer driver properties.
• Darkness: denes the darkness of the printed objects on the paper and overrides setting from
the label. The provided value must be in range of accepted values.
• Print oset X: applies horizontal oset. The label printout will be repositioned by the specied
number of dots in the horizontal direction. Negative oset can be dened.
• Print oset Y: applies vertical oset. The label printout will be repositioned by the specied
number of dots in the vertical direction. Negative oset can be dened.
435

TIP
All print parameters can either be hard-coded or dynamically dened using an existing
or a newly created variable.
Advanced group customizes the printer settings that are sent along with the print job.
Printer settings, such as printing speed, darkness, media type, osets and similar, can be dened as
follows:
• Dened in a label
• Recalled from a printer driver
• Recalled from a printer at print time
The supported methods depend on the printer driver and its capabilities. Printing mode (recall
settings from label or driver or printer) is congurable in the label design. You might need to apply
these printer settings at print time – they can vary with each printout.
Example
A single label should be printed using a variety of printers, but each printer requires slightly dierent
parameters. The printers from various manufacturers don't use the same values to set the printing
speed or temperature. Additionally, some printers require vertical or horizontal oset to print the label
to the correct position. During the testing phase, you can determine the optimal settings for every
printer you intend to use and apply them to a single label template just before printing. This action will
apply the corresponding settings to each dened printer.
This action expects to receive the printer settings in a DEVMODE structure. This is a Windows
standard data structure with information about initialization and environment of a printer.
Printer settings option applies custom printer settings. The following inputs are available:
• Fixed-data Base64-encoded DEVMODE. In this case, provide the printer's DEVMODE encoded
in Base64-encoded string directly into the edit eld. If executed, the action converts the
Base64-encoded data back into binary form.
436

• Variable-data Base64-encoded DEVMODE. In this case, the selected data source must contain
the Base64-encoded DEVMODE. Enable Data source and select the appropriate variable from
the list. If executed, the action converts the Base64-encoded data back into the binary form.
• Variable-data binary DEVMODE (available in Automation Builder). In this case, the selected
variable must contain the DEVMODE in its native binary form. Enable Data source and select the
appropriate variable from the list. If executed, the action uses the DEVMODE as-is, without any
conversion.
NOTE
If the variable does not provide a binary DEVMODE, make sure that the selected
variable is dened as a binary variable in the conguration.
NOTE
Make sure the Set Printer action is dened in front of this action.
Action Execution and Error Handling
Each action in can be set as a conditional action. Conditional actions only run when the dened
conditions allow them to be run. To dene these conditions, click Show execution and error handling
options.
Execution options are:
• Enabled: species if the action is enabled or disabled. Only enabled actions will execute. This
functionality may be used while testing a form.
• Condition: denes one-line programming expression that must provide a Boolean value (true
or false). When the result of the expression is true, the action will execute. Condition oers a
way to avoid executing actions every time.
Error handling options are:
• Ignore failure: species whether an error should be ignored or not. With Ignore failure option
enabled, the execution of actions continues even if the current action fails.
NOTE
Nested actions that depend on the current action do not execute in case of a failure.
The execution of actions continues with the next action on the same level as the
current action. The error is logged, but does not break the execution of the action.
Example
At the end of printing, you might want to send the status update to an external application using the
HTTP Request action. If the printing action fails, action processing stops. In order to execute the
437

reporting even after the failed print action, the Print Label action must have the option Ignore failure
enabled.
• Save error to variable: allows you to select or create a variable to save the error to. The same
cause of error is also saved to internal variables ActionLastErrorId and
ActionLastErrorDesc.
Redirect Printing to PDF
TIP
This action is available in NiceLabelLMS Enterprise.
This action diverts the print job to a PDF document. The created PDF document retains the exact
label dimensions as dened during label design process. The rendering quality of graphics in the PDF
matches the resolution of the target printer and desired printout size.
Print stream data can be appended to an existing le, or it may overwrite it.
The action instructs NiceLabel 2019 to redirect printing – as a result, the labels are not printed. Make
sure the action is followed by the Print Label action.
NOTE
NiceLabel Automation module runs as service under dened Windows user account.
Make sure this user account has privileges accessing the specied folder with read/
write permissions. For more information, see section Access to Network Shared
Resources in NiceLabel Automation user guide.
About group identies the selected action.
• Name: allows you to dene a custom action name. This makes actions easily recognizable on
the solution's list of actions. By default, action name is taken from its type.
• Description: custom information about the action. Enter a description to explain purpose and
role of action in a solution.
• Action type: read-only information about the selected action type.
File group denes the redirect le.
• File name: species the le name for diverting the print job to. If hard-coded, the printing is
redirected to the specied le every time. To dene it dynamically, use an existing or create a
new variable.
• Overwrite the le: if the specied le already exists on the disk, it is going to be overwritten
(selected by default).
438

• Append data to the le: the job le is appended to the existing data in the provided le
(deselected by default).
Persistence group allows controlling the persistence of the redirect action. Dene the number of Print
Label actions that are aected by the Redirect Printing to File action.
• Apply to next print action: species for the print redirect to be applicable to the next Print Label
action only (single event).
• Apply to all subsequent print actions: species for the print redirect to be applicable to all Print
Label action dened after the current Redirect Printing to File action.
Action Execution and Error Handling
Each action in can be set as a conditional action. Conditional actions only run when the dened
conditions allow them to be run. To dene these conditions, click Show execution and error handling
options.
Execution options are:
• Enabled: species if the action is enabled or disabled. Only enabled actions will execute. This
functionality may be used while testing a form.
• Condition: denes one-line programming expression that must provide a Boolean value (true
or false). When the result of the expression is true, the action will execute. Condition oers a
way to avoid executing actions every time.
Error handling options are:
• Ignore failure: species whether an error should be ignored or not. With Ignore failure option
enabled, the execution of actions continues even if the current action fails.
NOTE
Nested actions that depend on the current action do not execute in case of a failure.
The execution of actions continues with the next action on the same level as the
current action. The error is logged, but does not break the execution of the action.
Example
At the end of printing, you might want to send the status update to an external application using the
HTTP Request action. If the printing action fails, action processing stops. In order to execute the
reporting even after the failed print action, the Print Label action must have the option Ignore failure
enabled.
• Save error to variable: allows you to select or create a variable to save the error to. The same
cause of error is also saved to internal variables ActionLastErrorId and
ActionLastErrorDesc.
439
Printer Status
This action communicates with the printer to acquire its real-time state, and contacts the Windows
Spooler for additional information about the printer and its jobs.
As a result, the information about errors, spooler status, number of jobs in the spooler is collected.
This uncovers potential errors and makes them easy to identify.
Possible use case scenarios. (1) Verifying the printer status before printing. If the printer is in error
state, you print the label to a backup printer. (2) Counting the number of jobs waiting in a spooler of
main printer. If there are too many, you will print label to alternative printer. (3) You will verify the printer
status before printing. If the printer is in error state, you will not print labels, but report the error back
to the main system using any of the outbound actions, such as Send Data to TCP/IP Port, Send Data
to HTTP, Execute SQL Statement, Web Service, or as the trigger response.
Live Printer Status Prerequisites
To make live printer status monitoring possible, follow these instructions:
• Use the NiceLabel Printer Driver to receive detailed status information. If using any other printer
driver, you can only monitor the parameters retrieved from the Windows Spooler.
• The printer must be capable of reporting its live status. For the printer models supporting
bidirectional communication see NiceLabel Download web page.
• Printer must be connected to an interface with support for bidirectional communication.
• Bidirectional support must be enabled in Control Panel > Hardware and Sound > Devices and
Printers > driver > Printer Properties > Ports tab > Enable bidirectional support.
• If using a network-connected label printer, make sure you are using Advanced TCP/IP Port, not
Standard TCP/IP Port. For more information, see Knowledge Base article KB189.
About group identies the selected action.
• Name: allows you to dene a custom action name. This makes actions easily recognizable on
the solution's list of actions. By default, action name is taken from its type.
• Description: custom information about the action. Enter a description to explain purpose and
role of action in a solution.
• Action type: read-only information about the selected action type.
Printer group selects the printer.
• Printer name: species the printer name to be used for the current print job.
You can select a printer from the list of locally installed printer drivers, or you can enter any
printer name. Data source enables variable printer name. When enabled, select or create a
variable that contains the printer name when a trigger is executed or an event takes place.
Usually, the variable value is assigned by a lter.
Data Mapping group sets the parameters that are returned as a result of the Printer Status action.
440

WARNING
Most of the following parameters are only supported with NiceLabel printer driver. If
you are using any other printer driver, you can use only the spooler-related
parameters.
• Printer status: species the printer live status formatted as a string.
If the printer reports multiple states, all states are merged into a single string, delimited by
comma ",". If there are no reported printer issues, this eld is empty. Printer status might be set
to Oine, Out of labels or Ribbon near end. Since there is no standardized reporting protocol,
each printer vendor uses proprietary status messages.
• Printer error: boolean (true/false) value of the printer error status.
• Printer oine: boolean (true/false) value of the printer oine status.
• Driver paused: boolean (true/false) value of the driver pause status.
• NiceLabel driver: species boolean (true/false) value of the printer driver status. Provides
information if the selected driver is a NiceLabel driver.
• Spooler status: species the spooler status in a string form – as reported by the Windows
system. The spooler can simultaneously report several statuses. In this case, the statuses are
merged using comma ",".
• Spooler status ID: species spooler status formatted as a number – as reported by the
Windows system. The spooler can simultaneously report several statuses. In this case, the
returned status IDs contains all IDs as ags. For example, value 5 represents status IDs 4 and 1,
which translates to "Printer is in error, Printer is paused". Refer to the table below.
TIP
The action returns a decimal value, the values in the table below are in hex
format, so you will have to do the conversion before parsing the response.
• Table of spooler status IDs and matching descriptions
Spooler status ID (in hex)
Spooler status description
0 No status.
1 Printer is paused.
2 Printer is printing.
4 Printer is in error.
8 Printer is not available.
10 Printer is out of paper.
20 Manual feed required.
40 Printer has a problem with paper.
441

80 Printer is oine.
100 Active Input/Output state.
200 Printer is busy.
400 Paper jam.
800 Output bin is full.
2000 Printer is waiting.
4000 Printer is processing.
10000 Printer is warming up.
20000 Toner/Ink level is low.
40000 No toner left in the printer.
80000 Current page can not be printed.
100000 User intervention is required.
200000 Printer is out of memory.
400000 Door is open.
800000 Unknown error.
1000000 Printer is in power save mode.
• Number of jobs in the spooler: species the number of jobs that are in the spooler for the
selected printer.
Action Execution and Error Handling
Each action in can be set as a conditional action. Conditional actions only run when the dened
conditions allow them to be run. To dene these conditions, click Show execution and error handling
options.
Execution options are:
• Enabled: species if the action is enabled or disabled. Only enabled actions will execute. This
functionality may be used while testing a form.
• Condition: denes one-line programming expression that must provide a Boolean value (true
or false). When the result of the expression is true, the action will execute. Condition oers a
way to avoid executing actions every time.
Error handling options are:
• Ignore failure: species whether an error should be ignored or not. With Ignore failure option
enabled, the execution of actions continues even if the current action fails.
442

NOTE
Nested actions that depend on the current action do not execute in case of a failure.
The execution of actions continues with the next action on the same level as the
current action. The error is logged, but does not break the execution of the action.
Example
At the end of printing, you might want to send the status update to an external application using the
HTTP Request action. If the printing action fails, action processing stops. In order to execute the
reporting even after the failed print action, the Print Label action must have the option Ignore failure
enabled.
• Save error to variable: allows you to select or create a variable to save the error to. The same
cause of error is also saved to internal variables ActionLastErrorId and
ActionLastErrorDesc.
Store Label to Printer
This action saves label template in the printer memory. The action is a vital part of Store/Recall
printing mode, using which you rst store a label template into the printer's memory and later recall it.
The non-changeable parts of label design are already stored in the printer, so you only have to
provide the data for variable label objects at print time. For more information, see section Using Store/
Recall Printing Mode in NiceLabel Automation user guide.
NOTE
The required label data transfer time is greatly minimized as there is less information
to be sent. This action is commonly used for stand-alone printing scenarios, where
the label is stored to the printer or applicator in the production line and later recalled
by some software or hardware trigger, such as barcode scanner or photocell.
About group identies the selected action.
• Name: allows you to dene a custom action name. This makes actions easily recognizable on
the solution's list of actions. By default, action name is taken from its type.
• Description: custom information about the action. Enter a description to explain purpose and
role of action in a solution.
• Action type: read-only information about the selected action type.
Advanced options for storing label to printer group allows you select a label and the preferred storing
variant.
443

• Label name to be used on the printer: species the name to be used for storing the label
template in printer memory. Enter the name manually or enable Data source to dene the name
dynamically using an existing or newly created variable.
WARNING
When storing the label to a printer, it is recommended to leave the label name
under the advanced options empty. This prevents label name conicts during
the recall label process.
• Store variant: denes printer memory location for stored label templates. Enter the location
manually or enable Data source to dene the name dynamically using an existing or newly
created variable.
Action Execution and Error Handling
Each action in can be set as a conditional action. Conditional actions only run when the dened
conditions allow them to be run. To dene these conditions, click Show execution and error handling
options.
Execution options are:
• Enabled: species if the action is enabled or disabled. Only enabled actions will execute. This
functionality may be used while testing a form.
• Condition: denes one-line programming expression that must provide a Boolean value (true
or false). When the result of the expression is true, the action will execute. Condition oers a
way to avoid executing actions every time.
Error handling options are:
• Ignore failure: species whether an error should be ignored or not. With Ignore failure option
enabled, the execution of actions continues even if the current action fails.
NOTE
Nested actions that depend on the current action do not execute in case of a failure.
The execution of actions continues with the next action on the same level as the
current action. The error is logged, but does not break the execution of the action.
Example
At the end of printing, you might want to send the status update to an external application using the
HTTP Request action. If the printing action fails, action processing stops. In order to execute the
reporting even after the failed print action, the Print Label action must have the option Ignore failure
enabled.
444

• Save error to variable: allows you to select or create a variable to save the error to. The same
cause of error is also saved to internal variables ActionLastErrorId and
ActionLastErrorDesc.
7.6.2.3. Form
Open Another Form
This action opens another form from the same solution or a form from your disk.
About group identies the selected action.
• Name: allows you to dene a custom action name. This makes actions easily recognizable on
the solution's list of actions. By default, action name is taken from its type.
• Description: custom information about the action. Enter a description to explain purpose and
role of action in a solution.
• Action type: read-only information about the selected action type.
Settings group includes the following options:
• Navigate back to previously opened form: reopens the preceding form when the Open Another
Form action is run.
• Open form: denes a form to be opened when the Open Another Form action is run.
There are four ways to open a form:
• Enter the absolute le path.
• Select an existing form from the solution.
• Click Open to locate the le on the disk.
• Use a data source to dene the le path dynamically
Form data sources group helps you manage variable values when switching between forms.
• Reset variable values: By default, if a form object's content is a variable value, switching to
another form retains its current value. If you enable the Reset variable values option, the value of
the variable resets to its initial value after you open another form.
•
NOTE
The Open another form action only keeps the values of variables that are in use
as object data sources. If the variables are only listed in the Dynamic Data
Manager, their values are not transferred.
445

NOTE
If the variable has no initial value, the object appears empty.
Example
This option can be useful for data management solutions. When editing the data, you want to
keep the existing values. When adding new data, you need to reset the values. If you use the rst
form for data editing and the second form for adding new data, you keep the Reset variable
values option disabled for the data editing form, and enable this option for the data adding form.
Action Execution and Error Handling
Each action in can be set as a conditional action. Conditional actions only run when the dened
conditions allow them to be run. To dene these conditions, click Show execution and error handling
options.
Execution options are:
• Enabled: species if the action is enabled or disabled. Only enabled actions will execute. This
functionality may be used while testing a form.
• Condition: denes one-line programming expression that must provide a Boolean value (true
or false). When the result of the expression is true, the action will execute. Condition oers a
way to avoid executing actions every time.
Error handling options are:
• Ignore failure: species whether an error should be ignored or not. With Ignore failure option
enabled, the execution of actions continues even if the current action fails.
NOTE
Nested actions that depend on the current action do not execute in case of a failure.
The execution of actions continues with the next action on the same level as the
current action. The error is logged, but does not break the execution of the action.
Example
At the end of printing, you might want to send the status update to an external application using the
HTTP Request action. If the printing action fails, action processing stops. In order to execute the
reporting even after the failed print action, the Print Label action must have the option Ignore failure
enabled.
446

• Save error to variable: allows you to select or create a variable to save the error to. The same
cause of error is also saved to internal variables ActionLastErrorId and
ActionLastErrorDesc.
Quit
This action closes the form in NiceLabel 2019 .
About group identies the selected action.
• Name: allows you to dene a custom action name. This makes actions easily recognizable on
the solution's list of actions. By default, action name is taken from its type.
• Description: custom information about the action. Enter a description to explain purpose and
role of action in a solution.
• Action type: read-only information about the selected action type.
Action Execution and Error Handling
Each action in can be set as a conditional action. Conditional actions only run when the dened
conditions allow them to be run. To dene these conditions, click Show execution and error handling
options.
Execution options are:
• Enabled: species if the action is enabled or disabled. Only enabled actions will execute. This
functionality may be used while testing a form.
• Condition: denes one-line programming expression that must provide a Boolean value (true
or false). When the result of the expression is true, the action will execute. Condition oers a
way to avoid executing actions every time.
Error handling options are:
• Ignore failure: species whether an error should be ignored or not. With Ignore failure option
enabled, the execution of actions continues even if the current action fails.
NOTE
Nested actions that depend on the current action do not execute in case of a failure.
The execution of actions continues with the next action on the same level as the
current action. The error is logged, but does not break the execution of the action.
Example
At the end of printing, you might want to send the status update to an external application using the
HTTP Request action. If the printing action fails, action processing stops. In order to execute the
447

reporting even after the failed print action, the Print Label action must have the option Ignore failure
enabled.
• Save error to variable: allows you to select or create a variable to save the error to. The same
cause of error is also saved to internal variables ActionLastErrorId and
ActionLastErrorDesc.
Move Focus
This action moves the focus to a specied object on a form.
Settings group denes focus movement:
• Move focus to rst object in tab order: sets focus on the rst object in the dened order after
running the form.
• Move focus to selected object places focus after running the form on the selected object.
About group identies the selected action.
• Name: allows you to dene a custom action name. This makes actions easily recognizable on
the solution's list of actions. By default, action name is taken from its type.
• Description: custom information about the action. Enter a description to explain purpose and
role of action in a solution.
• Action type: read-only information about the selected action type.
Action Execution and Error Handling
Each action in can be set as a conditional action. Conditional actions only run when the dened
conditions allow them to be run. To dene these conditions, click Show execution and error handling
options.
Execution options are:
• Enabled: species if the action is enabled or disabled. Only enabled actions will execute. This
functionality may be used while testing a form.
• Condition: denes one-line programming expression that must provide a Boolean value (true
or false). When the result of the expression is true, the action will execute. Condition oers a
way to avoid executing actions every time.
Error handling options are:
• Ignore failure: species whether an error should be ignored or not. With Ignore failure option
enabled, the execution of actions continues even if the current action fails.
448

NOTE
Nested actions that depend on the current action do not execute in case of a failure.
The execution of actions continues with the next action on the same level as the
current action. The error is logged, but does not break the execution of the action.
Example
At the end of printing, you might want to send the status update to an external application using the
HTTP Request action. If the printing action fails, action processing stops. In order to execute the
reporting even after the failed print action, the Print Label action must have the option Ignore failure
enabled.
• Save error to variable: allows you to select or create a variable to save the error to. The same
cause of error is also saved to internal variables ActionLastErrorId and
ActionLastErrorDesc.
Get Selected Table Row
This action enables you to retrieve the numbers of selected rows, or selected eld values in the
Database Table form object. The values are stored in an existing or newly created variable. Get
Selected Table Row action works as a counterpart of the Select Table Row action.
About group identies the selected action.
• Name: allows you to dene a custom action name. This makes actions easily recognizable on
the solution's list of actions. By default, action name is taken from its type.
• Description: custom information about the action. Enter a description to explain purpose and
role of action in a solution.
• Action type: read-only information about the selected action type.
Form Table group allows you to choose the Database Table object on the form, and to select which
values should be stored in a variable.
• Table: denes which Database Table object on the form is used with this action.
• Selected row numbers: stores numbers of selected table rows in the Selected rows
variable.
• Table eld content for selected rows: stores the eld-related value of selected table rows.
• Table eld: denes the table eld from which the values are taken and stored in the
Selected rows variable.
449

NOTE
If multiple rows are selected, the stored values (row numbers or eld values) are
separated by commas. To enable multiple row selection, open Database Table
object properties > Settings an enable multiple row selection.
NOTE
If the stored values (row numbers or eld values) contain comma, they are
surrounded with quotation marks.
• Selected rows variable: selects or creates a variable that stores the Table eld or Selected row
numbers value.
TIP
Use this variable as a data source to display the selected values in a form object.
TIP
To display the selection of record immediately after the form is run, use the On Form
Load event. Go to Form Properties > Events > On Form Load and click Actions.... Add
Select Table Row action and dene the rows as explained in this section.
Action Execution and Error Handling
Each action in can be set as a conditional action. Conditional actions only run when the dened
conditions allow them to be run. To dene these conditions, click Show execution and error handling
options.
Execution options are:
• Enabled: species if the action is enabled or disabled. Only enabled actions will execute. This
functionality may be used while testing a form.
• Condition: denes one-line programming expression that must provide a Boolean value (true
or false). When the result of the expression is true, the action will execute. Condition oers a
way to avoid executing actions every time.
Error handling options are:
• Ignore failure: species whether an error should be ignored or not. With Ignore failure option
enabled, the execution of actions continues even if the current action fails.
450

NOTE
Nested actions that depend on the current action do not execute in case of a failure.
The execution of actions continues with the next action on the same level as the
current action. The error is logged, but does not break the execution of the action.
Example
At the end of printing, you might want to send the status update to an external application using the
HTTP Request action. If the printing action fails, action processing stops. In order to execute the
reporting even after the failed print action, the Print Label action must have the option Ignore failure
enabled.
• Save error to variable: allows you to select or create a variable to save the error to. The same
cause of error is also saved to internal variables ActionLastErrorId and
ActionLastErrorDesc.
Select Table Row
This action allows you to dene which row in a Database Table form object is selected. It works as a
counterpart of the Get Selected Table Row action.
About group identies the selected action.
• Name: allows you to dene a custom action name. This makes actions easily recognizable on
the solution's list of actions. By default, action name is taken from its type.
• Description: custom information about the action. Enter a description to explain purpose and
role of action in a solution.
• Action type: read-only information about the selected action type.
Form Table group allows you to choose the Database Table object on the form, and select the mode
under which the row in the chosen table is selected.
• Table: denes which Database Table object on the form is used with this action.
• Selection mode: denes database record selection mode.
• First row: selects the rst row in the Database Table object.
• Last row: selects the last row in the Database Table object.
• Row number: enables custom selection of a database table rows. Enter the row numbers
or dene them dynamically using a data source. To select multiple rows, enter their row
numbers separated by commas.
• Field value: selects all records in the database table with matching data value.
451
• Table eld: database eld with value(s) that are selected in case of a match.
• Field value: value which selects the row (record) in case of a match.
NOTE
Row number and Field value options select the table row without regard to the
current sorting of table rows. For example, "row number 3" remains selected
even if table sorting repositions the "row number 3" to any other row.
• Select all rows: selects all rows in the table.
• Deselect all rows: deselects all rows in the table.
NOTE
Multiple rows are selected if the table supports it. If not, only the rst row is
selected.
When selecting a table row, the row number can be stored in a variable. To enable this option, use the
Store selected row number to variable option in Database Table properties.
NOTE
The Select Table Row action denes its selection range on the dataset. This means
that the records are directly selected from the connected database, and not from the
table. If there is ltering enabled the Database Table object, it does not aect the
Select table row action.
Action Execution and Error Handling
Each action in can be set as a conditional action. Conditional actions only run when the dened
conditions allow them to be run. To dene these conditions, click Show execution and error handling
options.
Execution options are:
• Enabled: species if the action is enabled or disabled. Only enabled actions will execute. This
functionality may be used while testing a form.
• Condition: denes one-line programming expression that must provide a Boolean value (true
or false). When the result of the expression is true, the action will execute. Condition oers a
way to avoid executing actions every time.
Error handling options are:
• Ignore failure: species whether an error should be ignored or not. With Ignore failure option
enabled, the execution of actions continues even if the current action fails.
452

NOTE
Nested actions that depend on the current action do not execute in case of a failure.
The execution of actions continues with the next action on the same level as the
current action. The error is logged, but does not break the execution of the action.
Example
At the end of printing, you might want to send the status update to an external application using the
HTTP Request action. If the printing action fails, action processing stops. In order to execute the
reporting even after the failed print action, the Print Label action must have the option Ignore failure
enabled.
• Save error to variable: allows you to select or create a variable to save the error to. The same
cause of error is also saved to internal variables ActionLastErrorId and
ActionLastErrorDesc.
Set Object Property
This action sets properties of form object, like width, height and color.
About group identies the selected action.
• Name: allows you to dene a custom action name. This makes actions easily recognizable on
the solution's list of actions. By default, action name is taken from its type.
• Description: custom information about the action. Enter a description to explain purpose and
role of action in a solution.
• Action type: read-only information about the selected action type.
Settings group denes the properties to be set:
• Object name: form object to be edited. Drop-down list contains objects on the form.
• Property: denes the form object property to be set. The availability of properties depends on
the currently selected object.
TIP
The settings take eect after the form is run and the assigned event takes place.
Property
Role Applicability
X Sets distance from left/right form
border.
All form objects.
453

Y Sets distance from top/bottom form
border.
All form objects.
Width Sets object width. All form objects.
Height Sets object height. All form objects.
Enabled Makes the object enabled or disabled. All form objects.
Visible Makes the object visible or invisible. All form objects.
Font name Changes font name to the selected
one.
All form objects with textual
content.
Font size Changes font size to the selected
value.
All form objects with textual
content.
Font style Changes font style to the selected
one.
All form objects with textual
content.
Font color Changes font color to the selected
one.
All form objects with textual
content.
Color Changes the object color to the
selected one.
All form objects, except
Database Navigator, Picture.
Visible
columns
Makes a selection of table columns
visible.
Columns are visible in the same order
as entered in the Value eld.
Database Table.
• Value: comma-separated values. Use the “ character if value name includes a comma.
TIP
An example for object property dening is described in Database Table form object
section of User Guide for Designers.
Action Execution and Error Handling
Each action in can be set as a conditional action. Conditional actions only run when the dened
conditions allow them to be run. To dene these conditions, click Show execution and error handling
options.
Execution options are:
• Enabled: species if the action is enabled or disabled. Only enabled actions will execute. This
functionality may be used while testing a form.
• Condition: denes one-line programming expression that must provide a Boolean value (true
or false). When the result of the expression is true, the action will execute. Condition oers a
way to avoid executing actions every time.
Error handling options are:
454

• Ignore failure: species whether an error should be ignored or not. With Ignore failure option
enabled, the execution of actions continues even if the current action fails.
NOTE
Nested actions that depend on the current action do not execute in case of a failure.
The execution of actions continues with the next action on the same level as the
current action. The error is logged, but does not break the execution of the action.
Example
At the end of printing, you might want to send the status update to an external application using the
HTTP Request action. If the printing action fails, action processing stops. In order to execute the
reporting even after the failed print action, the Print Label action must have the option Ignore failure
enabled.
• Save error to variable: allows you to select or create a variable to save the error to. The same
cause of error is also saved to internal variables ActionLastErrorId and
ActionLastErrorDesc.
Translate Form
This action translates all strings on a form to the selected language. Translation le that contains
strings in source language and translated strings is mandatory for this action. If you have to create a
new translation le, follow the formatting rules below.
About group identies the selected action.
• Name: allows you to dene a custom action name. This makes actions easily recognizable on
the solution's list of actions. By default, action name is taken from its type.
• Description: custom information about the action. Enter a description to explain purpose and
role of action in a solution.
• Action type: read-only information about the selected action type.
Translate form settings group selects language and selects or creates a new translation le.
• Language: language to be used on the translated form. The language name is dened in the rst
row of the translation le.
455

TIP
The language name in the translation le is user-congurable. Use the same ID
(name) in the action as you have dened in the translation le. The language
name can be xed or variable. Its usage depends on the language selection type
you that is used on the form.
Fixed name: hard-coded language name which must match the name in the rst
row of the translation le.
Variable name: Example is a drop-down box with language names. When the
user changes the language in the list, the onChange event executes the
Translate Form action. The drop-down box saves the user selection in a variable,
which is used for the action.
• Translation le: le that contains source strings and translations into various languages. This is a
structured text le, similar to a CSV le.
• Create translation le: click this button to create the translation le containing the source and
translated strings.
Translation File Structure: a text le with UTF-8 encoded data. It is similar to comma-separated-values
(CSV).
Formatting Rules are mandatory. Always follow the below listed rules.
• The rst line contains language ID.
• The rst eld is always named as Source. Do not change it.
• The names of other elds in the rst row are user-congurable. Use the suggested names, such
as "Language 2" and "Language 3", or replace them with whatever describes the language
better, such as "German", "French", "Chinese", etc.
• All lines that follow the rst line are lines with the translations from the original language. The
rst eld contains the original string, the next elds in the same line contain translation to other
languages. The rst line species in which order the translation should follow the source string.
• All values are enclosed with double-quote characters (").
• All values are delimited by a semicolon character (;).
• If you have multiline text objects in the form, the newline (<CR><LF>) will be encoded as special
string $NEWLINE$.
• If you leave the translation empty, the Source string is used.
Example of Translation File:
Source";"DE"
"&Print";"&Druck"
456

"Customize$NEWLINE$your$NEWLINE$printing$NEWLINE$forms";"
Anpassen$NEWLINE$Sie$NEWLINE$Ihre$NEWLINE$Druckformen"
"Printer:";"Drucker"
"Quantity";"Menge"
"SAMPLE";"PROBE"
"Se&ttings";"Einstellungen"
"Translate";"Übersetzen"
"www.nicelabel.com/solutions";""
Translating Strings
When using the Translate Form action anywhere in your form, all strings of the form are automatically
saved to the translation le whenever you save the form. This ensures that the translation le is
always up to date with your form.
The translation le is Unicode-aware text le. You can edit it in any text editor, but you might have
troubles recognizing the elds, because their values are semicolon-separated and not aligned one
below another.
You can also open the le in a spreadsheet application, such as Microsoft Excel. In this case, the elds
belonging to particular language are displayed in the same column of data, and much easier to edit.
NOTE
Spreadsheet applications might change the input le structure of the translation le.
In this case, reformat the data by yourself after you save the translation le.
Example
Microsoft Excel will save the translation le as CSV. The elds lose the double quotes around the
values and will be delimited by comma (,) instead of semicolon (;). You will have to convert commas
into semicolons and put double quotes around elds. This can be done with a few search &
replace actions.
Translating Label Values in a Solution
Forms sometimes display values that come from labels in the same solution document. The Translate
Form action does not translate these label values automatically because you have to manually add
them to the translation le.
Add label values to the translation le using the same formatting rules as described above.
Example
Your solution contains one form and one label. The form includes Data Initialization object for
assigning values to the label variables. You want to display the originally English form in German
language using the Translate Form action (i.e. by clicking a button on the form).
457

Original prompt text for variables is "Define variable value". To display German translation, add
this line to the translation le: "Define variable value";"Definieren Sie den
Variablenwert"; After you click the button with assigned Translate Form action, the prompt text
appears in German.
Action Execution and Error Handling
Each action in can be set as a conditional action. Conditional actions only run when the dened
conditions allow them to be run. To dene these conditions, click Show execution and error handling
options.
Execution options are:
• Enabled: species if the action is enabled or disabled. Only enabled actions will execute. This
functionality may be used while testing a form.
• Condition: denes one-line programming expression that must provide a Boolean value (true
or false). When the result of the expression is true, the action will execute. Condition oers a
way to avoid executing actions every time.
Error handling options are:
• Ignore failure: species whether an error should be ignored or not. With Ignore failure option
enabled, the execution of actions continues even if the current action fails.
NOTE
Nested actions that depend on the current action do not execute in case of a failure.
The execution of actions continues with the next action on the same level as the
current action. The error is logged, but does not break the execution of the action.
Example
At the end of printing, you might want to send the status update to an external application using the
HTTP Request action. If the printing action fails, action processing stops. In order to execute the
reporting even after the failed print action, the Print Label action must have the option Ignore failure
enabled.
458

• Save error to variable: allows you to select or create a variable to save the error to. The same
cause of error is also saved to internal variables ActionLastErrorId and
ActionLastErrorDesc.
Message action
The Message action creates pop-up windows with custom messages in your Solutions so you can
provide your operators with:
• Specic warnings
• Error messages
• Information
• Questions
You can assign xed values to Caption and Message actions or connect to dynamic data sources.
You can save responses to your messages ("OK", "Cancel", "Yes", or "No") as variables. You can also
use Messages as debugging tools when you design and test forms by showing the results of
functions in messages.
Creating custom messages for your forms in the Actions Editor.
Messages contain graphic symbols corresponding to dierent messages:
• Information
459

• Errors
• Warnings
• Questions
Add messages with the Messages action to prevent confusion and inform operators of data
processing errors when your solutions run.
7.6.2.4. Variables
Set Variable
This action assigns a new value to the selected variable.
Variables usually obtain their values using Use Data Filter action (available in Automation Builder)
which extracts elds from the received data and maps them to variables. You might also need to set
the variable values by yourself, usually for troubleshooting purposes. In Automation Builder, the
variable values are not remembered between multiple triggers, but are kept while the same trigger is
being processed.
About group identies the selected action.
• Name: allows you to dene a custom action name. This makes actions easily recognizable on
the solution's list of actions. By default, action name is taken from its type.
• Description: custom information about the action. Enter a description to explain purpose and
role of action in a solution.
460

• Action type: read-only information about the selected action type.
Variable group denes the variable name and its value.
• Name: name of variable that should store the value changed.
• Value: value to be set to a variable. It can either be manually or dynamically dened using an
existing or a newly created variable.
Action Execution and Error Handling
Each action in can be set as a conditional action. Conditional actions only run when the dened
conditions allow them to be run. To dene these conditions, click Show execution and error handling
options.
Execution options are:
• Enabled: species if the action is enabled or disabled. Only enabled actions will execute. This
functionality may be used while testing a form.
• Condition: denes one-line programming expression that must provide a Boolean value (true
or false). When the result of the expression is true, the action will execute. Condition oers a
way to avoid executing actions every time.
Error handling options are:
• Ignore failure: species whether an error should be ignored or not. With Ignore failure option
enabled, the execution of actions continues even if the current action fails.
NOTE
Nested actions that depend on the current action do not execute in case of a failure.
The execution of actions continues with the next action on the same level as the
current action. The error is logged, but does not break the execution of the action.
Example
At the end of printing, you might want to send the status update to an external application using the
HTTP Request action. If the printing action fails, action processing stops. In order to execute the
reporting even after the failed print action, the Print Label action must have the option Ignore failure
enabled.
• Save error to variable: allows you to select or create a variable to save the error to. The same
cause of error is also saved to internal variables ActionLastErrorId and
ActionLastErrorDesc.
461

Save Variable Data
This action saves values of a single or multiple variables in an associated data le.
In NiceLabel Automation module, this action allows data exchange between triggers. To read the data
back into the trigger, use action Load Variable Data.
TIP
The values are saved in a CSV le with the rst line containing variable names. If the
variables contain multi-line values, the newline characters (CR/LF) are encoded as \n
\r.
About group identies the selected action.
• Name: allows you to dene a custom action name. This makes actions easily recognizable on
the solution's list of actions. By default, action name is taken from its type.
• Description: custom information about the action. Enter a description to explain purpose and
role of action in a solution.
• Action type: read-only information about the selected action type.
Settings group denes the le name.
• File name: data le to save the variable data to. If the name is hard-coded, values are saved into
the same data le each time.
Use UNC syntax for network resources. For more information, see section Access to Network
Shared Resources in NiceLabel Automation user guide.
If le exists group oers additional options to save the values.
• Overwrite the le: overwrites the existing data with new variable data. The old content is lost.
• Append data to the le: appends the variable values to the existing data les.
File Structure group denes the CSV variable data le parameters:
• Delimiter: species the delimiter type (tab, semicolon, comma or custom character). Delimiter is
a character that separates the stored variable values.
• Text qualier: species the character that qualies the stored content as text.
• File encoding: species character encoding type to be used in the data le. Auto denes the
encoding automatically. If required, the preferred encoding type can be selected from the drop-
down list.
TIP
UTF-8 makes a good default selection.
462

• Add names of variable in the rst row: places the variable name in the rst row of the le.
Variables group denes the variables whose value should be read from the data le. Values of the
existing variables are overwritten with values from the le.
• All variables: variable data of all variables from the data le is read.
• Selected variables: variable data of listed variables is red from the data le.
Action Execution and Error Handling
Each action in can be set as a conditional action. Conditional actions only run when the dened
conditions allow them to be run. To dene these conditions, click Show execution and error handling
options.
Execution options are:
• Enabled: species if the action is enabled or disabled. Only enabled actions will execute. This
functionality may be used while testing a form.
• Condition: denes one-line programming expression that must provide a Boolean value (true
or false). When the result of the expression is true, the action will execute. Condition oers a
way to avoid executing actions every time.
Error handling options are:
• Ignore failure: species whether an error should be ignored or not. With Ignore failure option
enabled, the execution of actions continues even if the current action fails.
NOTE
Nested actions that depend on the current action do not execute in case of a failure.
The execution of actions continues with the next action on the same level as the
current action. The error is logged, but does not break the execution of the action.
Example
At the end of printing, you might want to send the status update to an external application using the
HTTP Request action. If the printing action fails, action processing stops. In order to execute the
reporting even after the failed print action, the Print Label action must have the option Ignore failure
enabled.
• Save error to variable: allows you to select or create a variable to save the error to. The same
cause of error is also saved to internal variables ActionLastErrorId and
ActionLastErrorDesc.
463

Load Variable Data
This action loads values of a single or multiple variables from the associated data le as saved by the
action Save Variable Data. Use this action to exchange the data between triggers. You can load a
particular variable or all variables that are stored in the data le.
About group identies the selected action.
• Name: allows you to dene a custom action name. This makes actions easily recognizable on
the solution's list of actions. By default, action name is taken from its type.
• Description: custom information about the action. Enter a description to explain purpose and
role of action in a solution.
• Action type: read-only information about the selected action type.
Settings group denes the le name.
• File name: species the le for the variable data to be loaded from. If the name is hard-coded,
the values are loaded from the same le each time.
Use UNC syntax for network resources. For more information, see section Access to Network
Shared Resources in NiceLabel Automation user guide.
File Structure group settings must reect the structure of the saved le from the Save Variable Data
action.
• Delimiter: species delimiter type (tab, semicolon, comma or custom character). Delimiter is a
character that separates the values.
• Text qualier: species the character that qualies content as text.
• File encoding: species the character encoding type used in the data le. Auto denes the
encoding automatically. If needed, select the preferred encoding type from the drop-down list.
TIP
UTF-8 makes a good default selection.
Variables group denes the variables whose values should be loaded from the data le.
• All variables: species all dened variables in the data le to be read.
• Selected variables: species selection of individual variables to be read from the data le.
Action Execution and Error Handling
Each action in can be set as a conditional action. Conditional actions only run when the dened
conditions allow them to be run. To dene these conditions, click Show execution and error handling
options.
Execution options are:
464

• Enabled: species if the action is enabled or disabled. Only enabled actions will execute. This
functionality may be used while testing a form.
• Condition: denes one-line programming expression that must provide a Boolean value (true
or false). When the result of the expression is true, the action will execute. Condition oers a
way to avoid executing actions every time.
Error handling options are:
• Ignore failure: species whether an error should be ignored or not. With Ignore failure option
enabled, the execution of actions continues even if the current action fails.
NOTE
Nested actions that depend on the current action do not execute in case of a failure.
The execution of actions continues with the next action on the same level as the
current action. The error is logged, but does not break the execution of the action.
Example
At the end of printing, you might want to send the status update to an external application using the
HTTP Request action. If the printing action fails, action processing stops. In order to execute the
reporting even after the failed print action, the Print Label action must have the option Ignore failure
enabled.
• Save error to variable: allows you to select or create a variable to save the error to. The same
cause of error is also saved to internal variables ActionLastErrorId and
ActionLastErrorDesc.
String Manipulation
This action denes how the values of selected variables should be formatted.
The most popular string manipulation actions are: delete leading and trailing spaces, search and
replace characters, and delete opening and closing quotes.
This feature is often required is a trigger receives an unstructured data le or legacy data. in such
cases, the data needs to be parsed using the Unstructured Data lter. String Manipulation action
allows you to ne-tune the data value.
NOTE
If this action doesn't provide enough string manipulation power for a particular case,
use Execute Script action instead to manipulate your data using Visual Basic Script or
Python scripts.
465

About group identies the selected action.
• Name: allows you to dene a custom action name. This makes actions easily recognizable on
the solution's list of actions. By default, action name is taken from its type.
• Description: custom information about the action. Enter a description to explain purpose and
role of action in a solution.
• Action type: read-only information about the selected action type.
Variables group denes the variables whose values need to be formatted.
• All variables: species all the dened variables in a data le to be formatted.
• Selected variables: species a selection of variables to be formatted from the data le.
Format Text group denes string manipulation functions that apply to the selected variables or elds.
Multiple functions can be used. The functions apply in the same order as seen in the editor – from top
to bottom.
• Delete spaces at the beginning: deletes all space characters (decimal ASCII code 32) from the
beginning of the string.
• Delete spaces at the end: deletes all space characters (decimal ASCII value 32) from the end of
a string.
• Delete opening closing characters: deletes the rst occurrence of the selected opening and
closing characters that is found in the string.
Example
If using "{" as opening character and "}" as closing character, the input string {{selection}} is
converted to {selection}.
466

• Search and replace: executes standard search and replace function upon the provided values
for nd what and replace with. Regular expressions are supported.
NOTE
Several implementations of regular expressions are present. NiceLabel 2019
uses .NET Framework syntax for the regular expressions. For more information, see
Knowledge Base article KB250.
• Replace non printable characters with space: replaces all control characters in the string with
"space" character (decimal ASCII code 32). Non printable characters are characters with decimal
ASCII values between 0–31 and 127–159.
• Delete non printable characters: deletes all control characters in the string. Non printable
characters are characters with decimal ASCII values between 0–31 and 127–159.
• Decode special characters: decodes the characters (or control codes) that are not available on
the keyboard, such as Carriage Return or Line Feed. NiceLabel 2019 uses a notation to encode
such characters in human-readable form, such as <CR> for Carriage Return and <LF> for Line
Feed. This option converts special characters from NiceLabel syntax into actual binary
characters.
Example
When you receive the data "<CR><LF>", Designer uses it as plain string of 8 characters. You will
have to enable this option to interpret and use the received data as two binary characters CR
(Carriage Return – ASCII code 13) and LF (Line Feed – ASCII code 10).
• Search and delete everything before: nds the provided string and deletes all characters in front
of the dened string. The string can also be deleted.
• Search and delete everything after: nds the provided string and deletes all characters behind
the dened string. The string can also be deleted.
Action Execution and Error Handling
Each action in can be set as a conditional action. Conditional actions only run when the dened
conditions allow them to be run. To dene these conditions, click Show execution and error handling
options.
Execution options are:
• Enabled: species if the action is enabled or disabled. Only enabled actions will execute. This
functionality may be used while testing a form.
• Condition: denes one-line programming expression that must provide a Boolean value (true
or false). When the result of the expression is true, the action will execute. Condition oers a
way to avoid executing actions every time.
467

Error handling options are:
• Ignore failure: species whether an error should be ignored or not. With Ignore failure option
enabled, the execution of actions continues even if the current action fails.
NOTE
Nested actions that depend on the current action do not execute in case of a failure.
The execution of actions continues with the next action on the same level as the
current action. The error is logged, but does not break the execution of the action.
Example
At the end of printing, you might want to send the status update to an external application using the
HTTP Request action. If the printing action fails, action processing stops. In order to execute the
reporting even after the failed print action, the Print Label action must have the option Ignore failure
enabled.
• Save error to variable: allows you to select or create a variable to save the error to. The same
cause of error is also saved to internal variables ActionLastErrorId and
ActionLastErrorDesc.
7.6.2.5. Data and Connectivity
Execute SQL Statement
This action sends SQL commands a connected SQL server and collects results. Use commands
SELECT, INSERT, UPDATE, and DELETE.
Use Execute SQL Statement action to achieve these two goals:
• Obtain additional data from a database: In Automation Builder module, a trigger receives data
for label printing, but not all of the required values. For example, a trigger receives values for
Product ID and Description, but not for Price. We have to look up the value for Price in
the SQL database. SQL code example:
SELECT Price FROM Products
WHERE ID = :[Product ID]
The ID is eld in the database, Product ID is a variable dened in the trigger.
• Update or delete records in a database: After a label is printed, update the database record
and send a signal to the system that the particular record has already been processed. SQL
code example: Set the table eld AlreadyPrinted value to True for the currently processed
record.
468

UPDATE Products
SET AlreadyPrinted = True
WHERE ID = :[Product ID]
Or delete the current record from a database, because it's not needed anymore.
DELETE FROM Products
WHERE ID = :[Product ID]
The ID is eld in the database, Product ID is a variable dened in the trigger.
NOTE
To use value of a variable inside an SQL statement, you have to insert colon (:) in front
of its name. This signals that a variable names follow.
About group identies the selected action.
• Name: allows you to dene a custom action name. This makes actions easily recognizable on
the solution's list of actions. By default, action name is taken from its type.
• Description: custom information about the action. Enter a description to explain purpose and
role of action in a solution.
• Action type: read-only information about the selected action type.
Database Connection group denes the database connection that is used for the statement.
TIP
Before you can send an SQL sentence to a database, set up the database connection.
Click Dene button and follow the on-screen instructions. You can connect to a data
source that can be controlled using SQL commands, so you cannot use text (CSV) or
Excel les.
SQL Statement group denes an SQL statement or query to be executed.
TIP
Statements from Data Manipulation Language (DML) are allowed to execute queries
upon existing database tables.
Use standard SQL statements, such as SELECT, INSERT, DELETE and UPDATE, including joins,
function and keywords. The statements in DDL language that are used to create databases and tables
(CREATE DATABASE, CREATE TABLE), or to delete them (DROP TABLE) are not permitted.
• Test: opens Data Preview section. Simulate execution (selected by default) tests the execution
of SQL statements. Click Execute to run the simulation.
469

TIP
Data Preview section allows you to test the execution of your SQL statement
upon a live set of data. To protect the data from accidental updates, make sure
the option Simulate execution is enabled. The statements INSERT, DELETE and
UPDATE will execute. This enables you to gain feedback on how many records
will be aected, then all of the transactions will be reversed.
If you use trigger variables in the SQL statement, you will be able to enter their values for the
test execution.
• Insert data source: inserts predened or newly created variables into an SQL statement.
• Export/Import: enables exporting and importing SQL statements to/from an external le.
• Execution mode: species the explicit mode of SQL statement execution.
TIP
In cases of complex SQL queries, it becomes increasingly dicult to
automatically determine what is the supposed action. If the built-in logic has
troubles identifying your intent, manually select the main action.
• Automatic: determines the action automatically.
• Returns set of records (SELECT): receives the data set with records.
• Does not return set of records (INSERT, DELETE, UPDATE): use this option if executing a
query that does not return the records. Either insert new records, delete or update the
existing records. The result is a status response reporting the number of rows that were
aected by your query.
• Execution timeout: allows you to dene the time delay for sending your commands to the SQL
server. Use the execution timeout if you are sending multiple consecutive SQL commands that
require longer processing time.
Type the requested timeout duration in seconds. By default, the execution timeout duration is 60
s. If you want your database provider to dene the timeout, type in 0 s.
Result group allows you to set how the SQL statement result should be stored, and to dene action
iteration.
• Save Data to Variable: selects or creates a variable to store the SQL statement result. This
option depends on the selected Execution mode.
• Result of SELECT statement. After you execute a SELECT statement, it results in a data
set of records. You receive a CSV-formatted text content. The rst line contains eld
names returned in a result. The next lines contain records.
To extract the values from the returned data set and to use them in other actions, dene
and execute the action Use Data Filter upon the contents of this variable (this action is
available in Automation Builder).
470

• Result of INSERT, DELETE and UPDATE statements. If you use INSERT, DELETE and
UPDATE statements, the result is a number indicating the number of records aected in
the table.
• Iterate for Every Record. If enabled, a new action For Every Record is automatically added. All
nested actions are repeated for each record that has been returned using the SQL statement.
NOTE
Automatic mapping is enabled. For Every Record action cannot be deleted.
Retry on failure group allows you to congure the action to continually retry establishing the
connection to a database server in case the rst attempt is unsuccessful. If the action fails to connect
within the dened number of attempts, en error is raised.
• Retry attempts: species the number of tries to connect to the database server.
• Retry interval: species the duration of time between individual retry attempts.
Action Execution and Error Handling
Each action in can be set as a conditional action. Conditional actions only run when the dened
conditions allow them to be run. To dene these conditions, click Show execution and error handling
options.
Execution options are:
• Enabled: species if the action is enabled or disabled. Only enabled actions will execute. This
functionality may be used while testing a form.
• Condition: denes one-line programming expression that must provide a Boolean value (true
or false). When the result of the expression is true, the action will execute. Condition oers a
way to avoid executing actions every time.
Error handling options are:
• Ignore failure: species whether an error should be ignored or not. With Ignore failure option
enabled, the execution of actions continues even if the current action fails.
NOTE
Nested actions that depend on the current action do not execute in case of a failure.
The execution of actions continues with the next action on the same level as the
current action. The error is logged, but does not break the execution of the action.
Example
At the end of printing, you might want to send the status update to an external application using the
HTTP Request action. If the printing action fails, action processing stops. In order to execute the
471

reporting even after the failed print action, the Print Label action must have the option Ignore failure
enabled.
• Save error to variable: allows you to select or create a variable to save the error to. The same
cause of error is also saved to internal variables ActionLastErrorId and
ActionLastErrorDesc.
Refresh Table
This action rereads the specied database table.
About group identies the selected action.
• Name: allows you to dene a custom action name. This makes actions easily recognizable on
the solution's list of actions. By default, action name is taken from its type.
• Description: custom information about the action. Enter a description to explain purpose and
role of action in a solution.
• Action type: read-only information about the selected action type.
Table group selects the database table to be reread.
• Table: denes an existing table to be reread or creates a new one using the Step-by-Step
Database Wizard.
Action Execution and Error Handling
Each action in can be set as a conditional action. Conditional actions only run when the dened
conditions allow them to be run. To dene these conditions, click Show execution and error handling
options.
Execution options are:
• Enabled: species if the action is enabled or disabled. Only enabled actions will execute. This
functionality may be used while testing a form.
• Condition: denes one-line programming expression that must provide a Boolean value (true
or false). When the result of the expression is true, the action will execute. Condition oers a
way to avoid executing actions every time.
Error handling options are:
• Ignore failure: species whether an error should be ignored or not. With Ignore failure option
enabled, the execution of actions continues even if the current action fails.
472

NOTE
Nested actions that depend on the current action do not execute in case of a failure.
The execution of actions continues with the next action on the same level as the
current action. The error is logged, but does not break the execution of the action.
Example
At the end of printing, you might want to send the status update to an external application using the
HTTP Request action. If the printing action fails, action processing stops. In order to execute the
reporting even after the failed print action, the Print Label action must have the option Ignore failure
enabled.
• Save error to variable: allows you to select or create a variable to save the error to. The same
cause of error is also saved to internal variables ActionLastErrorId and
ActionLastErrorDesc.
Import Data into Table
This action reads data from a formatted CSV text le and imports it into an SQL database.
NOTE
Before using this action, a connection to the SQL database must already be set. The
action does not work with le-based databases, such as Microsoft Access, or data
les like Microsoft Excel, or plain text les. Use a server-based SQL database, such as
Microsoft SQL Server.
About group identies the selected action.
• Name: allows you to dene a custom action name. This makes actions easily recognizable on
the solution's list of actions. By default, action name is taken from its type.
• Description: custom information about the action. Enter a description to explain purpose and
role of action in a solution.
• Action type: read-only information about the selected action type.
The following rules apply to this action:
• The table must already exist within the SQL database.
• The table must contain PRIMARY KEY.
• The rst line in a text le must dene eld names.
473
• The eld names in the text le must match eld names in the database table.
• If the text le does not provide a value for some eld, NULL is written to the database. If the eld
does not accept NULL values, an empty string ("") is written.
• Setting values for auto-incremental elds are ignored. The database provides value for such
eld.
• If the value from text le does not match the structure of the eld, the action is canceled and an
error message is displayed. For example, when trying to enter alphanumerical value into
numerical eld.
• If you lter records on the form and display only records matching certain condition, you can
only import records that either do not provide value for the lter eld, or provide the same value
for the lter as dened with the form.
• Only lters with condition "equal" , not "greater than", "less than", "contains" or similar are
permitted.
• If the text le contains elds not dened in the SQL database, the import will ignore them. Only
known elds will be imported.
Settings group selects the table.
• Table denes a predened table from the drop-down menu or creates a new one using the Step-
by-Step Database Wizard.
File Text Structure group species the text database parameters:
• Delimiter: species the delimiter type in the data le. Select a predened delimiter, or create a
custom one.
• Text qualier: species the text qualier. Select a predened delimiter or insert a custom one.
• File encoding: species the character encoding type used in the data le. Auto denes the
encoding automatically. If needed, select the preferred encoding type from the drop-down list.
Action Execution and Error Handling
Each action in can be set as a conditional action. Conditional actions only run when the dened
conditions allow them to be run. To dene these conditions, click Show execution and error handling
options.
Execution options are:
• Enabled: species if the action is enabled or disabled. Only enabled actions will execute. This
functionality may be used while testing a form.
• Condition: denes one-line programming expression that must provide a Boolean value (true
or false). When the result of the expression is true, the action will execute. Condition oers a
way to avoid executing actions every time.
Error handling options are:
474

• Ignore failure: species whether an error should be ignored or not. With Ignore failure option
enabled, the execution of actions continues even if the current action fails.
NOTE
Nested actions that depend on the current action do not execute in case of a failure.
The execution of actions continues with the next action on the same level as the
current action. The error is logged, but does not break the execution of the action.
Example
At the end of printing, you might want to send the status update to an external application using the
HTTP Request action. If the printing action fails, action processing stops. In order to execute the
reporting even after the failed print action, the Print Label action must have the option Ignore failure
enabled.
• Save error to variable: allows you to select or create a variable to save the error to. The same
cause of error is also saved to internal variables ActionLastErrorId and
ActionLastErrorDesc.
Send Data to TCP/IP Port
PRODUCT LEVEL INFO
The described feature is available in NiceLabel LMS Enterprise and NiceLabel
LMS Pro.
This action sends data to any external device which accepts TCP/IP connection on a predened port
number.
Send Data to TCP/IP Port establishes connection with a device, sends the data and terminates the
connection. The connection and communication is governed by the client – server handshake that
occurs when initiating or terminating the TCP connection.
About group identies the selected action.
• Name: allows you to dene a custom action name. This makes actions easily recognizable on
the solution's list of actions. By default, action name is taken from its type.
• Description: custom information about the action. Enter a description to explain purpose and
role of action in a solution.
• Action type: read-only information about the selected action type.
Connection Settings group sets connection details.
475

• Reply to sender: Enables direct reply to the socket from which the trigger data originates. Use
this option to provide feedback about the printing process.
NOTE
This option is available in NiceLabel Automation.
Prerequisites for Reply to sender setting are:
• Remote party does not close the communication channel, once the message gets
delivered.
• Send Data to TCP/IP Port action is used within the TCP/IP Server trigger.
• Do not congure the Execution Event in the TCP/IP Server trigger as On client disconnect.
• Destination (IP address:port): destination address and port of the TCP/IP server. Hard-code the
connection parameters and use xed host name or IP address or use variable connection
parameters by clicking the right arrow and selecting a predened variable. For more information,
see section Combining Values in an Object in NiceLabel Automation user guide.
Example
If the variable hostname provides the TCP/IP server name and the variable port provides the
port number, enter the following parameter for the destination:[hostname]:[port]
• Disconnect delay: prolongs the connection with the target socket for the dened time intervals
after the data has been delivered. Certain devices require more time to process the data. Insert
the delay value manually or click the arrows to increase or decrease it.
• Save data reply in a variable: selects or creates a variable that stores the server reply. Any data
received from the TCP/IP server after passing the "disconnect delay" is stored in this variable.
Content group denes the content to be sent to a TCP/IP server.
TIP
Use xed content, mix of xed and variable content, or variable content alone. To enter
variable content, click the button with arrow to the right of data area and insert a
variable from the list. For more information, see section Combining Values in an
Object in NiceLabel Automation user guide.
• Data: content to be sent outbound.
• Encoding: encoding type for the sent data. Auto denes the encoding automatically. If needed,
select the preferred encoding type from the drop-down list.
Action Execution and Error Handling
476
Each action in can be set as a conditional action. Conditional actions only run when the dened
conditions allow them to be run. To dene these conditions, click Show execution and error handling
options.
Execution options are:
• Enabled: species if the action is enabled or disabled. Only enabled actions will execute. This
functionality may be used while testing a form.
• Condition: denes one-line programming expression that must provide a Boolean value (true
or false). When the result of the expression is true, the action will execute. Condition oers a
way to avoid executing actions every time.
Error handling options are:
• Ignore failure: species whether an error should be ignored or not. With Ignore failure option
enabled, the execution of actions continues even if the current action fails.
NOTE
Nested actions that depend on the current action do not execute in case of a failure.
The execution of actions continues with the next action on the same level as the
current action. The error is logged, but does not break the execution of the action.
Example
At the end of printing, you might want to send the status update to an external application using the
HTTP Request action. If the printing action fails, action processing stops. In order to execute the
reporting even after the failed print action, the Print Label action must have the option Ignore failure
enabled.
• Save error to variable: allows you to select or create a variable to save the error to. The same
cause of error is also saved to internal variables ActionLastErrorId and
ActionLastErrorDesc.
Send Data to Serial Port
This action sends data to a serial port. Use it to communicate with external serial-port devices.
TIP
Make sure the port settings match on both ends – in the congured action and on the
serial-port device. Serial port can be used by a single application in the machine. To
successfully use the port from this action, no other application may use the port at the
same time, not even any printer driver.
477

About group identies the selected action.
• Name: allows you to dene a custom action name. This makes actions easily recognizable on
the solution's list of actions. By default, action name is taken from its type.
• Description: custom information about the action. Enter a description to explain purpose and
role of action in a solution.
• Action type: read-only information about the selected action type.
Port group denes the serial port.
• Port name: name of the port to which the external device connects to. This can either be a
hardware COM port or a virtual COM port.
Port Settings group denes additional port connection settings.
• Bits per second: speed rate used by the external device to communicate with the PC. The usual
alias used with the setting is "baud rate". Select the value from the drop-down menu.
• Data bits: number of data bits in each character. 8 data bits are almost universally used in newer
devices. Select the value from the drop-down menu.
• Parity: method of detecting errors in a transmission. The most common parity setting, is "none",
with error detection handled by a communication protocol (ow control). Select the value from
the drop-down menu.
• Stop bits: halts the bits sent at the end of every character allowing the receiving signal hardware
to detect the end of a character and to resynchronize with the character stream. Electronic
devices usually use a single stop bit. Select the value from the drop-down menu.
• Flow control: serial port may use interface signals to pause and resume the data transmission.
Content group denes the content to be sent to serial port.
TIP
Fixed content, mix of xed and variable content, or variable content alone are
permitted. To enter variable content, click the button with arrow to the right of data
area and insert a variable from the list. For more information, see section Combining
Values in an Object in NiceLabel Automation user guide.
• Data: content to be sent outbound.
Action Execution and Error Handling
Each action in can be set as a conditional action. Conditional actions only run when the dened
conditions allow them to be run. To dene these conditions, click Show execution and error handling
options.
Execution options are:
478
• Enabled: species if the action is enabled or disabled. Only enabled actions will execute. This
functionality may be used while testing a form.
• Condition: denes one-line programming expression that must provide a Boolean value (true
or false). When the result of the expression is true, the action will execute. Condition oers a
way to avoid executing actions every time.
Error handling options are:
• Ignore failure: species whether an error should be ignored or not. With Ignore failure option
enabled, the execution of actions continues even if the current action fails.
NOTE
Nested actions that depend on the current action do not execute in case of a failure.
The execution of actions continues with the next action on the same level as the
current action. The error is logged, but does not break the execution of the action.
Example
At the end of printing, you might want to send the status update to an external application using the
HTTP Request action. If the printing action fails, action processing stops. In order to execute the
reporting even after the failed print action, the Print Label action must have the option Ignore failure
enabled.
• Save error to variable: allows you to select or create a variable to save the error to. The same
cause of error is also saved to internal variables ActionLastErrorId and
ActionLastErrorDesc.
Read Data from Serial Port
This action collects data received via serial port (RS-232) and saves it in a selected variable. Use this
action to communicate with external serial port devices.
About group identies the selected action.
• Name: allows you to dene a custom action name. This makes actions easily recognizable on
the solution's list of actions. By default, action name is taken from its type.
• Description: custom information about the action. Enter a description to explain purpose and
role of action in a solution.
• Action type: read-only information about the selected action type.
Port group denes the serial port.
479

• Port name: name of the port to which an external device connects to. This can either be a
hardware COM port or a virtual COM port.
Port Settings group denes additional port connection settings.
• Bits per second: speed rate used by the an external device to communicate with the PC. The
usual alias used with the setting is "baud rate".
• Data bits: species the number of data bits in each character. 8 data bits are almost universally
used in newer devices.
• Parity: species the method of detecting errors in a transmission. The most common parity
setting, is "none", with error detection handled by a communication protocol (ow control).
• Stop bits: halts the bits sent at the end of every character allowing the receiving signal hardware
to detect the end of a character and to resynchronize with the character stream. Electronic
devices usually use a single stop bit.
• Flow control: serial port may use interface signals to pause and resume the data transmission.
Example
A slow device might need to handshake with the serial port to indicate that data should be paused
while the device processes received data.
Options group includes the following settings:
• Read delay: optional delay when reading data from serial port. After the delay, the entire content
of the serial port buer is read. Enter the delay manually or click the arrows to increase or
decrease the value.
• Send initialization data: species the string that is sent to the selected serial port before the
data is read. This option enables the action to initialize the device to be able to provide the data.
The option can also be used for sending a specic question to the device, and to receive a
specic answer. Click the arrow button to enter special characters.
Data Extraction group denes how the dened parts of received data are extracted.
• Start position: starting position for data extraction.
• End position: ending position for data extraction.
Result group denes a variable for data storing.
• Save data to variable: select or create a variable to store the received data.
Action Execution and Error Handling
Each action in can be set as a conditional action. Conditional actions only run when the dened
conditions allow them to be run. To dene these conditions, click Show execution and error handling
options.
480

Execution options are:
• Enabled: species if the action is enabled or disabled. Only enabled actions will execute. This
functionality may be used while testing a form.
• Condition: denes one-line programming expression that must provide a Boolean value (true
or false). When the result of the expression is true, the action will execute. Condition oers a
way to avoid executing actions every time.
Error handling options are:
• Ignore failure: species whether an error should be ignored or not. With Ignore failure option
enabled, the execution of actions continues even if the current action fails.
NOTE
Nested actions that depend on the current action do not execute in case of a failure.
The execution of actions continues with the next action on the same level as the
current action. The error is logged, but does not break the execution of the action.
Example
At the end of printing, you might want to send the status update to an external application using the
HTTP Request action. If the printing action fails, action processing stops. In order to execute the
reporting even after the failed print action, the Print Label action must have the option Ignore failure
enabled.
• Save error to variable: allows you to select or create a variable to save the error to. The same
cause of error is also saved to internal variables ActionLastErrorId and
ActionLastErrorDesc.
Send Data to Printer
This action sends data to a selected printer. Use it to send pre-generated printer streams to any
available printer.
NiceLabel Automation module uses the installed printer driver in pass-through mode just to be able to
send data to the target port, such as LPT, COM, TCP/IP or USB port, to which the printer is connected.
481

NOTE
Possible scenario. Data received by the trigger must be printed out on the same
network printer, but on dierent label templates (.NLBL label les). The printer can
accept data from various workstations and will usually print the jobs in the received
order. Automation Builder module will send each label template in a separate print job,
making it possible for another workstation to insert its job between the jobs created in
our own Automation Builder module. Instead of sending each job separately to the
printer, merge all label jobs (using the action Redirect Printing to File) and send a single
"big" print job to the printer.
About group identies the selected action.
• Name: allows you to dene a custom action name. This makes actions easily recognizable on
the solution's list of actions. By default, action name is taken from its type.
• Description: custom information about the action. Enter a description to explain purpose and
role of action in a solution.
• Action type: read-only information about the selected action type.
Printer group selects the printer.
• Printer name: name of the printer to send the data to. Select the printer from the drop-down list
of locally installed printer drivers, enter a custom printer name, or dene it dynamically using an
existing or newly created variable.
Data Source group denes the content to be sent to printer.
• Use data received by the trigger: trigger-received data it used. In this case, you want the
received printer stream to be used as an input to the lter. Your goal is to redirect it to a printer
without any modication. The same result can be achieved by enabling the internal variable
DataFileName and using the contents of the le it refers to. For more information, see section
Using Compound Values in NiceLabel Automation user guide.
• File name: path and le name of the le containing a printer stream. Content of the specied le
is sent to a printer. Select Data source to dene the le name dynamically using a variable value.
• Variable: variable (existing or new) that contains the printer stream.
• Custom: denes custom content to be sent to a printer. Fixed content, mix of xed and variable
content, or variable content alone are permitted. To enter variable content, click the button with
arrow to the right of data area and insert a variable from the list. For more information, see
section Combining Values in an Object in NiceLabel 2019 user guide.
Action Execution and Error Handling
Each action in can be set as a conditional action. Conditional actions only run when the dened
conditions allow them to be run. To dene these conditions, click Show execution and error handling
options.
482

Execution options are:
• Enabled: species if the action is enabled or disabled. Only enabled actions will execute. This
functionality may be used while testing a form.
• Condition: denes one-line programming expression that must provide a Boolean value (true
or false). When the result of the expression is true, the action will execute. Condition oers a
way to avoid executing actions every time.
Error handling options are:
• Ignore failure: species whether an error should be ignored or not. With Ignore failure option
enabled, the execution of actions continues even if the current action fails.
NOTE
Nested actions that depend on the current action do not execute in case of a failure.
The execution of actions continues with the next action on the same level as the
current action. The error is logged, but does not break the execution of the action.
Example
At the end of printing, you might want to send the status update to an external application using the
HTTP Request action. If the printing action fails, action processing stops. In order to execute the
reporting even after the failed print action, the Print Label action must have the option Ignore failure
enabled.
• Save error to variable: allows you to select or create a variable to save the error to. The same
cause of error is also saved to internal variables ActionLastErrorId and
ActionLastErrorDesc.
HTTP Request
This action sends data to the destination Web server using the selected HTTP method. HTTP and
HTTPS URI schemes are allowed.
HTTP works as a request-response protocol in client-server computing model. In this action, acts as a
client that communicates with a remote server. This action submits a selected HTTP request
message to a server. The server returns a response message, which can contain completion status
information about the request and may also contain requested content in its body.
About group identies the selected action.
• Name: allows you to dene a custom action name. This makes actions easily recognizable on
the solution's list of actions. By default, action name is taken from its type.
483

• Description: custom information about the action. Enter a description to explain purpose and
role of action in a solution.
• Action type: read-only information about the selected action type.
Connection Settings group sets connection parameters.
NOTE
This action supports Internet Protocol version 6 (IPv6).
• Destination: address, port and destination (path) of the Web server.
NOTE
If a Web server runs on default port 80, skip the port number. Hard-code the
connection parameters and use a xed host name or IP address. Use a variable
value to dene this option dynamically. For more information, see section Using
Compound Values in NiceLabel Automation user guide.
Example
If the variable hostname provides the Web server name and the variable port provides the port
number, you can enter the following for the destination: [hostname]:[port]
• Request method: available request methods.
• Timeout: timeout duration (in ms) during which the server connection should be established and
response received.
• Save status reply in a variable: variable to store the status code received from the server.
TIP
Status code in range 2XX is a success code. Common "OK" response is code
200. Codes 5XX are server errors.
• Save data reply in a variable: variable to store the data received from the server.
Authentication group enables you to secure the Web server connection.
• Enable basic authentication: allows you to enter the required credentials to connect to the Web
server. User name and password can either be xed or provided using a variable.
HTTP Basic authentication (BA) uses static standard HTTP headers. The BA mechanism provides no
condentiality protection for the transmitted credentials. They are merely encoded with Base64 in
transit, but are not encrypted or hashed in any way. Basic Authentication should be used over HTTPS.
484

• Show password: unmasks the password characters.
Content group denes the contents to be sent to a Web server.
• Data: content to be sent outbound. Fixed content, mix of xed and variable content, or variable
content alone are permitted. To enter variable content, click the button with arrow to the right of
data area and insert variable from the list. For more information, see section Combining Values
in an Object in NiceLabel 2019 user guide.
• Encoding: encoding type for the sent data.
TIP
Auto denes the encoding automatically. If needed, select the preferred
encoding type from the drop-down list.
• Type: Content-Type property of the HTTP message. If no type is selected, the default
application/x-www-form-urlencoded is used. If an appropriate type is not listed, dene a
custom one or set a variable that would dene it dynamically.
Additional HTTP Headers are requested by certain HTTP servers (especially for REST services).
• Additional headers: hard coded headers or headers obtained from variable values. To access
the variables, click the small arrow button to the right hand side of the text area. For more
information, see section Combining Values in an Object in NiceLabel 2019 user guide.
Certain HTTP servers (especially for REST services) require custom HTTP headers to be
included in the message. This section allows you to provide the required HTTP header.
HTTP headers must be entered using the following syntax:
header field name: header field value
For example, to use the header eld names Accept, User-Agent and Content-Type, you
could use the following syntax:
Accept: application/json; charset=utf-8
User-Agent: Mozilla/5.0 (Windows NT 6.3; WOW64) AppleWebKit/537.36
(KHTML,
like Gecko) Chrome/31.0.1650.63 Safari/537.36
Content-Type: application/json; charset=UTF-8
You can hard code the header eld names, or you can obtain their values from trigger variables.
Use as many custom header elds as you want, just make sure that each header eld is placed
in a new line.
NOTE
The entered HTTP headers override the already dened headers elsewhere in
the action properties, such as Content-Type.
Action Execution and Error Handling
485

Each action in can be set as a conditional action. Conditional actions only run when the dened
conditions allow them to be run. To dene these conditions, click Show execution and error handling
options.
Execution options are:
• Enabled: species if the action is enabled or disabled. Only enabled actions will execute. This
functionality may be used while testing a form.
• Condition: denes one-line programming expression that must provide a Boolean value (true
or false). When the result of the expression is true, the action will execute. Condition oers a
way to avoid executing actions every time.
Error handling options are:
• Ignore failure: species whether an error should be ignored or not. With Ignore failure option
enabled, the execution of actions continues even if the current action fails.
NOTE
Nested actions that depend on the current action do not execute in case of a failure.
The execution of actions continues with the next action on the same level as the
current action. The error is logged, but does not break the execution of the action.
Example
At the end of printing, you might want to send the status update to an external application using the
HTTP Request action. If the printing action fails, action processing stops. In order to execute the
reporting even after the failed print action, the Print Label action must have the option Ignore failure
enabled.
• Save error to variable: allows you to select or create a variable to save the error to. The same
cause of error is also saved to internal variables ActionLastErrorId and
ActionLastErrorDesc.
Web Service
Web Service is a method of communication between two electronic devices or software instances.
Web Service is dened as a data exchange standard. It uses XML format to tag the data, SOAP
protocol is used to transfer the data, and WSDL language is used to describe the available services.
This action connects to a remote Web service and executes the methods on it. Methods can be
described as actions that are published on the Web Service. The action sends inbound values to the
selected method in the remote Web service, collects the result and saves it in selected variables.
After importing the WSDL and adding a reference to the Web Service, its methods are listed in the
Method combo box.
486

NOTE
You can transfer simple types over the Web Service, such as string, integer, boolean,
but not the complex types. The WSDL must contain single binding only.
You plan to print product labels. Your trigger would receive only a segment of the required data. E.g.
the trigger receives the value for Product ID and Description variables, but not the Price. The
price information is available in a separate database, which is accessible over Web service call. Web
service denes the function using a WSDL denition. For example, function input is Product ID and
its output is Price. The Web Service action sends Product ID to the Web service. It executes and
makes an internal look up in its database and provide the matching Price as the result. The action
saves the result in a variable, which can be used on the label.
About group identies the selected action.
• Name: allows you to dene a custom action name. This makes actions easily recognizable on
the solution's list of actions. By default, action name is taken from its type.
• Description: custom information about the action. Enter a description to explain purpose and
role of action in a solution.
• Action type: read-only information about the selected action type.
Web Service Denition group includes the following settings:
NOTE
This action supports Internet Protocol version 6 (IPv6).
• WSDL: location of WSDL denition.
WSDL is usually provided by the Web service. Typically, you would enter the link to WSDL and
click Import to read the denition. If facing troubles while retrieving the WSDL from online
resource, save the WSDL to a le and enter the path with le name to load the methods from it.
automatically detects if the remote Web Service uses a document or RPC syntax, and whether it
communicates appropriately or not.
• Address: address at which the Web Service is published.
Initially, this information is retrieved from the WSDL, but can be updated before the action is
executed. This is helpful for split development / test / production environments, where the same
list of actions is used, but with dierent names of servers on which the Web Services run.
Fixed content, mix of xed and variable content, or variable content alone are permitted. To
enter variable content, click the button with arrow to the right hand side of data area and insert
variable from the list. For more information, see section Combining Values in an Object in
NiceLabel 2019 user guide.
• Method: methods (functions) that are available for the selected Web service. The list is
automatically populated by the WSDL denition.
487
• Parameters: input and output variables for the selected method (function).
Inbound parameters expect an input. For testing and troubleshooting reasons, you can enter a
xed value and see the preview result on-screen. Typically, you would select a variable for
inbound parameter. Value of that variable will be used as input parameter. The outbound
parameter provides the result from the function. You must select the variable that will store the
result.
• Timeout: timeout after which the connection to a server is established.
Authentication enables basic user authentication. This option denes user credentials that are
necessary to establish an outbound call to a remote web service.
• Enable basic authentication: enables dening the Username and Password that can be entered
manually or dened by variable values. Select Data sources to select or create the variables.
• Show password: uncovers the masked Username and Password characters.
Details about security concerns, are available in section Securing Access to your Triggers in
NiceLabel Automation user guide.
Data Preview eld allows you to perform a test Web service execution.
• Execute button executes a Web service call.
It sends values of inbound parameters to the Web service and provides the result in the
outbound parameter. Use this functionality to test the execution of a Web service. You can enter
values for inbound parameters and see the result on-screen. When satised with execution,
replace the entered xed value for inbound parameter with a variable from the list.
Action Execution and Error Handling
Each action in can be set as a conditional action. Conditional actions only run when the dened
conditions allow them to be run. To dene these conditions, click Show execution and error handling
options.
Execution options are:
•
Enabled: species if the action is enabled or disabled. Only enabled actions will execute. This
functionality may be used while testing a form.
• Condition: denes one-line programming expression that must provide a Boolean value (true
or false). When the result of the expression is true, the action will execute. Condition oers a
way to avoid executing actions every time.
Error handling options are:
• Ignore failure: species whether an error should be ignored or not. With Ignore failure option
enabled, the execution of actions continues even if the current action fails.
488

NOTE
Nested actions that depend on the current action do not execute in case of a failure.
The execution of actions continues with the next action on the same level as the
current action. The error is logged, but does not break the execution of the action.
Example
At the end of printing, you might want to send the status update to an external application using the
HTTP Request action. If the printing action fails, action processing stops. In order to execute the
reporting even after the failed print action, the Print Label action must have the option Ignore failure
enabled.
• Save error to variable: allows you to select or create a variable to save the error to. The same
cause of error is also saved to internal variables ActionLastErrorId and
ActionLastErrorDesc.
7.6.2.6. File Operations
Save Data to File
This action saves variable value or other data streams (such as binary data) in a selected le. The
NiceLabel Automation service must have write access to the dened folder.
File group denes the le to be opened.
• File name: location of the le to be opened within this action.
Path and le name can be hard-coded, and the same le is going to be used every time. If only a
le name without path is dened, the folder with NiceLabel Automation conguration le (.MISX)
is used. You can use a relative reference to the le name, in which the folder with .MISX le is
used as the root folder.
Data source: enables variable le name. Select a variable that contains the path and/or le name
or combine several variables that create the le name. For more information, see section Using
Compound Values in NiceLabel Automation User Guide.
If le exists group handles options in case of an already existing le.
• Overwrite the le: overwrites existing data with new data. The old content is lost.
• Append data to the le: appends variable values to the existing data les.
Content group denes which data is going to be written in the specied le.
• Use data received by the trigger: original data as received by the trigger is going to be saved in
the le. Eectively, this option makes a copy of the incoming data.
489

• Custom: saves content as provided in the text area. Fixed values, variable values and special
characters are permitted. To enter variables and special characters, click the arrow button to the
right of the text area. For more information, see section Combining Values in an Object in
NiceLabel Automation User Guide.
• Encoding: encoding type for the sent data. Auto denes the encoding automatically. If needed,
select the preferred encoding type from the drop-down list.
Action Execution and Error Handling
Each action in can be set as a conditional action. Conditional actions only run when the dened
conditions allow them to be run. To dene these conditions, click Show execution and error handling
options.
Execution options are:
• Enabled: species if the action is enabled or disabled. Only enabled actions will execute. This
functionality may be used while testing a form.
• Condition: denes one-line programming expression that must provide a Boolean value (true
or false). When the result of the expression is true, the action will execute. Condition oers a
way to avoid executing actions every time.
Error handling options are:
• Ignore failure: species whether an error should be ignored or not. With Ignore failure option
enabled, the execution of actions continues even if the current action fails.
NOTE
Nested actions that depend on the current action do not execute in case of a failure.
The execution of actions continues with the next action on the same level as the
current action. The error is logged, but does not break the execution of the action.
Example
At the end of printing, you might want to send the status update to an external application using the
HTTP Request action. If the printing action fails, action processing stops. In order to execute the
reporting even after the failed print action, the Print Label action must have the option Ignore failure
enabled.
• Save error to variable: allows you to select or create a variable to save the error to. The same
cause of error is also saved to internal variables ActionLastErrorId and
ActionLastErrorDesc.
490

Read Data from File
PRODUCT LEVEL INFO
The described feature is available in NiceLabel LMS Enterprise and NiceLabel
LMS Pro.
This action reads content of the provided le name and saves it in a variable. Content of any le type,
including binary data can be read.
Usually, Automation Builder module receives data for label printing using a trigger. E.g. if a le trigger
is used, the content of trigger le is automatically read and can be parsed by lters. However, you
might want to bypass lters to obtain some external data. Once you execute this action and have the
data stored in a variable, you can use any of the available actions to use the data.
This action is useful:
• If you must combine data received by the trigger with data stored in a le.
WARNING
If you load data from binary les (such as bitmap image or print le), make sure the
variable to store the read content is dened as a binary variable.
• When you want to exchange data between triggers. One triggers prepares data and saves it to
le (using the Save Data to File action), the other trigger reads the data.
File group denes the le to read the content from.
• File name: location of the le to be read within this action.
Path and le name can be hard-coded, and the same le is going to be used every time. If only a
le name without path is dened, the folder with NiceLabel Automation conguration le (.MISX)
is used. You can use a relative reference to the le name, in which the folder with .MISX le is
used as the root folder.
Data source: enables variable le name. Select a variable that contains the path and/or le name
or combine several variables that create the le name. For more information see section Using
Compound Values in NiceLabel Automation User Guide.
NOTE
Use UNC syntax for network resources. For more information, see section
Access to Network Shared Resources in NiceLabel Automation User Guide.
Content group sets le content related details.
• Variable: variable that stores the le content. At least one variable (existing or newly created)
should be dened.
491

• Encoding: encoding type for the sent data. Auto denes the encoding automatically. If needed,
select the preferred encoding type from the drop-down list.
NOTE
Encoding cannot be selected if the data is read from a binary variable. In this
case, the variable contains the data as-is.
Retry on Failure group denes how the action execution should continue if the specied le becomes
inaccessible.
TIP
Automation Builder module might become unable to access the le, because it is
locked by another application. If an application still writes data to the selected le and
keeps it locked in exclusive mode, no other application can open it at the same time,
not even for reading. Other possible causes for action retries are: le doesn't exist
(yet), folder does not exist (yet), or the service user doesn't have the privileges to
access the le.
• Retry attempts: denes the number of retry attempts for accessing the le. If the value is set to
0, no retries are made.
• Retry interval: time interval between individual retries in milliseconds.
Action Execution and Error Handling
Each action in can be set as a conditional action. Conditional actions only run when the dened
conditions allow them to be run. To dene these conditions, click Show execution and error handling
options.
Execution options are:
• Enabled: species if the action is enabled or disabled. Only enabled actions will execute. This
functionality may be used while testing a form.
• Condition: denes one-line programming expression that must provide a Boolean value (true
or false). When the result of the expression is true, the action will execute. Condition oers a
way to avoid executing actions every time.
Error handling options are:
• Ignore failure: species whether an error should be ignored or not. With Ignore failure option
enabled, the execution of actions continues even if the current action fails.
492

NOTE
Nested actions that depend on the current action do not execute in case of a failure.
The execution of actions continues with the next action on the same level as the
current action. The error is logged, but does not break the execution of the action.
Example
At the end of printing, you might want to send the status update to an external application using the
HTTP Request action. If the printing action fails, action processing stops. In order to execute the
reporting even after the failed print action, the Print Label action must have the option Ignore failure
enabled.
• Save error to variable: allows you to select or create a variable to save the error to. The same
cause of error is also saved to internal variables ActionLastErrorId and
ActionLastErrorDesc.
Delete File
PRODUCT LEVEL INFO
The described feature is available in NiceLabel LMS Enterprise and NiceLabel
LMS Pro.
This action deletes a selected le from a drive.
NiceLabel Automation module runs as service under a dened Windows user account. Make sure that
account has the permissions to delete the le in a specied folder.
About group identies the selected action.
• Name: allows you to dene a custom action name. This makes actions easily recognizable on
the solution's list of actions. By default, action name is taken from its type.
• Description: custom information about the action. Enter a description to explain purpose and
role of action in a solution.
• Action type: read-only information about the selected action type.
File group sets the le related details.
• File name: the name of the le to be deleted. File name can be hard-coded. Data source
dynamically denes the File name using an existing or newly created variable.
Path and le name can be hard-coded, and the same le is going to be used every time. If only a
le name without path is dened, the folder with NiceLabel Automation conguration le (.MISX)
493

is used. You can use a relative reference to the le name, in which the folder with .MISX le is
used as the root folder.
Data source option enables variable le name. Select or create a variable that contains the path
and/or le name or combine several variables that create the le name. For more information
see section Using Compound Values in NiceLabel Automation User Guide.
NOTE
Use UNC syntax for network resources. For more information, see section
Access to Network Shared Resources in NiceLabel Automation User Guide.
Action Execution and Error Handling
Each action in can be set as a conditional action. Conditional actions only run when the dened
conditions allow them to be run. To dene these conditions, click Show execution and error handling
options.
Execution options are:
• Enabled: species if the action is enabled or disabled. Only enabled actions will execute. This
functionality may be used while testing a form.
• Condition: denes one-line programming expression that must provide a Boolean value (true
or false). When the result of the expression is true, the action will execute. Condition oers a
way to avoid executing actions every time.
Error handling options are:
• Ignore failure: species whether an error should be ignored or not. With Ignore failure option
enabled, the execution of actions continues even if the current action fails.
NOTE
Nested actions that depend on the current action do not execute in case of a failure.
The execution of actions continues with the next action on the same level as the
current action. The error is logged, but does not break the execution of the action.
Example
At the end of printing, you might want to send the status update to an external application using the
HTTP Request action. If the printing action fails, action processing stops. In order to execute the
reporting even after the failed print action, the Print Label action must have the option Ignore failure
enabled.
• Save error to variable: allows you to select or create a variable to save the error to. The same
cause of error is also saved to internal variables ActionLastErrorId and
ActionLastErrorDesc.
494

Browse File/Folder
This action opens the system browse for le or folder dialog.
About group identies the selected action.
• Name: allows you to dene a custom action name. This makes actions easily recognizable on
the solution's list of actions. By default, action name is taken from its type.
• Description: custom information about the action. Enter a description to explain purpose and
role of action in a solution.
• Action type: read-only information about the selected action type.
Dialog group sets the browsing preferences.
• Browse for: selects between browsing for le or folder.
• Filter: sets the le type to be located. Enter the le type manually, dene the lters using a
Dene File Filters dialog or select Data source to determine the lter dynamically using a
variable value. The Dene File Filters dialog allows the user to:
• List the lters. Each lter is identied with a Filter Name and Filter type.
• Manage the existing lters using Add, Delete, Move up and Move down buttons.
NOTE
If you remove all lters, le type selection drop-down list will not be shown when
the dialog opens.
• Initial folder: sets the initial folder to be opened with action.
• Dialog title: title of the le browser window that opens with action.
• Allow non-existing le: enables browsing for a le that does not exist in the specied folder. This
option allows you to store the path to a non-existent le in a variable and use it in a series of
actions. The le can be created later using other actions, such as Save Data to File.
Output data source group selects a variable for le/folder path storing.
• Save path to: existing or new variable for the le/folder path to be saved to.
Action Execution and Error Handling
Each action in can be set as a conditional action. Conditional actions only run when the dened
conditions allow them to be run. To dene these conditions, click Show execution and error handling
options.
Execution options are:
• Enabled: species if the action is enabled or disabled. Only enabled actions will execute. This
functionality may be used while testing a form.
495

• Condition: denes one-line programming expression that must provide a Boolean value (true
or false). When the result of the expression is true, the action will execute. Condition oers a
way to avoid executing actions every time.
Error handling options are:
• Ignore failure: species whether an error should be ignored or not. With Ignore failure option
enabled, the execution of actions continues even if the current action fails.
NOTE
Nested actions that depend on the current action do not execute in case of a failure.
The execution of actions continues with the next action on the same level as the
current action. The error is logged, but does not break the execution of the action.
Example
At the end of printing, you might want to send the status update to an external application using the
HTTP Request action. If the printing action fails, action processing stops. In order to execute the
reporting even after the failed print action, the Print Label action must have the option Ignore failure
enabled.
• Save error to variable: allows you to select or create a variable to save the error to. The same
cause of error is also saved to internal variables ActionLastErrorId and
ActionLastErrorDesc.
7.6.2.7. Flow Control
For Loop
PRODUCT LEVEL INFO
Here described product feature is available in NiceLabel LMS Enterprise.
This action executes all of the subordinate (nested) actions multiple times. All nested actions are
executed in a loop for as many times as dened by the dierence between start value and end value.
496

NOTE
For Loop action starts session printing mode – a printing optimization mode that
prints all labels in a loop using a single print job le. For details, see Session Printing
section in NiceLabel Automation user guide.
About group identies the selected action.
• Name: allows you to dene a custom action name. This makes actions easily recognizable on
the solution's list of actions. By default, action name is taken from its type.
• Description: custom information about the action. Enter a description to explain purpose and
role of action in a solution.
• Action type: read-only information about the selected action type.
Loop Settings group includes the following options:
• Start value: loop starting point reference. Select Data source to dene the start value
dynamically using a variable value. Select or create a variable containing a numeric value for
start.
•
End value: ending point reference. Select Data source to dene the start value dynamically using
a variable value. Select or create a variable containing a numeric value for start.
TIP
Negative values are permitted for Start value and End value.
• Save loop value to a variable: saves the current loop step value in an existing or a newly created
variable. The loop step value is allowed to contain any value between start and end value. Save
the value in order to reuse it in another action to identify the current iteration.
Action Execution and Error Handling
497

Each action in can be set as a conditional action. Conditional actions only run when the dened
conditions allow them to be run. To dene these conditions, click Show execution and error handling
options.
Execution options are:
• Enabled: species if the action is enabled or disabled. Only enabled actions will execute. This
functionality may be used while testing a form.
• Condition: denes one-line programming expression that must provide a Boolean value (true
or false). When the result of the expression is true, the action will execute. Condition oers a
way to avoid executing actions every time.
Error handling options are:
• Ignore failure: species whether an error should be ignored or not. With Ignore failure option
enabled, the execution of actions continues even if the current action fails.
NOTE
Nested actions that depend on the current action do not execute in case of a failure.
The execution of actions continues with the next action on the same level as the
current action. The error is logged, but does not break the execution of the action.
Example
At the end of printing, you might want to send the status update to an external application using the
HTTP Request action. If the printing action fails, action processing stops. In order to execute the
reporting even after the failed print action, the Print Label action must have the option Ignore failure
enabled.
• Save error to variable: allows you to select or create a variable to save the error to. The same
cause of error is also saved to internal variables ActionLastErrorId and
ActionLastErrorDesc.
For Every Record
This action executes subordinate nested actions for multiple times. All of the nested actions are
executed in a loop for as many times as there are records in the form table with a connected
database.
About group identies the selected action.
• Name: allows you to dene a custom action name. This makes actions easily recognizable on
the solution's list of actions. By default, action name is taken from its type.
498

• Description: custom information about the action. Enter a description to explain purpose and
role of action in a solution.
• Action type: read-only information about the selected action type.
Settings group selects the records.
• Form table: form table that contains records for which an action should repeat.
• Use all records: repeats an action for all records in a dened table.
• Use selected record: repeats an action for the selected records only.
Action Execution and Error Handling
Each action in can be set as a conditional action. Conditional actions only run when the dened
conditions allow them to be run. To dene these conditions, click Show execution and error handling
options.
Execution options are:
• Enabled: species if the action is enabled or disabled. Only enabled actions will execute. This
functionality may be used while testing a form.
• Condition: denes one-line programming expression that must provide a Boolean value (true
or false). When the result of the expression is true, the action will execute. Condition oers a
way to avoid executing actions every time.
Error handling options are:
• Ignore failure: species whether an error should be ignored or not. With Ignore failure option
enabled, the execution of actions continues even if the current action fails.
NOTE
Nested actions that depend on the current action do not execute in case of a failure.
The execution of actions continues with the next action on the same level as the
current action. The error is logged, but does not break the execution of the action.
Example
At the end of printing, you might want to send the status update to an external application using the
HTTP Request action. If the printing action fails, action processing stops. In order to execute the
reporting even after the failed print action, the Print Label action must have the option Ignore failure
enabled.
• Save error to variable: allows you to select or create a variable to save the error to. The same
cause of error is also saved to internal variables ActionLastErrorId and
ActionLastErrorDesc.
499

Try
This action allows you to:
• monitor errors while the actions are being executed
• run an alternative set of actions, if an error occurs
Try action creates Do and On error placeholders for actions. All actions that should execute if a
trigger res, must be placed inside the Do placeholder. If no error is detected when executing actions
from Do placeholder, these are the only actions that ever execute. However, if an error does happen,
the execution of actions from Do placeholder stops and the execution switches over to actions from
On error placeholder.
Example
If any action in the Do placeholder fails, the action execution stops and resumes with the actions in
the On Error placeholder. If Try would be placed on its own, that would terminate the trigger execution.
In our case, Try is nested under the For loop action. Normally, any error in Do placeholder would also
stop executing the For loop action, even if there are still further steps until the For loop is complete. In
this case, the Save Data to File action does not execute as well. By default, each error breaks the
entire trigger processing. However, you can also continue with the execution of the next iteration in
the For loop action. To make this happen, enable the Ignore failure option in the Try action. If the data
from the current step in For Loop causes an error in the Do placeholder, the actions from On Error
execute. After that, the Save Data to File in level 2 execute and then the For loop action continues to
execute in the next iteration.
This action provides for an easy error detection and execution of "feedback" or "reporting" actions.
For example, if an error happens during trigger processing, you can send out a warning. For more
information, see section Print Job Status Feedback in NiceLabel Automation user guide.
500

NOTE
Important! The Try action gives expected results with asynchronous actions. If your
Try loop includes the Print Label action that fails, the action execution still completes
the Try loop, and does not switch to the On error actions as expected. The result for
not switching to the On error actions is the Print Label action that runs in synchronous
mode by default. To avoid this, make sure supervised printing is on. Go to trigger
settings > Other > Feedback from the Print Engine and enable Supervised printing.
NOTE
Read more about supervised printing in section Synchronous Print Mode.
About group identies the selected action.
• Name: allows you to dene a custom action name. This makes actions easily recognizable on
the solution's list of actions. By default, action name is taken from its type.
• Description: custom information about the action. Enter a description to explain purpose and
role of action in a solution.
• Action type: read-only information about the selected action type.
Action Execution and Error Handling
Each action in can be set as a conditional action. Conditional actions only run when the dened
conditions allow them to be run. To dene these conditions, click Show execution and error handling
options.
Execution options are:
• Enabled: species if the action is enabled or disabled. Only enabled actions will execute. This
functionality may be used while testing a form.
• Condition: denes one-line programming expression that must provide a Boolean value (true
or false). When the result of the expression is true, the action will execute. Condition oers a
way to avoid executing actions every time.
Error handling options are:
• Ignore failure: species whether an error should be ignored or not. With Ignore failure option
enabled, the execution of actions continues even if the current action fails.
NOTE
Nested actions that depend on the current action do not execute in case of a failure.
The execution of actions continues with the next action on the same level as the
current action. The error is logged, but does not break the execution of the action.
501

Example
At the end of printing, you might want to send the status update to an external application using the
HTTP Request action. If the printing action fails, action processing stops. In order to execute the
reporting even after the failed print action, the Print Label action must have the option Ignore failure
enabled.
• Save error to variable: allows you to select or create a variable to save the error to. The same
cause of error is also saved to internal variables ActionLastErrorId and
ActionLastErrorDesc.
Group
This action congures multiple actions within the same container. All actions placed below the Group
action belong to the same group and are going to be executed together.
This action provides the following benets:
• Better organization and displaying of action workow. You can expand or collapse the Group
action and display the nested actions only when needed. This helps keep the conguration area
cleaner.
• Dening conditional execution. You can dene a condition in the Group action just once, not
individually for each action. If the condition is met, all actions inside the Group are executed.
This can save a lot of conguration time and can reduce the number of conguration errors.
Group action provides a good method to dene IF..THEN execution rules for multiple actions.
About group identies the selected action.
• Name: allows you to dene a custom action name. This makes actions easily recognizable on
the solution's list of actions. By default, action name is taken from its type.
• Description: custom information about the action. Enter a description to explain purpose and
role of action in a solution.
• Action type: read-only information about the selected action type.
Action Execution and Error Handling
Each action in can be set as a conditional action. Conditional actions only run when the dened
conditions allow them to be run. To dene these conditions, click Show execution and error handling
options.
Execution options are:
• Enabled: species if the action is enabled or disabled. Only enabled actions will execute. This
functionality may be used while testing a form.
502

• Condition: denes one-line programming expression that must provide a Boolean value (true
or false). When the result of the expression is true, the action will execute. Condition oers a
way to avoid executing actions every time.
Error handling options are:
• Ignore failure: species whether an error should be ignored or not. With Ignore failure option
enabled, the execution of actions continues even if the current action fails.
NOTE
Nested actions that depend on the current action do not execute in case of a failure.
The execution of actions continues with the next action on the same level as the
current action. The error is logged, but does not break the execution of the action.
Example
At the end of printing, you might want to send the status update to an external application using the
HTTP Request action. If the printing action fails, action processing stops. In order to execute the
reporting even after the failed print action, the Print Label action must have the option Ignore failure
enabled.
• Save error to variable: allows you to select or create a variable to save the error to. The same
cause of error is also saved to internal variables ActionLastErrorId and
ActionLastErrorDesc.
7.6.2.8. Other
Get Label Information
This action returns structural information about the associated label le. It provides information about
the label dimensions, printer driver and lists all label variables, and their main properties.
The Get Label Information action returns the original information as saved in the label le. Additionally,
it also provides information after the print process has been simulated. The simulation ensures that all
labels variables get the value as they would have during a normal print. Also, the label height
information provides correct dimensions in case you dene the label as a variable-height label (in this
case, the label size depends on the amount of data to be printed). The action returns the dimensions
for a label size, not for a page size.
The action saves label structure information in a selected variable. You can then send the data back to
the system using the HTTP Request action (or a similar outbound data connectivity action), or send it
back in trigger response, if you use a bidirectional trigger.
503

NOTE
This action must be nested under the Open Label action.
Variable group selects or creates a variable that stores the structural information about a label.
• Name: species the variable name. Select or create a variable which stores the XML-formatted
label information.
• If you want to use the information from the XML inside this trigger, you can dene the and
execute it with Use Data Filter action (Automation Builder only).
• If you want to return the XML data as a response in your HTTP or Web Service trigger, use
this variable directly in the Response data eld of the trigger conguration page.
• If you want to save the XML data to a le, use the Save Data to File action.
Additional settings group allows you to enable the use of provisional values.
• Use provisional values: replaces missing data source values with provisional values.
TIP
See section Variable in NiceLabel 2019 user guide for detailed description of
provisional values.
Sample Label Information XML
The sample below presents a structural view of the label elements and their attributes as they are
returned.
<?xml version="1.0" encoding="UTF-8"?>
<Label>
<Original>
<Width>25000</Width>
<Height>179670</Height>
<PrinterName>QLS 3001 Xe</Printer>
</Original>
<Current>
<Width>25000</Width>
<Height>15120</Height>
504

<PrinterName>QLS 3001 Xe</Printer>
</Current>
<Variables>
<Variable>
<Name>barcode</Name>
<Description></Description>
<DefaultValue></DefaultValue>
<Format>All</Format>
<CurrentValue></CurrentValue>
<IncrementType>None</IncrementType>
<IncrementStep>0</IncrementStep>
<IncrementCount>0</IncrementCount>
<Length>100</Length>
</Variable>
</Variables>
</Format>
Label Information XML Specication
This section contains a description of the XML le structure as returned by the Get Label Information
action.
NOTE
All measurement values are expressed in the 1/1000 mm units. For example width of
25000 is 25 mm.
• <Label>: this is a root element.
• <Original>: species label dimensions and printer name as stored in the label le.
• Width: this element contains the original label width.
• Height: this element contains the original label height.
• PrinterName: this element contains the printer name for which the label has been created
for.
• Current: species label dimensions and printer name after the simulated print has been
completed.
• Width: this element contains the actual label width.
• Height: this element contains the actual label height. If a label is dened as a variable-
height label, it can increase along with label objects. For example, Text Box and RTF object
sizes may increase in vertical direction and cause the label to expand as well.
• PrinterName: this element contains printer name that will be used for printing.
505

Example
A printer dierent from the original one is going to be used if the original printer driver is
not installed on this computer, or if the printer has been changed using the Set Printer
action.
• <Variables> and <Variable>: the element Variables contains a list of all prompt label
variables, each dened in a separate Variable element. The prompt variables are the ones
listed in the print dialog box when you print label from NiceLabel 2019 . If there are no prompt
variables dened in the label, the element Variables is empty.
• Name: contains variable name.
• Description: contains variable description.
• DefaultValue: contains default value as dened for the variable during the label design
process.
• Format: contains the acceptable type of variable content (characters).
• IsPrompted: contains information whether or not the variable is prompted at print time or
not.
• PromptText: contains text that prompts the user for value input.
• CurrentValue: contains the actual value that is used for printing.
• IncrementType: contains information, if the variable is dened as a counter or not. If
identied as a counter, it tells what kind of counter it is.
• IncrementStep: contains information about the counter step. Counter value increments/
decrements for this value on the next label.
• IncrementCount: contains information about the point of counter value incrementing/
decrementing. Usually, the counter changes value on every label, but that can be changed.
• Length: contains maximum number of stored characters in a variable.
• IsPickListEnabled: contains information whether or not the user selects variable values
from a pick list.
• PickListValues: contains the actual (selectable) pick list values.
XML Schema Denition (XSD) for Label Specication XML
<?xml version="1.0" encoding="utf-8"?>
<xs:schema id="Format" xmlns:xs="http://www.w3.org/2001/XMLSchema">
<xs:element name="Label">
<xs:complexType>
<xs:all>
<xs:element name="Original">
<xs:complexType>
506

<xs:sequence>
<xs:element name="Width" type="xs:decimal"
minOccurs="1" />
<xs:element name="Height" type="xs:decimal"
minOccurs="1" />
<xs:element name="PrinterName" type="xs:string"
minOccurs="1" />
</xs:sequence>
</xs:complexType>
</xs:element>
<xs:element name="Current">
<xs:complexType>
<xs:sequence>
<xs:element name="Width" type="xs:decimal"
minOccurs="1" />
<xs:element name="Height" type="xs:decimal"
minOccurs="1" />
<xs:element name="PrinterName"
type="xs:string" minOccurs="1" />
</xs:sequence>
</xs:complexType>
</xs:element>
<xs:element name="Variables">
<xs:complexType>
<xs:sequence>
<xs:element name="Variable" minOccurs="0"
maxOccurs="unbounded">
<xs:complexType>
<xs:sequence>
<xs:element name="Name"
type="xs:string" minOccurs="1" />
<xs:element name="Description"
type="xs:string" minOccurs="1" />
<xs:element name="DefaultValue"
type="xs:string" minOccurs="1" />
<xs:element name="Format"
type="xs:string" minOccurs="1" />
<xs:element name="CurrentValue"
type="xs:string" minOccurs="1" />
<xs:element name="IncrementType"
type="xs:string" minOccurs="1" />
<xs:element name="IncrementStep"
type="xs:integer" minOccurs="1" />
<xs:element name="IncrementCount"
type="xs:integer" minOccurs="1" />
<xs:element name="Length"
507

type="xs:string" minOccurs="1" />
</xs:sequence>
</xs:complexType>
</xs:element>
</xs:sequence>
</xs:complexType>
</xs:element>
</xs:all>
</xs:complexType>
</xs:element>
</xs:schema>
Action Execution and Error Handling
Each action in can be set as a conditional action. Conditional actions only run when the dened
conditions allow them to be run. To dene these conditions, click Show execution and error handling
options.
Execution options are:
• Enabled: species if the action is enabled or disabled. Only enabled actions will execute. This
functionality may be used while testing a form.
• Condition: denes one-line programming expression that must provide a Boolean value (true
or false). When the result of the expression is true, the action will execute. Condition oers a
way to avoid executing actions every time.
Error handling options are:
• Ignore failure: species whether an error should be ignored or not. With Ignore failure option
enabled, the execution of actions continues even if the current action fails.
NOTE
Nested actions that depend on the current action do not execute in case of a failure.
The execution of actions continues with the next action on the same level as the
current action. The error is logged, but does not break the execution of the action.
Example
At the end of printing, you might want to send the status update to an external application using the
HTTP Request action. If the printing action fails, action processing stops. In order to execute the
reporting even after the failed print action, the Print Label action must have the option Ignore failure
enabled.
508
• Save error to variable: allows you to select or create a variable to save the error to. The same
cause of error is also saved to internal variables ActionLastErrorId and
ActionLastErrorDesc.
Run Command File
This action executes commands that are included in a selected command le. All File type options
provide commands that NiceLabel 2019 executes in top-to-bottom order.
Command les usually provide data for a single label, but you can dene les of any level of
complexity. For more information, see section Command File Types.
About group identies the selected action.
• Name: allows you to dene a custom action name. This makes actions easily recognizable on
the solution's list of actions. By default, action name is taken from its type.
• Description: custom information about the action. Enter a description to explain purpose and
role of action in a solution.
• Action type: read-only information about the selected action type.
File group denes the type and name of the command le that is going to be executed (JOB, XML or
CSV).
• File type. Species the type of the command le to be executed.
• File name. Species the command le name.
File name can be hard-coded, and the same command le will execute every time. The option
Variable enables a variable le name. Select or create a variable that contains the path and/or
le name if a trigger is executed or an event takes place. Usually, the value to the variable is
assigned by a lter.
Use UNC syntax for network resources. For more information, see section Access to Network
Shared Resources in NiceLabel Automation user guide.
This section is applicable to Automation Builder module.
How to receive a command le in a trigger and execute it
After a trigger receives the command le and you wish to execute it, complete the following steps:
1. In Automation Builder module, on Variables tab, click the Internal Variable button in the
ribbon.
2. In the drop down list, enable the internal variable named DataFileName. This internal variable
provides path and le name of the le that contains the data received by the trigger. In this
case, its contents is command le. For more information, see section Internal Variables in the
NiceLabel Automation user guide.
3. In Actions tab, add the action to execute the command le, such as Run Command File, Run
Oracle XML Command File, or Run SAP AII XML Command File.
509

For the action Run Command File, select the type of the command le in File type.
4. Enable the option Variable.
5. Select the variable named DataFileName from the list of available variables.
Action Execution and Error Handling
Each action in can be set as a conditional action. Conditional actions only run when the dened
conditions allow them to be run. To dene these conditions, click Show execution and error handling
options.
Execution options are:
• Enabled: species if the action is enabled or disabled. Only enabled actions will execute. This
functionality may be used while testing a form.
• Condition: denes one-line programming expression that must provide a Boolean value (true
or false). When the result of the expression is true, the action will execute. Condition oers a
way to avoid executing actions every time.
Error handling options are:
• Ignore failure: species whether an error should be ignored or not. With Ignore failure option
enabled, the execution of actions continues even if the current action fails.
NOTE
Nested actions that depend on the current action do not execute in case of a failure.
The execution of actions continues with the next action on the same level as the
current action. The error is logged, but does not break the execution of the action.
Example
At the end of printing, you might want to send the status update to an external application using the
HTTP Request action. If the printing action fails, action processing stops. In order to execute the
reporting even after the failed print action, the Print Label action must have the option Ignore failure
enabled.
• Save error to variable: allows you to select or create a variable to save the error to. The same
cause of error is also saved to internal variables ActionLastErrorId and
ActionLastErrorDesc.
Send Custom Commands
This action executes the entered custom NiceLabel commands.
510

Always nest this action under the Open Label action. This enables referencing the label to which the
commands apply. For more information, see section Using Custom Commands in NiceLabel
Automation user guide.
NOTE
Majority of custom commands is available with individual actions, so in most cases,
custom commands are not required.
NOTE
Send Custom Commands action can be used to end the Session printing mode. This
mode acts as a printing optimization mode that prints all labels in a loop using a single
print job le. To end session printing, nest the Send Custom Commands action under
the For Loop action and use the SESSIONEND command. For details, see sections
Session Printing and Using Custom Commands in NiceLabel Automation user guide.
About group identies the selected action.
• Name: allows you to dene a custom action name. This makes actions easily recognizable on
the solution's list of actions. By default, action name is taken from its type.
• Description: custom information about the action. Enter a description to explain purpose and
role of action in a solution.
• Action type: read-only information about the selected action type.
Script editor oers the following features:
• Insert data source: inserts an existing or newly created variable into the script.
• Script editor: opens the editor which makes scripting easier and more ecient.
Action Execution and Error Handling
Each action in can be set as a conditional action. Conditional actions only run when the dened
conditions allow them to be run. To dene these conditions, click Show execution and error handling
options.
Execution options are:
• Enabled: species if the action is enabled or disabled. Only enabled actions will execute. This
functionality may be used while testing a form.
• Condition: denes one-line programming expression that must provide a Boolean value (true
or false). When the result of the expression is true, the action will execute. Condition oers a
way to avoid executing actions every time.
Error handling options are:
511
• Ignore failure: species whether an error should be ignored or not. With Ignore failure option
enabled, the execution of actions continues even if the current action fails.
NOTE
Nested actions that depend on the current action do not execute in case of a failure.
The execution of actions continues with the next action on the same level as the
current action. The error is logged, but does not break the execution of the action.
Example
At the end of printing, you might want to send the status update to an external application using the
HTTP Request action. If the printing action fails, action processing stops. In order to execute the
reporting even after the failed print action, the Print Label action must have the option Ignore failure
enabled.
• Save error to variable: allows you to select or create a variable to save the error to. The same
cause of error is also saved to internal variables ActionLastErrorId and
ActionLastErrorDesc.
Verify License
This action reads the activated license and executes the actions nested below this action only if a
certain license type is used.
TIP
Verify License action provides protection of your trigger conguration from being run
on unauthorized machines.
NOTE
License key that activates software can also encode the Solution ID. This is the unique
number that identies the solution provider that sold the NiceLabel 2019 license.
If the congured Solution ID matches the Solution ID encoded in the license, the target machine is
permitted to run nested actions, eectively limiting execution to licenses sold by the solution
provider.
The triggers can be further encrypted and locked so only authorized users are allowed to open the
conguration. For more information, see section Protecting Trigger Conguration in NiceLabel
Automation user guide.
About group identies the selected action.
512

• Name: allows you to dene a custom action name. This makes actions easily recognizable on
the solution's list of actions. By default, action name is taken from its type.
• Description: custom information about the action. Enter a description to explain purpose and
role of action in a solution.
• Action type: read-only information about the selected action type.
License Information group allows you to select the license ID.
• License ID: denes the ID number of the licenses that are allowed to run the nested actions.
• If the entered value is not the License ID that is encoded in the license, the nested actions
is not executed.
• If the entered value is set to 0, the actions execute if a valid license is found.
NOTE
Digital Partner UID can also be used as License ID. This option is available for
members of NiceLabel Digital Partner Program.
Action Execution and Error Handling
Each action in can be set as a conditional action. Conditional actions only run when the dened
conditions allow them to be run. To dene these conditions, click Show execution and error handling
options.
Execution options are:
• Enabled: species if the action is enabled or disabled. Only enabled actions will execute. This
functionality may be used while testing a form.
• Condition: denes one-line programming expression that must provide a Boolean value (true
or false). When the result of the expression is true, the action will execute. Condition oers a
way to avoid executing actions every time.
Error handling options are:
• Ignore failure: species whether an error should be ignored or not. With Ignore failure option
enabled, the execution of actions continues even if the current action fails.
NOTE
Nested actions that depend on the current action do not execute in case of a failure.
The execution of actions continues with the next action on the same level as the
current action. The error is logged, but does not break the execution of the action.
513

Example
At the end of printing, you might want to send the status update to an external application using the
HTTP Request action. If the printing action fails, action processing stops. In order to execute the
reporting even after the failed print action, the Print Label action must have the option Ignore failure
enabled.
• Save error to variable: allows you to select or create a variable to save the error to. The same
cause of error is also saved to internal variables ActionLastErrorId and
ActionLastErrorDesc.
Log Event
This action logs an event to NiceLabel Control Center for history and troubleshooting purposes.
NOTE
To make Log event action active, make sure that print job logging to NiceLabel Control
Center is enabled.
About group identies the selected action.
• Name: allows you to dene a custom action name. This makes actions easily recognizable on
the solution's list of actions. By default, action name is taken from its type.
• Description: custom information about the action. Enter a description to explain purpose and
role of action in a solution.
• Action type: read-only information about the selected action type.
Event Data group provides information about the logged event.
• Information: basic description of the event that will be included in the NiceLabel Control Center
event log. Up to 255 characters are allowed in this area.
• Details: detailed description of the event to be logged in the NiceLabel Control Center. Up to
2000 characters are allowed in this area.
TIP
The descriptions entered in Information and Details elds allows you to lter out the
events in Control Center All Activities History. When working with Control Center, go
to History > All Activities > Dene lter. For more details, read the Control Center User
Guide.
Action Execution and Error Handling
514

Each action in can be set as a conditional action. Conditional actions only run when the dened
conditions allow them to be run. To dene these conditions, click Show execution and error handling
options.
Execution options are:
• Enabled: species if the action is enabled or disabled. Only enabled actions will execute. This
functionality may be used while testing a form.
• Condition: denes one-line programming expression that must provide a Boolean value (true
or false). When the result of the expression is true, the action will execute. Condition oers a
way to avoid executing actions every time.
Error handling options are:
• Ignore failure: species whether an error should be ignored or not. With Ignore failure option
enabled, the execution of actions continues even if the current action fails.
NOTE
Nested actions that depend on the current action do not execute in case of a failure.
The execution of actions continues with the next action on the same level as the
current action. The error is logged, but does not break the execution of the action.
Example
At the end of printing, you might want to send the status update to an external application using the
HTTP Request action. If the printing action fails, action processing stops. In order to execute the
reporting even after the failed print action, the Print Label action must have the option Ignore failure
enabled.
• Save error to variable: allows you to select or create a variable to save the error to. The same
cause of error is also saved to internal variables ActionLastErrorId and
ActionLastErrorDesc.
Preview Label
This action executes the print process and provides label image preview. By default, the preview is
saved to disk as JPEG image, but you can choose other image format. You can also control the size of
the created preview image. The action generates preview for a single label.
Once you have the label preview created in a le, you can send the le to a third party application
using one of the outbound actions, such as Send Data to HTTP, Send Data to Serial Port, Send Data
to TCP/IP Port, or use it as response message from bidirectional triggers, such as and Web Service
Trigger. The third party application can take the image and show is as label preview to the user.
About group identies the selected action.
515

• Name: allows you to dene a custom action name. This makes actions easily recognizable on
the solution's list of actions. By default, action name is taken from its type.
• Description: custom information about the action. Enter a description to explain purpose and
role of action in a solution.
• Action type: read-only information about the selected action type.
Preview group denes the le to be previewed and its details.
• File name: species the path and le name. If hard-coded, the same le is used every time. If
you only use the le name without path, the folder with conguration le (.MISX) is used. You can
use a relative reference to the le name, where folder with .MISX le is used as root folder. Data
source option enables variable le name. Select or create a variable that contains the path
and/or le name after a trigger is executed. Usually, the value to the variable is assigned by a
lter.
• Image type: species the image type which is used for saving the label preview.
• Preview label back side (2-sided labels): enables preview of the back label. This is useful, if you
use double-sided labels and want to preview the label's back side.
Example
For example, if your label template denes dimension as 4" × 3" and the label printer resolution is set
to 200 DPI, the resulting preview image has dimensions of 800 × 600 pixels. Width equals 4 inches
times 200 DPI, which results in 800 pixels. Height equals 3 inches times 200 DPI, which results in 600
pixels.
Additional settings group allows you to enable the use of provisional values.
• Use provisional values: replaces missing data source values with provisional values and displays
them in the label preview.
TIP
Provisional value denes a custom placeholder variable value in an object while
designing labels or forms. In a label object, the provisional value is replaced by
the real variable value at print time.
Action Execution and Error Handling
Each action in can be set as a conditional action. Conditional actions only run when the dened
conditions allow them to be run. To dene these conditions, click Show execution and error handling
options.
Execution options are:
• Enabled: species if the action is enabled or disabled. Only enabled actions will execute. This
functionality may be used while testing a form.
516

• Condition: denes one-line programming expression that must provide a Boolean value (true
or false). When the result of the expression is true, the action will execute. Condition oers a
way to avoid executing actions every time.
Error handling options are:
• Ignore failure: species whether an error should be ignored or not. With Ignore failure option
enabled, the execution of actions continues even if the current action fails.
NOTE
Nested actions that depend on the current action do not execute in case of a failure.
The execution of actions continues with the next action on the same level as the
current action. The error is logged, but does not break the execution of the action.
Example
At the end of printing, you might want to send the status update to an external application using the
HTTP Request action. If the printing action fails, action processing stops. In order to execute the
reporting even after the failed print action, the Print Label action must have the option Ignore failure
enabled.
• Save error to variable: allows you to select or create a variable to save the error to. The same
cause of error is also saved to internal variables ActionLastErrorId and
ActionLastErrorDesc.
Create Label Variant
This action allows you to create a review-ready variant of an existing label. Label objects in such
variants have locked data source values. Their content is dened by the current value of the
applicable data source.
The purpose of creating a review-ready variant of a label with “locked” data sources is to make the
label suitable for approval process in which data and template need to be approved together. Instead
of viewing a label without dened content for its objects, the approver reviews a variant with dened
values. This allows him to quickly see and approve the nal label layout with actual values that are
going to be used for printing.
TIP
Label approval process is applicable to labels that are stored in Control Center
Document Storage. You can apply various approval workow types for the stored
labels and label variants. Approval workow selection depends on the requirements of
your business environment. See NiceLabel 2019 Control Center User Guide for more
details.
517

About group identies the selected action.
• Name: allows you to dene a custom action name. This makes actions easily recognizable on
the solution's list of actions. By default, action name is taken from its type.
• Description: custom information about the action. Enter a description to explain purpose and
role of action in a solution.
• Action type: read-only information about the selected action type.
Settings group denes the label le to be converted and the output le (label variant).
• Label name: the name of the label le to be converted into a review-ready variant with locked
data source values. Data source dynamically denes the Label name using an existing or newly
created variable.
• Print time data sources: this option allows you to dene the data sources whose values are
going to be provided at the actual print time. If a data source is listed in this eld, its value is not
locked and can be provided at print time. Typical examples are data sources for production
values like LOT number, expiry date, etc.
TIP
Insert only data source names without square brackets, separated by commas
or listed in a column using Enter key.
• Output le name: the name of the label variant le that is going to be ready for review. Data
source dynamically denes the Label name using an existing or newly created variable.
There are several rules that apply to the review-ready label variant:
1. Data source values are locked by default. To exclude the data sources from being locked, list
them in Print time data sources eld to keep them active on the review-ready label. You can
dene their values at print time.
2. Counter variables, functions, database elds and global variables are converted to non-
prompted variables.
3. Graphics are embedded.
4. The destination label variant stored in NiceLabel Control Center Document Storage is
automatically checked in. Original Label name and Print time data sources are used as check-
in comment.
5. Label variants can be opened in NiceLabel 2019 Designer in locked state.
6. Label les generated with this action cannot be imported.
7. If label variants are stored in printer memory, the recall command can only provide values for
print time data sources.
8. If using NiceLabel Control Center, label preview in Document Storage allows editing of print
time data sources.
518

9. Current time and current date variables cannot be set as Print time data sources on the
review-ready label variant.
Action Execution and Error Handling
Each action in can be set as a conditional action. Conditional actions only run when the dened
conditions allow them to be run. To dene these conditions, click Show execution and error handling
options.
Execution options are:
• Enabled: species if the action is enabled or disabled. Only enabled actions will execute. This
functionality may be used while testing a form.
• Condition: denes one-line programming expression that must provide a Boolean value (true
or false). When the result of the expression is true, the action will execute. Condition oers a
way to avoid executing actions every time.
Error handling options are:
• Ignore failure: species whether an error should be ignored or not. With Ignore failure option
enabled, the execution of actions continues even if the current action fails.
NOTE
Nested actions that depend on the current action do not execute in case of a failure.
The execution of actions continues with the next action on the same level as the
current action. The error is logged, but does not break the execution of the action.
Example
At the end of printing, you might want to send the status update to an external application using the
HTTP Request action. If the printing action fails, action processing stops. In order to execute the
reporting even after the failed print action, the Print Label action must have the option Ignore failure
enabled.
• Save error to variable: allows you to select or create a variable to save the error to. The same
cause of error is also saved to internal variables ActionLastErrorId and
ActionLastErrorDesc.
7.6.3. Combining Values in an Object
Certain objects accept multiple values as their content. Such content can be a combination of xed
values, variables and special characters (control codes). The objects that accept combined values are
identied by a small right arrow button on the right side of the object. Click the arrow button to enter
either a variable or a special character.
519

• Using xed values. Enter a xed value for the variable.
• Using xed values and data from variables. Combined values may contain variables and xed
values. The variable names must be enclosed in square brackets []. Enter the variables
manually or insert them by clicking the arrow button to the right. During the processing time, the
values of variables are merged together with xed data and used as the object content.
In the example below, the content is merged from three variables and xed data items.
Example
[variable1] // This is fixed value [variable2][variable3]
• Using special characters. Special characters are supported with combined values. You can
enter the special characters manually, or insert them using a dropdown list. In this case, the
value of variable1 is merged with xed data and form-feed binary character. The list of
available special characters is available here.
Example
[variable1] Form feed will follow this fixed text <FF>
7.6.4. Access to Shared Network Resources
This topic describes best practice steps to use shared network resources.
7.6.4.1. User privileges for service mode
The execution component of Designer runs in service mode under specied user account inheriting
access privileges of that account.
To be able to open label les and to user printer drivers in Designer, the associated user account must
be granted sucient privileges.
7.6.4.2. UNC notation for network shares
When accessing the le on a network drive, use the UNC syntax and not the mapped drive letters.
UNC is a naming convention to specify and map network drives. Designer will try to replace the drive-
letter syntax with the UNC syntax automatically.
Example
If the le is accessible as G:\Labels\label.lbl, refer to it in UNC notation as \\server\share
\Labels\label.lbl (where G: drive is mapped to \\server\share).
520

7.6.4.3. Notation for accessing les in Control Center
When opening a le in Document Storage inside Control Center, use the HTTP notation such as
http://servername:8080/label.lbl, or WebDAV notation as \
\servername@8080\DavWWWRoot\label.lbl.
NOTE
You must rst add and congure the users that work with les stored in Document
Storage in your Control Center. Read more about user management in the Control
Center user guide.
7.6.4.4. Printer drivers availability
To print labels using a network shared printer, make the printer driver available on the server where
Designer is installed on.
Make sure the user account that Designer runs under has access to the printer driver. If the network
printer was just installed on the machine, Designer might not see it until you restart the Service.
TIP
To allow automatic notication of new network printer drivers, you have to enable the
appropriate inbound rule in Windows rewall. For more information, see Knowledge
Base article KB 265.
7.6.5. Search Order for Requested Files
If Designer attempts to load a label or image le, and this le is not immediately found, it neither
cancels the processing nor does it report an error. It tries to locate the requested le at alternative
locations.
Designerchecks le locations in the below listed order:
1. Check if the le exists at the location as dened in the action.
2. Check if the le exists in the same folder as solution or label le.
3. Check if the label le exists in .\Labels folder (for graphic les, check .\Graphics folder).
4. Check if the label le exists in ..\Labels folder (for graphic les, check ..\Graphics
folder).
5. Check if the le exists in the global Labels folder (Graphics folder for graphics les).
If the le cannot be found at any of above listed locations, the action fails. An error is raised.
521

7.6.6. Spooler Status ID
Spooler status ID (in hex) Spooler status description
0 No status.
1 Printer is paused.
2 Printer is printing.
4 Printer is in error.
8 Printer is not available.
10 Printer is out of paper.
20 Manual feed required.
40 Printer has a problem with paper.
80 Printer is oine.
100 Active Input/Output state.
200 Printer is busy.
400 Paper jam.
800 Output bin is full.
2000 Printer is waiting.
4000 Printer is processing.
10000 Printer is warming up.
20000 Toner/Ink level is low.
40000 No toner left in the printer.
80000 Current page can not be printed.
100000 User intervention is required.
200000 Printer is out of memory.
400000 Door is open.
800000 Unknown error.
1000000 Printer is in power save mode.
522

8. NiceLabel Print
NiceLabel Print is a stand-alone application for fast and easy printing. It eliminates the need for
opening labels and solution documents in Designer.
NiceLabel Print window consists of:
• File location selector: dropdown list lets you select and manage the locations that store labels or
solutions.
TIP
See section below for more details on les and locations.
• Search: nds the requested document.
• Location folder structure: displays the folders that are selected in the File location selector.
• Document display area: presents the documents which are stored in the selected folder.
8.1. Managing Document Locations
When using the NiceLabel Print for the rst time, a blank NiceLabel Print window appears. Click
Manage Locations in the File location selector. Manage Locations dialog opens.
Use Manage Locations dialog to browse for document locations on your system or network.
• Add: button for adding the label les:
• Folder Location: browses for les on your system or network.
• Move up and Move down: change the order of selected label locations.
• Delete: removes the location from NiceLabel Print.
8.2. Opening the Documents
After dening the local or remote location that stores the documents, start with printing. Follow the
steps in this section to successfully print the labels.
523

8.3. Printing Using NiceLabel Print
To print a label using the NiceLabel Print, complete the following steps.
1. Use Manage Locations dialog to select the location that stores the documents to be printed
or run. See section Managing Label Locations for more details. All documents become visible
and instantly printable in the document display area.
TIP
Skip this step in case of repeated printing from the same folder.
2. Select a document. Document type determines the actions that follows:
• In case of a label le, click Print to open the printing form.
• When opening a label le, printing form appears. It allows the user to preview the
label, select the printer, dene quantity settings, and enter prompted variable
values (if included on the label).
• To return to the label display eld, click back arrow in the upper left corner of the
NiceLabel Print window.
• In case of a solution, click Run to open the solution in a separate instance.
TIP
All supported document types in the document display area are presented with
previews for easier recognition and selection.
524

9. Reference
9.1. Command File Types
Command les are plain text le that contain instructions for the printing process – these instructions
are expressed using NiceLabel commands. Commands are executed one at a time from the beginning
until the end of the le.
supports the following command le types:
• JOB command les
• XML command les
• CSV command les
NOTE
The les support Unicode formatting. This allows you to include multi-lingual content.
9.1.1. JOB Command File
JOB command le is text le that contains native NiceLabel printing commands. The commands
execute in order from top to bottom. The sequence of commands usually starts with LABEL (open
label). LABEL command is followed by SET (to set variable value), and nally by PRINT (print label).
JOB command le can be executed using the following actions:
• Run Command File
• Send Custom Commands
9.1.1.1. JOB Command File Denition
NiceLabel commands are used in command les to control label printing. Designer executes the
commands within command les from top to bottom.
COMMENT
;
If developing a command le, it is a good practice to document your commands. This helps you
decode what the script really performs, when you check the code after some time. Use a semicolon
525

(;) at the beginning of the line. Everything that follows the semicolon is treated as a comment and is
not processed.
CLEARVARIABLEVALUES
CLEARVARIABLEVALUES
This command resets variable values to their default values.
CREATEFILE
CREATEFILE <file name> [, <contents>]
This command creates a text le. You can use it to signal a third party application that the printing
process has begun or ended, depending on the location where command is put. Use the UNC syntax
for network resources. For more information, see section Access to Network Shared Resources in
NiceLabel Automation user guide.
DELETEFILE
DELETEFILE <file name>
Deletes the specied le. Use UNC syntax for network resources. For more information, see section
Access to Network Shared Resources in NiceLabel Automation user guide.
EXPORTLABEL
EXPORTLABEL ExportFileName [, ExportVariant]
This command is implemented to automate the "Export to printer" command that is available in the
label designer. The label is exported directly to the printer and stored in the memory for o-line
printing. The user can recall the label using the keyboard on the printer or by sending a command le
to the printer. The same functionality is available also with Store Label to Printer action.
NOTE
To specify the label for exporting, use the LABELcommand rst.
• ExportFileName. This parameter is mandatory and denes the le name of generated printer
commands.
• ExportVariant. Some printers support multiple export variants. If exporting them manually, the
user can select the export variant in the dialog. With the EXPORTLABEL command, you must
specify which export variant you want to use. The variants are visible in the label designer after
you enable the Store/Recall printing mode.
The rst variant in the list holds the value 0. The second variant has the value 1, etc.
If you do not specify any variant type, value 0 is used as default.
For more information about o-line printing, see topic Using Store/Recall Printing Mode.
IGNOREERROR
526

IGNOREERROR <on> [,<off>]
Species that the below listed JOB le errors do not terminate the printing process:
• Incorrect variable name is used.
• Incorrect value is sent to a variable.
• Label does not exist / is not accessible.
• Printer does not exist / is not accessible.
LABEL
LABEL <label name> [,<printer_name>]
The command opens a label to be printed. If the label is already loaded, it will not be re-opened. You
can include the path name. Enclose the label name in double quotes, if the name or path contains
spaces. Use UNC syntax for network resources. For more information, see topic Access to Network
Shared Resources in NiceLabel Automation User Guide.
The optional parameter printer_name species the printer, for which the label will be opened. Use
this setting if you want to override the printer name that is saved in the label template. If the driver for
the provided printer name is not installed or not available, the command raises an error.
MESSAGEBOX
MESSAGEBOX <message> [,<caption>]
Logs the custom message into the trigger log. If the message contains space characters or commas,
you have to enclose the text in double quotes (").
PORT
PORT <file name> [, APPEND]
This command overrides port as dened in the printer driver and redirects printing to a le. If le path
or le name contain spaces, enclose the value in double quotes ("). Use UNC syntax for network
resources. For more information, see topic Access to Network Shared Resources in NiceLabel
Automation User Guide.
The parameter APPEND is optional. By default, the le is overwritten. Use this parameter to append
data into the existing le.
Once you use a PORT command in the JOB le, it remains valid until the next PORT command, or until
the end of le (whichever comes rst). If you use PRINTER command after the PORT command has
been executed, the PORT setting overwrites the port dened for the selected printer. If you want to
use the actual port that is dened for the selected printer, you have to use another PORT command
with an empty value, such as PORT = "".
PRINT
527

PRINT <quantity> [,<skip> [,<identical label copies> [,number of label
sets]]]
This command starts the print process.
• Quantity. Species the number of labels to print.
• <number>. Specied number of labels will print.
• VARIABLE. Species that some label variable is dened as variable quantity and will
contain the number labels to print. The label will determine how many labels to print.
• UNLIMITED. If you use a database to acquire values for objects, unlimited printing will print
as many labels as there are record in the database. If you do not use a database, the
maximum number of labels that thermal printer internally supports will be printed.
• Skip. Species the number of labels you want to skip on the rst page. The parameter is used
for printing labels on sheets of paper. When the part of the page has already been used, you can
reuse the same sheet by Shifting the start location of the rst label.
• Identical label copies. Species how many copies of the same label must print.
• Number of label sets. Species the number of times the whole printing process should repeat
itself.
NOTE
Make sure the quantity values are provided as the numeric value, not string value. Do
not enclose the value in the double quotes.
PRINTER
PRINTER <printer name>
This command overrides the printer dened in the label le. If the printer name contains space
characters, enclose it in double quotes (").
Use the printer name as displayed in the status line in the label design application. Printer names are
usually the same as the printer names in Printers and Faxes from Control Panel, but not always. If
using network printers, you might see the name displayed using syntax \\server\share.
PRINTJOBNAME
PRINTJOBNAME
This command species the print job name to be seen in Windows Spooler. If the name contains
space characters or commas, you have to enclose the value in double quotes (").
SESSIONEND
SESSIONEND
528

This command closes the print stream. Also see SESSIONSTART.
NOTE
SESSIONEND must be sent as the only item in Send Custom Command action. If you
would like to send additional commands, use separate Send Custom Command
actions.
SESSIONPRINT
SESSIONPRINT <quantity> [,<skip>]
This command prints the currently referenced label and adds it into the currently open session-print
stream. You can use multiple SESSIONPRINT commands one after another and join the referenced
labels in a single print stream. The stream does not close until you close it using the SESSIONEND
command. The meaning of quantity and skip parameters is the same as with NiceLabel command
PRINT. Also see SESSIONSTART.
• Quantity. Species the number of labels to be printed.
• Skip. Species the number of labels you want to skip on the rst page. The parameter is used
for printing labels on sheets of paper. If a part of the page has already been used, you can reuse
the same sheet by Shifting the start location of the rst label.
SESSIONSTART
SESSIONSTART
This command initiates the session-print type of printing.
The three session-print-related commands (SESSIONSTART, SESSIONPRINT, SESSIONEND) are
used together. When you use command PRINT, every label data will be sent to the printer in a separate
print job. If you want to join label data for multiple labels into print stream, you should use the session
print commands. You must start with the command SESSIONSTART, followed with any number of
SESSIONPRINT commands and in the end the command SESSIONEND.
Use these commands to optimize label printing process. Printing labels coming from one print job is
much faster than printing labels from a bunch of print jobs.
There some rules you have to follow so the session print will not break.
• You cannot change the label within a session.
• You cannot change the printer within a session
• You must set values for all variables from the label within a session, even if some of the variables
will have empty values
SET
SET <name>=<value> [,<step> [,<number or repetitions>]]
529

This command assigns a value to the name variable. The variable must be dened on the label, or an
error is raised. If the variable isn't on the label, an error occurs. Step and number of repetitions
are parameters for counter variables. These parameters specify the counter increment and the
number labels before the counter changes value.
If value contains spaces or comma characters, you must enclose the text in double quotes ("). Also
see TEXTQUALIFIER.
If you want to assign multi-line value, use \r\n to encode newline character. \r is replaced with CR
(Carriage Return) and \n is replaced with LF (Line Feed).
Be careful when setting values to variables that provide data for pictures on the label, as backslash
characters might be replaced with some other characters.
Example
If you assign a value "c:\My Pictures\raw.jpg" to the variable, the "\r" will be replaced with CR character.
SETPRINTPARAM
SETPRINTPARAM <paramname> = <value>
This command allows you to set ne-tune printer settings just before printing. The supported
parameter for printer settings (paramname) are:
• PAPERBIN. Species the tray that contains label media. If the printer is equipped with more than
just one paper / label tray, you can control which is used for printing. The name of the tray should
be acquired from the printer driver.
• PRINTSPEED. Species the printing speed. The acceptable values vary from one printer to the
other. See printer's manuals for exact range of values.
• PRINTDARKNESS. Species the printing darkness / contrast. The acceptable values vary from
one printer to the other. See printer's manuals for exact range of values.
• PRINTOFFSETX. Species the left oset for all printing objects. The value for parameter must
be numeric, positive or negative, in dots.
• PRINTOFFSETY. Species the top oset for all printing objects. The value for parameter must
be numeric, positive or negative, in dots.
• PRINTERSETTINGS.Species the custom printer settings to be applied to the print job. The
parameter requires the entire DEVMODE for the target printer, provided in a Base64-encoded
string. The DEVMODE contains all parameters from the printer driver at once (speed, darkness,
osets and other). For more information, see topic Understanding printer settings and
DEVMODE in NiceLabel Automation User Guide.
NOTE
The Base64-encoded string must be provided inside double quotes (").
530

TEXTQUALIFIER
TEXTQUALIFIER <character>
Text-qualier is the character that embeds data value that is assigned to a variable. Whenever data
value includes space characters, it must be included with text-qualiers. The default text qualier is a
double quote character ("). Because double quote character is used as shortcut for inch unit of
measure, sometimes it is dicult to pass the data with inch marks in the JOB les. You can use two
double quotes to encode one double quote, or use TEXTQUALIFIER.
Example
TEXTQUALIFIER %
SET Variable = %EPAK 12"X10 7/32"%
9.1.1.2. JOB Command File Example
This JOB le opens the label2.nlbl label, sets variable values and prints a single label. Because no
PRINTER command is used to redirect printing, the label will be printed using the printer name as
dened in the label.
LABEL "label2.nlbl"
SET code="12345"
SET article="FUSILLI"
SET ean="383860026501"
SET weight="1,0 kg"
PRINT 1
9.1.2. XML Command File
The commands available in the XML Command Files form a subset of NiceLabel commands. You can
use the following commands: LOGIN, LABEL, SET, PORT, PRINTER, SESSIONEND, SESSIONSTART,
and SESSIONPRINT. The syntax requires minor adaptation if used in an XML le.
XML command le can be executed using the following actions:
• Run Command File
• Send Custom Commands
The root element in the XML Command le is <Nice_Commands>. The next element that must follow
is <Label>– it species the label to be used.
Two methods are available to start the label printing:
• Print the labels normally using the <Print_Job> element.
531
• Print the labels in a session using the <Session_Print_Job> element.
You can also change the printer using which the labels are going to be printed, and set the variable
value.
9.1.2.1. XML Command File Denition
This section denes the XML Command le structure. There are several elements that contain
attributes. Some attributes are required, while the others are optional. Some attributes can occupy
pre-dened values only. For others, you can specify custom values.
• <Nice_Commands>. This is a root element.
• <Label>. Species the label le to be opened. If the label is already open, it won't be re-opened.
The label le must be accessible from this computer. For more information, see the topic
Access to Network Shared Resources in NiceLabel Automation user guide. This element can
occur several times within the command le.
• Name. This attribute contains label name. You can include the path to the label name.
Mandatory element.
• <Print_Job>. The element that contains data for one label job. This element can occur several
times within the command le.
• Printer. Use this attribute to override the printer dened in the label. The printer must be
accessible from this computer. For more information, see the topic Access to Network
Shared Resources. Optional element.
• Quantity. Use this attribute to specify the number of labels to print. Possible values:
numeric value, VARIABLE or UNLIMITED. For more information on parameters, see the
topic Print Label. Mandatory element.
• Skip. Use this attribute to specify the number of skipped labels at the beginning. This
feature is useful if you print sheet of labels to laser printer, but the sheet is partial already
printed. For more information, see the topic Print Label. Optional element.
• Job_name. Use this attribute to specify the name of your job le. The specied name is
visible in the print spooler. For more information, see the topic Set Print Job Name.
Optional element.
• Print_to_le. Use this attribute to specify the le name where you want to save the printer
commands. For more information, see the topic Redirect Printing to File. Optional element.
• Identical_copies. use this attribute to specify the number of copies you need for each
label. For more information, see the topic Print label. Optional element.
• <Session_Print_Job>. The element that contains commands and data for one or more
sessions. The element can contain one or more <Session> elements. It considers session print
rules. You can use this element several times within the command le. For available attributes
look up the attributes for the element <Print_Job>. All of them are valid, you just cannot use
532

the quantity attribute. See the description of the element <Session> to nd out how to specify
label quantity in session printing.
• <Session>. The element that contains data for a single session. When printing in session, all
labels are encoded into a single print job and are sent to the printer as one job.
• Quantity. Use this attribute to specify the number of labels to print. Possible values:
numeric value, string VARIABLE, or string UNLIMITED. For more information on parameters,
see the topic Print Label. Required.
• <Variable>. The element that sets the value of variables on the label. This element can occur
several times within the command le.
• Name. The attribute contains the variable name. Required.
XML Schema Denition (XSD) for XML Command File
<?xml version="1.0" encoding="utf-8"?>
<xs:schema targetNamespace="http://tempuri.org/XMLSchema.xsd"
elementFormDefault="qualified" xmlns="http://tempuri.org/XMLSchema.xsd"
xmlns:mstns="http://tempuri.org/XMLSchema.xsd" xmlns:xs="http://www.w3.org/
2001/X
MLSchema">
<xs:element name="nice_commands">
<xs:complexType>
<xs:sequence>
<xs:element name="label" maxOccurs="unbounded" minOccurs="1">
<xs:complexType>
<xs:sequence>
<xs:element name="print_job" maxOccurs="unbounded" minOccurs="0">
<xs:complexType>
<xs:sequence>
<xs:element name="database" maxOccurs="unbounded" minOccurs="0">
<xs:complexType>
<xs:simpleContent>
<xs:extension base="xs:string">
<xs:attribute name="name" type="xs:string" use="required" />
</xs:extension>
</xs:simpleContent>
</xs:complexType>
</xs:element>
<xs:element name="table" maxOccurs="unbounded" minOccurs="0">
<xs:complexType>
<xs:simpleContent>
<xs:extension base="xs:string">
<xs:attribute name="name" type="xs:string" use="required" />
</xs:extension>
</xs:simpleContent>
</xs:complexType>
533

</xs:element>
<xs:element name="variable" maxOccurs="unbounded" minOccurs="0">
<xs:complexType>
<xs:simpleContent>
<xs:extension base="xs:string">
<xs:attribute name="name" type="xs:string" use="required" />
</xs:extension>
</xs:simpleContent>
</xs:complexType>
</xs:element>
</xs:sequence>
<xs:attribute name="quantity" type="xs:string" use="required" />
<xs:attribute name="printer" type="xs:string" use="optional" />
<xs:attribute name="skip" type="xs:integer" use="optional" />
<xs:attribute name="identical_copies" type="xs:integer"
use="optional" />
<xs:attribute name="number_of_sets" type="xs:integer"
use="optional" />
<xs:attribute name="job_name" type="xs:string" use="optional" />
<xs:attribute name="print_to_file" type="xs:string"
use="optional" />
<xs:attribute name="print_to_file_append" type="xs:boolean"
use="optional" />
<xs:attribute name="clear_variable_values" type="xs:boolean"
use="optional" />
</xs:complexType>
</xs:element>
<xs:element name="session_print_job" maxOccurs="unbounded"
minOccurs="0">
<xs:complexType>
<xs:sequence>
<xs:element name="database" maxOccurs="unbounded" minOccurs="0">
<xs:complexType>
<xs:simpleContent>
<xs:extension base="xs:string">
<xs:attribute name="name" type="xs:string" use="required" />
</xs:extension>
</xs:simpleContent>
</xs:complexType>
</xs:element>
<xs:element name="table" maxOccurs="unbounded" minOccurs="0">
<xs:complexType>
<xs:simpleContent>
<xs:extension base="xs:string">
<xs:attribute name="name" type="xs:string" use="required" />
</xs:extension>
534

</xs:simpleContent>
</xs:complexType>
</xs:element>
<xs:element name="session" minOccurs="1" maxOccurs="unbounded">
<xs:complexType>
<xs:sequence>
<xs:element name="variable" minOccurs="0"
maxOccurs="unbounded">
<xs:complexType>
<xs:simpleContent>
<xs:extension base="xs:string">
<xs:attribute name="name" type="xs:string"
use="required" />
</xs:extension>
</xs:simpleContent>
</xs:complexType>
</xs:element>
</xs:sequence>
<xs:attribute name="quantity" type="xs:string" use="required" />
</xs:complexType>
</xs:element>
</xs:sequence>
<xs:attribute name="printer" type="xs:string" use="optional" />
<xs:attribute name="skip" type="xs:integer" use="optional" />
<xs:attribute name="job_name" type="xs:string" use="optional" />
<xs:attribute name="print_to_file" type="xs:string"
use="optional" />
<xs:attribute name="print_to_file_append" type="xs:boolean"
use="optional" />
<xs:attribute name="clear_variable_values" type="xs:boolean"
use="optional" />
</xs:complexType>
</xs:element>
</xs:sequence>
<xs:attribute name="name" type="xs:string" use="required" />
<xs:attribute name="close" type="xs:boolean" use="optional" />
<xs:attribute name="clear_variable_values" type="xs:boolean"
use="optional" />
</xs:complexType>
</xs:element>
</xs:sequence>
<xs:attribute name="quit" type="xs:boolean" use="required" />
</xs:complexType>
</xs:element>
</xs:schema>
535

9.1.2.2. XML Command File Example
The sample below presents the structural view on the elements and their attributes as you can use
them in an XML command le.
<nice_commands>
<label name="label1.nlbl">
<session_print_job printer="CAB A3 203DPI" skip=0 job_name="job name 1"
print_to_file="filename 1">
<session quantity="10">
<variable name="variable name 1" >variable value 1</variable>
</session>
</session_print_job>
<print_job printer="Zebra R-402" quantity="10" skip=0 identical_copies=1
number_of_sets=1 job_name="job name 2" print_to_file="filename 2">
<variable name="variable1" >1</variable>
<variable name="variable2" >2</variable>
<variable name="variable3" >3</variable>
</print_job>
</label>
</nice_commands>
9.1.3. CSV Command File
The commands available in CSV command les form a subset of NiceLabel commands. You can use
the following commands: LABEL, SET, PORT, PRINTER and PRINT.
CSV command le can be executed using the following actions:
• Run Command File
• Send Custom Commands
CSV command le is a text le in which the values are delimited by comma (,) character. The text le
can contain Unicode value (important for multi-language data). Each line in the CSV command le
contains commands for a single label print action.
The rst row of CSV command le must contain commands and variable names. The order of
commands and names is not important, but all records in the same data stream must follow the same
structure. Variable name-value pairs are extracted automatically and sent to the label that is referred
to them.
NOTE
No error is raised if the variable with its name included in the CSV does not exist on
the label.
536

9.1.3.1. CSV Command File Denition
The commands in the rst line of data must be expressed with at (@) character. The elds without @ at
the beginning are names of variables, and they will be extracted with their values as name-value
pairs.
• @Label. Species the label name to be used. It's a good practice to include label path and
lename. Make sure the service user can access le. For more information, see the topic Access
to Network Shared Resources in NiceLabel Automation user guide. Mandatory eld.
• @Printer. Species the printer to use. It overrides the printer dened in the label. Make sure the
service user can access the printer. For more information, see the topic Access to Network
Shared Resources in NiceLabel Automation user guide. Optional eld.
• @Quantity. Species the number of labels to print. Possible values: numeric value, VARIABLE or
UNLIMITED. For more information, see the topic in NiceLabel Automation user guide. Mandatory
eld.
• @Skip. Species the number of labels to skip at the beginning of the rst printed page. This
feature is useful if you want to re-use the partially printed sheet of labels. Optional eld.
• @IdenticalCopies. Species the number of label copies that should be printed for each unique
label. This feature is useful when printing labels with data from database or when you use
counters, and you need label copies. Optional eld.
• @NumberOfSets. species the number of times the printing process should repeat. Each label
set denes the occurrence of the printing process. Optional eld.
• @Port. Specied the port name for the printer. You can override the default port as specied in
the printer driver. You can also use it to redirect printing to le. Optional eld.
• Other eld names. All other elds dene names of variables from the label. The eld contents
will be saved to the variable of the same name as its value.
9.1.3.2. CSV Command File Example
The sample below presents a structural overview of elds that you can use in a CSV command le.
@Label,@Printer,@Quantity,@Skip,@IdenticalCopies,NumberOfSets,@Port,Product_
ID, Product_Name
label1.nlbl, CAB A3 203 DPI, 100, , , , , 100A, Product 1
label2.nlbl, Zebra R-402, 20, , , , , 200A, Product 2
9.2. Variables Export File Denition
This section gives a structural overview of the elements and their attributes in a .NLVR variables
export le. To understand the role of individual elements, see their denitions below.
537
9.2.1. .NLVR File Denition
<Variables> and <Variable>: list of all prompt label variables, each dened in a separate Variable
element. Prompt variables are listed in the data entry table of the printing form. If there are no prompt
variables dened in the label, the element Variables is empty.
• Name: variable name.
• Description: variable description.
• Data Type: denes what type of data is stored in a variable.
• Initial value: starting value that is assigned to a variable when created.
• Initial value: starting value that is assigned to a variable when created.
• Provisional value: denes a custom placeholder variable value in an object while designing
labels or forms.
• IsProvisionalValueAutoGenerated: provisional value is auto-generated by the application.
• IncrementType: information if the variable is dened as counter, and if it is, what kind of counter
it is.
• IncrementStep: information about the counter step. Counter value increments/decrements
using this value on the next label.
• IncrementCount: information about the point of incrementing/decrementing the counter value.
Usually, the counter changes its value on every label, but that can be changed.
• Format: type of content (characters) that can be accepted by the variable.
• IsPrompted: denes is the variable is prompted at print time or not.
• PromptText: text that is displayed to the print operator at print time.
• IsValueRequired: denes if the variable value should be dened or not.
• IsDynamicValue: information if the value is dynamically dened.
• PrinterCounterType: denes the counter type if enabled.
• AllowedCharactersForCustomFormat: denes if there is a specic character format allowed for
the variable.
• Length: maximum number of characters a variable can contain.
• MinLength: minimum number of characters a variable can contain.
• IsFixedLength: the variable must contain the exact given number of characters.
• HasMinimumValue: denes if the minimum value is set for the variable.
• MinimumValue: minimum variable value.
• HasMaximumValue: denes if the maximum value is set for the variable.
538
• MaximumValue: maximum variable value.
• InputFormat: allowed input value format.
• OutputFormat: allowed output value format.
• OutputLanguage: language selection and regional variable value formatting.
• InputFormatDecimalDelimiter: data input format of character that separates the integer part
from the fractional part of a number written in decimal form.
• InputFormatDecimalPlaces: data input denition for number of decimal places to be included in
the variable value.
• InputFormatDecimalSeparator: data input format of separator (character) that groups the
thousands into groups.
• InputFormatCurrencySymbol: data input symbol that represents the selected currency.
• InputFormatCurrencySymbolPosition: species data input position of the currency symbol.
• OutputFormatDecimalDelimiter: number of decimal places to be included in the variable value
on the printed label.
• OutputFormatDecimalPlaces: number of decimal places to be included in the variable value on
the printed label.
• OutputFormatDecimalSeparator: separator (character) that groups the thousands into groups
on the printed label.
• OutputFormatCurrencySymbol: symbol that represents the selected currency on the printed
label.
• OutputFormatCurrencySymbolPosition: species position of the currency symbol on the
printed label.
• HasPickList: denes if pick list is enabled or not.
• PickListValues: the selection of pick list values.
• HasRolloverOnMinimumMaximumValue: denes if the counter is reset after the minimum or
maximum value is reached.
• Prex: prex value that is added to the variable.
• Sux: sux value that is added to the variable.
• PaddingType: denes if the variable has padding characters added or not.
• PaddingValue: padding character.
• HasMultilineEnabled: divides text into multiple lines.
• MultilineNumberOfLines: maximum number of lines for a variable value.
• MultilineLineLength: maximum number of characters in a single line.
539

• HasMultilineWordWrap: divides the text into multiple lines at space character locations
NOTE
All measurement values are expressed in 1/1000 mm units.
9.2.2. XML Schema Denition (XSD) for Label
Specication XML
<?xml version="1.0" encoding="utf-8"?>
<xs:schema xmlns:xs="http://www.w3.org/2001/XMLSchema">
<xs:element name="Variables">
<xs:complexType>
<xs:sequence minOccurs="0" maxOccurs="unbounded">
<xs:element name="Variable" minOccurs="0">
<xs:complexType>
<xs:sequence>
<xs:element name="Name" type="xs:string" minOccurs="1"
maxOccurs="1"></xs:element>
<xs:choice minOccurs="0" maxOccurs="unbounded">
<xs:element name="Description" type="xs:string"
minOccurs="0"></xs:element>
<xs:element name="DataType" minOccurs="0">
<xs:simpleType>
<xs:restriction base="xs:integer">
<!--0 -Text variable type.-->
<xs:enumeration value="0"/>
<!--1 -Date variable type.-->
<xs:enumeration value="1"/>
<!--2 -Time variable type.-->
<xs:enumeration value="2"/>
<!--3 -Floating point variable type.-->
<xs:enumeration value="3"/>
<!--4 -Currency variable type.-->
<xs:enumeration value="4"/>
<!--1 -Current date variable type.-->
<xs:enumeration value="5"/>
<!--2 -Current time variable type.-->
<xs:enumeration value="6"/>
</xs:restriction>
</xs:simpleType>
</xs:element>
<xs:element name="InitialValue" type="xs:string"
540

minOccurs="0"></xs:element>
<xs:element name="ProvisionalValue" type="xs:string"
minOccurs="0"></xs:element>
<xs:element name="IsProvisionalValueAutoGenerated"
type="xs:boolean" minOccurs="0"></xs:element>
<xs:element name="IncrementType" minOccurs="0">
<xs:simpleType>
<xs:restriction base="xs:integer">
<!--0 -None of the types used.-->
<xs:enumeration value="0"/>
<!--1 -Incremental type.-->
<xs:enumeration value="1"/>
<!--2 -Decremental type.-->
<xs:enumeration value="2"/>
</xs:restriction>
</xs:simpleType>
</xs:element>
<xs:element name="IncrementStep" type="xs:integer"
minOccurs="0"></xs:element>
<xs:element name="IncrementCount" type="xs:integer"
minOccurs="0"></xs:element>
<xs:element name="Format" minOccurs="0">
<xs:simpleType>
<xs:restriction base="xs:integer">
<!--0 -All characters are allowed.-->
<xs:enumeration value="0"/>
<!--1 -Numeric characters are allowed.-->
<xs:enumeration value="1"/>
<!--2 -Alphanumeric characters are allowed.-->
<xs:enumeration value="2"/>
<!--3 -Letters characters are allowed.-->
<xs:enumeration value="3"/>
<!--4 -7 bit ASCI characters are allowed.-->
<xs:enumeration value="4"/>
<!--5 -Hex characters are allowed.-->
<xs:enumeration value="5"/>
<!--7 -Digits & capitals characters are allowed.-->
<xs:enumeration value="7"/>
<!--8 -Custom characters are allowed.-->
<xs:enumeration value="8"/>
<!--9 -Code 39 characters are allowed.-->
<xs:enumeration value="9"/>
<!--10 -Code 128A characters are allowed.-->
<xs:enumeration value="10"/>
<!--11 -Code 128B characters are allowed.-->
<xs:enumeration value="11"/>
541

<!--12 -Code 128C characters are allowed.-->
<xs:enumeration value="12"/>
<!--13 -Code 128 characters are allowed.-->
<xs:enumeration value="13"/>
<!--14 -Codabar characters are allowed.-->
<xs:enumeration value="14"/>
</xs:restriction>
</xs:simpleType>
</xs:element>
<xs:element name="IsPrompted" type="xs:boolean"
minOccurs="0"></xs:element>
<xs:element name="PromptText" type="xs:string"
minOccurs="0"></xs:element>
<xs:element name="IsValueRequired" type="xs:boolean"
minOccurs="0"></xs:element>
<xs:element name="IsDynamicValue" type="xs:boolean"
minOccurs="0"></xs:element>
<xs:element name="PrinterCounterType" minOccurs="0">
<xs:simpleType>
<xs:restriction base="xs:integer">
<!--0 -Printer counter unknown.-->
<xs:enumeration value="0"/>
<!--1 -Do not use printer counter.-->
<xs:enumeration value="1"/>
<!--2 -Always use printer count.-->
<xs:enumeration value="2"/>
<!--3 -Use printer counter if possible.-->
<xs:enumeration value="3"/>
</xs:restriction>
</xs:simpleType>
</xs:element>
<xs:element name="AllowedCharactersForCustomFormat"
type="xs:string" minOccurs="0"></xs:element>
<xs:element name="Length" type="xs:integer" minOccurs="0"></
xs:element>
<xs:element name="MinLength" type="xs:integer"
minOccurs="0"></xs:element>
<xs:element name="IsFixedLength" type="xs:boolean"
minOccurs="0"></xs:element>
<xs:element name="HasMinimumValue" type="xs:boolean"
minOccurs="0"></xs:element>
<xs:element name="MinimumValue" type="xs:string"
minOccurs="0"></xs:element>
<xs:element name="HasMaximumValue" type="xs:boolean"
minOccurs="0"></xs:element>
<xs:element name="MaximumValue" type="xs:string"
542

minOccurs="0"></xs:element>
<xs:element name="InputFormat" type="xs:string"
minOccurs="0"></xs:element>
<xs:element name="OutputFormat" type="xs:string"
minOccurs="0"></xs:element>
<xs:element name="OutputLanguage" type="xs:integer"
minOccurs="0"></xs:element>
<xs:element name="InputFormatDecimalDelimiter"
type="xs:string" minOccurs="0"></xs:element>
<xs:element name="InputFormatDecimalPlaces"
type="xs:integer" minOccurs="0"></xs:element>
<xs:element name="InputFormatDecimalSeparator"
type="xs:string" minOccurs="0"></xs:element>
<xs:element name="InputFormatCurrencySymbol"
type="xs:string" minOccurs="0"></xs:element>
<xs:element name="InputFormatCurrencySymbolPosition"
type="xs:integer" minOccurs="0"></xs:element>
<xs:element name="OutputFormatDecimalDelimiter"
type="xs:string" minOccurs="0"></xs:element>
<xs:element name="OutputFormatDecimalPlaces"
type="xs:integer" minOccurs="0"></xs:element>
<xs:element name="OutputFormatDecimalSeparator"
type="xs:string" minOccurs="0"></xs:element>
<xs:element name="OutputFormatCurrencySymbol"
type="xs:string" minOccurs="0"></xs:element>
<xs:element name="OutputFormatCurrencySymbolPosition"
type="xs:integer" minOccurs="0"></xs:element>
<xs:element name="HasPickList" type="xs:boolean"
minOccurs="0"></xs:element>
<xs:element name="PickListValues" minOccurs="0">
<xs:complexType>
<xs:sequence minOccurs="0" maxOccurs="unbounded">
<xs:element name="Value" type="xs:string"
minOccurs="0"></xs:element>
</xs:sequence>
</xs:complexType>
</xs:element>
<xs:element name="HasRolloverOnMinimumMaximumValue"
type="xs:boolean" minOccurs="0"></xs:element>
<xs:element name="Prefix" type="xs:string" minOccurs="0"></
xs:element>
<xs:element name="Suffix" type="xs:string" minOccurs="0"></
xs:element>
<xs:element name="PaddingType" minOccurs="0">
<xs:simpleType>
<xs:restriction base="xs:integer">
543

<!--0 -Padding not used.-->
<xs:enumeration value="0"/>
<!--1 -Padding on left.-->
<xs:enumeration value="1"/>
<!--2 -Padding on right.-->
<xs:enumeration value="2"/>
<!--3 -Padding surrounding-->
<xs:enumeration value="3"/>
</xs:restriction>
</xs:simpleType>
</xs:element>
<xs:element name="PaddingValue" type="xs:string"
minOccurs="0"></xs:element>
<xs:element name="HasMultilineEnabled" type="xs:boolean"
minOccurs="0"></xs:element>
<xs:element name="MultilineNumberOfLines" type="xs:integer"
minOccurs="0"></xs:element>
<xs:element name="MultilineLineLength" type="xs:integer"
minOccurs="0"></xs:element>
<xs:element name="HasMultilineWordWrap" type="xs:boolean"
minOccurs="0"></xs:element>
</xs:choice>
</xs:sequence>
</xs:complexType>
</xs:element>
</xs:sequence>
</xs:complexType>
</xs:element>
</xs:schema>
NOTE
XML Schema Denition (XSD) for Label Specication XML is by default accessible at:
c:\Program Files\NiceLabel\\bin.net\Configuration\Variables.xsd.
9.2.3. .NLVR File Example
Variables>
<Variable>
<Name>Sample variable</Name>
<Description>Describes the variable</Description>
<DataType>0</DataType>
<InitialValue>1</InitialValue>
<ProvisionalValue>1</ProvisionalValue>
<IsProvisionalValueAutoGenerated>1</IsProvisionalValueAutoGenerated>
544

<IncrementType>0</IncrementType>
<IncrementStep>1</IncrementStep>
<IncrementCount>1</IncrementCount>
<Format>0</Format>
<IsPrompted>1</IsPrompted>
<PromptText>Enter the required value.</PromptText>
<IsValueRequired>1</IsValueRequired>
<IsDynamicValue>0</IsDynamicValue>
<PrinterCounterType>3</PrinterCounterType>
<AllowedCharactersForCustomFormat />
<Length>20</Length>
<MinLength>0</MinLength>
<IsFixedLength>0</IsFixedLength>
<HasMinimumValue>0</HasMinimumValue>
<MinimumValue />
<HasMaximumValue>0</HasMaximumValue>
<MaximumValue />
<HasPickList>1</HasPickList>
<PickListValues>
<Value>1</Value>
<Value>2</Value>
<Value>3</Value>
</PickListValues>
<HasRolloverOnMinimumMaximumValue>0</HasRolloverOnMinimumMaximumValue>
<Prefix>pre</Prefix>
<Suffix>post</Suffix>
<PaddingType>1</PaddingType>
<PaddingValue>_</PaddingValue>
</Variable>
</Variables>
9.3. Oracle WMS File Denition
This section describes the content of Oracle WMS le. Oracle denes the XML format so that the
XML contents can be understood, parsed and then printed as a label.
The XML Document Type Denition (DTD) denes its XML tags to be used in an XML le. Oracle
generates XML les according to this DTD and so does the 3rd party software translates the XML
according to this DTD.
545

9.3.1. XML DTD
The below shown example is the XML DTD that is used in forming the XML for both the synchronous
and asynchronous XML formats. DTD denes the elements that are used in the XML le, a list of their
attributes, and the next level elements.
<!ELEMENT labels (label)*>
<!ATTLIST labels _FORMAT CDATA #IMPLIED>
<!ATTLIST labels _JOBNAME CDATA #IMPLIED>
<!ATTLIST labels _QUANTITY CDATA #IMPLIED>
<!ATTLIST labels _PRINTERNAME CDATA #IMPLIED>
<!ELEMENT label (variable)*>
<!ATTLIST label _FORMAT CDATA #IMPLIED>
<!ATTLIST label _JOBNAME CDATA #IMPLIED>
<!ATTLIST label _QUANTITY CDATA #IMPLIED>
<!ATTLIST label _PRINTERNAME CDATA #IMPLIED>
<!ELEMENT variable (#PCDATA)>
<!ATTLIST variable name CDATA #IMPLIED>
9.3.2. Sample Oracle XML
This is the Oracle XML providing data for a single label (there is just one <label> element).
<?xml version="1.0" encoding="UTF-8" standalone="no"?>
<!DOCTYPE labels SYSTEM "label.dtd">
<labels _FORMAT ="Serial.nlbl" _QUANTITY="1" _PRINTERNAME=""
_JOBNAME="Serial">
<label>
<variable name= "item">O Ring</variable>
<variable name= "revision">V1</variable>
<variable name= "lot">123</variable>
<variable name= "serial_number">12345</variable>
<variable name= "lot_status">123</variable>
<variable name= "serial_number_status">Active</variable>
<variable name= "organization">A1</variable>
</label>
</labels>
When executing this sample Oracle XML le, the label serial.nlbl is printed with the following
variable values.
Variable Name
Variable Value
item O Ring
revision V1
546

lot 123
serial_number 12345
lot_status 123
serial_number_status Active
organization A1
The label will be printed in a single 1 copy, with the spooler job name Serial. Printer name is not
specied in the XML le, so the label will print to the printer as dened in the label template.
9.4. Importing Variables from Legacy Labels
The legacy label format (.LBL) is supported by NiceLabel 2019. This means that labels which have
been created using the NiceLabel V6 can be imported into NiceLabel 2019 along with their variables.
Generally speaking, imported variables with matching names from legacy label les are merged with
variables on labels created using NiceLabel 2019. Because you might come across issues with
variable importing, please read the below listed rules under which the variables are imported and
integrated into a .NLBL label le.
TIP
Merged variable is a variable that displays the value after the import from Designer V6
to NiceLabel 2019 label le.
Merging variable is a variable that is imported to NiceLabel 2019 label le.
Original variable is a variable in NiceLabel 2019 label le.
1. Variables with matching names are merged in a NiceLabel 2019 label le in the following
cases:
• Data Type of variables (Text, date, Time, etc.) is the same.
• Variable values are equal.
• One of the variables is a Counter.
• Variables have either dened xed length or not.
2. Variables with matching names are merged with a reported conict in the following cases:
• Input formats, dynamic values, prex/sux, or padding types/values of variables are
dierent.
• Length of variable values is dened as xed. In case of non-matching lengths of values,
merged variables report a conict.
547

• Variables have multiline values. With non-matching number of lines, line length, or word
wrap, merged variables report a conict.
• Min and max values of merged variables do not match.
3. Counters with matching names are merged with a reported conict in the following cases:
• Step, count, and increment type do not match. Merged variables report a conict.
• Dierences in rollover settings: min/max value, counter type, rollover on variable change,
variable reference, date/week rollover type, day rollover time. In case of non-matching
values, merged variables report a conict.
• Printer counter is enabled. If the internal counter types do not match, merged variables
report a conict.
4. General rules for conicting values of merged variables.
• Value of the original variable is used for prex, sux and padding. If these values are
empty, the value of merging variable is used instead.
• If one of the variable values is dynamic, the merged variable displays the dynamic value.
• If the variables have values with xed lengths, the higher value is assigned to the merged
variable.
• If one of the variables has enabled multiline value, its value is assigned to the merged
variable.
• If the variables have dened line length and number of lines, the higher value is assigned
to the merged variable.
• If one of the variables has enabled word wrap, its value is assigned to the merged
variable.
• If the both variables have dened min and max values, the merging variable value is
assigned to the merged variable. If not, the original value is used instead.
• In case of non-matching counter values, the value of merging variable is assigned to the
merged variable.
9.5. Licensing and Printer Usage
PRODUCT LEVEL INFO
This section applies to NiceLabel 2019 Pro and PowerForms editions.
Depending on the license type, your copy of NiceLabel 2019 may be limited to a specic number of
printers you can use simultaneously. In case of a multi-user license, keeps track of the number and
names of dierent printers you have used for printing on all NiceLabel clients in your network. The
548

unique printer identier is a combination of printer driver name (not printer name), printer location,
and port.
"To use a printer" means that one of the below listed actions has been taken within a solution:
• Print Label
• Send Data To Printer
• Dene Printer Settings
• Set Print Parameter
Each of these actions signalizes that a printer has been used. The associated printer is added to the
list of used printers and remains listed for 7 days from the last usage. To remove a printer from the list,
do not use it for a period of 7 days and it will be automatically removed. The software will display the
Last Used information so you know when the 7-day will pass for each printer. You can bind a printer
seat with a specic printer, by clicking the Reserved checkbox. This will ensure the printer availability
at all times.
WARNING
If you exceed the number of seats dened by your license, the software enters a 30-
day grace period. While in this mode, the number or allowed printers is temporarily
incremented to twice the number of purchased seats.
Grace period provides plenty of time to resolve the licensing problems without any printing downtime
or loss of the ability to design labels. This is usually an eect of replacing printers in your
environment, when the old and new printers are used simultaneously, or when you add new printers. If
you do not resolve a license violation within the grace period, the number of available printers will be
reduced to the number of purchased seats starting from the recently used printers that are visible on
the list.
TIP
To learn more about NiceLabel 2019 licensing, read the dedicated document.
9.6. Spell Checking Support
Spell checker for entered text in Edit eld and Memo eld objects language support depends on the
operating system. Table below lists languages that can be spell-checked in Windows 8.1 and 10.
Culture
IETF Language Tag Win 8.1 Win 10
Arabic_SaudiArabia ar-SA Yes Yes
Bulgarian_Default bg-BG Yes Yes
549

Culture IETF Language Tag Win 8.1 Win 10
Catalan_Default ca-ES Yes Yes
Czech_Default cs-CZ Yes Yes
Danish_Default da-DK Yes Yes
German_German de-DE Yes Yes
Greek_Default el-GR Yes Yes
English_US en-US Yes Yes
Finnish_Default -FI Yes Yes
French_French fr-FR Yes Yes
Hebrew_Default he-IL Yes Yes
Italian_Italian it-IT Yes Yes
Dutch_Dutch nl-NL Yes Yes
Norwegian_Bokmal nb-NO Yes Yes
Polish_Default pl-PL Yes Yes
Portuguese_Brazil pt-BR Yes Yes
Romanian_Default ro-RO Yes Yes
Russian_Default ru-RU Yes Yes
Croatian_Default hr-HR Yes Yes
Slovak_Default sk-SK Yes Yes
Swedish_Default sv-SE Yes Yes
Turkish_Default tr-TR Yes Yes
Indonesian_Default id-ID Yes Yes
Ukrainian_Default uk-UA Yes Yes
Slovenian_Default sl-SI Yes Yes
Latvian_Default lv-LV Yes Yes
Lithuanian_Default lt-LT Yes Yes
Hindi_Default hi-IN Yes Yes
Portuguese_Portugal pt-PT Yes Yes
Spanish_Modern es-ES Yes Yes
Hungarian_Default hu-HU No Yes
Urdu_Default ur-PK No Yes
Vietnamese_Default vi-VN No Yes
Malay_Malaysia ms-MY No Yes
Punjabi_Default pa-IN No Yes
Gujarati_Default gu-IN No Yes
Tamil_Default ta-IN No Yes
550

Culture IETF Language Tag Win 8.1 Win 10
Telugu_Default te-IN No Yes
Kannada_Default kn-IN No Yes
Malayalam_Default ml-IN No Yes
Marathi_Default mr-IN No Yes
English_UK en-GB No Yes
Bengali_Default bn-BD No Yes
9.7. Session Printing
Session printing enables printing of multiple labels using a single print job. If session printing is
enabled, the printer receives, processes and prints all labels in the print job at once. As a result,
printing speed increases due to continuous process of bundled label printing.
TIP
Session printing serves as an alternative to the normally used non-session printing,
during which each label is sent to a printer as a separate print job.
NOTE
NiceLabel 2019 activates session printing automatically based on the conguration of
actions.
How does session printing start?
Session printing automatically starts if For Loop or For Every Record actions are present in the
workow. In such case, the nested Print Label action automatically enables session printing. This
means that print actions for all items in the loop are included in a single print job.
How does session printing end?
Each session printing ends either with a nished loop or with Print Label action combined with at least
one of the following conditions:
• Printer changes. If you select another printer using the Set Printer action, session printing ends.
• Printer port changes. If you redirect the print job to a le using the Redirect Printing to File
action, session printing ends.
551

• Label changes. If you select another label to be printed using Open Label action, session
printing ends.
• Custom command that ends session printing is sent. If you send SESSIONEND command using
the Send Custom Command action, session printing ends.
NOTE
In this case, SESSIONEND must be sent as the only item in Send Custom
Command action. If you would like to send additional commands, use separate
Send Custom Command actions.
NOTE
More complex congurations might have multiple loops nested within each other. In
such case, session printing ends when the outermost parent loop exits.
9.8. Tracing Mode
By default, NiceLabel 2019 logs events into the log database. This includes higher-level information,
such as logging of action execution, logging of lter execution and logging of trigger status updates.
For more information, see section Event Monitoring.
However, the default logging does not log the deep under-the-hood executions. When
troubleshooting is needed on the lower-level of the code execution, tracing mode must be enabled. In
this mode, NiceLabel 2019 logs the details about all internal executions that take place during event
processing.
NOTE
Tracing mode should only be enabled during troubleshooting to collect logs and then
disabled to enable normal operation.
WARNING
Tracing mode slows down processing and should only be used when instructed to do
so by the technical support team.
To enable the tracing mode, perform the following:
1. Navigate to the System folder.
552

Example
%PROGRAMDATA%\NiceLabel\NiceLabel 2019
2. Make a backup copy of the product.config le
3. Open product.config in a text editor. The le has an XML structure.
4. Add the element Common/Diagnostics/Tracing/Enabled and assign value True to it.
The le includes the following contents:
<?xml version="1.0" encoding="utf-8"?>
<configuration>
<Common>
<Diagnostics>
<Tracing>
<Enabled>True</Enabled>
<Folder>c:\Troubleshooting\TracingLogs</Folder>
</Tracing>
</Diagnostics>
</Common>
...
</configuration>
5. After you save the le, NiceLabel 2019 Service will automatically apply the setting.
6. By default, tracing les (*.LOG) will appear in the same System folder.
NOTE
You can override the location of the log folder by specifying it in the element
Folder. This element is optional.
9.9. Synchronizing Cutter Settings with
Printer
NiceLabel 2019 synchronizes Cutter settings with the currently selected printer, and vice versa. After
you enable cutter in Designer, this also enables cutter in Printer Settings.
TIP
Printer Settings is the printer driver dialog that helps you congure detailed printing
properties.Printer Settings is accessible from printing form or printer and status bar.
Cutter mode selection in Printer Settings depends on how you congure Cutter settings in Designer:
553

• Cut after the last printed label activates the cutter in normal mode.
• Cut after a specic number of labels activates the cutter in normal mode in two cases:
• Horizontal and Vertical count of labels under Labels Across remains 1.
• If the web of labels creates no leftover blank labels on the paper.
• Cut after a specic number of labels activates the cutter in advanced mode in these two
cases:
• You print a web of labels and there are leftover blank labels on the paper.
Example
We congure a web of labels in Designer Cutter settings as shown in the picture below:
A single web of labels (labels across) contains 4 printed labels. If you set the cutter to
activate after 4, 8, 12, ... printed labels, there are no leftover blank labels. Every 4, 8, 12, ...
labels translate to every 1, 2, 3, ... printed pages in Printer Settings. As a result, cutter runs
in normal mode.
If you set the cutter to activate after 1, 2, 3, 5, ... (not a multiplier of number 4) printed
labels, cutter runs in advanced mode.
• You set a condition that activates the cutter under Cut if condition is met option.
554

10. How To
10.1. Insert Characters with <#hex_code>
Syntax
Another method of entering special characters is using the syntax <#hex_code>. The hex_code
stands for a two-character mark in hexadecimal numerical system. The appropriate values go from 0
(decimal 0) to FF (decimal 255).
Example
<#BC> (decimal 188) would be the same as <FNC1>, as they both would encode the character with
ASCII code 0188.
10.2. Insert Characters with <Alt>
+<ASCII_code>
This method is valid only for characters that are above ASCII code 32. A typical example would be
FNC codes that are used to encode GS1-128 barcode data. Labeling software encodes this type of
barcode according to standards – normally, you would not have to change anything. However,
sometimes it becomes necessary to manually add such character, to label data.
To include Function Codes, enter the appropriate character for a Function Code. ASCII codes of
Function Codes are as follows:
FNC1
0188
FNC2 0189
FNC3 0190
FNC4 0191
To enter a character for FNC1, press and hold the <Alt> key and type in digits 0188 on the numeric
keyboard. Note the leading zero is mandatory. Release the <Alt> and the FNC1 character appears.
555

10.3. Automatic Font Replacement
You might design your label templates to print text objects using internal printer fonts. These are the
fonts that are stored in your printer's memory. If you try to print such labels on a dierent kind of
printer, the selected internal fonts might not be available. The new printer probably supports an
entirely dierent set of internal fonts. The font layout might be similar in such case, but is available
under a dierent name.
Font mismatch might also occur if the Truetype font that you are using on your labels is not installed
on the computer on which you run Designer to design and print labels.
You can congure Designer to automatically replace the fonts used on the label with compatible
fonts. In such a case, Designer maps and replaces the fonts using their names. If the original font is
not available, Designer uses the rst available replacement font dened in the mapping table.
If there are no suitable replacement fonts, Designer uses the Arial Truetype font.
NOTE
After conguring the font replacement, mapping rules execute when you change the
printer for your label.
10.3.1. Conguring Font Mapping
1. Open le explorer and navigate to the following folder:
%PROGRAMDATA%\NiceLabel\NiceLabel 2019
2. Copy fontmapping.def le to fontmapping.local.def.
3. Open the fontmapping.local.def le in your favorite text XML editor.
4. Inside the element FontMappings, create a new element with a custom name.
5. Inside the new element, create at least two elements named as Mapping.
• Value of the rst element named Mapping must contain the name of the original font.
• Value of the second element named Mapping must contain the name of the replacement
font.
NOTE
Additional Mapping elements with new font names are allowed. If the rst
replacement font is not available, Designer tries the next one. If no
replacement fonts are available, Arial Truetype is used instead.
556
NOTE
The le fontmapping.local.def is your le and is preserved during the
upgrades. On the other hand, fontmapping.def belongs to NiceLabel and
is overwritten during the upgrades. Do not modify the fontmapping.def
le.
10.3.2. Sample Mapping Conguration
In the below shown example, two mapping rules are dened.
• The rst mapping rule converts any Avery font into a matching Novexx font. For example, a font
named Avery YT100 will be replaced with a font named Novexx YT100, and a font named Avery
1 will be replaced with a font named Novexx. If the Novexx font is not available, Arial Truetype
font will be used.
• The second mapping rule converts a font named Avery YT100 into a font named Novexx
YT104. If this font is not available, font Zebra 0 will be used. If this font is also not available Arial
Truetype will be used.
• The second mapping rule overrides the rst one.
<?xml version="1.0" encoding="utf-8"?>
<FontMappings>
<AveryNovexx>
<Mapping>Avery</Mapping>
<Mapping>Novexx</Mapping>
</AveryNovexx>
<TextReplacement>
<Mapping>Avery YT100</Mapping>
<Mapping>Novexx YT104</Mapping>
<Mapping>Zebra 0</Mapping>
</TextReplacement>
</FontMappings>
10.4. Formatting Allergens for Food
Ingredients
PRODUCT LEVEL INFO
This section applies to NiceLabel 2019 Pro and PowerForms editions.
557

The European Union’s mandatory food labeling legislation, formalized in Regulation (EU) No.
1169/2011 not only species what information must be shown, but also how that specic information
is presented, including font, color and contrast. The regulation deals in detail with font size, but leaves
the exact type of allergen highlighting to the user. The ingredient allergens must be printed using a
font that distinguishes them from the rest of the list (such as bold, italic, underlined, inverse, dierent
color).
NiceLabel oers a built-in support for allergen formatting using custom functions. These are
predened functions that you can use to highlight the allergens in the list of ingredients. To highlight
them, you can use bold, italic, underline, CAPS formatting or combination of this formatting. The
function result is RTF-formatted data you can use with the Rich Text Box object.
The allergen word might appear inside a certain ingredient that is not categorized as an allergen. In
this case you can use the "WithExceptions" type of functions. These functions will accept another
input parameter – a list of exceptions. These are words or sentences that must not be formatted even
if they contain the allergen word. For example, if you dene the word "milk" as allergen, it will also be
highlighted in the ingredient "coconut milk", which is incorrect. You can dene "coconut milk" as an
exception and Designer will not highlight the word "milk" when used in combination "coconut milk".
NOTE
For samples and additional how-to documentation see NiceLabel web page: EU Food
Allergen Labeling Regulation.
10.4.1. Prerequisites
The Food Allergens functions connect to the provided data source and read the included allergens.
To open the data source, the appropriate database drivers (ODBC drivers) must be installed on the
computer.
• For Excel and Access data sources. If you have Microsoft Oce installed on the same
computer, you already have the database drivers. If not, install the drivers separately. Visit
Microsoft Download Center to download and install Microsoft Access Database Engine 2010
Redistributable or Microsoft Access 2013 Runtime.
• For MS SQL data sources. The ODBC driver has been released within the Microsoft SQL
Server Feature Pack. You must have installed support for the provider SQLSQLNCLI11. Visit
Microsoft Download Center and download the driver.
10.4.2. Applying formatting to allergens
To format allergens in the list of ingredients, you have to execute the formatting function and provide
the input parameters. The formatting functions are executed as VBScript function and will provide
result in the output variable, which can be used directly in the Rich Text Box object. The function that
558

you would use must match the data location, where you keep the list of allergens, such as CSV string,
Microsoft Excel spreadsheet, or Microsoft Access database.
To format the allergens from a list in Excel, do the following:
1. Create a new label in Designer and open Dynamic Data Manager.
2. Click Functions and select VBScript and type in the function Name.
3. Open Script editor.
4.
Change the line Result = "0" into Result = and position the cursor after the equal sign.
5. Under Available scripting elements expand Food Alergens and select
FormatAllergensFromExcel
6. In the Script editing eld category, dene the function parameters, for example:
Result = FormatAllergensFromExcel([Products.Ingred],"c:\Data
\DB.xlsx","Allergens","Allergen","bold,italic,underline")
This will read the list of ingredients provided in the variable Products.Ingred, read the list
of allergens from Microsoft Excel le DB.xls in the Product column in the sheet Products
and apply bold formatting to all allergens within.
7. Click OK.
8. In Output variable name, dene the variable name, where the formatted allergens will be
saved.
NOTE
Make sure the variable begins with the prex RTF_, such as
RTF_FormattedIngredients. This will instruct Rich Text Object to honor the
control codes specied in the variable.
9. Click OK.
10. Select Rich Text Box object and add it ot the design surface.
11. In Rich Text Editor, select your variable in the list and add it into the content.
You can add additional variables or xed text if necessary.
12. You can use the controls available in the Rich Text Editor to format the font type, size and
colors.
13. Click OK.
559

10.4.3. Syntax of Allergen formatting functions
10.4.3.1. User provided list of allergens
This function accepts the list of ingredients and list of allergens in two variables and creates the RTF
code with highlighted allergens. All words from the Allergens that are matched in the Ingredients
will be formatted by the Highlight specication.
Syntax:
FormatAllergens(Ingredients,Allergens,Highlight)
Parameter Description
Ingredients The CSV list of ingredients.
Allergens The CSV list of allergens.
Highlight The CSV list of formatting switches you want to apply to the allergen. You can use
"bold", "italic", "underline", "caps", text color and/or background color. The colors
are formatted in hex syntax for RGB scheme, for example "#FF0000" for red. For
text color just provide the color code, for the backround, prex the color code
with "bg:", such as "bg:#FF0000".
This is an optional parameter. If provided as empty value (""), bold format is used.
Example
FormatAllergens("wheat our,salt,veg fat,hazelnuts","wheat,hazelnuts","bold,italic")
FormatAllergens(Ingredients,"wheat,hazelnuts","bold,italic")
10.4.3.2. Allergens from Microsoft Excel spreadsheet
This function accepts the list of ingredients and location of the Microsoft Excel spreadsheet. The
function reads the allergens from the spreadsheet and creates the RTF code with highlighted
allergens. All words from the spreadsheet that are matched in the Ingredients are formatted by the
Highlight specication.
Syntax:
FormatAllergensFromExcel(Ingredients,ExcelFile,Spreadsheet,Column,Highlight)
Parameter
Description
Ingredients The CSV list of ingredients.
Excel le The full path and lename to the Microsoft Excel le containing the allergens.
Spreadsheet The name of the spreadsheet containing the list of allergens.
560

Parameter Description
Field The name of the eld (column name) containing the allergens.
You can also provide the column index number containing the list of allergens.
Column A must be provided as "1", column B as "2", etc.
Highlight The CSV list of formatting switches you want to apply to the allergen. You can
use "bold", "italic", "underline", "caps", text color and/or background color. The
colors are formatted in hex syntax for RGB scheme, for example "#FF0000" for
red. For text color just provide the color code, for the backround, prex the
color code with "bg:", such as "bg:#FF0000".
This is an optional parameter. If provided as empty value (""), bold format is
used.
10.4.3.3. Allergens from Microsoft Access database
This function accepts the list of ingredients and location of the Microsoft Access database. The
function reads the allergens from the table and creates the RTF code with highlighted allergens. All
words from the database table that are matched in the Ingredients are formatted by the
Highlight specication.
Syntax:
FormatAllergensFromAccess(ingredients,AccessDb,table,field,highlight)
Parameter
Description
ingredients The CSV list of ingredients.
AccessDb The full path and lename to the Microsoft Access database le containing the
allergens.
table The name of the table containing the list of allergens.
eld The name of the eld (column name) containing the allergens.
You can also provide the column index number containing the list of allergens.
Field1 must be provided as "1", Field2 as "2", etc.
highlight The CSV list of formatting switches you want to apply to the allergen. You can use
"bold", "italic", "underline", "caps", text color and/or background color. The colors
are formatted in hex syntax for RGB scheme, for example "#FF0000" for red. For
text color just provide the color code, for the backround, prex the color code
with "bg:", such as "bg:#FF0000".
This is an optional parameter. If provided as empty value (""), bold format is used.
10.4.3.4. Allergens from Microsoft SQL Database
This function accepts the list of ingredients and location of the Microsoft SQL Server database. The
function reads the allergens from the table and creates the RTF code with highlighted allergens. All
561

words from the database table that are matched in the Ingredients are formatted by the
Highlight specication.
Syntax:
FormatAllergensFromMSSQL(ingredients,sqlserver,dbusername,dbpassword,
dbname,table,field,highlight
Parameter Description
ingredients The CSV list of ingredients.
sqlserver The full path and lename to the Microsoft SQL Server database le containing
the allergens.
dbusername User name for accessing the database.
dbpassword Password for accessing the database.
dbname The name of the database which contains the list of allergens.
table The name of the table containing the list of allergens.
eld The name of the eld (column name) containing the allergens.
highlight The CSV list of formatting switches you want to apply to the allergen. You can
use "bold", "italic", "underline", "caps", text color and/or background color. The
colors are formatted in hex syntax for RGB scheme, for example "#FF0000" for
red. For text color just provide the color code, for the backround, prex the color
code with "bg:", such as "bg:#FF0000".
This is an optional parameter. If provided as empty value (""), bold format is
used.
10.4.3.5. Allergens from SQL Server
This function accepts the list of ingredients and location of the SQL Server database. The function
reads the allergens from the table and creates the RTF code with highlighted allergens. All words from
the database table that are matched in the Ingredients are formatted by the Highlight
specication.
Syntax:
FormatAllergensFromSQL(ingredients,connectionstring,table,field, highlight)
Parameter
Description
ingredients The CSV list of ingredients.
connectionstring Connection string which is used to connect to the SQL Server database.
table The name of the table containing the list of allergens.
eld The name of the eld (column name) containing the allergens.
562

Parameter Description
highlight The CSV list of formatting switches you want to apply to the allergen. You
can use "bold", "italic", "underline", "caps", text color and/or background
color. The colors are formatted in hex syntax for RGB scheme, for example
"#FF0000" for red. For text color just provide the color code, for the
backround, prex the color code with "bg:", such as "bg:#FF0000".
This is an optional parameter. If provided as empty value (""), bold format is
used.
10.4.3.6. Allergens from Tags
This function reads the formats enclosed in custom tags to highlight the allergens among ingredients.
The function reads the allergens from the table and creates the RTF code with highlighted allergens.
All words which include matching tags under Ingredients are formatted by the Highlight
specication.
Syntax:
FormatAllergensFromTags(ingredients,tag,highlight)
Parameter
Description
ingredients The CSV list of ingredients.
tag Tag used to identify the ingredient as an allergen.
highlight The CSV list of formatting switches you want to apply to the allergen. You can use
"bold", "italic", "underline", "caps", text color and/or background color. The colors
are formatted in hex syntax for RGB scheme, for example "#FF0000" for red. For
text color just provide the color code, for the backround, prex the color code
with "bg:", such as "bg:#FF0000".
This is an optional parameter. If provided as empty value (""), bold format is used.
10.4.4. Syntax of Allergen formatting functions with
support for exclusions
10.4.4.1. User provided list of allergens
This function accepts the list of ingredients and the list of allergens in two variables and creates the
RTF code with highlighted allergens. All words from the Allergens that are matched in the
Ingredients are formatted by the Highlight specication. The last parameter provides the CSV
list of sentences that must not be highlighted even if they contain the allergen words.
Syntax:
563

FormatAllergensWithExclusions(Ingredients,Allergens,Highlight,Exclusions)
Parameter Description
Ingredients The CSV list of ingredients.
Allergens The CSV list of allergens.
Highlight The CSV list of formatting switches you want to apply to the allergen. You can use
"bold", "italic", "underline", "caps", text color and/or background color. The colors
are formatted in hex syntax for RGB scheme, for example "#FF0000" for red. For
text color just provide the color code, for the backround, prex the color code
with "bg:", such as "bg:#FF0000".
This is optional parameter. If provided as empty value (""), bold format is used.
Exclusions The CSV list of words & sentences that will not be highlighted even if they contain
allergen words.
Milk is an allergen so the word "milk" must be highlighted, but not when used in
context "coconut milk". In this case "coconut milk" must be dened as exception.
Example
FormatAllergensWithExclusions("wheat our,salt,veg fat,hazelnuts, coconut
milk","wheat,hazelnuts,milk","bold,italic","coconut milk")
10.4.4.2. Allergens from Microsoft Excel spreadsheet
This function accepta the list of ingredients and location of the Microsoft Excel spreadsheet. The
function reads the allergens from the spreadsheet and creates the RTF code with highlighted
allergens. All words from the spreadsheet that are matched in the Ingredients are formatted by the
Highlight specication. The last parameter provides the CSV list of sentences that must not be
highlighted even if they contain the allergen words.
Syntax:
FormatAllergensFromExcelWithExclusions(Ingredients,ExcelFile,Spreadsheet,Fie
ld,Highlight,SpreadsheetEx,FieldEx)
Parameter
Description
Ingredients The CSV list of ingredients.
Excel le The full path and lename to the Microsoft Excel le containing the allergens.
Spreadsheet The name of the spreadsheet containing the list of allergens.
Field The name of the eld (column name) containing the allergens.
You can also provide the column index number containing the list of
allergens. Column A must be provided as "1", column B as "2", etc.
564

Parameter Description
Highlight The CSV list of formatting switches you want to apply to the allergen. You can
use "bold", "italic", "underline", "caps", text color and/or background color. The
colors are formatted in hex syntax for RGB scheme, for example "#FF0000"
for red. For text color just provide the color code, for the backround, prex
the color code with "bg:", such as "bg:#FF0000".
This is optional parameter. If provided as empty value (""), bold format is used.
SpreadsheetEx The name of the spreadsheet containing the list of word & sentences to be
excluded from allergen formatting.
FieldEx The name of the eld (column name) containing the strings to be excluded
from the formatting.
You can also provide the column index number containing the list of
allergens. Column A must be provided as "1", column B as "2", etc.
Example
FormatAllergensFromExcelWithExclusions("wheat our,salt,veg fat,hazelnuts","c:\les
\data.xlsx","Sheet1","1","bold,italic","Sheet2","2")
FormatAllergensFromExcelWithExclusions(Ingredients,"c:\les
\data.xlsx","Sheet1","1","bold,italic","Sheet2","2")
10.4.4.3. Allergens from Microsoft Access Database
This function accepts the list of ingredients and location of the Microsoft Access database. The
function reads the allergens from the table and creates the RTF code with highlighted allergens. All
words from the spreadsheet that are matched in the Ingredients are formatted by the Highlight
specication. The last parameter provides the list of strings that must not be highlighted even if they
contain the allergen words.
Syntax:
FormatAllergensFromAccessWithExclusions(ingredients,accessdb,table_with_alle
rgens,field_with_allergens,highlight,table_with_exclusions,field_with_exclus
ions)
Parameter
Description
Ingredients The CSV list of ingredients.
accessdb The full path and lename to the Microsoft Access database le
containing the allergens.
table_with_allergens The name of the table containing the list of allergens.
eld_with_allergens The name of the eld (column name) containing the allergens.
565

Parameter Description
table_with_exclusions The name of the table containing the list of word & sentences to be
excluded from allergen formatting.
eld_with_exclusions The name of the eld (column name) containing the strings to be
excluded from the formatting.
10.4.4.4. Allergens from Microsoft SQL Database
This function accepts the list of ingredients and location of the Microsoft SQL Server database. The
function reads the allergens from the table and creates the RTF code with highlighted allergens. All
words from the database table that are matched in the Ingredients are formatted by the
Highlight specication. The last parameter provides the list of strings that must not be highlighted
even if they contain the allergen words.
Syntax:
FormatAllergensFromMSSQLWithExclusions(ingredients,sqlserver,dbusername,dbpa
ssword,dbname,table_with_allergens,field_with_allergens,highlight,table_with
_exclusions,field_with_exclusions)
Parameter
Description
ingredients The CSV list of ingredients.
sqlserver The full path and lename to the Microsoft SQL Server database le
containing the allergens.
dbusername User name for accessing the database.
dbpassword Password for accessing the database.
dbname The name of the database which contains the list of allergens.
table_with_allergens The name of the table containing the list of allergens.
eld_with_allergens The name of the eld (column name) containing the allergens.
highlight The CSV list of formatting switches you want to apply to the allergen.
You can use "bold", "italic", "underline", "caps", text color and/or
background color. The colors are formatted in hex syntax for RGB
scheme, for example "#FF0000" for red. For text color just provide the
color code, for the backround, prex the color code with "bg:", such as
"bg:#FF0000".
This is an optional parameter. If provided as empty value (""), bold
format is used.
table_with_exclusions The name of the table containing the list of word & sentences to be
excluded from allergen formatting.
eld_with_exclusions The name of the eld (column name) containing the strings to be
excluded from the formatting.
566

10.4.4.5. Allergens from SQL Server
This function accepts the list of ingredients and location of the SQL Server database. The function
reads the allergens from the table and creates the RTF code with highlighted allergens. All words from
the database table that are matched in the Ingredients are formatted by the Highlight
specication. The last parameter provides the list of strings that must not be highlighted even if they
contain the allergen words.
Syntax:
FormatAllergensFromSQLWithExclusions(ingredients,connectionstring,table_with
_allergens,field_with_allergens,highlight,table_with_exclusions,field_with_e
xclusions)
Parameter Description
ingredients The CSV list of ingredients.
connectionstring Connection string which is used to connect to the SQL Server
database.
table_with_allergens The name of the table containing the list of allergens.
eld_with_allergens The name of the eld (column name) containing the allergens.
highlight The CSV list of formatting switches you want to apply to the allergen.
You can use "bold", "italic", "underline", "caps", text color and/or
background color. The colors are formatted in hex syntax for RGB
scheme, for example "#FF0000" for red. For text color just provide the
color code, for the backround, prex the color code with "bg:", such as
"bg:#FF0000".
This is an optional parameter. If provided as empty value (""), bold
format is used.
eld_with_exclusions The name of the eld (column name) containing the strings to be
excluded from the formatting.
10.5. Designing Labels with Variable Length
In most label printing scenarios you design and print the label with xed dimensions. The label width
and height do not change so you must make sure to t all objects on the label.
However, in some cases you need the ability to design the label with the variable length. The label
length changes in accordance to the size of the label objects. When you assign more data to the label
objects, their size increases and occupies more space on the label. In order to t such objects on the
label, the label height must change.
567

NOTE
The requirement for variable label sizing is quite often in the textile industry, where
labels print to endless label material. There are no gaps between the labels. The
printer cutter cuts the material after the label prints.
To enable the variable label sizing, do the following:
1. Open the label properties dialog.
2. Go to the Label Dimensions tab.
3. Enable the Enable variable label size option.
4. Oset denes the amount of space between the last object on the label and the bottom label
edge.
See the screenshots below to understand the automatic label resizing function.
Variable label size is enabled on the label. A 1 cm wide gap is set between the bottom label border and
the last object on the label – barcode in this case. The text object is a multi-line object. If you enter
more data for the text object, the label height must increase to accommodate for the larger text
object.
568

Variable label sizing feature increases label height on demand
To make the most of variable label sizing, enable object relative positioning (open object properties >
Position > Relative position tab). In this case, the objects are not always be placed on the same spot
on the label. Their placement changes in accordance with the placement of reference objects.
NOTE
If you enable variable label sizing, the Labels Across option can no longer be used.
10.6. Multicolor Printing
Some thermal printers support multicolor printing. They use multiple heads, each head for a ribbon of
a dierent color. The colors for each printer head are customizable and can be dened in the printer
driver. Each printhead is assigned a color that matches the used ribbon. The same colors become
available in the labeling software. For multicolor printing to work, you need to use the appropriate
NiceLabel printer driver.
Color palette synchronizes the available colors with settings in the printer driver. All colors you have
dened in the printer driver are retrieved in the labeling software and made available for color
selection. Color palette, color selection dialog box and label properties dialog box all display only the
available colors from the printer. Each label object can then easily be assigned some of the available
colors. The object is then printed using that same color. More than one color cannot be used with a
single label object.
When you use color images on the label, their appearance on the label changes. They cannot be
printed in more colors than supported by the printer. The images are not displayed in full color. Each
image is converted to monochrome graphics and previewed on the label as such. Conversion from
color to monochrome graphics is done using dithering setting in the driver. You can assign the image
one color and thus the printhead where the image will be printed.
The colors on the label identify which printer head will be used for printing the objects.
569

10.7. How to Create GS1 Compliant Labels
The GS1 System provides for the use of unambiguous numbers to identify goods, services, assets,
and locations worldwide. These numbers can be represented in barcodes to enable their electronic
reading wherever required in business processes.
GS1-128 is an application standard of the GS1 implementation using the Code 128 barcode
specication. The former name was UCC/EAN-128.
GS1-128 uses a series of Application Identiers (AI) to include additional data such as best before
dates, batch numbers, quantities, weights, and many other attributes needed by the user.
• See section describing the GS1 function to read more about the AIs.
• Ocial recommendations for creating a GS1 compliant label are available here.
Complete the following steps to assign GS1-128 compliant data structure to a barcode:
1. Create a new label.
2. Add a Barcode object to design surface.
3. Select GS1-128 as barcode type on Barcode tab.
NOTE
GS1-128 barcode selection results in creating a Barcode and a Text object.
Barcode object includes the symbol while the Text object includes GS1-128
function content. GS1-128 function to which both objects are connected is
automatically added to the dynamic data explorer.
4. Click Source tab and open the Edit Function Denition dialog.
5. Add LOT Number AI.
6. Enter the sample data, for example 12345.
570

7. Add another AI, such as Expiration Date, for example June 3, 2016 (in YYMMDD format).
8. Click OK. The GS1-128 barcode is placed on the label containing LOT and expiration date.
10.8. Printing of Unlimited Data
When printing labels with All (unlimited quantity) option selected, the labels are printed in various
quantities, depending on the label content.
All (unlimited quantity) option sets the printing quantity in two ways.
10.8.1. Label with Connected Database or Counter
With All (unlimited quantity) option selected, the number of printed labels is not limited up front. It is
determined by one of the following properties:
• Number of database records to be printed.
• Quantity set by the counters used on the label.
TIP
All (unlimited quantity) option is useful when printing labels connected to a database.
The number of labels to be printed for such labels is usually not known in advance.
After selecting this option, all relevant records from the connected database are
printed.
NOTE
With multiple databases or counters for print quantity, the one with the lowest value
actually determines the number of printed labels.
571

Example
Counter value: 90
Number of database values: 100
Number of printed labels under All (unlimited quantity): 90
10.8.2. Label without connected Database or Counter
If a label does not use database or counter objects, a maximum supported number of identical label
copies is printed. In such case, the printing continues until:
• Printer is switched o.
• Printer receives a command to clear its memory buer.
NOTE
When printing identical label copies, use a NiceLabel printer driver to print the labels.
The driver is aware of printer's quantity limitations and prints the exact supported
number of labels.
NOTE
If you select All (unlimited quantity), and the maximum supported print quantity is
32000, the printer will print all of them.
10.9. Using the Internal Printer Counter
Almost all thermal printers support an internal increment counter functionality. This is a special printer
counter that counts labels internally. The printer only receives the rst value of the counter and
automatically increments the counter by 1 on the subsequent labels.
TIP
Internal counters reduce the amount of data transferred between computer and
printer as only the start value is sent to printer. This speeds up the label production
signicantly.
To use counter as internal printer element, pay attention to the following settings:
572

• The variable's maximum length is limited by you printer. You should nd this value in your
printer's Owner Manuals. If you can not nd this value, experiment.
• The variable length has to be set by enabling the Limit length option (go to Counter properties >
Input rules).
• Set allowed characters to Numeric.
• The Text object linked to the variable must be formatted as internal printer font (make sure the
Show printer fonts only option is enabled.
• Enable the option Always use printer counter in the Source tab. This option is available only if
the counter variable has been set up properly.
• A symbol for internal printer must appear in the bottom right corner of the Text object which
contains the counter value.
10.10. Installation of Printer Drivers
There are two ways to install NiceLabel printer drivers:
• Use NiceLabel PrnInst application (recommended).
• Use Windows Add printer process (alternative option).
NOTE
For detailed instructions on how to install printer drivers, refer to the document
NiceLabel Printer Drivers Installation Guide.
573

10.11. Creating Hyperlinks and Sending
Emails on Forms
PRODUCT LEVEL INFO
This section is applicable to PowerForms.
To allow your users to visit web pages or to send emails via hyperlinks on their forms greatly improves
the usability of your solutions.
allows you to embed hyperlinks and email addresses in all form objects that can execute Actions. The
action that allows you to directly visit web pages or send emails from forms is the Open Document/
Program action.
To add a hyperlink to your form:
1. Add an object to a form. For this explanation, we use the Text object.
NOTE
To see which events are available with various form objects, see section Form
Objects.
2. Open object Properties > Events tab.
3. Normally, you click on hyperlinks, so use the On Click event.
4. Assign the Open Document/Program action. Click the Actions... button.
• Action Editor opens.
5. Add the Open Document/Program action.
6. Go to File. Paste the hyperlink to the web page in the File name eld.
7. Click OK. When you run the form, clicking the Text object opens the web page in your web
browser.
To send emails from your form:
574

1. Repeat previous steps from 1 to 6.
2. Go to File. Paste the email address in the File name eld. Use this format:
mailto:[email protected].
NOTE
You can also congure the email hyperlink to open a message with predened
content. For example, to open a message with predened subject, use this
format: mailto:[email protected]?subject=My%20subject.
3. Click OK. When you run the form, clicking the Text object opens the your default email client
with a new message addressed to your recipient.
575

11. Online Support
You can nd the latest builds, updates, workarounds for problems and Frequently Asked Questions
(FAQ) on the product web site at www.nicelabel.com.
For more information please refer to:
• Knowledge base: https://www.nicelabel.com/support/knowledge-base
• NiceLabel Support: https://www.nicelabel.com/support/technical-support
• NiceLabel Tutorials: https://www.nicelabel.com/learning-center/tutorials
• NiceLabel Forums: https://forums.nicelabel.com/
NOTE
If you have a Service Maintenance Agreement (SMA), please contact the premium
support as specied in the agreement.
576
