
4-735-404-13(1)
Optical Disc Archive
Utility
Help
ODS-D55U
ODS-D77U
ODS-D280U
© 2013 Sony Imaging Products & Solutions Inc.

2
About the Optical Disc Archive Software
Overview
This software can perform the following functions to ODS-D55U/ODS-D77U/ODS-D280U on the
computer connected to ODS-D55U/ODS-D77U/ODS-D280U.
• Information display function
ˇ
Drive information
ˇ
Media information
• Setup function
ˇ
Operation mode settings
ˇ
Write-protect settings for media using Cartridge Memory
• Media manipulation function
ˇ
Rollback
ˇ
Format
ˇ
Finalize
ˇ
Recover file
ˇ
Duplicate volume
• Maintenance function
ˇ
Update firmware
ˇ
Log display and export
ˇ
System Check
Related Manual
OPERATION MANUAL
This manual is supplied with the ODS-D55U/ODS-D77U/ODS-D280U.
It describes how to use the ODS-D55U/ODS-D77U/ODS-D280U and the supplied software.

3
System Requirements
This software requires a computer system that meets the following requirements.
Item Requirement
Processor ODS-D55U/D77U/D77UA:
Intel Core 2 Duo 2.66 GHz or higher, or Intel Xeon 2.0 GHz or higher
ODS-D280U:
3rd Generation Intel Core i5 2.5 GHz or higher, or Intel Xeon 2.27GHz or
higher
Memory ODS-D55U/D77U/D77UA:
2 GB × (number of the connected units + 1) or more
ODS-D280U:
4 GB × (number of the connected units + 1) or more
Free space on the destination
location for installation
ODS-D55U/D77U/D77UA:
32 GB + 16 GB × (number of the connected units + 1) or more
ODS-D280U:
32 GB + 32 GB × (number of the connected units + 1) or more
Operating system See the Sony Creative Software site
a)
or Sony professional products site
b)
.
Other Hi-Speed USB (USB 2.0)
(Hi-Speed USB (USB 2.0) host controller required)
SuperSpeed USB (USB 3.0)
(SuperSpeed USB (USB 3.0) host controller required)
a) Sony Creative Software site
http://www.sonycreativesoftware.com/
b) Sony professional products site
U.S.A.
Canada
Latin America
Europe
Middle East, Africa
Russia
Brazil
Australia
New Zealand
Japan
Asia Pacific
Korea
China
India
http://pro.sony.com
http://www.sonybiz.ca
http://sonypro-latin.com
http://www.pro.sony.eu/pro
http://sony-psmea.com
http://sony.ru/pro/
http://sonypro.com.br
http://pro.sony.com.au
http://pro.sony.co.nz
http://www.sonybsc.com
http://pro.sony-asia.com
http://bp.sony.co.kr
http://pro.sony.com.cn
http://pro.sony.co.in

4
About the Optical Disc Archive Utility
Starting and Quitting the Software
Starting
To start this software, perform one of the following.
• Open the folder (/usr/bin/odautility) in which this software is installed.
• Select [Optical Disc Archive Utility] from the system tools in the application menu.
Quitting
Perform one of the following.
• Right-click the title bar of this software to select [Close].
• Click the (close) button on the title bar.
• While this software is active, press Alt + F4 (press the F4 key while holding down the Alt key).
Screen Organization
Menu Bar
Click a menu name to display the commands for that menu.

5
Tab
The Device screen, Log screen and Setting screen are switched.
Information Display Section/Operating Section
The screen selected in the Tab is displayed.
Menu Bar Items
The menu bar contains the following menus and commands.
View Menu
Minimize
Move
Always on Top
Always on Visible Workspace
Only on This Workspace
Move to Workspace Right *When locating on the left workspace
or
Move to Workspace Left *When locating on the right workspace
Close
Tools Menu
System Check
Determines whether Optical Disc Archive Software functions correctly.
This uses CoreMark-Pro, an EEMBC benchmark software, to measure the performance of the CPU.
http://www.eembc.org/
Note
This does not mean that the performance is guaranteed.
Change File Cache Destination
Changes the destination that the File Cache is saved to.

7
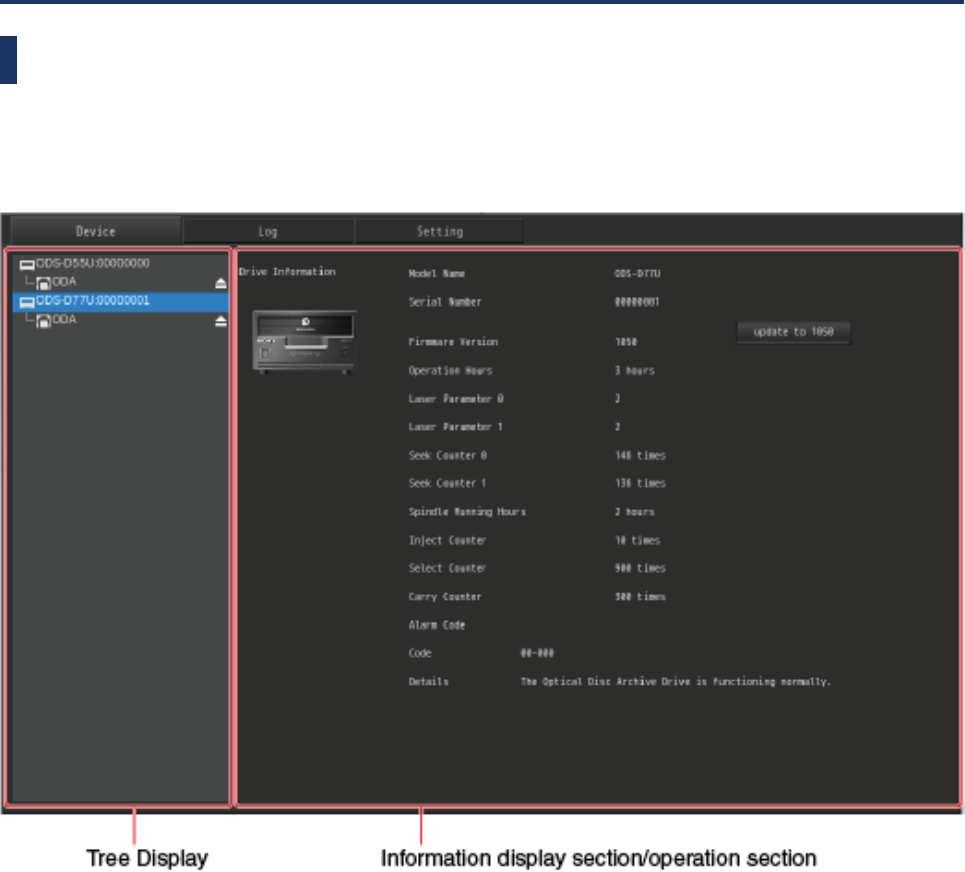
Tree Display-Media Information
The connected drive (model name and serial number) and media are displayed in the Tree Display. The
eject icon is displayed on the rightmost side of the list. Information about the selected drive or media
will be displayed in the Information Display Section/Operating Section on the right of the list.
Note
One computer can connect to four drives.
Information display section/operation section
Displays the information or operates the drive or media selected in the Tree Display.
Drive Information
Item Information displayed
Model Name Name of the selected drive (ODS-D55U/ODS-D77U/ODS-D280U)
Serial Number The serial number of the selected ODS-D55U/ODS-D77U/ODS-
D280U
Firmware Version The firmware version of the selected ODS-D55U/ODS-D77U/ODS-
D280U
Operation Hours
a)
Total number of hours the ODS-D55U/ODS-D77U/ODS-D280U has
been powered on (unit:hour)
Laser Parameter 0 to 3
a)
The cumulative light output time of the optical head
Seek Counter 0 to 3
a)
The cumulative number of seek operations of the optical head
Spindle Running Hours
a)
The cumulative spindle rotating time (unit:hour)
Inject Counter
a)
The cumulative counts of cartridge inserting
Select Counter
a)
The select count of the internal disc
Carry Counter
a)
The carry count of the internal disc
Disc Guide Counter The cumulative number of disc carries using disc carrier rollers

8
Item Information displayed
Carry Motor (H) Counter The cumulative number of disc carries using Carry Motor (H)
Carry Motor (V) Counter The cumulative number of disc carries using Carry Motor (V)
Air Filter Parameter Accumulated running time of the air filter (reset is possible)
b)
Alarm Code Displays information about any alarms that may have occurred on
the selected drive.
a) This screen displays information about the operational history of the ODS-D55U/ODS-D77U/ODS-D280U. Use the information as
a guide in scheduling periodic maintenance. For details on periodic maintenance, consult your Sony service representative.
b) For details on how to reset the Air Filter Parameter, refer to the installation manual included in the air filter (RP).
Note
Some items are not displayed depending on models.
Drive operation
Item Information
Update to 1.090
c)
The firmware version of the selected drive
c) Update when the firmware version in this package is 1.090.
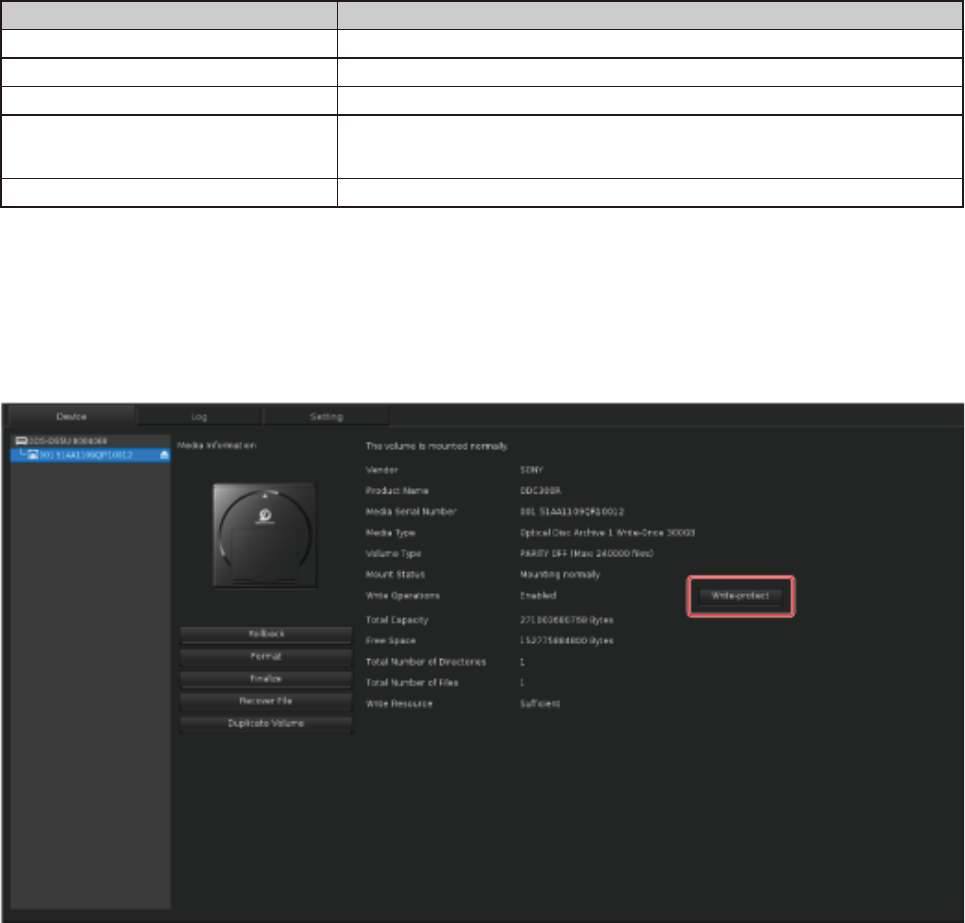
Media Information
Item Information displayed
Vendor The manufacturer of the selected media
Product Name The product name of the selected media
Media Serial Number The serial number of the selected media
Media Type The type and capacity of the selected media
• Optical Disc Archive 1 Rewritable 300GB
• Optical Disc Archive 1 Rewritable 600GB
• Optical Disc Archive 1 Rewritable 1200GB
• Optical Disc Archive 1 Write-Once 300GB
• Optical Disc Archive 1 Write-Once 600GB
• Optical Disc Archive 1 Write-Once 1500GB
• Optical Disc Archive 2 Write-Once 3300GB
Volume Type The volume type of the selected media
Mount Status The mount status of the selected media
Write Operations The selected media can be written or not.
Total Capacity The total capacity of the selected media
Free Space The write availability of the selected media
Total Number of Directories The total number of directories of the selected media
Total Number of Files The total number of files of the selected media
Rewrite Count The cumulative rewrite count of the selected media (Only
rewritable media displayed)
Format Count The cumulative format count of the selected media (Only
rewritable media displayed)
Write Resource [Empty], [Few] or [Full] is displayed. (Displayed only WO media)
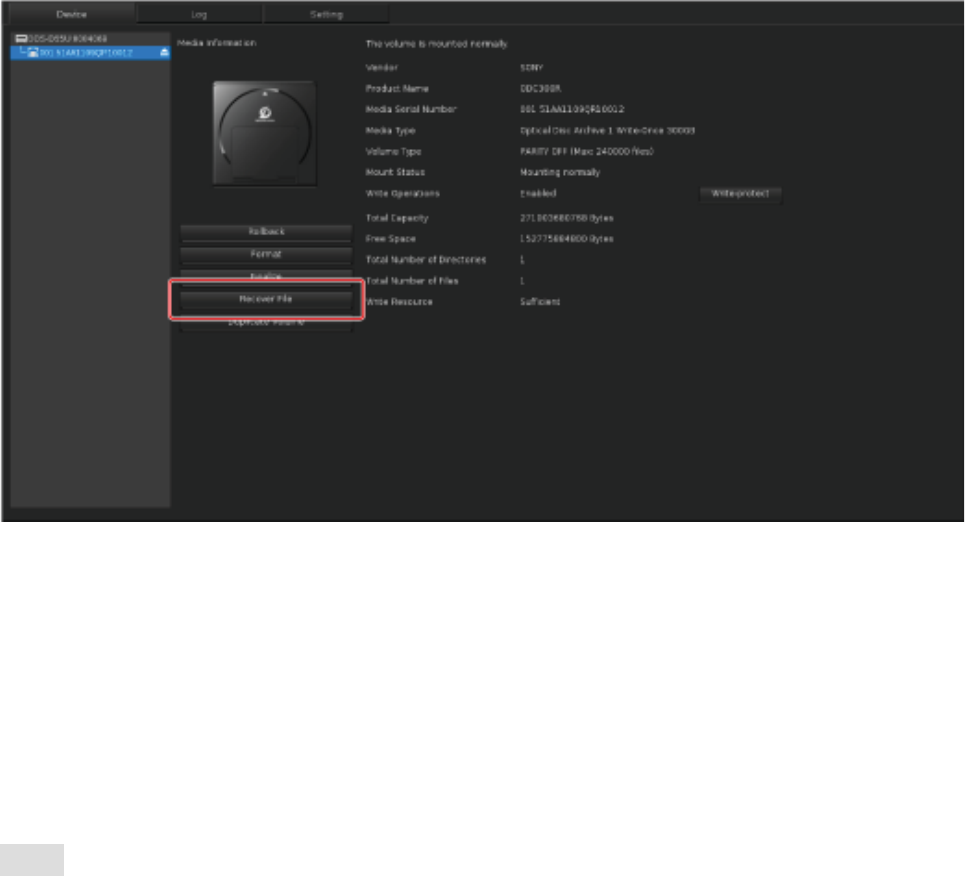
Media operation
Item Information
[Rollback] button Starts to seek the rollback points.
9
Item Information
[Format] button Starts to format.
[Finalize] button Starts to finalize.
[Recover File] button Displays the screen of the recover file list.
[Write-protect (or Write-protect
release) ] button
Starts to set or release the write-protection.
[Duplicate Volume] button Starts to duplicate volume.
Related Topics
Alarm Code
Device screen-Write-protect settings for media
Write-protect settings for media using Cartridge Memory
1. Click the [Write-protect] button.
"Do you want to change the write-protect setting? If so, the cartridge is automatically ejected."
appears.
2. Click the [Apply] button.
The media is write-protected and the cartridge is ejected.
To release the write-protection for media using Cartridge Memory
1. Click the [Write-protect release] button.
"Do you want to change the write-protect setting? If so, the cartridge is automatically ejected."
appears.
2. Click the [Apply] button.
Write-protection for media is released and the cartridge is ejected.

10
Alarm Code
This screen displays information about any alarms that may have occurred on the selected ODS-
D55U/ODS-D77U/ODS-D280U. This information is preserved until the error is eliminated.
Code
This displays the code number of the alarm that occurred on the selected ODS-D55U/ODS-D77U/ODS-
D280U.
Details
This displays information about the alarm that occurred on the selected ODS-D55U/ODS-D77U/ODS-
D280U and information about how to deal with it.
For details on alarms, see Alarm Code List.
Refreshing the Display
Select [Update] from the View menu.
Related Topics
Device screen-Screen Organization
Update Firmware
Updates the firmware of ODS-D55U/ODS-D77U/ODS-D280U.

11
How to update the firmware
1. Click the [Update to 1.630] button
a)
.
“Do you want to update the firmware?” appears.
2. Click the [Yes] button.
“Updating the firmware. Do not turn off the PC and the drive; do not disconnect cables during the
update.” appears and the update starts.
After a certain period of time, the drive will restart and the update will be complete.
a) Update when the firmware version in this package is 1.630.
Related Topics
Device screen-Screen Organization
Rollback
If you delete the file system control information or media file accidentally, you can restore the file by
searching for the roll-back points.
How to perform the rollback
1. Click the [Rollback] button.
The [Search roll-back points] screen appears and seeking for the roll-back points starts.
2. Select the roll-back point in the list and then click the [Mount] button.
The message appears, then read-only mount starts.
When read-only mount succeed, “Read-only mount to the roll-back point completed. You can copy
the whole volume to another volume by Optical Disc Archive Filer, or copy files or directories in the
volume. Or, please select one below.” appears.

12
3. Select [Apply writable to this roll-back point.] and then click the [OK] button.
The message appears, writable mount to the roll-back point starts.
“Writable mount applied. Roll-back successfully completed.” appears, roll-back is completed.
How to perform the rollback (capacity recovery)
When using rewritable media, media capacity can be recovered by performing rollback processing,
deleting the rollback point of time newer than selected roll-back point.
1. In step 3 in “How to perform the rollback”, select both [Apply writable to this roll-back point.] and
[Restore the capacity of the media.], click the [OK] button.
Note
You cannot recover the deleted roll-back point.
How to perform the rollback (file recovery)
The files in the volume can be recovered under read-only mount.
1. In step 2 in “How to perform the rollback”, select [Recover files in the volume.], and then click the
[OK] button.
How to perform rollback (volume duplication)
1. In step 3 of “How to perform the rollback”, select [Duplicate the volume to another media], then click
the [OK] button.
“Are you sure you want to duplicate the volume? Please do not change files during the volume
duplication” appears.
2. Click the [Yes] button.
“Please select a duplication destination.” appears.
3. Select [Select another volume.], then click the [OK] button.
Select an empty folder from another volume in the displayed screen or click the [New Folder] button
to create a new folder, then click the [OK] button.
Volume duplication starts. The duplication status is displayed on the progress bar.
Tip
When you select the Optical Disc Archive volume as a duplication destination and select [Restrict disc
spanning.], you can restrict a single file from being recorded spanning multiple discs.
Related Topics
Device screen-Screen Organization
Format
All files and directories in the media are deleted.
Tip
After formatting, you can return to the state before format processing by a rollback function.

13
Note
• The media capacity cannot be recovered after being formatted.
• When you select [Restore the capacity of the media.], media capacity can be recovered. Otherwise,
the rollback function cannot be used.
• When unable to format
The media is write-protected. Check the following, then format again.
ˇ
that the cartridge is possible to write with the Optical Disc Archive Drive. (For details, refer to the
ODS-D55U/ODS-D77U/ODS-D280U OPERATION MANUAL.)
ˇ
that the write-protect tab of the cartridge is not set to [Writing disabled]. (For details, refer to the
ODS-D55U/ODS-D77U/ODS-D280U OPERATION MANUAL.)
ˇ
that the [Make the drives rec-Inhibit] checkbox is not set to ON in the Setting screen. (Set the
checkbox to OFF, then perform "How to change the Operational Mode".)
ˇ
that the [Write-protect release] is not displayed on the [Write-protect] button in the Device
screen/Media Information.
How to format
1. Click the [Format] button.
"Are you sure you want to format the media? If you format it, all files saved on it are deleted. "
appears.
2. Click the [Yes] button.
When formatting is completed, "Format completed." appears.
3. Click the [Close] button.
Formatting is completed.

14
How to format (capacity recovery)
When you use rewritable media, you can format the whole media in order to free up the recorded space.
In addition, you can select the volume type from PARITY ON (Max: 60000 files) or PARITY OFF (Max:
240000 files) when the Optical Disc Archive 1 cartridge is injecting.
1. Select [Restore the capacity of the media.] in step 2 above, and click the [Yes] button.
Related Topics
Device screen-Screen Organization
Finalize (Write-Once media only)
When you finalize a media, the media will be read-only and cannot be written. The tolerance of the data
is improved.
Note
• When unable to finalize
The media is write-protected. Check the following, then finalize again.
ˇ
that the cartridge is compatible with the Optical Disc Archive Drive. (For details, refer to the ODS-
D55U/ODS-D77U/ODS-D280U OPERATION MANUAL.)
ˇ
that the write-protect tab of the cartridge is not set to [Writing disabled]. (For details, refer to the
ODS-D55U/ODS-D77U/ODS-D280U OPERATION MANUAL.)
ˇ
that the [Make the drives rec-Inhibit] checkbox is not set to ON in the Setting screen. (Set the
checkbox to OFF, then perform "How to change the Operational Mode".)
ˇ
that the [Write-protect release] is not displayed on the [Write-protect] button in the Device
screen/Media Information.
15
How to finalize
1. Click the [Finalize] button.
"Are you sure you want to finalize the media? If you finalize it, it is altered to be read-only. Once
started finalizing, it is irreversible. " appears.
2. Click the [Yes] button.
After finalizing is completed, ”Finalization completed.” appears.
3. Click the [Close] button.
Finalizing is completed.
Related Topics
Device screen-Screen Organization
Recover File
You can recover and restore broken files.
How to recover a file
Register a file
1. Click the [Recover File] button.
The list screen is displayed.
2. Click the [Add files] button.
3. Select the file you want to recover in the displayed screen, then click the [Open] button.
The file you want to recover is added in the list screen.
Tip
You can also drag and drop a file to add to the screen in step 3 by drag and drop.

16
Recovering a file
1. Click the [Recover File] button.
The list screen is displayed.
2. Select a file you want to recover and click the [Perform recovery] button.
3. Select the destination to save on the displayed screen after recovery, and then click the [OK] button.
Returning to the list screen, file recovery starts. When file recovery is completed, “Status” is changed
to “Recovery completed.”
Note
When you perform [Recover File], the file is recalled from the cartridge and recovered, and then stored in
other storage devices such as HDD.
How to perform the volume check
You can check and recover the file system.
Performing the volume check
1. Click the [Recover File] button.
The list screen is displayed.
2. Click the [Volume Check] button.
"Are you sure you want to perform the volume check?" appears.
3. Click the [Yes] button.
The volume check screen is displayed, and the volume check starts.
4. When the volume check is completed successfully, "No problem is found." appears.
If any problems are found, recover the volume according to the on-screen instructions.
Note
To recover the broken files, see "How to recover a file."
Related Topics
Device screen-Screen Organization
Volume Duplication
You can promptly duplicate the selected media data on a volume or folder unit to another media.
Also, you can duplicate to the hard disk drive (HDD) other than ODC (Optical Disc Cartridge).

17
To duplicate from Optical Disc Archive volume to other file system
volume such as local disk
1. Click the [Duplicate Volume] button.
"Are you sure you want to duplicate the volume? Please do not change files during the volume
duplication." appears.
2. Click the [Yes] button.
Select [Duplicate on a volume unit.] or [Duplicate on a folder unit.], and then click the [OK] button.
When you select [Duplicate on a folder unit.], click the [Reference] button to select the folder you
want to duplicate in the displayed screen.
3. Select [Select another volume.], and then click the [OK] button.
Select the folder you want to duplicate in the displayed screen or create the new folder, and then
click the [OK] button.
4. Select [Terminate the volume duplication.] or [Rewrite it.], and then click the [OK] button.
Volume duplication starts. The duplication status is displayed on the progress bar.
To duplicate from Optical Disc Archive volume to another Optical Disc
Archive volume
1. Click the [Duplicate Volume] button.
"Are you sure you want to duplicate the volume? Please do not change files during the volume
duplication." appears.
2. Click the [Yes] button.
Select [Duplicate on a volume unit.] or [Duplicate on a folder unit.], and then click the [OK] button.
When you select [Duplicate on a folder unit.], click the [Reference] button to select the folder you
want to duplicate in the displayed screen.

18
3. Select [Select the volume of Optical Disc Archive Drive.] and another Optical Disc Archive volume
from the pull-down menu, and then click the [OK] button.
Note that empty folder should be selected or new folder should be created.
4. Select [Terminate the volume duplication.] or [Rewrite it.], and then click the [OK] button.
Volume duplication starts. The duplication status is displayed on the progress bar.
Tip
When you select a duplication destination and select [Restrict disc spanning.], you can restrict a single
file from being recorded spanning multiple discs.
To duplicate to the same Optical Disc Archive volume
1. Click the [Duplicate Volume] button.
"Are you sure you want to duplicate the volume? Please do not change files during the volume
duplication." appears.
2. Click the [Yes] button.
Select [Duplicate on a volume unit.] in the displayed screen and the same Optical Disc Archive
volume from the pull-down menu, and then click the [OK] button.
3. Select the backup destination from another volume, and then click the [OK] button.
4. Select [Terminate the volume duplication.] or [Rewrite it.], and then click the [OK] button.
Volume duplication starts from the duplication source to the backup destination. The duplication
status is displayed on the progress bar.
When the volume duplication terminates from the duplication source to the backup destination,
the cartridge is automatically ejected and [Inject another cartridge as a duplication destination.]
appears.
5. Inject the cartridge, and then click the [OK] button.
[When injecting another cartridge] => Step 6
[When injecting the same cartridge] => Step 7
6. Select [Format the media, and duplicate to it.] or [Duplicate to the folder which you select.], and then
click the [OK] button.
Volume duplication starts from the backup destination to duplication destination. The duplication
status is displayed on the progress bar.
7. [The same cartridge as a duplication source has injected. You are recommended to duplicate the
media to another cartridge.] appears.
Click [Reselect] or [Confirm].
When you select [Reselect], the cartridge is automatically ejected and "Inject another cartridge as a
duplication destination." appears.
When you select [Confirm], go to Step 6.
Tip
When you select a duplication destination and select [Restrict disc spanning.], you can restrict a single
file from being recorded spanning multiple discs.

19
Related Topics
Device screen-Screen Organization
Log screen
Log screen-screen Organization
The log that occurred on the driver.
Date
Selects the date of log you want to display.
Click to display the dates of log in the list form.
Log
Displays the log list of selected date.
You can filter log types by [Information], [Warning], or [Error].
Double-click or right-click the list to display the log's detailed dialog.
Item Information displayed
Type Displays the type of log (information/warning/error)
Time The time when log occurred.
Contents Contents of log
Export button
Exports the log to any desired location.

20
Note
You cannot select the capacity for the Optical Disc Archive Drive.
How to export the log
1. Click the [Export] button.
The [Save as] screen is displayed.
2. Designate the file name and the destination to save, then click the [Save] button.
“Export completed.” appears.
3. Click the [Close] button.
The log is exported to the designated place.
Refreshing the Display
Select [Update] from the View menu.
Note
• A drive log may not be available with the old version of the Optical Disc Drive firmware.
• A drive log is not available from the drive with a cartridge injected.
Setting screen
Setting screen-Screen Organization
Sets the Operational mode for ODS-D55U/ODS-D77U/ODS-D280U.
Note
To validate change of a setup, it is necessary to re-inject the cartridge.

21
Operational Mode
Operational Mode Information
Write-verify
Write-verify in the Optical Disc Archive 1 media
Write a file on the volume while verifying if the writing is
successful.
Always write-verify in the Optical Disc Archive 2 media.
Note
Transfer speed will be changed. For details, refer to the ODS-
D55U/ODS-D77U/ODS-D280U OPERATION MANUAL.
Make the drives rec-Inhibit Prevents from writing to the drive.

22
Operational Mode Information
Synchronizes management data
to media, immediately after
completion of writing files
Saves finished files, even if an error occurs halfway through the
recording.
Note
“File System” operation mode: ON – Default setting Even in the
event of a drive power interruption or a failure in recording a
file, previously finished files are safely stored. Next time the
volume is mounted, only the damaged file during recording due
to such interruptions is deleted, while the other completed files
are recovered automatically. This is because system information
is updated and written every time a new file is recorded. It is
recommended to set to [ON], when safety comes on top of your
priorities.
“File System” operation mode: OFF The [OFF] mode provides
improved performance in recording a series of small files. In
addition, it enhances the efficiency rate of cartridge usage. On the
other hand, many files could possibly be deleted due to troubles
such as a power interruption during successive recordings. This
is because system information is updated and written once, right
after consecutive files are recorded. In the case of a recording
trouble, a rollback occurs and it returns to the previous state
before you start recording a series of files. Next time the volume
is mounted, the last complete file system update written to the
cartridge is valid. All previous small files unaccompanied by
complete file system records will be deleted and irrecoverable.
For this reason, it is recommended to set to [ON] under unstable
power supply environments.
Default Volume Type
Optical Disc Archive 1 :
When unformatted media is injected, it will be automatically
formatted to this volume type.
Always write with parity-added in the Optical Disc Archive 2
media. The maximum number of files is 480000.
Note
When parity-added write is performed, broken files will be
recovered/restored since performing “Recover File” corrects the
error with parity information.
[Restore the factory defaults] button
Restores the operational mode to the factory default settings.

23
[Apply] button
Determines the operational mode.
How to change the Operational Mode
1. Select a check box of the Operational Mode. Select [Default Volume Type] from the pull-down menu.
2. Click the [Apply] button.
“Operational mode setting has been changed. Reinject the cartridge to activate the mode newly
set.” appears.
3. Click the [Close] button.
4. Re-inject the cartridge.
The operational mode is changed.
How to return the operational mode to the factory default setting
1. Click the [Restore the factory defaults] button.
“Do you want to restore the factory defaults of operational mode settings?” appears.
2. Click the [Yes] button.
“Operational mode setting has been changed. Reinject the cartridge to activate the mode newly
set.” appeas.
3. Click the [Close] button.
4. Re-inject the cartridge.
The operational mode returns to the factory default setting.
Appendix
Alarm Code List
The contents of the alarm displayed on the drive information in the device screen are listed according to
each state of ODS-D55U/ODS-D77U/ODS-D280U.
When the error is eliminated, the indicator goes off.
• Alarms when a Cartridge is injected
• Alarms during Operation
• Alarms Relating to Sensors and Drives

24
Alarms when a Cartridge is injected
LED
a)
Alarm code Description Possible solution
Flashes four times
per second
50-010
50-011
51-020
51-021
54-008
The management area of the
disc is unreadable.
Unusable media; inject
another cartridge.
51-500 Unsupported disc.
The latest firmware is
required to use the media.
Get the latest Optical Disc
Archive Software, install it,
and update the firmware.
Flashes every
second
21-001
6D-000
This cartridge is nearing the
end of its use cycle.
You are recommended to
duplicate the data to another
cartridge at your earliest
convenience.
21-100 Unusable media; Consult your Sony Service
representative.
54-009 The cartridge and the disc do
not correspond.
Unusable media; inject
another cartridge.
54-000
54-001
54-002
54-003
Unsupported format of the
disc.
Unusable media; inject
another cartridge.
54-006 Unsupported format of the
cartridge memory.
Unusable media; inject
another cartridge.
54-004
54-005
54-007
95-517
95-518
Inaccessible to the cartridge
memory.
Reinject the cartridge.
a) ALARM indicator on the ODS-D55U/ODS-D77U/ODS-D280U.
Related Topics
Alarms during Operation
Alarms Relating to Sensors and Drives

25
Alarms during Operation
LED
a)
Alarm code Description Possible solution
Flashes every
second
6D-001 Unusable media; Consult your Sony Service
representative.
54-200
54-201
53-502
Detected an error in the
management area of the disc.
Reinject the cartridge.
54-004
54-005
54-007
95-517
95-518
Inaccessible to the cartridge
memory.
Reinject the cartridge.
54-006 Unsupported format of the
cartridge memory.
Unusable media; inject
another cartridge.
54-300 Physical format of the disc for
recording is being restored.
Do not turn off the power
while an error occurs.
Non-lighting 22-001 Multiple, simultaneous access
were frequently made to the
cartridge.
Do not conduct the following
operation;
performance may decline.
• Reading multiple files at
the same time
• Reading (writing) a file
while it is being written
(read)
• Producing a duplicate
copy of a file in the same
volume
For details, see “Inadvisable
Operations.”
91-552 Mounting failed. Eject the cartridge and insert
the same cartridge again.
91-553 A read error occurred.
91-554 A write error occurred.
a) ALARM indicator on the ODS-D55U/ODS-D77U/ODS-D280U.
Related Topics
Alarms when a Cartridge is injected
Alarms Relating to Sensors and Drives

26
Alarms Relating to Sensors and Drives
LED
a)
Alarm code Description Possible solution
Flashes four times
per second
95-50D
95-51D
37-901
37-A01
37-B01
37-C01
47-901
47-A01
47-B01
47-C01
Internal temperature of the
drive is abnormal.
Turn off the drive immediately
and disconnect the power
cable.
If you continue to use
the drive, the internal
temperature may rise higher
and cause damages or fire.
Flashes every
second
95-50E
95-51E
37-900
37-A00
37-B00
37-C00
Internal temperature of the
drive has risen.
Be sure not to block up
ventilation holes on the front
and back of the drive, and
release heat.
3E-500 The drive is not set
horizontally.
Please set the drive
horizontally.
95-52A Mismatch of the serial
number of the drive unit was
detected.
Perform the drive adjustment.
Flashes four times
per second
3E-501 The drive is not set
horizontally.
Turn off and turn on the
drive after setting the drive
horizontally.
20-xxx Detected an abnormality in
the mechanical control of the
drive.
Please push the EJECT button
and eject the cartridge when
the cartridge is not ejected.
Turn off and turn on the drive
if the cartridge cannot be
ejected.
20-117 Detected an abnormality in
the mechanical control of the
drive.
There is a possibility that the
cartridge unable to handle
was injected.
52-00B
52-08B
52-10B
52-18B
72-00B
72-08B
72-10B
72-18B
Inaccessible to the disc. Reinject the cartridge.

27
LED
a)
Alarm code Description Possible solution
Flashes every
second
6F-E00
6F-E80
6F-F00
6F-F80
8F-E00
8F-E80
8F-F00
8F-F80
Unable to write to the disc. Reinject the cartridge.
Flashes four times
per second
6F-E03
6F-E83
6F-F03
6F-F83
8F-E03
8F-E83
8F-F03
8F-F83
Inaccessible to the disc. Reinject the cartridge.
Flashes every
second
3F-511 It is time for replacement of
the air filter.
Replace the air filter.
b)
a) ALARM indicator on the ODS-D55U/ODS-D77U/ODS-D280U.
b) For details, refer to the operation manual.
Related Topics
Alarms when a Cartridge is injected
Alarms during Operation

28
About Optical Disc Archive Utility Command
Line Interface
Overview
Optical Disc Archive Utility Command Line Interface is included with Optical Disc Archive Software. In the
Optical Disc Archive Utility functions, the following are supplied as the available commands in the CUI
environment.
• Drive information display
• Update drive firmware
• Media information display
• Log export
Limitations
• The Optical Disc Archive Utility Command Line Interface command cannot be executed via multi
processes at the same time.
• The Optical Disc Archive Utility Command Line Interface command and GUI application of Optical
Disc Archive Utility cannot be used at the same time.
• Administrator privileges are required to execute the Optical Disc Archive Utility Command Line
Interface.
About commands
Optical Disc Archive Utility Command Line Interface supplies a command system that has a hierarchic
structure.
The oda-util command, which is the base command, has management commands such as the oda-util
drive command. Management commands have commands that supply concrete functions such as the
oda-util drive info command.
For more details of each command, perform the command with “--help” option, then refer to the help.
Outputs the help of the base command
# oda-util --help
Outputs the help of the management command
# oda-util drive --help
Outputs the help of the command
# oda-util drive info --help
oda-util drive
Management command to control the drive.
The main function of this command is supplied via the following commands.
29
Available commands
• oda-util drive info
Outputs the drive information.
• oda-util drive update
Updates the drive firmware.
• oda-util drive version
Displays the drive firmware version and whether it can be updated or not.
oda-util log
Management command to control the log.
The main function of this command is supplied via the following commands.
Available command
• oda-util log export
Exports the log.
oda-util media
Management command to control media.
The main function of this command is supplied via the following commands.
Available command
• oda-util media info
Outputs the media information.

30
About the file system
Overview
This section explains the overview of the file system.
• Mount operations
• Limitations
• Inadvisable Operations
Mount operations
[Volume] means the file system of the media that is formatted.
[Mount] means the status where access to the volume is possible.
On your desktop, the volume is mounted automatically by system. On the current supported RHEL6
system, it is mounted under the /media/ directory. On the RHEL7 system, it is mounted under the /run/
media/user_name/ directory.
When the device administering tool is not operated, mount the volume manually as in the following
example.
mount -t odaudf/dev/sdx/*mount-point
*Specify the mounting directory to the mount-point.
When the mount command is executed, the root authority is required.
When the file system type is not specified to odaudf, be careful as the operation may not be done
correctly.
For the blank media
When the media is inserted to the drive, it is formatted automatically, then it is mounted as the empty
volume that does not contain files and directories.
Optical Disc Archive 1 media
You can select one of the following volume types depending on the volume type for the setting screen/
rule for Utility in advance.
• PARITY ON (Max 60000 files)
This is the format that can create up to 60,000 files (including directories).
When recording the file, the redundant parity data is created automatically. This parity data is used
when file restoration is needed.
• PARITY OFF (Max 240000 files)
This is the format that can create up to 240,000 files (including directories).
When recording the file, the parity data is not created.
Optical Disc Archive 2 media
• PARITY ON (Max 480000 files)
This is the format that can create up to 480,000 files (including directories).

31
When recording the file, the redundant parity data is created automatically.
This parity data is used when file restoration is needed.
For the rewritable media
You can change the volume type of the media that is formatted to one of the volume types above to
another volume type by selecting [Restore the capacity of the media.] when using the format function of
Utility.
(Refer to How to format (capacity recovery).)
For the write-once media
You cannot change the volume type of the media that is formatted to one of the volume types above.
For media that is already formatted
You can access files and directories created on volume.
When the volume is recordable, you can create a new file and directory.
You can also perform reading, viewing, deleting, changing of the name, moving, changing of the
attributes, and changing of the volume label, of the file and directory that are already created.
When the recording operation of the volume is disabled or restricted, you can perform reading and
viewing of the file and directory, but you cannot perform creating, changing of the name, moving,
changing of the attributes, and changing of the volume label.
You can check whether the volume is recordable or not on the device screen/media information/
recording operation of Utility.
When the media cannot be mounted due to an abnormality
You cannot access the file or directory that is created on volume.
Check the mount state of the volume on the device screen/media information/mount state of Utility.
Related Topics
Device screen- Format
Limitations
The number of the maximum files + directories
You can create the following files + directories depending on the type of the volume.
Optical Disc Archive 1 media
• PARITY ON (Max 60000 files): Up to 60,000
• PARITY OFF (Max 240000 files): Up to 240,000
Optical Disc Archive 2 media
• PARITY ON (Max 480000 files): Up to 480,000
The root directory is counted as one. There is one directory (root directory) even with an empty volume.

32
File and directory hierarchy
You can create up to 64 hierarchies for files and directories.
The root directory is counted as one hierarchy.
The file that is created on the root directory is counted as the second hierarchy.
File name
The usable characters for the file and directory name are from 1 to 127 characters in Unicode 2.0.
Characters in surrogate pair are counted as two characters.
You cannot use the following characters for names.
Code Character
U+0000 (null)
U+002F / (slash)
You cannot compose a name using only “.” (dot) or “..” (consecutive dots).
You cannot use double file names in (IGNORE CASE) on the same directory.
You cannot compose a name using only “$” (dollar) or “$$” (consecutive dollar) under the root directory.
Volume label
The usable characters for the volume label are from 1 to 63 characters in Unicode 2.0.
Characters in surrogate pair are counted as two characters.
You cannot use the following characters for names.
Code Character
U+0000 - U+001F
U+0022 " (double quotation)
U+002A * (asterisk)
U+002F / (slash)
U+003A : (colon)
U+003C < (less than)
U+003E > (greater than)
U+003F ? (question mark)
U+005C \ (back slash, or Yen mark)
U+007C | (vertical bar)
U+007F (DEL)
You cannot use a character string beginning with “.” (dot).
File recording
You can only open one file in recording mode. Only sequential recording is possible.
Normally, you cannot open the recorded file in recording mode.
The following recording file can be opened in recording mode and recorded additionally through
sequential recording.
• Last recorded file
• Size zero (0) files.

33
Inadvisable Operations
Files of the source and destination may be lost if an impairment occurs during the file moving process.
Do not move the file if an impairment occurs.
When any of the following inadvisable operations ([1] to [4]) is performed to the cartridge, cartridge
accessing becomes slow. If this situation continues for a long time, access to the cartridge will be
temporarily prohibited.
This error will be resolved when the cartridge is re-inserted.
Perform the operations on Possible solution instead of the inadvisable operations.
Inadvisable operations Possible solution
[1]
Reading files simultaneously
Example:
In Nautilus, while copying the recorded file on the
ODA media to your local folder with drag-and-
drop, at the same time you drag-and-drop another
file on the ODA media to your local folder.
Such simultaneous operations should not cause
an error. However, if the two files are located
on different discs, the transfer rate will become
extremely slow because the discs will swap for
every 64 KB to 1 MB of data copied, and the
media's durability will deteriorate.
Finish copying the first file to your local folder (the
computer’s hard disk or another medium), then
start copying the next file.
[2]
Reading a file while recording, or recording a file
while reading
Example:
In Nautilus, while copying a file in your local folder
to the ODA media with drag-and-drop, at the same
time you copy another file on the ODA media to
your local folder with drag-and-drop.
These two operations will continue but if the files
are on different discs, the transfer rate will become
extremely slow because the discs will swap for
every 64 KB to 32 MB of data copied, and the
media's durability will deteriorate.
Finish copying the file to the ODA media, then
copy the file on the media to your local folder (the
computer’s hard disk or another medium).

34
Inadvisable operations Possible solution
[3]
Producing a duplicate copy of a file in the same
volume
Example:
In Nautilus, right-click and drag the file recorded
on the ODA media to the folder, then select [Copy
here].
This copy operation does not cause an error, but
if the files are on different discs, the transfer rate
will become extremely slow because the discs will
swap for every 64 KB to 32 MB of data copied, and
the media's durability will deteriorate.
Finish copying the file to the computer’s hard disk
(or some other medium), then copy that file again
from the hard disk to the ODA media.
[4]
Reading a file which is spread over more than one
disc
Example:
When playing a clip file via XDCAM Viewer, if the
file is recorded over more than one disc in the ODA
media, then you move the slider on the position
bar repeatedly from side to side.
The transfer rate will become extremely slow
because the discs will swap frequently, and the
media's durability will deteriorate.
Copy the file to the computer’s hard disk (or some
other medium), then play (or scrub, etc.) the
copied file from that medium.
When Content Manager (recommended software
for ODA) is used while recording to the ODA media,
recording over multiple discs can be prevented. (If
the recording file size is larger than the available
disc space, the recording over multiple discs
cannot always be prevented.)

35
Trademarks
• Optical Disc Archive Drive logo are trademarks of Sony Corporation.
• Intel Core 2 Duo and Intel Xeon are trademarks of Intel Corporation or its subsidiaries in the United
States and/or other countries.
• Microsoft and Windows are registered trademarks of Microsoft Corporation in the United States and/
or other countries.
• Mac OS is a registered trademark of Apple, Inc. in the United States and/or other countries.
• EEMBC and CoreMark-Pro are registered trademarks of the Embedded Microprocessor Benchmark
Consortium.
