
Wesleyan University The Honors College
Destruction of the Default User:
Designing and Building a Gender-Inclusive Electric
Guitar in a World Designed For Men
by
Leo Elliot Rose
Class of 2024
A thesis submitted to the
faculty of Wesleyan University
in partial fulfillment of the requirements for the
Degree of Bachelor of Arts
with Departmental Honors in General Scholarship
Middletown, Connecticut April, 2024


Acknowledgements
Firstly, to my family, for always supporting the things I am passionate about:
This document could not exist without you guys telling me to go for it when I wanted
to build my rst guitar in 2018.
To my mom specically, for being the best mom and also a ridiculously
powerful female role model: When my middle school English teacher told me to call
you to come to school and bring my missing assignment, it was really awesome that I
got to say “That’s not going to happen, my mom’s in a meeting with the Mayor.” Dope
as hell. I never handed that assignment in.
To my sister, for teaching me how to cite my sources: I had no idea how to do
that shit until quite literally 11 pm the night before this was due. Amazing work.
To my Dad, for serving as a day-to-day advisor and master planner of this
thing: You are really good at that. NBA-level, one might say.
To my roommates, Charlie, Taua, and Kyle: I’m sorry for making the house so
cluttered with wood and tools and the like. Thank you for not getting mad at me.
To the boys, who helped calm me down after what I describe in my design log
as “hell week”. Thank you for being so ass at ping-pong. The fact that I only lost like
two matches over spring break helped my condence somewhat.
To Katie Humble: Thank you for inspiring me to do this project.
1

To Ben Crowe and Crimson Guitars: Thank you for existing and for teaching
me everything I know about building guitars.
And nally, to you, the reader: Thanks for being here. This is going to be fun.
2

Table Of Contents
Acknowledgments - - - - - - - - - - - - - - - - - - - - - - - - - - - - - - - - - - - - - - - - - 1
Table Of Contents - - - - - - - - - - - - - - - - - - - - - - - - - - - - - - - - - - - - - - - - - 2
Introduction - - - - - - - - - - - - - - - - - - - - - - - - - - - - - - - - - - - - - - - - - - - - - 5
Guitar Anatomy- - - - - - - - - - - - - - - - - - - - - - - - - - - - - - - - - - - - - - - - - - - 9
What Does It Mean To Be A Guitarist? - - - - - - - - - - - - - - - - - - - - - - - - - 14
Empathize - - - - - - - - - - - - - - - - - - - - - - - - - - - - - - - - - - - - - - - - - - - - - - 19
Dene- - - - - - - - - - - - - - - - - - - - - - - - - - - - - - - - - - - - - - - - - - - - - - - - - - 48
Interviews- - - - - - - - - - - - - - - - - - - - - - - - - - - - - - - - - - - - - - - - - - - - - - - 53
Ideate, Prototype, Test (#1) - - - - - - - - - - - - - - - - - - - - - - - - - - - - - - - - - - 62
The Final Design and Build- - - - - - - - - - - - - - - - - - - - - - - - - - - - - - - - - - 75
Moving Forward- - - - - - - - - - - - - - - - - - - - - - - - - - - - - - - - - - - - - - - - - - 90
Works Cited- - - - - - - - - - - - - - - - - - - - - - - - - - - - - - - - - - - - - - - - - - - - - 92
Appendix- - - - - - - - - - - - - - - - - - - - - - - - - - - - - - - - - - - - - - - - - - - - - - - 97
3

4

Introduction
I’ve been playing guitar for thirteen years and building them for six. A few years
ago, conversations with female guitarist friends led me to realize that guitars are not
designed for women. Further research into the problem led me to discover that these
ergonomic issues are one of several barriers that can make guitar, and especially the
electric guitar, less accessible to female guitarists than male ones. Additionally, these
barriers are a symptom of a greater issue: When we design for a general population, we
really only design for men. To combat this, I decided to design and build a guitar that
was more ergonomic for women. Quickly I discovered the process would not be
simple- Even saying I’m going to design and build an electric guitar for women implies
that women can’t play the guitars that exist, which isn’t true. So how did I go about
doing it?
This thesis is largely centered around concepts central to a eld known as
Human-Centered Design. Human centered design is the practice of designing with a
user group (as opposed to for them), understanding the context in which the group's
issues lie through secondary research, and building collaborative relationships with the
individuals in the group. When one designs from the perspective of the user group, the
process can lead to unexpected solutions that are embraced by not only the user group,
but the population as a whole. Based on that logic, by working with women to design a
5

guitar xes some of their ergonomic issues, I can design and construct a guitar that is
better for many users, not just women.
At the start of my thesis journey, I committed myself to design in this way by
using a very well known ve-step process: Empathize, Dene, Ideate, Prototype, Test.
This process is not linear, and going through the process can lead to questions that
require you to repeat other phases of the design process. For example, in dening my
design challenge, I realized I would need to interview women to gain a more specic
understanding of how they interact with their guitars.
In lieu of traditional chapters, this thesis is organized by the same steps featured
in the design process. The rst section of this thesis is called empathize, and it is the
rst step in the design process. In empathize, I conducted secondary research to
understand the context of gender-based issues in the guitar industry. I was fascinated
and horried to uncover the extent to which gender-based design issues translated to
other objects and services, including bicycles, sneakers, and snow-plowing schedules.
The second step in the design process is called dene. In order to create this
guitar, I needed to understand what my own personal goals were for the project and to
create a design challenge for me to shoot for.
The third section is called interviews. After dening my design challenge, I
further empathized with my user group by interviewing women about their experience
playing guitar. The goal of these interviews was to uncover the specic design elements
6

that made electric guitars uncomfortable for some women, so that I could generate a
design that adequately responded to those needs.
Using the data gathered from the interviews, I created a new set of design goals
(far more specic than my broad ideas from dene), then designed and built a
prototype guitar to serve those goals. I also tested it with members of the interview
group to determine its eectiveness. This section is called ideate, prototype, test #1
The Final Design and Build is quite literally just that- a deep dive into the
steps I took to make a new design that responded to the issues of the rst prototype,
and then the manufacturing of that design, resulting in a complete guitar.
Penultimately, moving forward includes my reections on the process of the
project and what steps I may take moving forward. The nal guitar I produced for this
project is the rst fully functional prototype of a design which I hope to improve upon
in the near future.
Finally, there is a complete design log in the appendix.. Almost every time I
worked on the guitar, I wrote about it in the design log. It goes farther into depth from
a content standpoint than what I thought was appropriate for a general audience. It is
very much worth reading, in order to understand the complete story of designing and
building this guitar. In the thesis itself I do my best to remove myself- my personal
thoughts, emotions, and biases- from the equation, and act as a vehicle for the design
process. I am a cisgender man, and my personal opinions of what a guitar that suits
female ergonomic needs should look like are irrelevant. As a result, none of the design
7

issues I responded to came from my head alone- they were created from the interviews.
The design log is the opposite. While it chronicles the steps I took, it also is a journal of
my thoughts and emotions at the time I took these steps and reached my conclusions.
Before taking you through the sections described above, I have added two
sections: “Guitar Anatomy” and “What Does It Mean To Be A Guitarist.”
Recognizing that not everyone has a full understanding of the various elements that
make up a guitar and the related language that I use in the body of my thesis, “Guitar
Anatomy” is a primer on what makes up a guitar. “What Does It Mean To Be A
Guitarist” was written to address conversations I had with a number of people
throughout the process of creating this thesis. It takes a look at the word “guitarist”
and denes how I use it in the context of this thesis.
8

Guitar Anatomy
What are the dierent components of an electric guitar? (Figure 1)
● The Strings.
○ The strings on an electric guitar are made out of magnetic material like cobalt
or nickel, and they vibrate when plucked at a frequency determined by their
length and tension. These strings are generally ordered such that the largest
string with the lowest pitch is closest to the player. Most electric guitars have six
strings, but some have seven, eight, or even nine. Any extra strings are usually
lower in pitch than the low E string.
● The Neck
○ The neck of the guitar contains the playing surface of the guitar, called a
fretboard (see below). It also houses the truss rod, a thin piece of metal rod
that can be shortened or lengthened, bending the neck to change the height of
the strings above the fretboard. This is called the action. Necks must be made
of a wood that is hard and stable, because the strings exert a bending force on
the wood. The most common wood for guitar necks is maple due to its
strength, durability, and low environmental impact.
1
1
Stringjoy, “Guitar Wood Types: A Guide to the Tonewoods Used in Guitar
Building,” Blog/ecommerce, Stringjoy, April 14, 2015,
https://stringjoy.com/guitar-wood-guide-tonewoods-guitar-building/.
9

○ The most important dening feature of a neck is the prole, which denes the
shape of the neck.
2
Necks will be thinner towards the headstock, the part of
the neck that houses the tuners, and thicker towards the neck heel, the part of
the neck closest to the body.
3
The thickness and shape of the neck is generally a
very subjective thing. Some players like thin necks with a v shape, some players
like thick necks with a D shape. Dierent shapes oer dierent levels of speed
and comfort. Many “fast” necks, like those on ibanez guitars, are very thin,
which makes them more popular among guitarists who “shred.”
4
● The Fretboard
○ The fretboard which is glued to the neck, is the portion of the neck that your
ngers touch while playing. The fretboard holds the frets, pieces of metal that
are spaced along the fretboard at specic distances to create accurate pitches.
Fretboards tend to be around ve to six millimeters thick, and are made out of
exceptionally hard woods like rosewood or ebony.
5
The fretboard may contain
inlays, designs cut out of a variety of materials that signify which fret you are
pressing down on.
5
Stringjoy, “Guitar Fretboard Woods: The Ultimate Guide,” October 5, 2020,
https://stringjoy.com/guitar-fretboard-woods/.
4
McCracken, “Guitar Neck Profiles Explained: Find Your Perfect Playing
Partner.”
3
Frank Ford, “Heel,” September 14, 1998,
http://www.frets.com/FretsPages/General/Glossary/Heel/heel.html#:~:text=The%
20heel%20is%20the%20portion,called%20a%20%22French%20heel.%22.
2
Matt McCracken, “Guitar Neck Profiles Explained: Find Your Perfect Playing
Partner,” March 22, 2023,
https://www.guitarworld.com/features/guitar-neck-profiles-explained.
10

● The Body.
○ The body of the guitar houses the pickups, bridge, electronics (described
below), and attaches to the neck via the neck pocket. Bodies are generally
between one and a half to two and a half inches thick, although not uniformly
so. Many bodies have sections carved out to make the guitar more comfortable
to play. These are called carves or cuts. Most guitar bodies feature an upper
bout, a waist, and a lower bout. The upper bout is the curves of the body
that are closer to the neck, and a lower bout is the curves of the body closer to
the tail end of the guitar. The waist is in between them, with the waist being
the thinnest of the three. Generally, lower bouts are wider than upper bouts.
The upper bout likely includes one horn if not two horns. They are called
horns because of their shape. A body with one horn on the treble side is called a
single-cut. A body with two horns (one on each side) is called a double cut.
On double-cuts, the bass side horn is usually larger than the treble side horn.
6
● The Nut.
○ The nut regulates the height and placement of the strings at the headstock end
of the fretboard.It is generally made of a hard material like bone, although
vegan alternatives such as TUSQ are often used. The nut has six slots that the
strings sit in. It sits in a slot called the nut slot.
7
7
Sweetwater.
6
Sweetwater, “Parts of a Guitar,” September 6, 2023,
https://www.sweetwater.com/insync/parts-of-a-guitar/.
11

● The Bridge
○ The bridge regulates the height and placement of the strings on the body.
There are many dierent bridge designs available. They are generally made of
aluminum or brass. The distance between the bridge and the nut is called the
scale length. It is generally between twenty-four and twenty-seven inches for a
standard tuning guitar. The scale length determines the distance between each
fret.
8
● The Tuners
○ Located at the far end of the neck, the tuners control the base pitch of each
string.
9
● The pickups.
○ Much of an electric guitar’s sound is determined by the pickups. Pickups are
made by wrapping copper wire around a magnetic core. This creates a small
electromagnet that has a eld which is disturbed by the strings, which are made
out of magnetic material. Two of these coils stuck together reduces hum and is
called a humbucker.
10
● The Electronics
○ Electronics allow you to switch between tones and change the sound of your
instrument. The most popular one is the switch. With a switch, you can have
10
Sweetwater, “Guitar Pickup Types Explained,” December 19, 2023,
https://www.sweetwater.com/insync/guitar-pickup-types-explained/.
9
Sweetwater.
8
Sweetwater.
12

multiple pickups on a guitar and choose which one or which combination of
pickups you want to use. For example, on a stratocaster, the switch has ve
positions: the neck pickup by itself, the neck and middle pickups together, the
middle pickup by itself, the middle and bridge pickups together, and the bridge
pickup by itself. Many guitars also have volume knobs. By using a variable
resistor potentiometer, you can change how much of the signal goes to the
output jack, which changes the volume. There are also tone circuits, which
remove frequencies from the signal using capacitors.
11
11
Sweetwater, “Parts of a Guitar.”
13

What Does It Mean To Be A
Guitarist?
Can the word guitarist refer to anyone who plays guitar, or is it more
complicated?
One could argue that Taylor Swift is one of the most inuential guitarists of all
time, because she is the direct cause of many people (young women especially) picking
up the guitar.
12
When I talked about this subject with men, they brought up the
argument that Taylor Swift isn’t a guitarist, at least not in the same way that Jimi
Hendrix, who is the most inuential “guitarist” of all time, is.
So why do people see Jimi Hendrix as a guitarist and not Taylor Swift? It’s in
the way they play. While about half of Swift's albums are guitar-centric, as most
country-rock (Taylor Swift, Speak Now, Fearless) and Folk (Folklore, Evermore) music
is, those albums are not “about” guitar.
13
The guitar acts as a harmonic, rhythmic,
melodic, and timbric base which the lyrics sit on top of - If Taylor Swift’s music was a
company, the guitar would be the worker, and the lyrics/melody would be the boss. If
you look at Jimi Hendrix’s music, the guitar is not the base of the song - it is the most
13
Kristen Hudgins, “How Taylor Swift Masterminded Global Success, Explained by
SOMD Experts,” University of Oregon School of Music and Dance, accessed April 17,
2024, https://musicanddance.uoregon.edu/TaylorSwift.
12
Jon Erickson, “A Taylor Swift Trend: More and More Girls Learning Guitar,
Music School Owner Says,” NBC26, December 4, 2023,
https://www.nbc26.com/news/local-news/a-taylor-swift-trend-more-and-more-girls
-learning-guitar-music-school-owner-says.
14

important part. Jimi Hendrix is a ne lyricist, but not a spectacular singer. If Taylor
Swift is not a guitarist, then Jimi Hendrix is not a vocalist, at least not in the way that
Taylor Swift is.
When I look at a piece of music from a critical perspective, I like to think about
what matters most. A good example of this is intellectual property. The copyrightable
material in a song consists of the melody, the lyrics, and the recording.
14
If I made a
song that re-recorded the instrumental elements from a Taylor Swift song but with a
dierent melody and dierent lyrics, I would have ripped her o, but if she sued me she
wouldn’t win. If I made a song that used the guitar line from the intro of “Purple
Haze,” by the Jimi Hendrix Experience, even if the melody of the vocal and the lyrics
were dierent, Hendrix’s estate could sue me for a portion of the rights to that song.
This is because that intro guitar line is a melody, and thus copyrightable.
15
Dierent
elements of a piece of music have dierent “weights” when it comes to recognizing that
song. In Taylor Swift’s music, it's the vocals and melody that have more weight than
the instrumental. In Jimi Hendrix’s music, the instrumental, and specically the guitar,
is arguably more recognizable.
That being said, there are several artists for whom I would argue their guitar
playing is on an equal level to their vocals and songwriting. One of the most famous
examples of this is John Mayer. He is known now as the guitar player lling in the role
15
“What Musicians Should Know about Copyright.”
14
“What Musicians Should Know about Copyright,” Copyright.gov, accessed April 17,
2024, https://www.copyright.gov/engage/musicians/.
15

of the late Jerry Garcia in Dead & Co
16
. However, his fame and platform came from
his ability to write great songs and sing well.
He won the Grammy for best pop vocal performance for “Your body is a
wonderland” and best song for “Daughters”- two of his songs that are less
guitar-centric.
17
Over time as he began to use as he would put it “the role of being a
guitarist” in his music, his audience began to change. His songs were initially most
popular with women under the age of 30, but now a lot of his audience is men,
specically men who play the guitar or are fans of guitar-centric music.
18
Another example of an artist like this is Joni Mitchell. Joni Mitchell is best
known for her songwriting and vocal ability, but I love her as a guitarist. She uses
alternate tunings extensively, and many of her songs are harmonically complex.
19
Yes,
the guitar parts do exist more as a “bed” for the lyrics and melody, but they are far more
complex than most music that ts in the singer-songwriter genre.
Adrienne Lenker is the same way. She is known best for her songwriting, but as
a musician I am in love with her guitar playing. I would argue that the vocals and
guitars in her songs are linked- if you took the complex guitar parts away and replaced
them with simpler ones, the songs would not be as good. Additionally, her guitar parts
19
Lloyd Whitesell, The Music of Joni Mitchell (Oxford University Press, 2008),
https://doi.org/10.1093/acprof:oso/9780195307993.001.0001.
18
Max Beyer, “The Evolution of John Mayer,” The Gustavian Weekly, March 5,
2010, sec. Variety,
https://weekly.blog.gustavus.edu/2010/03/05/the-evolution-of-john-mayer/.
17
“John Mayer,” Grammy Awards, accessed April 17, 2024,
https://www.grammy.com/artists/john-mayer/14891.
16
Dean Budnick, “Dead & Company: The Origin Story,” Relix, July 14, 2023,
https://relix.com/articles/detail/dead-and-company-the-origin-story/.
16

require a high level of skill to play correctly- I’ve been playing guitar for 13 years and I
struggle with Adrienne Lenker songs far more than I do with Jimi Hendrix ones.
20
But are John Mayer and Adrianne Lenker singer/songwriters, or are they
guitarists? I think it doesn’t really matter, and that anyone can be both. Often in music
people are pigeonholed into one category, and I think that only serves to hurt music as
a whole. You can be a pop singer while also being a guitarist.
I think this is more of a philosophical issue than a legal one. I go on in this
thesis to talk about how the activity of playing the electric guitar is a male-coded one,
and I think in conjunction with that, the word “guitarist” has similarly become male
coded. Instead of meaning “someone who plays guitar” it has come to mean, “someone
who uses the guitar as their primary artistic tool.” Jimi Hendrix’s primary artistic tool is
his guitar, and Taylor Swift’s is her songwriting. Due to the fact the electric guitar is a
“male” object, there are far fewer female “guitarists.”
By saying a guitarist is someone who uses the guitar as their primary artistic
tool, I would be perpetuating the ideas that have led the electric guitar industry to take
50 years to make a signature model of a popular female artist’s guitar, that have led
journalists to write articles titled “Top 10 Female Guitarists Of All Time,”
21
that have
led guitar stores to be uncomfortable environments for women, that have led electric
21
Aaron Cameron, “Top 10 Female Guitarists Of All Time,” n.d., 10,
https://wm-dev.watchmojo.com/articles/top-10-female-guitarists-of-all-time/script-
written-by-aaron-cameron.
20
Amanda Petruisch, “Adrianne Lenker’s Radical Honesty,” October 12, 2020,
https://www.newyorker.com/magazine/2020/10/19/adrianne-lenkers-radical-hone
sty.
17

guitars to be in some cases uncomfortable instruments for women to play.
22 23
It is for
this reason that in this thesis, when I use the word guitarist, I am referring to anyone
who can play the guitar at any level.
With that out of the way, let’s start the design process with empathize.
23
Chris Mcmahon, “Don’t Be That Guy: Is Sexism Hurting Guitar Shops?,”
October 2, 2015,
https://reverb.com/news/dont-be-that-guy-is-sexism-hurting-guitar-shops.
22
Monique Bourdage, “‘A Young Girls Dream’: Examining the Barriers Facing
Female Electric Guitarists,” IASPM@Journal 1, no. 1 (April 15, 2011): 1–16,
https://doi.org/10.5429/2079-3871(2010)v1i1.1en.
18

Empathize
Empathy as a mindset for inclusion
Practicing empathy can help designers gain a better understanding of what the
problems users experience are, and what may be done to x them. In this section, I
empathize with my user base by doing secondary research, using that to inform
conversations with users as a jumping o point for further collaboration.
An IDEOu article titled “How To Get Started In Inclusive Design” teaches
empathy as a means to get started in the design thinking process through the use of
inclusive mindsets. One mindset outlined in the article is the “collaborative
relationship builder.”
24
By forming interpersonal relationships with members of the
chosen user group and giving them the context of the design challenge, users can be
treated as collaborative designers as opposed to information resources. For example,
instead of asking one of my interviewees whether or not they thought making the bass
side of the body smaller would help guitarists with breasts feel more comfortable, I
asked my interviewees about their experiences playing the guitar, and what they think
could be done better. By being a collaborative relationship builder, I was more likely to
get helpful feedback from my user group and reduce my own bias.
Another mindset outlined in the article is the “conscientious advocate.” “A
conscientious advocate actively looks for opportunities to balance power and remove
24
Coe Leta Stafford and Nusrat Ahmed, “How to Get Started with Inclusive Design,”
Inclusive Design Mindsets (blog), accessed April 17, 2024,
https://www.ideou.com/blogs/inspiration/how-to-get-started-with-inclusive-design.
19

barriers that prevent fair participation.”
25
In order to empathize with my user group I
discovered and explored the barriers and power imbalances that exist in order to nd
ways to disrupt them during the later sections of this thesis. A great mindset to use
during this process was that of the “informed partner.” An informed partner is
someone who researches the issues the user groups may face before interacting with
them. By doing secondary research, I could better understand the context of the issues
my user group faces.
The nal mindset outlined in the article is the “curious researcher.”
26
A curious
researcher is someone who does not bring their own thoughts and assumptions into
conversations with members of the user group. By attempting to remove oneself from
the equation, one gains a truer understanding of the issues they are trying to solve. For
me, this was particularly dicult because I am a relatively experienced guitarist and
luthier. I had to be careful not to ask questions that would lead people to conrm my
own biases about what the guitar might look like. Although I was leading the
interviews, I had to let the interviewees lead me to their conclusions about the design
of the guitar, not the other way around.
By becoming a curious researcher, an informed partner, and a collaborative
relationship builder, I could eectively empathize with my design challenge. One of the
primary ways I used these methods to empathize was through secondary research.
Through this process, I discovered two things: Firstly, there exists a serious gender bias
26
Stafford and Ahmed.
25
Stafford and Ahmed.
20

towards male users in the guitar industry. Secondly, the biases in the guitar industry are
merely a symptom of the gender biases in the world of design itself.
Men as the Default User
Anyone can use any object, within reason. But not every object is for every person. One
example of this is soccer- As you grow up, the size of the ball you use changes to
accommodate the players getting older, bigger, and stronger. When I play soccer with
my friends, I bring an adult size ball, not a ball designed for six year olds; when a six
year old goes to play soccer with their friends, the opposite is true. The size of an object
is one way that designs can be successfully ported to dierent user groups. There would
be a problem if all soccer players, young and old, had to use an adult sized ball, and a
bigger problem if the people who designed and manufactured the soccer balls said that
their balls were designed for everyone, no? Unfortunately, many of the objects that are
used by everyone are not designed to be used by everyone.
All too frequently when something is intended to be designed for a broad user
group it is - in reality - designed only for men. One clear-cut example of this is crash test
dummies. Women are 73% more likely to be injured in a car crash than men. This is
because the crash test dummies used for the past 60 years have all been designed with
male anatomical features. Crash tests have never taken into account that female bodies
21

are dierent from male ones, and therefore might behave dierently during a crash.
27
When you read this, you probably think “how stupid could they be? How could they
not have thought to make a female crash dummy until now?” Think about this: how
many women were involved in creating the crash test guidelines, or worked in high level
design positions at car companies? Looking closer at almost any industry reveals that
we live in a world that was designed by, and coincidentally for, men.
The case of the crash test dummy example brings into question the idea of a
“default” user. When a designer creates a product, who are they visualizing using that
product as they design it? This is the default user. It is a sad reality that in the majority
of cases the default user is male.
Another example of men as the default user is the size of the piano keyboard.
Anyone can play the piano, but the physical design of pianos gives an advantage to male
users over female users because men have, on average, larger hands. The average female
handspan is just larger than the spacing of one octave on a piano, while the average
male hand span is larger by a more comfortable amount. This makes it so that men are
more likely to nd acclaim at the professional level than women. Additionally, the
women that do nd professional acclaim tend to have larger-than-average hands
compared to the average female hand-size.
28
The size of the piano doesn’t stop women
28
Caroline Criado-Perez, Invisible Women: Data Bias in a World Designed for
Men (New York, NY: Abrams, 2020), 157.
27
Julia Joy, “The Real Reason Why Cars Are More Dangerous for Women,”
Columbia Magazine, accessed April 17, 2024,
https://magazine.columbia.edu/article/real-reason-why-cars-are-more-dangerous-
women-drive-US-forward.
22

from becoming virtuosos, but it does make it more dicult. Additionally, it makes it
more likely that they get injured; female pianists have a 50% higher risk of pain and
injury compared to their male counterparts.
29
When it comes to oce environments, men are the default user yet again. The
temperature in oces are typically set according to formulas created in the 1960s to
determine standard oce temperatures. Only recently were these formulas tested, and
researchers realized that the original formulas overestimated the female metabolic rate
by 35%. The overestimation has made oces roughly ve degrees too cold for women
for over half a century.
30
What is the solution here? As a society, we can’t keep designing for men when
we design for everybody. In an attempt to x gender-focused issues, many bodies take a
gender-blind approach: treat everyone equally. In theory this is good, equality is a
positive word, but in the context of design, treating everyone the same is not always
what’s best for everyone. In many cases a gender blind approach leads to designs that
are further biased against women.
Caroline Criado Perez uses the tenure track system in the U.S to exemplify the
problems with a gender blind approach to design, “US academics in the tenure-track
system have seven years to receive tenure after getting their rst academic job or they’re
red. This system is biased against women - especially women who want to have
children, in part because the years between completing a PHD and receiving tenure
30
Criado-Perez, 113.
29
Criado-Perez, 158.
23

(thirty to forty) coincide with the years these women are most likely to try for a baby.”
31
In order to x this issue, some universities created a gender-blind policy, “Parents
would receive an extra year per child to earn tenure.”
32
While this problem would help
women in theory, in practice it did the opposite. Mothers used the extra year to care for
their children, while fathers were able to dedicate an extra year per child towards their
research. As a result of these policies, men became more likely to gain tenure and
women became less likely to gain tenure.
33
In this case, attempting to solve a
gender-based problem through gender-inclusive strategies did not work.
Exclusive Design is Great, When it Works.
While male designers designing for a general population often exclude women,
it’s surprising that this neglect can extend to products designed for women specically.
Even when designing for women, designers design for men.
In the 1970’s, the athletic training shoe was developed and released for sale to
the general public.
34
At the start it was marketed towards men almost exclusively,
because playing sports and working out were male-coded activities.
35
As women’s
inclusion in athletics expanded in the 80’s and 90’s, the equipment began to expand
35
Pat Kirkham, ed., The Gendered Object (Manchester, UK New York: Manchester
University Press, 1996), 121.
34
Pat Kirkham, ed., The Gendered Object (Manchester, UK New York: Manchester
University Press, 1996), 121.
33
Criado-Perez, 83.
32
Criado-Perez, 83.
31
Criado-Perez, 83.
24

too, but in an interesting way: all of the shoes were pink and white.
36
In an age where
companies hadn’t yet designed athletic shoes specically for women (more on this
later), the only way to distinguish between male and female users was with color. Pink,
white, purple, and yellow for girls. Red, blue, and black for boys. The shoes had the
exact same design; the girls’ shoes were just a dierent color and smaller. This is a
phenomenon called “shrink it and pink it”
37
that was very popular in redesigning
“male” products for female markets. Shrink it and pink it design is harmful because it
ignores the fact that size is only one of several anatomical dierences between men and
women. In the case of the training shoe, women’s feet aren’t just smaller- they have a
higher instep, a smaller heel.
38
These shoes not tting properly can lead to injury.
It looks like the world is moving towards actually designing products for
women. For example, multiple sports companies including Nike, Puma, and IDA are
designing soccer cleats for women that could help prevent an unfortunately common
injury in women's soccer.
39
Female soccer players are four to six times more likely to
experience an ACL injury than their male counterparts. Women have wider hips, so
when pivoting their feet and changing directions, more pressure is placed on the knees.
39
Sophie Downey, Nike is coming out with a soccer cleat specifically for women, Podcast,
June 19, 2023,
https://www.wusf.org/2023-06-19/nike-is-coming-out-with-a-soccer-cleat-specifically-for-w
omen.
38
Roshna E. Wunderlich and Peter R. Cavanagh, “Gender Differences in Adult Foot
Shape: Implications for Shoe Design:,” Medicine and Science in Sports and Exercise,
April 2001, 605–11, https://doi.org/10.1097/00005768-200104000-00015.
37
Karen Korellis Reuther, “Shrink It and Pink It: Gender Bias in Product Design,” Harvard
Advanced Leadership Initiative Social Impact Review, 10/25,
https://www.sir.advancedleadership.harvard.edu/articles/shrink-it-and-pink-it-gender-bias-
product-design.
36
Pat Kirkham, ed., The Gendered Object (Manchester, UK New York: Manchester
University Press, 1996), 123.
25

Additionally, women produce more estrogen than men do, which leads to them having
slightly looser, weaker ligaments.
40
By changing the design of the stud pattern, as well
as the design of the shoe itself to t women’s feet, the risk of ACL tears can be reduced.
Another example of positive exclusive design is the snowplowing system in
Karlskoga, Sweden. Prior to 2013, the snow-clearing schedule in Karlskoga started with
the major trac areas of the cities, and it ended with sidewalks and bicycle paths. This
did not take into account the fact that men are more likely to drive and women are
more likely to walk..The impacts are compounded when one factors in why the
women are walking as opposed to driving. Men are more likely to have simple travel
patterns. Women are more likely to have complicated travel patterns because women
typically own 75% of the unpaid care work responsibilities. Care work includes going
to the grocery store, the pharmacy, the laundromat, the tailor, and taking the kids to
and from school. All of these activities are likely to occur within walking distance,
according to Criado Perez. After a gender initiative forced public ocials to examine
Karlskoga’s services through a lens of gender inequality, they changed the schedule so
that bike paths and pedestrian walkways were cleared earlier than the roads. The
unexpected benet of this change was nancial in addition to social: the change in
40
Carrie Macmillan, “Are ACL Tears Really More Common in Women?,” Yale Medicine,
February 14, 2020,
https://www.yalemedicine.org/news/sports-injuries-gender#:~:text=Women%20also%20h
ave%20much%20more,women%20more%20prone%20to%20injury.
26

schedules saved millions of euros in healthcare costs because people were less likely to
slip on ice and suer an injury.
41
One example of exclusive design sparking positive social change is that of the
bicycle. Bicycles have been gendered since their invention due to their design. One of
the rst objects that resembled the modern bicycle was the draisienne. Invented in
France in 1817, it would become known in the states as the hobby horse.
42
As bicycles
became more and more advanced, the sport of cycling became more and more popular,
but only with men. Riding a bicycle was a man’s sport, and the bicycle was a male
object. The growth in popularity of the tricycle challenged this. Tricycle’s were used by
both men and women, so was the act of cycling truly a male one? As it turns out the
reason women didn’t use bicycles was not because of any anatomical dierence, but
because using a bicycle would defy the social conventions of how women should dress.
With early bicycles, the pedals were mounted to the front wheel. If a woman
wore a long skirt, which was the popular convention for how women dressed at the
time, it was dangerous to use a bicycle because her skirt could get caught in the pedals.
When the pedals moved to the position that they are in today, women’s skirts still got
in the way due to a crossbar that ran from the seat to the handlebars. When a
“drop-frame” design, in which the crossbar ran from the pedals to the handlebars on a
curve, was developed in the 1890’s, cycling became a much more popular activity for
women. Bicycles with a drop frame were “women’s bicycles,” and bicycles with a
42
Kirkham, The Gendered Object, 60.
41
Criado-Perez, Invisible Women, 31.
27

diamond frame were “Gentlemen’s bicycles.”
43
With a bicycle, women did not have to
be so reliant on men to get around. Susan B Anthony said in 1896, “I think [the
bicycle] has done more to emancipate women than any one thing in the world. I rejoice
every time I see a woman ride by on a bike. It gives her a feeling of self-reliance and
independence the moment she takes her seat, and away she goes, the picture of
untrammeled womanhood.”
44
Exclusive Design Practices can have Inclusive Design Results
A key point in the book Mismatch is that designing for a user with a physical
mismatch to a product can lead to an innovation that benets all users of the
product.
45
In other words, designing exclusively can yield results that benet everyone.
One example of this is Sam Farber’s OXO’s kitchen products. The founder of
OXO’s wife has arthritis, and she struggled to use a peeler because it was painful to
hold. The peeler that Farber designed to be easier to hold for his wife turned out to be
easier to hold for everyone.
46
The bicycle is another example of this. One thing I’ve noticed both in my
reading and in my experience is that “womens’” bicycles are easier to use than “mens’”
bicycles. The drop frame design is far easier to get into and out of than diamond frame
46
Valerie Liston, “Behind the Design: OXO’s Iconic Good Grips Handles,” January 31,
2017,
https://www.oxo.com/blog/behind-the-scenes/behind-design-oxos-iconic-good-grips-handl
es.
45
Kat Holmes and John Maeda, Mismatch: How Inclusion Shapes Design, Simplicity :
Design, Technology, Business, Life (Cambridge, Massachusetts ; London, England: The
MIT Press, 2018), 115.
44
T Vijayendra, “Bicycle and Women’s Liberation,” Countercurrents, July 3, 2023,
https://countercurrents.org/2023/03/bicycle-and-womens-liberation/.
43
Kirkham, The Gendered Object, 62.
28

designs because you can step “through” it as opposed to swinging your leg all the way
over. Anecdotally, I am a man who occasionally rides bikes for fun, as well as
transportation, and I actually prefer the drop frame design. If you look at the photos of
the two designs, you will also notice that the handlebars are higher compared to the
seat in the drop frame design. This makes the bike more comfortable, as bicyclists can
sit upright as they ride, as opposed to crouching over the handlebars. The design is less
aerodynamic, but for someone who uses the bicycle as a means of transportation
around town rather than for sport , aerodynamics don’t matter as much as comfort. In
France, some women began to use diamond frame bicycles for sport because of the
design’s better aerodynamics, despite the design’s intention for men.
47
Perhaps the
distinction between the diamond and drop frame bicycles should not have been that of
gender- it should have been its intended use- sport or leisure.
The Gendering of Objects
One of the reasons that bikes were labeled as male and female as opposed to
sport and leisure is western society's inexorable need to assign a gender to every single
object and activity. Tonka trucks are a toy most closely associated with boys, while
barbies are most associated with girls. There is no design, logical, or pragmatic reason
for barbies to be for girls and tonka trucks to be for boys. So what is it that makes these
technologies masculine or feminine?
47
Kirkham, The Gendered Object, 65.
29

Who uses the object has to do with the gender we assign to it. Girls play with
barbies, therefore barbies are feminine. The chapter “Why Feminine Technologies
Matter” in Gender & Technology: A Reader explores how femininity is related to
technological change. It brought up one point in particular that resonated with me as I
did my interviews: “it is also true that until we began to study women and
technological change, we were able to remain unaware and ignorant of technology’s
masculine dimensions”
48
My interview subjects did not think of the guitar as a
gendered object, but when I asked them about details related to their playing
ergonomics, there would always be a “now that you mention it” moment. In many
cases, only after being present in examining the way they play, and how they feel when
they play, did they discover their ergonomic issues. Even subjects who viewed their
guitar as considerate of someone their size, gender and body type, found ergonomic
issues that were related to sex-based anatomical dierences. The gendering of objects I
believe only serves to create problems for non-male minority users. Or in other words,
for the people who weren’t designed for.
When a person uses an object for which they have a mismatch, they can feel
rejected by the object.
49
Holmes uses examples primarily in childhood play to show
how design aects not just the users, but the non-users and their emotions. Everyone
has had the experience of being excluded from a group, especially in childhood. A key
49
Holmes and Maeda, Mismatch, 18.
48
Nina E. Lerman, Ruth Oldenziel, and Arwen Mohun, eds., Gender & Technology: A
Reader (Baltimore: Johns Hopkins University Press, 2003), 15.
30

point in Holmes’ book is that we can have that same feeling of disinclusion when an
object “rejects” us. Many of my interviewees complained about their guitars being too
big for their bodies, and many referenced acoustic guitars as being worse in that regard.
Given that most guitarists are introduced through acoustic guitars, these feelings of
rejection would be even more common for younger women, and could certainly lead to
them giving up guitar completely. I presume this could also be the case with young
men. The jump from acoustic to electric guitars is a very important step. I believe it
could also lead to feelings of rejection, not just due to the physical discomfort that it
may provide, but also because the electric guitar is far more gendered than the acoustic
guitar is.
The Gendering of Guitar
One barrier that may lead women to not play the electric guitar is the culture
surrounding it. Playing the electric guitar has always been a male-coded activity,
particularly in comparison to the acoustic guitar, but why? This section hopes to
answer that question, and rst we must start with the gendering of the acoustic guitar.
The acoustic guitar is much less comfortable to play than the electric guitar for
the women whom I interviewed, yet the act of playing an acoustic guitar is one that
doesn’t appear to be so gendered as playing an electric. When nding people to
interview, I found many women who played acoustic guitar but not electric, and none
who played electric but not acoustic. Several of the guitarists who played both
31

primarily played acoustic guitar. Acoustics, just like electrics, were designed by men, so
why is it more common for women to play acoustic? If you look at the history of the
acoustic guitar, it makes sense that the acoustic culture is not as gendered. Women have
been playing the acoustic guitar since its invention
In 1784, Carl Ludwig Junker, a composer, wrote an essay outlining which
instruments women should and shouldn’t play. According to Junker, the role of
women was to stay quiet. Orchestral instruments, and especially string instruments,
were very loud, and required vigorous movements. Women were considered too weak
to play horns, which Junker described as having a militaristic feel. The body position
required to play the cello did not suit a woman as she had to open her legs and press her
breasts against the body of the instrument. What instruments could they play? Lutes,
zithers, harps, and claviers were all ne instruments for women, as they did not require
a vigorous eort to perform. Clever musicians will note that all of these instruments
are for accompaniment. Women could not play instruments that commonly had solos,
like violins. Men were the soloists, and the role of women in society at the time was to
be generally subservient and assist men in their endeavors.
50
When the acoustic guitar was accepted as a concert instrument in the late
1800’s and early 1900’s, it began to be seen less and less as a woman’s instrument.
51
I
51
Ashawnta Jackson, “At First, the Guitar Was a ‘Women’s Instrument,’” Jstor Daily,
October 4, 2020, https://daily.jstor.org/at-first-the-guitar-was-a-womens-instrument/.
50
Rita Steblin, “The Gender Stereotyping of Musical Instruments in the
WesternTradition,” Canadian University Music Review 16, no. 1 (March 1, 2013): 128–44,
https://doi.org/10.7202/1014420ar.
32

think a distinction can be made here between the action of playing the instrument and
the act of playing an instrument in concerts. Women could play instruments as a
hobby, but if they wanted to perform music outside the home, they had to sing. As the
guitar got older and the Women's Rights Movement gained traction in the 1900’s, this
barrier began to fall. By the 1950’s and 1960’s, female acoustic guitarists had begun to
reach the mainstream with artists like Joan Baez and Joni Mitchell.
Playing an acoustic guitar is more of a unisex activity because in this post-rock
and roll era of music (1950s onward), there have been a number of successful acoustic
guitarists, both male and female. The electric guitar did not experience this same
phenomena
Due to the design of electric guitars, men tend to have a more comfortable
playing experience, but the design and ergonomics of guitars are not the largest barrier
for women to play. There is a barrier to entry for potential female electric guitar players
due to a lack of prominent role models. A female electric guitarist today has plenty of
role models to emulate such as Phoebe Bridgers, a popular example who may pop into
Wesleyan students’ heads. Phoebe Bridgers had electric guitar role models like Liz Phair
and Bonnie Raitt. But Liz Phair and Bonnie Raitt didn’t have female electric guitar
role models, at least not ones as popular as male electric guitar role models like Jimi
Hendrix and B.B. King. There have been two generations of prominent, main-stream
female electric guitar players. There have been at least ve generations of main-stream
male electric guitar players. Even before the invention of the solid-body electric guitar,
33

the invention of the pickup and amplier meant that guitar’s could be a part of jazz
big-bands in the 1930s.
52
Charlie Christian was one of the rst truly famous guitar
players, and he came to popularity in the 1930s. Even before that, there were acoustic
blues guitar players like Blind Lemon Jeerson in the 1920s.
53
There is such a long list
of household names when it comes to male guitar players, and this line is much shorter
for women.
It’s not that there haven’t been popular female rock guitarists in the early rock
era, it’s that the legacy of these artists have been suppressed. The most famous of these
artists was Sister Rosetta Tharpe, who is known today as the “Godmother of Rock and
Roll.” She has been cited as an inuence by Mick Jagger, Chuck Berry, Little Richard,
and Eric Clapton. According to Bonnie Raitt, “[Sister Rosetta] blazed a trail for the
rest of us women guitarists…She has long been deserving of wider recognition and a
place of honor in the eld of music history.”
54
Despite Tharpe’s levels of commercial
success and inuence on the genre of rock music, she was not inducted into the Rock
and Roll Hall of Fame until 2018 - years after many of the people she inuenced were. I
think part of the reason it has taken so long to see a burgeoning population of female
guitarists is because history has suppressed the legacy of artists like Sister Rosetta
Tharpe. To be completely honest, I’m a lifelong student of blues and rock music, and I
54
“Sister Rosetta Tharpe,” Rock And Roll Hall Of Fame, July 20, 2020,
https://www.rockhall.com/sister-rosetta-tharpe.
53
Britannica, The Editors of Encyclopaedia. "Blind Lemon Jefferson". Encyclopedia
Britannica, 15 Mar. 2024,
https://www.britannica.com/biography/Blind-Lemon-Jefferson. Accessed 17 April 2024.
52
Martin, R.. "electric guitar." Encyclopedia Britannica, February 23, 2024.
https://www.britannica.com/art/electric-guitar.
34

had not heard of Sister Rosetta Tharpe until I started doing research on this project.
Although anecdotal, I think it shows how guitar culture has negatively impacted the
number of guitar role models for young women.
When we see people with similar physical characteristics to ourselves
performing an activity, we are more likely to believe that we can perform that activity. I
was not at all into musical theater or dance as a young child, despite my interest in
music. I hated it; I thought it was for girls. Evidently, my older sister loved it, which
may have further fueled my dislike (we had quite the rivalry). When I was in the third
grade, my parents dragged me to Broadway to see How to Succeed in Business Without
Really Trying. Their reasoning was that Daniel Radclie was in it, and I loved Harry
Potter. The next year, I signed up for the school play. I played the mayor in Seussical the
Musical. The point is, I had completely written o musical theater as an activity
because I didn’t think it was for me, or even men as a concept, until I saw How to
Succeed. Seeing Daniel Radclie, someone who was not just a man but a man with
similar physical features as myself (skinny and dark brown hair) doing musical theater
made me realize that I could do it too.
While I can’t relate to the experience of not feeling like the guitar is for
someone of my gender, I can relate to the feeling of feeling like an activity isn’t for my
gender, and I can attest that it’s incredibly dicult, both internally and externally, to
break through that barrier. Even after you break through, there are further challenges.
While the administration of my all-boys middle school was ne with me missing
35

wrestling practice on the days I had ballet class, most of the boys at school did not like
that I was doing something so feminine, and I received a lot of ack for it.
In addition to a lack of early female electric guitar role models, the act of
playing the electric guitar was highly sexualised by men. Playing the guitar was seen as
sexy and a way to get girls, but it was more than that. The act of playing the guitar
appeared sexual, and the guitar itself became a phallic symbol. The guitar when played
well is an extension of the body, but artists in the 1960s and 1970s popularized using
the guitar like it was a penis. Especially given that the common strap length at the time
left the guitars lower down- right at or just below the belt line. It was easy, almost
natural, for guitarists to rock their hips, and by extension the guitar, as they played. In
addition, the faces many guitarists made when soloing appeared to be similar to the
faces one would make when orgasming.
55
Concluding thoughts
The fact that guitars are designed “By men, and For men”
56
is a symptom of the
fact that we live in a world that is designed by men, and for men. This unfortunate
truth has led to designs of objects, services, and more broadly a society that does not
cater to women's needs. Even when we do attempt to design for women, there is a clear
56
Mavis Bayton, “Women and The Electric Guitar,” in Sexing The Groove: Popular Music
And Gender (New York: Routledge, 1997), 37–50.
55
Johnny Sharp, “When Music and Orgasms Collide: The Secrets of ‘Guitar Face,’”
Louder Sound, January 22, 2020,
https://www.loudersound.com/features/when-music-and-orgasms-collide-the-secrets-of-g
uitar-face.
36

potential to create something that harms women further. That being said, when done
well, when done empathetically, design can positively aect these issues. By designing
empathetically- being a curious researcher- I have gained a better understanding of the
context in which gender-based issues in guitar design sit. With that lens and context, I
felt adequately prepared to build collaborative relationships in this eld as an informed
partner. I did this primarily by interviewing women about the specic ergonomic
issues they face in order to create a physical design solution that eectively solves those
problems.
Addendum: Examining the Market
After empathizing with my user group, it was clear that almost all of the
popular guitar options on the market were designed by men, for men. Here is a list of
some of those guitars, the designs of which have remained largely unchanged since
their creation. In no particular order…
1.) Fender Stratocaster
2.) Fender Telecaster
3.) Fender Jazzmaster
4.) Gibson SG
5.) Gibson Les Paul
6.) Gibson 335
37

All of these guitars were designed by men primarily. The stratocaster, telecaster,
and les paul were all designed by men INDIVIDUALLY- in that one man designed it
without help or consultation, and of the list above, those are the most popular ones of
all time. As shown in Invisible Women, when a man or group of men design a product
or service without the help of women, they often accidentally exclude women in some
way. After speaking to female guitarists in my life about whether or not the lack of
female consultation to these guitar designs led to ergonomic issues, it became clear that
it did.
That being said, not all guitars on the market are poorly suited to match female
ergonomic needs. I was not the rst person to design a guitar that can appeal to female
needs, and there are guitars on the market not specically designed for women that do
meet those needs. Before I designed this guitar, I needed to understand this challenge
completely. What guitars exist on the current market that cater to the needs of female
guitar players?
Parker Fly
There are a number of electric guitars in the current market that solve the main
ergonomic issue I found in my interviews: weight. Lightweight electric guitars have
existed for quite some time. One popular example is Parker Fly. Ken Parker (renowned
luthier) and Larry Fishman (renowned pickups craftsman) started Parker Fly guitars in
1993 and built some of the most innovative electric guitars until they closed up shop in
2016. The experiments that led to their construction started in 1983. The brand was
38

known for its unique construction methods. Specically, the body of the guitar was
made of a carbon ber exoskeleton with a thin coating of epoxy resin, carbon ber and
berglass. The neck and body were completely seamless. The result was undeniable- an
electric guitar that was highly rigid, acoustically responsive, and weighed in at four
point seven pounds with no neck dive.
57
Joni Mitchell played Parker Fly guitars
exclusively for six years, and most recently played one at Newport Folk Festival in
August 2023.
58
While Parker Fly guitars succeeded in creating an instrument that was
lightweight, sounded fantastic, and was highly playable, they were not without their
problems. Their peculiar construction extended to the fretboard, which was so thin
that it could not use normal frets. Normal frets have a “tang” that gets seated into the
material. Instead, the Parker Fly frets were glued into small grooves. The frets were
made of stainless steel, which wears less than traditional frets, but the glue would still
wear down over time, and the frets could pop o and need to be re-glued. Additionally,
they were very expensive to nish, given the materials. Later, Parker Fly switched to
using multiple materials for the body, including hardwoods.
59
Finishing a surface that
contains both carbon ber and wood seamlessly is much more dicult that nishing a
59
Justin Beckner, “The History of the Parker Fly,” Guitar, June 28, 2022,
https://guitar.com/features/gallery/the-history-of-the-parker-fly/.
58
Matt Owen, “Watch Joni Mitchell Play a Parker Fly at Her First Headline Show in 23
Years,” Guitar World, June 12, 2023,
https://www.guitarworld.com/news/joni-mitchell-parker-fly-first-headline-show-in-23-years.
57
Christopher Scappelliti, “Parker Fly: Six Things You Didn’t Know About This Unique
Production Guitar,” May 14, 2018,
https://www.guitarworld.com/gear/parker-fly-six-things-you-didnt-know-about-unique-prod
uction-guitar.
39

surface that is just wood or just carbon ber. Ease of production is something that
should be considered in the design process.
The technological innovations of the Parker Fly were undeniable, but I believe
they never took o in the same way that companies like Ibanez and PRS did because
they were not accessible from a pricing perspective. In the 1990s and early 2000s,
Parker Fly guitars were around $2000, around $4000 adjusted for ination. These
guitars were unattainable for the general public, and something I should consider in
my design is how much a mass produced version of my guitar would cost.
Strandberg
One guitar company that came up in a conversation with Kim Perlak, the
current head of the guitar department at Berklee School of Music, was Strandberg, a
highly ergonomic guitar largely popular among guitarists who play very technical
genres like metal. It has notable male and female users, like Sarah Longeld, Yvette
Young, and Plini. It is “headless” in that the tuners are located at the end of the body, as
opposed to behind the neck. This results in a guitar that is lighter in weight (ve and a
half pounds) and has no neck dive. Additionally, Strandbergs are shaped such that the
guitar can be played in multiple dierent seated positions. They have a patented neck
shape that is somewhat trapezoidal, oering a dierent (but potentially more
comfortable) playing experience. A new Strandberg can run as low as $1,000, and their
standard model can be had for around $1750. They are competitively priced when
compared to American-made Fenders. Still, I don’t think Strandberg solved the
40

problem that I am trying to solve, which is accessibility. Strandbergs are great guitars,
but they look like they came out of a spaceship. I think that’s awesome, but I think
approaching one of their guitars could be intimidating if you weren’t well informed
about them already- say, if you were walking into a music store.
St. Vincent and Ernie Ball Music Man
One of the more widely known success stories of a guitar designed with women
in mind is the St. Vincent signature model from Ernie Ball Music Man. Generally,
signature models are direct copies of the guitar the artist plays live. The company takes
the guitar and makes perfect replicas: the exact same neck shape, pickups, even the
same blemishes and road scars that come with each artist's heavy use.
60
The St. Vincent signature model is dierent from an ordinary signature model
in that it is a new guitar, designed from the ground up by Annie Clark (St. Vincent is
her stage name) and Ernie Ball Music Man. “The St. Vincent signature model was
conceived by Annie Clark to create and inspire musicians who desire a comfortable and
lightweight guitar with complete tonal exibility. Crafted with the nest materials
available, this unique electric guitar was designed to perfectly t her form, playing
technique, and personal style.”
61
In other words, it’s a guitar designed to t Annie
Clark’s specic ergonomic needs. Given that Annie Clark is a woman, the guitar also
61
“ST. VINCENT COLLECTION,” Ecommerce, Ernie Ball Music Man, accessed April 17,
2024, https://www.music-man.com/instruments/families/guitars/st-vincent.
60
Tony Bacon, “From Les Paul to Rob Chapman: The History of Signature Guitars,” April
11, 2019, https://guitar.com/guides/essential-guide/history-of-signature-guitars/.
41

ts the ergonomic needs of other women. When introducing the guitar, she described
it as having room for “a breast or two”
62
and it does.
The St. Vincent signature model is one of the more accessible guitars for
women, due to both the design and marketing. The body shape is small, but attractive.
It doesn’t evoke a vintage vibe, but it’s not so modern that it’s alien, like Strandbergs.
It’s got a sizable belly carve, the neck is comfortable, and it doesn’t have neck dive.
Historically, the pricing has been very inaccessible. The version produced in the U.S.
costs over $3000. That being said, Sterling by Ernie Ball Music man, a company that
licenses Ernie Ball Music Man’s designs in order to manufacture cheaper versions of
the guitars overseas, recently launched a St. Vincent model that costs $800. Here we
have a guitar that caters to the ergonomic needs of women without breaking the bank.
It’s accessible, it looks good, it plays well, an all around design success. This gives me a
benchmark to beat. Will my guitar be better than a St. Vincent signature model?
Fender Highway Series
While not technically an electric guitar, I thought it was worth including
fender’s most recent guitar design, the Fender Highway Series. The highway series is a
group of acoustic/electric guitars that feature thinner and more comfortable bodies
and necks than traditional acoustics. The design goal seems to be comfort and ease of
use, so while not technically designed for women, I believe it is a great option for a
62
Alyxandra Vesey, “Room for a Breast or Two,” Journal of Popular Music Studies 32, no.
4 (November 30, 2020): 37–59, https://doi.org/10.1525/jpms.2020.32.4.37.
42

woman who is looking for an acoustic that is more comfortable than a traditional
dreadnought or even concert style shape.
Two Notable Attempts to Solve the Problem
In the early 2000s, two companies attempted to appeal to a female guitar
market, and created what I now look at as examples of what not to do when pursuing
this project.
Daisy Rock Girl Guitars
In an attempt to build guitars that “leveled the playing eld” for young girls
who might not ordinarily participate in such a male dominated activity, Tish Ciravolo
founded Daisy Rock Girl Guitars in 2000. The guitars tended to be sparkly, pink, and
in shapes that might appeal to a younger girl. One of the brand’s most popular models
was in fact shaped like a daisy, hence the name.
Ciravolo’s version of the “pink it and shrink it” strategy worked quite well. By
2010, Daisy Rock Girl Guitars had sold 175,000 units worldwide, and for good reason.
In addition to being attractive to younger girls, they were easier to pick up and play
than the male designed instruments. Thin bodies and necks, smaller body shapes, and
attractive price tags led Daisy Rock to be highly accessible to both younger girls and
their parents.
63
63
Goldenaudiomusic, “Rock ‘n’ Gender Roles: The Gendering of Daisy Rock Girl Guitars,”
October 20, 2015,
https://goldenaudiomusic.com/2015/10/20/rock-n-gender-roles-the-gendering-of-daisy-rock-girl-gu
itars/.
43

Daisy Rock Girl Guitars also made concerted eorts to create safer spaces and
increase representation for young girls who were interested in guitar. The company
sponsored camps and programs that fostered community among female guitar players.
Daisy Rock also had an artists program where female musicians could be featured on
their main website, regardless of how famous their music was, or even how old they
were. Ciravolo created a powerful movement that brought more young women to play
electric guitar, and it cannot be understated how important and how much of an
accomplishment the movement was.
Unfortunately, there’s a clear reason why the original Daisy Rock designs are
no longer being built: the portrayal of femininity that Daisy Rock Girl Guitars creates
further galvanizes the gendering of guitar as an object. Many of the Daisy Rock designs
do not conform to the conventional design aspects of guitars. The guitars have no
cutaways, no waist, no lower bout, etc. The designs focused on aesthetics over
functionality added a barrier towards learning how to play.
64
Although an adult-sized
stratocaster would be uncomfortable to play for an eight year old (regardless of gender),
a guitar shaped like a daisy or a star was not an ergonomic advancement. Additionally,
if Daisy Rock guitars are “girl” guitars, are all of the other guitars “boy” ones? If boys
and girls are playing dierent guitars, then boy guitarists and girl guitarists must be
dierent in some respect, and that’s problematic. We want more girls to be playing
guitar, but we want to foster a culture that is gender inclusive, as opposed to divided.
64
Goldenaudiomusic.
44

Gibson’s Goddess Series, and the Les Paul Vixen (oy vey)
Daisy Rock was not the only unsuccessful player in the race to create electric
guitars that appealed to female markets. In 2006, Fender released a “Hello Kitty”
Stratocaster under their squier aliate.
The same year, Gibson released the “Goddess” series, which included the Les
Paul “Vixen,” a clear example of the problematic “shrink it and pink it" design
philosophy. Les Paul Vixens actually did succeed in xing one of the main issues many
women have with standard Les Pauls: the weight of the guitar. Because the body was
thinner, Les Paul Vixens could weigh under seven pounds, while average Les Pauls
range between a cumbersome nine pounds and a backbreaking eleven pounds. Vixens
also featured a slimmer neck than a Les paul.
65
The problem with the Vixen was not so
much the guitar itself, but the marketing, and of course, the name. I think that the
Gibson marketing department was trying to say “play this guitar and you can be sexy,
condent, and comfortable in your gender identity” when they named the Les Paul
Vixen. It doesn’t really come across that way when you look at how the guitar industry
portrayed women at the time.
Guitar World Magazine is one of the more popular magazines in the industry.
Being on the cover of Guitar World for a guitarist is like being on the cover of Sports
Illustrated for a professional athlete. Notable cover-holders include, Je Beck, Jimmy
65
“A Slimmer, Lighter Les Paul,” Sweetwater, 2006,
https://www.sweetwater.com/store/detail/LPVCLCH--gibson-les-paul-vixen-caribbean-blu
e.
45

Page, Steve Vai, Eddie Van Halen, the list goes on. When St. Vincent graced the cover;
she was only the fth female artist to do so in the thirty-six years the magazine had been
running.
That’s not to say there haven’t been women on the cover of Guitar World.
Many women have been on the cover of Guitar World, it’s just that most of them have
been bikini models who don’t play guitar. In 2016, when St. Vincent was on the cover,
Guitar World announced they would no longer feature bikini models on the covers of
yearly gear review issues. It’s good that Guitar World recognized there was a need for
change, but in 2007, both Guitar World and the guitar industry at large had a culture
that objectied women instead of treating women like musicians. Instead of projecting
condence, the marketing of the Gibson Les Paul Vixen enforced the damaging idea
that if you are a woman, your guitar is an accessory, as opposed to an instrument.
66
The marketing for the Goddess series was even more problematic. In 2007,
Gibson partnered with Agent Provocateur, a lingerie store, to bring the Goddess series
to new faces. In addition to wearing lingerie, Agent Provocateur storefront
mannequins also wore guitars from the Gibson Goddess Series. It’s worth noting that
this isn’t just one store in one mall; the Agent Provocateur marketing campaign was at
every single location including storefronts in London, Paris, New York, and Los
Angeles. The press release for this guitar line featured an image in which a scantily-clad
66
Bourdage, “A Young Girls Dream.”
46

pinup girl holds a Goddess line guitar next to a small amplier. The guitar is not
plugged in.
67
67
Amanda Crespo, Girl Guitars: Negotiating Gender through Instrument Design,
Mediation, and Use (Ottawa: Library and Archives Canada = Bibliothèque et Archives
Canada, 2011).
47

DEFINE
Dening The Design Challenge
After exploring and examining a clear bias towards male users in guitar design,
the guitar industry, and the design activity as a whole, I was left with this question:
“what can be done to x it?” And more pointedly, “what am I going to accomplish
with this thesis?”
It is clear that the largest reason it has taken so long to see an emergence of
female electric guitar players is the gendering of electric guitar as an object and as an
activity. One person alone cannot make the systemic changes necessary to dismantle a
subconscious belief system, but things are already changing on their own. Music that
features female guitarists has been doing incredibly well at the Grammys - Boygenius, a
supergroup with three guitar-playing frontwomen, won best alternative music album,
best rock performance, and best rock song in 2024.
68
In 2023, Madison Cunningham’s
“Revealer,”an album with Cunningham’s guitar playing as the focal point, won the
Grammy for best folk album.
69
A 2019 Fender study showed that 50% of beginner and
69
“Madison Cunningham,” Grammy Awards, accessed April 17, 2024,
https://www.grammy.com/artists/madison-cunningham/251720.
68
“Boygenius,” Grammy Awards, accessed April 17, 2024,
https://www.grammy.com/artists/boygenius/54205.
48

aspirational guitarists are women.
70
I suspect that the numbers for electric guitarists
specically are lower, but I cannot conrm that apart from my own anecdotal evidence.
There is still work to be done; many women still have bad experiences at guitar
stores as consumers. In high school, one of my female friends who plays guitar went to
Guitar Center to buy strings, and the checkout clerk asked her if she was buying them
for her boyfriend. That’s wholly inappropriate, especially considering she was sixteen
at the time. Once when stopping in at Guitar Center with my sister, the checkout clerk
asked her if we were in a relationship. Similarly inappropriate, but also made worse by
the fact that my sister and I look very much alike. In the minds of cashiers at music
stores, my friend and my sister could only be purchasing strings for their male
boyfriends, not themselves.
I can do my best to x the systemic issues locally by supporting my female
guitarist friends, but I alone cannot x the misogyny that exists in the guitar
community in general. What I can do is build a guitar. My initial idea was to build a
guitar for women, but in doing the research for this project, I realized that would
actually do the opposite of what I want. Building an electric guitar for women is saying
that women can’t play the electric guitars that currently exist as well as men can, which
is both sexist and untrue.
70
Paul Kobylensky, “50% of New Guitarists Are Women,” Sweetwater, January 4, 2019,
https://www.sweetwater.com/insync/50-new-guitarists-women/#:~:text=According%20to%
20a%20study%20conducted,seem%20to%20back%20their%20findings.
49

That being said, many popular guitar models feature designs that can be
uncomfortable to play for a majority of the women I interviewed. Not being able to
nd a guitar that “ts” you and feels comfortable to play can be a death sentence to
beginner guitarists of any gender, especially when compounded with the fact that
learning new lines and new chords can be painful regardless of the guitar you’re
playing. Therefore, I concluded the goal should not be to make a design that’s more
ergonomic for women, but to make a design more accessible to all users.
To make a design more accessible to all users, I had to design for a general
population. As I mentioned in the previous section, designing for a general population
is quite a dicult task. When designing for the general population, many designers
exclusively think of a “default user,” and this default user is male. In reality, there is no
default user, but I still had to base my design o of facts, as opposed to my own ideas
and preferences- just empathizing with a user group was not enough.
How could I generate a set of design parameters that appealed to a wide user
base? Rather than creating a default user, I based my design parameters o of data
collected from a number of people instead of making assumptions about what the
default user base may look like. By interviewing a number of women about their
experiences with guitar and, more specically, their ergonomic issues, the design of the
guitar was more likely to be successful.
Now you may be thinking, haven’t I just explained that designing for women
would perpetuate the idea that women can’t play the guitar as well as men? There are
50

two key distinctions to make. Firstly, I did not design this guitar for women. I designed
it with women. In my design process, the women I interviewed were not pieces of data
on a page. I viewed my interviewees more as collaborators. The design parameters were
not generated by my preconceived notions of the ergonomic issues, they were
generated directly from the answers I was given by my interviewees and the suggestions
they made. Secondly, by designing this way, the nal result will be benecial to
non-female users. One of the key points in Holmes’ Mismatch is that oftentimes,
designing with a user group that has a physical mismatch to an object can create an
improvement on that object for all users.
71
Answering the question of “what do I want to accomplish with this thesis” is
the same as creating my design goal, which is the following. I wanted to make a guitar
that is physically and aesthetically accessible to people of all genders and levels of
experience. I make this distinction because a number of guitars, like Strandbergs, are
ergonomically near-perfect but wholly inaccessible to many players because the design
elements that make them ergonomic also dene the aesthetic- futuristic, hi-tech,
spaceship. I want to make a gender inclusive and ergonomically pleasing guitar, but I
want it to look like a guitar.
71
Holmes and Maeda, Mismatch.
51

52

INTERVIEWS
As I said in the introduction, the design process is not linear. After
empathizing with my user group through secondary research and dening my broader
design goals, I found it necessary to speak to female guitarists on a number of topics,
including the extent to which they experience ergonomic issues with their guitars and
what might be done to x those issues. By being a collaborative relationship builder,
my design will be better informed. This section looks at the entire interview process,
including writing the questions, creating a sample of interviewees, doing the
interviews, and the results of the interviews.
Removing the self from the interview process
As a guitar builder, I knew it would be very tempting for me to just design,
design, design, without actually paying attention to data. This ethos of building rst
and asking questions later is rather central to luthiery - both as a hobby and even as a
profession. Part of the skillset of a great luthier is not to build a guitar without
mistakes, but to be able to x mistakes seamlessly. Often what was once a mistake
becomes a highlight feature of a build. When it comes to design they are no dierent.
Luthiery is the opposite of academia in this way.
When I was on a guitar building program at Crimson Guitar Co. in England a
few years ago, there were a lot of statements made on the lines of “if you do x, it will
53

sound better/play better/be more ergonomic,” and while I did not think this at the
time, and would never say it to their faces now, how do they know that? The luthiers
didn’t cite sources, they operated on experience and intuition. This is not a diss on the
luthier community- this system works for them.They make their money o of it. But
for a multitude of reasons, the greatest of which being my gender, I needed a solid set
of data to work from, not just for parameters to work from in the build, but to prove
that the build even needs to be done. This is a concept used in empathetic design
related to a design mindset I outlined in Empathize; I had to be a curious researcher. By
attempting to remove my own opinions, goals, and biases from the interview process, I
did not lead the interviewees to any conclusions that arm my own subconscious
biases.
Interviewees
One of the most important parts of the interview process was creating a group
of interviewees that could give me reliable, relevant, and accurate information. In line
with my dislike of having a “default user,” I wanted my interview group to be broad.
Originally, I wanted to do the majority of the interviews with women studying at
Berklee College of Music in Boston. I had received feedback on my initial thesis
proposal that called into question the ecacy of these interviews - how would I know
the problems my interviewees were facing were ergonomic, or as a result of not having
enough experience on the guitar? After speaking with Kim Perlak, the head of the
guitar program at Berklee, I realized that doing all of the interviews at Berklee would be
54

detrimental to the project because I was likely to see similar people with similar
problems. To design for a broader audience, I would need a diverse group of
interviewees. Having my entire interview group be women aged eighteen to
twenty-two with roughly ten years of experience and an aim to pursue playing music as
their career is the opposite of diverse. Additionally, I realized the following:
pre-professional guitarists at Berklee won’t experience the same accessibility issues
when looking at the ergonomic guitars currently on the market. To them, a Strandberg
isn’t a spaceship, it’s just another guitar. I came to the conclusion that I wanted to talk
to several people from Berklee, but I really wanted a mix of people - some
pre-professional, some experienced hobbyists, some fully professional, and some
beginners.
Finding these people was surprisingly arduous, and I think serves as a piece of
evidence in the gendering of the electric guitar. It was very easy to nd women who
played acoustic guitar, but it was much more dicult to nd women who played
electric guitar, even with the resources I had. I used connections with a friend at
Berklee School of music to nd some pre-professionals and one beginner. I cold
emailed the heads of guitar departments at dierent schools to nd more interviewees,
but I was surprised (although maybe I shouldn’t have been, given the research I’ve
done) to nd that very few women had been through these programs. I got a large
number of my interviewees through personal connections, specically related to
Wesleyan. I knew several women who played electric guitar on campus and a few recent
55

graduates. My uncle introduced me to a female guitarist who has been playing
professionally for over forty years. It took me several months to complete the
interviews largely because of how dicult it was to reach a good number of
interviewees. My goal was twenty women, and I ended up interviewing seventeen. Had
I only been looking for men, I could have completed the twenty interviews in two
weeks.
Designing The Interview: Introductory Questions
Operating as a curious researcher was very scary because I knew that there was a
possibility that the results would say my theories were wrong, and that I wouldn’t be
able to build this guitar because there is no need for it. As a result of this scary thought,
I realized that the interviews had to be relatively open ended. I had a list of questions,
but the interviewees would lead me through their personal journey, as opposed to me
leading the interviewer to a conclusion. I generally didn’t ask extra questions, but if an
interviewee wanted to go on a tangent or explore a topic further I was happy to follow
their lead.
I wanted to start with a series of very basic questions that will allow me to
categorize my interviewees in the future. I wanted to know their age and their
experience level. At the same time, I also wanted to understand how they were
introduced to the guitar and whether or not they took lessons. I asked about these
things because understanding the environment of how these guitarists started playing
56

may help answer questions about the “invisible” boundaries surrounding the
gendering of the electric guitar.
I also wanted to know what types of music they played because dierent genres
require dierent levels of diculty. I had a theory that female jazz guitar players with
smaller hands may have a harder go at reaching the true upper echelons of the jazz
world than their male counterparts because complex jazz voicings are harder on your
hands (big stretches) than say, indie rock. This was incorrect. As it turns out the jazz
world is even more sexist than the guitar industry; that’s the main reason. Also, what
guitars are people playing? How could I diagnose their problems if I didn’t understand
what they’re working with? Someone complaining about their PRS being harder to
play while sitting down is very dierent from someone complaining about a Fender
Stratocaster being harder to play sitting down. I also asked for pronouns.
Designing the Interview: Sitting vs. Standing
After these basic introductory questions, I asked a few questions about how
they interact with their guitars. In my personal experience I’ve noticed that sitting and
playing is very dierent from standing and playing. For a very long time I wanted a
PRS Special Semi-Hollow, similar to John Mayer’s PRS Super Eagle. I nally tried one
while sitting and it was awful because I couldn’t do the complex voicings I normally
play because my wrist was bent too much. The same voicings were easier to play
standing up. As it turns out, PRS guitars tend to have a small waist, which means the
guitar is physically lower down when sitting, so you have to bend your wrist more. If I
57

didn’t try to play it standing up with a strap, I wouldn’t own one today. Asking
questions about whether the player was sitting or standing mostly when they played,
and whether there was a dierence in physiology between the two positions, has
become fascinating. Almost every right-handed woman crosses their right leg over their
left when sitting down and playing, because it raises the guitar higher. Additionally,
when standing up, the positioning of the elbow of the fretting arm is way dierent.
Your wrist comes at the neck from a completely dierent angle.
Designing the Interview: Pain and Discomfort
I then moved to specic questions about any discomfort. I wanted to know
about a few things in particular. My theories were that women would have more wrist
and nger pain, and they would also experience discomfort in their breasts. I emailed
Victoria Pitts-Taylor, the chair of Feminist, Gender, and Sexuality Studies at Wesleyan
to ask whether it was okay to ask about issues with breasts, and how I should address
that from a language standpoint. I really didn’t want to make anyone uncomfortable.
She told me the word breast was ne, but I still didn’t feel comfortable asking
questions about that, so I added an open-ended question: “Are there any areas of
discomfort that I haven’t mentioned?” Several of the interviewees used this as an
opportunity to talk about breast related issues.
I also asked about the size of their hands. Since the interviews were mostly over
the phone or on zoom, I could not measure or eectively ask people to bring a
measuring tape. Instead, I asked interviewees whether they thought of their hands as
58

large, small, or average, and what was their frame of reference - men, women, or
everyone. About halfway through the interview process, I added a question: how many
frets can you reliably stretch, not in a vacuum, but if you were on a gig? This was a less
subjective question that gave more precise data. A woman with large hands will not
experience the same issues as a woman with small hands. I viewed hand size as more of
an issue than gender in a way - a man with small hands will experience some of the
same issues as a woman with small hands.
I also asked about back and neck issues. These were a bit harder to pin down, as
everyone seems to have back issues these days. I had people tell me about chiropractic
visits and previous injuries, but some people attributed their back pain to playing the
guitar. Many of my interviewees talked about playing longer gigs standing up, and how
that created soreness and discomfort.
Designing the Interview: Abstract Questions
Finally, I asked more abstract questions that were a bit more edgy. A primary
example of this was, “do you feel that the design of your guitar is considerate of
someone of your size body type?” It was hard to write that without using gendered
language. I also asked whether there was anything they would like for me to consider
while building this guitar. I wanted to give an opportunity for direct feedback and
discussion. What were the things they really wanted? Some people said no, some people
talked about specic ergonomic things, and some people talked more about the
marketing of the guitar. I also asked if there was a perfect or “dream” guitar that people
59

had? The answers were surprisingly not related to ergonomics, they were more related
to pickups and “vibe.” A lot of people said specic instruments that their favorite
players used.
Results
Here is a summary of my main ndings after interviewing 17 women about
their experiences playing guitar:
● The weight of the guitareight was the single largest issue to x.
○ Almost everyone experienced back issues after playing guitar for several hours,
especially standing up.
● Most interviewees did something to lift the guitar higher when in the sitting
position in order to get better wrist positioning on the neck including going on the ball
of their right foot, using classical positioning, and crossing their right leg over their left
leg (this was most common.)
● Many interviewees held the guitar in the middle of their body when standing.
○ The neck of the guitar was higher in this position (compared to the wrist) than
when sitting, no matter what they do to raise the guitar
● Guitars could be bothersome when they come into contact with breasts.
○ Guitars with large horns like Stratocasters could be “stabby”
○ When worn lower it could “show o” the breasts in a way that the interviewees
believe was undesirable.
60

● The balance of the guitar was a key aspect I should look out for.
○ People didn’t like the way all of the weight was on one shoulder when playing
with a strap.
○ Many lighter guitars like Gibson SGs have neck dive.
● The length of the neck.
○ Some women complained about having to reach far to the left when playing
chords low on the neck.
● Fretting hand cramped from barre chords
● Many interviewees became guitarists at least in part due to encouragement
from fathers, uncles, and/or brothers.
The nal thing to note is that the women I interviewed were not against the
idea of me building this guitar. Many had questions or some degree of skepticism at
rst, but in the end they all agreed that designing and building the guitar would not be
perpetuating the idea that women cannot play guitar, and that if done well, the design
could help some number of people in their guitar playing journey. Armed with this
condence, I went about designing and building the rst prototype.
61

IDEATE
PROTOTYPE
TEST (#1)
The purpose of the prototyping process is to create something that allows users
to understand what your product is, and for you to create iterative discourse- what
works, what doesn’t work, what are the ways we can improve the design in the future.
There are many levels of prototyping. Some are fully functional nished objects, and
others are less advanced.
Designing the Prototype
Based on the results of the interviews, I created some smaller design challenges
that will help me design the guitar. The key issues I found in my interviews led me to
the following four areas that could be improved upon: weight and balance, arm and
wrist positioning, sitting versus standing playing experience, and breast contact. The
guitar should be lightweight, but balanced; the fretting arm and wrist should not have
to extend or bend unnecessarily to play chords lower on the neck; the playing position
62

should not change a lot regardless of whether or not the guitarist is sitting or standing;
and nally, the guitar should not be uncomfortable to play for guitarists with breasts.
Using these ideas, I began to loosely design the guitar.
Weight And Balance
The number one issue that my interviews brought to light was weight.
Solid-body electric guitars are just too heavy and can cause back problems down the
road. This is compounded by the fact that all of the weight of the guitar rests on the
shoulder of the fretting arm when the player is using a strap.
The simplest solution to this problem would be to make the guitar as
lightweight as possible. A more complex idea would be to redesign the guitar strap such
that the weight is distributed dierently. Redesigning the guitar strap is a good idea
that I will save for later, as it seems less feasible for me. I don’t know how to sew, and I
think that entering a completely new industry with the due date of this thesis just four
months away (I started to design the rst prototype in January) was a recipe for
disaster. A lightweight guitar was a far more appealing prospect. In retrospect, I learned
how to use a CNC machine well enough to create a fully functional electric guitar in
three months, so maybe that wasn’t so far-fetched an idea after all.
Making a lightweight guitar was not as easy as removing weight from the body
until the guitar was light enough. While there is debate as to whether or not that would
aect the sound of the instrument, there is consensus that creating a body that is too
lightweight would lead to a problem called “neck dive.” The phenomenon of neck dive
63

occurs when the weight of the headstock is too high compared to the body, leading the
headstock to “dive” down, when in the playing position. There are several factors that
can contribute to neck dive:
1.) The weight of the tuners/headstock itself
a.) Too heavy = neck dive
2.) The weight of the body
a.) Too light = neck dive
3.) The fulcrum point. When standing up the fulcrum point is where the strap
rests on your shoulder. When sitting down it’s where the waist of the guitar sits on
your knee/thigh.
a.) Too close to the bridge = neck dive
I was able to modify all of these things, but we have to contextualize them
within the other design parameters. For example, the fulcrum point. The fulcrum
point when using a strap is determined by the positioning of the strap buttons, and
that is determined by the shape of the body. The fulcrum point when sitting is
determined by the location of the waist on the treble side of the body. In an ideal
world, we could have an incredibly lightweight body, but move the standing fulcrum
point towards the headstock by having a longer upper horn. Unfortunately, a large
upper horn of the guitar can “stab” the breasts. One of my interviewees had this exact
experience with a Fender Stratocaster. This doesn’t mean our standing fulcrum point
64

will be bad, it just means that it won't be exceptional. Changing the sitting fulcrum
point is far easier, it’s more a matter of designing something that doesn’t look “weird.”
Accepting that the standing fulcrum point of the guitar won’t be the solution
to neck dive, so I looked at the body and the headstock in tandem. If you look at it
simply, we have a physics equation.
We have a fulcrum point and a weight on each side of the fulcrum point, with
both the weights and distances from the fulcrum point being unequal. To simplify it
even further, let’s assume that the mass of the body and neck are localized to two
points respectively. The body is heavier, but closer to the fulcrum point. The neck is
lighter, but farther away from the fulcrum point.
The easiest strategy that ts within the rules of guitar building was to make a
guitar without a headstock. Instead of having the tuners be behind the nut and the
strings attached to the bridge, I had the strings attached to a piece of steel or brass
behind the nut and have the tuners be behind the bridge. This is called a headless
guitar, and it is a popular design strategy for ergonomic guitars, like Strandbergs. A six
string solid-body Strandberg can weigh as little as ve pounds. This would be a good
strategy if I wanted to build a traditional ergonomic guitar, but I wanted to build
outside of that aesthetic because I believe it is inaccessible to most guitarists.
What I needed to do to make the guitar lighter was to remove weight from the
body and headstock in a way that maintained an equilibrium. It was easy to remove
weight from the body. I created a semi-hollow or chambered body by hollowing out
65

the inside of a body and gluing a thinner piece of wood on top. This is called “drop-top
construction.”
Removing weight from the headstock is more dicult because the majority of
the weight of the headstock comes from the tuning machines, as opposed to the wood
itself. The goal should not be to make the lightest headstock possible, but to use tuners
that are signicantly lighter than the tuners most guitars use. Many of the guitars I’ve
built in the past utilized locking tuners, as they hold pitch well and are easy to change
strings with. These tuners weigh around 0.45 pounds. As it turns out, the tuners for
slotted headstock guitars tend to weigh a little bit less. I used tuners from Grover that
weigh 0.36 pounds. Since I slotted the headstock, the weight was further reduced. I
estimate that my headstock weighs 0.2 pounds less than a headstock on a Stratocaster.
This may not seem like much, but the headstock is at least twice as far away from the
standing fulcrum point as the body is, so this will make a sizable dierence.
Even with the reduced weight of the headstock, I had to be careful not to
remove too much weight from the body. Additionally, making a completely hollow
guitar would cause feedback issues. Taking a cue from the design of many semi-hollow
body guitars, I chose not to remove material in the areas near the bridge or pickups.
This is called “chambered construction,” and I rst experienced it with my former
guitar teacher’s main guitar, a Soloway “Swan.” Apart from the “core” of the guitar and
a three-quarter inch ring around the edge for the drop top to adhere to, the rst
prototype was hollow.
66

Hands and Wrists
Another issue I found was players having hands and wrists cramp up when
playing barre chords. This is not an issue exclusive to women because I experience it
too, and quite frequently. The easiest way of “understanding” chords on the guitar are
to learn shapes in the open position and then use your pointer nger to barre where the
“0” fret would be as you move the shape around the neck. By learning three shapes - E
major, E minor, and E dominant, you can play a lot of songs. That being said, the barre
shapes can be painful when used repeatedly over a long period of time. I dislike them,
so I only use them when I really have to.
One thing I noticed among most of my interviewees is that they tended to
prefer thin necks. Many of my interviewees attributed their preference to having small,
or at least not large hands. That being said, I don’t know if this is a gendered issue. My
hands are average for a man, and I too prefer thinner necks. They are easier to play on.
Still, I wanted to create a neck that was even more comfortable than the ones currently
available and could possibly help people with smaller ngers stretch more.
In my own playing, I use a lot of voicings that require a large degree of stretch.
It’s not uncommon for me to play a chord on four strings that has a ve fret stretch
within it. For many of my interviewees, the maximum comfortable stretch they would
make on a chord was three or four. I’ve noticed that when I play “stretchy” chords, my
thumb goes to a certain position on the neck. Usually it's on the center or just to the
right of the center, but when stretching it goes the other way, to the left. This thumb
67

positioning allows the hand to be more open while still providing a lot of leverage for
fretting. If I put a small groove along the neck at that position, maybe that could help
people stretch more.
Standing Vs. Sitting
The positioning of the arm and wrist is determined by the positioning of the
neck in relation to the guitarist's body, and that is determined by the length of the
neck, the shape of the body, and the rotation of the neck and/or body. The further the
bass side of the guitar is rotated away from the guitarist, the less they will have to bend
their wrist. The longer the neck is when attached to the body of the guitar, the further
the guitarist will have to reach when playing low chords. Finally, when sitting, the
shape of the guitar body determines how close the neck is to the guitarist.
Rotating the guitar is excellent in theory but unfortunate in practice because
many guitarists have to look at the neck to play correctly. So I did not create a neck that
eases wrist rotation in that way.
Looking more closely at the guitar in relation to the body when sitting and
standing yields some interesting thoughts. When sitting, many guitarists,both male and
female, cross their right leg over their left to raise the guitar higher. This makes the
guitar easier to play because the neck is now closer to the guitarist. The lower the guitar
is, the more a player’s fretting wrist has to bend. This is easy to x for when players are
standing: players just tighten the guitar strap to a position that is comfortable.
68

Unfortunately, the position that is most comfortable standing for many
guitarists is higher than when seated, which makes practicing dierent - not necessarily
more dicult, but dierent. The lower seated position also caused guitarists to slouch
or hunch over their instrument. This is bad for your lower back. The easiest way to x
this problem was to design the guitar to make the lower bout and lower waist of the
guitar wider. Even doing just an inch could help. That being said, I had to be careful
not to go too far, or else the nal result could look weird.
Breasts, And How To Avoid Them
One issue that guitarists with breasts told me about was that many guitars
come into contact with their breasts in ways that can be both uncomfortable and
physically painful. On guitars without a belly cut, like a Gibson SG or a Fender
Telecaster, breasts prohibit the length of the guitar strap- the guitar can’t be worn
particularly high up as a result. Additionally, the upper bout of the guitar can press
against the breasts when seated, especially when the guitarist is hunched over. On
guitars with a belly cut, like a Fender Stratocaster, it’s much easier to maneuver the
guitar. That being said, guitars with large or particularly pointy horns can stab the
breasts (ouch!)
I’ve noticed that female frontwomen of indie rock bands frequently use guitars
that have an oset body shape, and I can attribute this to a few things. Firstly, the
inuence of Kevin Shields, who largely uses Fender Jazzmasters (an oset guitar
design), on indie rock cannot be understated. Secondly, I believe oset guitars are a
69

relatively safe bet if you have breasts. The horns aren’t particularly large or pointy, they
frequently have belly cuts, and most importantly, the lower bout of the guitar is shifted
down, allowing room for at least one breast.
Making a large belly cut on my design could help the problem, but I thought I
could largely solve the issue by making the entire bass side of the body smaller. This
means that the guitar can be held higher with a strap without changing the position of
the neck, and it won’t interfere with breasts nearly as much as a symmetrical guitar.
Creating and evaluating the prototype
The loose parameters of the guitar include:
1.) Chambered body
2.) Slotted headstock
3.) Thin Neck
4.) Groove along treble side of neck
5.) Treble side of body wider than normal
6.) Bass side of body smaller than normal
7.) Upper bout oset from lower bout
8.) Small Upper horn
9.) Big belly carve
Using these parameters, I created the following design in Fusion 360 (Figure 1,
2, 3, 4). After creating the design, I manufactured it at a makerspace in New Haven
70

called Makehaven. I chose to work at Makehaven because they had a CNC machine
that was up to the task. The resulting prototype looked like this. (Figure 5). Readers
will note that this guitar has no drop top and no hardware. I chose not to make this a
complete guitar largely due to time constraints. The majority of the time of building
guitars is ne detail work, and not all of the ne details are needed to determine
whether or not a guitar is ergonomically viable, which was my main concern of the
design. My central question was, “would these loose parameters combine nicely and
work in real life?”
They did. My super-initial testing of the prototype involved clamping the neck
to the body and taping the hardware to the guitar. I also put screws where the strap
buttons would be so I could judge the sitting vs. standing positions. I would mimic
playing the guitar in dierent positions, seeing what was comfortable and what wasn’t.
When standing the guitar was great: the groove in the neck seemed very promising, and
it was supremely comfortable on my body. Because of the arm and belly carves I put in,
I could wear it higher than a normal guitar. It didn’t look weird in this position because
the treble side of the body is wider than the bass side. It appeared to be a conventional
electric guitar.
The neck wouldn’t dive down, but it sat slightly lower than I wanted it to. The
neck was basically parallel to the oor both when standing or sitting. In addition, the
guitar was relatively well balanced considering how lightweight it was. Without the
hardware, it weighed four pounds. When sitting, the guitar was still very comfortable,
71

and it felt particularly comfortable when crossing the right leg over the left. That being
said, it denitely felt like it was designed to be held that way, which is not a problem
per se, but it may be better to create a sitting position that is a little bit more universal,
because not everyone crosses their right leg over their left knee.
After testing the guitar by myself, I invited some of my interviewees to check it
out. This yielded some very helpful feedback, and even led me to a conclusion that I
had not thought of.
The feedback was generally very positive: the body shape was attractive, the
neck was comfortable, it did a great job of not interfering with breasts, and it felt much
lighter than a normal guitar (interviewees tested the guitar with hardware taped on.)
There was some constructive feedback: the neck felt like it rested low, and one of my
interviewees specically requested I move the position and change the shape of the
treble side of the body. She wanted this because although having the sitting fulcrum so
close to the neck was good for balance, it changed the way she had to play a little bit.
Her picking hand was much closer to the neck than usual, and she had to bend her arm
dierently to play in the way she would with a Stratocaster. Additionally, when playing
far up the neck, she had to rotate her fretting shoulder slightly inward. Finding the
right balance between this and not having the nut feel too far away from the guitarist is
a priority, so I took note and decided to work on it for the next design.
The feedback yielded a surprising pivot of thinking about the groove in the
neck. Firstly, the feedback about the groove was interesting because some players did
72

not notice it until I specically pointed it out. I think that’s a good thing, because it
means the neck is accessible. Functionally, my neck was perceived to be similar to a
normal guitar neck. That being said, when they did notice the groove in the neck, they
didn’t use it as a means to play “stretchy” chords as I had anticipated. Instead,
interviewees immediately collapsed their wrist into what I like to call “The John Mayer
Position.”
A signature aspect of John Mayer’s playing is the fact that he often curls the
thumb of his fretting hand over the neck and frets the low E string with it. He got this
technique from Jimi Hendrix and Stevie Ray Vaughan, but John Mayer is the most
contemporary example. The problem with the John Mayer position is that he had
incredibly large hands with long thumbs, such that he could even use his thumb to fret
the bass strings on an eight string guitar.
72
This hand position is widely considered to
be anatomically challenging. I have average sized hands for a man, and I do not use this
technique because I struggle to get my thumb over on many guitar necks. It is usually
easier for me to just play with normal technique. A woman with average hands would
have an even more dicult time. This is unfortunate because it is an incredibly popular
playing style.
Upon further inspection, I realized why the groove in the neck enables this
playing style. When the wrist collapses, the heads of the metacarpals (just below where
your ngers start) jut against the neck. Having the groove there allows them to go in
72
John Mayer Plays 8 String Tosin Abasi Guitar! (Los Angeles), accessed April 17, 2024,
https://www.youtube.com/watch?v=Xo4xfGYj_cg&ab_channel=R%26MNews.
73

further, which allows the thumb to go further. The initial design and prototype was
largely successful, although there are denitely some things that I wanted to change.
74

THE FINAL DESIGN AND
BUILD
After empathizing with my user base through secondary research, dening my
design challenge, interviewing seventeen women, and designing, manufacturing and
testing a prototype, I was ready to begin working on the nal guitar. In this section,
you will nd a detailed summary of my work.
I start by describing how I came up with the nal design, then I move on to the
CNC manufacturing process. After the CNC manufacturing process, I describe the
woodworking process I used to nalize the shape of the parts, as well as the nishing
and assembly of the nal guitar.
Finalizing the Design
I began manufacturing the rst prototype at the beginning of February, and I
nished it in the rst week of March. Several interviewees were able to test the initial
guitar, however I regret that more were unable to do so due to time constraints. In
order to complete the nal build, I needed to start designing and building by the
second week of March. The interviewee’s invaluable feedback indicated that a few
things could be improved.
1.) There was no neck dive per sé, but the angle of the neck was parallel to the
oor. The playing position would be better if the neck was closer to the player
75

2.) The neck groove could be moved closer to the center of the neck.
3.) Although the seated position was great for balance and overall comfort, it made
playing high on the neck dicult because the fulcrum point was very close to the
upper frets.
It was not particularly dicult to x the issues. To x the balance of the guitar,
I redistributed where the weight was in the body: I added material to the area behind
where the bridge would sit. This makes the guitar slightly more body heavy, but the
guitar is so light that at this point adding an extra quarter pound or so to solve the issue
was worthwhile. Moving the neck groove was as easy as shifting the control point
splines that dene the neck groove in Fusion 360 (Figure 1). The same could be said for
changing the lower horn, which helps control the seated position: I moved that part of
the sketch downward, away from the end of the neck.
Upon going through the process of designing and building the prototype, I
also noticed a few things that could change to make the non-ergonomic aspects of the
guitar better. Firstly, the truss rod could be adjusted. In the prototype, I did not make a
slot for the truss rod access, instead I had the truss rod come out at the end of the neck.
This makes it more dicult to adjust the truss rod. By shifting the truss rod towards
the nut, I could make a slot between the twenty-third and twenty-fourth frets for truss
rod adjustment. Additionally, I realized that bending the top would be much more
dicult if there was no material between the wood under the bridge and the wood at
the edge of the body. In Fusion 360, I made it so that the area where the top wood
76

would bend had material to support it (Figure 2) Additionally, I edited the width of
the neck at dierent spots to my specications. Specically, I made the width at the nut
the same width as a telecaster, 1.625 inches.
Finally, I changed the way the neck met the body at the neck pocket. I made
sure the neck pocket was three inches long at its longest point (the same length as a
Fender,) and I changed the way the fretboard, neck, and neck pickup pocket related to
each other in order to create a guitar with twenty-four frets. The twenty-fourth fret
marked the end of the neck pocket, and had a little bit of overhang that reached the
neck pickup. Including an upper fret access carve on the lower horn of the body made
it so that getting to the twenty-second fret was far more comfortable on this guitar
than on a Stratocaster. The twenty-third and twenty-fourth frets are harder to get to,
but Fender guitars generally only have twenty-one to twenty-two frets. The extra few
frets were just a bonus.
Materials
The rst thing I do with any build is decide which materials to use. This helps
me visualize the nished guitar in my head and allows me to plan things ahead of time.
For example, dierent bridges require dierent mounting holes, and I can draw where
the mounting holes go in the 3D design. Here is my original list of materials:
● Body: Black Limba from Stewmac
● Drop-Top: Bookmatched Ziricote from Stewmac
77

● Neck: Roasted Quartersawn Flame Maple from Tempered Tonewoods
● Fretboard: Ziricote from Stewmac
● Nut: 1/8” unbleached bone
● Frets: Medium/higher from Stewmac
● Pickups: P90s from Barenuckle Pickups
● Bridge: Hipshot 0.125 from Hipshot
● Tuners: Grover Sta-tite 18/1 from Grover
To put things in perspective, This is a nice list. The woods are all top shelf, and
everything else is maybe a shelf or two below that. The total cost of these materials is
somewhere around $600-$700. Large retailers like Fender and Gibson don’t build
guitars with these woods, but PRS does, and if PRS built this with their designs, the
nished guitar would cost somewhere around $5,000. That is why I was quite dejected
when I ruined these materials through a mixture of lack of manufacturing forethought,
rookie mistakes, CNC error, and just plain bad luck. Here is the actual nished list of
materials for the nal guitar:
● Body: Mahogany from Stewmac
● Drop Top: Engelmann Spruce from Stewmac
● Neck: Mahogany from Stewmac
● Fretboard: Pau Ferro from Stewmac
78

Thankfully, I didn’t ruin any of the hardware, so that’s all the same.
CNC Manufacturing
The rst step in manufacturing is to adequately prepare your materials. Wood
tends to move and shift when placed in dierent climates with dierent levels of
humidity, so I let the wood sit on my storage shelf at Makehaven for a day or two
before beginning the process of cutting the wood to size. I did the body rst. For the
CNC, at least one of the faces needs to be at, so I used a jointer to get one at face. I
used a planer to bring the body blank down to just above its nal thickness of 1.625.
After doing this, I could put it on the CNC.
Setting Up the CNC Machine
The Makehaven CNC machine is a Gerber Sabre from the 1990s that has been
outtted with a more modern controller. The rst step in using it, at least for me, was
to place my own sacricial board on top of the spoilboard. I did this for a number of
reasons. Firstly, because two of my parts were double sided I had to mill holes for
dowel pins into some sort of a xture board. Secondly, the spoilboard on this CNC
was in very bad shape, it honestly really needs to be replaced. Without my sacricial
xture board, I would not be able to get accurate heights. Even with my sacricial
board it was a little sketchy. Anyways, I clamped the sacricial board to the spoilboard.
(Figure 3)
79

After this, I set the x and y zeros, the origin point of the machine. The origin
point is the reference in the xy plane for every single cut on a particular part. I attached
a laser pointer to the CNC and used that to draw a line representing x and a line
representing y, so I had a visual reference for placing my workpiece. For workholding, I
used masking tape on both the workpiece and the xture with a layer of superglue in
between. (Figure 4) Many CNC manufacturers use screws or clamps, but my
workpiece was suciently small that this wouldn’t work for me. Masking tape and
superglue is the oldest trick in the book for luthiers; it’s super strong.
Body, Back
Once my workpiece was in place, I could mill the back of the body. I put my
⅜” inch spiral downcut end mill into the machine and I set my z zero using a 0.5 inch
steel puck. I used this tool to run my rst operation, which was making a series of
0.505” holes that I would later put dowel pins in when I ipped the workpiece. I ran
my rst operation, an adaptive clearing that milled out the electronics cavity, then
another operation which milled out the holes for the neck attachment ferrules. I then
switched to a one half inch spiral downcut ball nose end mill to do another adaptive
clearing that roughed out the belly carve. After this, I executed a parallel nishing
operation that made the belly carve uniform and smooth. My nal operation used a
1/16” bit which marked out the holes for the neck attachment screws and the string
through ferrules. (Figure 5)
80

Body Front
After that operation, I took the workpiece o of the xture board. There were
several holes in the xture board as a result of the rst operation, and I malleted in my
½” steel dowel pins (Figure 6). I then put masking tape on the back of the workpiece
and on the xture board. I applied a line of superglue to the tape then lined up the
holes with the pins and mallet the workpiece down until it touched the spoilboard.
Next was to mill out the neck and pickup pockets, which I did with my ⅜” bit in an
adaptive clearing operation. I then switched back to my ½” ball nose and did an
adaptive clearing to hollow out the body and make the arm carve. After this I did a
nishing pass on the entire body, which depending on the material could give an
incredibly smooth and even glue-ready surface. On the black limba it did, but the
mahogany needed some light sanding to get into shape. This was due to the grain of
black limba being much tighter. After sanding, I could cut the body out, using my ⅜”
end mill. There was no need for tabs because the material is bonded to the spoilboard
itself via masking tape and superglue at that point. That being said, the nal contour
toolpath cut out the body with two of the xture holes, which enabled me to put the
body back on the CNC in the future if I needed to x something or add something.
Milling the body took about six hours. (Figure 7)
Neck Front
Milling the neck took about 4 hours and started the same way as milling the
body. I took my wood and ran it through the jointer and planer to be at and of a
81

uniform thickness. After that, I set a new x and y zero, as I had to do that every time I
restarted the machine. My rst operation was to make a new set of xture holes for
ipping the neck accurately. Then I did an adaptive clearing for the headstock followed
by a parallel nishing pass for the headstock and the face of the neck with a ⁄'' ball
nose. After this, I did a pocketing toolpath with a ⅛” upcut to mill the slot for the truss
rod. I also used a 1/16” drill bit to make holes for locating pins to be used to attach the
fretboard. (Figure 8)
Neck Back
I ipped the neck using the same method as the body. After ipping, I used my
½” ball nose to do an adaptive clearing operation that carved the rough shape of the
neck. After this, I did a ow operation which followed the z level of the piece along the
y direction as it made a series of cuts, slowly moving in the x direction. This operation
nished the shape of the neck. I completed a parallel nishing operation that made the
headstock and neck heel perfectly at and parallel to the top of the neck. I cut out the
slots in the headstock, and then cut out the contour of the neck with a ⅜” end mill.
This time, I did use tabs, because there was no masking tape and superglue between the
top of the neck and the spoilboard. (Figure 9)
Fretboard.
To make the fretboard, I jointed just one face before axing it to the
spoilboard with masking tape and superglue along the previously drawn x axis line. I
rst did a parallel operation with the one half inch ball nose to radius the fretboard.
82

After this, I used my 0.023” fret slotting bit to make the fret slots and to mark the nut
lines. I also marked where the truss rod access would go. I then used a 1/16” drill bit to
make holes for locating pins. This allowed me to glue the fretboard to the neck without
the fretboard shifting. Finally, I cut the fretboard out with a ⅜” end mill and a contour
operation. This process took about an hour. (Figure 10, 11, 12)
Drop Top.
The rst step in preparing the drop top was to join the two edges of the
bookmatch and glue the two pieces together. They were too thin to put on the jointer,
so I used a 24” fret leveling beam and Stikit sandpaper with the two pieces of wood
clamped to a shooting board. This was an easy way to get a perfect joint. I could tell if I
did the job properly by holding the joint up to the light and seeing if any light came
through. If none did, I was ready to glue it up.
Gluing the top together was easy but stressful. I procrastinated doing this for
several weeks. Essentially, instead of using clamps, I used tape. I put three pieces of
masking tape across the glue joint, stretching the tape as I did this. This way, the tape
would provide all of the clamping force needed. The joint was so good that it required
almost no force at all to bond the two pieces together. I opened up the faces, put glue
on one of them, then sealed it up, taping and stretching on the other side. Finally, I put
the joint between two pieces of wood, ensuring that the joint didn’t shift and make one
side higher than the other. After the glue had cured, I ran the nal piece through a
83

thickness sander to make it perfectly at and remove excess glue. It was then ready to go
on the CNC
I set up the workpiece the same way I usually did and ran just one operation: a
contour that cut the outside of the top and the electronics cavity plate. All of that
work for a forty-ve second CNC job (Figure 13)
Actual Woodworking
Glue-ups and steam bending and clamps, oh my!
Once I had my CNC-milled parts, I needed to put them together. The neck
was fairly easy; I placed the previously tested truss rod (I didn’t want to attach it
without knowing if it worked) then covered it with masking tape, then put in the
locating pins (I had to re-drill them because they did not quite line up) then spread the
glue, then remove the tape, put the fretboard on, and clamp clamp clamp. The body
was much more dicult.
The rst step in gluing the top to the body was to bend the top to the right
shape. This is a very unconventional way to build a guitar, but this is an
unconventional guitar. I soaked the spruce top in almost boiling water for an hour or
so, and then I used the dowel pins from earlier to attach it to the top and manually
bend it with clamps. I left it to set up for one week while I went on spring break.
(Figure 14)
84

After a week the top had become rigid and dry again. I spread glue over the
surface of the body and clamped it on. It would have been better to do this with my
thin air press, but I had never successfully used it before, so I was scared. It ended up
working out for me - the top went on okay. I used a table router to cut out the neck
and pickup pockets, as well as cut it down to the exact shape of the body. I also drilled
the holes for the neck screws and attached the neck to the body. That was a really big
moment: being able to actually hold the guitar like a guitar.
Fixing some past mistakes
When milling, I had made three non-grave errors. Firstly, I said I cut out the
contour of the body with a ⅜” end mill, and it was my intention to do so. However, I
actually cut it out from both sides with a shorter one fourth inch end mill, because I
broke my ⅜” end mill trying to create a piece to x the black limba body blank. All of
this is told in detail in my design log. Anyways, I fucked up the CAM of the operation
that cut the contour from the back. Instead of cutting the outside of the line, it cut the
inside of the line, meaning the back of my body had a ¼” shelf along the contour. To
x this, I milled a new piece of this exact negative space and epoxied it in. (Figure 15,
16, 17)
The second mistake I made was forgetting to include the upper fret access
carve. This was no big deal, because I could easily do this by hand.
Finally, when I tried to cut out the truss rod access cavity, I made a mistake
with my chisel and it looked really really ugly. To x it, I used my dremel to cut away
85

the excess material, and then I inlaid a new piece of pau ferro taken from the fretboard
blank. This piece had the exact same grain pattern, so it’s not immediately noticeable.
(Figure 18, 19, 20)
Fretting
The time had come to put frets in the guitar. Unfortunately, when I went to do
this, I realized the vibration of the machine had actually caused the fret slots to be cut
just too wide for the tang of the fret to bite into the wood. The slots were still centered,
so I used epoxy to install them. I switched to superglue gel halfway through because it
required less cleanup. Usually, you use a dead blow hammer (a hollow hammer lled
with sand or oil) to hammer the frets in, but the fret slots were too wide for me to do
this. Afterwards, I led the ends of the frets down, and cleaned up the fretboard with a
razorblade. The neck was now ready for sanding and nishing.
Finalizing the Body
I used a router table to cut the excess from the ¼” ller piece to the right shape,
then sanded the sides of the body to be uniform. After this, the body went back to the
router table to cut the roundover. The body was now ready to be sanded and nished.
Finishing
The rst step in the nishing process was to sand all parts excluding the
fretboard to 320 grit. This was my least favorite part of the process:working my way up
through the grits and removing micro-scratches. But the more eort I put into
sanding, the better the nish would be. After sanding, I had to ll in the grain with a
86

clear grain ller. Mahogany is quite porous, which means that a coat of nish would
not be even unless I lled in the pores.
After letting the grain ller dry overnight, I began to nish the guitar. I used
shellac because it dries and cures quickly. It’s made from the excrement of lac bugs
which are soaked in alcohol. The result is a very cheap and easy to apply nish. I
brushed on thin coats and let them dry. In between the coats, I sanded with 320 grit
sandpaper. This ensured that the nish did not build up in one place more than
another. After the last coat dried, I began to sand with progressively higher grits of
sandpaper. This process brings the shellac to a low gloss nish.
Assembly
With the nish complete, it was time to assemble the guitar. Holes are drilled in
the headstock for the tuners, as well as guide holes for the screws that hold the tuners
in. The neck is installed using screws and ferrules I’ve installed in the neck heel.
Locating the bridge is one of the most important parts of the build in terms of
playability. I drew two lines on the body by running a straightedge along the side of the
neck. On a normal guitar build, I would have done this before the neck was carved
because the straightedges would have more surface to latch onto. Additionally, drawing
the two lines is a great way to tell if the sides of your neck are at and x them if they
aren’t. I found the center of those lines using a center nding ruler. Doing this in two
places allowed me to create a centerline. Using that centerline, I measured twenty ve
inches from the nut to nd the position of the bridge saddles. The bridge does not end
87

exactly at that line; the line should hit the center of the bridge's intonation range,
which could be half an inch back from the front of the bridge. Using the blueprint of
the bridge with the centerline, I marked exactly where the holes for the strings and
bridge screws go.
An alternative method for locating the bridge: after the tuners and nut are
installed, one could run a low E and a high E string from the tuners through the nut to
the bridge and mark twenty-ve inches from the nut. One could move the bridge
around so that the strings lie equally close to the ends of the fretboard and mark the
holes of the bridge with a pencil. This method is very easy, but often yields a bridge
that’s just a little bit o in some way. Maybe the bridge turns out functionally very
good but ever so slightly rotated one way or another.
After drilling the holes for the bridge, it was time to install the electronics.
First, I drilled holes connecting the pickup pockets to the major body cavity for the
pickup wires to go through. I also drilled three holes in the top for the two knobs and
switch, and one larger hole in the side of the body for the jack plate. I soldered the
circuit together using a wiring diagram and tested it by tapping a screwdriver against
the pickups.
The fretwork could have been done earlier in the process, I chose to wait until
this point due to personal preference. . First, I leveled the frets. I drew a line on every
fret with a sharpie, then used my fret leveling beam to run sandpaper along every fret
until the sharpie was gone. Next, I re-sharpied every fret. This helped me know I was
88

not not messing up my work when I crowned each fret. Using a fret rocker allowed me
to see if any frets were too high or too low and adjust them accordingly. After I know
the frets are level, I can crown them with my triangle fret crowning le, making sure to
leave a thin line of sharpie on top of the fret. I bevel the fret ends, being careful not to
go too far. Then, I dress the fret ends, making sure they won’t poke or scratch the
player. After this, the frets are ready to be polished. The goal is to get them shiny
without changing their height. A feat easier said than done.
After the frets are done, I can work on the nut. I led the nut blank down to
⅛”, so it ts in the slot snugly. I then used a string spacing ruler to determine the
correct position of the strings. After marking the strings, I cut the nut down to size and
installed it. Cutting slots for the strings was relatively easy as I have specic les from
Stewmac that are the exact size of common string shapes. After the slots are at the right
depth, I led the nut to its nal shape and polished it. The guitar is now ready to be
played. (Figure 21)
89

Moving Forward
The nal build was completed on Monday, April 15th, very close to the
deadline. As such, there was no real way to evaluate the guitar apart from my own
playing. I like it quite a bit. It achieved every design goal I created for myself. The nal
guitar, with all of the hardware and electronics installed, weighs in at ve pounds and
two ounces. This is almost two and a half pounds, or thirty three percent lighter, than a
fender stratocaster, and half as light as a Gibson Les Paul. It’s two pounds less than the
St. Vincent signature model. The best part? No neck dive.To my hands, the neck
groove is highly eective at enabling me to use my thumb on the low E string in the
“John Mayer Position.” I think this is perhaps the greatest technical advancement of all.
Looking to the future, this is only the beginning of this project. This guitar is
the rst functional prototype, and I will be building the second soon after graduation
this May, after I have had ample time to receive feedback from a number of guitarists
both male and female.
In that vein, I do have one note. For me, the guitar feels a bit small. When I
strum normally, I nd myself strumming where the 24th and 23rd frets are,
occasionally hitting the neck with my ngers. I think slightly smaller guitarists won’t
have this issue. This guitar design, if produced to a signicant degree, will help a
number of women feel more comfortable while playing their instrument.
90

All of this to say, this guitar won’t x the issues outlined in the empathize
section of this thesis. We still live in a world designed by and for men, and while things
may be improving (one fewer acl-tear per capita at a time) they are improving slowly,
and I don’t know if there can be true gender equality without dismantling the
patriarchal nature of our society that have led to to these issues. Of course, every little
bit counts, and who knows how this guitar will evolve over the coming months.
91

Works Cited
Bacon, Tony. “From Les Paul to Rob Chapman: The History of Signature
Guitars,” April 11, 2019.
https://guitar.com/guides/essential-guide/history-of-signature-guitars/.
Bayton, Mavis. “Women and The Electric Guitar.” In Sexing The Groove: Popular
Music And Gender, 37–50. New York: Routledge, 1997.
Beckner, Justin. “The History of the Parker Fly.” Guitar, June 28, 2022.
https://guitar.com/features/gallery/the-history-of-the-parker-fly/.
Beyer, Max. “The Evolution of John Mayer.” The Gustavian Weekly, March 5,
2010, sec. Variety.
https://weekly.blog.gustavus.edu/2010/03/05/the-evolution-of-john-mayer/.
Bourdage, Monique. “‘A Young Girls Dream’: Examining the Barriers Facing
Female Electric Guitarists.” IASPM@Journal 1, no. 1 (April 15, 2011):
1–16. https://doi.org/10.5429/2079-3871(2010)v1i1.1en.
Budnick, Dean. “Dead & Company: The Origin Story.” Relix, July 14, 2023.
https://relix.com/articles/detail/dead-and-company-the-origin-story/.
Cameron, Aaron. “Top 10 Female Guitarists Of All Time,” n.d.
https://wm-dev.watchmojo.com/articles/top-10-female-guitarists-of-all-time
/script-written-by-aaron-cameron.
Copyright.gov. “What Musicians Should Know about Copyright.” Accessed April
17, 2024. https://www.copyright.gov/engage/musicians/.
Crespo, Amanda. Girl Guitars: Negotiating Gender through Instrument Design,
Mediation, and Use. Ottawa: Library and Archives Canada = Bibliothèque
et Archives Canada, 2011.
Criado-Perez, Caroline. Invisible Women: Data Bias in a World Designed for
Men. New York, NY: Abrams, 2020.
Downey, Sophie. Nike is coming out with a soccer cleat specifically for women.
92

Podcast, June 19, 2023.
https://www.wusf.org/2023-06-19/nike-is-coming-out-with-a-soccer-cleat-s
pecifically-for-women.
Erickson, Jon. “A Taylor Swift Trend: More and More Girls Learning Guitar, Music
School Owner Says.” NBC26, December 4, 2023.
https://www.nbc26.com/news/local-news/a-taylor-swift-trend-more-and-m
ore-girls-learning-guitar-music-school-owner-says.
Ernie Ball Music Man. “ST. VINCENT COLLECTION.” Ecommerce. Accessed
April 17, 2024.
https://www.music-man.com/instruments/families/guitars/st-vincent.
Ford, Frank. “Heel,” September 14, 1998.
http://www.frets.com/FretsPages/General/Glossary/Heel/heel.html#:~:text
=The%20heel%20is%20the%20portion,called%20a%20%22French%20h
eel.%22.
Goldenaudiomusic. “Rock ‘n’ Gender Roles: The Gendering of Daisy Rock Girl
Guitars,” October 20, 2015.
https://goldenaudiomusic.com/2015/10/20/rock-n-gender-roles-the-gender
ing-of-daisy-rock-girl-guitars/.
Grammy Awards. “Boygenius.” Accessed April 17, 2024.
https://www.grammy.com/artists/boygenius/54205.
Grammy Awards. “John Mayer.” Accessed April 17, 2024.
https://www.grammy.com/artists/john-mayer/14891.
Grammy Awards. “Madison Cunningham.” Accessed April 17, 2024.
https://www.grammy.com/artists/madison-cunningham/251720.
Holmes, Kat, and John Maeda. Mismatch: How Inclusion Shapes Design.
Simplicity : Design, Technology, Business, Life. Cambridge,
Massachusetts ; London, England: The MIT Press, 2018.
Hudgins, Kristen. “How Taylor Swift Masterminded Global Success, Explained by
SOMD Experts.” University of Oregon School of Music and Dance.
Accessed April 17, 2024. https://musicanddance.uoregon.edu/TaylorSwift.
Jackson, Ashawnta. “At First, the Guitar Was a ‘Women’s Instrument.’” Jstor
Daily, October 4, 2020.
93

https://daily.jstor.org/at-first-the-guitar-was-a-womens-instrument/.
John Mayer Plays 8 String Tosin Abasi Guitar! Los Angeles. Accessed April 17,
2024.
https://www.youtube.com/watch?v=Xo4xfGYj_cg&ab_channel=R%26MNe
ws.
Joy, Julia. “The Real Reason Why Cars Are More Dangerous for Women.”
Columbia Magazine. Accessed April 17, 2024.
https://magazine.columbia.edu/article/real-reason-why-cars-are-more-dan
gerous-women-drive-US-forward.
Kirkham, Pat, ed. The Gendered Object. Manchester, UK New York: Manchester
University Press, 1996.
Kobylensky, Paul. “50% of New Guitarists Are Women.” Sweetwater, January 4,
2019.
https://www.sweetwater.com/insync/50-new-guitarists-women/#:~:text=Ac
cording%20to%20a%20study%20conducted,seem%20to%20back%20the
ir%20findings.
Korellis Reuther, Karen. “Shrink It and Pink It: Gender Bias in Product Design.”
Harvard Advanced Leadership Initiative Social Impact Review, 10/25.
https://www.sir.advancedleadership.harvard.edu/articles/shrink-it-and-pink
-it-gender-bias-product-design.
Lerman, Nina E., Ruth Oldenziel, and Arwen Mohun, eds. Gender & Technology:
A Reader. Baltimore: Johns Hopkins University Press, 2003.
Liston, Valerie. “Behind the Design: OXO’s Iconic Good Grips Handles,” January
31, 2017.
https://www.oxo.com/blog/behind-the-scenes/behind-design-oxos-iconic-g
ood-grips-handles.
Macmillan, Carrie. “Are ACL Tears Really More Common in Women?” Yale
Medicine, February 14, 2020.
https://www.yalemedicine.org/news/sports-injuries-gender#:~:text=Wome
n%20also%20have%20much%20more,women%20more%20prone%20to
%20injury.
McCracken, Matt. “Guitar Neck Profiles Explained: Find Your Perfect Playing
Partner,” March 22, 2023.
94

https://www.guitarworld.com/features/guitar-neck-profiles-explained.
Mcmahon, Chris. “Don’t Be That Guy: Is Sexism Hurting Guitar Shops?,” October
2, 2015.
https://reverb.com/news/dont-be-that-guy-is-sexism-hurting-guitar-shops.
Owen, Matt. “Watch Joni Mitchell Play a Parker Fly at Her First Headline Show in
23 Years.” Guitar World, June 12, 2023.
https://www.guitarworld.com/news/joni-mitchell-parker-fly-first-headline-sh
ow-in-23-years.
Petruisch, Amanda. “Adrianne Lenker’s Radical Honesty,” October 12, 2020.
https://www.newyorker.com/magazine/2020/10/19/adrianne-lenkers-radic
al-honesty.
Rock And Roll Hall Of Fame. “Sister Rosetta Tharpe,” July 20, 2020.
https://www.rockhall.com/sister-rosetta-tharpe.
Scappelliti, Christopher. “Parker Fly: Six Things You Didn’t Know About This
Unique Production Guitar,” May 14, 2018.
https://www.guitarworld.com/gear/parker-fly-six-things-you-didnt-know-ab
out-unique-production-guitar.
Sharp, Johnny. “When Music and Orgasms Collide: The Secrets of ‘Guitar Face.’”
Louder Sound, January 22, 2020.
https://www.loudersound.com/features/when-music-and-orgasms-collide-t
he-secrets-of-guitar-face.
Stafford, Coe Leta, and Nusrat Ahmed. “How to Get Started with Inclusive
Design.” Inclusive Design Mindsets (blog). Accessed April 17, 2024.
https://www.ideou.com/blogs/inspiration/how-to-get-started-with-inclusive-
design.
Steblin, Rita. “The Gender Stereotyping of Musical Instruments in the
WesternTradition.” Canadian University Music Review 16, no. 1 (March 1,
2013): 128–44. https://doi.org/10.7202/1014420ar.
Stringjoy. “Guitar Fretboard Woods: The Ultimate Guide,” October 5, 2020.
https://stringjoy.com/guitar-fretboard-woods/.
Stringjoy. “Guitar Wood Types: A Guide to the Tonewoods Used in Guitar
Building.” Blog/ecommerce. Stringjoy, April 14, 2015.
https://stringjoy.com/guitar-wood-guide-tonewoods-guitar-building/.
95

Sweetwater. “A Slimmer, Lighter Les Paul,” 2006.
https://www.sweetwater.com/store/detail/LPVCLCH--gibson-les-paul-vixen
-caribbean-blue.
Sweetwater. “Guitar Pickup Types Explained,” December 19, 2023.
https://www.sweetwater.com/insync/guitar-pickup-types-explained/.
Sweetwater. “Parts of a Guitar,” September 6, 2023.
https://www.sweetwater.com/insync/parts-of-a-guitar/.
Vesey, Alyxandra. “Room for a Breast or Two.” Journal of Popular Music Studies
32, no. 4 (November 30, 2020): 37–59.
https://doi.org/10.1525/jpms.2020.32.4.37.
Vijayendra, T. “Bicycle and Women’s Liberation.” Countercurrents, July 3, 2023.
https://countercurrents.org/2023/03/bicycle-and-womens-liberation/.
Whitesell, Lloyd. The Music of Joni Mitchell. Oxford University Press, 2008.
https://doi.org/10.1093/acprof:oso/9780195307993.001.0001.
Wunderlich, Roshna E., and Peter R. Cavanagh. “Gender Differences in Adult
Foot Shape: Implications for Shoe Design:” Medicine and Science in
Sports and Exercise, April 2001, 605–11.
https://doi.org/10.1097/00005768-200104000-00015.
96

Appendix
Figures
Guitar Anatomy:
Figure 1
97

Ideate, Prototype, Test #1
Figure 1.)
98

Figure 2.)
99
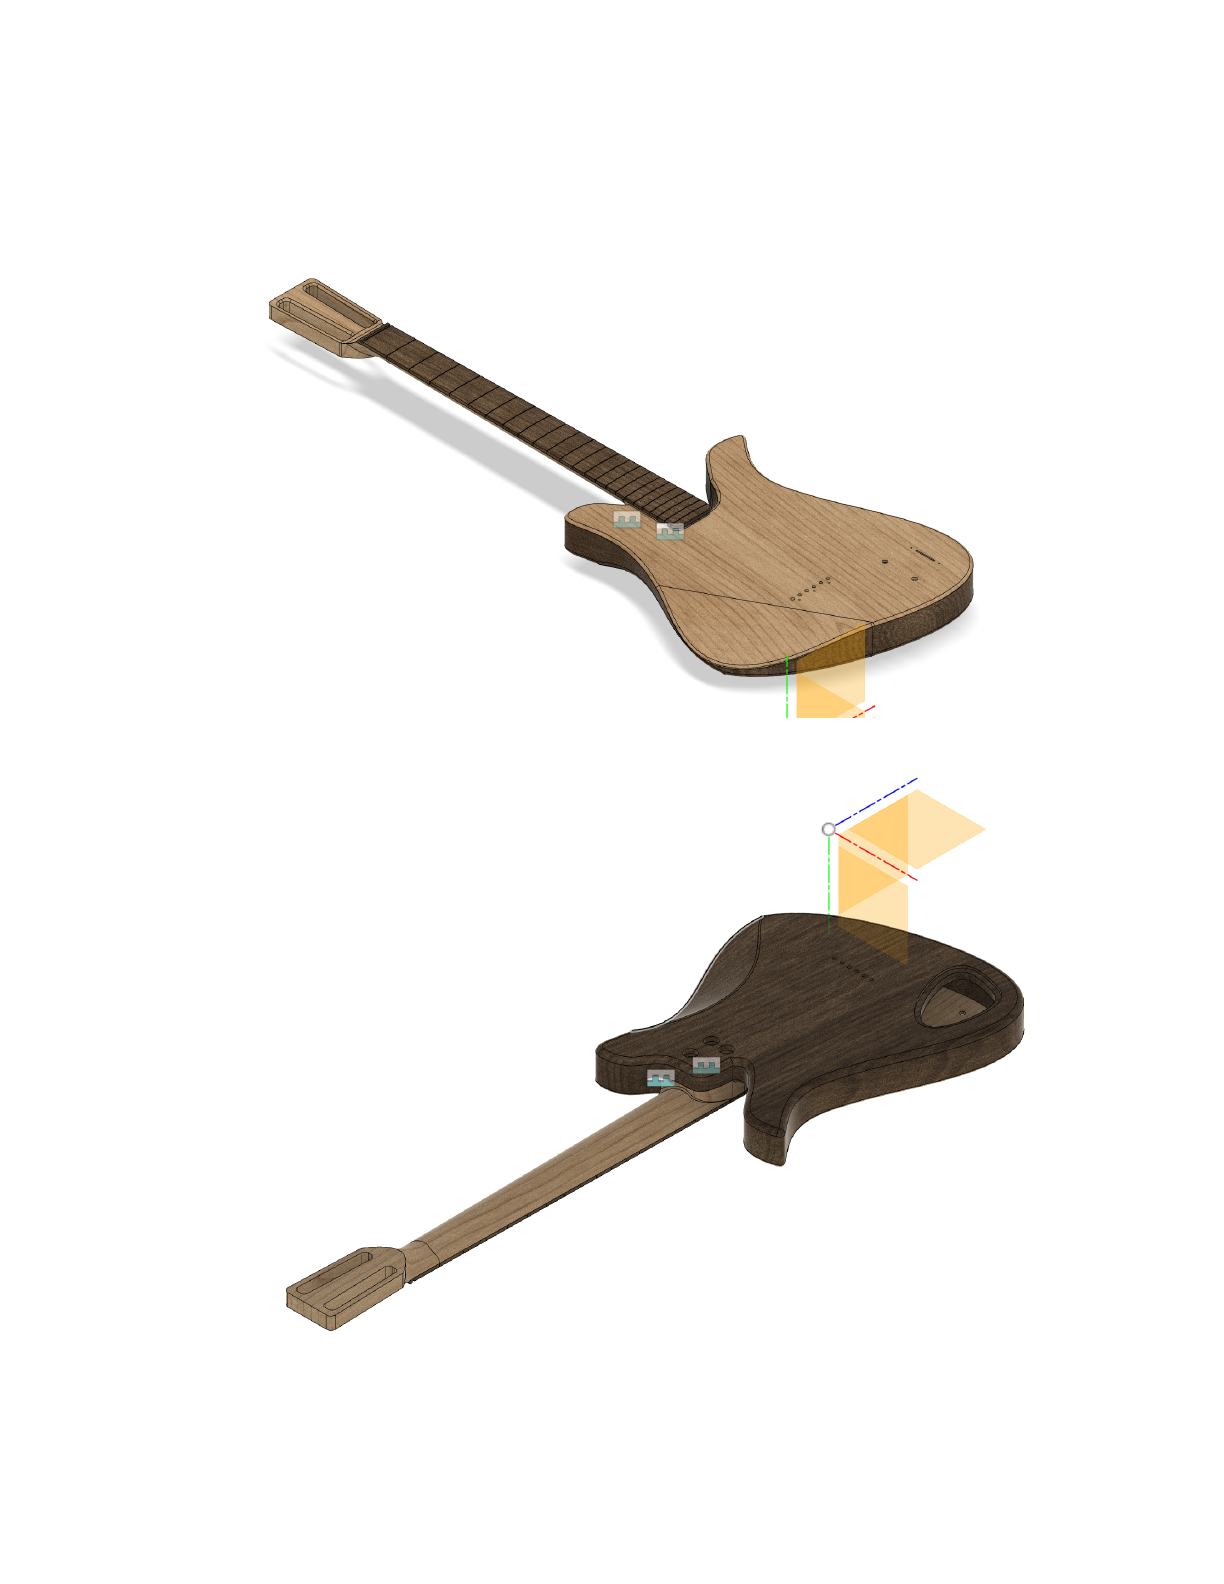
Figure 3.)
Figure 4.)
100

Figure 5.)
The Final build
Figure 1.)
101

Figure 2.)
Figure 3.)
102

Figure 4.)
Figure 5.)
103

Figure 6.)
Figure 7.)
104

Figure 8.)
Figure 9.)
105

Figure 10.)
Figure 11.)
Figure 12.)
106

Figure 13.)
107

Figure 14.)
Figure 15.)
108

Figure 16.)
Figure 17.)
109

Figure 18.)
Figure 19.)
110

Figure 20.)
Figure 21.)
111

Interview Questions
Intro: Establishing questions
1.) How old are you?
2.) How long have you been playing guitar?
3.) How were you introduced to the guitar?
4.) Did you take lessons? Self taught?
5.) What styles of music do you play most frequently?
6.) What types of guitars do you play? What made you choose those guitars?
Sitting vs. Standing
1.) What are the ways you interact with your guitar- are you sitting? Standing
up?
If standing up
1.) When you use a guitar strap, where does the guitar sit on your body?
2.) How did you end up at that strap length?
3.) What would happen if you made the strap longer?
4.) What would happen if you made the strap shorter?
If sitting down
1.) How do you hold the guitar when playing while sitting down/How does the
guitar rest on your body while sitting down?
2.) What are the benets/detriments of using that position as opposed to
another?
If Both
1.) Is there anything dierent about how you interact with the guitar while
sitting down vs while standing and using a strap?
2.) How does the position of your fretting hand change?
3.) How does the position of your picking hand change?
112

Wrists, hands, and discomfort
1.) What chords do you use most frequently/ What are your most comfortable
chords?
2.) What chords are more dicult to play? Why are they more dicult to play?
3.) Would you say you have large/average/small hands?
4.) When playing your guitar, do you ever experience discomfort/soreness in
your hands and wrists?
5.) If yes, how long does it take for those symptoms to appear in a given session?
6.) Do you ever experience discomfort in your back, shoulders, or neck?
7.) If yes, how long does it take for those symptoms to appear in a given session?
8.) Are there any areas of discomfort that I haven’t mentioned?
Abstract
1.) Do you have to make any adjustments to your playing based on the guitar
you’re using?
2.) Do you feel that the design of your guitar is considerate of someone of your
size and body type?
3.) Are there any guitars that you dislike playing? Why?
4.) If you could change anything about your current guitar, what would it be?
5.) What does your perfect guitar look like?
6.) Knowing that I’m designing this guitar to be more ergonomic for women, are
there any things you would like for me to consider?
113

Design Log
The following text is my design log from early January to late March. Every
time I did work on the guitar, I wrote about it. It dives much deeper into things like
CAD and CAM, which I do not go over in detail here. It also chronicles my struggles
with CNC post-processors, leading me to completely switch makerspaces at the end of
January. These logs are unedited and unltered.
Design log: January Third
At the start of this project, these were my hypotheses
1.) A major point of this project will be designing a body that accommodates
breasts
a.) This was less of a hypothesis as my friends had complained to me about this
2.) Another major point of this project will be designing a neck and fretboard that
works well for people with small hands.
a.) This will have to be done without dramatically altering the scale length of the
instrument, as that will change the string tension too much. The shortest scale length
that I see people actually play is 24 inches.
114

b.) One thing about me: I play a lot of weird, stretchy chords. I don’t have
particularly big hands, I would say they’re roughly average. But, I can do a ve fret
stretch for a rst inversion major seven chord quite comfortably. I think it has
something to do with my thumb positioning. By putting my thumb closer to the treble
side of the neck, I can open my hand up more. You can also see this on double bass
players. Their thumbs will be farther away from their hands when playing high on the
neck.
3.) The body shape of the guitar will be in an “oset” style
a.) Many popular female guitarists today choose to play fender style oset guitars,
like jazzmasters.
4.) The neck of the body will be “further in” than usual
a.) For many basses, the scale length is suciently long that the bridge is at the end
of the body. For guitars, it's generally ⅓ of the way up the body. Why is that? If you
brought the bridge of the guitar closer to the edge of the body, the player would not
have to reach so much with their left hand when playing around the nut of the guitar.
i.)One potential problem with bringing the neck in is that you then have to cut into the
body to make room for the neck. This could potentially make upper fret access
dicult. If you could do it in a way that doesn’t sacrice upper fret access and doesn’t
look awful, the guitar will be more compact, easier to play standing up, and have better
balance as the headstock is not so far away from the body
115

I have now organized the data from my interviews with women: here are the main
things
1.) Weight
a.) How do we make this guitar as lightweight as possible without sacricing
“tone”
2.) Women tend to cross their right leg over their left to bring the guitar higher
a.) Can this be a cause of lower back issues? If so, how can we alter the guitar to
encourage that not happening
3.) Guitars can be bothersome when they come into contact with breasts
a.) Strat horn can be “stabby
b.) When worn lower it can “show o” the breasts in a way that is undesirable
c.) How can we adjust the body shape, specically the carves on the upper bout to
counteract these issues?
4.) Balance- related to weight.
a.) The guitar should be able to balance IN THE PLAYING POSITION without
tipping
116

b.) The guitar should not have neck dive
5.) “Height”
a.) Players should not have to reach too far with their fretting hand when standing
b.) At the same time, upper fret access needs to be good, and the guitar should
have 22 or 24 frets- not 21 like a telecaster
c.) Should we use a shorter scale length?
6.) Fretting hand cramping from barre chords
a.) Not a female-only issue, but can we do anything to x it?
The biggest takeaway is that weight is the most important factor. Things that I thought
would be important, like the body shape, were in fact somewhat subjective- Some
people didn’t like strat bodies, some people liked strat bodies. But almost everyone
experienced back issues after playing for a long time, especially standing up.
Additionally, people didn’t like the way all of the weight was on one shoulder.
How do we x this? Can we design a new strap/system for hanging the guitar that uses
both shoulders? This would be complicated and potentially cumbersome, although
still worth exploring. One way we can at least improve upon this issue is to make the
guitar as lightweight as possible while still being well balanced.
117

Balanced is a key term here. If you make the body too light, you run the risk of
the weight of the tuners and headstock causing the guitar to tilt. This is called “neck
dive.” It is not fun to deal with for people of either gender, speaking from experience.
Gibson SG’s, and especially gibson SG basses, are some of the worst oenders when it
comes to neck dive. SG’s have an exceptionally thin and lightweight body, but the
horns do not go very far. The strap button is on the back of the body where the neck
connects. This means that if you imagine the guitar as a 2d object, when hung from a
strap, the balance point is somewhere in the middle third of the body. Even without
tuners and whatnot, the guitar would tilt down. So neck dive can be caused by
1.) Light body
2.) Heavy headstock
3.) Headstock too far away from the body
4.) Poor balance point and strap button placement
Consequently, some things can help cure neck dive.
1.) Heavy body
2.) light/no headstock
3.) Headstock closer to body
4.) Good strap button placement.
118

Making the body heavy does the opposite of what we want to achieve, so we’re not
going to do that. I don’t like the headless guitar designs, they’re too alien, so if we were
to try to remove weight from that end of the guitar, it would be making a headstock
lighter. I don’t know as of yet if we can bring the headstock closer to the body, as I have
not created a design yet that incorporates that. Its certainly worth testing out. As for
strap button placement, I fear that the guitar may have poor strap button placement as
a result of the design. The balance of some guitars can largely be attributed to the
placement of the upper strap button. The closer to the nut the upper strap button is,
the closer to the nut the balance point of the guitar will be. The location of the strap
button is determined by the length of the horn. Many guitars have great balance due to
a large upper bout. Examples of these guitars are: tosin abasi signature, warwick basses,
fender stratocaster. Because we want to have room to accommodate breasts, the upper
horn of the guitar may not be particularly long. In fact, it may be rather short. But
there are other guitars that have short upper horns that have good, or at least decent
balance, like telecasters. How can we reduce the weight of the body without inducing
neck dive?
You have to remove weight evenly. If you remove weight from the body side of
the balance point, you also have to remove weight from the headstock side of the
balance point. Unfortunately, its hard to remove a lot of weight from that portion of
the guitar. Fortunately, we only have to remove a little because of physics. Because the
119

headstock is further away from the balance point, and the distance times the mass is
equal to the downward gravitational force, we have to remove less weight from the
headstock side to make it even. This is important in conventional headstock design
when selecting the tuners. For us, it oers an interesting opportunity. I would like to
formally thank tim sway for helping guide me to this conclusion-why can’t an electric
guitar have a slotted headstock? Classical guitars, and some steel string acoustics (I own
one) have slotted headstocks. They’re slightly harder to put new strings on, but other
than that they’re great. Additionally, slotted headstock tuning machines weigh less
than conventional tuning machines. I estimate that you can lower the weight of the
headstock (furthest thing away from the balance point) by .25 pounds. Additionally, I
believe it will not make construction more dicult because the headstock can be at,
due to the break angle provided by the slotted headstock.
Design Log, January 12
The time has come to start creating prototypes. The rst step is designing
around a set of parameters, reaped from the data. Let's pick the most important ones
and incorporate them as design constraints
1.) Weight- the goal should be to make a guitar around (or under!) 6 lbs, while also
having good balance
120

2.) The experience of playing the guitar should not change greatly from sitting to
standing
3.) The guitar shouldn’t get in the way of breasts
4.) The guitar shouldn’t require a propped up leg to play well while sitting
5.) The neck should be very comfortable, thin, and conducive to stretching
How are these going to manifest themselves
1.) Body mostly hollow, slotted headstock
2.) All about nding a natural balance point, maybe bringing the neck closer to
the bottom of the guitar and moving the bridge down? This is very artful, may take
multiple prototypes
3.) Small upper bout and upper horn
4.) Large lower bout- maybe extendable?
5.) Thin neck- skinny fretboard too. Add a small bump?
121

January 15th
Over the past few days I’ve spent around 15 hours designing an initial
prototype body. I started by creating a sketch called “base” that is really just my stock
box. It's the same size as my body blank from stewmac- 15 inches wide by 20 inches
long, 1.75 inches thick.
My next sketch was the shape of the body. I started with no reference- just raw
does it look good, which is much harder than using a reference because you have no
idea how big something is without referencing something else. The only way I could
know the size was to compare it to the base sketch, from which I projected a centerline,
because that is very useful for checking the symmetry of things. I used a series of
control point splines, placing one at each point where the tangency of the curve
changed signicantly. For those who don’t know, a control point spline is an easy way
of creating a curved line in fusion 360. The “points” are not attached to the line, but
they control it with their position. If you have an arc with three points in a vertical line
and you move the middle one to the left, it looks like (. The fewer control point splines,
the more stable to spline is (less chance of accidentally moving too far and making the
curve do crazy stu like going inside out) The more control point splines, the less stable
122

the curve is, but you have greater control over the curve. I probably used more than I
needed to, but hey, sounds good is good.
After I had a basic body shape, I wanted to check it against a strat, so I created a
canvas (a way of projecting an image in fusion 360) and put in a strat body into my
design. This helped me hone in on the problems I wanted to solve. For the body, we
want to improve the seated position by having a larger lower bout to help low back
issues, improve the weight by making it hollow (more on this later) have a smaller
upper bout to accommodate breasts, and make it so that the seated position and
playing position are more similar, especially in how far the fretting arm has to stretch.
The upper horn area is particularly small, and I think this is good, although it
makes the lower bout look HUGE. Certainly smaller than a strat, and I would say the
place where the strap button would go is somewhat close to a tele. Teles generally don’t
have neck dive, so not a bad way of going about things. I don’t think this will stab
people in the boob like a strat will, and the picking arm will t nicely, theres a big arm
cut, and a big belly cut. These were made using the sweep function.
One failure of this design ( I don’t know for sure, I haven’t manufactured it
yet) is that the leg resting position, while at a better balance point (closer to the neck of
the guitar, is not going to stop players from wanting to bring th guitar higher because
it’s actually similar to the width of a strat at the leg balance position. I think theres a
real question of how far outside the box do I want to go. This still very much looks like
a guitar. I don’t think I want to create truly out there design, because the goal is
123

accessibility for less experienced players, and having a guitar that doesn’t look like a
strat or a tele, etc, will push people away. It has to look good. Even with the normal leg
resting depth, its an incredibly asymmetrical design. It doesn’t look bad, maybe a little
too modern. How can we make the leg resting position better? Maybe an external thing
that sits in the position and bumps it up? Who knows.
To make the seated position more similar to the playing position, i want to
move the “core” of the guitar- the neck, pickups, bridge, etc, in. That is, move them all
closer to the lower strap button. By doing this, people will not have to move their
fretting arm further towards the headstock by bending their elbow out from their
shoulder when standing. This will lead to better wrist positioning and leverage. You
want the shoulder to be locked in and the elbow itself to be rotating. The elbow should
almost be touching your body.
The trouble with bringing everything in is that it hurts the upper fret access, so
we have to be careful with how we design the lower horn of the guitar, as well as the
neck joint. Strats necks meet the body at the 16th fret, and strats have 21 or 22 frets.
The upper fret access is a little annoying, its very much blocked by the neck pocket, but
the lower horn doesn’t get in the way I dont think. Upper fret access has been
important to me since the rst guitars I’ve built. One clever thing I’ve done here is use a
24 fret neck, as opposed to a 22. By doing this, I can sort of trick everybody- my neck
has the same size neck pocket (3 inches long), but my neck joins my body at the 18th
fret. Whats more, by using neck screws with ferrules as opposed to a plate, I can further
124

round over the back of the body to make the transition section more comfortable. Also
because I have a 24 fret neck, I can have fret 23-24 be past the joint, a little harder to get
to, but its ne because you only need 22. A small fret access carve also helps.
One thing I’m now realizing is that having the leg resting position be so close
to the neck might make it so the shoulder has to rotate internally when sitting, and I
don’t want that. I might move it back on the next go. This would also make it easier to
put it at a wider position, because the lower waist gets fatter. Curious.
If this were a glued in neck joint, I would go for the style of joint used in a les
paul junior- The neck joins the body on fret 22, so the access is absolutely incredible,
and most of the joint is hidden underneath the slot for the pickups, or a pickguard.
Brilliant. What they’ve never done (and I could do) is to make a guitar with virtually no
neck heel. Have a very rough transition, but it doesn’t matter because the transition is
past the point where your hand would go if you were playing up to the last fret.
Something to think about.
I’ve decided for now to do centerblock construction with a thin air press glued
top and an otherwise hollow body. Interestingly, I couldn’t do this by hand, the cnc
machine is a big help here, as it can create 3d curves in a pocket scenario, which would
be very dicult with a hand router, although doable with gouges.
At this point, I’ve had a go at trying to machine the body at the hartford
makerspace. What I didn’t realize was that their CNC machine, a technocnc Titan
125

series, uses a hk105 G3 controller, which is not compatible with the fusion 360 titan
post processor, which was designed for a WINcnc controller. The post processor and
the controller are the liaisons between the CAM software and the machine. If one
point in the chain is incompatible, the whole thing doesn’t work. This means
something has to change in the chain. I can’t make the makerspace get a new
controller, and I don’t have the time or know-how to design or modify a post
processor, so I have to either change CAM software, or change machines. Getting a
new software like aspire or rhino cam would denitely work, but I might have to
redesign all of my parts. Additionally, if i got aspire, I could use the cnc machine in the
ideas lab, which would be nice. But i love fusion 360 for design, I know it pretty well. I
don’t know how well importing STL’s into rhino would work, or aspire, ill look into
that. There are some other makerspaces in CT, but they don’t have cnc machines quite
as nice the one in hartford. We shall see. This coming week, I hope to gure all of that
out, as I’m a bit behind on, well, everything.
A note on materials:
Here are the materials I’m using for the prototype:
126

For xtures: ¾ sanded plywood, ½ steel dowel pins
For workholding: starbond (super glue) and masking tape
Body blank: mahogany from stewmac
Top blank: Engelmann Spruce from stewmac
Neck: Maple from stewmac
Fretboard: Pau Ferro from stewmac
Design Log Jan 26-Feb 14
127

Over the past few weeks I xed all of my makerspace issues and began
production on the rst prototype of the guitar. Lets start at the beginning. On
Tuesday January 23rd, I took a tour of the New Haven Makerspace, makehaven. It was
a good tour, its a good makerspace, but they have a high number of safety restrictions
that make it dicult to get onto the machines in a short amount of time. On
wednesday I toured a makerspace in watertown called CTHackerspace. While CT
hackerspace had a really cool group of people and a lot of freedom, Their cnc machine
wasn’t powerful enough to do what I wanted it to, so I decided to go with Makehaven,
despite their safety restrictions.
I gained access to the facility on the 26th. To get access to their large format cnc
machine, a gerber sabre from the late 1990’s that had been modied to use a LinuxCnc
controller, I rst had to get “badged” on their smaller cnc machine, a shapeoko. I did
that on sunday the 28th. The following friday, February 2nd, I got badged on the
Gerber, and I started working on the prototype on February third. Progress was
initially quite slow- I needed to develop a better understanding of CAM toolpaths,
feeds and speeds, workholding- By making this prototype I’ve been giving myself a
crash course in cnc machining. I want to reduce the post-cnc hand tool work as much
as possible, so being able to get a high quality nish right o of the machine is
important. This takes time and experience, with a little bit of experimentation. Every
dierent type of wood is going to be a little dierent.
128

Lets talk about CAM. CAM stands for computer automated machining. In
fusion 360, I take my 3d model, and use that to generate a set of toolpaths to cut that
model out with the cnc router. It can at times be dicult to reconcile a digital
simulation with a physical process. One example of this is pocketing. A pocketing tool
path plunges or ramps the endmill down into the wood, then moves it around to the
edges you have selected in your software. The issue I have found with my pocketing is
tool engagement. As a rule of thumb, you generally dont want more than 1/4 the face
of the tool to be engaged. With a bit with a quarter-inch diameter, I would set my
maximum stepover (how much the router moves between two cuts in the same
operation) to one eighth of an inch. Too low of a stepover, you’re being inecient, and
too high of a stepover can lead to poor nish quality, tearout, and it can even break
your end mill. When I do a pocketing toolpath right now, like when I’m milling out
the hollow part of the body, or the pickup and neck cavities, for the rst cut of the
operation (after ramping), ½ the tool is moving through the wood. It’s cutting a
semicircle as it moves in one direction. It doesn’t sound good, and it doesn’t leave a
good nish quality. To combat this, I’ve had to make my passes on those operations less
deep and less fast, which makes my operating time longer. I need to gure out how to
do pockets in some sort of a spiral pattern, so the tool engagement is not too high.
Another thing I’ve been learning about is workholding. Workholding is how
your piece sticks onto the spoilboard. The obvious option for workholding in most
cases is clamps. Simple, easy to set up. Due to the requirements of my project-
129

double-sided machining, milling over several sessions, small stock- I can’t use clamps.
To make sure the wood is oriented correctly every time I use the machine, I use a set of
indexing holes and dowel pins. At the start of a session, I use an operation I created
called “xture holes.ngc” to mill out 4 .505 inch holes in a very exact spacing. These
holes are drilled into a sacricial piece of ¾ inch sanded plywood that I have clamped to
the spoil board of the Gerber. The rst time I worked on the body, I put holes in the
same positions on the body stock. I can then mallet in four ½ inch steel dowel pins.
This means that while my origin may be in a dierent location every time I use the
machine, my workpiece is in the exact same place in relation to the origin, and I can ip
the stock and re mallet in the dowel pins to mill the other side with incredible accuracy.
To hold the stock down, my original plan was to use double sided tape, but I realized it
would be less time consuming to drill holes right next to the dowel pins and attach the
stock to my xture with four screws.
It was slow going at rst- It used to take me a full hour and a half to set
everything up, but I can do it in about twenty minutes now. This rst body “base”
prototype (no spruce top) was not milled perfectly, especially at rst. I noticed that
while milling out the arm carve that there was an irregularity in the machining that
resulted in a lip on the edge of the body. This was because I had changed the speed of
the machine using the software controller in the middle of the operation. At higher
feed rates, this machine can skip steps with the motors and veer o course to a
miniscule degree, but enough to make a dierence in the nished part. The lip was less
130

than 1/16” but that was enough to make me want to x it. I ran the same le at a lower
speed during a later session and it xed the issue, the lip was gone. There were also
some issues with nish quality, and some minor tearout, which I think are feeds/speeds
things.
Design Log: Feb 15.
Here is a timeline of how the build has been going so far:
February 2nd: Gained access to the Gerber
February 3rd: Did a small facing pass and milled the major body cavity using a ⅜
downcut endmill.
February 7th: Milled the pickup and neck pockets with ¼ inch downcut, attempted to
do a nishing pass of the top with ½ ball end mill but was left with a small lip on the
arm carve section.
February 8th: Did the rst cuts on the back side of the piece. Rough carved the belly
cut with a ½ inch ball nose, then did a .04 stepover nishing pass with the same end
mill. Results were positive- things lined up, although .04 isnt a small enough stepover,
it will require considerable sanding. Re-did a nishing pass on the arm carve, xed the
lip issue. Ended session 2:30 am february 9th
February 9th: Went back to the makerspace in the early afternoon, marked all of the
holes for the bridge and neck screws, milled out the electronics cavity plate from the
131

back side to middling/poor results. I used a downcut bit, but when you use a downcut
bit to cut all the way through material, if there isnt something on the directly other side
of the material, it may cause tearout. In the future, I will use an upcut bit for that
cavity, or a compression bit. Ran a 2d contour toolpath with a ⅜ downcut to cutout
the body.
Design Log: February 28th
After a week of rehearsals and concerts, the moment has come- the moment
that I have feared since the inception of this project, the moment that I have pretended
not to notice creeping ever closer towards me- the time has come for shit to get fucking
real.
It needs to get real rather quickly. This thesis is due in 6 weeks. That means I
have six weeks to nish the prototype, test it, redesign, build the real thing, all the while
documenting it beautifully and perfecting a 35 page interrogation of the guitar
industry. It is time for shit to get fucking real.
It took me two days to design the neck of the prototype- one session to design
the general shape, make a lot of assumptions about what fusion could do, and generally
fail, although I did end up with a good hack that let me basically not design a neck heel-
and one session to make the volute/ x everything that was wrong with the rst design.
132

The types of curves of the volute and the neck heel are very dicult for me to make
eectively in fusion at this stage. I spent a great deal of time watching Austin Shaner’s
youtube videos on parametric guitar design in fusion 360, which is how I learned to do
most of my guitar modeling (shoutout to austin for creating the methods I used for
carves on the body) but I’ve never gured out how to do the volute. His way is sort of a
hack that uses a bunch of surface functions that I haven’t really touched or played
around with yet. That’s all ne, but the reason I couldn’t eectively use his method is
that shape of my neck. Somewhere in here I wrote earlier about how when I play the
guitar, I use a lot of stretchy chords, and The position of my thumb goes to specic
spots on the neck when I do that. I want to build a guitar that helps other players
realize this as well. Adding a groove in that spot would help. Because austin uses Arcs
to make his neck proles (they are cleaner to loft/press-pull when using the surface
toolbar) and my ideal neck prole is not a uniform arc shape, I can’t use his method.
To create my grooved neck (note to self- keep the name “groove neck” in mind
for future advertising and marketing purposes) I need to use control point splines. I
make proles at the 1st fret and the 12th fret and connect them together using the loft
function. I made the depth I believe 17 millimeters at the 1st fret.The max thin-ness of
the neck is determined by the thickness of the fretboard and the depth of the truss rod
slot. The truss rod slot is 11.21 millimeters. My fretboard is 5 millimeters, which means
there would be .79 mm from the bottom of the truss rod slot to the back of the neck.
133

The last guitar I built was 19, and that neck is by no means chunky. A 1950’s telecaster
had a 1st fret thickness of 22.86 mm. 17 is really really thin.
Next, we extrude the prole of the neck pocket to the nal thickness of the
neck. To connect my 12th fret prole, I use a press/pul and drag to the edge of the
pocket. This joins them together. The volute is so much harder. I create a sketch on the
bottom of the headstock with a volute shape, I create a 3d sketch that connects a sketch
prole of the neck a behind the rst fret to the nutline. I want the tip of the volute to
be at the nutline, most guitars have this. I create a loft between these 3 sketches, and I
change the form of some of the proles to curvature, then use the slider that pops up
to get the prole as close as possible to the one I outlined in the neck silhouette sketch.
This is a little bit fudgy as a process, I wish the loft could lock to the silhouette sketch,
but it works well enough for now.
Lets talk about milling it out. I did it over two sessions. The top of the neck
was rst. For workholding, I used super glue and masking tape, as well as some locating
pins on a centerline so I could ip it easily. This went smoothly, although I am going to
consider in the future making the z0 of my cam the top of the stock, as it means I wont
have to account for the thickness of my tape and superglue when zeroing a tool. I
discovered this height issue after milling the nishing pass of the headstock- there was a
very small (if i had to guess, the exact thickness of two pieces of masking tape bound
together with superglue) lip where the operation ended. Both the roughing and
nishing functions went very smoothly apart from that. After this, I tried ipping, but
134

I fatngered a key and accidentally moved my bit into the workpiece. This moved my
xture (meaning I have to reset the origin- take the workpiece o, drill new holes, yada
yada yada, maybe an extra 45 minutes of work.) It was late so I decided to just do the
fretboard. The fretboard was so so so smooth, like butter. It was done in 25 minutes,
and it was cleaner than any fretboard I had ever milled by hand before I went to
crimson. It’s literally awless. The next day I did the truss rod slot and the back of the
neck. These did not go nearly as well. I messed something up with my z0 on the truss
rod slot, so my bit plunged too deep, and now there is a 6 inchx1/8 inch hole in the
back of my neck. Unfortunate. Whats more, I believe I did something with the tool
boundary in my cam. I set it to contact point boundary, which means the center point
of the tool will touch the exact point of the boundary, not just the cutting edge. I think
this changed the shape slightly from what I really wanted it to be, and made my neck
less wide, as well as killing the shoulder of it, it hits the fretboard at a weird angle.. It’s
unusable as a neck. I need to recam it and test it. That being said, my groove seems to
work, although if you follow the scientic method I couldn’t prove it, there are
multiple factors that have changed. On this neck, I max out at a seven fret stretch as
opposed to a six when stretching from the fth fret. My thumb does go into the
groove, although I believe I could make the groove a lot smaller. It may end up as just a
line. Also, I may choose to not have the groove at all throughout the rst few frets,
because I believe it is less useful there. This may be good because beginner users may
not feel comfortable with the groove, and they mostly use the lower frets.
135

Looking at the pieces so far, I need to redesign my neck. It’s too thin, and also
just not wide enough, I think I messed up some measurements early in the game. It
seems to be around an eighth of an inch less wide than my handmade necks are at the
neck pocket, which is rather signicant. I’ll probably go to 19mm thick and use a more
standard size for the width next time.
Design log: Feb 29:
I’ve decided to make a new neck. I have an extra neck blank and 4 hours
tomorrow, let’s see what we can do to make it happen. The rst thing we need to do is
gure out what went wrong with the old neck. Firstly, I selected contact point
boundary in the cam, although I need to test that that is actually what was going on as
opposed to something else. Secondly, I started checking the z heights of my pieces. My
neck is supposed to be exactly .9 inches at the neck heel with a headstock thickness of
.7 inches. It came out to be 21.11 mm at the heel and 15.9 mm at the headstock
according to my calipers, which is .831 in and .625 in respectively. It looks like we have
an error of about 70 thou. Let’s check the fretboard. It’s supposed to be 5 millimeters,
but it's 4.42 mm and 4.21 at the other. The body is supposed to be 1.625 inches, but
it's 1.566. There's a z error of 60-80 thousandths in every single part I’ve milled so far.
The major body cavity, which is supposed to be 1.125 inches deep, is less than an inch,
so this issue also seems to have occurred in pocketing operations.
136

There are a number of potential causes for this issue, but I’m generally a very
good troubleshooter. Firstly, the TRAM of the machine could be o. Essentially, the
machine and its controller aren’t working in harmony. Every now and again, you need
to basically “reset” what the machine thinks is an inch. The motors use these things
called steps to rotate very precisely, and each step is equal to some very small distance. If
the very small distance is even just a little bit o from what it should be, even one
percent o, you could see a very real eect on a larger piece. Furthermore, smaller cuts
would be less aected than larger ones. For instance, a ¼ inch fretboard could be .02
inches o while a .9 inch neck blank could be .07 inches o. To remedy this, you
would need to calibrate the machine, basically reset what an inch is. I don’t think that
this is the problem, and there are other things that I would really hope it would be
before this, because I don’t actually know how to x it in practice, and it would spark a
whole thing- I really need to x this problem as simply and as easily as possible.
It could also very well be more of a hardware issue. The spoilboard of this
machine is in really bad shape, so it’s possible that that has an eect on the z. It would
certainly explain the dierences in z heights on the fretboard, why it was more o at
one end than the other.
I don’t think it’s a CAM thing. If it says .9 inches in fusion 360 I’m going to
trust that.
Easiest to remedy is a distance between the piece of plywood I put on the
spoilboard and the actual workpiece. Because I used masking tape and super glue for
137

workholding on the neck, there is a small z gap. I set my z0 as my xture, meaning it’s
actually slightly below my workpiece. If I set my z0 to the top of my workpiece as
opposed to my xture, I could solve this issue, or make it so that setting the z0 of the
machine actually adds a small oset to account for the masking tape and super glue.
I’m going to try that rst and really hope it isn’t either of the other things. If I can get
down to a z error of .01 or even .005 I’ll be happy. .07 is unacceptable.
I also checked the pickup pockets for x and y errors. The width (bass to treble)
should be 3.37 and its 3.353, and the length (nut to bridge) should be 1.37 and it’s
dead on.
I also looked at the fretboard and neck thickness in comparison to my 1960’s
mosrite, which has a normal fretboard and a very very thin neck. My neck ended up
being 16 mm thick at the rst fret (in the design it was 17). The mosrite was 19.5 mm
thick. I’m going to make this neck thicker, probably 19.5 like the mosrite. The
fretboard of my guitar was actually wider than the mosrite by a little bit, so I’m not
going to change that.
Design Log: Feb 29, part 2:
I just redesigned the neck and re-did the cam. A few things to note.
The neck is thicker. The parameter “1st fret thickness” was set to 15mm up
from 13, and 12th fret thickness was set to 17mm up from 15. With our fretboard, our
total neck thicknesses will be 19 mm ( up from 16) and 21 mm (up from 18) I also
made the shoulders of the neck thicker and the groove slightly smaller (i thought it was
138

too big on the rst one). Notably, the way I made the shoulders thicker was by creating
a vertical line at the edges of the 1st and 12th fret sketch proles, and making my neck
proles tangent to them. I also set the bottom height to be .1 inches higher than the
bottom of my model, so there will be a small lip that I will rasp away manually. I also
switched the nishing toolpath from a parallel toolpath to a ow toolpath. Instead of
going at a stationary z height, the ow toolpath reacts to the curves of the neck and has
all three axii moving at once. Additionally, it goes along the y axis as opposed to the x. I
hope this will at least make it more clear if theres a z height issue with the machine.
Design Log: March 1st
Testing z height issues in the machine
Problem: When I try to cut a certain depth, it does not cut that depth.
Theories: The machine needs to be calibrated, The spoilboard is dodgy,
Control: 1.145 inches
First cut, z height from control, goal height 1.125. End Height 1.1045- Error of .0205
Second cut, z height from rst cut, goal height 1.0835. End height 1.0765- Error of
.007
Third cut, z height from second cut, oset=0, goal height 1.0555. End height 1.0480-
Error of .0075.
Interesting that there are two errors. Let’s try again with a .5 inch cut depth
139

After attempting to cut a .5 inch hole, i got a .507 inch hole. Zeroed with paper, ripped
through paper, set oset to .004
Second attempt: Same hole, did not rip paper, same oset, .504-.505
Third attempt: Same hole, did not rip paper, set oset to 0, got .5 dead on
Final test: Using puck instead of paper. Slide puck underneath bit, set z oset to .5.
Dead on, although the spoilboard is a bit fucked.
Conclusion
It appears you need to be really careful with your osets. Additionally, the spoilboard is
not perfect. If your spoilboard is heavily used like the one at makehaven is (currently)
then you will nd a cut depth of .021 will yield up to ve or six thousandths of error
each way if your cut isn’t localized to a single point
Design Log: March 8th
140

This past week I milled out the neck for the prototype, glued the neck to the
fretboard, glued the top to itself, and began to do user testing for weight balance.
The answer to my z problems was really that I needed a new method of zeroing
out my tools. Even zeroing to the top of the workpiece, I was o by a few thou until I
started using the “puck” method. Basically, the makerspace has a steel puck that is .5
inches thick exactly. I put that on top of my workpiece, and slowly raise the gantry
until I can just barely slide the puck under my endmill. Doing this method ensures that
my heights are accurate.
There are still some height accuracy issues, but these are due to the spoilboard
being in bad shape. The makerspace is in the process of replacing the spoilboard. With
a good spoilboard I should be able to make parts that are accurate within two
thousandths!
Onto the milling of the neck itself, I am going to say it was a success. Because I
had already milled the top of the neck and I only had to do the backside, the job was
completed in under three hours. I hope to get to a point where I can do an entire body
and neck on the cnc in less than two working days. I had previously redesigned the
neck a little bit. The rst neck, while it milled out incorrectly, also had some design
issues (shoulders were not convex enough), and the groove was too big. I xed that rst,
then milled out the neck, leaving .1 inches of stock at the transition point so I could
take it down to the nal shape with the fretboard glued on by hand.
141

Gluing the fretboard on was surprisingly tricky, for reasons that extend to the
overall cnc machining of the neck. When I make the neck and fretboard normally, I use
centerlines and templates to keep everything lined up. When the glue is on, things tend
to shift around a little, so most luthiers use locating pins, drilled into the fretboard and
the neck blank, to keep everything stable while the neck is being glued on. I
incorporated holes for locating pins in my cnc machining, however when I went to glue
on the neck, I noticed that the holes were misaligned by a miniscule amount, less than
1/16 of an inch. This meant that if I tried to use those locating pins, parts of the
fretboard would hang over the neck and parts of the neck would be exposed, and the
frets wouldn’t be square to the centerline. Luckily, this is very easy to x. Because the
fretboard and the neck have the same prole, I lined them up manually, clamped the
fretboard to the neck, and drilled new locating pin holes. After I did this, I glued up the
neck as I normally would, although the IDEAS lab doesn’t have titebond so I had to
use Gorilla Wood Glue (ugh). It’s also probably worth me looking into hide glue and
sh glue.
The glue-up went ne, but I really need to gure out why the holes weren’t
lined up, that’s a big problem. That’s not the only thing that was funky about this
process. After machining the back of the neck, I noticed that the truss rod was slightly
o center, as well as the headstock slots. I think that this is because of what happened
when I milled the top of the neck.
142

When I milled the top of the neck, I did a facing pass before I drilled the dowel
pin holes. I then proceeded to mallet the dowel pins into the holes while the neck blank
was still attached to my xture via masking tape and super glue. I’m pretty sure it
shifted somewhat while I was malleting in the dowel pins because afterwards, there
were some gaps between the neck blank and the xture, so I malleted those sections
back down. I think it’s possible that this movement caused the neck to stray from the
original position slightly. Additionally, I only use two dowel pins for the neck. In the
future I could use four to ensure a perfect alignment.
I also glued the ⅛ inch bookmatch spruce top, using tape as my main clamping
force. I made a makeshift shooting board from a piece of a maple top, and used my
stewmac 24” fret leveling beam to join the two faces. I haven’t checked it yet, but I
suspect it worked pretty well, although I will also probably have to use the drum sander
to get it perfect. It was surprisingly easy, so I’m annoyed at myself that I put it o for so
long. It would have been nice for the prototype to have a glued on top.
Speaking of the prototype, I’ve rigged it up and have begun to test it. I can’t
really test the playability of it as it doesn’t have strings, but I can test the weight
balance. I clamped the neck to the body and taped the tuners on. I also taped the
pickups, a potentiometer, and the bridge to the body to get a better idea of the weight
balance. First of all, It is light as hell. Without any hardware (apart from the clamp) it
weighs about four pounds. I think when all is said and done it will weigh about ve
pounds. A strat weighs about 7.5 pounds, so ve pounds is really insane. The real
143

question after that is: How is the balance? I’m really concerned about neck dive,
because it legitimately makes it harder to play. Neck dive happens when the overall
weight of the headstock is too much, or the body is too lightweight.
I have tested with a strap, and by putting it on my leg. While the neck does sit a
little bit lower than the average neck, it doesn’t “Dive” down, and I don’t really feel like
I have to do much to stop the neck from diving down. That being said, since it’s so
lightweight, I think you could make the body a little heavier, or change where the body
is heavy, to get it do a place of complete normalcy.
In testing, I’ve been giving the guitar to people who I interviewed and letting
them sit with it for a little bit, then asking them what their thoughts were. I didn’t
want to lead them in any way. Although I haven’t been able to test the prototype with
too many people (it’s midterms right now) the people I have tested with think that the
balance is pretty good and they like how light it is, as well as how thin the neck is.
Additionally, it was very comfortable to hole and it t very nicely to the body. One of
my testers noticed that the guitar wants to be in a specic position while sitting, and
said the seated position would be even more comfortable and a little closer to the
standing position if the balance point of the bottom of the guitar was moved back
toward the bridge a little bit. Additionally, it might be worthwhile to explore other
ways to hold the guitar while sitting. You can’t tell people how to use your product (at
least not to this degree of specicity) so altering the curves or doing some hand carving
to open up that section should be useful.
144

Let's look to the future, the future being the next few days. This guitar needs to
be done before I go to Florida on the 18th. There's a day of body milling, a day of neck
milling, a day to dial in the shape and sand it, a day to apply the nish, a day to install
the frets, and a day to do setup. I’ve bought a bunch of wood to both have options and
backups. I’m thinking ziricote for the top and fretboard, black limba for the body, and
ame maple for the neck. Pretty killer combo. I have a set of p90’s from bare nuckle
pickups, a hipshot bridge, really most of the hardware that i need, although I could
stand to stock up on electronics as well as strap buttons. I also need to alter the design
to respond to the comments, also for some general improvements’ sake. Here’s my
order of operations for the cad.
1.) Figure out the nal width of the neck, and cut out multiple dierent sized neck
pockets to see what ts best straight o of the cnc. This needs to be really dialed in.
a.) Additionally, purchase the threaded inserts for the neck, as we intend to make
the neck pocket longer, so there will be a ¼ inch thick section that extends into the
pickup pocket. This is more common on glued necks (I did this on my guitar that I
made at crimson) but I think it will work here too. My only concern is the thickness of
the neck underneath the pickup.
2.) Slightly alter the pockets of the body for better weight distribution. As it
stands, there is a lot of weight in the body that can be not removed, but moved.
Between the pickups, on the horns, etc. If I move these away from the balance point
(towards the butt end of the guitar) I can improve the balance/reduce the risk of neck
145

dive. I denitely want to put a piece of wood on the arm carve, to guide the top to the
right position when it is being glued down and bent. I think if i didn’t do this there
would be a small chance the top could collapse.
3.) Change the shape of the pickup pockets so they t the p90s. The pockets I had
were just barely not wide enough.
4.) Start thinking about inlay. While this is my thesis guitar, It could have
post-wesleyan relevancy. Yes it’s a guitar designed to x ergonomic problems more
prevalent in female users, but when I think about the potential marketing of this guitar
in my theoretical future guitar company, I think it’s not the best idea to say exactly that.
You don’t want men to feel like they’re buying a “girl” guitar, and you don’t want
women to feel like this guitar is a crutch. One way to market it: it’s just a fucking great
guitar. Top shelf woods, top shelf production techniques, top shelf pickups and
hardware, and top shelf quality control. Adding inlay would be a little cherry on top
that can make people go “wow.”
146

Design Log: March 9th
Starting the Design of the Final Build.
A Note on Parameters
Part of the reason I chose to learn guitar design in fusion 360 is because of its
parametric modeling system. You can set constants and refer to them throughout your
design process. For example, one parameter I have is called “scale”. It is the scale length
of the guitar, 25 inches. By creating this parameter, I can refer to it when setting the
dimensions of sketch objects, operations like extrusions, and even other parameters.
For example, the expression for the parameter that controls distance from the nut to
the rst fret, called “Fret1” is (scale/17.817). The expression for “Fret2” is
((scale-Fret1)/17.817)+Fret1. By creating these expressions, I can save time when
making simple changes to my design. If I decide to change the scale length to say, 27”, I
can change the value of the “scale” parameter instead of manually changing the
distance to every single fret. The more parameters you have, the less work you have to
do.
Initial Top View Sketch
The rst sketch I’m going to create is called neck top view. The goal of this
sketch is to create an outline of the neck, not including the headstock. I want the
center of the bridge to be at the origin. I make a centerline that extends to “scale”
147

inches from the origin. We’re going to create some parameters here. “Nut_Spacing”
and “Bridge_Spacing” are constants, showing the distance between the center of the
strings at the nut and bridge. “Overhang” refers to how far the fretboard extends past
the center of the strings, I chose .1”. “Nut_Width” and “Bridge_Width” are
expressions- nut or bridge spacing plus double the overhang. My design parameters say
the guitar has 23 frets, so I make a line “Fret24” inches away from the nut line on the
centerline. A horizontal line here indicates the end of the fretboard. At the end of the
fretboard, I make the pocket of the neck pickup. The x value of the pickup pocket is
called “p90length” and is 3.41”. The y value of the pickup pocket is called “p90width”
and is 1.37”. These are slightly larger than the size of the actual pickup, but the t will
be very good in the end- not too loose and not too tight.
Instead of having the neck pocket end where the pickup pocket starts, I want
the neck pocket to extend to the end of the neck pickup pocket. This is an idea that I
stole from the construction methods of Paul Reed Smith and Gibson guitars. In order
to make my neck as comfortable as possible, I want as small of a visible neck heel as
possible. To make it small without making the neck joint weak, I make the neck heel
bigger by extending it into the pickup pocket. The only potential issue with this is that
my threaded inserts have to be small enough to accommodate the neck heel being
relatively thin at that point. The thickness of the neck at this point will be determined
in this next section, it's very cute.
Cross Section Sketching and Planning
148

Heights are everything when it comes to guitar building. The height of your
string above the fret, also known as the action, determines the playability of the
instrument. Because of this, most guitar builders begin their build by making a sketch
of the cross section of their instrument along the centerline. This sketch makes it far
easier to determine important things like the angle and depth of the neck pocket. I
know I want to have a at pocket, like fender necks, so I need to account for that by
being very careful in this stage. Being o by an eighth of an inch or even less could
potentially create a situation down the road where you have to put a shim underneath
your neck or bridge, and we’d all prefer to get it right the rst time.
I know that I’m using a hipshot bridge with a .125”oor height. Most guitar bridges
have adjustable saddles, which allow you to change the height of the strings
individually. The minimum and maximum saddle heights of the bridge are .3” and .57”
respectively, according to the manufacturer’s blueprints. It would be nice to have the
nal resting height of the middle two saddles be somewhere around .435, the center of
this range. This means that we have a little bit of room to go upwards.
The fretboard is 5 millimeters thick. The height of the fret crown is .05”. At the 12th
fret, the stewmac guidelines say that the action should be .078” at the 12th fret, or 78
thousandths from the top of the fret to the bottom of the string. Also, all of these
distances are stored as parameters with names referring to what they are, like
“Fret12_Action” and “Fretboard_Thickness”. 5 millimeters + .05” + .078” = .32485”.
Keep in mind that the fretboard has a radius. If we use a 12” radius on the face of the
149

fretboard, the edges of the fretboard will be a little bit lower. This means that if the
bottom of the bridge and the bottom of the fretboard are on the same plane, the
saddles cannot go low enough to accommodate proper action for the low and high e
strings. To remedy this, we can change the height of the neck pocket, to give us a new
parameter I’m calling Neck_Peek_Height. This is a constant that refers to the distance
between the bottom of the fretboard and the top of the guitar body. Since we haven’t
created the parameters for neck pocket depth or neck heel thickness yet, I’m going to
make Neck_Peek_Height a constant, as opposed to an expression
(Neck_Heel_Thickness-Neck_Pocket_Depth). Using a peek height of .125” or even
.1” is enough to x the saddle issue. If you set the peek height too low, the saddles can’t
go low enough for the outer strings. If you set the peek height too high, the saddles
can’t go high enough for the inner strings. You need to nd a happy medium.
Understanding the Neck Pocket
I know that I want to have a neck heel thickness of .9”. It’s a little thick for a bolt on
neck heel (fenders are .75”) but adding the .15 will enable me to have a very stable neck
joint with my threaded inserts. At the end of the fretboard, the outside thickness (top
and bottom string relevancy) is .149”. This means that my neck pickup can come up to
.149” higher than the top of the guitar. My neck pickup is .64” deep. This means that
my minimum neck pickup pocket depth is about .5 inches. It should be deeper because
you want to put foam underneath and have room for the wires. We have to think about
how this aects the neck. The smallest set of threaded inserts I could nd is 10 mm,
150

just under .4 inches. If my neck is .9 inches, and I take away .5 inches to account for the
neck pickup, I’m left with exactly .4 inches. We could potentially x this by making the
neck thicker, but the blank I have right now is just under an inch. Using 1 inch for the
neck heel would allow us to create a deeper pocket. I ordered a neck blank from
Tempered Tonewoods, hopefully it will come a little bit thick and I can make the heel
thicker. I can also keep searching for smaller inserts. UPDATE: I found smaller inserts
from Grizzly that are .24 inches in length. I’m going to order both, but I don’t think
this will be an issue in the long run.
Not just the depth of the neck pocket but the width of the neck pocket matters too.
You want a t that is tight enough to hold the body from the neck without screws, but
not so tight that it’s hard to take the neck out of the pocket. In order to do this, I am
going to mill the shape of a neck heel out of a mahogany neck blank (I can turn this
into a real neck after I’m done with this project, so it’s not a waste of good wood and
money). After I do this, I am going to mill out a neck pocket in a dierent piece of
wood. I will then try and t them together. If it’s too small, I’ll mill out a new pocket a
few thousandths wider. I’ll do this until I can get the perfect t.
Designing The Body
The general design of the body last time was very successful. My feedback was
rather positive, however there are some places where the body can be improved. I don’t
want to change the shape too much, but I want to change where the curve of the lower
waist of the guitar apexes, moving it slightly towards the bridge. I think this will make
151

the guitar more comfortable to play in multiple dierent seated positions. Apart from
that the changes are less artistic- I want to put less weight on the neck side and more
weight behind the bridge. I also want to make the upper fret access carve better. I can
copy the design and paste it into my new design le, using a point to point movement
translation to make sure it’s in the right place.
Design Log: March 10-March 17
152

To quote one of the teachers at Crimson Guitars, “The mark of a great luthier
is not the ability to avoid mistakes, it’s the ability to x them when they arise, and trust
me-they will.”
This was one of my worst weeks in recent memory, but it didn’t start out that
way. My goal for this week was to get as far into the build as I could- If things went
relatively well, I would be leaving for Florida on monday the 18th with a sanded body,
and a sanded neck with frets- everything ready for nishing when I got back.
On Monday, I joined and glued up three ⅛ inch tops, as well as using the CNC
to mill a neck heel and neck pockets of several dierent sizes, so I could gure out the
best t. My original neck pocket on the prototype was a little bit too small, so I milled
versions of the current neck pocket that were “too big” by increments of ve hundreths
of an inch. As it turned out, all I needed was an increment of two thousandths to create
a neck pocket that t my neck snugly, but was not too tight. An important thing that I
realized was that my idea for making the neck pocket longer would not work unless I
made the neck heel dramatically thicker (see: understanding the neck pocket.) Instead
of doing that, I changed the position of the neck pickup so the neck heel would be
about three inches long (the same as a stratocaster) and would have one fret of
overhang before the neck pickup. This means that the guitar would have 24 frets
without having the neck be too far from the body.
I milled this new body design on Tuesday, going into wednesday. It took slightly longer
than I thought it would. I started milling at 11:15 pm and was done at 3:19 am
153

Wednesday morning. This is still faster than the original body, largely due to my
discovery of the adaptive clearing toolpath. I mentioned in an earlier log that I was
annoyed with how pocketing toolpaths would engage the whole tool at points in an
operation, and I wanted to nd a way for it to spiral around- a more ecient tool path
with a smaller tool engagement. An adaptive clearing did exactly this. Because you are
using less of the diameter of the tool, you can take a much deeper cut, which means it
can mill faster, although the edges of your cut will not be as nice. Not a huge problem,
as they are still straight in aggregate, and easily sandable if visible (like on a pickup
pocket or neck pocket. I also ran the tops through a thickness sander.
The next day is when things started to go awry, for a number of reasons. By wednesday,
it had been a while since I had done my laundry, so I decided I had to get that done
before going to the makerspace, otherwise my mental health would suer. My room
was an absolute mess, clothes everywhere and whatnot. I didn’t nish my laundry until
about 8:30 pm (I hadn’t gotten up until maybe 2 pm as I was at the makerspace until
3:45 am the night before) so I didn’t get to the makerspace until about 9:15 pm. I cut
the tops to size using the cnc (I would later learn I cut them too large) and took them
home to bend them using an iron, aluminum foil, and a spray bottle. I thought if I
sprayed them with water, then used the iron on them with the aluminum foil covering
the wood so as to not burn it, I could bend them in relatively little time. I had seen
similar methods with acoustic guitars, where the wood was made wet, then put in a
sort of metal bag with a heating element, then clamped to the correct shape. This
154

worked ok for the spruce, but I could not get the ziricote to bend to my arm carve
without cracking. I got close, but not close enough for me to be condent about it.
The next day, the ziricote had sprung back, it did not bend nearly as much as it did the
night before.
I decided the problem was the shape of the arm carve. The curve just got too steep at
the end. I had a few options:
1.) Make a new body with a more doable arm carve.
2.) Use spruce for the top.
3.) Make a piece identical to the negative space of the arm carve, glue it on, put the
body back onto the cnc machine, and then make a new arm carve and glue to that.
I decided to go with the last option. However, I also needed to start working on
the neck. I went to the makerspace on Thursday night with a degree of condence. I
started with the neck. This is when things really started to go wrong. I milled out the
truss rod slot rst. Immediately after doing this I realized that I had messed up the cam.
Instead of setting my bottom height to “selected contours” I had selected “model
bottom”. This means that instead of cutting the truss rod slot 7/16 inches deep, it cut
.9 inches deep. Oops. Luckily, I had another neck blank I could use but it means I lost
an hour of progress. I decided to mill the “ller” piece for the arm carve instead of
processing a whole new neck. Milling this piece went well, apart from the fact that I
didn’t secure my stock well enough.
155

On the nal contour cut, as my ⅜” end mill cut through the last bit of material, the
waste material snapped o and hit the end mill, breaking it into two pieces. The piece
was complete, but I had destroyed the end mill that I used to cut the contours on my
body and neck, as well as the xture holes. I had other end mills I could use for this
purpose, but they were not as long. On my way out of the makerspace around 1 am
friday morning, I spoke to some people who were brewing beer, and they gave me the
idea to use the ller piece I had made not as a ller, but as a clamping jig in order to get
the ziricote to bend to the right shape. This was not such a bad idea in theory, but it
would prove to be too hard in practice, at least for my current level of skill.
Friday, I milled out a new neck relatively successfully. I also tried to mill out a
fretboard, unsuccessfully. When I was setting the z0 with my fret slot cutter, I punched
the wrong key and reset the x0. There isn’t an undo button in linux cnc, and I had
moved my fretboard after setting the original x0 to get a better grain placement.
Because my fretboards can be done in one go (single sided) I never thought to add
locating pins to the operations. I tried to reset the x0 manually by changing the CAM,
and then setting the x0 to the bottom of the fretboard stock. This was close to
working, but it was o a little bit. I decided to run the fret slotting path anyway. As it
turns out, I had set my speed and depth of cut way too high in the CAM, and the bit
snapped pretty much immediately. I only have two of those, they can't be replaced by
another bit in my arsenal, and they take a week to arrive. At this point it was late and I
was quite frustrated with myself, so I went home.
156

Saturday, I decided to mill a new body with a smaller arm carve. I had a
mahogany body blank left, so instead of trying to work with the black limba and try
and do a very dicult bend, I decided to not put all of my eggs in one basket. With two
body blanks, I could use a spruce top on the mahogany, which I knew would work
both from a physical perspective (spruce bends easily) and a design one (spruce and
mahogany look good together). If the ziricote could not bend to the carve of the black
limba, I could just use the mahogany and spruce body for my nal guitar. I also tried to
mill a new fretboard on saturday but failed once again. This time, while my fret slots
were correct, my nut slot wasn’t. I was using a 1/16” bit for a ⅛” inch slot, and my tool
settings must be o, because there was a TLO X oset of .0258”. I decided to run it
anyway (ugh) and I realized after that the nut slot was to close to the rst fret by (you
guessed it!) 0258”. This is more than enough to create intonation errors, and it wasn’t
worth the time to x it with inlay. When milling the body, I made another mistake.
Because I didn’t have my ⅜” end mill, which was two inches long, I had to use my 1.5”
long ¼” diameter endmill to do the contour cuts on the body. I would set it up so it did
half before the ip and half after. On the backside of the body (before the ip) I didn’t
click the requisite button that says to cut the outside of the sketch prole as opposed to
the inside. I didn’t notice until a few minutes into the cut. The body will functionally
be okay, but I have to gure out how to make it a feature.
Sunday, I had one goal: bend the wood into shape. I used my sous vide
machine to heat a water bath to 195 degrees fahrenheit, and soaked the spruce and
157

ziricote for one and four hours respectively. The spruce bending went relatively
smoothly. The ziricote cracked pretty much instantly. My goal for the week was to
nish the guitar. I would be leaving for Florida the next day with a top that wasn’t
glued to the body, and a neck with no fretboard.
My condence had been sapped. Everything that could have gone wrong did, and
much of it was my fault. I became increasingly stressed as the week went on, and that
aected my mental health to a severe degree. Earlier in the week I was internally
romanticizing the “grindset” that I was using. Nothing existed in my life except for the
thesis. I averaged less than two meals per day, and the second meal was often a
microwave burrito, or chicken tenders- not exactly the healthiest stu. I was staying in
the makerspace very late every night, I wasn’t showering enough, I didn’t do my
laundry until wednesday. Because my mental health was bad, I was more on edge.
When I was in middle school, I was a competitive magic: The Gathering player. One
thing that I took pride in was my ability to never play “tilted.” When you’re tilted,
you’re frustrated and angry (maybe because you made a mistake, maybe because you’re
getting unlucky). Whatever the source of your problem may have been, becoming
tilted makes it ten times worse, because you begin to focus on every mistake you make,
everything that goes wrong. Because you aren’t seeing the real goal of the game (which
is to have fun) you make even more mistakes. In the case of my thesis, I would say I
started to get tilted at the end of wednesday. Four days of tilt destroyed the forward
progress of my thesis. I’m writing this entry from a couch overlooking the sunset at my
158

grandparents house in orida, an hour away from eating Mahi-Mahi tacos I’m grilling
up with two of my best friends, and I started today by getting a massage and spending
an hour in the steam room. For the rest of this thesis, I have to take care of my mental
health, because that is my only limiting factor. I know exactly what I need to do to
complete this thesis, but my ability to operate that plan is only limited by my ability to
deal with the stress that will come with that. Additionally, I’ve realized I need to
separate the completion of this guitar with myself as a person. This is a project that I
am doing, but it does not encapsulate my being- I can and should exist outside of it as
much as possible. By attaching myself to this thesis, I am motivated yes, but not by my
ability to succeed- I am instead motivated (and hampered) by my fear of failure, and the
social and academic situation that would create for me.
This is a thesis yes, but I have also let it creep into who I am- people who don’t know
me that well know about “the boob guitar” and it’s important that I don’t let myself
fall into that trap anymore. I can and will complete this thesis to a high standard, but
I’m going to do it in a way that doesn’t destroy my mental health, because overworking
myself and setting ridiculously high expectations has diminishing returns. If I had
taken just Thursday or Friday to hang out with a friend, eat 3 meals, go rock climbing,
and reect on the work of the start of the week and the work to come later in the week,
I wouldn’t have made all of the mistakes I did, and I suspect I would be in a
dramatically better position for this thesis when I go back to Connecticut this Sunday.
159

160
