
Verity Confidential
Web Application Scanning
Getting Started Guide
August 2, 2024
Copyright 2011-2024 by Qualys, Inc. All Rights Reserved.
Qualys and the Qualys logo are registered trademarks of Qualys, Inc. All other trademarks
are the property of their respective owners.
Qualys, Inc.
919 E Hillsdale Blvd
4th Floor
Foster City, CA 94404
1 (650) 801 6100

3
Table of Contents
Welcome to WAS ............................................................................................ 4
Get Started ........................................................................................................ 7
Let’s go!..................................................................................................................................... 7
Add your web app settings ..................................................................................................... 8
Get the latest security status from your dashboard.......................................................... 10
Manage Detections ................................................................................................................ 11
Scanning using Selenium scripts......................................................................................... 12
We recommend a discovery scan first................................................................................ 13
Next scan for vulnerabilities................................................................................................ 15
Check out the Sitemap.......................................................................................................... 19
Tip - Schedule your scans to run automatically................................................................ 21
Get the latest security status from your dashboard.......................................................... 22
Tell me about the catalog..................................................................................................... 24
Manage Detections ................................................................................................................ 25
Want to import Burp findings? ............................................................................................ 25
Integration with Bugcrowd................................................................................................... 26
Retest multiple findings without launching a full scan.................................................... 27
Test Authentication .............................................................................................................. 27
High volume scanning of web applications........................................................................ 28
Scanning using Selenium scripts......................................................................................... 29
Virtual Patch Support ........................................................................................................... 30
Reporting .......................................................................................................... 31
Steps to create reports .......................................................................................................... 31
Sample Web Application Report.......................................................................................... 33
Sample Scorecard Report .................................................................................................... 34
Tips & Tricks .......................................................................................................................... 35
Customizable report templates ........................................................................................... 38
Scheduled Reporting ............................................................................................................. 39
Adding Users................................................................................................... 41
Frequently Asked Questions (FAQ)......................................................... 48
Why I am unable to access the WAS module? .................................................................. 48
Getting Help ................................................................................................... 50
4
Welcome to WAS
Welcome to WAS
Qualys Web Application Scanning (WAS) provides organizations with the ease of use,
centralized management and integration capabilities they need to keep the attackers at
bay and their web applications secure. Qualys WAS enables organizations to assess, track
and remediate web application vulnerabilities.
Qualys WAS is an automated scanner that uses fault injection tests to find vulnerabilities.
It inserts specially crafted character strings into your application form fields. WAS then
examines the responses from your web application to determine the existence of
vulnerability. You can see what is sent and how your application responded in
WAS’s reporting capabilities.
Qualys WAS enables organizations to scan their web applications for vulnerabilities. It
assess, track and remediate web application vulnerabilities.Qualys WAS enables
organizations to assess, track and remediate web application vulnerabilities
Key Features
- Crawl web applications (Intranet, Internet) and scan them for vulnerabilities
- Fully interactive UI with flexible workflows and reporting
- Identify web applications’ handling of sensitive or secret data
- Customize: black/white lists, robots.txt, sitemap.xml and more
- Supports common authentication schemes
- View reports with recommended security coding practice and configuration
Robust Scalable Scanning Capabilities
- Supports scanning HTML web applications with JavaScript and embedded Flash
- Comprehensive detection of custom web application vulnerabilities including OWASP
Top 10 Vulnerabilities
- Differentiates exploitable fault-injection problems from simple information disclosure
- Profiles custom web application behaviors
- Configures scanning performance with customizable performance level
Qualys Cloud Platform - Benefits for Users
New technologies implemented in the Java-based backend offer many benefits for users:
- UI with dynamic and interactive interfaces, wizards and new report templates to present
scan data with a wide range of presentation options.
- Integrated Unified Dashboard (UD) with WAS. UD brings information from all Qualys
applications into a single place for visualization.
- Customizable template-driven reporting engine outputs reports in a variety of formats
(html, pdf, encrypted pdf, ppt, xml, cvs).
Welcome to WAS
5
- Fast searching of several extensive Qualys data sets, related to web applications,
detections, authentication records, and configurations - option profiles, search lists,
parameter sets, using search tokens.
- Create and manage tags (static and dynamic) to group and organize web applications.
- Dynamic distribution of scans on multiple scanners based on availability and load to
optimize scanning of large networks, drastically reducing the overall scan time required to
complete large scan jobs.
6
Welcome to WAS
REST API Scanning, CI/CD Integration, and More
We support Swagger version 2.0, allowing DevOps teams to streamline assessments of
REST APIs and get faster visibility of the security posture of mobile application backends
and Internet of Things (IoT) services. Additionally, a new native plugin for Jenkins delivers
automated vulnerability scanning of web applications for teams using the popular
Continuous Integration/Continuous Delivery (CI/CD) tool. In tandem, customers can now
leverage the new Qualys Browser Recorder, a free Google Chrome browser extension, to
easily review scripts for navigating through complex authentication and business
workflows in web applications.
- Scanning of Swagger-based Representational State Transfer (REST) APIs - In addition to
scanning Simple Object Access Protocol (SOAP) web services, Qualys WAS leverages the
Swagger specification for testing REST APIs. Users need to only ensure the Swagger version
2.0 file (JSON format) is visible to the scanning service, and the APIs will automatically be
tested for common application security flaws.
- Enhanced API Scanning with Postman Support - Postman is a widely-used tool for
functional testing of REST APIs. A Postman Collection is a file that can be exported from
the tool that clubs together related requests (API endpoints) and share them with other
users. These collections are exported in JSON format. With the release of Postman
Collection support in Qualys WAS, customers have the option to configure their API scans
using the Postman Collection for their API.
- Jenkins plugin - The Qualys WAS Jenkins plugin empowers DevOps teams to build
application vulnerability scans into their existing CI/CD processes. By integrating scans in
this manner, application security testing is accomplished earlier in the SDLC to catch and
eliminate security flaws thereby significantly reducing the cost of remediation compared
to doing so later in the SDLC. Download the plugin here.
- Qualys Browser Recorder – This new Chrome extension allows users to record web
browser activity and save the scripts for repeatable, automated testing. Scripts are played
back in Qualys WAS, allowing the scanning engine to successfully navigate through
complex authentication and business workflows. The Qualys Browser Recorder extension
is free and available to anyone (not just Qualys customers) via the Chrome Web Store.

Get Started
Let’s go!
7
Get Started
Qualys WAS is the most powerful web application scanner available.
Note: The new WAS UI supports only the Web Applications, Authentications, Option
Profiles, Search Lists, Parameters Sets, and Detection features. The guide gives overview of
these features. For detailed information, see WAS Online Help. We will navigate you to our
Classic WAS UI version for the features that are not available in the new WAS UI.
Let’s go!
Just log in and select Web Application Scanning from the application picker.

8
Get Started
Add your web app settings
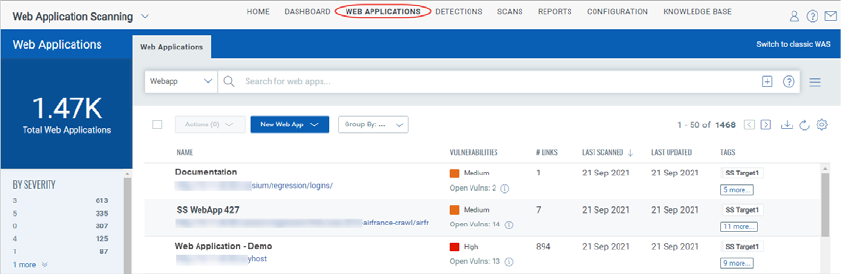
Click Switch to new WAS view!
Start by telling us about the web application you want to scan - just click Web
Applications > New Web App.
Add your web app settings
The web application name and URL are required when adding a web app from scratch.
Want to scan your external
site for malware? Just turn on
Malware Monitoring and we’ll
perform automatic daily
malware scans.
Get Started
Add your web app settings
9
Your web application appears in the Web Applications tab, where you can edit the
application settings or launch a scan on it.
Why use authentication? Using authentication allows our service to access to all parts of
your web application during the crawling process. This way we can perform more in-depth
assessment of your web application. Some web applications require authenticated access
to the majority of their functionality. Authenticated scanning can be configured for HTML
forms like login pages and server-based authentication (HTTP Basic, Digest, NTLM, or SSL
client certificates). Just go to the Authentication tab, select New Record and configure an
authentication record with access credentials. Form and server authentication may be
combined as needed - we’ll monitor the session state to ensure an authenticated scan
remains authenticated throughout the crawl.
Do I need to provide authentication details?
Is authentication needed to access the functionality of this web application? If yes be sure
to select an authentication record.
Tell me about the option profile
An option profile is a set of scan configuration options. We recommend “Initial WAS
Options” to get started. Editing options in the profile allows you to customize crawling and
scan parameters.
Take actions on Web Applications
Take action against individual applications using the Quick Actions menu. Select or hover
a web application and click the arrow to view the options in the Quick Actions menu. Use
the Quick Actions menu to view, edit the details of web assets, add tags and remove tags
from web assets, purge scan data of web assets. You can also remove web assets from the
subscription and other associated modules and create a new web asset with the same
configurations using the Save as option. You can take action against multiple web
applications using the Bulk Actions menu.

10
Get Started
Get the latest security status from your dashboard
Good to Know
What vulnerability checks are tested? We’ll scan for all vulnerability checks (QIDs) listed
in the KnowledgeBase unless you configure your option profile to do limit the scan to
certain vulnerabilities (confirmed, potential and/or information gathered). We constantly
update the KnowledgeBase as new security information becomes available. Click
KnowledgeBase on the top menu.
What is Severity? Each QID is assigned a severity level by our service: confirmed
vvulnerability (red), potential vulnerability (yellow) and information gathered (blue).
Get the latest security status from your dashboard
Your dashboard gives you security status at a glance and it’s always up to date.
Dashboards help you visualize your web applications and their detections. We have
integrated Unified Dashboard (UD) with WAS. UD brings information from all Qualys
applications into a single place for visualization. UD provides a powerful new
dashboarding framework along with platform service that will be consumed and used by
all other products to enhance the existing dashboard capabilities.
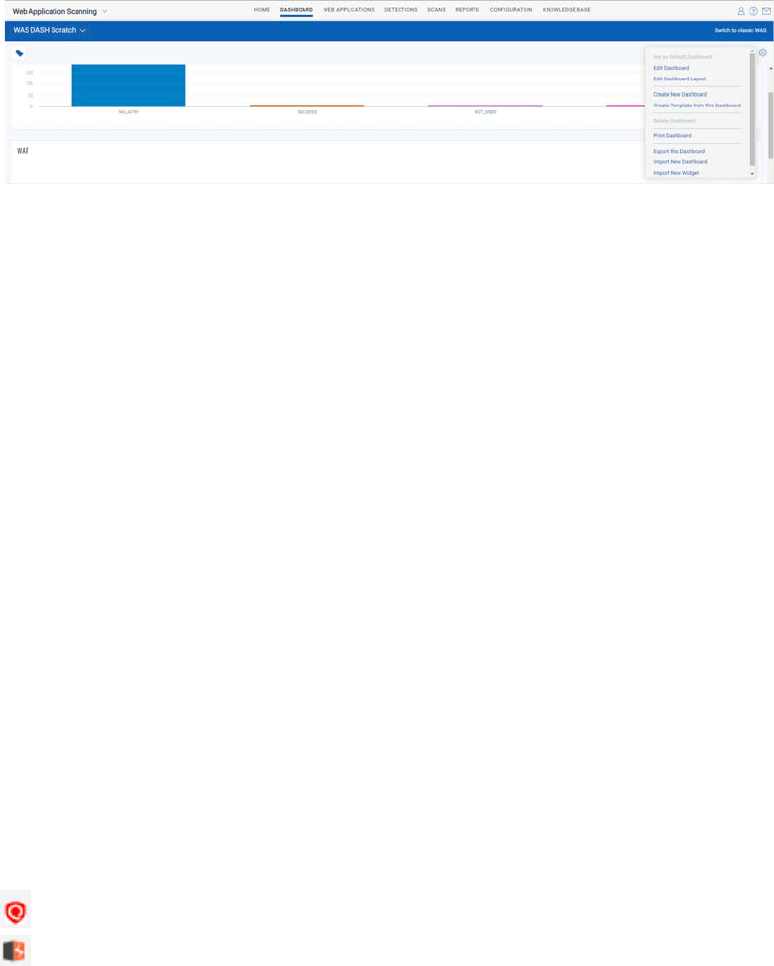
Click the gear icon at the top right to create, edit, print a Dashboard. You also have an
option to add widgets with search queries to see exactly what you’re interested in. You
can also export and import Dashboard and Widget configurations to a file in a json format
allowing you to share them between accounts or within the Qualys community.
Create multiple dashboards and switch between them for different views of your data.
Get Started
Manage Detections
11
From the Widget menu, you can edit, delete, duplicate, refresh, and export a widget. You
also have an option to create a template from a widget.
Adding widgets
1) Start by clicking the Add Widget button on your dashboard.
2) Pick one of our widget templates - or create your own.
3) Click the gear icon at the top right and from the menu you can also import
configurations to a file in a json format, allowing you to share the widgets between
accounts or within the Qualys community.
Tips:
- Wondering how we created the widgets on the default dashboard? Choose widgets
menu> Edit to see the settings.
Manage Detections
Manage all your detections in one place. The detections tab acts as a central area for
application security vulnerability detections, management and information. We list all
your findings (Qualys, Burp, and Bugcrowd) in the Detections tab.
We have filters in the left pane to enhance the search and quickly locate the detection
type. In addition to the common filters, use the search tokens to build complex search
expression to find detections specific to your requirement. For example, to view BURP
findings with age greater than 10 days, enter this search express in the search bar:
vulnerability.source:"BURP" and vulnerability.age>10.
You can distinguish the finding type with the icon displayed in the list.
- Qualys detections
- Burp issues

12
Get Started
Scanning using Selenium scripts
- Bugcrowd submissions
Take actions on detections
Take action against individual detections using the Quick Actions menu. Select or hover a
detection and click the arrow to view the options in the Quick Actions menu. Use the
Quick Actions menu to edit, ignore, and reactivate ignored detections. You can also edit
and restore the severity level of the detections, add comments to the detections. You can
take action against multiple detections using the Actions menu.
Scanning using Selenium scripts
You can use Qualys Browser Recorder (QBR) to create a Selenium script. QBR is a free
browser extension (for Google Chrome browser) to record & play back scripts for web
application automation testing. QBR allows you to capture web elements and record
actions in the browser to let you generate, edit, and play back automated test cases
quickly and easily. It also allows you to select a UI element from the browser’s currently
displayed page and then select from a list of Selenium commands with parameters. You
can use these scripts in WAS to help the scanner navigate through the complex
authentication and business workflows in a web application.

Get Started
We recommend a discovery scan first
13
A common authentication mechanism used by web applications is single sign-on (SSO).
This introduces complexity and can cause some confusion when it comes to
authenticating and scanning with Qualys WAS. With use of QBR, you could simplify
authentication mechanism for the scanner. For detailed steps, refer to our blog article.
Warning about scans and their potential impact Web application scans submit forms
with test data. If this is not desired you should add configurations for black lists, POST
data black lists, and/or select the GET only method within the option profile. Keep in mind
when these configurations are used, testing of certain areas of the web application is not
included and any vulnerabilities that exist in these areas may not be detected.
We recommend a discovery scan first
A discovery scan finds information about your web application without performing
vulnerability testing. This is a good way to understand where the scan will go and whether
there are URIs you should blacklist for vulnerability scans.
Tell me about the option profile
An option profile is a set of scan configuration options. We recommend “Initial WAS
Options” to get started. Editing options in the profile allows you to customize crawling and
scan parameters.
Go to Scans > Scan List
and then click New Scan >
Discovery Scan.
The launch scan wizard
walks you through the
steps.
Tell us the web
application you want to
scan and select scan
settings (* means
required).
Ready to start your scan?
Click Continue, review the
settings, then click Finish.

14
Get Started
We recommend a discovery scan first
Do I need to provide authentication details?
Is authentication needed to access the functionality of this web application? If yes be sure
to select an authentication record.
Do I need a scanner appliance?
Our security service provides cloud scanners for external scanning on the network
perimeter. For internal scanning you need to setup a scanner appliance (physical or
virtual). Go to VM/VMDR > Scans > Appliances and select an option from the New menu
and we’ll walk you through the steps. (Do you have Express Lite? Your account may be
enabled with External scanning, Internal scanning or both).
The scan view
The full scan report
Double click the
finished scan to see
the scan view.
The Overview gives you an
overview of the scan findings.
Want to view the full scan
report? Just click the View
Report button.
Each QID is a security
check we performed
and gathered
information on. Just
click the row to see
details.
Be sure to check QID
150009 Links Crawled
and QID 150021 Scan
Diagnostics to review
important data about
the scan.

Get Started
Next scan for vulnerabilities
15
Next scan for vulnerabilities
A vulnerability scan performs vulnerability checks and sensitive content checks to tell you
about the security posture of your web application.
Good to Know
What vulnerability checks are tested? We’ll scan for all vulnerability checks (QIDs) listed
in the KnowledgeBase unless you configure your option profile to do limit the scan to
certain vulnerabilities (confirmed, potential and/or information gathered). We constantly
update the KnowledgeBase as new security information becomes available.
What is Severity? Each QID is assigned a severity level by our service: confirmed
vulnerability (red), potential vulnerability (yellow) and information gathered (blue).
You’ll see the results
for QID 150009 Links
Crawled gives you a
listing of the links
crawled.
Click KnowledgeBase
on the top menu.

16
Get Started
Next scan for vulnerabilities
Start your scan
Check scan progress
Go to Scans on the top
menu and then select
New Scan >
Vulnerability Scan.
The launch scan wizard
walks you through the
steps.
Tell us the web
application you’d like to
scan for vulnerabilities
and select scan settings.
Ready to start your
scan? Click Continue,
review the settings, then
click Finish.
The status column tells
you the status (in this
case Running).
Want more info?
Double click the scan
row.
Then you’ll see the Scan
Progress bar - this gives
you an estimate of
when the scan will
finish.

Get Started
Next scan for vulnerabilities
17
The scan view
The full scan report
How do I see this? Hover
over the scan and select
View from the Quick
Actions menu.
The Overview gives you
an overview of the scan
findings.
Want to see the full scan
report? Just click the
View Report button.
Vulnerabilities are
sorted by
group.

18
Get Started
Next scan for vulnerabilities
Easily find out what
the severity levels
mean in the Appendix.

Get Started
Check out the Sitemap
19
Check out the Sitemap
The Web Application Sitemap gives you a convenient way to get a list of all pages/links
scanned with view on the links crawled, vulnerabilities and sensitive content detected (go
to Web Applications, select your web app and then View Sitemap from the Quick Actions
menu).
Here’s a sample sitemap for a web application that has 271 total pages crawled, 306 total
vulnerabilities and 8 sensitive content detections.
Filter the Sitemap
Click the edit icon to view the page filters. For example Vulnerabilities for current
vulnerabilities.

20
Get Started
Check out the Sitemap
Drill down to see nested links
This lets you explore the security of different parts of your applications. Double click a
parent folder to display child links.
Take actions on web app links
Create a new web application from a link, or add a link to a black list or white list. You can
view a link in your browser - just select that row then click the link in the details panel (to
the right).
Easily export web app links
Download the links scanned with their detection data in multiple formats.

Get Started
Tip - Schedule your scans to run automatically
21
Your download report will show you scan results per link.
Tip - Schedule your scans to run automatically
We recommend you set up scan schedules to run repeatedly. This way you’ll get results
automatically (daily, weekly or monthly) and during a time window convenient for your
organization.
Go to Scans >
Schedules and select
New Schedule.

22
Get Started
Get the latest security status from your dashboard
Get the latest security status from your dashboard
Your dashboard gives you security status at a glance and it’s always up to date with the
latest scan results. This is very interactive - just click the sections, links and discover
further details.
Easily create custom dashboards and switch views
Focus your dashboard on areas of interest, certain web applications and production
environments, whenever you want. You can even set a custom dashboard as the default
for your account.
Click the icon > Create New Dashboard.
You can change the default dashboard. Click the highlighted icon > Manage Dashboards.

Get Started
Get the latest security status from your dashboard
23
To change the default dashboard, from the list of dashboards, select the dashboard, and
click Set as default.

24
Get Started
Tell me about the catalog
Tell me about the catalog
The catalog is the staging area for web applications you can choose to add to your
subscription. The catalog requires manual triaging to know which entries are truly web
applications that should be scanned with WAS.
Catalog entries are processed from completed maps, vulnerability scans and WAS scans in
your account. Catalog entries are not necessarily web applications but are simply web
servers that responded to an HTTP request on a certain port.
(The catalog feature is not available to Express Lite users.)
How do I get started?
Your catalog will be empty until you (or another user) launches maps, vulnerability scans
using the VM application or WAS scans. Once they are complete you are ready to process
the results.
- Process scan results: Go to Web Applications > Catalog and click Update (above the list).
- Process map results: Go to Web Applications > Maps, select one or more maps and then
select Process Results.
You’ll see new catalog entries for the newly discovered web applications. You can easily
choose to add these web applications to your account and scan them for security risks.

Get Started
Manage Detections
25
You can also locate your web applications even if you don’t know where they are. With our
enhanced discovery method, if a server is running multiple virtual hosts, we can better
identify what applications exist and add them into our WAS Catalog. The WAS Catalog is
updated with the web applications that are detected through WAS scans but are not added
as web assets.
Manage Detections
Manage all your detections in one place. The detections tab acts as a central area for
application security vulnerability detections, management and information. We list all
your findings (Qualys, Burp, and Bugcrowd) in the Detections tab.
We have filters to enhance the search and quickly locate the detection type. In addition to
the common filters, depending on your finding type, more filters specific to each finding
type are displayed. For example, if you choose Finding Type as Burp, then filters that are
applicable for Burp related findings are enabled and the other non-applicable filters are
disabled.
You can distinguish the finding type with the icon displayed in the list.
- Qualys detections
- Burp issues
- Bugcrowd submissions
Want to import Burp findings?
(This feature is not available to Express Lite users.)
We recommend you to try Qualys WAS Burp extension to import a WAS finding directly
into Burp Repeater to manually validate the vulnerability. The extension works with both
Burp Suite Professional and Burp Suite Community Edition.

26
Get Started
Integration with Bugcrowd
The Qualys WAS Burp extension is available at the BApp Store, located under the Extender
tab. To learn more about Qualys WAS Burp extension refer to this blog article at the
Qualys community.
Alternately, go to Detections > Burp > Import. Choose a Burp file in XML format from your
local file system and select the web application that the Burp report applies to.
The issues imported with your Burp reports are displayed in the Detections list. Go to
Detections > Detections. Select Burp in the Finding Type of the Search Filter and you can
view issues in detail - including detection dates, status and severity.
Integration with Bugcrowd
Bugcrowd customers can also import approved Bugcrowd submissions into WAS account.
Our Bugcrowd integration gives you a way to view and report on vulnerabilities identified
by WAS and vulnerabilities found via bug bounty programs managed by Bugcrowd.
Go to Detections > Bugcrowd > Import and choose a Bugcrowd file in CSV format from
your local file system and select the web application that the Bugcrowd file applies to. The
issues imported with your Bugcrowd file are displayed in the issues list. Go to Detections >
Detections.

Get Started
Retest multiple findings without launching a full scan
27
Retest multiple findings without launching a full scan
Yes, you can easily retest the findings for vulnerabilities by launching a scan to test the
selected multiple findings. Only potential vulnerabilities, confirmed vulnerabilities and
sensitive contents are available for retest. You can club the multiple findings that belong
to the same QID and web application and launch a retest in a single batch. The retest scan
uses same settings used in the latest scan. If you cancel the retest for any of the findings,
the retest scan is cancelled for the entire batch of findings.
Go to Detections >
Detections. You can use
filters in the left-pane to
view all findings of same
QID and web application.
Select the findings to be
retested. From the Actions
menu, select Retest. Once
you confirm, the retest
scan would be launched on
all the selected findingsat
one go.
Test Authentication
You can test authentication records for web applications you define without having to run
a Discovery scan. You can quickly test authentication for a web application and test the
scanner's ability to authenticate to a web application.
Go to Web Applications > Web Applications and select the web application and select Test
Authentication from the quick actions menu.
Once the authentication test scan is in Finished state, select View Report from the quick
actions menu and view the Authentication Test scan report.

28
Get Started
High volume scanning of web applications
High volume scanning of web applications
Qualys WAS is the most scalable web application scanning solution. We’ve enhanced the
ability to support large web application scanning programs by adding the ability to scan
any number of web applications as a Multi-Scan. This feature enables organizations to
scan hundreds or even thousands of web applications they may have in their enterprise
with granular insight into what scans are running and which ones are complete.
Choose your applications - select individual apps or tags
Take advantage of Qualys asset tagging to categorize applications that may have similar
attributes and you can scan them together. Don’t have time to tag your applications? No
problem - users can pick and choose application names.

Get Started
Scanning using Selenium scripts
29
Select scan settings - authentication, option profile, scanner appliance
The Multi-Scan feature gives you many options to accept defaults for the web applications
or to override the default web application settings.
Scanning using Selenium scripts
You can use Qualys Browser Recorder (QBR) to create a Selenium script. QBR is a free
browser extension (for Google Chrome browser) to record & play back scripts for web
application automation testing. QBR allows you to capture web elements and record
actions in the browser to let you generate, edit, and play back automated test cases
quickly and easily. It also allows you to select a UI element from the browser’s currently
displayed page and then select from a list of Selenium commands with parameters. You
can use these scripts in WAS to help the scanner navigate through the complex
authentication and business workflows in a web application.
A common authentication mechanism used by web applications is single sign-on (SSO).
This introduces complexity and can cause some confusion when it comes to
authenticating and scanning with Qualys WAS. With use of QBR, you could simplify
authentication mechanism for the scanner. For detailed steps, refer to our blog article.

30
Get Started
Virtual Patch Support
Virtual Patch Support
WAS lets you install virtual patches for selected vulnerabilities (detections) when your
account has WAS and WAF enabled. Once installed we’ll automatically add firewall rules
to block exploitation of the selected vulnerabilities. We’ve added capabilities to the WAF
API to help you manage virtual patches.

Reporting
Steps to create reports
31
Reporting
Steps to create reports
Select New Report, or click the + button (on the right).
Alternately, you could quick generate a scan report by selecting a scan from the scan list
and then select View Report from the quick actions menu.
Select a report
type, in this case
Web Application
Report.
Select web
application(s) -
by tag and/or
name

32
Reporting
Steps to create reports
Similarly, you could generate a web application report using View report from the quick
actions menu of a web application.

Reporting
Sample Web Application Report
33
Sample Web Application Report

34
Reporting
Sample Scorecard Report
Sample Scorecard Report

Reporting
Tips & Tricks
35
Tips & Tricks
View, edit settings and repeat
Our reports are iterative. Just click the Edit Report button to change report settings and
we’ll create an updated report with your changes. This way you can quickly apply filters to
the report content, like which vulnerabilities and web applications.
Do side by side comparisons
Just click the icon in the report header and we’ll open the report in a new window. This lets
you do side by side comparisons, and easily work with multiple reports at a time.

36
Reporting
Tips & Tricks
How do I save my reports?
Use the Download option to download the report to your local machine and also save it in
your account.
Your reports list is where you can view your saved reports. You can view each report
(summary), download it, run it again, and add tags to share the report with other users.

Reporting
Tips & Tricks
37
Set a default report format
This saves you time! You won’t need to select your favorite report format each time you
download your report. Just select My Profile under your user name (in top right corner)
and edit your profile settings.
What do the severities and levels mean?
Just go to the Appendix and click Severity Levels. You’ll find a description for each severity
and level for each detection type (vulnerability, sensitive content, information gathered).

38
Reporting
Customizable report templates
Customizable report templates
Create templates with the specific information you’re interested in. This way it’s easy to
deliver the right information to application stakeholders. All your custom templates are
saved in your account for future use. Go to Reports > Templates and select the New
Template button to get started.
Numerous report template settings let you configure filters such as search lists,
vulnerability detections, vulnerabilities marked as ignored, and display settings such as
what content to include, grouping and sorting.

Reporting
Scheduled Reporting
39
Want to share your templates? No problem - just tag them, just like you do for other
objects (web applications, reports, etc) and add the tags to user scopes (use the
Administration utility).
Scheduled Reporting
Schedule your report to run automatically, in the same way you schedule scans. You can
schedule a report to run daily, weekly, or monthly or just one time only. Scheduling
reports is a great way to get security updates based on the latest scan results and share
them with other users.
Go to Reports > Schedules and click New Schedule to get started

40
Reporting
Scheduled Reporting
It’s easy to configure report notifications
Just choose Activate notification and tell us the users who should receive email
notifications. An alert is set to users each time a report is complete with a link to
download it, and whenever report generation fails.

Adding Users
41
Adding Users
It's easy to add users to your Qualys subscription and grant them access to WAS. You'll
need a Manager role to do this.
How do I add new users?
Use the New User work-flow provided in the Vulnerability Management application. Select
VM/VMDR from the app picker and go to the Users section to create a new user. We'll walk
you through the steps.
Viewing users, their roles and permissions
The Qualys Cloud Platform UI shows you all the users in your subscription, their assigned
roles and permissions to the various applications which are enabled for your account.
You'll notice newly added sub-accounts (Scanners, Readers, Unit Managers, etc) are not
granted access to WAS automatically.
How to grant a user access to WAS?
Say you created a new user Christina Hans with the Scanner role and you want Christina
to be able to scan web application for security risks using WAS.
View the new user’s permissions for applications with Qualys Cloud Platform. Go to the
Administration utility. You’ll notice for the new user WAS application is not listed.
Edit the new user (select the user and pick Edit from the Quick Actions menu). Under
Roles and Scopes the user is assigned SCANNER role for VM and/or PC scanning
(depending on your subscription settings).

42
Adding Users
Qualys provides predefined WAS user roles to help you grant users WAS permissions
easily. The predefined roles are WAS MANAGER, WAS SCANNER, WAS USER.
Our user Christina has SCANNER role (for VM/PC) so we’ll add WAS SCANNER role to her
account. Select WAS SCANNER then pick View from the Quick Actions menu. You’ll see
WAS SCANNER permission groups and can drill down to see the role details. This role does
not grant permissions to add/update/purge web applications for example.
Click Close to edit user settings.

Adding Users
43
Click the Add link next to WAS SCANNER role to add it to the user’s assigned roles.
Assigned roles will look like this.
Update the Edit Scope section to grant the user access to web applications in your
subscription. By default the user doesn’t have access to any web applications or other
WAS configurations. Choose one of the options.
Assign specific tags.
Grant full scope (i.e. all tags)
Click Save to save the user settings.

44
Adding Users
Role Management
The Role Management section shows you all about the roles in your subscription.
For each role you can view details and take actions to add to users, add permissions,
remove permissions etc.
The New Role option lets you create a custom role with the exact permissions you want.

Adding Users
45
For example you can create role WAS Scanner.
Grant the role access to UI and/or API.
In the role details, choose the access methods for the user.
46
Adding Users
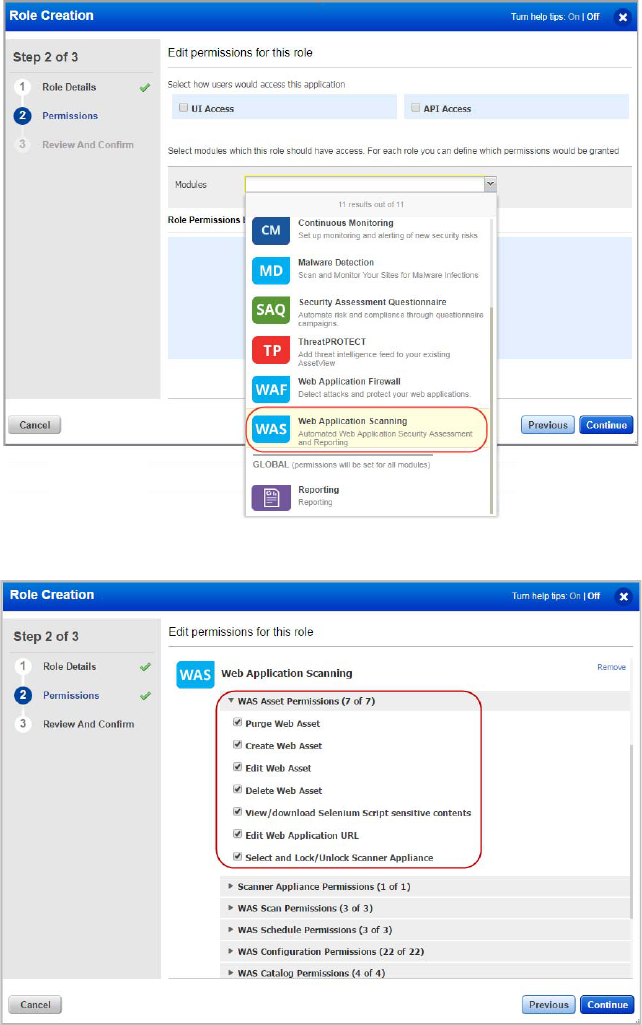
Grant the role access to the WAS app. In the Permissions section add select the WAS app
from the menu provided.
Grant the role permissions within the WAS app.
Edit the user account and assign role.
Adding Users
47

48
Frequently Asked Questions (FAQ)
Why I am unable to access the WAS module?
Frequently Asked Questions (FAQ)
Why I am unable to access the WAS module?
You need sufficient privileges to access the WAS module. Non-Manager users (Scanners,
Readers, Unit Managers) must be granted permission to access the WAS application and
the web applications in the subscription. A Manager (or user with the Edit User
permission) can configure roles for the users using the Administration utility.
Follow the steps given here to assign roles to the user.
Pre-requisite
This procedure must be performed by a user with Manager role.
1) Log in to Qualys using your account credentials.
2) From the module picker, select the Administration module.
3) From the User Management tab, select the user who is facing the issue and from the
Quick Actions menu, select Edit.

Frequently Asked Questions (FAQ)
Why I am unable to access the WAS module?
49
4) Go to the Roles and Scopes tab and select appropriate WAS Role & Scope for the user as
per the requirement. See the “Manage User Roles” topic in the Qualys Administration
Utility Online help.
If you want to give access to a web application in your subscription, go to the Edit section
and click the Select link. Choose a web application tag and add the tag to the user's scope.
5) Click Save and request the user to log in again.
50
Getting Help
Why I am unable to access the WAS module?
Getting Help
Qualys is committed to providing you with the most thorough support. Through online
documentation, telephone help, and direct email support, Qualys ensures that your
questions will be answered in the fastest time possible. We support you 7 days a week,
24 hours a day. Access online support information at
https://success.qualys.com/customersupport/s/.
WAS Community
To know more about latest features, discussions, documents and videos related to WAS,
you can access Qualys WAS Community page.
