
Setting up your Student Email on
Windows Mail or Microsoft Outlook
Last Revised: 03/21/18 Page 1 of 9
Complete First: Allow Less Secure Apps on your Student Email Account
Changes in Google’s Policy means that you must enable this feature to connect your student e-mail to the
Windows Mail app or Microsoft Outlook. To successfully add your email to Windows Mail or Microsoft Outlook,
please follow the steps below first before proceeding to the next steps.
Steps
Images
Step One
Log onto your Student Email. On
the top right of your Student E-mail
account, click on your user avatar
and then click on My Account.
Step Two
In the Sign in & Security section,
click on Connected apps & sites.
Step Three
Scroll down to the Connected apps
& sites section and turn on the
Allow less secure apps.
Step Four
Select your mail app for further
instructions
Windows Mail
Microsoft Outlook

QRG-Connect to Your Student Email: Windows Mail /Microsoft Outlook
Last Revised: 03/02/16 Page 2 of 9
Windows Mail Instructions
Steps
Images
Step One
Open up the Mail app and move
your cursor / swipe from the right to
open up the menu. Tap/Click on
Settings.
Step Two
Tap/Click on Account.
Step Three
Tap/Click on Add an account.
Step Four
Tap/Click on Google.
QRG-Connect to Your Student Email: Windows Mail /Microsoft Outlook
Last Revised: 03/02/16 Page 3 of 9
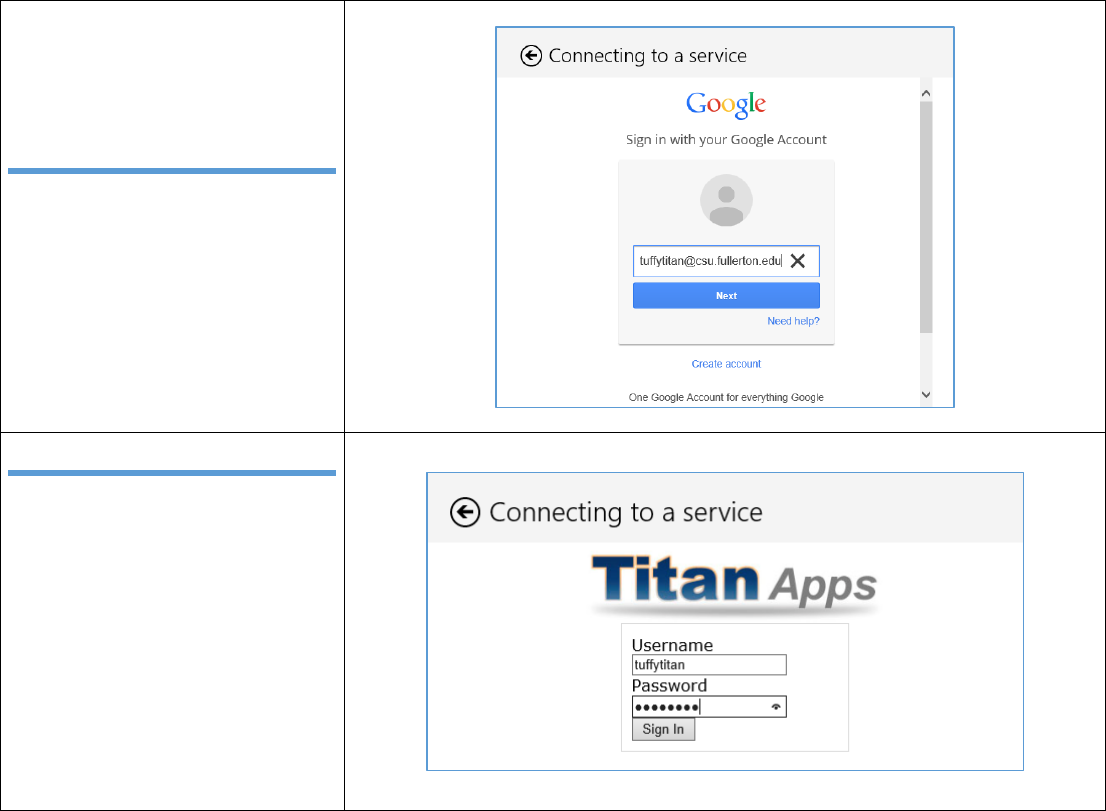
Step Five
A window will appear. Enter your full
@csu.fullerton.edu e-mail address
and click Next.
Step Six
You will be prompted to log in
through the Titan Apps page. Enter
your Campus Username/Password
to login.
Click Sign In to finish adding your
student e-mail account to the
Windows Mail app. It may take a
moment for your emails (and
calendar, contacts, etc.) to be
synced to your device.

QRG-Connect to Your Student Email: Windows Mail /Microsoft Outlook
Last Revised: 03/02/16 Page 4 of 9
Microsoft Outlook Instructions
Please follow all three steps to correctly setup your student email on Microsoft Outlook.
Step 1: Enable POP/IMAP on your Student Email Account
Steps
Images
Step One
Login to your CSUF student email
account and click on the Settings
icon ( ) at the far right.
Step Two
Select Settings from the drop-down
menu.
Step Three
Select the IMAP/POP menu.

QRG-Connect to Your Student Email: Windows Mail /Microsoft Outlook
Last Revised: 03/02/16 Page 5 of 9
Step Four
In the POP Download section, click
Enable POP for mail that arrives
from now on. In the IMAP Access
section, click Enable IMAP.
NOTE: for both options you should
decide what you want to happen
with your deleted emails; that is,
when you delete an email on your
mobile device do you want the
email to be deleted from your
student email account, archived in
your student email account, marked
as read in your student email
account, or left as unread in your
student email account.
Step Five
At the bottom of the POP/IMAP
screen, click Save Changes.

QRG-Connect to Your Student Email: Windows Mail /Microsoft Outlook
Last Revised: 03/02/16 Page 6 of 9
Step 2: Set a POP/IMAP Password
Steps
Images
Step One
Login to your Student Portal.
On the search bar on the left hand
side, search for Titan Apps and
then click on the link.
Step Two
Click on How to setup a
POP/IMAP account.
Step Three
In the Step 2 – Set Password section,
enter a strong password that
meets the listed requirements
and then click Set Password.
Note: The password you set
may be the same as your
current student email/portal
password if you wish but note
that this does not change your
student email/portal password.
Once the password has been
set, it may take 10 minutes to
24 hours to update the system

QRG-Connect to Your Student Email: Windows Mail /Microsoft Outlook
Last Revised: 03/02/16 Page 7 of 9
Step 3: Add Your Student Email Account to Microsoft Outlook
NOTE: These screenshots were used on a Microsoft Outlook 2013 but should still be compatible with Microsoft
Outlook 2016.
Steps
Images
Step One
If you are opening Microsoft
Outlook for the first time, a wizard
will appear. Click on the Next
button. When asked if you would
like to set up Outlook to connect to
an email account, choose Yes and
click Next.
NOTE: You may also click on File
and under the Info section you
can click on Add Account to
proceed to the next step.

QRG-Connect to Your Student Email: Windows Mail /Microsoft Outlook
Last Revised: 03/02/16 Page 8 of 9
Step Two
Choose the Manual setup or
additional server types option and
click Next.
Step Three
Choose the ‘POP or IMAP’ account.
Click Next.
NOTE: in older versions, it may
appear as Internet Email:
Connect to POP or IMAP server
to send and receive e-mail
messages.
Step Four
Enter the following information to
configure the email settings:
Account Type: IMAP
Incoming Server: imap.gmail.com
Outgoing Server: smtp.gmail.com
Username: your full student email
address, including
@csu.fullerton.edu
Password: one created in Part 2
above
Click on More Settings

QRG-Connect to Your Student Email: Windows Mail /Microsoft Outlook
Last Revised: 03/02/16 Page 9 of 9
Step Five
Under the Outgoing Server tab,
check My outgoing server (SMTP)
requires authentication. The radio
button Use same settings as my
incoming mail server should also be
selected.
Step Six
Under Advanced tab
Change the Incoming Server (IMAP)
port to 993, and the Outgoing
Server (SMTP) to 465.
Make sure both types of encrypted
connections are changed to SSL.
Once you are finished, click ‘OK’.
Click OK
Click Next. Once your account
credentials are verified, your
account should be added.
Click Close Finish to complete
the setup. It may take a moment for
your emails (and calendar, contacts,
etc.) to be synced to your device.
Need more help?
Visit the Student Genius Corner located on the first floor of Pollak Library
North. View their website for their hours: http://sts.fullerton.edu/sgc.
Contact the Student IT Help Desk at 657-278-8888 or
StudentITHelpD[email protected]
.
