
Copyright © 2023. Cloud Software Group, Inc. All Rights Reserved.
ibi™ WebFOCUS®
Reporting Language Primer
Release 8205 and higher | October 2023

Contents
1. Creating Basic Output Requests ................................................7
Creating Basic Reports ................................................................8
Types of Output Requests ............................................................. 8
Before You Begin ....................................................................10
Sending Instructions to the Server.................................................11
Identifying Data for Use in Reports .....................................................11
Presenting Data Values: Verbs ........................................................ 14
Displaying Field Values: PRINT....................................................14
Correcting Errors................................................................16
Listing Field Values: LIST........................................................ 16
Adding Field Values: SUM........................................................17
Counting Field Values: COUNT....................................................18
Manipulating Display Fields With Display Options ........................................ 19
Manipulating Display Fields With Prefix Operators ........................................21
Manipulating Display Field Values in a Sort Group ........................................27
Naming Columns: Field Names and AS ................................................. 28
Creating a Stored Request ............................................................29
2. Sorting Records ..............................................................31
Sorting the Rows of a Report Down the Page ............................................31
Sorting on Several Fields .............................................................35
Sorting Information Across the Page ................................................... 36
Creating a Matrix Using BY With ACROSS ...............................................37
Changing the Order of the Sorting ......................................................38
Ranking Sort Field Values .............................................................38
Limiting Sort Field Values .............................................................40
Hiding a Field .......................................................................41
Clustering Numeric Data Into Groups ...................................................42
3. Selecting Records ............................................................45
Describing Screening Conditions .......................................................45
Relational Operators............................................................ 46
Logical Operators...............................................................46
Reporting Language Primer
3

Screening Numeric Data ..............................................................47
Defining Ranges................................................................49
Combining Ranges and WHERE Conditions......................................... 51
Screening Aggregated Values.....................................................52
Screening Alphanumeric Data .........................................................52
Screening Alphanumeric Content ...................................................... 54
Screening Masked Fields: LIKE................................................... 56
Limiting Records Retrieved: RECORDLIMIT .............................................. 57
4. Using Temporary Fields .......................................................59
Creating a Temporary Field Using the COMPUTE Command ................................59
Combining Two Alphanumeric Fields Into a New Field .....................................61
Using Temporary Fields With DEFINE ................................................... 64
Adding More Temporary Fields ................................................... 66
Extracting Part of the Text From an Alphanumeric Field ....................................66
Decoding the Characters in an Alphanumeric Field ....................................... 68
5. Creating Subtotals and Grand Totals ...........................................71
Creating Column and Row Totals ...................................................... 71
Creating a Column Total......................................................... 72
Creating a Row Total............................................................ 74
Creating Column and Row Totals..................................................74
Adding Section Totals and Grand Totals to Reports .......................................75
Producing Section Totals for a Specified Sort Field: SUBTOTAL........................76
Suppressing a Single-Line Summary: MULTILINES..............................78
Producing Section Totals for a Specified Sort Field: RECOMPUTE...................... 79
Producing Section Totals for More Than One Sort Field: SUB-TOTAL....................82
Producing Section Totals for More Than One Sort Field: SUMMARIZE...................85
Producing Row Totals for ACROSS Sort Field Values................................. 87
Summary Chart for Producing Section Totals........................................88
Suppressing Grand Totals: NOTOTAL ...................................................89
Displaying Subtotals Conditionally: WHEN ...............................................90
Calculating Values Based on Subtotals: RECAP ..........................................92
6. Formatting Reports ...........................................................95
Contents
4

Headings and Footings: Types You Can Use .............................................95
Including a Page Heading in a Report: HEADING ......................................... 96
Including a Page Footing in a Report: FOOTING .......................................... 99
Including a Section Heading in a Report: SUBHEAD ..................................... 102
Including a Section Footing in a Report: SUBFOOT ...................................... 104
Conditionally Displaying Section Headings and Footings: WHEN......................106
Adding Blank Lines Between Sorted Records: SKIP-LINE .................................107
Separating Sorted Records With an Underline: UNDER-LINE .............................. 110
Creating a New Page: PAGE-BREAK ................................................... 111
7. Introducing Formatting and Style Sheets ..................................... 115
What Kinds of Formatting Can I Do? .................................................. 116
General StyleSheet Syntax ...........................................................117
Creating a TIBCO WebFOCUS StyleSheet Within a Report Request....................118
Aligning a Heading or Footing Element Across Columns............................. 119
Creating and Applying a StyleSheet File...........................................120
Conditionally Formatting a StyleSheet .................................................122
8. Merging Data Sources .......................................................125
Including Data From More Than One File: JOIN ..........................................125
Issuing a JOIN Command.......................................................125
Merging Data: MATCH ...............................................................127
MATCH Processing With Common High-Order Sort Fields............................ 131
Concatenating Data: MORE ..........................................................133
Concatenating Data Sources....................................................134
Field Name and Format Matching................................................ 134
9. Advanced Features ..........................................................137
Using Multiple Verb Commands in Requests ........................................... 137
Applying Selection Criteria ...........................................................139
Applying Selection Criteria to the Internal Matrix................................... 139
Extracting Data Into a File ........................................................... 142
Extracting Report Output........................................................142
Presenting Data in a Matrix: Financial Modeling Language ................................143
Reporting Dynamically From a Hierarchy...........................................145
Contents
Reporting Language Primer 5

Defining a Hierarchy in a Master File........................................ 146
Displaying an FML Hierarchy ..........................................147
Customizing Your Environment Using SET Commands ................................... 148
Issuing SET Commands........................................................ 148
Creating a Synonym ................................................................ 151
Enhancing a Synonym..........................................................152
A. Data Sources and Master Files ...............................................153
EMPLOYEE Data Source .............................................................154
JOBFILE Data Source ............................................................... 156
EDUCFILE Data Source ..............................................................157
EMPDATA Data Source ..............................................................158
FINANCE Data Source ...............................................................159
SALHIST Master File ................................................................159
CENTGL Master File ................................................................ 160
CENTSYSF Master File ..............................................................160
B. Reporting Language Syntax Summary ........................................163
Reporting Language Summary ........................................................163
C. Glossary ....................................................................165
Legal and Third-Party Notices .................................................. 189
Contents
6

Chapter
1
Creating Basic Output Requests
This Primer provides a foundation of the basic concepts to write reports. You use the
reporting language to create all of the output requests in this Primer. You describe the
reports you want to produce by writing report requests. For more information on reporting
features and syntax described in this Primer, see the technical content for your product.
Each request contains a set of English language instructions called commands that are
interpreted and implemented. The result of the request is a report or a chart. Charting
syntax is similar to reporting syntax. A chart can present the same kinds of information
as a tabular report, in a wide variety of two-dimensional and three-dimensional chart
types.
In this chapter:
Creating Basic Reports
Types of Output Requests
Before You Begin
Identifying Data for Use in Reports
Presenting Data Values: Verbs
Manipulating Display Fields With Display Options
Manipulating Display Fields With Prefix Operators
Manipulating Display Field Values in a Sort Group
Naming Columns: Field Names and AS
Creating a Stored Request
Reporting Language Primer 7

Creating Basic Reports
In this topic, you create elementary reports using basic building blocks common to even the
most complex report requests. You learn to use:
The TABLE FILE command. TABLE starts the reporting request. FILE identifies the data
source to use in reports.
The PRINT, LIST, SUM, and COUNT display commands to specify how to process data in a
report, individually or grouped.
Field names to identify the data to retrieve from a data source.
The AS keyword to change column titles that are automatically provided.
The END command to complete a report request and break the connection to the data
source you named in the TABLE command. To write another request, you start with the
TABLE command.
Any text editor, to create and change files called FOCEXECs. A FOCEXEC is a set of
commands, in this case, reporting commands, that you can save and execute at any time.
You can also edit FOCEXECs.
Types of Output Requests
You can create the following types of output requests using the reporting language syntax:
Tabular Report. Displays information in rows and columns. This is the basic report type,
incorporating the fundamental reporting concepts. Most of the other report formats build on
these concepts. You can drill down or roll up data hierarchies, pivot fields from columns to
rows or from rows to columns, and separate information by filtering or querying data
sources based on specified criteria or thresholds. You can display these reports in many
different formats, including HTML, Excel
®
, PowerPoint
®
, and PDF.
Drill-Down Report. Enables you to create links from report data (including headings and
footings), as well as graphic images (such as a company logo or product image), to other
reports, procedures, URLs, or JavaScript
®
functions.
Drill-Through Report. Enables you to create a PDF document that contains a summary
report plus detail reports, where the detail reports contain all the detail data for designated
fields in the summary report. Clicking a Drill-Through hyperlink navigates internally in the
PDF file and no additional reports are run. Drill-Through reports are static. You can save the
PDF file to disk or distribute it using ReportCaster. When opened with Acrobat
®
Reader, it
retains its full drill-through functionality.
Creating Basic Reports
8

Accordion Report. Provides an interactive interface to data aggregated at multiple levels by
presenting the sort fields within an expandable tree. By default, the report will present the
highest dimension or sort field (BY value) and the aggregated measures associated with
each value. You can use the tree control to open or close each dimension and view the
associated aggregated values. Clicking the plus sign (+) next to a sort field value opens
new rows that display the next lower-level sort field values and subtotals. The lowest level
sort field, when expanded, displays the aggregated data values. Accordion reports can also
be created to be opened by column, instead of by row.
Active Technologies Report. Designed for offline analysis. When using an active report,
you can interact with data, using analysis options similar to those found in an Excel
workbook. Since no connection to a server is required to view the data or use the analysis
options, you can save and use the report anywhere. Analysis options include filtering,
sorting, charting, and much more.
Excel Compound and Table of Contents Report. Provides a way to generate multiple
worksheet reports using the XLSX output format. By default, each of the component reports
from the compound report is placed in a new Excel worksheet. A Table of Contents report
generates a multiple worksheet report where a separate worksheet is generated for each
value of the first sort field (BY) in the report.
Free-Form Report. Presents detailed information about a single record in a form-like
context that is often used with letters and forms. If your goal is to present a detailed
picture of one record per report page, you can use free-form reports to position headers,
footers, free text, and fields precisely on a page. You can customize your headers and
footers by including fields as display variables, and incorporate prefix operators in your
headers and footers to perform calculations on the aggregated values of a single field.
Financial Report. Specifically designed to handle the task of creating, calculating, and
presenting financially oriented data, such as balance sheets, consolidations, and budgets.
You design the content of the report on a row-by-row basis using a field, called a FOR field,
that identifies each row, such as an account field. This organization provides a number of
advantages, including easily defined inter-row and inter-column calculations, formatting on a
cell-by-cell basis, and saving individual rows and row titles in extract files.
Precision Report. Provides an additional set of tools that make it easy to control the
precise placement of objects and data in the report output. With a precision report, you can
quickly create a layout that is perfectly aligned for a preprinted form, such as a Bill of Sale
or a tax form, and that automatically breaks out one record per report page. You can
convert an existing report into a precision report or you can create a new precision report.
1. Creating Basic Output Requests
Reporting Language Primer 9

Chart Request. Presents the same kinds of information as tabular reports, but in a wide
variety of two-dimensional and three-dimensional chart types. Charts allow you to present
information graphically, using such visual cues as color, size, and position to convey
relationships between measures (numeric fields to be aggregated) and dimensions
(categories) and to identify trends and outliers. Using the GRAPH command, you can easily
transform almost any type of data into an effective chart that you can customize to suit
your needs. You can link your chart to other resources, or feature conditional styling to
highlight specific data in your chart. You may select from a multitude of chart styles, which
include the standard chart formats, bar, line, pie, and scatter, as well as many variations
on these types.
Before You Begin
The reporting language is powerful and is available on several platforms.
Note:
The TIBCO WebFOCUS
®
reporting language on the Windows platform was used to create
the sample output shown in this Primer. If you are not using Windows, your screens and
keyboard may differ slightly. The concepts of the reports, however, are the same.
The default StyleSheet (Warm), which uses the IBIDefault font Arial for many languages,
was used for the output in the examples that we show in this Primer. You can change the
Stylesheet and font in any request. For more information, see Introducing Formatting and
Style Sheets on page 115.
The syntax and images in the examples were edited to include only those portions of
information that highlight the components discussed. For example, for readability purposes
and consolidation of syntax, the following StyleSheet code was removed from the
examples:
ON TABLE SET STYLE *
TYPE=REPORT, INCLUDE=Warm.sty, $
TYPE=DATA, BORDER=OFF, TOPGAP=.03, BOTTOMGAP=.03, $
ENDSTYLE
In order to execute each of the requests in this Primer, make sure you have the following:
The WebFOCUS
®
, TIBCO WebFOCUS
®
App Studio, or TIBCO FOCUS
®
product.
The sample data sources that are included with the product.
A text editor.
Contact your system administrator if any of the above conditions does not exist.
Before You Begin
10

Sending Instructions to the Server
Once you are in the product, you can create and issue report requests using the embedded
text editor that is available in the product, or any text editor that has an option to save the file
as text only.
When you use a text editor, the product does not process instructions as you enter them.
Instead, you can save the entire request and run it at a different time. This saved request is
called a FOCEXEC.
All language commands must be typed in uppercase text.
Identifying Data for Use in Reports
The data you use to create a report is organized into units called fields. Fields are stored in a
data source. Each field has a value. For instance, a field named LAST_NAME stores the last
name of an employee. LAST_NAME is the field, but each of the last names stored is a field
value.
Fields are distinguished based on their functions in a request. Fields that are used for sorting
and categorizing data are called dimensions. They are usually, but not always, alphanumeric
fields. Fields that are used in summations and other calculations are called measures. They
are usually numeric fields. Some numeric fields are not meant to be summed and are,
therefore, not considered measures. For example a bank code would be considered a
dimension because it would probably be used for sorting and selecting records.
A Master File describes the structure and contents of a data source. The Master File consists
of statements, called declarations, that name each part of the file and describe its
characteristics.
1. Creating Basic Output Requests
Reporting Language Primer 11

The following is the EMPLOYEE Master File for your reference.
FILENAME=EMPLOYEE, SUFFIX=FOC
SEGNAME=EMPINFO, SEGTYPE=S1
FIELDNAME=EMP_ID, ALIAS=EID, FORMAT=A9, $
FIELDNAME=LAST_NAME, ALIAS=LN, FORMAT=A15, $
FIELDNAME=FIRST_NAME, ALIAS=FN, FORMAT=A10, $
FIELDNAME=HIRE_DATE, ALIAS=HDT, FORMAT=I6YMD, $
FIELDNAME=DEPARTMENT, ALIAS=DPT, FORMAT=A10, $
FIELDNAME=CURR_SAL, ALIAS=CSAL, FORMAT=D12.2M, $
FIELDNAME=CURR_JOBCODE, ALIAS=CJC, FORMAT=A3, $
FIELDNAME=ED_HRS, ALIAS=OJT, FORMAT=F6.2, $
SEGNAME=FUNDTRAN, SEGTYPE=U, PARENT=EMPINFO
FIELDNAME=BANK_NAME, ALIAS=BN, FORMAT=A20, $
FIELDNAME=BANK_CODE, ALIAS=BC, FORMAT=I6S, $
FIELDNAME=BANK_ACCT, ALIAS=BA, FORMAT=I9S, $
FIELDNAME=EFFECT_DATE, ALIAS=EDATE, FORMAT=I6YMD, $
SEGNAME=PAYINFO, SEGTYPE=SH1, PARENT=EMPINFO
FIELDNAME=DAT_INC, ALIAS=DI, FORMAT=I6YMD, $
FIELDNAME=PCT_INC, ALIAS=PI, FORMAT=F6.2, $
FIELDNAME=SALARY, ALIAS=SAL, FORMAT=D12.2M, $
FIELDNAME=JOBCODE, ALIAS=JBC, FORMAT=A3, $
SEGNAME=ADDRESS, SEGTYPE=S1, PARENT=EMPINFO
FIELDNAME=TYPE, ALIAS=AT, FORMAT=A4, $
FIELDNAME=ADDRESS_LN1, ALIAS=LN1, FORMAT=A20, $
FIELDNAME=ADDRESS_LN2, ALIAS=LN2, FORMAT=A20, $
FIELDNAME=ADDRESS_LN3, ALIAS=LN3, FORMAT=A20, $
FIELDNAME=ACCTNUMBER, ALIAS=ANO, FORMAT=I9L, $
SEGNAME=SALINFO, SEGTYPE=SH1, PARENT=EMPINFO
FIELDNAME=PAY_DATE, ALIAS=PD, FORMAT=I6YMD, $
FIELDNAME=GROSS, ALIAS=MO_PAY, FORMAT=D12.2M, $
SEGNAME=DEDUCT, SEGTYPE=S1, PARENT=SALINFO
FIELDNAME=DED_CODE, ALIAS=DC, FORMAT=A4, $
FIELDNAME=DED_AMT, ALIAS=DA, FORMAT=D12.2M, $
SEGNAME=JOBSEG, SEGTYPE=KU, PARENT=PAYINFO, CRFILE=JOBFILE,
CRKEY=JOBCODE,$
SEGNAME=SECSEG, SEGTYPE=KLU, PARENT=JOBSEG, CRFILE=JOBFILE, $
SEGNAME=SKILLSEG, SEGTYPE=KL, PARENT=JOBSEG, CRFILE=JOBFILE, $
SEGNAME=ATTNDSEG, SEGTYPE=KM, PARENT=EMPINFO, CRFILE=EDUCFILE,
CRKEY=EMP_ID,$
SEGNAME=COURSEG, SEGTYPE=KLU, PARENT=ATTNDSEG, CRFILE=EDUCFILE,$
In order to retrieve field values for use in a report, you first identify the data source in which
they are stored. You identify and access a data source using the command:
TABLE FILE
followed by the name of the data source that contains the fields you want to use. The word
TABLE indicates that you want to write a report request and invokes the reporting language.
Identifying Data for Use in Reports
12

For example, in this Primer, you will use the sample EMPLOYEE data source supplied with
every release of the product. The reports you produce may differ from the ones you see in this
Primer. Although the data source names are the same, different releases of the product may
include different sets of data.
To start a request and access the EMPLOYEE data source, issue the command:
TABLE FILE EMPLOYEE
The EMPLOYEE data source contains information about employees, such as names,
addresses, salary, and deductions. This information is useful for creating reports on
individuals or groups of employees. You start with simple requests that display employee
identification numbers, names, and salaries. You gradually include more commands in your
requests to produce more complex reports.
Note: TABLEF is a variation of the TABLE command that provides a fast method of retrieving
data that is already stored in the order required for printing and requires no additional sorting.
Using TABLEF, records are retrieved in the logical sequence from the data source. TABLEF is
limited in functionality in comparison to TABLE.
Now that you have issued the TABLE FILE EMPLOYEE command, you include instructions that
retrieve information for inclusion in reports. Before you begin, you might want to display a list
of fields stored in the EMPLOYEE data source.
Issue the following commands from a text editor:
?F
END
Depending on your platform, the list of fields may include asterisks, instead of blanks, to
separate different groups of related fields.
FILENAME=EMPLOYEE
EMPINFO.EMP_ID LAST_NAME FIRST_NAME HIRE_DATE
DEPARTMENT CURR_SAL CURR_JOBCODE ED_HRS
BANK_NAME BANK_CODE BANK_ACCT EFFECT_DATE
DAT_INC PCT_INC SALARY PAYINFO.JOBCODE
TYPE ADDRESS_LN1 ADDRESS_LN2 ADDRESS_LN3 ACCTNUMBER
PAY_DATE GROSS
DED_CODE DED_AMT
JOBSEG.JOBCODE JOB_DESC
SEC_CLEAR
SKILLS SKILL_DESC
DATE_ATTEND ATTNDSEG.EMP_ID
COURSE_CODE COURSE_NAME
1. Creating Basic Output Requests
Reporting Language Primer 13

Note: All references to field name in this manual assume that field names are unique within
the data source structure. If field names are NOT unique, field names can be qualified as
follows:
FILENAME.
fieldname
SEGNAME.
fieldname
FILENAME.SEGNAME.
fieldname
In the above field list, the EMP_ID and JOBCODE fields are qualified to indicate which field
name instance is being referenced.
Presenting Data Values: Verbs
You can present data in the reporting language using a choice of four display commands,
commonly called verbs. You can use one or more verbs in a single request. Using multiple
verbs in a single request is explained in Advanced Features on page 137. Each verb, PRINT,
LIST, SUM, and COUNT, displays data in a unique way.
The following display commands display each record:
PRINT displays individual data.
LIST displays individual data in a numbered list.
The following display commands process multiple records:
SUM returns a single value, typically the sum total.
COUNT counts and displays the number of data occurrences.
Displaying Field Values: PRINT
The PRINT command displays all the values for each field you specify. The values retrieved for
each field appear in a column. The PRINT command, by default, uses the field name or the
value for the TITLE attribute in the Master File to name each column. The columns
automatically display in the same order you request them when you use PRINT.
To create a report request that displays employee identification numbers (EMP_ID field), last
names (LAST_NAME field), and salaries (CURR_SAL field), issue the following request:
TABLE FILE EMPLOYEE
PRINT EMP_ID LAST_NAME CURR_SAL
To complete the request and run it, issue the following command on a line by itself:
END
Presenting Data Values: Verbs
14

You must always type the END command on its own line. When you use END to complete a
request, you are indicating that you are finished using the data source you identified in the
request, in this case, EMPLOYEE. Therefore, in order to start another request, you must
identify the data source again using the TABLE FILE command.
To see statistics after running a request, such as the number of records retrieved and how
many lines appear on the report, you can use the Message Viewer or Session Viewer,
depending on the product you are using. This output is not displayed for every example in this
Primer. The information is shown below, though:
NUMBER OF RECORDS IN TABLE= 12 LINES= 12
Run the request. The output is:
The report you produce shows field values displayed in columns from left to right in the same
order in which you specified them in your request. Each column uses the field name or the
value for the TITLE attribute in the Master File as its title. You can also specify edit options,
such as date formats, floating dollar signs, commas, and zero suppression. Notice that
alphanumeric data is left-justified and numeric data is right-justified.
Alphanumeric data consists of characters and/or digits that cannot be used in calculations.
For example, the EMP_ID field consists of only numbers, yet the numbers are not the type you
use in calculations. Therefore, the data stored in EMP_ID is alphanumeric.
1. Creating Basic Output Requests
Reporting Language Primer 15

Numeric data, which includes decimal and integer values, contain numbers for use in
calculations. Field formats identify the type of data a field stores. You see that there is no
apparent order to the values in this report. You learn how to organize, or sort values in Sorting
Records on page 31.
Correcting Errors
When you run a request, error messages display when you make mistakes. Mistakes can be
typos or using the wrong command format. To see an example of an error message, type the
same request you just entered. But this time, include a typo by typing PRINTE, instead of
PRINT.
The following message displays:
ERROR AT OR NEAR LINE 2 IN PROCEDURE procedure_name
(FOC002) A WORD IS NOT RECOGNIZED: PRINTE
Correct the word PRINT to fix the typo.
Listing Field Values: LIST
If you want to display the values for the field or fields you request in a numbered list, use LIST
instead of PRINT. The LIST command numbers each row of data.
Issue the previous request, but use LIST instead of PRINT.
TABLE FILE EMPLOYEE
LIST EMP_ID LAST_NAME CURR_SAL
END
Presenting Data Values: Verbs
16

Run the request. The output is:
Notice that there is an additional column titled LIST, which includes a number for each row in
the report. The contents and order of the columns remain the same. The only difference is that
LIST numbered each row for you.
Adding Field Values: SUM
The SUM command adds the values of numeric fields. Because SUM acts on multiple records,
it is known as an aggregating verb. If you use SUM with an alphanumeric field, only the last
value retrieved for that field is displayed, by default. A command you can use interchangeably
with SUM is WRITE. SUM is used in our examples.
Unlike PRINT and LIST, which display individual field values, SUM uses the values to create
new information.
Issue the following request:
TABLE FILE EMPLOYEE
SUM CURR_SAL
END
Look at the statistics for this report. Even though there are 12 records, only one line of
information is produced:
NUMBER OF RECORDS IN TABLE= 12 LINES= 1
1. Creating Basic Output Requests
Reporting Language Primer 17

Run the request. The output is:
SUM adds the values for CURR_SAL and produces one line of aggregated data, not individual
values. This is why 12 records were retrieved, but only one line of data displays.
Counting Field Values: COUNT
The COUNT command, like SUM, is an aggregating verb. It uses data you select to create new
information. The difference is that COUNT tells you the number of occurrences of values that
exist for a field, instead of calculating the summed value. The values counted do not have to
be unique. By default, the result of COUNT is limited to five (5) digits.
COUNT has the same effect on both alphanumeric and numeric fields. You can see how
COUNT differs from SUM when you compare the following request and report to the ones you
produced using SUM.
Issue the following request:
TABLE FILE EMPLOYEE
COUNT CURR_SAL
END
Once again, the statistics indicate that the number of records exceeds the number of lines in
the report.
NUMBER OF RECORDS IN TABLE= 12 LINES= 1
Run the request. The output is:
You have just completed several requests that show you the differences among the four verb
commands available to you. Although the sample requests in this Primer use one verb
command at a time, you can use up to 64 verbs in a single request. A brief description of a
multi-verb request in included in Advanced Features on page 137.
Presenting Data Values: Verbs
18

Manipulating Display Fields With Display Options
Display options may be used to edit formats. These options only affect how the data in the
field is printed or appears on the screen, not how it is stored in your data source.
The following table describes the display options that you can use to edit the display of
numeric formats. For more information on display options for alphanumeric, currency, date and
time fields, see the Describing Data With TIBCO WebFOCUS
®
Language manual for your
product.
Edit Option Meaning Effect
-
Minus sign Displays a minus sign to the right of negative
numeric data.
%
Percent sign Displays a percent sign (%), along with
numeric data. Does not calculate the
percent.
p
Percentage Converts a number to a percentage by
multiplying it by 100, and displays it followed
by a percent sign (%).
A
Negative
suppression
Displays the absolute value of the number,
but does not affect the stored value.
a
Automatic
abbreviation
Calculates the appropriate abbreviation (K,
M, B, or T) to use for displaying the number
based on the magnitude of the number. This
option uses the appropriate abbreviation for
the specific value on the current row and,
therefore, each row may have a different
abbreviation. For example, 1234567890
displays as 1.23B, while 1234567890000
displays as 1.23T.
b
Billions abbreviation Displays numeric values in terms of billions.
For example, 1234567890 displays as
1.23B.
B
Bracket negative Encloses negative numbers in parentheses.
1. Creating Basic Output Requests
Reporting Language Primer 19

Edit Option Meaning Effect
c
Comma suppress Suppresses the display of commas.
Used with numeric format options M and N
(floating and non-floating dollar sign) and
data format D (floating-point double-
precision).
C
Comma edit Inserts a comma after every third significant
digit, or a period instead of a comma if
continental decimal notation is in use.
E
Scientific notation Displays only significant digits.
k
Thousands
abbreviation
Displays numeric values in terms of
thousands. For example, 12345 displays as
12.35K.
L
Leading zeroes Adds leading zeroes.
m
Millions abbreviation Displays numeric values in terms of millions.
For example, 1234567 displays as 1.23M.
M
Floating currency
symbol ($ for US
code page)
Places a floating currency symbol to the left
of the highest significant digit. The default
currency symbol depends on the code page.
N
Fixed currency
symbol ($ for US
code page)
Places a currency symbol to the left of the
field. The symbol appears only on the first
detail line of each page.
R
Credit (CR) negative Places CR after negative numbers.
S
Zero suppress If the data value is zero, prints a blank in its
place.
t
Trillions abbreviation Displays numeric values in terms of trillions.
For example, 1234567890000 displays as
1.23T.
Manipulating Display Fields With Display Options
20

The following request uses the numeric abbreviation option k on the SALARY field, displaying
two decimal places. The request also changes the ED_HRS field to Integer format and
suppresses values equal to zero (0).
TABLE FILE EMPLOYEE
SUM SALARY SALARY/D6.2k ED_HRS ED_HRS/I2S
BY DEPARTMENT
BY EMP_ID
END
Run the request. The output is:
Manipulating Display Fields With Prefix Operators
You can use prefix operators to perform calculations directly on the values of aggregated
fields. Each prefix operator is applied to a single field, and affects only that field.
The syntax is:
{SUM|COUNT}
prefix
.
fieldname
1. Creating Basic Output Requests
Reporting Language Primer 21

The following table lists prefix operators and describes the function of each.
Prefix Function
ASQ.
Computes the average sum of squares for standard deviation in
statistical analysis.
AVE.
Computes the average value of the field.
AVE.DST.
Averages the distinct values within a field.
CNT.
Counts the number of occurrences of the field, even if used with the
SUM verb. The data type of the result is always Integer.
CNT.DST.
Counts the number of distinct values within a field.
CT.
Produces a cumulative total of the field. This operator only applies when
used in subfoots.
DST.
Determines the total number of distinct values in a single pass of a data
source.
FST.
Generates the first physical instance of the field. Can be used with
numeric or text fields.
LST.
Generates the last physical instance of the field. Can be used with
numeric or text fields.
MAX.
Generates the maximum value of the field.
MDE.
Computes the mode of the field values.
MDN.
Computes the median of the field values.
MIN.
Generates the minimum value of the field.
PCT.
Computes a field percentage based on the total value for the field. The
PCT operator can be used with detail, as well as summary fields.
PCT.CNT.
Computes a field percentage based on the number of instances found.
The format of the result is always F6.2.
Manipulating Display Fields With Prefix Operators
22

Prefix Function
RNK.
Ranks the instances of a BY sort field in the request. Can be used in
PRINT commands, COMPUTE commands, and IF or WHERE TOTAL tests.
ROLL.
Recalculates values on summary lines using the aggregated values from
lower level summary lines.
RPCT.
Computes a field percentage based on the total values for the field
across a row.
ST.
Produces a subtotal value of the field at a sort break in the report. This
operator only applies when used in subfoots.
SUM.
Sums the field values, even if used with the COUNT verb.
SUM.DST.
Sums the distinct values within a field.
TOT.
Totals the field values for use in a heading (includes footings, subheads,
and subfoots).
AVE. Prefix Operator
To calculate the average number of education hours spent in each department, issue the
following request:
TABLE FILE EMPLOYEE
SUM AVE.ED_HRS BY DEPARTMENT
END
Run the request. The output is:
1. Creating Basic Output Requests
Reporting Language Primer 23

MAX. and MIN. Prefix Operators
To calculate the maximum and minimum values of SALARY, issue the following request:
TABLE FILE EMPLOYEE
SUM MAX.SALARY AND MIN.SALARY
END
Run the request. The output is:
PCT. Prefix Operator
To calculate the percentage that a field makes up of the column total value, for example, each
employee share of education hours, issue the following request:
TABLE FILE EMPLOYEE
SUM ED_HRS PCT.ED_HRS BY LAST_NAME
ON TABLE COLUMN-TOTAL
END
Run the request. The output is:
Manipulating Display Fields With Prefix Operators
24

RCPT. Prefix Operator
To calculate the total education hours (ED_HRS column) and the percentage that total makes
up in relation to the sum of all education hours (RPCT.ED_HRS) for each employee within
department, issue the following request:
TABLE FILE EMPLOYEE
SUM ED_HRS RPCT.ED_HRS ROW-TOTAL BY LAST_NAME
ACROSS DEPARTMENT
END
Run the request. The output is:
SUM and COUNT in the Same Request
To count the occurrences of EMP_ID and sum the value of ED_HRS, issue either of the
following requests:
TABLE FILE EMPLOYEE
SUM CNT.EMP_ID AND ED_HRS
END
or
TABLE FILE EMPLOYEE
COUNT EMP_ID AND SUM.ED_HRS
END
1. Creating Basic Output Requests
Reporting Language Primer 25

Run the request. The output is:
PCT.CNT. Prefix Operator
To count the occurrences of EMP_ID and the relative percentage of the values in the EMP_ID
field for each department, issue the following request:
TABLE FILE EMPLOYEE
SUM CNT.EMP_ID PCT.CNT.EMP_ID
BY DEPARTMENT
END
Run the request. The output is:
CNT.DST. Prefix Operator
To count the number of unique ED_HRS values, issue either of the following requests:
TABLE FILE EMPLOYEE
SUM CNT.DST.ED_HRS
END
or
TABLE FILE EMPLOYEE
COUNT DST.ED_HRS
END
Run the request. The output is:
Manipulating Display Fields With Prefix Operators
26

FST. and LST. Prefix Operators
To retrieve the first and last logical record in the EMP_ID field, issue the following request:
TABLE FILE EMPLOYEE
SUM FST.EMP_ID LST.EMP_ID
END
Run the request. The output is:
Manipulating Display Field Values in a Sort Group
You can use the WITHIN phrase to manipulate display field values as they are aggregated
within a sort group. This technique can be used with a prefix operator to perform calculations
on a specific aggregate field within a subset of all data.
The WITHIN phrase requires a BY phrase and/or an ACROSS phrase. A maximum of two
WITHIN phrases can be used for each display field. If one WITHIN phrase is used, it must act
on a BY phrase. If two WITHIN phrases are used, the first must act on a BY phrase and the
second on an ACROSS phrase.
You can also use WITHIN TABLE, which allows you to return the original value within a request
command. The WITHIN TABLE command can also be used when an ACROSS phrase is needed
without a BY phrase. Otherwise, a single WITHIN phrase requires a BY phrase.
The basic format of the WITHIN command is:
field
WITHIN {
by_field
|TABLE} [WITHIN
across_field
]
To display the gross salary and the percent of gross salary by job code within each
department, issue the following request:
TABLE FILE EMPLOYEE
SUM ED_HRS PCT.ED_HRS WITHIN TABLE WITHIN DEPARTMENT
BY CURR_JOBCODE
ACROSS DEPARTMENT
END
1. Creating Basic Output Requests
Reporting Language Primer 27

Run the request. The output is:
Note: Prefix operators, except for CNT. (I5) and PCT.CNT. (F6.2) use the format of the
referenced field.
Naming Columns: Field Names and AS
In order to include data in a report, you need to identify which fields you want to retrieve from
the data source. You identify which fields you want to include using the appropriate field
names.
Fields have different formats. Two types of formats we use in our examples are alphanumeric
and numeric.
Alphanumeric fields contain characters and/or digits. Even if the field contains only digits, it
cannot be used in calculations. For example, social security numbers or zip codes are not used
in mathematical calculations.
Numeric fields, which include decimal and integer formats, contain numbers for use in
calculations.
Each field name or TITLE attribute in the Master File serves as a title for the column it
produces and sets the width for that column. If the length of a particular field value is greater
than the field name, the column is automatically sized to be as wide as the field length.
When you write a report request, you can include a keyword called AS that changes the default
column title. Since field names are used as titles for columns, type AS next to the field name
for which you want to provide a new column title. Then, type the new title after AS and enclose
it in single quotation marks ('). If you want more than a one-line title, use a comma (,) to
indicate where each new line begins. You can include up to 16 lines in your column titles.
Naming Columns: Field Names and AS
28

To produce a two-line title, issue the following request:
TABLE FILE EMPLOYEE
LIST EMP_ID LAST_NAME CURR_SAL AS 'CURRENT,SALARY'
END
Run the request. The output is:
Notice the new column title in this report. Each time you want to change a title, simply include
another AS keyword after the appropriate field name.
Creating a Stored Request
A request stored in a file is called a FOCEXEC. A FOCEXEC stores the request commands as
straight text. No formatting or other codes, such as those created by many word processors,
can be included in it. When you execute the FOCEXEC, the commands are read from the file,
line by line.
You can create a FOCEXEC using the embedded text editor or any text editor that has an option
to save the file as text only. The file extension for a FOCEXEC is .fex.
Note: If you are using the WebFOCUS
®
App Studio GUI tools to create a request, you can view
and edit the underlying syntax using the Text Editor tab. For more information, see the TIBCO
WebFOCUS
®
App Studio User's Manual.
1. Creating Basic Output Requests
Reporting Language Primer 29

Creating a Stored Request
30

Chapter
2
Sorting Records
In the first chapter, you learned how to write simple report requests that print, add up, or
count records from your data source. You can add detail to a report by sorting the
records retrieved using the data from another field, called a sort field.
Sorting reorganizes the records in a report in the order of the values found in the sort
field. For example, you can put names into alphabetic order or add up salaries by
department.
In this chapter:
Sorting the Rows of a Report Down the Page
Sorting on Several Fields
Sorting Information Across the Page
Creating a Matrix Using BY With ACROSS
Changing the Order of the Sorting
Ranking Sort Field Values
Limiting Sort Field Values
Hiding a Field
Clustering Numeric Data Into Groups
Sorting the Rows of a Report Down the Page
The simplest report requests either print or add up all the records in the data source. The
report has one line for each record retrieved or one line displaying the total for each numeric
field.
You can reorganize the way the records are printed by sorting them using the data found in
another field. To do this, you type the keyword BY followed by the name of the field you want to
sort, the sort field.
Reporting Language Primer 31

For example, issue a report request that adds up the hours spent in the classroom for each
job category in the data source. Classroom hours are stored in the field ED_HRS. Job
categories are stored in the field CURR_JOBCODE. Use AS to rename the column title the sort
field CURR_JOBCODE creates.
Issue the following request:
TABLE FILE EMPLOYEE
SUM ED_HRS
BY CURR_JOBCODE AS 'JOB,CATEGORY'
END
Run the request. The output is:
If you execute this request without using BY, a single number displays, which represents the
total number of classroom hours for the entire data source. However, the report now shows
the total number of classroom hours logged in each job category. You could just as easily
analyze the numbers by department or by employee.
Notice how sorting affects the output of the request. A total for each job category retrieved
from the data source is produced. The sort order is low to high, by default.
Now use the verb LIST with a sort phrase. When you list records, they are printed next to their
corresponding sort field value and the list counter is set to one (1) each time the value for the
first sort field specified in the request changes.
For example, issue a report request that lists the date and percent of salary increases
associated with each job category in the data source. The increase date is stored in the field
DAT_INC and the percentage increase is stored in the field PCT_INC.
Sorting the Rows of a Report Down the Page
32

Issue the following request:
TABLE FILE EMPLOYEE
LIST DAT_INC PCT_INC
BY CURR_JOBCODE AS 'JOB,CATEGORY'
END
Run the request. The output is:
Note: By default, a sort field value displays only on the first row or column of the set of detail
rows or columns generated for that sort field value. If you want the sort field values to display
for every row, issue the SET BYDISPLAY = ON or ON TABLE SET BYDISPLAY ON command in
your request.
2. Sorting Records
Reporting Language Primer 33

Issue the following request:
TABLE FILE EMPLOYEE
LIST DAT_INC PCT_INC
BY CURR_JOBCODE AS 'JOB,CATEGORY'
ON TABLE SET BYDISPLAY ON
END
Run the request. The output is:
Sorting the Rows of a Report Down the Page
34

Sorting on Several Fields
You can show more detail by sorting on additional fields. You name each field with its own sort
phrase. A report can have up to 128 sort phrases.
For example, issue a report request that summarizes the gross salary payments for the
employees in each department. This data is stored in the fields GROSS, DEPARTMENT, and
EMP_ID.
Issue the following request:
TABLE FILE EMPLOYEE
SUM GROSS AS 'TOTAL,GROSS PAY'
BY DEPARTMENT
BY EMP_ID
END
Run the request. The output is:
When you name several fields as sort fields, the first sort field named in the request, in this
case, DEPARTMENT, appears on the left-hand side of the report. This field is called the highest
order or primary sort field. The next sort field named, in this example EMP_ID, appears to its
right and is called a low order or secondary sort field. Sort fields appear on the report from left
to right in the same order they are specified in the request. Note that the GROSS PAY values
include dollar sign ($) and comma (,) edit options.
2. Sorting Records
Reporting Language Primer 35

Sorting Information Across the Page
Just as you can sort data down the page, you can sort data across the page using the keyword
ACROSS.
When you use ACROSS, you produce a column for each unique value in the sort field. For
example, if you have a field named QUARTER that contains the values FIRST, SECOND, THIRD,
and FOURTH, then using ACROSS QUARTER produces four columns.
To count the number of employees in each department, issue the following request:
TABLE FILE EMPLOYEE
COUNT EMP_ID
ACROSS DEPARTMENT
END
Run the request. The output is:
Notice the column titles in this report. In Creating Basic Output Requests on page 7, you
learned that the field named by a verb command is used as a column title. This is not the case
for this report. You do not see a column title for the field EMP_ID anywhere. This happens
when you use ACROSS in a request that uses only one field after the verb. In this example, the
single field is EMP_ID.
As with BY, you can enter more than one ACROSS in a report request. You can include up to
128.
Also, when the verb in a report request names more than one field, each of the fields is
repeated for each value in the ACROSS phrase.
To sum the gross salary and deductions for each of the job categories in each department,
issue the following request:
TABLE FILE EMPLOYEE
SUM GROSS DED_AMT
ACROSS DEPARTMENT
ACROSS CURR_JOBCODE
END
Sorting Information Across the Page
36

Run the request. The output is:
This report produces several screens to display the report. Only the first screen is shown here.
If there are many values in the field you specify with ACROSS, or if you use several fields with
ACROSS, the report can become quite unwieldy.
Creating a Matrix Using BY With ACROSS
You can combine both BY and ACROSS to produce a matrix report. A matrix report displays
values in rows and columns. For example, issue the previous report request, but this time, sort
CURR_JOBCODE using BY instead of ACROSS, and change the column title that the field
CURR_JOBCODE produces.
Issue the following request:
TABLE FILE EMPLOYEE
SUM GROSS DED_AMT
ACROSS DEPARTMENT
BY CURR_JOBCODE AS 'JOB,CATEGORY'
END
Run the request. The output is:
The report is now much more compact. It is easier to compare the numbers for the same job
category in different departments.
2. Sorting Records
Reporting Language Primer 37

Notice that some positions in the report are marked with a period (.). The period is called the
NODATA character. It appears in a report when there is no data available in the field for that
position in the report. In this report, it means that no one with that job code works in the
particular department. For example, there are no employees with job code A15 working in the
MIS department.
The period (.) is the default NODATA character. You can change it to another character, or to a
set of characters such as 'NA'.
Changing the Order of the Sorting
By default, sorting is from the lowest to the highest value. You can reverse this order by adding
the keyword HIGHEST to the sort phrase.
Issue the following request:
TABLE FILE EMPLOYEE
SUM DED_AMT
BY HIGHEST DED_CODE
ACROSS DEPARTMENT
END
Run the request. The output is:
The DED_CODE field stores alphanumeric data which normally displays in a low-to-high order
(alphabetically, A to Z is low to high). This makes the first record CITY and the last record
STAT. By adding HIGHEST to the sort phrase, you reverse the order of sorting.
Ranking Sort Field Values
When you sort report rows using the BY phrase, you can indicate the numeric rank of each row.
Ranking sort field values is frequently combined with restricting sort field values by rank.
Changing the Order of the Sorting
38

Note that it is possible for several report rows to have the same rank if they have identical sort
field values.
The default column title for RANKED BY is RANK. You can change the title using an AS phrase.
The RANK field has format I7. Therefore, the RANK column in a report can be up to seven (7)
digits.
You can rank aggregated values using the syntax RANKED BY TOTAL.
The format of the RANKED command is:
RANKED [AS '
name
'] BY {HIGHEST|LOWEST|TOP|BOTTOM} [
n
]
sort_field
[AS '
text
']
TOP is a synonym for HIGHEST and BOTTOM is a synonym for LOWEST.
To display a list of employee names in salary order, indicating the rank of each employee by
salary, issue the following request. Note that employees Jones and McCoy have the same rank
since their current salary is the same.
TABLE FILE EMPLOYEE
PRINT LAST_NAME
BY DEPARTMENT
RANKED AS 'Sequence' BY CURR_SAL
END
Run the request. The output is:
2. Sorting Records
Reporting Language Primer 39

To rank sort field values while restricting sort field values by rank, issue the following request:
TABLE FILE EMPLOYEE
PRINT LAST_NAME
BY DEPARTMENT
RANKED BY HIGHEST 3 CURR_SAL
END
Run the request. The output is:
Notice that the rank resets based on the outer BY field, DEPARTMENT.
Limiting Sort Field Values
In a sort phrase, you can restrict the number of sort values displayed. With the PLUS OTHERS
phrase, you can aggregate all other values to a separate group and display this group as an
additional report row.
The format of the PLUS OTHERS phrase is as follows:
[RANKED] BY {HIGHEST|LOWEST}
n
sort_field
[AS '
text
']
[PLUS OTHERS AS '
othertext
']
To display the top two ED_HRS values and aggregate the values not included in a row labeled
Others, issue the following request:
TABLE FILE EMPLOYEE
PRINT CURR_SAL LAST_NAME
BY HIGHEST 2 ED_HRS
PLUS OTHERS AS 'Others'
END
Limiting Sort Field Values
40

Run the request. The output is:
Hiding a Field
You have an option to use, but not display, a field.
A common use for this is when you want to list or print records from a data source, and you
want them to appear in alphabetical order. You print the field and sort it by itself, but you hide
the sort field.
To hide a sort field, you add the keyword NOPRINT right after the field you are sorting. For
example, if you want to print the employee names in alphabetic order, and you print
FIRST_NAME and sort it by LAST_NAME, the field LAST_NAME appears as the first field on the
report and FIRST_NAME as the second. However, see what happens when you enter a request
using NOPRINT.
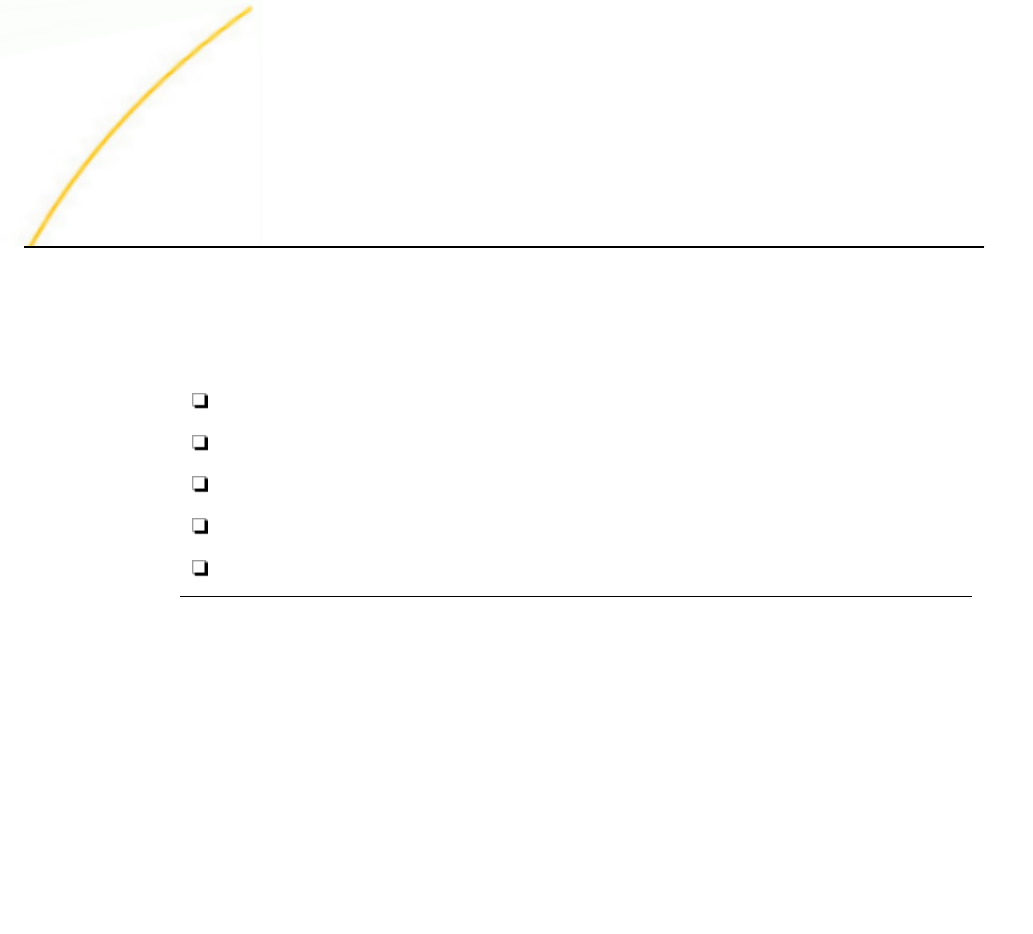
Issue the following request:
TABLE FILE EMPLOYEE
PRINT FIRST_NAME LAST_NAME
BY LAST_NAME NOPRINT
END
2. Sorting Records
Reporting Language Primer 41

Run the request. The output is:
This report prints the employee names organized alphabetically by last name, and the first
name appears before last name as you would expect to see it. If you omit NOPRINT, you
produce three columns in the report in this order: LAST_NAME, FIRST_NAME, LAST_NAME.
Clustering Numeric Data Into Groups
You can group the records in a report into ranges by adding the following phrase to a sort
phrase. The sort field must be numeric. The keyword TOP is optional.
IN-GROUPS-OF
value
[TOP
value
]
In an IN-GROUPS-OF phrase, the first value defines the ranges within which the records will be
grouped. The optional word TOP sets an upper limit within which all records with greater values
than that amount are grouped.
For example, suppose you want a count of the number of employees who have taken classes,
grouped for every twenty hours spent in the classroom. The number of hours of classroom time
is stored in the field ED_HRS.
Issue the following request:
TABLE FILE EMPLOYEE
COUNT EMP_ID
BY ED_HRS IN-GROUPS-OF 20
END
Clustering Numeric Data Into Groups
42
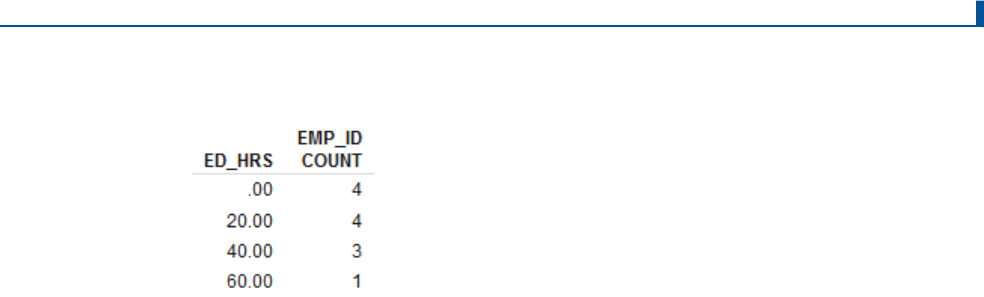
Run the request. The output is:
The report shows that four (4) employees have fewer than 20 hours of classroom time, while
one (1) has taken 60 hours or more.
2. Sorting Records
Reporting Language Primer 43

Clustering Numeric Data Into Groups
44
Chapter
3
Selecting Records
Now that you know how to retrieve and sort records, the next step in creating a report is
to selectively retrieve records. Selecting data (screening) enables you to retrieve a
subset of data in the data source.
In this chapter:
Describing Screening Conditions
Screening Numeric Data
Screening Alphanumeric Data
Screening Alphanumeric Content
Limiting Records Retrieved: RECORDLIMIT
Describing Screening Conditions
So far, you have written report requests that retrieve all records available in the EMPLOYEE
data source for the fields you specify. Using the WHERE keyword, you can limit the records
retrieved by specifying conditions a record must meet in order to be retrieved.
You use WHERE to begin a conditional statement. You create a condition by comparing a field
or calculation to a test value, another field, or a calculation you supply. You can include
several conditions in a single request.
You create a conditional statement using the following format:
WHERE
field
relational_operator
{
test_value
|
field
|
calculation
}[;]
In the above structure, if you supply a test value, it is the value to which each record is
compared. If you supply a field, it can be alphanumeric or numeric as long as the data type is
the same as the field name to the left of the relational operator. If you supply a calculation, it
can be a mathematical formula or alphanumeric manipulation.
The relational operator enables you to determine the type of comparison between the field and
any of the components to the right of the operator. When the value is retrieved from the data
source, it checks each value to see if it meets the condition you specified. Only values that
satisfy the condition or conditions are included in the report. To retrieve values that do not
satisfy conditions, use the NOT operator in front of the expression.
Reporting Language Primer 45

When you include WHERE in your request to describe screening conditions, remember the
following rules:
Make sure the field or fields you are screening and the test values or fields to which you
are comparing them to are the same data type. That is, they must both be either numeric
or alphanumeric.
Enclose all literal test values that are alphanumeric in single quotation marks ('). The literal
test value is the string of characters searched for in each record.
Note: You can include screening conditions in a procedure, Master File, or filter file.
Relational Operators
The following table includes a partial list of relational operators and the types of comparisons
they perform.
Relational Operator
Type of Comparison
GT Greater than.
LT Less than.
EQ Equals.
NE Not equal.
GE Greater than or equal to.
LE Less than or equal to.
LIKE Selects values containing test character strings.
For instance, if you want to retrieve records that are greater than the specified test value, field,
or calculation, you use the GT (greater than) operator. If you want to retrieve only records that
are less than the specified component, you use the LT (less than) operator.
Logical Operators
Another type of operator you use in conditional statements is the logical operator. There are
two logical operators, AND and OR. You use these logical operators to connect more than one
condition. If you want each and every condition satisfied before a record is retrieved, you
connect them using AND. If you want at least one of the conditions to be met for a record to be
retrieved, you connect the conditions using OR.
Describing Screening Conditions
46

Screening Numeric Data
Fields can have either alphanumeric or numeric formats. Using the relational operators, along
with WHERE, you can screen data of both types in the same request.
Start with a request that has no screening conditions. To display each employee salary in the
EMPLOYEE data source, issue the following request:
TABLE FILE EMPLOYEE
PRINT CURR_SAL
BY LAST_NAME BY FIRST_NAME
END
Run the request. The output is:
The salary for every employee is retrieved.
Suppose now that you want to see only employees whose salaries fall within a range. To
retrieve employees whose salaries satisfy this condition, add a WHERE condition to the
previous request.
Issue the following request:
TABLE FILE EMPLOYEE
PRINT CURR_SAL
BY LAST_NAME BY FIRST_NAME
WHERE CURR_SAL GT 11000 AND CURR_SAL LT 20000;
END
3. Selecting Records
Reporting Language Primer 47

Notice that you left out the dollar signs ($) and commas (,) in each salary figure in the request.
These are format edit options, which are not stored in the data source. Therefore, do not
include either in your requests.
Run the request. The output is:
This time four (4) records are retrieved, each of which meets the screening conditions you
included in the request. Notice that Alfred Stevens does not appear in this report since his
current salary is $11,000.
Now, suppose you want to display employees earning less than a minimum or more than a
maximum amount. In our last example, you saw how the AND relationship worked. In this next
example, you explicitly change the AND relationship using the OR logical operator. As a result,
any record that satisfies one OR another of the conditions is retrieved.
Issue the following request:
TABLE FILE EMPLOYEE
PRINT CURR_SAL
BY LAST_NAME BY FIRST_NAME
WHERE CURR_SAL LT 11000 OR CURR_SAL GT 20000;
END
Run the request. The output is:
Screening Numeric Data
48

Notice that there are some salaries in this report that meet the first condition (LT 11000) and
others that meet the second condition (GT 20000). If you used the AND logical operator, your
report would contain no data because no salary record could be less than $11,000 and
greater than $20,000 at the same time.
You do not always use a field as a basis of comparison. Rather, you can use a calculation
using WHERE. For instance, a company is giving employees a 10 percent increase. You want to
find out which employees, even after the increase, are still making less than $10,000 a year.
The field you use is CURR_SAL. The calculation is CURR_SAL increased by 10 percent
(CURR_SAL * 1.1). The parentheses are optional, but are used for clarity.
Issue the following request:
TABLE FILE EMPLOYEE
PRINT LAST_NAME FIRST_NAME HIRE_DATE CURR_SAL
WHERE (CURR_SAL * 1.1) LT 10000;
END
Run the request. The output is:
You see from this report that only Mary Greenspan is earning less than $10,000.
Defining Ranges
You have actually already included a range in a report request by creating the report that
displayed four (4) records for salaries greater than $11,000 and less than $20,000. A range
sets a lower and upper limit. Here is another way to specify a range. Notice that using a range
is another way to specify the AND relationship.
Issue the following request:
TABLE FILE EMPLOYEE
PRINT CURR_SAL
BY LAST_NAME
WHERE CURR_SAL FROM 11000 TO 20000;
END
3. Selecting Records
Reporting Language Primer 49

Run the request. The output is:
There is a subtle difference between using FROM ... TO to specify a range and using GT and
LT. To see the difference, compare this report to the earlier one that displays salaries greater
than $11,000 and less than $20,000.
This report displays an employee named Stevens who earns $11,000. In the previous report,
Stevens is omitted. This is because the GT and LT operators exclude the test values, while the
FROM ... TO operator includes them.
Remember, the test values are those values to which each record is compared.
In this scenario, to exclude the test values of 11000 and 20000 from your report, issue the
following request:
TABLE FILE EMPLOYEE
PRINT CURR_SAL
BY LAST_NAME
WHERE CURR_SAL FROM 11000.01 TO 19999.99;
END
Run the request. The output is:
Screening Numeric Data
50

Combining Ranges and WHERE Conditions
You can combine range limitations with other WHERE conditions. Suppose you are interested
in retrieving information about employees with a certain salary level and a certain number of
training hours. To retrieve this information, issue the following request:
TABLE FILE EMPLOYEE
PRINT FIRST_NAME LAST_NAME CURR_SAL ED_HRS
BY LAST_NAME NOPRINT
WHERE CURR_SAL GT 15000 AND ED_HRS FROM 10 TO 50;
END
Run the request. The output is:
Here is another example using WHERE to combine more than one condition to narrow down
records. In many companies, employees must be with the company for a specified length of
time, or attain a certain title to qualify for additional vacation time. In the following example,
you retrieve employees who satisfy at least one of these two requirements, that they started
work before 1981, or that their job code (A15, A16, or A17) indicates a managerial position.
Issue the following request:
TABLE FILE EMPLOYEE
PRINT LAST_NAME FIRST_NAME HIRE_DATE CURR_JOBCODE
WHERE HIRE_DATE LT '810101' OR CURR_JOBCODE EQ 'A15' OR 'A16' OR 'A17';
END
Run the request. The output is:
3. Selecting Records
Reporting Language Primer 51

Screening Aggregated Values
So far you have used WHERE to screen individual values. Before any value is retrieved, it is
evaluated to make sure it satisfies the condition or conditions in the WHERE statement. But,
you may recall from Creating Basic Output Requests on page 7, that the SUM and COUNT verb
commands produce summary information rather than individual values. This process is called
aggregation and requires use of the WHERE TOTAL condition.
The WHERE TOTAL condition screens aggregated values produced by SUM or COUNT. Instead
of evaluating data before it is retrieved, WHERE TOTAL works on data after it has been
retrieved and processed. Whenever you want to screen the results of an aggregation, you must
use WHERE TOTAL.
To determine which job codes exceed a minimum training requirement of 35 hours, issue the
following request:
TABLE FILE EMPLOYEE
SUM ED_HRS BY CURR_JOBCODE
WHERE TOTAL ED_HRS GT 35;
END
Run the request. The output is:
Screening Alphanumeric Data
In the previous sections, you selected fields with numeric data. Here, you screen fields that
contain alphanumeric data. An alphanumeric field can contain characters, numbers not used in
calculations, or a combination of the two.
In this section, you use some relational operators that you used with numeric data, as well as
three (3) relational operators used only with alphanumeric data: CONTAINS, OMITS, and LIKE.
Screening Alphanumeric Data
52

As you know, every employee has certain deductions taken from each paycheck. To display the
total deductions for each type, sorted by the deduction code, issue the following request:
TABLE FILE EMPLOYEE
SUM DED_AMT
BY DED_CODE AS 'DEDUCTION,TYPE'
END
Run the request. The output is:
All records from the file are retrieved.
Now, suppose you want to see the total amount withheld for Federal, State, and City taxes.
Issue the following request:
TABLE FILE EMPLOYEE
SUM DED_AMT
BY DED_CODE AS 'DEDUCTION,TYPE'
WHERE DED_CODE EQ 'FED' OR 'STAT' OR 'CITY';
END
Run the request. The output is:
You have seen that you can screen aggregated values. In this example, you also see that you
can screen sort fields (DED_CODE).
Notice that there are now only three (3) deduction types in your report, and that the summed
amounts for each of them are the same as those produced in the first report. The screening
condition caused only Federal, State, and City deductions to be retrieved.
3. Selecting Records
Reporting Language Primer 53

You can tailor a request to retrieve different types of information about employees. In the
following request, you find out which employees have changed job titles within the company.
You do this by comparing their current job code to another field called JOBCODE.
Issue the following request:
TABLE FILE EMPLOYEE
PRINT LAST_NAME FIRST_NAME CURR_JOBCODE JOBCODE
BY DAT_INC
WHERE CURR_JOBCODE NE JOBCODE;
END
Run the request. The output is:
Screening Alphanumeric Content
There are three (3) relational operators designed to screen only alphanumeric data. These are
CONTAINS, OMITS, and LIKE (NOT LIKE is the opposite of LIKE).
CONTAINS is useful when an alphanumeric field may have the same string of characters
appearing in differing places in multiple records. For example, suppose you are interested in
seeing which employees live on Lombardo Avenue.
Issue the following request:
TABLE FILE EMPLOYEE
PRINT ADDRESS_LN1
BY FIRST_NAME BY LAST_NAME
WHERE ADDRESS_LN1 CONTAINS 'LOMBARDO';
END
Run the request. The output is:
Screening Alphanumeric Content
54

The literal LOMBARDO is the string of characters searched for in each record. This example
retrieves all the records in which that string appears, regardless of where in the ADDRESS_LN1
field the value appears.
Of course, this example would also retrieve records, if there were any, for employees who live
on Lombardo Street, or Lombardo Boulevard. To limit the records to those living on Lombardo
Avenue, you would use the following request. Since we know there is only one record
containing "Lombardo", do not issue this request:
TABLE FILE EMPLOYEE
PRINT ADDRESS_LN1
BY FIRST_NAME BY LAST_NAME
WHERE ADDRESS_LN1 CONTAINS 'LOMBARDO' AND ADDRESS_LN1 CONTAINS 'AVE';
END
By using two conditions connected by AND, you avoid problems related to the positions of the
words "Lombardo" and "Avenue" relative to each other (for instance, "LombardoAve" or
"Lombardo Avenue"), and problems related to abbreviations of the word "Avenue".
OMITS is the opposite of CONTAINS. You exclude records that contain the character string you
specify. In this next request, the field TYPE, which defines the type of addresses available for
employees, is used to exclude employee bank addresses.
Issue the following request:
TABLE FILE EMPLOYEE
PRINT ADDRESS_LN1 BY FIRST_NAME BY LAST_NAME BY TYPE
WHERE TYPE OMITS 'BANK';
END
Run the request. The output is:
3. Selecting Records
Reporting Language Primer 55

Screening Masked Fields: LIKE
Another type of screening that uses only alphanumeric data is the type that uses a mask to
identify data. A mask is an alphanumeric pattern you supply that is used to compare to
characters in a data field value. The relational operator you use to screen a masked field is
LIKE.
The format of a screening condition using LIKE is:
WHERE
field
LIKE '
mask
';
The field in the above structure is the field in which the mask appears. The mask is an
alphanumeric string of characters enclosed in single quotation marks ('). To retrieve records
that do not contain the specified mask, use NOT LIKE. When you use a mask, you use two
masking characters:
The percent sign (%) to indicate any number of characters, which may be zero (0).
The underscore (_) to indicate a single character in a specific position.
Here is a simple example of how you might use the percent sign (%) in a mask. Assume you
want to retrieve every employee whose last name begins with a certain letter, B for instance.
Although each last name may be different, you can still retrieve each one because the percent
sign (%) matches any arbitrary sequence of characters that occurs starting in the position you
place it.
Issue the following request:
TABLE FILE EMPLOYEE
PRINT LAST_NAME
WHERE LAST_NAME LIKE 'B%';
END
Run the request. The output is:
You use the underscore (_) to specify a position in the record and to indicate that any
character in that position is acceptable. As a contrast, when you use CONTAINS, you specify a
string that can occur anywhere in a record.
Screening Alphanumeric Content
56

The following example shows how you can retrieve all employees who are managers. Each
employee is assigned a three-character job code. The second character in this code indicates
whether or not a job is on the management level. If the second character is a 1, it is,
otherwise, it is not. In this following example, you use the underscore (_) to retrieve only job
codes whose second character is 1, with any character in the first and third position.
Issue the following request:
TABLE FILE EMPLOYEE
PRINT JOBCODE
BY LAST_NAME BY FIRST_NAME
WHERE JOBCODE LIKE '_1_';
END
Run the request. The output is:
Only employees whose job codes match the mask you provided are retrieved.
Limiting Records Retrieved: RECORDLIMIT
If you are working with a large data source and want to test report requests to see if they work,
use RECORDLIMIT. Instead of processing hundreds or thousands of records to test your
design, you could see results just as effectively by processing and displaying a few.
RECORDLIMIT retrieves the number of records that meet test conditions specified in a request.
For instance, if five (5) employees live in New Jersey and you want to retrieve only those
records, you would use a RECORDLIMIT of five (5). As soon as the fifth record is retrieved, the
searching of the data source stops.
To see how RECORDLIMIT works, first issue the following request without using RECORDLIMIT:
TABLE FILE EMPLOYEE
PRINT LAST_NAME FIRST_NAME EMP_ID
END
Notice that the statistics display the following:
NUMBER OF RECORDS IN TABLE= 12 LINES= 12
3. Selecting Records
Reporting Language Primer 57
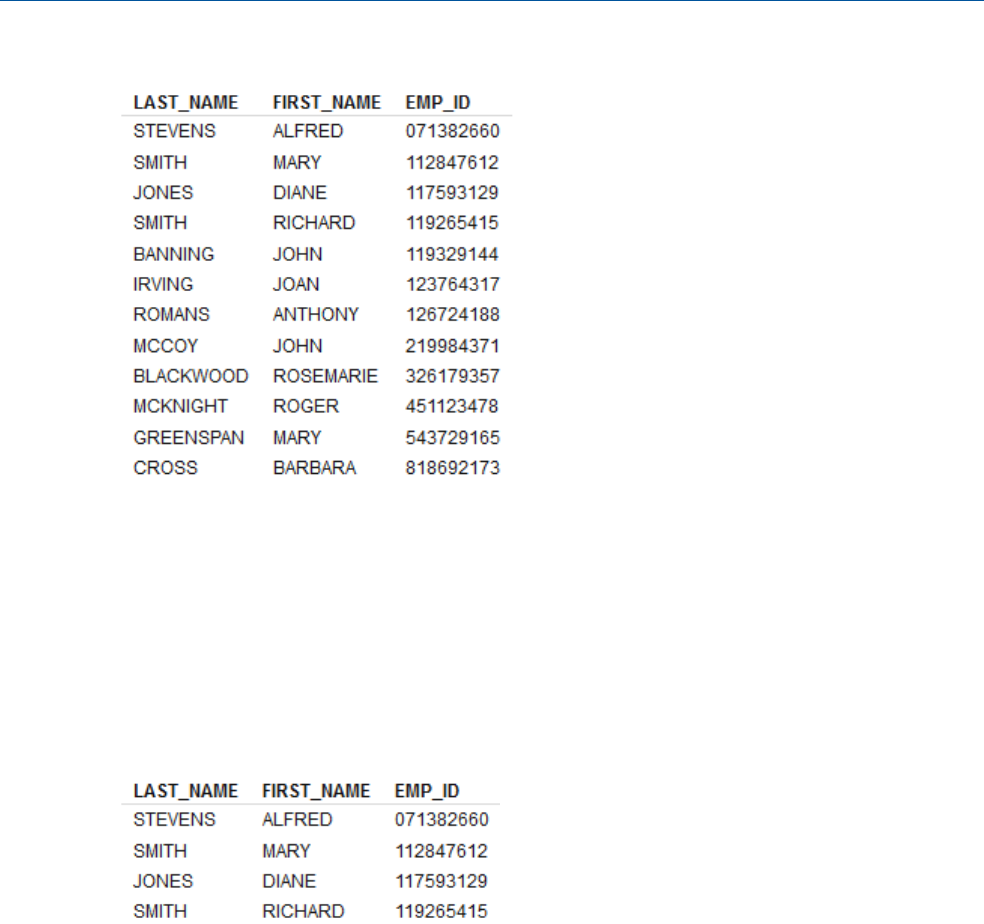
Run the request. The output is:
To limit the records to four (4), issue the following request:
TABLE FILE EMPLOYEE
PRINT LAST_NAME FIRST_NAME EMP_ID
WHERE RECORDLIMIT EQ 4;
END
The statistics reflect the number specified in the RECORDLIMIT command:
NUMBER OF RECORDS IN TABLE= 4 LINES= 4
Run the request. The output is:
You can see the difference in the statistics. The structure of your report does not change so
you can evaluate it as effectively and save time using fewer records.
Limiting Records Retrieved: RECORDLIMIT
58

Chapter
4
Using Temporary Fields
Sometimes the information you want to use is not stored in the data source, but you can
calculate it from data that is. For example, you might want to use employee salaries and
deductions to calculate their net take-home pay. If you can compute the data you want,
then you can create a temporary field to calculate and display it.
There are two ways to create a temporary field. You can define it in the report request
using the COMPUTE command (calculated value), or you can declare it before you write
the report request using a DEFINE command (virtual field).
The main difference between fields created with COMPUTE and fields created with
DEFINE is that DEFINE creates the fields before you start the report request and
COMPUTE creates the fields after records have been retrieved. Once the DEFINE
command has been executed, the temporary fields look just like real fields from the data
source. You can use them to sort the report, select records, or use them in other
temporary field definitions.
In this chapter:
Creating a Temporary Field Using the COMPUTE Command
Combining Two Alphanumeric Fields Into a New Field
Using Temporary Fields With DEFINE
Extracting Part of the Text From an Alphanumeric Field
Decoding the Characters in an Alphanumeric Field
Creating a Temporary Field Using the COMPUTE Command
The simplest way to calculate a temporary field is to define it in a report request using the
COMPUTE command. The temporary fields you create using the COMPUTE command are not
real fields in the data source. They only exist for the request in which you create them.
The basic format of a COMPUTE command is:
COMPUTE
field
/
format
=
expression
;
Reporting Language Primer 59

In this structure, field represents the name you give the temporary field you are creating. You
define the field format with a slash (/) and the desired format, which describes the type and
length of data in a field. By default, the numeric format D12.2 is assigned to temporary fields,
but it is good coding practice to always provide a format. On the right side of the equation,
expression is a formula you specify that indicates how to calculate values for the new field.
When you write a COMPUTE command, keep the following rules in mind:
The COMPUTE command cannot start a report request. It must follow a verb command.
Any fields that are used, but not referenced prior to the COMPUTE, are treated as NOPRINT
verb objects.
To illustrate how you create a new field from existing data, calculate the difference between
gross pay and the amount taken out in deductions for each employee and store it in a new
field called DIFF.
The data you use is stored in the fields GROSS and DED_AMT. The formula for calculating the
new field value is simply:
DIFF = GROSS - DED_AMT;
Issue the following request:
TABLE FILE EMPLOYEE
SUM GROSS AND DED_AMT AS 'DEDUCTIONS'
COMPUTE DIFF/D12.2=GROSS - DED_AMT; AS 'NET,INCOME'
BY EMP_ID
END
Creating a Temporary Field Using the COMPUTE Command
60

Run the request. The output is:
You have just used a simple expression to create a new field in a report. You can write many
kinds of expressions, depending on the kind of temporary field you want to create.
Combining Two Alphanumeric Fields Into a New Field
In the previous section, you created a new numeric field by performing a simple calculation on
two numeric fields in the data source. You can also create new alphanumeric fields.
For example, you can combine the data in two or more alphanumeric fields into a new field.
This is called concatenation. There are two forms of concatenation, weak and strong. You use
weak concatenation when you want to include trailing blanks in the field value to which you are
concatenating. Trailing blanks occur when a field value is shorter than the field length. The
blanks occur at the end of the value, trailing behind it. When you want to eliminate blanks at
the end of the value, you use strong concatenation.
You use a solid bar (|) or a broken vertical bar (¦) to indicate concatenation. A single bar means
weak concatenation, where the entire field value, including blanks, is used. A double bar (| |)
means strong concatenation, where blanks at the end of the first data value are discarded. It
is good coding practice to include a space before and after the concatenation bar.
4. Using Temporary Fields
Reporting Language Primer 61

To show how this works, first combine the fields FIRST_NAME and LAST_NAME into one field
called FULL_NAME, using weak concatenation. You use a format of A30 to account for the
alphanumeric nature of the data (first names and last names) and to allow enough space in
the field to fit the two names. The browser automatically removes extra blank spaces, so you
must add the SET SHOWBLANKS = ON command to the request to retain the blanks. Also,
since the default font is proportional, the spaces and characters are not all the same size. If
you want to see the characters all aligned, you need to use a monospaced font, such as
Courier.
Issue the following request:
SET SHOWBLANKS=ON
TABLE FILE EMPLOYEE
PRINT CURR_JOBCODE AND
COMPUTE FULL_NAME/A30= FIRST_NAME | LAST_NAME;
END
Run the request. The output is:
The names retrieved from the FIRST_NAME and LAST_NAME fields have been combined into
the field FULL_NAME. Notice two things about the temporary field definition:
1. The characters /A30 declare that FULL_NAME is an alphanumeric field 30 characters long.
Remember that the default is a numeric format for temporary fields. Because the fields
used in this expression are alphanumeric, FULL_NAME must also be defined as an
alphanumeric field. A length of 30 characters provides room for the combined values from
both FIRST_NAME and LAST_NAME.
2. FIRST_NAME is 10 characters long. For names that are shorter than this, blank spaces fill
the rest of the field. Using the single vertical bar (|) keeps these spaces in FULL_NAME.
Combining Two Alphanumeric Fields Into a New Field
62

If you want only one blank space between the first names and last names, you cannot use the
double vertical bar (| |) because strong concatenation discards all trailing blanks. The two (2)
names will simply be stuck together. Instead, you first append a blank to the start of
LAST_NAME using weak concatenation. Then you concatenate the result to FIRST_NAME, using
strong concatenation to discard the trailing blanks from the end of that field. Use parentheses
( ) around the blank space and LAST_NAME to perform this concatenation first, then
concatenate FULL_NAME to the result.
Issue the following request:
TABLE FILE EMPLOYEE
PRINT CURR_JOBCODE
COMPUTE FULL_NAME/A30=FIRST_NAME || (' '| LAST_NAME);
END
Run the request. The output is:
The field FULL_NAME now appears as you want it to, with one blank space between the
names. The parentheses around the blank space and LAST_NAME perform this concatenation
first, then concatenate FULL_NAME to the result.
In this example, the field FULL_NAME appears to the right of the field CURR_JOBCODE,
because you can only write the COMPUTE command after you have specified the verbs and
field names for the request. Since you used COMPUTE, you cannot put FULL_NAME before the
PRINT command or use it to sort the report.
4. Using Temporary Fields
Reporting Language Primer 63

Using Temporary Fields With DEFINE
If you want to use a temporary field in a report request for a session, as if it were a real field in
the data source, you create it using the DEFINE command before writing the report request.
The basic format of a DEFINE command is:
DEFINE FILE
filename
field
/
format
=
expression
;
.
.
.
END
Filename represents the name of the data source you are using. Field is the name you give the
temporary field you are creating. You define the field format with a slash (/) and the desired
format. On the right side of the equation, expression represents a formula you specify that
indicates how to calculate values for the new field. You complete the DEFINE command with
the command END. A DEFINE command alone does not produce any display on your screen.
To illustrate the difference between creating temporary fields using DEFINE and COMPUTE, you
now create FULL_NAME using DEFINE.
Issue the following DEFINE command:
DEFINE FILE EMPLOYEE
FULL_NAME/A30=FIRST_NAME || (' '| LAST_NAME);
END
Now, issue the following request:
TABLE FILE EMPLOYEE
PRINT CURR_JOBCODE
BY FULL_NAME
END
Using Temporary Fields With DEFINE
64

Run the request. The output is:
Unlike a temporary field created by a COMPUTE command, you can sort the field FULL_NAME
and it continues to exist after the report is finished.
Note that the report output is sorted by FULL_NAME, which has the first name concatenated to
the last name.
If you want to sort by last name and then first name, but not show those values, you can use
NOPRINT to suppress their display.
Issue the following request:
DEFINE FILE EMPLOYEE
FULL_NAME/A30=FIRST_NAME || (' '| LAST_NAME);
END
TABLE FILE EMPLOYEE
PRINT FULL_NAME CURR_JOBCODE
BY LAST_NAME NOPRINT
BY FIRST_NAME NOPRINT
END
4. Using Temporary Fields
Reporting Language Primer 65

Run the request. The output is:
Adding More Temporary Fields
When you issue a new DEFINE, it erases existing temporary fields, unless you start the DEFINE
command as follows:
DEFINE FILE
filename
ADD
ADD prevents existing temporary fields from being erased and lets you add new ones. Right
now, FULL_NAME is the only temporary field that exists. In the next example, you will add
another.
Extracting Part of the Text From an Alphanumeric Field
When data is in an alphanumeric field, you can extract some of the characters from the data or
change the way the characters are presented. For example, you might want to pick out the first
character of the job code and use it as the job category.
You can use the EDIT function to do this. Using EDIT, you can:
Change the way an alphanumeric field displays.
Extract part of a field.
Change an alphanumeric field to an integer field or an integer field to an alphanumeric field.
To change an alphanumeric field to an integer field, the basic format is:
field_alpha
/A
n
=EDIT(
field_numeric
);
Extracting Part of the Text From an Alphanumeric Field
66

To use the EDIT function to extract characters, the basic format is:
field
/A
n
= EDIT(
fieldname
,'mask');
Field is the name you give the temporary field. You must use A to declare that the temporary
field is alphanumeric. The n represents an integer you supply that defines the field length.
Fieldname is the name of the field in the data source, and mask represents a series of
characters you supply that act as a filter for the data found in the field. Enclose your masks
within single quotation marks (').
The mask works like this:
If a character in the mask is a "9", then the character in the same position in a data value
is passed to the new field.
If a character in the mask is a "$", then the character in the same position in a data value
is discarded.
Any other character is simply inserted in the field and the other characters are moved over
one position to the right.
For example, CURR_JOBCODE contains a three-character job code consisting of a letter and
two numbers. In the next example, you use EDIT to discard the letter and extract the two
numbers. You use them in a field called JOB_LEVEL.
Issue the following DEFINE command:
DEFINE FILE EMPLOYEE ADD
JOB_LEVEL/A2=EDIT(CURR_JOBCODE, '$99');
END
Although you see nothing on your screen when you execute this or any DEFINE command, this
is what it does once you execute a report request.
The $ in the first position in the mask discards the letter from each data value retrieved from
CURR_JOBCODE. The nines (9) in the next two positions pass the two numbers retrieved from
each value in CURR_JOBCODE to the temporary field JOB_LEVEL.
Now, issue the following request:
TABLE FILE EMPLOYEE
SUM CURR_SAL BY JOB_LEVEL
END
4. Using Temporary Fields
Reporting Language Primer 67

Run the request. The output is:
This example illustrates the basics of the EDIT function.
Decoding the Characters in an Alphanumeric Field
You can also decode or translate characters stored in a field. For example, job codes could be
decoded into job titles.
You can use the DECODE command to do this. DECODE enables you to replace values
retrieved from a field with its decoded value.
The basic format of the DECODE command is:
field
/
format
= DECODE
fieldname
(
value result value result
...
ELSE
default
);
In this structure, field is the name you give the temporary field. You supply the format, which
must match the format of the results. For instance, if you supply an alphanumeric format for
the field, the results of the DECODE must also be alphanumeric. Likewise, if you supply a
numeric format, the results must be numeric also.
The fieldname is the name of the field in the data source you want to translate, and value is a
data value found in the data source that you specify. The result represents the value you want
written to the temporary field when its matching value is found in the data source. The result
does not have to be unique. Several values retrieved from the data source can all be
translated into the same result.
The keyword ELSE is optional and goes into effect if no values in the data source match the
values you list. It is good coding practice to always include an ELSE value. default represents a
value you specify to be written to the temporary field. If you do not supply a default value, the
previous value is maintained.
Decoding the Characters in an Alphanumeric Field
68

In the next example, you use DECODE to translate deduction codes into one of three (3)
categories: BENEFITS, SAVINGS, or TAXES. The deduction codes are found in the field
DED_CODE. You use a temporary field named D_TYPE for the translated values.
Issue the following DEFINE command:
DEFINE FILE EMPLOYEE ADD
D_TYPE/A10=DECODE DED_CODE (HLTH BENEFITS LIFE BENEFITS
SAVE SAVINGS ELSE TAXES);
END
DED_CODE contains seven (7) possible values: FICA, FED, STAT, CITY, HLTH, LIFE, and SAVE.
If the value retrieved from DED_CODE is either HLTH or LIFE, D_TYPE will contain the value
BENEFITS. If the value is SAVE, D_TYPE will contain the value SAVINGS. Since the remaining
values can only be one of the tax deductions, the default for D_TYPE is TAXES.
Notice also that the expression for D_TYPE spans two lines. The expression can be written on
more than one line. A semicolon (;) ends the expression.
Issue the following request:
TABLE FILE EMPLOYEE
SUM DED_AMT AS 'TOTAL,DEDUCTIONS'
BY D_TYPE AS 'DEDUCTION,TYPE'
END
Run the request. The output is:
4. Using Temporary Fields
Reporting Language Primer 69

Decoding the Characters in an Alphanumeric Field
70

Chapter
5
Creating Subtotals and Grand Totals
In the previous chapters, you learned how to control the detailed information on a report
by sorting and selecting records and by calculating new values that do not exist in the
data source from records in the data source. To help you and others interpret the
detailed information on a report, you can summarize the numeric information using
subtotals and grand totals. You can also display totals on a conditional basis using
WHEN.
As a reminder, some of the reports you generate in the Primer extend over several
pages. To focus your attention on the salient points in each exercise, a subset of the
sample output is shown. In addition, the border line for subtotals and grandtotals were
removed from the Warm StyleSheet.
In this chapter:
Creating Column and Row Totals
Adding Section Totals and Grand Totals to Reports
Suppressing Grand Totals: NOTOTAL
Displaying Subtotals Conditionally: WHEN
Calculating Values Based on Subtotals: RECAP
Creating Column and Row Totals
The exercises in this topic demonstrate how to add column totals and row totals to your
reports, using the following commands:
COLUMN-TOTAL
ROW-TOTAL
You can add these commands either to the verb phrase in a report request or to the ON TABLE
phrase, as shown in the some of the following examples. You also can use the optional
keyword AND to connect more than one command in a single request. The AND is included in
some examples for clarity and omitted in others for brevity.
Reporting Language Primer 71

Creating a Column Total
Perhaps the simplest kind of total is one that adds the numeric values in a column. You can
create totals for all columns that contain numeric data or only for particular columns.
To total the current salaries of all employees, issue the following request:
TABLE FILE EMPLOYEE
PRINT CURR_SAL AND COLUMN-TOTAL
BY LAST_NAME
END
Run the request. The output is:
This report contains one column of numeric data. However, if it had contained another numeric
field, for example, gross pay for each employee, that column would be totaled also. By default,
COLUMN-TOTAL calculates values for all columns of numeric data.
Suppose that your next report has more than one column of numeric data, but that only one
contains data that you want to summarize. To provide you with maximum control over the data
you present, you can restrict totaling to that one column simply by naming the field you wish to
total in the ON TABLE phrase.
Creating Column and Row Totals
72

Issue the following request:
TABLE FILE EMPLOYEE
PRINT DAT_INC AS 'DATE OF,INCREASE'
PCT_INC AS '%,INCREASE SALARY'
SALARY
BY LAST_NAME
ON TABLE COLUMN-TOTAL SALARY
END
Notice that this request identifies two columns of numeric data, PCT_INC and SALARY, yet it
only asks to total employee salaries, since adding their percentages of increase would not
provide meaningful information.
Run the request. The output is:
As requested, the report displays a single column total at the bottom of the SALARY column.
5. Creating Subtotals and Grand Totals
Reporting Language Primer 73
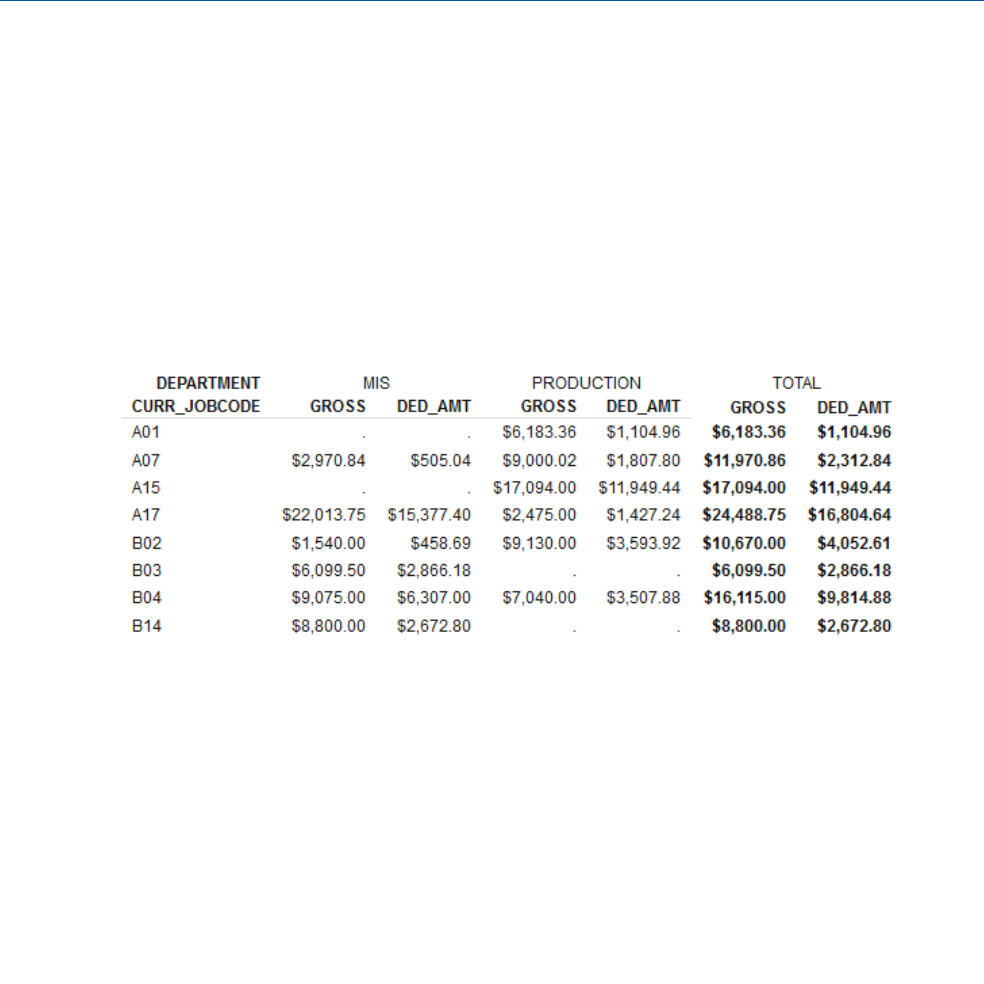
Creating a Row Total
Similarly, you can create row totals by including the command ROW-TOTAL in your report
request.
To create a report with totals at the end of each row, issue the following request:
TABLE FILE EMPLOYEE
SUM GROSS DED_AMT
ACROSS DEPARTMENT
BY CURR_JOBCODE
ON TABLE ROW-TOTAL
END
Run the request. The output is:
Notice that if you use more than one (1) verb object, the output displays a row total for each of
the fields, in this case, GROSS and DED_AMT.
Creating Column and Row Totals
You can add column totals and row totals to a report by including both commands in your
request. To subtotal gross salary for each department, as well as for each job code, issue the
previous request as follows:
TABLE FILE EMPLOYEE
SUM GROSS
ACROSS DEPARTMENT
BY CURR_JOBCODE
ON TABLE ROW-TOTAL AND COLUMN-TOTAL
END
Creating Column and Row Totals
74

Run the request. The output is:
Once again, you could produce the same results by including the totaling commands in the
verb phrase and omitting the ON TABLE phrase, as follows:
SUM GROSS AND ROW-TOTAL AND COLUMN-TOTAL
Adding Section Totals and Grand Totals to Reports
Frequently, reports contain detailed information that is broken down into subsections for which
simple column and row totals do not provide adequate summaries. In these instances, it is
more useful to look at subtotals for particular sections and a grand total at the end of the
report.
You can add the following commands to your report requests to create section subtotals and
grand totals:
SUBTOTAL
SUB-TOTAL
RECOMPUTE
SUMMARIZE
5. Creating Subtotals and Grand Totals
Reporting Language Primer 75

Use SUBTOTAL or SUB-TOTAL when you only need to add up columns of numbers each time
the named sort field changes values. SUBTOTAL shows column totals each time the named
sort field changes values. SUB-TOTAL shows column totals each time the named sort field
and any higher level sort fields change values.
Use RECOMPUTE or SUMMARIZE when you need to add up columns of numbers and
recalculate temporary fields, such as ratios, using subtotals. RECOMPUTE shows column
totals each time the named sort field changes values. SUMMARIZE shows column totals
each time the named sort field and any higher level sort fields change values.
By completing the exercises in this section, you learn when and how to use each of these
commands. Following that, we provide a reference chart that summarizes the function or
functions of each subtotaling command.
Producing Section Totals for a Specified Sort Field: SUBTOTAL
The SUBTOTAL command enables you to produce a subtotal each time the sort field you
specify in a request changes. For example, if you sort by LAST_NAME, you will see a subtotal
following the data for each employee.
To produce section totals and a grand total for a specified sort field, issue the following
request:
TABLE FILE EMPLOYEE
SUM GROSS
BY DEPARTMENT BY LAST_NAME BY PAY_DATE
ON LAST_NAME SUBTOTAL AS 'TOTAL GROSS PAY:'
END
Adding Section Totals and Grand Totals to Reports
76

Run the request. The output is:
5. Creating Subtotals and Grand Totals
Reporting Language Primer 77

Notice that the request contains three sort fields, but the report only subtotals on the sort field
you specifically request. That is, it displays a section total for each named employee and a
grand total at the end of the report. The AS phrase in the request makes the subtotal line
more readable by changing the default subtotal heading: *TOTAL. Therefore, instead of seeing
*TOTAL BLACKWOOD
on the report, you see the more descriptive phrase:
TOTAL GROSS PAY: BLACKWOOD
Suppressing a Single-Line Summary: MULTILINES
If an employee, for example BANNING, has only one pay date, the subtotal line duplicates the
single-line total. To avoid such redundancy, you may suppress this subtotal line on your report
using the MULTILINES command.
Issue the previous request with the following variation:
TABLE FILE EMPLOYEE
SUM GROSS
BY DEPARTMENT BY LAST_NAME BY PAY_DATE
IF LAST_NAME EQ BANNING OR BLACKWOOD OR IRVING
ON LAST_NAME SUBTOTAL MULTILINES AS ' TOTAL GROSS PAY: '
END
This command indicates to subtotal only when the specified sort field has multiple records.
Adding Section Totals and Grand Totals to Reports
78

Run the request. The output is:
Notice that a single line for BANNING displays, in addition to displaying subtotals for IRVING
and all other employees with multiple lines of data.
You can use the MULTILINES command with all of the subtotaling commands in this section.
Producing Section Totals for a Specified Sort Field: RECOMPUTE
In this exercise, you again produce section subtotals for a specified sort field, but this time the
report request contains a COMPUTE command. In order to demonstrate the effect of
RECOMPUTE, you first type the request incorrectly, using the SUBTOTAL command. After
examining the results, you change the command to RECOMPUTE and rerun the report.
5. Creating Subtotals and Grand Totals
Reporting Language Primer 79

Issue the following request:
TABLE FILE EMPLOYEE
SUM GROSS DED_AMT AS 'DEDUCTIONS'
AND COMPUTE DED_PCT=(DED_AMT/GROSS)*100;
BY DEPARTMENT BY CURR_JOBCODE
ON DEPARTMENT SUBTOTAL
END
Run the request. The output is:
Notice that gross pay and deductions are properly totaled. However, the numbers in the
DED_PCT column are added, producing results that you might not expect to see. This happens
because the SUBTOTAL command adds up numeric values, which is fine for data like salaries
and gross pay. However, computed values, such as ratios, cannot be added together to
produce meaningful results. Such values need to be recalculated, not just added.
Adding Section Totals and Grand Totals to Reports
80

Issue the previous request, substituting RECOMPUTE for SUBTOTAL, as follows:
TABLE FILE EMPLOYEE
SUM GROSS DED_AMT AS 'DEDUCTIONS'
AND COMPUTE DED_PCT=(DED_AMT/GROSS)*100;
BY DEPARTMENT BY CURR_JOBCODE
ON DEPARTMENT RECOMPUTE
END
Run the request. The output is:
This time, in addition to showing totals for gross pay and deductions, the deduction
percentage is recalculated based on the subtotals for each department, using the COMPUTE
command in the request. For example, to determine that the total DED_PCT for the MIS
department is 55.82, the computation is:
$28,187.25/$50,499.12*100
5. Creating Subtotals and Grand Totals
Reporting Language Primer 81

Producing Section Totals for More Than One Sort Field: SUB-TOTAL
Sometimes it is useful to display subtotals for more than one sort field, for example, for each
employee in a department, and then for the department as a whole. You can do this easily
using the SUB-TOTAL command. Once again, to demonstrate the effect of SUB-TOTAL, by
comparison, you first type the request using SUBTOTAL. After reviewing the report, you change
the command to SUB-TOTAL and examine the results.
Issue the following request:
TABLE FILE EMPLOYEE
SUM GROSS DED_AMT AS 'DEDUCTIONS'
BY DEPARTMENT BY LAST_NAME BY PAY_DATE
ON LAST_NAME SUBTOTAL
END
Adding Section Totals and Grand Totals to Reports
82

Run the request. The output is:
Notice that the report displays a subtotal for each employee name, but it does not display a
subtotal for all employees in the department.
Issue the following request, substituting SUB-TOTAL for SUBTOTAL, as follows:
TABLE FILE EMPLOYEE
SUM GROSS DED_AMT AS 'DEDUCTIONS'
BY DEPARTMENT BY LAST_NAME BY PAY_DATE
IF LAST_NAME EQ JONES OR MCCOY OR SMITH
ON LAST_NAME SUB-TOTAL
END
5. Creating Subtotals and Grand Totals
Reporting Language Primer 83

The SUB-TOTAL command includes multiple levels of section totals in a report. Section totals
for the sort field you explicitly request (in this case, LAST_NAME), as well as section totals for
any sort fields that precede the specified field in the request (in this case, DEPARTMENT).
These are also known as higher-level sort fields.
Run the request. The output is:
Adding Section Totals and Grand Totals to Reports
84

Notice that the report now shows a subtotal for each employee and a separate subtotal line for
the department. To take full advantage of this capability, it is important to think about the
order of sort fields as you type them in a request. Of course, the final line of the report still
displays the grand total for all departments.
Producing Section Totals for More Than One Sort Field: SUMMARIZE
Once again, you produce a report with multiple section totals, however, this time you also
compute and subtotal deduction percentages.
Issue the following request:
TABLE FILE EMPLOYEE
SUM GROSS DED_AMT AS 'DEDUCTIONS'
AND COMPUTE DED_PCT=(DED_AMT/GROSS)*100;
BY DEPARTMENT BY CURR_JOBCODE BY PAY_DATE NOPRINT
IF CURR_JOBCODE EQ B03 OR B04 OR B14
ON CURR_JOBCODE SUMMARIZE DED_PCT AS 'DEDUCTION PERCENTAGE: '
END
5. Creating Subtotals and Grand Totals
Reporting Language Primer 85

Run the request. The output is:
Adding Section Totals and Grand Totals to Reports
86

The SUMMARIZE command recalculates a combined deduction percentage for each job code,
as well as a combined percentage for all job codes within each department, using the formula
you specify in a request. Notice, however, that the following line in the request that produces
this report restricts summary information to the computed field DED_PCT:
ON CURR_JOBCODE SUMMARIZE DED_PCT AS ' DEDUCTION PERCENTAGE: '
Therefore, you do not see subtotals in the GROSS or DEDUCTIONS columns. Nevertheless,
these values are added internally and the resulting subtotals are used to compute a combined
deduction percentage for each job code and for all job codes within each department.
Before moving on, look again at the line of the request that produced the previous report:
BY DEPARTMENT BY CURR_JOBCODE BY PAY_DATE NOPRINT
Notice that it includes the NOPRINT command, which you learned to use in Chapter 2, Sorting
Records. In this instance, NOPRINT indicates that the PAY_DATE sort field column will not
display on the report. This column would make the report too wide to fit on a single screen. By
removing the PAY_DATE column, we are able to show all of the essential data on one screen.
Producing Row Totals for ACROSS Sort Field Values
You can produce row totals for horizontal (ACROSS) sort field values. Row totals for horizontal
sort fields, referenced by ACROSS-TOTAL, are different from standard row totals because only
horizontal sort field values, within each ACROSS, are included in the total. Integer, single
precision floating point, double precision floating point, packed, and long packed fields can all
be totaled.
To produce an ACROSS total for the count of CITY and FED deduction codes with each
department, issue the following request:
TABLE FILE EMPLOYEE
SUM CNT.EMP_ID
BY CURR_JOBCODE
ACROSS DEPARTMENT
ACROSS DED_CODE ACROSS-TOTAL
WHERE DED_CODE EQ 'CITY' OR 'FED'
END
5. Creating Subtotals and Grand Totals
Reporting Language Primer 87

Run the request. The output is:
Summary Chart for Producing Section Totals
The following chart summarizes the four (4) situations illustrated by the exercises you have
completed in this section:
By a specified sort field
By a specified sort field and all
previous (higher) sort fields
To add up all numeric
columns
Use SUBTOTAL Use SUB-TOTAL
To add numeric columns
and then recalculate
computed fields based
on the numeric subtotals
Use RECOMPUTE Use SUMMARIZE
Adding Section Totals and Grand Totals to Reports
88

Suppressing Grand Totals: NOTOTAL
You have already learned how to suppress the display of redundant subtotals using the
MULTILINES command. To further enhance your control of totaling on reports, you can also
suppress grand totals using the NOTOTAL command.
Issue the following request:
TABLE FILE EMPLOYEE
SUM GROSS
BY DEPARTMENT BY CURR_JOBCODE
ON DEPARTMENT SUBTOTAL
ON TABLE NOTOTAL
END
Run the request. The output is:
Notice that unlike all of the other reports in this chapter, this one does not display a grand
total.
5. Creating Subtotals and Grand Totals
Reporting Language Primer 89

Displaying Subtotals Conditionally: WHEN
Another way to control when subtotals appear in your report is to specify a condition that must
be satisfied in order for the subtotal to be displayed. You accomplish this using WHEN.
WHEN enables you to specify under which conditions subtotals appear. Do not confuse this
with WHERE. Although the concept is similar to screening, there is an important distinction.
When you use WHERE, you determine what data is included in a report. When you use WHEN,
you determine when a subtotal is displayed based on the data in the report. You can use
multiple WHEN phrases on the same sort field in a request.
You use WHEN in conjunction with each of the following commands explained in this chapter:
SUBTOTAL
SUB-TOTAL
RECOMPUTE
SUMMARIZE
First, you use one of the above commands in a report, then you follow it with WHEN. For
instance, assume you have a report that contains the following line:
ON DEPARTMENT SUBTOTAL
To control when the subtotal appears in the report, you add a line like the following:
WHEN DEPARTMENT EQ 'MIS'
Regardless of which of the above commands you choose to use with WHEN, the format of
WHEN is the same. The format is:
WHEN
fieldname
calculation
WHEN signals the beginning of a condition. The field name is the same one used with the
preceding subtotaling command of your choice. The calculation can be a simple or complex
equation, using either alphanumeric or numeric fields.
To produce a departmental subtotal only for the MIS department, issue the following request:
TABLE FILE EMPLOYEE
SUM GROSS
BY DEPARTMENT BY CURR_JOBCODE
ON DEPARTMENT SUBTOTAL
WHEN DEPARTMENT EQ 'MIS'
END
Displaying Subtotals Conditionally: WHEN
90

Run the request. The output is:
As a result of the WHEN condition, a subtotal is displayed for the MIS department, but not the
Production department.
To display different subfoot text, depending on the department value, issue the following
request:
TABLE FILE EMPLOYEE
SUM GROSS
BY DEPARTMENT
BY EMP_ID
ON DEPARTMENT SUBFOOT
" "
"COST CENTER 123"
" "
WHEN DEPARTMENT EQ 'MIS'
SUBFOOT
" "
"COST CENTER 456"
" "
WHEN DEPARTMENT EQ 'PRODUCTION'
END
5. Creating Subtotals and Grand Totals
Reporting Language Primer 91

Run the request. The output is:
Calculating Values Based on Subtotals: RECAP
You can also compute a new value based on subtotals using RECAP.
The format of the RECAP command is:
{ON|BY}
fieldname1
RECAP
fieldname2
[
/format
]=
calculation
;
In the above structure, fieldname1 must be a BY field. Each time the BY field changes in the
report, recapped information appears. RECAP indicates that a new field is going to be created
for subtotal purposes. Fieldname2 is the new field and equals the calculation you provide.
The /format is optional, but if you use it, it must be numeric. You use this to change the
default format of D12.2 to indicate the new field format.
For example, you could calculate the percentage of salary deductions applied to gross salary
for each department, using RECAP.
Calculating Values Based on Subtotals: RECAP
92

Issue the following request:
TABLE FILE EMPLOYEE
SUM DED_AMT GROSS
BY DEPARTMENT BY HIGHEST PAY_DATE
ON DEPARTMENT RECAP DED_PCT/D6.2=(DED_AMT/GROSS)*100;
END
Run the request. The output is:
Notice that for each department a new field and its calculated value appears. Using RECAP
enables you to produce subtotals based on a calculation you provide.
5. Creating Subtotals and Grand Totals
Reporting Language Primer 93

Calculating Values Based on Subtotals: RECAP
94

Chapter
6
Formatting Reports
In the previous chapters, you learned how to use reporting commands to identify, sort,
and select a subset of records. You also learned how to create temporary fields and
perform calculations, and include subtotals and totals for rows and columns, in a report.
In this chapter, you learn how to:
Insert headings and footings into a report.
Change the layout of a report to enhance its readability.
Set conditions that control when headings, footings, and layout adjustments take
place.
In this chapter:
Headings and Footings: Types You Can Use
Including a Page Heading in a Report: HEADING
Including a Page Footing in a Report: FOOTING
Including a Section Heading in a Report: SUBHEAD
Including a Section Footing in a Report: SUBFOOT
Adding Blank Lines Between Sorted Records: SKIP-LINE
Separating Sorted Records With an Underline: UNDER-LINE
Creating a New Page: PAGE-BREAK
Headings and Footings: Types You Can Use
You can create the following types of headings and footings for a report. Each type is defined
by where it appears in the report. These types are:
Page headings and footings.
Section headings and footings.
Report headings and footings.
Reporting Language Primer 95

Page headings and page footings appear on every page of a report. You can create them using
the HEADING and FOOTING commands, respectively.
Section headings and section footings appear above and below each section of a report. A
section is created each time a specified sort field changes. You can create section headings
and footings using the SUBHEAD and SUBFOOT commands, respectively, along with a sort field
of your choice.
Report headings and report footings appear on the first and last pages only of a report. You
can produce report headings and footings also using the SUBHEAD and SUBFOOT commands,
respectively. The difference here is that you do not use these commands with a sort field.
You can use one, or many of these headings and footings in a report. You decide which
approach is best for improving the clarity and impact of a report. In the following sections, you
will learn how to issue report requests that combine headings and footings with formatting
enhancements, sometimes on a conditional basis, to change the appearance of reports in
various ways.
Including a Page Heading in a Report: HEADING
To clarify the purpose, or contents of a report, you can insert explanatory text into the report
using the HEADING command.
You can also determine the placement of the heading but, by default, a page heading is left-
justified and positioned at the top of each page of a report.
Before you issue a report request, here are some basic guidelines for using HEADING:
Enclose the text you want to use as the page heading in double quotation marks (") on the
line following the HEADING command. The double quotation mark (") is reserved for
marking the beginning and ending of heading text. You cannot use it within the text of the
heading.
Type CENTER after HEADING on the same line to center the heading over a report.
Including a Page Heading in a Report: HEADING
96

In the first request, you center a page heading over a report. To create some distance between
the heading and the report, include a blank line between the two.
To insert a blank line after a page heading, enclose a blank in double quotation marks (") on
the line below the heading text, as follows:
" "
If you want to insert more than one blank line between the heading and the report, repeat the
blank within quotation marks on a new line. You can also use the </n spot marker to specify
the number of lines to skip.
Issue the following request:
SET LINES=21
TABLE FILE EMPLOYEE
HEADING CENTER
"EMPLOYEES WHO LIVE IN"
"NEW YORK STATE"
" "
PRINT ADDRESS_LN3 AS 'CITY STATE AND ZIP'
BY LAST_NAME AS 'EMPLOYEE'
WHERE ADDRESS_LN3 CONTAINS 'NY';
END
6. Formatting Reports
Reporting Language Primer 97

Run the request. The output is:
Including a Page Heading in a Report: HEADING
98

Notice that the page number automatically displays in the top left corner of each page of the
report. As you will see in the remaining requests and reports, you can change the position of a
page number and the numbering sequence.
Now, look at the heading you produced using HEADING CENTER. It appears on both pages of
the report in the same location. Notice too, that a blank line is inserted between the heading
and the report on both pages.
Including a Page Footing in a Report: FOOTING
The counterpart of a page heading is the page footing. You can include a footing in your report
using the FOOTING command. Footings, like headings, appear on each page of the report. The
footing, by default, is left-justified and positioned two (2) lines below the last line of output in
the report, even if the output is not at the end of the page.
FOOTING is similar to HEADING in the way it works. Here are some simple rules for using
FOOTING in your requests:
Type FOOTING on its own line near the end of the request. This keeps the request ordered
in a way that logically reflects the report.
Enclose the text you want to use as the page footing in double quotation marks (") on the
line following the FOOTING command. The double quotation mark (") is reserved for marking
the beginning and ending of footing text. You cannot use it within the text of the footing.
Type CENTER after FOOTING on the same line to center the footing under a report.
Type BOTTOM after FOOTING to position the footing text at the bottom of each page (as
opposed to two lines below the last line of text in a report).
Now, you can enhance the report you just produced by adding a centered footing.
In this report, you can also change the default location of each page number. To do this, use a
system variable, called TABPAGENO, as part of a page, section, or report heading or footing. A
system variable represents values supplied automatically, in this case, the page number.
Referencing TABPAGENO automatically turns off the default page number location. If you want
heading or footing text made up solely of the page number, type the following on the line after
HEADING or FOOTING:
"<TABPAGENO"
6. Formatting Reports
Reporting Language Primer 99

The caret or less than symbol (<) signals that the next item in a heading or footing object is a
system variable, such as TABPAGENO, or a field name. You can also include prior RECAP
values in a heading or footing.
Issue the following request:
SET LINES=21
TABLE FILE EMPLOYEE
HEADING CENTER
"EMPLOYEES WHO LIVE IN NEW YORK STATE"
" "
PRINT ADDRESS_LN3 AS 'CITY STATE AND ZIP'
BY LAST_NAME AS 'EMPLOYEE'
WHERE ADDRESS_LN3 CONTAINS 'NY';
FOOTING CENTER
"PAGE <TABPAGENO"
END
Including a Page Footing in a Report: FOOTING
100

Run the request. The output is:
6. Formatting Reports
Reporting Language Primer 101

Notice the difference between this report and the first one you generated. This report has a
centered footing which consists of only the page number. Each page has the correct page
number even though you do not supply the numbers in the request. These numbers are
provided by the TABPAGENO system variable. The new location of the page numbers is
achieved by using TABPAGENO in conjunction with FOOTING CENTER. As you progress through
this chapter, you learn that you can increase control of a report format by using different
combinations of commands.
Including a Section Heading in a Report: SUBHEAD
In addition to page headings and footings, you can include section headings and footings in a
report. You can use the SUBHEAD command in conjunction with a sort field you specify to
produce section headings. Remember from Sorting Records on page 31, that sort fields are
fields that immediately follow BY or ACROSS in a request. The section heading repeats each
time the value of the specified sort field changes. You can use the ON TABLE PAGE_BREAK
AND SUBHEAD command to produce a heading that appears only once at the beginning of the
report and on its own page.
The format of the SUBHEAD command is:
ON {
sort_field
|TABLE} [PAGE-BREAK AND] SUBHEAD
"
text
"
You provide the text for the section heading.
To include a SUBHEAD and HEADING CENTER command, issue the following request:
SET LINES=22
TABLE FILE EMPLOYEE
HEADING CENTER
"TOTAL CLASSROOM HOURS USED PER JOB CATEGORY"
" "
SUM ED_HRS
BY DEPARTMENT
BY CURR_JOBCODE
ON DEPARTMENT SUBHEAD
" "
"------NEXT DEPARTMENT ------"
" "
RUN
Including a Section Heading in a Report: SUBHEAD
102

Run the request. The output is:
6. Formatting Reports
Reporting Language Primer 103

This report spans two pages. Notice that the section heading for the Production department is
not redisplayed on page 2. This is because a section heading appears only once before each
sort field. The page heading, however, does appear on both pages. Compare the request to
the report and you see the correlation between the blank lines in the report and the " " in the
request.
You can force each department to begin on a new page, using PAGE-BREAK. For more
information on using PAGE-BREAK see Creating a New Page: PAGE-BREAK on page 111. In
Conditionally Displaying Section Headings and Footings: WHEN on page 106, you learn how to
conditionally display section headings using WHEN.
Including a Section Footing in a Report: SUBFOOT
In the previous section, you learned how to include a heading before each new section of a
report. Now you learn how to include a footing at the end of a section, just before a new sort
field value and section begins. The command you use to achieve this is SUBFOOT.
You can use SUBFOOT, in conjunction with a sort field you specify, to produce section footings.
These footings are displayed each time the specified sort field value changes. You can use the
ON TABLE PAGE-BREAK AND SUBFOOT command to produce a footing that appears only once
at the end of the report and on a trailing page.
The format of the SUBFOOT command is:
ON {
sort_field
|TABLE} [PAGE-BREAK AND] SUBFOOT
"
text
"
You provide the text for the section footing.
Here is an example that demonstrates the difference between a section heading and section
footing.
Issue the following request:
SET LINES=21
TABLE FILE EMPLOYEE
SUM ED_HRS
BY DEPARTMENT
BY CURR_JOBCODE
ON DEPARTMENT SUBHEAD
" "
"BEGINNING OF SECTION"
" "
ON DEPARTMENT SUBFOOT
"END OF SECTION"
END
Including a Section Footing in a Report: SUBFOOT
104

Run the request. The output is:
6. Formatting Reports
Reporting Language Primer 105

Conditionally Displaying Section Headings and Footings: WHEN
You may recall from Creating Subtotals and Grand Totals on page 71, that you were able to
display total and subtotal summary lines on a conditional basis, using WHEN. You can also
use WHEN to control when section headings and footings are displayed.
You include WHEN to display section headings and footings only when the condition or
conditions you specify are satisfied. You can include multiple WHEN conditions in a request.
The format for using WHEN with SUBFOOT is:
ON
sort field
SUBFOOT
"
text
"
WHEN
expression
You include in the expression the same sort field from the ON command in the first line and
the condition that sort field must satisfy. Only when the condition is met will the section
footing for that sort field be included.
In addition to SUBFOOT, you could use SUBHEAD, or a number of other commands not
reviewed in this Primer. For a complete list of commands you can use with WHEN, see the
User's Manual for your product.
Here is a scenario in which using WHEN is very helpful. Your company provides three (3) weeks
of vacation for employees with a minimum base salary of $25,000. You produce a report that
shows employee salaries in every department. To draw attention to those employees eligible
for the additional vacation, you include a section footing that is only displayed for employees
who have a salary of at least $25,000.
You include an additional level of detail by using the FIRST_NAME and LAST_NAME fields as
variables. Earlier you used a system variable, TABPAGENO, to automatically include the correct
page number, even though it changed. Here, you include a field name variable so that the
appropriate first and last names of employees are displayed in the footing. The caret or less
than symbol (<) signals that the next item in a heading object is a field name.
Issue the following request:
TABLE FILE EMPLOYEE
PRINT LAST_NAME FIRST_NAME
BY DEPARTMENT BY CURR_SAL
ON CURR_SAL SUBFOOT
"<FIRST_NAME <LAST_NAME IS DUE EXTRA VACATION"
WHEN CURR_SAL GT 25000
ON DEPARTMENT SKIP-LINE
END
Including a Section Footing in a Report: SUBFOOT
106
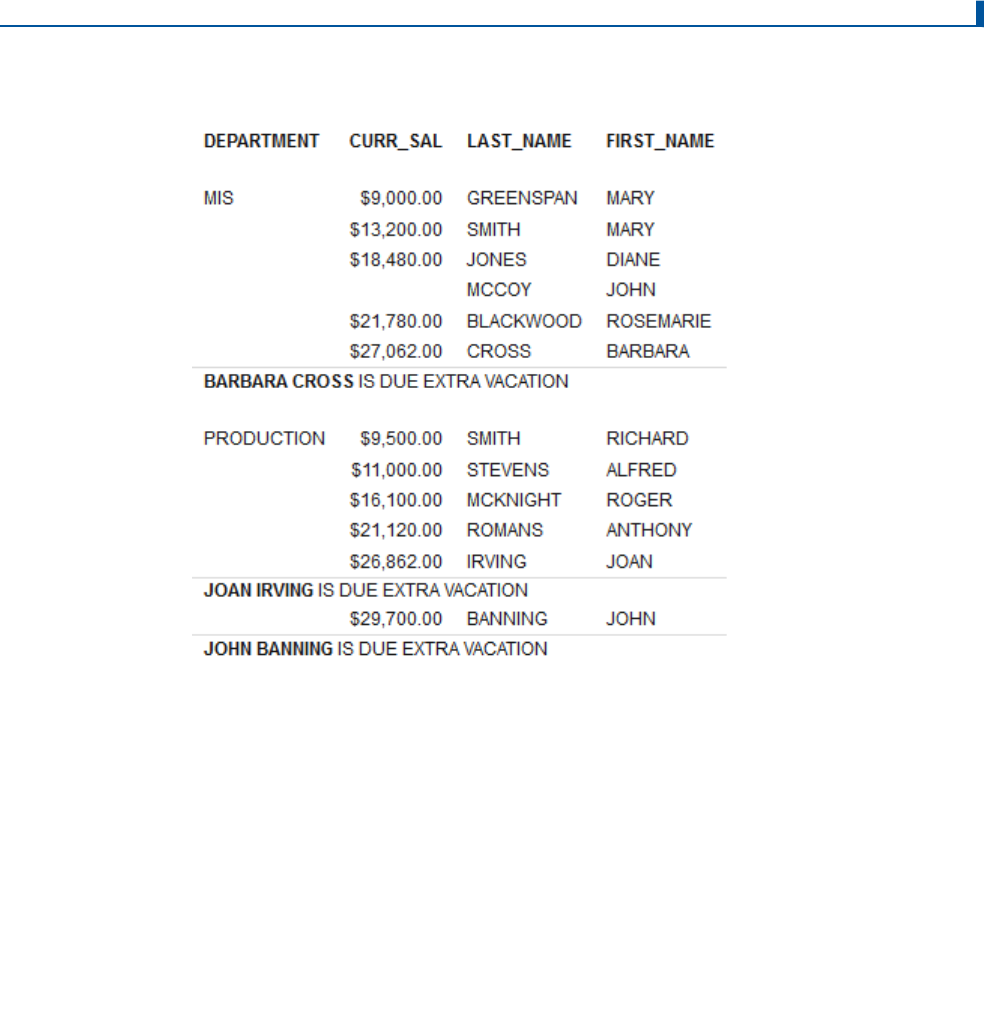
Run the request. The output is:
Note: In order to display a caret symbol (<) in a heading object, use two consecutive caret
symbols (<<).
Adding Blank Lines Between Sorted Records: SKIP-LINE
To make a report easier to read, you can insert blank lines between every line of the report, or
between every section. You can achieve both effects using the SKIP-LINE command.
The format of the SKIP-LINE command is:
ON
fieldname
SKIP-LINE
or
verb_command fieldname
SKIP-LINE
SKIP-LINE does not have to be used with a sort field. When you do use it with a sort field, you
insert a blank line between each section of a report. Remember, a section is defined by the
sort field each time it changes.
6. Formatting Reports
Reporting Language Primer 107

When you use SKIP-LINE with a field that follows a verb command, you insert a blank line
between each line of the report, in effect double spacing the report.
You can only use one SKIP-LINE in each report request. You do not have to type it on its own
line. Instead, you include it after the field name or sort field for which you want to insert a
blank line.
To insert a blank line between each section of the report, issue the following request:
TABLE FILE EMPLOYEE
PRINT DAT_INC PCT_INC SALARY
BY EMP_ID BY LAST_NAME
ON EMP_ID SKIP-LINE
END
Adding Blank Lines Between Sorted Records: SKIP-LINE
108

Run the request. The output is:
To see how using SKIP-LINE on a non-sort field changes the preceding report, use SKIP-LINE
after the field SALARY, which is not a sort field.
Issue the following request:
TABLE FILE EMPLOYEE
PRINT DAT_INC PCT_INC SALARY SKIP-LINE
BY EMP_ID BY LAST_NAME
END
6. Formatting Reports
Reporting Language Primer 109

Run the request. The output is:
Notice that this time the report has a blank line between each line of the report.
Separating Sorted Records With an Underline: UNDER-LINE
Another formatting technique you can use to delineate sections of a report is to insert an
underline after each section. You can accomplish this using the UNDER-LINE command. You
can use UNDER-LINE only in connection with a sort field. Each underline goes across the entire
page.
The format of the UNDER-LINE command is:
ON
sort_field
UNDER-LINE
To see how an underline separates report sections, issue the following request:
TABLE FILE EMPLOYEE
SUM DED_AMT AS 'DEDUCTIONS'
BY DEPARTMENT BY DED_CODE AS 'DEDUCTION,TYPE'
ON DEPARTMENT UNDER-LINE
END
Separating Sorted Records With an Underline: UNDER-LINE
110

Run the request. The output is:
Creating a New Page: PAGE-BREAK
The PAGE-BREAK command enables you to control when a new page is created. You must use
PAGE-BREAK with a sort field.
The format of the PAGE-BREAK command is:
ON
sort_field
PAGE-BREAK
PAGE-BREAK creates a new page to be started each time the specified sort field value
changes. Place the PAGE-BREAK command after the sort field on which you want to break the
page. This ensures that each section of the report remains separate from any other section.
To use PAGE-BREAK with commands that produce headings or footings, type PAGE-BREAK first,
then on the same line, type the command of your choice.
6. Formatting Reports
Reporting Language Primer 111

You can use PAGE-BREAK to prevent information that should be grouped together from being
fragmented over more than one page. This situation occurred in Including a Section Heading in
a Report: SUBHEAD on page 102, when information for the Production department was
displayed on two different pages.
You can solve that problem now using PAGE-BREAK. The page heading has been omitted from
this request. Otherwise, it is the same request you issued in Including a Section Heading in a
Report: SUBHEAD on page 102.
Issue the following request:
TABLE FILE EMPLOYEE
SUM ED_HRS
BY DEPARTMENT
BY CURR_JOBCODE
ON DEPARTMENT PAGE-BREAK SUBHEAD
" "
"------NEXT DEPARTMENT ------"
" "
END
Creating a New Page: PAGE-BREAK
112

Run the request. The output is:
Compare this report to its earlier version. The information for the Production department no
longer shares a page with information from the MIS department.
You now know that, by default, each page is numbered consecutively from the number one (1).
You can change the numbering sequence and print the first page within a sort field as Page 1
using the REPAGE command. To display the preceding report so that the first page for each
new sort value is numbered 1, add the REPAGE command as follows.
6. Formatting Reports
Reporting Language Primer 113

Issue the following request:
TABLE FILE EMPLOYEE
SUM ED_HRS
BY DEPARTMENT
BY CURR_JOBCODE
ON DEPARTMENT PAGE-BREAK REPAGE SUBHEAD
" "
"----- NEXT DEPARTMENT -----"
" "
END
Run the request. The output is:
Creating a New Page: PAGE-BREAK
114

Chapter
7
Introducing Formatting and Style Sheets
To create an effective report, you need to account for:
Content. The data in your report.
Formatting. How to present that content to a reader in a way that achieves maximum
impact.
There are many formatting options that you can use to give your report a professional
appearance and affect how people read and interpret it. For example, you can control:
The appearance of the data, which you can change to emphasize important values.
The headings, footings, and other text with which you "frame" the data to give it
context.
The layout of the report on the page or screen, which you can adjust for different
display environments and for audiences with different vision needs.
The following topics provide an overview of formatting and style sheets.
In this chapter:
What Kinds of Formatting Can I Do?
General StyleSheet Syntax
Conditionally Formatting a StyleSheet
Reporting Language Primer 115

What Kinds of Formatting Can I Do?
There are many kinds of formatting that you can apply to a report:
The appearance of the report data, such as its font, size, style (italic, bold, or underlined),
color (of the foreground and the background), position, and justification. You can also draw
boxes or lines around data. You can use these properties to emphasize critical values and
to draw attention to important data relationships.
You can also select which character to use to mark decimal position, using either a period
(.) or a comma (,), to match the convention of the country in which the report will be read.
You can even choose which character to use to represent a null value and missing data.
Providing context for data by "framing" it, for example, with headings, footings, subtotals,
recaps, and customized column titles. You can include fields and images within headings
and footings. As with data, you can specify a heading, footing, subtotal, subhead, subfoot,
recap, and column title font, size, style, color, position, and justification, as well as enclose
it within boxes or lines. You can use these framing devices to explain the context of the
data and to engage the interest of the reader.
Laying out the report on the screen or printed page. You can choose the report margins,
where to place headings and footings, where to place background images (watermarks),
and how to arrange the report columns (adjusting the space around and between columns,
adjusting column width and column order, and even stacking one column above another to
reduce report width). You can visually distinguish between different columns, rows, or sort
groups using color and lines. If you wish, you can draw borders around parts of a report or
around the entire report.
You can lay out the report to optimize it for different display environments such as screens
of different sizes and resolutions, and printed pages of different sizes. You can create
multiple report panes on a single page to print labels. You can even combine several
reports into a single file to display or print them as a group.
Conditionally formatting a report based on the report data. You specify a condition that, at
run time, is automatically evaluated for each instance of the report component you specify,
such as each value of a sort column. The formatting option is applied to each instance of
the report component for which the condition is true. For example, in a sales report, you
can draw attention to sales staff who exceeded quota by making their names bold and
using a different color.
Choosing a display format, such as HTML (the default), PDF (Adobe Acrobat Portable
Document Format), Excel, or PostScript, to suit the viewing and processing needs of the
readers.
What Kinds of Formatting Can I Do?
116

General StyleSheet Syntax
A StyleSheet, identified by the ON TABLE SET STYLE command in a report request, consists of
declarations that identify the report components you wish to format and the formatting you
wish to apply. A declaration usually begins with the TYPE attribute and is followed by the
attribute=value pairs you assign to the report component, for example, COLUMN, COLOR, or
FONT. You can also include comments that provide context for your StyleSheet. Comments do
not affect StyleSheet behavior.
Each StyleSheet declaration specifies a series of attributes in the format:
attribute
=
value
, [
attribute
=
value
, ...] $
7. Introducing Formatting and Style Sheets
Reporting Language Primer 117

Creating a TIBCO WebFOCUS StyleSheet Within a Report Request
You can create a StyleSheet within a report request. This enables you to create and maintain
the formatting for your report directly in the report request. This type of StyleSheet is known as
an inline StyleSheet.
The format for creating a StyleSheet within a report request is:
ON TABLE SET STYLE[SHEET] *
declaration
[
declaration
]
.
.
.
[ENDSTYLE]
StyleSheet declarations usually specify the report component you want to format and the
formatting you want to apply. ENDSTYLE Indicates the end of an inline StyleSheet.
The format to apply an external StyleSheet file within your report request is:
ON TABLE SET STYLE[SHEET]
stylesheet
Issue the following request, which illustrates an inline StyleSheet. The StyleSheet declarations
are highlighted in the request.
TABLE FILE EMPLOYEE
SUM CURR_SAL BY DEPARTMENT BY LAST_NAME
HEADING
"Employee Salary Report"
" "
FOOTING CENTER
"**End of Report**"
ON TABLE SET PAGE-NUM OFF
ON TABLE SET STYLE *
TYPE=REPORT, GRID=OFF, $
TYPE=HEADING, FONT=ARIAL, SIZE=16, STYLE=BOLD, $
TYPE=TITLE, STYLE=ITALIC, $
TYPE=DATA, COLUMN=DEPARTMENT, STYLE=BOLD, COLOR=BLUE, $
TYPE=FOOTING, COLOR=RED, STYLE=BOLD, $
ENDSTYLE
END
General StyleSheet Syntax
118

Run the request. The output is:
Aligning a Heading or Footing Element Across Columns
By default, every heading, subheading, footing, or subfooting element (ITEM) is placed in the
first available column. However, using the COLSPAN StyleSheet attribute, along with the
HEADALIGN attribute, you can position an item to span multiple columns.
Issue the following request. In this request, the COLSPAN attribute for the first item on the
fourth line of the SUBHEAD spans the first two columns, LAST_NAME and FIRST_NAME.
TABLE FILE EMPLOYEE
PRINT LAST_NAME AS ' ' FIRST_NAME AS ' ' CURR_SAL AS ' '
BY DEPARTMENT NOPRINT SUBHEAD
" "
"Employee Salary Report for Department: <DEPARTMENT "
" "
"----------------------Employee Full Name----------------------- <+1 Salary
"
ON TABLE SET STYLE *
TYPE=REPORT, GRID=OFF, $
TYPE=SUBHEAD, HEADALIGN=BODY, STYLE=BOLD, $
TYPE=SUBHEAD, LINE=4, ITEM=1, COLSPAN=2, FONT=ARIAL, $
ENDSTYLE
END
7. Introducing Formatting and Style Sheets
Reporting Language Primer 119

Run the request. The output is:
Creating and Applying a StyleSheet File
You can create a StyleSheet as a separate file and apply it to as many reports as you wish. A
StyleSheet file contains only declarations and optional comments. Unlike an inline StyleSheet,
a StyleSheet file does not contain the ON TABLE SET STYLESHEET and ENDSTYLE commands.
You can apply a StyleSheet file to a report using the SET STYLESHEET command.
You should name a StyleSheet file filename.sty, where filename can include letters, numbers,
and underscores (_), and otherwise must be valid for the operating environments on which it
resides.
As an alternative to creating a new StyleSheet file, you can use one of the sample StyleSheet
files provided with the product as a template.
The format to include a StyleSheet File in another StyleSheet is:
INCLUDE=
stylesheet
,$
General StyleSheet Syntax
120

To use one of the distributed StyleSheets in the inline report (INCLUDE) and override the
heading and department styles (TYPE=HEADING, TYPE=DATA), issue the following request:
TABLE FILE EMPLOYEE
SUM CURR_SAL BY DEPARTMENT BY LAST_NAME
HEADING
"Employee Salary Report"
" "
FOOTING CENTER
"**End of Report**"
ON TABLE SET PAGE-NUM OFF
ON TABLE SET STYLE *
INCLUDE=IBFS:/FILE/IBI_HTML/ibi_themes/Warm.sty,$
TYPE=DATA, COLUMN=DEPARTMENT, STYLE=BOLD + UNDERLINE, COLOR=BLUE, $
TYPE=HEADING, FONT=ARIAL, SIZE=16, STYLE=BOLD + ITALIC, $
TYPE=TITLE, STYLE=ITALIC, $
ENDSTYLE
END
Run the request. The output is:
7. Introducing Formatting and Style Sheets
Reporting Language Primer 121

Conditionally Formatting a StyleSheet
You can conditionally format report components, display a graphic, and include links in your
report based on the values in your report. Using conditional styling, you can:
Draw attention to particular items in the report.
Emphasize differences between significant values.
Customize the resources to which an end user navigates from different parts of the report.
To conditionally format reports, add the WHEN attribute to a StyleSheet declaration. The WHEN
attribute specifies a condition that is evaluated for each instance of a report component (that
is, for each cell of a tabular report column, each element in a chart, or each free-form report
page). The StyleSheet declaration is applied to each instance that satisfies the condition, and
is ignored by each instance that fails to satisfy the condition.
To conditionally format reports, using the WHEN attribute, the format is:
TYPE=
type
, [
subtype
,]
attributes
, WHEN=
field1 relation_operator
{
field2
|
value
},$
Issue the following request:
TABLE FILE EMPLOYEE
HEADING
" "
"Employee"
" "
"Salary Report 2018"
" "
"Page <TABPAGENO"
" "
SUM CURR_SAL AS 'Current,Salary'
BY DEPARTMENT BY LAST_NAME BY FIRST_NAME
ON TABLE SET STYLESHEET *
TYPE=REPORT, GRID=OFF, UNITS=INCHES, $
TYPE=DATA, FONT='TIMES', $
TYPE=DATA, COLOR=RED, STYLE=BOLD + ITALIC,
WHEN=CURR_SAL LT 10000, $
TYPE=DATA, COLUMN=CURR_SAL, BACKCOLOR=AQUA, COLOR=NAVY, STYLE=BOLD,
WHEN=CURR_SAL GT 10000, $
TYPE=TITLE, FONT='HELVETICA', $
TYPE=HEADING, FONT='HELVETICA', STYLE=BOLD, SIZE=14, JUSTIFY=CENTER,
COLOR=WHITE, BACKCOLOR=DARK TURQUOISE, $
TYPE=HEADING, LINE=6, BACKCOLOR=WHITE, COLOR=DARK TURQUOISE, $
TYPE=HEADING, LINE=7, BACKCOLOR=WHITE, $
ENDSTYLE
END
Conditionally Formatting a StyleSheet
122

Run the request. The output is:
Notice that employees with salaries less than $10,000 are red and italic and employees with
salaries greater than $10,000 are navy and bold, with a dark turquoise background.
7. Introducing Formatting and Style Sheets
Reporting Language Primer 123

Conditionally Formatting a StyleSheet
124

Chapter
8
Merging Data Sources
You can gather data for your reports by joining data sources using the JOIN command,
merging the contents of data structures using the MATCH command, or concatenating
data sources using the MORE phrase, and reporting from the combined data.
The JOIN command creates a new parent-child structure from multiple data sources.
The MATCH command creates new data records by combining records from two or
more data sources, based on common sort values.
The MORE command appends output from multiple data sources.
In this chapter:
Including Data From More Than One File: JOIN
Merging Data: MATCH
Concatenating Data: MORE
Including Data From More Than One File: JOIN
Creating Basic Output Requests on page 7 illustrated how to access data from a data source.
The JOIN command enables you to report from two or more data sources, as if they were one.
Although the two data sources remain physically separate, it will seem as if you are working
with one data source. When two data sources are joined, one is called the host file, the other
is called the cross-referenced file. Each time a record is retrieved from the host file, the
corresponding fields in the cross-referenced file are identified, if they are referenced in the
report request. The records in the cross-referenced file containing the corresponding values are
then retrieved. You can establish a joined structure in several ways. Each way requires specific
conditions.
Issuing a JOIN Command
The format for a simple JOIN command is:
JOIN
field
IN
host
TO [ALL]
field
IN
crfile
AS
joinname
Reporting Language Primer 125

The fields from the host file and cross-referenced file (crfile) must have the same format. The
JOIN command requires a real field as the target (cross-referenced field). ALL retrieves multiple
matching records from the cross-referenced file. Without ALL, only a single value is retrieved.
The AS phrase is a name to identify the Join.
For example, both the EMPLOYEE data source and the JOBFILE data source contain a
JOBCODE field. The JOBFILE data source contains a description for each of the job codes
(JOB_DESC field). To join the EMPLOYEE data source to the JOBFILE data source, issue the
following JOIN command:
JOIN JOBCODE IN EMPLOYEE TO JOBCODE IN JOBFILE AS JJOIN
To retrieve the job description for each of the job codes for each employee, issue the following
request:
TABLE FILE EMPLOYEE
BY LAST_NAME BY JOBCODE BY JOB_DESC
END
Run the request. The output is:
Including Data From More Than One File: JOIN
126

Note: Joining two separate structures may result in duplication of field names. To identify
which field name is being referenced in a request, qualify it as FILENAME.fieldname,
SEGNAME.fieldname or FILENAME.SEGNAME.fieldname, to uniquely identify which field name
instance is to be used. Without qualification, any field name reference will find the FIRST
matching field name within the structure, which may not be what was intended.
Merging Data: MATCH
You can merge two or more data sources, and specify which records to merge and which to
eliminate, using the MATCH command. The command creates a new data source (a HOLD file),
into which it merges fields from the selected records. You can report from the new data source
and use it as you would use any other HOLD file. HOLD files are discussed in Advanced
Features on page 137.
You can select the records to be merged into the new data source by specifying sort fields in
the MATCH command. Specify one set of sort fields, using the BY phrase, for the first data
source, and a second set of sort fields for the second data source. The MATCH command
compares all sort fields that have been specified in common for both data sources, and then
merges all records from the first data source whose sort values match those in the second
data source into the new HOLD file. You can specify up to 128 sort sets. This includes the
number of common sort fields.
In addition to merging data source records that share values, you can merge records based on
other relationships. For example, you can merge all records in each data source whose sort
values are not matched in the other data source. Yet another type of merge combines all
records from the first data source with any matching records from the second data source.
You can merge up to 16 sets of data in one Match request.
8. Merging Data Sources
Reporting Language Primer 127

The syntax of the MATCH command is similar to that of the TABLE command:
MATCH FILE
file1
.
.
.
RUN
FILE
file2
.
.
.
[AFTER MATCH
merge_phrase
]
RUN
FILE
file3
.
.
.
[AFTER MATCH
merge_phrase
]
END
The merge phrase specifies how the retrieved records from the files are to be compared.
Note that a RUN command must follow each AFTER MATCH command, except for the last one.
The END command must follow the final AFTER MATCH command.
MATCH generates a HOLD file. You can print the contents of the HOLD file using the PRINT
command with the wildcard character (*).
Syntax:
How to Specify Merge Phrases
The results of each merge phrase are graphically represented using Venn diagrams. In the
diagrams, the left circle represents the old data source, the right circle represents the new
data source, and the shaded areas represent the data that is written to the HOLD file.
AFTER MATCH
Command
Description
OLD-OR-NEW specifies that all records from both the old data source
and the new data source appear in the HOLD file. This is the default, if
the AFTER MATCH line is omitted.
Merging Data: MATCH
128

AFTER MATCH
Command
Description
OLD-AND-NEW specifies that records that appear in both the old and
new data sources appear in the HOLD file. This is the intersection of
the sets.
OLD-NOT-NEW specifies that records that appear only in the old data
source appear in the HOLD file.
NEW-NOT-OLD specifies that records that appear only in the new data
source appear in the HOLD file.
OLD-NOR-NEW specifies that only records that are in the old data
source but not in the new data source, or in the new data source but
not in the old, appear in the HOLD file. This is the complete set of non-
matching records from both data sources.
OLD specifies that all records from the old data source, and any
matching records from the new data source, are merged into the HOLD
file.
NEW specifies that all records from the new data source, and any
matching records from the old data source, are merged into the HOLD
file.
8. Merging Data Sources
Reporting Language Primer 129

In the following request, the high-order sort field is the same for both files.
MATCH FILE EDUCFILE
SUM COURSE_CODE
BY EMP_ID
RUN
FILE EMPLOYEE
SUM FIRST_NAME
BY EMP_ID BY LAST_NAME
AFTER MATCH HOLD OLD-OR-NEW
END
-******************************
-* PRINT CONTENTS OF HOLD FILE
-******************************
TABLE FILE HOLD
PRINT *
END
The merge phrase used in this example was OLD-OR-NEW. This means that records from both
the first (old) data source plus the records from the second (new) data source appear in the
HOLD file.
Run the request. The output is:
Merging Data: MATCH
130

MATCH Processing With Common High-Order Sort Fields
When you construct your MATCH so that the first sort (BY) fields (called the common high-order
sort fields) used for both data sources are the same in name and format, the match compares
the values of the common high-order sort fields.
At least one pair of sort fields is required. Field formats must be the same. In some cases, you
can redefine a field format using the DEFINE command. If the field names differ, use the AS
phrase to rename the second sort field to match the first.
When you are merging files with common sort fields, the following assumptions are made:
If one set of sort fields is a subset of the other, a one-to-many relationship is assumed.
If neither set of sort fields is a subset of the other, a one-to-one relationship is assumed.
At most, one matching record is retrieved.
Example:
Merging With a Common High-Order Sort Field
This request combines data from the EMPLOYEE and EMPDATA data sources. The sort fields
are EID and PIN.
MATCH FILE EMPLOYEE
PRINT LN FN DPT
BY EID
RUN
FILE EMPDATA
PRINT LN FN DEPT
BY PIN AS 'EID'
AFTER MATCH HOLD OLD-OR-NEW
END
TABLE FILE HOLD
PRINT *
END
8. Merging Data Sources
Reporting Language Primer 131

Example:
Merging Without a Common High-Order Sort Field
If there are no common high-order sort fields, a match is performed on a record-by-record
basis. The following request matches the data and produces the HOLD file:
MATCH FILE EMPLOYEE
PRINT LAST_NAME AND FIRST_NAME
BY EMP_ID
RUN
FILE EMPDATA
PRINT PIN
BY LASTNAME
BY FIRSTNAME
AFTER MATCH HOLD OLD-OR-NEW
END
TABLE FILE HOLD
PRINT *
END
Merging Data: MATCH
132

The retrieved records from the two data sources are written to the HOLD file. No values are
compared.
Run the request. The output is:
Concatenating Data: MORE
With universal concatenation, you can retrieve data from unlike data sources in a single
request. All data, regardless of source, appears to come from a single file. The MORE phrase
can concatenate all types of data sources (such as, FOCUS
®
, Db2, and Oracle), provided they
share corresponding field names with the same format. You can use DEFINE fields, if
necessary, to make the fields match.
To use MORE, you must divide your request into:
One main request that retrieves the first data source, sorting criteria, and output format for
all data.
Subrequests that define the data sources to be concatenated to the data of the main
request. The fields printed and sorted by the main request must exist in each concatenated
data source, but are not mentioned.
8. Merging Data Sources
Reporting Language Primer 133

You can add WHERE and IF selection tests in any request.
During retrieval, data is gathered from each data source in turn, then all data is sorted and the
output formatted as specified in the main request.
Concatenating Data Sources
The MORE phrase, which is accessible within the TABLE and MATCH commands, specifies how
to concatenate data from sources with dissimilar Master Files.
The format of the MATCH command is:
{TABLE|MATCH} FILE
file1
main request
MORE
FILE
file2
subrequest
MORE
FILE
file3
subrequest
MORE
.
.
.
END
Field Name and Format Matching
All fields referenced in the main request must either exist with the same names and formats in
all the concatenated files, or be remapped to those names and formats using virtual fields.
Referenced fields include those used in COMPUTE commands, headings, aggregation phrases,
sort phrases, and the PRINT, LIST, SUM, COUNT, and WRITE commands.
A successful format match means that:
Usage Format Type
Correspondence
A Format type and length must be equal.
I, F, D Format type must be the same.
P Format type and scale must be equal.
DATE (new) Format information (type, length, components, and order) must
always correspond.
DATE (old) Edit options must be the same.
Concatenating Data: MORE
134

Usage Format Type Correspondence
DATE -TIME Format information (type, length, components, and order) must
always correspond.
Note: Text (TX) fields and CLOB fields (if supported) cannot be concatenated.
The following annotated example concatenates data from the EMPDATA and SALHIST data
sources.
DEFINE FILE EMPDATA
1. NEWID/A11=EDIT (ID,'999-99-9999');
END
DEFINE FILE SALHIST
2. NEWID/A11=EDIT (ID,'999-99-9999');
CSAL/D12.2M=OLDSALARY;
END
3. TABLE FILE EMPDATA
HEADING
"EMPLOYEE SALARIES"
" "
PRINT CSAL
BY NEWID
4. WHERE CSAL GT 65000
5. MORE
FILE SALHIST
6. WHERE OLDSALARY GT 65000
END
1. Defines NEWID in the EMPDATA data source with the same name and format as the sort
field referenced in the main request.
2. Defines NEWID in the SALHIST data source with the same name and format as the sort
field referenced in the main request.
3. The main request. This contains all the formatting for the resulting report and names the
first file to be concatenated. It also contains all printing and sorting information. The fields
printed and the sort fields must exist as real or DEFINE fields in each file.
4. The WHERE criterion in the main request applies only to the EMPDATA data source.
5. The MORE phrase concatenates the SALHIST data source to the EMPDATA data source.
6. This WHERE criterion applies only to the SALHIST data source. Notice that it references a
field that is not defined in the EMPDATA data source.
8. Merging Data Sources
Reporting Language Primer 135

Run the request. The output is:
Concatenating Data: MORE
136

Chapter
9
Advanced Features
The reporting language has several features that enable you to accomplish more complex
tasks than discussed so far. The following topics introduce useful functions for more
advanced users. Although we do not teach you how to use them here, we think you
should know they exist. You may find that having mastered the basics of reporting, you
will be ready to try using these features on your own.
You can read detailed explanations of how these features work in the User's Manual for
your product.
In this chapter:
Using Multiple Verb Commands in Requests
Applying Selection Criteria
Extracting Data Into a File
Presenting Data in a Matrix: Financial Modeling Language
Customizing Your Environment Using SET Commands
Creating a Synonym
Using Multiple Verb Commands in Requests
Although each of the sample requests in this Primer uses one verb command at a time, you
can use up to sixteen different commands in a single request, to get multiple levels of
aggregation.
In a multi-verb request, LIST or PRINT must be the last command in the request. Other
preceding display commands must be aggregating commands. An easy way to remember this
is, before you display fields (PRINT, LIST), you need to decide what you want to do to them
(SUM, COUNT).
Also, when you use a sort phrase with a verb, the verb phrases following it must repeat the
same sorting phrase using the same order. In this example, the first sorting phrase (BY
DEPARTMENT) is repeated before a new sort phrase (BY CURR_JOBCODE) is added.
Reporting Language Primer 137

Issue the following request:
TABLE FILE EMPLOYEE
SUM ED_HRS BY DEPARTMENT
PRINT LAST_NAME FIRST_NAME BY DEPARTMENT BY CURR_JOBCODE
END
Run the request. The output is:
Note: ED_HRS aggregates to the DEPARTMENT level. LAST_NAME and FIRST_NAME are based
on CURR_JOBCODE within DEPARTMENT.
Using Multiple Verb Commands in Requests
138

Applying Selection Criteria
The ability to select records can occur at four different times during the processing of a
request, as shown in the following image.
The primary difference among these possibilities is:
Before the internal matrix when you are reading individual records.
After the internal matrix when you are working with aggregated values, such as sums,
counts, averages, maximums, minimums, and so on.
Where the selection occurs can make a significant difference in the output, the performance of
the request, or both.
If you need to do your selection at the record level, you can select on a real field or select
or a virtual field (DEFINE). If you are working with a large number of records, selecting on
real fields may help speed the processing.
If you want to select on aggregated values, you can select before COMPUTE fields are
evaluated or after they are evaluated.
Applying Selection Criteria to the Internal Matrix
After records are retrieved, selected, sorted, and aggregated, the aggregated values are stored
in an internal area called an internal matrix. WHERE TOTAL tests are applied to the rows of the
internal matrix after COMPUTE calculations are processed. WHERE_GROUPED tests are applied
to the internal matrix values prior to COMPUTE calculations. The processing then continues
with COMPUTE calculations, and then WHERE TOTAL tests. This allows you to control the
evaluation, and is particularly useful in recursive calculations.
9. Advanced Features
Reporting Language Primer 139

The syntax is:
WHERE_GROUPED
expression
The following request has two COMPUTE commands. The first COMPUTE checks to see if the
department value has changed, incrementing a counter if it has. This allows you to sequence
the records in the matrix. The second COMPUTE creates a rolling total of the education hours
within the department.
TABLE FILE EMPLOYEE
SUM ED_HRS AS HOURS
COMPUTE CTR/I3 = IF DEPARTMENT EQ LST.DEPARTMENT THEN CTR+1 ELSE 1;
COMPUTE NEWHOURS = IF DEPARTMENT EQ LST.DEPARTMENT THEN NEWHOURS+ED_HRS
ELSE ED_HRS;
BY DEPARTMENT
BY EMP_ID
WHERE DEPARTMENT EQ 'MIS'
END
Run the request, The output is:
The following version of the request adds a WHERE TOTAL test to select only those employee
IDs where education hours exceeds 36.00 hours.
TABLE FILE EMPLOYEE
SUM ED_HRS AS HOURS
COMPUTE CTR/I3 = IF DEPARTMENT EQ LST.DEPARTMENT THEN CTR+1 ELSE 1;
COMPUTE NEWHOURS = IF DEPARTMENT EQ LST.DEPARTMENT THEN NEWHOURS+ED_HRS
ELSE ED_HRS;
BY DEPARTMENT
BY EMP_ID
WHERE DEPARTMENT EQ 'MIS'
WHERE TOTAL ED_HRS GT 36.00
END
Applying Selection Criteria
140

Run the request, The output is:
The COMPUTE calculations for CTR and NEWHOURS were processed prior to eliminating the
rows in which TOTAL ED_HRS were 36.00 or less, so their values are the same as in the
original output. This does not correctly reflect the sequence of records and the rolling total of
the values that are actually displayed on the output. To do this, you need to select the
appropriate employee IDs (ED_HRS GT 36.00) before the COMPUTE expressions are
evaluated. This requires WHERE_GROUPED.
The following version of the request replaces the WHERE TOTAL test with a WHERE_GROUPED
test.
TABLE FILE EMPLOYEE
SUM ED_HRS AS HOURS
COMPUTE CTR/I3 = IF DEPARTMENT EQ LST.DEPARTMENT THEN CTR+1 ELSE 1;
COMPUTE NEWHOURS = IF DEPARTMENT EQ LST.DEPARTMENT THEN NEWHOURS +ED_HRS
ELSE ED_HRS;
BY DEPARTMENT
BY EMP_ID
WHERE DEPARTMENT EQ 'MIS'
WHERE_GROUPED ED_HRS GT 36.00
END
Run the request, The output is:
The COMPUTE calculation for NEWHOURS was processed after eliminating the rows in which
TOTAL ED-HRS were 36.00 or less, so its values are based on fewer rows than the calculations
in the original request. This is verified by the CTR values, which are now in a continuous
sequence. The rolling total now reflects the values that are actually displayed on the report
output.
9. Advanced Features
Reporting Language Primer 141

Extracting Data Into a File
You can create extract files, in various formats, that contain the data output of your report
requests. Depending on the format you use, a Master File for the data may be created. You
can use these files for further reporting or import them into other programs, such as word
processors or spreadsheets.
The following commands extract and save report output in a variety of file formats:
HOLD. The HOLD command creates a data source containing the output of a report
request. By default, the data is stored in binary format, but you can specify a different
format, such as HTML, Excel, PDF, or XLSX. For some formats, the HOLD command also
creates a corresponding Master File. You can then write other report requests that in turn
extract or save data from the HOLD file.
SAVE and SAVB. The SAVE command is identical to a HOLD command, except that it does
not create a Master File, and ALPHA is the default format. If you wish to create a SAVE file
in BINARY format, use a variation of the SAVE command called SAVB. As with a HOLD file,
you can specify a variety of formats suitable for use with other software products.
PCHOLD. The PCHOLD command creates a data source containing the output of a report
request, and downloads the HOLD data source and the optional Master File to a client
computer or browser. As with a HOLD file, you can specify a variety of file formats.
Extracting Report Output
You create an extract file by adding the proper command to your report request.
The following is the simple format of the extract command:
ON TABLE {HOLD|SAVE|SAVB|PCHOLD} [AS
filename
] [FORMAT
fmt
]
To produce a HOLD file, issue the following request:
TABLE FILE EMPLOYEE
SUM CURR_SAL ED_HRS
BY DEPARTMENT
BY LAST_NAME BY FIRST_NAME
ON TABLE HOLD
END
Extracting Data Into a File
142

The ? HOLD command displays the Master File once the data is extracted. Here is what the
Master File for this request looks like:
Two SET parameters that enable you to control how data is presented in a HOLD Master File
are SET ASNAMES (controls the naming of fields) and SET TITLE (controls the naming of
column titles). For more information on SET commands, see the Developing Reporting
Applications manual.
Presenting Data in a Matrix: Financial Modeling Language
The Financial Modeling Language (FML) is an extension of the reporting language. It is
particularly suited for use with financial data from which you can produce documents, such as
balance sheets or budgets, where rows in addition to columns are interrelated. This means you
can perform calculations between rows as well as columns.
The following is a sample FML request along with the asset sheet it produces. Notice that the
FML commands are embedded in a standard TABLE request.
This annotated example is similar to a typical report request, except for the addition of the
FML keywords. The example produces a simple asset sheet, contrasting the results of two
years. The numbers refer to the explanations that follow.
9. Advanced Features
Reporting Language Primer 143

TABLE FILE FINANCE
HEADING CENTER
"Comparative Asset Sheet </2"
SUM AMOUNT ACROSS HIGHEST YEAR
IF 'YEAR' EQ '1983' OR '1982'
1. FOR ACCOUNT
2. 1000 AS 'UTILITY PLANT' LABEL UTP OVER
2. 1010 TO 1050 AS 'LESS ACCUMULATED DEPRECIATION' LABEL UTPAD OVER
3. BAR OVER
4. RECAP UTPNET=UTP-UTPAD; AS 'TOTAL PLANT-NET' OVER
BAR OVER
2000 TO 3999 AS 'INVESTMENTS' LABEL INV OVER
"CURRENT ASSETS" OVER
4000 AS 'CASH' LABEL CASH OVER
5000 TO 5999 AS 'ACCOUNTS RECEIVABLE-NET' LABEL ACR OVER
6000 AS 'INTEREST RECEIVABLE' LABEL ACI OVER
6500 AS 'FUEL INVENTORY' LABEL FUEL OVER
6600 AS 'MATERIALS AND SUPPLIES' LABEL MAT OVER
6900 AS 'OTHER' LABEL MISC OVER
BAR OVER
RECAP TOTCAS = CASH+ACR+ACI+FUEL+MAT+MISC; AS 'TOTAL CURRENT ASSETS' OVER
BAR OVER
7000 AS 'DEFERRED DEBITS' LABEL DEFDB OVER
BAR OVER
RECAP TOTAL=UTPNET+INV+TOTCAS+DEFDB; AS 'TOTAL ASSETS' OVER
BAR AS '='
FOOTING CENTER
"</2 *** PRELIMINARY ASSET SHEET BASED ON UNAUDITED FIGURES ***"
END
Note:
1. FOR and OVER are FML keywords that enable you to easily structure the report on a row-by-
row basis.
2. LABEL assigns a variable name to a line item for use in a RECAP calculation.
3. BAR enables you to underline a column of numbers before performing a RECAP calculation.
4. RECAP allows a calculated row to be inserted anywhere in the output.
Presenting Data in a Matrix: Financial Modeling Language
144

Run the request. The output is:
Reporting Dynamically From a Hierarchy
Hierarchical relationships between fields can be defined in a Master File, and automatically
displayed using the Financial Modeling Language (FML). The parent and child fields must share
data values, and their relationship should be hierarchical. The formats of the parent and child
fields must both be either numeric or alphanumeric.
9. Advanced Features
Reporting Language Primer 145

With FML hierarchies, you can define the hierarchical relationship between two fields in the
Master File and load this information into memory. The FML request can then dynamically
construct the rows that represent this relationship and display them in the report, starting at
any point in the hierarchy.
Defining a Hierarchy in a Master File
The CENTGL Master File contains a chart of accounts hierarchy.
The GL_ACCOUNT_PARENT field is the parent field in the hierarchy (described by
PROPERTY=PARENT_OF, REFERENCE=GL_ACCOUNT).
The GL_ACCOUNT field is the hierarchy field.
The GL_ACCOUNT_CAPTION field can be used as the descriptive caption for the hierarchy
field (described by PROPERTY=CAPTION, REFERENCE=GL_ACCOUNT).
FILE=CENTGL ,SUFFIX=FOC
SEGNAME=ACCOUNTS,SEGTYPE=S01
FIELDNAME=GL_ACCOUNT, ALIAS=GLACCT, FORMAT=A7,
TITLE='Ledger,Account', FIELDTYPE=I, $
FIELDNAME=GL_ACCOUNT_PARENT, ALIAS=GLPAR, FORMAT=A7,
TITLE=Parent, PROPERTY=PARENT_OF, REFERENCE=GL_ACCOUNT, $
FIELDNAME=GL_ACCOUNT_TYPE, ALIAS=GLTYPE, FORMAT=A1,
TITLE=Type,$
FIELDNAME=GL_ROLLUP_OP, ALIAS=GLROLL, FORMAT=A1,
TITLE=Op, $
FIELDNAME=GL_ACCOUNT_LEVEL, ALIAS=GLLEVEL, FORMAT=I3,
TITLE=Lev, $
FIELDNAME=GL_ACCOUNT_CAPTION, ALIAS=GLCAP, FORMAT=A30,
TITLE=Caption, PROPERTY=CAPTION, REFERENCE=GL_ACCOUNT, $
FIELDNAME=SYS_ACCOUNT, ALIAS=ALINE, FORMAT=A6,
TITLE='System,Account,Line', MISSING=ON, $
The CENTSYSF data source contains detail-level financial data. This is unconsolidated financial
data for a fictional corporation, CenturyCorp. It is designed to be separate from the CENTGL
database, as if it came from an external accounting system. It uses a different account line
system (SYS_ACCOUNT) which can be joined to the SYS_ACCOUNT field in CENTGL. The data
uses natural signs (expenses are positive, revenue negative).
FILE=CENTSYSF ,SUFFIX=FOC
SEGNAME=RAWDATA ,SEGTYPE=S2
FIELDNAME=SYS_ACCOUNT , ,A6 , FIELDTYPE=I,
TITLE='System,Account,Line', $
FIELDNAME=PERIOD , ,YYM , FIELDTYPE=I, $
FIELDNAME=NAT_AMOUNT , ,D10.0 , TITLE='Month,Actual', $
FIELDNAME=NAT_BUDGET , ,D10.0 , TITLE='Month,Budget', $
FIELDNAME=NAT_YTDAMT , ,D12.0 , TITLE='YTD,Actual', $
Presenting Data in a Matrix: Financial Modeling Language
146

Displaying an FML Hierarchy
The GET CHILDREN and WITH CHILDREN commands dynamically retrieve and display
hierarchical data on the FML report. GET CHILDREN displays only the children, not the parent
value referenced in the command. WITH CHILDREN displays the parent and then the children.
The following request displays hierarchical account data for account number 3100.
1. SET NODATA=' '
2. JOIN SYS_ACCOUNT IN CENTGL TO ALL SYS_ACCOUNT IN CENTSYSF
3. TABLE FILE CENTGL
4. HEADING CENTER
5. "Hierarchical Report of Selling Expenses"
6. SUM NAT_AMOUNT NAT_YTDAMT
7. FOR GL_ACCOUNT
8. 3100 WITH CHILDREN ALL AS CAPTION OVER
9. BAR AS - OVER
10. 3100 ADD ALL AS 'Total Group 1' OVER
11. BAR AS = OVER
12. " " OVER
13. 3100 AS CAPTION OVER
14. 3100 GET CHILDREN ADD AS CAPTION OVER
15. BAR AS - OVER
16. 3100 ADD ALL AS 'Total Group 2' OVER
17. BAR AS =
18. IF PERIOD EQ '2002/03'
19. ON TABLE SET BLANKINDENT ON
20. ON TABLE SET FORMULTIPLE ON
21. ON TABLE SET PAGE NOPAGE
22. ON TABLE NOTOTAL
23. END
Note:
8. WITH CHILDREN ALL shows parent and all lower-level children. Caption indicates the field
that contains the description that will be on the report based on the account number in the
synonym (ELEMENT=CAPTION).
10. ADD ALL consolidates the totals at the parent level.
13. Shows just the parent description by itself, no children or totals.
14. GET CHILDREN ADD consolidates totals to the first child level.
16. Consolidates the totals at the parent level. The same as number 10.
19. The SET BLANKINDENT command creates an indent at the next child level.
20. The SET FORMULTIPLE command allows the use of the FOR value in multiple parts of the
request.
9. Advanced Features
Reporting Language Primer 147

Run the request. The output is:
Customizing Your Environment Using SET Commands
You can use SET commands to override default actions that govern your WebFOCUS,
WebFOCUS App Studio, or FOCUS environment. SET command parameters control the content
of reports and charts, in addition to system responses to requests and data retrieval
characteristics that affect performance. SET commands also help you set up metadata and
manipulate information, such as dates.
Issuing SET Commands
You can issue a SET command by coding it directly in a stored procedure or by using the SET
tool. If you use the SET tool, a SET command will be generated, in the stored procedure, for
the report you are developing.
The format of a SET command is:
SET
parameter
=
option
Customizing Your Environment Using SET Commands
148
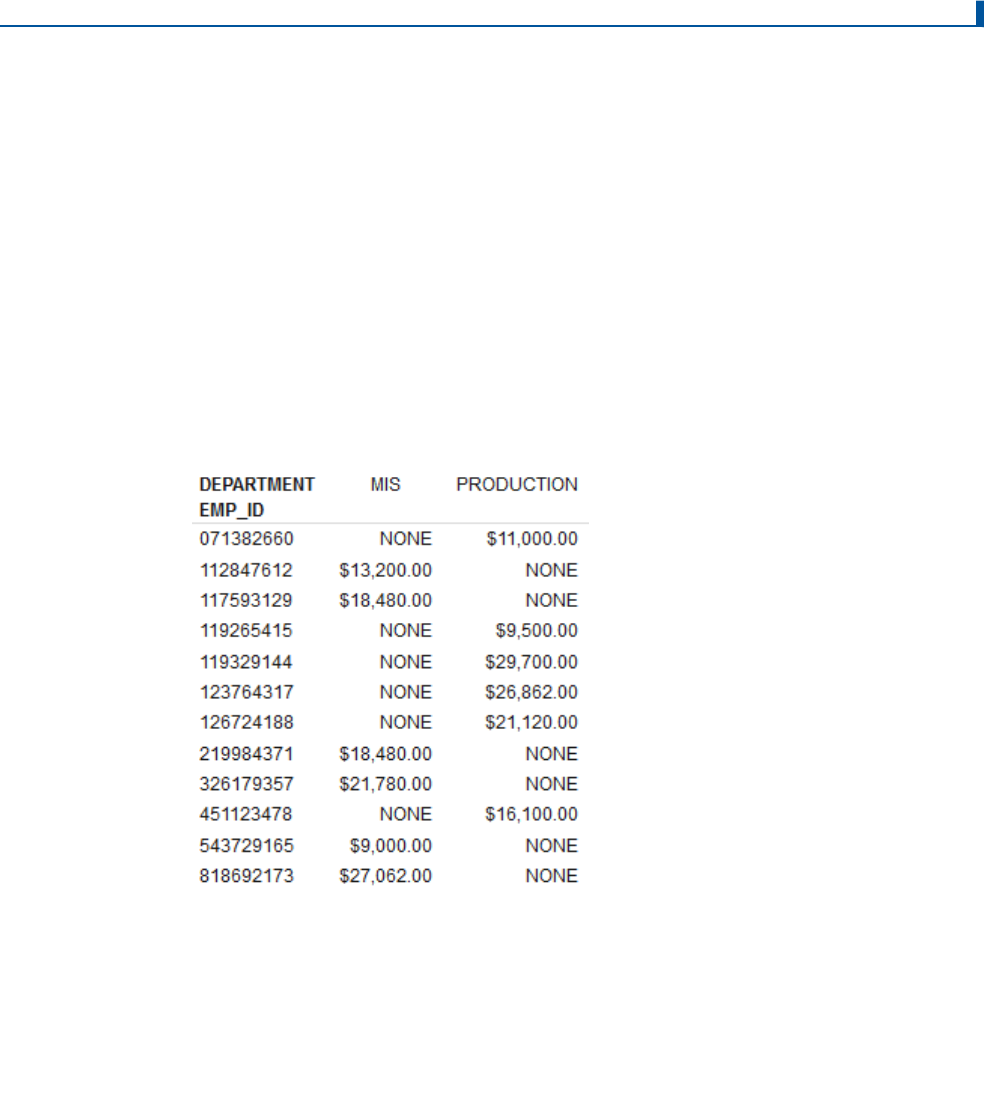
You have a choice of different parameters that control different aspects of the product. Each
parameter has a set of options, one of which is usually a default setting. You can change the
parameters and the options for the parameters.
To change the default character for missing data (NODATA) from a period to the word NONE
and to suppress default page numbering (PAGE-NUM), issue the following command:
SET NODATA=NONE, PAGE-NUM=OFF
To see the result, issue the following request:
TABLE FILE EMPLOYEE
PRINT CURR_SAL BY EMP_ID
ACROSS DEPARTMENT
END
Run the request. The output is:
In the output, NONE appears when there is no salary information for a specific employee,
because that employee does not work in the department that is referenced. There is no page
number at the top of the output.
To see a list of most often used SET commands, issue the following request:
? SET
END
9. Advanced Features
Reporting Language Primer 149

Run the request. The output is:
Note:
The parameters may be different depending on your platform and release.
To see a more detailed list of SET commands, issue the following command:
? SET ALL
A complete list of SET commands and their options is available in the TIBCO WebFOCUS
®
Developing Reporting Applications manual.
Customizing Your Environment Using SET Commands
150

Creating a Synonym
When the server accesses a data source, it needs to know how to interpret the data stored
there. To obtain the necessary information, your application reads a data source description,
also called a synonym. A synonym consists of a Master File (.mas) and, for some data
sources, an Access File (.acx). A Master File describes the structure of a data source, its
fields, and the mapping of the data types. An Access File supplements a Master File and
includes additional information that completes the description of the data source, for example,
the full data source name and location. You need one Master File and, for some data sources,
one Access File to describe a data source.
When the server needs to retrieve data from the data source, it needs to know how to interpret
the request and how to format an answer set from the response, for example, creating dialect-
specific SQL for data retrieval. If you already have a configured adapter, you can connect to a
data source to build reports. Whatever your data source, the adapter you are using manages
the synonym creation process for you. Synonyms define unique names (or aliases) for each
table and view that is accessible from the server. Synonyms are useful because they hide the
underlying data source location and identity from client applications. They also provide support
for extended metadata features of the server, such as virtual fields and additional security
mechanisms.
Once you have generated a synonym from the WebFOCUS start page, which provides an
automatic and error-free synonym creation tool, you can report against the synonym. In many
instances, the configured adapter and the generated synonym are all you need to access your
data and create reports. However, you may wish to enhance the synonym in order to
implement particular capabilities that are supported in the WebFOCUS data description
language.
The following are the steps to create a synonym:
1. Depending on the product or tool you are using, see the appropriate manual for how to
connect to a data source.
2. Select a connection to the data source, for example, Microsoft SQL Server or Db2, and
show the objects within the data source.
3. Select one or more tables for synonym creation. If you select more than one table, you can
create a cluster synonym or single, separate synonyms.
4. Once you create the synonym, the Synonym Editor opens so that you can enhance the
synonym before saving it, if necessary.
9. Advanced Features
Reporting Language Primer 151

Enhancing a Synonym
The following are some of the attributes you might want to add to the synonym to enhance your
data access and reporting capabilities:
Create a business view of the metadata in order to limit the fields available to any retrieval
request and to group fields together based on their roles, for example, Measures and
Dimensions. Fields can be grouped into a meaningful folder structure. Field names, titles,
and descriptions can be customized for each Business View.
Create a cluster join view by linking available synonyms to create a multi-segment (multi-
table) file.
Create a multi-fact table by using two or more root tables that have only descendants, not
parents.
Define parent and child hierarchies for cube and non-cube data sources.
Rename field names and add meaningful titles and descriptions, including multi-language
variations.
Add virtual columns (DEFINE fields) and columns for aggregated values (COMPUTE fields).
Add filters to specify data selection criteria.
Add group definitions for data sources that support groups (binning).
Change the format of fields, for example, the size of an alphanumeric field or the format of
a date field.
Define parent and child hierarchies for cube data sources.
Apply security rules for fields and values to ensure that user access is based on data
source security (DBA) specifications.
For information about reporting against single view or cluster views, including multi-fact tables,
see the Creating Reports With TIBCO WebFOCUS
®
Language manual.
Creating a Synonym
152

Appendix
A
Data Sources and Master Files
This appendix provides a description of the data sources used in the reporting language
examples.
The file that describes a data source is called a Master File. This file provides the names
and formats of each field in the data source.
You can display the structure of a data source by issuing the following command:
CHECK FILE
filename
PICTURE
In this appendix:
EMPLOYEE Data Source
JOBFILE Data Source
EDUCFILE Data Source
EMPDATA Data Source
FINANCE Data Source
SALHIST Master File
CENTGL Master File
CENTSYSF Master File
Reporting Language Primer 153

EMPLOYEE Data Source
EMPLOYEE contains sample data about company employees.
The following is the EMPLOYEE Master File for your reference.
FILENAME=EMPLOYEE, SUFFIX=FOC
SEGNAME=EMPINFO, SEGTYPE=S1
FIELDNAME=EMP_ID, ALIAS=EID, FORMAT=A9, $
FIELDNAME=LAST_NAME, ALIAS=LN, FORMAT=A15, $
FIELDNAME=FIRST_NAME, ALIAS=FN, FORMAT=A10, $
FIELDNAME=HIRE_DATE, ALIAS=HDT, FORMAT=I6YMD, $
FIELDNAME=DEPARTMENT, ALIAS=DPT, FORMAT=A10, $
FIELDNAME=CURR_SAL, ALIAS=CSAL, FORMAT=D12.2M, $
FIELDNAME=CURR_JOBCODE, ALIAS=CJC, FORMAT=A3, $
FIELDNAME=ED_HRS, ALIAS=OJT, FORMAT=F6.2, $
SEGNAME=FUNDTRAN, SEGTYPE=U, PARENT=EMPINFO
FIELDNAME=BANK_NAME, ALIAS=BN, FORMAT=A20, $
FIELDNAME=BANK_CODE, ALIAS=BC, FORMAT=I6S, $
FIELDNAME=BANK_ACCT, ALIAS=BA, FORMAT=I9S, $
FIELDNAME=EFFECT_DATE, ALIAS=EDATE, FORMAT=I6YMD, $
SEGNAME=PAYINFO, SEGTYPE=SH1, PARENT=EMPINFO
FIELDNAME=DAT_INC, ALIAS=DI, FORMAT=I6YMD, $
FIELDNAME=PCT_INC, ALIAS=PI, FORMAT=F6.2, $
FIELDNAME=SALARY, ALIAS=SAL, FORMAT=D12.2M, $
FIELDNAME=JOBCODE, ALIAS=JBC, FORMAT=A3, $
SEGNAME=ADDRESS, SEGTYPE=S1, PARENT=EMPINFO
FIELDNAME=TYPE, ALIAS=AT, FORMAT=A4, $
FIELDNAME=ADDRESS_LN1, ALIAS=LN1, FORMAT=A20, $
FIELDNAME=ADDRESS_LN2, ALIAS=LN2, FORMAT=A20, $
FIELDNAME=ADDRESS_LN3, ALIAS=LN3, FORMAT=A20, $
FIELDNAME=ACCTNUMBER, ALIAS=ANO, FORMAT=I9L, $
SEGNAME=SALINFO, SEGTYPE=SH1, PARENT=EMPINFO
FIELDNAME=PAY_DATE, ALIAS=PD, FORMAT=I6YMD, $
FIELDNAME=GROSS, ALIAS=MO_PAY, FORMAT=D12.2M, $
SEGNAME=DEDUCT, SEGTYPE=S1, PARENT=SALINFO
FIELDNAME=DED_CODE, ALIAS=DC, FORMAT=A4, $
FIELDNAME=DED_AMT, ALIAS=DA, FORMAT=D12.2M, $
SEGNAME=JOBSEG, SEGTYPE=KU, PARENT=PAYINFO, CRFILE=JOBFILE,
CRKEY=JOBCODE,$
SEGNAME=SECSEG, SEGTYPE=KLU, PARENT=JOBSEG, CRFILE=JOBFILE, $
SEGNAME=SKILLSEG, SEGTYPE=KL, PARENT=JOBSEG, CRFILE=JOBFILE, $
SEGNAME=ATTNDSEG, SEGTYPE=KM, PARENT=EMPINFO, CRFILE=EDUCFILE,
CRKEY=EMP_ID,$
SEGNAME=COURSEG, SEGTYPE=KLU, PARENT=ATTNDSEG, CRFILE=EDUCFILE,$
EMPLOYEE Data Source
154

The following diagram illustrates the structure of the EMPLOYEE data source.
A. Data Sources and Master Files
Reporting Language Primer 155

JOBFILE Data Source
JOBFILE contains sample data about company job positions.
The following is the JOBFILE Master File for your reference.
FILENAME=JOBFILE, SUFFIX=FOC
SEGNAME=JOBSEG, SEGTYPE=S1
FIELDNAME=JOBCODE, ALIAS=JC, FORMAT=A3, INDEX=I,$
FIELDNAME=JOB_DESC, ALIAS=JD, FORMAT=A25 ,$
SEGNAME=SKILLSEG, SEGTYPE=S1, PARENT=JOBSEG
FIELDNAME=SKILLS, ALIAS=, FORMAT=A4 ,$
FIELDNAME=SKILL_DESC, ALIAS=SD, FORMAT=A30 ,$
SEGNAME=SECSEG, SEGTYPE=U, PARENT=JOBSEG
FIELDNAME=SEC_CLEAR, ALIAS=SC, FORMAT=A6 ,$
The following diagram illustrates the structure of the JOBFILE data source.
JOBSEG
01 S1
**************
*JOBCODE **I
*JOB_DESC **
* **
* **
* **
***************
**************
I
+-----------------+
I I
I SECSEG I SKILLSEG
02 I U 03 I S1
************** *************
*SEC_CLEAR * *SKILLS **
* * *SKILL_DESC **
* * * **
* * * **
* * * **
************** **************
*************
JOBFILE Data Source
156

EDUCFILE Data Source
EDUCFILE contains sample data about company in-house courses.
The following is the EDUCFILE Master File for your reference.
FILENAME=EDUCFILE, SUFFIX=FOC
SEGNAME=COURSEG, SEGTYPE=S1
FIELDNAME=COURSE_CODE, ALIAS=CC, FORMAT=A6, $
FIELDNAME=COURSE_NAME, ALIAS=CD, FORMAT=A30, $
SEGNAME=ATTNDSEG, SEGTYPE=SH2, PARENT=COURSEG
FIELDNAME=DATE_ATTEND, ALIAS=DA, FORMAT=I6YMD, $
FIELDNAME=EMP_ID, ALIAS=EID, FORMAT=A9, INDEX=I, $
The following diagram illustrates the structure of the EDUCFILE data source.
COURSEG
01 S1
**************
*COURSE_CODE **
*COURSE_NAME **
* **
* **
* **
***************
**************
I
I
I
I ATTNDSEG
02 I SH2
**************
*DATE_ATTEND **
*EMP_ID **I
* **
* **
* **
***************
**************
A. Data Sources and Master Files
Reporting Language Primer 157

EMPDATA Data Source
EMPDATA contains sample data about company employees.
The following is the EMPDATA Master File for your reference.
FILENAME=EMPDATA, SUFFIX=FOC
SEGNAME=EMPDATA, SEGTYPE=S1
FIELDNAME=PIN, ALIAS=ID, FORMAT=A9, INDEX=I, $
FIELDNAME=LASTNAME, ALIAS=LN, FORMAT=A15, $
FIELDNAME=FIRSTNAME, ALIAS=FN, FORMAT=A10, $
FIELDNAME=MIDINITIAL, ALIAS=MI, FORMAT=A1, $
FIELDNAME=DIV, ALIAS=CDIV, FORMAT=A4, $
FIELDNAME=DEPT, ALIAS=CDEPT, FORMAT=A20, $
FIELDNAME=JOBCLASS, ALIAS=CJCLAS, FORMAT=A8, $
FIELDNAME=TITLE, ALIAS=CFUNC, FORMAT=A20, $
FIELDNAME=SALARY, ALIAS=CSAL, FORMAT=D12.2M, $
FIELDNAME=HIREDATE, ALIAS=HDAT, FORMAT=YMD, $
$
DEFINE AREA/A13=DECODE DIV (NE 'NORTH EASTERN' SE 'SOUTH EASTERN'
CE 'CENTRAL' WE 'WESTERN' CORP 'CORPORATE' ELSE 'INVALID AREA');$
The following diagram illustrates the structure of the EMPDATA data source.
EMPDATA
01 S1
**************
*PIN **I
*LASTNAME **
*FIRSTNAME **
*MIDINITIAL **
* **
***************
**************
EMPDATA Data Source
158

FINANCE Data Source
FINANCE contains sample financial data for balance sheets. Aliases do not exist for the fields
in this Master File, and the commas (,) act as placeholders.
The following is the FINANCE Master File for your reference.
FILENAME=FINANCE, SUFFIX=FOC,$
SEGNAME=TOP, SEGTYPE=S2,$
FIELDNAME=YEAR , , FORMAT=A4, $
FIELDNAME=ACCOUNT, , FORMAT=A4, $
FIELDNAME=AMOUNT , , FORMAT=D12C,$
The following diagram illustrates the structure of the FINANCE data source.
TOP
01 S2
**************
*YEAR **
*ACCOUNT **
*AMOUNT **
* **
* **
***************
**************
SALHIST Master File
SALHIST contains information about employee salary history.
The following is the SALHIST Master File for your reference.
FILENAME=SALHIST, SUFFIX=FOC
SEGNAME=SLHISTRY, SEGTYPE=SH2
FIELDNAME=PIN, ALIAS=ID, FORMAT=A9, INDEX=I, $
FIELDNAME=EFFECTDATE, ALIAS=EDAT, FORMAT=YMD, $
FIELDNAME=OLDSALARY, ALIAS=OSAL, FORMAT=D12.2, $
The following diagram illustrates the structure of the SALHIST data source.
SLHISTRY
01 SH2
**************
*PIN **I
*EFFECTDATE **
*OLDSALARY **
* **
* **
***************
**************
A. Data Sources and Master Files
Reporting Language Primer 159

CENTGL Master File
CENTGL contains a chart of accounts hierarchy.
FILE=CENTGL ,SUFFIX=FOC
SEGNAME=ACCOUNTS,SEGTYPE=S01
FIELDNAME=GL_ACCOUNT, ALIAS=GLACCT, FORMAT=A7,
TITLE='Ledger,Account', FIELDTYPE=I, $
FIELDNAME=GL_ACCOUNT_PARENT, ALIAS=GLPAR, FORMAT=A7,
TITLE=Parent, PROPERTY=PARENT_OF, REFERENCE=GL_ACCOUNT, $
FIELDNAME=GL_ACCOUNT_TYPE, ALIAS=GLTYPE, FORMAT=A1,
TITLE=Type,$
FIELDNAME=GL_ROLLUP_OP, ALIAS=GLROLL, FORMAT=A1,
TITLE=Op, $
FIELDNAME=GL_ACCOUNT_LEVEL, ALIAS=GLLEVEL, FORMAT=I3,
TITLE=Lev, $
FIELDNAME=GL_ACCOUNT_CAPTION, ALIAS=GLCAP, FORMAT=A30,
TITLE=Caption, PROPERTY=CAPTION, REFERENCE=GL_ACCOUNT, $
FIELDNAME=SYS_ACCOUNT, ALIAS=ALINE, FORMAT=A6,
TITLE='System,Account,Line', MISSING=ON, $
The following diagram illustrates the structure of the CENTGL data source.
ACCOUNTS
01 S1
**************
*GL_ACCOUNT **I
*GL_ACCOUNT_>**
*GL_ACCOUNT_>**
*GL_ROLLUP_OP**
* **
***************
**************
CENTSYSF Master File
CENTSYSF contains detail-level financial data.
FILE=CENTSYSF ,SUFFIX=FOC
SEGNAME=RAWDATA ,SEGTYPE=S2
FIELDNAME=SYS_ACCOUNT , ,A6 , FIELDTYPE=I,
TITLE='System,Account,Line', $
FIELDNAME=PERIOD , ,YYM , FIELDTYPE=I, $
FIELDNAME=NAT_AMOUNT , ,D10.0 , TITLE='Month,Actual', $
FIELDNAME=NAT_BUDGET , ,D10.0 , TITLE='Month,Budget', $
FIELDNAME=NAT_YTDAMT , ,D12.0 , TITLE='YTD,Actual', $
CENTGL Master File
160

The following diagram illustrates the structure of the CENTSYSF data source.
RAWDATA
01 S2
**************
*SYS_ACCOUNT **I
*PERIOD **I
*NAT_ACCOUNT **
*NAT_BUDGET **
* **
***************
**************
A. Data Sources and Master Files
Reporting Language Primer 161

CENTSYSF Master File
162

Appendix
B
Reporting Language Syntax Summary
This appendix provides you with a syntax summary of reporting language commands.
In this appendix:
Reporting Language Summary
Reporting Language Summary
The syntax of a TABLE request is:
DEFINE FILE filename [CLEAR|ADD]
tempfield
[/
format
]
[{DEFCENT|DFC} {cc|19} {YRTHRESH|YRT} {[-]yy|0}]
[MISSING {ON|OFF} [NEEDS] {SOME|ALL} [DATA]]
[(GEOGRAPHIC_ROLE =
georole
)] [WITH
realfield
]
[TITLE '
line1
[,
line2
...']]
[DESCRIPTION '
description
'] =
expression
;
tempfield
[/
format
] REDEFINES
qualifier.fieldname = expression
;
.
.
.
END
TABLE FILE
filename
HEADING [CENTER]
"
text
"
{
display_command
} [SEG.]
field
[/R|/L|/C] [/
format
]
{
display_command
} [
prefixop
.] [
field
] [/R|/L|/C] [/
format
]
[NOPRINT|AS '
title1,...,title5
'] [AND|OVER] [
obj2...obj1024
]
[WITHIN
field
] [IN [+]
n
]
COMPUTE
field
[/
format
] [(GEOGRAPHIC_ROLE =
georole
)] =
expression
; [AS '
title,...,title5
'] [IN [+]
n
]
[AND] ROW-TOTAL [/R|/L|/C] [/
format
] [AS '
name
']
[AND] COLUMN-TOTAL [/R|/L|/C] [AS '
name
']
ACROSS [HIGHEST]
sortfieldn
[IN-GROUPS-OF
qty
]
[NOPRINT] AS '
title1,...,title5
']
BY [HIGHEST]
sortfieldn
[IN-GROUPS-OF
qty
]
[NOPRINT] AS '
title1,...,title5
']
BY [HIGHEST|LOWEST{
n
}] TOTAL [
prefix_operator
] {
field
|
code_value
}
RANKED [AS '
name
'] BY {TOP|HIGHEST|LOWEST} [
n
]
field
[PLUS OTHERS AS '
othertext
']
[IN-GROUPS-OF
qty
[TILES [TOP
m
]] [AS '
heading
']]
[NOPRINT|AS '
title1
,...,
title5
']
Reporting Language Primer 163

{BY|ACROSS}
sortfield
IN-RANGES-OF value [TOP
limit
]
ON
sfld option1
[AND]
option2
[WHEN
expression;...
]
ON
sfld
RECAP
fld1
[/
fmt
] = FORECAST (
fld2
,
intvl
,
npredct
,
'{MOVAVE|EXPAVE}',
npnt
);
ON
sfld
RECAP
fld1
[/
fmt
] = FORECAST(
fld2
,
interval
,
npredict
, 'DOUBLEXP',
npoint1
,
npoint2
);
ON
sfld
RECAP
fld1
[/
fmt
] = FORECAST(
fld2
,
interval
,
npredict
, 'SEASONAL',
nperiod
,
npoint1
,
npoint2
,
npoint3
);
ON
sfld
RECAP
fld1
[/
fmt
] = FORECAST (
fld2
,
intvl
,
npredct
, 'REGRESS');
ON {
sortfield
|TABLE} RECAP
y
[/
fmt
] = REGRESS(
n
,
x1
, [
x2
, [
x3
,]]
z
);
ON
sfld
RECAP
fld1
[/
fmt
] = FORECAST (
infield
,
interval
,
npredict
,
'DOUBLEXP',
npoint, npoint2
);
ON
sfld
RECAP
fld1
[/
fmt
] = FORECAST (
infield, interval, npredict
,
'SEASONAL',
nperiod, npoint, npoint2, npoint3
);{BY|ON}
fieldname
SUBHEAD
[NEWPAGE]
"
text
"
{BY|ON}
fieldname
SUBFOOT [WITHIN] [MULTILINES] [NEWPAGE]
"
text
" [<
prefop
.
fieldname
... ]" [WHEN
expression
;]
WHERE [TOTAL]
expression
WHERE {RECORDLIMIT|READLIMIT} EQ
n
IF [TOTAL]
field relation value
[OR
value
...]
WHERE_GROUPED
expression
ON TABLE SET
parameter value
ON TABLE HOLD [VIA
program
][AS
name
] [FORMAT
format
] [DATASET
dataset
]
[MISSING {ON|OFF}] [PERSISTENCE {STAGE|PERMANENT}]
ON TABLE {PCHOLD|SAVE|SAVB} [AS
name
] [FORMAT
format
] [MISSING {ON|OFF}]
ON TABLE NOTOTAL
ON TABLE COLUMN-TOTAL [/R|/L|/C] [AS '
name
']
fieldname
ON TABLE {ROW-TOTAL|ACROSS-TOTAL}[/R|/L|/C][
format
] [AS '
name
']
fieldname
{BY|ON}
sfld
[AS '
text1
'] {SUBTOTAL|SUB-TOTAL|SUMMARIZE|RECOMPUTE}
[MULTILINES] [
pref
.] [
field1
[
pref
.]
field2
...] [AS '
text2
']
[WHEN
expression
;]
{ACROSS|ON}
sfld
[AS '
text1
'] {SUBTOTAL|SUB-TOTAL|SUMMARIZE|RECOMPUTE}
[AS '
text2
'] [COLUMNS
c1
[AND
c2
...]]
ON TABLE {SUBTOTAL|SUB-TOTAL|SUMMARIZE|RECOMPUTE}
[
pref
.] [
field1
[
pref
.]
field2
...] [AS '
text2
']
FOOTING [CENTER] [BOTTOM]
"
text
"
MORE
FILE
file2
[IF
field relation value
[OR
value
...]|WHERE
expression
]
END
Reporting Language Summary
164

Glossary
This glossary includes definitions of reporting language terminology and general computer
terminology used in this Primer.
?F
Query command that displays the names of fields in an identified
data source.
? DEFINE
Query command that displays a list of fields created with the
DEFINE command.
? HOLD
Query command that displays the fields in a HOLD file Master File.
? JOIN
Query command that lists the Joins currently in effect.
? n
Query command that displays the meaning of a specified error
message. You replace the n with the error message number in
question.
? REL
Query command that displays the release in use.
? SET
Query command that displays SET parameters and option settings.
Accordion Report
Provides an interactive interface to data aggregated at multiple
levels by presenting the sort fields within an expandable tree. By
default, the report will present the highest dimension or sort field
(BY value) and the aggregated measures associated with each
value. You can use the tree control to open or close each
dimension and view the associated aggregated values.
Reporting Language Primer 165

ACROSS
Keyword that starts a sort phrase. ACROSS uses the order of
values in the first highest-order sort field to control the order of
records. Each unique sort field value produces a column across the
page.
Active Technologies report
Designed for offline analysis. When using an active report, you can
interact with data, using analysis options similar to those found in
an Excel workbook. Since no connection to a server is required to
view the data or use the analysis options, you can save and use
the report anywhere. Analysis options include filtering, sorting,
charting, and much more.
ADD
Keyword used in a DEFINE command to add to, rather than erase,
existing temporary fields created with a previous DEFINE.
aggregating verb
Verbs that group data (SUM and COUNT). SUM adds the value of
data values and COUNT counts the number of those values. WRITE
is a synonym for SUM.
aggregation
Process of grouping records to produce summary information, not
individual values.
alphanumeric
Term that identifies format of fields and type of data stored in
those fields. The letters of the alphabet, numbers, punctuation
marks, and other special symbols can all be stored in an
alphanumeric field. Numbers stored in alphanumeric fields cannot
be used in calculations.
AND
Logical operator used in conditional statements to screen records.
This operator requires that each and every condition connected by it
be true in order for a record to be retrieved. The word AND used
outside of a WHERE or WHEN condition is optional for clarity.
Glossary
166

AS
Keyword that changes the default title of columns in a report. The
AS phrase consists of AS followed by a new title enclosed in single
quotation marks (').
ASNAMES
Parameter used with the SET command that controls the naming of
fields in HOLD files.
BOTTOM
Keyword that changes the default position of footings from two
lines below the last line of output to the bottom of each page when
used in conjunction with FOOTING.
BY
Keyword that starts a sort phrase. BY uses the order of values in
the highest-order sort field to control the order of records. Each
value in the sort field is displayed in a row on the page.
BYDISPLAY
Displays sort field values for every row.
CENTER
Keyword that changes the default position of headings and footings
from left-justified to centered. CENTER is used in conjunction with
HEADING and FOOTING.
character string
A sequence of characters enclosed in single quotation marks (') or
double quotation marks ("), depending on the command with which
it is used.
Glossary
Reporting Language Primer 167

chart
Any type of chart produced by the GRAPH command. A chart
presents the same kinds of information as tabular reports, but in a
wide variety of two-dimensional and three-dimensional chart types.
Charts allow you to present information graphically, using such
visual cues as color, size, and position to convey relationships
between measures (numeric fields to be aggregated) and
dimensions (categories) and to identify trends and outliers.
column
Vertical collection of data.
COLSPAN
Allows heading, subheading, footing, and subfooting items to span
multiple columns.
COLUMN-TOTAL
Command used with a verb command to produce totals for all
columns that contain numeric values. When used with the ON
TABLE phrase, COLUMN-TOTAL produces totals for specified
columns that contain numeric values. When used with ROW-TOTAL,
it produces a matrix report.
command
Any instruction issued to WebFOCUS, WebFOCUS App Studio, or
FOCUS that performs an action.
COMPUTE
Command that creates temporary fields AFTER records have been
retrieved. These are not real fields. They apply only to the request
in which they are created.
concatenation
Process of connecting one alphanumeric field value to another. The
two types of concatenation are weak, which maintains trailing
blanks in the field to which you are concatenating, and strong
concatenation, which eliminates trailing blanks in the field to which
you are concatenating.
Glossary
168

conditional phrase
Phrase initiated by the WHERE keyword that specifies requirements
or conditions in conjunction with logical and relational operators to
screen unwanted records and select desired ones.
CONTAINS
Relational operator used in a WHERE phrase to screen
alphanumeric records. CONTAINS ensures that records containing
the specified literal are retrieved. OMITS is the reverse of
CONTAINS.
COUNT
Aggregating verb command that counts the number of non-
distinctive values that exist for any field or fields specified by it.
data
Information used to create reports. The data for the EMPLOYEE
data source is stored in units called fields.
data source
One or more files used to store and maintain a collection of related
records.
DECODE
Command that translates characters stored in a field into a user-
supplied value.
default
Predetermined setting that causes automatic action. Many defaults
can be changed.
DEFINE
Command that creates temporary fields BEFORE a request is
written. Treated just like real fields, these last for an entire session
and can be used to sort and select records.
dimensions
Fields used for sorting and categorizing data. The fields are usually,
but not always, alphanumeric fields.
Glossary
Reporting Language Primer 169

display commands
Present data in the reporting language, commonly called verbs.
PRINT and LIST display each record: PRINT displays individual data,
LIST displays individual data in a numbered list. SUM and COUNT
process multiple records: SUM returns a single value, typically the
sum total. COUNT counts and displays the number of data
occurrences.
drill-down report
Enables you to create links from report data (including headings
and footings) as well as graphic images (such as a company logo or
product image), to other reports, procedures, URLs, or JavaScript
functions.
drill-through report
Enables you to create a PDF document that contains a summary
report plus detail reports, where the detail reports contain all the
detail data for designated fields in the summary report.
EDIT
Function that changes the display of alphanumeric fields, extracts
part of a field, or changes alphanumeric fields to integer fields or
integer fields to alphanumeric fields.
EDUCFILE data source
Source of data for reports in this Primer. EDUCFILE contains
sample data about company in-house courses.
EMPDATA data source
Source of data for reports in this Primer. EMPDATA contains sample
data about company employees.
EMPLOYEE data source
Source of data for reports in this Primer. EMPLOYEE contains
sample data about company employees.
Glossary
170

Excel Compound Report
Provides a way to generate multiple worksheet reports using the
XLSX output format. By default, each of the component reports
from the compound report is placed in a new Excel worksheet.
FINANCE data source
Source of data for the Financial Modeling Language (FML) report in
this Primer. FINANCE contains sample financial data for balance
sheets.
END
Command that terminates and executes a report request and
breaks connection to the data source named in the TABLE FILE
command.
ENTER key
Key used to transmit WebFOCUS, WebFOCUS App Studio, or FOCUS
commands on some systems.
entering commands
Process of transmitting commands to WebFOCUS, WebFOCUS App
Studio, or FOCUS. Requires pressing of either ENTER or RETURN
key, depending on system used. Synonymous with issuing
commands.
error message
Message produced and displayed each time a mistake is made.
Mistakes can be typos or misuse of commands.
EX
Command used to execute a FOCEXEC.
expression
Calculation or equation provided by the user for use with
commands and phrases, such as COMPUTE, DEFINE, WHEN, and
WHERE.
Glossary
Reporting Language Primer 171

field
Unit of a data source that stores data called field values. Each field
in a data source has a name and the field names are usually
unique.
field name
Name that identifies fields in a data source. Often used
synonymously with field. Field names specify which fields contain
the data values to include in a report.
field name variable
Field name used as a variable (changes when the field value
changes) in headings and footings.
field value
Value contained in a field. For example, the name Banning is a
value in the field named LAST_NAME.
Financial Modeling
Language (FML)
Extension of the reporting language, which produces reports with
interrelated columns and rows.
financial report
Specifically designed to handle the task of creating, calculating,
and presenting financially oriented data, such as balance sheets,
consolidations, and budgets. You design the content of the report
on a row-by-row basis. This organization provides a number of
advantages, including easily defined inter-row and inter-column
calculations, formatting on a cell-by-cell basis, and saving individual
rows and row titles in extract files.
FML hierarchy
Defines the hierarchical relationship between two fields in the
Master File and loads this information into memory. The FML
request can then dynamically construct the rows that represent this
relationship and display them in the report, starting at any point in
the hierarchy.
Glossary
172

FOCEXEC
A set of commands that can be edited, saved, and executed at any
time. This set of commands is stored as straight text. No
formatting codes or codes created by many word processors are
allowed.
FOOTING
Command that produces and displays a page footing on each page
of a report. The footing contains text supplied by you, and by
default, is positioned left-justified and two lines below the last line
of output.
format
Term used to identify the length of a field and the type of data it
contains. Alphanumeric and numeric are two types of formats often
used.
formatting symbols
Symbols such as dollar signs ($) and commas (,) that are not
stored in a data source, but are included in the display of records.
free-form report
Presents detailed information in a form-like context that is often
used with letters and forms. You can use free-form reports to
position headers, footers, free text, and fields precisely on a page,
customize your headers and footers by including fields as display
variables, and incorporate prefix operators in your headers and
footers to perform calculations on the aggregated values of a single
field.
GRAPH language
A collection of commands that enables you to produce reports in
chart form.
graph request
Group of commands, starting with the GRAPH FILE command and
ending with the END command, that produces a chart.
Glossary
Reporting Language Primer 173

HEADALIGN
Aligns heading, subheading, footing, and subfooting items with
columns in the report body.
HEADING
Command that produces and displays a page heading at the top of
each page of a report. The heading contains text supplied by you,
and by default, is positioned left-justified at the top of each page.
highest-order sort field
The first sort field specified in a report, also called the primary sort
field. This produces the first column of a report and is used to
control the ordering of records.
HOLD
Command that creates extract files. HOLD files contain output from
report requests in a format specified by you, for example, XLSX,
PDF, PPTX. A Master File may be created, depending on the format
used.
IN-GROUPS-OF
Command that groups records in a report into specified ranges.
This command is added to a sort phrase and is used only with
numeric sort fields.
internal matrix
An internal area where aggregated values are stored after records
are retrieved, selected, sorted, and aggregated.
issuing commands
See "entering commands."
JOBFILE data source
Source of data for reports in this Primer. JOBFILE contains sample
data about company job positions.
Glossary
174

JOIN
Command that links two or more data source so they can be
accessed as if they were one, even though they remain physically
separate.
keyword
Any single word of syntax.
LIKE
Relational operator used to screen alphanumeric records only. LIKE
can be used in conjunction with a mask character, that is, the
percent sign (%) and the underscore (_). LIKE ensures that only
records matching the specified mask are retrieved.
LINES
Parameter used with the SET command that controls the number of
lines of a report that are printed on a page.
LIST
Verb command that displays and numbers data in specified fields.
literal test value
See "test value."
logical operator
Component of a conditional statement that joins more than one
condition. Examples of logical operators are AND and OR. The AND
operator requires that each and every condition connected by AND
be true before a record is retrieved. The OR operator requires that
at least one condition connected by OR be true before a record is
retrieved.
mask
String of characters used to act as a filter for data in a field when
used with the EDIT function, and used to act as a conditional basis
of comparison when used with WHERE. Masking characters for
screening records are the dollar sign ($), percent sign (%), and the
underscore (_).
Glossary
Reporting Language Primer 175

Master File
File that describes the structure and contents of data sources and
HOLD files. The Master File consists of statements, called
declarations, that name each part of the file and describe its
characteristics.
MATCH
Merges two or more data sources. The command creates a new
data source (a HOLD file), into which it merges fields from the
selected records. You specify which records to merge and which to
eliminate.
matrix
A type of report produced using BY and ACROSS together in a
single request, or the Financial Modeling Language (FML). A matrix
displays values in rows and columns.
measures
Fields used in summations and other calculations. The fields are
usually numeric fields.
MORE
Concatenates data from data sources with dissimilar Master Files
in a single request.
MULTILINES
Command used with SUBTOTAL, SUB-TOTAL, SUMMARIZE, and
RECOMPUTE to display subtotal lines only when the specified sort
field contains more than one record.
multi-verb request
Report request that uses more than one verb command at a time.
Requires use of LIST or PRINT only once in report and as last verb.
NODATA character
Character used in a report to indicate that no data exists for that
field. The default NODATA character is the period (.).
Glossary
176

NOPRINT
Command that suppresses the printing of a field.
NOTOTAL
Command that suppresses display of grand totals in a report.
numeric
Term that identifies the format of fields and type of data stored in
those fields. Numeric data consists of decimal and integer numbers
used in calculations.
OMITS
Relational operator used in a WHERE phrase to screen
alphanumeric records. OMITS ensures that only records lacking the
specified literal are retrieved. CONTAINS is the reverse of OMITS.
OR
Logical operator used in conditional statements to screen records.
Requires that at least one condition connected by OR be true in
order for a record to be retrieved.
page footing
Footing produced and displayed by the FOOTING command two
lines below the last line of output on each page of a report. The
footing contains text supplied by you.
page heading
Heading produced and displayed by the HEADING command at the
top of each page of a report. The heading contains text supplied by
you.
PAGE-BREAK AND
Command used in conjunction with a sort field that controls when a
new page is created. Each time the sort field changes values, a
new page is created.
Glossary
Reporting Language Primer 177

platform
Term that refers to hardware as well as software, that is, the type
of machine and operating system used to run WebFOCUS,
WebFOCUS App Studio, or FOCUS.
PCHOLD
Creates a data source containing the output of a report request,
and downloads the HOLD data source and the optional Master File
to a client computer or browser. As with a HOLD file, you can
specify a variety of file formats.
PLUS OTHERS
In a sort phrase, you can restrict the number of sort values
displayed. With the PLUS OTHERS phrase, you can aggregate all
other values to a separate group and display this group as an
additional report row.
precision report
Provides an additional set of tools that make it easy to control the
precise placement of objects and data in the report output. With a
precision report, you can quickly create a layout that is perfectly
aligned for a preprinted form, such as a Bill of Sale or a tax form,
and that automatically breaks out one record per report page.
prefix operators
Perform calculations directly on the values of aggregated fields.
primary sort field
See "highest-order sort field."
PRINT
Verb command that displays data in specified fields.
query command
Command that starts with a question mark (?) and provides
information about aspects of the product and the reporting session,
including SET parameter settings, temporary fields created with the
DEFINE command, and names of fields stored in a data source.
Glossary
178

range
An upper and lower limit used to screen records. A range is created
using the relational operators FROM...TO, or a combination of GT
and LT, or GE, and LE.
RANKED
Indicates the numeric rank of each row.
RECAP
Command that computes subtotals based on user-supplied
calculations. New values are displayed each time the specified BY
field value changes.
RECOMPUTE
Command that displays totals for columns containing numeric
values, and recalculates temporary fields containing information,
such as ratios, using subtotals each time a specified sort field
changes values.
record
A collection of fields stored together as a unit.
RECORDLIMIT
Keyword used in a WHERE phrase that retrieves a specified number
of records that meet the specified test conditions.
relational operator
The component of a conditional statement that determines the type
of comparison made between a field or calculation and another
field, a test value, or a calculation. EQ, LT, and LIKE are examples
of relational operators.
REPAGE
Command that changes the default page numbering of reports from
consecutive to renumbering the page number as 1 each time the
specified sort field changes values. Page numbering is consecutive
within each section of the report.
Glossary
Reporting Language Primer 179

report
Result of a report request.
report footing
Footing produced and displayed by the SUBFOOT command two
lines below the last line of output on the last page only of a report.
The footing contains text supplied by you.
report heading
Heading produced and displayed by the SUBHEAD command at the
top of the first page only of a report. The heading contains text
supplied by you.
report request
Group of commands, starting with the TABLE FILE command and
ending with END, that produces a report.
reporting language
A collection of commands used to create reports, invoked by the
TABLE FILE command.
retrieve
Process performed by WebFOCUS, WebFOCUS App Studio, or
FOCUS, based on instructions in report requests. The data source
specified in the TABLE FILE command is searched for records that
satisfy the specified instructions and conditions. Records that
satisfy the instructions are included in the report.
RETURN key
Key used to transmit commands to WebFOCUS, WebFOCUS App
Studio, or FOCUS on some systems.
row
Horizontal collection of data.
Glossary
180

ROW-TOTAL
Command used in a verb phrase to produce totals for all rows in a
report containing numeric values. ROW-TOTAL used in an ON TABLE
phrase produces totals for specified rows in a report containing
numeric values. When used with COLUMN-TOTAL, ROW-TOTAL
produces a matrix report.
SALHIST data source
Source of data for reports in this Primer. SALHIST contains
information about employee salary history.
SAVB
Creates a SAVE file in BINARY format. As with a HOLD file, you can
specify a variety of formats suitable for use with other software
products.
SAVE
Identical to a HOLD command, except that it does not create a
Master File, and ALPHA is the default format. You can specify a
variety of formats suitable for use with other software products.
screening
Process of selecting a subset of records by eliminating those that
do not satisfy conditions specified in a WHERE conditional
statement.
screening condition
A comparison that starts with WHERE and provides a condition that
must be met in order for records to be retrieved.
secondary sort field
Sort field identified after the primary sort field. Also called lower-
level sort field.
section footing
Footing produced and displayed by the SUBFOOT command at the
end of each section of a report. A section is produced each time a
specified sort field changes values. The footing contains text
supplied by you.
Glossary
Reporting Language Primer 181

section heading
Heading produced and displayed by the SUBHEAD command at the
beginning of each section of a report. A section is produced each
time a specified sort field changes values. The heading contains
text supplied by you.
SET
Overrides default actions that govern your WebFOCUS, WebFOCUS
App Studio, or FOCUS environment.
SKIP-LINE
Command that inserts a blank line between each line of a report
when used with a field in a verb phrase. When used with a sort
field, SKIP-LINE inserts a blank line between each section of a
report. A section is created each time the sort field changes values.
Only one SKIP-LINE may be used in a single request.
sort field
Field identified in a BY or ACROSS phrase. The order of values in
the sort field is used to reorganize records in a report. The first sort
field identified produces the first (left-most) column of a report.
Subsequently identified sort fields produce the subsequent
columns in the same order they are specified.
sorting
Process of ordering data in default or specified order using BY
and/or ACROSS.
sorting keywords
BY and ACROSS are the two sorting keywords that start a sort
phrase. BY sorts fields and displays their values down the page in
rows. ACROSS sorts fields and displays their values across the
page in columns.
statistics
Display of number of records and lines included in a report
produced by executing a request.
Glossary
182

string
See "character string."
strong concatenation
See "concatenation."
style sheet
Enables you to format and produce attractive reports that highlight
key information. With StyleSheets, you can specify various
characteristics of your report and format report components
individually.
SUBFOOT
Command that produces a footing below each section of a report. A
section is defined each time a specified sort field changes values,
when used in conjunction with a sort field. The footing contains text
supplied by you. When used with a non-sort field, SUBFOOT
produces a report footing that appears only on the last page of a
report.
SUBHEAD
Command that produces a heading above each section of a report.
A section is defined each time a specified sort field changes
values, when used in conjunction with a sort field. The heading
contains text supplied by you. When used with a non-sort field,
SUBHEAD produces a report heading which appears only on the
first page of a report.
SUBTOTAL
Command that displays a total for columns containing numeric
values only when a specified sort field changes values. SUBTOTAL
is used in conjunction with a sort field and can be specified in a BY
or ON phrase.
SUB-TOTAL
Command that displays a total for columns containing numeric
values only when a specified sort field, and any preceding sort
fields change values. SUB-TOTAL can be specified in a BY or ON
phrase.
Glossary
Reporting Language Primer 183

SUM
Aggregating verb that acts on multiple records and returns a single
value, typically the sum total. If used with an alphanumeric field,
SUM displays only the last value retrieved for that field. WRITE is a
synonym for SUM.
SUMMARIZE
Command that displays totals for columns containing numeric
values and recalculates temporary fields containing information,
such as ratios, using subtotals each time a specified sort field, or
preceding sort fields (higher level) changes values. SUMMARIZE
can be specified in a BY or ON phrase.
synonym
Defines unique names (or aliases) for each table and view that is
accessible from the server. Synonyms are useful because they hide
the underlying data source location and identity from client
applications. They also provide support for extended metadata
features of the server, such as virtual fields and additional security
mechanisms.
system editor
Text editor provided on your system.
system variable
Variable that represents values supplied automatically. An example
of a system variable is TABPAGENO.
TABLE environment
See "reporting language."
TABLE FILE
Command that provides two functions. It invokes the reporting
language and identifies the source of data for subsequent reports.
Table of Content report
Generates a multiple worksheet report where a separate worksheet
is generated for each value of the first sort field (BY) in the report.
Glossary
184

TABLEF
Variation of the TABLE command that provides a fast method of
retrieving data that is already stored in the order required for
printing and requires no additional sorting. Using TABLEF, records
are retrieved in the logical sequence from the data source.
TABPAGENO
System variable that turns off the default page number location and
provides a page number for each page of a report. You incorporate
TABPAGENO into the commands that create page, section, and
report heading or footings.
tabular report
Displays information in rows and columns. This is the basic report
type, incorporating the fundamental reporting concepts. Most of the
other report formats build on these concepts.
temporary field
A field created using the DEFINE or COMPUTE command.
temporary field definition
Expression used in a COMPUTE or DEFINE command to indicate
how to calculate values for the new temporary field.
test value
A user-supplied value in a conditional statement to which records
are compared before being retrieved. All literal test values that are
dates or alphanumeric must be enclosed in single quotation marks
(').
TITLE
Parameter used with the SET command that controls the naming of
column titles in HOLD files.
TOP
When used in an IN-GROUPS-OF phrase, TOP sets an upper limit
within which all records with greater values than that amount are
grouped.
Glossary
Reporting Language Primer 185

trailing blanks
Blanks that occur in a field value when the value is shorter than the
field length. The blanks occur at the end of the value.
UNDER-LINE
Command used with a sort field that inserts underlines after each
section of a report. A section is defined each time the sort field
value changes.
verb command
A reporting language command that indicates how to display data in
specified fields. PRINT, LIST, COUNT, and SUM are all verb
commands.
weak concatenation
See "concatenation."
WHEN
Keyword that controls when subtotals appear in a report based on
user-supplied conditions. WHEN is used in conjunction with the field
specified in the preceding SUBTOTAL, SUB-TOTAL, RECOMPUTE, or
SUMMARIZE commands.
WHERE
Keyword that starts a WHERE phrase used to select records based
on specified conditions. Only records meeting the specified
conditions are retrieved and included in a report.
WHERE_GROUPED
Test that is applied to the rows of the internal matrix prior to the
processing of COMPUTE calculations.
WHERE TOTAL
Test that is applied to the rows of the internal matrix after
COMPUTE calculations are processed.
Glossary
186

WITHIN
Keyword that performs operations on a field value within the scope
of a sort field value. These calculations take place regardless of
the summarizing commands in a request.
WRITE
Aggregating verb that acts on multiple records and returns a single
value, typically the sum total. If used with an alphanumeric field,
WRITE displays only the last value retrieved for that field. SUM is a
synonym for WRITE.
Glossary
Reporting Language Primer 187

Glossary
188

Legal and Third-Party Notices
SOME CLOUD SOFTWARE GROUP, INC. (“CLOUD SG”) SOFTWARE AND CLOUD SERVICES
EMBED, BUNDLE, OR OTHERWISE INCLUDE OTHER SOFTWARE, INCLUDING OTHER CLOUD SG
SOFTWARE (COLLECTIVELY, “INCLUDED SOFTWARE”). USE OF INCLUDED SOFTWARE IS
SOLELY TO ENABLE THE FUNCTIONALITY (OR PROVIDE LIMITED ADD-ON FUNCTIONALITY) OF
THE LICENSED CLOUD SG SOFTWARE AND/OR CLOUD SERVICES. THE INCLUDED SOFTWARE
IS NOT LICENSED TO BE USED OR ACCESSED BY ANY OTHER CLOUD SG SOFTWARE AND/OR
CLOUD SERVICES OR FOR ANY OTHER PURPOSE.
USE OF CLOUD SG SOFTWARE AND CLOUD SERVICES IS SUBJECT TO THE TERMS AND
CONDITIONS OF AN AGREEMENT FOUND IN EITHER A SEPARATELY EXECUTED AGREEMENT,
OR, IF THERE IS NO SUCH SEPARATE AGREEMENT, THE CLICKWRAP END USER AGREEMENT
WHICH IS DISPLAYED WHEN ACCESSING, DOWNLOADING, OR INSTALLING THE SOFTWARE OR
CLOUD SERVICES (AND WHICH IS DUPLICATED IN THE LICENSE FILE) OR IF THERE IS NO
SUCH LICENSE AGREEMENT OR CLICKWRAP END USER AGREEMENT, THE LICENSE(S)
LOCATED IN THE “LICENSE” FILE(S) OF THE SOFTWARE. USE OF THIS DOCUMENT IS SUBJECT
TO THOSE SAME TERMS AND CONDITIONS, AND YOUR USE HEREOF SHALL CONSTITUTE
ACCEPTANCE OF AND AN AGREEMENT TO BE BOUND BY THE SAME.
This document is subject to U.S. and international copyright laws and treaties. No part of this
document may be reproduced in any form without the written authorization of Cloud Software
Group, Inc.
ibi, the ibi logo, ActiveMatrix BusinessWorks, BusinessConnect, Enterprise Message Service,
FOCUS, Hawk, iWay, Maporama, Omni-Gen, Omni-HealthData, TIBCO, the TIBCO logo, the
TIBCO O logo, TIBCO Administrator, TIBCO Designer, and WebFOCUS are either registered
trademarks or trademarks of Cloud Software Group, Inc. in the United States and/or other
countries.
All other product and company names and marks mentioned in this document are the property
of their respective owners and are mentioned for identification purposes only. You
acknowledge that all rights to these third party marks are the exclusive property of their
respective owners. Please refer to Cloud SG’s Third Party Trademark Notices (https://
www.cloud.com/legal) for more information.
This document includes fonts that are licensed under the SIL Open Font License, Version 1.1,
which is available at: https://scripts.sil.org/OFL.
Copyright (c) Paul D. Hunt, with Reserved Font Name Source Sans Pro and Source Code Pro.
Cloud SG software may be available on multiple operating systems. However, not all operating
system platforms for a specific software version are released at the same time. See the
“readme” file for the availability of a specific version of Cloud SG software on a specific
operating system platform.
189

THIS DOCUMENT IS PROVIDED “AS IS” WITHOUT WARRANTY OF ANY KIND, EITHER EXPRESS
OR IMPLIED, INCLUDING, BUT NOT LIMITED TO, THE IMPLIED WARRANTIES OF
MERCHANTABILITY, FITNESS FOR A PARTICULAR PURPOSE, OR NON-INFRINGEMENT.
THIS DOCUMENT COULD INCLUDE TECHNICAL INACCURACIES OR TYPOGRAPHICAL ERRORS.
CHANGES ARE PERIODICALLY ADDED TO THE INFORMATION HEREIN; THESE CHANGES WILL
BE INCORPORATED IN NEW EDITIONS OF THIS DOCUMENT. CLOUD SG MAY MAKE
IMPROVEMENTS AND/OR CHANGES IN THE PRODUCT(S), THE PROGRAM(S), AND/OR THE
SERVICES DESCRIBED IN THIS DOCUMENT AT ANY TIME WITHOUT NOTICE.
THE CONTENTS OF THIS DOCUMENT MAY BE MODIFIED AND/OR QUALIFIED, DIRECTLY OR
INDIRECTLY, BY OTHER DOCUMENTATION WHICH ACCOMPANIES THIS SOFTWARE, INCLUDING
BUT NOT LIMITED TO ANY RELEASE NOTES AND "README" FILES.
This and other products of Cloud SG may be covered by registered patents. For details, please
refer to the Virtual Patent Marking document located at https://www.tibco.com/patents.
Copyright
©
2023. Cloud Software Group, Inc. All Rights Reserved.
190
