
ZebraDesigner Essentials
Version 3 User Guide
Product level: Essentials. Rev-2019-1
P1108968-EN

ZEBRA and the stylized Zebra head are trademarks of Zebra Technologies Corporation,
registered in many jurisdictions worldwide. All other trademarks are the property of their
respective owners. ©2019 Zebra Technologies Corporation and/or its affiliates. All rights
reserved.
Information in this document is subject to change without notice. The software described in
this document is furnished under a license agreement or nondisclosure agreement. The
software may be used or copied only in accordance with the terms of those agreements.
For further information regarding legal and proprietary statements, please go to:
SOFTWARE:www.zebra.com/linkoslegal
COPYRIGHTS:www.zebra.com/copyright
WARRANTY:www.zebra.com/warranty
END USER LICENSE AGREEMENT: www.zebra.com/eula
Terms of Use
Proprietary Statement
This manual contains proprietary information of Zebra Technologies Corporation and its
subsidiaries (“Zebra Technologies”). It is intended solely for the information and use of
parties operating and maintaining the equipment described herein. Such proprietary
information may not be used, reproduced, or disclosed to any other parties for any other
purpose without the express, written permission of Zebra Technologies.
Product Improvements
Continuous improvement of products is a policy of Zebra Technologies. All specifications
and designs are subject to change without notice.
Liability Disclaimer
Zebra Technologies takes steps to ensure that its published Engineering specifications and
manuals are correct; however, errors do occur. Zebra Technologies reserves the right to
correct any such errors and disclaims liability resulting therefrom.
Limitation of Liability
In no event shall Zebra Technologies or anyone else involved in the creation, production, or
delivery of the accompanying product (including hardware and software) be liable for any
damages whatsoever (including, without limitation, consequential damages including loss of
business profits, business interruption, or loss of business information) arising out of the use

of, the results of use of, or inability to use such product, even if Zebra Technologies has
been advised of the possibility of such damages. Some jurisdictions do not allow the
exclusion or limitation of incidental or consequential damages, so the above limitation or
exclusion may not apply to you.

Contents
1 Typographical Conventions 7
2 Activating ZebraDesigner 8
2.1 Activating ZebraDesigner Online 8
2.2 Activating ZebraDesigner Offline 9
2.3 Deactivating ZebraDesigner 11
2.4 Activating and Deactivating over a Proxy Server 12
3 Introduction 17
3.1 Basic ZebraDesigner Concepts 17
3.2 Keyboard and Mouse Support 18
3.3 Options (Configuring the Program) 20
4 Workspace Overview 22
4.1 Landing Page 22
4.2 Object and Explorer Panels 23
4.3 Printer and Status Bar 23
4.4 Tabs and Ribbons 24
4.5 Design Surface 46
4.6 Document Properties and Management Dialogs 49
4.7 Context Menus 50
5 Label 53
5.1 Label Setup Wizard 53
5.2 Label Properties 56

5.3 Label Objects 60
5.4 Working with Objects 76
6 Barcode 78
6.1 Source 78
6.2 Barcode 78
6.3 Check Digit 79
6.4 Human Readable 80
6.5 Bearer Bar 80
6.6 Details 81
6.7 Position 81
6.8 General 82
6.9 Available Barcodes and Their Settings 83
6.10 GS1 DataBar Subtypes 95
6.11 1D Barcode Details 98
6.12 2D Barcode Details 99
6.13 GS1 DataBar Specifics 101
6.14 Maxicode Barcode Content 102
6.15 USPS Intelligent Mail Barcode Content 103
7 Printing 105
7.1 Print Pane (Default Printing Form) 105
7.2 Printing Procedure 108
7.3 Optimize Printing Speed 109
7.4 Changing Common Printer Settings 110
7.5 Changing Dithering Options 112


1 Typographical Conventions
Text that appears in bold refers to menu names and buttons.
Text that appears in italic refers to options, confirming actions like Read only and locations
like Folder.
Text enclosed in <Less-Than and Greater-Than signs> refers to keys from the desktop PC
keyboard such as <Enter>.
Variables are enclosed in [brackets].
NOTE: This is the style of a note.
EXAMPLE: This is the style of an example.
This is the style of a best practice.
WARNING: This is the style of a warning.
TIP: This is the style of a tip.

2 Activating ZebraDesigner
ZebraDesigner helps you design and print labels on Zebra printers from your computer.
There are two editions to choose from:
l ZebraDesigner Essentials is free to use, and requires no activation. It offers basic
label design features.
l ZebraDesigner Professional is free to use for 30 days, then requires purchase and
activation. It offers advanced features to help you design more complex labels based
on fixed or variable data and also includes database and RFID support.
2.1 Activating ZebraDesigner Online
To use ZebraDesigner Professional to efficiently design and print your labels, activate your
copy to use all features. You need:
l ZebraDesigner Essentials installed and running on your computer.
l Your 18-digit license key, available from Zebra's online store or your Zebra software
distributor.
l An active Internet connection. To activate offline, read section "Activating
ZebraDesigner Offline" on the next page.
To activate ZebraDesigner Professional:
1. Open ZebraDesigner.
2. Go to Home > Activate Key or File > About > Activate your license.
l The ZebraDesigner Activation window opens.
3. Paste in your 18-digit license key. You receive this key after you purchase
ZebraDesigner.
4. Type in your information.
5. Click Activate.
Your ZebraDesigner Professional is activated and ready to use.
NOTE: You cannot activate your license key in virtual PC environments.
To deactivate your license, read section "Deactivating ZebraDesigner" on page11.

To activate or deactivate your license using a proxy server, read section "Activating and
Deactivating over a Proxy Server" on page12.
2.2 Activating ZebraDesigner Offline
ZebraDesigner helps you design and print labels on Zebra printers from your computer. To
use ZebraDesigner Professional to efficiently design and print your labels, activate your
copy to use all features.
To activate ZebraDesigner Professional on computers without an internet connection, send
Zebra your activation certificate to receive your license. You need:
l ZebraDesigner Essentials installed and running on your computer.
l Your 18-digit license key, available from Zebra's online store or your Zebra software
distributor.
l Another computer with an active internet connection.
l A way to transfer files between your offline and online computers (e.g., USB Drive,
internal email, networked location).
Open ZebraDesigner and go to Home > Activate Key or File > About > Activate your
license.
1. Click Activate offline.
l Paste in your 18-digit license key. You receive this key after you purchase
ZebraDesigner.
l Type in your information.

2. Click Generate activation certificate. Copy or save your generated text.
l Transfer your saved activation certificate to another computer with an active
internet connection. Use this online computer to complete registration.
3. Send your activation certificate to Zebra. There are two options:
l Use Zebra’s self-service activation portal.
l Email support@Zebra.com and attach your activation certificate.
4. When you send your activation certificate, Zebra emails you your license.
l Transfer this license to your offline computer and paste or load your license.
5. Click Activate your license. Your ZebraDesigner Professional is activated and ready
to use.
NOTE: You cannot activate your license key in virtual PC environments.
To deactivate your license, read section "Deactivating ZebraDesigner" on the next page.

To activate or deactivate your license using proxy server, read section "Activating and
Deactivating over a Proxy Server" on the next page.
2.3 Deactivating ZebraDesigner
ZebraDesigner helps you design and print labels on Zebra printers from your computer. To
use ZebraDesigner Professional, activate your copy to use all features.
To deactivate ZebraDesigner on computers with an active internet connection:
1. Open ZebraDesigner.
2. Go to File > About > Deactivate your license.
l The ZebraDesigner Deactivation warning window opens.
3. Click OK to proceed.
l ZebraDesigner closes. Your ZebraDesigner Professional is deactivated and
ready to use on another computer.
To deactivate ZebraDesigner Professional on computers without an internet connection:
1. Open ZebraDesigner and go to File > About > Deactivate your license.
l The ZebraDesigner Deactivation warning window opens.
2. Click OK to confirm. Your computer tries to access the license server. Because there
is no internet connection, continue offline.
3. Click Deactivate offline.
4. Click Deactivate License to generate your deactivation certificate. This deactivates
your ZebraDesigner.

l Copy or save your generated text.
5. Transfer your saved deactivation certificate to another computer with an active
internet connection. Use this online computer to complete deactivation.
6. Send your deactivation certificate to Zebra. There are two options:
l Use Zebra’s self-service deactivation portal to deactivate your ZebraDesigner
immediately.
l Email support@Zebra.com and attach your deactivation certificate.
l When you send your deactivation certificate, Zebra emails you your license
deactivation confirmation.
Your ZebraDesigner Professional is now deactivated on server and client side.
NOTE: You cannot activate your license key in virtual PC environments.
To activate or deactivate your license using a proxy server, read section "Activating and
Deactivating over a Proxy Server" below
2.4 Activating and Deactivating over a Proxy
Server
If your company's internet connection uses a proxy server, use this procedure to activate or
deactivate ZebraDesigner.

2.4.1 Activating over a Proxy Server
1. Open ZebraDesigner. The ZebraDesigner Activation window appears. Click
Activate.
If you are already running the trial, go to:
l File > About and click Activate your license.
l Home > Trial and click Activate Key.
The ZebraDesigner Activation window opens.
2. Type or paste your license key into the License key field. You receive this key after
purchasing your ZebraDesigner license.
3. Type your First name, Last name, Company, and Email address.
4. Configure your proxy connection. Click Configure proxy.
If ZebraDesigner detects no internet connection, the online activation error window
opens automatically. Click Configure proxy.

The proxy configuration window opens.
5. Enable the Use proxy to activate and deactivate your license option and configure
your proxy settings:
l Type your Proxy IPAddress.
l Define the number of your Proxy port.
l If your proxy server connection requires credentials, type your User name and
Password.
6. Click OK. The online activation error window opens again.
7. Click Retry.
8. After connecting, the ZebraDesigner Activation window opens. Click Activate.
l ZebraDesigner is now activated and ready.
l If ZebraDesigner still cannot connect to the license server, you can activate
offline.
2.4.2 Deactivating over a Proxy Server
1. Go to File > About and click Deactivate your license.
l The License deactivation confirmation window appears.

2. Click Yes to deactivate your license.
l If your deactivation is successful, ZebraDesigner closes. You can use your
license key on another computer immediately.
3. If ZebraDesigner cannot connect to the license server, the online deactivation error
window opens. Click Configure proxy.
The proxy configuration window opens.
4. Enable the Use proxy to activate and deactivate your license and configure your
proxy settings:
l Type your Proxy IPAddress.
l Define the number of your Proxy port.
l If your proxy server connection requires credentials, type your User name and
Password.
5. Click OK. The online deactivation error window opens again.


3 Introduction
3.1 Basic ZebraDesigner Concepts
This section describes the ZebraDesigner elements that enable you to efficiently design a
label.
Listed below are the essential ZebraDesigner concepts.Being familiar with them provides a
perfect starting point for successful labeling projects.
l Label
l Object
l Design Surface
If you come across any other unfamiliar items while working with ZebraDesigner, refer to the
Help tab.
3.1.1 Label
Label works as a template which allows adding label objects and can be printed using any
kind of printing media.
Each object adds a different kind of content such as text, line, ellipse, barcode or rectangle
to a label. The content is either fixed (manually entered by the user) or dynamic (defined
automatically via connected data sources).
After finishing with your label design, you can print the labels using any of your installed
printers.
3.1.2 Object
Object is the basic building block for designing labels and forms. To design a label or form
means to select, add, and position the objects on the design surface.

EXAMPLE: Each object performs a different role. Text object is used for single-line textual
content that does not need to adapt its font size to the label design. Barcode object adds
a barcode whose type and content can be adapted to the needs of current document.
Label object types and their purpose are listed here.
3.1.3 Design Surface
Design surface is ZebraDesigner's central field that serves as a place to create, add,
position, and interconnect the label objects.
To make designing of labels as simple and efficient as possible, design surface follows the
same usability and functional principles as Microsoft Office applications.
TIP: Use View tab to customize design surface.
l Design surface elements are described here.
l Design surface editing actions are described here.
l Design surface visual aid elements are described here.
3.2 Keyboard and Mouse Support
To efficiently perform and complete the ZebraDesigner tasks, follow the guidelines related
to the use of keyboard and mouse:
l How to efficiently use keyboard and mouse
l Mouse wheel support
l Keyboard shortcuts
3.2.1 Efficient Use of Keyboard and Mouse
Use the following list of tips to make your work with ZebraDesigner easier and more
efficient.
1.
Select object anchoring point. Press Ctrl key and click the object placeholders to
quickly define the anchoring point.
2.
Label scrolling and zooming. Use mouse wheel to scroll the label. Holding Ctrl
when rotating the wheel, adjusts zoom factor. Shift scrolls label left or right.
3. Set label or form properties. Double-click the design surface to open the label
properties dialog.

4.
Vertical or horizontal object moving. Hold Shift while moving an object over the
design surface. The object is moved in straight vertical and horizontal lines.
5.
Resize an object with arrow keys. Holding Shift while pressing arrow keys resizes
the object.
6.
Fine-tune the object position. Hold Ctrl while pressing arrow keys.
7. Open contextual menus. Right-click the object or design surface to access the label
or design surface contextual menus.
8.
Select multiple objects. Hold Shift and click the objects to add them to the
selected objects in a group.
9. Quickly add an object with connected data source. Click the object's shortcut
handle in the object toolbox. A list of available data sources appears. Select a data
source or add a new one, and click the design surface to add an object which already
has a dynamic data source connected to it.
3.2.2 Mouse Wheel Support
Use mouse wheel to speed up design object zooming and design surface scrolling.
l Turning the wheel scrolls the label vertical direction.
l Holding <SHIFT> and turning the wheel scrolls the label left or right.
l Holding <CTRL> and turning the wheel zooms the label in or out.
3.2.3 Keyboard Shortcuts
Use keyboard shortcuts to reduce the time needed to accomplish frequent tasks with
ZebraDesigner. To complete these tasks, use a standard combination of keys.
TIP: Keyboard shortcuts are just a faster and more convenient way of choosing
commands. The command itself is executed in the same way as if it was run from the menu
or toolbar.
Action Press
Select all Ctrl+A
Run the startup form Ctrl+D
Paste Ctrl+V
Cut Ctrl+X
Move up ↑
Move right →
Move down ↓
Move left ←

Action Press
Close Alt+F4
Zoom to document Ctrl+0
Bold Ctrl+B
Copy Ctrl+C
Italic Ctrl+I
Zoom Out Ctrl+minus sign on numeric keypad
Zoom In/Out Ctrl+mouse scroll up/down
Open Ctrl+O
Print Ctrl+P
Zoom In Ctrl+plus sign on numeric keypad
Save Ctrl+S
Open blank label connected to default printer Ctrl+Shift+N
Redo CTRL+Y
Undo Ctrl+Z
Cancel Esc
Move Focus Tab or Shift+Tab
Format painter – copy object properties Ctrl+Shift+C
Format painter – paste object properties Ctrl+Shift+V
3.3 Options (Configuring the Program)
To customize the general program configuration of ZebraDesigner, open the Options dialog
which is accessible from the File tab.

ZebraDesigner configuration options are grouped on the following tabs:
l Folders:allows you to set the default locations for storing the labels and picture files.
l Language:selects the user interface language. Select the preferred language from
the listed options.
l Designer: enables you to configure opening behavior of ZebraDesigner.

4 Workspace Overview
ZebraDesigner's workspace offers a flexible and easy-to-use environment for simple label
designing.
ZebraDesigner workspace follows the widely used application interface guidelines, and is
therefore equipped with tools and interface elements that are familiar to a majority of users.
ZebraDesigner workspace consists of the following segments:
l Landing page
l Object and Explorer Panels
l Printer and Status bar
l Tabs and Ribbons
l Design Surface
4.1 Landing Page
ZebraDesigner's landing page is an introductory page which opens after ZebraDesigner
completes loading. It consists of the following segments:

l New document area: creates new or opens existing ZebraDesigner documents.
l Create a New Label:creates a new label document.
l Recent Files: list of recently used ZebraDesigner files.
TIP: The landing page and its segments depend on whether your are running a licensed
ZebraDesigner or a trial version.
l Learning resources: access to useful resources that help you create labels, and learn
more about ZebraDesigner.
l Printer Drivers:access to the Zebra printer drivers. These drivers enable you to
optimize your labels for printing with a specific printer model.
l Software Information: contains information about the installed copy of
ZebraDesigner – license, license key, and installed version.
4.2 Object and Explorer Panels
Object and explorer panels are located at the left-most area of the ZebraDesigner window.
They provide access to objects.
l Object Toolbox: contains available label . These objects are ready to be used on a
label. Click the selected object and drag it to the design surface.
4.3 Printer and Status Bar
Printer and Status bar stretches over the bottom part of the ZebraDesigner window. The
bar performs these roles:

l Printer Selection for the current print job. Select your preferred printer from the
drop-down list of installed printers.
TIP: When changing a printer, label and paper size adapt automatically to the dimensions
defined by the printer driver.
l Printer Properties for the selected printer. The button gives you direct access to
the properties dialog of the selected printer driver.
l Design surface zooming.
4.4 Tabs and Ribbons
ZebraDesigner uses a standard Windows-based interface.
The ZebraDesigner's top section interface segments are described below.
4.4.1 Tabs
Tabs represent subsets of ZebraDesigner features. The tabs contain interrelated
commands that are available to the user in an organized way – grouped, and labeled:
l File (background): opens the print form and document management panel.
l Home: offers commonly used commands such as copy/paste, print, and style
commands.
l View: gives you control over layout tools, zooming options and element markers
visibility.
l Contextual tabs: appear after clicking an object. They allow you to define object-
specific settings. The type of contextual tabs adapts to the selected object.
l Help:besides offering the access to F1 help, this tab leads you to multiple helpful
resources that make your work with ZebraDesigner easier and more efficient.

4.4.2 Ribbon
Ribbon is a rectangular area that spreads across the top of an application window. Related
commands are divided into ribbon groups.The ribbon changes along with the selected tabs
and adapts to the currently used tools using the contextual tabs.
4.4.3 File Tab
File tab serves as document management panel. The following options are available:
l Start:takes you to the ZebraDesigner landing page.
l New: creates a new stand-alone label.
l Open: allows opening existing label.
l Save: saves the active label.
l Save as: allows saving the active label file by defining its name and location.
l Print: opens the printing form.
l Store:stores the current label as a template on the printer to be used in store/recall
mode.
l Close: closes the current ZebraDesigner document.
l Options: opens the dialog for configuring the program defaults.
l About: provides license and software version information.
l Exit: closes the application.
4.4.3.1 Start
Start panel takes you to ZebraDesigner landing page. Use it to create or open documents,
access recently opened files, preview files and learn more about ZebraDesigner.
4.4.3.2 New
New Label creates a new stand-alone label. New Label Setup Wizard opens after clicking
this button.
New from Sample Templates creates a document based on a selection of industry-
standard templates.
TIP: There are two ways of opening new labels. You can open each additional document
in a separate instance (window) of ZebraDesigner. An alternative way is to open

additional documents within the already opened instance of ZebraDesigner. To select
the way that suits you better, go to File > Options > Designer.
4.4.3.3 Open
Open dialog allows opening existing label files.
Browse allows selecting the label on local or connected network drives.
Recent Files field lists the latest files that have been edited. Click any of them to open the
file.
4.4.3.4 Save
Save panel saves the active label using the same file name that was used to open it.
NOTE: If a file has been opened for the first time, Save directs you to the Save as on the
File tab.
4.4.3.5 Save as
Save as allows saving the active label file by defining its name and location.
Recent folders field lists the folders that were recently used to save the label files.
4.4.3.6 Print
Print opens the print pane. In ZebraDesigner, print pane hosts a powerful default printing
form.
4.4.3.7 Store/Recall Printing Mode
Store/Recall printing mode is a method for speeding up the printing process. It increases
printer response by reducing the amount of data that needs to be sent during repetitive
printing tasks.
With store/recall mode activated, ZebraDesigner does not need to resend the complete
label data for each printout. Instead, default labels (templates) and internal printer elements
(graphics, fonts) are stored in the printer memory, and ZebraDesigner only sends recall
commands which render the stored label content during the printing process. Typically, a
few bytes of data are sent to the printer as compared to a few kilobytes in the case of
normal printing.
The action consists of two processes:

l Store label. During this process, ZebraDesigner creates a description of the label
template formatted in the selected printer's command language. When done,
ZebraDesigner sends the created command file to the printer memory and stores it.
l Recall label. A label stored in the printer memory is printed out immediately. Using
the recall process, ZebraDesigner creates another command file to instruct the
printer which label from its memory should be printed. The recall label command
occupies a few bytes of data only. The actual amount of data depends on the current
situation. For fixed labels without any variable contents, the recall command file only
contains the recall label command. For variable labels that contain variable fields, the
command file includes the values for these variables and the recall label command.
NOTE: Before activating this mode, make sure the appropriate printer driver is selected
for the label printer. Not all label printers have the ability to use the store/recall printing
mode.
1. Click File > Store. Make sure the Store variant points to the correct memory location
in the printer.
2. Insert or select values for variable objects that are not formatted as internal printer
objects. These variables will be given the same value on each label. They will behave
as objects with fixed values.
3. Click Store to printer to create the command file with label template description and
to send it to the printer.
4. Insert values for prompted label variables. These variables are linked with internal
printer objects on the label. For this reason, their values can be changed during each
printing.
5. Click Print to send variable values and recall label command to the selected label
printer.
4.4.3.8 Options (Configuring the Program)
To customize the general program configuration of ZebraDesigner, open the Options dialog
which is accessible from the File tab.

ZebraDesigner configuration options are grouped on the following tabs:
l Folders:allows you to set the default locations for storing the labels and picture files.
l Language:selects the user interface language. Select the preferred language from
the listed options.
l Designer: enables you to configure opening behavior of ZebraDesigner.
4.4.3.8.1 Folders
Folders tab defines the default location for opening and storing the documents and files
which are edited and used in ZebraDesigner.
NOTE: Make sure read/write rights are granted to the account under which the
ZebraDesigner is running.
l Labels:location for opening and saving the label files.
l Database: location for file databases (Excel, Access, Text).
l Picture: location for opening the picture files.
Folders set in this tab serve as the default location when searching for a specific file in
ZebraDesigner.
4.4.3.8.2 Language
Language tab allows selecting the ZebraDesigner interface language. Select the
appropriate language and click OK.

NOTE: Restart is necessary to make the user interface appear in the selected language.
Make sure you save your work before closing the program.
4.4.3.8.3 Designer
Designer tab enables you to configure opening behavior of ZebraDesigner.
Opening mode group defines how your ZebraDesigner opens new documents.
l Display each document in its own window: If enabled, additionally opened
documents appear in separate windows of ZebraDesigner. This applies to both –
newly created and existing documents.
If you decide to disable this option, additionally opened documents will appear within
the currently active instance of ZebraDesigner.
Printer Settings Source group allows you to choose the source of printer settings.
l Use printer settings from the printer driver: Select this option if you prefer printing
using the printer driver settings. This option allows you to standardize the printer
settings in your working environment.
l Use custom printer settings saved in the label: Each label may have its own printer
settings defined and saved by the user. Select this option to use custom settings for
your labels while printing.
4.4.3.9 About
The About dialog page provides information about your Zebra product license, enables
license purchasing (when in trial mode) and activation, provides software details, and
enables you to change the ZebraDesigner product level.
l Product level tells you the product level you are currently running.
l Change product level: opens the product level selection dialog. When in trial mode,
you can choose and evaluate all product levels. With an activated license, you can
change your product level only to lower levels.
l Trial mode duration: information about the remaining days for product evaluation.
l Purchase License: button directs you to the Zebra online store.
l Activate license: button opens the ZebraDesigner license activation dialog. After
activating the license, this button is renamed to Deactivate License – after clicking it
and confirming the deactivation, your copy of ZebraDesigner is no longer activated.
NOTE: These segments are no longer visible after purchasing and activating the
product license.

Product level changes take effect after you restart ZebraDesigner.
If ZebraDesigner has been installed with predefined product level (i.e., the level has been
defined by the license key), product level selection is not required during first start.
l License type: is the type of license that you are using to run the ZebraDesigner.
Software information contains information about the installed copy of ZebraDesigner –
license, license key, and installed version.
4.4.4 Home Tab
Home Tab provides access to frequently used commands and settings in the following
ribbon groups:
l Clipboard: temporarily stores the selected elements, objects or groups of objects.
l Font: group lets you define the font properties.
l Action: group contains the Print button which starts the printing procedure or runs a
form.
l Management: group provides direct access to Document properties.
l The Align group options define relative horizontal and vertical positioning for the
object content.
l Object: group allows you to align, group or arrange label objects.
4.4.4.1 Clipboard
Clipboard group temporarily stores the selected elements, objects or groups of objects.
Use the selected and stored objects to transfer them from one label to another.
TIP: Copying and pasting of textual (plain text) and graphical (bitmaps) content between
multiple applications is supported.
l Paste: pastes the clipboard contents on the design surface. Multiple reuse of a single
clipboard item is allowed.
l Cut: removes the selected element(s) from the design surface and adds it to the
clipboard to be pasted elsewhere. Note that the first element is selected by clicking
it. When selecting additional elements, press and hold Shift key while clicking
these elements.

l Copy: copies the selected content to the clipboard. Multiple objects can be copied at
once – select them and click Copy.
l Delete: deletes the selected elements or objects. They are not stored in the
clipboard.
l Format painter: copies the formatting properties from one object to another. This is
how you multiply the style of your reference object.
EXAMPLE: Use the format painter to copy font, font size, font color, alignment and
spacing from your reference Text object to all other Text objects using a single
action.
To copy the object style properties:
1. Click your reference object. This is the object you want to copy the properties
from.
2. Click the format painter.
3. Click the target object. This object now has the same properties as your
reference object.
When using the format painter for different objects, you are copying and pasting the
object's properties from the Style tab. If there are matching Style properties
between the objects, ZebraDesigner transfers these properties to the target object.
EXAMPLE: When multiplying the properties from a Rectangle object to Ellipse
objects, all Style tab properties apply, except for the corner radius. This property is
only applicable to the Ellipse object.
NOTE: You can also copy properties between the objects on different labels,
different forms, or between objects on labels and forms.
4.4.4.2 Font
Font group defines font properties:
l Show/hide printer fonts: button allows you to exclusively display internal printer
fonts on the list of available fonts. Graphical fonts are hidden in this case. After
pressing this button again, all available fonts are visible on the list once more.
l Font: defines the font family to be used in a selected object.
l Font Size: defines the text size in an object. Select the desired point size from the
dropdown selector or enter it manually.
l Font Style: defines the object text stylistic characteristics of text, such as bold or
italic.

l Alignment: defines horizontal text positioning in an object: Left, Center or Right.
l Justify: makes a paragraph aligned along the left and right object margins.
TIP: When changing a font during the design process, ZebraDesigner remembers the
last used font type and size.
4.4.4.3 Action
Action group creates a printing shortcut or starts the printing procedure.
Print button opens the ZebraDesigner Print pane as defined by the Default Printing Form.
4.4.4.4 Management
Management ribbon group provides direct access to:
l Document Properties opens current label properties.
4.4.4.5 Align
The Align group options define relative horizontal and vertical positioning for the object
content:
l Align Objects Left: aligns objects with the left border of the first selected object or
with the leftmost object.
l Align Objects Center: aligns objects with the horizontal center of the first selected
object or with horizontal center of the largest object.
l Align Objects Right: aligns objects with the right border of the first selected object
or with the rightmost object.
l Distribute Horizontally: distributes objects using equal horizontal spacing.
l Align Objects Top: aligns objects with the upper border of the first selected object or
with the highest object.
l Align Objects Middle: aligns objects with the vertical center of the first selected
object or with vertical center of the largest object.
l Align Objects Bottom: aligns objects with the bottom border of the first selected
object or with the lowest object.
l Distribute Vertically: distributes objects using equal vertical spacing.

4.4.4.6 Object grouping and arranging
The Object group helps you work with mutiple objects.
Group objects unites the selected objects and makes them behave as a single object.
l Group Objects: unites the selected objects and makes them behave as a single
element.
l Ungroup objects: separates the grouped objects.
Arrange positions the objects so that they appear either in front of or behind each other:
l Send Backward: sends the element back one level.
l Send to Back: sends the element behind all other elements on the label.
l Bring Forward: brings the element forward one level.
l Send to Front: sends the element in front of all other elements on the label.
4.4.5 View Tab
View Tab gives you control over document zooming, marker visibility, visual aids and design
surface rotation. It makes the following ribbon groups available:
l Zoom: defines design surface zoom level and ZebraDesigner window zoom behavior.
l Object Markers Visibility: defines visibility settings for object properties.
l Alignment and Gridlines: sets object positioning behavior and defines properties for
design surface gridlines.
l Rotation:rotates the design surface clockwise for 90° per click.
4.4.5.1 Zoom
Zoom group defines the design surface zoom level.
l Zoom to Document: displays the entire label in the ZebraDesigner window.
l Zoom to Objects: displays all objects in the ZebraDesigner window.
l Zoom In: magnifies the design surface by a percentage of the currently defined zoom
level.
l Zoom Out: decreases the design surface by a percentage of the currently defined
zoom level.

4.4.5.2 Alignment and Gridline Guides
Alignment and Gridlines group sets object positioning behavior and defines properties for
design surface gridlines.
l Display gridline guides: makes the design surface grid dots visible.
l Grid Size X: defines horizontal distance between the grid dots.
l Grid Size Y: defines vertical distance between the grid dots.
l Grid Offset X: defines the horizontal offset of the grid from the design surface
center.
l Grid Offset Y: defines the vertical offset of the grid from the design surface center.
l Align to Objects: makes an object align with other objects on the design surface.
When an object is aligned, a line which marks the object alignment appears.
l Align to Gridlines: aligns the selected objects with gridlines.
l Do Not Align: makes the object position independent of gridlines and position of
other object(s).
4.4.5.3 Rotation
Rotate view button rotates the design surface clockwise. Horizontal and vertical rulers
adapt to the current position of the design surface.
TIP: Rotation type is defined by the printer driver. Certain drivers support complete 360°
rotation (90° per click), while others allow 90° rotation clockwise (portrait/landscape).
4.4.6 Contextual Tabs
Contextual tab is a hidden tab that becomes visible when a specific label object is selected
on the design surface. Contextual tabs appear on the right side of the standard
ZebraDesigner tab. The selection of displayed tabs depends on the object that you are
currently editing.
4.4.6.1 Label-specific Contextual Tabs
When editing various label objects, the following contextual tabs appear depending on the
selected object:

l Design tab
l Barcode tab
l Shape tab
l Picture tab
l Text tab
4.4.6.1.1 Design Contextual Tab
Design tab serves as a contextual tab that defines the layout and positioning of the
selected label object.
The following groups of settings are available on the Design tab:
l General: defines object's visibility and printability on a label.
l Positioning: defines the object's position on the design surface.
l Arrange: positions the object relative to neighboring objects on a label.
General
General group defines the object's visibility and printability on a label.
l Not printable: when enabled, this option prevents the object from being printed on
the label. The object remains visible on the label preview.
l Visible: when disabled, the object neither appears on the print preview nor on the
printed label. The object is treated as if it does not exist.
l Name: allows you to enter object name and its description.
Positioning
Positioning group sets the object location and size on a label.
Position button opens:
l X and Y: coordinates set the exact position on the design surface.
l Width and Height: object dimensions.
l Keep aspect ratio: makes sure both object dimensions change proportionally while
resizing.
l Rotation angle: rotates the object clockwise.

Anchoring Point button defines the spot where an object is pinned to the design surface.
Variable size objects increase or decrease their size in the direction that is opposite to the
chosen anchoring point.
Keep aspect ratio: makes sure the object is resized proportionally.
Lock prevents the selected object from being moved during the design process.
Arrange
Arrange group defines how objects are positioned in a group.
l Bring forward: moves the selected object up one layer.
l Bring to front: moves the selected object to the top of the object stack.
l Send backward: moves the selected object down one layer.
l Send to back: moves the selected object to the bottom of the object stack.
l Group objects: adds selected objects to a group.
l Group objects: unites the selected objects and makes them behave as a
single object.
l Ungroup objects separates previously grouped objects.
Align group allows setting the alignment and spacing for objects on the design surface. All
objects can be aligned according to the neighboring object or according to the document
border.
Horizontal alignment options are:
l Left: aligns the selected objects with the left edge of the leftmost object or with the
left edge of the first selected object. If a single object is selected, it is placed on the
label's left border.
l Center Horizontally: aligns the selected objects with the horizontal center of the
largest selected object or with the horizontal center of the first selected object. If a
single object is selected, it is placed in the horizontal center of a label.
l Align Objects Right: aligns the selected objects with the right edge of the rightmost
object or with the right edge of the first selected object. If a single object is selected,
it is placed on the label's right border.
l Distribute Horizontally: equalizes horizontal spacing between the objects.
Vertical alignment options are:
l Top: aligns the selected objects with the top edge of the topmost object or with the
top edge of the first selected object. If a single object is selected, it is placed on the
label's top border.

l Center Vertically: aligns the selected objects with the vertical center of the largest
selected object or with the vertical center of the first selected object. If a single
object is selected, it is placed in the vertical center of a label.
l Bottom: aligns the selected objects with the bottom edge of the lowest object or
with the bottom edge of the first selected object. If a single object is selected, it is
placed on the label's bottom border.
l Distribute Vertically: equalizes vertical spacing between the objects.
4.4.6.1.2 Barcode Contextual Tab
Barcode tab serves as a contextual tab that defines the type, layout and positioning of
barcode object.
The following groups of settings are available on the Barcode tab:
l Barcode: defines basic barcode symbol type and its dimensions.
l Settings:defines barcode details.
l Arrange: positions the object relative to neighboring objects on a label.
Barcode Tab
Barcode group allows you to choose the barcode type and to set the dimensions of your
barcode symbol.
NOTE: Settings in Barcode group depend on the selected barcode type.
l Barcode Type: defines type of the barcode symbol to be used on a label.
By default, Code128 barcode type is selected. For more details about the available barcode
types, see section Barcode Types and Available Settings.
l DataBar Type: if one of the DataBar barcode types is selected, DataBar Type
defines its specific subtype to be used on the label.
l X dimension: width of the barcode's narrow bar in the selected Unit of
measurement.
l Height: vertical dimension of your barcode in the selected Unit of measurement.

l Ratio defines the ratio between the barcode's narrow and wide bar widths.
Each barcode type's range of permitted ratios is limited by the standard.
ZebraDesigner only allows you to use valid ratios. By default, the ratio is set to 3. This
means that the wide bar is 3 times the width of a narrow bar.
NOTE: The available ratios depend on the selected X dimension. If you are
changing the X dimension, this also affects the selection of available ratios.
l Row height defines the height of a single data row in 2D barcodes. Row height is
specified as a multiple over the X dimension.
Settings
Settings group allows you to configure barcode details.
Human Readable button defines the human readable content's layout.
l No human readable: makes the barcode appear without the human readable text.
l Above barcode: locates human readable text above the barcode.
l Below barcode: locates human readable text below the barcode.
l Content mask: enables the user to reformat the input data before passing it to the
human readable part.
l Barcode Details button opens advanced 1D and 2D barcode settings:
l Include quiet zones: adds blank space around the printed barcode to ensure
the highest level of scanning reliability.
l Space correction: adds white pixels to increase the gap width (in dots)
between the bars.
l Check digit is used by any scanning system to verify that the number scanned
from a barcode is read correctly.
Check digit is derived from the preceding barcode digits and is placed as the final digit of a
barcode.
l Color: sets the barcode's line and human readable content color on the printed label.
Arrange
Arrange group defines how objects are positioned in a group.
l Bring forward: moves the selected object up one layer.
l Bring to front: moves the selected object to the top of the object stack.
l Send backward: moves the selected object down one layer.
l Send to back: moves the selected object to the bottom of the object stack.

l Group objects: adds selected objects to a group.
l Group objects: unites the selected objects and makes them behave as a
single object.
l Ungroup objects separates previously grouped objects.
Align group allows setting the alignment and spacing for objects on the design surface. All
objects can be aligned according to the neighboring object or according to the document
border.
Horizontal alignment options are:
l Left: aligns the selected objects with the left edge of the leftmost object or with the
left edge of the first selected object. If a single object is selected, it is placed on the
label's left border.
l Center Horizontally: aligns the selected objects with the horizontal center of the
largest selected object or with the horizontal center of the first selected object. If a
single object is selected, it is placed in the horizontal center of a label.
l Align Objects Right: aligns the selected objects with the right edge of the rightmost
object or with the right edge of the first selected object. If a single object is selected,
it is placed on the label's right border.
l Distribute Horizontally: equalizes horizontal spacing between the objects.
Vertical alignment options are:
l Top: aligns the selected objects with the top edge of the topmost object or with the
top edge of the first selected object. If a single object is selected, it is placed on the
label's top border.
l Center Vertically: aligns the selected objects with the vertical center of the largest
selected object or with the vertical center of the first selected object. If a single
object is selected, it is placed in the vertical center of a label.
l Bottom: aligns the selected objects with the bottom edge of the lowest object or
with the bottom edge of the first selected object. If a single object is selected, it is
placed on the label's bottom border.
l Distribute Vertically: equalizes vertical spacing between the objects.
4.4.6.1.3 Shape Contextual Tab
Shape tab serves as a contextual tab that defines the appearance of ellipse, rectangle and
line objects.
The following groups of settings are available on the Shape tab:
l Outline:defines how the line of the selected shape should appear.
l Fill:group defines the shape's fill style and color.
l Arrange:positions the object relative to neighboring objects on a label.
Outline
Outline group defines how the line of the selected shape should appear.
Outline Style button options are:
l None: makes the object line invisible.
l Solid: makes the object line solid.
l Dot: makes the object line dotted.
l Dash: makes the object line dashed.
l Clear: makes parts of other objects underneath the line invisible.
Outline Color defines the color of the shape's line.
Thickness defines the object line's width.
Corner radius: makes the rectangle corners round. Higher values make the curve broader.
Fill
Fill group defines the shape's fill style and color.
FillStyle options are:
l None: makes the object completely transparent.
l Clear: makes other objects beneath the active one invisible.
l Solid: fills the object with solid color.
l 25% of color: sets fill color opacity to 25 %.
l 50% of color: sets fill color opacity to 50 %
l 75% of color: sets fill color opacity to 75 %.
Background Color defines the color of the shape's fill.
Arrange
Arrange group defines how objects are positioned in a group.
l Bring forward: moves the selected object up one layer.
l Bring to front: moves the selected object to the top of the object stack.
l Send backward: moves the selected object down one layer.
l Send to back: moves the selected object to the bottom of the object stack.

l Group objects: adds selected objects to a group.
l Group objects: unites the selected objects and makes them behave as a
single object.
l Ungroup objects separates previously grouped objects.
Align group allows setting the alignment and spacing for objects on the design surface. All
objects can be aligned according to the neighboring object or according to the document
border.
Horizontal alignment options are:
l Left: aligns the selected objects with the left edge of the leftmost object or with the
left edge of the first selected object. If a single object is selected, it is placed on the
label's left border.
l Center Horizontally: aligns the selected objects with the horizontal center of the
largest selected object or with the horizontal center of the first selected object. If a
single object is selected, it is placed in the horizontal center of a label.
l Align Objects Right: aligns the selected objects with the right edge of the rightmost
object or with the right edge of the first selected object. If a single object is selected,
it is placed on the label's right border.
l Distribute Horizontally: equalizes horizontal spacing between the objects.
Vertical alignment options are:
l Top: aligns the selected objects with the top edge of the topmost object or with the
top edge of the first selected object. If a single object is selected, it is placed on the
label's top border.
l Center Vertically: aligns the selected objects with the vertical center of the largest
selected object or with the vertical center of the first selected object. If a single
object is selected, it is placed in the vertical center of a label.
l Bottom: aligns the selected objects with the bottom edge of the lowest object or
with the bottom edge of the first selected object. If a single object is selected, it is
placed on the label's bottom border.
l Distribute Vertically: equalizes vertical spacing between the objects.
4.4.6.1.4 Picture Contextual Tab
Picture tab serves as a contextual tab that defines picture resizing options and object
arranging.

The following groups of settings are available on the Picture tab:
l Resize: resizes the object relative to neighboring objects on a label.
l Arrange: positions the object relative to neighboring objects on a label.
Resize
Resize group defines if the picture adapts to the label size at print time or not.
Picture Fit button opens the picture sizing options.
l Resize options: define how the source file dimensions adapt to the size of object at
print time.
l Keep original picture size: disables resizing. The source file is displayed using
the object with its original dimensions.
l Resize proportionally: makes the source file resize proportionally. The aspect
ratio of source file dimensions is preserved.
l Resize to the designed size: resizes the picture horizontally and vertically to
make it fit into the bounding box. Using this option will most likely make the
picture distorted.
l Original size: displays the picture's Width and Height before resizing.
l Revert to original picture size: removes resizing actions.
Keep aspect ratio makes sure both object dimensions change proportionally while resizing.
Arrange
Arrange group defines how objects are positioned in a group.
l Bring forward: moves the selected object up one layer.
l Bring to front: moves the selected object to the top of the object stack.
l Send backward: moves the selected object down one layer.
l Send to back: moves the selected object to the bottom of the object stack.
l Group objects: adds selected objects to a group.
l Group objects: unites the selected objects and makes them behave as a
single object.
l Ungroup objects separates previously grouped objects.

Align group allows setting the alignment and spacing for objects on the design surface. All
objects can be aligned according to the neighboring object or according to the document
border.
Horizontal alignment options are:
l Left: aligns the selected objects with the left edge of the leftmost object or with the
left edge of the first selected object. If a single object is selected, it is placed on the
label's left border.
l Center Horizontally: aligns the selected objects with the horizontal center of the
largest selected object or with the horizontal center of the first selected object. If a
single object is selected, it is placed in the horizontal center of a label.
l Align Objects Right: aligns the selected objects with the right edge of the rightmost
object or with the right edge of the first selected object. If a single object is selected,
it is placed on the label's right border.
l Distribute Horizontally: equalizes horizontal spacing between the objects.
Vertical alignment options are:
l Top: aligns the selected objects with the top edge of the topmost object or with the
top edge of the first selected object. If a single object is selected, it is placed on the
label's top border.
l Center Vertically: aligns the selected objects with the vertical center of the largest
selected object or with the vertical center of the first selected object. If a single
object is selected, it is placed in the vertical center of a label.
l Bottom: aligns the selected objects with the bottom edge of the lowest object or
with the bottom edge of the first selected object. If a single object is selected, it is
placed on the label's bottom border.
l Distribute Vertically: equalizes vertical spacing between the objects.
4.4.6.1.5 Text Contextual Tab
Text tab serves as a contextual tab that defines formatting of Text object.
The following groups of settings are available on the Text tab:
l Format: lets you define the text format.
l Text Settings: lets you define the layout of any textual content that is added to label
object.
l Arrange:positions the object relative to neighboring objects on a label.
Format
Format group lets you define the text format.
l Show/hide printer fonts: button turns visibility of printer fonts on the font list on/off.
l Font: allows specifying the typeface and its size. Fonts fall into two groups, OpenType
fonts and Printer fonts.
NOTE: If the currently selected printer is a thermal printer, additional fonts will be
visible on the list of available fonts. These are the Printer fonts identified by the
printer icon in front of their names.
l The font may appear Bold, Italic, Underlined or as a Strikethrough text.
l Scaling: factor that defines how much the font is stretched from its original
proportions.
If the stretch factor is set to 100 %, the font has a normal look. If factor is 200 %, it means
that font is twice as wide as normal. If it is 50 %, the font is half as wide.
l Font color: specifies font and underscore color.
Text Settings
Text Setting group allows defining the layout of any textual content that is added to the
object.
Character and Paragraph button opens line and character spacing options:
l Line spacing: distance between each line in a paragraph.
l Character spacing: distance between individual characters.
Effects button displays the available text effects:
l Inverse: inverts the colors of text and background.
Arrange
Arrange group defines how objects are positioned in a group.
l Bring forward: moves the selected object up one layer.
l Bring to front: moves the selected object to the top of the object stack.
l Send backward: moves the selected object down one layer.
l Send to back: moves the selected object to the bottom of the object stack.

l Group objects: adds selected objects to a group.
l Group objects: unites the selected objects and makes them behave as a
single object.
l Ungroup objects separates previously grouped objects.
Align group allows setting the alignment and spacing for objects on the design surface. All
objects can be aligned according to the neighboring object or according to the document
border.
Horizontal alignment options are:
l Left: aligns the selected objects with the left edge of the leftmost object or with the
left edge of the first selected object. If a single object is selected, it is placed on the
label's left border.
l Center Horizontally: aligns the selected objects with the horizontal center of the
largest selected object or with the horizontal center of the first selected object. If a
single object is selected, it is placed in the horizontal center of a label.
l Align Objects Right: aligns the selected objects with the right edge of the rightmost
object or with the right edge of the first selected object. If a single object is selected,
it is placed on the label's right border.
l Distribute Horizontally: equalizes horizontal spacing between the objects.
Vertical alignment options are:
l Top: aligns the selected objects with the top edge of the topmost object or with the
top edge of the first selected object. If a single object is selected, it is placed on the
label's top border.
l Center Vertically: aligns the selected objects with the vertical center of the largest
selected object or with the vertical center of the first selected object. If a single
object is selected, it is placed in the vertical center of a label.
l Bottom: aligns the selected objects with the bottom edge of the lowest object or
with the bottom edge of the first selected object. If a single object is selected, it is
placed on the label's bottom border.
l Distribute Vertically: equalizes vertical spacing between the objects.
4.4.7 Help Tab
Help tab provides direct access to various resources that help you design and use labels
quickly and efficiently.
Help ribbon group includes buttons with links to the following resources:

l Help:ZebraDesigner online help.
l User Guides:online collection of Zebra user guides. The collection includes user
guides for the entire product portfolio.
l Training Videos:Zebra collection of training videos.
l Knowledge base: online library of articles that describe many technical solutions, tips,
and solved issues for labels.
l Sample files:access to the collection of sample label files. Use them to become
familiar with ZebraDesigner and to explore software capabilities.
l Technical support: connects you with Zebra technical support department.
Product ribbon group includes links to:
l Software About page
l Zebra web page:https://www.zebra.com
4.5 Design Surface
Design surface is ZebraDesigner's central field that serves as a place to create, add,
position, and interconnect the label objects.
To make designing of labels as simple and efficient as possible, design surface follows the
same usability and functional principles as Microsoft Office applications.
TIP: Use View tab to customize design surface.
l Design surface elements are described here.
l Design surface editing actions are described here.
l Design surface visual aid elements are described here.
4.5.1 Design Surface Elements
Design surface consists of the following elements:
l Ruler: Design surface is equipped with horizontal and vertical ruler. Use it to line up
the objects or to properly position the label and its content. Change the unit
measurements displayed on the ruler in Label properties.
l Paper: Yellow area of the design surface displays the current size of paper. The
information about supported paper format is acquired from the printer driver, but you
also have the option to define custom format. Manual paper size has to be defined
when printing on regular office sheets of paper. See Paper section for more details.
l Label: White area represents the area for label designing. Red line displays limit of the
currently printable area.

l Object Properties Window: Defines the selected label object's properties. Double-
click an object to open the dialog.
4.5.2 Design Surface Editing Actions
Below listed are the most relevant common actions for editing the objects on design
surface:
l Object arranging: allows the objects to be placed in front of or behind other objects
in a group. Arranging options are described here.
l Objects aligning: allows the objects to be aligned among each other. Aligning
options are described here.
l Zooming: enables the entire design surface to be zoomed in or out. Zooming options
are described here.
l Scrolling: enables sliding the design surface up and down.
l Selecting: enables the objects on design surface to be selected for editing
individually or in a group. Group selection allows any actions to be applied to multiple
object simultaneously.
l Rotating: enables object rotation.
4.5.3 Visual Aid Elements
Listed below are the visual aid elements that enable you to work with ZebraDesigner.

l Gridlines serve as a visual aid during the design process. They can be either visible
or hidden. Their density is customizable. Gridline options are available in
ZebraDesigner's Align ribbon group.
l Snaplines are non-visible alignment lines that help the user align the objects during
the design process. Snap options are available in ZebraDesigner's Align ribbon group.
l Ruler shows the available design area for label (white colored field) and file page (gray
colored field).
l Resize handles appear on the selected (active) objects. They enable you to resize
the object dimensions. X and Y dimensions can be resized simultaneously or
separately.
l Margins are the amount of fixed space between the edge of an object and the edge
of a label.
4.5.4 Object Properties Window
When designing a label object, double-click an object to set its properties.
Double-click opens the object properties window. Available object properties window
options adapt to each selected object and its properties.
l Available label objects and their properties are listed and described in detail here.
After pressing F4, object properties dialog becomes pinned as object properties editor on
the right side of the design surface.

4.6 Document Properties and Management
Dialogs
ZebraDesigner offers multiple dialogs that help you configure and manage the active
document and connected data sources. Read the following topics for detailed instruction:
l Label Properties
4.6.1 Label Properties
Label Properties editor selects the printer, sets label dimensions, and defines the printing
paper properties.
The label properties settings are listed below and appear as dialog tabs:
Label Property Description
Printer Selects the preferred printer.
Label Dimensions Defines the Unit of measure and label dimensions.
Paper Defines the printing paper properties.
Stocks Selects the stock type.
Style Defines the label style parameters.
Info Inserts the label description.
TIP: To open the Label Properties Editor, double-click the design surface.
4.7 Context Menus
In ZebraDesigner, right-click displays various context menus that contain commonly used
commands. The availability of commands depends on the selected items – design surface or
object.
4.7.1 Design Surface Context Menu
When right-clicking the design surface, a context menu appears. The context menu includes
commonly used commands:
l Document Properties: opens the dialog.
l Paste: pastes clipboard contents on the design surface. Multiple reuse of a single
clipboard item is allowed.
l Cut: removes the selected element(s) from the design surface and adds it to the
clipboard to be pasted elsewhere.
l Copy: copies the selected object to the clipboard.
l Select all: selects all objects on the design surface.
l Align to objects: makes the object on the design surface align with other objects.
When two objects are aligned, a leading line appears linking the edges of the two
aligned objects.
l Align to grid: makes the object on the design surface align with gridlines. When
moving the object, it always snaps to the gridline.
l Display gridline guides: makes the gridlines visible.
l Objects markers visibility: toggles visibility for the object properties. Markers
become visible when moving the mouse pointer over the object.
l Object name: marker shows the name of an object.
l Internal element: marker shows if the selected object belongs to the internal
printer elements.
l Counter: marker shows that the connected variable is Counter.
l Locked object: marker shows that an object's position is locked.
l Zoom: defines zooming behavior.
l Zoom to Document: shows the entire label in the ZebraDesigner window.
l Zoom to Objects: shows all objects in the ZebraDesigner window.
4.7.2 Object Context Menu
When right-clicking an object, a context menu appears. The context menu includes the
following commands:

l Properties: opens object properties dialog.
l Copy: copies the selected content to the clipboard.
l Cut: removes the selected element from the design surface and adds it to the
clipboard to be pasted elsewhere.
l Delete: removes the selected object from the design surface.
l Lock: prevents the selected object from being moved.
l Arrange: positions the objects so that they appear either in front of or behind each
other.
l Bring Forward: brings the element forward for one level.
l Send backward: sends the element back for one level.
l Send to Front: sends the element in front of all other elements on the label.
l Send to Back: sends the element behind all other elements on the label.
4.7.3 Group Context Menu
When right-clicking an object, a context menu appears. The context menu includes the
following commands:
l Properties: opens common object properties dialog.
l Copy: copies the selected content to the clipboard.
l Cut: removes the selected object from the design surface and adds it to the clipboard
to be pasted elsewhere.
l Delete: deletes the selected object(s) from the design surface.
l Lock: prevents the selected objects from being moved.
l Group objects: unites the selected objects and makes them behave as a single
object.
l Ungroup objects: separates previously grouped objects.
Arrange group defines how objects are positioned in a group.
l Send backward: moves the selected object down one level.
l Send to back: moves the selected object to the bottom of the object stack.
l Bring forward: moves the selected object up one level.
l Bring to front: moves the selected object to the top of the object stack.
Align group allows setting the alignment and spacing for objects on the design surface. All
objects can be aligned according to the neighboring object or according to the document
border.
Horizontal alignment options are:
l Left: aligns the selected objects with the left edge of the leftmost object or with the
left edge of the first selected object. If a single object is selected, it is placed on the
label's left border.

l Center Horizontally: aligns the selected objects with the horizontal center of the
largest selected object or with the horizontal center of the first selected object. If a
single object is selected, it is placed in the horizontal center of a label.
l Align Objects Right: aligns the selected objects with the right edge of the rightmost
object or with the right edge of the first selected object. If a single object is selected,
it is placed on the label's right border.
l Distribute Horizontally: equalizes horizontal spacing between the objects.
Vertical alignment options are:
l Top: aligns the selected objects with the top edge of the topmost object or with the
top edge of the first selected object. If a single object is selected, it is placed on the
label's top border.
l Center Vertically: aligns the selected objects with the vertical center of the largest
selected object or with the vertical center of the first selected object. If a single
object is selected, it is placed in the vertical center of a label.
l Bottom: aligns the selected objects with the bottom edge of the lowest object or
with the bottom edge of the first selected object. If a single object is selected, it is
placed on the label's bottom border.
l Distribute Vertically: equalizes vertical spacing between the objects.

5 Label
Label works as a template which allows adding label objects and can be printed using any
kind of printing media.
Each object adds a different kind of content such as text, line, ellipse, barcode or rectangle
to a label. The content is either fixed (manually entered by the user) or dynamic (defined
automatically via connected data sources).
After finishing with your label design, you can print the labels using any of your installed
printers.
5.1 Label Setup Wizard
Label Setup Wizard guides you through the process of creating a new label. The wizard
consists of four configuration steps and a summary:
l Step 1:Select the Printer
l Step 2:Set the Page Size
l Step 3:Select the Label Layout
l Step 4:Specify the Label Dimensions
l Step 5: Summary
After finishing these steps, the label is ready for editing and printing.
NOTE: To quit Label Setup Wizard during any step, press Escape. The new label
properties are set to default.
5.1.1 Step 1:Select the Printer
This step selects the printer to be used for printing the newly created label. It also provides
direct access to printer driver properties.
1. Select the printer from the dropdown list.
2. Label setup wizard remembers the last selected printer. When creating another new

label, the wizard will automatically select the printer that you selected for your last
created label. If this printer is currently missing, your default printer is selected.
5.1.2 Step 2: Set the Page Size
This step defines how the page size is selected. When using a thermal printer, it is
recommended to set the size automatically. Manual selection proves to be useful if you know
the exact stock code or label format.
NOTE: When changing the printer, the Page Size settings always go to default
(automatic).
1. Select print media.
l Print on a roll of labels option prints on the installed roll of labels. Page size
for thermal printers is detected automatically.
NOTE: If a thermal printer is selected in the preceding Select the Printer
wizard step, this option is enabled by default.
l Print on a sheet of paper option prints labels on sheets of paper. It lets you
manually define the label page size to fit the printer.
With this option selected, additional settings appear:
l Unit of measure: defines the unit of measure to be used while designing
the label.
l Paper: defines the label page Width and Height.
NOTE: If a regular home/office printer is selected in the preceding Select
Printer wizard step, Page size is enabled by default.
2. Select stock.
Load settings from a predefined stock option sets the page to be defined by the
selected stock type.
With this option selected, additional settings appear:
l Stock: defines which stock type should be used when designing and printing
the newly created label. Stock types are usually associated with printer
vendors or stationery suppliers. Select the exact stock from the dropdown
menu.

If the selected stock is not compatible with printer, a warning appears. Label
designing and printing is disabled.
l Stock information: displays the selected stock's properties.
5.1.3 Step 3:Select the Label Layout
This step defines the label orientation and rotation on a printer:
l Orientation: sets the new label layout as Portrait or Landscape.
l Rotation: rotates the Printer Layout of a label by 180 degrees, if the selected printer
supports it.
l Preview field: displays the label layout according to the currently set properties.
5.1.4 Step 4:Specify the Label Dimensions
This step defines the dimensions of the newly created label, its margins, measurement unit,
and labels across positioning settings:
l Unit of measure: defines the unit to be used while designing the label.
l Label Dimensions: define the new label's Width and Height.
l Margins: define the distance between the edge of the printing surface and the edge
of the label (left/right, top/bottom).
l Labels Across: defines the number of labels to be printed on a single label sheet.
l Horizontal count: number of labels in a row.
l Vertical count: number of labels in a column.
l Horizontal gap: sets horizontal distance between the labels on a sheet.
l Vertical gap: sets vertical distance between the labels on a sheet.
l Processing order: defines the direction in which the labels are printed. Set the
starting corner where the printing starts and define the horizontal and vertical
direction of label positioning.
5.1.5 Step 5:Summary
This step summarizes the new label properties as defined using the Label Setup Wizard.
Before clicking Finish to enter the label editing and printing phases, check the displayed
settings:
l Printer: selected printer for label printing.
l Label dimensions: dimensions of newly created label.
l Paper dimensions: dimensions of printable paper.

5.2 Label Properties
Label Properties editor selects the printer, sets label dimensions, and defines the printing
paper properties.
The label properties settings are listed below and appear as dialog tabs:
Label Property Description
Printer Selects the preferred printer.
Label Dimensions Defines the Unit of measure and label dimensions.
Paper Defines the printing paper properties.
Stocks Selects the stock type.
Style Defines the label style parameters.
Info Inserts the label description.
TIP: To open the Label Properties Editor, double-click the design surface.
5.2.1 Printer
Printer tab lets you define the printer to print the labels on, and to set printing behavior.
Printer dropdown menu lets you select a printer from the currently available printers.

TIP: To set the printer settings, select a printer and click Printer properties. This button
gives direct access to the selected printer's driver and its settings.
5.2.2 Label Dimensions
Label Dimensions tab specifies label dimensions and defines whether its size should adapt
to the changing size of the objects or not.
Unit of measure defines the unit to be used while designing the label. There are four
available units:cm, in, mm, and dot.
Label Dimensions group defines the label's Width and Height. Label dimension settings
become active if manual label dimensions are enabled.
When manually inserting the unit of measure, this also changes the currently defined Unit.
Margins group sets the distance between the edge of the printing surface and the edge of
the label (left/right, top/bottom).
Radius group enables you to make the label corners rounded.
l Vertical radius: adjusts corner roundness value in vertical direction.
l Horizontal radius: adjusts corner roundness value in horizontal direction.
Labels Across defines the number of labels to be printed on a single label sheet.
l Horizontal count: number of labels in a row.
l Vertical count: number of labels in a column.
l Horizontal gap: horizontal distance between labels on a sheet.
l Vertical gap: vertical distance between labels on a sheet.
l Processing order: defines the direction in which labels are printed. Set the starting
corner in which printing starts, and the horizontal/ vertical directions of label
positioning.
5.2.3 Paper
Paper tab sets printing paper properties.
Unit selects the Unit of measure to be used in a label.
Paper Type group defines paper dimensioning type – automatic or manual.
l Automatically set page size based on the label dimensions (labels on a roll): page
size is defined by the printer driver.
l Manually set page size (sheets of paper): page size is set manually.
If the page size is defined manually, additional options appear:

l Paper: selection of standard paper formats.
l Width and Height: custom paper dimensions.
Orientation group sets the new label layout as Portrait or Landscape.
l Rotated: Printer Layout is rotated by 180 degrees.
Preview displays current label screen and print layouts.
5.2.4 Stocks
Label stocks are a time-saving alternative to designing labels from scratch. Use stock
templates when designing labels for a specific printer type and when optimizing the label
designing process.
Stocks group defines which stock type should be used when designing and printing a label.
Stock types are usually associated with printer vendors or stationery suppliers.
NOTE: Here defined stock properties override the manually set label properties.
Stock defines the exact stock to be used for label designing and printing. Stocks are sorted
by vendors and media formats. Expand stock provider and select a specific stock type.
TIP: Use Search... to easily find the requested stock. Partial search is available – enter a
sequence of characters and all stocks which contain it will be listed.

NOTE: If the selected stock is not compatible with the selected printer, a warning
appears. Previously selected stock becomes active again (if it was defined) allowing the
printing to continue.
Stock information displays the selected stock's properties:
l Label dimensions
l Labels across
l Description
l Author
5.2.5 Style
Style tab is used for defining label style properties.
Background color: sets the color of label background.
Background picture: sets the label background picture.
l Picture file name: defines the image file to be used as background picture.
l Embed picture in a document: saves picture into the label file.
l Save embedded picture to file: the embedded label picture is saved to a separate
file.
l Remove embedded picture:embedded picture is removed from the label file.
l Picture position: sets picture position on the label.
l Center: centers the picture on the label with its original dimensions. A picture
larger than the label will display only the central part leaving the rest out of
view.
l Fit:resizes the picture to fill the label while keeping the original aspect ratio.
l Stretch: stretches picture to make it fill the entire label.
NOTE: This option ignores the original aspect ratio of the picture. The
picture might appear distorted on the label.
l Rotation: background picture rotated by 90 degrees.
l Print background picture: background picture is printed.
5.2.6 Info
Info tab includes a Description that serves as a hint or as a guide for the user that is going
to work with the label.
Define label Description by entering text into the field.

5.3 Label Objects
After setting the label properties, it's time to start adding content to the label. Label objects
are basic design items that are used for adding and editing various content types. Each
object has its own function as described in the table below.
Label Object Icon Description
Text
Container for textual content. It adapts its dimensions to
fit the amount of entered characters. When typing, text
object grows horizontally and/or vertically.
Barcode
Object for adding and editing various types of barcodes
on a label.
Picture Object for adding graphic content to a label.
Rectangle Object for creating rectangular shapes on a label.
Line Object for creating lines on a label.
Ellipse Object for creating circular shapes on a label.
Inverse Object for inverting the color of the underlying object.

5.3.1 Text
Text object is a container for textual content which adapts its dimensions to fit the amount
of inserted characters. When typing, text object grows horizontally and/or vertically.
5.3.1.1 Source
Connected data source defines the content source of the selected object.
l Fixed data: manually entered fixed text.
l Variable keyboard input: type of variable that enables the content of a prompted field
to be different for every print job.
l Current date: displays current date value on the label.
l Current time: displays current time value on the label.
l Counter:displays counter value on the label.
Content field allows you to type the object content.
5.3.1.2 Style
Font color sets text font and underline color.
Font selects the typeface. Fonts are divided into two groups: OpenType fonts and Printer
fonts.
NOTE: If the currently selected printer is a thermal printer, additional fonts become
available. These are the internal Printer fonts that are installed on the printer. Printer
fonts are identified by the printer icon in front of their names.
The font may appear Bold, Italic, Underlined or as a Strikethrough text.
Font Scaling sets the font stretch factor. If the factor is set to 100 %, font appears in normal
scale. If the factor is set to 200 %, font appears twice as wide. If set to 50 %, font width is
shrunk to half its size.
Alignment defines horizontal positioning of the entered content.
l Left: text aligned with the left object border.
l Center: text positioned in the center of the object.
l Right: text aligned with the right object border.
l Justified: distributes text evenly along both sides.
Spacing sets the space between text characters and lines.
l Line spacing: space between each line in a paragraph.
l Character spacing: space between individual characters.

5.3.1.3 Effects
Inverse: inverted text and object background colors.
5.3.1.4 Position
Position tab defines object positioning and its position-related behavior.
Position group defines the object's position.
l X and Y: anchoring point coordinates.
Size group gives an information about the object's dimensions.
l Width and Height: horizontal and vertical object dimension.
l Keep aspect ratio: simultaneous changing of object dimensions while scaling.
In Text object, the size of text is determined by the font size. Object dimensions and aspect
ratio cannot be changed manually and only serve as information about its current size.
NOTE: If the measurement unit is changed in label properties, the value transforms
automatically.
Rotation angle is the object angle according to the design surface.
There are multiple ways to set the object's angle: enter the angle manually , drag the slider
or click and drag the icon on the selected object. Rotation angle and slider rotates the
object around its anchoring point. The icon rotates the object around its central point.
Anchoring point is the spot where an object is pinned to design surface. Variable size
objects increase or decrease their size in the direction that is opposite to the chosen
anchoring point.
Lock prevents the object from being moved during the design process, select under the
Design behavior group.
5.3.1.5 General
General tab identifies the object and sets its status.
Name sets a unique object ID.
NOTE: Avoid using spaces or special characters in object names.

Description allows adding notes and annotations for an object. It provides help during the
label design process.
Status group defines object visibility on print preview and on printed labels.
l Not printable: prevents the object from being printed.
l Visible: if the check box is not selected, the object neither appears on the print
preview nor on the printed label. The object is treated as if it does not exist.
Option Print Preview Printout
Not printable
(selected)
YES NO
Visible (cleared) NO NO
5.3.2 Barcode
Barcode object is used for adding various types of barcodes with encoded data to a label.
Details on barcode properties, types, and data encoding methods are available in the
dedicated Barcode section.
5.3.3 Picture
Use Picture object to add graphic content on a label. The following file formats are
supported:
l Portable Network Graphic (*.png)
l PDF (*.pdf)
l Adobe Photoshop (*.psd)
l Scalable Vector graphics (*.svg)
l Paintbrush (*.pcx)
l JPEGbitmaps (*.jpg, *.jpeg, *.jpe)
l TIFFbitmaps (*.tif, *.tiff)
l Enhanced Windows Metafile (*.emf)
l Windows Metafile (*.wmf)
l Windows bitmap (*.bmp)
5.3.3.1 Source
Connected data source defines the content source of the selected object.
l Fixed data: manually entered fixed text.
l Variable keyboard input: type of variable that enables the content of a prompted field
to be different for every print job.

l Current date: displays current date value on the label.
l Current time: displays current time value on the label.
l Counter:displays counter value on the label.
Content field is used for entering the object content.
To (re)define the Picture object Content, click Browse and locate the file to be displayed on
the label.
Embed picture in a document stores the picture in the label file. Link to the original picture
file is discarded.
TIP: Picture embedding makes the label file more portable as the user does not have to
include the picture file when sharing the label.
Save embedded picture to file: the embedded label picture is saved as a separate file.
5.3.3.2 Style
Dithering group allows you to select the most appropriate dithering method to print
pictures on labels in black and white.
TIP: When printing pictures in black and white, dithering creates the illusion of multiple
colors and shades by varying the pattern of black dots.
Dithering type selects the dithering method:
l Printer driver default: no dithering method is selected for the picture object. When
printing in black and white, printer driver uses its own dithering method.
If no dithering is set for the picture object, the algorithm can also be selected using the
printer properties dialog. The selected dithering algorithm for an object in ZebraDesigner
overrides the algorithm selected using printer properties dialog. See Changing dithering
options for more detailed information.
l Ordered: achieves dithering by applying a threshold map (matrix with cells) on the
pixels displayed. If the value of the pixel (scaled into the 0-9 range) is less than the
number in the corresponding cell of the matrix, the algorithm plots the pixel black,
otherwise, it plots it white.
l Threshold: sets a threshold to which every pixel is compared. If the original pixel
value is higher than the threshold, it renders white. The lower the threshold value,
the higher the share of pixels turned to white.
l Floyd Steinberg:achieves dithering using error dispersion. This algorithm generates
the closest result to the original, but represents the slowest option.

5.3.3.3 Position
Position tab defines object positioning and its position-related behavior.
Position group defines the object's position.
l X and Y: anchoring point coordinates.
Size group sets the object's dimensions:
l Width and Height: horizontal and vertical object dimension.
l Keep aspect ratio: simultaneous changing of object dimensions while scaling.
NOTE: If the measurement unit is changed in label properties, the value transforms
automatically.
Rotation angle is the object angle according to the design surface.
TIP: There are multiple ways to set the object's angle: enter the angle manually, drag the
slider or click and drag the icon on the selected object. Rotation angle and slider
rotates the object around its anchoring point. The icon rotates the object around its
central point.
Anchoring point is the spot where an object is pinned to design surface. Variable size
objects increase or decrease their size in the direction that is opposite to the chosen
anchoring point.
Lock prevents the object from being moved during the design process.
NOTE: If the measurement unit is changed, the value converts automatically.
Graphic Resizing tab is available if the picture object is connected to a variable. These
settings define how the Picture object adapts its size to the source file at print time.
l Keep original picture size: disabled picture resizing. Picture size remains
unchanged.
l Resize proportionally: proportional picture resizing. Aspect ratio of picture
dimension remains fixed.
l Resize to the designed size: horizontal and vertical picture resizing to make it fit into
the bounding box. This option will most likely make the picture distorted.

Original size displays the picture's Width and Height before resizing. Revert to original
picture size cancels the resizing actions.
5.3.3.4 General
General tab identifies the object and sets its status.
Name sets a unique object ID.
NOTE: Avoid using spaces or special characters in object names.
Description allows adding notes and annotations for an object. It provides help during the
label design process.
Status group defines object visibility on print preview and on printed labels.
l Not printable: prevents the object from being printed.
l Visible: if the check box is not selected, the object neither appears on the print
preview nor on the printed label. The object is treated as if it does not exist.
Option Print Preview Printout
Not printable
(selected)
YES NO
Visible (cleared) NO NO
5.3.4 Rectangle
Rectangle object creates a rectangular frame on a label.
5.3.4.1 Style
Outline group defines line settings:
l Thickness: object line thickness.
l Outline style: object line style.
l None: line invisible.
l Solid: solid line.
l Dot: dotted line.
l Dash: dashed line.
l Erase: parts of neighboring objects become invisible underneath this object.
l Outline color: color of the line.
l Corner radius: makes the rectangle corners round. Higher values make the curve
broader.

Fill defines the object fill settings and color.
l Fill style: object fill properties definition:
l None: completely transparent object.
l Erase: makes objects beneath the active one hidden.
l Solid: fills the object with solid color.
l Right Diagonal: fills the object with diagonal lines that ascend toward the right
side.
l Left Diagonal: fills the object with diagonal lines that ascend toward the left
side.
l Vertical: fills the object with vertical lines.
l Horizontal: fills the object with horizontal lines.
l Cross: fills the object with crossed lines.
l Cross Diagonal: fills the object with diagonally crossed lines.
l 25% of color: fill color opacity 25 %.
l 50% of color: fill color opacity 50 %.
l 75% of color: fill color opacity 75 %.
l Fill color: object fill color definition.
NOTE: The system does not allow the Outline style and Fill style to be set to None at
the same time.
TIP: Shape objects (Rectangle, Line and Ellipse) in ZebraDesigner remember the last
used setting. Each time you add one of these objects to the label, it has the same outline
and fill settings as the previously added shape object.
5.3.4.2 Position
Position tab defines object positioning and its position-related behavior.
Position group defines the object's position.
l X and Y: anchoring point coordinates.
Size group sets the object's dimensions:
l Width and Height: horizontal and vertical object dimension.
l Keep aspect ratio: simultaneous changing of object dimensions while scaling.
NOTE: If the measurement unit is changed in label properties, the value transforms
automatically.
Rotation angle is the object angle according to the design surface.

TIP: There are multiple ways to set the object's angle: enter the angle manually, drag the
slider or click and drag the icon on the selected object. Rotation angle and slider
rotates the object around its anchoring point. The icon rotates the object around its
central point.
Anchoring point is the spot where an object is pinned to design surface. Variable size
objects increase or decrease their size in the direction that is opposite to the chosen
anchoring point.
Lock prevents the object from being moved during the design process.
5.3.4.3 General
General tab identifies the object and sets its status.
Name sets a unique object ID.
NOTE: Avoid using spaces or special characters in object names.
Description allows adding notes and annotations for an object. It provides help during the
label design process.
Status group defines object visibility on print preview and on printed labels.
l Not printable: prevents the object from being printed.
l Visible: if the check box is not selected, the object neither appears on the print
preview nor on the printed label. The object is treated as if it does not exist.
Option Print Preview Printout
Not printable
(selected)
YES NO
Visible (cleared) NO NO
Printing optimization group allows activating the use of internal printer elements.
TIP: If supported by the selected printer model, a share of label element processing is
handled directly by the printer (e.g., internal fonts, shapes, barcodes). This speeds up the
printing process also due to significantly reduced data traffic.

l Use printer elements if supported: prints labels using internal printer elements if
the printer allows it. If a selected printer does not support internal printer elements,
the element is sent as a graphic file.
l Always use printer element:prints labels using printer elements only. If a selected
printer does not support internal printer elements, an error message with
explanation is displayed.
l Always print as graphics: sends and prints the objects as graphic files.
5.3.5 Line
Line object creates a line on a label.
5.3.5.1 Style
Outline group defines line settings:
l Thickness: object line thickness.
l Outline style: object line style.
l None: line invisible.
l Solid: solid line.
l Dot: dotted line.
l Dash: dashed line.
l Erase: parts of neighboring objects become invisible underneath this object.
l Outline color: color of the line.
TIP: Shape objects (Rectangle, Line and Ellipse) in ZebraDesigner remember the last
used setting. Each time you add one of these objects to the label, it has the same outline
and fill settings as the previously added shape object.
5.3.5.2 Position
Position tab defines object positioning and its position-related behavior.
Position group defines the object's position.
l X and Y: anchoring point coordinates.
If the measurement unit is changed in label properties, the value transforms automatically.
Rotation angle is the object angle according to the design surface.
TIP: There are multiple ways to set the object's angle: enter the angle manually, drag the
slider or click and drag the

icon on the selected object. Rotation angle and slider rotates the object around its
anchoring point. The icon rotates the object around its central point.
Lock prevents the object from being moved during the design process.
5.3.5.3 General
General tab identifies the object and sets its status.
Name sets a unique object ID.
NOTE: Avoid using spaces or special characters in object names.
Description allows adding notes and annotations for an object. It provides help during the
label design process.
Status group defines object visibility on print preview and on printed labels.
l Not printable: prevents the object from being printed.
l Visible: if the check box is not selected, the object neither appears on the print
preview nor on the printed label. The object is treated as if it does not exist.
Option Print Preview Printout
Not printable
(selected)
YES NO
Visible (cleared) NO NO
Printing optimization group allows activating the use of internal printer elements.
TIP: If supported by the selected printer model, a share of label element processing is
handled directly by the printer (e.g., internal fonts, shapes, barcodes). This speeds up the
printing process also due to significantly reduced data traffic.
l Use printer elements if supported: prints labels using internal printer elements if
the printer allows it. If a selected printer does not support internal printer elements,
the element is sent as a graphic file.
l Always use printer element:prints labels using printer elements only. If a selected
printer does not support internal printer elements, an error message with
explanation is displayed.

l Always print as graphics: sends and prints the objects as graphic files.
5.3.6 Ellipse
Ellipse object creates a circular object on a label.
5.3.6.1 Style
Outline group defines line settings:
l Thickness: object line thickness.
l Outline style: object line style.
l None: line invisible.
l Solid: solid line.
l Dot: dotted line.
l Dash: dashed line.
l Erase: parts of neighboring objects become invisible underneath this object.
l Outline color: color of the line.
Fill defines the object fill settings and color.
l Fill style: object fill properties definition:
l None: completely transparent object.
l Erase: makes objects beneath the active one hidden.
l Solid: fills the object with solid color.
l Right Diagonal: fills the object with diagonal lines that ascend toward the right
side.
l Left Diagonal: fills the object with diagonal lines that ascend toward the left
side.
l Vertical: fills the object with vertical lines.
l Horizontal: fills the object with horizontal lines.
l Cross: fills the object with crossed lines.
l Cross Diagonal: fills the object with diagonally crossed lines.
l 25% of color: fill color opacity 25 %.
l 50% of color: fill color opacity 50 %.
l 75% of color: fill color opacity 75 %.
l Fill color: object fill color definition.
NOTE: The system does not allow the Outline style and Fill style to be set to None at
the same time.

TIP: Shape objects (Rectangle, Line and Ellipse) in ZebraDesigner remember the last
used setting. Each time you add one of these objects to the label, it has the same outline
and fill settings as the previously added shape object.
5.3.6.2 Position
Position tab defines object positioning and its position-related behavior.
Position group defines the object's position.
l X and Y: anchoring point coordinates.
Size group sets the object's dimensions:
l Width and Height: horizontal and vertical object dimension.
l Keep aspect ratio: simultaneous changing of object dimensions while scaling.
NOTE: If the measurement unit is changed in label properties, the value transforms
automatically.
Rotation angle is the object angle according to the design surface.
TIP: There are multiple ways to set the object's angle: enter the angle manually, drag the
slider or click and drag the icon on the selected object. Rotation angle and slider
rotates the object around its anchoring point. The icon rotates the object around its
central point.
Anchoring point is the spot where an object is pinned to design surface. Variable size
objects increase or decrease their size in the direction that is opposite to the chosen
anchoring point.
Lock prevents the object from being moved during the design process.
NOTE: If the measurement unit is changed, the value transforms automatically.
5.3.6.3 General
General tab identifies the object and sets its status.
Name sets a unique object ID.

NOTE: Avoid using spaces or special characters in object names.
Description allows adding notes and annotations for an object. It provides help during the
label design process.
Status group defines object visibility on print preview and on printed labels.
l Not printable: prevents the object from being printed.
l Visible: if the check box is not selected, the object neither appears on the print
preview nor on the printed label. The object is treated as if it does not exist.
Option Print Preview Printout
Not printable
(selected)
YES NO
Visible (cleared) NO NO
Printing optimization group allows activating the use of internal printer elements.
TIP: If supported by the selected printer model, a share of label element processing is
handled directly by the printer (e.g., internal fonts, shapes, barcodes). This speeds up the
printing process also due to significantly reduced data traffic.
l Use printer elements if supported: prints labels using internal printer elements if
the printer allows it. If a selected printer does not support internal printer elements,
the element is sent as a graphic file.
l Always use printer element:prints labels using printer elements only. If a selected
printer does not support internal printer elements, an error message with
explanation is displayed.
l Always print as graphics: sends and prints the objects as graphic files.
5.3.7 Inverse
5.3.7.1 About
Inverse object inverts the underlying object's color.

5.3.7.2 Position
Position tab defines object positioning and its position-related behavior.
Position group defines the object's position.
l X and Y: anchoring point coordinates.
Size group sets the object's dimensions:
l Width and Height: horizontal and vertical object dimension.
l Keep aspect ratio: simultaneous changing of object dimensions while scaling.
NOTE: If the measurement unit is changed in label properties, the value transforms
automatically.
Rotation angle is the object angle according to the design surface.
TIP: There are multiple ways to set the object's angle: enter the angle manually, drag the
slider or click and drag the icon on the selected object. Rotation angle and slider
rotates the object around its anchoring point. The icon rotates the object around its
central point.
Anchoring point is the spot where an object is pinned to design surface. Variable size
objects increase or decrease their size in the direction that is opposite to the chosen
anchoring point.
Lock prevents the object from being moved during the design process.

NOTE: If the measurement unit is changed, the value transforms automatically.
5.3.7.3 General
General tab identifies the object and sets its status.
Name sets a unique object ID.
NOTE: Avoid using spaces or special characters in object names.
Description allows adding notes and annotations for an object. It provides help during the
label design process.
Status group defines object visibility on print preview and on printed labels.
l Not printable: prevents the object from being printed.
l Visible: if the check box is not selected, the object neither appears on the print
preview nor on the printed label. The object is treated as if it does not exist.
Option Print Preview Printout
Not printable
(selected)
YES NO
Visible (cleared) NO NO
Printing optimization group allows activating the use of internal printer elements.
TIP: If supported by the selected printer model, a share of label element processing is
handled directly by the printer (e.g. internal fonts, shapes, barcodes). This speeds up the
printing process also due to significantly reduced data traffic.
l Use printer elements if supported: prints labels using internal printer elements if
the printer allows it. If a selected printer does not support internal printer elements,
the element is sent as a graphic file.
l Always use printer element:prints labels using printer elements only. If a selected
printer does not support internal printer elements, an error message with
explanation is displayed.
l Always print as graphics: sends and prints the objects as graphic files.

5.4 Working with Objects
This section describes how to work with objects and blend them with the design of a label.
Object is a basic building block of any label or solution. Each object is dedicated to a specific
type of content. See the related topics for style and content related object properties.
These are the common actions for multiple object types:
l Adding an object: adds an object to the design surface.
l Grouping: makes multiple object behave as a single object.
l Rotating: changes the angle of a selected object.
l Aligning:make the object positions.
5.4.1 Adding Objects
There are multiple methods to add an object to a label or form. Use the most convenient
one:
l Click and Click: click the object in the object toolbox. Mouse cursor transforms. Click
on the design surface – the selected object appears where clicked.
l Click and Drag:click the object in object toolbox. Mouse cursor transforms. Click on
the design surface and drag to define the size of the added object.
Text object's size cannot be defined using this method – its size is defined dynamically.
l Drag and Drop: click the object in the object toolbox and drag it to the design
surface. The selected object appears where the mouse button is released.
l Copy and Paste: graphical and textual content can be pasted directly to the design
surface. The following rules apply when copying items and pasting them directly to a
label:
l Graphical content from clipboard is pasted as embedded Picture object.
l Single line text is pasted as Text object.
5.4.2 Grouping
To make multiple object on a label behave as a single object, add them to a group. To group
objects:
l Surround the objects you wish to group using mouse. A rectangle appears marking
the selected objects. Right-click and select Group objects to create a group of
objects.

l
Hold Shift key and click the objects you wish to group. This select multiple objects –
right-click and select Group objects to create a group of objects.
5.4.3 Rotating
There are two ways to set the angle of an object:
l Enter the angle manually in degrees or drag the slider. The object rotates around its
anchoring point. Rotation commands are accessible in two ways:
l Click Position in the Positioning group of the Design tab
l Go to Object properties -> Position -> Rotation angle.
l
Click and drag the icon next to the selected object. The icon rotates the
object around its central point.
Anchoring point is the spot where an object is pinned to design surface. Variable size
objects increase or decrease their size in the direction that is opposite to the chosen
anchoring point.

6 Barcode
ZebraDesigner supports a wide variety of 1D and 2D barcode types to be printed on labels.
Each barcode type is configurable according to specific standards.
TIP: When encoding the barcode content, make sure the used characters, length, and
identifiers comply with the barcode standard guidelines.
The following barcode types are available in ZebraDesigner:
l 1D and 2D Barcodes
l GS1 DataBar Barcode Subtypes
In ZebraDesigner, barcodes are added to a label using the barcode object. To properly
encode the data and to set the barcode object properties, read the sections below. Each of
these sections describes barcode object properties. To start editing them, double-click the
object to open the Object Properties Window.
6.1 Source
Connected data source defines the content source of the selected object.
l Fixed data: manually entered fixed text.
l Variable keyboard input: type of variable that enables the content of a prompted field
to be different for every print job.
l Current date: displays current date value on the label.
l Current time: displays current time value on the label.
l Counter:displays counter value on the label.
Content field allows you to type the object content.
6.2 Barcode
Barcode Type defines the specific barcode type which should be used to encode the data.

TIP: Code128 barcode type is selected by default. For more details about the available
barcode types, see section Barcode Types and Available Settings.
l X dimension: width of the narrowest bar in the barcode.
l Height: barcode's vertical dimension.
l Ratio defines the ratio between the barcode's narrow and wide bar widths.
Each barcode type's range of permitted ratios is limited by the standard.
ZebraDesigner only allows you to use valid ratios. By default, the ratio is set to 3. This
means that the wide bar is 3 times the width of a narrow bar.
NOTE: The available ratios depend on the selected X dimension. If you are
changing the X dimension, this also affects the selection of available ratios.
l Row height defines the height of a single data row in 2D barcodes. Row height is
specified as a multiple over the X dimension. For example, "3x" means that the row is
3 times the X dimension.
Actual properties based on selected printer displays the X dimension as it would appear
printed on a label using the currently selected printer.
Color defines the color of the barcode.
6.3 Check Digit
Check digit is used by any scanning system to verify that the number scanned from a
barcode is read correctly.
TIP: Check digit is derived from the preceding barcode digits and is placed as the final
digit of a barcode.
Include check digit determines if check digit is included in a barcode or not.
l Auto-generate check digit: automatic check digit calculation.
If the data already includes invalid check digit, ZebraDesigner replaces it with a proper value.
l Verify the provided check digit: verification of the manually provided check digit. An
error message appears if the check digit proves to be incorrect.
l Display in human readable: check digit included in the human readable barcode text.

6.4 Human Readable
Human Readable text displays readable barcode data content located below or above the
barcode. Its role is to provide backup in case the barcode is damaged or of poor quality.
NOTE: Human Readable tab is visible with supported barcode types.
l No human readable: barcode is rendered without human readable text.
l Above barcode: human readable text is located above the barcode.
l Below barcode: human readable text is located below the barcode.
Style group allows you to set custom properties for human readable text.
NOTE: If you decide to customize human readable text, barcode can no longer be used as
internal printer element. It is sent to printer and printed as a graphic element.
l Custom font: enables font and font size selection. Internal printer fonts cannot be
used as custom human readable font.
l Auto font scaling:If enabled (default setting), human readable text grows or shrinks
proportionally along with the changing size of the barcode. To set a custom size for
human readable text, disable this option and select the appropriate font size.
l Bold: makes human readable text appear bold.
l Italic:makes human readable text appear italic.
6.5 Bearer Bar
Bearer bar is a border that surrounds the barcode. Its purpose is to protect the barcode
image and to enhance reading reliability.
l Fixed thickness: automatically defined bearer bar width.
l Variable thickness: user-defined bearer bar width.
l Thickness multiplier:bearer bar width factor.
l Show vertical bar: vertical bearer bars displayed or hidden.

6.6 Details
Details differ according to the barcode standards. Define the options that are given with
regard to the currently selected barcode type. Details for 1D and 2D barcodes are
described in dedicated sections:
l 1D barcode details
l 2D barcode details
6.7 Position
Position tab defines object positioning and its position-related behavior.
Position group defines the object's position.
l X and Y: anchoring point coordinates.
Size group sets the object's dimensions:
l Width and Height: horizontal and vertical object dimension.
l Keep aspect ratio: simultaneous changing of object dimensions while scaling.
NOTE: If the measurement unit is changed in label properties, the value transforms
automatically.
Rotation angle is the object angle according to the design surface.
TIP: There are multiple ways to set the object's angle: enter the angle manually, drag the
slider or click and drag the icon on the selected object. Rotation angle and slider
rotates the object around its anchoring point. The icon rotates the object around its
central point.
Anchoring point is the spot where an object is pinned to design surface. Variable size
objects increase or decrease their size in the direction that is opposite to the chosen
anchoring point.
Lock prevents the object from being moved during the design process.

NOTE: If the measurement unit is changed in label properties, the value transforms
automatically.
6.8 General
General tab identifies the object and sets its status.
Name sets a unique object ID.
NOTE: Avoid using spaces or special characters in object names.
Description allows adding notes and annotations for an object. It provides help during the
label design process.
Status group defines object visibility on print preview and on printed labels.
l Not printable: prevents the object from being printed.
l Visible: if the check box is not selected, the object neither appears on the print
preview nor on the printed label. The object is treated as if it does not exist.
Option Print Preview Printout
Not printable
(selected)
YES NO
Visible (cleared) NO NO
Printing optimization group allows activating the use of internal printer elements.
TIP: If supported by the selected printer model, a share of label element processing is
handled directly by the printer (e.g., internal fonts, shapes, barcodes). This speeds up the
printing process also due to significantly reduced data traffic.
l Use printer elements if supported: prints labels using internal printer elements if
the printer allows it. If a selected printer does not support internal printer elements,
the element is sent as a graphic file.
l Always use printer element:prints labels using printer elements only. If a selected
printer does not support internal printer elements, an error message with
explanation is displayed.
l Always print as graphics: sends and prints the objects as graphic files.

6.9 Available Barcodes and Their Settings
Barcode Example Info Available Settings
Anker
Variation of Plessey
Code. Used for point of
sale systems prior to the
advent of EAN code.
Basic Barcode Set-
tings
Human Readable
Details tab:
Include quiet
zones
Space correction
Bookland
EAN-13 barcode used
exclusively for books.
Basic Barcode
Settings
Human Readable
Details tab:
Include quiet
zones
Space correction
Codabar
A self-checking and bin-
ary level linear barcode
symbology with no check
sum digit appended.
Widely used in libraries
and package delivery sys-
tems.
Basic Barcode
Settings
Human Readable
Details tab:
Include quiet
zones
Code93
43 characters allowed.
ASCII character set sup-
ported by using com-
binations of 2 characters.
Basic Barcode
Settings
Human Readable

Barcode Example Info Available Settings
Details tab:
Include quiet
zones
Space correction
Code128
Double density data
encoding, ASCII char-
acter set supported.
Basic Barcode
Settings
Human Readable
Details tab:
Include quiet
zones
Space correction
Code128-A
ASCII characters 00 to 95
(0-9, A-Z, and control
codes), special char-
acters, and FNC 1-4 sup-
ported.
Basic Barcode
Settings
Human Readable
Details tab:
Include quiet
zones
Space correction
Code128-B
ASCII characters 32 to
127 (0-9, A-Z, a-z), special
characters, and FNC 1-4
supported.
Basic Barcode
Settings
Human Readable
Details tab:
Include quiet
zones
Space correction
Code128C
00-99 (encodes each two
digits with one code) and
FNC1.
Basic Barcode
Settings
Human Readable
Details tab:

Barcode Example Info Available Settings
Include quiet
zones
Space correction
Code-39
Fully alphanumeric bar-
code for use with data-
entry systems.
Basic Barcode
Settings
Check Digit
Human Readable
Details tab:
Include quiet
zones
Inter character
gap
Space correction
Code-39 full
ASCII
28 ASCII character set
including asterisks sup-
ported.
Basic Barcode
Settings
Check Digit
Human Readable
Details tab:
Include quiet
zones
Inter character
gap
Space correction
Code-39 Tri
Optic
Computer tape cartridge
marking.
Basic Barcode
Settings
Check Digit
Human Readable
Details tab:
Include quiet

Barcode Example Info Available Settings
zones
Inter character
gap
Space correction
Dun-14
Numbering system for
shipping containers that
uses other barcode
types.
Basic Barcode
Settings
Check Digit
Human Readable
Details tab:
Include quiet
zones
Inter character
gap
Space correction
Ean-13
European Article Number,
used for global retail.
Basic Barcode
Settings
Check Digit
Human Readable
Details tab:
Include quiet
zones
Descender bar
Include EANwhite
space
Ean-13 + 2
Often used on news-
papers and magazines.
Basic Barcode
Settings
Check Digit
Human Readable
Details tab:

Barcode Example Info Available Settings
Include quiet
zones
Descender bar
Include EANwhite
space
Ean-13 + 5
For books in English lan-
guage: the first digit of
the EAN-5 is the currency
indicator. The four fol-
lowing digits represent
the price multiplied by
100.
Basic Barcode
Settings
Check Digit
Human Readable
Details tab:
Include quiet
zones
Descender bar
Include EANwhite
space
Ean-14 Traded goods.
Basic Barcode
Settings
Check Digit
Human Readable
Details tab:
Include quiet
zones
Space correction
Ean-8
Small package marking
where an EAN-13 bar-
code would be too large.
Basic Barcode
Settings
Check Digit
Human Readable
Details tab:
Include quiet

Barcode Example Info Available Settings
zones
Descender bar
Include EANwhite
space
Space correction
Ean-8 + 2
Only used if the article is
too small for an EAN-13
code.
Basic Barcode
Settings
Check Digit
Human Readable
Details tab:
Include quiet
zones
Descender bar
Include EANwhite
space
Ean-8 + 5
Only used if the article is
too small for an EAN-13
code.
Basic Barcode
Settings
Check Digit
Human Readable
Details tab:
Include quiet
zones
Descender bar
Include EANwhite
space
GS1-128
A variant of Code 128 - it
automatically inserts a
FNC1 character after the
initial character.
Basic Barcode
Settings
Details tab:
Include quiet

Barcode Example Info Available Settings
zones
Space correction
Interleaved 2 of 5
Used on 135 film, for ITF-
14 barcodes, and on
packaging.
Basic Barcode
Settings
Check Digit
Human Readable
Details tab:
Include quiet
zones
Space correction
ITF 14
Higher level packaging.
GTIN included.
Basic Barcode
Settings
Check Digit
Human Readable
Bearer Bar
Details tab:
Space correction
ITF 16
Higher level packaging.
GTIN included.
Basic Barcode
Settings
Check Digit
Human Readable
Bearer Bar
Details tab:
Space correction
MSI
Used primarily for invent-
ory control, marking stor-
age containers and
shelves in warehouse
environments.
Basic Barcode
Settings
Check Digit
Human Readable

Barcode Example Info Available Settings
Details tab:
Include quiet
zones
Space correction
SSCC
Identification in logistics.
The code includes an
extension digit, a GS1
company prefix, a serial
reference, and a check
digit.
Details tab:
Space correction
Plessey
One of the first barcode
symbologies. Still used in
libraries and for shelf
tags in retail stores.
Basic Barcode
Settings
Check Digit
Human Readable
Details tab:
Include quiet
zones
Space correction
SSCC-18
Identification in logistics.
The code includes an
extension digit, a GS1
company prefix, a serial
reference, and a check
digit.
Basic Barcode
Settings
Check Digit
Human Readable
Details tab:
Include quiet
zones
Space correction
Upc Case Code
Used for cartons, cases,
or pallets that contain
products with UPC or
EAN product iden-
tification number.
Basic Barcode
Settings
Check Digit
Human Readable

Barcode Example Info Available Settings
Details tab:
Include quiet
zones
Space correction
Upc-A
Product identifying at
retail checkout. GTIN
included.
Basic Barcode
Settings
Check Digit
Human Readable
Details tab:
Include quiet
zones
Descender bar
Space correction
Upc-A + 2
Product identifying at
retail checkout. GTIN
included. Used with
magazines and peri-
odicals.
Basic Barcode
Settings
Check Digit
Human Readable
Details tab:
Include quiet
zones
Descender bar
Space correction
Upc-A + 5
Product identifying at
retail checkout. GTIN
included. Used for book
pricing.
Basic Barcode
Settings
Check Digit
Human Readable
Details tab:
Include quiet
zones

Barcode Example Info Available Settings
Descender bar
Upc-E
Product identifying at
retail checkout. GTIN
(compressed)included.
Adapted for smaller pack-
ages.
Basic Barcode
Settings
Check Digit
Human Readable
Details tab:
Include quiet
zones
Descender bar
Symbology
Upc-E + 2
Product identifying at
retail checkout. GTIN
(compressed)included.
Adapted for smaller pack-
ages.
Basic Barcode
Settings
Check Digit
Human Readable
Details tab:
Include quiet
zones
Descender bar
Upc-E + 5
Product identifying at
retail checkout. GTIN
(compressed)included.
Adapted for smaller pack-
ages.
Basic Barcode
Settings
Check Digit
Human Readable
Details tab:
Include quiet
zones
Descender bar
USPSIntelligent
Mail Barcode
Tracking and sorting of
letters and flat packages
in the United States.
USPS Intelligent
Mail Barcode Con-
tent

Barcode Example Info Available Settings
Details tab:
Include quiet
zones
6.9.1 2D Barcodes
Barcode Example Info Available Settings
Aztec
High capacity, sym-
bol size adjusts
automatically
depending on the
amount of input
data.
Basic Barcode Settings
Details tab:
Code page
Data layer
Error correction level
Data Matrix
High capacity,
optimal for small
packages.
Basic Barcode Settings
Details tab:
Code page
Encoding
Format
GS1
DataBar
Marking products
that cross
POSapplications.
GS1 identification
(AIs) included.
Available settings change
according to the selected
GS1 DataBar type.
GS1
Datamatrix
Added GS1 Applic-
ation Identifiers
and ASC MH10
Data Identifiers and
maintenance.
Basic Barcode Settings
Details tab:
Format
Encoding
Code page

Barcode Example Info Available Settings
GS1 QR
Code
Added GS1 Applic-
ation Identifiers
and ASC MH10
Data Identifiers and
maintenance.
Basic Barcode Settings
Details tab:
Code page
Encoding
Error correction level
Symbol version
MaxiCode
Used by UPS on
shipping labels for
world-wide
addressing and
package sortation.
MaxiCode Content
Basic Barcode Settings
Micro QR
Reduced size and
capacity of a nor-
mal QRcode.
Optimal when the
barcode size needs
to be minimized.
Basic Barcode Settings
Details tab:
Code page
Encoding
Error correction level
Symbol version
MicroPDF
Compact version of
PDF-417.
Basic Barcode Settings
Details tab:
Code page
Compaction mode
Version
PDF-417
Commonly used in
transport, invent-
ory management,
etc. The code is
both self-checking
and bi-directionally
decodable.
Basic Barcode Settings
Details tab:
Code page
Compaction mode
Columns
Error correction level

Barcode Example Info Available Settings
Rows
Truncated
QR
A matrix barcode
readable by QR
scanners and
smartphones.
Adaptable size to
the amount of
encoded data.
Basic Barcode Settings
Details tab:
Code page
Encoding
Error correction level
Symbol version
6.10 GS1 DataBar Subtypes
6.10.1 Linear Symbol Types
GS1 DataBar Subtype Example Info
Omnidirectional
Omnidirectional scan-
ning, up to 20 trillion
encodable values.
Stacked
Stacked truncated sym-
bol for omnidirectional
scanning with reduced
symbol length.
Stacked Omnidirectional
Full height symbol
stacked in two rows
separated by a delim-
iter.
Truncated
Height reduced to 13
times the X dimension.
For handheld scanners.

GS1 DataBar Subtype Example Info
Expanded
Omnidirectional scan-
ning, variable content
length.
Expanded Stacked
Omnidirectional scan-
ning, variable content
length, reduced length
due to stacking (2 to 11
rows)."GS1 DataBar
Properties" on
page101.
Limited
Limited range of values.
For handheld scanners.
6.10.2 Composite Symbol Types
GS1 DataBar Subtype Example Info
Omnidirectional
A linear symbology
that supports omni-
directional scanning of
packages. It encodes
14 digits of numerical
data used to identify
GTIN for scanning in
the supply chain.
Stacked Omnidirectional
Represents the
encoded data sep-
arately in linear and
composite part of the
code. Advantage is
reduced symbol
length. For hand held
scanners.
Truncated
Intended for very
small items in health-
care, not intended for
POS scanners.

GS1 DataBar Subtype Example Info
Expanded
Omnidirectional scan-
ning, variable content
length. Used for vari-
able-measure food,
coupons.
Expanded Stacked
Omnidirectional
scanning, variable
content length,
reduced length due to
stacking (2 to 11
rows). See section
"GS1 DataBar
Properties" on
page101
Limited
Limited range of val-
ues. For hand held
scanners.
EAN-8
A smaller and
shortened version of
the EAN code.
EAN-13
EAN codes require 13
digits (12 if the check
digit is calculated
automatically).
EAN.UCC 128 & CC-A
GS1-128 linear bar-
code linked to a 2D
barcode called CC-A.
EAN.UCC 128 & CC-C
GS1-128 linear bar-
code linked to a 2D
barcode called CC-C.
UPC-A
The linear component
encodes the item’s
primary identification.
The adjacent 2D Com-

GS1 DataBar Subtype Example Info
posite Component
encodes sup-
plementary data, such
as a batch number and
expiration date.
UPC-E
PC-E compresses a
normal UPC-A code
into a six digit code by
“suppressing” the num-
ber system digit, trail-
ing zeros in the
manufacturers code
and leading zeros in
the product number.
6.11 1D Barcode Details
Details tab settings vary along with the specific barcode standards.
TIP: Keep in mind the currently selected barcode type as you define the available
barcode settings.
ZebraDesigner allows setting the following 1D barcode details:
l Include quiet zones: blank space around the printed barcode. Quiet zone ensures
the highest level of scanning reliability.
l Inter character gap: distance between the last bar of a character and the first bar of
the next character in a barcode.
l Descender bars: makes the bars at the beginning, in the middle, and at the end of
certain barcode types (EAN and UPC) longer.
l
Include EANwhite space: inserts a special character (< or >) to indicate the
EANbarcode width.
This option ensures optimum readability in case a neighboring object on a label is located
right next to the barcode.

l Space correction: adds white pixels to increase the gap width between the bars.
l Symbology: UPCbarcode Number system:
l 0, 1 , 6, 7 and 8 are for regular UPC codes.
l 2 is for random weight items, e.g., meat, marked in-store.
l 3 is for National Drug Code and National Health related Items.
l 4 is for in-store marking of non-food items.
l 5 and 9 are for coupon use.
6.12 2D Barcode Details
2D barcodes enable multiple type-specific settings under the Details tab. When defining
these settings manually, the dropdown lists offer specific standard-compliant options.
TIP: ZebraDesigner defines the Details tab settings automatically if the user chooses
not to manually define them.
6.12.1 Code Page
Code page defines how the mapping of code characters with scanned characters is done.
To display the scanned data accurately, the correct code page must be selected. If none of
the code pages is selected by the user, ZebraDesigner uses system character encoding.
6.12.2 Columns
Columns are basic vertical elements of a PDF417 barcode. A maximum of 30 columns may
be included in a single PDF417 symbol.
6.12.3 Compaction Mode
Compaction mode compacts a number of data characters into codewords. The decoding
algorithm uses the individual codewords to place them into a meaningful matrix.
l Text: all printable ASCII characters 32–126 and ASCII 9, 10 and 13 (up to 1800
characters) are allowed.
l Binary: all 256 ASCII values (up to 1100 bytes) are allowed.
l Numeric: encoding of numeric data (up to 2700 digits).
6.12.4 Data Layer
Data layer defines the number of data layers that encode data in an Aztec barcode. The
number of data layers correlates directly with the barcode data capacity. If the value

exceeds the data capacity provided by the selected Data layer, an error is reported. One to
four data layers are allowed.
6.12.5 Encoding
Encoding defines character encoding scheme for the selected barcode.
NOTE: If you select the GS1 Datamatrix barcode, ZebraDesigner automatically sets the
encoding scheme to ASCII. This makes sure the GS1 Datamatrix barcodes on your labels
are GS1-compliant.
6.12.6 Error Correction Level
Error correction level defines the symbol security level. It adds a series of error correction
codewords to the encoded data. These codewords enable the printed symbol to withstand
damage without data loss. The higher the security level, the greater the number of data
layers required to contain the symbol – and hence, its overall size. If none of the Error
correction levels is selected, ZebraDesigner defines it automatically.
6.12.7 Format
Format defines the symbol size and its capacity using the number of column and row
elements.
If using Data Matrix barcode on your labels, DMRE (Data Matrix Rectangular Extension) allows
you to use multiple rectangular formats. These additional rectangular sizes increase data
encoding capacity of the barcode.
NOTE: For printers without internal DMRE support, enable Always print as graphics
under General properties to print the Data Matrix barcode successfully.
6.12.8 Rows
Rows – PDF417 barcode symbol is made of stacks of vertically aligned rows. Such barcode
adapts its size to the amount of the encoded data and may contain from 3 to 90 rows.
6.12.9 Symbol Version
Symbol version defines the symbol data capacity. As the amount of data increases,
additional modules are required to build a QR code. This makes the symbol larger on the
printed label.

6.12.10 Truncated
Truncated reduces the PDF417 barcode size by removing a single codeword and a stop bar
from each symbol row.
6.12.11 Version
Version defines the symbol size based on the number of columns. One-, two-, three-, and
four-column versions of Micro PDF417 barcode are available.
6.13 GS1 DataBar Specifics
In addition to the common barcode properties, the below described specifics are available
for GS1 DataBar.
6.13.1 GS1 DataBar Source
General group specifies how the databar content is going to be formatted before encoding.
l Structured data sets the standard GS1 system data structure as a model for
inserting the barcode data. Composite GS1 barcodes represent structured data in
the composite part of the code.
l Unstructured data allows inserting the data without a model – only character type
and number must comply with the selected barcode type.
Data
l Linear data is the part of the data that is encoded in the linear part of the barcode.
The data is either manually inserted or defined by a predefined Data source.
l Composite data is the part of the data that is encoded in the composite part of the
barcode. This part of data is always structured and follows one of the standard system
data structures as defined by the GS1. The data is either manually inserted or defined
by a predefined Data source.
6.13.2 GS1 DataBar Properties
GS1 DataBar Expanded Stacked subtype encodes the data in form of a symbol segments
sequence. Symbol width is defined by the number of symbol segments in each stacked row.
Symbol height is defined by the number of stacked rows and their height.
l Segments per Row defines the number of segments for each row of a symbol. Up to
22 segments are allowed per symbol.

6.14 Maxicode Barcode Content
Symbology Definition defines the barcode mode of operation (data structuring type).
ZebraDesigner supports the following modes:
l Mode 2: US carriers with postal codes up to 9 digits in length.
l Postal Code: USZip Codes using a single field with 5 or 9 digits, or two fields
with 4 or 5 digits.
l Mode 3: international carrier with alpha-numeric postal codes with up to 6 digits.
There are two additional options under Symbology Definition:
l Structured data: automatically selected Mode 2 or Mode 3 modes based on the
entered data.
l Unstructured data: barcode mode of operation is set to Mode 4.
This mode encodes general data for purposes other than shipping industry (e.g., purchase
order number, customer reference, invoice number).
Data Contents
Field Description
SHIP TO Postal Code
Mandatory. 5 or 9 alphanumeric characters. Alpha char-
acters must be uppercase.
4 Digit Extension (enabled with
Postal code field: Two Fields (5
and 4 digits) type).
Mandatory. 4 numeric digits defining micro location.
SHIP TO ISO Country Code
(Mode 3 only)
Mandatory. 3 numeric digits.
Class of Service
Mandatory. 3 numeric digits, a comma must be included to
mark the end of field.
Transportation Data Mandatory. The 5 characters, including the GS code.
Tracking number
Mandatory. 10 or 11 alphanumeric characters. Alpha char-
acters must be upper case.
UPS SCAC Mandatory. 4 characters followed by the GS code.
Julian Day of Puckup Mandatory. 3 numeric digits.
Shipment ID Number
Optional. 0-30 alphanumeric characters. Alpha characters
must be upper case. GS code must always be sent even if
no data is specified.

Package in Shipment
Mandatory. 1-3 numeric digits for package number. 1-3
numeric digits for number of shipped items. Forward slash
must separate these two numbers.
Package in Weight Mandatory. 1-3 numeric digits.
Address Validation
Mandatory. Single character “Y” or “N”. Upper case char-
acters.
SHIP TO Address
Optional. 0-35 alphanumeric characters. Alpha characters
in upper case. GS code must always be sent even if no
data is specified.
SHIPTOCity
Mandatory. 1-20 alphanumeric characters. Alpha char-
acters must be upper case.
SHIPTOState
Mandatory. 2 alpha characters. Both characters must be
upper case. RS code marks the end of this field and the
end of the secondary message data.
6.15 USPS Intelligent Mail Barcode Content
Data Contents group defines the input mode for the encoded data.
Input mode defines the structure of the encoded data.
l Structured data: to ensure proper intelligent mail tracking, a string of numbers must
be obtained. This string is referred to as the DataToEncode. The DataToEncode
consists of the Intelligent Mail Data Fields.
l Unstructured data: encoded data follows no predefined structure.
Intelligent Mail Data Fields group allows you to encode the barcode data in accordance
with the standard.
Field Description
Barcode Identifier Specific two-digit identifier assigned by the Postal Service.
Service Type Identifier
Three-digit identifier defines the mail piece as full-service or
basic (Non-automation) and is also used to determine the dis-
position of undeliverable-as-addressed (UAA) mail and the form
of address correction that a mailer desires.
Mailer Identifier
Unique 6-or 9-digit number that identifies a business entity or
customer.
Serial Number
A serial or sequence number which enables unique iden-
tification and tracking. Depending on the specific barcode con-

struct, this field can vary in length from 5-10 digits.
Delivery Point ZIPCode
Routes the mail to its final delivery point (length variations:
none, 5, 9, or 11 digits).

7 Printing
When a label is ready to be printed, ZebraDesigner helps you print it using a print dialog. It
allows you to:
l Preview the label during the design process.
l Insert values for variable keyboard input.
l Define printer settings.
l Control print quantity.
l Define additional quantity settings.
To open the print dialog, click the Print button in the Action group of the Home tab ribbon or
press Ctrl+P.
Step-by-step printing procedure is described here.
7.1 Print Pane (Default Printing Form)
File (background) tab opens the default printing form. In ZebraDesigner, it serves as the
primary print dialog.

Print button starts the printing procedure. It sends the print job to the selected printer.
Printer group of settings includes:
l Print button: starts the print label action.
l Printer selection combo box: lists the installed printers.
l Printer settings combo boxes:define printing speed and darkness. The selectable
values are provided by the selected printer driver.
l Speed: speed of printing. Available options are defined by the active printer
driver.
l Darkness: sets the intensity of printing. Available options are defined by the
active printer driver.
l Print to file check box: redirects the printing to a file.
l Printer Settings button: opens properties printer driver dialog for the currently
selected printer.
Quantity group of settings includes:
l Print quantity object: defines the number of labels to be printed.
l Number of labels: number of printed labels.
l Number of pages: number of printed pages with labels.
NOTE: Number of pages option becomes active if more than 1 label per
page is set under label properties > label dimensions.
l Print all labels (unlimited): prints all labels as defined by the label design.
More details about this option are available here.
more... link opens the Additional Quantity Settings window.
l Number of labels skipped on first page:defines how many labels should be left
unprinted on the first page.

EXAMPLE: A single page includes five labels. Number of labels skipped on first
page is set to three. Two labels are printed on the first page.
l Identical copies per label: number of identical label copies to be printed.

EXAMPLE: A single page includes five labels. Identical copies per label is set to
three. There are three copies of each label printed.
l Number of label sets: defines the number of print jobs to be sent to the printer.
EXAMPLE: A set of printed labels contains three labels:A, B and C.
Number of labels:
Identical copies per label:2.
Number of label sets: 3.
Print result: [A, A; B, B; C, C] [A, A; B, B; C, C] [A, A; B, B; C, C]
Print preview field displays the current label design and content.
field (data entry table) allows inserting prompted variable values at print time.
7.2 Printing Procedure
Use the following steps to successfully print a label using the ZebraDesigner.
Step 1: Create
Create a new or edit an existing label.
Step 2: Preview

Label preview field is a part of default ZebraDesigner Print dialog. To make the print form
appear on screen, select one of the following options:
l Go to Home tab > Action group and click Print.
l Press Ctrl+P.
Label preview field displays current label design.
Step 3: Select printer
Choose the preferred printer from the Printer tab dropdown menu. All currently available
printers are listed. More details on defining the printer are available here.
During this step, printing speed and darkness can be set as well. These two parameters
depend on the selected printer's driver.
Step 4: Set print quantity
Number of labels sets the number of printed labels.
Number of pages sets the number of printed pages. This option becomes active if the
labels are positioned across at least two pages.
Print all labels (unlimited) prints all labels as defined by the label design. More details
about this option are available in "Printing of Unlimited Data" on page131.
Click more... to open the Additional Quantity Settings dialog.
l Identical copies per label defines the number of identical label copies in a print job.
l Number of label sets defines how many times the entire label printing process
should repeat.
Step 5. Start Printing
Click the Print button.
7.3 Optimize Printing Speed
There are many factors that affect the speed of label printing in ZebraDesigner. Follow the
guidelines below to dramatically increase the speed of printing.
NOTE: When implementing the following guidelines, ensure they are supported by the
selected printer.

l If the selected printer supports parallel and serial port, use the parallel port. When the
computer sends the data to printer over parallel port, it is much faster than over serial
port.
l When designing a label, use internal printer fonts instead of Windows true-type fonts.
True-type fonts are sent to the printer as graphics. This vastly increases the size of
data sent to printer (couple of kilobytes). With internal printer fonts, only the text is
sent to printer (couple of bytes).
l Avoid using graphics on labels.
l When using barcodes, ensure the barcodes are used as internal printer elements.
l When using counters, the printer internally increments the numbers if the internal
printer fonts are used. This means, that the printer only needs to receive the first
object number. The printer later increments this number while printing additional
labels. This option also reduces the amount of data transferred between computer
and printer.
With internal printer counter, the printing speed difference becomes noticeable with high
quantity of labels.
l Set the printing speed to a higher value. Increasing the printing speed usually affects
the quality of printing. The higher the speed, the lower the quality. Find an acceptable
compromise.
l Don't print excessive amount of data on labels. If the speed of printing is an important
factor, consider using preprinted labels, and only print the data, that changes with
each label.
7.4 Changing Common Printer Settings
When designing a label, you also define which printer should be used for printing it. Each
label file stores its own printer settings for the selected printer driver.
Changes made in the printer settings dialog box are saved to the label and will be used in
future print actions.
NOTE: Ensure that Use custom printer settings saved in the label option is enabled in
Label properties > Printer. If not, default printer settings are going to be used.
Complete the following steps to change and save common printer settings for a label:

1. Open the label properties dialog.
2. Click Printer properties button on Printer tab. The dialog window with printer driver
settings opens.
3. Open the Printer Options tab.
4. Adjust the Speed and Darkness settings.
These settings depend on the selected printer.
5. Click OK.
6. Save the label.
NOTE: Any changes in the printer settings dialog box will be saved to the label and
applied to future print actions.
Changes in label printing speed and darkness can also be done at print time. These settings
are only valid while the file remains open. After reopening the file, the settings are reset to
those defined in Printer properties dialog.
Complete the following steps:
1. Open Print dialog.
2. Click Print.
3. Adjust Speed and Darkness values under Printer group.
4. Save the label.

NOTE: Changes to the settings in the Printer tab will not be saved in the label but used
only at print time.
7.5 Changing Dithering Options
NOTE: This option is applicable only if a Zebra printer driver is used for label printing.
Dithering is a process of converting color or gray scale pictures to black and white pictures
that can be printed on thermal printers. Thermal printers normally cannot print color images
and can either print a dot on the label or leave the area blank. There are no intermediate
shades of gray.
During the dithering process, all colors and shades of gray in the picture are converted to
black and white dots, creating an illusion of new colors and shades by varying the pattern of
dots. Different shades of gray are produced by varying the patterns of black and white dots.
There are no gray dots at all. In printing, dithering is usually called half-toning, and shades of
gray are called halftones.
To change the dithering settings, do the following:
1. Open label properties dialog.
2. Click Printer properties button on Printer tab. The dialog window with printer driver
settings opens.
3. Open Graphic Options tab and use Photo slider to select the preferred dithering
type.
NOTE: These settings depend on the selected printer.

4. Change the dithering type option to suit your needs. Look at the preview on the right
side how you can expect the selected type to be applied on the label.
5. Click OK.
6. Save the label.

8 Dynamic Data Sources
Dynamic data sources form an essential part of working with the ZebraDesigner. They
enable the use of label objects that dynamically change their content with each printed
label, if necessary.
EXAMPLE: Typical dynamic content that are automatically updated are counters, serial
numbers, date, time, weight, and article images.
To display and print the dynamic object content properly, ZebraDesigner uses the following
dynamic data types:
l Variable keyboard input: content of an object is defined before each printing.
l Current Date: current date taken as a variable value.
l Current Time: current time taken as a variable value.
l Counter: type of variable whose value increments or decrements along with the
changing value of system or printer counter.
8.1 Variables
Variables serve as containers for storing and passing the data between objects, scripts,
external applications, printers, and user inputs. You may want to print labels on which data
changes for each label (e.g., counters, serial numbers, date, time, weight, and product
images).
To accommodate the changing data, ZebraDesigner can easily be used to format labels
using variable data.
ZebraDesigner offers multiple types of variables:
l Variable Keyboard Input: type of variable that enables the content of a prompted field
to be different for every print job. Its value is defined right before label printing.
l Current Date: current date taken as a variable value.
l Current Time: current time taken as a variable value.
l Counter: variable that changes its value incrementally or decrementally with each
label print.

TIP: All label or solution variables are managed in Dynamic Data Explorer.
8.1.1 Variable Keyboard Input
Variable Keyboard Input is a type of variable that enables the content of a prompted field
to be different for every print job. Its value is defined before each printing.
8.1.1.1 General
Definition group of settings defines which input data types are valid for a variable.
l Data type defines what type of data is stored in a variable.
l Text: keyboard input that contains text.
l Date: keyboard input that contains date values.
l Time: keyboard input that contains time values.
l Floating point: representation of real numbers in a variable.
l Currency: variables that contain monetary values.
l Initial value: starting value that is assigned to a variable keyboard input when
created. It is defined using one of the following methods:

l Manually entering a fixed value.
TIP: If you enter period (".") as the initial value for a variable with selected
Date or Time data type, it displays current date or time.
EXAMPLE: Edit field on a form is connected to a variable with Date selected
as Data type. If period is selected as Initial value, the Edit field displays
current date when the form is run. Dropdown button opens Date picker with
preselected current date.
l Using a special character:
l Special characters can be entered manually using the less than/greater
than signs, e.g.,<CR>, <LF> ...
l Special characters can be selected from the dropdown list.
Make sure the inserted initial value meets the criteria defined with Output Rules for each
data type.
Prompting group of settings defines the print time behavior of a data source. Read more
about prompting here.
8.1.1.2 Text
Text data type is used for variables that store textual content. As a result, only textual input
is allowed as the variable input data type.

8.1.1.2.1 Input Rules
Data group defines permitted data properties.
l Limit variable length: maximum length of variable value.
l Fixed length: variable must contain the exact number of characters as defined in the
Limit length.
Check range group allows you to enter minimum and maximum permitted value of the
variable. Setting the limits is optional.
l Minimum value:the lowest permitted variable value.
l Maximum value:the highest permitted variable value.
If enabled, minimum and maximum values must not be left empty.
8.1.1.2.2 Output Rules
Prefix and Suffix are characters that are added to a variable value.
l Prefix: text placed in front of the variable value.
l Suffix: text placed behind the variable value.
8.1.1.3 Date
Date data type stores date-related values in the selected variable. Date field displays the
date value using various date formats. The date value format can be either selected from the
preloaded formats, or customized to meet the specific local, regulatory or industry related
requirements.
8.1.1.3.1 Input Rules
Input Formatting group defines the allowed date format and displays a preview.
l Input format: allowed date input format.
l Sample value: displays the preview according to the selected input format.
NOTE: ZebraDesigner supports a range of preloaded or customized date formats.
Check range group allows you to enter minimum and maximum permitted value of the
variable. Setting the limits is optional.
l Minimum value:the lowest permitted variable value.
l Maximum value:the highest permitted variable value.

NOTE: If enabled, minimum and maximum values must not be left empty.
8.1.1.3.2 Output Rules
Output formatting sets the output date format.
l Output format: format in which the date is displayed.
l Output language: language selection and regional formatting for days and months.
Output Language becomes relev ant w hen the da t es t hat inc lude mont hs or
dates a r e writ t en in w ords. I n s ome c as es , da t a calc ula t ions may be af f ect ed a s
well. For exa mple, in US, a new w eek begins on S unda y whereas in EU a nd ot her
count r ies , a new w eek begins on Monda y .
l Sample value: date preview according to the selected input format.
Prefix and Suffix group defines characters that are added to a variable value.
l Prefix: text placed in front of the variable value.
l Suffix: text placed behind the variable value.
TIP: Input rules help the user when inserting the variable data. They act as a filter that
defines the type, length, and other input data properties.
Output rules set the final variable formatting – they define how the variable value is going
to be presented in an object.
8.1.1.4 Time
Time data type stores time values in a variable. Time field displays the date value using
various time formats. The time value format can be either selected from the preloaded
formats, or customized to meet the specific local, regulatory or industry related
requirements.
8.1.1.4.1 Input Rules
Input Formatting defines the allowed time format and displays a preview.
l Input format: allowed time input format.
l Sample value: variable preview according to the selected input format.
NOTE: ZebraDesigner supports a range of preloaded or customized time formats.
Check range group allows you to enter minimum and maximum permitted value of the
variable. Setting the limits is optional.

l Minimum value:the lowest permitted variable value.
l Maximum value:the highest permitted variable value.
If enabled, minimum and maximum values must not be left empty.
8.1.1.4.2 Output Rules
Output formatting defines the output time format.
l Output format: format in which the time is displayed.
l Sample value: time preview according to the selected input format.
Prefix and Suffix group defines characters that are added to a variable value.
l Prefix: text placed in front of the variable value.
l Suffix: text placed behind the variable value.
TIP: Input rules help the user when inserting the variable data. They act as a filter that
defines the type, length, and other input data properties.
Output rules set the final variable formatting – they define how the variable value is going
to be presented in an object.
8.1.1.5 Floating Point
Floating Point data type specifies the representation settings for numeric values that are
stored in a variable. This Data type is used to set the digit grouping points (separators)
according to the regional specifics, and to place the decimal delimiters at the right places.
8.1.1.5.1 Input Rules
Input formatting specifies the allowed input number format.
l Decimal delimiter: specifies the character that separates the integer part from the
fractional part of a number written in decimal form.
l Decimal places: the number of decimal places to be included in the number.
l Use 1000 separator: separator places the thousands into groups.
l Separator: a character that is used as thousands separator.
l Sample value: displays a preview of the current number input format.
l Limit variable length: enables limiting the number of digits to be defined for a
variable.
l Length (characters): allowed number digits in a variable.
Check range defines the minimum and maximum number values. Defining the minimum and
maximum limits is optional:

l Minimum value: the lowest allowed input number.
If already defined, the initial value is taken as the minimum value.
l Maximum value: defines the highest allowed input number.
8.1.1.5.2 Output Rules
Output formatting group specifies the preferred output number format.
l Decimal delimiter: the character that separates the integer part from the fractional
part of a number written in decimal form.
l Decimal places: the number of decimal places to be included in the number.
l Auto: decimal places are defined by local system settings.
l Use 1000 separator: enabled use of a separator that places the thousands into
groups.
l Separator: a character that is used as thousands separator.
l Sample value displays a preview of the current output format.
Prefix and Suffix are characters that are added to a variable value.
l Prefix: text placed in front of the variable value.
l Suffix: text placed behind the variable value.
TIP: Input rules help the user when inserting the variable data. They act as a filter that
defines the type, length, and other input data properties.
Output rules set the final variable formatting – they define how the variable value is going
to be presented in an object.
8.1.1.6 Currency
Currency data type is used for variables that store numerical values of monetary amounts.
Define currencies for various regions and set their properties.
8.1.1.6.1 Input Rules
l Input formatting group specifies the allowed input currency format.
l Decimal delimiter is the character that separates the integer part from the fractional
part of value written in decimal form.
l Decimal places is the number of decimal places that is allowed to be included in the
value.
l Use 1000 separator enables using a separator that places the thousands into
groups.

l Separator: character that is used as 1000 separator.
l Currency symbol is a graphic symbol that represents a currency.
l Placement: position of the currency symbol.
l Sample value displays a preview of the currency input format.
l Limit length enables limiting the number of digits to be defined in a variable.
l Length (characters): allowed number of digits in a variable.
Check range defines the minimum and maximum values expressed in currency. Defining the
minimum and maximum limits is optional.
l Minimum value: the lowest allowed input currency value.
If already defined, the initial value is taken as the minimum value.
l Maximum value: the highest allowed input currency value.
8.1.1.6.2 Output Rules
Output formatting specifies the preferred output currency format.
l Decimal delimiter: character that separates the integer part from the fractional part
of a value written in decimal form.
l Decimal places: number of decimal places to be included in the value.
l Use 1000 separator: separator that places the thousands into groups.
l Separator: character that is used as 1000 separator.
l Currency symbol is a graphic symbol that represents a currency.
l Placement defines the currency symbol's position. Select it from the dropdown list.
l Sample value displays a preview of the currency input format.
Prefix and Suffix are characters that are added to a variable value.
l Prefix: text placed in front of the variable value.
l Suffix: text placed behind the variable value.
TIP: Input rules help the user when inserting the variable data. They act as a filter that
defines the type, length, and other input data properties.
Output rules set the final variable formatting – they define how the variable value is going
to be presented in an object.
8.1.2 Current Date
Current Date is a type of variable that displays the current date value. The value is obtained
from system or printer clock.

8.1.2.1 General
Definition group sets output formatting and displays its preview.
l Output format: format in which the date is displayed. Available date formats are listed
here.
The selected clock source option (see below) defines the range of allowed date Formats.
Printer clock option only allows the use of printer supported date formats. An error is
reported if a non-valid format is used. Computer (system) clock option allows a range of
preloaded or customized date formats.
l Output language: language selection and regional formatting for days and months.
EXAMPLE: Output Language becomes relevant when the dates that include months or
dates are written in words. In some cases, data calculations may be affected as well. For
example, in US, a new week begins on Sunday whereas in EU a new week begins on
Monday.
l Output preview: displays the printed current date. The range of used characters
adapts to the selected Output language and printer.
Date offset group enables adding a certain number of days, months or years to the current
date. The offset date is displayed in the object instead of the present date.
l Days: date offset in days.
l Months: date offset in months.
l Years: date offset in years.
Printer Clock group defines which clock should be used as the date value source.
l Always use computer clock: computer (system) clock set as the exclusive Current
Date value source.
l Always use printer clock: printer clock set as the exclusive Current Date value
source. An error is reported if the printer clock is unavailable.
l Use printer clock if supported: printer clock set as the preferred Current Date
value source. If the printer clock is not supported, the computer (system) clock value
is used instead.
8.1.2.2 Output Rules
Prefix and Suffix values may be added to a variable value if required.
l Prefix: text placed in front of the variable value.
l Suffix: text placed behind the variable value.

8.1.2.3 Date Formats
ZebraDesigner enables flexible use of date fields. When defining the formats, the following
notations are used:
Notation Description
d The number of the day in a month. Occupies one or two
characters.
dd The number of the day in a month. Always occupies two characters
– leading zeros are added if necessary.
M M is the number of month. Occupies one or two characters.
MM MM is the number of month. Always occupies two characters.
yy or yyyy The year represented with 2 or 4 digit numbers.
ddd The abbreviated name of the day of the week.
dddd The full name of the day of the week.
MMM The abbreviated name of the month.
MMMM The full name of the month.
J The number of days since January 1. Occupies from one to three
characters.
JJJ The number of days since January 1. Always occupies three
characters.
W The week number in current year. Occupies one or two characters.
WW The week number in current year. Always occupies two characters.
N The weekday number. The value range takes 1–7 characters,
where 1 represents Monday and 7 represents Sunday.
Custom text Any sequence of characters is displayed unchanged. Insert dots,
commas, and other characters to present the date as required.
8.1.2.3.1 Date Format Examples
Format Printed Date (English)
d.M.yyyy 10.3.2016
dd/MM/yy 10/03/16

dddd, d.MMMM yyyy Thursday, 10.March 2016
JJJWWyyyy 069102005
textd/M/yyyytext text10/3/2016text
8.1.3 Current Time
Current Time is a type of variable that displays the current time value. The value is obtained
from system or printer clock.
8.1.3.1 General
About group of settings identifies the variable and defines time output format and language.
l Name: unique variable name. This name is used as a variable reference during its use.
l Description: is a field that allows adding additional information and suggestions.
Definition group sets output formatting and displays its preview.
l Output format: format in which the time is displayed. Available time formats are listed
here.
The selected clock source option defines the range of supported time Formats. Printer
clock option only allows the use of printer supported time formats. An error is reported if a
non-valid format is used. Computer (system) clock option allows a range of preloaded and
customized time formats.
l Output preview displays the printed current time format.
Time offset enables adding or subtracting a certain number of seconds, minutes or hours
from the current time.
l Seconds: time offset in seconds.
l Minutes: time offset in minutes.
l Hours: time offset in hours.
Printer Clock group defines which clock should be used as the time value source.
l Use printer clock if supported: printer clock set as the preferred current time value
source. If the printer clock is not supported, the system clock value is used instead.
l Always use printer clock: printer clock set as the exclusive Current Time value
source. An error is reported if the printer clock is unavailable.
l Always use computer clock computer (system) clock set as the exclusive Current
Time value source.

8.1.3.2 Output Rules
Prefix and Suffix values may be added to a variable value if required.
l Prefix: text placed in front of the variable value.
l Suffix: text placed behind the variable value.
8.1.3.3 Time Formats
ZebraDesigner enables flexible use of time fields. Select a predefined time format or create
a customized one. When defining the formats, the following notations are used.
Notation Description
h Hours in 12-hour format. AM/PM is added, if selected. Occupies
one or two characters.
hh Hours in 12-hour format. AM/PM is added if selected. Always
occupies two characters. Leading zeros are added, if necessary.
H Hours in 24-hour format. Occupies one or two characters.
HH Hours in 24-hour format. Always occupies two characters.
mm Used for minutes.
ss Used for seconds.
8.1.3.3.1 Time Format Examples
Format Printed Date
h:mm {AM/PM} 8:25PM
H:mm 20:25
hh:mm:ss 08:25:36
8.1.4 Counter
Counter is a type of variable whose value increments or decrements along with the
changing value of system or printer counter.
Thermal printers are usually equipped with an internal incremental counter. This is a
dedicated counter that counts the printed labels internally. The printer only receives the
first value and automatically increases or decreases it on the subsequent labels. This option

reduces the amount of data transferred between computer and printer as only initial value is
sent to the printer. Internal counter speeds up the label production significantly.
8.1.4.1 General Tab
About group of settings identifies the variable and defines serialization details.
l Name: unique variable name. This name is used as variable reference.
l Description: is a field that allows adding additional information and suggestions.
Definition group of settings defines the counter behavior.
l Counter type: counter value increasing or decreasing.
l Incremental: value increases along with the printed labels.
l Decremental: variable value decreases along with the printed labels.
l Step: amount of units that represent the next state of counter value.
l Repetition: number of repetitions for each counter value.
l Initial value: value that is used when the counter starts.
l Preview: displays the counter value sequence as defined by the current Step,
Repetition and Initial value.
EXAMPLE: Counter Step = 3, Repetition = 3 and Initial value = 1 are:1, 1, 1, 4, 4, 4, 7, 7, 7,
10, 10, 10, 13, 13, 13, ...
Prompting group of settings defines the print time behavior of a data source. Read more
about prompting here.
Printer Counter defines which counter should be used as counter variable value source.
l Use printer counter if supported: printer counter is set as the counter of choice if
supported by the active printer. If the printer counter is not supported, system
counter is used instead.
l Always use printer counter: printer counter set as the exclusive counter value
source. If the printer counter value is not available, the default (system counter) value
is used.
An error is reported if the selected printer has no support for internal printer counter.
Printing cannot continue.
l Always use computer counter: computer counter set as the only counter value
source.
TIP: Input rules help the user when inserting the variable data. They act as a filter that
defines the type, length, and other input data properties.

Output rules set the final variable formatting – they define how the variable value is going
to be presented in an object.
To use internal printer counter, follow these rules:
l The variable's maximum length is limited by the printer. The value should be included
in the printer user guide.
TIP: If the exact maximum variable length value is not available, Zebra recommends
making a few test prints for determining the value.
l Set variable length to fixed.
l Set variable format to numeric.
l Text object that is linked to the variable must be formatted using an internal printer
font.
l Enable Always use printer counter option.
l Ensure the Internal Element icon is visible next to the counter text.
l Ensure an internal printer font is used for the counter text.
8.1.4.2 Input Rules
Data defines the counter input criteria.
l Limit variable length: maximum length of a variable value.
l Length (characters):specifies the exact number of characters permitted.
l Fixed length: variable must contain the exact number of characters as defined in the
Limit variable length.
Check range group defines minimum and maximum counter values.
l Minimum value: minimum counter value.
l Maximum value: maximum counter value.
Rollover settings group defines the condition at which the counter automatically resets its
value to default.
l Using min/max: minimum and maximum counter values activates the rollover.
l When the selected data source changes: data source value change activate the
rollover.
l When date or time changes: date or time value change activates the rollover.
Date/time change is defined by computer clock.
8.1.4.3 Output Rules
Prefix and Suffix are characters that are added to a variable value.

l Prefix: text placed in front of the variable value.
l Suffix: text placed behind the variable value.
8.2 Special Character Shortcuts
ZebraDesigner includes several predefined control characters – select them from the
dropdown menu in any dialog when text input is enabled. An arrow button on the right side
of the edit field lists the shortcuts.
EXAMPLE: FNC1 character can simply be encoded as <FNC1>.
If specific special character is not available on the list of shortcuts, see sections "Insert
Characters with Alt+<ASCII_code>" on page130 and "Insert Characters with <#hex_code>
Syntax" on page130.
ASCII code Abbreviation used in the application Description of the character
1 SOH Start of Heading
2 STX Start of Text
3 ETX End of Text
4 EOT End of Transmission
23 ETB End Transmission Block
25 EM End of Medium
5 ENQ Enquiry
6 ACK Acknowledgment
7 BEL Bell
8 BS Back Space
9 HT Horizontal Tab
11 VT Vertical Tab
13 CR Carriage Return
10 LF Line Feed
12 FF Form Feed
14 SO Shift Out
15 SI Shift In
16 DLE Data Link Escape
17 DC1 XON - Device Control 1

18 DC2 Device Control 2
19 DC3 XOFF - Device Control 3
20 DC4 Device Control 4
28 FS File Separator
29 GS Group Separator
30 RS Record Separator
31 US Unit Separator
21 NAK Negative Acknowledgment
22 SYN Synchronous Idle
24 CAN Cancel
26 SUB Substitute
27 ESC Escape
188 FNC Function Code 1
189 FNC Function Code 2
190 FNC Function Code 3
191 FNC Function Code 4

9 How To
9.1 Insert Characters with <#hex_code>
Syntax
Another method of entering special characters is using the syntax <#hex_code>. The hex_
code stands for a two-character mark in hexadecimal numerical system. The appropriate
values go from 0 (decimal 0) to FF (decimal 255).
EXAMPLE: <#BC> (decimal 188) would be the same as <FNC1>, as they both would
encode the character with ASCII code 0188.
9.2 Insert Characters with Alt+<ASCII_code>
This method is valid only for characters that are above ASCII code 32. A typical example
would be FNC codes that are used to encode GS1-128 barcode data. Labeling software
encodes this type of barcode according to standards – normally, you would not have to
change anything. However, sometimes it becomes necessary to manually add such
character to label data.
To include Function Codes, enter the appropriate character for Function Code. ASCII codes
of Function Codes are as follows:
FNC1 0188
FNC2 0189
FNC3 0190
FNC4 0191
To enter a character for FNC1, press and hold the Alt key and type in digits 0188 on the
numeric keyboard. Note the leading zero is mandatory. Release the Alt and the FNC1
character appears.

9.3 Printing of Unlimited Data
When printing labels with All (unlimited quantity) option selected, the labels are printed in
various quantities, depending on the label content.
All (unlimited quantity) option sets the printing quantity in two ways.
9.3.1 Label with Connected Database or Counter
With All (unlimited quantity) option selected, the number of printed labels is not limited up
front. It is determined by one of the following properties:
l Number of database records to be printed.
l Quantity set by the counters used on the label.
TIP: All (unlimited quantity) option is useful when printing labels connected to a
database. The number of labels to be printed for such labels is usually not known in
advance. After selecting this option, all relevant records from the connected database
are printed.
NOTE: With multiple databases or counters for print quantity, the one with the lowest
value actually determines the number of printed labels.
EXAMPLE:
Counter value:90
Number of database values:100
Number of printed labels under All (unlimited quantity): 90
9.3.2 Label without connected Database or Counter
If a label does not use database or counter objects, a maximum supported number of
identical label copies is printed. In such case, the printing continues until:
l Printer is switched off.
l Printer receives a command to clear its memory buffer.
NOTE: When printing identical label copies, use a Zebra printer driver to print the labels.
The driver is aware of printer's quantity limitations and prints the exact supported
number of labels.

NOTE: If you select All (unlimited quantity), and the maximum supported print quantity is
32000, the printer will print all of them.
9.4 Using the Internal Printer Counter
Almost all thermal printers support an internal increment counter functionality. This is a
special printer counter that counts labels internally. The printer only receives the first value
of the counter and automatically increments the counter by 1 on the subsequent labels.
TIP: Internal counters reduce the amount of data transferred between computer and
printer as only the start value is sent to printer. This speeds up the label production
significantly.
To use counter as internal printer element, pay attention to the following settings:
l The variable's maximum length is limited by you printer. You should find this value in
your printer's Owner Manuals. If you can not find this value, experiment.
l The variable length has to be set by enabling the Limit length option (go to Counter
properties > Input rules).
l Set allowed characters to Numeric.
l The Text object linked to the variable must be formatted as internal printer font (make
sure the Show printer fonts only option is enabled.
l Enable the option Always use printer counter in the Source tab. This option is
available only if the counter variable has been set up properly.
l A symbol for internal printer must appear in the bottom right corner of the Text object
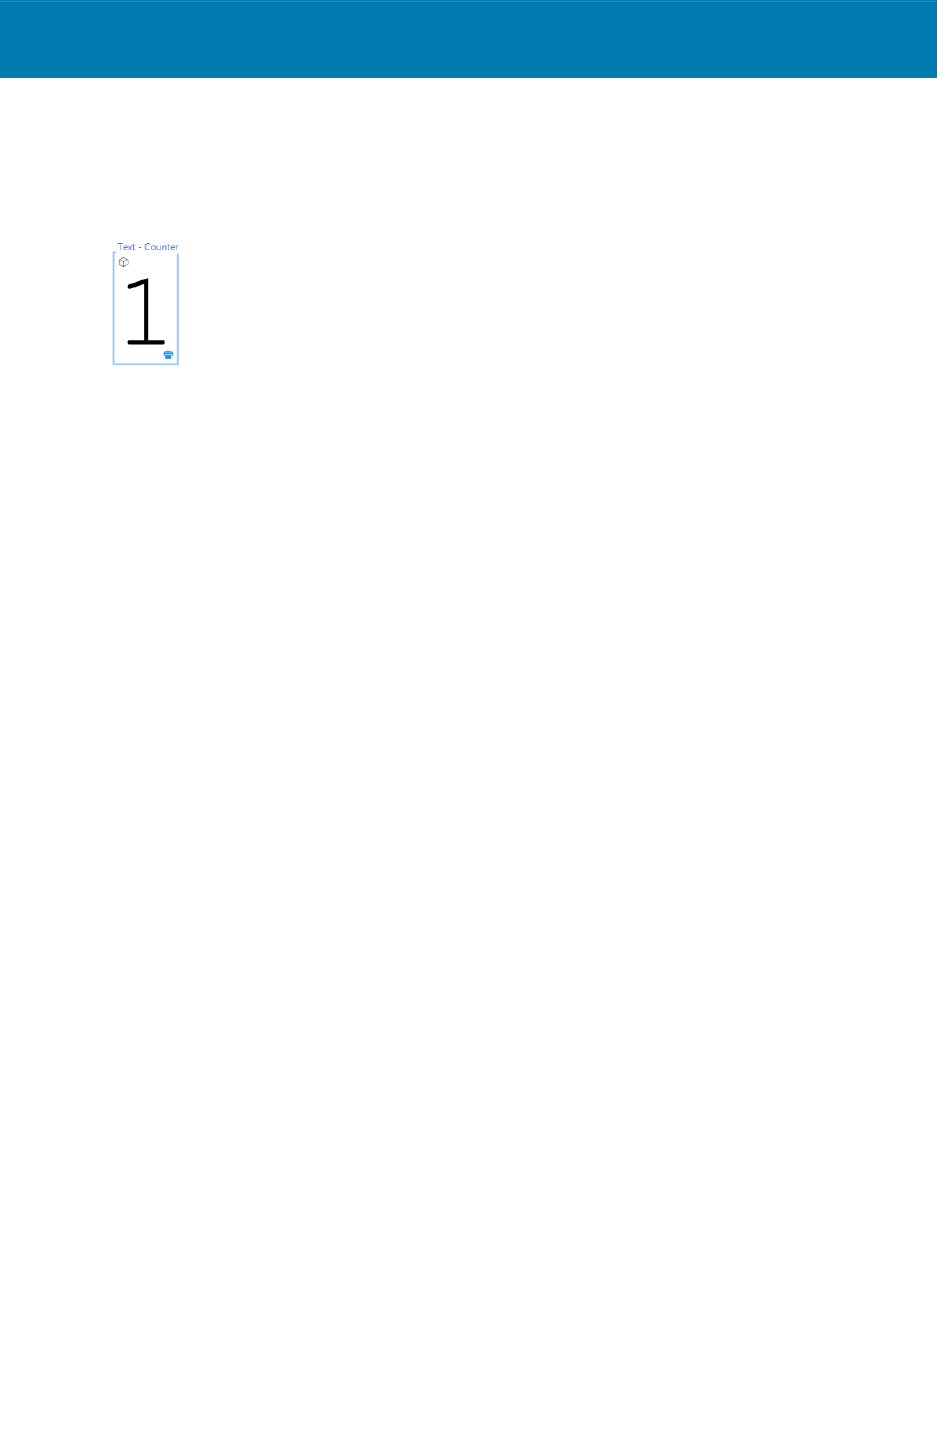
which contains the counter value.

10 Glossary
A
AI
Application Identifier
ANSI
American National Standards Institute
B
BOM
Bite Order Mark
C
CIJ
Continuous Inkjet
CSV
Comma Separated Values
D
DDL
Data Definition Language
DI
Data Identifier
DMRE
Data Matrix Rectangular Extension

E
EAS
Electronic Article Surveillance
F
FNC
Barcode extension character
G
GTIN
Global Trade Item Number
H
HIBC
Health Industry Bar Code
N
NDEF
NFC Data Exchange Format
NFC
Near Field Communication
O
ODBC
Microsoft Open Database Connectivity
OLE
Object Linking and Embedding

P
PJM
Phase Jitter Modulation
R
RF
Radio Frequency
RPC
Remote Procedure Call
RTF
Rich Text Format
S
SCAC
Standard Carrier Alpha Code
T
TID
Transponder ID
U
UNC
Universal Naming Convention
UPC
Universal Product Code

W
WSDL
Web Services Description Language

ZEBRA and the stylized Zebra head are trademarks of Zebra Technologies Corporation,
registered in many jurisdictions worldwide. All other trademarks are the property of their
respective owners. ©2019 Zebra Technologies Corporation and/or its affiliates. All rights
reserved.
www.zebra.com
