
Integration Manager
July 24, 2024
7.2
Copyright © 2013, 2024, Oracle and/or its affiliates.
This software and related documentation are provided under a license agreement containing restrictions
on use and disclosure and are protected by intellectual property laws. Except as expressly permitted
in your license agreement or allowed by law, you may not use, copy, reproduce, translate, broadcast,
modify, license, transmit, distribute, exhibit, perform, publish, or display any part, in any form, or by any
means. Reverse engineering, disassembly, or decompilation of this software, unless required by law for
interoperability, is prohibited.
The information contained herein is subject to change without notice and is not warranted to be error-
free. If you find any errors, please report them to us in writing.
If this is software or related documentation that is delivered to the U.S. Government or anyone licensing it
on behalf of the U.S. Government, then the following notice is applicable:
U.S. GOVERNMENT END USERS: Oracle programs (including any operating system, integrated software,
any programs embedded, installed or activated on delivered hardware, and modifications of such
programs) and Oracle computer documentation or other Oracle data delivered to or accessed by
U.S. Government end users are "commercial computer software" or "commercial computer software
documentation" pursuant to the applicable Federal Acquisition Regulation and agency-specific
supplemental regulations. As such, the use, reproduction, duplication, release, display, disclosure,
modification, preparation of derivative works, and/or adaptation of i) Oracle programs (including any
operating system, integrated software, any programs embedded, installed or activated on delivered
hardware, and modifications of such programs), ii) Oracle computer documentation and/or iii) other
Oracle data, is subject to the rights and limitations specified in the license contained in the applicable
contract. The terms governing the U.S. Government's use of Oracle cloud services are defined by the
applicable contract for such services. No other rights are granted to the U.S. Government.
This software or hardware is developed for general use in a variety of information management
applications. It is not developed or intended for use in any inherently dangerous applications, including
applications that may create a risk of personal injury. If you use this software or hardware in dangerous
applications, then you shall be responsible to take all appropriate fail-safe, backup, redundancy, and other
measures to ensure its safe use. Oracle Corporation and its affiliates disclaim any liability for any damages
caused by use of this software or hardware in dangerous applications.
Oracle and Java are registered trademarks of Oracle and/or its affiliates. Other names may be trademarks
of their respective owners.
Intel and Intel Inside are trademarks or registered trademarks of Intel Corporation. All SPARC trademarks
are used under license and are trademarks or registered trademarks of SPARC International, Inc. AMD,
Epyc, and the AMD logo are trademarks or registered trademarks of Advanced Micro Devices. UNIX is a
registered trademark of The Open Group.
This software or hardware and documentation may provide access to or information about content,
products, and services from third parties. Oracle Corporation and its affiliates are not responsible for and
expressly disclaim all warranties of any kind with respect to third-party content, products, and services
unless otherwise set forth in an applicable agreement between you and Oracle. Oracle Corporation and
its affiliates will not be responsible for any loss, costs, or damages incurred due to your access to or use
of third-party content, products, or services, except as set forth in an applicable agreement between you
and Oracle.
If this document is in public or private pre-General Availability status:
This documentation is in pre-General Availability status and is intended for demonstration and preliminary
use only. It may not be specific to the hardware on which you are using the software. Oracle Corporation
and its affiliates are not responsible for and expressly disclaim all warranties of any kind with respect to
this documentation and will not be responsible for any loss, costs, or damages incurred due to the use of
this documentation.
If this document is in private pre-General Availability status:
The information contained in this document is for informational sharing purposes only and should be
considered in your capacity as a customer advisory board member or pursuant to your pre-General
Availability trial agreement only. It is not a commitment to deliver any material, code, or functionality, and
should not be relied upon in making purchasing decisions. The development, release, timing, and pricing
of any features or functionality described in this document may change and remains at the sole discretion
of Oracle.
This document in any form, software or printed matter, contains proprietary information that is the
exclusive property of Oracle. Your access to and use of this confidential material is subject to the terms
and conditions of your Oracle Master Agreement, Oracle License and Services Agreement, Oracle
PartnerNetwork Agreement, Oracle distribution agreement, or other license agreement which has
been executed by you and Oracle and with which you agree to comply. This document and information
contained herein may not be disclosed, copied, reproduced, or distributed to anyone outside Oracle
without prior written consent of Oracle. This document is not part of your license agreement nor can it be
incorporated into any contractual agreement with Oracle or its subsidiaries or affiliates.
Documentation Accessibility
For information about Oracle's commitment to accessibility, visit the Oracle Accessibility Program website
at http://www.oracle.com/pls/topic/lookup?ctx=acc&id=docacc
Access to Oracle Support
Oracle customers that have purchased support have access to electronic support through My Oracle
Support. For information, visit http://www.oracle.com/pls/topic/lookup?ctx=acc&id=info or visit http://
www.oracle.com/pls/topic/lookup?ctx=acc&id=trsif you are hearing impaired.
Sample Code
Oracle may provide sample code in SuiteAnswers, the Help Center, User Guides, or elsewhere through
help links. All such sample code is provided "as is” and “as available”, for use only with an authorized
NetSuite Service account, and is made available as a SuiteCloud Technology subject to the SuiteCloud
Terms of Service at www.netsuite.com/tos, where the term “Service” shall mean the OpenAir Service.
Oracle may modify or remove sample code at any time without notice.
No Excessive Use of the Service
As the Service is a multi-tenant service offering on shared databases, Customer may not use the Service
in excess of limits or thresholds that Oracle considers commercially reasonable for the Service. If Oracle
reasonably concludes that a Customer’s use is excessive and/or will cause immediate or ongoing
performance issues for one or more of Oracle’s other customers, Oracle may slow down or throttle
Customer’s excess use until such time that Customer’s use stays within reasonable limits. If Customer’s
particular usage pattern requires a higher limit or threshold, then the Customer should procure a
subscription to the Service that accommodates a higher limit and/or threshold that more effectively aligns
with the Customer’s actual usage pattern.
Table of Contents
Integration Manager Overview .................................................................................................. 1
Getting Started with Integration Manager ................................................................................... 3
Installing, Updating and Uninstalling Integration Manager ............................................................. 6
Integration Manager General Settings and Menu Options ............................................................. 9
Backing Up Your Integration Manager Settings and Shortcuts .................................................. 11
Restoring Your Integration Manager Settings and Shortcuts from the Backup .............................. 13
Transferring Integration Manager Shortcuts to a Different Computer or Environment ................... 14
Connecting Integration Manager with your OpenAir Account .................................................... 15
CSV Character Encoding ..................................................................................................... 16
Exporting OpenAir Data to a CSV File ....................................................................................... 18
Adding Header Information to Exported CSV Files .................................................................. 20
Importing Data from a CSV File into OpenAir ............................................................................. 22
Record Creation or Update Rules on Import .......................................................................... 26
Making User Settings Available for Mapping (User Imports Only) ............................................... 30
Mapping OpenAir Fields to CSV Columns .................................................................................. 33
Making OpenAir Custom Fields Available for Mapping ................................................................. 38
Making Additional Information Available for Mapping (Calculated Fields) ......................................... 41
Combining and Splitting Information ........................................................................................ 44
OpenAir Field Value Lookup (Export) and Record Lookup (Import) ................................................. 50
Filtering OpenAir Records for Export ........................................................................................ 54
Formatting Information for Export and Import ........................................................................... 59
Setting the Date and Time Format Used in the CSV File ........................................................... 59
Setting Up Conditional Overrides ......................................................................................... 60
Validating Field Value Length and Range on Export ................................................................. 66
Accounting Settings ............................................................................................................... 68
Working with Export and Import Shortcuts ................................................................................ 71
Creating an Export or Import Shortcut .................................................................................. 72
Batching Export and Import Shortcuts .................................................................................. 76
Editing Integration Manager Shortcuts ................................................................................. 77
Upgrading Integration Manager Shortcuts ............................................................................ 80
Records and Fields Reference .................................................................................................. 81
Accounting Period ............................................................................................................. 85
Actual Cost ....................................................................................................................... 86
Agreement ....................................................................................................................... 86
Agreement to Project ......................................................................................................... 87
Approval Process ............................................................................................................... 87
Booking ........................................................................................................................... 88
Booking Type .................................................................................................................... 89
Budget ............................................................................................................................. 89
Budget Allocation .............................................................................................................. 90
Category .......................................................................................................................... 90
Category_<N> ................................................................................................................... 91
Contact ............................................................................................................................ 91
Cost Category ................................................................................................................... 93
Cost Center ...................................................................................................................... 93
Cost Type ......................................................................................................................... 93
Currency .......................................................................................................................... 94
Customer ......................................................................................................................... 94
Customer PO .................................................................................................................... 97
Customer PO to Project ...................................................................................................... 98
Deal ................................................................................................................................ 98
DealContact ...................................................................................................................... 99
DealSchedule .................................................................................................................... 99
Department .................................................................................................................... 100
Entity tag ........................................................................................................................ 100
Envelope ........................................................................................................................ 101
Estimate ......................................................................................................................... 102
EstimateAdjustment ......................................................................................................... 103
EstimateExpense .............................................................................................................. 103
EstimateLabor ................................................................................................................. 104
EstimatePhase ................................................................................................................. 104
Event ............................................................................................................................. 104
Expense Item .................................................................................................................. 105
Filter set ......................................................................................................................... 106
ForexInput ...................................................................................................................... 106
Invoice ........................................................................................................................... 107
Issue .............................................................................................................................. 108
Item to User Location ...................................................................................................... 109
Job Code ........................................................................................................................ 110
Leave accrual rule ............................................................................................................ 110
Leave accrual rule to user ................................................................................................. 111
Leave accrual trans .......................................................................................................... 111
Loaded Cost ................................................................................................................... 112
Payment ......................................................................................................................... 113
Payment Terms ............................................................................................................... 113
Payment Type ................................................................................................................. 114
Payroll Type .................................................................................................................... 114
Product .......................................................................................................................... 114
Profile Type ..................................................................................................................... 115
Project ........................................................................................................................... 116
Project Assignment .......................................................................................................... 120
Project Billing Rule ........................................................................................................... 120
Project Billing Transaction ................................................................................................. 122
Project Group ................................................................................................................. 124
Project Pricing ................................................................................................................. 124
Project Stage .................................................................................................................. 124
Project Task .................................................................................................................... 125
Project task assign ........................................................................................................... 127
Projecttask_type ............................................................................................................... 127
Proposal ......................................................................................................................... 128
ProposalBlock .................................................................................................................. 129
Prospect ......................................................................................................................... 130
Proxy ............................................................................................................................. 133
Purchase item ................................................................................................................. 133
Purchase order ............................................................................................................... 135
Purchaser ....................................................................................................................... 137
Purchase request ............................................................................................................. 137
Rate Card ....................................................................................................................... 138
Rate Card Item ................................................................................................................ 138
Receipt ........................................................................................................................... 139
Reimbursement ............................................................................................................... 141
Repeat ........................................................................................................................... 141
Request Item .................................................................................................................. 142
Resource Profile .............................................................................................................. 143
Resource Request ............................................................................................................ 144
Resource Request Queue .................................................................................................. 144
Resource Search .............................................................................................................. 145
Rev. Recogn. Amount ....................................................................................................... 146
Rev. Recogn. Rule ............................................................................................................ 146
Rev. Recogn. Trans. .......................................................................................................... 148
Revenue Container ........................................................................................................... 151
Revenue Stage ................................................................................................................ 151
Schedule Exception .......................................................................................................... 152
ScheduleRequest ............................................................................................................. 152
ScheduleRequest item ...................................................................................................... 153
Service ........................................................................................................................... 154
Slip Projection ................................................................................................................. 155
Slip Stage ....................................................................................................................... 157
Tag Group ...................................................................................................................... 158
Tag Group Attribute ......................................................................................................... 158
Target Utilization ............................................................................................................. 158
Task Adjustment .............................................................................................................. 159
Tax Location ................................................................................................................... 159
Tax Rate ......................................................................................................................... 160
Time Type ....................................................................................................................... 160
TimeBill .......................................................................................................................... 161
Timecard ........................................................................................................................ 163
Timesheet ....................................................................................................................... 164
Timesheet entry ............................................................................................................... 166
Timesheet/Timecard entry ................................................................................................. 168
Todo .............................................................................................................................. 170
User .............................................................................................................................. 171
User Location .................................................................................................................. 175
User Project Rate ............................................................................................................. 175
User Workschedule .......................................................................................................... 176
Vendor ........................................................................................................................... 177
Workspace Link ............................................................................................................... 178
Workspace User .............................................................................................................. 178
Troubleshooting .................................................................................................................. 179
Troubleshooting Common Errors ....................................................................................... 179
Creating a Support Case ....................................................................................................... 181

Integration Manager Overview 1
Integration Manager Overview
This guide describes the functionality available in OpenAir Integration Manager 7.0 and later versions.
Important: As announced in the October 8, 2022 OpenAir Release Notes and through
Proactive Feature Change Notification (PFCN), support for the QuickBooks integration functionality
in OpenAir Integration Manager ended with the OpenAir 2023.1 Release on April 15, 2023.
Previous versions of OpenAir Integration Manager, including any shortcuts created using
Integration Manager 6.6 or earlier version, can no longer be used to exchange information
between OpenAir and QuickBooks.
OpenAir Integration Manager is a Windows desktop application designed to support the exchange of
data between OpenAir and third-party applications in your infrastructure. OpenAir Professional Services
configures Integration Manager to suit your business requirements as part of your initial OpenAir account
setup if you purchase a license for this add-on service. You can maintain and add to the integration as
enhancements become available.
Integration Manager is a licensed add-on service. You must hold a valid license to use Integration
Manager. Contact your OpenAir account manager to review licensing or purchase a license for
Integration Manager.
Integration Manager lets you:
■
Export your OpenAir data to a comma separated values (CSV) file. You can then use this CSV file to
import your OpenAir data into third-party software such as a productivity application, a payroll system,
or an accounting package.
■
Import data from a CSV file into your OpenAir account. Refer to Records and Fields Reference for a list
of OpenAir records you can import.
■
Use a CSV text in almost any delimited format. Tab, comma, colon, pipe, tilde, semicolon, and other
custom delimiters are supported to ensure the generated CSV file is ready for import without having
to convert the file to a different format beforehand.
■
Set the required or expected format for date and time values in the CSV files you export OpenAir
information to or import information from.
■
Export and import the information (fields) stored in OpenAir standard and custom fields, in the order
you specify. You can map OpenAir fields with the corresponding column in the CSV file.
■
Export only those OpenAir records matching specific filter conditions.
■
Column naming, adding calculated fields, and concatenating multiple fields help you better meet your
operational needs.
■
Use filter sets in OpenAir to control who can access the data.
■
Update records in bulk on your OpenAir account. If you change project information, you can update
all impacted projects in OpenAir, or if timesheet or expense report approvers change for one or more
projects, you can update all related OpenAir records at the same time.
■
Export transactions associated with accounts payable and accounts receivable. Enter bills, track
expenses, create invoices, receive payments, and keep track of inventory and revenue.
■
Create shortcuts to run specific imports and exports manually without launching the Integration
Manager application, or to schedule imports and exports to run automatically.
Integration Manager

Integration Manager Overview 2
Important: Review the following limitations:
■
Integration Manager is a Windows application. There are no versions of Integration Manager
designed to run on macOS or Linux. Additional setup is required to run Integration Manager
on macOS. See Options for using Windows 11 with Mac® computers with Apple® M1® and
M2™ chips.
■
Integration Manager cannot be used to delete records in OpenAir, only to create or update
records.
■
Authentication using SAML Single Sign-on is not supported. Users signing in to OpenAir using
SAML Single Sign-on will not be able to connect Integration Manager with OpenAir to export or
import information.
Integration Manager

Getting Started with Integration Manager 3
Getting Started with Integration Manager
Integration Manager is a licensed add-on service. You must hold a valid license to use Integration
Manager. OpenAir Professional Services configures Integration Manager to suit your business
requirements as part of your initial OpenAir account setup if you purchase a license for this add-
on service. You can maintain and add to the Integration Manager setup as new features, product
enhancements, and software fixes become available. Appropriate training is required before you can use
Integration Manager and change its settings.
Important: You should not use Integration Manager unless you have received the relevant
training. You must have a good understanding of the OpenAir application and how its database is
structured, as well as knowledge of the Integration Manager application.
Step 1: Get Access to Integration Manager
OpenAir account administrators grant access to Integration Manager at the individual user level. To do
so:
1.
Go to Administration > Global Settings > Users > Employees > [Select the employee] > Access
Control
2.
Click Exchange Access.
3.
Add OpenAir Integration Manager to the selected list.
Step 2: Download and Install Integration Manager
OpenAir Professional Services provide you with a download link for Integration Manager. A wizard guides
you through the installation process. See Installing Integration Manager.
Step 3: Grant Full User Access Privileges in
Windows for the Integration Manager User
In Windows 8 and 10, access to files and folders is restricted unless you have Administrator privileges.
An error can occur when a user does not have full permissions. Make sure Integration Manager users
can create, modify, and delete files in the Integration Manager installation folder. The default installation
location is C:\Program Files (x86)\OpenAir\IntegrationManager but you can choose a different location
during the installation – see Installing Integration Manager.
Important: Integration Manager does not support a multiple user setup. The same Windows
user account should be used to run Integration Manager, and to create or run Integration
Manager shortcuts. Running Integration Manager from different Windows user accounts may
lead to inconsistent application behavior.
Step 4: Read the Relevant Documentation
This guide provides a reference for using Integration Manager. The guide is organized around the
following conceptual topics for ease of reference:
Integration Manager

Step 4: Read the Relevant Documentation 4
■
Integration Manager General Settings and Menu Options — Explore the menu options, review how to
connect Integration Manager to your OpenAir account, choose a character encoding scheme, backup
your application settings and shortcuts, and restore them from back up, and review the logs.
■
Exporting OpenAir Data to a CSV File — Follow the steps to export OpenAir records to a CSV file using
Integration Manager.
Includes steps to add header information to the exported CSV file. See Adding Header Information to
Exported CSV Files.
■
Importing Data from a CSV File into OpenAir — Follow the steps to import information from a source
CSV file into OpenAir using Integration Manager.
Includes information about rules determining if a record already exists in OpenAir and if the record
should be created or updated on import. See Record Creation or Update Rules on Import
Includes steps to import user settings, including user preferences and user privileges when importing
user records from a CSV file. See Making User Settings Available for Mapping (User Imports Only).
■
Mapping OpenAir Fields to CSV Columns — Follow the steps to map the OpenAir fields to columns in
the CSV file you export information to or import information from.
■
Making OpenAir Custom Fields Available for Mapping — Follow the steps to make custom fields you
create in OpenAir available for mapping.
■
Making Additional Information Available for Mapping (Calculated Fields) — Follow the steps to make
additional information that is not in your source data available for mapping.
■
Combining and Splitting Information — Follow the steps to split a source field into two or more
destination fields (Import only), combine source fields into a single destination field (Import and
Export), or combine separate date and time fields in the source CSV file into a datetime field in
OpenAir (Import only).
■
OpenAir Field Value Lookup (Export) and Record Lookup (Import) — Follow the steps to look up
OpenAir field values for record types directly or indirectly related to the record type you selected for
export, or to look up OpenAir records associated with the records you import by name or external ID.
■
Filtering OpenAir Records for Export — Follow the steps to export only the OpenAir records that meet
specific criteria to the CSV file.
■
Formatting Information for Export and Import — Review the formatting options in Integration
Manager. These options includes, the ability to:
□
Specify the format of values containing both date and time parts in your CSV file. See Setting the
Date and Time Format Used in the CSV File.
□
(Export only) Add length and range validation for field values in your CSV file. See Validating Field
Value Length and Range on Export.
□
Using conditional overrides to compare numeric or text field values to a fixed value or pattern, and
replace the value if the condition is met. See Setting Up Conditional Overrides.
■
Accounting Settings — Perform account balancing and secondary balancing on the Receipt, Revenue
recognition transaction, TimeBill (charge, slip, or bill), Timesheet entry, or Slip projection records you
export, and summarize grouped record data for export, with subtotals for selected fields.
■
Working with Export and Import Shortcuts — Follow the steps to create shortcuts to run specific
imports and exports manually without launching the Integration Manager application, or to schedule
imports and exports to run automatically.
■
Records and Fields Reference — Review the OpenAir record types and fields available for export and
import, and refer to other reference material about the OpenAir database.
■
Important: Integration Manager does not support all tables and fields included in the
OpenAir Data Dictionary. See OpenAir Data Dictionary.
■
Troubleshooting — Review common export and import errors and how to resolve them, follow steps
to get additional help or report issues.
Integration Manager

Step 5: Set Up Example Export or Import on a Sandbox Environment 5
Step 5: Set Up Example Export or Import on a
Sandbox Environment
Integration Manager lets you export data from your OpenAir account to text CSV files or import from text
CSV files to your OpenAir account. Decide which fields to export or import, in what order, and which fields
they will map to in the resulting file or account record. You can limit the data that exports to a subset
of all the records in your account. You can also specify the date and time formats and the method used
to delimit the fields. See Exporting OpenAir Data to a CSV File and Importing Data from a CSV File into
OpenAir.
Step 6: Create Export and Import Shortcuts
After you have set up your field mapping settings and other options, you can create and edit shortcuts.
See Working with Export and Import Shortcuts.
Integration Manager

Installing, Updating and Uninstalling Integration Manager 6
Installing, Updating and Uninstalling
Integration Manager
Important: Review the following guidelines:
■
Integration Manager is a licensed add-on service. You must hold a valid license to use
Integration Manager.
■
Integration Manager should be used by trained users only. It is essential to have a good
understanding of the OpenAir application and how its database is structured before you can
set up Integration Manager. Contact OpenAir Professional Services for help with setting up
Integration Manager or to arrange the relevant training.
OpenAir Professional Services provide you with a link to download the Integration Manager installer EXE
file as part of the initial setup. You use this link to download and install the latest version of Integration
Manager. For more information, see Installing Integration Manager.
Before you install Integration Manager, review the minimum system requirements – See System
Requirements.
You should review OpenAir Release Notes regularly and update Integration Manager to the latest
available version to take advantage of new features, product enhancements and defect fixes. For more
information, see Updating Integration Manager to a New Version.
You can uninstall Integration Manager at any time. For more information, see Uninstalling Integration
Manager.
System Requirements
Integration Manager can be installed on the following platforms:
■
Microsoft® Windows Server 2012 or later versions.
■
Microsoft® Windows 8 and 10.
Other requirements include:
■
Microsoft® .NET Framework Version 3.5 or above.
Note: Microsoft® .NET framework 3.5 or above is required to run Integration Manager 6.3. If
it is not installed on your computer, download it from https://dotnet.microsoft.com/download/
dotnet-framework and install it before installing Integration Manager.
■
RAM size of at least 1 GB (2+ GB for large integration jobs).
While it is not necessary to run Integration Manager on a dedicated server, other operations running
in parallel might hinder the performance of Integration Manager. You should run Integration Manager
shortcuts in time slots separate from other CPU-intensive operations.
Installing Integration Manager
Use the following steps to install Integration Manager.
Integration Manager

Updating Integration Manager to a New Version 7
To install Integration Manager:
1.
Download the installer EXE file using the link provided by OpenAir Professional Services.
2.
Run the Integration Manager installer file.
The OpenAir Integration Manager Setup Wizard appears.
3.
Click Next.
4.
Read and accept the License Agreement then click Next.
5.
Choose the location to install Integration Manager then click Next.
The default location is C:\Program Files(x86)\OpenAir\IntegrationManager.
6.
The installation creates a shortcut icon for Integration Manager on the computer desktop. Clear
the Create a desktop icon box if you do not want to create a desktop icon, then click Next.
7.
Review your installation settings, then click Install.
The wizard shows the installation progress. After the installation completes, the wizard shows
information about the application (the content of the README.TXT file).
8.
Review the content of README.TXT, then click Next.
9.
Click Finish.
Updating Integration Manager to a New Version
You should review OpenAir Release Notes regularly and update Integration Manager to the latest
available version to take advantage of new features, product enhancements and defect fixes.
Important: When upgrading to a new version, you should test Integration Manager, including
all shortcuts, on a sandbox environment. Check that all import and export shortcuts run as
expected before you upgrade Integration Manager on a production environment. If you use
Integration Manager to support business-critical processes, such as exchanging information
between OpenAir and your accounting system, for example, you should exercise appropriate
responsibility.
To update Integration Manager to a New Version
1.
You should back up your Integration Manager settings and shortcuts before updating to a new
version. See Backing Up Your Integration Manager Settings and Shortcuts.
2.
Close Integration Manager.
3.
Follow the steps for installing Integration Manager. See Installing Integration Manager. You do not
need to uninstall the previous version beforehand.
4.
Upgrade all Integration Manager shortcuts. See Upgrading Integration Manager Shortcuts.
Uninstalling Integration Manager
You can uninstall Integration Manager at any time, if you no longer use it to exchange information
between OpenAir and third-party applications.
Integration Manager is a licensed add-on service. If you do not hold a valid license for this add-on service,
you must stop using Integration Manager and should uninstall it.
The following steps are given for Windows 10.
Integration Manager

Uninstalling Integration Manager 8
To uninstall Integration Manager:
1.
Click the Windows Start menu icon, then Settings.
The Settings screen appears.
2.
Click Apps & Features.
The Apps & Features screen appears and lists the applications installed on your computer.
3.
Locate and click OpenAir Integration Manager.
4.
Click Uninstall.
A confirmation window appears.
5.
Click Yes.
A confirmation message appears.
6.
Click OK.
7.
(Optional) Delete the installation folder. The default installation location is C:\Program Files
(x86)\OpenAir\IntegrationManager but you can choose a different location during the installation –
see Installing Integration Manager.
Important: Uninstalling Integration Manager does not delete your import and export
field mapping.
To remove all settings completely, delete the installation folder.
Integration Manager

Integration Manager General Settings and Menu Options 9
Integration Manager General Settings and
Menu Options
By default, the Integration Manager installation adds a shortcut to your desktop . Double click the
shortcut to launch Integration Manager.
The main Integration Manager window includes a top menu bar and a table listing the record types
available for import from and export to a CSV file.
Click the menu headers to view the available menu options:
■
File — The File menu includes the following options:
□
Create shortcut, Open shortcut, or Upgrade shortcut— You can use shortcuts to run specific
imports and exports manually without launching the Integration Manager application, or to
schedule imports and exports to run automatically. You should upgrade all your Integration
Manager shortcuts after you update the Integration Manager application to a new version. See
Working with Export and Import Shortcuts.
□
Create backup or Restore from backup — You can back up your Integration Manager settings,
and restore your application settings from this backup when required. See Backing Up Your
Integration Manager Settings and Shortcuts and Restoring Your Integration Manager Settings and
Shortcuts from the Backup.
Integration Manager

Integration Manager General Settings and Menu Options 10
The backup is stored on an OpenAir server to ensure availability. The backup may be useful if you
want to transfer shortcuts and other settings to a different computer or environment without
having to recreate all the field mapping and logic. See Transferring Integration Manager Shortcuts
to a Different Computer or Environment.
□
Exit — Click Exit to close the Integration Manager application.
■
Options — The Options menu includes the following options:
□
OA Account settings — You must enter your OpenAir sign-in details to connect Integration
Manager with your OpenAir account. See Connecting Integration Manager with your OpenAir
Account.
□
CSV Encoding — If you are using Integration Manager 6.6 or later version, you can choose the
character encoding scheme used for the CSV file you export to or import from. See CSV Character
Encoding.
□
The following options are available when you select a record type to export or import:
▬
Field mapping — Integration Manager lets you map the OpenAir fields for each supported
record type to columns in the CSV file you export information to or import information from.
You can set the name and order of columns in the CSV file, combine multiple OpenAir fields into
a single CSV column (export) or multiple CSV columns into a single OpenAir field (import), split
a CSV column into multiple OpenAir fields (import), or include additional information such as
custom fields or calculated fields. See Mapping OpenAir Fields to CSV Columns.
▬
Filtering — You can set up Integration Manager to export only those OpenAir records
matching specific filter conditions. See Filtering OpenAir Records for Export.
▬
Formatting — You can change the format of some of the information you export or import
automatically. You can set the date and time format, or set a conditional override. When
exporting information from OpenAir to a CSV file, you can also set a maximum field length and
the range of acceptable numerical values. See Formatting Information for Export and Import.
▬
Accounting settings — When you export Receipt, Revenue recognition transaction, TimeBill
(charge, slip, or bill), Timesheet entry, or Slip projection records from OpenAir to a CSV file, you
can perform account balancing and secondary balancing on the records you are exporting.
You can also summarize the information for export, and choose the fields to sum and the
combination fields for which you want subtotals. See Accounting Settings.
□
Logging options — Integration Manager always adds a log entry when an error occurs. By default,
it also adds a log entry with information about each action performed. You can set logging options
so that the log only records errors.
The log file is located in the AppData folder for the Windows user – C:\Users\<username>\AppData
\Roaming\OpenAir\Integration Manager\OpenAirManager.log. To view the log, go to Help > Display
log.
Integration Manager

Backing Up Your Integration Manager Settings and Shortcuts 11
■
Help — The Help menu includes the following options:
■
User guide (online) — Click to view the latest version of the Integration Manager User Guide (PDF file)
in your default browser.
■
Supported fields for import and export — Click to view the list of tables and fields available for
export from and import into OpenAir (CSV file) in your default application for CSV files. See also
Records and Fields Reference.
■
Contents (release notes) — Click to view the readme.txt file in your default text editor. The file
content includes a version history with a summary of features introduced with each version.
■
OpenAir website — Click to view the OpenAir product information website (https://
www.openair.com/) in your default browser.
■
Display log — Click to view the Integration Manager log in your default text editor. It lists actions
on specific dates and times. When contacting OpenAir Customer Support to report an issue with
Integration Manager, it is helpful to attach the log file. See also Troubleshooting.
■
About OpenAir Integration Manager — Click to view version information.
Note: If you select an item to import or export and right-click on the highlighted row, available
items from the options menu also display. They include the option to Create Shortcut as well as
Field Mapping, Filtering, and Formatting when applicable.
Backing Up Your Integration Manager Settings and
Shortcuts
You should back up your Integration Manager settings after you make any changes to your application or
shortcuts settings that you want to preserve or copy to another computer. Backups include the settings
Integration Manager

Backing Up Your Integration Manager Settings and Shortcuts 12
for the main application and all your export and import shortcuts. You can create a backup at any time
after you launch the application. Integration Manager prompts you to backup your settings when you
close the application.
Important: The Integration Manager back up is stored on the OpenAir servers. Backing up
your settings overwrites the previous backup. You can only restore settings from the most recent
backup stored on OpenAir servers. Previous backups are not available.
To back up your Integration Manager settings and shortcuts:
1.
Connect Integration Manager to your OpenAir account. See Connecting Integration Manager with
your OpenAir Account.
2.
Do one of the following:
■
In Integration Manager, go to File > Create Backup.
■
When you close the application through File > Exit, a window appears prompting you to backup
your settings. To continue with the backup, click Yes.
A window appears with information about the settings and shortcuts to include in the backup and
the date they were last modified.
3.
Click OK.
A confirmation window appears.
4.
To continue with the backup, enter Y in the text box and click Yes. Creating a backup overwrites the
previous backup stored on OpenAir servers. After you create a new backup, you will not be able to
recover settings from the previous backup.
Integration Manager

Backing Up Your Integration Manager Settings and Shortcuts 13
Note: With Integration Manager 6.5.2 and earlier versions, you could select the shortcuts you
wanted to include in your backup. In some cases, this was required to stay within the 100 MB
maximum backup size.
Integration Manager 6.5.3 and later versions optimize the backup for speed, size, and security
faster backup, and remove the requirement to pick and choose shortcuts to stay within the
maximum backup size.
To backup selected shortcuts only:
1.
You should take a local copy of C:\im_shortcuts before you start
2.
Delete all but the shortcut files you want to backup from the folders where you created or
saved these shortcuts.
3.
Delete all but the shortcut bundle directories you want to backup from C:\im_shortcuts.
4.
Create backup.
5.
Restore all the deleted shortcut files and shortcut bundle directories from the Recycle bin.
Restoring Your Integration Manager Settings and
Shortcuts from the Backup
You can restore your Integration Manager settings or shortcuts from the backup saved on OpenAir
servers at any time.
You can choose to restore:
■
All application settings.
■
All shortcuts.
■
All application settings and all shortcuts.
It is not possible to hand pick and recover only specific application settings or specific shortcuts.
Integration Manager

Restoring Your Integration Manager Settings and Shortcuts from the Backup 14
Important: You should always perform extensive tests on a sandbox environment before you
restore a backup and overwrite your shortcuts or configuration settings with the backup version
on your production environment.
Restoring application settings from the backup replaces all application settings files with the same
name. Restoring shortcuts from the backup replaces all shortcut files with the same name in the
location you select.
To retain your current application or shortcut settings, including any field mapping settings,
create a local copy of relevant files in a different location or rename the current files.
To restore your Integration Manager settings and shortcuts from backup:
1.
Connect Integration Manager to your OpenAir account. See Connecting Integration Manager with
your OpenAir Account.
2.
In Integration Manager, go to File > Restore From Backup.
A confirmation window appears.
3.
Confirm that you want to restore shortcuts from the backup. Do one of the following:
■
To restore shortcuts from the backup, enter Y in the text box and click Yes. This will replace
current shortcuts with the same name in the selected location with the backup versions. This
action cannot be undone.
■
To skip this step and retain the current shortcuts on your computer, click No.
A confirmation window appears.
4.
Confirm that you want to restore application settings from the backup. Do one of the following:
■
To restore application settings from the backup, enter Y in the text box and click Yes. This will
replace current application settings, including all field mapping information stored on your
computer with the backup versions. This action cannot be undone.
■
To skip this step and retain the current application settings, click No.
The Browse for Folder window appears.
5.
Select the location where restored shortcuts should be saved.
6.
Click OK.
After the application settings and shortcuts are restored, a window appears. You must restart the
application before you can use the restored settings and shortcuts.
7.
Click OK.
Integration Manager closes and restarts.
Transferring Integration Manager Shortcuts to a
Different Computer or Environment
You can transfer your Integration Manager settings and shortcuts to a different computer or environment
at any time.
To transfer your Integration Manager settings and shortcuts to a different
computer:
Integration Manager

Transferring Integration Manager Shortcuts to a Different Computer or Environment 15
1.
Back up of your Integration Manager settings and shortcuts. See Backing Up Your Integration
Manager Settings and Shortcuts.
2.
Restore the backup on the other computer. See Restoring Your Integration Manager Settings and
Shortcuts from the Backup.
3.
Edit the shortcut to use different sign-in details and account settings, or to specify a different name
and location for the CSV file. See Editing Integration Manager Shortcuts.
Connecting Integration Manager with your
OpenAir Account
You must connect Integration Manager with your OpenAir account before you can use Integration
Manager to exchange information between OpenAir and CSV files.
All operations you perform with Integration Manager will take place using the sign-in details you enter
in the following steps. When you make changes to records in your OpenAir account using Integration
Manager, OpenAir records your User ID in the audit trail against these changes.
To connect Integration Manager with your OpenAir account:
1.
In Integration Manager, go to Options > OA Account Settings.
The OpenAir Settings window appears.
2.
Enter your OpenAir Company ID, User ID, and Password.
Check the Remember Password box to store your OpenAir credentials on this computer.
3.
Server — Enter the URL for your OpenAir Account. The server URL includes the domain name for
your OpenAir account <account-domain>. For more information about your account-specific domain
name, see the help topic Your OpenAir Account URLs.
Note: Usage of the generic domain www.openair.com for integrations and add-on services
is no longer supported. Integration Manager 7.0 and later versions use your account-
specific domain even if you enter a generic domain such as www.openair.com.
4.
Account ID – In most cases, you do not need to enter your OpenAir account ID.
Integration Manager

Connecting Integration Manager with your OpenAir Account 16
5.
Click OK.
Note: By clicking the OK button, you understand and agree that the use of Oracle's
application is subject to the Oracle.com Terms of Use. Additional details regarding Oracle’s
collection and use of your personal information, including information about access,
retention, rectification, deletion, security, cross-border transfers and other topics, is
available in the Oracle Privacy Policy.
CSV Character Encoding
If you are using Integration Manager 6.6 or later version, you can choose the character encoding scheme
used for the CSV file you export to or import from.
There are two encoding options:
■
ANSI — ANSI (codepage 1252, Western Europe) is the default character encoding scheme for CSV
imports and exports to ensure backward compatibility with existing infrastructures. Integration
Manager 6.5.3 and earlier versions use ANSI encoding exclusively.
■
UTF-8 — Integration Manager 6.6 or later version supports UTF-8 character encoding for CSV imports
and exports.
To update all your existing Integration Manager shortcuts automatically when you change the CSV
encoding option, check the Set this encoding setting to all existing local shortcuts box. After you click
OK, a confirmation window appears – click Yes to confirm you want to overwrite all existing shortcuts with
the new encoding. You must upgrade all shortcuts to work with Integration Manager 6.6 or later version
before you can update them automatically to use the new encoding option.
You can also edit each Integration Manager shortcut and change the CSV encoding option for that
shortcut, if the shortcut uses Integration Manager 6.6 or later version. See Editing Integration Manager
Shortcuts.
Integration Manager

CSV Character Encoding 17
Important: Review the following guidelines:
■
The CSV Encoding menu option is available only if you are using Integration Manager 6.6 or
later version.
■
Previous versions of Integration Manager use ANSI encoding exclusively. UTF-8 is not
supported in Integration Manager 6.5.3 or earlier version.
■
ANSI (codepage 1252, Western Europe) is the default character encoding scheme for CSV
imports and exports to ensure backward compatibility with existing infrastructures.
■
The files you provide for import must be encoded using the character encoding scheme
selected in Integration Manager. For example, if CSV Encoding is set to UTF-8, CSV files you
provide for import must be UTF-8 encoded — If the CSV files is not UTF-8 encoded, data may
be corrupted during import.
■
Upgrade all existing shortcuts to work with Integration Manager 6.6 or later version before
updating them automatically to use the new encoding option. See Upgrading Integration
Manager Shortcuts.
You can only update all existing shortcuts to use the new encoding option when you change
the CSV encoding in the main Integration Manager application. If you are updating it in a
shortcut bundle instance, you can only change it for that shortcut bundle.
Only the shortcuts saved in the shortcut bundle root directory (typically c:\im_shortcut\) can
be updated automatically to use the new encoding option.
Integration Manager

Exporting OpenAir Data to a CSV File 18
Exporting OpenAir Data to a CSV File
Integration Manager lets you export your OpenAir data to a comma separated values (CSV) file. You
can then use this CSV file to import your OpenAir data into third-party software such as a productivity
application, a payroll system, or an accounting package.
You can export all records of a supported record type or a subset of records, using filtering options. You
can select the fields containing the information you want to export and map them to columns in the
exported CSV file, include information stored in the custom fields specific to your OpenAir account, look
up and export information from directly and indirectly related tables in the OpenAir database, combine
several OpenAir fields into one CSV column, add additional information as a CSV column or as header
information. You can specify the format of date and time columns in your exported CSV file, and build in
some simple length and range validation for field values, or some simple logic to change a target field
value in your exported CSV file based on a test field value in OpenAir.
To export data to a text CSV file:
1.
Launch Integration Manager. To do so, do one of the following:
■
Double-click the shortcut icon on your desktop (if you opted to add the shortcut during
installation).
■
Enter "Integration Manager" in the search box on the Windows task bar, then double-click
Integration Manager.
2.
Enter your OpenAir account and sign-in details. See Connecting Integration Manager with your
OpenAir Account.
3.
Select the character encoding scheme for CSV imports and exports. See CSV Character Encoding.
4.
In Integration Manager, identify the type of record you want to export and configure the export. To
do so:
a.
Map OpenAir fields to CSV columns. See Mapping OpenAir Fields to CSV Columns.
The field mapping functionality lets you select the OpenAir fields you want to export. All
supported standard OpenAir fields for the selected record type and for directly associated
record types are selected for export by default. You can exclude any OpenAir fields from
your export, change the order of columns in the exported CSV file as well as the column
headers. You can also:
■
Include information stored in the custom fields specific to your OpenAir account. See
Making OpenAir Custom Fields Available for Mapping.
■
Include additional information not already available in OpenAir as a CSV column. See
Making Additional Information Available for Mapping (Calculated Fields).
■
Combine several OpenAir field values under one CSV column. See Combining and
Splitting Information.
■
Look up standard and custom field values for OpenAir records directly or indirectly
related to the record you are exporting. See OpenAir Field Value Lookup (Export) and
Record Lookup (Import).
b.
Set formatting options. See Formatting Information for Export and Import.
The formatting options let you:
Integration Manager

Exporting OpenAir Data to a CSV File 19
■
Specify the format of values containing both date and time parts in your CSV file. See
Setting the Date and Time Format Used in the CSV File.
■
Add length and range validation for field values in your CSV file. See Validating Field Value
Length and Range on Export.
■
Build in some simple logic using conditional overrides to change a target field value in
your exported CSV file based on a test field value in OpenAir. See Setting Up Conditional
Overrides.
c.
Set filtering options. See Filtering OpenAir Records for Export.
d.
Set accounting settings. See Accounting Settings.
e.
Include header information at the top of your CSV file content. See Adding Header
Information to Exported CSV Files.
5.
Create an Integration Manager shortcut if you want to export records of this type on a regular
basis manually without launching the Integration Manager application, or to schedule the export
to run automatically. This may be useful to support an on-going integration, for example. The
Integration Manager shortcut you create captures the field mapping, filter, format and other
settings you configured for this export. See Working with Export and Import Shortcuts and
Working with Export and Import Shortcuts.
6.
On the main Integration Manager window, select the row corresponding to the record type you
want to export to a CSV file, then click Start to launch the export process.
A window appear showing the progress of your export.
Note: To keep the export progress status window open after the export completes, clear
the Close this dialog box when complete box. This may be useful if you want to check the
status of your export on completion without viewing the log file.
To open the exported CSV file in the default application associated with CSV files on your
computer, check Open file when complete.
Next, the Select Options window appears.
7.
Select the CSV file you want to export information to. To do so, click the Select file icon , select the
CSV file, or select the location for your CSV file and enter the name if the file does not exist, then
click Open.
The Select Options window shows the file path.
8.
Select the delimiter to be used in the exported CSV file from the File delimiter dropdown options.
Integration Manager

Adding Header Information to Exported CSV Files 20
9.
By default, Integration Manager adds the selected delimiter at the end of each row (record), after
the last column. To exclude the delimiter at the end of each row, check the Exclude trailing
delimiter from each record box.
Note: Both the CSV delimiter and the optional row end delimiter depend on the third-
party application you plan to import the CSV file into and the CSV format it requires.
10.
Click OK.
The progress status window shows the detailed progress of your export from start to completion.
11.
After the export completes, you can open the exported CSV file.
Note: Spreadsheet applications may interpret certain type of information in your CSV
file and change the format of the values. For example, alphanumeric values with leading
zeros may be interpreted as number fields and leading zeros may be dropped. To check the
format of values in the exported CSV file, open the file with a text editor.
Adding Header Information to Exported CSV Files
When you export OpenAir data to a CSV file using Integration Manager, you can add default header
information at the top of exported CSV files. This may be useful if you plan to import date from the CSV
file into a third party application that requires this header information. This header information is defined
as a constant for each record type you export — you can have different headers for each record type
but the header is the same each time you run an export for a given record type unless you change the
constant header.
To add header information to exported CSV files:
1.
On the Field Mapping window, click Const Header.
Note: For steps to go to the Field Mapping window, see Mapping OpenAir Fields to CSV
Columns.
The Constant Header window appears.
Integration Manager

Adding Header Information to Exported CSV Files 21
2.
Enter the header information. You can add as many rows of header information as required. Press
Enter to go to the next line (row).
3.
Click OK to return to the Field Mapping window.
4.
Click OK to save the field mapping settings and return to the main Integration Manager window.
Integration Manager

Importing Data from a CSV File into OpenAir 22
Importing Data from a CSV File into OpenAir
Integration Manager lets you import information from a comma separated values (CSV) file into OpenAir.
You can use this functionality to import information from a third-party software application in two steps,
exporting information from that third-party application to a CSV file first, and then importing information
from that CSV into OpenAir.
You can use the Integration Manager import functionality to create new records or update existing
records in OpenAir. Integration Manager creates a new record if it determines that the record does not
exist in OpenAir. The rules determining if a record already exists in OpenAir and if the record should
be created or updated depend on the record type and whether the import is configured to lookup any
existing OpenAir record with matching external ID. For more information, see Record Creation or Update
Rules on Import.
You can select the columns in the CSV file containing the information you want to import into OpenAir
and map CSV columns to OpenAir fields, include information you want to store in the custom fields
specific to your OpenAir account, look up related OpenAir records by external ID, combine values from
several CSV columns into one OpenAir field, split values from a CSV column into several OpenAir fields,
import specific information only when the import creates a new record in OpenAir. You can specify the
format of date and time columns in the CSV file you import information from, and build in some simple
logic to change a target field value in OpenAir based on a test field value in your source CSV file. If you
use Integration Manager to import user information for your employees, you can import user settings,
including user preferences and user privileges that are stored in the switch table, in addition to the
employee information stored in the user table.
Integration Manager

Importing Data from a CSV File into OpenAir 23
Important: Review the following guidelines:
■
Always use caution when importing information from a CSV file into OpenAir. You should not
use Integration Manager unless you have received the relevant training. You must have a
good understanding of the OpenAir application and how its database is structured, as well as
knowledge of the Integration Manager application.
■
Integration Manager 6.6 or later version supports Unicode (UTF-8) characters — You can
choose between ANSI (codepage 1252, Western Europe) or UTF-8 encoding. Previous versions
of Integration Manager use ANSI (codepage 1252, Western Europe) encoding exclusively.
When using ANSI encoding, for imports, only Western European characters are supported.
Be sure that the source CSV file containing the information you import into OpenAir uses
the character encoding scheme selected in the Integration Manager application or shortcut
bundle instance you are using to import the information.
■
Use only a decimal point to separate the integral part and decimal part of decimal number
values imported to OpenAir. Other decimal separators and thousands separators are not
supported in integral numbers.
■
Most decimal numbers in OpenAir have two-digit precision. To avoid rounding inconsistencies
in OpenAir, you should use the same precision in your source CSV file.
■
Conditional overrides may be used to modify the format of values following a regular
expression pattern. For more information, see Setting Up Conditional Overrides and Regular
Expressions Use Case Examples.
■
To verify the format and decimal precision of an OpenAir field, refer to the OpenAir Data
Dictionary. See OpenAir Data Dictionary.
To import data from a CSV file into OpenAir:
1.
Launch Integration Manager. To do so, do one of the following:
■
Double-click the shortcut icon on your desktop (if you opted to add the shortcut during
installation).
■
Enter "OpenAir Integration Manager" in the search box on the Windows task bar, then double-
click OpenAir Integration Manager.
2.
Enter your OpenAir account and sign-in details. See Connecting Integration Manager with your
OpenAir Account.
3.
Select the character encoding scheme for CSV imports and exports. See CSV Character Encoding.
4.
In Integration Manager, identify the type of record you want to import and configure the import. To
do so:
Integration Manager

Importing Data from a CSV File into OpenAir 24
a.
Map OpenAir fields to CSV columns. See Mapping OpenAir Fields to CSV Columns.
The field mapping functionality lets you select the CSV columns you want to import into
OpenAir and map each CSV column to the corresponding OpenAir field. You can also:
■
Import information into the custom fields specific to your OpenAir account. See Making
OpenAir Custom Fields Available for Mapping.
■
Include additional information not already available in your source CSV file and import
it into an OpenAir field. See Making Additional Information Available for Mapping
(Calculated Fields).
■
Combine values under several CSV columns and import them into one OpenAir field, or
split values under one CSV column and import them into separate OpenAir fields. See
Combining and Splitting Information.
■
When importing user information for your employees, import user settings, including
user preferences and user privileges that are stored in the switch table, in addition to the
employee information stored in the user table. See Making User Settings Available for
Mapping (User Imports Only).
■
Look up related OpenAir records by external ID. See OpenAir Field Value Lookup (Export)
and Record Lookup (Import).
Important: Integration Manager uses an import key field or a combination of
import field key fields to determine if a matching record already exists in OpenAir.
If the record exists, Integration Manager updates the OpenAir record with the
corresponding information in the CSV file. If the record does not exist, Integration
Manager adds a new record in OpenAir.
Integration Manager determines which field to use as import key based on the
field mapping configuration. For more information about rules determining record
creation or update, see Record Creation or Update Rules on Import.
b.
Set formatting options. See Formatting Information for Export and Import.
The formatting options let you:
■
Specify the format of values containing both date and time parts in your CSV file. See
Setting the Date and Time Format Used in the CSV File.
■
Build in some simple logic using conditional overrides to change a target field value in
OpenAir based on a test field value in your source CSV file. See Setting Up Conditional
Overrides.
5.
Create an Integration Manager shortcut if you want to import records of this type on a regular
basis manually without launching the Integration Manager application, or to schedule the import
to run automatically. This may be useful to support an on-going integration, for example. The
Integration Manager shortcut you create captures the field mapping, format and other settings
you configured for this import. See Working with Export and Import Shortcuts and Working with
Export and Import Shortcuts.
6.
On the main Integration Manager window, select the row corresponding to the record type you
want to import to a CSV file, then click Start to launch the import process.
The Select Import Options window appears.
Integration Manager

Importing Data from a CSV File into OpenAir 25
7.
Select the CSV file you want to import information from. To do so, click the Select file icon , select
the CSV file, then click Open.
The Select Import Options window shows the file path.
8.
Select the delimiter used in the CSV file from the File delimiter dropdown options.
9.
Check the Use first row to get field names box if the selected CSV file includes column headers
(field names) in the first row. If the CSV file does not contain column headers on the first row, enter
column headers in the bottom box. You can edit existing column headers if required.
Important: The name and sequence of column headers in the CSV file must be the same
as in the CSV file you used to configure the import.
10.
Click OK.
The Date/Time Format window appears.
11.
Specify the format of values containing both date and time parts in your CSV file. See Setting the
Date and Time Format Used in the CSV File.
12.
Click OK.
A confirmation message appears
13.
14.
Click Yes to continue with the import.
A progress status appears and shows the detailed progress of your export from start to
completion.
Integration Manager

Record Creation or Update Rules on Import 26
Note: To keep the import progress status window open after the import completes, clear
the Close this dialog box when complete box. This may be useful if you want to check the
status of your import on completion without viewing the log file.
To open the imported CSV file in the default application associated with CSV files on your
computer, check Open file when complete.
Record Creation or Update Rules on Import
You can use the Integration Manager import functionality to create new records or update existing
records in OpenAir.
Integration Manager uses an import key field or a combination of import field key fields to determine if a
matching record already exists in OpenAir. If the record exists, Integration Manager updates the OpenAir
record with the corresponding information in the CSV file. If the record does not exist, Integration
Manager adds a new record in OpenAir.
Several factors impact the record creation and update rules when importing information from a source
CSV file into OpenAir:
1.
Lookup method — Two lookup methods are available. The New serverside lookup by
external_id box on the Field Mapping window control which method Integration Manager uses.
Important: You should use the server-side import key lookup method. It is faster and
more robust than the alternative client-side method. To do so, check the New serverside
lookup by external_id box. This is the default method – the box is already checked the
first time you open the field mapping settings for a specific record type.
■
Server-side lookup (when the box is checked) — Integration Manager uses server-side logic
to process each row of information (or record) in the source CSV file one after the other, and
searches for the import key field value in OpenAir to determine whether to update or create
the corresponding record in OpenAir.
■
Client-side lookup (when the box is cleared) — Integration Manager compares each row of
information in the source CSV (on the client-side) with information retrieved from OpenAir
before the import. This method also uses import keys, but the record creation or update rules
depend on the type of record you import. This method does not cross check the content if
Integration Manager

Record Creation or Update Rules on Import 27
the source CSV file for duplicated import key field values. You must verify your CSV data and
be sure that all import key field values are unique to avoid the creation of duplicate records in
OpenAir.
The server-side lookup offers a little less flexibility in the type of fields that can be used as import
keys. However, it is faster and more robust than the alternative client-side method.
2.
Field mapping — Integration Manager determines which field to use as the import key based on
the field mapping you define for your import. The following table lists the fields that can be used
as import key in descending order of precedence from highest to lowest. The import key is the
highest of the listed OpenAir field that is mapped to column in the source CSV file.
Note: When the New serverside lookup by external_id box is checked, a red color
arrow indicates the field used as an import key.
# OpenAir Field Descripton
1. Internal ID [id] Map the OpenAir internal ID if you want the import to update OpenAir records
only.
The OpenAir internal ID is the unique identifier (primary key) for a record of a given
type in OpenAir. OpenAir assigns a unique internal ID sequentially to each new
record. The assignment of internal IDs is reserved to OpenAir.
If the OpenAir internal ID [Id] is mapped to a column in the source CSV file,
Integration Manager uses the internal ID as the import key to find and update the
matching OpenAir record. If there are no records with a matching record type and
matching internal ID, Integration Manager returns an error.
Integration Manager

Record Creation or Update Rules on Import 28
# OpenAir Field Descripton
A mapped OpenAir internal ID always takes precedence over a custom import key,
external ID, or name field.
Important: Integration Manager never creates a record in OpenAir on
import if the OpenAir internal ID is mapped with a column in the CSV file.
2. Custom Import
Key Field
Define and map a custom import key to create or update OpenAir records.
OpenAir lets you store an External ID [External_id] for records imported from a
third-party application as standard. You can also create custom fields in OpenAir
to store unique identifiers for corresponding records in multiple third-party
applications across your IT infrastructure. To do so:
a.
In OpenAir, create a custom field to use as import key. See the help topic
Creating and Modifying Custom Fields.
b.
In Integration Manager, declare this custom field as an import key by
checking the Its value is unique and the field is used as a key mapping
field box. See Making OpenAir Custom Fields Available for Mapping.
Integration Manager uses the custom import key to find and update the matching
OpenAir record, if it exists, or to create a new record in OpenAir if there are no
records with a matching record type and custom import key, if all the following
conditions are met:
■
A custom import key is mapped to a column in the source CSV file.
■
The OpenAir internal ID [Id] is not mapped to a column in the source CSV file.
Important: You should use the custom import key to reference a
unique identifier (primary key) for the corresponding record in the third-
party application you import information from. The custom import key can
then be used to link an OpenAir record with an external system record in a
1:1 relationship, to ensure that the OpenAir record can be updated after you
make changes to the information in the external system, and to avoid the
creation of duplicate records.
3. External ID
[external_id]
Map the external ID standard field to create or update OpenAir records.
OpenAir lets you store an External ID [External_id] for records imported from a
third-party application.
Integration Manager uses the external ID to find and update the matching OpenAir
record, if it exists, or to create a new record in OpenAir if there are no records with a
matching record type and external ID, if all the following conditions are met:
■
The external ID [External_id] field is mapped to a column in the source CSV file.
■
A custom import key field is not mapped to a column in the source CSV file.
■
The OpenAir internal ID [Id] field is not mapped to a column in the source CSV
file.
Important: You should use the external ID to reference a unique
identifier (primary key) for the corresponding record in the third-party
application you import information from. The external ID can then be
used to link an OpenAir record with an external system record in a 1:1
relationship, to ensure that the OpenAir record can be updated after you
make changes to the information in the external system, and to avoid the
creation of duplicate records.
4. Name [name] Map the name standard field to create or update OpenAir records (client-side
lookup only) depending on the record type.
Integration Manager

Record Creation or Update Rules on Import 29
# OpenAir Field Descripton
Depending on the record type, Integration Manager uses the name field to find and
update the matching OpenAir record, if it exists, or to create a new record in OpenAir
if there are no records with a matching record type and name, if all the following
conditions are met:
■
The New serverside lookup by external_id box is not checked on the Field
Mapping window.
■
The name [name] field is mapped to a column in the source CSV file.
■
The external ID [External_id] field is not mapped to a column in the source CSV
file.
■
A custom import key field is not mapped to a column in the source CSV file.
■
The OpenAir internal ID [Id] field is not mapped to a column in the source CSV
file.
Important: The name cannot be used as the import key field when the
server-side lookup is enabled.
This lookup behavior depends on the type of records you import. See below.
3.
Record Type — If using the client-side lookup (when New serverside lookup by external_id box
is not checked), the record creation or update rules depend on the type of record being imported.
The following table describes record creation and update rule variations for different types of
records.
Record Type Record Creation and Update Rules Variations
Transaction Records:
■
Booking
■
Envelope
■
Invoice
■
Payment
■
Project Billing Rule
■
Project task
■
Project task assign
■
Receipt
■
Reimbursement
■
Resource Profile
■
TimeBill or Slip
(Charges)
■
User Project Rate.
Only the OpenAir internal ID can be used as import key.
Entity Records:
■
Booking Type
■
Cost Center
■
Customer
■
Department
■
Expense Item
■
Prospect
■
Service
■
Vendor
OpenAir internal ID, custom import key, external ID, and name fields can be
used as import keys.
Integration Manager

Record Creation or Update Rules on Import 30
Record Type Record Creation and Update Rules Variations
Special Case:
■
Contact
The OpenAir internal ID can be used as import key.
In addition, a combination of customer_id, firstname and lastname is always
used as import key. If the customer ID and the contact first and last name in
the source CSV file match the customer ID, first and last name of an existing
contact record in OpenAir, in addition to a matching internal ID, custom import
key, or external ID, that record is updated, and if there are no contact records
with a matching customer ID, first and last name, a new record is created.
Special Case:
■
Project
The OpenAir internal ID can be used as import key.
The combination of customer_id and name fields can be used as import key
(instead of the name field alone). In this case, if both the customer ID and the
project name in the source CSV file match the customer ID and name of an
existing project record in OpenAir, that record is updated, and if there are no
project records with a matching customer ID and matching name, a new record
is created.
Special Case:
■
User
OpenAir internal ID, custom import key, and external ID fields can all be used as
import keys.
The nickname can be used as import key (instead of the name field).
Special Case:
■
Profile Type
The OpenAir internal ID can be used as import key.
The combination of name and type fields can be used as import key (instead of
the name field alone). In this case, if both the name and the type in the source
CSV file match the name and type of an existing profile type record in OpenAir,
that record is updated, and if there are no profile type records with a matching
name and matching type, a new record is created.
Making User Settings Available for Mapping (User
Imports Only)
You can import user information for your employees using Integration Manager. In addition to the
employee information stored in the user table, you can import user settings, including user preferences
and user privileges that are stored in the switch table.
To make a user setting available for mapping:
1.
On the Field Mapping window for user imports, click Switch.
Note: For steps to go to the Field Mapping window, see Mapping OpenAir Fields to CSV
Columns.
The Add a switch field dialog windows.
Integration Manager

Making User Settings Available for Mapping (User Imports Only) 31
2.
Enter the setting name exactly as used in the OpenAir switch table. The setting name display name
that is used on forms and list views in the OpenAir UI in addition to the unique field name that is
used to reference the custom field.
To verify the setting name in OpenAir, go to Administration > Global Settings > Users > Employees
> [Select an employee] then use the developer tools in your browser to inspect the label for the
setting. The Inspector pane or window shows the HTML code for the page you are viewing with the
element you are inspecting highlighted. The element should read as follows, with the setting name
showing in between quotation marks.
<label for="setting_name">Setting label</label>
Note: Make sure you use the setting name and not the label displayed on the form. The
setting name is used to reference the setting in the OpenAir software and contains only
alphanumeric or underscore characters.
3.
Click OK to return to the Field Mapping window.
4.
Click OK to save the field mapping settings and return to the main Integration Manager window.
Examples of Standard User Settings
Setting Name Privilege / Preference Accepted values
ta_module_off Access to Timesheets
module
0 – user can access
1 – user cannot access
te_module_off Access to Expenses
module
0 – user can access
1 – user cannot access
pm_module_off Access to Projects
module
0 – user can access
1 – user cannot access
rm_module_off Access to Resources
module
0 – user can access
1 – user cannot access
ma_module_off Access to My account
module
0 – user can access
1 – user cannot access
tb_module_off Access to Invoices
module
0 – user can access
1 – user cannot access
Integration Manager

Making User Settings Available for Mapping (User Imports Only) 32
Setting Name Privilege / Preference Accepted values
km_module_off Access to Worspaces
module
0 – user can access
1 – user cannot access
po_module_off Access to Purchases
module
0 – user can access
1 – user cannot access
om_module_off Access to Opportunities
module
0 – user can access
1 – user cannot access
enable_report_editor Enable the report
management and editor
interface
0 – clear the box
1 – check the box
sort_pt_dropdown_alpha Sort the task drop-downs
by name and omit the ID
number prefix
0 – clear the box
1 – check the box
ta_timesheet_required Timesheet required 0 – clear the box
1 – check the box
ta_length_user Timesheet duration A – same as company setting
D – daily timesheets
W – weekly timesheets
B – bi-weekly timesheets
M – monthly timesheets
ta_open_periods Timesheet open periods
MM/DD/YYYY-MM/DD/YYYY
MM/DD/YYYY-MM/DD/YYYY
...
te_open_periods Expenses open periods
MM/DD/YYYY-MM/DD/YYYY
MM/DD/YYYY-MM/DD/YYYY
...
ta_capture_time Enable start and end time
entry on timesheets
0 – clear the box
1 – check the box
<allocation_grid_custom_field_name> Allocation grid custom
field
GridCategory1, PercentageValue1
GridCategory2, PercentageValue2
GridCategory3, PercentageValue3
...
Where GridCategory<N> are the categories
defined for your allocation grid, and
PercentageValue<N> are the percentage shares for
each category.
Integration Manager

Mapping OpenAir Fields to CSV Columns 33
Mapping OpenAir Fields to CSV Columns
Integration Manager lets you map the OpenAir fields for each supported record type to columns in
the CSV file you export information to or import information from. You can set the name and order of
columns in the CSV file, combine multiple OpenAir fields into a single CSV column (export) or multiple CSV
columns into a single OpenAir field (import), split a CSV column into multiple OpenAir fields (import), or
include additional information such as custom fields or calculated fields.
Important: Incorrect field mapping can result in corrupted data in OpenAir or third-party
application you are integrating OpenAir with, including the creation of duplicate records. You
must have a good understanding of OpenAir and its database structure before you create or
modify field mappings, and you must proceed with caution.
To map OpenAir fields to CSV columns:
1.
In Integration Manager, locate the row corresponding to the record type and the direction
required from the table listing the record types available for import from and export to a CSV
file.
2.
Do one of the following:
■
Click to select the row, then go to Options > Field Mapping.
■
Right-click the row, then click Field Mapping from the context menu.
Depending on the direction, the Field Mapping window appears (export ) or the Select Import
Options window appear (import ).
3.
(Import only) When importing information from a CSV file into OpenAir, do the following in the
Select Import Options window:
Integration Manager

Mapping OpenAir Fields to CSV Columns 34
a.
Click the More button and select the CSV file to import information from.
b.
Select the File delimiter in the CSV file you want to import information from.
c.
Check the Use first row to get field names box if the selected CSV file includes column
headers (field names) in the first row. If the CSV file does not contain column headers on the
first row, enter column headers in the bottom box. Each column must have a header. You
can edit existing column headers if required.
d.
Click OK.
A window appears.
e.
Click Yes to save the mapping profile.
The Field Mapping window appears.
4.
The Field Mapping window includes a table listing OpenAir fields and CSV column headers.
A green color arrow in the middle column indicates that the information in this OpenAir field or CSV
column is included in the export or import.
■
For export field mappings, the CSV is noted as Destination. The middle column shows green
color arrows for each row – all available OpenAir fields are included in the export by default.
■
For import field mappings, the CSV is denoted as Source. The middle column is empty –
no information is included in the import by default. When the New serverside lookup by
external_id box is checked, a red color arrow indicates the field used as an import key. OpenAir
Integration manager uses the import key to determine if a matching record already exists. If
the record exists, Integration Manager updates the OpenAir record with the corresponding
information in the CSV file. If the record does not exist, Integration Manager adds a new record
in OpenAir. Integration Manager automatically determines the import key. See Record Creation
or Update Rules on Import.
Listed OpenAir fields include supported standard fields for the OpenAir record type you selected
for export or import. If you select an OpenAir record type for export, the listed OpenAir fields
also include supported standard fields for other record types directly related with the record type
you selected for export. In this case, the field name appears in the list as <record_type>_<field>,
where <record_type> is the name of the associated record type and <field> is the field name. For
example, when exporting project records, Customer_name and other customer fields are also listed
in the field mapping table.
Integration Manager

Mapping OpenAir Fields to CSV Columns 35
To map a CSV column with an OpenAir field, or change an existing field mapping, drag the CSV
column name under the Source or Destination column to the corresponding field name under the
OpenAir column.
(Export only) To change the order of the CSV columns, drag the OpenAir field to the new position.
(Export only) To change the name of a CSV column, double click the CSV column name and enter
the new name.
To add or remove an OpenAir field or CSV column from the import or export, double-click the
middle column on the corresponding row.
To add or remove several OpenAir fields or CSV columns from the import or export at the same
time, use the Shift key or Ctrl key to select multiple rows and click Set Mapping or Clear Mapping.
(Export only) To set field level formatting for a specific OpenAir field to CSV column mapping, right-
click the row then click Format. For more information about formatting, see Formatting Information
for Export and Import and Validating Field Value Length and Range on Export.
You can:
■
Make custom fields defined for your OpenAir account available for mapping. See Making
OpenAir Custom Fields Available for Mapping.
■
Make additional information not in your source data available for mapping. See Making
Additional Information Available for Mapping (Calculated Fields).
■
Split a source field into two or more destination fields (Import only), combine source fields
into a single destination field (Import and Export), or combine separate date and time fields in
the source CSV file into a datetime field in OpenAir (Import only). See Combining and Splitting
Information.
■
(Import only) Import specific information only when the import creates a new record in OpenAir.
By default, the information is imported into all mapped fields both when the import creates a
new record and when the import updates an existing record. You can specify the fields you do
Integration Manager

Importing Field Values on Initial Import Only 36
not want to be updated when the import updates a record. See Importing Field Values on Initial
Import Only.
■
(Export only) Look up OpenAir standard or custom field values for record types directly or
indirectly related to the record type you selected for export. See OpenAir Field Value Lookup
(Export) and Record Lookup (Import).
■
(Import only) Look up OpenAir records associated with the records you import by name or
external ID. See OpenAir Field Value Lookup (Export) and Record Lookup (Import).
■
(Export only) Add default header information to your exported CSV files. See Adding Header
Information to Exported CSV Files.
■
(User import only) Make user settings, including privileges and preferences, available for
mapping. See Making User Settings Available for Mapping (User Imports Only).
5.
(Import only) The New serverside lookup by external_id box is checked by default. You should
keep this box checked.
Note: When importing information into OpenAir, Integration Manager uses an import
key to check if any of the records in your source CSV file already exist in OpenAir. If a record
with a matching import key value exists in OpenAir, Integration Manager updates that
record with the information in the CSV file. If Integration Manager does not find a matching
import key value, it creates a new record in OpenAir.
The server-side lookup (when the box is checked) optimizes the import process. It is both
faster and more robust than the alternative client-side method (when the box is cleared),
which may result in the creation of duplicate records in OpenAir if the source CSV file
contains several rows with the same import key field values.
For more information, see Record Creation or Update Rules on Import.
6.
Click OK to save the field mapping settings and return to the main Integration Manager window.
Importing Field Values on Initial Import Only
You can set up Integration Manager to import specific information only during the initial import of a
record (when the import creates a new record in OpenAir). By default, the information is imported into
all mapped fields both when the import creates a new record and when the import updates an existing
record. You can specify the fields you do not want to be updated when the import updates a record.
To import field values on initial import only:
1.
On the Field Mapping window, right-click on a field mapping with a green arrow, and click Edit.
Note: For steps to go to the Field Mapping window, see Mapping OpenAir Fields to CSV
Columns.
The Edit field mapping window appears. External ID is selected by default.
Integration Manager

Importing Field Values on Initial Import Only 37
2.
Check the Only map for records that are added box.
3.
Click OK to return to the Field Mapping window.
4.
Click OK to save the field mapping settings and return to the main Integration Manager window.
Integration Manager

Making OpenAir Custom Fields Available for Mapping 38
Making OpenAir Custom Fields Available for
Mapping
By default, only supported OpenAir standard fields are available for mapping. You can add custom fields
for a specific record type in OpenAir and make these custom fields available for mapping in Integration
Manager. You can then export and import information to and from OpenAir custom fields in the same
way as you import and export information to and from OpenAir standard fields. You can rename, reorder,
map, combine, or split into OpenAir custom fields in the same way as you work with standard fields.
Note: Each custom field in OpenAir is associated with a specific record type. When you make a
custom field available for mapping in Integration Manager, ensure that:
■
For export field mappings, the custom field is associated with either the record type selected
for import, or a record type directly related with the record type selected for import.
■
For import field mappings, the custom field is associated with the record type selected for
import.
For export field mappings, you can also look up OpenAir custom field values for record types
directly or indirectly related to the record type you selected for export. See OpenAir Field Value
Lookup (Export) and Record Lookup (Import).
After you make a custom field available for mapping, you can edit its properties or remove it at any time.
See Editing the Properties of a Custom Field Available for Mapping and Removing a Custom Field Available
for Mapping.
To make an OpenAir custom field available for mapping:
1.
On the Field Mapping window, click Custom Field.
Note: For steps to go to the Field Mapping window, see Mapping OpenAir Fields to CSV
Columns.
The Add a custom field window appears.
2.
Enter the custom field name and select the custom field type exactly as defined in OpenAir.
Integration Manager

Editing the Properties of a Custom Field Available for Mapping 39
Note: To verify the name and type of custom fields in OpenAir, go to Administration >
Global Settings > Custom Fields.
Custom fields may have an optional display name that is used on forms and list views in
the OpenAir UI in addition to the unique field name that is used to reference the custom
field. This field name may contain only alphanumeric and underscore characters. For more
information about custom fields, see the help topic Custom Fields.
Not all custom field types are available for selection. For example, to import a URL custom
field, select Text instead of URL and ensure that the field values follow the expected format
for import into OpenAir. The expected format for URL custom field values is [Example of
visible link text](https://www.example.com/example).
3.
(Export only) Select the record type for which this custom field is defined under Select Association.
Dropdown list options include the record type selected for export and other supported record
types directly related to the record type selected for export.
4.
(Import only) To use a custom field as an import key, check the Its value is unique and the field
is used as a key mapping field box. Integration Manager can use a custom import key to find
and update the matching OpenAir record, if it exists, or to create a new record in OpenAir if there
are no records with a matching record type and custom import key, if certain conditions are met.
For more information about using custom import keys, see Record Creation or Update Rules on
Import.
5.
Click OK to return to the Field Mapping window.
6.
Click OK to save the field mapping settings and return to the main Integration Manager window.
Editing the Properties of a Custom Field Available
for Mapping
After you make a custom field available for mapping, you can edit its properties at any time.
To edit the properties of a custom field available for mapping:
1.
On the Field Mapping window, locate and right-click the custom field you want to edit.
A context menu appears.
2.
Click Edit.
The Edit a custom field window appears.
Integration Manager

Removing a Custom Field Available for Mapping 40
3.
Modify the properties as required. For more information, see Making OpenAir Custom Fields
Available for Mapping.
4.
Click OK to return to the Field Mapping window.
5.
Click OK to save the field mapping settings and return to the main Integration Manager window.
Removing a Custom Field Available for Mapping
After you make a custom field available for mapping, you can remove it at any time.
To remove a custom field available for mapping:
1.
On the Field Mapping window, locate and click the custom field you want to edit.
2.
Click Delete.
A confirmation window appears.
3.
Click Yes.
4.
Click OK to save the field mapping settings and return to the main Integration Manager window.
Integration Manager

Making Additional Information Available for Mapping (Calculated Fields) 41
Making Additional Information Available for
Mapping (Calculated Fields)
You can use calculated fields to make additional information available for mapping, and then export
this information to a column in your CSV file, or import it into a standard or custom field in OpenAir. This
additional information can be:
■
A constant — This may be useful when setting default values, such as marking records as Active
when importing them into OpenAir, for example, or to substitute any required information that cannot
be extracted from your source of data with a constant value.
■
A copy of a source field — This may be useful if you need to map the same source field to several
destination fields.
■
A prompt input — This may be useful if you want to enter the information when running the export
or import. A prompt dialog appears before the export or import and lets you enter the field value.
■
(Export only) A current date and time stamp — This may be useful if you want to record the data and
time of the export run.
■
(Export only) A counter — This may be useful if you want to:
□
Increment a field value by 1 for each exported record across the whole export run, or for each
exported record with the same reference field value. For example, if you export receipt records,
you can increment a receipt counter by 1 for each receipt included in the entire export run, or
for each receipt in the same expense report (each receipt with the same expense report tracking
number [envelope_number]) with the counter being reset for each expense report.
□
Add information about the number of records exported across the whole export run, or about the
number of exported records with the same reference field value. For example, if you export receipt
records, you can add information about the number of receipts exported in this export run, or
about the number of receipts in the same expense report.
□
Summarize grouped record data and increment a field value by 1 for each group, or include
information about the number of groups. This may be useful to number the distribution lines
in an Accounts Receivable invoice or an Accounts Payable voucher, or include the number
of distributions in an Accounts Receivable invoice, for example. For more information about
summarizing grouped data, see Accounting Settings.
After you add a calculated field, it appears at the bottom of the field mapping table under OpenAir
(for export field mappings) or under Source (for import field mapping). You can rename, reorder, map,
combine calculated fields in the same way as you work with standard fields, however calculated fields do
not exist in your source data.
To make additional information available for mapping:
1.
On the Field Mapping window, click Calc Field.
Note: For steps to go to the Field Mapping window, see Mapping OpenAir Fields to CSV
Columns.
The Add a calculated field window appears.
Integration Manager

Making Additional Information Available for Mapping (Calculated Fields) 42
2.
Enter the name of the field.
Note: You should give the field a name that tells what it is supposed to accomplish. For
example:
If you are defining a constant to mark OpenAir records imported from a CSV file, name the
constant "Active – 1”.
If you are using a constant to import projects into OpenAir at a certain stage, name the
constant "Project Stage = In-flight".
If you are copying a source field, use the same source field name and append the mention "
(Copy)" at the end.
3.
Do one of the following:
■
To use a default field value (constant) across all exported or imported records, enter a
numerical or string value in the Please enter any value or text for this constant box.
■
To copy an existing source field, select the source field you want to copy from the Select
reference field dropdown options.
■
To show an input prompt before the export or import run starts and use the value entered
at the prompt, check the Input field box. To set a default value for the input prompt, enter a
numerical or string value in the Please enter any value or text for this constant box.
■
(Export only) To use the date and time of the export run, check the Current date box.
■
(Export only) To use a counter, check the Use this field as auto-counter box. By default, this
results in incrementing the field value by 1 for each exported record across the whole export
run.
□
To increment the field value by 1 for each exported record in the run with the same
reference field value, select the counter reference field from the Select reference field
dropdown options. You can use this to include a unique reference for each transaction
records (such as receipts, for example) within a specific container (such as an expense
report). The counter is reset with each new container record.
Integration Manager

Making Additional Information Available for Mapping (Calculated Fields) 43
□
To add information about the number of records exported across the whole export run,
check the Set highest counter box.
□
To add information about the number of exported records in the run with the same
reference field value (under the same container), check the Set highest counter box and
select the counter reference field from the Select reference field dropdown options.
□
To summarize grouped record data and increment a field value by 1 for each summary
group, check the Apply after summing box.
□
To summarize grouped record data and increment a field value by 1 for each summary
group with the same reference field value (under the same container), check the Apply
after summing box and select the counter reference field from the Select reference field
dropdown options. For more information about summarizing grouped data, see Accounting
Settings.
Note: If you check both the Input field and Current date boxes, the Input field box is
ignored – the input prompt is not shown before the export run starts.
The value you enter in the Please enter any value or text for this constant box is ignored
if you check the Use this field as auto-counter or the Current date box.
4.
Click OK to return to the Field Mapping window.
5.
Click OK to save the field mapping settings and return to the main Integration Manager window.
Integration Manager

Combining and Splitting Information 44
Combining and Splitting Information
You can combine several source fields into a single destination field (Import and Export), combine
separate date and time fields in the source CSV file into a datetime or timestamp field in OpenAir (Import
only), or split a source field into two or more destination fields (Import only).
■
Combining Several Source Fields into a Single Destination Field (Import and Export)
■
Combining Date and Time Fields for Import
■
Undoing a Field Combination
■
Splitting a Source CSV Field into Several OpenAir Fields for Import
■
Undoing a Field Split
Combining Several Source Fields into a Single
Destination Field (Import and Export)
You can combine information stored under several columns in your CSV file and import it into a single
OpenAir field. You can also combine information stored in several OpenAir fields and export it to a CSV file
under a single column. You can combine information in either one of three ways:
■
Concatenate — You can join two or more text strings into one string and specify a separator to use
between the source strings in the destination string.
■
Add — (Export only) You can sum numerical values in two or more OpenAir fields and use the total to
populate the value under the destination column in the CSV file.
■
Multiply — (Export only) You can multiply numerical values in two or more OpenAir fields and use the
product to populate the value under the destination column in the CSV file.
Note: To modify a combined field mapping, or exclude the fields from the information exported
or imported, you must undo the field combination first. You can then combine the fields again, or
remove the fields from the export or import as required. For more information about undoing a
field combination, see Undoing a Field Combination.
To combine several source fields into a single destination field:
1.
On the Field Mapping window, line up the source fields you would like to combine so they are
adjacent. Drag each field to change the order they appear in the list if necessary.
The source fields are under OpenAir for export field mappings, or under Source for import field
mappings. If you want to concatenate the source field values, line them up in the order you want
them to be concatenated. Source fields lined up top to bottom are concatenated left to right in the
destination field.
Note: For steps to go to the Field Mapping window, see Mapping OpenAir Fields to CSV
Columns.
2.
Hold Ctrl and click the fields you want to combine.
Selected fields are highlighted in blue.
3.
Click Combine.
The Combine fields window appears.
4.
Do one of the following:
■
For exports, enter the name of the CSV column that will hold the combined OpenAir field values
in the Name of the combined fields box.
Integration Manager

Combining Several Source Fields into a Single Destination Field (Import and Export) 45
■
For imports, select the OpenAir field that will hold the combined CSV values from the Select an
OA field to combine into dropdown options.
5.
(Export only) Choose the combining method. Three combining methods are available: Concatenate,
Add, and Multiply.
■
You can combine any OpenAir field values using the Concatenate method, regardless of
the combined field data types — non-string values are converted to string before being
concatenated.
■
When combining field values using the Add or Multiply methods, the combined OpenAir field
values should be either numbers or decimals. The resulting value is 0 otherwise.
Note: For import field mappings, you can only combine source fields using the
Concatenate method.
6.
If you are combining fields using the Concatenate method, select the separator to use between
field values in the resulting string from the Specify type of the fields separator dropdown
options. If you select the Custom separator option, enter the separator in the text box, or leave it
empty to combine the fields with no separator.
7.
Click OK to return to the Field Mapping window.
The Field Mapping window shows the combined fields with a blue branched arrow.
8.
Click OK to save the field mapping settings and return to the main Integration Manager window.
Integration Manager

Combining Date and Time Fields for Import 46
Combining Date and Time Fields for Import
You can combine separate date and time fields in your source CSV file into fields containing both date
and time parts when importing information into OpenAir. This may be useful if date and time information
are recorded in separate columns in your CSV file and you want to import information into OpenAir fields
such as created (datetime data type) or updated (timestamp data type), for example.
To combine date and time fields for import:
1.
On the Field Mapping window, click Combine Date.
Note: For steps to go to the Field Mapping window, see Mapping OpenAir Fields to CSV
Columns.
The Field Mapping Windows shows blue branched arrows for each datetime or timestamp fields in
the OpenAir record type.
You can undo the field combination for any of OpenAir datetime or timestamp fields if you do not
need to import the information, or if the column values already contain both date and time parts in
the source CSV file. For more information about undoing a field combination, see Undoing a Field
Combination.
2.
Drag the date and time fields in your source CSV file to the end of the blue branched arrow for the
corresponding OpenAir datetime or timestamp fields. The time field must be below the date field.
3.
Click OK to save the field mapping settings and return to the main Integration Manager window.
Integration Manager

Undoing a Field Combination 47
Undoing a Field Combination
You can undo a field combination at any time after you combine fields. To modify a combined field
mapping, or exclude the fields from the information exported or imported, you must undo the field
combination first. You can then combine the fields again, or remove the fields from the export or import
as required.
To undo a field combination
1.
On the Field Mapping window, click the field combination you want to undo.
Note: For steps to go to the Field Mapping window, see Mapping OpenAir Fields to CSV
Columns.
2.
Click Uncombine.
3.
Click OK to save the field mapping settings and return to the main Integration Manager window.
Splitting a Source CSV Field into Several OpenAir
Fields for Import
You can split a field from the source CSV file into two or more fields when importing information into
OpenAir.
Note: To modify a split field mapping, or exclude the fields from the information imported, you
must undo the split field first. You can then split the fields again, or remove the fields from the
import as required. For more information about undoing a field split, see Undoing a Field Split.
To split a source CSV field into a several OpenAir fields for import:
1.
On the Field Mapping window, line up the OpenAir fields you want to split the information into
so they are adjacent. The source CSV field value is split left to right and will populate the selected
OpenAir fields top to bottom. Line up the source CSV field containing the information you want
to split with the top OpenAir field that will receive the information. Drag each field to change the
order they appear in the list if necessary.
Note: For steps to go to the Field Mapping window, see Mapping OpenAir Fields to CSV
Columns.
2.
Hold Ctrl and click the fields you want to split the information into.
Selected fields are highlighted in blue.
Integration Manager

Undoing a Field Split 48
3.
Click Split.
The Split fields window appears.
4.
Select the CSV field containing the information to split.
5.
Choose a method under Split options.
■
Split using delimiter — Select a delimiter or specify a custom delimiter.
■
Split using character range — enter the character range for each OpenAir fields.
6.
Click OK to return to the Field Mapping window.
The Field Mapping window shows the split fields with a red branched arrow.
7.
Click OK to save the field mapping settings and return to the main Integration Manager window.
Undoing a Field Split
You can undo a field split at any time after you split fields. To modify a split field mapping, or exclude the
fields from the information imported, you must undo the field split first. You can then split the fields again,
or remove the fields from the import as required.
Integration Manager

Undoing a Field Split 49
To undo a field combination
1.
On the Field Mapping window, click the field split you want to undo.
Note: For steps to go to the Field Mapping window, see Mapping OpenAir Fields to CSV
Columns.
2.
Click Clear Splitting.
3.
Click OK to save the field mapping settings and return to the main Integration Manager window.
Integration Manager

OpenAir Field Value Lookup (Export) and Record Lookup (Import) 50
OpenAir Field Value Lookup (Export) and
Record Lookup (Import)
You can use the following lookup options when mapping OpenAir fields to columns in the CSV file you
export information to or import information from:
■
Field value lookup (Export) — You can look up OpenAir standard or custom field values for record
types directly or indirectly related to the record type you export from OpenAir to a CSV file. This may
be useful when you need to include:
□
Information stored in a custom field for a record type directly related to the record type you
selected for export.
Note: Standard fields for supported record types directly related with the record type
you selected for export are available for mapping without additional setup. See Mapping
OpenAir Fields to CSV Columns.
□
Information stored in a standard or custom field for a record type indirectly related to the record
type you selected for export. If the record type you export includes a foreign key to a related
record type that itself includes a foreign key to a third record type, you can make information from
that third record type available for mapping. For example, each project is associated to a customer
referenced using the foreign key customer_id in the project table, there is a named employee who
approves invoices for each customer and this named employee is referenced using the foreign key
tb_approver in the customer table. If you export projects, you can use a field value lookup to include
information from the user table about the employee who approves invoices for the customer you
are delivering the project for.
Note: You can use external field lookup to export information about the payment terms
associated with your invoices in invoice and time bill exports.
The optional feature Save Payment Terms Internal ID on Invoice Records must
be enabled for your account. This feature adds a hidden payment terms ID field
(payment_termsid), that can then be used for external field lookup.
For more information, see Optional Features.
□
Information stored in a standard or custom field for a related record of the same type you selected
for export. For example, a rebill invoice or a credit note is an invoice object that relates to an
original invoice referenced by the foreign key original_invoiceid. If you export invoices, you can
use a field lookup to include information about the original invoice associated with a rebill invoice
or a credit note.
■
Related record lookup (Import) — You can look up OpenAir records associated with the records you
import by name or external ID. For example, a CSV file contains information about expense receipts
and includes the name of the project for which the expense was incurred, or the unique ID for that
project in the third-party software application from which you extracted the information. If you import
receipts from that CSV file into OpenAir, you can use a record lookup by name or external ID to include
the internal ID of the OpenAir project record associated with each receipt you import.
Looking Up OpenAir Field Values (Export)
Use the following steps to look up OpenAir standard or custom field values for record types directly or
indirectly related to the record type you export from OpenAir to a CSV file.
Integration Manager

Looking Up OpenAir Field Values (Export) 51
To look up OpenAir field values on export:
1.
On the Field Mapping window, select a field mapping with a green arrow and click External Field.
Note: For steps to go to the Field Mapping window, see Mapping OpenAir Fields to CSV
Columns.
The External Field Lookup window appears.
2.
Enter a name for the OpenAir field value lookup.
3.
Source Association — Select the record type and the field for this record type containing the
foreign key. To do so:
a.
Select a record type under Select the association to map from. Dropdown list options
include the record type selected for export and other supported record types directly
related to the record type selected for export.
b.
Do one of the following:
■
If the field containing the foreign key is a standard OpenAir field, choose Record field
and select one of the standard fields for that record type.
■
If the field containing the foreign key is a custom field, choose Custom field and enter
the custom field name exactly as defined in OpenAir.
Integration Manager

Looking Up Associated OpenAir Records (Import) 52
Note: The custom field type must be a pick list or hold a foreign key referencing
an OpenAir object by its internal ID.
To verify the name and type of custom fields in OpenAir, go to Administration >
Global Settings > Custom Fields.
Custom fields may have an optional display name that is used on forms and
list views in the OpenAir UI in addition to the unique field name that is used to
reference the custom field. This field name may contain only alphanumeric and
underscore characters. For more information about custom fields, see the help
topic Custom Fields.
4.
Target Association — Select the record type and the field for this record type containing the
looked up field value. To do so:
a.
Select a record type under Select the external record type. Dropdown list options include
all supported record types.
b.
Do one of the following:
■
If the lookup field is a standard OpenAir field, choose Record field and select one of the
standard fields for that record type.
■
If the lookup field is a custom field, choose Custom field and enter the custom field
name exactly as defined in OpenAir.
Note: To verify the name and type of custom fields in OpenAir, go to
Administration > Global Settings > Custom Fields.
Custom fields may have an optional display name that is used on forms and
list views in the OpenAir UI in addition to the unique field name that is used to
reference the custom field. This field name may contain only alphanumeric and
underscore characters. For more information about custom fields, see the help
topic Custom Fields.
5.
Click OK to return to the Field Mapping window.
6.
Click OK to save the field mapping settings and return to the main Integration Manager window.
Looking Up Associated OpenAir Records (Import)
Use the following steps to look up OpenAir records associated with the records you import by name or
external ID.
To look up associated OpenAir records on import:
1.
On the Field Mapping window, right-click on a field mapping linking a foreign key in the OpenAir
table to any column in the CSV file with a green arrow, and click Edit.
Integration Manager

Looking Up Associated OpenAir Records (Import) 53
Note: For steps to go to the Field Mapping window, see Mapping OpenAir Fields to CSV
Columns.
The Edit field mapping window appears.
2.
If the field value can reference several associated records referenced by a comma-separated list of
external IDs or names, check the List of values separated by comma.
3.
Check the Map in place of internal OpenAir ID box.
4.
Choose the lookup option. You can look up the OpenAir record (and its OpenAir internal ID) by
External ID (default) or by Name.
Note: OpenAir lets you store a unique External ID [external_id] for records imported
from a third-party application. You should use this External ID to reference the primary key
of each record in the external system you import it from, and lookup record associations
using external IDs. Names may not necessarily be unique, unless you have some strict
validation in place to avoid duplicate names.
5.
Select the OpenAir record type to look up from the Select record type this id is associated with
dropdown list.
6.
Click OK to return to the Field Mapping window.
A confirmation window appears.
7.
Click Yes to confirm that the value of the external ID or name field is unique for each record in the
selected record type, and continue.
8.
Click OK to save the field mapping settings and return to the main Integration Manager window.
Integration Manager

Filtering OpenAir Records for Export 54
Filtering OpenAir Records for Export
Note: The Filtering functionality is not available when importing information from a CSV file into
your OpenAir account.
You can use filters to export only the OpenAir records that meet specific criteria to the CSV file.
The following filter options are available as standard:
■
Only new items since the last export — Use this filter option to export only records that were not
exported previously. You can choose to take into account either:
□
Recorded exports to CSV file done using Integration Manager or an Integration Manager shortcut,
or since the last export done using any application.
□
Recorded exports done by any application integrating with OpenAir.
Note: By default, Integration Manager and other applications and integrations provided and
supported by OpenAir add an exported date and time stamp on a record when this record, and
a row in the OpenAir import_export table when the record is exported. The applications can
then use this information to exclude previously exported records from the export.
You can configure filter options in Integration Manager so that it does not mark records as
exported in OpenAir. This may be useful for testing, or when you want to export the same set
of records several times, if you want to be able to export the same records again while using
the Only new items since last export filter option.
■
Only deleted records — Use this filter option to export only deleted records.
Note: When a user deletes a record in OpenAir, the record is flagged as deleted. It is not
removed immediately from the OpenAir database. Deleted records are retained in the OpenAir
database for a minimum of 180 days. Older deleted records, that is, records marked as
deleted and last updated 180 or more days ago, are removed permanently from the database
according to a routine schedule.
For more information, see the help topic Data Deletion.
You can define a custom filter and add multiple filter conditions to it. Each filter condition compares the
value of a field for the selected OpenAir record type (first operand) with a static value, a range of values,
or another field value, depending on the comparison operator and the data type of the field you select as
the first operand.
All fields available for mapping are also available as operands in your filter condition. This includes not
only standard OpenAir fields, custom fields, but also calculated fields and field value lookups defined in
Integration Manager.
You can compare datetime fields with a custom date range or metavalue relative to the current date.
Available date metavalues include last month, this month, <N> days ago, <N> hours ago (where <N> is an
integer), today, or next month.
The following comparison operators are available: equal to, not equal to, is empty, is filled, contains,
not contains, before, after and between.
The following logical operators are available:
■
All conditions must be true — Records must match all the filter conditions to be exported (AND
logical operator).
■
At least one condition must be true — Records must match one or more filter conditions to be
exported (OR logical operator).
Integration Manager

Filtering OpenAir Records for Export 55
After you add a filter condition, you can edit or delete it at any time.
To filter OpenAir records for export:
1.
In Integration Manager, locate the row corresponding to the OpenAir record type available for
export to a CSV file.
2.
Do one of the following:
■
Click to select the row, then go to Options > Filtering.
■
Right-click the row, then click Filtering from the context menu.
The Filters window appears.
3.
(Optional) Check the Only new items since last export box to export only records that were not
exported previously. Choose one of the following options:
■
By this application (or shortcut) — to export only records that were not exported previously
to a CSV file using either Integration Manager or an Integration Manager shortcut.
■
By all applications — to export only records that are not marked as exported in OpenAir.
4.
(Optional) Check the Do not mark items as exported box to export records without marking
them as exported in OpenAir.
5.
(Optional) Check the Only deleted records box to export only deleted records.
6.
(Optional) Create a custom filter. To do so::
a.
Click Add to add a filter condition.
The Create Filter window appears.
b.
Enter a Name for the filter condition.
Integration Manager

Filtering Best Practice 56
c.
Select one of the fields for the selected record type from the Select a field to filter against
dropdown options.
Depending on the field you select, the Value box and Select a field to compare with
dropdown field appear. If you select a datetime field, the current date appears in the Value
box.
d.
Do one of the following:
■
Select a comparison operator from the Condition dropdown options, then enter a static
Value, enter two static values defining a range, or select a field from the Select a field
to filter against dropdown options. When comparing numbers, check the Numeric
comparison box, otherwise clear the box.
Note: Available comparison operators in the Condition dropdown options
depend on the datatype of the field you select as first operand. The ability to enter
a static Value, enter two static values defining a range, or select a field as the
second operand depends on the comparison operator you select.
■
If you want to compare a datetime field to a custom date range relative to the current
date, click Custom Date Range.
The Advanced Filtering window appears. Select the day of the month and the month
relative to the current date for the start date and for end date to define an inclusive date
range, and click OK. Relative month options include this month, last month and each
previous month, up to 12 months ago.
Note: You can also compare datetime field values to a relative date range using
the comparison operator between and supported date metavalues.
e.
Click OK.
The Filters window shows the filter condition you added. Remember that dates are inclusive
and you should use date filters to limit the amount of data OpenAir needs to process.
f.
Repeat the steps to add other filter conditions as required.
You can also edit or deleted filter conditions at any time, to do so click the filter condition
name in the Custom filters box and click Edit or Delete.
g.
If you have two or more filter conditions, choose whether all conditions must be true
(equivalent to an AND logical operator between all filter conditions) or At least one condition
must be true (equivalent to an OR logical operator between all filter conditions).
7.
Click OK to save the filter settings and return to the main Integration Manager window.
Filtering Best Practice
Integration Manager uses server-side or client-side filtering depending on the situation. Server-side
filtering can reduce export time significantly.
Integration Manager

Known Limitations 57
Server-side filtering is used for filter conditions in each of the following cases:
■
The selected field is native to the exported record type, the Condition is set to “Equal to” or “Not equal
to”, all conditions must be true is selected, and both the Only new items since last export and
Only deleted records filtering options are disabled. Note that if you use both “Equal to” and “Not
equal to” filter conditions, server-side filtering is done based on the first of these filter conditions.
■
The selected field is the timesheet or envelope status field, the exported field, and date fields native
to the exported record type.
Note: The distinction between native fields and non-native fields is best illustrated by examples:
■
slip.date and slip.updated on a TimeBill export are native fields.
■
slip.invoice_date and slip.invoice_updated on a TimeBill export are not native fields as they
relate to the invoice this time bill is associated to. Client-side filtering is used in this case.
Client-side filtering is used in all other situations. To reduce the time it takes to run regular exports for a
specific subset of records, you run a cleanup export before you run the production export.
■
You can use the cleanup export to mark all records that are not in the required subset as exported.
■
You can then exclude all records that are already exported in your production export.
For example, if you want to create a TimeBill export and include only TimeBill records that are not yet
exported and that are associated with a specific project stage (for example, the project stage with the
internal ID 2):
1.
Create a cleanup export shortcut to export all TimeBill records that are associated with all
project stages other than the project stage — for example, slip.project_project_stage_id not
equal to “2”.
2.
Run the cleanup export and discard the output CSV file.
3.
Create a production export shortcut to export TimeBills records, excluding records already
exported, and including only the records for which slip.project_project_stage_id is equal to
“2”.
Known Limitations
■
Filter conditions on Boolean or numeric fields with the Condition is set to “Equal to” may not work as
expected when OpenAir API returns an empty field value.
Workaround: Specify a conditional override and check the Numeric comparison box and try the
export again. With the Numeric comparison option enabled, the empty field value will be interpreted
as 0 in the filter condition.
■
Filter conditions on Boolean fields may not work as expected when the Boolean value is 0 (False).
OpenAir API returns an empty field value in some cases.
Workaround: As above.
■
Filter conditions on numeric fields may not work as expected. The value returned by OpenAir API may
include a decimal part (for example, .00) with a specific number of decimal places, depending on the
field type and definition, and may not match exactly the value specified in the filter condition.
Workaround: Use the same number of decimal places for the value specified in the filter condition,
as in the values returned by OpenAir API. For custom fields, decimal places are determined by the
Integration Manager


Formatting Information for Export and Import 59
Formatting Information for Export and
Import
The formatting options in Integration Manager let you:
■
Specify the format of values containing both date and time parts in your CSV file. Integration Manager
supports different formats for date and time information in your CSV file, and converts OpenAir
date and time values into the format you specify when exporting OpenAir information to a CSV file,
or converts date and time values from the format you specify to the format used by the OpenAir
database, when you import information a CSV file into OpenAir. See Setting the Date and Time Format
Used in the CSV File.
■
(Export only) Add length and range validation for field values in your CSV file. See Validating Field Value
Length and Range on Export.
■
Using conditional overrides to compare numeric or text field values to a fixed value or pattern, and
replace the value if the condition is met. See Setting Up Conditional Overrides.
Setting the Date and Time Format Used in the CSV
File
You can specify the format of values containing both date and time parts in your CSV file. Integration
Manager supports different formats for date and time information in your CSV file, and converts OpenAir
date and time values into the format you specify when exporting OpenAir information to a CSV file, or
converts date and time values from the format you specify to the format used by the OpenAir database,
when you import information a CSV file into OpenAir.
Important: The date and time information in your import CSV file must be the same as the
format specified in the Integration Manager Formatting options. Otherwise, the Integration
Manager log shows the error "Error: Non valid string specified as DATE".
To set the date and time format used in the CSV file:
1.
In Integration Manager, locate the row corresponding to the record type and the direction
required from the table listing the record types available for import from and export to a CSV
file.
2.
Do one of the following:
■
Click to select the row, then go to Options > Formatting.
■
Right-click the row, then click Formatting from the context menu.
The Formatting window appears. The date and time formatting options are slightly different for
export and import.
Integration Manager

Setting the Date and Time Format Used in the CSV File 60
3.
Select the date format from the dropdown options and specify the separator between date
components (year, month, and day).
Note: The Current date/time format box shows a preview of the date and time format
as you change the settings.
4.
Select the time format from the dropdown options and specify the separator between time
components (hours, minutes, and seconds).
5.
If the date and time values in the CSV file show, or should show the time before the date, check the
Time is set first box.
6.
If the CSV file includes, or should include date information only without information about time,
check the Export date only box (Export) or Date/Time contains date only box (Import).
7.
(Export only) If the CSV file should include date information and time information in separate
columns, check the Split date and time into separate columns. The two columns will have
headers including the CSV column name as listed on the Field Mapping screen followed by (date)
and (time). For example if the OpenAir field created is mapped to a CSV column dateCreated, the
two separate columns will have dateCreated(date) and dateCreated(time) for headers.
8.
(Export only) To exclude column headers from the exported CSV file, check the Do not export the
header box. All column headers will be excluded, not only the date and time column headers.
9.
Click OK to save the date and time formatting settings and return to the main Integration Manager
window.
Setting Up Conditional Overrides
Conditional overrides are a way to build in some light logic on export and import in Integration Manager.
You can use conditional overrides to:
■
Compare test field values with a fixed value, and replace a reference field value with a custom value or
a field value if the condition is met.
Integration Manager

Setting Up Conditional Overrides 61
■
Replace reference field values with a custom value or a field value if the test field value contains a
specific pattern of text (regular expression).
■
Use regular expressions to search for a specific pattern of text in the reference field value, and replace
this pattern with a custom value or a field value.
The reference field is the source field containing the values you want to override if the condition is met.
The condition that determines if the reference field value should be replaced is a simple logical
expression with two operands and a comparison operator.
■
The first operand is a test field, or if you select more than one test field, the sum of numeric test
field values (Export only), or the result of concatenating text test field values. The test field and the
reference field can be the same field.
■
The second operand can be either a fixed value or a pattern (regular expression), depending on the
selected comparison operator.
■
The following comparison operators are available: Equals, Not Equals, Regex (regular expression),
Contains, Not Contains.
Use the Regex comparison operator to find test field values that contain a specific pattern of text. The
condition evaluates as true if the test field value or the result of concatenating text test field values
contains a portion of text matching the regular expression pattern. If the test field is the same as the
reference field, you can use the Regex comparison operator to match and substitute a pattern of text
in the reference field value with a custom value, instead of replacing the entire reference field value
with that custom value. You may use capturing groups in the regular expression pattern and use
these capturing groups for string substitution. For examples of conditional overrides using regular
expressions, see Regular Expressions Use Case Examples.
Note: For more information about regular expression, see https://en.wikipedia.org/wiki/
Regular_expression and https://cheatography.com/davechild/cheat-sheets/regular-expressions/.
You should discuss your requirements with OpenAir Professional Services before you start using
regular expressions in conditional overrides.
Conditional overrides are evaluated before field combinations. If you are using field combination to
combine several source fields into one destination field, you can use conditional overrides to replace each
source field values before the source field values are combined.
You can define multiple conditional overrides for the same field (reference field). Integration Manager
evaluates each conditional override for every record included in the export or import in the order from
the bottom to the top of the list. On export, conditional overrides with the Override after summing
entries box checked are evaluated last. You should set the evaluation order carefully as the test fields
used in one conditional override can be modified by a previous conditional override.
To set up conditional overrides:
1.
In Integration Manager, locate the row corresponding to the record type and the direction
required from the table listing the record types available for import from and export to a CSV
file.
2.
Do one of the following:
■
Click to select the row, then go to Options > Formatting.
■
Right-click the row, then click Formatting from the context menu.
The Formatting window appears.
3.
Click the Conditional Override tab.
Integration Manager

Setting Up Conditional Overrides 62
4.
Click Add.
The Conditional Overrides window appears.
5.
Select the reference field (the source field containing the values you want to override if the
condition is met) To do so, select a field from the Select the reference field whose value will be
overridden the dropdown options.
6.
Select one or more test fields (the fields used as first operand in the condition determining if the
reference field value should be replaced). Use the arrows to add fields to (arrow pointing right), or
remove fields from (arrow pointing left) the Selected column. If you select more than one field, the
logical expression compares the result of concatenating the test field values —or on export, the
sum of numeric test field values— with the value or pattern you specify.
7.
Specify the comparison operator and the value or pattern you want to compare the test values with
under Override Condition.
Integration Manager

Setting Up Conditional Overrides 63
8.
(Export only) Check the Numeric comparison box if you are comparing numeric values.
9.
(Export only) Check the Override after summing entries box if you want to and apply
the conditional override to summarized grouped record data. For more information about
summarizing grouped record data, see Accounting Settings.
10.
Set the override value. To do so, do one of the following:
■
Choose and enter a Custom value.
If you select Regex (regular expression) as the comparison operator, and if the test field is the
same as the reference field, Integration Manager substitute the custom value for the portions
of the reference field value matching the regular expression pattern. You can include capturing
groups in the regular expression pattern and use these capturing groups for string substitution
in the custom value. For examples of conditional overrides using regular expressions, see
Regular Expressions Use Case Examples.
(Export only) You can use any value even if the value is not a valid value for the field data type.
To allow any value, independently of the field data type, check the Override field type box.
■
(Export only) Choose and select a Field value from the dropdown options.
11.
Click OK to save the conditional override and return to the Formatting window.
The Conditional override tab on the Formatting window shows a summary of the conditional
override you added.
12.
Add other conditional overrides as required.
13.
After you add conditional overrides, you can:
■
Edit or delete any listed conditional overrides. To edit or delete a conditional override, click the
conditional override, and click Edit or Delete.
■
Change the order of evaluation for your conditional overrides. To do so, click the conditional
override you want to move up or down the list, and click Shift Up or Shift Down.
Important: Integration Manager evaluates each conditional override one after the
other following the order from the bottom of the list (first) to the top of the list (last). On
export, conditional overrides with the Override after summing entries box checked
are evaluated last. You should set the evaluation order carefully as the test fields used in
one conditional override can be modified by a previous conditional override.
14.
Click OK to save the running order of conditional overrides and return to the main Integration
Manager window.
Regular Expressions Use Case Examples
The following example illustrate a possible use of regular expressions.
Leading zeros
In this example, the source field value is an integer with up to 3 digits and the destination field value must
always be a 4-digit number converted to string with leading zeros. You can use a calculated field and
conditional overrides to add 2 or 3 leading zeros depending on the number of digits in the source field
value. To do so:
1.
Add a calculated field with the name Leading Zero and the constant value 0 (zero). See Making
Additional Information Available for Mapping (Calculated Fields).
Integration Manager

Setting Up Conditional Overrides 64
2.
Combine the Leading Zero and the source field (in this example Activity) into the destination
field Activity Ref. See Combining and Splitting Information.
3.
Create a conditional override with Leading Zero as reference field, Activity as test field, Regex
as comparison operator, enter the pattern \b[0-9]\b, and the custom override value 000 (three
zeros).
The regular expression \b is a word boundary anchor marking either end of a continuous series
of non-space characters, and [0-9] is a number digit. The pattern \b[0-9]\b matches any 1-digit
integer values. The conditional override adds three leading zeros if Activity is a 1-digit integer.
Integration Manager

Setting Up Conditional Overrides 65
4.
Create a conditional override with Leading Zero as reference field, Activity as test field, Regex as
comparison operator, enter the pattern \b[0-9][0-9]\b, and the custom override value 00 (two
zeros).
The conditional override adds two leading zeros if Activity is a 2-digit integer.
Note: In this case, the evaluation order of conditional overrides does not matter.
Changing Dates to First Day of the Month
In this example, the source field value is a date field in the MM/DD/YY and the destination date field
value must always be the first day of the month. You can use a conditional override to change the DD
component to 01 in the source date field.
To do so, create a conditional override with the source date field as both reference field and test field,
Regex as the comparison operator, enter the pattern /[0-3][0-9]/ and the custom override value /01/.
Number Format for Import
When importing information into OpenAir from a CSV file, numeric values must use the following format:
■
Decimal separator: dot (.)
■
Thousands separator: none
Integration Manager

Setting Up Conditional Overrides 66
Important: Imported numeric values must not contain commas.
Imported numeric values should have the same maximum number of decimal digits (decimal precision) as
the destination field in OpenAir. Otherwise, values will be rounded to the decimal precision of the OpenAir
field.
You can use conditional overrides to change the format of the imported numeric values, if required.
Examples:
■
To change the decimal comma to a decimal dot, create a conditional override with the source number
field as both reference field and test field, Regex as the comparison operator, enter the pattern , and
the custom override value ..
■
To remove commas separating groups of thousands, create a conditional override with the source
number field as both reference field and test field, Regex as the comparison operator, enter the
pattern ,, and leave the custom override value empty.
To verify the format of the OpenAir field, refer to the OpenAir Data Dictionary. See OpenAir Data
Dictionary.
Validating Field Value Length and Range on Export
You can add length and range validation for field values exported from OpenAir to a CSV file.
To validate field length and range on export:
1.
On the Field Mapping window, right-click on an OpenAir field, and click Format.
Note: For steps to go to the Field Mapping window, see Mapping OpenAir Fields to CSV
Columns.
The Individual Field Formatting window appears.
2.
Length validation — To validate the length of the field value, do the following:
a.
Enter the Total Length (maximum or expected number of characters or digits) for field
values.
b.
Select the validation outcome from the dropdown options under Total Length. This
determines what happens when the field value length is greater or less than the specified
Total Length. The following options are available:
Integration Manager

Validating Field Value Length and Range on Export 67
■
Fail with warning if longer — Integration Manager does not export a record and adds a
log entry for the error if the field value length is greater than the specified Total Length
for that record.
■
Truncate the end if longer — Integration Manager exports all records and shortens the
field value to match the specified Total Length by removing digits or characters from the
right of the field value.
■
Truncate the beginning if longer — Integration Manager exports all records and
shortens the field value to match the specified Total Length by removing digits or
characters from the left of the field value.
■
Pad left with spaces — Integration Manager exports all records and lengthens the field
value to match the specified Total Length by adding spaces to the left of the field value.
■
Pad right with spaces — Integration Manager exports all records and lengthens the
field value to match the specified Total Length by adding spaces to the right of the field
value.
■
Pad left with zeros — Integration Manager exports all records and lengthens the field
value to match the specified Total Length by adding zeros to the left of the field value.
c.
Enter the Decimal Length (maximum number of digits in the decimal part) for field values.
d.
Select the validation outcome from the dropdown options under Decimal Length. This
determines what happens when the field value length is greater or less than the specified
Total Length. The following options are available:
■
Fail with warning — Integration Manager does not export a record and adds a log entry
for the error if the length of the field value decimal part is greater than the specified
Decimal Length for that record.
■
Truncate — Integration Manager exports all records and shortens the decimal part of the
field value to match the specified Decimal Length by removing digits from the left of the
decimal part.
3.
Range validation — To validate the range of the field value, do the following:
a.
Enter the minimum value under Lowest.
b.
Enter the maximum value under Highest.
c.
Select the validation outcome from the dropdown options. This determines what happens
when the field value is outside the range (less than the specified Lowest value, or greater
than the specified Highest value). The following options are available:
■
Fail with warning — Integration Manager does not export a record and adds a log entry
for the error if the field value is outside the specified range for that record.
■
Set to closest range — Integration Manager exports all records and changes the field
value either to the minimum value (Lowest) if less than that value, or to the maximum
value (Highest) if greater.
4.
Click OK to return to the Field Mapping window.
5.
Click OK to save the field mapping settings and return to the main Integration Manager window.
Integration Manager

Accounting Settings 68
Accounting Settings
Accounting Settings contains two areas of functionality: Account Balancing/Secondary Balancing and
Sum/Sum By. These two functions are often used together when creating exports of transactions with a
container/detail-line relationship, but they can also be used independently. Each is explained as follows.
■
Account Balancing/Secondary Balancing - lets you create exports containing extra records that
correspond to the records created from summed or individual OpenAir transactions. Using Account
Balancing/Secondary Balancing, the export file contains more records than would otherwise be
created.
■
Sum/Sum By - lets you create exports where one record in the export file is created from multiple
records in OpenAir. For example, an OpenAir expense report may contain many receipts for the
same expense item and the desired export file would contain one record containing the sum of those
receipts. Using Sum/Sum By, the export file therefore contains the same number or fewer records
than the number of OpenAir transactions from which it was created.
When you export a category from OpenAir to a text CSV file, you have the option to perform Account
Balancing and Secondary Balancing on the category you are exporting. You can also select fields to Sum
By as well as fields to Sum. These accounting settings features are available for the following categories:
■
Receipt
■
Revenue Recognition Transactions (Rev. Recogn. Trans.)
■
TimeBill (charge, slip, or bill)
■
Timesheet entry
■
Slip projection
Access Accounting Settings
To access Account Balancing and Sum By settings:
1.
In Integration Manager, locate the row corresponding to the record type and the direction
required from the table listing the record types available for import from and export to a CSV
file.
2.
Do one of the following:
■
Click to select the row, then go to Options > Accounting Settings.
■
Right-click the row, then click Accounting Settings from the context menu.
The Sum By Settings window appears.
Integration Manager

Create Balancing Entries 69
Create Balancing Entries
To create balancing entries:
1.
Type the Account Number. This is a value you want to appear on every record created as a
balancing entry in your export file. If you are creating balancing lines as part of an A/R export, this
may be your accounting system's A/R account. Even if you do not have a fixed value you want to
appear on every balancing line, you must enter something here as this is what triggers OpenAir to
create a balancing line.
2.
Select whether the total field for the balancing line is a Negative or Positive balancing total. The
balancing line always creates a balancing value for the total field in the record being exported. To
create a balancing value for other fields, see Secondary Balancing below in step 6.
3.
Select the check boxes as desired for Balancing entry first to place the balancing line in the export
file ahead of the line or lines it is balancing.
4.
Select Generate balancing entry for each SUM group to generate a balancing line for each
single record in the export file generated by Sum/Sum By. If you do not check this box, OpenAir
generates one balancing line per container for exports. For example, OpenAir would generate
one balancing line per invoice for timebill exports, one balancing line per envelope for receipt
exports, or one balancing line per timesheet for timesheet entry exports. When OpenAir exports
transactions that do not have containers, such as revenue transactions, it creates one balancing
line per export file.
5.
Select the Associated field using the drop-down list. This is the column in which the Account
Number value will appear on balancing lines.
6.
If desired, generate Secondary Balancing. Type the Account Number.
7.
Select whether the field being balanced should be balanced as a Negative or Positive total.
8.
Select the check boxes as desired for Balancing entry first and Generate balancing entry for each
SUM group.
9.
Select the Associated field using the drop-down list.
10.
Click the Include fields button and select the check boxes of the item(s) to sum and display for
the balancing record.
11.
Select a Balance field from the drop-down list of fields you selected to SUM. This field's value is
balanced for all the records being summed (if Sum/Sum By is used) or for an individual record.
Integration Manager

Use Sum/Sum By 70
12.
Select a field to override from the drop-down list of fields you selected to SUM.
13.
If required, check the Add blank line after each SUM group box.
14.
Click the Include fields button.
The Select items window appears.
15.
Check the boxes corresponding to the item(s) you want to display for the balancing record. Click
OK. These are the fields you previously selected to SUM BY. If you do not select any values, the
balancing record contains blank columns except for the associated field and any fields you selected
in the sum box.
Use Sum/Sum By
To use the Sum/Sum By function:
1.
Select the fields to SUM BY. Highlight the item(s) and click the arrow to include the selected fields.
OpenAir creates one record in the export file for every transaction record in OpenAir where the
values of all the fields selected in Sum By are the same. For example, if exporting receipts and sum
by user, envelope, expense item, the export file contains one record for all receipts that have the
same user, envelope, and expense item.
2.
Select the fields to SUM. Highlight the item(s) and click the arrow to include the selected fields.
Fields you select here are summed from the values in all the records grouped by the Sum By
fields above. The total value displays in the output record. Fields picked here are always money or
quantity fields. Note that only fields that appear in Sum By or Sum are available to be selected in
the field mapping dialogue.
3.
If required,check the Respect formatting for individual fields box. This causes a date field (used
in summing as an example) to be displayed properly formatted based on date format settings.
4.
On a TimeBill export, you may click the Taxables button to select which columns in the output
record contain the total taxable amount and total non-taxable amount for each record. These
are defined by calculated fields in the field mapping window. See Making Additional Information
Available for Mapping (Calculated Fields).
5.
Click OK.
6.
To export data, refer to Exporting OpenAir Data to a CSV File.
Integration Manager

Working with Export and Import Shortcuts 71
Working with Export and Import Shortcuts
You can create Integration Manager shortcuts for each record import or export you want to run on a
regular basis without having to launch the Integration Manager application. This may be useful to support
an on-going integration, for example. Each Integration Manager shortcut you create captures the field
mapping, filter, format and other settings you configured for a specific export or import and for a specific
record type. You can configure each Integration Manager shortcut to send email messages to report
errors, regular status notifications or both. See Creating an Export or Import Shortcut.
Each Integration Manager shortcut includes the following components:
■
A separate instance of Integration Manager — This instance may also be referred to as an Integration
Manager shortcut bundle, and includes a copy of the Integration Manager executable file, and all
the supporting files for that program, including the files containing the field mapping and other
configuration settings for the corresponding export or import process. When you create a shortcut
or restore a shortcut from the backup version, Integration Manager stores the shortcut bundle in a
dedicated folder C:\im_shortcuts\<shortcutFilename>_oabundle\, where <shortcutFilename> is the
name you enter when creating the shortcut.
For example, if you create the shortcut 1_Customers.lnk, the Integration Manager shortcut bundle is
located in.
■
A shortcut pointing to C:\im_shortcuts\<shortcutFilename>_oabundle\OpenAirManager.exe and saved
under the location you select when creating the shortcut.
For example, C:\Users\<username>\Desktop\OAIMShortcuts\Imports\1_Customers\1_Customers.lnk.
Each Integration Manager shortcut is associated with a separate instance of Integration Manager. If you
have three shortcuts on your computer, for example, there will be four instances of Integration Manager:
the main Integration Manager application and the three shortcut bundles. Launching a shortcut launches
that instance of Integration Manager in the background.
After you create Integration Manager shortcuts, you can:
■
Run Integration Manager shortcuts manually. To do so, double-click the shortcut.
Note: Running a shortcut is similar to launching the export or import from the main
Integration Manager application. Depending on the shortcut configuration, you may need to
select the CSV file you want to export information to, or import information from in the same
way as you do after you launch the export or import from the main application. See Exporting
OpenAir Data to a CSV File and Importing Data from a CSV File into OpenAir.
■
Schedule Integration Manager shortcuts to run automatically using Task Scheduler on Windows or
other automatic scheduling utilities. See the vendor documentation for more information about task
scheduling.
■
Batch Integration Manager shortcuts to run them one after the other in the required sequence
without having to launch or schedule these shortcuts individually. Batching Export and Import
Shortcuts.
■
Upgrade your shortcut bundles after updating the main instance of Integration Manager to a new
version. Unless you upgrade the shortcut bundle, the shortcut uses the same version of Integration
Manager as the version you used to create the shortcut. See Upgrading Integration Manager
Shortcuts.
Integration Manager

Creating an Export or Import Shortcut 72
Note: You can continue to use shortcut bundle using an older version of Integration
Manager after you update the main Integration Manager application to a new version. Shortcut
bundles are not updated to the new version automatically. However, you must either close the
main Integration Manager application and launch the shortcut bundle instance, or upgrade
the shortcut bundle to the same version as that of the instance you are using before you
can launch the shortcut or open the shortcut for edit. You cannot run two different version
instances of Integration Manager at the same time.
■
Edit Integration Manager shortcuts to change your OpenAir sign-in details (account type, company ID,
user ID, and password), or to modify the configuration as your integration requirements change. See
Editing Integration Manager Shortcuts.
Important: When using a shortcut to import information into OpenAir, the structure
and format of your CSV file must be the same every time you run the shortcut. The column
headers in the CSV file you are importing information from must match the column headers
in the CSV file you used to set up the field mapping settings exactly. If you need to add or
remove a column as your integration requirements change, you must modify or redo the
field mapping configuration for the shortcut. In most cases, it is best to make changes to the
existing shortcut rather than creating a new one.
Creating an Export or Import Shortcut
You can create Integration Manager shortcuts for each record import or export you want to run on a
regular basis without having to launch the Integration Manager application. Each Integration Manager
shortcut you create captures the field mapping, filter, format and other settings you configured for a
specific export or import and for a specific record type. You can configure each Integration Manager
shortcut to send email messages to report errors, regular status notifications or both.
To create an Export or Import shortcut:
1.
In Integration Manager, locate the row corresponding to the record type and the direction
required from the table listing the record types available for import from and export to a CSV
file.
2.
Set up the export or import.
a.
Set up the field mapping for the export or import — See Mapping OpenAir Fields to CSV
Columns.
b.
Set up Filtering options — See Filtering OpenAir Records for Export.
c.
Set up Formatting options — See Formatting Information for Export and Import.
d.
Set up Accounting settings — See Accounting Settings.
3.
Do one of the following:
■
Click to select the row, then go to File > Create Shortcut.
■
Right-click the row, then click Create Shortcut from the context menu.
A files selection window appears.
4.
Select a location, enter a filename for the shortcut then click Save. The default shortcut location is
your desktop.
The Create Shortcut window appears. The path under Please enter the path for the shortcut is
sourced from the location you selected and the filename you entered.
Integration Manager

Creating an Export or Import Shortcut 73
Note: You should create a folder for your Integration Manager shortcut. You can save
your export and import CSV files in the same folder.
5.
Accept the default shortcut location or change it.
6.
You should check the Create separate log file based on shortcut name box. This will create a
separate log file for this shortcut and name the log file based on the shortcut filename. The log file
may be useful to troubleshoot any issues with your export or import.
The following settings become available:
a.
To send the export or import status notification and log by email, do the following:
i.
Check the Email log to a specified address box.
ii.
Click Settings.
The Email Server Settings window appears.
iii.
Enter the Server. This is the name of your outgoing SMTP email server.
iv.
Check the User Authentication box for, then enter your Username and Password, if
required.
Integration Manager

Creating an Export or Import Shortcut 74
v.
Enter the Email addresses you want to send the status notification email and log
to when the export or import completes with no errors. You can enter several email
addresses separated by a semicolon (;) or comma (,).
vi.
(Optional) Click Custom, enter the message body text for email sent when the export
or import completes with no errors, then click OK.
vii.
Enter the Email addresses you want to send the status notification email and log to
when the export or import completes with errors.
viii.
(Optional) Click Custom, enter the message body text for email sent when the export
or import completes with errors, then click OK.
b.
Check the Log all information to shortcut log file box.
7.
To enter OpenAir sign-in details specific for this shortcut, click OA Account Settings.
The Account Settings window appears. The account settings are sourced from the settings entered
in Options > OA account settings. See Connecting Integration Manager with your OpenAir Account.
Enter new sign-in details if necessary. In most cases, you would use the same OpenAir sign-in
details for your shortcuts and for the Integration Manager application.
8.
Click the Import or Export tab.
9.
Under Select export parameters or Select import parameters, click the Select file button
and select the CSV file you want to export information to or import information from. If you do not
select a file, Integration Manager will prompt you to select a file each time you run the shortcut.
For imports, the file you select must exist when you run the shortcut and be in the correct format.
Integration Manager

Creating an Export or Import Shortcut 75
When importing information from multiple CSV files, select the path to a directory containing files
with filenames matching the pattern you specify. See below.
10.
Choose the action Integration Manager should take when the selected file exists (Export) or does
not exist (Import). The following options are available:
■
(Export only) Overwrite — Replace the content of the file with the exported information.
Previous file content will be lost; it will not be possible to recover it.
■
(Export only) Append to an existing file — The exported information is added at the end of the
previous file content.
■
(Export only) Append timestamp — Creates a new CSV file with a timestamp at the end of the
filename.
■
Delay and try again after … minutes — When choosing this option, enter the retry delay time in
minutes.
■
Abort — Terminate the shortcut.
Note: On import, it is typically best to choose Abort and stop trying to process the import
if the CSV file does not exist. If you schedule an import shortcut to run automatically and the
import is dependent on other automatic process to generate the import CSV file, you should
select Delay and try again after.
On export, you should choose Append timestamp to keep a track of each export.
11.
(Export Only) To transfer the exported CSV file to a remote server, check the SFTP/FTP exported
file to a specified location box, then click Settings and enter the FTP server details in the FTP
Settings window.
12.
(Import only) If you want to schedule the shortcut to run automatically, you should check the Files
containing only header data should process successfully box. This ensures that the import will
be successful even if the CSV file contains no data.
13.
(Import only) To import information from multiple files, check the Import multiple files, click
Settings and enter the name pattern for files to import. You can use the wild card character *
to match any number of characters. All files must be in the directory you selected under Select
import parameters.
If you want to schedule the shortcut to run automatically, this option lets you import information
from more than one CSV file generated by the source system since your last import.
14.
(Import only) You should check the Write failed records to a separate kickout file box. The
kickout file contains a row for each record that could not be imported with all the information in
the original import CSV file, and an additional column with the error code and description. You can
review the kickout file and resolve any error before you try to import again. For more information,
see Import Kickout files.
a.
Clear the Insert a header in the kickout file box, if you do not want the kickout file to
include a header. The box is checked by default.
b.
You should check the Move kickouts to a separate directory box and create a folder for
kickout files within your shortcut folder for better organization.
15.
(Import only) To append a timestamp to the name of the CSV file after importing information
from that file, check the Append timestamp to import file box. If your integration does not use
external ID values to avoid the creation of duplicate records on import, you should check either or
both this box and the Move import file to this directory box. This prevents the import CSV file
from being imported a second time by renaming it and moving it to a different folder.
16.
(Import only) To move the CSV file to a directory after importing information from that file, check
the Move import file to this directory box, then select the directory.
17.
Click OK.
A window appears and shows some basic information about the shortcut you created.
Integration Manager

Creating an Export or Import Shortcut 76
18.
Click OK.
The shortcut is added to the location you selected. You can double click the shortcut to launch the
export or import process you configured.
The C:\Im_shortcuts\ folder on your computer contains a copy of the shortcut file as well as the
folder holding the shortcut application.
Import Kickout files
You can configure your import shortcuts to create a kickout file automatically when creating or editing
an import shortcut. The kickout CSV file contains a row for each record that could not be imported with
all the information in the original import CSV file, and an additional column with the error code and
description at the end of the row. This additional information can be useful to resolve import errors.
To do so, when creating or editing an import shortcut, do the following:
1.
On the Create Shortcut window, Import tab, check the Write failed records to a separate
kickout file box.
2.
By default, the kickout file includes a header row at the top. Clear the Insert a header in the
kickout file box, if you do not want the kickout file to include a header.
3.
You should check the Move kickouts to a separate directory box and create a folder for kickout
files within your shortcut folder for better organization.
For more information about creating or editing an import shortcut, see Creating an Export or Import
Shortcut and Editing Integration Manager Shortcuts.
After you have resolved the errors, you can import the kickout CSV file to complete the import. If the
kickout CSV file still contains errors, a second kickout file is created during the import of the first kickout
file.
Important: Do not modify the error column of the kickout file as this may cause import errors.
Sample kickout file showing a header and error column
id;nickname;first;last;country;role_id;IM Import Errors
123456789;jadmin;John;Admin;CANADA;3;Import Error:Record #2 for OA type User failed to import. Error Code: 601, Error Description:
Invalid ID. There isn't a record matching the ID or code you asked for..
555555555;mcollins;Marc;Collins;USA;3;Import Error:Record #6 for OA type User failed to import. Error Code: 818, Error Description:
Duplicate User nickname.
Batching Export and Import Shortcuts
You can batch Integration Manager shortcuts to run sequentially in the order specified to save you having
to launch or schedule these shortcuts one at a time.
To batch export and import shortcuts:
1.
Identify the sequence in which the integration routine should be completed.
Integration Manager

Batching Export and Import Shortcuts 77
2.
In a text editor, create a new text file.
3.
For each shortcut you want to include, and in the required running sequence, do the following:
a.
Go to the folder that contains the LNK shortcut file.
b.
Right-click the LNK shortcut file, and click Properties from the context menu.
The Shortcut properties window appears.
c.
On the Shortcut tab, copy the path in the Target box.
d.
Paste the path on a new line of your BAT file.
4.
Save the BAT file. Be sure to name the file with a BAT extension, such as example.bat.
Note: To do so in Notepad, go to File > Save As, select All Files (*.*) from the Save as
type dropdown options, and enter a File name with a BAT extension.
Editing Integration Manager Shortcuts
You can edit Integration Manager shortcuts at any time, to change your OpenAir sign-in details (account
type, company ID, user ID, or password), or to modify the configuration as your integration requirements
change.
To edit an Integration Manager shortcut, you must open the shortcut using the same version of
Integration Manager as the shortcut bundle instance. To open a shortcut for edit, do either of the
following:
■
Launch the Integration Manager shortcut bundle instance — Locate the shortcut bundle folder
corresponding to the shortcut you want to edit and double-click the EXE file C:\im_shortcuts
\<shortcutFilename>_oabundle\OpenAirManager.exe, where <shortcutFilename> is the name you
entered when creating the shortcut.
■
Launch the main Integration Manager application instance and upgrade the shortcut to the same
version, before you can open the shortcut for edit. See Upgrading Integration Manager Shortcuts.
Important: Do not edit a shortcut in a different version of Integration Manager than the one
used with the shortcut. If you do so, Integration Manager prompts you to exit the application
and then to launch the version stored in C:\im_shortcuts\<shortcutFilename>_oabundle
\OpenAirManager.exe.
To edit an Integration Manager shortcut:
1.
Launch the Integration Manager shortcut bundle instance — C:\im_shortcuts
\<shortcutFilename>_oabundle\OpenAirManager.exe, where <shortcutFilename> is the name you
entered when creating the shortcut.
Note: You cannot have two different instances of Integration Manager running at the
same time. To launch either the main application instance or the shortcut bundle instance,
you must exit the other first.
2.
In the main Integration Manager window, go to File > Open Shortcut.
A File Selector window appears.
3.
Locate and select the shortcut you would like to edit, then click Open.
The Create Shortcut window appears.
Integration Manager

Editing Integration Manager Shortcuts 78
4.
To change your OpenAir password or any other sign-in details, click OA Account Settings.
The Account Settings window appears.
Enter your new password or any other sign-in details. See also Connecting Integration Manager
with your OpenAir Account.
5.
Change other shortcut settings as required. For more information about the shortcut configuration
settings, see Creating an Export or Import Shortcut.
6.
Click OK.
A confirmation message appears.
7.
Click OK.
The OpenAir Integration Manager window appears with the name of the shortcut in the title.
8.
To change the character encoding scheme of the CSV file you are importing information from or
exporting information to, use the following steps:
a.
Go to Options > CSV Encoding
The CSV Encoding window appears.
Integration Manager

Editing Integration Manager Shortcuts 79
b.
Choose ANSI or UTF-8.
c.
Click OK.
Important: Review the following guidelines:
■
The files you provide for import must be encoded using the character encoding scheme
selected in Integration Manager. For example, if CSV Encoding is set to UTF-8, CSV files
you provide for import must be UTF-8 encoded — If the CSV files is not UTF-8 encoded,
data may be corrupted during import.
■
The CSV Encoding menu option is available only if you the shortcut uses a version of
Integration Manager 6.6 or later version.
■
Previous versions of Integration Manager use ANSI encoding exclusively. UTF-8 is not
supported in Integration Manager 6.5.3 or earlier version.
■
ANSI (codepage 1252, Western Europe) is the default character encoding scheme for
CSV imports and exports to ensure backward compatibility with existing infrastructures.
■
When editing a shortcut, you can only change the CSV character encoding scheme for
this shortcut. The Set this encoding setting for all existing local shortcuts box has
no effect. To update all your existing Integration Manager shortcuts at the same time,
change the CSV encoding option in the main Integration Manager application instance,
and check the Set this encoding setting for all existing local shortcuts box box. See
CSV Character Encoding.
9.
For all other changes, use the following steps:
a.
Locate the row corresponding to the record type and the direction corresponding to your
shortcut from the table listing the record types available for import from and export to
a CSV file.
Important: Be sure to select the same record type and direction that the shortcut
was created for.
b.
Follow the usual steps to change any of the field mapping, filtering, formatting, and
accounting settings. For more information, see the following topics:
■
Mapping OpenAir Fields to CSV Columns
■
Filtering OpenAir Records for Export
■
Formatting Information for Export and Import
■
Accounting Settings
c.
Click Exit to save your changes and exit the application.
Integration Manager

Upgrading Integration Manager Shortcuts 80
Upgrading Integration Manager Shortcuts
You can upgrade your shortcut bundles after updating the main instance of Integration Manager to a
new version. Unless you upgrade the shortcut bundle, the shortcut uses the same version of Integration
Manager as the version you used to create the shortcut.
You can continue to use shortcut bundle using an older version of Integration Manager after you update
the main Integration Manager application to a new version. Shortcut bundles are not updated to the new
version automatically. However, you must either close the main Integration Manager application and
launch the shortcut bundle instance, or upgrade the shortcut bundle to the same version as that of the
instance you are using before you can launch the shortcut or open the shortcut for edit. You cannot run
two different version instances of Integration Manager at the same time.
To upgrade a shortcut, you will need to enter a password. Contact OpenAir Professional Services or
OpenAir Customer Support to request this password. For more information about contacting OpenAir
Customer Support, see Creating a Support Case.
Important: You must contact OpenAir Professional Services or OpenAir Customer Support to
discuss your requirements before upgrading any Integration Manager shortcuts.
If you created shortcuts for business-critical processes such as accounting system integrations,
ensure they run correctly under the new version of Integration Manager. Regression test any
business-critical applications in a sandbox environment before you upgrade a shortcut on your
production environment.
To upgrade an Integration Manager shortcut:
1.
In the updated version of the main Integration Manager application, go to File > Upgrade Shortcut.
A File Selector window appears.
2.
Locate and select the shortcut you would like to upgrade, then click Open.
The Shortcut Upgrade window displays and prompts for a password. To obtain the password,
contact OpenAir Customer Support.
3.
Enter the Upgrade password, and click OK.
A window appears showing messages about the progress of the shortcut upgrade. A confirmation
message appears on completion.
4.
Click OK.
Integration Manager

Records and Fields Reference 81
Records and Fields Reference
OpenAir provide technical documentation for identifying record types, corresponding tables in the
OpenAir database, and field names. See OpenAir Data Dictionary.
Integration Manager does not support all tables and fields in the OpenAir database. This section provides
a list of OpenAir record types available for import and export using Integration Manager, see OpenAir
Records Available for Export and Import.
Click the links in the list of supported record types to view the list of standard fields supported for each
record type.
OpenAir Data Dictionary
The OpenAir Data Dictionary provides a summary of all tables, and standard fields in OpenAir.
The Database Guide also provides an overview of the corresponding tables and their relationships for
most record types in OpenAir with cross-references to the OpenAir Data Dictionary for details. See
Database Guide.
Note: To view the OpenAir Data Dictionary, use the following URL: https://<account-domain>/
database/single_user.html.
■
The URL includes the domain name for your OpenAir account <account-domain>. For more
information about your account-specific domain name, see the help topic Your OpenAir
Account URLs.
■
To view the details of a specific table, append a hash symbol # followed by the table name to
the end of the data dictionary URL. For example, use https://<account-domain>/database/
single_user.html#project to view the details of the Project table.
■
You can access the data dictionary from the OpenAir Help Center using the link in the
navigation bar if you have the View Help Center role permission.
OpenAir Records Available for Export and Import
The following table lists the OpenAir record types available for import and export using Integration
Manager. Some record types are supported only when exporting information from OpenAir to a CSV
file, or only when importing information from a CSV file into OpenAir. Check marks under the Export and
Import columns indicate that you can export or import records of that type.
When exporting information from OpenAir to a CSV file, supported standard fields for other record types
directly related with the record type you selected for export are also available for mapping. A check mark
under the Export (Related Object) column indicates the record types available as related objects and the
fields available for these related object. Some of records are only supported as related object.
Click the links in the list of supported record types to view the list of standard fields supported for each
record type.
OpenAir Record Export Export (Related Object) Import
Accounting Period —
Integration Manager

OpenAir Records Available for Export and Import 82
OpenAir Record Export Export (Related Object) Import
Actual Cost — —
Agreement —
Agreement to Project —
Approval Process —
Booking —
Booking Type —
Budget —
Budget Allocation —
Category — —
Category_1 (see Category_<N>) —
Category_2 (see Category_<N>) —
Category_3 (see Category_<N>) —
Category_4 (see Category_<N>) —
Category_5 (see Category_<N>) —
Contact —
Cost Category — —
Cost Center
Cost Type — —
Currency —
Customer
Customer PO —
Customer PO to Project — —
Deal —
DealContact — —
DealSchedule — —
Department
Entity tag —
Envelope
Estimate —
Integration Manager

OpenAir Records Available for Export and Import 83
OpenAir Record Export Export (Related Object) Import
EstimateAdjustment — —
EstimateExpense — —
EstimateLabor — —
EstimatePhase — —
Event —
Expense Item —
Filter set — —
ForexInput — —
Invoice
Issue —
Item to User Location —
Job Code —
Leave accrual rule
Leave accrual rule to user —
Leave accrual trans —
Loaded Cost —
Payment —
Payment Terms —
Payment Type
Payroll Type —
Product —
Profile Type
Project
Project Assignment —
Project Billing Rule
Project Billing Transaction —
Project Group —
Project Stage — —
Project Task
Integration Manager

OpenAir Records Available for Export and Import 84
OpenAir Record Export Export (Related Object) Import
Project task assign —
Projecttask_type — —
Proposal —
ProposalBlock — —
Prospect —
Proxy
—
Purchase item —
(only non-PO purchase items)
Purchase order — —
Purchaser — —
Purchase request — —
Rate Card — —
Rate Card Item —
Receipt
Reimbursement —
Repeat —
Resource Profile —
Resource Request —
Resource Request Queue —
Resource Search —
Rev. Recogn. Amount — —
Rev. Recogn. Rule —
Rev. Recogn. Trans. —
Revenue Container —
Revenue Stage — —
Schedule Exception —
ScheduleRequest
ScheduleRequest item — —
Service —
Integration Manager

Accounting Period 85
OpenAir Record Export Export (Related Object) Import
Slip Projection — —
Slip Stage — —
Tag Group —
Tag Group Attribute —
Target Utilization —
Tax Location — —
Tax Rate — —
Time Type — —
TimeBill
Timecard — —
Timesheet
Timesheet entry —
Timesheet/Timecard entry — —
Todo — —
User
User Project Rate —
User Workschedule —
Vendor — —
Workspace Link —
Workspace User —
Accounting Period
Field Name Data Type Export Import
active TEXT
created DATE —
current_period TEXT
default_period TEXT
end_date DATE
id ID
Integration Manager

Accounting Period 86
Field Name Data Type Export Import
name TEXT
notes TEXT
period_date DATE
period_date_how TEXT
start_date DATE
updated DATE —
Actual Cost
Field Name Data Type Export Import
cost NOT_SET —
cost_typeid ID —
created DATE —
currency NOT_SET —
date DATE —
externalid NOT_SET —
id ID —
is_accrual NOT_SET —
name NOT_SET —
notes NOT_SET —
period NOT_SET —
updated DATE —
userid ID —
Agreement
Name Data Type Export Export (Related Object) Import
acct_date DATE — —
active NOT_SET —
code NOT_SET —
Integration Manager

Agreement 87
Name Data Type Export Export (Related Object) Import
created DATE —
currency NOT_SET —
customer_externalid NOT_SET — —
customer_id ID —
date DATE —
external_id NOT_SET —
id ID —
name NOT_SET —
notes NOT_SET —
number NOT_SET —
total NOT_SET —
updated DATE —
Agreement to Project
Name Data Type Export Import
active TEXT
agreementid ID
created DATE —
customerid ID
id ID
projectid ID
updated DATE —
Approval Process
Name Data Type Export Import
created DATE —
external_id TEXT
id ID
Integration Manager

Approval Process 88
Name Data Type Export Import
name TEXT
updated DATE —
Booking
Name Data Type Export Import
approval_status NOT_SET
as_percentage NOT_SET
■
booking_type_id (Export)
■
bookingtype_id (Import)
ID
booking_type_<field_name> See Booking Type —
created DATE
customer_id ID
customer_<field_name> See Customer —
enddate DATE
endtime NOT_SET
external_id NOT_SET
hours NOT_SET
id ID
invoice_layoutid ID —
invoice_prefix TEXT —
invoice_text TEXT —
job_codeid ID
locationid ID
notes TEXT
ownerid ID
percentage NOT_SET
project_assignment_profileid ID
project_id ID
project_<field_name> See Project —
Integration Manager

Booking 89
Name Data Type Export Import
project_taskid ID
repeat_id ID
resource_request_queueid ID
startdate DATE
starttime NOT_SET
updated DATE
user_id ID
user_<field_name> See User —
Booking Type
Name Data Type Export Export (Related Object) Import
active NOT_SET
created DATE
id ID
name NOT_SET
notes TEXT
priority NOT_SET
updated DATE
Budget
Name Data Type Export Import
budget_category_id ID
categoryid ID
created DATE
currency NOT_SET
customer_id ID
date DATE
id ID
Integration Manager

Budget 90
Name Data Type Export Import
name NOT_SET
notes NOT_SET
project_id ID
total NOT_SET
updated DATE
Budget Allocation
Name Data Type Export Import
allocation NOT_SET
budget_activity_id ID
budget_category_id ID
budget_id ID
created DATE
currency NOT_SET
customer_id ID
date DATE
id ID
project_id ID
total NOT_SET
updated DATE
user_id ID
Category
Name Data Type Export Export (Related Object) Import
active NOT_SET — —
code NOT_SET — —
cost_centerid ID — —
created DATE — —
Integration Manager

Category 91
Name Data Type Export Export (Related Object) Import
currency NOT_SET — —
externalid NOT_SET — —
fixed_fee NOT_SET — —
id ID — —
name NOT_SET — —
other_rate NOT_SET — —
other_rate_type NOT_SET — —
rate NOT_SET — —
taxable NOT_SET — —
updated DATE — —
Category_<N>
Name Data Type Export Import
active NOT_SET
code NOT_SET
created DATE
externalid NOT_SET
id ID
name NOT_SET
notes NOT_SET
updated DATE
Contact
Name Data Type Export Export (Related Object) Import
acct_code NOT_SET
active NOT_SET
address1 NOT_SET
address2 NOT_SET
Integration Manager

Contact 92
Name Data Type Export Export (Related Object) Import
address3 TEXT
address4 TEXT
can_bill_to NOT_SET
can_ship_to NOT_SET
can_sold_to NOT_SET
city NOT_SET
country NOT_SET
created DATE
customer_company NOT_SET
customer_externalid NOT_SET
customer_id ID
customer_<field_name> See Customer — —
email NOT_SET
external_id NOT_SET
fax NOT_SET
firstname TEXT
invoice_layoutid ID — —
invoice_prefix TEXT — —
invoice_text TEXT — —
id ID
job_title NOT_SET
lastname TEXT
middle TEXT
mobile NOT_SET
name TEXT
notes NOT_SET
phone NOT_SET
state NOT_SET
title NOT_SET
Integration Manager

Contact 93
Name Data Type Export Export (Related Object) Import
updated DATE
zip NOT_SET
Cost Category
Name Data Type Export Import
active NOT_SET —
created DATE —
externalid NOT_SET —
id ID —
name NOT_SET —
notes NOT_SET —
updated DATE —
Cost Center
Name Data Type Export Export (Related Object) Import
active NOT_SET
created DATE
external_id NOT_SET
id ID
name TEXT
notes TEXT
updated DATE
Cost Type
Name Data Type Export Import
active NOT_SET —
cost_categoryid ID —
created DATE —
Integration Manager

Cost Type 94
Name Data Type Export Import
externalid NOT_SET —
id ID —
name NOT_SET —
notes NOT_SET —
updated DATE —
Currency
Name Data Type Export Import
created DATE
rate NOT_SET
symbol NOT_SET
updated DATE
Customer
Name Data Type Export Export (Related Object) Import
acct_code NOT_SET
active CHAR
address1 TEXT
address2 TEXT
address3 TEXT
address4 TEXT
billing_address1 NOT_SET
billing_address2 NOT_SET
billing_address3 TEXT
billing_address4 TEXT
billing_city NOT_SET
billing_code TEXT —
billing_contact_id ID —
Integration Manager

Customer 95
Name Data Type Export Export (Related Object) Import
billing_country NOT_SET
billing_email NOT_SET
billing_fax NOT_SET
billing_firstname TEXT
billing_lastname TEXT
billing_middle TEXT
billing_mobile NOT_SET
billing_phone NOT_SET
billing_state NOT_SET
billing_title NOT_SET
billing_zip NOT_SET
bus_typeid ID
city TEXT
company TEXT
company_sizeid ID
contact_address1 NOT_SET
contact_address2 NOT_SET
contact_address3 TEXT
contact_address4 TEXT
contact_city NOT_SET
contact_country NOT_SET
contact_email NOT_SET
contact_fax NOT_SET
contact_firstname TEXT
contact_lastname TEXT
contact_middle TEXT
contact_mobile NOT_SET
contact_phone NOT_SET
contact_state NOT_SET
Integration Manager

Customer 96
Name Data Type Export Export (Related Object) Import
■
contact_titles (Export)
■
contact_title (Import)
NOT_SET
contact_zip NOT_SET
cost_center_id ID
cost_center_<field_name> See Cost Center — —
country TEXT
created DATE
credit_invoice_layout_id NOT_SET
currency NOT_SET
customer_locationid NOT_SET — —
email TEXT
external_id NOT_SET
fax TEXT
filterset_ids NOT_SET —
firstname TEXT
hear_aboutid ID
hierarchy_node_ids IDS —
id ID
invoice_layoutid ID —
invoice_prefix TEXT —
invoice_text TEXT —
lastname TEXT
middle TEXT
mobile NOT_SET
name TEXT
notes TEXT
phone TEXT
primary_contactid ID —
rate DECIMAL
Integration Manager

Customer 97
Name Data Type Export Export (Related Object) Import
shipping_contactid ID —
state TEXT
■
statement (Export)
■
statements (Import)
TEXT
ta_include NOT_SET — —
tb_approvalprocess ID
tb_approver ID
te_include NOT_SET — —
terms TEXT
territoryid ID
title TEXT
type NOT_SET —
updated DATE
userid ID
user_<field_name> See User — —
web TEXT
zip TEXT
Customer PO
Name Data Type Export Export (Related Object) Import
acct_date DATE — —
active NOT_SET —
code NOT_SET —
created DATE —
currency NOT_SET —
customer_externalid NOT_SET — —
customer_id ID —
date DATE —
external_id NOT_SET —
Integration Manager

Customer PO 98
Name Data Type Export Export (Related Object) Import
id ID —
name NOT_SET —
notes NOT_SET —
number NOT_SET —
total NOT_SET —
updated DATE —
Customer PO to Project
Name Data Type Export Import
active NOT_SET —
created DATE —
customer_id ID —
customerpoid ID —
external_id NOT_SET —
id ID —
projectid ID —
updated DATE —
Deal
Name Data Type Export Export (Related Object) Import
active NOT_SET —
closed DATE —
created DATE —
customer_id ID —
customer_<field_name> See Customer — —
exported NOT_SET —
id ID —
invoice_layoutid ID — —
Integration Manager

Deal 99
Name Data Type Export Export (Related Object) Import
invoice_prefix TEXT — —
invoice_text TEXT — —
name NOT_SET —
notes TEXT —
opened DATE —
rating NOT_SET —
stage NOT_SET —
status NOT_SET —
territory_id ID —
updated DATE —
user_id ID —
user_<field_name> See User — —
DealContact
Name Data Type Export Import
contact_id ID —
contact_<field_name> See Contact —
created DATE —
deal_id ID —
deal_<field_name> See Deal —
id ID —
updated DATE —
DealSchedule
Name Data Type Export Import
amount NOT_SET —
created DATE —
date DATE —
Integration Manager

DealSchedule 100
Name Data Type Export Import
deal_id ID —
deal_<field_name> See Deal —
id ID —
updated DATE —
Department
Name Data Type Export Export (Related Object) Import
created DATE
external_id NOT_SET
id ID
name TEXT
notes NOT_SET
updated DATE
user_id ID
user_<field_name> See User —
Entity tag
Name Data Type Export Import
created DATE —
customerid ID
default_for_entity NOT_SET
end_date DATE
externalid TEXT
id ID
projectid ID
start_date DATE
tag_group_attribute_name NOT_SET —
tag_group_attributeid ID
Integration Manager

Entity tag 101
Name Data Type Export Import
tag_group_id NOT_SET —
updated DATE —
userid ID
Envelope
Name Data Type Export Export (Related Object) Import
acct_date DATE
advance NUMBER
approved DATE
balance NUMBER
created DATE
currency NOT_SET
currency_exchange_intolerance NOT_SET —
customerid NUMBER —
date DATE
date_end DATE
date_start DATE
errors NOT_SET — —
external_id NOT_SET
id ID
is_overlapping NOT_SET
log NOT_SET — —
name NOT_SET
notes TEXT
number NOT_SET
projectid NUMBER —
status NOT_SET
submitted DATE
■
tax_locationid (Export)
ID
Integration Manager

Envelope 102
Name Data Type Export Export (Related Object) Import
■
tax_location_id (Import)
thin_clientid NOT_SET —
total NUMBER
totreimburse NUMBER
tottickets NUMBER
trip_reason NOT_SET
updated DATE
user_id ID
user_<field_name> See User — —
warnings NOT_SET — —
Estimate
Name Data Type Export Export (Related Object) Import
created DATE —
customer_id ID —
customer_<field_name> See Customer — —
deal_id ID —
deal_<field_name> See Deal — —
hide_expenses NOT_SET —
id ID —
invoice_layoutid ID — —
invoice_prefix TEXT — —
invoice_text TEXT — —
name NOT_SET —
notes TEXT —
updated DATE —
Integration Manager

EstimateAdjustment 103
EstimateAdjustment
Name Data Type Export Import
adjustment_type NOT_SET —
amount NUMBER —
amount_type NOT_SET —
created DATE —
estimate_id ID —
estimate_<field_name> See Estimate —
id ID —
name NOT_SET —
updated DATE —
EstimateExpense
Name Data Type Export Import
created DATE —
date DATE —
description TEXT —
estimate_id ID —
estimate_<field_name> See Estimate —
id ID —
item_id ID —
item_<field_name> See Expense Item —
markup NUMBER —
markup_type NOT_SET —
price NOT_SET —
quantity NOT_SET —
updated DATE —
Integration Manager

EstimateLabor 104
EstimateLabor
Name Data Type Export Import
amount NUMBER —
amount_type NOT_SET —
billing_rate NOT_SET —
description TEXT —
end_date DATE —
created DATE —
estimate_id ID —
estimate_<field_name> See Estimate —
id ID —
loaded_cost NOT_SET —
start_date DATE —
updated DATE —
user_id ID
user_<field_name> See User —
EstimatePhase
Name Data Type Export Import
created DATE —
estimate_id ID —
estimate_<field_name> See Estimate —
id ID —
name NOT_SET —
updated DATE —
Event
Name Data Type Export Import
contactid ID
Integration Manager
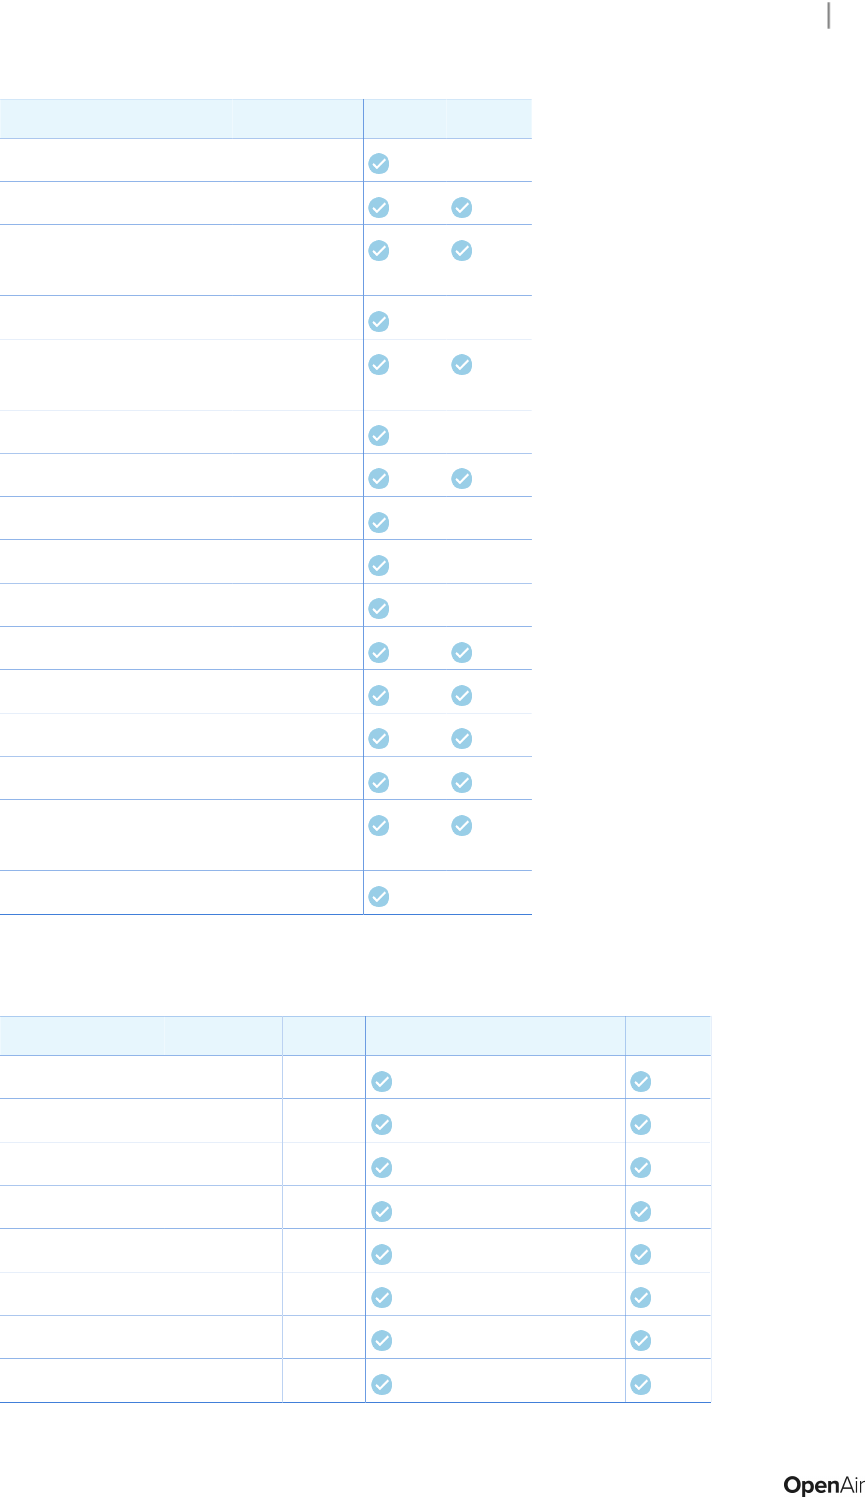
Event 105
Name Data Type Export Import
contact_<field_name> See Contact —
created DATE
■
customer_id (Export)
■
customerid (Import)
ID
customer_<field_name> See Customer —
■
deal_id (Export)
■
dealid (Import)
ID
deal_<field_name> See Deal —
id ID
invoice_layoutid ID —
invoice_prefix TEXT —
invoice_text TEXT —
name TEXT
notes TEXT
occurred DATE
updated DATE
■
user_id (Export)
■
userid (Import)
ID
user_<field_name> See User —
Expense Item
Name Data Type Export Export (Related Object) Import
acct_code NOT_SET —
active CHAR —
cost NUMBER —
cost_center_id ID —
created DATE —
external_id NOT_SET —
id ID —
item_currency NOT_SET —
Integration Manager

Expense Item 106
Name Data Type Export Export (Related Object) Import
name NAME —
tax_locationid ID — —
taxable NOT_SET —
tp_comp NOT_SET — —
tp_cost NOT_SET — —
tp_notes_required NOT_SET — —
tp_unit_or_total NOT_SET — —
type NOT_SET —
unitm NOT_SET —
updated DATE —
Filter set
Name Data Type Export Import
active NOT_SET —
all_access NOT_SET —
created DATE —
default_filter_set NOT_SET —
id ID —
name NOT_SET —
notes NOT_SET —
updated DATE —
ForexInput
Name Data Type Export Import
base NOT_SET —
enddate DATE —
future NOT_SET —
past NOT_SET —
Integration Manager

ForexInput 107
Name Data Type Export Import
rate NOT_SET —
startdate DATE —
symbol NOT_SET —
Guidelines
The base currency must be one of the user-defined reporting currencies. It is not possible to set historical
foreign currency exchange rates if the base currency is one of the currencies supported by OpenAir
as standard. If one record in the import CSV file includes a system-supported currency as the base
currency, the Integration Manager log shows "OA type ForexInput failed to import. Error Code: 837;
Error Description: Not a valid account currency, You can only specify a currency currently enabled for the
account. API Error: Invalid base currency specified. It must be one of user-defined currencies."
For more information about user-defined reporting currencies, see the help topic User-Defined Reporting
Currencies.
Invoice
Name Data Type Export Export (Related Object) Import
access_log NOT_SET
accounting NOT_SET
acct_date DATE
approval_status NOT_SET
balance NOT_SET
contactid ID
created DATE
credit NOT_SET
credit_reason NOT_SET
credit_rebill_status TEXT —
currency NOT_SET
■
customer_id (Export)
■
customerid (Import)
ID
customer_<field_name> See Customer — —
date DATE
draw NOT_SET
Integration Manager

Invoice 108
Name Data Type Export Export (Related Object) Import
draw_date DATE
emailed DATE
externalid NOT_SET
id ID
invoice_layoutid ID
invoice_prefix TEXT — —
invoice_text TEXT — —
notes NOT_SET
number NOT_SET
original_invoiceid ID
paperrequest DATE
papersend DATE
payment_termsid ID — —
shipping_contactid ID
sold_to_contactid ID —
status NOT_SET
tax NOT_SET
tax_federal NUMBER
tax_gst NUMBER
tax_hst NUMBER
tax_pst NUMBER
tax_state NUMBER
terms NOT_SET
total NOT_SET
updated DATE
Issue
Name Data Type Export Import
attachment_id ID
Integration Manager

Issue 109
Name Data Type Export Import
created DATE —
customer_id ID
date DATE
date_resolution_expected DATE
date_resolution_required DATE
date_resolved DATE
description NOT_SET
id ID
issue_category_id ID
issue_notes NOT_SET
issue_severity_id ID
issue_source_id ID
issue_stage_id ID
issue_status_id ID
name NOT_SET
number NOT_SET
owner_id ID
prefix NOT_SET
priority NOT_SET
project_id ID
project_task_id ID
resolution_notes NOT_SET
updated DATE —
user_id ID
Item to User Location
Name Data Type Export Import
created DATE —
id ID
Integration Manager

Item to User Location 110
Name Data Type Export Import
itemid ID
tax_locationid ID
updated DATE —
user_locationid ID
Job Code
Name Data Type Export Import
active NOT_SET
code NOT_SET
created DATE
currency NOT_SET
■
externalid (Export)
■
external_id (Import)
NOT_SET
id ID
loaded_cost NOT_SET
name NOT_SET
notes NOT_SET
updated DATE
userid_fte ID
Leave accrual rule
Name Data Type Export Export (Related Object) Import
active NOT_SET
amount NOT_SET
cap NOT_SET
category_filter NOT_SET
created DATE
draw_down_when NOT_SET
grace_days NOT_SET
Integration Manager

Leave accrual rule 111
Name Data Type Export Export (Related Object) Import
id ID
lose_how NOT_SET
name NOT_SET
notes NOT_SET
period NOT_SET
project_filter NOT_SET
project_task_filter IDS
timetype_filter NOT_SET
timing NOT_SET
updated DATE
Leave accrual rule to user
Name Data Type Export Import
created DATE
end_date DATE
id ID
leave_accrual_rule_id ID
leave_accrual_rule_<field_name> See Leave accrual rule —
start_date DATE
transfer_balance_to ID
updated DATE
user_id ID
user_<field_name> See User —
Leave accrual trans
Name Data Type Export Import
amount NOT_SET
created DATE
Integration Manager

Leave accrual trans 112
Name Data Type Export Import
date DATE
from_run NOT_SET
id ID
leave_accrual_rule_id ID
leave_accrual_rule_<field_name> See Leave accrual rule —
notes NOT_SET
taskid ID
type NOT_SET
updated DATE
user_id ID
user_<field_name> See User —
Loaded Cost
Name Data Type Export Import
cost NOT_SET
created DATE
currency NOT_SET
current NOT_SET
customerid ID
end DATE
external_id TEXT
id ID
lc_level NOT_SET
project_taskid ID
projectid ID
start DATE
updated DATE
userid ID
user_<field_name> See User —
Integration Manager

Loaded Cost 113
Guidelines
The loaded_cost table includes historical user loaded cost information. To import current user loaded cost
information, map the OpenAir field current to a constant set to 1 unless you have a matching field in your
import CSV file.
Payment
Name Data Type Export Import
bulk_payment_id ID
created DATE
currency NOT_SET
customer_id ID
customer_<field_name> See Customer —
date DATE
externalid NOT_SET
id ID
invoice_id ID
invoice_layoutid ID —
invoice_number NOT_SET
invoice_prefix TEXT —
invoice_text TEXT —
invoice_<field_name> See Invoice —
notes NOT_SET
total NUMBER
updated DATE
Payment Terms
Name Data Type Export Import
active NOT_SET
created DATE
default_terms NOT_SET
Integration Manager

Payment Terms 114
Name Data Type Export Import
id ID
name NOT_SET
notes NOT_SET
updated DATE
Payment Type
Name Data Type Export Export (Related Object) Import
active NOT_SET
created DATE
id ID
name NOT_SET
notes NOT_SET
updated DATE
Payroll Type
Name Data Type Export Export (Related Object) Import
active NOT_SET —
created DATE —
externalid NOT_SET —
id ID —
name NOT_SET —
notes NOT_SET —
updated DATE —
Product
Name Data Type Export Export (Related Object) Import
acct_code NOT_SET —
Integration Manager

Product 115
Name Data Type Export Export (Related Object) Import
active NOT_SET —
created DATE —
currency NOT_SET —
externalid NOT_SET —
id ID —
manufacturer_part NOT_SET —
manufacturerid ID —
name NOT_SET —
notes NOT_SET —
standard_cost NOT_SET —
taxable NOT_SET —
um NOT_SET —
updated DATE —
vendor_sku NOT_SET —
vendorid ID —
Profile Type
Name Data Type Export Export (Related Object) Import
active NOT_SET
created DATE
description TEXT
externalid NOT_SET
id ID
name NOT_SET
related_id ID
related_table NOT_SET
type NOT_SET
updated DATE
Integration Manager

Project 116
Project
Name Data Type Export Export (Related Object) Import
acct_code NOT_SET
active CHAR
auto_bill NOT_SET
auto_bill_cap NOT_SET
auto_bill_cap_value NOT_SET
auto_bill_override NOT_SET
az_approvalprocess ID
az_approver ID
billing_code NOT_SET —
billing_contact_id ID
billing_contact_<field_name> See Contact — —
br_approvalprocess ID
br_approver ID
budget NOT_SET
budget_time NOT_SET
category_filter NOT_SET —
copy_approvers NOT_SET —
copy_custom_fields NOT_SET —
copy_dashboard_settings NOT_SET —
copy_invoice_layout_settings NOT_SET —
copy_issues NOT_SET —
copy_loaded_cost NOT_SET —
copy_notification_settings NOT_SET —
copy_project_billing_auto_settings NOT_SET —
copy_project_billing_rules NOT_SET —
copy_project_pricing NOT_SET —
copy_revenue_recognition_auto_
settings
NOT_SET —
Integration Manager

Project 117
Name Data Type Export Export (Related Object) Import
copy_revenue_recognition_rules NOT_SET —
cost_center_id ID
cost_center_<field_name> See Cost Center — —
create_workspace NOT_SET —
created DATE
credit_invoice_layout_id NOT_SET
currency NOT_SET
current_dr NUMBER
current_wip NUMBER
customer_id ID
customer_name TEXT —
customer_<field_name> See Customer — —
exported_dr NUMBER
exported_wip NUMBER
external_id NOT_SET
filtersetids NOT_SET —
finish_date DATE
hierarchy_node_ids IDS —
id ID
invoice_layoutid ID
invoice_prefix TEXT — —
invoice_text NOT_SET
is_portfolio_project TEXT —
location_active NOT_SET — —
location_created DATE — —
location_name NOT_SET — —
location_related_table NOT_SET — —
location_relatedid ID — —
location_type NOT_SET — —
Integration Manager
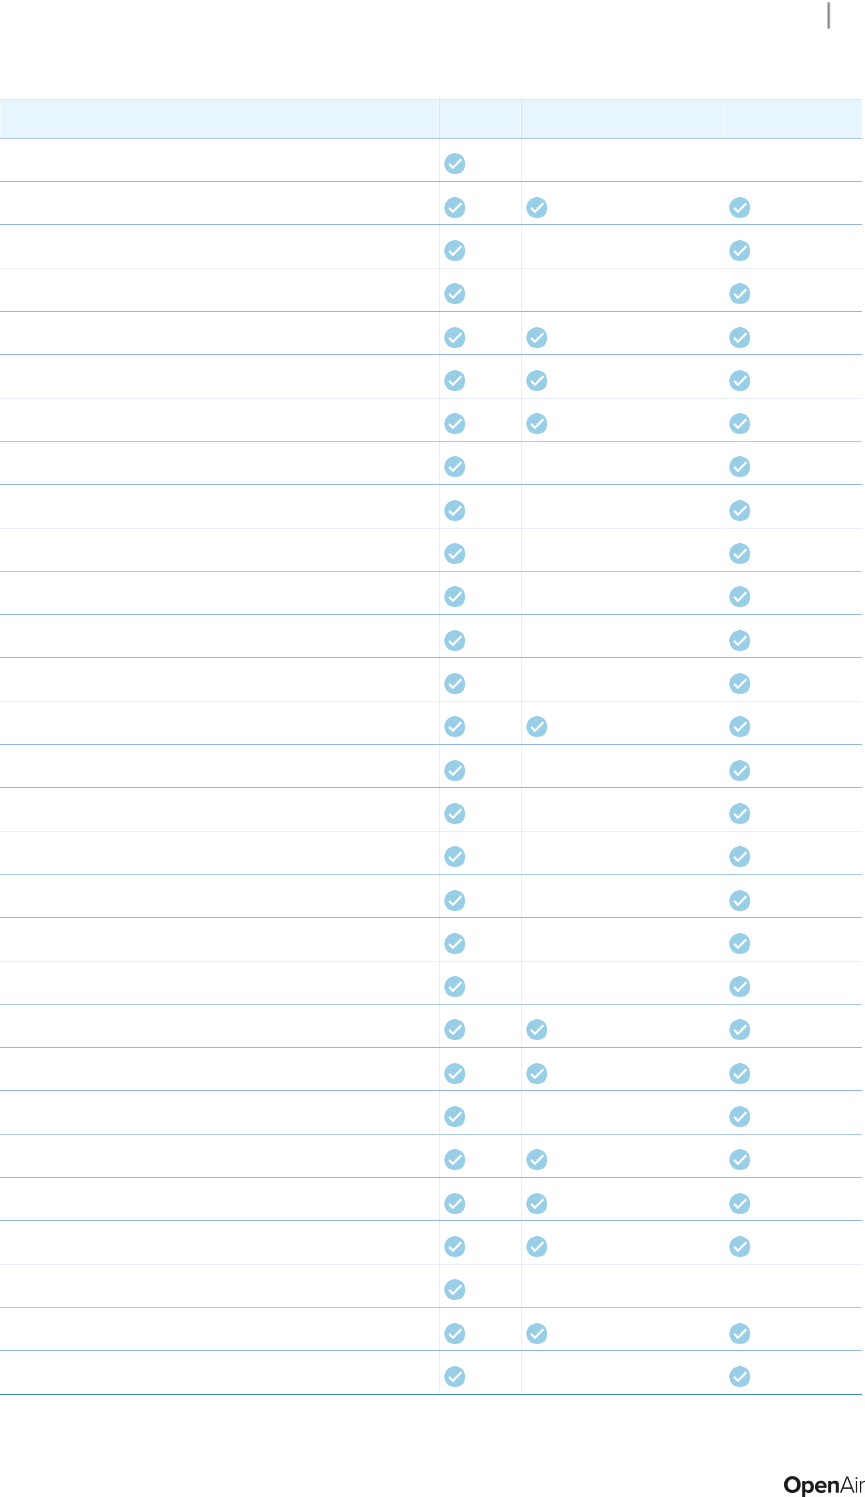
Project 118
Name Data Type Export Export (Related Object) Import
location_updated DATE — —
locationid ID
message TEXT —
msp_link_type NOT_SET —
name TEXT
notes TEXT
notify_assignees NOT_SET
notify_issue_assigned_to NOT_SET —
notify_issue_closed_assigned_to NOT_SET —
notify_issue_closed_customer_owner NOT_SET —
notify_issue_closed_project_owner NOT_SET —
notify_issue_created_customer_owner NOT_SET —
notify_issue_created_project_owner NOT_SET —
notify_owner NOT_SET
notify_sr_submitted_project_owner NOT_SET —
only_owner_can_edit NOT_SET —
payroll_type_filter NOT_SET —
pm_approver_1 ID —
pm_approver_2 ID —
pm_approver_3 ID —
po_approvalprocess ID
po_approver ID
portfolio_projectid ID —
pr_approvalprocess ID
pr_approver ID
project_stageid ID
project_stage_<field_name> See Project Stage — —
rate NOT_SET
rate_cardid NUMBER —
Integration Manager

Project 119
Name Data Type Export Export (Related Object) Import
rm_approvalprocess ID —
rm_approver ID —
rv_approvalprocess ID —
rv_approver ID —
shipping_contact_id ID —
shipping_contact_<field_name> See Contact — —
sold_to_contact_id ID —
sqa_labor NOT_SET
start_date DATE
sync_workspace NOT_SET —
ta_approvalprocess ID
ta_approver ID
ta_include NOT_SET —
tax_location_id ID
tax_location_name NOT_SET
tb_approvalprocess ID
tb_approver ID
te_allowance_approvalprocess NUMBER —
te_allowance_approver NUMBER —
te_approvalprocess ID
te_approver ID
te_include NOT_SET —
template_project_id ID —
timetype_filter NOT_SET —
tracked CHAR
updated DATE
user_filter NOT_SET —
user_id ID
user_<field_name> See User — —
Integration Manager

Project Assignment 120
Project Assignment
Name Data Type Export Import
allocation NOT_SET
created DATE
customerid ID
id ID
job_codeid ID
project_groupid ID
projectid ID
updated DATE
userid ID
Project Billing Rule
Name Data Type Export Export (Related Object) Import
accounting_period_id ID —
acct_date DATE —
acct_date_how NOT_SET —
active NOT_SET
adjust_if_capped NOT_SET
agreementid ID
amount NUMBER
backout_gst NOT_SET
cap NOT_SET
cap_by_customerpo NUMBER —
cap_hours NOT_SET
category_1id ID —
category_2id ID —
category_3id ID —
category_4id ID —
Integration Manager

Project Billing Rule 121
Name Data Type Export Export (Related Object) Import
category_5id ID —
category_filter TEXT
category_when NOT_SET
categoryid ID
cost_center_id ID —
created DATE
currency NOT_SET
customerpoid ID
daily_cap_hours NOT_SET —
daily_cap_is_per_user NOT_SET
daily_cap_period NOT_SET
daily_rate_multiplier NOT_SET —
daily_roll_to_next NOT_SET
description TEXT
end_date DATE
end_milestone ID
exclude_archived_ts NOT_SET
exclude_non_billable NOT_SET
exclude_non_reimbursable NOT_SET
id ID
item_filter TEXT
job_code_filter NOT_SET —
markup NOT_SET
markup_category ID
markup_type NOT_SET
name NOT_SET
notes TEXT
percent NOT_SET
percent_how NOT_SET
Integration Manager

Project Billing Rule 122
Name Data Type Export Export (Related Object) Import
position NOT_SET
product_filter NOT_SET
project_id ID —
project_<field_name> See Project — —
project_task_filter IDS
project_task_id NUMBER —
rate_cardid ID
rate_from NOT_SET
rate_multiplier NUMBER
repeat_id ID
round_rules TEXT
slip_stage_id ID
slip_stage_<field_name> See Slip Stage — —
start_date DATE
start_milestone ID
stop_if_capped NOT_SET
ticket_maximums NOT_SET
timetype_filter TEXT
type NOT_SET
updated DATE
user_filter TEXT
Project Billing Transaction
Name Data Type Export Import
agreementid ID
categoryid ID
cost DECIMAL
cost_centerid ID
created DATE —
Integration Manager

Project Billing Transaction 123
Name Data Type Export Import
currency TEXT
customerid ID
customerpoid ID
date DATE
description TEXT
hour DECIMAL
id ID
itemid ID
job_codeid ID
minute DECIMAL
notes TEXT
payroll_typeid ID
project_billing_ruleid ID
project_taskid ID
projectid ID
quantity DECIMAL
rate DECIMAL
slip_stage_id ID
slipid ID
taskid ID
ticketid ID
timetypeid ID
total DECIMAL
type CHAR
um TEXT
updated DATE —
userid ID
Integration Manager

Project Billing Transaction 124
Guidelines
Import requires the Modify Project Billing Transaction Using OpenAir API feature enabled. Otherwise, the
Integration Manager log shows "OA type Projectbillingtransaction failed to import. Error Code: 1; Error
Description: Unknown Error". To enable the Modify Project Billing Transaction Using OpenAir API feature,
contact OpenAir Customer Support
Project Group
Name Data Type Export Import
active TEXT
assigned_users TEXT
created DATE —
id ID
name TEXT
notes TEXT
updated DATE —
Project Pricing
Name Data Type Export Import
created DATE —
customerid ID
discount_rate_cardid ID
id ID
projectid ID
standard_rate_cardid ID
updated DATE —
Project Stage
Name Data Type Export Export (Related Object) Import
created DATE — —
enable_analysis NOT_SET — —
enable_billing NOT_SET — —
Integration Manager
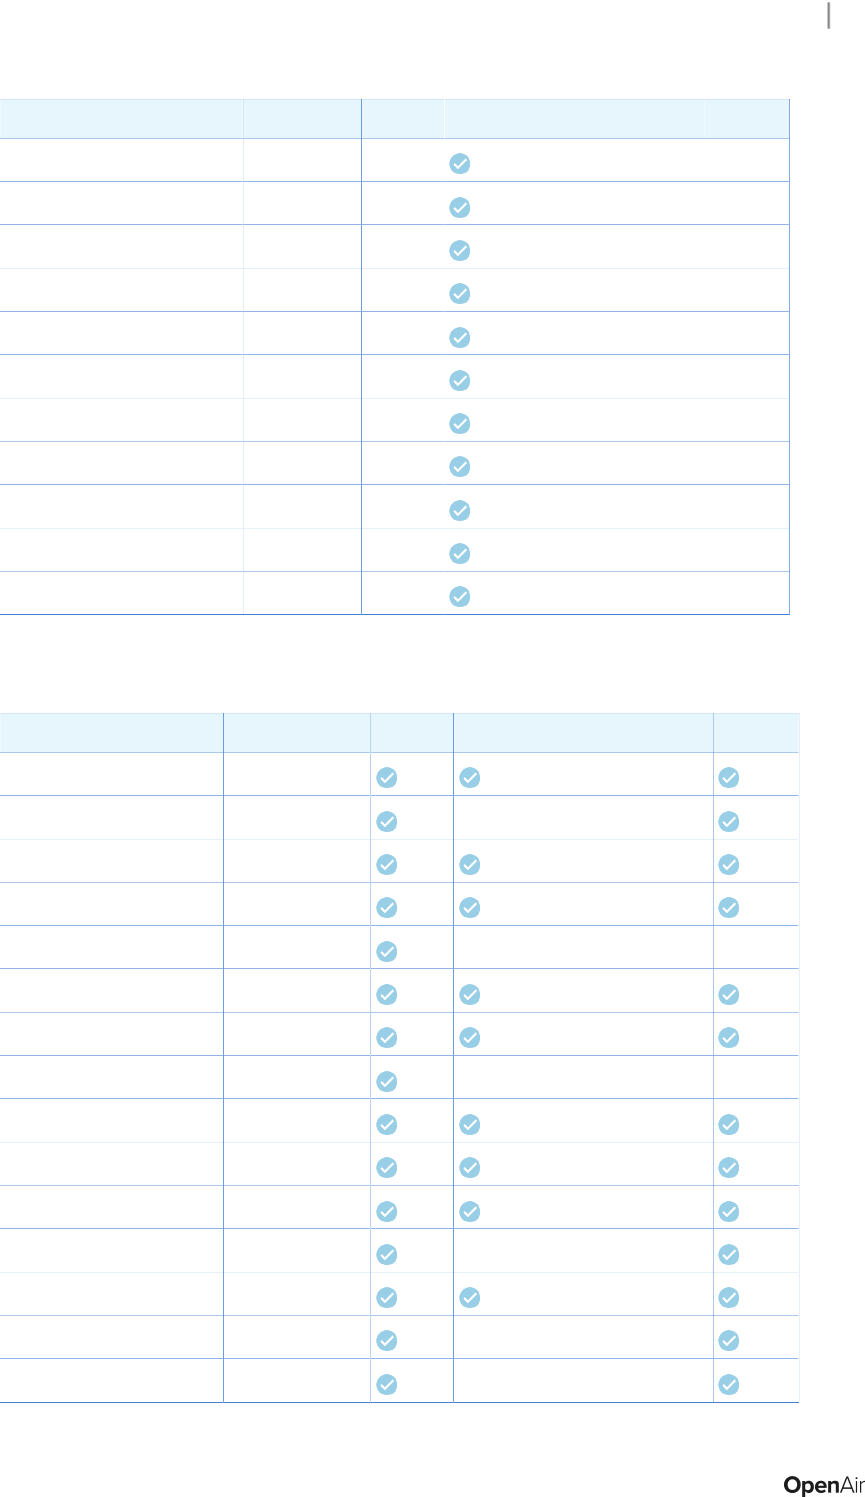
Project Stage 125
Name Data Type Export Export (Related Object) Import
enable_phase_and_task NOT_SET — —
enable_pricing NOT_SET — —
enable_project_assignments NOT_SET — —
enable_recognition NOT_SET — —
enable_team NOT_SET — —
enable_utilization NOT_SET — —
id ID — —
name NOT_SET — —
notes NOT_SET — —
position NOT_SET — —
updated DATE — —
Project Task
Name Data Type Export Export (Related Object) Import
all_can_assign NUMBER
assign_user_names TEXT —
calculated_finishes DATE
calculated_starts DATE
category_<field_name> See Category — —
closed NOT_SET
cost_center_id ID
cost_center_<field_name> See Cost Center — —
created DATE
currency TEXT
customer_id ID
customer_name TEXT —
default_category ID
default_category_1 ID —
default_category_2 ID —
Integration Manager

Project Task 126
Name Data Type Export Export (Related Object) Import
default_category_3 ID —
default_category_4 ID —
default_category_5 ID —
estimated_hours NUMBER
external_id TEXT
fnlt_date DATE
id ID
id_number NOT_SET
manual_task_budget NOT_SET —
name NOT_SET
non_billable NUMBER
notes TEXT
parentid ID
percent_complete NOT_SET
phase NOT_SET
planned_hours NOT_SET
predecessors NOT_SET
predecessors_lag NOT_SET
predecessors_type NOT_SET
priority NOT_SET
project_id ID
project_name TEXT —
project_<field_name> See Project — —
projecttask_typeid ID
seq NOT_SET
starts DATE
task_budget_cost NUMBER
task_budget_revenue NUMBER
timetype_filter NOT_SET
Integration Manager

Project Task 127
Name Data Type Export Export (Related Object) Import
updated DATE
use_project_assignment NUMBER
Project task assign
Name Data Type Export Import
allocation NUMBER
bookingid ID
closed_for_envelope NUMBER
closed_for_timesheet NUMBER
created DATE
external_id TEXT
id ID
job_codeid ID
pending_bookingid ID
planned_hours NUMBER
project_assignment_profileid ID
project_groupid NOT_SET
project_id ID
project_<field_name> See Project —
projecttask_id ID
projecttask_<field_name> See Project Task —
updated DATE
user_id ID
user_<field_name> See User —
Projecttask_type
Name Data Type Export Import
active NOT_SET —
Integration Manager

Projecttask_type 128
Name Data Type Export Import
created DATE —
id ID —
name NOT_SET —
notes NOT_SET —
supress_notification NOT_SET —
updated DATE —
Proposal
Name Data Type Export Export (Related Object) Import
access_log NOT_SET —
approved DATE —
approved_by NOT_SET —
attachment_id ID —
created DATE —
created_by NOT_SET —
customer_id ID —
customer_<field_name> See Customer — —
description TEXT —
expires DATE —
id ID —
invoice_layoutid ID —
invoice_prefix TEXT — —
invoice_text TEXT — —
name NOT_SET —
notes TEXT —
number NOT_SET —
project_id ID —
project_<field_name> See Project — —
responded DATE —
Integration Manager

Proposal 129
Name Data Type Export Export (Related Object) Import
response NOT_SET —
sent DATE —
status NOT_SET —
submitted DATE —
total NOT_SET —
updated DATE —
user_id ID —
user_<field_name> See User — —
viewed DATE —
ProposalBlock
Name Data Type Export Import
category_id ID —
category_<field_name> See Category —
content NOT_SET —
cost NOT_SET —
created DATE —
description TEXT —
hour NOT_SET —
id ID —
item_id ID —
item_<field_name> See Expense Item —
minute NOT_SET —
name NOT_SET —
proposal_id ID —
proposal_<field_name> See Proposal —
quantity NUMBER —
rate NOT_SET —
seq NUMBER —
Integration Manager

ProposalBlock 130
Name Data Type Export Import
slip_id ID —
slip_<field_name> See TimeBill —
template_id ID —
total NUMBER —
type NOT_SET —
um NOT_SET —
updated DATE —
Prospect
Name Data Type Export Import
acct_code NOT_SET
active CHAR
address1 TEXT
address2 TEXT
address3 TEXT
address4 TEXT
billing_address1 NOT_SET
billing_address2 NOT_SET
billing_address3 TEXT
billing_address4 TEXT
billing_city NOT_SET
billing_contact_id ID
billing_country NOT_SET
billing_email NOT_SET
billing_fax NOT_SET
billing_firstname TEXT
billing_lastname TEXT
billing_middle TEXT
billing_mobile NOT_SET
Integration Manager

Prospect 131
Name Data Type Export Import
billing_phone NOT_SET
billing_state NOT_SET
billing_title NOT_SET
billing_zip NOT_SET
bus_typeid ID
city TEXT
company TEXT
company_sizeid ID
contact_address1 NOT_SET
contact_address2 NOT_SET
contact_address3 TEXT
contact_address4 TEXT
contact_city NOT_SET
contact_country NOT_SET
contact_email NOT_SET
contact_fax NOT_SET
contact_firstname TEXT
contact_lastname TEXT
contact_middle TEXT
contact_mobile NOT_SET
contact_phone NOT_SET
contact_state NOT_SET
contact_title NOT_SET
contact_zip NOT_SET
cost_center_id ID
cost_center_<field_name> See Cost Center —
country TEXT
created DATE
currency NOT_SET
Integration Manager

Prospect 132
Name Data Type Export Import
email TEXT
external_id NOT_SET
fax TEXT
firstname TEXT
hear_aboutid ID
id ID
invoice_layoutid ID
invoice_prefix TEXT
invoice_text TEXT
lastname TEXT
middle TEXT
mobile NOT_SET
name TEXT
notes TEXT
phone TEXT
primary_contactid ID
rate DECIMAL
shipping_contactid ID
state TEXT
■
statement (Export)
■
statements (Import)
TEXT
terms TEXT
territoryid ID
title TEXT
type CHAR —
updated DATE
userid ID
user_<field_name> See User —
web TEXT
Integration Manager

Prospect 133
Name Data Type Export Import
zip TEXT
Proxy
Name Data Type Export Import
created DATE —
expiration DATE —
id ID —
own NOT_SET —
proxy_id ID —
role_id ID —
updated DATE —
user_id ID —
Guidelines
Import requires the Modify Proxy Using OpenAir API feature enabled. Otherwise, the Integration Manager
log shows "Error code 425: Functionality not available". To enable the Modify Proxy Using OpenAir API
feature, contact OpenAir Customer Support.
Purchase item
Name Data Type Export Import
acct_date DATE
allow_vendor_substitution NOT_SET
approved_cost NOT_SET
attachmentid ID
cost NOT_SET
created DATE
currency NOT_SET
■
customer_id (Export)
■
customerid (Import)
ID
customer_<field_name> See Customer —
Integration Manager

Purchase item 134
Name Data Type Export Import
date DATE
date_fulfilled DATE
id ID
manufacturer_part NOT_SET
manufacturerid ID
name NOT_SET
non_po NOT_SET
notes NOT_SET
order_reference_number NOT_SET
productid ID
product_<field_name> See Product —
projectid ID
project_<field_name> See Project —
■
purchaseorder_id (Export)
■
purchaseorderid (Import)
ID
purchaseorder_<field_name> See Purchase order —
purchaserequestid ID
purchaserequest_<field_name> See Purchase request —
purchaserid ID
purchaser_<field_name> See Purchaser —
quantity NOT_SET
quantity_fulfilled NOT_SET
quantity_payable NOT_SET
request_itemid ID
request_item_<field_name> See Request Item —
tax_location_name NOT_SET
total NOT_SET
um NOT_SET
updated DATE
Integration Manager

Purchase item 135
Name Data Type Export Import
userid ID
user_<field_name> See User —
vendor_quote_number NOT_SET
vendor_sku NOT_SET
vendorid ID
vendor_<field_name> See Vendor —
Guidelines
There are several limitations impacting the import of purchase item information into OpenAir:
■
Imports can create or modify a purchase item record only if it is not associated with a PO record.
These purchase items are also referred to as "Quick POs" or "non-po purchase items".
□
The Quick PO functionality must be enabled for your OpenAir account. Otherwise, the Integration
Manager log shows "Error code 846: Cannot create non-po purchase items".
To enable the Quick PO functionality, go to Administration > Application Settings > Purchases >
Other Settings. Scroll down and check the Enable the ability to create quick POs. These are
purchase items for purchases made without an OpenAir PO box.
□
non_po must be set to 1. Otherwise, the Integration Manager log shows "Error code 848: Only
non_po purchase items can be added/modified".
□
purchaseorderid must be empty. Otherwise, the Integration Manager log shows "Error code 847:
purchaseorderid must be blank".
■
An optional feature lets you update the project association (Customer: Project) for purchase item
records associated with a PO on import. This is the only information you can modify. To enable project
association update for purchase items associated with a PO, contact OpenAir Customer Support.
Purchase order
Name Data Type Export Export (Related Object) Import
accounts_payableid NOT_SET — —
approval_status NOT_SET — —
attachmentid ID — —
auto_track_payable_with_fulfilled NOT_SET — —
carrierid ID — —
created DATE — —
currency NOT_SET — —
date DATE — —
Integration Manager

Purchase order 136
Name Data Type Export Export (Related Object) Import
date_approved DATE — —
date_expected DATE — —
date_fulfilled DATE — —
date_order_placed DATE — —
date_required DATE — —
date_shipped DATE — —
date_submitted DATE — —
description NOT_SET — —
id ID — —
locationid ID — —
name NOT_SET — —
notes NOT_SET — —
number NOT_SET — —
prefix NOT_SET — —
purchase_items_fulfilled NOT_SET — —
quantity_fulfilled NOT_SET — —
receivingid ID — —
ship_complete_only NOT_SET — —
shipping_cost NOT_SET — —
shipping_termsid ID — —
terms NOT_SET — —
total NOT_SET — —
total_purchase_items NOT_SET — —
total_quantity NOT_SET — —
updated DATE — —
userid ID — —
vendorid ID — —
Integration Manager

Purchaser 137
Purchaser
Name Data Type Export Export (Related Object) Import
accounts_payableid ID — —
carrierid ID — —
created DATE — —
id ID — —
name NOT_SET — —
notes NOT_SET — —
receivingid ID — —
ship_complete_only NOT_SET — —
updated DATE — —
userid ID — —
Purchase request
Name Data Type Export Export (Related Object) Import
approval_status NOT_SET — —
attachmentid ID — —
created DATE — —
currency NOT_SET — —
customerid ID — —
date DATE — —
date_approved DATE — —
date_fulfilled DATE — —
date_required DATE — —
date_submitted DATE — —
description NOT_SET — —
id ID — —
name NOT_SET — —
notes NOT_SET — —
Integration Manager

Purchase request 138
Name Data Type Export Export (Related Object) Import
number NOT_SET — —
ordered_request_items NOT_SET — —
prefix NOT_SET — —
projectid ID — —
quantity_fulfilled NOT_SET — —
request_items_fulfilled NOT_SET — —
total NOT_SET — —
total_quantity NOT_SET — —
total_request_items NOT_SET — —
updated DATE — —
userid ID — —
Rate Card
Name Data Type Export Import
active NOT_SET —
created DATE —
id ID —
name NOT_SET —
notes NOT_SET —
updated DATE —
Rate Card Item
Name Data Type Export Import
created DATE —
currency NOT_SET
current NOT_SET
end DATE
id ID
Integration Manager

Rate Card Item 139
Name Data Type Export Import
job_code_id ID
rate NOT_SET
rate_card_id ID
start DATE
updated DATE —
The rate_card_item table includes historical rate card item information. To import current rate card item
information, map the OpenAir field current to a constant set to 1 unless you have a matching field in your
import CSV file.
Receipt
Name Data Type Export Export (Related Object) Import
acct_date DATE
■
categoryid (Export)
■
category_id (Import)
ID
category_<field_name> See Category — —
city NOT_SET
cost NUMBER
cost_center_id ID
cost_center_<field_name> See Cost Center — —
created DATE —
currency NOT_SET
currency_cost NOT_SET
currency_exchange_intolerance NOT_SET —
currency_rate NOT_SET
currency_symbol TEXT
currency_total NOT_SET — —
currency_total_tax_paid NOT_SET —
customer_id ID
customer_<field_name> See Customer — —
date DATE
Integration Manager

Receipt 140
Name Data Type Export Export (Related Object) Import
description TEXT
envelope_id ID
envelope_<field_name> See Envelope — —
externalid NOT_SET —
id ID
invoice_layoutid ID — —
invoice_prefix TEXT — —
invoice_text TEXT — —
item_id ID
item_<field_name> See Expense Item — —
missing_receipt NOT_SET
non_billable NOT_SET
notes TEXT
paymethod NOT_SET
paytype_id ID
paytype_<field_name> See Payment Type — —
project_id ID
project_<field_name> See Project — —
projecttask_id ID
projecttask_typeid ID —
projecttask_<field_name> See Project Task — —
quantity NUMBER
reference_number NUMBER
slipid ID —
status NOT_SET
tax_location_id ID —
tax_location_name NOT_SET
■
tax_rateid (Export)
■
tax_rate_id (Import)
ID
Integration Manager

Receipt 141
Name Data Type Export Export (Related Object) Import
tax_rate_<field_name> See Tax Rate — —
thin_clientid NOT_SET —
total NUMBER
total_no_tax NUMBER
total_tax_paid NOT_SET
updated DATE
user_id ID
user_locationid ID —
user_<field_name> See User — —
vendor_id ID
vendor_<field_name> See Vendor — —
Reimbursement
Name Data Type Export Import
created DATE
currency NOT_SET
date DATE
envelope_id ID
envelope_number NOT_SET
envelope_<field_name> See Envelope —
id ID
notes NOT_SET
total NUMBER
updated DATE
Repeat
Name Data Type Export Import
created DATE —
Integration Manager

Repeat 142
Name Data Type Export Import
end DATE
every NOT_SET
exclude_dow NOT_SET
frequency NOT_SET
how_end NOT_SET
id ID
occur_number NOT_SET
updated DATE —
Request Item
Name Data Type Export Export (Related Object) Import
allow_vendor_substitution NOT_SET — —
attachmentid ID — —
cost NOT_SET — —
created DATE — —
currency NOT_SET — —
customerid ID — —
date DATE — —
date_fulfilled DATE — —
id ID — —
manufacturer_part NOT_SET — —
manufacturerid ID — —
name NOT_SET — —
notes NOT_SET — —
productid ID — —
projectid ID — —
purchase_itemid ID — —
purchaseorderid ID — —
purchaserequestid ID — —
Integration Manager

Request Item 143
Name Data Type Export Export (Related Object) Import
quantity NOT_SET — —
quantity_fulfilled NOT_SET — —
request_reference_number NOT_SET — —
total NOT_SET — —
um NOT_SET — —
updated DATE — —
userid ID — —
vendor_quote_number NOT_SET — —
vendor_sku NOT_SET — —
vendorid ID — —
Resource Profile
Name Data Type Export Import
attribute_id ID
comment TEXT
created DATE
desirability NOT_SET
expertise NOT_SET
externalid NOT_SET
id ID
name NOT_SET
resourceprofile_type_id ID
resourceprofile_type_<field_name> See Profile Type —
type NOT_SET
updated DATE
user_id ID
user_<field_name> See User —
Integration Manager

Resource Request 144
Resource Request
Name Data Type Export Import
booking_typeid ID
created DATE —
customerid ID
date_end DATE
date_finalized DATE
date_start DATE
date_start_expected DATE
externalid TEXT
id ID
name TEXT
notes TEXT
number TEXT
ownerid ID
percent_fulfilled TEXT
projectid ID
status TEXT
updated DATE —
Resource Request Queue
Name Data Type Export Import
created DATE —
customerid ID
date_end DATE
date_start DATE
externalid TEXT
id ID
name TEXT
Integration Manager

Resource Request Queue 145
Name Data Type Export Import
notes TEXT
percent_fulfilled TEXT
projectid ID
resource_requestid ID
resourcesearchid ID
slots NUMBER
status TEXT
updated DATE —
Resource Search
Name Data Type Export Import
as_percentage TEXT
availability_search TEXT
consecutive_availability TEXT
created DATE —
enddate DATE
excluding TEXT
externalid TEXT
hours DECIMAL
id ID
include_generic_resources TEXT
include_inactive_resources TEXT
include_regular_resources TEXT
name TEXT
percentage DECIMAL
preferred TEXT
required TEXT
resource_request_queueid ID
startdate DATE
Integration Manager

Resource Search 146
Name Data Type Export Import
updated DATE —
Rev. Recogn. Amount
Name Data Type Export Import
acct_code NOT_SET —
agreement_id ID —
amount NOT_SET —
category_1id ID —
category_2id ID —
category_3id ID —
category_4id ID —
category_5id ID —
category_id ID —
cost_center_id ID —
created DATE —
currency NOT_SET —
customerpo_id ID —
id ID —
recognition_type NOT_SET —
revenue_recognition_rule_id ID —
updated DATE —
Rev. Recogn. Rule
Name Data Type Export Import
accounting_period_id ID
acct_code NOT_SET
acct_date DATE
acct_date_how NOT_SET
Integration Manager

Rev. Recogn. Rule 147
Name Data Type Export Import
active NOT_SET
agreement_id ID
amount NOT_SET
asb_exclude_slip_type NOT_SET
asb_which_slips NOT_SET
break_by_user NOT_SET
category_1id ID
category_2id ID
category_3id ID
category_4id ID
category_5id ID
category_id ID
created DATE
currency NOT_SET
customer_id ID
customerpo_id ID
end_date DATE
end_milestone ID
expense_how NOT_SET
extra_data NOT_SET
id ID
item_filter NOT_SET
marked_as_ready NOT_SET
name NOT_SET
notes NOT_SET
percent NOT_SET
percent_how NOT_SET
percent_trigger NOT_SET
phase ID
Integration Manager

Rev. Recogn. Rule 148
Name Data Type Export Import
product_filter NOT_SET
project_billing_rule_filter TEXT
project_id ID
project_task_filter IDS
purchase_how NOT_SET
recognition_type NOT_SET
repeat_id ID
slip_stage_filter NOT_SET
start_date DATE
start_milestone ID
timetype_filter NOT_SET
type NOT_SET
updated DATE
user_filter NOT_SET
Rev. Recogn. Trans.
Name Data Type Export Import
acct_code NOT_SET
acct_date DATE
agreement_externalid NOT_SET
■
agreement_id (Export)
■
agreementid (Import)
NOT_SET
agreement_<field_name> See Agreement —
category_1_id ID
category_2_id ID
category_3_id ID
category_4_id ID
category_5_id ID
category_externalid NOT_SET
Integration Manager

Rev. Recogn. Trans. 149
Name Data Type Export Import
■
category_id (Export)
■
categoryid (Import)
ID
category_<field_name> See Category —
cost_center_id ID
cost_center_<field_name> See Cost Center —
created DATE
currency NOT_SET
customer_externalid NOT_SET
■
customer_id (Export)
■
customerid (Import)
ID
customer_<field_name> See Customer —
customerpo_id NOT_SET
date DATE
decimal_hours NOT_SET
hour NOT_SET
id ID
invoice_layoutid ID —
invoice_prefix TEXT —
invoice_text TEXT —
is_from_open_stage TEXT
job_codeid ID
minute NOT_SET
notes NOT_SET
offsetsid ID
originatingid ID
other_rate_type NOT_SET
percent_complete NOT_SET
portfolio_projectid ID
project_externalid NOT_SET
Integration Manager

Rev. Recogn. Trans. 150
Name Data Type Export Import
■
project_id (Export)
■
projectid (Import)
ID
project_<field_name> See Project —
projecttask_externalid NOT_SET
■
projecttask_id (Export)
■
project_taskid (Import)
ID
projecttask_<field_name> See Project Task —
rate NOT_SET
recognition_type NOT_SET
revenue_containerid ID
■
revenue_recognition_rule_id (Export)
■
revenue_recognition_ruleid (Import)
ID
rev_rec_rule_<field_name> See Rev. Recogn. Rule —
revenue_stageid ID
■
slip_id (Export)
■
slipid (Import)
ID
slip_<field_name> See TimeBill —
■
task_id (Export)
■
taskid (Import)
ID
task_<field_name> See Timesheet entry —
■
ticket_id (Export)
■
ticketid (Import)
ID
ticket_<field_name> See Receipt —
total NOT_SET
type NOT_SET
updated DATE
user_externalid NOT_SET
■
user_id (Export)
■
userid (Import)
ID
user_<field_name> See User —
Integration Manager

Revenue Container 151
Revenue Container
Name Data Type Export Import
acct_date DATE —
approval_status TEXT —
balancing_type TEXT —
created DATE —
currency TEXT —
customerid ID —
date DATE —
date_approved DATE —
date_submitted DATE —
externalid TEXT
id ID
name TEXT —
notes TEXT —
number ID —
prefix TEXT —
projectid ID —
total_accrued NUMBER —
total_deferred NUMBER —
total_invoiced NUMBER —
total_posted NUMBER —
total_recognized NUMBER —
updated DATE —
Revenue Stage
Name Data Type Export Import
created DATE —
id ID —
Integration Manager

Revenue Stage 152
Name Data Type Export Import
name TEXT —
revenue_stage_type TEXT —
updated DATE —
Schedule Exception
Name Data Type Export Import
created DATE —
enddate DATE
exception_type TEXT
id ID
name TEXT
schedule_request_itemid ID
startdate DATE
timetypeid ID
updated DATE —
userid ID
workhours NUMBER
workscheduleid ID
ScheduleRequest
Name Data Type Export Export (Related Object) Import
approval_status NOT_SET
attachmentid ID
categoryid ID
category_<field_name> See Category — —
created DATE —
customerid ID
customer_<field_name> See Customer — —
Integration Manager

ScheduleRequest 153
Name Data Type Export Export (Related Object) Import
date DATE
date_approved DATE
date_submitted DATE
description NOT_SET
enddate DATE
externalid NOT_SET
id ID
invoice_layoutid ID — —
invoice_prefix TEXT — —
invoice_text TEXT — —
name NOT_SET
notes NOT_SET
number NOT_SET
prefix NOT_SET
project_taskid ID
projectid ID
project_<field_name> See Project — —
startdate DATE
projecttask_<field_name> See Project Task — —
timetypeid ID
timetype_<field_name> See Time Type — —
updated DATE — —
userid ID
user_<field_name> See User — —
ScheduleRequest item
Name Data Type Export Import
categoryid ID —
category_<field_name> See Category —
Integration Manager

ScheduleRequest item 154
Name Data Type Export Import
created DATE —
customerid ID —
customer_<field_name> See Customer —
date DATE —
externalid NOT_SET —
hours NOT_SET —
id ID —
invoice_layoutid ID —
invoice_prefix TEXT —
invoice_text TEXT —
name NOT_SET —
projectid ID —
project_<field_name> See Project —
project_taskid ID —
projecttask_<field_name> See Project Task —
request_reference_number NOT_SET —
schedule_requestid ID —
schedule_request_<field_name> See ScheduleRequest —
timetypeid ID —
timetype_<field_name> See Time Type —
updated DATE —
userid ID —
user_<field_name> See User —
Service
Name Data Type Export Import
active TEXT
code NOT_SET
■
cost_centerid (Export)
ID
Integration Manager

Service 155
Name Data Type Export Import
■
cost_center_id (Import)
created DATE
currency NOT_SET
■
externalid (Export)
■
external_id (Import)
NOT_SET
fixed_fee NOT_SET
id ID
name TEXT
notes TEXT
other_rate DECIMAL
other_rate_type NOT_SET
rate DECIMAL
taxable NOT_SET
updated DATE
Slip Projection
Name Data Type Export Import
agreement_id NOT_SET —
agreement_<field_name> See Agreement —
billing_contactid ID —
billing_contact_<field_name> See Contact —
booking_typeid ID —
category_id ID —
category_<field_name> See Category —
city NOT_SET —
cost NOT_SET —
created DATE —
currency NOT_SET —
customer_id ID —
Integration Manager

Slip Projection 156
Name Data Type Export Import
customer_<field_name> See Customer —
customerpo_id ID —
customerpo_<field_name> See Customer PO —
date DATE —
decimal_hours NOT_SET —
description NOT_SET —
hour NOT_SET —
id ID —
invoice_id ID —
invoice_<field_name> See Invoice —
item_id ID —
item_<field_name> See Expense Item —
minute NOT_SET —
notes NOT_SET —
paytype_id ID —
paytype_<field_name> See Payment Type —
product_id ID —
product_<field_name> See Product —
projectid ID —
project_<field_name> See Project —
project_billing_rule_id ID —
project_billing_rule_<field_name> See Project Billing Rule —
project_taskid ID —
projecttask_<field_name> See Project Task —
quantity NOT_SET —
rate NOT_SET —
shipping_contactid ID —
shipping_contact_<field_name> See Contact —
slip_projection_type NOT_SET —
Integration Manager

Slip Projection 157
Name Data Type Export Import
slip_stage_id ID —
slip_slip_stage_<field_name> See Slip Stage —
sold_to_contactid ID —
sold_to_contact_<field_name> See Contact —
timer_start NOT_SET —
timetype_id ID —
timetype_<field_name> See Time Type —
total NOT_SET —
transactionid ID —
type NOT_SET —
unitm NOT_SET —
updated DATE —
user_id ID —
user_<field_name> See User —
Slip Stage
Name Data Type Export Export (Related Object) Import
created DATE — —
enable_slip_tab NOT_SET — —
exclude_from_invoicing NOT_SET — —
id ID — —
name NOT_SET — —
notes NOT_SET — —
position NOT_SET — —
updated DATE — —
Integration Manager
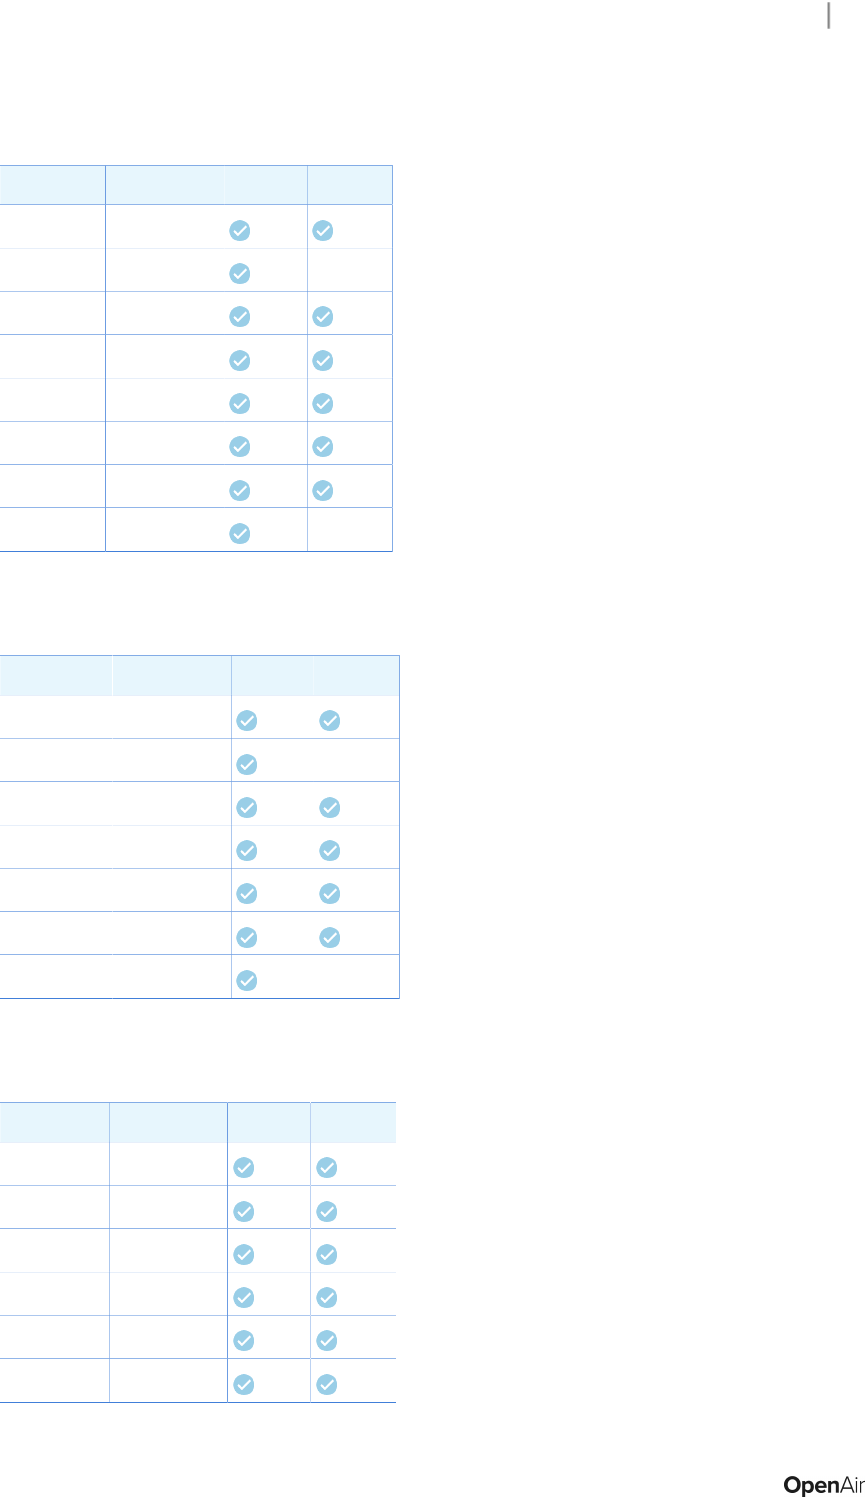
Tag Group 158
Tag Group
Name Data Type Export Import
active TEXT
created DATE —
entity_type TEXT
externalid TEXT
id ID
name TEXT
searchable TEXT
updated DATE —
Tag Group Attribute
Name Data Type Export Import
active TEXT
created DATE —
externalid TEXT
id ID
name TEXT
tag_groupid ID
updated DATE —
Target Utilization
Name Data Type Export Import
created DATE
end_date DATE
id ID
percentage NOT_SET
start_date DATE
updated DATE
Integration Manager

Target Utilization 159
Name Data Type Export Import
user_id ID
Task Adjustment
Name DataType Export Import
created NOT_SET —
deleted NOT_SET —
id NOT_SET —
new_taskid NOT_SET —
new_timesheetid NOT_SET —
old_taskid NOT_SET —
old_timeshettid NOT_SET —
updated NOT_SET —
Tax Location
Name DataType Export Import
acct_code_federal NOT_SET —
acct_code_gst NOT_SET —
acct_code_hst NOT_SET —
acct_code_pst NOT_SET —
acct_code_state NOT_SET —
active NOT_SET —
created DATE —
deferal_rate NOT_SET —
gst_rate NOT_SET —
hst_rate NOT_SET —
id ID —
name NOT_SET —
notes NOT_SET —
Integration Manager

Tax Location 160
Name DataType Export Import
pst_rate NOT_SET —
state_rate NOT_SET —
tax_method NOT_SET —
updated DATE —
Tax Rate
Name Data Type Export Export (Related Object) Import
created DATE — —
currency NOT_SET — —
date DATE — —
federal NUMBER — —
gst NUMBER — —
hst NUMBER — —
notes TEXT — —
pst NUMBER — —
purchase_itemid ID — —
slipid ID — —
state NUMBER — —
tax_locationid ID — —
ticketid ID — —
updated DATE — —
tax_rateid ID — —
Time Type
Name Data Type Export Export (Related Object) Import
acct_code NOT_SET — —
active NOT_SET — —
cost_center_id ID — —
Integration Manager

Time Type 161
Name Data Type Export Export (Related Object) Import
created DATE — —
external_id NOT_SET — —
id ID — —
name NOT_SET — —
notes NOT_SET — —
updated DATE — —
TimeBill
Name DataType Export Export (Related Object) Import
acct_date DATE
agreement_id ID
agreement_<field_name> See Agreement — —
billing_contactid ID
billing_contact_<field_name> See Contact — —
category_1id ID —
category_2id ID —
category_3id ID —
category_4id ID —
category_5id ID —
category_id ID
category_<field_name> See Category —
city NOT_SET
cost NUMBER
cost_centerid ID
cost_center_<field_name> See Cost Center — —
created DATE
currency NOT_SET
customer_id ID
customer_<field_name> See Customer — —
Integration Manager

TimeBill 162
Name DataType Export Export (Related Object) Import
customerpo_id ID
customerpo_<field_name> See Customer PO — —
date DATE
decimal_hours NOT_SET
description TEXT
hour NUMBER
id ID
invoice_id ID
invoice_<field_name> See Invoice — —
item_id ID
item_<field_name> See Expense Item — —
job_code_id ID —
minute NUMBER
notes TEXT
payroll_typeid ID
paytype_id ID
paytype_<field_name> See Payment Type — —
product_id ID
product_<field_name> See Product — —
project_id ID
project_<field_name> See Project — —
■
project_billing_rule_id (Export)
■
project_billing_ruleid (Import)
ID
project_billing_rule_<field_name> See Project Billing Rule — —
projecttask_id ID
projecttask_<field_name> See Project Task — —
quantity NUMBER
rate NOT_SET
ref_slipid ID —
Integration Manager

TimeBill 163
Name DataType Export Export (Related Object) Import
shipping_contactid ID
shipping_contact_<field_name> See Contact — —
slip_stage_id ID
slip_slip_stage_<field_name> See Slip Stage — —
sold_to_contactid ID
sold_to_contact_<field_name> See Contact — —
tax_location_name NOT_SET
tax_rate_adjusted NUMBER — — —
tax_rateid ID — — —
timer_start DATE
timetype_id ID
timetype_<field_name> See Time Type — —
total NUMBER
total_tax NUMBER —
total_with_tax NUMBER —
type NOT_SET
unitm NUMBER
updated DATE
user_id ID
user_<field_name> See User — —
Timecard
Name DataType Export Export (Related Object) Import
break_end DATE — —
break_start DATE — —
created DATE — —
date DATE — —
hours NOT_SET — —
id ID — —
Integration Manager

Timecard 164
Name DataType Export Export (Related Object) Import
notes NOT_SET — —
time_end DATE — —
time_start DATE — —
timesheetid ID — —
updated DATE — —
userid ID — —
Timesheet
Name DataType Export Export (Related Object) Import
acct_date DATE —
approved DATE
created DATE —
■
dflt_category_id (Export)
■
default_categoryid (Import)
ID
dflt_category_<field_name> See Category —
■
dflt_customer_id (Export)
■
default_customerid (Import)
ID
dflt_customer_<field_name> See Customer —
dflt_invoice_layoutid ID — —
dflt_invoice_prefix TEXT — —
dflt_invoice_text TEXT — —
■
dflt_payrolltype_id (Export)
■
default_payrolltypeid (Import)
ID
dflt_payrolltype_<field_name> See Payroll Type —
■
dflt_project_id (Export)
■
default_projectid (Import)
ID
■
dflt_project_<field_name>
■
project_<field_name>
See Project — —
■
dflt_timetype_id (Export)
■
default_timetypeid (Import)
ID
timetype_<field_name> See Time Type —
Integration Manager

Timesheet 165
Name DataType Export Export (Related Object) Import
duration NOT_SET
ends DATE
errors NOT_SET — —
log NOT_SET — —
id ID
name NOT_SET
notes NOT_SET
starts DATE
status NOT_SET
submitted DATE
thin_clientid NOT_SET —
total NUMBER
updated DATE
userid ID
user_<field_name> See User — —
warnings NOT_SET — —
Guidelines
Review the following guidelines:
■
By default, it is not possible to modify time entries from a timesheet when:
□
The timesheet is submitted for approval, approved, or archived (status value is S, A, or X) in
OpenAir. To be able to update approved and archived time entries when importing time entries
from a CSV file, the Modify Approved and Archived Timesheets feature must be enabled for your
account. To enable the Modify Approved and Archived Timesheets feature, contact OpenAir
Customer Support.
□
The timesheet has already been exported. To be able to update exported time entries when
importing time entries from a CSV file, contact OpenAir Customer Support.
In both cases, the Integration Manager user must be an account administrator or have the necessary
role permission to perform the update.
The Integration Manager log shows "Error code 821: The timesheet cannot be modified because it is
no longer Open or has been exported" if time entries in a timesheet cannot be updated because the
timesheet was approved or exported, and the authenticated user does not have sufficient privileges.
Integration Manager

Timesheet entry 166
Timesheet entry
Name DataType Export Import
acct_date DATE
category_1id ID
category_2id ID
category_3id ID
category_4id ID
category_5id ID
category_externalid NOT_SET
■
category_id (Export)
■
categoryid (Import)
ID
category_<field_name> See Category
cost_center_externalid NOT_SET
■
cost_center_id (Export)
■
cost_centerid (Import)
ID
cost_center_<field_name> See Cost Center —
created DATE
■
customer_id (Export)
■
customerid (Import)
ID
customer_<field_name> See Customer —
date DATE
decimal_hours NOT_SET
description NOT_SET
end_time DATE
■
hour (Export)
■
hours (Import)
NOT_SET
id ID
invoice_layoutid ID —
invoice_prefix TEXT —
invoice_text TEXT —
job_codeid ID
Integration Manager

Timesheet entry 167
Name DataType Export Import
loaded_cost NUMBER —
loaded_cost_2 NUMBER —
loaded_cost_3 NUMBER —
■
minute (Export)
■
minutes (Import)
NOT_SET
notes NOT_SET
■
payroll_type_id (Export)
■
payroll_typeid (Import)
ID
payroll_type_<field_name> See Payroll Type —
■
project_id (Export)
■
projectid (Import)
ID
project_externalid NOT_SET
project_<field_name> See Project —
■
projecttask_id (Export)
■
projecttaskid (Import)
ID
■
projecttask_external_id (Export)
■
project_task_externalid (Import)
NOT_SET
projecttask_typeid ID
projecttask_<field_name> See Project Task —
■
slip_id (Export)
■
slipid (Import)
ID
slip_<field_name> See TimeBill —
start_time DATE
thin_clientid NOT_SET —
■
timesheet_id (Export)
■
timesheetid (Import)
ID
timesheet_<field_name> See Timesheet —
■
timetype_id (Export)
■
timetypeid (Import)
ID
timetype_externalid NOT_SET
timetype_<field_name> See Time Type —
updated DATE
Integration Manager

Timesheet entry 168
Name DataType Export Import
■
user_id (Export)
■
userid (Import)
ID
user_externalid NOT_SET
user_<field_name> See User —
Guidelines
Review the following guidelines:
■
By default, it is not possible to modify time entries from a timesheet when:
□
The timesheet is submitted for approval, approved, or archived (status value is S, A, or X) in
OpenAir. To be able to update approved and archived time entries when importing time entries
from a CSV file, the Modify Approved and Archived Timesheets feature must be enabled for your
account. To enable the Modify Approved and Archived Timesheets feature, contact OpenAir
Customer Support.
□
The timesheet has already been exported. To be able to update exported time entries when
importing time entries from a CSV file, contact OpenAir Customer Support.
In both cases, the Integration Manager user must be an account administrator or have the necessary
role permission to perform the update.
The Integration Manager log shows "Error code 821: The timesheet cannot be modified because it is
no longer Open or has been exported" if time entries in a timesheet cannot be updated because the
timesheet was approved or exported, and the authenticated user does not have sufficient privileges.
■
The ability to capture a start time and end time on time entries must be enabled in OpenAir at an
account level (Administration > Application Settings > Timesheets > Other Settings) and user level
(Administration > Global Settings > Users > Employees > [Select an employee] > Demographic) to
import a start_time and end_time.
Timesheet/Timecard entry
Name DataType Export Import
category_1id ID —
category_2id ID —
category_3id ID —
category_4id ID —
category_5id ID —
category_id ID —
category_<field_name> See Category —
cost_center_id ID —
cost_center_<field_name> See Cost Center —
Integration Manager

Timesheet/Timecard entry 169
Name DataType Export Import
created DATE —
customer_id ID —
customer_<field_name> See Customer —
date DATE —
decimal_hours NOT_SET —
description NOT_SET —
hour NOT_SET —
id ID —
invoice_layoutid ID —
invoice_prefix TEXT —
invoice_text TEXT —
minute NOT_SET —
notes NOT_SET —
payroll_type_id ID —
payroll_type_<field_name> See Payroll Type —
phase_id ID —
phase_<field_name> See Project Task —
project_id ID —
project_<field_name> See Project —
projecttask_id ID —
projecttask_<field_name> See Project Task —
slip_id ID —
slip_<field_name> See TimeBill —
timecard_id ID —
timecard_<field_name> See Timecard —
timesheet_id ID —
timesheet_<field_name> See Timesheet —
timesheet_id ID —
timetype_<field_name> See Time Type —
Integration Manager

Timesheet/Timecard entry 170
Name DataType Export Import
updated DATE —
user_id ID —
user_<field_name> See User —
Todo
Name DataType Export Import
contact_id ID —
contact_<field_name> See Contact —
created DATE —
created_by_id ID —
customer_id ID —
customer_<field_name> See Customer —
deal_id ID —
deal_<field_name> See Deal —
due DATE —
finished DATE —
id ID —
invoice_layoutid ID —
invoice_prefix TEXT —
invoice_text TEXT —
name NOT_SET —
notes TEXT —
priority NOT_SET —
start DATE —
status NOT_SET —
updated DATE —
user_id ID —
user_<field_name> See User —
Integration Manager

User 171
User
Name Data Type Export Export (Related Object) Import
account_workschedule_externalid NOT_SET —
acct_code NOT_SET
active CHAR
address1 NOT_SET
address2 NOT_SET
address3 TEXT
address4 TEXT
az_approvalprocess ID
az_approver ID
az_approver_externalid NOT_SET —
book_assign_stamp NOT_SET —
br_approvalprocess ID
br_approver ID
br_approver_externalid NOT_SET —
city NOT_SET
cost NOT_SET —
cost_center_externalid NOT_SET —
cost_center_id ID
cost_center_<field_name> See Cost Center — —
cost_currency NOT_SET —
cost_end_date DATE —
cost_lc_level NOT_SET —
cost_start_date DATE —
country NOT_SET
created DATE
currency NOT_SET
department_externalid NOT_SET —
Integration Manager

User 172
Name Data Type Export Export (Related Object) Import
departmentid ID
department_<field_name> See Department — —
dr_approvalprocess ID
dr_approver ID
dr_approver_externalid NOT_SET —
email NOT_SET
external_id NOT_SET
fax NOT_SET
filterset_ids NOT_SET —
filterset_stamp TEXT —
firstname TEXT
generic NOT_SET
hierarchy_node_ids IDS
id ID
job_code_externalid NOT_SET —
job_code_id ID
km_filter_set ID —
km_filter_set_externalid NOT_SET —
lastname TEXT
line_manager_externalid NOT_SET —
line_managerid ID
locked NOT_SET —
logintime DATE
ma_filter_set ID —
ma_filter_set_externalid NOT_SET —
mfa_status NOT_SET —
middle TEXT
mobile NOT_SET
name TEXT
Integration Manager

User 173
Name Data Type Export Export (Related Object) Import
nickname TEXT
om_filter_set ID —
om_filter_set_externalid NOT_SET —
password NOT_SET —
password_forced_change NOT_SET —
pb_approvalprocess ID
pb_approver ID
pb_approver_externalid NOT_SET —
phone NOT_SET
pm_filter_set ID —
pm_filter_set_externalid NOT_SET —
po_approvalprocess ID
po_approver ID
po_approver_externalid NOT_SET —
po_filter_set ID —
po_filter_set_externalid NOT_SET —
pr_approvalprocess ID
pr_approver ID
pr_approver_externalid NOT_SET —
primary_filter_set ID —
primary_filter_set_externalid NOT_SET —
project_access_nodes TEXT —
rate NOT_SET
report_filter_set NOT_SET —
report_filter_set_externalid NOT_SET —
rm_approvalprocess ID —
rm_approver ID —
rm_filter_set ID —
rm_filter_set_externalid NOT_SET —
Integration Manager

User 174
Name Data Type Export Export (Related Object) Import
role_externalid NOT_SET —
role_id ID
sr_approvalprocess ID
sr_approver ID
sr_approver_externalid NOT_SET —
ssn NOT_SET
state NOT_SET
ta_approvalprocess ID
ta_approver ID
ta_approver_externalid NOT_SET —
ta_filter_set ID —
ta_filter_set_externalid NOT_SET —
tag_end_date DATE —
tag_group_attribute_id ID —
tag_group_id ID —
tag_start_date DATE —
tb_filter_set ID —
tb_filter_set_externalid NOT_SET —
te_allowance_approvalprocess NUMBER —
te_allowance_approver NUMBER —
te_approvalprocess ID
te_approver ID
te_approver_externalid NOT_SET —
te_filter_set ID —
te_filter_set_externalid NOT_SET —
timezone NOT_SET
title NOT_SET
type CHAR
update_cost NOT_SET —
Integration Manager

User 175
Name Data Type Export Export (Related Object) Import
update_tag NOT_SET —
updated DATE
user_location_externalid NOT_SET —
user_locationid ID
week_starts NOT_SET
workscheduleid ID
zip NOT_SET
User Location
Name DataType Export Import
acct_code TEXT
active CHAR
created DATE —
externalid TEXT
id ID
name TEXT
notes TEXT
updated DATE —
User Project Rate
Name DataType Export Import
categoryid ID
created DATE
currency NOT_SET
customerid ID
duration NOT_SET
id ID
job_codeid ID
Integration Manager
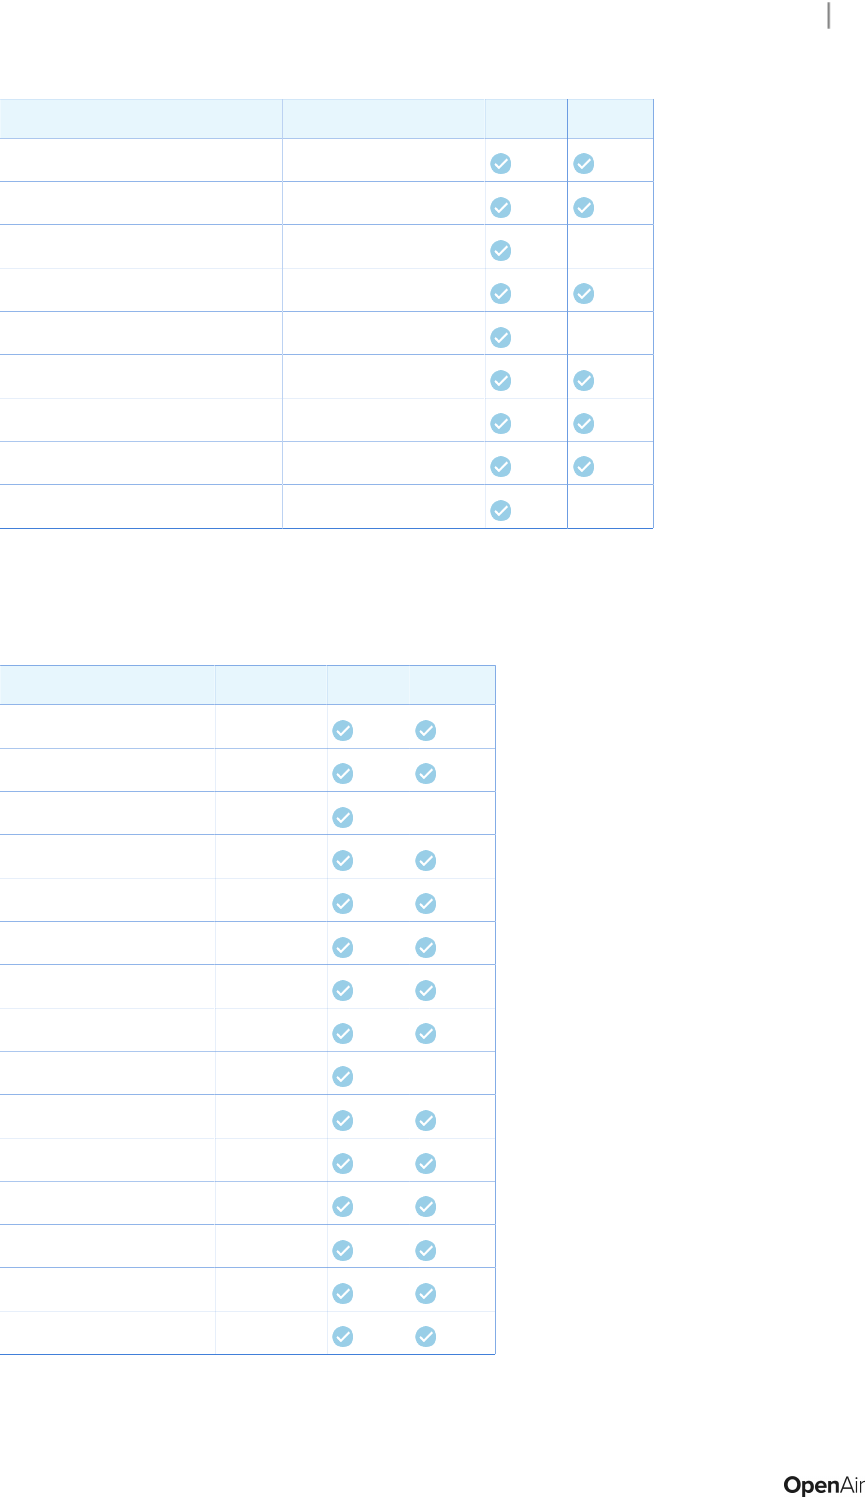
User Project Rate 176
Name DataType Export Import
notes NOT_SET
project_billing_rule_id ID
project_billing_rule_<field_name> See Project Billing Rule —
project_id ID
project_<field_name> See Project —
rate NOT_SET
updated DATE
user_id ID
user_<field_name> See User —
User Workschedule
Name DataType Export Import
account_workscheduleid ID
acct_code TEXT
created DATE —
externalid TEXT
id ID
master_workscheduleid ID
name TEXT
sample_date DATE
updated DATE —
use_this_schedule TEXT
userid ID
week_num TEXT
workdays TEXT
workhourid ID
workhours TEXT
Integration Manager

Vendor 177
Vendor
Name DataType Export Import
acct_code NOT_SET —
active CHAR —
address1 NOT_SET —
address2 NOT_SET —
address3 TEXT —
address4 TEXT —
attention NOT_SET —
city NOT_SET —
country NOT_SET —
created DATE —
currency NOT_SET —
email NOT_SET —
external_id NOT_SET —
fax NOT_SET —
firstname TEXT —
id ID —
lastname TEXT —
middle TEXT —
mobile NOT_SET —
name TEXT —
notes TEXT —
phone NOT_SET —
po_email_text TEXT —
po_text TEXT —
state NOT_SET —
tax_location_id ID —
terms NOT_SET —
Integration Manager

Vendor 178
Name DataType Export Import
title NOT_SET —
type CHAR —
updated DATE —
web NOT_SET —
zip NOT_SET —
Workspace Link
Name DataType Export Import
created DATE
external NOT_SET
id ID
recordid ID
updated DATE
url NOT_SET
workspaceid ID
Workspace User
Name DataType Export Import
access NOT_SET
created DATE
id ID
project_group_id ID
updated DATE
userid ID
user_<field_name> See User —
workspaceid ID
Integration Manager

Troubleshooting 179
Troubleshooting
The first step in troubleshooting is to ensure that you have installed the latest version of Integration
Manager so that you have the most recent enhancements, fixes, and features. Refer to Updating
Integration Manager to a New Version for more information and considerations for updating.
If you are experiencing difficulties with Integration Manager or would like to enable an optional feature
for your OpenAir account, create a support case. Our Customer Support staff and engineers will work with
you to find a solution to your problem. See Creating a Support Case.
Before you create a support case, review the following resources:
■
List of common errors and their solutions. See Troubleshooting Common Errors.
■
API error codes. Integration Manager uses the XML API and the log file includes error codes returned
by the API. See the help topic Error Codes.
Important: Make sure you attach the Integration Manager log file (compressed as a ZIP file)
when creating a support case.
To view the log in Integration Manager, go to Help > Display log.
The log file is located in the AppData folder for the Windows user – C:\Users\<username>\AppData
\Roaming\OpenAir\Integration Manager\OpenAirManager.log.
Troubleshooting Common Errors
The following table lists common errors and their solutions.
Integration Manager uses the XML API and the log file includes error codes returned by the API. See the
help topic Error Codes.
Use the following table and the API error code reference in addition to the Integration Manager log file to
try and troubleshoot your integration before you contact OpenAir Customer Support.
Error
type
Error Solution
Popup Access to bckupdthash was
denied
You may not have full permissions. If you are using Windows 8 or
higher, access to files and folders is restricted unless your Windows
user account has administrator privileges. Users running Integration
Manager must have read-write access to the Integration Manager
installation folder (C:\Program Files(x86)\OpenAir\IntegrationManager)
and be able to create, modify, and delete files in this folder. See Getting
Started with Integration Manager.
Log ERR: Status: Access is not
enabled. Contact your OpenAir
account administrator to
enable this functionality.
ERR: Error while exporting
The OpenAir user specified in the account settings may not have access
to Integration Manager. You must grant access to Integration Manager
at the individual user level.
See Getting Started with Integration Manager.
Log Error code 425: Functionality
not available
You are attempting to import information that requires a feature that is
not enabled for your account. For example, your account configuration
Integration Manager

Troubleshooting Common Errors 180
Error
type
Error Solution
may not allow you to import proxy information. In this case, importing
proxy information would result in this error.
Log Error code 601: Invalid ID. There
isn't a record matching the id or
code you asked for
You are attempting to import records from a CSV file into OpenAir
and the OpenAir internal ID is used as primary import key. Integration
Manager logs an error for each record if the value under the column
mapped with the OpenAir internal ID is [blank] or does not match
OpenAir internal ID values for that record type. See also Record Creation
or Update Rules on Import.
Log Error Code 821: The timesheet
cannot be modified because it
is no longer open or has been
exported
By default, it is not possible to modify timesheets and time entries
from timesheets that are submitted for approval, approved, or
archived (status value is S, A, or X) in OpenAir. Your OpenAir account
configuration can be changed to allow account administrators to modify
timesheets in these cases. You should proceed with caution as such
changing approved or archived time entries may have a downstream
impact. See also Timesheet and Timesheet entry.
Integration Manager

Creating a Support Case 181
Creating a Support Case
If you are experiencing difficulties with OpenAir or would like to enable an optional feature, go to
SuiteAnswers through your OpenAir account and create a support case.
Our support staff and engineers will work with you to find a solution to your problem.
Important: Be sure to review the Support Usage Best Practice Guidelines, Case Severity
Definitions and Case Resolution Overview before you submit a support case or call the Support
team.
As a part of the support case creation process you will be presented with existing answers that
may solve your problem. Take a moment to view the available answers before proceeding to
create a support case.
To create a support case:
1.
Sign in to your OpenAir account and select Support from the User Center menu.
2.
Click Go to SuiteAnswers.
Integration Manager

Creating a Support Case 182
3.
On the OpenAir SuiteAnswers website, click Contact Support Online.
4.
Enter keywords corresponding to the question or problem you want to resolve and click Search.
Note: If you do not have a question but need a feature enabled, for example, click Search.
5.
Oftentimes, the answer to your question will be displayed. If you still want to create a support case,
click Continue to Create Case.
Integration Manager

Creating a Support Case 183
6.
Fill out the Create Case form and then click Submit. You will receive an email confirmation with
your support case reference (OpenAir Customer Care #).
Important: Review the Case severity definitions and always use the appropriate case
severity when submitting a case. See the help topic Case Severity Definitions.
Using the appropriate case severity helps OpenAir Customer Support prioritize between
cases. Otherwise, OpenAir Customer Support need to evaluate the true urgency of each
case, which slows down the response time to all cases.
Note: An asterisk * indicates a required field.
Integration Manager
