Quick Start Guide
Your quick start guide for creating, building and installing
custom Joomla extensions using the Joomla Component
Generator.
Table of Contents
1. Creating components .................................................................................................................................... 1
1.1. Add component ...................................................................................................................................... 1
1.2. Add views (and table) ............................................................................................................................. 4
1.2.1. What are tables used for? ................................................................................................................... 4
1.2.2. What are views for? .............................................................................................................................. 4
1.2.3. Why should I add both a table and views simultaneously? ................................................... 4
1.2.4. How many views can a table have? ................................................................................................ 4
1.2.5. Let’s create views and a table ........................................................................................................... 5
1.2.6. Creation of a table with views in three simple steps (to recap) .......................................... 9
1.3. Add fields .............................................................................................................................................. 11
1.3.1. What are fields for? ............................................................................................................................. 11
1.3.2. Are some fields added by default? ................................................................................................ 11
1.3.3. Let’s add fields to our component ................................................................................................. 11
2. Creating modules ......................................................................................................................................... 18
2.1. Add module .......................................................................................................................................... 18
3. Building extensions ...................................................................................................................................... 22
4. Installing extensions .................................................................................................................................... 22
4.1. How to display component views to frontend users ........................................................................... 23
5. Additional information ................................................................................................................................ 23
5.1. What are view templates in the Component Generator?.................................................................... 23
5.2. Selecting a view template .................................................................................................................... 23
5.3. Frontend detail view templates ........................................................................................................... 26
5.3.1. Single item...................................................................................................................................................... 26
5.3.2. Frontend detail editing .................................................................................................................................. 26
5.3.3. Empty item ..................................................................................................................................................... 27
5.3.4. Contact form .................................................................................................................................................. 27
5.3.5. Data form ....................................................................................................................................................... 27
5.4. Frontend list view templates ................................................................................................................ 27
5.4.1. List of items .................................................................................................................................................... 27
5.4.2. Frontend list editing ....................................................................................................................................... 27
5.4.3. Empty list ....................................................................................................................................................... 28
5.5. Captcha on view templates .................................................................................................................. 28
5.5.1. Which view templates support captcha? ....................................................................................................... 28
5.5.2. How to create a contact form ........................................................................................................................ 29
5.5.3. How to create a data form ............................................................................................................................. 34

Page 1 / 37
Thank you for choosing the Joomla Component Generator as your component
generation tool for Joomla. We’re so excited to have you on board!
This guide will show you how to generate a component using the Joomla Component
Generator and how to install it into Joomla. Furthermore, we will show you how to
create various types of fields and views in Joomla using the generator and for
different purposes, all without having to write a single line of code.
1. Creating components
Let's say you need to create a website for a car dealer who wants to showcase cars
and car manufacturers on their website. To achieve this, you will need a component
with two tables and several views.
First, you need to create the component.
1.1. Add component
To create a new component, click on the menu item “My components” and then click
the “Add component” button to set up the basic settings for the component.

Page 2 / 37
Fill in each field
Tip: There is a small question mark to the left of each title. Hover over the question mark to show detailed
information. The question mark will provide instructions on how to use the field.
• Joomla Version
Select the version of Joomla into which this component will be installed. Choose
the version that you are using for your website.
• Display Name
Choose an appropriate name for the component. Since this component displays
cars and manufacturers, you may decide to name it “Vehicles”. Enter “Vehicles”
in the “Display Name” field.
• Name
The "Name" field will automatically be set to “com_vehicles” when text is
entered into the “Display Name” field.
• Component Version
This is the version number of the component. It is used to track changes in
your component. Since this is the first version of the component, set it to
“1.0.0”.
• Languages
Specify the languages you want the component to support.
Tip: Each language file is initially filled with English. After installing the
component, you'll need to manually edit the language files to customize the
languages as needed.

Page 3 / 37
• Description
Provide a description of what this component is about for the Joomla
administration.
• Copyright
Enter copyright information.
• License
Enter licensing information.
• Developer
Specify the name of the developer.
• Developer e-mail
Provide the email address of the developer.
• Developer URL
Enter the URL of the developer.
Once you have filled in all the above fields, click “Create” to store the basic
configuration for the component.

Page 4 / 37
1.2. Add views (and table)
Since at least one view is required for a Joomla component, a notification will prompt
you to add a table with a view to the component you have just created. You can do
this by clicking the “Add views (and table)” link after the basic component has been
created.
1.2.1. What are tables used for?
Tables serve as database tables that store data for the views in both the frontend and
backend of the Joomla component.
1.2.2. What are views for?
Views are responsible for displaying the content from a database table. They also
enable you to perform create, update, and delete operations on the table rows within
the backend administration of the Joomla component.
1.2.3. Why should I add both a table and views simultaneously?
Adding both a table and its associated views together saves time compared to adding
them separately. However, it is possible to add individual tables if there is a need for
one or more tables without corresponding views. For example, if you intend to store
data in the database that shouldn't be displayed in a Joomla view.
1.2.4. How many views can a table have?
A table can have up to four views:
1. Frontend list: Displays a list of items from the table in the frontend.

Page 5 / 37
2. Frontend detail: Shows the details of a specific item from the table in the
frontend.
3. Backend list: Displays a list of items from the table in the backend
administration.
4. Backend detail (for editing): Allows editing, deleting, or adding an item from
the table in the backend administration.
In the example with cars, the four views would be used as follows:
1. Cars: A list view of all the cars in the frontend.
2. Car: A detailed view of each car in the frontend.
3. Cars: A list view of all the cars in the backend administration.
4. Car: A view for editing, deleting, or adding a car in the backend administration.
After this brief introduction to tables and views let’s go back to our component to
create tables and views.
1.2.5. Let’s create views and a table
Clicking the “Add views (and table)” notification link will lead you to a view that allows
you to create views and a table in one step.
The “Add views (and table)” button does the exact same thing in case no notification
is available.
You will be prompted to enter the names of the views for the table:
1) In the first site field, enter the singular name of the view for the site. E.g., “Car”.
The name of the corresponding admin view will be entered automatically.
2) In the second field, enter the plural name of the view for the site. E.g., “Cars”.
The name of the corresponding admin view will be entered automatically.
3) The table name is generated automatically from the plural name. Convenient, isn’t
it?

Page 6 / 37
Feel free to change the table name (step 3) afterwards if you’re not satisfied with the
one automatically generated from the plural name (step 2).
The yellow arrows in the screenshot point to the view template selector modal pop-
ups. In short, they allow you to choose a template for the view. Let's just state that
it’s a way to define the appearance and behavior of the view. Additionally, it's
important to note that a view template can be applied to both frontend detail and
frontend list views.
As a teaser to illustrate the functionality, we will provide you with this screenshot
showcasing the frontend detail view templates.
And here is another screenshot demonstrating the frontend list view templates.

Page 7 / 37
Let's get back on track :-)
You now need to choose which views to create. Let's create all four views for now, as
we want to achieve the following:
• Show a list of all the cars in the frontend (Site List)
This allows website users to see the cars.
• Show a detailed view for each car in the frontend (Site Detail)
This enables website users to navigate to a detailed view of each car.
• Show a list of all the cars in the backend (Admin List)
This provides site administrators with an overview of the cars.
• Be able to edit the information of each car in the backend (Admin Edit)
This allows site administrators to edit each car.
Please note that it’s possible to select an icon for the admin (backend) views by
clicking the button next to the text input field for the singular and plural names.
However, selecting an icon for each view is optional.
Click on the icon you want to use for each of the backend views.

Page 8 / 37
All the views are already marked as default, which means you only need to click the
“Create” button to generate both the table and all four views associated with it.

Page 9 / 37
The “#__” part of the table name is the default Joomla table prefix. Joomla
automatically converts it to match the database table prefix used in your Joomla
installation.
The table and views are now stored. Take a look at the screenshot below. It shows the
data you’ve just created.
1.2.6. Creation of a table with views in three simple steps (to recap)
Let's summarize the three simple steps we followed to create a table with views:
1. Click the “Add views (and table)” button.
2. Enter the singular name of the view (e.g., “Car”) and the plural name (“e.g.,
“Cars”) and observe the automatic filling of the table name. Adjust the table
name if necessary.
3. Click the “Create” button to generate the table and views simultaneously.
That's all there is to it! You have successfully created the table and views.
Now, repeat the same process for the “Car” views, but this time use the singular
name “Manufacturer” to generate a table and four views for the manufacturers as
well.
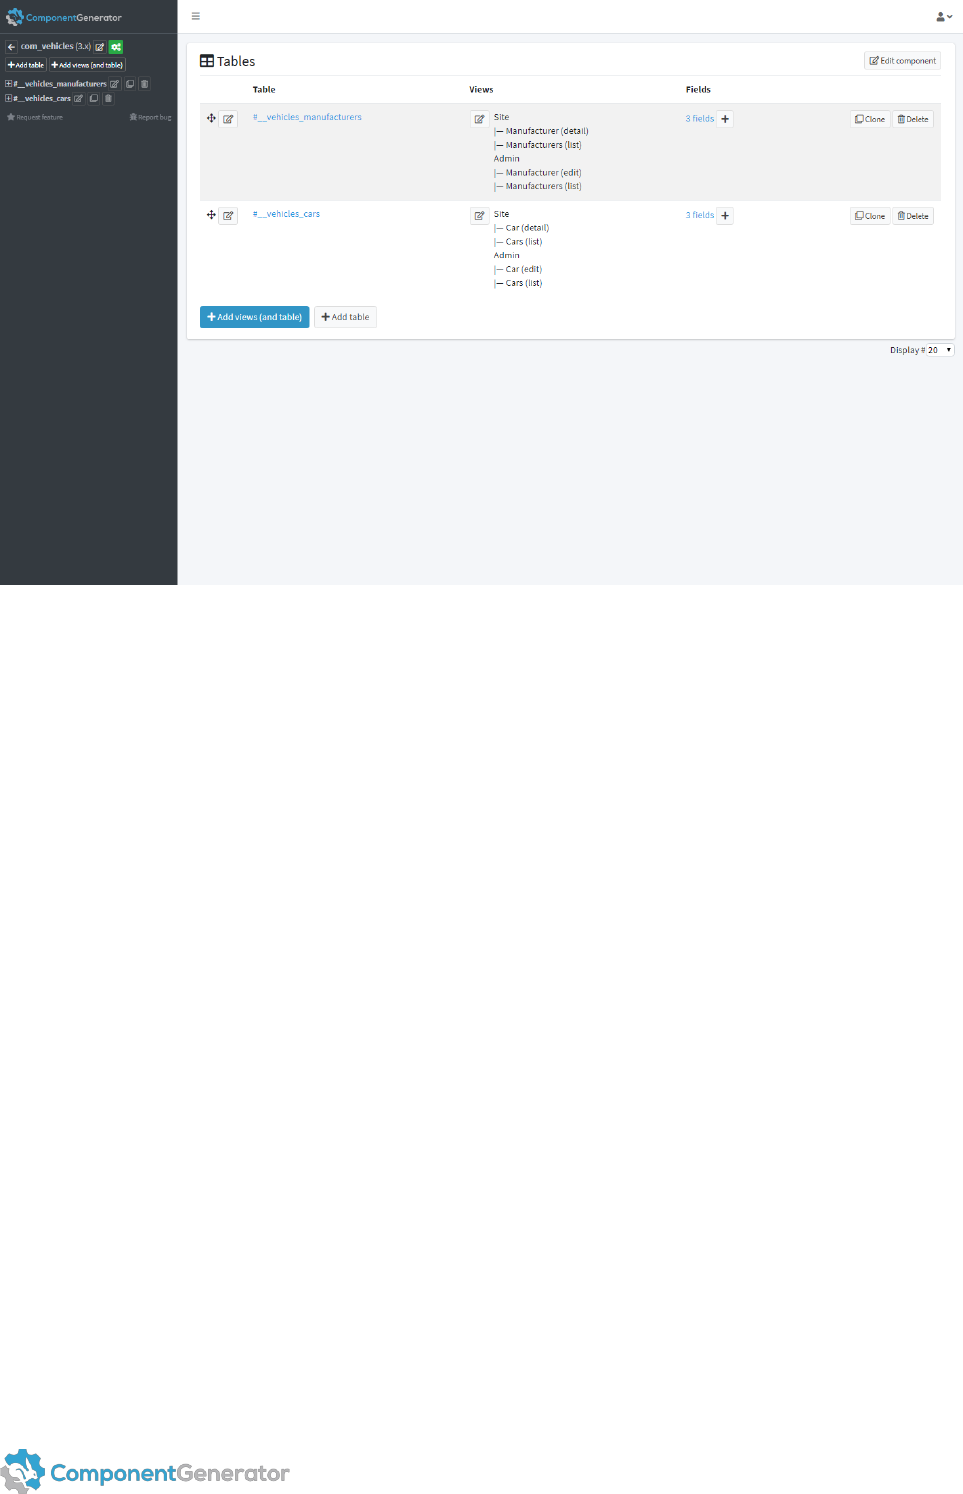
Afterwards, your table overview in the “Vehicles” component should look like this:
Page 10 / 37
Great! You now have the following tables and views set up:
#__vehicles_cars: Database table for the cars.
- Cars: A list view displaying all the cars in the frontend.
- Car: A view to show the details of each car in the frontend.
- Cars: A list view displaying all the cars in the backend.
- Car: A view for adding, editing, or deleting a car in the backend.
#__vehicles_manufacturers: Database table for the manufacturers.
- Manufacturers: A list view displaying all the manufacturers in the frontend.
- Manufacturer: A view to show the details of each manufacturer in the frontend.
- Manufacturers: A list view displaying all the manufacturers in the backend.
- Manufacturer: A view for adding, editing, or deleting a manufacturer in the
backend.
Did you notice?
• Three fields were automatically added to each table (refer to the screenshot
above). These fields are default fields required by Joomla. We will explain this
in more detail soon.
• The green build button is suddenly visible (see screenshot above). The green
build button will appear when the component is ready to be generated.
However, it does not make sense to build the component yet. First, you need to
add your custom fields to each of the two tables in your component.

Page 11 / 37
1.3. Add fields
Once you have added your two tables and corresponding views to the component, you
need to add some fields as well.
1.3.1. What are fields for?
A field is simply a database field associated with a database table.
1.3.2. Are some fields added by default?
Yes, there are some fields that are required for Joomla views:
• Created by (the owner of the item)
• State (the state of the item)
• Ordering (the sort order of the item)
The Joomla Component Generator automatically creates these default fields for you
when you add views to the tables in your component. The default fields can be
restored at any time in case you accidentally delete or modify them.
Tables without views do not create any default fields. Feel free to create tables
without views using the "Add table" button. However, remember to never remove
default Joomla fields from a view. If you do so, the view won't work properly. In case
you accidentally delete any Joomla field, simply click the “Restore Joomla fields”
button, and they will be restored instantly.
Let’s continue with the “Vehicles” component for the car dealer.
1.3.3. Let’s add fields to our component
You need the following fields for the two tables in your component (in addition to the
default Joomla fields):
#__vehicles_cars
• Car name (Text Field) – The name of the car
• Color (Color Picker) – The color of the car
• Manufacturer (Foreign Key) - The car manufacturer
• Photo (Media) – An image of the car
#__vehicles_manufacturers
• Manufacturer name (Text Field) – The name of the manufacturer
That’s enough fields for now.
Notice about a reserved field name in Joomla
Please note that the “params” field name is reserved by Joomla for internal processes.
Therfore, when you name a field “params”, the DB column of the field will
automatically be renamed to “params_reserved_by_joomla”. We recommend calling
the DB column “parameters” or something similar to avoid naming conflicts with
Joomla.
To start adding the fields to the two tables, click on the ”#__vehicles_manufacturers”
link in the left menu to expand it.

Page 12 / 37
Afterward, click the "Fields" link in the left menu to switch to the fields of the table.
Lastly, click the “Add Field” button to add the first field to that table.

Page 13 / 37
Fill in the information about each field.
• Field Name
Enter the name of the first field. In our example, the name of the first field is
“Manufacturer name”, so enter that.
• DB Column
This field is automatically updated with text when a text is entered into the
“Field Name” field. In this example, the “DB Column” field value will be set to
“manufacturer_name”. Adjust if needed.
• Field Type
Select the type of field you need in the dropdown. For the first field
(Manufacturer name), you need a Text Field.
• Data Type
Select the database field data type from the dropdown. For the first field
(Manufacturer name), a varchar would suffice.
• Length/value
Let’s set the field length to 255 characters. You don’t need to change anything
since this is the default value for the varchar data type.
Now click the “Create” button to create the field.

Page 14 / 37
The field has now been added.
You can click on the field link in the list at any time to modify advanced settings for
the field.

Page 15 / 37
All field options will be displayed when a field is edited. This allows you to choose in
which views this field should be displayed in the frontend and backend of Joomla. For
instance, you can choose whether the field should link to the detail page in the
frontend or link to the editing functionality in the backend. You can also choose to
display a hint to the administrator or make the field searchable, required, or read-
only. The decision is yours.
For now, let’s just use the default field settings.
We’re done with the fields in the “#__vehicles_manufacturers” table.
Let’s start adding our four fields to the “#__vehicles_cars” table.
Switch to the “#__vehicles_cars” table and add the first three fields. Just add each of
the fields like we just did
• Car name (Text Field) – The name of the car
• Color (Color Picker) – The color of the car
• Photo (Media) – An image of the car
For now, a varchar with a length of 255 will suffice for the three fields above.
Normally, we would adjust the data type and length to optimize the performance of
each field in the database. Feel free to change the data type and length according to
your needs.
Your “#__vehicles_cars” table should now contain the following fields.

Page 16 / 37
You can drag and drop to reorder the fields in any way you like. If you want the "Car
name" field to be the first field, simply drag and drop it to the top.
We’re almost done adding fields to the tables of our component. We only need to add
one more field to the “#__vehicles_cars” table, and it’s a very special field called the
“Foreign Key” field. This field allows us to create a foreign key relation from one table
to another without having to write any code. We’re adding this field to be able to show
data from the manufacturers in the views in Joomla that display cars.
Notice: This field is not required but recommended for professional component
developers. You need to understand what a foreign key is to comprehend how this
field works.
Setting up a foreign key field in the Joomla Component Generator is actually quite
simple. First of all, ensure that you're still looking at the fields in the
"#__vehicles_cars" table. Then, click the "Add Field" button to add the field.
Enter the following information for the field:
Field Name: Manufacturer
DB Column: manufacturer
Field Type: Foreign Key
Table: #__vehicles_manufacturers (the foreign key table)
Key Field: id (the foreign key id)

Page 17 / 37
Value Field: manufacturer_name (the foreign key value)
Data Type: INT
Length/value: 11
Adding this field (called “Manufacturer”) in the “#__vehicles_cars” table of your
component allows you to choose a manufacturer (e.g., Toyota) for each car in the
administration of the component, once installed. The manufacturer can also be
displayed for each car in the frontend of the component.
Click “Create” to create the foreign key field.
The foreign key field has now been added to the “#__vehicles_cars” table.

Page 18 / 37
You can reorder the fields to match your needs by using drag and drop. Simply click
and hold on a field, then drag it to the desired position within the table. Release the
field to finalize the reordering.
That's all. You've successfully created a fully functional Joomla component for adding
cars and manufacturers to a custom website. And the best part is, you didn't have to
write a single line of code throughout the entire process. How amazing is that?
2. Creating modules
Let’s say you need to add content anywhere on a website using a Joomla module.
First, you need to create the module.
2.1. Add module
To create a new module, click on the "Modules" menu item in the left menu, then click
the "Add module" button to set up the basic settings for the module.

Page 19 / 37
Fill in each field
Tip: There is a small question mark to the left of each title. Hover over the question mark to show detailed
information. The question mark will provide instructions on how to use the field.
• Joomla Version
Select the version of Joomla that this module will be installed into. Just choose
the version of Joomla you’re using for your website.

Page 20 / 37
• Display Name
Choose a suitable name for the module. Since this is a module that shows
content, you might decide to name the module “My content”.
Enter “My content” into the “Display Name” field.
• Name
The "Name" field will automatically be set to “mod_my_content” when you
enter text into the “Display Name” field.
• Module Version
This is the version number of the module. The version number is used to keep
track of changes in your module. Since this is the first version of the module,
we will set it to “1.0.0”.
• Languages
Now, you need to define which languages you want the module to support.
Notice: Each language file is filled with English as the default. You will need to
manually translate each language file after the module has been installed.
Customize the language files as needed.
• Description
Provide a description of what this module is about for the Joomla
administration.
• Copyright
Enter copyright information.
• License
Enter licensing information.
• Developer
Specify the name of the developer.
• Developer e-mail
Provide the email address of the developer.
• Developer URL
Enter the URL of the developer.
Once you have filled in all the above fields, click “Create” to store the basic
configuration for the module.

Page 21 / 37
The module generator facilitates the creation of modules for Joomla, making it
possible to add custom code and HTML to any part of a website quickly. Currently,
modules are generated as empty shells intended for developers or front-enders to
further develop. As we continue to enhance and develop the module generator, it will
become even more flexible in the future.

Page 22 / 37
For now, all you need to do is build the module in Joomla and insert it into a module
position in your template.
3. Building extensions
This step is pretty straightforward. All you need to do is to click the green cogwheel
build button to build the extension. A ZIP file will then be generated for download.
Once downloaded, you can install the ZIP file directly into the Joomla CMS. This
screenshot illustrates how it’s done for components, but similar build buttons are also
available for modules.
4. Installing extensions
Here's how you can install a component or module into the Joomla CMS.
First, log into your Joomla installation and navigate to “Extensions” -> “Manage” ->
“Install” (or a similar option). Then, simply drag and drop the downloaded ZIP file
(your custom extension) into the upload field in the browser to install the component
or module.
Joomla will provide confirmation regarding the successful completion of the extension
installation.

Page 23 / 37
4.1. How to display component views to frontend users
After the component has been installed into Joomla, new menu item types will appear
automatically in the backend of Joomla for the installed component. Create new menu
items for the views and select the available menu types for the component to present
the views to frontend users.
5. Additional information
In this section, you will find all the information that didn't fit into the simplified guide
above for generating a basic component. Before reading this section, we assume that
you have already gone through the entire process of creating a component for Joomla
using the guide provided above.
5.1. What are view templates in the Component Generator?
A view template in the generator is not the same as a template for a view in Joomla.
It is a concept we came up with to define not only the appearance but also the
behavior of the view in the generator. In other words, if you select another template
for your view, many of the code files will be rewritten in the generated component to
make the view work as expected. Don't worry. We have done the hard work to allow
you to simply choose another appearance and behavior without having to do anything
else than changing the active template for the view.
5.2. Selecting a view template
To select another view template for a view, simply edit the views of a table by clicking
the button with the edit icon (as shown on this screenshot).

Page 24 / 37
We want to change the frontend detail view template. To do this, click on the edit icon
next to the frontend detail view, where it says "Single item," which is the currently
selected view template.
You should now see a popup that looks like this:

Page 25 / 37
Notice that the currently selected template is the "Single item" template. If you wish
to change the view template, simply click on the desired template, for example, "Data
form" (1), and then click the "Set template" button (2) to apply the changes.
Remember to save the view afterwards, or your modifications will not be saved.
Notice how the frontend detail template changes (1) and click the “Save” button (2)
afterwards to save the change.

Page 26 / 37
You successfully changed the view template.
5.3. Frontend detail view templates
In this section, you will find a brief description of each frontend detail view template available in the
generator. Always read the information about the chosen template in the blue alert box above the
templates or by clicking the question mark icon next to the template name.
5.3.1. Single item
This template is used to display the data of a single record. Since the data is defined by you, it can be
anything from information about a famous film star, a flower, a travel destination, a song, or anything else
you can think of. The possibilities are almost endless. If the list view is enabled, it is possible to link from
one or more fields in the list to the detail view, as shown in the selected illustration. Simply enable the
“Detail link” option on the field in the generator to achieve this.
5.3.2. Frontend detail editing
Did you notice the possibility to enable editing for the single item view template?
Click the graphical “Checkbox” above (indicated by the red arrow) to enable this feature. Remember to click
the “Set template” button and “Save” afterwards to save the changes. When you enable this option, an
extra menu item type for the view will be available in Joomla. Create a menu item in Joomla and select the
editing view type for it to allow editing a single item from the frontend. Please note that the editing
functionality requires the frontend user to be logged into Joomla. This allows editing a single item of choice.
The editable item is selected by the administrator from the backend of Joomla. To enable logged in users to
edit records of their own choice and add new ones, you need to enable editing controls on the list view as
well.

Page 27 / 37
5.3.3. Empty item
An empty template prepared for a single item. This template allows you to create the content of the detail
view and the remaining files required by the view from scratch. We have prepared everything, making it a
great starting point for developers seeking an empty shell where everything just works out of the box.
5.3.4. Contact form
A template for creating a contact form from the fields in the view. The information from the form is sent by
email to all administrators of the Joomla website. This template supports the built-in Joomla captcha.
Simply add the captcha field to your view within the generator and enable the captcha plugin and captcha
setting in Joomla. Both hidden and regular captchas are supported.
5.3.5. Data form
A template for enabling frontend users to submit information. The information will be pushed to a
database table, ensuring that sensitive information can be submitted safely. Users need to log in to access
views that use this template. This template supports the built-in Joomla captcha. Simply add the captcha
field to your view within the generator, and enable the captcha plugin and the captcha setting in Joomla.
Both hidden and regular captchas are supported.
5.4. Frontend list view templates
In this section you will get a brief description of each frontend list view template available in the generator.
5.4.1. List of items
This template can be used to display a list with multiple records. Since the data is defined by you, it can be
anything from information about famous film stars, flowers, travel destinations, songs, or anything else you
can come think of. The possibilities are almost endless. The list contains a search area where it's possible to
look up fields prepared for searching. To prepare a field for search, simply edit the field in the generator
and check the “Searchable” checkbox.
5.4.2. Frontend list editing
Did you notice the possibility to enable editing controls for the default list view template called “List of
items”?

Page 28 / 37
Click the graphical “Checkbox” above (indicated by the red arrow) to enable this feature. Remember to click
the “Set template” button and “Save” afterwards to save the changes. When you enable this option, editing
controls will be added to the frontend list view. This means editing icons will be displayed next to the edit
link on the list. Furthermore, a button will be provided for adding new records to the database. When this
feature is enabled, users must log in to see the editing controls in the view. Note: Make sure to enable
editing on the frontend detail view as well for the controls to work.
5.4.3. Empty list
An empty template prepared for a list. This template allows you to create the content of the list view and
the remaining files required by the view from scratch. We have prepared everything, making it a great
starting point for developers seeking an empty shell where everything just works out of the box.
5.5. Captcha on view templates
Some view templates in the generator support captcha. In this section, we will show you how to enable
captcha on the views generated by the Component Generator. This includes the setup of the view and field
in the generator, as well as a short description of the setup in Joomla after the component has been
installed.
5.5.1. Which view templates support captcha?
Currently, the following view templates support the built-in Joomla captcha:
• Contact form
• Data form

Page 29 / 37
5.5.2. How to create a contact form
We will create a contact form and demonstrate how to set up captcha. Let’s name the contact form
“Messages”. First, we add the views and table by clicking the “Add views (and table)” button.
Enter “Message” in the input field for the site detail view and “Messages” in the input field for the site list
view (1). Since we only require a contact form and nothing else, we uncheck the “Create” checkboxes for all
views except the site detail view (2) and select the “Contact form” template for that view (3). Finally, click
the “Create” button to generate the views and table (4).

Page 30 / 37
As we create a contact form that doesn't require storing data in the Joomla database for display, we can
skip the use of built-in Joomla fields. To proceed, just click on the link labeled “3 fields” associated with the
recently created table, which will lead you directly to the fields section.

Page 31 / 37
Now, delete the three Joomla fields. The generator automatically adds Joomla fields by default when a view
is present, as fields can serve various purposes. While it is not necessary to delete them, it is considered
good practice since they should not be utilized for anything in this specific case.
After the three fields have been deleted, start adding the fields for your contact form.
A typical contact form often includes the following information for the frontend user to enter:
• Name

Page 32 / 37
• Email
• Message
• Captcha (for validating that it’s human input)
Please note that these fields serve as an example. You could add any field for your contact form or use the
form for anything you want to send by mail. Like with anything else in the Component Generator, it’s a very
flexible system, and in this case, it’s for sending anything you need by mail.
Let’s add the four fields mentioned above to the active table. Since you should be familiar with adding
fields after completing the component generation guide, we won't go into detail. Simply create these fields
and configure the options as mentioned. The remaining settings can be left as the default values in the
form:
Field name: Name
DB column: name
Field type: Text field
Data type: VARCHAR
Length: <automatically set to 255>
Field name: Email
DB column: email
Field type: Email
Data type: VARCHAR
Length: <automatically set to 255>
Field name: Message
DB column: message
Field type: Textarea
Data type: TEXT
Length: <automatically set to nothing>
Field name: Captcha
DB column: captcha
Field type: Captcha
Data type: VARCHAR
Length: <automatically set to 255>
After having created the above fields, rearrange them by dragging and dropping so that the order is
reversed, and the ordering is: “name”, “email”, “message”, “captcha”. The fields overview in the
component should now look like this:

Page 33 / 37
Since a contact form doesn't submit any data to the database table, we want to disable the creation of the
DB table. To do that, click the edit icon next to the table name in the left menu.
Now uncheck the “Create” checkbox option (1) and click “Save” (2) to save the changes.

Page 34 / 37
Now you just need to build the component and install it into Joomla. After installing the component in the
Joomla administration, a new menu item type will appear for the component. Create a new menu item and
select this menu type to present the contact form to frontend users.
Note: The captcha field requires a Joomla captcha plugin to be enabled and configured. Additionally, one of
the enabled captcha plugins should be selected in the general settings of the Joomla site where the
component is installed. Please note that only the built-in Joomla reCAPTCHA plugins are supported by the
views created by the generator.
5.5.3. How to create a data form
It’s now time to create a data form and demonstrate how to set up captcha for that scenario. In this
scenario, the captcha is primarily used as a form of flood control to limit the amount of data pushed to the
database. Since a data form can be used for securely submitting any type of information, we will use it in a
business setting to allow employees to submit ideas for improving the company's products and services.
First, we add the views and table by clicking the “Add views (and table)” button.
Since the task is to improve the business, we name the view “Ideas”. Enter “Idea” in the name field of the
site detail view and “Ideas” in the site list view input field (1). Although it’s possible to combine multiple
views, for simplicity, we will stick to a single detail view since we only need a data form view to showcase
this example. Therefore, we disable the "Create" checkboxes for all views except the site detail view (2),
and set the "Data form" template for that view (3). Finally, click the "Create" button to create the view and
table (4).

Page 35 / 37
We choose to delete the three Joomla fields from this table, just like we did in the guide for creating a
contact form, because the fields are not necessary for the "Data form" single detail view template.
However, please remember to add the fields again if you decide to create additional views in the table, as
they are required for other types of views to function properly in Joomla.
Click the “3 fields” link to go to the fields.
Now delete each of the three Joomla fields.
Tip: You can always restore them again with the “Restore Joomla fields” button.

Page 36 / 37
We want to use our data form to allow business employees to submit ideas to improve business products
and services. For that, we will add this simple structure to demonstrate how to configure the data form:
• Your idea
• Area to improve
• Estimated cost
• Captcha (for validating that it’s human input)
This only serves as a simple example. You can add any field for your data form or use the form for securely
pushing any information to the database. Like with anything else in the Component Generator, it's a highly
flexible system for pushing any data you need to the associated database table. It's even possible to work
with multiple tables and relations, although that’s an advanced feature and not necessary for this setup.
Now let's add the four fields mentioned above to the active table:
Since you should be familiar with adding fields after completing the guide for generating a component, we
won't go into detail. Simply create these fields and set the mentioned options. The remaining settings can
be left as their default values in the form:
Field name: Your idea
DB column: your_idea
Field type: Textarea
Data type: TEXT
Length: <automatically set to nothing>
Field name: Area to improve
DB column: area_to_improve
Field type: Dropdown list
Data type: VARCHAR
Options: Products
Services
Length: <automatically set to 255>
Field name: Estimated cost
DB column: estimated_cost
Field type: Number
Data type: INT
Length: <automatically set to 11>
Field name: Captcha
DB column: captcha
Field type: Captcha
Data type: VARCHAR
Length: <automatically set to 255>
Create: <uncheck this option since the captcha field shouldn’t be present in the DB table>
After having created the above fields, drag-drop reorder the items so that the order is reversed, and the
ordering is “your_idea”, “area_to_improve”, “estimated_cost”, “captcha”. The fields overview in the
component should now look similar to this:

Page 37 / 37
Now you just need to build the component and install it into Joomla. After installing the component in the
Joomla administration, the “Data form” menu item type will appear for the component. Create a new menu
item and select this menu type to present the data form to the frontend users.
Please notice the following:
• Frontend users need to be logged in to access the view.
• The captcha field requires a Joomla captcha plugin to be enabled and configured, and one of the
enabled captcha plugins should be selected in the general settings of the Joomla site where the
component is installed. Please note that only the built-in Joomla reCAPTCHA plugins are supported
by the views created by the generator.
