
UNMC - Research IT Office
A Comprehensive Guide to REDCap
University of Nebraska Medical Center, Omaha, NE
Spring 2019

UNMC - Research IT Office
1
Overview of Workflow
Why use REDCap?
Secure – Full user authentication (log-on/password), customizable user rights restrictions, real-time data
validation, centralized & secure data storage, data de
–
identification options, and a full audit trail.
Web-based – Enter data or build your database from anywhere in the world over a secure web
connection with authentication and data logging.
Fast – Quick project start
–
up. Clinical report forms can be implemented without the need for a
programmer. Concept to production-level database is possible in less than one day.
Easy
– Intuitive user interface and work flow, readily available online training materials, and assistance
from the Center for Health Insights (CHI) make it easy to get started.
Fully customizable
– You are in total control of shaping your database.
Autonomous utilization
– Research groups have complete autonomy and control to add new users and
set several levels of specific user rights.
Data export
– Seamless data downloads to common statistical packages (including SPSS, SAS, Stata, and
to the .csv (comma separated values) format, the most common import and export format for
spreadsheets and databases.
Data import
– Data import capability through Microsoft Excel
Advanced features – File uploading, auto
–
validation, branching logic, calculated fields, signature, Dynamic
Query (SQL) and more!

2
UNMC - Research IT Office
Diagram
Study Design
Create Project
Design Data
Forms
(Instruments)
IRB Approval
Testing
Submit
Request for
Prod Deploy
Draft Mode Inactive Mode
Complete
Project
Archive ProjectDelete Project
Development Mode
Production Mode
Archive Mode
or Delete
Study Design
: Before beginning a REDCap project, you should formulate a general study design. Ex: Who
or what are you planning to study? What kind of data are you measuring? Will your study be
cross-
sectional or longitudinal? Have you discussed your study design with a statistician?
IRB Approval: If your study is a research project with human subjects or involving Protected Health Information
(PHI), you likely need the documented approval of your Institutional Review Board. All research projects with
PHI data should go through IRB. On the other hand, projects focused on Quality will not require IRB approval
but you are strongly advised to contact IRB and get confirmation. For more information, visit UNMC
IRB.
Request New Project
: UNMC employees have access to UNMC REDCap by using NetId and password. In
order to manage the volume of projects being hosted by our servers, we encourage you to contact RITO
and discuss about your project. Grant funded projects or large projects might needs input from RITO. The
RITO staff can be contacted using rit[email protected]u. It takes less than 1-2 business days to get the answer.
Design Data Forms
: In order to effectively collect and order your data, you must first design the data
collection forms to do so. This step is the highlight feature of REDCap: immensely customizable,
expandable, fluid data forms.
Testing
: You should test data collection forms to verify all needed data are collected correctly before

3
UNMC - Research IT Office
committing to production mode. If possible, designate one person to perform the build and another to
perform the testing.
Deployment
: Once your study enters Production Mode, you may enter, review, and analyze real data. In
Production Mode, it is more difficult and risky to make major changes to your data entry forms, which is
why thorough testing is strongly encouraged.
Draft Mode
: If you enter production and find that you do need to modify an element of your data entry
forms, you may enter Draft Mode and submit changes to be approved by a REDCap Administrator. Data
activities can continue during this mode.
Inactive Mode
: No data entry or update may take place in this mode, although you may view and analyze
data. You can initiate this mode if you want to ensure that no new data entry will occur, but you would
still like to access all of your data easily.
Archived Mode
: If you have completed data analysis, moved your project to indefinite hiatus, or simply
decided you no longer wish to use it, you may move the project to archived status as an alternative to
full
deletion. Archived projects incur fee as well. You can un-archive your project at any time.
Delete Project
: After completion of the project, it is highly recommended that you delete the project.
However, we recommend you to download the project data dictionary along with its data and save safely
in UNMC cloud environment (Box or OneDrive). After this step, delete the project from REDCap. In case
if you need to restore the project at a later point of time, you can import the data dictionary with or
without data.
REDCap Terminology
Arms: groups of events. You may want to employ multiple arms when using different treatment groups
(control, experimental) or conducting a multi-site study, for instance.
Branching Logic: may be employed when fields/questions need to be hidden for data entry under certain
conditions. For instance, you may want to hide the question “How many hours per week do you watch
TV?” until a “Yes” answer is checked for a previous question, “Do you watch TV?”
Data Access Groups: restrict viewing of data within a database, for instance in a double-blind or multi-site
study.
Data Collection Instrument: a form created to capture data. This term is essentially interchangeable with
“data entry form.”
Data Dictionary: a specifically formatted .csv spreadsheet containing the metadata used to construct data
collection instruments and fields.
“Development” vs. “Production” Modes: study status modes. In Development Mode, you are still working
through the design of your data forms and testing them with mock data; you may make any changes to
the forms at any time. In Production Mode, you have deployed your forms and you are collecting real
data; changes to your forms are more difficult to implement once you have launched into Production
Mode. (See also: Development vs Production Modes.)
Event: used in longitudinal designs. An event is a scheduled (or unscheduled) occurrence during which
data is captured using your REDCap data instruments (forms).

4
UNMC - Research IT Office
Field: a singular data entry, such as age or height.
Form Status: status of the record’s data form completeness, denoted with a color; red – incomplete;
yellow – unverified; green – complete.
Logging: the audit trail of modification occurrences in the project.
Record: the set of information for a unique participant or subject. Each record is composed of a number
of fields (pieces of data), which can be spread across multiple forms (instruments) per record.
Record ID: a unique key that can identify each record in the database. (You may label this differently in
your project, but the ID must remain the first field in the first data form.)
User Rights: the customized privileges that research team members have in terms of data form
modification, data entry, and data access. P.I.s may create “Roles” for groups of team members to ensure
consistency in specified user rights.
Variable Name: the name of the variable that is stored in the REDCap database (not visible during data
entry).
Begin your Project
Signing in to REDCap for the first time
The first time you log in to https://unmcredcap.unmc.edu, it will prompt you for your basic information
in order to verify your account.
Once you submit this information, an e-mail will be sent to your UNMC account. Click the link included in
that e-mail to verify your account, and you’ll be all set to use REDCap!

5
UNMC - Research IT Office
Things you should already know about your project
There are several things you should already know about your project before submitting a project creation
request. The following items are intended to provide a starting ground for prior knowledge, but this will vary
on a case-by-case basis. Some studies may have far more than this planned out already, while others may still
be defining the basics.
The end goals of your research
The specific data you are going to be capturing
The type of study you are going to be performing (longitudinal, cross-sectional, etc.)
Who will comprise your research team?
We recommend designing your data forms in REDCap
before
submitting your final IRB protocol for
approval, so that you may include PDF versions with your IRB submission. Whether you are in the
beginning or ending stages of IRB approval, we will likely be able to assist and support your project.
Notably, an IRB approval notification (email copy) will be required before we will be able to move your
project to “Production” (official deployment) status.
Do I need IRB approval?
Note:
The Research IT Office will not make this determination for you
. If in doubt, we recommend
consulting your IRB. The following information may help you prepare for that conversation.
The UNMC IRB is an independent, academically
–
based committee constituted of medical, scientific,
and non-scientific members whose responsibility is to ensure the safety, well-being, and the protection
of the rights of human subjects who take part in research studies. The IRB reviews research in accordance
with the Department of Health and Human Services (DHHS) and the US Food and Drug Administration (FDA)
regulations.
If your study involves research using human subjects, you likely need IRB approval before you will be able
to conduct the study. The federal definitions are as follows:
Research: a systematic investigation, including research development, testing and evaluation, designed
to develop or contribute to generalizable knowledge. Activities which meet this definition constitute
research for purposes of this policy, whether or not they are conducted or supported under a program

6
UNMC - Research IT Office
which is considered research for other purposes. For example, some demonstration and service programs
may include research activities.
Human subject: a living individual about whom an investigator (whether professional or student)
conducting research obtains:
Data through intervention or interaction with the individual, or
Identifiable private information.
A research protocol may qualify for exemption if it meets certain criteria. View the IRB exempt research
categories for the detailed federal list
IRB exempt research categories
The following describes human subjects research that qualifies for exemption from IRB review based on
the Federal Register Title 45 § 46.101. IRB exemption status cannot be self
–
determined. All exemption
determinations are made by the Research Compliance Office. If you believe that your protocol qualifies
for exemption, please contact your institution’s IRB for submission instructions and guidance.
Unless otherwise required by department or agency heads, research activities in which the only
involvement of human subjects will be in one or more of the following categories are exempt from this
policy:
Research conducted in established or commonly accepted educational settings, involving normal
educational practices, such as (i) research on regular and special education instructional strategies, or (ii)
research on the effectiveness of or the comparison among instructional techniques, curricula, or
classroom management methods.
Research involving the use of educational tests (cognitive, diagnostic, aptitude, achievement), survey
procedures, interview procedures or observation of public behavior, unless: (i) information obtained is
recorded in such a manner that human subjects can be identified, directly or through identifiers linked to
the subjects; and (ii) any disclosure of the human subjects' responses outside the research could
reasonably place the subjects at risk of criminal or civil liability or be damaging to the subjects' financial
standing, employability, or reputation.
Research involving the use of educational tests (cognitive, diagnostic, aptitude, achievement), survey
procedures, interview procedures, or observation of public behavior that is not exempt under paragraph
(b)(2) of this section, if: (i) the human subjects are elected or appointed public officials or candidates for
public office; or (ii) federal statute(s) require(s) without exception that the confidentiality of the
personally identifiable information will be maintained throughout the research and thereafter.
Research involving the collection or study of existing data, documents, records, pathological specimens,
or diagnostic specimens, if these sources are publicly available or if the information is recorded by the
investigator in such a manner that subjects cannot be identified, directly or through identifiers linked to
the subjects.
Research and demonstration projects which are conducted by or subject to the approval of department
or agency heads, and which are designed to study, evaluate, or otherwise examine: (i) Public benefit or
service programs; (ii) procedures for obtaining benefits or services under those programs; (iii) possible
changes in or alternatives to those programs or procedures; or (iv) possible changes in methods or levels
of payment for benefits or services under those programs.

7
UNMC - Research IT Office
Taste and food quality evaluation and consumer acceptance studies, (i) if wholesome foods without
additives are consumed or (ii) if a food is consumed that contains a food ingredient at or below the level
and for a use found to be safe, or agricultural chemical or environmental contaminant at or below the
level found to be safe, by the Food and Drug Administration or approved by the Environmental Protection
Agency or the Food Safety and Inspection Service of the U.S. Department of Agriculture.
What happens if I conduct human research without IRB approval?
Conducting human research without IRB approval will place the University out of compliance with Federal
requirements that regulate research involving human subjects. This can result in Federal or IRB actions
that will prevent you, your department/division, or the University from conducting research involving
human subjects. It will also jeopardize the University’s human research certification with the Office for
Human Research Protections (the FWA).
Data collected without IRB approval cannot be used in class research, theses, or dissertations, which may
ultimately prevent students from fulfilling graduation requirements.
Can I start collecting data before I receive official IRB approval?
No. You may enter practice data for the express purpose of testing your data forms, but
you absolutely
may not collect real data for research involving human subjects until you have explicit IRB approval
.
Citing REDCap in your IRB protocol
Below is the recommended REDCap documentation for the Data Management section of your IRB
protocol:
“The Research IT Office deployed REDCap (4230 Leavenworth, Omaha, NE) in UNMC Data Center will be used
as a central location for data processing and management. Vanderbilt University, with collaboration from a
consortium of institutional partners, has developed a software toolset and workflow methodology for electronic
collection and management of research and clinical trial data. REDCap (Research Electronic Data Capture)
data collection projects rely on a thorough study
–
specific data dictionary defined in an iterative self
–
documenting process by all members of the research team with planning assistance from the Center for
Health Insights. The iterative development and testing process results in a well
–
planned data collection
strategy for individual studies. UNMC REDCap data transactions are web
–
based information transmission is
encrypted. REDCap was developed specifically around HIPAA
–
Security guidelines. REDCap has been
disseminated for use
locally at other institutions and currently supports over 1000 academic/non-profit
consortium partners on six continents and over 100,000 research end
–
users (www.project-redcap.org).”
Initial
Project
Set-Up
Log into UNMC REDCap (https://unmcredcap.unmc.edu
) using your UNMC NetId and Password, after
successful login, you can start creating new projects

8
UNMC - Research IT Office
Submitting the project request is very simple. You will need to provide a project title and purpose. You
have five options for project purpose:
If this is your first project in REDCap, we recommend selecting “Practice / Just for fun.” This way, you can
explore the various functionalities of REDCap and become acquainted with it before implementing a full
project. See the Project types section for more details about the various project types. If you select the
Practice option and later decide you would like to turn it into your official project, you may amend the
project purpose on the main Project Setup page. Your project’s title can be changed at any point in
Development.
Notice the “Start project from scratch or being with a template?” option. 95% of the time, you will want

9
UNMC - Research IT Office
to begin your project empty (blank slate) so that you can design it to your exact specifications. However,
there are many templates available that have forms designed already, which can be added to and
modified to fit your project’s needs. This is not the only opportunity you will have to access these general
forms: during the process of project design, you may also visit the Shared Library to add template forms
to your project. See the Project templates and Shared Library sections for more details.
When your request is sent, this message will appear, and we will be able to approve your project
so that
you may begin. Project approvals will generally be granted within 1
–
2 business days (24
–
48
hours) of the
request.
Once we approve your project, you will receive an e
–
mail similar to the one below confirming approval
and providing a link to your new project. You can also access the project by simply logging into
unmcredcap.unmc.edu and clicking the “My Projects” tab.
[TIPS AND TRICKS]
:
•
If you’ve completed a consult with us about your study, we will be anticipating your project
request, and it will get approved more quickly. In addition, any questions or concerns that we
would have about your project will have already been discussed.
Project types
When you first create your project, you will be asked to select a project purpose. You have five options:
Practice / Just for fun, Operational Support, Research, Quality Improvement, and Other.

10
UNMC - Research IT Office
If you choose Practice / Just for fun, you will not be prompted for any additional information. This type
is, as the title suggests, intended for practice purposes: to become familiar with the features and learn
about REDCap.
Operational Support projects are generally intended for the management and monitoring of a system or
technical environment issues. This can include management of an organization, bug report tracking,
project tracking, and more.
Quality Improvement projects include projects such as evaluation surveys and suggestion forms.
These projects can help channel organizational goals and facilitate performance improvement.
If you select Other, you will be prompted to briefly describe the intention of your project. If we have
further questions about your project type, we will contact you before approving your project.
Selecting Research will prompt many new fields:
Fill out as much as you can before submitting your project request. If you do not have all of the
information at the time of your project request, do not worry about it – you can add these details later,
as long as they are all completed before launching into Production phase. In fact, we recommend that
you wait until after designing your REDCap forms to submit your study to the IRB: this way, you can
convert your forms to PDF documents and include them with your IRB submission or other topics that

11
UNMC - Research IT Office
might be considered “Project Types”, see:
Longitudinal studies
Survey
–
based studies
Multiple treatment groups (Arms)
Project templates
When requesting your project, you will generally want to select the “Create an empty project (blank
slate)” option. This will allow you to customize your project to your exact specifications. However, if you
would like to select a template to base your project upon, several are available.
The templates have varying numbers of data forms, each with a set of pre
–
specified fields. If
you do
decide to use a template, new forms/fields can still be added and existing forms/fields can be modified
or deleted if you choose. The structure is still very flexible; this can just give you a base upon which to
build your project.
If you create an empty project and later decide that you would like to use pre
–
designed forms,
you may
access the Shared Library to import forms that other REDCap users have uploaded. The Shared Library
has many more options than the project templates. See the Shared Library section for more details.
Development versus Production modes
You will begin your project in Development mode. This means that you are still in the process of designing
and testing your data collection instruments. Everything can be modified freely in Development mode. If
you are conducting a research study, your IRB number is not required until you move into Production
mode.
Once you feel ready to deploy your project, you may request to have your project placed into Production
mode. At this point, you should have fully tested the workflow, data validation and branching logic: you
should be certain that your data forms are finalized and fully functional. You should also have your IRB
approval number, if applicable. If this was not added to your project when you initially created it, you
may add it under “Modify project title, purpose, etc.” on your main project dashboard.
Moving your project to Production prior to collecting real study data ensures you are maintaining data accuracy
and integrity. The post production control process
provides an additional check to ensure that data in your
records is not modified, deleted, or overwritten unintentionally. In addition, it allows us to have a check point

12
UNMC - Research IT Office
at which we require IRB numbers for validation; otherwise, we would have to require them at the time of
project request.
See the Beyond Development Mode sections for details about other project modes available after
moving
into Production mode.
Designing Data Tools
Online designer
Overview
The Online Designer is the primary tool with which you will design your data forms. Assuming that you
started with an empty project (started without using a template), you will see one default form already
present in your Online Designer, entitled “My First Instrument.” You may rename this form by clicking
the “Rename” button on the right. To begin editing, click on the instrument name.
By default, your first form will have only one field, entitled “Record ID.” This indicates the unique
record/participant identifier, and must be preserved. You may change the name of the field by clicking
the Edit icon (the yellow pencil). However, whatever you decide to call it (“Participant ID,” “Study ID,”
etc.), its purpose as a unique identifier must remain the same. This field does not need to be repeated for
any other data forms throughout the project; this is the only place you will need to be concerned with it.

13
UNMC - Research IT Office
You may click the “Preview Instrument” button to preview what your form will look like during actual
data entry. Calculated fields and branching logic will not work in this preview; practice data must be
entered in records in order to test those particular functionalities.
Adding a new field
To create a new data field, click the “Add Field” button. There are twelve types of fields you may choose
from. Our example in this section will use the “Text Box” field type (essentially a “short answer” field),
one of the most common field types in REDCap data entry. The general “new field” addition process is
very similar across field types – however, other types may have additional features or nuances associated
with them, which is discussed in detail in the Field types section.

14
UNMC - Research IT Office
If you are designing a survey, the Field Label will generally be a question, such as “First Name?” If you are
designing a research data entry form, your Field Label may look more like a standard label, such as
“Baseline heart rate:”.
The Variable Name is used by REDCap to store the data. We strongly advise against enabling
auto
–
naming
for variables (the checkbox to the right of the Variable Name field). You generally want to
keep variable
names short but somewhat descriptive, so that if you need to export your data, you will be able to
recognize key variables. For instance, “Q1” is
not
a very descriptive variable name, and is not advised for
most situations. “Height” is a good variable name, but “height_in” or “height_cm” is even better, because
you are reiterating your measurement unit within the variable name, which is a good practice.
Validation is an extended option which is discussed in detail in the Data validation section
The Required option, by default, is set to “no.” If changed to “yes,” it will require an answer before a data form
can be saved (or before a survey can be submitted, depending on your study set
–
up).
The Identifier option should be marked whenever a field asks for one of the 18 HIPAA identifiers. When
you export or view deidentified data, the fields that were marked as identifiers will be omitted. A concise
list of the 18 HIPAA identifiers is listed below, but for an official list and supporting details, see Box 2 on
this page from the CDC website:
http://www.cdc.gov/mmwr/preview/mmwrhtml/m2e411a1.htm
A brief reminder of the 18 HIPAA identifiers: 1.) names, 2.) geography more specific than state, 3.) any relevant
dates more specific than year, 4.) phone numbers, 5.) fax numbers, 6.) e
–
mail addresses, 7.) SSNs, 8.)
MRNs, 9.) health plan beneficiary numbers, 10.) account numbers, 11.)
certificate/license numbers, 12.) vehicle identifiers, 13.) device identifiers, 14.) URLs, 15.) IP
addresses, 16.)
biometric identifiers, 17.) full
–
face photographic images, and 18.) any other
unique identifying number,
code, or characteristic.
The Custom Alignment option changes how the question (and answers, if the field is a multiple choice
option) appears in the data entry screen. We don’t recommend adjusting this unless there is an aesthetic
need to do so, but you may play around with the functionality as you explore REDCap’s features.
The Field Note option displays a side
–
note in small text beneath the text entry field (or multiple
choice
options) on the data entry screen. It is useful for designating units or clarifying a manner in which the
question should be answered (e.g. “Mark all that apply”).
The end result of the field creation in this example looks like this:
The Choices component of field creation is specifically for multiple choice field types (drop
–
down list,
radio buttons, and checkboxes). It appears directly below the Field Label and serves as the place for you to
list the various choices to select from, one choice per line. REDCap automatically “codes” these variables
in increasing order beginning with “1.” This is for data storage purposes, and will not affect the way the choices
are viewed in data entry. Below is the screen that will be prompted if you have not provided manual codes
for your choices:

15
UNMC - Research IT Office
[TIPS AND TRICKS]
:
•
Generally, it is acceptable to have REDCap provide the automated coded values for your multiple
choice options, but there may be instances in which you should manually enter or change the
coded values. For instance, let’s say you are writing a survey question inquiring about the
frequency of a participant’s consumption of fast food, and let’s say you have decided your choices
are “Never,” “Once per month or less,” “Two to five times per month,” and “More than once a
week.” Since this is a scale with an absolute zero, coding “Never” as 0 and moving upward from
there (rather than beginning at 1) is a wise decision.
•
If you have many forms, it can be helpful to add a prefix to your field variable names that indicates
which form they are on. For instance, a variable representing age in years on your Demographics
form might be labeled “dm_age_yrs.”
•
We strongly advise against numbering your fields within the field label (e.g. “1. How old are
you?”). Any branching logic or future decisions to move/delete fields will drop or mix numbers,
causing unnecessary work later. The REDCap survey option features
auto
–
numbering and custom
numbering abilities, which should be used instead (toward
the end of project design).
Field types
There are fourteen types of fields you may choose from: Text Box, Notes Box, Calculated Field, Multiple Choice
–Drop
–
down List, Multiple Choice – Radio Buttons, Checkboxes, Yes
–
No, True
–
False, Signature, Slider/Visual

16
UNMC - Research IT Office
Analog Scale, File Upload, Descriptive Text, Begin New Section and Dynamic Query (SQL).
1.) Text Box: a single
–
line text box for text and numbers. The example in the Adding a new field section
is a text box.
2.)
Notes Box: a large text box for a large amount of text. This is convenient for long descriptions and
“Additional Comments” boxes.
3.) Calculated Field: a field which performs real
–
time calculations based on the entries in other
fields.
The syntax for complicated calculations can be intricate, but REDCap will alert you to any syntax
errors, and will refuse to attempt calculations until they are resolved, preventing data errors.
Variable names are referred to in [brackets] in the written calculation equation.
In this example, weight and height are two variables from previous questions being utilized to
calculate Body Mass Index (BMI). Clicking the “How do I format the equation?” hyperlink will open
a dialog box describing some of the nuances and specifications of the calculation syntax, such as
the rounding function used in this example.
In data entry, it is impossible to directly edit the value of a calculated field (hence the red text).
This ensures the integrity of the calculation procedure.
4.) Multiple Choice – Drop
–
down List: a drop
–
down menu with options. Only one option can be selected.
This can help save space on a data form if there are many different choices to display.

17
UNMC - Research IT Office
5.)
Multiple Choice – Radio Buttons: a set of radio buttons (round buttons), from which only one
choice can be selected at a time. The “reset” button in the corner removes any current selection
and returns the field to a null (absent) value.
6.)
Checkboxes: checkboxes which allow the selection of multiple options if desired.
7.) Yes
–
No: radio buttons with the options “Yes” and “No.” These values are automatically coded: “Yes”
= 1, “No” = 0.
8.) True
–
False: radio buttons with the options “True” and “False.” These values are
automatically coded: “True” = 1, “False” = 0.
9.) Signature: Allows a person to draw their signature on a survey or data entry form using a mouse, pen,
or finger (depending on whether using a desktop computer or mobile device). Once captured, the
signature will be displayed as an inline image on the survey page or data entry form. While this option
appears as a "Signature" field type in the Online Designer, it is specified in the Data Dictionary as a
"file" type field with validation type of "signature". Thus, it is essentially a special type of File Upload
field. Note: The signature image for Signature fields cannot be imported via the API, although they can
be downloaded or deleted via the API using the "Export a File" and "Delete a File" API methods,
respectively.

18
UNMC - Research IT Office
10.) Slider: visual analogue scale coded as values 0
–
100. You may provide labels above the left,
middle,
and right sides of the slider.
11.)
File Upload: an uploading tool for any associated images or documents that may need to be
attached to individual records.
12.) Descriptive Text: text displayed with optional image/file attachment. The file may be displayed as a
clickable (downloadable) link, or (if the file is an image) displayed in
–
line with the text.
13.)
Begin New Section: a field composed of a single line appearing in different color from the rest of
your form, indicating separation. This is largely for aesthetic/organization purposes. Adding text
(to serve as a header) is optional. When deploying a survey, you have the option to break each
section into separate pages, giving these headers a true separation functionality.

19
UNMC - Research IT Office
14.)
Dynamic SQL Query: A "sql" field allows one to populate a drop-down list on a data entry form or
survey by providing an SQL query ("select" queries only) in the Online Designer for a field or in the
Select Choices column of the Data Dictionary.
[TIPS AND TRICKS]
:
•
In your data entry screens (
not
including the survey submission screen), there is a small “H” and
speech bubble appearing beside each field. The “H” tracks the history of all recorded data values
for that particular variable. The speech bubble is the Field Comment Log, which allows users to
make comments on particular fields, and lights up when a comment exists for a field.
Data validation
When using the Text Box method of entry, it is best to ensure that the data coming in is the type of data that
you are expecting to see. One method of doing this is by employing the Validation option in the field creation
screen. By utilizing this feature, REDCap will prompt an error when a field’s entry does not meet certain
expectations for data type. There are eleven basic data types that you can designate via the Validation option:
date (3 formats), date time (6 formats), e
–
mail, integer, letters only, MRN, number (5 formats), phone
(U.S.), Social Security Number (U.S.), time (2 formats), and ZIP code (U.S.).
1.) Date: The three different formats you can specify for date are Day-Month-Year, Month-Day-Year, and
Year-Month-Day. Regardless of which type you choose, a small calendar icon will be visible next to
the field in data entry which you can utilize to easily specify a date in the appropriate format. You
can also click the “Today” icon to automatically fill in the current date.
2.)
Datetime: Datetime can be recorded with or without a “seconds” count. The three without
seconds follow the same formats as the three Date formats (listed above), with an additional H:M
to indicate time (Hours:Minutes). The three that do include seconds also follow the same three
Date formats, with an additional H:M:S to indicate time (Hours:Minutes:Seconds). Like the Date
option, a calendar icon appears next to the field, and in addition, a clock icon appears. You can
also click the “Now” icon to automatically fill in the current date and time. An example of usage
of the calendar/clock dialog box is below:

20
UNMC - Research IT Office
3.) E
–
mail: To validate an e
–
mail address entry, REDCap checks for a singular “@” symbol and an
appropriate e
–
mail domain ending (such as “.com” or “.edu”). The inclusion of other special
characters that would not be a part of valid e
–
mail addresses (such as “$” or “#”) will also prompt a
data validation error. This is very widely applicable, however, if you are expecting e
–
mail addresses
connected to new or uncommon domains, we do not recommend using this validation option.
4.)
Integer: Integers include all of the negative and positive whole numbers, plus zero. This means
that any decimal or fractional values will prompt a validation error, as well as any values outside
the designated minimum
–
maximum range.
5.)
Letters only: This validation type will only accept English alphabetical characters. It will not accept
spaces, numbers, special characters, or accented letters.
6.)
Number: This validation type accepts numbers, including decimal values. The five formats are
derived from the number of decimal points you choose to allot: 1, 2, 3, 4, or unspecified. If you
choose to specify a number of decimal points, an error will be prompted if that exact number of
decimal points is not met. For instance, if you have specified two decimal points, an entry of “3”
or “3.0” would not be accepted – only “3.00” is considered a valid entry in this case.
7.) ORCID Number: This validation type will only accept sixteen numerical digits separated by hyphens in
the appropriate ORCID format. Example: 0123
–
4567-8901-2345.
8.) Phone: This validation type will only accept a ten
–
digit U.S. phone number. Not including a
valid
U.S. area code will prompt an error. It is fairly lenient regarding the input format (spaces, no
spaces, hyphens, etc.), but it will change your entry to a standardized “(###) ###
---
####” format
upon
field completion.
9.)
Time: This validation type accepts only HH:MM time format. Like the Datetime type, the clock
21
UNMC - Research IT Office
icon and/or the “Now” icon can be used to assist data entry.
10.) UNMC Cost center: This validation type will accept numerical digits separated by hyphens in the
appropriate UNMC cost center format. Example: 12-34-56-7890
11.) ZIP code: Only five
–
or nine
–
digit ZIP codes are accepted. Nine
–
digit ZIP codes must include a hyphen
separating the first five from the final four, or an error will be prompted.
[TIPS AND TRICKS]
:
•
Many of the data validation types include an option for setting minimum and maximum expected
values. We strongly encourage users to employ this wherever applicable. For instance, if a field
asks for the age of a participant, you may want to set the minimums and maximums around your
study eligibility guidelines, such as 16 to 55. If you do not have study eligibility rules, it is still a
good practice to set relatively reasonable limits, such as 4 to 120.
Branching logic
If you would like for certain questions to appear only under certain conditions, you may employ the
REDCap technique “branching logic” to do so. The easiest way to demonstrate branching logic is by
walking through an example. Let’s say you are working in your Online Designer, and you are concerned
with these two questions:
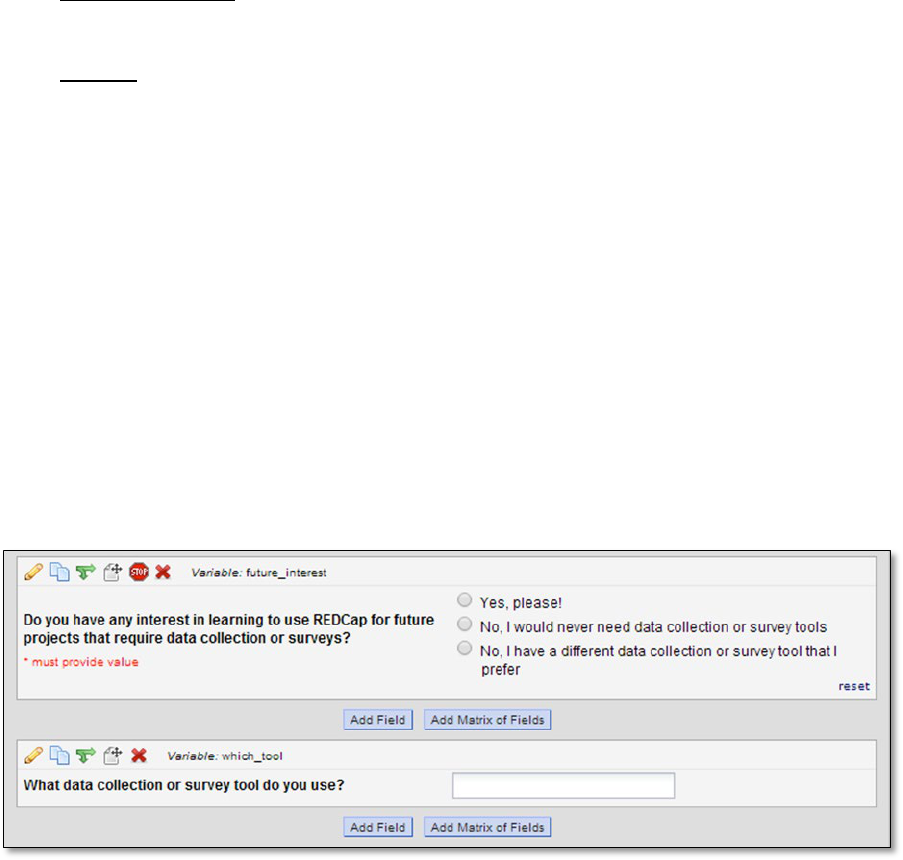
You only want that second question to appear if the participant selects “No, I have a different data
collection or survey tool that I prefer.” Otherwise, the question does not make much sense in context.
Because the appearance of the second question (the variable “which_tool”) is dependent on the answer
to the first question (the variable “future_interest”), we call future_interest the
parent
(or
independent
)
question
and which_tool the
child
(or
dependent
)
question
.
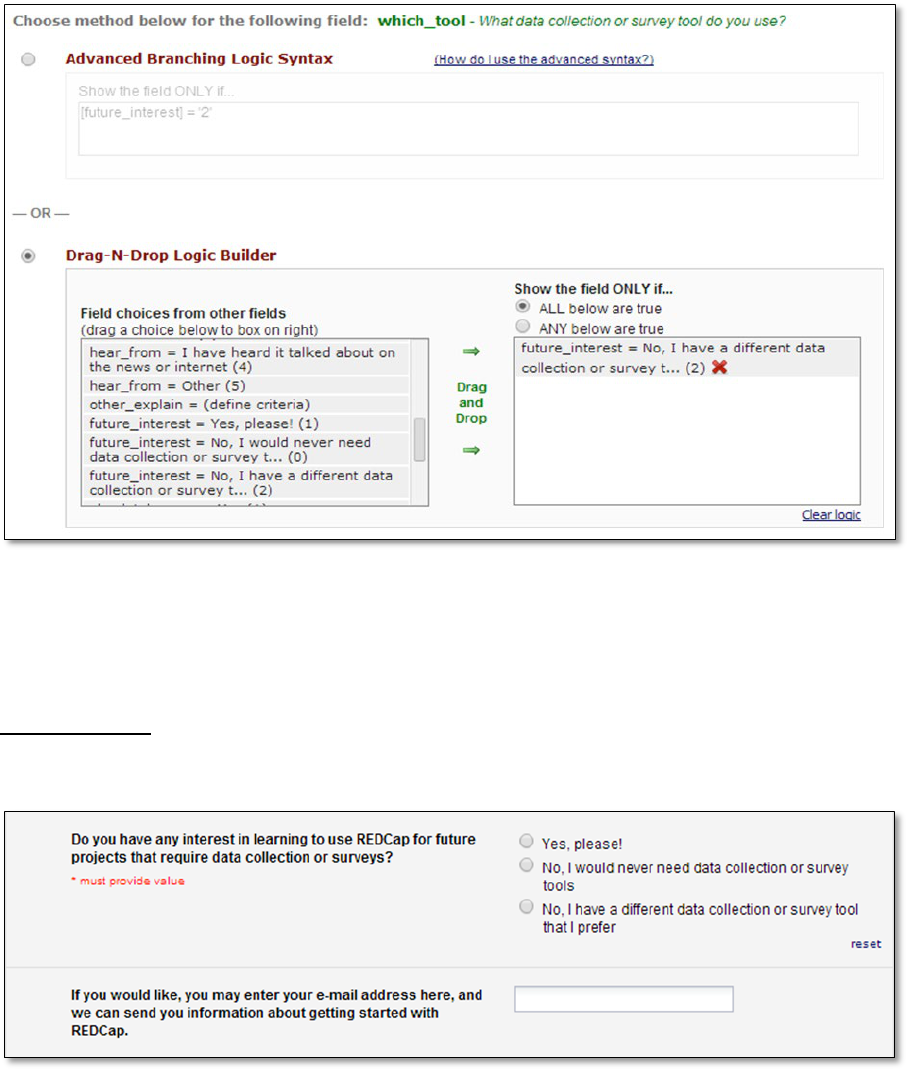
To begin defining your branching logic, click the branching logic icon (the green arrows) on the child question.
The Branching Logic dialog box will appear. You may use either the Advanced Branching Logic Syntax box or
the Drag
–
N
–
Drop Logic Builder box. For most branching logic uses, the Drag-N-Drop Logic Builder will be
sufficient. We do not recommend using the Advanced Syntax box if you have no experience with computer
science or programming syntax. If you have a question which you think may require the Advanced Syntax box,
please feel free to contact us for assistance or review of the coding.
22
UNMC - Research IT Office
Simply drag and drop the appropriate conditions for appearance of the child question, being sure to
specify whether you want ANY or ALL of the conditions to be true in order for the child question to appear.
Remember, branching logic is only employed on the child question. Since we want our first question to
remain static regardless of any other values on the page, we leave it alone.
Implementation:
Survey appearance before choosing any option (or with a non-target option selected):
Survey appearance after choosing the logic
–
dependent option:

23
UNMC - Research IT Office
[TIPS AND TRICKS]
:
•
Be sure to thoroughly test any use of branching logic with practice records to ensure that your
fields/questions are being displayed exactly as you want them. Recall that the “Preview
Instrument” function in the Online Designer will not test branching logic; only actual practice
records can do this.
•
Try not to include too many conditions in your branching logic. Overuse of branching logic can
lead to a higher chance of errors.
Adding a matrix of fields
For some data forms and surveys, the same set of answers may be used for many questions in a row, such as
scales indicating frequency or agreement. To fully grasp the “matrix of fields” concept, it may be easier to view
an example of a finished implementation before delving into the specifics of the set
–
up:
Setting up the matrix is essentially writing many questions at once, all of which use the same set of
answers. As such, there is only one section to define column choices, but there are many field labels, each
with their own variable names and requirement statuses. You may add as many rows as necessary for
your matrix.

24
UNMC - Research IT Office
There are two answer formats for matrices of fields: Single Answer (Radio Buttons) and Multiple Answers
(Checkboxes). For most matrices, Single Answer will be the preferred format.
A matrix group name must be provided. Its naming mechanism is similar to the general variable naming
mechanism. The group name itself is basically a coded value which ensures that no matter what display
platform the matrix goes through, all of the rows will be displayed together in a single matrix.
[TIPS AND TRICKS]
:
•
When exporting data, it will be easier for your data manager to keep track of matrix fields by
assigning each field’s variable name the same short prefix, such as “mtrx_” or “eval_”.
Shared Library
The Shared Library can be accessed from the home page of your Project Setup.

25
UNMC - Research IT Office
In the Shared Library, you can browse and search through a collection of data entry forms that have been
uploaded by other users. Upon finding a form that sounds useful or interesting, you may view it as a web
page or PDF and decide whether or not to incorporate it into your project as a new data form. Some
forms may want you to agree to a “Terms of Use,” which generally simply requests that you do not claim
any of their forms as original works (which is usually rather easy to follow, given that you don’t delete the
descriptive text within the form giving details about intellectual property). Not all forms will ask this.
[TIPS AND TRICKS]
:
•
If you don’t find the results you want from your first search, be sure to search for synonymous
and/or related keywords. For instance, if you search “education” and don’t find any relevant
results, try “academic” or “school.”
Data Dictionary
For large or repetitive projects, you may need to make large
–
scale changes to your forms that would be difficult
or tedious to perform with the Online Designer. The Data Dictionary is a CSV file version of your project, and
serves as an efficient way to make large
–
scale changes using (usually) Excel.
To begin making changes to your project using the Data Dictionary, click on “Upload Data Dictionary” on
the home page of your Project Setup. It will prompt you to download the current Data Dictionary so that
you can make changes to it. Here is a sample excerpt from a Data Dictionary (with the columns expanded
for readability):

26
UNMC - Research IT Office
Large
–
scale changes made easier through the Data Dictionary may include copying many fields
(rows)
into another form. For instance, if you wanted to copy rows 3 through 13 into another instrument, you
would simply highlight rows 3 through 13 in Excel (the entire rows), copy, paste into the appropriate
position (ensuring you did not paste
over
any other rows), and change the Form Name (column B) to
“Contact Info” for the newly pasted rows.
To re
–
upload the modified Data Dictionary, save the CSV file and re
–
upload it back in the Upload
Data
Dictionary window. If REDCap notices any syntax errors it cannot read, it will prompt an error message
alerting you to the issue. If there are no errors, it will ask for confirmation, ensuring that you know the
new Data Dictionary will
replace
the old Data Dictionary (not append to it).
[TIPS AND TRICKS]
:
•
Remember, the Data Dictionary does NOT contain any of the information from any of your
practice records. Changing information in the Data Dictionary
can
sometimes affect information
in the records (deleting fields, for instance), but it will not erase the records or corrupt the data.
• If you are making large
–
scale changes using the Data Dictionary, it may be helpful to
save separate
copies of your old Data Dictionary in case you discover any errors later on after uploading it (for
instance, if you mistakenly deleted several fields that you did not intend to delete).
Practice Records
An important part of any project, big or small, is the testing phase. Whether you are using surveys or
traditional data entry, REDCap allows you to create practice records to test the full functionalities of your
forms. This is especially crucial for testing branching logic, calculated fields, and survey appearance (if
applicable). For more information about practice records for
surveys
, see the
Survey
–
based studies section.

27
UNMC - Research IT Office
Once you are in the main “Add/Edit Records” page, you may choose an existing record to edit, create a
new record by typing in a new Record ID, or search for a particular record by a field value (for instance,
using the search field “Name” and typing “Jane Doe” into the search query). If you are employing multiple
Arms in your study, the first two options sort the records into groups by Arm. To search for a record
whose Arm you are not certain of, using the Data Search option is best.

28
UNMC - Research IT Office
If your study is not employing multiple Events (i.e., if it is not a longitudinal study), your first data entry
form will appear immediately, ready for data input. If your study does employ multiple Events, you will
see a screen similar to the one above. Records are edited one Event at a time; clicking on the first form
of an Event and filling it out will lead you through the forms assigned to that specific Event and then
return you to this screen. To learn more about longitudinal studies and Events, see the Longitudinal
studies section.
At the bottom of your data entry form, you have the option to mark the form as Incomplete, Unverified,
or Complete. Incomplete forms will display a red icon, which is the default status for all forms in a new
record; the yellow icon indicates Unverified, and green indicates Complete.
Clicking “Save and Stay” will save your progress and keep you on the current page. Clicking “Save and go
to Next Form” will save all data and take you immediately to the next form for that record. Clicking “Save
Record” will save all data and return you to the “Add/Edit Records” main page. You may also lock forms
for a record to prevent other users from editing existing information.
The most important thing to remember about practice records is that they are intended for
practice
.
This means that
no real data
should ever be entered into REDCap while your study is still in
Development mode. Real data entry will occur once you deploy your project into Production mode, where
your forms are finalized and data is more securely protected.
[TIPS AND TRICKS]
:
•
In your data entry screens (not including the survey submission screen), there is a small “H” and
speech bubble appearing beside each field. The “H” tracks the history of all recorded data values
for that particular variable. The speech bubble is the Field Comment Log, which allows users to
make comments on particular fields, and lights up when a comment exists for a field.
Data Access
User Rights

29
UNMC - Research IT Office
Clicking on “User Rights” in the toolbar on the left will bring you to a screen displaying the current users
on the project, and the rights to which they have access. You may also add new users to your project with
customized rights, or create “roles” (such as P.I., Data Manager, or Statistician) with specific rights so that
you may assign new users to a role right away. For research teams of 4 or more people, creating roles is
recommended.
Being able to customize the access that individuals have to your project ensures that specific roles are

30
UNMC - Research IT Office
going to be maintained, even if any breaches would be accidental.
[TIPS AND TRICKS]
:
• For multi
–
site studies and other special situations, it may be advantageous to have
entire groups
of users blinded to entire sets of records. Utilizing the “Data Access Groups” (DAGs) tool is the
easiest way to accomplish this. Once the DAGs are created, you may only see records that have
been created by another member of your DAG. This tightens security and prevents data overlap.
Logging
By clicking the “Logging” tool in the left
–
side toolbar, you can view the entire audit trail
throughout
the life of the project. Each event’s category and specific change is listed along with the time/date and
user’s username. The logging box is easily filterable, and can even be downloaded to a singular CSV file if
need be.
Report Builder
31
UNMC - Research IT Office
In the Report Builder application accessible from the left
–
side toolbar, you may view the results
of a
specific field or fields for all records in your project. The purpose of various reports can be to isolate
records, identify groups, study certain demographics of your participant population, and more. Let’s say
I want to produce a general demographic report of my participants along with their resting heart rate
and
BMI. To generate a new report, click the “Report Builder” tool in your left
–
side menu.
32
UNMC - Research IT Office

33
UNMC - Research IT Office
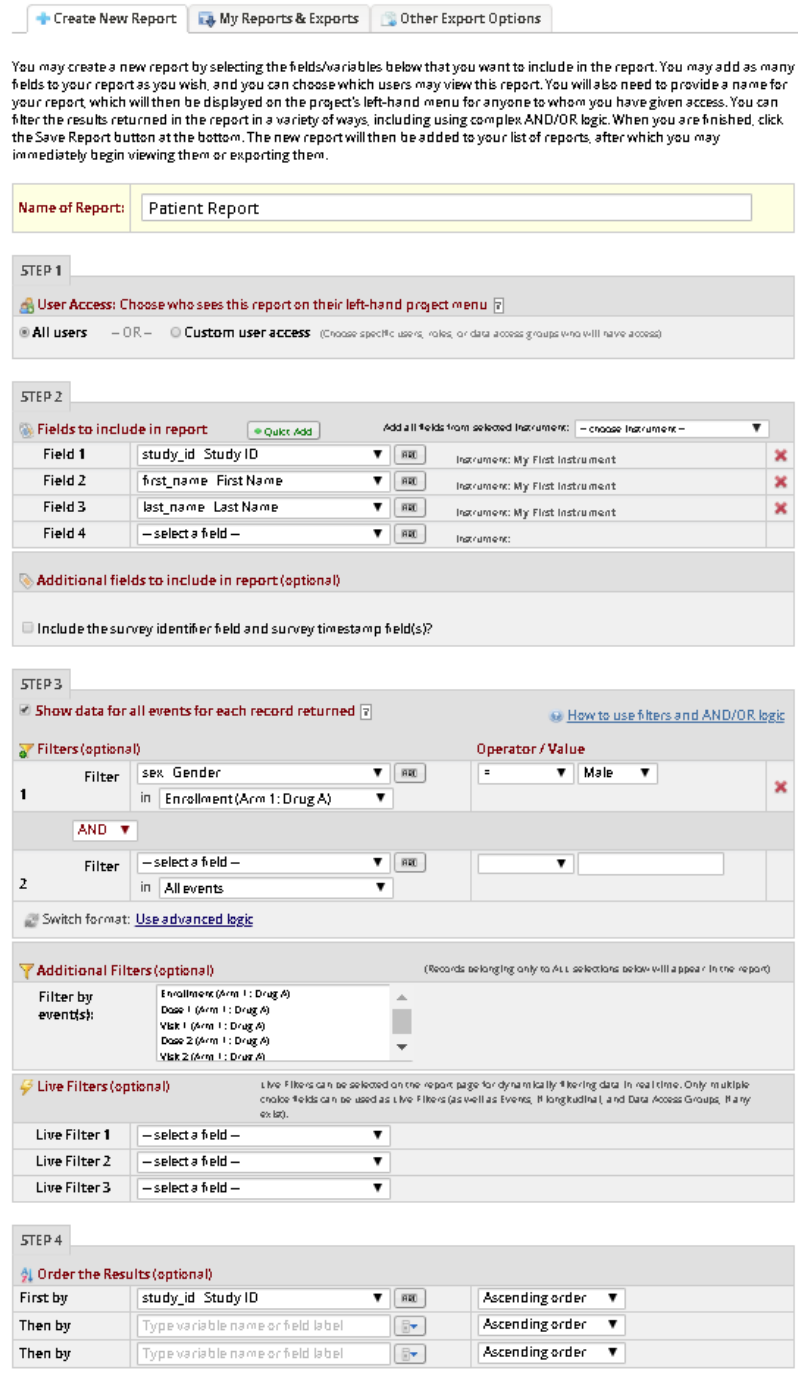
Name your report, and specify the variables you would like to the report to display. You may choose to
order the results in a specific manner to make data viewing easier. In this example, I have sorted by
gender. Once you are finished organizing the details, click “Save Report.”
Clicking “View” next to the title of your report after you have saved it will present the current data report
(see below). This is updated in real time as your data is collected. You may export your reports to .CSV or
.XML format; you may also simply print your report.
Let’s say we only want to view records whose age is greater than equals to 16. To do this, we will utilize
the “Filters” in the initial “Create a New Report” page.

34
UNMC - Research IT Office
You will notice that this time, I have specifically indicated that I want to see only the records whose age
is >= 16. Below is the result when viewing the report:

35
UNMC - Research IT Office
Notice that although 4 total records were queried, only 2 records matched our conditions, and thus only
2 are shown.
You may have multiple reports that you would like to generate for your project. This is easily tracked
through REDCap. Each report is even given its own shortcut in the Reports Module (which will appear
once you have created your first report).
[TIPS AND TRICKS]
:
• In the Report Builder, filtering/sorting by fields is easiest for fields that are single
–
answer
multiple choice (drop
–
down, radio buttons, true/false, yes/no).

36
UNMC - Research IT Office
•
Each report changes in real time as new data records (or surveys) are created for the project.
Once more records are completed, you can go back to the same report and it will update
accordingly.
Importing data
If you are conducting a study for which you already have some partial data, or if you are simply importing
data from an additional source, using the Data Import Tool is one of the easiest ways to accomplish this
task. First, you will be prompted to download one of two .CSV templates: one arranging separate records
into rows, and another into columns. Whichever you choose may depend on how your other data is
already arranged, and/or whichever you aesthetically prefer.
Once you have downloaded the template, use a program (generally Excel) to fill in the records, ensuring that
the correct variables are slotted into the correct places. Then, on the same Data Import application page, you
may re
–
upload the .CSV file and import your new data records.
NOTE:
This section deals with importing data
records
into your project. For more information on
importing your data dictionary (i.e. your data
forms
), see the Data Dictionary section.
[TIPS AND TRICKS]
:
•
For ease of data transfer, ensure that the order of the variables is the same on both your external
source and your REDCap data forms.
Exporting data
When accessing the Data Export Tool, you can either choose the “Simple Data Export” or
“Advanced Data
Export” option. If you only want to export certain fields or forms, or if you want to de
–
identify the data
before exporting, select “Advanced Data Export.” If you wish to export all of the data you have access to,
“Simple Data Export” is the best route.
Exporting your data “Raw” will export coded values. For instance, in a yes/no field type, data coded in
that column will either be “1” or “0” – not “yes” or “no.” In addition, field titles will be the coded versions
of the variable names, rather than the field labels. The “Labeled” data option is precisely the opposite –
exporting clear, labeled versions rather than coded values. For efficiency and compatibility with statistical
analysis tools, we often recommend exporting raw values.
The Data Export Tool is compatible with many analysis programs: Excel, SPSS, SAS, R, and Stata.

37
UNMC - Research IT Office
[TIPS AND TRICKS]
:
•
Exporting data to programs other than Excel produce syntax files, which are not always the easiest
to deal with. Often, exporting to .CSV and then using your preferred statistical analysis program
to import the .CSV is the ideal option. If you do choose this option, to ensure you are getting the
data precisely the way you want it, be sure to download one of the .CSV files listed next to “Excel”
rather than the one listed next to your program of choice.
Beyond Development Mode
Production Mode

38
UNMC - Research IT Office
Once your project has been created and tested adequately, you may be ready to move to Production
mode and begin collecting real data. If your study requires IRB approval, your IRB number must be
attached to your project before we will approve the project for Production status. For more information
on what must be done in Development before moving to Production, see the Development vs Production
Modes section.
By default, moving to Production erases all existing practice records, calendar events, and all other associated
practice data. It is a very thorough way to flush all of the practice data out of your project before collecting
real data, however, it is optional. Once your project is approved for Production, you will receive an e
–
mail
alerting you to its new status. Now, your project is ready for real data to be collected.

39
UNMC - Research IT Office
Draft Mode
Once you move to Production, changes made to your project are still possible, but the rules are
more
stringent. There are a few things which you may modify post
–
Production without significant
changes
to the data integrity of your project. For instance, you may add new fields or add new choices to existing
multiple choice fields. You may
not
make major changes to existing components (such as altering any
existing fields or choices) without gaining approval from a REDCap administrator.
To make any changes, a new module will appear at the bottom of your main Project Setup page giving
you the option of modifying your project in Draft Mode (NOTE: this make take several minutes to first
appear in your project).
Once entered into the Online Designer, you will be prompted to ensure that entering Draft Mode is what
you intend to do. Once you have clicked “Enable Draft Mode”, you may make any necessary changes and
submit them for review and approval.

40
UNMC - Research IT Office
Once you have made your change(s) to your data form(s), we strongly encourage you to click
“View detailed summary of all drafted changes” before submitting your changes for review. In that
screen, you will be able to view how many records will be affected by the changes, which modifications
may take place immediately (versus which will need administrator approval), and other details about the
drafted changes.
41
UNMC - Research IT Office
Any changes that need approval will be pending until your REDCap administrator verifies and approves them.
You will be alerted to this approval (or rejection) by e
–
mail. Once the changes are approved (or
rejected), your project will be back in full, official Production status and you have the option to enter Draft
Mode again if necessary.
[TIPS AND TRICKS]
:
• Communication with your REDCap contact admin is key to ensuring your changes will be approved
quickly. Sending a short e
–
mail describing the reasons behind your changes will help validate your
modifications and get them implemented more swiftly.
Inactive Mode
Inactive Mode is only available once a project is already in Production Mode; it is not available in
Development. Under the “Other Functionality” tab in your project’s home page, you may move the
project to an inactive status. This is ideal for a point in time where you would like to stop any incoming
data entry, but you would still like to export and analyze the records you have collected. Accordingly,
Inactive Mode will restrict data collection and any project setup changes, leaving record access and data
analysis intact for all existing records.
Your project will still be accessible from your main “My Projects” page, but you will see a new red

42
UNMC - Research IT Office
“Inactive” icon next to it. Once you enter the project, you will notice that there is now limited
functionality. Not all of the modules from previous modes appear in your left
–
side menu, and your
project status is explicitly listed as “Inactive.”
To move your project back into Production, simply click the “Other Functionality” tab and click “Move to
production status.” Since your project was already previously approved for Production, it does not need
approval a second time; it will be immediately placed back into Production.
Archived Mode
Once you are finished with a project, you may either delete it or archive it. We recommend
archiving your
projects rather than deleting them, in case you would like to perform any follow
–
up
studies in the
future. Unlike Inactive Mode, a project can be moved into Archived Mode whether it is in Development
or
Production status. You may even move a project into Archived Mode directly from Inactive Mode.

43
UNMC - Research IT Office

44
UNMC - Research IT Office
Once a project is moved to Archived Mode, a toggle will appear at the bottom of your projects listed in
the main “My Projects” home page (“Show/Hide Archived Projects”). By default, archived projects will be
hidden from your “My Projects” list, but toggling it to “Show” will enable you to access the project. Like
Inactive Mode, limited data access abilities are still available. To move your project back into Production,
simply click the “Other Functionality” tab and click “Move to production status.”
Specific Study Designs
Longitudinal studies
Projects that use a longitudinal design may track records over a series of multiple events. Different data
collection forms can be associated with different events; in addition, the same form can be utilized over
multiple events. For instance, a Demographics form may only need to be completed at the very first event,
while a Lab Results form may be required at each event.
In order to utilize the longitudinal study features of REDCap, you must have enabled the use of
longitudinal data collection in your “Main project settings” options on your Project Setup home page.
Once you have enabled the user of longitudinal data collection, a new module will appear in your main
Project Setup page so that you may define your events.
When defining your events, be sure to title each event and specify the “Days Offset” from the initial event.
You first event’s “Days Offset” should be 0.

45
UNMC - Research IT Office
This page is also where you are able to define your study’s Arms. If you have multiple treatment groups or
multiple sample populations, you may want to utilize this feature. Arms can be custom
named, and do
not necessarily need to have the same forms/events as other Arms. This can allow you to easily
group/block records. A single record may not belong to more than one Arm.
Once you have defined your events (and Arms, if applicable), you must now designate forms for your
events. To do this, click the “Designate Instruments for My Events” tab and “Begin Editing” to assign forms
to your defined events. In a longitudinal design, each form must be attached to at least one event. If
there are data entry forms which have been created within your project but are not attached to any
events whatsoever, your REDCap administrator will assume this is an error and will not approve the
project for Production status until it is corrected.

46
UNMC - Research IT Office
[TIPS AND TRICKS]
:
•
See the Calendar/Scheduling section for information on how to automatically add scheduled
Events to the Calendar module.
Survey based studies
In order to utilize the survey features of REDCap, you must have enabled the use of surveys in your “Main
project settings” options on your Project Setup home page.
Once this is enabled, a new module in your left
–
side menu will be available: “Manage Survey
Participants.” Upon entering this module for the first time, you will be prompted to enable at least one
of your existing data collection forms as a survey. There are many customizable survey settings that you
will be prompted to confirm, which you may edit later by clicking the “Survey settings” option next to the

47
UNMC - Research IT Office
form on the front page of your Online Designer.
Once you have enabled a data form as a survey and you have navigated to the Manage Survey Participants
module, you will see three tabs: Public Survey Link, Participant List, and Survey Invitation Log.
The Public Survey Link is a singular URL to your survey, which does not track IP addresses, e
–
mail addresses,
or any other identifying information. This means that any person with that survey link can take the survey
multiple times if need be. While this is an optimal feature for some surveys, it is not the best option for
projects in which we must ensure that no participant has taken the survey more than one time. New records
that are created by survey submissions appear in your existing records in auto
–
numbered order and are
labeled only by the date/time of submission.
The Participant List tab will enable you to send out a pool of e
–
mails to participants from REDCap.
Each e
–
mail will contain a unique URL that is only valid for one submission. To add the e
–
mail addresses of
your participants to the participant list, click “Add participants” and type in the e
–
mail addresses, one
per line. This will only create your pool of participant e
–
mail addresses; no e
–
mails have been sent out by the
completion of this step. This is in case you would like to send the surveys out in batches rather than all at one
time. To actually begin sending out the survey e
–
mails, click the “Compose Survey Invitations” button.
You may designate the time at which the e
–
mails are sent out, the subject of the e
–
mail, any additional
content or comments of the e
–
mail invitation, and the checklist of participants to whom you would like
to send the e
–
mail.

48
UNMC - Research IT Office
Later, once you return to the Manage Survey Participants module (see below), you will see the list of
participants along with a sent/unsent status regarding the e
–
mail invitation, and a status checking whether
or not the participant has responded. If Participant Identifiers are not enabled, there is no way to link an
individual’s e
–
mail address to a particular record, maintaining survey anonymity. If necessary for your
records, you may export the participant list as a .CSV file.
The Survey Invitation Log (not pictured) allows you to sort your participant list with various filters and
view some finer details (such as the time at which a survey invitation was sent out to a participant).
Individual times at which survey invitations should be sent out (if the invitation to a participant is not
already sent) can be modified here.
[TIPS AND TRICKS]
:
•
We do not recommend enabling multiple data collection forms as surveys if
all
surveys will be
sent to
all
participants. If there is concern about survey length, the best solution is to divide groups
of questions into sections with section headers (a field type) in the Online Designer and setting
the Question Display Format as “One section per page” in your Survey Settings.
• If you have a long list of e
–
mail addresses separated by some punctuation other than line breaks,
using the “Replace” feature (Windows shortcut Ctrl
–
H) in a program such as Word or Notepad++
will easily fix this formatting so that you can paste the list into REDCap. For instance, if your e
–
mail
addresses are separated by “;” (semicolon space), in the Replace window of Microsoft Word, simply
have the program find “;” and replace with “^l” (carat lowercase
–
L). (In Notepad++, line breaks are
specified with “\n” rather than “^l”.)
• If there is another e-mail address you would like to have the survey e-mails come from (besides
the main e-mail address associated with your account), you may click the “From:” drop-down box in
the “Compose Survey Invitations” window and add an additional e-mail address to your account.
This e-mail address must be verified via a verification e-mail before it can be utilized in this manner.
• If a survey contains study-qualifying information in a multiple
–
choice field, you may choose to
end a survey prematurely when certain qualifications are (or are not) met by using the Stop Action
icon in the Online Designer (the red stop sign). This will prevent you from gathering unnecessary

49
UNMC - Research IT Office
data, and save time for the survey
–
taker. For instance, if your question is “What is your role at
UNMC?” and you want the survey to continue for everyone who isn’t a student, you may click the Stop
Actions icon and select to stop the survey at that point for the “Student” response.
Multiple treatment groups (Arms)
When you have multiple treatment groups in your study, there are two primary ways to handle this in
REDCap:
Create a field in your data form which identifies which treatment group the record belongs to and use the
Report Builder to organize the data groups accordingly.
Enable longitudinal data collection methods, even if the study is not longitudinal, so that you may utilize the
“Arms” feature. This specific use of the “Arms” feature is discussed below. See the Longitudinal studies section
for more general information on Arms.
You can see in this example that we are able to use the Arms feature of the longitudinal design to easily
group records. Even in the Manage Survey Participants module, Arms are fully taken into consideration.
View the screen caps below for examples of REDCap’s Arm sorting and distinguishing.

50
UNMC - Research IT Office
Note that when exporting data, it is not possible to export each Arm’s data separately, however,
a record’s
Arm is listed as the second
–
column variable (immediately after Record ID), making it very easy
to distinguish
between the groups and separate the initial .CSV file into multiple files.

51
UNMC - Research IT Office
Additional Features of REDCap
Calendar/Scheduling
The calendar feature of REDCap allows you to keep track of events related to your project/study, with
the option of associating each event with a record. In the above example, three of the events are attached
to specific records, while the Design Meeting is not. Various viewing modes are available for the calendar,
and you may print the calendar as well.
Another feature of the Calendar module is the Scheduling module, which is available for longitudinal
studies only. The Scheduling module can be seen by enabling both the “Use longitudinal data collection
with repeating forms?” option and the “Scheduling module (longitudinal only)” option.

52
UNMC - Research IT Office
Once both of those options are enabled, a new “Scheduling” tool will appear in the left
–
side
menu.
Assuming that you have already set up your Events with the correct “days offset” specifications (see
the Longitudinal studies section), adding new Record IDs will automatically generate a schedule to
add to the calendar with all events accordingly booked for that record. You may also generate a
schedule for the remaining events on any existing record.

53
UNMC - Research IT Office
Graphical Data View & Stats
This module takes aggregate data from your data set (organized by data form) and automatically
generates relevant plots and simple statistical analyses. It is a useful tool for data overview and
evaluation. You can choose to view only the plots, only the statistics, or both. In the example below,
I have chosen to view only the statistics. Total responses, missing values, and count frequencies for
individual responses are listed. When viewing the plots, you may choose between viewing them
either as bar charts or pie charts.

54
UNMC - Research IT Office
File Repository
The File Repository module contains all of the data exports that have been performed on your data
set. In addition, users may upload relevant files for other users to download and/or utilize.
Field Comment Log
When entering data into a data form, you may have comments or caveats concerning specific fields.
If this is the case, you may utilize the Field Comment Log. To first create your comment, click the
speech bubble next to the field in the record you are working on. Enter your comment and click
“Save.” You will notice that the speech bubble icon is now lit, indicating that a comment exists for
that field.
To view the collective comments for all records, click the Field Comment Log module in the left-side
toolbar. Comments are linked to their corresponding records, along with the user who made the
comment, and the date/time at which the comment was made. You may sort through the comments with
various filters, as well as export the comment log to a .CSV file.

55
UNMC - Research IT Office
Data Quality
Running a check in the Data Quality module can help you keep track of invalid or missing data across
fields. You may execute each “rule” in the pre
–
made list (as well as create your own) and check for
discrepancies such as missing values and data validation errors. I have run a few of them in the example
below. As you can see, while I do not have any data validation errors, there are 82 total missing
values among my records, which (depending on the fields that are missing) can cause problems in
advanced data analysis.
FAQ
Note:
Many of the FAQs below stem directly from the Vanderbilt REDCap “Help & FAQ” section. We

56
UNMC - Research IT Office
chose to include only those that we felt were the most important and relevant to the general
purposes of our clients. For Vanderbilt’s full FAQ, see the “Help & FAQ” module inside
unmcredcap.unmc.edu.
Q: How much experience with programming, networking and/or database construction is required
to use REDCap?
No programming, networking or database experience is needed to use REDCap. Simple design
interfaces within REDCap handle all of these details automatically.
It is recommended that once designed, you have a statistician review your project. It is important to
consider the planned statistical analysis before collecting any data. A statistician can help assure that
you are collecting the appropriate fields, in the appropriate format necessary to perform the needed
analysis.
Q: How should I cite REDCap for the Data Management section of my IRB submission?
We do have recommended documentation; see the Citing REDCap in your IRB protocol section of our
REDCap Walkthrough.
Q: What is the Record Status Dashboard?
This is a table listing all existing records/responses and their status for every data collection
instrument (and for a longitudinal project, for every event). When viewing this page, form
–
level
privileges
are utilized (i.e. a user cannot see a form's status if the user does not have access to that form), and
if the user belongs to a Data Access Group, they will only be able to view the records that belong to
their group.
Q: How do I enter / view my data?
To enter or view individual records, you can navigate to the “Data Collection” section on the left
menu bar. Depending on your project type, you will see “Add or View Survey Responses”, a listing of
your form names, or a “Data Entry” icon. Use the drop down record lists so you can select or add a
new record/response.
Use the Report Builder tool to view your data. The Report Builder tool serves as the search engine of
a REDCap database. The Report Builder queries the database in real time and displays the resulting
data in table format. Variables are listed in columns and individual records are displayed in rows.
Use the Graphical View & Stats tool to view your data. The Plots tab displays graphical
representations for all numerical and categorical variables and provides links for cleaning notable
data (missing, highest, lowest values). The Descriptive Stats tab displays descriptive statistics for all
variables.
Q: Can I upload files to attach to individual subject records?
Yes, you can upload documents for individual records. To create a new document upload field in the
Data Dictionary for any given REDCap project, set the Field Type = ‘file.’ You may add as many ‘file’
fields as needed to your data collection instruments. Documents can be uploaded and downloaded
by navigating to the record’s data entry page and clicking the file link. A document can be deleted at
57
UNMC - Research IT Office
any time, and there is no limit to how many times the document can be replaced by uploading
another file to that record’s file upload field. On the other hand, REDCap has file size limit (100 MB).
Q: Do I need to select the record number again each time I change data entry forms?
No. To navigate between forms within a given record, select the colored dots indicating form status
(i.e. incomplete, unverified, and complete) which appear to the left of the form name when a record
is open. Note that moving to a new form by selecting the form status indicator will close the current
form without saving entries. In order to save entries, select the “Save and continue” button located
at the bottom of the form before using the form status indicators to move to a new form.
Alternatively, you can select the “Save and go to Next Form” button if you wish to move to the next
form for the current record.
Q: What are the risks of modifying a database that is already in Production?
Altering a database that is in Production can cause data loss. If a Production database must be
modified, follow these rules to protect your data:
Do not change existing variable names, or data stored for those variables will be lost. To restore data
that has been lost in this way, revert to previous variable name(s).
Do not change existing form names via a data dictionary upload, or form completeness data will be
lost. Form names may be changed within the Online Designer without data loss.
Do not modify the codes and answers for existing dropdown, radio, or checkbox variables; or existing
data will be lost or confused. It is only acceptable to add choices to a dropdown, radio, or checkbox
field.
Q: When exporting data from REDCap into SPSS, will the variable codes that you've defined be
automatically imported into SPSS (for ex 1, Female 2, Male)?
Yes. REDCap uses the metadata you have defined in your data dictionary to create syntax files for
SPSS, SAS, R, and Stata. The Data Export tool includes instructions for linking the exported syntax and
data files. Note that SPSS has several variable naming conventions:
The name MUST begin with a letter. The remaining characters may be any later, digit, a period or the
symbols #, @, _, or $
Variable names cannot end with a period
The length of the name cannot exceed 64 bytes (64 characters)
Spaces and special characters other than the symbols above cannot be used
No duplicate names are acceptable; each character must be unique
Reserved keywords cannot be used as variable names (ALL, AND, BY, EQ, GE, GT, LE, LT, NE, NOT, OR,
TO, and WITH)
Q: How do I import data from another source?
Data from another source can be imported using the Data Import Tool (most commonly used) or the
API (Application Programming Interface).
The Data Import Tool requires that data to be imported is in CSV (comma separated variables)
format. The order of the fields or the number of fields being imported does not matter, except that
the record identifier (e.g., Subject ID) must be the first field.

58
UNMC - Research IT Office
Q: How do I import longitudinal data?
The Data Import Tool requires you to use the “redcap_event_name” column when importing data.
You must specify the event name in the file using the unique “redcap_event_name.” You can upload
multiple event data per subject.
The unique “redcap_event_name”s are listed on each project's Define My Events page.
You can insert this field after the unique identifier as the second column or you can add it to
the end of your import spreadsheet (last column).
Additional Resources
Links:
UNMC REDCap: https://unmcredcap.unmc.edu/
REDCap Training Videos: https://redcap.vanderbilt.edu/consortium/videos.php \
Research IT Office (RITO) Web site: http://info.unmc.edu/vcr/rito
Contacts:
REDCap Support Team: rito@unmc.edu
Ashok Mudgapalli, RITO Director
Vinod Kumar Yarroju, REDCap support Admin
