
1
MARINE INVASIVE SPECIES PROGRAM (MISP)
REPORTING FORM WEB APPLICATION
HELP TOPICS
Contents
Background ............................................................................................................................................................................. 2
How to Create an Account (Sign Up) ...................................................................................................................................... 3
How to Sign In ......................................................................................................................................................................... 5
Forgot Your Password or How to Reset Your Password ......................................................................................................... 6
How to Sign Out ...................................................................................................................................................................... 9
How to Edit Your Profile ........................................................................................................................................................ 10
How to Close Your Account .................................................................................................................................................. 12
How to Add Vessels to “My Vessels” .................................................................................................................................... 13
How to Remove a Vessel from “My Vessels” ........................................................................................................................ 14
How to View Vessel History .................................................................................................................................................. 15
What Is Available Under Vessel History? .............................................................................................................................. 15
How to Start a New BWMR (Ballast Water Management Report) ....................................................................................... 16
How to Fill Out a New BWMR (Ballast Water Management Report) ................................................................................... 17
How to Fill Out a New AVRF (Annual Vessel Reporting Form) .............................................................................................. 26
How to Edit and Complete an Incomplete BWMR and AVRF ............................................................................................... 43
How Reports Get Added to “My Work,” and What is Listed under “My Work” .................................................................. 44
How to Delete Items from “My Work” ................................................................................................................................. 45
What to do After Your BWMR or AVRF is Rejected .............................................................................................................. 46
How to Report a Bug ............................................................................................................................................................. 47

2
Background
This MISP Web App allows external users to submit required reporting forms to California
State Lands Commission. These reports are the Ballast Water Management Report (BWMR)
and the Annual Vessel Report Form (AVRF) Users have access to previously submitted reports
and the most up-to-date reporting form versions and features, making reporting fast and easy.
All vessels that arrive at California ports must submit the Ballast Water Management Report
24 hours prior to arrival at each port call in California. If a vessel’s voyage is less than 24 hours,
the report shall be submitted upon departure from the last port of call prior to arrival.
The Annual Vessel Report Form is required at least 24 hours in advance of the first arrival of
each calendar year at a California port.
Ballast water discharge and vessel biofouling of commercial ships are the primary sources of
aquatic invasive species introductions in state marine waters, with as many as 4,000 species in
a single ship's tank at any given time. Once established, invasive species have enormous
ecological, public health, and economic impacts.
Prevention of nonindigenous species introductions is the most effective approach to protect
coastal waters. The Commission administers the Marine Invasive Species Program, which is a
multi-agency program applying to vessels registering 300 gross tons or higher and intended to
move California expeditiously towards elimination of nonindigenous species introductions into
state waters.
For more information regarding regulations, statutes, stakeholder communications, technical
advisory groups, and legislation for the Marine Invasive Species Program, visit the California
State Lands Commission website: http://www.slc.ca.gov/Programs/MISP.html
.

3
How to Create an Account (Sign Up)
1. Click the Sign In | Sign Up button located on the home page in the upper right corner.
2. Read the CSLC Access Authorization message and click the Continue button.
3. On the Sign In page, click on the text Sign up now (under the Sign In button).
4. Enter a valid email address and click the Send Verification Code button. NOTE: This
action will send an email message to the address you indicated. The message will
contain a verification code that you will need in order to continue the Sign Up process.

4
5. Check your email Inbox for a message from MISP.
6. Copy the code and paste it into the Verification Code box on the MISP Sign Up form.
7. Click the Verify Code button.
8. Enter a password in the New Password box. NOTE: The password must be 8-16
characters, containing 3 out of 4 of the following: Lowercase characters, uppercase
characters, digits (0-9), and one or more of the following symbols: @ # $ % ^ & * - _ + = [
] { } | \ : ' , ? / ` ~ " ( ) ; .
9. Enter the password again in the Confirm New Password box.
10. Click the Create button.
If the Sign Up was successful, the website will take you to the User Profile page. On the
User Profile page, fill in all required information and click the Update Profile button.

5
How to Sign In
1. Click the Sign In | Sign Up button located on the Home page in the upper right corner.
2. Read the CSLC Access Authorization message and click the Continue button.
3. Enter the email address you used to create your MISP account.
4. Enter the password associated with your MISP account.
5. Click the Sign In button.

6
Forgot Your Password or How to Reset Your Password
Use the following steps if you want to change your existing password, or if you forgot your
password.
1. From the Home page, click the Forgot Password button on the main menu at the top.
IMPORTANT NOTE: Do not go to the Sign In | Sign Up page and click the Forgot Your
Password link. Always use the Home Page button.
2. Read the CSLC Access Authorization message and click the Continue button.
3. Enter the email address you used to create your MISP account.
4. Click the Send Verification Code button. A verification code will be sent to your Inbox.

7
5. Check your email Inbox for a message from MISP.
6. Copy the code from your email message and paste it into the Verification Code box on
the MISP Sign Up form.
7. Click the Verify Code button.
8. If the verification was successful, click the Continue button.
9. Enter a password in the New Password box. NOTE: The password must be 8-16
characters, containing 3 out of 4 of the following: Lowercase characters, uppercase
characters, digits (0-9), and one or more of the following symbols: @ # $ % ^ & * - _ + = [
] { } | \ : ' , ? / ` ~ " ( ) ; .
10. Enter the password again in the Confirm New Password box.
11. Click the Continue button.

8
If successful, the website will take you to your Dashboard.

9
How to Sign Out
1. Click the Account button located on the menu bar.
2. Select and click Sign Out from the pull-down menu. CAUTION: Do NOT select Close
Account, which will permanently close your account and require you to create a new
account.

10
How to Edit Your Profile
1. Sign in to your account.
2. Click the Account button located on the menu bar.
3. Select and click User Profile from the pull-down menu.
4. Edit your profile as needed and click the Update Profile button when finished.

11

12
How to Close Your Account
NOTE: This action will permanently close your account and will require you to contact the
system administrator if you wish to sign in/sign up again.
1. Sign in to your account.
2. Click on the red Account button located on the menu bar.
3. Select and click User Profile from the pull-down menu.
4. From the User Profile page, click on the Close Account button.
5. Read the warning message, then click on the Yes button to close your account.
13
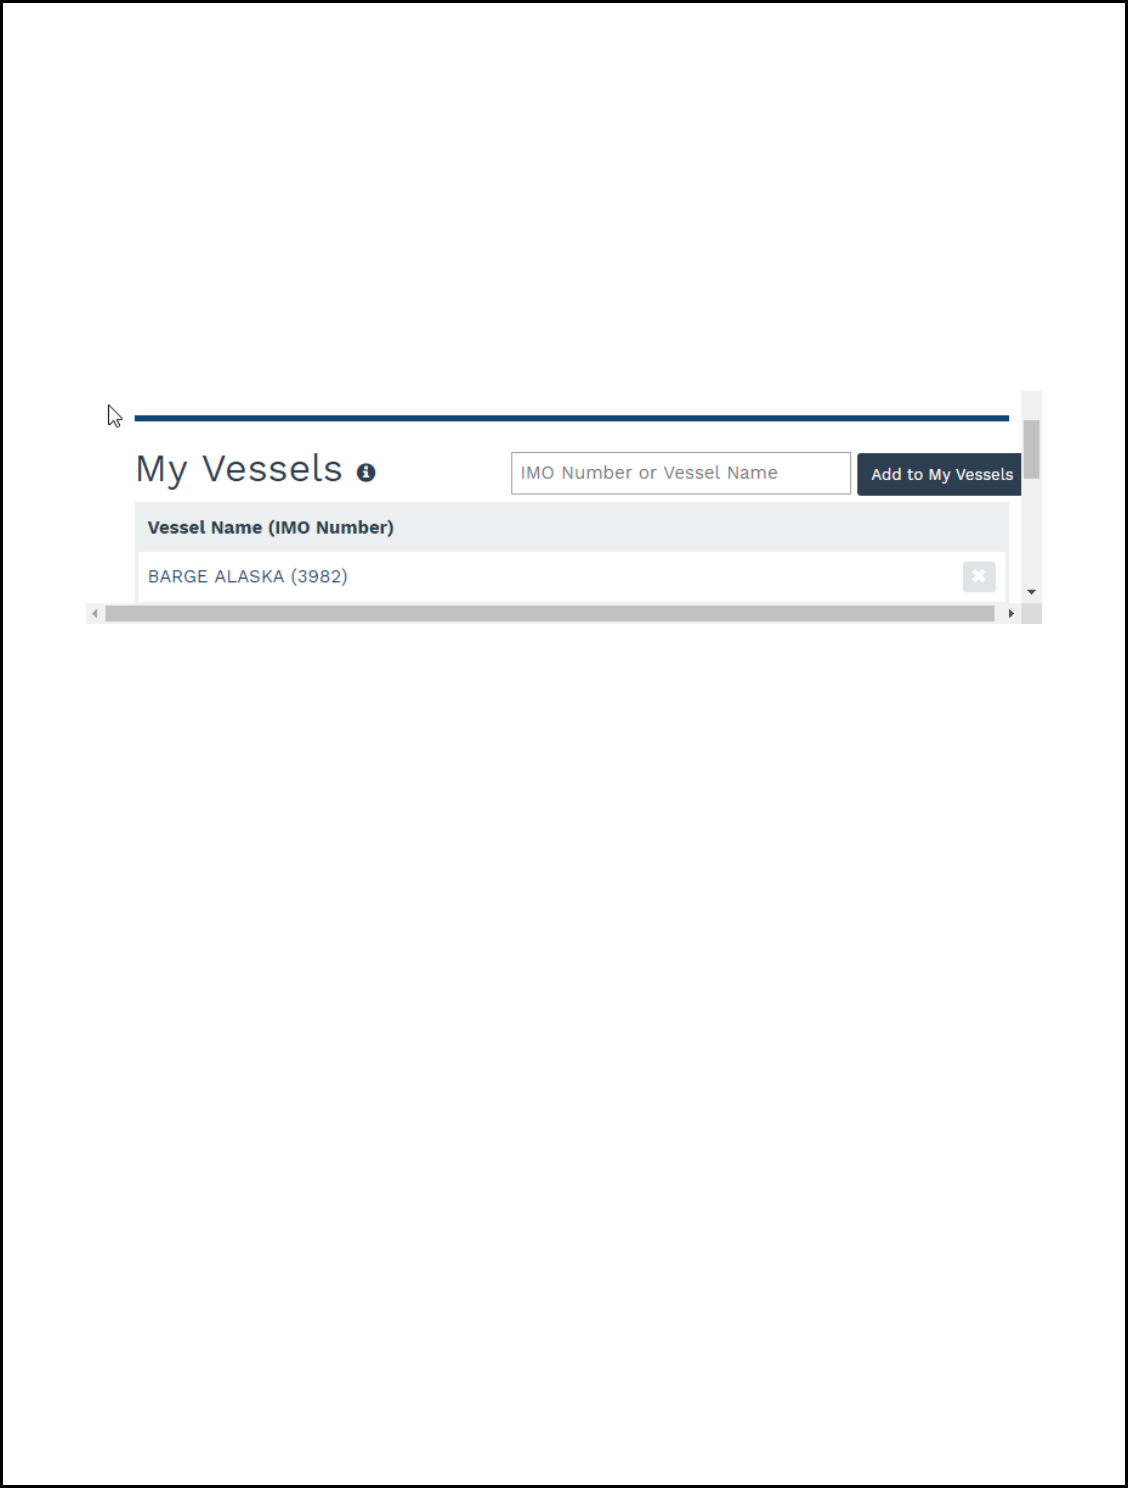
How to Add Vessels to “My Vessels”
1. From the Dashboard, under My Vessels, enter a valid IMO number, or a vessel name, or
select a name from the list.
To find an existing vessel name, type the first letter of the vessel into the box to activate
the list.
2. Click the Add to my Vessels button. This action will add your vessel under My Vessels on
your Dashboard.

14
How to Remove a Vessel from “My Vessels”
1. From the Dashboard, under My Vessels, locate the vessel name you wish you remove.
2. Hover your cursor over the gray “X” at the end of the row until it turns red, then click
the red “X” to remove the vessel name from your list. NOTE: This action will only remove
the vessel from your list and not from the MISP database.

15
How to View Vessel History
From the Dashboard, under My Vessels, locate the vessel name in your list and click the name
or the white space within the row to view the vessel’s history.
What Is Available Under Vessel History?
Under Vessel History you will find comprehensive information and details for each vessel.
• BWMRs: All reports that have been submitted and approved for the vessel.
This tab includes Arrival Date, Arrival Port, Last Port, and Next Port.
To edit a report listed here, click the edit symbol at the end of the row under Action.
A corrected report will be indicated by a “Y” in the Corrected column.
• AVRFs: Annual reports that have been submitted for this vessel.
• Open Port Calls: All voyages that have no BWMRs submitted.
• Inspected Port Calls: All port calls that have been inspected by the California State Lands
Commission.
• Vessel Details: This tab includes Vessel Name, IMO Number, Country of Registry, Vessel
Type, Gross Tonnage, Total Ballast Water Capacity, Number of Tanks on Ship, and
Onboard BW Management System (if applicable).

16
How to Start a New BWMR (Ballast Water Management Report)
1. From the Dashboard, under My Vessels, select a vessel from the list.
2. From the Vessel History page, click the New BWMR button.
3. In the Port Call dialog box, select an open port call from the pull-down menu, or if your
port call is not listed, select Unlisted Voyage.
4. Click the Continue button.
5. From the Ballast Water Management Report page, enter any required vessel
information that is not already filled in.
6. Click the Save and Continue button or the Next button to move through all the tabs
until you arrive at the Review page.

17
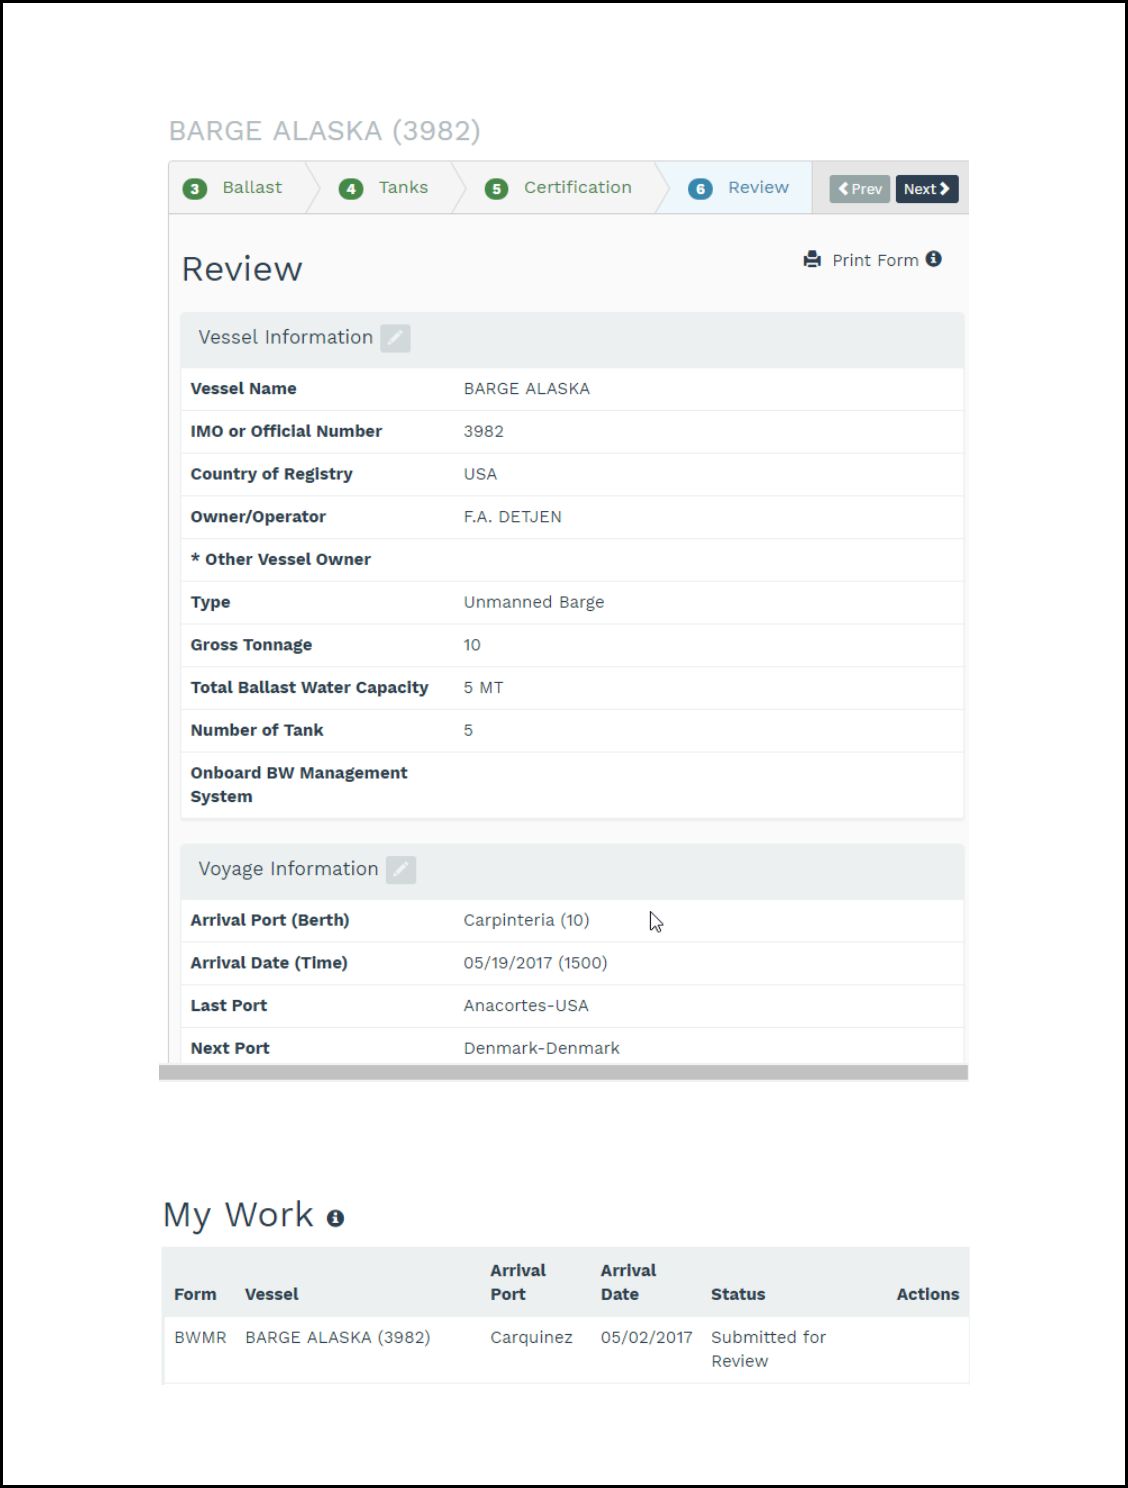
How to Fill Out a New BWMR (Ballast Water Management Report)
Tab 1: Vessel (Vessel Information)
1. From the Dashboard, under My Vessels, select a vessel from the list.
2. From the Vessel History page, click the New BWMR button.
3. Select the correct Port Call, then click the Continue button.
4. From the Ballast Water Management Report page, enter any required vessel
information that is not already filled in.
Vessel Name: The name of the vessel you are creating a new report for should already
be listed in this field.
IMO or Official Number: International Maritime Organization (IMO) number or Official
Number is a unique reference for ships and for registered ship owners and management
companies. This field should already be filled in.
Country of Registry: Choose a name from the country pull-down menu.
Owner/Operator: Name of registered owner(s) of the vessel.
If not on the list, please specify: Type a name if the owner/operator is not present in
the list.
Vessel Type: Vessel types are listed in the pull-down menu. If the exact vessel type is
not available, select "Other."
Gross Tonnage: Enter the Gross Tonnage of the vessel. If reporting a tug-barge combo,
report total combined gross tonnage.
Total Ballast Water Capacity: Enter the maximum total volume of ballast water that
can be carried in the vessel. If reporting a tug-barge combo, report total combined
ballast water capacity.
Number of Tanks: Enter the total number of ballast water tanks, cargo holds, and
other spaces that are used for carrying ballast water.
Onboard BW Management System: If the vessel is equipped with an approved BWMS,
select the system from the pull-down list.

18
5. Click the Save and Continue button, or click the Next button.

19
Tab 2: Voyage (Voyage Information)
Arrival Port (port and state): Enter the name of the port or place that is the destination
for this voyage. Select the matching state or territory from the pull-down list.
Berth: Enter the berth number or name.
Arrival Date: Enter the date of arrival to the arrival port using this format: MM/DD/YY.
Arrival Time: Enter the time of arrival to the arrival port. Use military time format (for
example: 0900, 0830, 2300).
Last Port (port and country): Enter the name of the last location at which the vessel
called, either outside the US EEZ or the previous US location. Select the Country or US
territory of the last port from the list.
Next Port (port and country): Enter the name of the next location at which the vessel
plans to arrive. Select the Country or US territory of the next port from the list.
Agent: Enter the name of the Agent, or select the Agent from the list.
If not on the list, enter an Agent name.
Click the Save and Continue button, or click the Next button.

20
Tab 3: Ballast (Ballast Water Information)
Total Ballast Water on Board & Units: Enter the total volume of ballast water on board
upon arrival into the Arrival port. Do not count potable water. If reporting a tug-barge
combo, report total combined ballast water on board.
Number of Tanks in Ballast: Enter the total volume of ballast water tanks, cargo holds,
and other spaces that are carrying ballast water upon arrival to the Arrival port.
Number of Tanks Discharged: Enter the total volume of ballast water tanks, cargo holds,
and other spaces carrying ballast water discharged at, or en route to, the Arrival port.
Alternative BW management conducted, per Instructions from COTP: Check this box
only if you have received specific instructions from a COTP on how to conduct an
alternative BW management on one or more of the tanks discharged.
Click the Save and Continue button, or click the Next button.

21
Tab 4: Tanks (Ballast Tank Information)
Individual ballast water events are to be reported separately for each ballast water tank.
Ballast Water history is reported on an "Event" basis. Each BW tank is designated by its name
and number, and its capacity. This tank information includes the tank's specific ballast water
discharge, management and source event information. Each tank is reported in a separate
block.
1. Click the Add Tank button to record the tanks used for discharging ballast water.
2. Enter the Tank Code, Count, Location (e.g. center, port, starboard), and Capacity
(maximum volume the tank or hold can carry) in the appropriate fields.
3. If BW management was not conducted for this tank, select one of the reasons from the
pull-down list.
4. Click the Save button.

22
5. Now you can either add more tanks or add an Event to your existing tank(s).
6. Click the Add Event button to add one or more Events for each tank.
7. Fill in all fields on the Add / Edit Event dialog box:
EVENT: Select an Event from the pull-down list.
DATE: Enter the Date of the Event.
VOLUME: Enter the Volume of ballast water for the Event.
8. Based on Event selected, select Port or specify the required Latitude/Longitude values.
PORT: Type the name of the port, then select the name from the pull-down list (latitude
and longitude are not required if Port is selected).
LATITUDE and LONGITUDE: If the Event did not take place at a port, enter the starting
and ending Latitude and Longitude of the Event.
The acceptable format is “Degree Minutes(.Decimal) Direction”:
Degree is MANDATORY
Latitude must be between 0-90
Longitude must be between 0-180
Minutes is MANDATORY

23
Decimal is OPTIONAL
Direction is MANDATORY
• Latitude must be either N or S
• Longitude must be either E or W
Examples of good formats:
• 41 25.5N / 165 51.8E
• 41 25.5 N / 165 51.8 E (space before Direction is OK)
• 25 59N / 121 24W (Decimal is optional)
Examples of bad formats:
• 141 25.5N / 165 51.8E (latitude Degrees not between 0-90)
• 25 59E / 121 24N (direction values not correct for Latitude or Longitude)
• 25S / 44 2E (Latitude is missing Minutes values)
9. Click the Save button or Save and Add Another Event.
10. Repeat this process until each tank’s events have been recorded.

24
Tab 5: Certification (Certification of Accurate Information)
1. Type the First Name and Last Name of the individual responsible for the information
provided on this form.
2. Select the Title of the individual from the pull-down list.
3. Submitted By: Type the name of the person submitting the report.
4. Contact Information: Provide the email address and/or phone number of the contact
person for this report.
5. Check the box to attest to the accuracy of the information provided.
6. Click the Save and Continue button.
25
Tab 6: Review
1. Ensure the accuracy of all information before clicking the Submit for Review button.
2. After submitting for review, the vessel will appear on your Dashboard in the list of
vessels under My Work, with the status “Submitted for Review.”

26
How to Fill Out a New AVRF (Annual Vessel Reporting Form)
1. From the Dashboard, ensure that the vessel you want to submit for is listed under My
Vessels. If not, type the vessel name or IMO number into the Search Vessels field, select
the correct vessel, and click on the Add to My Vessels.
2. Select the vessel from the My Vessels list.
3. From the Vessel History page, click the Create New AVRF button.

27
Tab 1: Responsible Officer Name & Reporting Year
1. Select the Reporting Year (Note: Only one AVRF per year can be reported per vessel).
2. Enter the Officer First Name, Last Name, and Title.
3. Enter Submit Date (DD/MM/YYYY).

28
Tab 2: Since delivery, has this vessel ever been removed from the water for maintenance?
Check the appropriate box to indicate whether, since delivery, the vessel has ever been
removed from the water for maintenance.
• If, “YES”, enter the date (DD/MM/YYYY) and location for the most recent out-of-water
maintenance period.
• If, “NO”, enter the vessel’s delivery date (DD/MM/YYYY) and the location where the
vessel was built.

29

30
Tab 3: Were the submerged portions of the vessel coated with an anti-fouling
treatment or coating during the out-of-water maintenance or shipbuilding process
listed in question #2?
• f “YES, full coat applied”, move on to Question 4.
• If “YES, partial coat”, list the completion date of the most recent full coat application of
an anti-fouling treatment/coating.
• If “NO coat applied”, list the completion date of the most recent full coat application of
an anti-fouling treatment/coating.

31
Tab 4: For the most recent full coat application of anti-fouling treatment, what type
of anti-fouling treatment was applied and to which specific sections of the
submerged portion of the vessel was it applied? List information for each anti-
fouling treatment/coating if more than one was applied.
Tab 5: Were the sea chests inspected and/or cleaned during the out-of-water
maintenance listed on question #4? If no out-of-water maintenance since delivery,
select Not Applicable. (Check all that apply).

32
Tab 6: Are Marine Growth Protection Systems (MGPS) installed in the sea chest(s)
and/or sea strainer(s)?
• If “YES” list the Manufacturer and Model.
• If “YES” indicate if MGPS is installed in sea chests or sea strainers (or both).
• If “NO” move on to Question 7.

33
Tab 7: Has the vessel undergone in-water cleaning to the submerged portions of
the vessel since the last out-of-water maintenance period? In-water cleaning does
not include cleaning carried out during out-of-water maintenance but does include
cleaning carried out during the Underwater Inspection in Lieu of Dry-Docking
(UWILD). For this question, out-of-water maintenance includes the shipbuilding
process.
• If “YES”, provide the date, location and the vendor that conducted the most recent in-
water cleaning (do not include cleaning performed during out-of-water maintenance
period). Check the sections that were cleaned (all that apply). Check the appropriate
cleaning method (divers, a robotic system, or both).
• If “NO”, go to Question 8.

34
Tab 8: Has the propeller been polished since the last out-of-water maintenance
(including shipbuilding process) or in-water cleaning?
• If “YES” list the date of the most recent propeller polishing.
• If “NO” go to Question 9.
Tab 9: Are the anchor and anchor chains rinsed during retrieval? Check the
appropriate box.

35
Tab 10: Over the past four months, list the average speed (knots) the vessel
traveled and the average length of time (either hours or days) the vessel spent in
any given port.

36
Tab 11: Since the hull was last cleaned (out-of-water or in-water), has the vessel
visited:
a. Freshwater ports (specific gravity of less than 1.005)
b. Tropical ports (latitudes 23.5̊ S and 23.5̊ N)
c. Panama Canal - If “YES”, list how many times.

37
Tab 12: Starting with the most recent port, list the last 10 ports visited by the vessel
in the order they were visited. Provide the port or place, country and the arrival and
departure dates. If the vessel follows a regular route, visiting the same ports
routinely, check the box and list the information for the most recently completed
route.
NOTE: You do not have to use all ten spaces if the regular route involves less than 10 ports.
To enter ports and arrival and departure dates, select Add Visited Port button.

38
A Port Visit (Tab #12) pop-up window will appear. Enter the port, arrival date, and departure
date for each port. After each port information, select Save and Add Another Visit to continue
adding ports. Once all ports are entered, select Save.

39
Tab 13: Since the most recent hull cleaning (out-of-water or in-water) or delivery,
has the vessel spent 10 or more consecutive days in any single location (Do not
include the time out-of-water or during in-water cleaning).
• If “YES” list all the occurrences where the vessel spent 10 or more consecutive days in a
single location.
• If “NO” enter the information for the single longest amount of time the vessel has spent
in a single location.

40
Tab 14-17: Does the vessel have a ballast water treatment system installed?
• If “YES” provide the system manufacturer or company, product name, model
number and the date the system was commissioned. This date should be when
the system was determined to be ready for active service including (1)
Functionally ready for use, and (2) Has received all applicable use approvals.
• If Treatment System not installed, check “NO” and click Save & Continue.
Tab 15: Has the installed ballast water treatment system been used to treat ballast
water in the last 12 months? If “YES” list the number of times.

41
Tab 16: Has the installed ballast water treatment system malfunctioned in the last
12 months?
• If “YES” provide the date of the most recent malfunction, describe the malfunction
including the type of malfunction (e.g., software, chemical, operational, plumbing).
Describe all repairs that were completed as a result of each malfunction.
• If “NO” move on to Question 17.

42
Tab 17: Has an onboard test for biological performance of the vessel's installed
ballast water treatment system been completed since the system was
commissioned?
• If “YES” list the dates of the test since the system was installed.
• If “NO”, this is the end of the report.
Click Save Treatment System button.
Tab: Review
1. Ensure the accuracy of all the information before clicking the SUBMIT button.
2. After submitting the report, the AVRF will appear on your Dashboard in the list of
vessels under My Work, with the status “Submitted”.

43
How to Edit and Complete an Incomplete BWMR and AVRF
1. From the Dashboard, under My Work, click on a vessel name in your list that shows a
status of “Saved.”
2. From either Ballast Water Management Report page or Annual Vessel Report Form
page, continue filling out the incomplete fields on each tab in the report. NOTE: You
cannot move to the next tab until all required fields on the current tab are complete.
3. You can Edit and Save your report, or you can complete all fields in each tab and submit
your report.

44
How Reports Get Added to “My Work,” and What is Listed under
“My Work”
Any report associated with your account that has been started and saved, rejected, or
submitted for review will be listed under My Work on the Dashboard. The Status column
under My Work will indicate the current status of your reports.
A “Saved” status indicates that the report has not been completed. You can select and edit the
saved report as appropriate. You can also delete a saved report.
A “Submitted for Review” status indicates that the report has been completed and submitted
to the California State Lands Commission for review. At the time of submittal, a confirmation
email is sent to the email address associated with your MISP account. You cannot edit or
delete a submitted report.
A “Rejected” status indicates that the report has been submitted to the California State Lands
Commission for review and was rejected. You can edit and correct a rejected report, and re-
submit for review. You can also delete a rejected report.

45
How to Delete Items from “My Work”
1. To delete an item from My Work, move your cursor over the row with the vessel name
you wish to remove.
2. Hover your cursor over the gray “X” until it turns red, then click the red “X.”
3. When the Alert box appears, click the Yes button if you wish to remove the item, or click
the No button if you want to cancel this action.

46
What to do After Your BWMR or AVRF is Rejected
A report will be rejected if information in the report is incorrect. You will be notified via email
if your report has been rejected, and the reason for the rejection should be detailed in the
email message.
A rejected report will also be listed under My Work with that status “Rejected.”
You have two choices when a report is rejected:
1. You can open the rejected report and correct the information and re-submit the
report for review.
2. You can delete the report from My Work and start a new report.

47
How to Report a Bug
1. To report a bug, or to report a problem with this application or its functionality, click the
blue Support button on the main menu at the top of any page.
2. Select “Report a Bug” from the pull-down menu to read the instructions.
Send your “bug report” to the following email address: misp-bug@the-mcorp.com. If possible,
list or describe the steps to reproduce the bug.
