
JCP Portal Access User Guide-External DLA
Joint Certification Program
Operations Support Solution
External Portal
Access User Guide
Prepared by: New River Systems, Inc.
3/20/2023
Version 1.0

JCP Portal Access User Guide-External DLA
Page 1 of 21
1.0 Document Information
1.1 Revision History
Version
Author
Date
Changes
1.0
Kelly Conboy
3/20/2023
Initial Draft
1.2 Document Specifics
Item
Details
Document Author(s)
Kelly Conboy
Contact Information
•
1.3 Disclosure Information
This document is for Defense Logistics Agency use only and contains proprietary information. Use or disclosure of
this document outside of Team New River Systems is strictly prohibited without written permission. © 2023 New River
Systems, Inc. All rights reserved.
JCP Portal Access User Guide-External DLA
Page 2 of 21
Contents
1.0 Document Information .................................................................................................................. 1
1.1 Revision History ......................................................................................................................................1
1.2 Document Specifics ................................................................................................................................1
1.3 Disclosure Information ...........................................................................................................................1
2.0 Introduction .................................................................................................................................. 3
2.1 Scope .....................................................................................................................................................3
2.2 Assumptions ...........................................................................................................................................3
3.0 User Registration into the JCP Portal ............................................................................................. 4
4.0 Profile ........................................................................................................................................... 7
5.0 Logging into the JCP Portal ............................................................................................................ 9
6.0 Joining an Organization ............................................................................................................... 12
6.1 Request to Join an Organization ............................................................................................................ 13
6.2 Create New Organization ...................................................................................................................... 15
7.0 Appendices .................................................................................................................................. 17
7.1 Appendix A: Two-Factor Authentication Setup ...................................................................................... 17

JCP Portal Access User Guide-External DLA
Page 3 of 21
2.0 Introduction
The purpose of this document is to provide end user instructions for gaining access to the JCP External Portal.
Portal URL:
https://www.public.dacs.dla.mil/jcp/ext (for PROD)
2.1 Scope
The scope for the JCP External Portal User document is as follows:
• User Registration
• Logging into the Portal
• Update Profile (for non-CAC users)
• Reset Password (for non-CAC users)
• Joining an Organization
2.2 Assumptions
The following assumptions apply to the JCP Portal.
• The user has browser software to access the JCP Portal.
• The user has Google Authenticator set up on their phone (directions in Appendix A)

JCP Portal Access User Guide-External DLA
Page 4 of 21
3.0 User Registration into the JCP Portal
When the user accesses the JCP External Portal, a Warning message appears. To move onto the Login page, click
the Continue button.
JCP Portal Warning Page
When the user is on the Login page, click the Registration link below the Login button to go to the Registration
page.
JCP Access Page

JCP Portal Access User Guide-External DLA
Page 5 of 21
Register – User Name and Password page – for use by users that do NOT processes a government Common
Access Card (CAC).
•
All fields must be filled in.
•
User Name - Enter your Username as firstname.lastname (ex: michael.gordon, sarah.jones ).
•
Enter your password:
•
must be 12 characters long and must contain at least:
•
1 lowercase letter
•
1 uppercase letter
•
1 number
•
1 special character.
•
You must type your password into the Password as well as the Confirm Password fields.
•
Once all fields are filled in, click the Register button to create the new account.
Registration – User Name and Password Page

JCP Portal Access User Guide-External DLA
Page 6 of 21
Register – CAC page:
•
All fields must be filled in.
•
EDIPI - Enter the 10-digit ID on the back of your CAC.
•
User Name - Enter your Username as firstname.lastname (ex: michael.gordon, sarah.jones ).
•
Once all fields are filled in, click the Register button to create the new account.
Registration – CAC Page

JCP Portal Access User Guide-External DLA
Page 7 of 21
4.0 Profile
In the header of a main page, such as the Dashboard, next to the Help and Logout links, is the Profile link.
To update your Profile information (First Name, Last name, Email, or Telephone), make a change in any or all the
form fields and save by clicking the Save button.
User Profile Page

JCP Portal Access User Guide-External DLA
Page 8 of 21
To reset your password, click the Reset Password button. Key in the current password into the Current Password
field, then key in your new password into the Password and Confirm Password fields and click the Save button.
Note: Clicking the Hide button will remove the password fields from the page.
Important: Your password MUST follow the following naming convention: This info is available when the icon is
hovered over by your mouse.
• at least 12 characters
• at least 1 upper case letter
• at least 1 lower case letter
• at least 1 number
• at least 1 special character
User Profile Page - Password Reset

JCP Portal Access User Guide-External DLA
Page 9 of 21
5.0 Logging into the JCP Portal
To Log into the JCP External Portal you must click the Continue button on the USG Warning page.
JCP Portal Warning Page
Then you must click the Login button. You will be prompted for your CAC certificate.
JCP Access Page

JCP Portal Access User Guide-External DLA
Page 10 of 21
If you have a CAC, click on the CAC certificate, and click the OK button. You will be taken to the Dashboard page.
If you do not possess a CAC, click the Cancel button.
CAC Certificate on Login Page
Key in your User name and Password and click the Sign In Button.
JCP Portal Login Page

JCP Portal Access User Guide-External DLA
Page 11 of 21
Get the code from your Authenticator on your phone and key it into the Authentication Code box (see instructions in
Appendix C for setting up two-factor authentication). Once you key in your Authentication Code, click the Verify
button. You will be taken to the Dashboard page. Be aware that the Authenticate Code changes every minute.
JCP Portal Login - Authentication Code Page

JCP Portal Access User Guide-External DLA
Page 12 of 21
6.0 Joining an Organization
If you have just registered with the JCP Portal, you won’t be initially attached to any organization. Upon first login after
registration, you will see the Dashboard page display similar to the screenshot below. The Organization Details on
the left, top side state No Linked Organization.
In the Actions drop-down are two options:
• Request to Join an Organization
• Create New Organization
JCP Portal Access User Guide-External DLA
Page 13 of 21
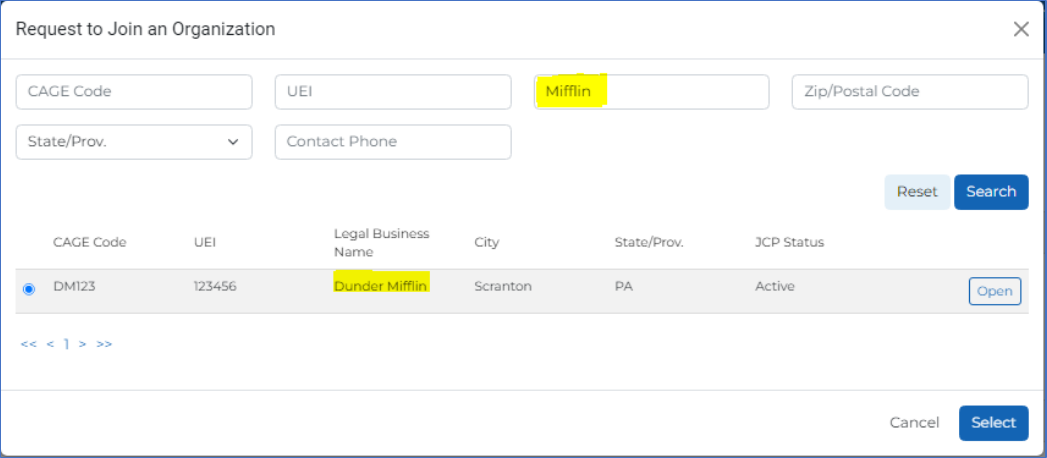
6.1 Request to Join an Organization
To request to join an existing organization, click the Actions drop-down and choose Request to Join an
Organization. The Request to Join an Organization pop-up appears. Search for an existing organization that you
would like to join by filling in search criteria into one of the fields and clicking the Search button. You can search by
CAGE Code, UEI, Legal Name, Zip/Postal Code, State/Province, or Contact Phone.
A list of search results should appear with a radio button next to each organization.
Click the radio button for the organization you want to join and click the Select button.
NOTE: If you do NOT select an organization and click the Select button, an error message will display at the bottom
right of the page and the pop-up will remain.
Request to Join an Organization Pop-Up

JCP Portal Access User Guide-External DLA
Page 14 of 21
You will be taken back to the Dashboard page and will see that in the upper left side of the page Requested
Organization appears with Legal Business Name and CAGE Code, and a message will appear at the bottom right
of the page stating: Request to join [Legal Name] has been sent. You will not be able to start any applications until
an existing member of the Organization you have requested to join approves your request.
Dashboard after new user completes Organization join request
NOTE: If you are the first user to request to join an organization, a JCP Administrator will approve or deny your
request.
You will receive an email stating whether you were approved or denied, so be sure to have a valid email address in
your user profile.

JCP Portal Access User Guide-External DLA
Page 15 of 21
6.2 Create New Organization
To create a new organization, from the Actions drop-down in the Dashboard page, click Create New Organization.
The Create New Organization page will appear. Fill in all the necessary information into the form and click the
Submit button. The Dashboard page appears again with a success message at the bottom right of the page stating
Organization [CAGE Code] has been created successfully.
Create New Organization Form

JCP Portal Access User Guide-External DLA
Page 16 of 21
Notice in the Dashboard page the new Organization Details on top left with your organization’s information. Since you
created the new organization, you can now create a new JCP Certification Request. You will also be able to
approve or deny new user join requests for your organization.
Note: It is best to try to search for an organization first before attempting to create a new organization. You can do
this by requesting to join an existing organization, which allows you to search. If you attempt to create an organization
that already exists, you will see an error message and the transaction will not complete. If that happens, you’ll have to
ask to join the existing organization (see Section 7.1)
Dashboard with successful Organization Creation

JCP Portal Access User Guide-External DLA
Page 17 of 21
7.0 Appendices
7.1 Appendix A: Two-Factor Authentication Setup
All JCP Portal users, who have a username and password, will need to enable Two Factor Authentication (TFA) on
their JCP Portal accounts. Two Factor Authentication (TFA) is a tool to help prevent unauthorized users from
accessing your JCP Portal account.
How it works
In a two-factor authentication system the first form of user identification is your current login credentials - your
username and password. The second form of identification is created by a special algorithm in the JCP Portal
system and sent to a device you have authorized to receive that code. JCP Portal is using a smartphone application,
Google Authenticator, as the primary tool for receiving codes. Because any user attempting to login must possess
both your username and password AND your phone, it is much more difficult for a user account to become
compromised.
Google Authenticator app generates a six-digit code for you to enter when you log in. The code changes about every
minute. Once you have set up the connection with JCP Portal’s site, every time that you log out of your JCP Portal
account you will need to use Google Authenticator to regain access when you login again.
Steps to set up Google Authenticator
Follow the steps below to link Google Authenticator to your JCP Portal account and use it as your secondary method
of identification.
• Login to your JCP Portal account using your username and password as you normally would.

JCP Portal Access User Guide-External DLA
Page 18 of 21
• On the next page, a prompt will inform you that you need to set up TFA on your account.
• On the next page, you will begin setup of Google Authenticator on your smartphone.
• You will be using Google Authenticator each time you login to JCP Portal to acquire the second authentication
code the system now requires. Below that, you will see a manual verification code and a QR code you can scan
with your phone.
Browser screen showing the QR and manual authentication codes
• You will use these in the following steps to connect your smartphone app with your JCP Portal account.
• On your smartphone, open the App Store on your iPhone or the Google Play Store on your Android device. Search
for “Google Authenticator.”

JCP Portal Access User Guide-External DLA
Page 19 of 21
• The Google Authenticator app will appear as the top search result. In the App Store, select “Get” and then “Install”,
as you do with any app you are installing. Choose the “Install” option in the Google Play Store.
iPhone App Store Screen
Google Play Store Screen
• Note: you may need to enter your App/Play Store password to verify that you want to download the application.
• Exit the app store and wait for the app to download before continuing. Once the Google Authenticator app has
been installed, open the app.
• A menu will appear that will allow to you either scan the QR code on the JCP Portal or manually enter the
verification code that appears above the QR code.
iPhone Screenshots from the Google Authenticator App

JCP Portal Access User Guide-External DLA
Page 20 of 21
• Note: Android users should tap the “Begin Setup” button on the first screen in the application.
Android Screenshots from the Google Authenticator App
• If you select “Scan a barcode,” your phone’s camera will activate. Hold your phone close to the screen to allow the
camera to capture the QR code.
• When the QR code or manual code has processed, Google Authenticator will generate a six-digit verification code
and display it.
iPhone Google Authenticator Code Screen

JCP Portal Access User Guide-External DLA
Page 21 of 21
Android Google Authenticator Code Screen
• Type the six-digit code you see in the app into the JCP Portal below the QR code. Then select verify and save.
• Note: the code has a timer, if the timer expires you may need to enter in a new code before continuing your login.
The field in your Browser where you enter the initial Verification Code from the app
