
Copyright © 2021 CData Software, Inc. All rights reserved.
CData Software, Inc.
DBAmp
SQL Server Integration with Salesforce.com
Version 5.1.9

2
Table of Contents
Acknowledgments ........................................................................... 7
Chapter 1: Installation/Upgrading ................................................. 8
Upgrading an existing installation ......................................................... 8
Prerequistes ....................................................................................... 9
Running the DBAmp installation file...................................................... 9
Configure the DBAmp provider options ................................................. 9
Connecting DBAmp to SQL Server ...................................................... 10
Verifying the linked server ................................................................. 11
Install the DBAmp Stored Procedures ................................................. 11
Running the DBAmp Configuration Program........................................ 11
Setting up the DBAmp Work Directory ................................................ 12
Enabling xp_cmdshell for DBAmp ....................................................... 13
Pointing DBAmp to your Salesforce Sandbox Instance ......................... 13
Chapter 2: Using DBAMP as a Linked Server ................................ 14
Four Part Object Names .................................................................... 14
SQL versus SOQL .............................................................................. 14
Using the four part object name and SQL ........................................... 14
Using OPENQUERY and SOQL ............................................................ 15
Inserting rows using SQL ................................................................... 17
Updating and Deleting rows using SQL ............................................... 18
Joining Salesforce.com Tables............................................................ 19
Analyzing Performance when Joining Tables ....................................... 19
Using BIT datatype with DBAmp ........................................................ 21
Using Dates with DBAmp ................................................................... 21
Using DBAmp System Tables (sys_sf tables) ....................................... 22
Using DBAmp System Views .............................................................. 23
Using Count() with salesforce.com objects .......................................... 25
Using DBAmp to convert currency amounts to a default currency......... 25
Using DBAmp to return translated values for picklists .......................... 26
Retrieving Archived and Deleted records ............................................ 26
Using Column Subset views ............................................................... 26
DBAmp and Salesforce API call Counts ............................................... 27
Big Objects Support .......................................................................... 28
3
Platform Events Support .................................................................... 30
Chapter 3: Making Local Copies of Salesforce Data ...................... 31
How SF_Mirror works ........................................................................ 31
How to run the SF_Mirror proc to make a local copy ........................... 32
Viewing the job history ...................................................................... 33
Mirroring all Salesforce Objects .......................................................... 33
How to run the SF_MirrorAll proc to replicate all objects ...................... 33
Copying only the rows that have changed .......................................... 34
Including Archived and Deleted rows in the local copy......................... 34
How to run the SF_Mirror proc without using xp_cmdshell ................... 34
Best Practices Incorporated into SF_Mirror ......................................... 35
Using the DBAmpTableOptions Table ................................................. 35
Making Local Copies with a Subset of Columns ................................... 37
Making Local Copies as Temporal Tables ............................................ 38
Chapter 4: Bulk Insert, Upsert, Delete and Update into Salesforce using
SF_TableLoader ............................................................................. 41
Differences between SF_BulkOps and SF_TableLoader ........................ 41
Why SF_TableLoader over SF_BulkOps? ............................................. 41
Checking the Column Names of the Input Table.................................. 42
Using External Ids as Foreign Keys ..................................................... 43
Understanding the Error Column ........................................................ 43
Bulk Inserting rows into Salesforce..................................................... 44
Bulk Upserting rows into Salesforce .................................................... 44
Bulk Updating rows into Salesforce .................................................... 44
Bulk Deleting rows from Salesforce .................................................... 45
Bulk HardDeleting rows from Salesforce ............................................. 45
Bulk UnDeleting rows from Salesforce ................................................ 45
Controlling the batch size with SF_TableLoader................................... 45
Understanding a Sort Column when using SF_TableLoader .................. 46
How to run the SF_TableLoader proc ................................................. 46
How to run the SF_TableLoader proc without using xp_cmdshell ......... 47
SF_TableLoader Sample Recipe ......................................................... 49
Understanding SF_TableLoader failures .............................................. 50
Using Optional SOAP Headers ............................................................ 50
Converting Leads with SF_TableLoader .............................................. 51
4
Using IgnoreFailures Option with SF_TableLoader ............................... 53
Using AssignmentRuleId Option with SF_TableLoader ......................... 53
Chapter 5: Using SSIS with DBAmp .............................................. 55
Using the linked server as an SSIS Source .......................................... 55
Pushing Data to Salesforce.com using SSIS ........................................ 55
Chapter 6: Uploading files into Content, Documents and Attachments 57
Chapter 7: DBAmp Stored Procedure Reference .......................... 62
SF_BulkOps ...................................................................................... 62
SF_TableLoader ................................................................................ 67
SF_BulkSOQL .................................................................................... 75
SF_BulkSOQL_Refresh ....................................................................... 80
SF_CreateKeys .................................................................................. 82
SF_DownloadBlobs ............................................................................ 83
SF_DropKeys .................................................................................... 85
SF_Generate ..................................................................................... 86
SF_Mirror ......................................................................................... 87
SF_MirrorAll ...................................................................................... 92
SF_Refresh ....................................................................................... 94
SF_RefreshIAD ................................................................................. 96
SF_RefreshAll ................................................................................... 98
SF_Replicate ................................................................................... 100
SF_ReplicateAll ............................................................................... 102
SF_ReplicateIAD ............................................................................. 104
SF_MigrateBuilder ........................................................................... 106
SF_MigrateGraphML ........................................................................ 109
Chapter 8: Using the DBAmp Configuration Program ................. 111
Options Page of the DBAmp Configuration Program .......................... 111
Registry Settings Page of the DBAmp Configuration Program ............. 113
Chapter 9: Retrieving Salesforce Metadata ................................ 118
How to run the SF_Metadata proc .................................................... 118
Using the LIST and RETRIEVE operations ......................................... 118
Requirements for the input table ...................................................... 119
Example: Retrieve Dependent Picklist Information ............................ 121
Example: Retrieve Field Descriptions ................................................ 122
Chapter 10: Using DBAmp Performance Package....................... 124
5
Installing the DBAmp Performance Package ...................................... 124
Using the DBAmp_Log Table............................................................ 126
Using the Performance Views........................................................... 127
DBAmp_Replicate_Perf view ............................................................ 127
DBAmp_Refresh_Perf view .............................................................. 128
DBAmp_TableLoader_Perf view ....................................................... 129
Enabling the Performance Trace ...................................................... 130
Chapter 11: MigrateAmp ............................................................. 131
What is MigrateAmp? ...................................................................... 131
Installing MigrateAmp ..................................................................... 131
MigrateAmp Approaches .................................................................. 132
Understanding MigrateAmp Concepts ............................................... 132
MigrateAmp Workflow ..................................................................... 136
MigrateAmp Architecture ................................................................. 137
Chapter 12: Using MigrateAmp ................................................... 140
Using the SF_MigrateBuilder Stored Procedures ................................ 140
Running SF_MigrateBuilder in User Interface .................................... 141
Running SF_MigrateBuilder in SQL Management Studio ..................... 144
Replicating the Source org data ....................................................... 146
Loading the Target org data ............................................................ 146
Resetting the Target org data if needed ........................................... 146
An in-depth look at the SF_MigrateBuilder Parameters ...................... 147
Passing Parameters to _Load Stored Procedure ................................ 150
Migrating Salesforce CRM Content .................................................... 150
Migrating Salesforce Knowledge ....................................................... 151
Migrating Single Salesforce Knowledge Article Type .......................... 152
Migrating Multiple Salesforce Knowledge Article Types ...................... 153
Associating Knowledge Articles with Cases ........................................ 154
Frequently Asked Questions ............................................................. 154
Chapter 13: Viewing a Migration Database Diagram .................. 156
Chapter 14: DBAmp Client .......................................................... 162
Why DBAmp Client? ........................................................................ 162
Installing DBAmp Client ................................................................... 163
Running the DBAmp Client .............................................................. 164
Performing a Mirror Action ............................................................... 165

7
Acknowledgments
Thanks to Sarah Parra of Microsoft. Without her excellent support, DBAmp
wouldn’t exist.
Also, thanks to Dave Carroll at Salesforce.com for being the "Original"
sForce programmer. Dave's sample code always points the way for the rest
of us.
And finally, thanks to those customers who have contributed ideas and
designs for several important features of DBAmp:
C.J. Land Local copy replication
Andy Hilliard Sys_sfPickList
Darrell Grissen Sys_sfLastId
Tad Tjornhom Bulk Inserting
Paul Coyne sf_replicateIAD
John Gee Metadata support

8
Chapter 1: Installation/Upgrading
Upgrading an existing installation
BREAKING CHANGES WITH v5.0.1 OR GREATER:
- DBAmp now uses bit datatype instead of varchar(5) for all
boolean fields.
- All fields are now nullable, except for Id field on local tables.
Please make sure all downstream processes that use the local
tables are compatible with the above changes.
If you are upgrading an existing installation, please do the following.
1. Stop SQL Server.
2. Run the DBAmp installation program. You will need your serial
number for installation. Please contact dbampsupport@cdata.com if
you need help with this value.
3. Your previous linked server definition can be use without
modification.
4. The DBAmp stored procedures change with every release. You must
upgrade every SQL database that currently contains DBAmp stored
procs with the new versions. Follow the instructions in the Install
the DBAmp Stored Procedures section later in this chapter.
Failure to do this will result in errors.
5. Because the new version may connect to a newer API endpoint,
additional fields and objects may become visible with the upgrade.
If you are using sf_refresh for local copies, you must run
sf_replicate on that object to pickup these schema changes. Then
you can resume your normal sf_refresh schedule.
Note that there are major, breaking changes that have occurred recently
with DBAmp.
- DBAmp only supports SQL 2008 or higher.
- DBAmp only supports Windows 2008 R2 or higher.
- DBAmp only support 64 bit Windows OS.
- DBAmp requires the .NET 4.6 library or higher
- SQL 2008 or greater and datetime2(7). On SQL 2008 or greater
systems, date and datetime fields of salesforce.com objects are now
created as datetime2(7) fields in the local database. To force these fields
to be created as datetime fields instead, set the Database Compatibility

9
Level of the Salesforce backup database to 90 prior to replicating the data
(step 5 above). This change applies to SQL 2008 and greater only.
Prerequistes
Before installing DBAmp, make sure that an instance of SQL Server 2008 or
greater is installed on the machine. If you do not have SQL Server, you
may download the SQL Server 2008 Express with Database Tools, which is
available for free from Microsoft. In addition, be aware that DBAmp only
supports Windows 2008 R2 or higher.
IMPORTANT: If you are using SQL Server Express, make sure you
download the package from Microsoft that contains the Database
Tools. You will need the SQL Management Studio tool to complete
the DBAmp installation.
There is an outstanding Microsoft issue that affects DBAmp. This issue only
occurs when the service account that you specify for SQL Server is the
Network Service account. Please use a different service account (like a
user account) for the SQL Server instance. We recommend that you use the
LocalSystem account or an admin domain.
Running the DBAmp installation file
To install DBAmp, unzip the DBAmp package to a temporary directory and
run the DBAmpInstall.exe program. DBAmpInstall.exe will prompt you for
the DBAmp program directory and install the software.
To uninstall DBAmp, use the Windows Add/Remove Programs option on the
control panel.
Configure the DBAmp provider options
NOTE: DO NOT SKIP THIS STEP. DBAMP WILL NOT FUNCTION PROPERLY.
Expand the Providers tree entry in the Object Explorer (Server
Objects/Linked Servers/Providers). Right click the DBAmp.DBAmp provider
entry and choose Properties.
Check only the following options:
Dynamic Parameters
Allow InProcess
Non transacted Updates
Verify the above options for proper operation of the provider.
The next step is to create the linked server.

10
Connecting DBAmp to SQL Server
Also, please see the note at the beginning of the chapter concerning the
Microsoft issue of using Network Service as the SQL Server Service
account.
DBAmp is designed to be used as a linked server. To install DBAmp as a
linked server, use the SQL Management Studio and perform the following
steps:
1. Using the SQL Server Management Studio, use the Object Explorer
window and expand the Server Objects branch to display Linked
Servers.
2. Right click on Linked Servers and choose New Linked Server...
Enter the following information for the new Linked Server:
General Page
Linked Server: Enter SALESFORCE. Note: We recommend not
having any spaces or hyphens in the linked server. If you need
spaces or hyphens in the linked server name, make sure to put
brackets around the linked server name in all DBAmp commands.
Provider: Choose DBAmp OLE DB Provider
Product Name: Enter DBAmp
Source: Enter SALESFORCE
Location: If you are connecting to a sandbox, enter
https://test.salesforce.com. Otherwise, leave blank.
Security Page
Click Be made using this security context:
For Remote Login:, enter your salesforce.com UserId.
For With password: enter your salesforce password. If needed by
your salesforce organization, append the salesforce security token to
the end of the password. For more details on salesforce security
tokens, see the Security Tokens section in the online salesforce
help.
Server Options
Check the following are true (leaving all other options false):
▪ Collation Compatible
▪ Data Access
11
▪ Use Remote Collation
▪ RPC Out
▪ Enable Promotion of Distributed Transactions
3. Press OK to create the SALESFORCE linked server.
Verifying the linked server
Use the following procedure to verify that the linked server is set up
correctly:
Execute the following query using the SQL Management Studio:
Select * from SALESFORCE...sys_sfobjects
You should see a list of all your salesforce.com objects.
Install the DBAmp Stored Procedures
The next step to install DBAmp is to create a database and create the
DBAmp stored procedures. The database you create contains not only the
DBAmp stored procedures but also the local replicated tables you make
from your live Salesforce.com data.
To install the DBAmp Stored Procedures:
1. 1. Using either the SQL Enterprise Manager or the SQL Management
Studio, create a new database named salesforce backups. . This
database will hold all the local replicated tables as well as the
DBAmp stored procedures.
2. Open the file “Create DBAmp SPROCS.sql” in Query Analyzer or
Management Studio but do not execute it yet. The file is located in
the \Program Files\DBAmp\SQL directory.
The stored procedures assume that you have installed DBAmp in the
directory c:\"Program Files"\DBAmp. If you used an alternate drive
or directory, you must find all occurrences of C:\"Program
Files"\DBAmp\ and replace them with the correct directory.
3. Make sure that default database shown on the toolbar is the
salesforce backups database (and not the main database). Then,
execute (F5) to add the stored procedures to the database.
Running the DBAmp Configuration Program
In order for the DBAmp stored procedures to work properly, you must run
the DBAmp configuration program and enter your SQL credentials along
with any additional proxy information needed by DBAmp.
You must display the Options dialog and press OK for the settings
to be saved (press OK even if you do not make changes).

12
Note: Normally, DBAmp handles the proxy automatically. If you are having
trouble connecting or need to setup your proxy information manually, you
can use the DBAmp Configuration Program to enter your proxy information.
To run the DBAmp Configuration Program:
1. From the Start menu, run the DBAmp Configuration program
located under DBAmp. Under the Configuration menu, select
Options.
2. Choose a DBAmp Work Directory. The DBAmp Work Directory holds
the work files produced by the Replicate Stored Procedures when
using the BulkApi or PKChunk options. Use the Browse button to
create, find and set the work directory. Make sure the directory is
on a drive with enough space. Large downloads will expand the size
of this directory dramatically.
3. Enter your SQL credentials. If you are using Windows
Authentication, use the default value of Trusted_Connection=Yes
4. If you need to enter proxy information, check the Use Proxy for
Salesforce connection checkbox.
5. Enter the appropriate proxy information:
Proxy Username - Username for the proxy login.
Proxy Password - Password for the above username.
Proxy URL - Direct proxy URL.
Proxy ConfigURL - Proxy script URL.
When a script URL is set but the proxy address cannot be accessed, for
example, the address is only available inside a corporate network but
the user is logging in from home, DBAmp will use the direct URL if it
has been set, or try a direct connection if the direct URL has not been
set.
If a direct URL is set and it cannot be accessed, DBAmp will not try a
direct connection. This is the same behavior as Internet Explorer.
Click OK. The credentials are stored in encrypted form for use by
the DBAmp stored procedures.
Setting up the DBAmp Work Directory
The DBAmp Work Directory holds the work files produced by the Replicate
stored procedures when using the BulkApi or PKChunk options. The

13
Work Directory must be setup before running the Replicate stored
procedures when using the BulkAPI or PKChunk options.
To setup the DBAmp Work Directory follow the instructions below:
1. Run the DBAmp Configuration Program on the server DBAmp is
installed on.
2. Navigate to the Configuration/Options page
3. Use the DBAmp Work Directory Browse button to create a Work
Directory on the server
4. Click OK
Notes:
• Make sure the directory is on a drive with enough space.
Large downloads will expand the size of this directory
dramatically.
• - The SQL Server instance must be able to read and write to
this directory.
• DO NOT use the C: for the Work Directory. Otherwise, the
Work Directory could expand to take all the space on the C:
drive and impair the Windows Operating System.
Enabling xp_cmdshell for DBAmp
The DBAmp stored procedure use the xp_cmdshell command. If you are not
an SQL Server administrator, you must have the proper permission to use
this command. See the SQL Server documentation under the topic
xp_cmdshell for more information. To quickly test, run the following sql in
Query Analyzer:
Exec master..xp_cmdshell "dir"
Pointing DBAmp to your Salesforce Sandbox Instance
By default, DBAmp points to your production Salesforce.com instance. If
you need to change DBAmp to point to your Sandbox instance or need to
use a different endpoint for DBAmp, alter the Location parameter of your
linked server.
The Location parameter is normally blank. If your Sandbox Instance is at
https://test.salesforce.com then you would enter
https://test.salesforce.com for the Location Parameter on the linked server
properties page.

14
Chapter 2: Using DBAMP as a Linked Server
When using DBAmp as a linked server, you can access salesforce.com
tables as if they were SQL server tables.
Four Part Object Names
To refer to a salesforce.com object in a SQL statement, use the four part
object name containing the name of the linked server and the object nam e
separated by three periods. For example, to select all rows and columns of
the Contact object:
Select * from SALESFORCE…Contact
The linked server name (SALESFORCE) and the table name (Contact) are
case sensitive.
SQL versus SOQL
There are 2 ways to query real time data from salesforce: use the four part
object name with SQL or use the OpenQuery clause with SOQL.
Using the four part object name and SQL
You may use the full Transact SQL syntax when entering SQL statements.
Internally, SQL Server and DBAmp will translate your SQL statement into
the appropriate SOQL statements for salesforce.com. Any elements that
cannot be done in SOQL (like SQL functions) will be done locally by the SQL
Server Distributed Query optimizer after retrieving the result set from
salesforce.com.
The SQL Server Distributed Query Optimizer will choose a plan for every
SQL statement that executes. Often, the plan chosen will be the most
efficient and there will be no need to modify your SQL.
Should you suspect a poorly performing plan, use the Query Analyzer and
enter the text of the SQL statement. Remember to use the 4 part naming
convention for the Salesforce.com tables, i.e. SALESFORCE…Account.
For maximum performance when joining, consider using the OpenQuery
clause with SOQL (described in the next section.
Note the following when using SQL:
• Do not enter unquoted date literals. Instead, use Transact SQL
syntax for date literals (i.e. include quotes)
• For SOQL Boolean fields, use quoted literals ( ‘false’ instead of
false).
• You may use * to indicate all columns.

15
• Following Transact SQL rules for where clause AND/OR precedence.
Parentheses are only needed when explicit grouping is needed and
are not required (unlike SOQL).
• User and Case are keywords in Transact SQL and must be quoted
when used as a four part name to refer to the salesforce.com
object. For example, specify the User Object as SALESFORCE…[User]
Using OPENQUERY and SOQL
When additional join performance is needed, consider using the
OPENQUERY clause with DBAmp. Using OPENQUERY allows you to pass
salesforce.com SOQL statements (not SQL) directly to DBAmp. A full
description of the SOQL language can be found on the salesforce.com
website at :
http://www.salesforce.com/us/developer/docs/api/index_Left.htm#StartTop
ic=Content/sforce_api_calls_soql.htm
Using OPENQUERY with SOQL can make dramatic performance difference s
on data that is joined. With SOQL, the join is performed back at the
salesforce.com server as opposed to locally at the SQL server.
select * from openquery(salesforce,
'SELECT Type, BillingCountry,
GROUPING(Type) grpType, GROUPING(BillingCountry) grpCty,
COUNT(id) accts
FROM Account
GROUP BY CUBE(Type, BillingCountry)
ORDER BY GROUPING(Type), GROUPING(BillingCountry)')
- DBAmp currently supports both child to parent relationship
queries and Parent to child queries.
For example,
select * from openquery(salesforce,
'SELECT Account.Name, (SELECT OwnerId FROM Account.Notes) FROM
Account')
select * from openquery(salesforce,
'SELECT Id, Who.FirstName, Who.LastName FROM Task');
- The where clause of the SOQL statement must be expressed using
SOQL syntax, not SQL syntax.

16
For example,
Select * from OpenQUery(SALESFORCE,
'Select Opportunity.Account.Name,
Opportunity.Account.AnnualRevenue, Opportunity.Name,
Opportunity.CloseDate, Opportunity.StageName, Description,
Quantity
From OpportunityLineItem
Where (Opportunity.Account.AnnualRevenue >200 AND
Opportunity.CloseDate < 2009-08-29)')
is a supported SOQL statement because the date value is not in quotes.
Select * from OpenQuery(SALESFORCE,'SELECT Id FROM Account
WHERE Owner.CreatedDate = LAST_N_DAYS:200')
is also supported because it uses a SOQL date literal.
Note that datetime constants must be entered in ISO8601 format per the
SOQL requirements.
Understanding hierarchical salesforce.com data when
using OPENQUERY and SOQL
Note: The following is only applicable when using SOQL and OPENQUERY.
When joining the linked server tables using standard SQL, the result table is
constructed using normal relational concepts and not as describe here.
For OPENQUERY SOQL, DBAmp uses a special algorithm to "flatten" parent-
child salesforce.com data into a two -dimensional table.
SQL Server results are two-dimensional with rows and columns. Because
salesforce.com data can have more than two dimensions, a flattening
algorithm is used to force the data into a two-dimensional format.
When flattening salesforce.com data in SQL Server, the column headings
are an indication of the source of the column and essentially contain the
navigation through the "tree" of returned data to get to that column. You
can read the column structure backwards to get to the root object, the
lookup objects, and related lists. For example, the column
Account_LastModifiedBy_Alias is the Alias field of the LastModifiedBy lookup
object for the Account root object.
There is a row of the root object for each object in a related list. When
there are two related lists, the root object in the flattened result gets
repeated by the sum of the count of all of the rows of the related lists. For
example, if an Account root object has five Contacts and eight Cases, the
root-object data is repeated in the result table thirteen times.

17
In the flattened result, fields of the Contact related list are shown with the
root object, along with fields of the Cases related list and the root object.
For rows where Contact data is returned, the Cases columns are null; for
rows where Cases data is returned, the Contact columns are null. The fields
are null because there really is no relationship between Contacts and Cases.
When the query contains a root object and multiple related lists, DBAmp
repeats the root-object data, the sum of the count of all of the related lists.
For example, if five related lists each had five items in them, the root
object is repeated 25 times. Rows for related lists are displayed and the
values in each row for the other related lists are null because they are not
applicable.
Passing Parameters in SOQL queries
To use parameters in a SOQL query, you must use the EXECUTE statement
of T-SQL. Here is an example:
CREATE TABLE RevByAccount
( Name nvarchar(255) NULL,
AnnualRevenue decimal(18,0) NULL
);
DECLARE @MinRev INT
SET @MinRev = 20
INSERT RevByAccount
EXEC ( 'SELECT Name, AnnualRevenue FROM Account WHERE
AnnualRevenue > ?',
@MinRev) AT Salesforce
go
Inserting rows using SQL
To insert new rows, use the standard SQL Insert statement. Do not include
the read-only columns (i.e. Id, LastModifiedId, etc.) in the fields list. For
example, to insert a new Note use the following SQL:
INSERT INTO SALESFORCE...Note (Body, IsPrivate, Pare ntId, Title)
VALUES('Body of Note 2','false', '00130000005ZsG8AAK','ToDelete')
For maximum scalability, please consider using the sf_TableLoader stored
procedure instead of SQL Insert statement. The sf_TableLoafer stored

18
procedure takes advantage of the ability to batch together insert requests
to the salesforce.com api.
Updating and Deleting rows using SQL
DBAmp supports updating and deleting Salesforce.com objects with SQL.
In order to get the maximum performance with your UPDATE and DELETE
statements, you need to understand how SQL Server handles
UPDATE/DELETE statements with a linked server (like DBAmp).
For example, take the following SQL UPDATE
Update SALESFORCE…Account
Set AnnualRevenue = 4000
Where Id='00130000005ZsG8AAK'
Using the Display Estimated Execution Plan option from the Query
Analyzer, you can see that SQL Server will retrieve the entire Account
table from Salesforce and then search for the one row that has the Id of
00130000005ZsG8AAK. Then, SQL Server will update the AnnualRevenue of
that row.
Obviously, this UPDATE statement has poor performance which gets worse
as the size of the Account table grows. What we need is a way to retrieve
only the row with Id 00130000005ZsG8AAK and then update the
AnnualRevenue of that row. To do this, use an OPENQUERY clause as the
table name.
Update OPENQUERY(SALESFORCE,
'Select Id, AnnualRevenue from Account
where Id=''00130000005ZsG8AAK'' ')
set AnnualRevenue = 4000
Using an OPENQUERY clause insures that we retrieve only the row with the
proper Id.
You can construct stored procedures that make your code more readable
and that use the above technique. See the Create SF_UpdateAccount.sql
file in the DBAmp program directory as an example. Using this stored
procedure, we can do updates to the Account table using the following SQL:
exec SF_UpdateAccount '00130000008hz55AAA','BillingCity','''Denver'''
or
exec SF_UpdateAccount '00130000008hz55AAA','AnnualRevenue','20000'
You can use the SF_UpdateAccount stored procedure as a template for
building your own specialized stored procedures. See the f ile Create

19
SF_UpdateAnnualRevenue.sql for an example. Then, use the following
SQL to update the Annual Revenue of an account.
exec SF_UpdateAnnualRevenue '00130000009DCEcAAO', 30000
Deleting rows with SQL has the same caveats. For best performance with
deletion by Id, use an OPENQUERY clause in the SQL statement. An
example of a stored procedure that deletes Accounts by Id is in the file
Create SF_DeleteAccount.sql.
For maximum scalability, please consider using the sf_TableLoader stored
procedure instead of SQL Update or Delete statements. The
sf_TableLoader stored procedure takes advantage of the ability to batch
together requests to the salesforce.com api.
Joining Salesforce.com Tables
Using joins, you can retrieve data from two or more tables based on logical
relationships between the tables. Joins indicate how SQL Server should use
data from one table to select the rows in another table.
Joins can be specified in either the FROM or WHERE clauses. The join
conditions combine with the WHERE and HAVING search conditions to
control the rows that are selected from the base tables referenced in the
FROM clause.
Specifying the join conditions in the FROM clause helps separate them from
any other search conditions that may be specified in a WHERE clause .
In addition, consider using the OPENQUERY and SOQL feature (see
above) for maximum performance when joining to salesforce.com
tables.
Analyzing Performance when Joining Tables
The SQL Server Distributed Query Optimizer will choose a plan for every
SQL statement that executes. Often, the plan chosen will be the most
efficient and there will be no need to modify your SQL.
Should you suspect a poorly performing plan, use the Query Analyzer an d
enter the text of the SQL statement. Remember to use the 4 part naming
convention for the Salesforce.com tables, i.e. SALESFORCE…Account.
Choose the Display Estimated Execution Plan option from the Query
menu to view the execution plan.
While a full discussion of execution plans is beyond this document, most
SQL Select with join statements involving Salesforce.com data will choose
to either return the entire result set of a table or read the needed rows
with a parameterized query.
For example, consider the following SQL Select:
20
Select T1.Name, T2.Salutation, T2.FirstName, T2.LastName
from SALESFORCE...Account as T1, SALESFORCE...Contact as T2
where T1.Id = T2.AccountId and T1.AnnualRevenue > 20000
Here is the initial execution plan:
|--Hash Match(Inner Join, HASH:
([SALESFORCE]...[Account].[Id])=([SALESFORCE]...[Contact].[AccountId]),
RESIDUAL:([SALESFORCE]...[Contact].[AccountId]=[SALESFORCE]...[Accou
nt].[Id]))
|--Remote Query(SOURCE:(SALESFORCE), QUERY:(SELECT T1."Id"
Col1004,T1."Name" Col1005 FROM "Account" T1 WHERE
T1."AnnualRevenue">(20000.0000)))
|--Remote Query(SOURCE:(SALESFORCE), QUERY:(SELECT
T2."AccountId" Col1007,T2."LastName" Col1010,T2."FirstName"
Col1008,T2."Salutation" Col1011 FROM "Contact" T2))
This plan will bring down from the Salesforce.com server all of the Contact
records. If most of our Accounts have Annual Revenue of > 20000, then
the plan is efficient because most of the Contact records will be needed.
If, however, only 3 Accounts have AnnualRevenue > 20000 and the othe r
1000 Accounts do not, then the plan is inefficient. The Contact query will be
retrieving more Contact records than we actually need to build the result
set.
Let’s change the SQL Select to use an inner remote join:
Select T1.Name, T2.Salutation, T2.FirstN ame, T2.LastName
from SALESFORCE...Account as T1
inner remote join SALESFORCE...Contact as T2 on T1.Id = T2.AccountId
where T1.AnnualRevenue > 20000
Now the execution plan shows a different choice.
|--Nested Loops(Inner Join, OUTER
REFERENCES:([SALESFORCE]...[Account].[Id]))
|--Remote Query(SOURCE:(SALESFORCE), QUERY:(SELECT T1."Id"
Col1010,T1."Name" Col1011 FROM "Account" T1 WHERE
T1."AnnualRevenue">(20000.0000)))
|--Remote Query(SOURCE:(SALESFORCE), QUERY:(SELECT
T2."Salutation" Col1007,T2."FirstName" Col1004,T2."LastName"
Col1006 FROM "Contact" T2 WHERE T2."AccountId"=?))
In the Contact Query, we will now use a parameter in the query
(“AccountID”=?) to read only the contact records we need. This is a much
more efficient way to get the same result.

21
Using BIT datatype with DBAmp
When returning results to SQL Server, DBAmp must choose a datatype to
use for salesforce.com Checkbox fields. DBAmp uses bit and populates the
column with either the values of 0 (FALSE) or 1 (TRUE).
Using Dates with DBAmp
When returning results to SQL Server, DBAmp converts Datetime values
from UTC into the local timezone.
In addition, any datetime values used in a WHERE clause are assumed to be
local times and not UTC times.
If you would prefer to have DBAmp always use UTC for all datetime values,
you can modify the DBAmp registry settings with the following procedure.
Note: this is not recommended but possible. Please contact cdata.com
support to understand the ramifications of UTC and DBAmp.
1. Using the Start/Run option, run the regedit program.
2. Navigate to the following key: HKEY_LOCAL_MACHINE / Software /
DBAmp .
3. Right click DBAmp and choose New DWORD Value. Name the key
NoTimeZoneConversion (watch case and spelling).
4. Right click the newly created NoTimeZoneConversion and choose
Modify. Then assign a value of 1.

22
Using DBAmp System Tables (sys_sf tables)
Note: The DBAmp System tables should not be used. Instead, use
the DBAmp System views in the next section. The reason for this is
because the views in the next section now support Where clauses.
In addition to the Salesforce.com tables, DBAmp also provides various
system tables that you can access with SQL SELECT statements. These
tables are read-only; they cannot be updated or deleted.
Also, Select statements for these tables cannot contain a WHERE clause. If
you need to use a WHERE clause, define a user-defined-function that
encapsulates the table. See Create DBAMP UDFS.sql for an example.
Table Name
Contents
sys_sfsession
Select * from SALESFORCE…sys_sfsession
The sys_sfsession table contains
information about the current
Salesforce.com session. Some of the
columns in this table are:
SessionId – Current Session Id
OrganizationId – 18 char OrgId
ServerURL – URL of SForce Server
sys_sfpicklists
Select * from SALESFORCE…sys_sfpicklists
The sys_sfpicklists table contains
information about the picklist values for
each picklist field There is one row for
each per picklist value. Some of the
columns in this table are:
ObjectName – Name of object
FieldName – Field of the above object
PickListValue – A single picklist value
PickListLabel – Label for the above value
sys_sfobjects
Select * from SALESFORCE…sys_sfobjects
The sys_sfobjects table contains
information about the Salesforce.com
objects. There is one row for each object
in your organization. Some of the
columns in this table are:
Name – Name of object
Createable – Is object createable ?
Deletable – Is object deletable ?
URLDetail – URL Detail for this object
URLNew – URL New for this object

23
sys_sffields
Select * from SALESFORCE…sys_sffields
The sys_sffields table contains
information about the Salesforce.com
object fields. There is one row for each
object field in your organization. Some of
the columns in this table are:
ObjectName – Name of object
Name – Name of the field
Createable – Is the field insertable ?
Type – Field Type using sf terminology
SQLDefinition – SQL Column definition
Using DBAmp System Views
DBAmp provides five system views that can be used to view object, field,
relationship, and user entity access metadata of a Salesforce Org. The
DBAmp stored procedure, SF_CreateSysViews, creates five views to view
this data. The views are created by supplying the DBAmp linked server
name to SF_CreateSysViews:
Exec SF_CreateSysViews 'SALESFORCE'
Where
SALESFORCE
is the name of the DBAmp linked server.
The above command creates five views: SALESFORCE_Fields,
SALESFORCE_FieldsPerObject, SALESFORCE_Objects,
SALESFORCE_Relationships, and SALESFORCE_UserEntityAccess. The prefix
of the view names are derived from the DBAmp linked server provided in
the command.
These views can be accessed by any SQL SELECT statement. Unlike the
DBAmp System Tables, Select statements for these tables support a
Where clause.
Table Name
Contents
SALESFORCE_Fields
Select * from SALESFORCE_Fields
Select * from SALESFORCE_Fields where
ObjectName = 'Account'
The SALESFORCE_Fields view contains
information about the Salesforce.com
object fields. There is one row for each
object field in your organization. Some of
the columns in this view are:
ObjectName – Name of object
FieldName – Name of the field
IsCreateable – Is the field insertable?
Type – Field Type using sf terminology
SALESFORCE_Objects
The SALESFORCE_Objects view contains
information about the Salesforce.com

24
Select * from SALESFORCE_Objects
Select ObjectName, KeyPrefix,
IsEverCreatable from SALESFORCE_Objects
where ObjectName = 'Contact'
objects. There is one row for each object
in your organization. Some of the
columns in this view are:
ObjectName – Name of object
IsEverCreatable – Is object creatable?
IsEverDeletable – Is object deletable?
IsEverUpdatable – Is object updatable?
KeyPrefix – Prefix of object’s SF Id
SALESFORCE_Relationships
Select * from SALESFORCE_Relationships
Select * from SALESFORCE_Relationships
where ParentObject = 'Account' and
ChildObject = 'Contact'
The SALESFORCE_Relationships view
contains information about the
relationships between the Salesforce.com
objects. There is one row for each
relationship between objects in your
organization. Some of the columns in this
view are:
ParentObject – Name of parent object
ChildObject – Name of child object
ParentToChildRelationshipName –
relationship name in SOQL for the parent
to child relationship
SALESFORCE_UserEntityAccess
Select * from SALESFORCE_UserEntityAccess
where UserId = '00530000000kQi6AAE'
Note: Where clause on UserId is required.
UserId is the Id of a Salesforce user.
The SALESFORCE_UserEntityAccess view
contains information about the
Salesforce.com objects a Salesforce user
can access. There is one row for each
object a Salesforce user can access.
Some of the columns in this view are:
ObjectName – Name of object
IsCreatable – Is object creatable?
IsDeletable – Is object deletable?
IsUpdatable – Is object updatable?
SALESFORCE_FieldsPerObject
Select * from SALESFORCE_FieldsPerObject
where ObjectName = 'Account'
Note: Where clause on ObjectName is
required. ObjectName is the name of a
Salesforce object.
The SALESFORCE_FieldsPerObject view
contains information about a
Salesforce.com object’s fields. There is
one row for each field in a specified
Salesforce.com object. Some of the
columns in this view are:
ObjectName – Name of object
FieldName – Name of the field
IsCreateable – Is the field insertable?
Type – Field Type using sf terminology

25
Using Count() with salesforce.com objects
There are two methods of obtaining a row count of salesforce.com objects.
The first method uses the following SQL:
Select Count() from SALESFORCE…Account
This SQL statement executes by retrieving all the Id values of the object
and counting the total number of Id values fetched. While this method
performs quickly for small tables, large tables perform badly because all the
Id’s are fetched to the local SQL Server to be counted.
The second method performs much better because it takes advantage to
the salesforce api SOQL Count function:
Select * from
OPENQUERY(SALESFORCE,'Select Count() from Account ')
In the OPENQUERY clause, replace SALESFORCE with the name of your
link server. Also, notice that the table name Account is NOT prefixed with
"SALESFORCE…" .
Using DBAmp to convert currency amounts to a default currency
International organizations can use multiple currencies in opportunities,
forecasts, reports, and other currency fields. The administrator sets the
"corporate currency," which reflects the currency of the corporate
headquarters.
If an organization is multicurrency enabled, you can configure DBAmp to
convert currency fields to a single currency. DBAmp uses the default
currency of the salesforce.com user id configured in the link server. DBAmp
converts currencies using the ConverCurrency() function of the
salesforce.com API.
Note that the default is NOT to convert currencies. You must set the
registry entry ConvertCurrency in the DBAmp hive for currency conversions
to occur. The ConvertCurrency registry setting is found under the following
registry key:
LOCAL_MACHINE\SOFTWARE\DBAmp\ConvertCurrency
A value of 1 causes the conversion to occur. A SQL restart is required after
modifying this value.
SOQL statements entered via an OPENQUERY phrase do not honor this
setting. If you need to convert currency inside an OPENQUERY, then use
the CONVERTCURRENCY function:
select * from openquery(salesforce,
'Select Id, convertcurrency(annualrevenue), ToLabel(type)

26
from Account')
Using DBAmp to return translated values for picklists
If an organization uses multiple languages, you can configure DBAmp to
return translated values for picklist fields by using the ToLabel function.
Note that the default is NOT return translated values. You must set
the registry entry ToLabel in the DBAmp hive to use translated values. The
ToLabel registry setting is found under the following regist ry key:
LOCAL_MACHINE\SOFTWARE\DBAmp\ToLabel
A value of 1 causes the ToLabel function to be used. A SQL restart is
required after modifying this value.
SOQL statements entered via an OPENQUERY phrase do not honor this
setting. If you need to return translated values inside an OPENQUERY,
then use the ToLabel function:
select * from openquery(salesforce,
'Select Id, convertcurrency(annualrevenue), ToLabel(type)
from Account')
Retrieving Archived and Deleted records
Normally, the salesforce api does not return archived and deleted records
as part of the result of a query. Therefore, the query result from DBAmp
does not contain these records.
If you would like to include the archived and deleted records, add the
_QueryAll prefix to the table name. For exam ple, the following query
retrieves only the task records that have been archived:
Select * from SALESFORCE…Task_QueryAll
where IsArchived = 'true'
You may also replicate all records including archived and task records to a
local table by using the sf_replicateIAD stored procedure. See the
SF_ReplicateIAD section in chapter DBAmp Stored Procedure Reference.
Using Column Subset views
Objects in salesforce that contain over 325 columns may produce an error
when either replicated or refreshed. The error occurs because the maximum
limit of the Select query statement in the salesforce api is 10,000
characters. A large number of columns in an object will p roduce a Select
query larger than 10,000 characters.

27
The solution is to take advantage of Column Subset views. These views
represent a user specified subset of the columns designed to 'fit' within the
10,000 character limit.
By attaching a specific suffix to the table name, DBAmp will include only
those columns with names that fall within the alphabetic range. For
example, the following SQL statement will return all columns with names
beginning with any letter between A and M inclusive:
Select * from SALESFORCE…Account_ColumnSubsetAM
Some system columns are returned unconditionally for every subset view.
The Id, SystemModstamp, LastModifiedDate, and CreatedDate columns are
always returned.
The suffix must have the following format: a single underscore, the word
ColumnSubset and two single letters indicating the alphabetic range.
In order to retrieve a full copy of the object data, use two or more column
subset views. For example, to replicate a large Account using column
subset views use the following command:
Exec sf_replicate 'SALESFORCE','Account_ColumnSubsetAM'
Exec sf_replicate 'SALESFORCE','Account_ColumnSubsetNZ'
Note that there is nothing special about the column partition used.
Account_ColumnSubsetAK and Account_ColumnSubsetLZ would work
equally as well.
Column Subset Views can be used in Select statements (but not
OPENQUERY) as well as the sf_replicate and sf_refresh stored procedures.
DBAmp and Salesforce API call Counts
Like all third party salesforce.com tools, DBAmp uses the s alesforce.com api
to send and receive data from salesforce.com. Every salesforce.com
customer has a limit on the total number of API calls they can execute, org
wide, from all tools they are using. This limit is found on the Company
Information screen in the salesforce.com application.
Here are some rough guidelines for api call counts for various operations in
DBAmp:
SELECT against link server tables, SF_Replicate and SF_Refresh –
DBAmp requests data in batches of 2000 records. The salesforce server
may reduce that amount based on the width of the row. Our experience
has been that the average batch size is 1000. So for every 1000 rows of
data retrieved = 1 API call

28
UPDATE and INSERT statements – 1 api call for each record updated or
inserted.
SF_TableLoader without the bulkapi switch – 1 api call for each batch
of 200 records.
SF_TableLoader with the bulkapi switch – 1 api call for each batch of
10,000 records. If you use the batchsize option, then 1 api call per
batchsize
There are other miscellaneous calls DBAmp makes to fetch schema data.
These api calls are in addition to the above guidelines.
Big Objects Support
Big objects let you store and manage massive amounts of data on the
Salesforce platform. Big objects have __b appended to the end of their API
name. DBAmp supports SOQL with big objects and certain DBAmp stored
procedures support big objects. For more information on big objects, see
the following link: https://developer.salesforce.com/docs/atlas.en-
us.bigobjects.meta/bigobjects/big_object.htm
DBAmp support for big objects is read-only. DBAmp does not support
inserting or updating big objects.
SOQL with Big Objects
Salesforce allows only indexed fields on the big object to be queried.
Below are examples to query big objects with DBAmp:
This query will return all the indexed fields in the Customer_Interaction__b
big object:
select * from SALESFORCE...Customer_interaction__b
This query will return all indexed fields where the game platform is ps3 and the
Account is as specified:
select Game_Platform__c, Account__c, Play_date__c from
SALESFORCE...Customer_Interaction__b
where Game_Platform__c = 'ps3' and Account__c = '0013000001L9BMSAA3'
Note: all three fields in the select clause are indexed fields on the
Customer_Interaction__b object
This query uses openquery to select all of the indexed fields in the
Customer_Interaction__b big object:
select * from Openquery(SALESFORCE, 'Select * from Customer_Interaction__b')

29
Replicating a Big Object
Only the indexed fields of the big objects will be in the local copy created
by the SF_Replicate or SF_BulkSOQL stored procedure. The following
DBAmp Stored Procedures are supported with big objects:
• SF_Replicate
• SF_BulkSOQL
It is recommended to use the BulkAPI to create a local copy of a big object.
This is because big objects contain millions to billions of records. Therefore,
the BulkAPI will perform much better on big objects than the SOAP API. To
use the BulkAPI, either use SF_Replicate with the bulkapi option or use
SF_BulkSOQL.
To run the SF_Replicate stored procedure with the BulkAPI option and make
a local copy, use the following command:
Exec SF_Replicate 'SALESFORCE', 'Customer_Interaction__b',
‘bulkapi’
where 'SALESFORCE' is the name you gave your linked server at inst allation
and Customer_Interation__b is the Salesforce.com big object to copy.
To run the SF_BulkSOQL stored procedure and make a local copy, use the
command below. Note the use of the relationship field for the Account
object, Account__r. For more information on using relationship fields, see
the link to the Salesforce documentation on big objects above:
Exec SF_BulkSOQL 'SALESFORCE', 'Customer_Interaction__b', '',
'Select *, Account__r.Name from Customer_Interaction__b'
Note: SF_Replicate using the SOAP API is supported but avoid using it due
to large record counts in big objects.
Using DBAmp Stored Procedures with Big Objects
The following stored procedures are not supported with big objects:
• SF_Refresh
• SF_BulkOps
• SF_TableLoader
• SF_RefreshIAD
• SF_ReplicateIAD

30
Platform Events Support
Platform events are the event messages that apps send and receive to take
further action. Platform events simplify the process of communicating
changes and responding to them. Platform events are defined in Salesforce
in the same way that you define custom objects. Platform event objects
have __e appended to the end of their API name. DBAmp supports only
inserting into platform event objects. For more information on platform
event objects, see the following link:
https://developer.salesforce.com/docs/atlas.en-
us.platform_events.meta/platform_events/platform_events_intro.htm
DBAmp support for platform event objects is inserting only using
SF_TableLoader. DBAmp does not support any other operation and
platform event objects are not queryable.
Inserting into a Platform Event using SF_TableLoader
To run the SF_TableLoader stored procedure using the SOAP API and insert
a record into the PETest__e platform event object, use the following
command:
Exec SF_TableLoader ‘Insert’, 'SALESFORCE', ‘PETest__e_Insert'
Where ‘Insert’ is the SF_TableLoader operation, 'SALESFORCE' is the name
you gave your linked server at installation, and PETest__e_Insert is the
name of the input table.
To run the SF_TableLoader stored procedure using the BulkAPI 2.0 and
insert a record into the PETest__e platform event object, use the following
command:
Exec SF_TableLoader ‘Insert:bulkapi’, 'SALESFORCE',
‘PETest__e_Insert'
Note: The name of the platform event object ends in __e. Insert is the
only operation that can be used with platform event objects for SF_BulkOps
and SF_TableLoader. Platform event objects are not queryable.
Inserting into a Platform Event using SQL Insert statements
To insert an event using a SQL Insert, pass the value for the event custom
fields. For example:
insert into salesforce...PETest__e
(EventMessage__c) VALUES('test msg')

31
Chapter 3: Making Local Copies of Salesforce
Data
One common usage of DBAmp is to make periodic copies of Salesforce.com
data into a local SQL Server database. Using a combination of Microsoft
SQL Server jobs scheduled by the SQL Server Agent and DBAmp, you can
import data from Salesforce.com and make local mirrored table copies.
The local mirrored tables are all located in a single database that you
create. On a schedule you setup, a job runs that backups the current local
table into a table name ending with _Previous. The job then drops the
current mirrored table and renames the _Previous table to the correct
object name.
You can setup retry options if the job is unable to run, perhaps delaying an
hour and retrying again.
By default, DBAmp does not download the values of Base64 fields but
instead sets the value to NULL. This is done for perform ance reasons. If
you require the actual values, modify the Base64 Fields Maximum Size using
the DBAmp Configuration Program to some value other than 0.
How SF_Mirror works
SF_Mirror automatically chooses whether to do a full copy or a delta copy
of the table. SF_Mirror decides this based on a couple of criteria laid out
below:
• SF_Mirror creates a local table with the contents of the same object
at Salesforce.com if the table does not already exist locally.
• If the table exists locally, SF_Mirror decides whether to do a full
copy or a delta copy of the table. SF_Mirror makes this decision
based on the created date of the local table (the last time the table
was replicated).
• If the created date of the local table is more than 7 days old,
SF_Mirror will make a full copy of the table.
• If the created date of the local table is less than 7 days old,
SF_Mirror will do a delta copy of the table.
• If there are any schema changes detected, SF_Mirror will make a
full copy of the table.
The name of the local table is the same name as the Salesforce.com object
(i.e. Account). By default, SF_Mirror uses the BulkAPI (With PKChunk
header where applicable) when making a full copy of the table locally.
Important Note: if the table has been mirrored locally, SF_Mirror will use
the SOAP API when the row count of the local table is below 20,000, and
the BulkAPI when the row count is above 20,000 when doing a full copy. In

32
addition, SF_Mirror creates a primary key on the Id field of the local table
and preserves any secondary indexes on the local table .
Note: SF_Mirror creates Boolean fields on Salesforce.com as the BIT field
data type in SQL Server. SF_Mirror ignores the “Use Bit Column Type”
registry setting in the DBAmp Configuration Program. The following is an
example of a query with one of these fields:
Select * from Account where IsDeleted = 'true'
How to run the SF_Mirror proc to make a local copy
Now you are ready to run the stored procedure.
To run the SF_Mirror stored procedure and make a local copy, use the
following commands in Query Analyzer:
Use "salesforce backups"
Exec SF_Mirror 'SALESFORCE', 'Account'
where 'SALESFORCE' is the name you gave your linked server in at
installation and Account is the Salesforce.com object to copy.
You can also setup a SQL Server job to run SF_Mirror on the schedule
needed.
1. Go to the jobs subtree in Enterprise Manager and right click to
create a new job.
2. Create a job with one job step with the following:
EXEC SF_Mirror 'SALESFORCE', 'Account'

33
where SALESFORCE is the name of your linked server and Account
is the name of the object. Be sure to set the database to the
database you created earlier. Under the Advanced tab, setup the
retry options.
Because the SF_Mirror proc generates substantional output, be sure
to check the output to table option to capture the output. Also check
the Append output to job history option.
3. Modify the job schedule for your execution schedule. You can also
execute the job now by right-clicking the newly created job and
choosing Start Job.
Viewing the job history
The output from the DBAmp stored procedures can be long and is often
truncated in the normal job history. For this reason, you should modify the
job step to retain the job output in a table or file.
To retain the entire step output, edit the job step and navigate to the
Advanced tab. Check “Route to table” to have SQL Server retain the entire
message output in a table.
To view the output, return to the Advanced tab and click View.
Mirroring all Salesforce Objects
You can use the SF_MirrorAll stored procedure to mirror all of your
Salesforce objects (including custom objects). When ru n, the SF_MirrorAll
proc compiles a list of all existing salesforce objects and calls the SF_ Mirror
stored procedure for each object.
Salesforce objects that cannot be queried via the salesforce api with no
where clause (like ActivityHistory) will NOT be included. In addition, Chatter
Feed objects are also skipped by the sf_MirrorAll stored procedure because
of the excessive api calls required to download those objects. You can
modify the stored procedures to include the Feed objects if needed.
Note: SF_Mirror assumes that there are no foreign keys defined on the
current set of local tables.
How to run the SF_MirrorAll proc to replicate all objects
Now you are ready to run the stored procedure.
To run the SF_MirrorAll stored procedure and make a local co py, use the
following commands in Query Analyzer:
Use "salesforce backups"
Exec SF_MirrorAll 'SALESFORCE'

34
where 'SALESFORCE' is the name you gave your linked server in at
installation.
You can also create a job to run the SF_MirrorAll procedure on a periodic
basis.
Copying only the rows that have changed
Once SF_Mirror has created an initial set of local, mirrored tables,
subsequent calls to SF_Mirror will automatically keep those tables up-to-
date by downloading inserted, updated and deleted rows since the last run
of SF_Mirror.
Including Archived and Deleted rows in the local copy
SF_Mirror does not include archived and deleted records of the
Salesforce.com object when making a copy of Salesforce data by default.
To include the archived and deleted records of the Salesforce.com object in
the copy of Salesforce data, add the optional queryall switch.
For example, to use the queryall option with SF_Mirror:
Exec SF_Mirror 'Salesforce', 'Account', 'queryall'
SF_Mirror will retain the permanently deleted rows from run to run. Once
you begin to use queryAll option for a table, all future SF_Mirror calls for
that table MUST USE queryAll. If you run SF_Mirror without the queryAll
option, you will lose all the permanently deleted rows in the local table.
How to run the SF_Mirror proc without using xp_cmdshell
In some SQL Server environments, the use of xp_cmdshell may be
restricted. In this case you can use a CmdExec feature of the SQL job step
to run the underlying replicate program directly (i.e. instead of using the
SF_Mirror stored procedure). The name of the exe is DBAmpAZ.exe and is
located in the DBAmp Program Files directory. Normally the directory is
c:\Program Files\DBAmp, but DBAmp may installed in a different location.
The DBAmpAZ.exe program takes the following 6 parameters:
1. Command: mirrorcopy
Note: must explicitly use mirrorcopy as the command when using
the CmdExec feature to run the replicate program directly.
2. Salesforce Object: The name of the Salesforce object to mirror
locally.
3. SQL Server Name: The name of the SQL instance to connect to.
4. SQL Database Name: The name of the database to connect to.
Enclose in double quotes if the name contains a blank.
5. Link Server Name: The name of the DBAmp link server.

35
6. Options: Must be either a combination of options or "". Options are
handled the same way as the SF_Mirror proc.
Note: if "" is specified as the option, bulkapi will be used.
Ex.- pkchunk,batchsize(50000)
Here is an example of a complete command:
"C:\Program Files\DBAmp\DBAmpAZ.exe" MirrorCopy Account BUDDY
"salesforce backups" SALESFORCE "pkchunk,batchsize(50000)"
Note that even though the command appears on multiple lines in this
document, the command must be entered as a single line in the job step.
Also, notice the use of double quotes around both the program and the
database. This is required because those values contain blanks.
When setting up a job step to call the program directly, you must change
the Type of the job step to: Operating System (CmdExec). Then enter
your complete command in the Command text box. Again, the command
must be on a single line.
The DBAmpAZ.exe program returns 0 for a successful completion and -1 if
any rows failed. Ensure that the Process exit code of a successful
command is 0 (zero). A -1 will be returned for situations where the
replicate failed.
Best Practices Incorporated into SF_Mirror
Our recommendation is to run SF_Mirror either hourly, nightly or weekly. In
the salesforce api, changes in formula fields will NOT be flagged as
changed records. Therefore, if you have formula fields on objects and only
their value changes, the record will not be picked up by sf_mirror when
doing a delta copy. This is because the salesforce api does not update the
last modified date of that record for a formula field change. Therefore,
SF_Mirror will automatically do a full copy every 7 days to pick up the se
formula field changes.
Large binary blobs may not be downloaded if their size is greater than
MaxBase64Size in the DBAmp registry. See MaxBase64Size in the DBAmp
Registry Settings chapter.
Using the DBAmpTableOptions Table
Use the DBAmpTableOptions table to skip tables that are not needed locally
in the SF_Mirror, and SF_MirrorAll stored procedures.
Note: the DBAmpTableOptions table is the replacement for the
DBAmpProcOptions table and the TablesToSkip table.
Additionally, use the DBAmpTableOptions table to provide options for tables
when using the SF_Mirror, and SF_MirrorAll stored procedures
36
The DBAmpTableOptions table contains four columns. Those four columns
are described below:
TableName – The name of the Salesforce object. There can onl y be one
row per Salesforce object in this table. This column cannot be null.
Options – Any options that can be specified in the options parameter of
the SF_Mirror stored procedures. This includes: bulkapi, pkchunk,
batchsize, soap, subset, etc. This column can be null.
SkipTable – This is a bit column. Specify 1 to skip the Salesforce object in
the SF_MirrorAll stored procedures. The default is 0 to not skip the
Salesforce object.
Comments – Any comments made by the DBAmp user as to why the
Salesforce object entry is in the DBAmpTableOptions table. This column
can be null.
A couple examples below for individual tables:
1. To skip the AcceptedEventRelation table from being replicated or
refreshed locally and provide a reason for doing so, run the
following command in the Salesforce Backups database:
Insert Into DBAmpTableOptions (TableName, SkipTable, Comments)
Values ('AcceptedEventRelation', 1, 'Not needed locally')
2. To use the pkchunk and batchsize options SF_Mirror and
SF_MirrorAll when the Account table is being replicated locally and
provide a reason for doing so, run the following command in the
Salesforce Backups database:
Insert Into DBAmpTableOptions (TableName, Options, Comments)
Values ('Account', 'pkchunk,batchsize(50000)', 'Use pkchunk when
replicating Account')
In addition to specifying individual table names, wildcard names can also be
specified. For example, %Share or Solution%. %Share would skip ev ery
table name that ends with Share. Solution% would skip every table that
starts with Solution.
A couple examples below:
1. To skip all tables that end with History from being replicated or
refreshed locally and provide a reason for doing so, run the
following command in the Salesforce Backups database:
Insert Into DBAmpTableOptions (TableName, SkipTable, Comments)
Values ('%History', 1, 'Not needed locally')
2. To use the bulkapi option with SF_Mirror and SF_MirrorAll when all
tables that end with Share are being replicated locally and provide a
reason for doing so, run the following command in the Salesforce
Backups database:

37
Insert Into DBAmpTableOptions (TableName, Options, Comments)
Values ('%Share', 'bulkapi', 'Use bulkapi when replicating any table
that ends with Share')
3. To use the pkchunk option SF_Mirror and SF_MirrorAll when using
ColumnSubset on the Account table and provide a reason for doing
so, run the following command in the Salesforce Backups database:
Insert Into DBAmpTableOptions (TableName, Options, Comments)
Values ('Account', 'pkchunk', 'Use pkchunk when replicating
Account_ColumnSubsetAM and Account_ColumnSubsetNZ’)
Note: When using the DBAmpTableOptions table with a
ColumnSubset table, enter the Salesforce object name as the
TableName. For example, if the ColumnSubset table is
Contact_ColumnSubsetAM, the TableName to enter is Contact.
4. To skip all tables except tables that start with Account from
SF_MirrorAll, run the following commands in the Salesforce B ackups
database:
Insert Into DBAmpTableOptions (TableName, SkipTable, Comments)
Values ('%', 1, ‘Used to skip all tables from being
replicated/refreshed’)
Insert Into DBAmpTableOptions (TableName, Options, SkipTable,
Comments) Values ('Account%', ‘bulkapi’, 0, ‘Used to
replicate/refresh all tables that start with Account’ )
Note: The ‘%’ wild card character with SkipTable set to 1 tells
SF_MirrorAll to skip every table.
Individual table names override wildcard names. For example, if
%Share and AccountShare are specified in the DBAmpTableOptions
table, the AccountShare entry will be chosen over the %Share
entry.
Note: The DBAmpTableOptions table is maintained by the user of DBAmp
and is not overwritten when DBAmp is upgraded or the Create DBAmp
SPROCS are executed to update the DBAmp stored procedures. The
DBAmpTableOptions table also impacts the older SF_ReplicateAll and
SF_RefreshAll stored procedures.
Making Local Copies with a Subset of Columns
Some customers do not want all columns of an object and only want a subset of the
columns locally. SF_BulkSOQL and SF_BulkSOQL_Refresh solve this need.
SF_BulkSOQL uses the BulkAPI to create a local copy based on any SOQL query
provided.
Once you have created an initial set of local, replicated tables with the subset of
columns, you can keep those tables up-to-date by using the SF_BulkSOQL_Refresh
stored procedure. The SF_BulkSOQL_Refresh stored procedure attempts to 'sync'
the local table created by the SOQL query, without having to download the entire

38
result set again. Note: There are restrictions on which SOQL queries can be used
with SF_BulkSOQL_Refresh.
For more information, see the SF_BulkSOQL and SF_BulkSOQL_Refresh
stored procedure reference in the chapter entitled DBAmp Stored Procedure
Reference.
Making Local Copies as Temporal Tables
Temporal tables are system-versioned tables designed to keep a full history
of data changes and allow easy point in time analysis. DBAmp provides
functionality to make local copies of Salesforce objects in SQL Server.
SF_Mirror can be used to make temporal tables of Salesforce objects or
with a subset of columns (equivalent to SF_BulkSOQL).
For more information on SQL Server temporal tables and how to query
them, take a look at the following link: https://docs.microsoft.com/en-
us/sql/relational-databases/tables/temporal-tables?view=sql-server-2017
Before using DBAmp to make local copies of Salesforce objects as temporal
tables, consider the following:
• SQL Server 2016 or higher is required.
• The local copy made on a Salesforce object will contain two local
tables: the current table and temporal table. The current table name
in SQL Server will be the name of the Salesforce object (ex.-
Account). The temporal table name in SQL Server will be the name
of the Salesforce object with _Temporal appended to the end (ex. -
Account_Temporal).
• Once a local copy of a Salesforce object is made as a te mporal
table, the SF_Mirror temporal option must always be used on that
object moving forward. There must be no mixing of temporal, IAD,
or regular options / stored procedures on an object.
• We recommend creating the local copies as temporal tables in a
separate database as copies being made using the IAD or regular
options / stored procedures.
• Do not make schema changes directly to the current or temporal
tables locally. Schema changes made on Salesforce are allowed.
• Any deleted fields on Salesforce are not removed from the local
copy. The field will remain in the current and temporal table locally.
• Salesforce object must contain a SystemModstamp field.
• Query the current table for the current reflected data on
Salesforce.com. For example:
Select Id, Name, AnnualRevenue from Account

39
• Query the temporal table for a full history of data changes made to
the object on Salesforce.com. For example:
Select * from Account FOR SYSTEM_TIME Between ‘2018-01-31
17:44:04’ and ‘2019-01-31 17:44:04’
• The Id and SystemModstamp columns must be included in the
SOQL statement.
For more information on the SF_Mirror stored procedure when using the
temporal options, see the SF_Mirror stored procedure references in the
chapter entitled
DBAmp Stored Procedure Reference.
Formula Fields with Large Tables/Result Sets
Whether formula fields exist in the object or result set being replicated
locally, using SF_Mirror with the temporal option, determines what DBAmp
does with the current and temporal table.
If a formula field exists in the object or result set being replicated locally,
DBAmp will add all rows in the current table to the temporal table. This
means, if the local object or result set contains 5,000 records, if a formula
field is found DBAmp will add all 5,000 records to the temporal table every
time the stored procedure is ran. Note: this can cause the temporal table
to grow at a very high rate.
If a formula field does not exist in the object or result set being replicated
locally, DBAmp will only add the rows that were updated/changed to the
temporal table. This means, if 5 records were changed on Salesforce, only
those 5 records will be added to the temporal table when the stored
procedure is run next.
Best Practices when using Temporal Tables
• Temporal tables take up large amounts of storage. Therefore, make
sure there is enough storage space in the database to handle this.
• Use SF_Mirror with a subset of columns to only pull the fields/data
needed locally instead of specifying a Salesforce object, which pulls
all the fields and data in an object.
Syntax
exec SF_Mirror '
linked_server
','
object_name
','
options
'
where
linked_server
is the name of your linked server and
object_name
is
the name of the object. There are several optional options you may include
as well, but temporal must be one of them.

40
Example
The following example creates a mirrored local Account table with the
current data on Salesforce.com using the SALESFORCE linked server.
exec SF_Mirror 'SALESFORCE', 'Account', ‘temporal’

41
Chapter 4: Bulk Insert, Upsert, Delete and
Update into Salesforce using SF_TableLoader
Normal SQL Insert, Delete and Update statements are processed one at a
time and are not sent in batches to Salesforce.com. To perform bulk
operations, use the SF_TableLoader stored procedure.
Conceptually, the SF_ TableLoader proc takes as input a local SQL Server
table you create that is designated as the "input" table. The input table
name must begin with a valid Salesforce object name followed by an
underscore and suffix. For example, Account_Load and
Account_FromWeb are valid input table names. XXX_Load is not a valid
input table name (XXX is not a valid Salesforce.com object).
Do not allow other applications to w rite to the input table while
SF_TableLoader is running.
Differences between SF_BulkOps and SF_TableLoader
NOTE: SF_Bulkops has been deprecated and will be removed from
future versions of DBAmp.
There are differences between SF_BulkOps and SF_TableLoader. Those
differences are listed below:
• SF_TableLoader can use the BulkAPI2 functionality of Salesforce.
• All results from Salesforce are written in a Result table, instead of
being written back to the input table. The Result table is named:
input table + _Result. For example, if the input table is
Account_Insert. The Result table is Account_Insert_Result
• SF_TableLoader automatically determines the Salesforce API to use
based off the input table given. This is to maximize
SF_TableLoader’s performance.
• No Error column is required in the input table. SF_TableLoader
writes errors into the Error column of the result table, not the input
table.
• The Result table contains the successful results, failed results, and
unprocessed results from Salesforce.
Why SF_TableLoader over SF_BulkOps?
NOTE: SF_Bulkops has been deprecated and will be removed from
future versions of DBAmp.
There are a few reasons to use SF_TableLoader over SF_BulkOps. The
reasons are listed below:
• SF_TableLoader is much more performant than SF_BulkOps or
SF_BulkOps when using the bulkapi, especially on large input tables.
Below is an example of this:

42
Type
500 rows
5,000 rows
25,000 rows
250,000 rows
SF_BulkOps
:03
:33
2:27
24:07
SF_BulkOps - bulkapi
:18
:46
2:12
17:08
SF_TableLoader – bulkapi2
:06
:35
1:06
2:37
SF_TableLoader - bulkapi
:20
:21
:40
1:49
• SF_TableLoader can use the BulkAPI2 API if explicity specified via
the bulkapi2 switch. Ex: exec SF_TableLoader ‘Update:bulkapi2’,
‘SALESFORCE’, ‘Account_Update’
• SF_TableLoader writes results of the operation to an _Result table.
Therefore, the input table and its data are not being touched by
SF_TableLoader.
• SF_TableLoader chooses which Salesforce API (soap, bulkapi) to use
based on the input table provided.
Checking the Column Names of the Input Table
The input table must contain a column named Id defined as nchar(18). In
SF_TableLoader, an Error column is not required in the input table.
SF_TableLoader creates the Error column in the Result table. If an Error
column is provided in the input table, SF_TableLoader will ignore the Error
column in the input table and write the messages to the Error column in the
Result table. In addition, the input table can contain other columns that
match the fields of the Salesforce object.
For example, below is a valid definition of an Account_Load table:
Id nchar(18)
Name nvarchar(80)
AnnualRevenue decimal(18, 2)
Note that in this example, the Account_Load table does not contain most of
the fields of the Account object.
How the input table is used depends on the operation requested. When
using the above example table with an Insert operation, the missing fields
are loaded as null values. When using the above example table with an
Update operation, the Name and AnnualRevenue fields becomes the only
fields updated on the Salesforce side. When using the above example table
with a Delete operation, the Name and AnnualRevenue fields are ignored
and the objects with the Id value are deleted.

43
The SF_TableLoader proc looks at each field of the Salesforce object and
tries to match it to a column name in the input table . Note that columns of
the input table that do not match a field name are ignored. When using the
BulkAPI2, these columns that are ignored do not show up in the Result
table. Only the columns sent to Salesforce show up in the Result table. In
addition, columns that match a computed field (like SystemModstamp) are
ignored if they exist in the input table. When using the SOAP API or
BulkAPI, all columns in the input table show up in the R esult table.
The SF_TableLoader proc will identify column names of the input table
that do not match with valid Salesforce.com column names and produce a
warning message in the output. Note that in a properly constructed input
table you may also have other columns in the input table tha t are for your
own use and that should be ignored as input to SF_TableLoader. The
SF_ColCompare stored procedure will also compare column names and
identify errors without having to run SF_TableLoader.
You can easily have DBAmp generate a valid local table for any
salesforce.com object by using the SF_Generate stored procedure.
SF_Generate will automatically create an empty local table with all the
proper columns of the salesforce.com object needed for that operation. See
the chapter entitled DBAmp Stored Procedure Reference for more
information on SF_Generate and SF_ColCompare.
Using External Ids as Foreign Keys
You can use external ID fields as a foreign key, allowing you to bulk create,
update, or upsert records in a single step instead of querying a reco rd to
get the ID first.
To do this, modify the column name of the input table and add a period
followed by the external ID field name. For example, let’s look at bulk
insert of contact records with the following table:
ID
LastName
AccountId.SAPXID__c
Error
Emerson
C01203
Harrison
C01202
In the first contact to be created (‘Emerson’), the relationship to the
Account is specified using the SAP Id of C01203.
Also, you must use the external id value for all rows of the input table.
You can use external ids as foreign keys when bulk inserting, updating, or
upserting.
Understanding the Error Column
For all rows that were successfully processed, SF_TableLoader writes the
phrase “Operation Successful" to the Error column of the Result table.

44
Successfully processed rows can therefore be selected using the following
SQL Select:
Select * from Account_Load_Result where Error like '%Operation
Successful%'
Rows that were not successfully processed will contain either a row specific
error or nothing if there was a global failure or they were unprocessed by
Salesforce.
Note: The Error column is not required in the input table when using
SF_TableLoader. SF_TableLoader handles the Error column for you. If an
Error column is provided in the input table, SF_TableLoader will ignore the
Error column in the input table and write the messages to the Error column
in the Result table.
Bulk Inserting rows into Salesforce
When the operation requested is Insert, SF_TableLoader reads each row
of the input table, matches the columns to the fields of the Salesforce
object, and attempts to insert the new object into Salesforce. Important:
SF_TableLoader attempts to insert all rows of the load table regardless of
any existing values in the Id column. In other words, the Id column is
ignored on input when doing an Insert operation.
After execution of the SF_TableLoader proc, the Id column of the Result
table is overwritten with the Id assigned by Salesforce for each successfully
inserted row. If the row could not be inserted, the Error column in the
Result table contains the error message for the failure.
Bulk Upserting rows into Salesforce
When the operation requested is Upsert, SF_TableLoader reads each row
of the input table, matches the columns to the fields of the Salesforce
object, and attempts to upsert the new object into Salesforce. You must
specify which field to use as the External Id field in the SF_TableLoader
call. Important: SF_TableLoader attempts to upsert all rows of the load
table regardless of any existing values in the Id column. In other words, the
Id column is ignored on input when doing an Upsert operation.
After execution of the SF_TableLoader proc, the Id column of the Result
table is overwritten with the Id assigned by Salesforce for each successfully
upserted row. If the row could not be upserted, the Error column of the
Result table contains the error message for the failure.
Bulk Updating rows into Salesforce
When the operation requested is Update, the SF_TableLoader reads each
row of the input table, maps the columns to the fields of the Salesforce
object, and attempts to update an object in Salesforce using the Id column
of the input table.
Important: the input table should only contain columns for those fields
that you want to update. If the data in a column is an empty string or

45
NULL, SF_TableLoader will update that field on salesforce.com to be
NULL. You may modify this behavior by using the following value for the
operation: Update:IgnoreNulls. The IgnoreNulls option tells
SF_TableLoader to ignore null values in columns. The IgnoreNulls
option can only be used with the SOAP API of Salesforce. Therefore, if you
are using the IgnoreNulls option, you should also explicity include the
soap option as IgnoreNulls does not work with the BulkAPI of Salesforce.
For example:
Exec SF_TableLoader 'Update:IgnoreNulls,soap','Salesforce','Account_Upd'
However, empty string values will still set the field on salesforce.com to
NULL. For each row in the input table that failed to update, the Error
column in the Result table will contain the error message for the failure.
Bulk Deleting rows from Salesforce
When the operation requested is Delete, the SF_TableLoader reads each
row of the input table and uses the Id field to delete an object in
Salesforce.
For each row in the input table that failed to delete, the Error column in the
Result table will contain the error message for the failure.
Bulk HardDeleting rows from Salesforce
When the operation requested is HardDelete, the SF_TableLoader reads
each row of the input table and uses the Id field to harddelete an object in
Salesforce.
For each row in the input table that failed to harddelete, the Error column
in the Result table will contain the error message for the failure.
Bulk UnDeleting rows from Salesforce
When the operation requested is UnDelete, the SF_TableLoader reads
each row of the input table and uses the Id field to undelete an object in
Salesforce.
You can identify deleted rows in a table with the following query:
Select Id from SALESFORCE…Account_QueryAll where IsDeleted= 'true'
Note: The UnDelete operation forces SF_TableLoader to use the SOAP
API of Salesforce.
Controlling the batch size with SF_TableLoader
SF_TableLoader with the soap switch uses a default batch size of 200
rows (SOAP API). When using the bulkapi, SF_TableLoader uses a default
batch size of 10,000. You may need to reduce the batch size to
accommodate APEX code on the salesforce.com server. To specify a
different batch size, use the batchsize(xx) option after the operation.
For example, to set the batch size to 50:

46
Exec SF_TableLoader 'Update:soap,batchsize(50)','Salesforce','User_Upd'
Exec SF_TableLoader 'Update:batchsize(50)','Salesforce','User_Upd'
Note: The batchsize option is ignored if SF_TableLoader uses the
bulkapi2 API of Salesforce.
Understanding a Sort Column when using SF_TableLoader
In addition, the sort column can be used to reduce locking issues on
salesforce. Salesforce recommends ordering a detail load table by the
master record id to improve locking (See
https://developer.salesforce.com/page/Loading_Large_Data_Sets_with_the_
Force.com_Bulk_API ).
Here is a quick way you can add a Sort column to your load table. Assume
that the load table is named Account_upd1:
Alter table Account_upd1
Add [Sort] int identity (1,1)
This adds a Sort column to the table that is a consecutive integer number.
Suppose you are uploading Contact records using a load table named
Contact_upd1. In this case, you could create a Sort column follows:
Alter table Contact_upd1
Add [Sort] int identity (1,1)
Then insert the source data into the Contact_upd1 table in AccountId order.
SF_TableLoader will send the records to salesforce in AccountId order to
reduce locking when inserting the contacts.
Note: The Sort column functionality should only be used if you are
receiving locking issue errors from the Salesforce server.
How to run the SF_TableLoader proc
Now you are ready to run the stored procedure.
Note: The SF_TableLoader stored procedure uses the xp_cmdshell
command. If you are not an SQL Server administrator, you must have the
proper permission to use this command. See the SQL Server docume ntation
under the topic xp_cmdshell for more information. To quickly test, run the
following sql in Query Analyzer:
Exec master..xp_cmdshell "dir"
To run the SF_TableLoader stored procedure, use the following
commands in Query Analyzer. Be sure your default database is salesforce
backups.
Exec SF_TableLoader 'Insert', 'SALESFORCE', 'Account_Load'

47
Or
Exec SF_TableLoader 'Upsert','SALESFORCE','Account_Load',
'ED__c' (where ED__c is the name of the external id field)
Exec SF_TableLoader 'Delete', 'SALESFORCE', 'Account_Load'
Or
Exec SF_TableLoader 'Update', 'SALESFORCE', 'Account_Load'
where 'SALESFORCE' is the name you gave your linked server at installation
and Account_Load is the name of the input table to use.
Similar to the SF_Replicate proc, you can schedule the SF_TableLoader
proc using the SQL Server job agent.
How to run the SF_TableLoader proc without using xp_cmdshell
In some SQL Server environments, the use of xp_cmdshell may be
restricted. In this case you can use a CmdExec feature of the SQL job step
to run the underlying tableloader program directly (i.e. instead of using the
SF_TableLoader stored procedure). The name of the exe is DBAmpAZ.exe
and is located in the DBAmp Program Files directory. Normally the directory
is c:\Program Files\DBAmp but DBAmp may installed in a different location.
The DBAmpAZ.exe program takes the following 6 parameters:
1. Operation: Must be either Insert, Delete, Update, Upsert,
HardDelete, Undelete, or ConvertLead. This is similar to the
first parameter of SF_TableLoader.
2. Input Table: The name of the local SQL table containing the data.
3. SQL Server Name: The name of the SQL instance to connect to.
4. SQL Database Name: The name of the database to connect to.
Enclose in double quotes if the name contains a blank.
5. Link Server Name: The name of the DBAmp link server.
6. Options: The options that can be specified. These options include:
soap, bulkapi, bulkapi2, batchsize(), ignorefailures, soapheaders(),
externalid(), serial, parallel, and assignmentruleid(). For more
information on these options, see the SF_TableLoader section in
Chatper 7.
Here is an example of a complete command using the soap option:
"C:\Program Files\DBAmp\DBAmpAZ.exe” update Account_Load BUDDY
"salesforce backups" SALESFORCE "soap"
Note that even though the command appears on multiple lines in this
document, the command must be entered as a single line in the job step.

48
Also, notice the use of double quotes around both the program and the
database. This is required because those values contain blanks.
Here is an example of a complete command using no options:
"C:\Program Files\DBAmp\DBAmpAZ.exe” update Account_Load BUDDY
"salesforce backups" SALESFORCE ""
The double quote, double quote (“”) on the end is mandatory even when no
options are specified.
Here is an example of a complete command using an external id and soap
headers:
"C:\Program Files\DBAmp\DBAmpAZ.exe” upsert Account_Load BUDDY "salesforce backups"
SALESFORCE "soapheaders(EmailHeader,triggerAutoResponseEmail,true),externalid(XID__c) "
When setting up a job step to call the program directly, you must change
the Type of the job step to: Operating System (CmdExec). Then enter
your complete command in the Command text box. Again, the command
must be on a single line.
The DBAmpAZ.exe program returns 0 for a successful completion and -1 if
any rows failed. Ensure that the Process exit code of a successful
command is 0 (zero). A -1 will be returned for situations where some of
the rows succeeded and some failed. Use the error column of the Result
table to determine the failed rows. Rows that succeeded do not need to be
resubmitted.
Below is a screen shot of a sample job step calling the DBAmp AZ.exe.
Your command may be different depending on the install directory.

49
SF_TableLoader Sample Recipe
Below is a sample workflow of a typical process using SF_TableLoader.
Follow the steps below as a guide to use the SF_TableLoader stored
procedure. The following updates the Account object up on Salesforce.com:
1. Create the Input table if it does not exist:
if not exists (select * from INFORMATION_SCHEMA.TABLES
where TABLE_NAME = 'Account_Update' AND TABLE_SCHEMA = 'dbo')
Begin
Create Table Account_Update
(
Id nchar(18),
Name nvarchar(255),
AnnualRevenue decimal(18, 0)
)
End
Note: The Id column must be included in the Input table no matter the
operation being used.
2. Truncate the Input table to prepare new load:
truncate table Account_Update
Note: This step should be done every time to clean out and prepare the
input table for the next load.
3. Load Input table with records to update to Salesforce:
Insert into Account_Update (Id, Name, AnnualRevenue)
Select Id, Name, AnnualRevenue
from Account
Note: This step is where the records that need to be pushed up to
Salesforce are inserted into the Input table. We recommend avoiding Select
Into statements as those lock the catalog when creating the Input table.
4. Update Salesforce with the records in the Input table:
exec SF_TableLoader 'Update', 'SALESFORCE', 'Account_Update'
Note: For more information on the operations that can be used and the
syntax of SF_TableLoader, refer to the
SF_TableLoader
section in chapter
entitled DBAmp Stored Procedure Reference.
5. Check the results of the load:
Select Error
From Account_Update_Result

50
Where Error <> 'Operation Successful.'
Note: The results of the load are put into an _Result table. The name of
the result table is the name of the Input table with _Result appended to the
end. Any records that were successful will have ‘Operation Successful’
written to the Error column. Any records that failed will have the Salesforce
error stating why in the Error column.
Understanding SF_TableLoader failures
When individual rows of the input table fail to complete the operation,
SF_TableLoader writes the error message in the Error column of the
Result table. Thus, in a batch of 200 rows it is possible that 175 rows were
successful and 25 rows failed.
The SF_TableLoader stored procedure outputs an error message in the
log indicating the SF_TableLoader failed when 1 or more rows failed.
The correct interpretation of this error message is that at least 1 row of the
Result table contained an error. Rows that have a blank error message are
unprocessed rows by Salesforce. In addition, SF_TableLoader outputs
messages indicating the total number of rows processed th e number of
rows that failed, the number of rows that succeeded, and the number of
rows that were unprocessed.
If SF_TableLoader is run in a job step, then the job step will fail if one or
more rows contain an error. Again, the rows that contain a blank error
message were unprocessed; the failure is thrown to indicate to the operator
that at least one row failed.
Using Optional SOAP Headers
The SOAP API allows you to pass additional SOAP Headers that alter the
behavior of the SF_TableLoader operation. The SOAP Headers are
described in detail in the Salesforce.com API documentation:
http://www.salesforce.com/us/developer/docs/api/Content/soap_headers.htm
The headers are specified in the form of 3 values separated by commas.
The first value is the header name, the next value is the section name and
the last value is the value for the section. The entire parameter is enclosed
in quotes. If you are specifying multiple SOAP Headers, separate them with
a semicolon. The salesforce.com API is case sensitive with respect to these
values; use the exact token given in the Salesforce.com documentation.
For example, to use the default assignment rule for these inserted Leads
you would add the following SOAP Header parameter:
Exec SF_TableLoader
'Insert:soap','SALESFORCE','Lead_Test','AssignmentRuleHeader,useDefaultRule,true'
The DBAmp Registry settings can also be used to add SOAP headers. The
difference is the SOAP header parameter on the SF_TableLoader call is a
“one-time” use. The DBAmp Registry settings apply the SOAP header to all

51
operations of DBAmp. Therefore, using the SOAP header parameter allows a
finer control over the header usage.
Here are some other examples of SOAP headers:
Trigger auto-response rules for leads and cases: 'EmailHeader,triggerAutoResponseEmail,true'
Changes made are not tracked in feeds: 'DisableFeedTrackingHeader,disableFeedTracking,true'
Note: SOAP Headers force SF_TableLoader to use the SOAP API of
Salesforce.
Converting Leads with SF_TableLoader
SF_TableLoader can be used to convert lead records to
accounts/contacts/opportunities.
Note: Converting leads forces SF_TableLoader to use the SOAP API of
Salesforce.
The first step is to create a table to hold the inf ormation needed for the
conversion. At minimum the table needs to have the following columns:
CREATE TABLE [dbo].[LeadConvert](
[LeadId] [nchar](18) NULL,
[convertedStatus] [nvarchar](255) NULL,
[Error] [nvarchar](512) NULL,
[AccountId] [nchar](18) NULL,
[OpportunityId] [nchar](18) NULL,
[ContactId] [nchar](18) NULL
) ON [PRIMARY]
Additional columns listed below may be added to the table if the
functionality of the column is needed.
Name
Type
Description
accountId
nchar(18)
NULL
ID of the Account into which the lead will be
merged. Required only when updating an existing
account, including person accounts. If no
accountID column is specified, then the API
creates a new account.
DBAmp will populate this column with the ID of the
newly created Account.
contactId
nchar(18)
NULL
ID of the Contact into which the lead will be
merged (this contact must be associated with the
specified accountId, and an accountId must be
specified). Required only when updating an
existing contact. Important
If you are converting a lead into a person account,
do not specify the contactId or an error will result.
Specify only the accountId of the person account.

52
Name
Type
Description
If no contactID is specified, then the API
creates a new contact that is implicitly associated
with the Account.
DBAmp will populate this column with the ID of the
newly created Contact.
convertedStatus
nvarchar(255)
NULL
Valid LeadStatus value for a converted lead.
Required. To obtain the list of possible values, you
must query the LeadStatus object. For example:
Select Id, MasterLabel
from SALESFORCE...LeadStatus
where IsConverted=true
doNotCreateOpportunity
varchar(5)
NULL
Specifies whether to create an Opportunity during
lead conversion (false, the default) or not
(true). Set this flag to true only if you do not
want to create an opportunity from the lead. An
opportunity is created by default.
leadId
nchar(18)
NULL
ID of the Lead to convert. Required.
opportunityId
nchar(18)
NULL
DBAmp populates the field with the Id of the newly
created Opportunity
opportunityName
nvarchar(80)
NULL
Name of the opportunity to create. If this column is
not included, then this value defaults to the
company name of the lead.
overwriteLeadSource
varchar(5)
NULL
Specifies whether to overwrite the LeadSource
field on the target Contact object with the contents
of the LeadSource field in the source Lead object
(true), or not (false, the default). To set this
field to true, you must specify a contactId for the
target contact.
ownerId
nchar(18)
NULL
Specifies the ID of the person to own any newly
created account, contact, and opportunity. If the
client application does not specify this value, then
the owner of the new object will be the owner of
the lead.
sendNotificationEmail
varchar(5)
NULL
Specifies whether to send a notification email to
the owner specified in the ownerId (true) or not
(false, the default).
Use the following command to convert leads:
Exec SF_TableLoader 'ConvertLead’, 'SALESFORCE', 'LeadConvert'

53
Be sure to examine the Error column in the Result table after running the
command to look for possible errors that may have occurred.
Using IgnoreFailures Option with SF_ TableLoader
Without this option, if a SF_TableLoader job runs and one record fails, it
fails the entire job. Some customers want a certain amount of records to
fail without it failing the entire job. The IgnoreFailures option in
SF_TableLoader allows for this functionality.
With the IgnoreFailures option, a number is specified for the percent of
record failures allowed, without failing the entire job. For example, if 10 is
entered for the IgnoreFailures option, 10 percent of the records in the table
being used for SF_TableLoader are allowed to fail, without failing the
entire job. If less than 10 percent of the records in the table fail, the
SF_TableLoader job is successful. If more than 10 percent of the records
in the table fail, the SF_TableLoader job fails.
An example is laid out below:
In this example, up to 20 percent of the records in the Opportunity_Load
table can fail, without the SF_TableLoader job failing. Use the following
command to allow up to 20 percent of records in the Opportunity_Load
table to fail:
Exec SF_TableLoader ‘Insert:IgnoreFailures(20)’, ‘SALESFORCE’,
‘Opportunity_Load’
Using AssignmentRuleId Option with SF_TableLoader
The BulkAPI allows you to pass an AssignmentRuleId that specifies who the
owner of a Case or Lead is. The AssignmentRuleId option can only be used
with the BulkAPI and if the data is being pushed to either the Case or
Lead objects.
Query the AssignmentRule table to obtain the AssignmentRuleId that is to
be used to specify the owner of the Case or Lead:
Select * from SALESFORCE…AssignmentRule
Where SALESFORCE is the name of your linked server.
The AssignmentRuleId option is passed after the operation in the
SF_TableLoader command. To specify an AssignmentRuleId, use the
assignmentruleid(xx) option after the operation:
exec SF_TableLoader 'update:bulkapi,assignmentruleid(01Q300000001Tp5EAE)',
'SALESFORCE', 'Lead_Update'
Note: The AssignmentRuleId option can only be used with the BulkAPI.
Therefore, if the input table contains less than 5,000 rows, the bulkapi
option must also be specified after the operation. If the input table
contains more than 5,000 rows, the bulkapi option does not have to be
specified after the operation.
54
The BulkAPI is case sensitive with respect to the AssignmentRuleId value;
use the exact AssignmentRuleId given in the AssignmentRule table.
Note: only one AssignmentRuleId can be given in the command.

55
Chapter 5: Using SSIS with DBAmp
DBAmp can be used with SSIS to build complex integrations. Within SSIS,
you can use DBAmp in two ways:
- Pull data from salesforce.com using the linked server
- Connecting to SQL Server and using the link server to push data to
salesforce.com.
Using the linked server as an SSIS Source
To bring salesforce data into SSIS as a data source, connect to the SQL
instance that contains the linked server and use a Data Flow task in SSIS
that reads data from salesforce.com using a SQL statement and a four part
name (i.e. Select Id, Name from SALESFORCE…Account).
1. While in the Control Flow panel, drag and drop a Data Flow Task
from the Toolbox. Right click on the new Data Flow Task and choose
Edit. The Data Flow panel should now be displayed
2. From the Toolbox, drag and drop the OLE DB Source item onto the
edit panel. Right click the new OLE DB Source item and choose
Properties.
3. Set the AlwaysUseDefaultCodePage property to TRUE. This must
be done for the DBAmp OLE DB Source to work correctly.
4. Now, right click on the OLE DB Source item and choose Edit. Set
the OLE DB Connection Manager to the SQL Server connection.
This should be the SQL Server where the DBAmp Linked Server
resdies.
5. Data Access Mode must be a SQL command.
Type your SQL statement directly into the SQL Command Text
field. Be sure to use a four part name in the FROM clause
(SALESFORCE…Account)
This OLE DB Source can now be used as the source of the data flow.
Pushing Data to Salesforce.com using SSIS
The most scalable way to push data to salesforce.com is the sf_ TableLoader
stored procedure.
In SSIS, you can use the Execute SQL Task to call the SF_TableLoader
stored procedure. The connection manager for the task should be a
connection to the SQL Server (NOT the DBAmp OLE DB provider). The SQL
Source Type should be Direct Input and the SQL Statement should be the
call to the SF_TableLoader stored procedure.

56
The Execute SQL Task that contains the SF_TableLoader call normally has
2 precedence constraints: 1 for SUCCESS and 1 for FAIL.
You can use the Precedence Constraints to direct flow based on the
SF_TableLoader outcome. SF_TableLoader (and therefore the Execute SQL
Task) fails if any row of the table cannot be processed successfully. If only
a partial number of rows succeed, the FAIL precedence constraint fires.
When this occurs, you can identify the successful rows by using the
following SQL:
Select * from Account_SSISUpdate_Result
where Error like '%Operation Successful%'

57
Chapter 6: Uploading files into Content,
Documents and Attachments
You can use DBAmp to upload files into salesforce.com as Content,
Documents or Attachments with the SF_TableLoader stored procedure.
When you place a file path in the VersionData or Body column,
SF_TableLoader will use the path to obtain the data needed.
SALESFORCE guidelines for uploading documents in ContentVersion object:
“To create a document, create a new version via the ContentVersion object
without setting the ContentDocumentId. This automatically creates a parent
document record. When adding a new version of the document, you must
specify an existing ContentDocumentId which initiates the revision process
for the document. When the latest version is published, the title, owner, and
publish status fields are updated in the document.”
To upload Content, use the following steps:
1. Use the SF_Generate stored procedure to generate a table to be
used for the upload. See SF_Generate in the Stored Procedure
reference for more details on SF_Generate.
exec sf_generate 'Insert','SALESFORCE','ContentVersion_Load'
2. Using SQL, modify the VersionData column type to be a
nvarchar(500) instead of an image type.
Alter table ContentVersion_Load Drop Column VersionData
Alter table ContentVersion_Load Add VersionData nvarchar(500) null
3. Insert rows into ContentVersion_Load with the following values:
• Title - file name.
• ContentDocumentId – ID of the document.
• Origin -The source of the content version. Valid values are:
o C—This is a Content document from the user's
personal library. Label is Content. The
FirstPublishLocationId must be the user's ID. If
FirstPublishLocationId is left blank, it defaults to the
user's ID.
o H—This is a Chatter file from the user's My Files.
Label is Chatter. The FirstPublishLocationId must be
the user's ID. If FirstPublishLocationId is left blank, it
defaults to the user's ID. Origin can only be set to H
if Chatter is enabled for your organization.
58
This field defaults to C. Label is Content Origin.
• OwnerId - ID of the owner of this document.
• Description - (optional) file or link description.
• VersionData - complete file path on the local drive of the file
you want to upload to Salesforce. For example:
c:\serialnumber.txt
• PathOnClient - complete file path on the local drive of the
file you want to upload to Salesforce.
• ContentUrl - URL (for uploading links only, leave blank for
files).
• FirstPublishLocationId - workspace ID.
• RecordTypeId - content type ID. If you publish to a
workspace that has restricted content types, you must
specify RecordTypeId.
4. Upload the table to Salesforce.com with SF_TableLoader.
SF_TableLoader will automatically read the file using the location
found in the VersionData column and pass the contents to
Salesforce as the file.
Note: You cannot use the bulkapi switch when uploading content
with SF_TableLoader.
exec SF_TableLoader 'Insert','SALESFORCE','ContentVersion_Load'
5. Check the Error column of ContentVersion_Load_Result table for any
error messages that may have occurred during the upload.
To upload Attachments, use the following steps:
1. Use the SF_Generate stored procedure to generate a table to be
used for the upload. See SF_Generate in the Stored Procedure
reference for more details on SF_Generate.
exec sf_generate 'Insert','SALESFORCE','Attachment_Load'
2. Using SQL, modify the Body column type to be a nvarchar(500)
instead of an image type.
Alter table Attachment_Load Drop Column Body
Alter table Attachment _Load Add Body nvarchar(500) null
3. Insert rows into Attachment_Load with the following values:
• Name - file name.

59
• Description - (optional) file description.
• Body- complete file path on the local drive of the computer
where DBAmp is installed. For example: c:\serialnumber.txt
• IsPrivate - false/true
• OwnerId - (optional) file owner, defaults to the user
uploading the file.
• ParentId – ID of the parent object of the attachment. The
following objects are supported as parents of attachments:
Account, Asset, Campaign, Case, Contact, Contract, Custom
objects, EmailMessage, EmailTemplate, Event, Lead,
Opportunity, Product2, Solution, Task.
4. Upload the table to Salesforce.com with SF_TableLoader.
SF_TableLoader will automatically read the file using the locatio n
found in the Body column and pass the contents to salesforce as the
file.
Note: You cannot use the bulkapi switch when uploading
attachments with SF_TableLoader.
exec SF_TableLoader 'Insert','SALESFORCE','Attachment_Load'
5. Check the Error column of Attachment_Load_Result table for any
error messages that may have occurred during the upload.
Using BlobId Option to push Blob Ids with SF_TableLoader
The RestAPI of Salesforce allows you to push binary blobs larger than 20
MB. The BlobId option allows you to specify blob Ids to push to Salesforce
using the RestAPI. This option can only be used with the Update and
Insert operations, and can only be used with three objects:
ContentVersion, Attachment, and Document.
When the BlobId option is specified, SF_TableLoader will look at the Id
column of the input table and try to match each Id value with a binary blob
files that exist in the Blob Directory. The Blob Directory is specified on the
Options page of the DBAmp Configuration Prog ram on the server. The
binary blob files that exist in the Blob Directory are brought down by the
SF_DownloadBlobs stored procedure. For more information on
SF_DownloadBlobs, see the SF_DownloadBlobs section in this Chapter.
The following are the steps to follow to push binary blobs to Salesforce:
1. Use SF_DownloadBlobs to download the binary blob files to the Blob
Dircetory that are to be pushed up to Salesforce. See the
SF_DownloadBlobs section in this Chapter for more information.

60
2. Create the input table that will contain the records to push to
Salesforce.
3. Populate the input table with the records to push to Salesforce. The
Id values need to be the Salesforce Id of the record to push. Note:
This Id needs to match the Id prefix of a binary blob file in the Bl ob
Directory. If there is not a binary blob file in the Blob Directory that
matches an Id specified in the input table, SF_TableLoader will
throw an error for that record in the Result table.
4. Use SF_TableLoader with the BlobId option to push the binary blo bs
to Salesforce. For example:
exec SF_TableLoader 'Insert:blobid', 'SALESFORCE', 'ContentVersion_Load'
5. Check the Result table for any errors that may have occurred. The
Result table name is the input table name with _Result appended to
the end. For example: ContentVersion_Load_Result.
Below is an example of using the BlobId option with SF_TableLoader to
insert a ContentVersion binary blob to Salesforce using the RestAPI:
1. Create input table to supply to SF_DownloadBlobs:
Create Table ContentVersion_Blobs
(Id nchar(18))
2. Insert ContentVersion record Id of binary blob to insert into
Salesforce:
Insert Into ContentVersion_Blobs (Id)
Values ('0683A000006HINuQAO')
3. Run SF_DownloadBlobs to bring down the binary blob file into the
Blob Directory for the ContentVersion record Id supplied in the input
table:
exec SF_DownloadBlobs 'SALESFORCE', 'ContentVersion_Blobs'
4. Create input table to supply to SF_TableLoader:
Create Table ContentVersion_Load
(Id nchar(18),
ContentDocumentId nchar(18),
Title nvarchar(255),
PathOnClient nvarchar(500))
5. Populate input table with blob record you want to insert into
Salesforce:
61
Insert Into ContentVersion_Load (Id, ContentDocumentId, Title,
PathOnClient)
Values ('0683A000006HINuQAO', '0694S000001dfmiQAA', 'Test',
'attachexample.txt')
6. Run SF_TableLoader with the BlobId option to insert the blob record
into Salesforce:
exec SF_TableLoader 'Insert:blobid', 'SALESFORCE',
'ContentVersion_Load'
7. Check the ContentVersion_Load_Result table for the Salesforce Id of
the newly inserted record and any errors that may have occurred:
Select Id, Error from ContentVersion_Load_Result

62
Chapter 7: DBAmp Stored Procedure Reference
Note: the SF_ReplicateTemporal, SF_RefreshTemporal,
SF_BulkSOQLTemporal, and SF_BulkSOQL_RefreshTemporal stored
procedures have been deprecated. Use SF_Mirror with the temporal
option instead. See the SF_Mirror section in this chapter for more
information.
SF_BulkOps
Note: Consider using SF_TableLoader instead of SF_BulkOps.
SF_TableLoader performs much better than SF_BulkOps.
Usage
SF_BulkOps takes as input a local SQL Server table you create that is
designated as the "input" table. The input table name must begin with a
valid Salesforce object name followed by an underscore and suffix. For
example, Account_Load and Account_FromWeb are valid input table
names. XXX_Load is not a valid input table name (XXX is not a valid
Salesforce.com object).
The input table must contain a column named Id defined as nchar(18) and
a column named Error defined as nvarchar(255). In addition, the input
table can contain other columns that match the fields of the Salesforce
object. SF_BulkOps produces warning messages for all columns that do not
match a field in the salesforce.com object. Non-matching columns are not
considered an error because you may want to have column data in the table
for reference but that should be intentionally ignored.
Do not allow other applications to write to the input table while
sf_bulkops is running.
NOTE: There are two different API's available from salesforce.com that
applications can use to push data: the Web Services API or the Bulk API.
You can use either API with SF_BulkOps with the Web Services API being
the default.
The Web Services API is synchronous, meaning that for every 200 rows that
are sent to salesforce, an immediate response is sent indicating the success
or failure of those 200 rows. SF_BulkOps has traditionally used the Web
Services API. The disadvantage of this API is that the maximum number of
rows that can be sent to salesforce at a time is 200. So if the input table to
SF_BulkOps contains 1000 rows, there will be at least 5 API calls to send
the data to the salesforce.com server.
The Bulk API is asynchronous, meaning that rows sent to salesforce.com
are queued as a job. The job is executed at some time in the future. The
advantage of the Bulk API is that up to 10,000 rows ca n be sent in a single
request or API call. An input table of 5000 rows would require a single API
63
call to send the data, along with API calls to retrieve the status at some
point in the future.
By default, SF_BulkOps uses the Web Services API.
The SF_Generate stored procedure can be used to quickly build input
tables for SF_BulkOps.
The SF_ColCompare stored procedure can be used to compare ‘hand built’
tables against the salesforce.com object to ensure correct column names.
SF_BulkOps can perform one of thirteen operations:
1. Insert – When the operation requested is Insert, the SF_BulkOps
reads each row of the input table, matches the columns to the fields
of the Salesforce object, and attempts to insert the new object into
Salesforce. Important: SF_BulkOps attempts to insert all rows of
the load table regardless of any existing values in the Id and Error
columns.
2. Insert:BulkAPI – Insert rows from the table using the Bulk API
instead of the Web Services API.
3. Upsert - When the operation requested is Upsert, the
SF_BulkOps reads each row of the input table, matches the
columns to the fields of the Salesforce object, and attempts to
upsert the new object into Salesforce using the specified external id
field. Important: SF_BulkOps attempts to upsert all rows of the
load table regardless of any existing values in the Id and Error
columns.
4. Upsert:BulkAPI – Upsert row using the Bulk API instead of the
Web Services API.
5. Update – When the operation requested is Update, the
SF_BulkOps reads each row of the input table, maps the columns
to the fields of the Salesforce object, and attempts to update an
object in Salesforce using the Id column of the input table.
Important: the input table should only contain columns for those
fields that you want to update. If the data in a column is an empty
string or NULL, sf_bulkops will update that field on salesf orce.com
to be NULL. You may modify this behavior by using the following
value for the operation: Update:IgnoreNulls . The IgnoreNulls
option tells sf_bulkops to ignore null values in columns. However,
empty string values will still set the field on salesforce.com to NULL.
6. Update:BulkAPI – Update salesforce objects using the Bulk API
instead of the Web Services API.
7. Delete - When the operation requested is Delete, the SF_BulkOps
reads each row of the input table and uses the Id field to delete an
object in Salesforce.

64
8. Delete:BulkAPI – Delete objects in salesforce using the Bulk API
instead of the Web Services API.
9. HardDelete:BulkAPI – Delete objects in salesforce using the Bulk
API. In addition, the deleted records are not stored in the Recycle
Bin.
10. Status – Populate the Error column with the current job/batch
status. This is used when using BulkAPI operations to determine
the result of the operation.
11. ConvertLead – Converts Lead records.
12. UnDelete – Use this option to undelete rows from the Recycle bin.
You can identify deleted rows using a query against the _QueryAll
table:
Select Id from SALESFORCE…Account_QueryAll
where IsDeleted='True'
13. IgnoreFailures – Use this option to specify the percent of records
in a BulkOps input table to allow to fail, without failing the BulkOps
job.
For each row in the input table that the operation fails, the Error column
will contain the error message for the failure.
Syntax
exec SF_BulkOps 'Insert', '
linked_server
','
object
','
OptionalSoapHdr
'
Or
exec SF_BulkOps 'Delete', '
linked_server
','
object
','
OptionalSoapHdr
'
Or
exec SF_BulkOps 'Update:BulkAPI','
linked_server
','
object
','
OptionalSoapHdr
'
or
exec SF_BulkOps 'Upsert','linked_server','object','
eid
', ,'
OptionalSoapHdr
'
where
linked_server
is the name of your linked server ,
object
is the name
of the object, and
eid
is the name of the external id field.
The
OptionalSoapHdr
parameter is optional and may be used to pass
salesforce.com SOAP headers for this execution only. See
Using Optional
SOAP Headers
later in this section.
Example

65
The following example bulk inserts rows from the local table named
Account_Load into the Account object at Salesforce.com using the
SALESFORCE linked server.
exec sf_bulkops 'Insert','SALESFORCE','Account_Load'
Controlling the batch size
SF_BulkOps uses a batch size of 200 rows (Web Services API) or 5,000
(Bulk API). You may need to reduce the batch size to accommodate APEX
code on the salesforce.com server. To specify a different batch size, use
the batchsize(xx) option after the operation.
For example, to set the batch size to 50:
Exec SF_Bulkops 'Update:batchsize(50)','Salesforce','User_Upd'
If you are also using the IgnoreNulls option, then separate the options with
a comma:
Exec sf_bulkops 'Update:IgnoreNulls,batchsize(50)','Salesforce','User_Upd'
Controlling the Concurrency Mode
If you are using the bulkapi switch, the default concurrency mode is Serial.
To specify parallel concurrency mode instead, use the parallel option:
Exec SF_Bulkops 'Update:bulkapi,parallel,'Salesforce','User_Upd'
Skipping the Status check
If you prefer not to have DBAmp poll for the status (i.e “fire and forget ”)
then add the phrase (ns) after the bulkapi option: 'Insert:bulkapi(ns) '
Using Optional SOAP Headers
The salesforce api allow you to pass additional SOAP Headers that alter the
behavior of the sf_bulkops operation. The SOAP Headers are described in
detail in the salesforce.com api documentation:
http://www.salesforce.com/us/developer/docs/api/Content/soap_headers.htm
The headers are specified in the form of 3 values separated by commas.
The first value is the header name, the next value is the section name and
the last value is the value for the section. The entire parameter is enclosed
in quotes. The salesforce.com api is case sensitive with respect to these
values; use the exact token given in the salesforce.com documentation.
For example, to use the default assignment rule for these inserted Leads
you would add the following SOAP Header parameter:
exec sf_bulkops 'Insert','SALESFORCE','Lead_Test','AssignmentRuleHeader,useDefaultRule,true'
The DBAmp Registry settings can also be used to add SOAP headers. The
difference is the SOAP header parameter on the sf_bulkops call is a “one -
time” use. The DBAmp Registry settings apply the SOAP header to all

66
operations of DBAmp. Therefore, using the SOAP header parameter allows a
finer control over the header usage.
Here are some other examples of SOAP headers:
Trigger auto-response rules for leads and cases: 'EmailHeader,triggerAutoResponseEmail,true'
Changes made are not tracked in feeds: 'DisableFeedTrackingHeader,disableFeedTracking,true'
SOAP Headers cannot be used along with the bulkapi switch.
Using IgnoreFailures Option
Used to specify the percent of records in the input table to allow to fail,
without failing the BulkOps job. Use the following command to allow up to
20 percent of the records in the Opportunity_Load to fail, without the
BulkOps job failing:
Exec SF_BulkOps ‘Insert:IgnoreFailures(20)’, ‘SALESFORCE’,
‘Opportunity_Load’
Note: IgnoreFailures option can be used with the Bul kAPI switch of
SF_BulkOps.
Notes
When individual rows of the input table fail to complete the operation,
sf_bulkops writes the error message back to the Error column of that row
and continues processing the next row. Thus, in a batch of 200 rows it is
possible that 175 rows were successful and 25 rows failed.
The sf_bulkops stored procedure outputs an error message in the log
indicating the sf_bulkops failed when 1 or more rows failed. The correct
interpretation of this error message is that at least 1 row of the input table
contained an error. In addition, sf_bulkops outputs messages indicating the
total number of rows processed the number of rows that failed and the
number of rows that succeeded.
For all rows that were successfully processed, sf_bulkops writes the phrase
'Operation Successful" to the Error column. Successfully processed rows
can therefore be selected using the following SQL Select:
Select * from Account_Load where Error like '%Operation Successful%'
This technique works for the bulkapi switch as well.
If sf_bulkops is run in a job step, then the job step will fail if one or more
rows contain an error. Again, the rows that contain a blank error message
were still successful; the failure is thrown to indicate to the operator that at
least one row failed.

67
SF_TableLoader
Usage
SF_TableLoader takes as input a local SQL Server table you create that is
designated as the "input" table. The input table name must begin with a
valid Salesforce object name followed by an underscore and suffix. For
example, Account_Load and Account_FromWeb are valid input table
names. XXX_Load is not a valid input table name (XXX is not a valid
Salesforce.com object).
The input table must contain a column named Id defined as nchar(18). An
Error column is not required in the input table. SF_TableLoader handles
the Error column for you. The results are written to a Result table, instead
of back to the input table. The Result table is named: Input table +
_Result. For example, if the input table was named Account_Load, the
Result table will be named Account_Load_Result.
In addition, the input table can contain other columns that match the field s
of the Salesforce object. SF_TableLoader produces warning messages for
all columns that do not match a field in the salesforce.com object. Non -
matching columns are not considered an error because you may want to
have column data in the table for reference but that should be intentionally
ignored. When using the BulkAPI2, the Result table only contains the
columns sent to Salesforce, all ignored columns are not included in the
Result table. When using the SOAP API or BulkAPI, all columns in the
input table are included in the Result table.
Do not allow other applications to write to the input table while
SF_TableLoader is running.
NOTE: There are three different API's available from Salesforce.com that
SF_TableLoader can use to push data: the SOAP API, the BulkAPI, and
the BulkAPI2 API. SF_TableLoader automatically determines which API
to use that provides the best performance based on the input table.
The SOAP API is synchronous, meaning that for every 200 rows that are
sent to salesforce, an immediate response is sent indicating the success or
failure of those 200 rows. The disadvantage of this API is that the
maximum number of rows that can be sent to salesforce at a time is 200.
So, if the input table to SF_TableLoader contains 1000 rows, there will be
at least 5 API calls to send the data to the salesforce.com server.
The BulkAPI is asynchronous, meaning that rows sent to Salesforce.com are
queued as a job. The job is executed at some time in the future. The
application must enquire about the status of the job at a later time to
retrieve the success, failure, or unprocessed results of the rows sent.
The BulkAPI2 API is asynchronous, meaning that rows sent to
Salesforce.com are queued as a job. The job is executed at some time in
the future. The application must enquire about the status of the job at a
68
later time to retrieve the success, failure, or unprocessed results of the
rows sent. The advantage of the bulkapi2 is that Salesforce handles the
batching and concurrency for you.
By default, SF_TableLoader automatically determines which API to use
that provides the best performance based on the input table.
The SF_Generate stored procedure can be used to quickly build input
tables for SF_TableLoader.
The SF_ColCompare stored procedure can be used to compare ‘hand built’
tables against the salesforce.com object to ensure correct column names.
SF_TableLoader can perform one of 7 operations:
1. Insert – When the operation requested is Insert,
SF_TableLoader reads each row of the input table, matches the
columns to the fields of the Salesforce object, and attempts to insert
the new object into Salesforce. Important: SF_TableLoader
attempts to insert all rows of the load table regardless of any
existing values in the Id and Error columns.
2. Upsert - When the operation requested is Upsert,
SF_TableLoader reads each row of the input table, matches the
columns to the fields of the Salesforce object, and attempts to
upsert the new object into Salesforce using the specified external id
field. Important: SF_TableLoader attempts to upsert all rows of
the load table regardless of any existing values in the Id and Error
columns.
3. Update – When the operation requested is Update,
SF_TableLoader reads each row of the input table, maps the
columns to the fields of the Salesforce object, and attempts to
update an object in Salesforce using the Id column of the input
table.
Important: the input table should only contain columns for those
fields that you want to update. If the data in a column is an empty
string or NULL, SF_TableLoader will update that field on
salesforce.com to be NULL. You may modify this behavior by using
the following value for the operation: Update:IgnoreNulls. The
IgnoreNulls option tells SF_TableLoader to ignore null values in
columns. However, empty string values will still set the field on
salesforce.com to NULL.
4. Delete - When the operation requested is Delete,
SF_TableLoader reads each row of the input table and uses the Id
field to delete an object in Salesforce.
5. HardDelete - When the operation requested is HardDelete,
SF_TableLoader reads each row of the input table and uses the Id
field to harddelete an object in Salesforce.

69
6. ConvertLead – Converts Lead records. See Converting Leads
with SF_TableLoader in Chapter 4 for more details.
7. UnDelete – Use this option to undelete rows from the Recycle bin.
You can identify deleted rows using a query against the _QueryAll
table:
Select Id from SALESFORCE…Account_QueryAll
where IsDeleted='True'
Syntax
exec SF_TableLoader 'Insert','
linked_server
','
object
','
OptionalSoapHdr
'
Or
exec SF_TableLoader 'Delete','
linked_server
','
object
','
OptionalSoapHdr
'
Or
exec SF_TableLoader 'Update’,'
linked_server
','
object
','
OptionalSoapHdr
'
or
exec SF_TableLoader 'Upsert','linked_server','object','
eid
','
OptionalSoapHdr
'
where
linked_server
is the name of your linked server,
object
is the name
of the object, and
eid
is the name of the external id field.
The
OptionalSoapHdr
parameter is optional and may be used to pass
salesforce.com SOAP headers for this execution only. See
Using Optional
SOAP Headers
later in this section. Note: this parameter can only be used
with the soap switch.
Example
The following example bulk inserts rows from the local table named
Account_Load into the Account object at Salesforce.com using the
SALESFORCE linked server.
exec SF_TableLoader 'Insert','SALESFORCE','Account_Load'
Using the SF_TableLoader switches
There are three switches that can be used to force SF_TableLoader to use a
certain Salesforce API:
• soap – this switch forces SF_TableLoader to use the SOAP API.
• bulkapi – this switch forces SF_TableLoader to use the BulkAPI.
• bulkapi2 – this switch forces SF_TableLoader to use the BulkAPI2.
By default, if the number of rows in the input table is less than 5,000,
SF_TableLoader will use the SOAP API. If the number of rows in the input
table is greater than 5,000, SF_TableLoader will use the BulkAPI. The

70
bulkapi2 switch needs to be specified for SF_TableLoader to use the
BulkAPI2 API.
For example, to force SF_TableLoader to use the BulkAPI2 API:
Exec SF_TableLoader 'Update: bulkapi2','Salesforce','User_Upd'
Controlling the batch size
SF_TableLoader with the soap switch uses a default batch size of 200
rows (SOAP API). When using the bulkapi, SF_TableLoader uses a default
batch size of 10,000. You may need to reduce the batch size to
accommodate APEX code on the salesforce.com server. To specify a
different batch size, use the batchsize(xx) option after the operation.
Note: The batchsize option cannot be used when using the bulkapi2
switch.
For example, to set the batch size to 50:
Exec SF_TableLoader 'Update:soap,batchsize(50)','Salesforce','User_Upd'
If you are also using the IgnoreNulls option, then separate the options with
a comma:
Exec sf_tableLoader 'Update:IgnoreNulls,batchsize(50)','Salesforce','User_Upd'
Controlling the Concurrency Mode
If you are using the bulkapi switch, the default concurrency mode is
Parallel. To specify serial concurrency mode instead, use the serial option:
Exec SF_TableLoader 'Update:bulkapi,serial,'Salesforce','User_Upd'
Note: The concurrency mode cannot be specified if using the soap or
bulkapi2 switches.
Using Optional SOAP Headers
The SOAP API allows you to pass additional SOAP Headers that alter the
behavior of the SF_TableLoader operation. The soap switch must be
provided to use the optional SOAP Headers. The SOAP Headers are
described in detail in the Salesforce.com API documentation:
http://www.salesforce.com/us/developer/docs/api/Content/soap_headers.htm
The headers are specified in the form of 3 values separated by commas.
The first value is the header name, the next value is the section name and
the last value is the value for the section. The entire parameter is enclosed
in quotes. If you are specifying multiple SOAP Headers, separate them with
a semicolon. The salesforce.com API is case sensitive with respect to these
values; use the exact token given in the Salesforce.com document ation.
For example, to use the default assignment rule for these inserted Leads
you would add the following SOAP Header parameter:

71
Exec SF_TableLoader
'Insert:soap','SALESFORCE','Lead_Test','AssignmentRuleHeader,useDefaultRule,true'
The DBAmp Registry settings can also be used to add SOAP headers. The
difference is the SOAP header parameter on the SF_TableLoader call is a
“one-time” use. The DBAmp Registry settings apply the SOAP header to all
operations of DBAmp. Therefore, using the SOAP header paramete r allows a
finer control over the header usage.
Here are some other examples of SOAP headers:
Trigger auto-response rules for leads and cases: 'EmailHeader,triggerAutoResponseEmail,true'
Changes made are not tracked in feeds: 'DisableFeedTrackingHeader,disableFeedTracking,true'
Note: SOAP Headers can only be used with the soap switch of
SF_TableLoader.
Using AssignmentRuleId Option with SF_TableLoader
The BulkAPI allows you to pass an AssignmentRuleId that specifies who the
owner of a Case or Lead is. The AssignmentRuleId option can only be used
with the BulkAPI and if the data is being pushed to either the Case or
Lead objects.
Query the AssignmentRule table to obtain the AssignmentRuleId that is to
be used to specify the owner of the Case or Lead:
Select * from SALESFORCE…AssignmentRule
Where SALESFORCE is the name of your linked server.
The AssignmentRuleId option is passed after the operation in the
SF_TableLoader command. To specify an AssignmentRuleId, use the
assignmentruleid(xx) option after the operation:
exec SF_TableLoader 'update:bulkapi,assignmentruleid(01Q300000001Tp5EAE)',
'SALESFORCE', 'Lead_Update'
Note: The AssignmentRuleId option can only be used with the BulkAPI.
Therefore, if the input table contains less than 5,000 rows, the bulkapi
option must also be specified after the operation. If the input table
contains more than 5,000 rows, the bulkapi option does not have to be
specified after the operation.
The BulkAPI is case sensitive with respect to the AssignmentRuleId value;
use the exact AssignmentRuleId given in the AssignmentRule table.
Note: only one AssignmentRuleId can be given in the command.
Using IgnoreFailures Option
Used to specify the percent of records in the input table to allow to fail,
without failing the TableLoader job. Use the following command to allow up

72
to 20 percent of the records in the Opportunity_Load to fail, without the
TableLoader job failing:
Exec SF_TableLoader ‘Insert:IgnoreFailures(20)’, ‘SALESFORCE’,
‘Opportunity_Load’
Note: IgnoreFailures option can be used with all three switches of
SF_TableLoader.
Using BlobId Option to push Blob Ids with SF_TableLoader
The RestAPI of Salesforce allows you to push binary blobs larger than 20
MB. The BlobId option allows you to specify blob Ids to push to Salesforce
using the RestAPI. This option can only be used with the Update and
Insert operations, and can only be used with three objects:
ContentVersion, Attachment, and Document.
When the BlobId option is specified, SF_TableLoader will look at the Id
column of the input table and try to match each Id value with a binary blob
files that exist in the Blob Directory. The Blob Directory is specified on the
Options page of the DBAmp Configuration Program on the server. The
binary blob files that exist in the Blob Directory are brought down by the
SF_DownloadBlobs stored procedure. For more information on
SF_DownloadBlobs, see the SF_DownloadBlobs section in this Chapter.
The following are the steps to follow to push binary blobs to Salesforce:
1. Use SF_DownloadBlobs to download the binary blob files to the Blob
Dircetory that are to be pushed up to Salesforce. See the
SF_DownloadBlobs section in this Chapter for more information.
2. Create the input table that will contain the records to push to
Salesforce.
3. Populate the input table with the records to push to Salesforce. The
Id values need to be the Salesforce Id of the record to push. Note:
This Id needs to match the Id prefix of a binary blob file in the Blob
Directory. If there is not a binary blob file in the Blob Directory that
matches an Id specified in the input table, SF_TableLoader will
throw an error for that record in the Result table.
4. Use SF_TableLoader with the BlobId option to push the binary blobs
to Salesforce. For example:
exec SF_TableLoader 'Insert:blobid', 'SALESFORCE', 'ContentVersion_Load'
5. Check the Result table for any errors that may have occurred . The
Result table name is the input table name with _Result appended to
the end. For example: ContentVersion_Load_Result.
Below is an example of using the BlobId option with SF_TableLoader to
insert a ContentVersion binary blob to Salesforce using the RestAPI:

73
1. Create input table to supply to SF_DownloadBlobs:
Create Table ContentVersion_Blobs
(Id nchar(18))
2. Insert ContentVersion record Id of binary blob to insert into
Salesforce:
Insert Into ContentVersion_Blobs (Id)
Values ('0683A000006HINuQAO')
3. Run SF_DownloadBlobs to bring down the binary blob file into the
Blob Directory for the ContentVersion record Id supplied in the input
table:
exec SF_DownloadBlobs 'SALESFORCE', 'ContentVersion_Blobs'
4. Create input table to supply to SF_TableLoader:
Create Table ContentVersion_Load
(Id nchar(18),
ContentDocumentId nchar(18),
Title nvarchar(255),
PathOnClient nvarchar(500))
5. Populate input table with blob record you want to insert into
Salesforce:
Insert Into ContentVersion_Load (Id, ContentDocumentId, Title,
PathOnClient)
Values ('0683A000006HINuQAO' , '0694S000001dfmiQAA', 'Test',
'attachexample.txt')
6. Run SF_TableLoader with the BlobId option to insert the blob record
into Salesforce:
exec SF_TableLoader 'Insert:blobid', 'SALESFORCE',
'ContentVersion_Load'
7. Check the ContentVersion_Load_Result table for the Salesforce Id of
the newly inserted record and any errors that may have occurred:
Select Id, Error from ContentVersion_Load_Result
Notes
74
A full explanation of the SF_TableLoader stored procedure can be found
in
Chapter 4: Bulk Insert, Upsert, Delete and Update into Salesforce using
SF_TableLoader
.
When individual rows of the input table fail to complete the operation,
SF_TableLoader writes the error message back to the Error column in the
Result table. Thus, in a batch of 200 rows it is possible that 175 rows were
successful and 25 rows failed.
The SF_TableLoader stored procedure outputs an error message in the
log indicating the SF_TableLoader failed when 1 or more rows failed.
The correct interpretation of this error message is that at least 1 row of the
Result table contained an error. In addition, SF_TableLoader outputs
messages indicating the total number of rows processed, the number of
rows that failed, the number of rows that succeeded, and the number of
rows unprocessed.
For all rows that were successfully processed, SF_TableLoader writes the
phrase 'Operation Successful" to the Error column in the Result table.
Successfully processed rows can therefore be selected using the following
SQL Select:
Select * from Account_Load_Result where Error like '%Operation
Successful%'
If SF_TableLoader is run in a job step, then the job step will fail if one or
more rows contain an error. Again, the rows that contain a blank error
message were unprocessed by Salesforce; the failure is thrown to indicate
to the operator that at least one row failed.

75
SF_BulkSOQL
Usage
SF_BulkSOQL creates and populates a local SQL table with the results of a
SOQL query. SF_BulkSOQL uses the salesforce Bulk API. Therefore,
the SOQL query must be valid to use with the Bulk API. For more
information on SOQL that is valid with the Bulk API, visit this link:
https://developer.salesforce.com/docs/atlas.en-
us.api_asynch.meta/api_asynch/asynch_api_using_bulk_query.htm
SF_BulkSOQL functionality uses two SQL Server tables: a Results table
and a SOQL table. The following goes into detail on each table:
1. Results Table
• Holds the results of a SOQL statement in a SQL Server table
locally
• Table is created or recreated when the SF_BulkSOQL stored
procedure runs
• Provided in the 2
nd
parameter of the SF_BulkSOQL stored
procedure
• The name of the table cannot be the name of a valid
Salesforce object. (AccountsContacts is valid, Contact is not
valid)
• The name of the table should describe the results of the
SOQL statement (Ex.- A SOQL statement that is bringing
down Accounts and Contacts could be named
AccountsContacts)
2. SOQL Table
• Holds the SOQL statement that populates the Results table
• Must be named: Results table name + an underscore +
“SOQL” (Ex.- AccountsContacts_SOQL)
• Must be created prior to running the SF_BulkSOQL stored
procedure
• Must contain one column only, named “SOQL” defined
nvarchar(max). Example:
Create Table AccountsContacts_SOQL
(SOQL nvarchar(max))
• Must contain one row only

76
• Value of one row in the SOQL field must be a valid BulkAPI
SOQL statement
Do not allow other applications to write to the same Results table
or the SOQL table while SF_BulkSOQL is running.
Syntax
exec SF_BulkSOQL '
table_server
','
table_name
','
options
',
‘soql_statement’
where
table_server
is the name of your linked server and
table_name
is the
name of the Results table. There are several optional options you may
include as well. Where
soql_statement
is the SOQL statement that can be
passed in as a 4
th
parameter. If you pass in a SOQL statement via the 4
th
parameter, you do not have to create a SOQL table, SF_BulkSOQL creates
it.
Example
The following example creates a local AccountsContacts Results table.
1. Create the SOQL table:
Create Table AccountsContacts_SOQL
(SOQL nvarchar(max))
2. Insert the SOQL statement into the SOQL column of the SOQL table:
Insert Into AccountsContacts_SOQL (SOQL)
Values('Select Account.Id, Account.Name, * from Contact’)
3. Run the SF_BulkSOQL stored procedure to populate the Results
table:
exec SF_BulkSOQL ‘SALESFORCE’, ‘AccountsContacts’
Notice the Results table in the 2
nd
parameter of the SF_BulkSOQL stored
procedure.
How to run the SF_BulkSOQL proc without using xp_cmdshell
Step 1: Run the SF_BulkSOQLPrep stored procedure with the same
parameters used for SF_BulkSOQL. Replace the SF_BulkSOQL stored
procedure with the SF_BulkSOQLPrep stored procedure using the same
parameters in the example above. If passing in the SOQL Statement to the
SF_BulkSOQLPrep stored procedure follow the example below, Example
passing in SOQL statement, but replace SF_BulkSOQL with
SF_BulkSOQLPrep. Note: you must use the SF_BulkSOQLPrep stored
procedure if you are not using xp_cmdshell.
77
Step 2: Run the underlying BulkSOQL program directly (i.e. instead
of using the SF_BulkSOQL stored procedure) using CmdExec. The
name of the exe is DBAmpNet2.exe and it is located in the DBAmp Program
Files directory. Normally the directory is c:\Program Files\DBAmp but
DBAmp may installed in a different location.
The DBAmpNet2.exe program takes the following 7 parameters:
1. Command: Must be Export.
2. Operation: must be Replicate:bulksoql.
3. Result table: the name of the result table. Must be the name of
the created SOQL table, but instead of _SOQL on the end, it is
_Result. For example, if the SOQL table you created is
AccountsContacts_SOQL, then the result table must be
AccountsContacts_Result.
4. SQL Server Name: The name of the SQL instance to connect to.
5. SQL Database Name: The name of the database to connect to.
Enclose in double quotes if the name contains a blank.
6. Link Server Name: The name of the DBAmp link server.
7. Base table: the name of the base table. Must be the name of the
created SOQL table, minus the _SOQL. For example, if the SOQL
table you created is AccountsContacts_SOQL, then the result table
must be AccountsContacts.
Here is an example of a complete command:
"C:\Program Files\DBAmp\DBAmpNet2.exe" Export Replicate:bulksoql
AccountsContacts_Result BUDDY "ReplicateAll Testing" SALESFORCE
AccountsContacts
Note that even though the command appears on multiple lines in this
document, the command must be entered as a single line in the job step.
Also notice the use of double quotes around both the program and the
database. This is required because those values contain blanks.
When setting up a job step to call the program directly, you must change
the Type of the job step to: Operating System (CmdExec). Then enter
your complete command in the Command text box. Again, the command
must be on a single line.
The DBAmp.exe program returns 0 for a successful completion and -1 if any
rows failed. Ensure that the Process exit code of a successful
command is 0 (zero). A -1 will be returned for situations where some of
the rows succeeded and some failed. Use the error column of the table to
determine the failed rows. Rows that succeeded do not need to be
resubmitted.
Your command may be different depending on the install directory.

78
Example for Embedded Single Quotes
The following example creates a local Contacts1 Results table where the
one record in the table has an embedded single quote in the last name. For
this example, the last name is O’Brien.
1. Create the SOQL table:
Create Table Contacts1_SOQL
(SOQL nvarchar(max))
2. Insert the SOQL statement into the SOQL column of the SOQL table:
Insert Into Contacts1_SOQL (SOQL)
Values('Select Id, LastName from Contact WHERE LastName =
''O''''Brien''')
Note: In the WHERE clause are all single quotes; there are no
double quotes.
3. Run the SF_BulkSOQL stored procedure to populate the Results
table:
exec SF_BulkSOQL 'SALESFORCE', 'Contacts1'
Notice the Results table in the 2
nd
parameter of the SF_BulkSOQL stored
procedure.
Example passing in SOQL statement
Do not create a SOQL table if using this technique, SF_BulkSOQL creates
the SOQL table.
The following example creates a local Leads1 Results table.
1. Run the SF_BulkSOQL stored procedure to populate the Leads1
Results table by passing in a valid SOQL state ment:
exec SF_BulkSOQL 'SALESFORCE', 'Leads1', '', 'Select * from
Lead'
Notice the Results table in the 2
nd
parameter of the SF_BulkSOQL stored
procedure. Also, notice the 3
rd
parameter, it is required for a SOQL
statement to be passed to SF_BulkSOQL.
Note: If you use the 4
th
parameter (soql_statement) of the
SF_BulkSOQL stored procedure, you must pass in a valid value for the
3
rd
parameter (options). The valid options for SF_BulkSOQL are
presented below.

79
Options
pkchunk: SF_BulkSOQL uses just the salesforce.com BulkAPI by default. If
you would like to use the salesforce.com BulkAPI with the pkchunking
header instead, add the optional pkchunk switch. SF_BulkSOQL will submit
a bulkapi job using the pkchunking header. This option should only be used
for large tables.
For example, to use pkchunk:
Exec SF_BulkSOQL 'SALESFORCE',' Contacts1','pkchunk'
The default batch size will be 100,000. You can alter this using the
batchsize parameter:
Exec SF_BulkSOQL 'SALESFORCE','
Contacts1','pkchunk,batchsize(50000)'
Note: By default, the options parameter in SF_BulkSOQL is null.

80
SF_BulkSOQL_Refresh
Usage
SF_BulkSOQL_Refresh compares the current, local SQL table containing
the results of a SOQL query with that same SOQL query for a given time.
The SOQL query used is the one in the _SOQL table produced by the
SF_BulkSOQL command. Any changes (insert, deletes or updates) are
detected and the local table is updated.
Take a look at the SF_BulkSOQL section of this chapter for more
information on how to create a local SQL table with the results of a SOQL
query.
Note: SF_BulkSOQL_Refresh uses the SOAP API to update the local SQL
table.
Syntax
exec SF_BulkSOQL_Refresh '
table_server
','
table_name
'
where
table_server
is the name of your linked server and
table_name
is the
name of the Results table provided in the SF_BulkSOQL command.
Example
The following creates a local AccountsContacts table containing the results
from the SOQL query provided below:
exec SF_BulkSOQL ‘SALESFORCE’, ‘AccountsContacts’, ‘’, ‘Select
account.name, owner.name, * from Contact’
The following example refreshes the local Account sContacts table using the
SOQL query located in the _SOQL table produced by the SF_BulkSOQL
command:
exec SF_BulkSOQL_Refresh ‘SALESFORCE’, ‘AccountsContacts’
Restrictions
There are several restrictions on SF_BulkSOQL_Refresh. These restrictions
are provided below:
1. The SOQL query provided to the SF_BulkSOQL command cannot
contain a Where clause
2. The Id and SystemModstamp field must be in the Select clause of
the SOQL query
3. The SOQL query cannot have any sub-selects in the Select clause

81
4. Any BulkAPI restrictions that are put on SOQL queries that can be
found here: https://developer.salesforce.com/docs/atlas.en-
us.api_asynch.meta/api_asynch/asynch_api_using_bulk_query.htm
Examples of Valid and Non-Valid SOQL Queries
Below are examples of valid SOQL queries:
‘Select account.name, owner.name, * from Contact’
‘Select * from Account’
‘Select account.name, owner.name, Id, SystemModstamp from
Contact’
‘Select Id, categories__c, location__c, Name, SystemModstamp
from Book__c’
Below are examples of non-valid SOQL queries:
‘Select Id, FirstName, LastName from Contact ’
‘Select * from Account where AnnualRevenue > 1000’
'Select Id, (Select Description from ActivityHistories) From
Account'
'Select Count(name), Count_distinct(name) from account'

82
SF_CreateKeys
NOTE: SF_CreateKeys has been deprecated and will be removed in
a future DBAmp release.
Usage
SF_CreateKeys creates foreign keys for all local replicated tables of a
database. This is useful for creating database diagrams and proving ad-hoc
query tools with join hints.
You should run SF_DropKeys to ensure that all previous foreign keys are
removed before recreating them with SF_CreateKeys.
Syntax
exec SF_CreateKeys '
linked_server
'
where
linked_server
is the name of your linked server.
Example
The following example creates foreign keys for all local, replicated tables in
the database using the SALESFORCE linked server.
exec sf_createkeys 'SALESFORCE'
Notes
SF_CreateKeys should only be used when creating keys for Database
Diagrams. See the chapter entitled
Creating Database Diagrams and Keys
for more information.
SF_CreateKeys will only create foreign keys for existing local tables; the
procedure does not create the local table itself. Therefore, you must
replicate down either all the salesforce.com tables (using SF_ReplicateAll)
or a subset of salesforce.com tables (using SF_Replicate) prior to running
SF_CreateKeys.
83
SF_DownloadBlobs
Usage
SF_DownloadBlobs downloads the binary content of a salesforce object
(Attachment, Knowledge Article, etc.) into a directory on the SQL Server
machine. SF_DownloadBlobs uses the salesforce Bulk API and
consumes 1 API call per file downloaded. Make sure you have enough
daily API calls in your salesforce org prior to running SF_DownloadBlobs.
SF_DownloadBlobs takes as input a local SQL Server table that is
designated as the "input" table:
Input Table
• Holds the records Ids of a Salesforce object that contains binary
content on salesforce.
• Input table name prefix must be the name of a valid Salesforce
object. (Ex.- Attachment and Attachment_Test are valid,
AttachmentTest is not valid)
• Input table must contain the Id field of the Salesforce object, all
other fields are ignored.
• Input table must contain at least one record
• The input table can be the table created by SF_Replicate or a table
you create manually.
SF_DownloadBlobs is a stored procedure that creates files in a local
directory with the contents of the binary field(s) of a Salesforce object.
File Name
The file name is based on the following template:
Id_fieldName.File
For example, consisder the following file name:
00P6000000BR8e1EAD_body.File
This file belongs to the attachment with id 00P6000000BR8e1EAD and is the
binary contents of the body field.
Syntax
exec SF_DownloadBlobs '
table_server
',’input_table'
where
table_server
is the name of your linked server and
input_table
is the name of a valid input table.

84
Note
The Base64 Maximum Field Size registry setting in the Registry Settings
dialog on the DBAmp Configuration Program must be set to 0.
Example
The following example downloads the binary files(s) of the Attachment
table into in a local directory on the server called the “Blob Directory”. This
example uses SF_Replicate to create the input table.
1. Create the input table using SF_Replicate. Normally, the Body
column of the local Attachment table is null because the
SF_Replicate does not download the binary content.
exec SF_Replicate ‘SALESFORCE’, ‘Attachment’
2. Create the Blob Directory:
1. Run the DBAmp Configuration Program
2. Navigate to Configuration/Options Dialog
3. Create a Blob Directory using the browse button
3. Run the SF_DownloadBlobs stored procedure to create files
containing the binary field(s) of the Attachment object in the Blob
Directory:
exec SF_DownloadBlobs ‘SALESFORCE’, ‘Attachment’
After execution, the Blob directory contains the individual Attachment
files.

85
SF_DropKeys
NOTE: SF_DropKeys has been deprecated and will be removed from
a future release.
Usage
SF_DropKeys drops all foreign keys for all local replicated tables of a
database. You should run SF_DropKeys to ensure that all previous
foreign keys are removed before recreating them with SF_CreateKeys.
For more information on SF_DropKeys, see the chapter entitled
Creating
Database Diagrams and Keys
.
Syntax
exec SF_DropKeys '
linked_server
'
where
linked_server
is the name of your linked server.
Example
The following example drops all foreign keys for all local, replicated tables
in the database using the SALESFORCE linked server.
exec sf_dropkeys 'SALESFORCE'
Notes
✓ SF_DropKeys should be run before SF_Replicate or
SF_Replicate since these procedures assume that no foreign
keys exist on the current local tables. We recommend that
you only use SF_CreateKeys and SF_DropKeys when you
need to database diagram.
✓ To create a permanent primary key on the ID field, do not
use SF_CreateKeys. Instead, SF_Replicate will automatically
create the primary key on the Id field.
✓ SF_DropKeys will drop the keys on all tables in the
salesforce backups database. Do not use SF_DropKeys if you
have created your own, non-salesforce tables with keys in
the database.

86
SF_Generate
Usage
SF_Generate generates a empty local table that can be used as input of
SF_BulkOps for the operation specified. All columns of the salesforce.com
obect that are valid for the operation are included in the table. The input table
name must begin with a valid Salesforce object name followed by an underscore
and suffix. For example, Account_Load and Account_FromWeb are valid
input table names. XXX_Load is not a valid input table name (XXX is not a
valid Salesforce.com object).
SF_Generate requires you to specify an operation of either
‘Insert’,’Update’,’Upsert’, or ‘Delete’. The local table generate will have all
columns that are valid for that operation.
The output of SF_ColCompare is a single empty table and the Create Table
SQL used to create it.
Syntax
exec SF_Generate ‘
op
’,'
linked_server
', '
local_table
'
where
op
is either ‘Insert’,’Update’,’Upsert’ or ‘Delete’,
linked_server
is the
name of your linked server and
local_table
is the name of the local input
table.
Example
The following example creates the local table named Account_Load for the
Account object at Salesforce.com using the SALESFORCE linked server.
exec sf_generate 'Insert','SALESFORCE','Account_Load'

87
SF_Mirror
Usage
SF_Mirror is a hybrid of the SF_Replicate and SF_Refresh stored
procedures. SF_Mirror automatically chooses whether to do a full copy
(Equivalent to SF_Replicate) or a delta copy (Equivalent to SF_Refresh) of
the table. SF_Mirror decides this based on a couple of criteria laid out
below:
• SF_Mirror creates a local table with the contents of the same object
at Salesforce.com if the table does not already exist locally.
• If the table exists locally, SF_Mirror decides whether to do a full
copy or a delta copy of the table. SF_Mirror makes this decision
based on the created date of the local table (the last time the table
was replicated).
• If the created date of the local table is more than 7 days old,
SF_Mirror will make a full copy of the table.
• If the created date of the local table is less than 7 days old,
SF_Mirror will do a delta copy of the table.
• If there are any schema changes detected, SF_Mirror will make a
full copy of the table.
The name of the local table is the same name as the Salesforce.com object
(i.e. Account). By default, SF_Mirror uses the BulkAPI (With PKChunk
header where applicable) when making a full copy of the table locally.
Important Note: if the table has been mirrored locally, SF_Mirror will use
the SOAP API when the row count of the local table is below 20,000, and
the BulkAPI when the row count is above 20,000 when doing a full copy. In
addition, SF_Mirror creates a primary key on the Id field of the local table.
Syntax
exec SF_Mirror '
linked_server
','
object_name
','
options
'
where
linked_server
is the name of your linked server and
object_name
is
the name of the object. There are several optional options you may include
as well.
Example
The following example makes a full copy or delta copy of the local Account
table with the current data on Salesforce.com using the SALESFORCE linked
server.
exec SF_Mirror 'SALESFORCE', 'Account'

88
Using Options with SF_Mirror
SF_Mirror will internally decide the best options to use to make a full copy
or delta copy of the table. You can override the options SF_Mirror uses in
two ways:
1. The Options parameter of the SF_Mirror stored procedure
2. The DBAmpTableOptions table
There is an order of precedence for using options with SF_Mirror when
replicating a Salesforce object locally. The order is as follows:
1. Options passed into the Options parameter of the SF_Mirror
stored procedure.
2. Options provided in the Options field of the DBAmpTableOptions
table for the specified table.
3. If no options are passed into the Options parameter of the
SF_Mirror stored procedure or the Options field of the
DBAmpTableOptions table for the specified table, SF_Mirror will
internally determine the best options to use to make a full copy of
the Salesforce object locally.
For more information on using the DBAmpTableOptions table see
the “Using the DBAmpTableOptions Table” section in Chapter 3 .
Options
Batchsize: SF_Mirror uses a default batch size of 100,000 rows when
making a full copy. You may need to reduce the batch size to
accommodate APEX code on the Salesforce.com server. To specify a
different batch size, use the batchsize(xx) optio n.
For example, to set the batch size to 50,000:
Exec SF_Mirror 'Salesforce','Account','batchsize(5 0000)'
pkchunk: SF_Mirror uses the BulkAPI by default when making a full copy.
If Salesforce allows the object to use the pkchunking header, SF_Mirror will
add it to the job. If you would like to force SF_Mirror to use the
Salesforce.com BulkAPI with the pkchunking header, add the optional
pkchunk switch. SF_Mirror will submit a BulkAPI job using the pkchunking
header and poll every minute for completion. This option should be used for
large tables.
For example, to use the pkchunk option and poll every 1 minute for
completion:
Exec SF_Mirror 'Salesforce','Account','pkchunk'
89
The default batch size will be 100,000. You can alter this using the
batchsize parameter:
Exec SF_Mirror 'Salesforce','Account','pkchunk,batchsize(50000)'
Bulkapi: SF_Mirror uses this option by default when making a full copy.
Therefore, specifying this as an option is not required for SF_Mirror to use
the BulkAPI. SF_Mirror will submit a BulkAPI job and poll every minute for
completion.
For example, to force SF_Mirror to use the BulkAPI and poll every 1 minute
for completion:
Exec SF_Mirror 'Salesforce', 'Account', 'bulkapi'
Queryall: SF_Mirror does not include archived and deleted records of the
Salesforce.com object when making a full copy of Salesforce data by
default. To include the archived and deleted records of the Salesforce.com
object in the full copy of Salesforce data, add the optional queryall switch.
For example, to use the queryall option with SF_Mirror:
Exec SF_Mirror 'Salesforce', 'Account', 'queryall'
Soap: SF_Mirror uses the Salesforce BulkAPI by default when making a full
copy. If you would like to use the Salesforce.com Web Services (SOAP) API
to make a full copy of Salesforce data, add the optional soap switch.
For example, to use the soap option with SF_Mirror:
Exec SF_Mirror 'Salesforce', 'Account', 'soap'
Temporal: creates a full copy of the table as a system-versioned table
designed to keep a full history of data changes and allow easy point in time
analysis. For more information, see the section ti tled “Making Local Copies
as Temporal Tables” in Chapter 3.
For example, to use the temporal option with SF_Mirror:
Exec SF_Mirror 'Salesforce', 'Account', 'temporal'
Subset: SF_Mirror will make a full copy the table locally if there is a
schema change to the Salesforce object by default. If the subset option is
specified, SF_Mirror will try to determine a valid subset of columns that
exist in both the local table and the table on Salesforce.com. It will do a
delta copy of the local table based on that column subset. 'Subset' implies
that new fields added to the Salesforce object will not be captured by
SF_Mirror. However, SF_Mirror will make a full copy of the table every 7
days regardless of the subset option being specified. In addition, deleted
fields will remain in the local table.
For example, to use the subset option with SF_Mirror:
Exec SF_Mirror 'Salesforce', 'Account', 'subset'

90
Full: SF_Mirror creates a full copied table with the contents of the same
object at Salesforce.com every 7 days by default. You can change the
number of days between making a full copied local table. To specify the
number of days, use the full(xx) option.
For example, to make a full copy of the local table once a day:
Exec SF_Replicate 'Salesforce', 'Account', 'full(1)'
Using the DBAmpSettings Table with SF_Mirror
Normally, customers use the Registry Settings page of the DBAmp
Configuration Program to specify different settings to use with D BAmp. The
settings in the Registry Settings page are SQL Server instance wide. If you
want to specify DBAmp settings on a database by database basis, use the
DBAmpSettings table. If the DBAmpSettings table exists in the database,
the DBAmpSettings table overrides the settings specified in the Registry
Settings page for that database. To create the DBAmpSettings table with
default values, run the following in the database:
Exec SF_CreateDBAmpSettingsTable
The DBAmpSettings table is used to configure differ ent settings of DBAmp.
To query the DBAmpSettings table, run the following query in the database:
select * from DBAmpSettings
To change a setting in the DBAmpSettings table run a SQL Update
statement against the table. For example, to change the
NetworkReceiveTimeout from 2400 seconds to 3000 seconds, run the
following in the database:
Update DBAmpSettings set NetworkReceiveTimeout = 3000
The following DBAmp settings can be set using the DBAmpSettings table:
MinimumLongSize, BulkAPIPoll, BulkAPITimeout, UseUTC, MaxBase64Size,
NetworkReceiveTimeout, MetadataOverride, TriggerUserEmail,
TriggerAutoResponseEmail, TriggerOtherEmail, UseDefaultAssignment,
ConvertCurrency, and ToLabel.
See the “Registry Settings Page of the DBAmp Configuration
Program” section in Chapter 8 for more information on the settings.
Notes
The SF_Mirror stored procedure is a hybrid of the SF_Replicate and
SF_Refresh stored procedures. Do not use both SF_Mirror and
SF_Replicate/Sf_Refresh on the same table.
A primary index on the Id column will be automatically created when the
table itself is replicated. SF_Mirror will also preserve any secondary indexes
on the local table.
91
By default, DBAmp does not download the values of Base64 fields but
instead sets the value to NULL. This is done for performance reasons. If
you require the actual values, modify the Base64 Fields Ma ximum Size using
the DBAmp Configuration Program to some value other than 0. If you are
using the DBAmpSettings table, update the MaxBase64Size field to a value
other than 0.
SF_Mirror always creates Boolean fields on Salesforce.com as the
BIT field data type in SQL Server. SF_Mirror ignores the “Use Bit
Column Type” registry setting in the DBAmp Configuration Program. The
following is an example of a query with one of these fields:
Select * from Account where IsDeleted = 'true'
SF_Mirror always creates fields as nullable in the local table.
92
SF_MirrorAll
Usage
SF_MirrorAll is a hybrid of the SF_ReplicateAll and SF_RefreshAll stored
procedures. SF_MirrorAll retrieves a list of the current objects from
Salesforce and automatically chooses whether to do a full copy (Equivalent
to SF_Replicate) or delta copy (Equivalent to SF_Refresh) on each
individual table in the list. If SF_MirrorAll decides to do a full copy on the
individual table, it will create a full backup with the contents of the
Salesforce.com object as a local table. If SF_MirrorAll decides to do a delta
copy on the individual table, it will compare the current, local table with the
contents of the same object at Salesforce.com. Any changes (insert, deletes
or updates) are detected and the local table is updated with those changes.
Salesforce objects that cannot be queried via the salesforce api with no
where clause (like ActivityHistory) will NOT be included. In addition, Chatter
Feed objects are also skipped by the SF_MirrorAll stored procedures
because of the excessive api calls required to download those objects. You
can modify the SF_MirrorAll stored procedure to include the Feed objects if
needed.
Syntax
exec SF_MirrorAll '
linked_server
'
where
linked_server
is the name of your linked server.
Example
The following example creates a full copy or does a delta copy of all the
current data on Salesforce.com using the SALESFORCE linked server.
exec SF_MirrorAll 'SALESFORCE'
Using the DBAmpTableOptions Table
Use the DBAmpTableOptions table to skip tables in the SF_MirrorAll stored
procedure that are not needed locally.
In addition, use the DBAmpTableOptions table to provide options for tables
when using the SF_MirrorAll stored procedure. Options can be specified to
tell SF_Mirror how to make a full copy of the table locally.
If there is not an entry for a given Salesforce object specified in the
DBAmpTableOptions table, SF_Mirror will internally decide the best way to
make a full copy of the object locally.
See the “Using the DBAmpTableOptions Table” section in Chapter 3
for more information.

93
Notes
The SF_MirrorAll stored procedure calls the SF_Mirror procedure for
each Salesforce.com object.
There are some tables, like Vote and UserProfileFeed, in Salesforce that are
not included in SF_MirrorAll. The salesforce.com API does not allow
selecting all rows from these tables. In addition, Chatter Feed objects are
also skipped by the SF_MirrorAll stored procedure because of the excessive
API calls required to download those objects. You can modify the
SF_MirrorAll stored procedure to include the Feed objects if needed.
By default, DBAmp does not download the values of Base64 fields but
instead sets the value to NULL. This is done for performance reasons. If
you require the actual values, modify the Base64 Fields Maximum Size usin g
the DBAmp Configuration Program to some value other than 0. If you are
using the DBAmpSettings table, update the MaxBase64Size field to a value
other than 0.
Important Note: if the table has been mirrored locally, SF_MirrorAll will
use the SOAP API when the row count of the local table is below 20,000,
and the BulkAPI when the row count is above 20,000 when doing a full
copy.

94
SF_Refresh
Usage
SF_Refresh compares the current, local replicated table with the contents
of the same object at Salesforce.com. Any changes (insert, deletes or
updates) are detected and the local table is updated. Use the SF_Refresh
stored procedure when you need to 'synch' your local copy with
Salesforce.com.
SF_Refresh can only be used on objects in salesforce that contain the
necessary timestamp columns for tracking changes.
Syntax
exec sf_refresh '
LS
,'
object
','
SchemaError
','
verify
','
bulkapi’
where
LS
is the name of your linked server and
object
is the name of the
object.
The optional parameter
SchemaError
should be set to ‘Yes’ if you want
sf_refresh to automatically call sf_replicate if there is a schema change to
the salesforce object.
The optional parameter
SchemaError
can also be set to ‘Subset’. If
there is a schema change to the salesforce object, sf_refresh will try to
determine a valid subset of columns that exist in both the local table and
the table on salesforce.com and will refresh the local table based on that
column subset. 'Subset' implies that new fields added to the salesforce
object will not be captured by the sf_refresh. In addition, deleted fields will
still remain in the local table. To alter the local table and immediately
delete columns no longer in the salesforce object, set
SchemaError
to
'SubsetDelete'. To match the schemas back up, either run sf_replicate or
sf_refresh with SchemaError of 'Yes'.
SchemaError
can also be set to ‘Repair’. With the ‘Repair’ option,
sf_refresh alters the method used for incrementally updating the local
table. Specifically, the Max(SystemModstamp) of the local table is used to
set the start time of the interval (as opposed to the last time sf_refresh
ran). In addition, deleted records are determined by comparing a list of the
Id’s locally with a list of Id’s from the salesforce.com table (as opposed to
using the GetDeleted function).
Note: the 'Subset' and 'SubsetDelete' options are not available for SQL
2000.
If
SchemaError
is not provided than sf_refresh prints an error message and
throw an error if the two schemas do not match.
The optional parameter
verify
can be set to 'no’, 'warn' or 'fail'.
The default value is 'no'. If the
verify
parameter is set to warn or fail, the
sf_refresh proc compares the row count of the local table with the row

95
count of the table on salesforce and reports any difference. If the
parameter is set to 'fail' the sf_refresh proc will fail.
The optional parameter bulkAPI allows sf_refresh to use the bulkAPI
instead of the salesforce web services API. This option should only be used
if you are having problems with the sf_refresh. Using the bulk API will
always be slower but may be the only way to get the rows down from
salesforce.com. Normally, this option should not be specified. To use
the bulkAPI, set this option to 'bulkapi':
exec sf_refresh 'SALESFORCE','Account','Yes','no','bulkapi'
Example
The following example refreshes the local Account table with the current
data on Salesforce.com using the SALESFORCE linked server.
exec sf_refresh 'SALESFORCE’, 'Account'
Using the DBAmpTableOptions Table
Use the DBAmpTableOptions table to provide replicate options for tables
when using the SF_Refresh stored procedure. When there is a schema
change detected on a table that is being refreshed by SF_Refresh and the
‘Yes’ parameter is set to replicate the table, replicate optio ns can be
specified to tell SF_Replicate how to replicate the table locally.
See the “Using the DBAmpTableOptions Table” section in Chapter 3
for more information.
Notes
The table must contain a SystemModstamp column in order to be
refreshed. An initial local copy of the table must exist and be less than 30
days old. If the table does not exist, use the sf_replicate procedure to
make a local copy before refreshing the table.

96
SF_RefreshIAD
Usage
SF_RefreshIAD compares the current, local replicated table with the
contents of the same object at Salesforce.com. Any inserted or updated
rows are detected and the local table is updated. Use the SF_RefreshIAD
stored procedure when you need to 'synch' your local copy (created with
SF_ReplicateIAD) with Salesforce.com.
SF_RefreshIAD adds to the local table all deleted rows that are currently
in the recycle bin. This is an important difference between SF_RefreshIAD
and SF_Refresh. SF_RefreshIAD uses the QueryAll api call.
SF_RefreshIAD can only be used on objects in salesforce that contain the
necessary timestamp columns for tracking changes.
Syntax
exec SF_RefreshIAD '
linked_server
','
object_name
','
SchemaError
'
where
linked_server
is the name of your linked server and
object_name
is
the name of the object.
The optional parameter
SchemaError
should be set to ‘Yes’ if you want
SF_RefreshIAD to automatically call sf_replicateIAD if there is a schema
change to the salesforce object.
If
SchemaError
is not provided than SF_RefreshIAD prints an error message
and throw an error if the two schemas do not match.
The optional parameter bulkAPI allows SF_RefreshIAD to use the BulkAPI
instead of the salesforce web services API. This option should only be used
if you are having problems with the SF_RefreshIAD. Using the BulkAPI will
always be slower but may be the only way to get the rows down from
salesforce.com. Normally, this option should not be specified. To use
the bulkAPI, set this option to 'bulkapi':
exec SF_RefreshIAD 'SALESFORCE','Account' ,'Yes','bulkapi'
Example
The following example refreshes the local Account table with the current
data on Salesforce.com using the SALESFORCE linked server.
exec SF_RefreshIAD 'SALESFORCE', 'Account'

97
Notes
The table must contain a SystemModstamp column in order to be
refreshed. An initial local copy of the table must exist and be less than 30
days old. If the table does not exist, use the sf_replicateIAD procedure
to make a local copy before refreshing the table.

98
SF_RefreshAll
Usage
SF_RefreshAll retrieves a list of the current objects from salesforce and
compares the current, local replicated table with the contents of the same
object at Salesforce.com. Any changes (insert, deletes or updates) are
detected and the local table is updated. Use the SF_RefreshAll stored
procedure when you need to 'synch' all your local tables with
Salesforce.com.
SF_RefreshAll does not refresh all the tables created by SF_Replicateall
because some of the objects in salesforce cannot be refreshed. These
objects do not contain a timestamp field that tracks the datetime of the last
modification. In addition, Chatter Feed objects are also skipped by the
sf_replicateall/sf_refreshall stored procedures because of the excessive api
calls required to download those objects. You can modify the stored
procedures to include the Feed objects if needed.
Syntax
exec sf_refreshall '
linked_server
','
SchemaError
','
verify
'
where
linked_server
is the name of your linked server.
The optional parameter
SchemaError
should be set to ‘Yes’ if you want
sf_refreshall to automatically call sf_replicate if there is a schema change
to the salesforce object.
SchemaError
of 'Yes' will also cause DBAmp to
replicate those tables that are not refreshable.
If
SchemaError
is not provided than sf_refreshall prints an error message
and throw an error if the two schemas do not match.
The optional parameter
verify
can be set to 'no’ , 'warn' or 'fail'.
The default value is 'no'. If the
verify
parameter is set to warn or fail, the
sf_refresh proc compares the row count of the local table with the row
count of the table on salesforce and reports any difference. If the
parameter is set to 'fail' the sf_refresh proc will fail.
Example
The following example refreshes all the local tables with the current data
on Salesforce.com using the SALESFORCE linked server.
exec sf_refreshall 'SALESFORCE'
Using the DBAmpTableOptions Table
Use the DBAmpTableOptions table to skip tables in the SF_RefreshAll stored
procedure that are not needed locally.

99
In addition, use the DBAmpTableOptions table to provide replicate options
for tables when using the SF_RefreshAll stored procedure. When there is a
schema change detected on a table that is being refreshed by SF_RefreshAll
and the ‘Yes’ parameter is set to replicate the table, replicate options can
be specified to tell SF_Replicate how to replicate the table locally.
See the “Using the DBAmpTableOptions Table” section in Chapter 3
for more information.
Notes
The tables must contain a SystemModstamp column to be refreshed. An
initial local copy of the table must exist and be less than 30 days old. If
the tables do not exist, use the sf_replicateall procedure to make a local
set of tables before refreshing the tables.
Tables that do not contain a SystemModstamp column are ignored unless
the SchemaError parameter is ‘Yes’. These are typically the Salesforce.com
tables that end with Status (like CaseStatus).
The SF_RefreshAll stored procedure calls the SF_Refresh procedure for
each valid local table.
There are some tables, like Vote and UserProfileFeed, in Salesforce that are
not included in sf_refreshall. The salesforce.com API does not allow
selecting all rows from these tables. In addition, Chatter Feed objects are
also skipped by the sf_replicateall/sf_refreshall stored procedures because
of the excessive api calls required to download those objects. You can
modify the stored procedures to include the Feed objects if needed.

100
SF_Replicate
Usage
SF_Replicate creates a local replicated table with the contents of the
same object at Salesforce.com. The name of the local table is the same
name as the Salesforce.com object (i.e. Account). Any schema changes in
the object at Salesforce.com are reflected in the new table.
In addition, SF_Replicate creates a primary key on the Id field of the table.
Syntax
exec sf_replicate '
linked_server
','
object_name
','
options
'
where
linked_server
is the name of your linked server and
object_name
is
the name of the object. There are several optional options you may include
as well.
Example
The following example replicates the local Account table with the current
data on Salesforce.com using the SALESFORCE linked server.
exec sf_replicate 'SALESFORCE' , 'Account'
Options
Batchsize: SF_Replicate uses the maximum allowed batch size of 2000
rows. You may need to reduce the batch size to accommodate APEX code
on the salesforce.com server. To specify a different batch size, use the
batchsize(xx) option.
For example, to set the batch size to 50:
Exec SF_Replicate 'Salesforce','Account','batchsize(50)'
pkchunk: SF_Replicate uses the salesforce.com web services api by
default. If you would like to use the salesforce.com bulkapi with the
pkchunking header instead, add the optional pkchunk swit ch. SF_Replicate
will submit a bulkapi job using the pkchunking header and poll every minute
for completion. This option should only be used for large tables.
For example, to use the pkchunk and poll every 1 minutes for completion:
Exec SF_Replicate 'Salesforce','Account','pkchunk'
The default batch size will be 100,000. You can alter this using the
batchsize parameter:
Exec SF_Replicate 'Salesforce','Account','pkchunk,batchsize(50000)'

101
Bulkapi: SF_Replicate uses the salesforce.com web services api by default.
If you would like to use the salesforce.com bulkapi instead, add the
optional bulkapi switch. SF_Replicate will submi t a bulkapi job and poll
every minute for completion. The bulkapi should only be used for large
tables.
For example, to use the bulkapi and poll every 1 minutes for completion:
Exec SF_Replicate 'Salesforce','Account','bulkapi'
NoDrop: SF_Replicate drops the local table by default. If you would like to
use SF_Replicate where it does not drop the local table, add the optional
NoDrop switch.
For example, to use the NoDrop switch with SF_Replicate:
Exec SF_Replicate 'Salesforce','Account','nodrop'
Notes
The SF_Replicate stored procedure creates a full copy and downloads all
the data for that object from Salesforce. If you only w ant to download the
any changes made since you created the local copy, use the SF_Refresh
stored procedure instead.
A primary index on the Id column will be automatically created when the
table itself is replicated.
By default, DBAmp does not download the values of Base64 fields but
instead sets the value to NULL. This is done for performance reasons. If
you require the actual values, modify the Base64 Fields Maximum Size using
the DBAmp Configuration Program to some value other than 0.

102
SF_ReplicateAll
Usage
SF_ReplicateAll creates a full backup of your Salesforce.com data as local
replicated tables with the contents of the same object at Salesforce.com.
Any schema changes in the object at Salesforce.com are reflected in the
new table.
Salesforce objects that cannot be queried via the salesforce api with no
where clause (like ActivityHistory) will NOT be included. In addition, Chatter
Feed objects are also skipped by the sf_replicateall/sf_refreshall stored
procedures because of the excessive api calls required to download those
objects. You can modify the stored procedures to include the Feed objects
if needed.
Syntax
exec sf_replicateall '
linked_server
'
where
linked_server
is the name of your linked server.
Example
The following example replicates all the current data on Salesforce.com
using the SALESFORCE linked server.
exec sf_replicateall 'SALESFORCE'
Using the DBAmpTableOptions Table
Use the DBAmpTableOptions table to skip tables in the SF_ReplicateAll
stored procedure that are not needed locally.
In addition, use the DBAmpTableOptions table to provide replicate options
for tables when using the SF_ReplicateAll stored procedure. Replicate
options can be specified to tell SF_Replicate how to replicate the table
locally.
See the “Using the DBAmpTableOptions Table” section in Chapter 3
for more information.
Notes
The SF_ReplicateAll stored procedure calls the SF_Replicate procedure
for each Salesforce.com object.
There are some tables, like Vote and UserProfileFeed, in Salesforce that are
not included in sf_ReplicateAll. The salesforce.com API does not allow
selecting all rows from these tables. In addition, Chatter Feed objects are
also skipped by the sf_replicateall/sf_refreshall stored procedures because
103
of the excessive api calls required to download those objects. You can
modify the stored procedures to include the Feed objects if needed.
By default, DBAmp does not download the values of Base64 fields but
instead sets the value to NULL. This is done for performance reasons. If
you require the actual values, modify the Base64 Fields Maximum Size using
the DBAmp Configuration Program to some value other than 0.

104
SF_ReplicateIAD
Usage
SF_ReplicateIAD creates a local replicated table with the contents of the
same object at Salesforce.com, including any archived or deleted records
from the recycle bin. The name of the local table is the same name as the
Salesforce.com object (i.e. Account). Any schema changes in t he object at
Salesforce.com are reflected in the new table.
Syntax
exec sf_replicateIAD '
linked_server
','
object_name
'
where
linked_server
is the name of your linked server and
Account
is the
name of the object.
Example
The following example replicates the local Account table with the current
data on Salesforce.com using the SALESFORCE linked server. Any archived
or deleted records will be included in the local table
exec sf_replicateIAD 'SALESFORCE' , 'Account'
Notes
The SF_ReplicateIAD stored procedure creates a full copy and downloads
all the data for that object from Salesforce.
Do not try to SF_Refresh tables create with SF_ReplicateIAD. Instead
you can use SF_RefreshIAD.
SF_ReplicateIAD only retrieves the deleted records that are currently in
the salesforce recycle bin.
SF_ReplicateIAD will retain the permanently deleted rows from run to run.
Once you begin to use SF_ReplicateIAD for a table, DO NOT USE
sf_replicate on that table. If you run sf_replicate instead of sf_replicateIAD,
you will lose all the permanently deleted rows in the local table.
Options
BulkAPI: SF_ReplicateIAD uses the salesforce.com web services API by
default. If you would like to use the salesforce.com bulkapi inst ead, add the
optional BulkAPI switch. SF_ReplicateIAD will submit a BulkAPI job and poll
for completion. The BulkAPI should only be used for large tables.
105
For example, to use the BulkAPI and poll for completion:
Exec SF_ReplicateIAD 'Salesforce','Account','bulkapi'
Batchsize: SF_ReplicateIAD uses the maximum allowed batch size of 2000
rows. You may need to reduce the batch size to accommodate APEX code
on the salesforce.com server. To specify a different batch size, use the
batchsize(xx) option after the operation.
For example, to set the batch size to 50:
Exec SF_ReplicateIAD 'Salesforce','Account','batchsize(50)'
pkchunk: SF_ReplicateIAD uses the salesforce.com web services API by
default. If you would like to use the salesforce.com BulkAPI with the
pkchunking header instead, add the optional pkchunk switch.
SF_ReplicateIAD will submit a BulkAPI job using the pkchunking header and
poll for completion. This option should only be used for large tables.
For example, to use the pkchunk and poll for completion:
Exec SF_ReplicateIAD 'Salesforce','Account','pkchunk'
The default batch size will be 100,000. You can alter this using the
batchsize parameter:
Exec SF_ReplicateIAD 'Salesforce','Account','pkchunk,batchsize(50000)'
NoDrop: SF_ReplicateIAD drops the local table by default. If you would
like to use SF_ReplicateIAD where it does not drop the local table, add the
optional NoDrop switch.
For example, to use the NoDrop switch with SF_Replicate:
Exec SF_ReplicateIAD 'Salesforce','Account','nodrop'

106
SF_MigrateBuilder
Usage
SF_MigrateBuilder creates three stored procedures needed for a
migration. The first stored procedure created by SF_MigrateBuilder is a
Replicate stored procedure used to replicate the objects locally needed in a
migration. This stored procedure is created in your source database and
executed in your source database.
The second stored procedure created by SF_MigrateBuilder is a Load stored
procedure used to migrate the records to the target org. This stored
procedure is created in your target database and executed in your ta rget
database.
The final stored procedure created by SF_MigrateBuilder is a Reset stored
procedure used to reset the target org. This stored procedure is created in
your target database and executed in your target database.
Syntax
exec SF_MigrateBuilder 'KeyObjectTable', 'Identifier',
‘Source_LinkedServer’, ‘Target_LinkedServer’,
‘Target_Database’, ‘Options’
where
KeyObjectTable
is either a single key object or a list of key objects,
Identifier
is the name you give the created stored procedure,
Source_LinkedServer
is the name of the linked server connected to your
source Salesforce org,
Target_LinkedServer
is the name of the linked server
connected to your target Salesforce org, and
Target_Database
is the name
of the target database you created. There are several optional options you
may include as well.
Example
The following example creates the three stored procedures named above. A
stored procedure called Acct_Replicate is created in your source database.
Two stored procedures called Acct_Load and Acct_Reset are created in your
target database.
exec SF_MigrateBuilder 'Account', 'Acct', ‘SOURCE’, ‘TARGET’,
‘Target DB’
Now you are ready to execute the stored procedures created by
SF_MigrateBuilder to complete a migration.

107
Replicating the Source org data
In your source database, execute the created stored procedure:
Acct_Replicate. This uses the SOURCE linked server to replicate the objects
locally needed for a migration.
exec Acct_Replicate
where
Acct_Replicate
is the name of the replicate stored procedure created
by SF_MigrateBuilder.
Loading the Target org data
In your target database, execute the created stored procedure: Acct_Load.
This migrates all records needed for a migration to your target org.
exec Acct_Load
where
Acct_Load
is the name of the migrate stored procedure created by
SF_MigrateBuilder.
Resetting the Target org data if needed
In your target database, execute the created stored procedure: Acct_Reset.
This resets only records that were loaded successfully into your t arget org
for a single migration.
exec Acct_Reset
where
Acct_Reset
is the name of the reset stored procedure created by
SF_MigrateBuilder.
To reset all records in your target org, use the ResetAll parameter of the
Reset script. In your target database, execute the created stored
procedure: Acct_Reset, using the keyword ‘all’ for the ResetAll parameter.
exec Acct_Reset ‘all’
where
Acct_Reset
is the name of the reset stored procedure created by
SF_MigrateBuilder, and ‘all’ is the keyword used in the reset script to reset
all records in the target org
Options
Children(All | Req | None): The Children option determines which child
objects of the key objects are included in the output. The default value is
None (includes no required or non-required children of the key object(s)).
For example, to include only required children of the key obje ct(s), use the
following command:
Exec SF_MigrateBuilder 'Account', 'Acct', ‘SOURCE', null, null,
‘children(req)’

108
Features(A | N): The features option determines which features to
include in the output. Features are special tables that can be included in a
migration. The default value is null (no features included).
| A |: includes Attachment
| N |: includes Note and ContentNote
For example, to include Attachments, Notes, and ContentNotes of the key
object(s), use the following command:
Exec SF_MigrateBuilder 'Account', 'Acct', ‘SOURCE', null, null,
‘features(AN)’
Note: any combination of A or N can be used for features
Parents(All | Req): The Parent option determines which parent objects of
the key objects are included in the output. The default value is All (includes
all required and non-required parents of the key object(s)).
For example, to include only required parents of the key object(s), use the
following command:
Exec SF_MigrateBuilder 'Account', 'Acct', ‘SOURCE', null, null,
‘parents(req)’
Example
Children, features, and parents can be used at the same time for the
options parameter. For example, to include all three options, use the
following command:
Exec SF_MigrateBuilder 'Account','MigrateAcct', ‘SOURCE', null,
null, ‘children(Req), features(AN), Parents(Req)’
Notes
KeyObjectTable, Identifier, Source_LinkedServer, Target_LinkedServer, and
Target_Database are required parameters for SF_MigrateBuilder. The
Options parameter is optional for SF_MigrateBuilder. The Options param eter
is defaulted to include no children and no features of the key object(s).
The Source database and Target database MUST be in the same collation
as the system.

109
SF_MigrateGraphML
Usage
SF_MigrateGraphML produces a script in the messages of your source
database that can be copied and pasted into a notepad, then loaded into
yED to view the relationships among the objects in a migration. Provide the
Salesforce object or list of Salesforce objects you want to view in yED in
the KeyObjectTable parameter.
Syntax
exec SF_MigrateGraphML 'KeyObjectTable', 'Identifier',
‘Source_LinkedServer’, ‘Target_LinkedServer’,
‘Target_Database’, ‘Options’
where
KeyObjectTable
is either a single key object or a list of key objects,
Identifier
is the name you give the created stored procedure,
Source_LinkedServer
is the name of the linked server connected to your
source Salesforce org,
Target_LinkedServer
is the name of the linked server
connected to your target Salesforce org, and
Target_Database
is the name
of the target database you created. There are several optional options you
may include as well.
Example
The following produces a script in the messages that can be copied and
pasted into a notepad, then loaded into yED. yED provides a way t o
visualize the Salesforce objects and their relationships with one another in
a migration. This example is for the Salesforce object Account.
exec SF_MigrateGraphML 'Account', 'MigrateAcct', ‘SOURCE’
Options
Children(All | Req | None): The Children option determines which child
objects of the key objects are included in the output. The default value is
None (includes no required or non-required children of the key object(s)).
For example, to include only required children of the key obje ct(s), use the
following command:
Exec SF_MigrateGraphML 'Account', 'MigrateAcct', ‘SOURCE', null, null,
‘children(req)’
Features(A | N): The features option determines which features to
include in the output. Features are special tables that can be included in a
migration. The default value is null (no features included).
| A |: includes Attachment

110
| N |: includes Note and ContentNote
For example, to include Attachments, Notes, and ContentNotes of the key
object(s), use the following command:
Exec SF_MigrateGraphML 'Account','MigrateAcct', ‘SOURCE', null,
null, ‘features(AN)’
Note: any combination of A or N can be used for features
Parents(All | Req): The Parent option determines which parent objects of
the key objects are included in the output. The default value is All (includes
all required and non-required parents of the key object(s)).
For example, to include only required parents of the key object(s), use the
following command:
Exec SF_ MigrateGraphML 'Account', 'Acct', ‘SOURCE', null, null,
‘parents(req)’
Example
Children, features, and parents can be used at the same time for the
options parameter. For example, to include all three options, use the
following command:
Exec SF_MigrateGraphML 'Account','MigrateAcct', ‘SOURCE', null,
null, ‘children(Req), features(AN), Parents(Req)’
Notes
If nothing is provided in the Options parameter, it is defaulted to include no
children, no features, and all parents of the key object(s) .
Only use this stored procedure if you have yED installed on your machine.
To install yED on your machine and to view a guide on yED, see the yED
section of the chapter entitled Viewing a Migration Database Diagram.

111
Chapter 8: Using the DBAmp Configuration
Program
To run the DBAmp Configuration Program: from the Start menu, click on
the DBAmp Configuration program located under DBAmp. The following
chapter will outline the Options page and Registry Settings page of the
DBAmp Configuration Program.
Note: You must be logged into the server as a Windows Administrator to
use the DBAmp Configuration Program. Otherwise, your changes will not
be saved to the registry.
Options Page of the DBAmp Configuration Program
To open the Options page of the DBAmp Configuration Program, click the
Configuration menu choice Options.
The Options page is used to configure the DBAmp work directory, the
DBAmp performance package, SQL Server credentials, and proxy
information.
The following screenshot is of the Options page of the DBAmp Configuration
Program. Click each button to get an in-depth explanation of each option on
the Options page.

112
1. DBAmp Work Directory
The DBAmp Work Directory holds the work files produced by the
Replicate stored procedures when using the BulkApi or PKChunk
options. Use the browse button to create, find and set the work
directory. Make sure the directory is on a drive with enough space.
Large downloads will expand the size of this directory dramatically.
2. DBAmp Blob Directory
The DBAmp Blob Directory is a local directory that holds downloaded
files containing the binary field(s) content of a Salesforce object. The
downloaded files are produced by the SF_DownloadBlobs stored
procedure. Use the browse button to create, find and set the blob
directory. Make sure the directory is on a drive with enough space.
Large downloads will expand the size of this directory dramatically.
1
3
4
5
7
6
8
9
10
2

113
3. Enable API Trace
Enabling the API Trace in the DBAmp Configuration Program allows you
to gather information on API calls, response times from the Salesforce
server, job status information, and other performance based metrics.
The API Trace produces files that contain the API information in a
directory created by you.
Checking this checkbox turns on the API Trace for DBAmp.
4. Trace Directory
The Trace Directory is used to hold the files created by the API trace.
Use the browse button to create, find and set the trace directory. Make
sure the directory is on a drive with enough space.
5. SQL Login Init String
Enter your SQL Server credentials. If you are using Windows
Authentication or Integrated Security, use the default value of
Trusted_Connection=Yes. For a specific SQL Server user, use the
value of Trusted_Connection=No;UID=Userid;PWD=password.
Where userid and password are your SQL Server credentials.
6. Use Proxy for Salesforce connection
Enable a proxy to use for a Salesforce connection by checking the
checkbox. Once enabled, enter valid proxy information for a Salesforce
connection.
7. Proxy Username
Enter the username for the proxy login.
8. Proxy Password
Enter the password for the above username.
9. Proxy URL
Enter a direct proxy URL.
10. Proxy ConfigureURL
Enter a proxy script URL. When a script URL is set but the proxy
address cannot be accessed, for example, the address is only available
inside a corporate network but the user is logging in from home, DBAmp
will use the direct URL if it has been set, or try a direct connection if
the direct URL has not been set.
Registry Settings Page of the DBAmp Configuration Program
To open the Registry Settings page of the DBAmp Configuration Program ,
click the Configuration menu choice Registry Settings.

114
The Registry Settings page is used to configure different settings of
DBAmp. These settings are explained in this section.
The following screenshot is of the Registry Settings page of the DBAmp
Configuration Program. Click each button to get an in -depth explanation of
each setting on the Registry Settings page.
1
2
3
4
5
6
7
8
9
10
11
12
13
14
15
115
1. Metadata Override
This entry allows you to modify the Scale of a decimal field or the
length of a string field. In some cases, salesforce.com returns data with
a greater scale than the reported metadata allows.
For example, in the RevenueForecast table, the scale of the CO MMIT
column is 0. But salesforce returns data for this column using a scale of
2. To alter DBAmp to use 2 as the scale, set the MetadataOverride field
to the following value:
Revenueforecast:Commit(2)
Another example is the Field column in the FieldPermiss ions table. Use
this to make the column larger so that the field names are not
truncated:
FieldPermissions:Field(100)
If you need to alter multiple fields, separate the entries with a
semicolon.
2. Base64 Maximum Field Size
This entry modifies how DBAmp handles large binary fields when
downloading from Salesforce (like the Body field of Attachments). If the
field has a value greater in length then MaxBase64Size, DBAmp will not
attempt to download the binary contents and instead set the value to
NULL.
A value of 0 causes DBAmp to set all Base64 fields to NULL. This is the
initial setting for performance reasons.
Be sure to restart SQL Server after changing this setting.
3. Network Receive Timeout
This entry is the number of seconds DBAmp waits for a response from
the Salesforce server.
If you are receiving “Operation Timed Out” error messages, increase
this value. For some organizations you may have to set this as high as
3000 (i.e. 50 minutes).
4. Network Connect Timeout
This entry is the number of seconds DBAmp waits for a successful
connection to the Salesforce server. Default is 30 seconds.
5. BulkAPI Status Timeout
This entry is the number of seconds DBAmp waits for a BulkAPI job to
complete. SF_Replicate with the BulkAPI option ignores this value and
always uses a timeout of 12 hours.
116
6. BulkAPI Polling Interval
This entry is the number of seconds DB Amp waits between querying for
BulkAPI job completion.
7. Minimum Long Size
All nvarchar fields in Salesforce with a length greater than the value will
be created as nvarchar(max). Otherwise, the fields are created as
nvarchar(length) where length is the length of the field.
8. Convert Currency Fields to Single Currency
This entry controls whether DBAmp uses the ConvertCurrency function
when retrieving currency amounts from Salesforce. A checked value
forces DBAmp to use the ConvertCurrency function. See chapter 2 of
this manual for more details. This setting does not apply to OpenQuery
selects.
Be sure to restart SQL Server after changing this s etting.
9. Translate Picklist Values
This entry controls whether DBAmp uses the ToLabel function when
retrieving picklists from Salesforce. A checked value forces DBAmp to
use the ToLabel function. See chapter 2 of this manual for more details.
This setting does not apply to OpenQuery selects.
Be sure to restart SQL Server after changing this setting.
10. Use UTC for all DateTime Fields
This entry controls whether DBAmp uses UTC time or not. When
returning results to SQL Server, DBAmp converts datetime values from
UTC into the local timezone. In addition, any datetime values used in a
WHERE clause are assumed to be local times and not UTC times.
A checked value forces DBAmp to always use UTC for all datetime
values.
Be sure to restart SQL Server after changing this setting.
11. Add Assignment Header
This entry controls whether DBAmp adds an AssignmentHeader to all
requests made to Salesforce.com. A checked value forces DBAmp to
include the header.
Be sure to restart SQL Server after changing this setting.
Note: Setting this registry switch forces DBAmp to add the header to all
DBAmp operations
12. Use TriggerAutoResponseEmail Header
117
This entry controls whether DBAmp adds an EmailHeader to all requests
made to salesforce.com. This EmailHeader indicates whether to trigger
auto-response rules for leads and cases. A checked value forces DBAmp
to include the header.
Be sure to restart SQL Server after changing this setting.
Note: Setting this registry switch forces DBAmp to add the header to all
DBAmp operations
13. Use NText Column Type
If not checked, then all long text fields from Salesforce map to
nvarchar(max). A checked value forces DBAmp to make all long text
fields from Salesforce map to ntext.
Be sure to restart SQL Server after changing this setting.
Note: In addition, to use nvarchar(max) with linked servers, Microsoft
requires that you turn on a trace switch to activate the fix: Dbcc
traceon(7309)
14. Use TriggerOtherEmail Header
This entry controls whether DBAmp adds an EmailHeader to all requests
made to salesforce.com. This EmailHeader indicates whether to trigger
an email outside the organization. A checked value forces DBAmp to
include the header.
Be sure to restart SQL Server after changing this setting.
Note: Setting this registry switch forces DBAmp to add the header to all
DBAmp operations
15. Use TriggerUserEmail Header
This entry controls whether DBAmp adds an EmailHeader to all requests
made to salesforce.com. This EmailHeader indicates whether to trigger
an email that is sent to users in the organization. A checked value
forces DBAmp to include the header.
Be sure to restart SQL Server after changing this setting.
Note: Setting this registry switch forces DBAmp to add the header to all
DBAmp operations.

118
Chapter 9: Retrieving Salesforce Metadata
DBAmp can retrieve Salesforce metadata information using the Salesforce
metadata api. The SF_Metadata stored procedure implements this
functionality.
A couple of items to note when using this functionality:
1. Due to the nature of Salesforce metadata information, the metadata
is returned to an XML type column in Salesforce. Knowledge of the
XML column type and the use of XQuery expressions in SQL Select
statements is required to produce results.
2. The SF_Metadata stored procedure implements the List and
Retrieve functions of the Salesforce Metadata API. These functions
require specific type and member inputs as defined in the Salesforce
Metadata API Developer’s Guide found at
http://www.salesforce.com/us/develope r/docs/api_meta/index.htm .
Successfully using SF_Metadata is not possible without a review of
the Metadata API Guide and an understanding of metadata types.
How to run the SF_Metadata proc
The SF_Metadata stored proc can be executed in a query window or job
step.
Note: The SF_Metadata stored procedure uses the xp_cmdshell command.
If you are not an SQL Server administrator, you must have the proper
permission to use this command. See the SQL Server documentation under
the topic xp_cmdshell for more information. To quickly test, run the
following sql in Query Analyzer:
Exec master..xp_cmdshell "dir"
To run the SF_Metadata stored procedure, use the following command:
Exec SF_Metadata 'List', 'SALESFORCE', 'MD_Input'
Or
Exec SF_Metadata 'Retrieve', 'SALESFORCE', 'MD_Input'
where 'SALESFORCE' is the name you gave your linked server in at
installation and MD_Input is the name of the input table to use.
Using the LIST and RETRIEVE operations
The SF_Metadata stored procedure takes as input an operation of either
List or Retrieve.
The Retrive operation is used to retrieve xml representations of
components in an organization. The input table contains rows that your
provide which indicate the components you want to retrieve.

119
The List operation is used when you want a high-level view of particular
metadata types in your organization. For example, you could use this
operation to return a list of names of all the CustomObject or Layout
components in your organization, and use this information to make a
subsequent SF_Metadata call with the Retrieve operation to return a
subset of these components.
Requirements for the input table
Conceptually, the SF_Metadata proc takes as input a local SQL Server
table you create that is designated as the "input" table. The input table
name must not contain embedded blanks. Though not enforced, a naming
standard for the input table to SF_Metadata should be used. For
example, an input table used to retrieve Settings information could be
called MD_Settings.
The input table must have the following structure:
CREATE TABLE MD_Settings (
[Name] [nvarchar](255) NULL,
[Member] [nvarchar](255) NULL,
[MetadataXML] [xml] NULL,
[CreatedByWildcard] [bit] NULL,
[CreatedByList] [bit] NULL,
[Error] [nvarchar](255) NULL,
[Id] [nchar](18) NULL
)

120
The purpose of each column is described below:
Name
Type
Description
Name
Nvarchar(255)
NULL
The type of metadata component to be retrieved.
For example, a value of CustomObject will retrieve
one or more custom objects as specified in the
member column
Member
Nvarchar(255)
NULL
One or more named components, or the wildcard
character (*) to retrieve all custom metadata
components of the type specified in the <name>
element. To retrieve a standard object, specify it by
name. For example a value of Account will retrieve
the standard Account object.
MetadataXML
xml
NULL
The xml describing the component is output to this
colum as a result of the Retrieve operation. The
xml contents are described by compenent in the
salesforce Metadata API documentation.
CreatedByWildcard
bit
NULL
Upon input this column should be NULL.
If an asterisk was used for the Member column
and the operation is Retrieve, then new rows will
be created with a value of TRUE for this column.
When the SF_Metadata procedure is executed
again with operation Retrieve, the rows containing
TRUE will be deleted and repopulated again.
CreatedByList
bit
NULL
Upon input this column should be NULL.
If an asterisk was used for the Member column
and the operation is List, then new rows will be
created with a value of TRUE for this column.
When the SF_Metadata procedure is executed
again with operation List, the rows containing
TRUE will be deleted and repopulated again.
Error
Nvarchar(255)
NULL
Upon input this column should be NULL.
The Error column is an output column and is
populated with any error messages that are
returned from the salesforce server.
Id
nchar(18)
NULL
Upon input this column should be NULL.
Specifies the ID of the component as returned by
the salesforce server.

121
Example: Retrieve Dependent Picklist Information
This example shows the steps needed to retrieve all dependent Picklist
information for the Lead Object.
1. Create an empty input table:
CREATE TABLE MD_LeadPicklists (
[Name] [nvarchar](255) NULL,
[Member] [nvarchar](255) NULL,
[MetadataXML] [xml] NULL,
[CreatedByWildcard] [bit] NULL,
[CreatedByList] [bit] NULL,
[Error] [nvarchar](255) NULL,
[Id] [nchar](18) NULL
)
2. Populate the input table. Insert a single row into the table with the
Name column of CustomObject and the Member column of Lead
INSERT INTO MD_LeadPicklists (Name,Member)
Values ( 'CustomObject', 'Lead')
3. Run the SF_Metadata proc to retrieve the information.
Exec SF_Metadata 'Retrieve', 'Salesforce', 'MD_LeadPicklists'
4. Run the following query against the table to generate the results:
-- Query to select dependent picklists
;WITH XMLNAMESPACES(DEFAULT 'http://soap.sforce.com/2006/04/metadata') SELECT
Member
,fn.c.value('(../../../fullName)[1]','nvarchar(50)') as FieldName
,fn.c.value('(../../controllingField)[1]','nvarchar(50)') as
ControllingFieldName
,fn.c.value('(../valueName)[1]','nvarchar(50)') as PicklistValue ,
fn.c.value('(.)[1]','nvarchar(50)') as ControllingPicklistValue
FROM MD_LeadPicklists
cross apply metadataxml.nodes
('/CustomObject/fields/valueSet/valueSettings/controllingFieldValue' ) as fn(c)

122
5. Result:
Member FieldName ControllingFieldNa PicklistValue ControllingPicklistValue
Lead ProductInterest__c Industry GC1000 series Agriculture
Lead ProductInterest__c Industry GC1000 series Apparel
Lead ProductInterest__c Industry GC1000 series Banking
Lead ProductInterest__c Industry GC1000 series Biotechnology
Lead ProductInterest__c Industry GC1000 series Construction
Lead ProductInterest__c Industry GC1000 series Education
Lead ProductInterest__c Industry GC5000 series Biotechnology
Lead ProductInterest__c Industry GC5000 series Chemicals
Lead ProductInterest__c Industry GC5000 series Construction
Lead ProductInterest__c Industry GC5000 series Electronics
Example: Retrieve Field Descriptions
This example shows how to retrieve field description information using the
salesforce metadata api.
Drop Table MD_FieldDesc
go
CREATE TABLE MD_FieldDesc (
[Name] [nvarchar](255) NULL,
[Member] [nvarchar](255) NULL,
[MetadataXML] [xml] NULL,
[CreatedByWildcard] [bit] NULL,
[CreatedByList] [bit] NULL,
[Error] [nvarchar](255) NULL,
[Id] [nchar](18) NULL
)
INSERT INTO MD_FieldDesc (Name,Member) Values ( 'CustomObject', '*')
-- Get a list of objects with customer fields
Exec SF_Metadata 'List', 'Salesforce', 'MD_FieldDesc'
-- Cleanup wildcard and objects that will error
Delete MD_FieldDesc where Member = '*'
Delete MD_FieldDesc where Member = 'SiteChangeList'
-- Retrieve the field metadata
123
Exec SF_Metadata 'Retrieve', 'Salesforce', 'MD_FieldDesc'
-- Query to select descriptions
;WITH XMLNAMESPACES(DEFAULT
'http://soap.sforce.com/2006/04/metadata') SELECT Member
,fn.c.value('(fullName)[1]','nvarchar(50)') as FieldName
,fn.c.value('(description)[1]','nvarchar(50)') as Description
--,fn.c.value('(../fullName)[1]','nvarchar(50)') as PicklistValue
,fn.c.value('(.)[1]','nvarchar(50)') as ControllingPicklistValue
FROM MD_FieldDesc
cross apply metadataxml.nodes ('/CustomObject/fields') as fn(c)

124
Chapter 10: Using DBAmp Performance Package
The DBAmp Performance package allows you to capture the message output
from the DBAmp stored procedures and summarize the information into
performance metrics.
There are many reasons to use the DBAmp Performance Package (DPP):
• DPP creates a DBAmp_Log table to log all message output from
stored procedure execution, this allows you to locate message
output errors
• DPP creates views to summarize SF_Replicate, SF_Refresh, and
SF_TableLoader
• DPP allows you to view run times, number of rows copied, deleted,
updated, inserted, etc.
• DPP allows you to easily view which tables failed
• DPP allows you to connect to an outside analytics tool to visualize
performance (ex: Excel)
Using the DBAmp Performance package you can answer questions like:
• How long does on average does it take to replicate or refresh a
table?
• What is the average throughput of an SF_TableLoader?
• What is the failure rate of the DBAmp stored procedures?
The DBAmp Performance Package contains two components:
1. The DBAmp_Log table that contains the message output from all
stored procedure execution
2. Performance Views that summarize the DBAmp_Log table into a set
of usable performance metrics.
Installing the DBAmp Performance Package
The first step to install the DBAmp Performance Package is to run a script
to create the needed objects.
If you are currently using DBAmp_Log table, installing the DBAmp
Performance package will delete all data in your current
DBAmp_Log.

125
DBAmp_Log can hold up to 250,000 rows, which is approximately 50 MB of
data storage. Once DBAmp_Log reaches 250,000 rows, it deletes ¼ of
itself.
To install the DBAmp Performance Package:
1. Open the file “Create DBAmp Perf.sql” in Query Analyzer or
Management Studio but do not execute it yet. The file is located in
the \Program Files\DBAmp\SQL directory.
2. Make sure the default database shown on the toolbar is the
salesforce backups database (and not the main database). Then,
execute (F5) to add the script to the database.
3. In order to make sure that the Create DBAmp Performance script
worked properly, perform two actions:
Verifying
Run the statement below to verify that the DBAmp_Log table was
created:
Select * from DBAmp_Log
You should see a table similar to the screenshot below:
• Under Views, in the salesforce backups database under Object
Explorer, check to see that the four performance views were created. It
should look similar to the screenshot provided below:

126
If these are working properly, you are ready to begin using the DBAmp
Performance Package.
Using the DBAmp_Log Table
All DBAmp stored procedures write their output message to the DBAmp_Log
table created by the DBAmp Performance Package. By querying the
DBAmp_Log table, you can view the message output from recently
executed DBAmp stored procedures. This allows you to view information
and find any errors related to each DBAmp stored procedure execution. The
columns in the table are:
Column Name
Documentation
SPName
Unique ID of each execution
Status
Status of the execution
Message
All messages related to each execution
LogTime
The date and time the execution started
(status = starting) and ended (status =
successful/failed)
Run the statement below to select all rows and columns of the DBAmp_Log Table:
Select * from DBAmp_Log

127
Using the Performance Views
Why Views?
- The views summarize the raw message output in the DBAmp_Log table
into views that can be analyzed for performance .
- The views can be used to import performance data into Excel or other
analytical tools
There are four performance views included in the DBAmp Performance
Package. The four views and their documentation are listed below:
DBAmp_Replicate_Perf view
The DBAmp_Replicate_Perf view contains the data and metrics of all
SF_Replicate, SF_ReplicateIAD, and SF_Replicate3 executed. The columns
in the view are:
Column Name
Documentation
SPName
Unique ID of each execution
LogTime
The date and time the execution started
(status = starting) and ended (status =
successful/failed)
LinkedServer
Name of the DBAmp linked server used
Object
Name of object
RowsCopied
Number of rows copied during each
execution
RunTimeSeconds
Number of seconds the execution took to
run

128
Failed
If the execution failed or not (True =
failed)
Run the statement below to select all rows and columns of the
DBAmp_Replicate_Perf:
Select * from DBAmp_Replicate_Perf
DBAmp_Refresh_Perf view
The DBAmp_Refresh_Perf view contains the data and metrics of all SF_Refresh and
SF_RefreshIAD executed. The columns in the view are:
Column Name
Documentation
SPName
Unique ID of each execution
LogTime
The date and time the execution started
(status = starting) and ended (status =
successful/failed)
LinkedServer
Name of the DBAmp linked server used
Object
Name of object
RowsUpdatedOrInserted
Number of rows updated/inserted
RowsDeleted
Number of rows deleted
RunTimeSeconds
Number of seconds the execution took to
run
Failed
If the execution failed or not (True =
failed)

129
Run the statement below to select all rows and columns of the
DBAmp_Refresh_Perf:
Select * from DBAmp_Refresh_Perf
DBAmp_TableLoader_Perf view
The DBAmp_TableLoader_Perf view contains the data and metrics of all
SF_TableLoaders executed. The columns in the view are:
Column Name
Documentation
SPName
Unique ID of each execution
LogTime
The date and time the execution started
(status = starting) and ended (status =
successful/failed)
TableLoaderAction
The execution action (update, insert,
upsert, delete, etc.)
LinkedServer
Name of the DBAmp linked server used
LoadTable
Name of the local SQL input table used
containing the data
RowsRead
Total number of rows read during each
execution
RowsSuccessful
Number of rows successfully read
RowsFailed
Number of rows that failed
RunTimeSeconds
Number of seconds the execution took to
run
Failed
If the execution failed or not (True =
failed)
Run the statement below to select all rows and columns of the
DBAmp_TableLoader_Perf:
Select * from DBAmp_TableLoader_Perf

130
Enabling the Performance Trace
Enabling the Performance Trace in the DBAmp Configuration Program allows you to
gather information on API calls, response times from the Salesforce server, what a
job is actually doing, and other performance based metrics. The Performance Trace
produces files that contain the performance information in a directory created by
you on the C: drive.
To enable and use the Performance Trace takes five steps:
Note: All of these steps must be performed on the SQL Server machine
where DBAmp is installed.
1. Create a new directory called c:\DBAmpLog This tells DBAmp where to put
the file output from the Performance Trace. Be sure to set the Security of
this directory to allow READ and WRITE access to the User group.. To check
this, right click on the DBAmpLog directory, choose Properties. Click on the
Security tab of the DBAmpLog Properties dialog box. In the Group or user
names box, highlight Users. In the Permissions for Users box, make sure
Write has a checkmark under the Allow column.
2. Run the DBAmp Configuration Program, navigate to menu choice Options,
and check the Enable Performance Trace checkbox. Checking this
checkbox turns on the Performance Trace for DBAmp.
3. Enter the directory you created on the C: drive in the Trace Directory
textbox. Be sure the directory entered has already been created on the C:
drive and is a valid directory. It should look similar to the screenshot below:
4. Click Ok on the Options page.
5. Run the query displayed by clicking Ok in SQL Management Studio.
To review the performance information produced, view the files in the created
directory on the C: drive. To turn off the Performance trace, uncheck the Enable
Performance Trace checkbox on the Options page of the DBAmp Configuration
Program.

131
Chapter 11: MigrateAmp
What is MigrateAmp?
MigrateAmp is a tool used for migrating data from a source Salesforce environment
to a target Salesforce environment. This can include org to org, or org to sandbox.
MigrateAmp takes the objects and records from a source environment, and builds
stored procedures that are executed to migrate data to a target environment. This
tool can be very useful for many reasons:
• MigrateAmp builds all stored procedures and load scripts used automatically.
This makes migrating very easy and efficient, while saving the organization
time and money. It also allows you to modify the scripts to fit individual
migration needs.
• MigrateAmp allows data to be migrated from any source Salesforce org to
any target Salesforce org or sandbox
• MigrateAmp makes the testing of data in Sandboxes easier by allowing an
easy path from a Salesforce org to a sandbox
• MigrateAmp will not affect production while in use
• MigrateAmp can be used to reset the target Salesforce org
• MigrateAmp allows any combination of objects and data to be migrated
• MigrateAmp, in conjuction with yED, a visualization software, provides a
platform to visualize the relationships among Salesforce objects in a
migration
MigrateAmp contains two components:
1. SF_MigrateBuilder
2. SF_MigrateGraphML
Installing MigrateAmp
To successfully install and use MigrateAmp, follow the instructions below.
Installing the MigrateAmp User Interface:
1. Navigate to the MigrateAmpInstall.exe file on the SQL Server machine
where DBAmp resides. The file is located in the \Program Files\DBAmp
directory.
2. Run the MigrateAmpInstall.exe file to install the MigrateAmp User Interface.
3. If you want to install and use the MigrateAmp User Interface on a client
machine, copy the MigrateAmpInstall.exe from the SQL Server machine to
you client machine. Then, run the MigrateAmpInstall.exe file.
Preparing to use MigrateAmp:
1. Create a source database, which will be used to hold the locally copied
Salesforce objects for a migration
2. Run the Create DBAmp SPROCS in the source database
3. For the source database, create a linked server that connects to your
source Salesforce org
4. Open the file “Create MigrateAmp SPROCS.sql” in query analyzer or
Management studio, but do not execute it yet. The file is located in the
\Program Files\DBAmp\SQL directory.

132
5. Make sure the default database shown on the toolbar is your source
database (and not the main database or target database). Then, execute
(F5) to add the script to the source database.
6. In order to make sure that the Create MigrateAmp SPROCS worked
properly, navigate to the stored procedures in the source database and
check to see that two stored procedures were created: SF_MigrateBuilder
and SF_MigrateGraphML.
7. Create a target database, which will be used to the data in a migration to
your target Salesforce org
8. Run the Create DBAmp SPROCS in the target database
9. For the target database, create a linked server that connects to your
target Salesforce org
MigrateAmp Approaches
There are two approaches to use DBAmp:
1. Using the MigateAmp User Interface
2. Using the MigrateAmp Scripts in SQL Management Studio
Using the MigrateAmp User Interface:
The MigrateAmp User Interface is an easy way to run SF_MigrateBuilder and create
the needed stored procedures to complete a migration. Use the MigrateAmp User
Interface to enter in the needed information and the application will automatically
run SF_MigrateBuilder to create the stored procedures. Visit the “Running
SF_MigrateBuilder in User Interface” section for more information.
Using the MigrateAmp Scripts in SQL Management Studio:
In this approach, SF_MigrateBuilder is being executed in SQL Management Studio.
Executing the SF_MigrateBuilder stored procedure, with correct parameters, will
create the needed stored procedures to complete a migration. Visit the “Running
SF_MigrateBuilder in SQL Management Studio” section for more information.
Understanding MigrateAmp Concepts
There are key concepts that need to be understood before using
MigrateAmp. The migration of data, and particularly migration involving the
Salesforce data model, is a very complicated task. The Salesforce data
model is very complex compared to other data models. For example, a
Salesforce object can have both required and non-required relationships to
other objects. Circular references can occur among objects. And unlike a
normal relational database, the Salesforce data model can contain
polymorphic keys. This section will dive into some of the key concepts, and
give a high-level education of MigrateAmp and how it works.
What is a Migration?
A migration is the process of transferring data from a source environment
to a target environment. In MigrateAmp’s case, it is transferring data from
a source Salesforce org to a target Salesforce org. The target org can be
either a sandbox org or another org. In a migration, there is a certain order
that objects and their data have to be migrated for the migration to be
successful. MigrateAmp automatically produces the object migration order

133
and maintains the relationships between the objects during the migr ation.
You provide MigrateAmp the key object(s) to be migrated, and MigrateAmp
does the rest.
Understanding Challenges of Migration
Migration has two major challenges to overcome: determining object load
order and maintaining foreign keys.
The first major challenge is the ordering of objects in a migration. The
import of objects to the target must be correctly sequenced for the
migration to be successful. It is very difficult in any data model to get the
order of objects sequenced correctly, but it is espe cially challenging with
the Salesforce data model. The Salesforce data model has the concept of
required and non-required relationships among objects. It also has the
concept of circular references. These make it very challenging to get the
correct order of objects for a migration.
To understand order, take for example, the migration of Salesforce
Opportunity records. In order to successfully migrate Opportunity, we have
to determine what objects are required to be migrated before the
Opportunity records can be migrated. This is because the Opportunity
records have parents that are required relationships with Opportunity. In
this example the Account records would be a required parent of
Opportunity, because Opportunity has a required relationship with Accoun t
via AccountId. Therefore, the Account records would need to be migrated
before the Opportunity records are migrated. But, for the Account records
to be migrated, the User records have to be migrated because of a required
relationship via OwnerId. This example sequence is the basis for how an
order of objects is established for a migration. MigrateAmp determines this
and creates an order of objects for any migration automatically.
The second major challenge of migration is maintain foreign key
relationships while loading the target org. In salesforce, a new primary key
id is given to every record in an object when that record is inserted.
Therefore, all foreign keys that point to the record must be changed to use
the newly assigned Id.
MigrateAmp automatically keeps a cross reference table of old ids to new
ids and uses this cross reference table to ensure that the foreign keys are
maintained on the target org.
What is a Key Object?
In MigrateAmp, a key object is an object that is essential to migrate from
your source org to your target org. The key object(s) are the only objects
in a migration that will have its required and non-required fields fully
populated. Based on the key object(s) provided, MigrateAmp will
automatically construct the migration and fix up the fields that point to the
required and non-required relationships of the key object(s). One or more
key objects can be supplied for a migration. If more than one key object is
chosen for a migration, a table will need to be constructed for the key
objects. The instructions for constructing this table are provided in the

134
KeyObjectTable section of the MigrateAmp Parameters in the chapter
entitled Using MigrateAmp.
Understanding Parent/Child Relationships
A parent object of a relationship is the object identified by a foreign key
field. A child object of a relationship is the object that contains the foreign
key field that points back to the parent object. A foreign key field is a
field in the child object that uniquely identifies a row in the parent object.
For example, take the relationship between the Account and Contact object.
In this relationship, Account is the parent object and Contact is the child
object. Account is the parent object because another object has a foreign
key field pointing back to the Account object. In this case, Contact has the
AccountId field pointing back to the Account object. Contact is the child
object because it contains the foreign key field, AccountId, that points back
to the parent object, Account.
The example from above is displayed in the diagram shown below:
This depicts the example of the Account
object being the parent of the Contact object.
Required Relationships
A Required Relationship is a relationship between a parent object and a
child object where the foreign key field of the child object is required to
have a value.
The Required parents of a child object are all the parent objects that are
identified by a foreign key field of the child object where the foreign key
field is required to have a value.
The Required children of a parent object A are all child objects containing
a foreign key field pointing to object A where the foreign key field of the
child object is required to have a value.
For each key object given in a migration, all required parents of the key
object, all required children and grandchildren of the key o bject, and all
required parents of the required children and grandchildren of the key
object are included in the migration. This is so the key object(s) in the
migration are fully populated. There are options where you can indicate
that you do not want the required children to be included in the migration.
See the Options section under MigrateAmp Parameters in the chapter Using
MigrateAmp for further details.
Non-Required Relationships
Contact
Account
AccountId

135
A Non-Required Relationship is a relationship between a parent object
and a child object where the foreign key field of the child object is not
required to have a value. For example, the Opportunity obj ect contains a
foreign key field that points to a Campaign parent object. However,
opportunities are not required to have campaigns and therefore the
relationship is a Non-Required Relationship.
The key object(s) supplied in the migration are the only object(s) where the
non-required parent objects of the key object(s) are included in the
migration.
For all objects in the migration that are not key objects, the non -required
parents and non-required children are not included.
Migration Database Diagram Example
The screenshot below is an example of a database diagram for the
Opportunity object. In this example, all objects associated with a migration
of the Opportunity object are included in the diagram . This means all
required and non-required objects associated with the Opportunity object
are included in the migration. This diagram shows the relationships
between objects in a typical migration. This was constructed using yED
Graph Editor. To view instructions on how to download and use yED Graph
Editor, see Using yED in the chapter entitled Viewing a Migration Database
Diagram .

136
Opportunity is marked as green, because it is a key object. The red dotted
lines are non-required relationships. The blue lines are required
relationships. This depicts the order of objects in a migration for
Opportunity. For example, starting at the top, the parents of the
Opportunity key object (Profile, User, Account) are loaded first. Then the
key object Opportunity is loaded. Finally, MigrateAmp loads the required
and non-required children for Opportunity: OpportunityContactRole,
OpportunityCompetitor, OpportunityLineItem, Quote, QuoteLineItem,
Partner, Task, and Event.
Circular References
A circular reference is when two or more objects each have required
foreign key field that refer to one another, causing a closed loop.
Salesforce allows circular references in their data model. In migration,
circular references are prohibited because an order of objects would not be
able to be determined. The records from the objects containing a circular
reference would have to be migrated at the same exact time. This is not
possible; therefore circular references are prohibited. MigrateAmp detects
circular references and throws an error if one is detected. If circular
references are detected, they will have to be removed before a migration.
Polymorphic Key
Polymorphic keys are foreign key fields that can refer to more than one
object as a parent. For example, either a Contact or Lead can be a parent
of a task. Another example would be all of the parents of Attachment
through a ParentId foreign key field. Polymorphic keys are challenging to
confront because the same foreign key field can point to many different
objects.
MigrateAmp handles polymorphic keys by loading only the records of a child
object where the polymorphic foreign key points to a key object(s).
MigrateAmp Workflow
The diagram above is depicting a typical workflow for a migration using
MigrateAmp. Migrations are continuous and more than likely not going to be
totally successful the first time you go through the workflow.
The first step in the workflow is replicating the objects that are needed for
a migration into your source database from Salesforce.com. MigrateAmp
creates the stored procedure to do this. The create d stored procedure has
Replicate
the
source
Load the
target
Check for
errors
Reset the
target

137
the suffix _Replicate appended to indicate the purpose of the proc. This
created stored procedure uses SF_Replicate calls to replicate all objects
needed for a migration into your source database
The second step in the workflow is loading the records that were replicated
into your source database into your target org on Salesforce.com.
MigrateAmp creates the stored procedure to do this. This created stored
procedure has the suffix _Load appended to indicate the purpose of the
proc. This created stored procedure uses SF_TableLoader to load the
records into the target org. The results of this stored procedure can then be
used for error handling if the migration is not successful.
The third step in the workflow is error handling. In thi s step, once the Load
stored procedure created by MigrateAmp is executed, any errors that
occurred from that execution are produced in the messages. Migrations are
very complex and errors do occur. The messages provide a means of
debugging these errors.
The final step in the workflow is resetting the target org. There are two
main reasons to reset the target org. The first main reason is because there
were errors in the migration. Being able to handle errors in the source data
and reset the target org to retry a migration is a key feature of this
product. The second main reason that you would want to reset the target
org is because you are done using the data in the target or want to delete
it out for a different migration.
This step in the workflow uses SF_TableLoader to delete records from the
target org to work as a reset if the migration is not successful or if the
migration is complete. The created stored procedure to do this has the
suffix _Reset appended to indicate the purpose of the proc.
These four steps in the MigrateAmp workflow are key concepts in
understanding how migrations work and how MigrateAmp works.
MigrateAmp Architecture
The diagram below depicts the workflow of migration using MigrateAmp.
Source DB
Holds the local copies of the tables needed for a migration.
• Source Linked Server: connects the source Salesforce org to the
Source DB
• Account and Contact Tables: the local tables copied down from
the source org into the Source DB. These tables are created by the
OrgMigrate_Replicate stored procedure.
• DBAmp Stored Procs: SF_Replicate, SF_TableLoader, etc.
• MigrateAmp Stored Procs: SF_MigrateBuilder, SF_GraphML, etc.

138
• OrgMigrate_Replicate: this stored procedure replicates the tables
locally into the Source DB from the source org. In this case, the
Account and Contact tables are replicated locally.
Target DB
Used to load and reset the target Salesforce org.
• Target Linked Server: connects the target Salesforce org to the
Target DB.
• Account_Load_OrgMigrate and Contact_Load_OrgMigrate
tables: these tables contain the row data to load the target org.
These tables are created by the OrgMigrate_Load stored procedure.
• Account_Reset_OrgMigrate and Contact_Reset_OrgMigrate
tables: these tables contain the row data used to reset the target
org. These tables are created by the OrgMigrate_Reset stored
procedure.
• DBAmp Stored Procs: SF_Replicate, SF_TableLoader, etc.
• OrgMigrate_Load: this stored procedure creates the load tables
and loads the data into the target org. In this case, the
Account_Load_OrgMigrate and Contact_Load_OrgMigrate tables are
loaded into the target org.
• OrgMigrate_Reset: this stored procedure creates the reset tables
and resets the data in the target org. In this case, the
Account_Reset_OrgMigrate and Contact_Reset_OrgMigrate tables
are used to reset the target org.

139
Tables
Procs
Proced
Source DB
OrgMigrate_Replicate
DBAmp
Stored Procs
MigrateAmp
Stored Procs
Account
Contact
Source Linked Server
Salesforce Source Org
Tables
Procs
Proced
Account_Load_OrgMigrate
Target DB
OrgMigrate_Reset
OrgMigrate_Load
Contact_Reset_OrgMigrate
Account_Reset_OrgMigrate
Contact_Load_OrgMigrate
DBAmp
Stored Procs
Target Linked Server
Salesforce Target Org

140
Chapter 12: Using MigrateAmp
This section describes how to use MigrateAmp and provides an example
migration using MigrateAmp.
Note: MigrateAmp does not support using Person Accounts.
Using the SF_MigrateBuilder Stored Procedures
For MigrateAmp to perform a migration, stored procedures must be created
for each step of the migration workflow. To create these stored procedures
use the SF_MigrateBuilder stored procedure. SF_MigrateBuilder is a stored
procedure that creates the three needed stored procedures to perform a
migration.
SF_MigrateBuilder creates a stored procedure to replicate the objects
needed for a migration into your source database. SF_MigrateBuilder
creates a stored procedure to load the target org with the records to be
migrated. This stored procedure also handles any errors that occurred
loading the target org. Lastly, SF_MigrateBuilder creates a stored procedure
to reset the target org.
The three stored procedures created by SF_MigrateBuilder are used to
migrate data from a source org to a target org. The section below provides
an example of a migration using SF_MigrateBuilder.
Replicate
the
source
Load the
target
Check for
errors
Reset the
target

142
1. Connect to SQL Server Button
By clicking the Connect to SQL Server button, a dialog is displayed to
connect to a SQL Server instance. Use this button to connect to the
SQL Server instance that is used for DBAmp and MigrateAmp .
You may also use this to connect to your Source DB, where the
MigrateAmp stored procedures are located.
2. Choose a Source DB
Select the database that is being used to replicate the objects down
locally in a migration. The DBAmp and MigrateAmp stored
procedures must be located in this database. If SF_MigrateBuilder
is run, the replicate stored procedure created by SF_MigrateBuilder will
be located in this database.
3. Choose a Source Linked Server
Select the linked server connected to your source Salesforce org .
4. Select Key Objects from the Source Instance
Select the key objects from your source Salesforce org wanted in a
migration. At least one Key Object must be selected to run Generate
List of Tables or SF_MigrateBuilder.
5. Choose a Children Option
The children option is used to specify which children of the key
object(s) to include in a migration. There are three options that can be
selected:
1. All - includes all required and non-required parents of the key
object(s), includes all required and non-required children of the
key object(s), and all required parents of the required and non-
required children.
2. Req - includes all required and non-required parents of the key
object(s), includes only the required children of the key
object(s), and all required parents of the required children.
3. None - includes only all required and non-required parents of
the key object(s)
Note: The default value is None.
6. Choose a Parent Option
The parent option is used to specify which parents of the key object(s)
to include in a migration. There are two options that can be selected:
1. All - includes all required and non-required parents of the key
object(s)
143
2. Req - includes only the required parents of the key object(s),
does not include the non-required parents of the key object(s)
Note: The default value is All.
7. Choose Feature Options
The features option is used to allow additional objects to be included in
a migration. There are three options that can be selected:
1. Attachments - includes the Salesforce object(s): Attachment.
2. Notes - includes the Salesforce object(s): Note, ContentNote.
3. Attachments and Notes – includes the Salesforce object(s)
Attachment, Note and ContentNote
Only the feature’s records that are associated with the key object(s) are
included in a migration.
Note: The default value is Blank.
8. Generate List of Tables Button
The Generate List of Tables button provides statistics and a list of
tables in the review output, based on the key objects selected in the
Select Key Objects from the Source Instance listbox.
The output generated, is a list of tables, in dependency order, that are
included in a migration based on the key object(s) and options selected.
This gives you the ability to see which objects are included in a
migration before you run SF_MigrateBuilder.
9. Choose a Target Linked Server
Select the linked server connected to your target Salesforce org.
10. Choose a Target DB
Select the database used for the migration and deletion of records from
your target org. The DBAmp stored procedures must be located in
this database. If SF_MigrateBuilder is run, the load and reset stored
procedures created by SF_MigrateBuilder will be located in this
database.
Note: The Source database and Target database MUST be in the same
collation as the system.
11. Enter a Name Prefix
Specifies the name being given to the stored procedures that are being
created by SF_MigrateBuilder. The created stored procedure that is
replicating the objects locally needed for a migration has _Replicate
appended to the name provided. The created stored procedure that is
inserting the records in the target org has _Load appended to the name

144
provided. The created stored procedure that is deleting the records
from the target org has _Reset appended to the name provided.
12. Run SF_MigrateBuilder Button
The SF_MigrateBuilder button is run to create the three stored
procedures needed to perform a migration. When this button is run: a
replicate stored procedure is created in the Source DB selected, a load
stored procedure is created in the Target DB selected, and a reset
stored procedure is created in the Target DB selected.
The output from the SF_MigrateBuilder is provided in the review output
box.
Note: The three stored procedures created by running
SF_MigrateBulider are not executed in the databases where they are
located, they are only created in those databases.
13. Save Output to File Button
The Save Output to File button is run to save the output in the review
output box to a text file.
14. Review Output Box
Output from running the Generate List of Tables or SF_MigrateBuilder
button is displayed in this box. Review this output for any errors that
occurred.
Note: SF_MigrateBuilder only creates the needed stored
procedures to complete a migration, it does not execute them.
You must navigate to the correct database in SQL Management
Studio where these stored procedures were created, and
execute them to complete a migration.
Running SF_MigrateBuilder in SQL Management Studio
SF_MigrateBuilder creates the three stored procedures used to perform a
successful migration. In this migration example, we are m igrating three key
objects (Order, Case, Quote) from the source org to the target org. To do
this, a table of key objects needs to be created first:
To create the table of key objects, use the exact syntax provided below.
This table must be created in your source database.
Create Table KeyObjects (ObjectName sysname)
Insert into KeyObjects (ObjectName) Values ('Order')
Insert into KeyObjects (ObjectName) Values ('Case')
Insert into KeyObjects (ObjectName) Values ('Quote')
The created table of key objects should look similar to this:

145
Now you are ready to run SF_MigrateBuilder.
To run the SF_MigrateBuilder stored procedure, make sure you are in the
source database. Use the following commands in Query Analyzer:
Exec SF_MigrateBuilder 'KeyObjects', 'Migration1', 'SOURCE',
'TARGET', 'Target DB'
where
'KeyObjects’
is the name of the table containing the key objects to
be migrated,
‘Migration1’
is the name given to the stored procedure that is
being created by SF_MigrateBuilder,
‘SOURCE’
is the name of the linked
server connected to your source org
, ‘TARGET’
is the name of the linked
server connected to your target org, and
‘Target DB’
is the name of your
target database.
Note: Since null was provided for the Options parameter, it is defaulted to
Children(None) and no features.
When SF_MigrateBuilder runs successfully, three new stored procedures are
created. The stored procedure used to replicate the objects locally for a
migration is located in your source database. In your source database,
there will be a stored procedure similar to the one in the screenshot below:
The stored procedures used to migrate the records and delete the records
from your target org are located in your target database. In your target
database, there will be two stored procedures similar to the two in the
screenshot below:

146
Replicating the Source org data
The Migration1_Replicate stored procedure created in your source database
is executed to replicate the objects locally that are needed in a mig ration.
To replicate the objects needed for a migration locally, run the stored
procedure below.
In your source database, run the created stored procedure in Query
Analyzer:
Exec Migration1_Replicate
where
Migration1_Replicate
is the name of the replicate stored procedure
created by SF_MigrateBuilder.
Loading the Target org data
The Migration1_Load stored procedure created in your target database is
executed to migrate records to your target org. To migrate the records
needed in a migration to your target org, run the stored procedure below.
In your target database, run the created stored procedure in Query
Analyzer:
Exec Migration1_Load
where
Migration1_Load
is the name of the load stored procedure created by
SF_MigrateBuilder.
You must review the output of the Migration1_Load stored procedure to
check for errors. Errors can occur for many reasons: validation rule
failures, trigger failures, etc.
If errors occur then you need to correct the source data, remove the
previously inserted records from the target and rerun the load to the target
org. The next section describes the steps to remove the previously inserted
target records.
Resetting the Target org data if needed
The Migration1_Reset stored procedure created in your target database is
executed to delete records out of your target org. This is used to reset the
target org once you are finished with a migration or there were errors that
occurred during a migration. To delete records out of your target org that
were loaded from a single migration, run the stored procedure below.
In your target database, run the created stored procedure in Query
Analyzer:
Exec Migration1_Reset
where
Migration1_Reset
is the name of the reset stored procedure created
by SF_MigrateBuilder.

147
By default, the Reset stored procedure only deletes the records that were
inserted by the Load stored procedure. If you need to delete all records out
of your target org, run the stored with the ResetAll parameter set to ‘all’, in
Query Analyzer:
Exec Migration1_Reset 'all'
where
Migration1_Reset
is the name of the reset stored procedure created
by SF_MigrateBuilder, and ‘all’ is the keyword used in the reset script to
reset all records in the target org
An in-depth look at the SF_MigrateBuilder Parameters
SF_MigrateBuilder takes six parameters. This section will detail each of the
six parameters in their order for SF_MigrateBuilder.
KeyObjectTable Parameter
Specifies what key objects to be migrated from your source org to your
target org. This parameter can either be a single key object or a table of
key objects.
Example: To migrate only a single key object, Account, run the command
below in your source database.
Exec SF_MigrateBuilder 'Account', 'MigrateAcct', 'SOURCE',
'TARGET', 'Target DB'
where ‘
Account’
is the single key object to be migrated,
‘MigrateAcct’
is the
name given for the created stored procedures,
‘SOURCE’
is the name of the
linked server connected to your source Salesforce org,
‘TARGET’
is the
name of the linked server connected to your target Salesforce org, and
‘Target DB’
is the name of the target database you created.
Example: To migrate multiple key objects, follow the steps below.
To migrate multiple key objects, a table must be constructed for the key
objects:
Create Table KeyObjects
(ObjectName sysname)
You must create the table as shown above for the migration to
work properly. The name of the table can be named whatever is
deemed necessary.
The table above is then populated with the key objects that need to be
migrated.
In your source database, run the following command to migrate the table of
key objects:
Exec SF_MigrateBuilder 'KeyObjects', 'MigrateKeyObjects',
'SOURCE', 'TARGET', 'Target DB'

148
where ‘
KeyObjects’
is the table containing the key objects to be migrated,
‘MigrateKeyObjects’ is the name given for the created stored procedures,
‘SOURCE’
is the name of the linked server connected to your source
Salesforce org,
‘TARGET’
is the name of the linked server connected to your
target Salesforce org, and
‘Target DB’
is the name of the target database
you created.
Identifier Parameter
Specifies the name being given to the stored procedures that are being
created by SF_MigrateBuilder. The created stored procedure that is
replicating the objects locally needed for a migration has _Replicate
appended to the name provided in this parameter. The created stored
procedure that is inserting the records in the target org has _Load
appended to the name provided in this parameter. The created stored
procedure that is deleting the records from the target org has _Reset
appended to the name provided in this parameter.
SourceLinkedServer Parameter
Specifies the linked server connected to your source Salesforce org.
TargetLinkedServer Parameter
Specifies the linked server connected to your target Salesforce org.
Target Database Parameter
Specifies the target database used for the migration and deletion of records
from your target org.
Note: The Source database and Target database MUST be in the same
collation as the system.
Options Parameter
Specifies the children of the key object(s) and the features to be included
in a migration. To specify the children objects to include in a migration, the
key word Children is used in the parameter. To choose the features
wanted in a migration, the key word Features is used in the parameter. To
specify the parent objects to include in a migration, the key word Parents
is used in the parameter.
Children
Children is a key word used in the Options parameter to specify which
children of the key object(s) to include in a migration. There are three
options that can be used with children:
4. Children(All)- includes all required and non-required parents of
the key object(s), includes all required and non-required children
of the key object(s), and all required parents of the required and
non-required children.
149
5. Children(Req)- includes all required and non-required parents
of the key object(s), includes only the required children of the
key object(s), and all required parents of the required children.
6. Children(None)- includes only all required and non-required
parents of the key object(s)
Note: The default value is Children(None). Only one of All, Req, or
None is permitted for the Options parameter.
Features
Features is a key word used in the Options parameter to allow additional
objects to be included in a migration. There are several options that can be
used to include features:
4. Features(A): includes the Salesforce object(s): Attachment.
5. Features(N): includes the Salesforce object(s): Note,
ContentNote.
Notes
Any combination of A or N can be used for features. Only the feature’s
records that are associated with the key object(s) are included in a
migration.
Parents
Parents is a key word used in the Options parameter to specify which
parents of the key object(s) to include in a migratio n. There are two
options that can be used with parents:
3. Parents(All)- includes all required and non-required parents of
the key object(s)
4. Parents(Req)- includes only the required parents of the key
object(s), does not include the non-required parents of the key
object(s)
Note: The default value is Parents(All). Only one of All or Req is
permitted for the Options parameter.
Example
Children, features, and parents can be used at the same time in the Options
parameter. For example, to include only required children, include
attachments, and include only the required parents in a migration, run the
query below in your source database:
Exec SF_MigrateBuilder 'KeyObjects', 'Migration1', 'SOURCE',
'TARGET', 'Target DB', 'Children(Req), Features(A) , Parents(Req)'

150
Passing Parameters to _Load Stored Procedure
The _Load stored procedure that is created by SF_MigrateBuilder takes a
parameter called KeyObjectIds. This section details the KeyObjectIds, and
provides an example using this parameter.
The KeyObjectIds parameter specifies what source key object Ids to include
in a migration. Instead of including all records of a key object, this
parameter allows you to specify particular records of a key object. To do
so, create a table that contains the specific source key object Ids wanted
for a migration. Using this parameter will only include the key object Ids
specified and the records from other objects associated with those key
object Ids for a migration.
This parameter takes a table that contains the source key object Ids
needed for a migration. The table is created in your source database. The
stored procedure used for loading the target org that was created in your
target database by SF_MigrateBuilder takes the KeyObjectIds parameter.
In your source database, create the table used for this parameter, by
following the instructions below:
Create Table KeyObjectIds (ObjectIds nchar(18))
You must create the table as shown above for the migration to
work properly. The name of the table can be named whatever is
deemed necessary.
Populate the created table above with the key object primary key Ids
needed to be migrated.
This table is provided for the KeyObjectIds parameter o f the _Load stored
procedure in your target database used to migrate records to your target
org.
For example, to migrate only certain records of the key objects in the
KeyObjects table and their associated records from other objects in the
migration, run the following query:
Exec Migration1_Load 'KeyObjectIds'
where
Migration1_Load
is the name of the load stored procedure created by
SF_MigrateBuilder, and
‘KeyObjectIds’
is the name of the table with the
specific records of the key object(s) to migrate.
Migrating Salesforce CRM Content
Migrating Salesforce CRM Content is a separate migration from all other
migrations, do not migrate Salesforce CRM Content with any other objects.
To migrate Salesforce CRM Content, follow the instructions below:
Note: The Max Base64 Field Size must be set to a number large enough to
handle the CRM Content being migrated. To modify the Max Base64 Field

151
Size, run the DBAmp Configuration Program on the server, go to
Configuration/Registry Settings.
In your source database, run the following SF_MigrateBuilder to create
the stored procedures needed to migrate CRM Content:
Exec SF_MigrateBuilder 'ContentWorkspaceDoc',
'ContentWorkspaceDoc', 'SOURCE', 'TARGET', 'Target DB'
Note: You must use ContentWorkspaceDoc as the key object in order
to migrate Salesforce CRM Content.
Once the SF_MigrateBuilder command above is executed, three stored
procedures are created: ContentWorkspaceDoc_Replicate,
ContentWrokspaceDoc_Load, and ContentWorkspaceDoc_Reset .
Use the ContentWorkspaceDoc_Replicate stored procedure to replicate
the tables needed to migrate CRM Content locally. To do this, run the query
below in your source database:
Exec ContentWorkspaceDoc_Replicate
Now, use the ContentWrokspaceDoc_Load stored procedure to load the
target org. To do this, run the query below in your target database:
Exec ContentWorkspaceDoc_Load
Finally, use the ContentWorkspaceDoc_Reset stored procedure to reset
the target org if any errors occur. To do this, run the query below in your
target database:
Exec ContentWorkspaceDoc_Reset 'all'
Note: Any CRM Content in a private library or private to a user
cannot be migrated. If users want them to be preserved during a
migration, they have to move them to a public folder first.
Migrating Salesforce Knowledge
Migrating Salesforce Knowledge is a separate migration from all other
migrations, do not migrate Salesforce Knowledge with any other objects.
When migrating Knowledge, you have to migrate via the
ArticleType__kav
tables.
ArticleType
is the name of the article’s type.
All articles in Knowledge are assigned to an
article type
(ex- FAQ,
Newsletter, Offer, etc.). An article’s type determines the type of content it
contains, its appearance, and which users can access it.
Note: MigrateAmp only migrates articles that are published. It does not
migrate articles that are drafts or articles that have been archived. All
Article Types must be created prior to the migration on the target
Salesforce org so that they match the Article Types on the source
Salesforce org.

152
Articles can also be in different languages. MigrateAmp only migrates the
articles in the Master Language. Articles translated into different
languages from the Master Language, are not included in the migration.
Note: The migrated Knowledge Articles on the target org are all created as
Draft Articles. This is a Salesforce restriction. Therefore, you have to
manually publish and submit translations for the Articles, up on your
target org.
Knowledge contains a concept called data categories. Data categories
allow users to classify records, find records, and control access to records.
Data categories are included in a migration via the
ArticleType__DataCategorySelection
tables. Any
ArticleType__kav
tables being migrated will include the __DataCategorySelection table for
each of the __kav tables being migrated.
Note: All data categories must be created prior to the migration on the
target org so that they match the data categories on the source org.
Also, the matching data categories must be active on both orgs.
For further information on Salesforce Knowledge, visit the following link:
https://developer.salesforce.com/docs/atlas.en-
us.api.meta/api/sforce_api_guidelines_knowledge.htm
Migrating Single Salesforce Knowledge Article Type
To migrate just the FAQ Salesforce Knowledge Article Type, follow the
instructions below:
In your source database, run the following SF_MigrateBuilder to create
the stored procedures needed to migrate FAQ Salesforce Knowledge:
Exec SF_MigrateBuilder 'FAQ__kav', 'FAQ', 'SOURCE', 'TARGET',
'Target DB'
Where FAQ__kav is the name of the article type table to be migrated.
Note: __kav must be appended to the end of the article type table to be
migrated.
Once the SF_MigrateBuilder command above is executed, three stored
procedures are created: FAQ_Replicate, FAQ_Load, and FAQ_Reset.
Use the FAQ_Replicate stored procedure to replicate the tables needed to
migrate the FAQ Article Type locally. To do this, run the query below in
your source database:
Exec FAQ_Replicate
Now, use the FAQ_Load stored procedure to load the target org. To do
this, run the query below in your target database:
Exec FAQ_Load

153
Finally, use the FAQ_Reset stored procedure to reset the target org if any
errors occur. To do this, run the query below in your target database:
Exec FAQ_Reset 'all'
Migrating Multiple Salesforce Knowledge Article Types
To migrate multiple Salesforce Knowledge Article Types, follow the
instructions below:
In this migration, there are four article types being migrated: FAQ,
Newsletter, Offer, and Notice.
In your source database, create the table to hold the article types you
want to migrate:
Create Table ListOfKAVTables (ObjectName sysname)
Insert into ListOfKAVTables (ObjectName) Values ('faq__kav')
Insert into ListOfKAVTables (ObjectName) Values
('newsletter__kav)
Insert into ListOfKAVTables (ObjectName) Values ('offer__kav)
Insert into ListOfKAVTables (ObjectName) Values
('notice__kav')
The created table of article types to be migrated should look similar to this:
In your source database, run the following SF_MigrateBuilder to create
the stored procedures needed to migrate multiple Knowledge Article Types:
Exec SF_MigrateBuilder 'ListOfKAVTables', 'ListOfKAVTables',
'SOURCE', 'TARGET', 'Target DB'
Once the SF_MigrateBuilder command above is executed, three stored
procedures are created: ListOfKAVTables_Replicate,
ListOfKAVTables_Load, and ListOfKAVTables_Reset.
Use the ListOfKAVTables _Replicate stored procedure to replicate the
tables needed to migrate multiple Article Types locally. To do this, run the
query below in your source database:
Exec ListOfKAVTables _Replicate

154
Now, use the ListOfKAVTables _Load stored procedure to load the target
org. To do this, run the query below in your target database:
Exec ListOfKAVTables _Load
Finally, use the ListOfKAVTables _Reset stored procedure to reset the
target org if any errors occur. To do this, run the query below in your
target database:
Exec ListOfKAVTables _Reset 'all'
Associating Knowledge Articles with Cases
By default, knowledge articles and cases are not associated automatically in
the target org after they have been migrated. Before knowledge articles can
be associated with cases, the following steps must be completed:
1. The Case object must be migrated over to the targe t org, with a
SourceId custom field on the target org Case object. Therefore,
you must have a SourceId__c column on the target Case
object.
2. The knowledge article types that you want to associate with cases
must me migrated over to the target (i.e. faq__kav ,
knowledge__kav, newsletter__kav, etc.)
Now you are ready to run the SF_PopulateCaseArticle stored procedure to
associate knowledge articles with cases. SF_PopulateCaseArticle is located
in the CREATE DBAmp SPROCS script. This stored procedure must be
executed in the target database.
To associate knowledge articles with cases, execute the
SF_PopulateCaseArticle stored procedure with the correct parameters in the
target database:
exec SF_PopulateCaseArticle 'SOURCE', 'TARGET', 'Source DB'
where
‘SOURCE’
is the name of the linked server connected to your source
org
, ‘TARGET’
is the name of the linked server connected to your target
org, and
‘’Source DB’
is the name of your source database.
Frequently Asked Questions
I want attachments in my migration. Which attachments are
included in a migration and how do I include them?
Attachments whose parent is a key object are the only attachments
included in a migration. Therefore, if Account is the key object in a
migration, only the attachments associated with the Accounts in a migration
are included.
In order to include attachments in a migration, use the options parameter
of SF_MigrateBuilder. In the options parameter, use the features keyword
and the ‘a’ key letter to include attachments. Either children(all) must be
used with the features keyword in order to include features or the children
155
keyword must not be specified in the options parameter. The two ways to
include attachments in a migration are shown below:
exec SF_MigrateBuilder 'Account', 'Account', 'SOURCE', 'TARG ET', 'Target
DB', 'children(all), features(a)'
exec SF_MigrateBuilder 'Account', 'Account', 'SOURCE', 'TARG ET', 'Target
DB', ‘features(a)'
Either syntax above includes attachments related to the Accounts in a
migration when Account is the Key Object.
Some foreign keys of the migrated objects are null even though the
object the key points to is a table of the migration.
All required relationship foreign keys should have the correct value for all
tables in the migration.
All non-required relationship foreign keys of key objects should have a
value. Non-required relationships on objects that are NOT key objects are
not populated. If you have an object that is affected by this rule, consider
making that object a key object of the migration.

156
Chapter 13: Viewing a Migration Database
Diagram
The SF_MigrateGraphML stored procedure produces a script that is
imported into the visualization software, yED Graph Editor.
SF_MigrateGraphML is used to produce a database diagram using yED.
SF_MigrateGraphML is executed in your source database, which produces
a script in the messages upon execution. The section below will walk
through using SF_MigrateGraphML.
To view a database diagram of a migration, you must d ownload the
software, yED Graph Editor, on your machine. To download yEd Graph
Editor, follow the instructions at the following link:
http://www.yworks.com/en/products_yed_download.html
Once you have downloaded yED Graph Editor, you are now ready to view a
database diagram for a migration. The steps for creating a database
diagram using yED are presented below:
1. Run the SF_MigrateGraphML stored procedure in your source
database. To run the SF_MigrateGraphML stored procedure, use the
following commands in Query Analyzer:
Exec SF_MigrateGraphML 'KeyObjects', 'Migration1', 'SOURCE'
An XML script is produced in the messages of the executed sto red
procedure.
2. Copy the XML script. The XML script should look similar to the
screenshot below:
3. Paste
the XML script into a notepad.

157
4. Save the XML script in the notepad as all files and append .graphml
to the end of the name you save it as. Save it in your documents
folder. A Screenshot of this is shown below:
5. Open the saved XML script in yED Graph Editor. Go to File/Open and
navigate to your saved XML script.
6. Navigate to Edit/Properties Manager to edit the node and edge
options for the diagram. The Properties Manager page is shown in
the screenshot below:
7. Under the Configurations section of Properties Manager, click the
green plus sign and select New Configuration for Nodes.

158
8. Under the Selected Configuration section of Properties Manager,
click the green plus sign twice. Under one Data Source, change label
to objecttype. Under Map To, change Label Text to Fill Color. Under
Conversion, change Automatic to Distinct Values.
9. Under the Selected Mapping section of Properties Manager, click the
green plus sign. For objecttype, select KeyObject. For Fill Color,
select green.
10. Click Apply, to apply these changes.
11. Under the Configurations section of Properties Manager, click the
green plus sign and select New Configuration for Edges.

159
12. Under the Selected Configuration section of Properties Manager,
click the green plus sign twice. Under Map To, change one Map To
to Line Type. Change the other Map To to Line Color. Under
Conversion, change both to Distinct Values.
13. With type that is mapping to Line Type highlighted, click the green
plus sign twice under the Selected Mapping section of Properties
Manager. For Required, select a solid Line Type. For Non -Required,
select a dotted Line Type.
14. With type that is mapping to Line Color highlighted, click the green
plus sign twice under the Selected Mapping section of Properties
Manager. For Required, select a blue Line Color. For Non -Required,
select a red Line Color.
15. Click Apply, to apply these changes. Then, click OK.

160
16. Navigate to Layout/Hierarchical. Make sure the Orientation is set to
Bottom to Top. Click OK.
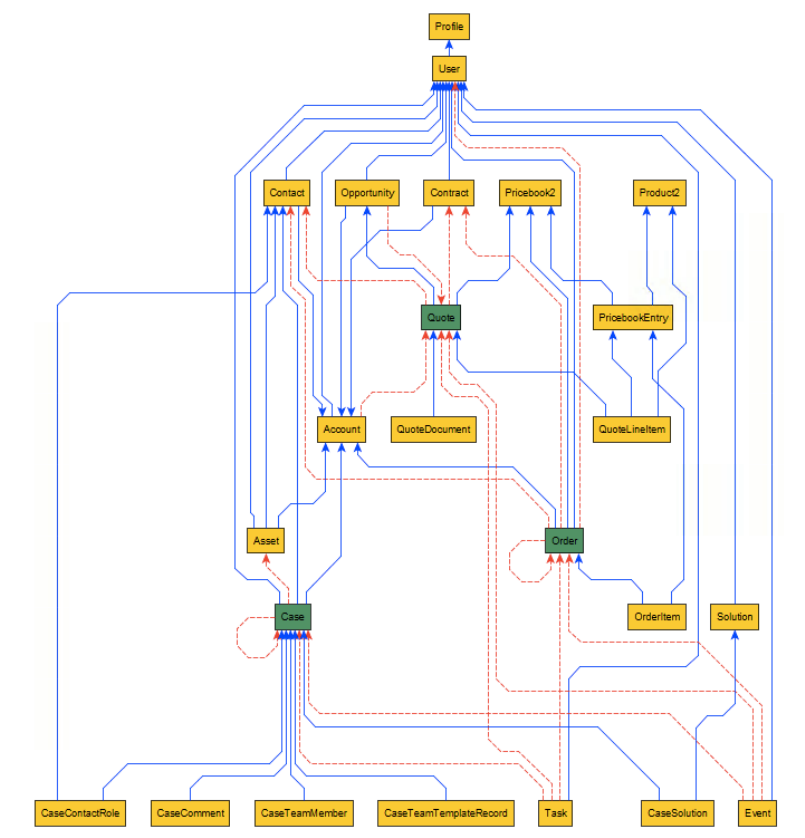
161
17. The Database Diagram should look similar to the screenshot below:

162
Chapter 14: DBAmp Client
Why DBAmp Client?
Advantages of using the DBAmp Client:
• XP_CmdShell not being enabled on the SQL Server machine prevents
some DBAmp stored procedures from being used. DBAmp Client
enables these DBAmp stored procedures to be run on a client
machine as opposed to on the actual SQL Server machine.
• DBAmp Client provides a user interface to help with parameter
construction for DBAmpAZ.
• Command lines constructed by DBAmp Client can be copied and
pasted to CmdExec steps in SSIS or SQL Job Steps.
Architecture of the DBAmp Client:
• DBAmp Client connects to a SQL Server machine with a DBAmp
linked server. Therefore, the full DBAmp package must be installed
on the SQL Server machine that the DBAmp Client is connecting to.
• The DBAmp Client must be able to connect to the remote SQL Serv er
machine using SQL Native Client.
• Salesforce credentials are not stored on the client machine where
DBAmp Client is running.
• The DBAmp linked server chosen in the DBAmp Client user interface
is used for obtaining the Salesforce credentials.
• The Work and Blob Directories are located on the client machine as
opposed to the SQL Server machine.

163
Below is a diagram showing the DBAmp Client architecture:
Installing DBAmp Client
To successfully install and use DBAmp Client, follow the instructions below.
Installing the DBAmp Client User Interface:
1. On the Client machine, download the dbampclient.zip file using the
download link on this page: http://www.forceamp.com/hats/dbampclient.zip
2. To install the DBAmp Client User Interface, unzip the DBAmpClient package
to a temporary directory. Run the DBAmpClientInstall.exe program. Setup
will prompt you for the DBAmp program directory and install the software.
Client Machine
Salesforce
DBAmpAZ
Work Directory
Blob Directory
SQL Server Machine
DBAmp linked server
Salesforce database
API calls to push/pull data
SQL Native Client connection

164
Running the DBAmp Client
The following screenshots are of the DBAmp Client User Interface and each
of its sections. Click each button to get an in-depth explanation of each
step in using the DBAmp Client User Interface.
1. Connect to SQL Server Button
By clicking the Connect to SQL Server button, a dialog is displayed to
connect to a SQL Server instance. Use this button to connect to the
SQL Server instance that is used for DBAmp. You may also use this
to connect to your salesforce database, where the DBAmp stored
procedures are located.
2. DBAmp Work Directory
The DBAmp Work Directory holds the work files produced by the
SF_Mirror and SF_TableLoader stored procedures when using the
BulkAPI or PKChunk options. Use the browse button to create, find
and set the work directory. Make sure the directory is on a drive with
enough space. Large downloads will expand the size of this directory
dramatically.
3. DBAmp Blob Directory
The DBAmp Blob Directory is a local directory that holds downloaded
files containing the binary field(s) content of a Salesforce object. The
downloaded files are produced by the SF_DownloadBlobs stored
procedure. Use the browse button to create, find and set the blob
directory. Make sure the directory is on a drive with enough space.
Large downloads will expand the size of this directory dramatically.
4. Choose a Database
Select the database that is being used to push and pull Salesforce data.
The DBAmp stored procedures must be located in this database .
5. Choose a Linked Server
Select the linked server connected to your Salesforce Org.
1
2
3
4
C
ho
os
e
a
D
at
ab
as
e
5
6
7

165
6. Choose an Action
Select the action for the DBAmp Client to perform. Actions include:
Mirror, TableLoader, and DownloadBlobs.
7. Proxy Information Button
By clicking the Proxy Information button, a dialog is displayed to enter
proxy information.
Performing a Mirror Action
The Mirror action is the equivalent of the SF_Mirror stored procedure.
1. Select a Salesforce Object
Select a Salesforce object to be mirrored locally.
2. Options
Enter any options that are valid for the SF_Mirror stored procedure. For
more information on what options are valid, see the SF_Mirror section
in Chapter 7.
1
2

166
Performing a TableLoader Action
The TableLoader action is the equivalent of the SF_TableLoader stored
procedure.
1. Select a SQL Input Table
Select the SQL table that contains the data to push to Salesforce.
2. Choose an Operation
Choose the Salesforce operation to push the data up to Salesforce with.
Operations include: Insert, Update, Delete, Upsert, UnDelete,
HardDelete, and ConvertLead.
3. Choose an External Id
Choose the external Id to use when using the upsert operation. Note:
must choose an external Id when using the upsert operation.
4. Options
Enter any options that can be specified for the SF_TableLoader stored
procedure. For more information on what options are valid, see the
SF_TableLoader section in Chapter 7.
1
2
3
4

167
Performing a DownloadBlobs Action
The DownloadBlobs action is the equivalent of the SF_DownloadBlobs
stored procedure.
1. Select a SQL Table
Select the SQL table that contains the Ids of the binary files(s) to
download locally into the Blob Directory.
Previewing Output
1. Command Output Window
Displays the command based on the options selected above. The
command can be copied and used in a CmdExec of a SQL job.
2. Run Button
Click this button to run the command displayed in the command output
window. The command is run on the SQL instance and in the database
chosen above.
3. Review Output Window
Displays the complete message output from the DBAmp command being
run in the command output window.
1
1
2
3
