
Cleod9 Collaboration (PC) – User Guide
This guide explains how to access and to use Collaboration and explains the basic operations: call, chat, video
call, conference, fax, SMS.
Prerequisites
First time login
Quick menu introduction
Colleagues (roster)
Edit colleagues list
User status icons explanation
Colleagues status information
Call pickup / see who is calling
Map view of colleagues
User status
User status and status message
User picture
Geolocation
Instant Messaging
Start a chat session
File transfer
Screen Sharing and remote control
Multiuser chat conference
Post-It & Call me back
Post-It
Call me back
Call
Active device for calls
Make a call / Search for contact
Answer a call
Call management
1/37

Hold / second call
Call transfer
Conference call
Video call
Record a call
Attendant Console
Fax / SMS
Fax
SMS
Settings
Personal
Call features
Function keys
Fax Server
Web Phone
Outlook integration
Extensions
Phonebook
Create / edit a contact
Personal phonebook
Contact notes
Calls / faxes history
Download faxes and call recordings
Setting tags
Voicemails
Prerequisites
Supported OS
Mac OS X 10.8 and higher
Microsoft Windows 7 and higher
Linux (only Chrome browser)
Note: Windows Server version pre 2012 is not supported over RDP
Android / iOS
2/37

Recommended web browser and connection mode
Collaboration can be accessed via any HTML5 browser
Recommended browser: the latest stable version of Chrome, since it fully integrates WebRTC
It is recommended to access via HTTPS
Licenses that must be enabled on PBX
Per-Service PBX:
Collaboration: (Essential) access to full features described in the current User Guide
Kite: (Business) possibility to create ubiconf video conferences and be contacted via Kite link
CDR-View: (Premium) access to advanced monitoring and reporting tool
First time login
1. Open the web browser
2. Type into URL the PBX name or IP address (example: https://mycompany.wildixin.com)
3. Enter your credentials:
Login (extension, user name or email address)
Password (WEB password)
4. Click the arrow to log in
You can enable single sign-on with your Google or Office 365 email for access to Collaboration, if:
you use the same email as the one present in your user settings
this email address is unique in the system
Note: Wildix does not get access to your Google / Office 365 password.
Note: PBX admin can automatically send users their credentials for access to Collaboration via email: WMS Users >
select users and click “Send welcome message”.
Login window:
3/37
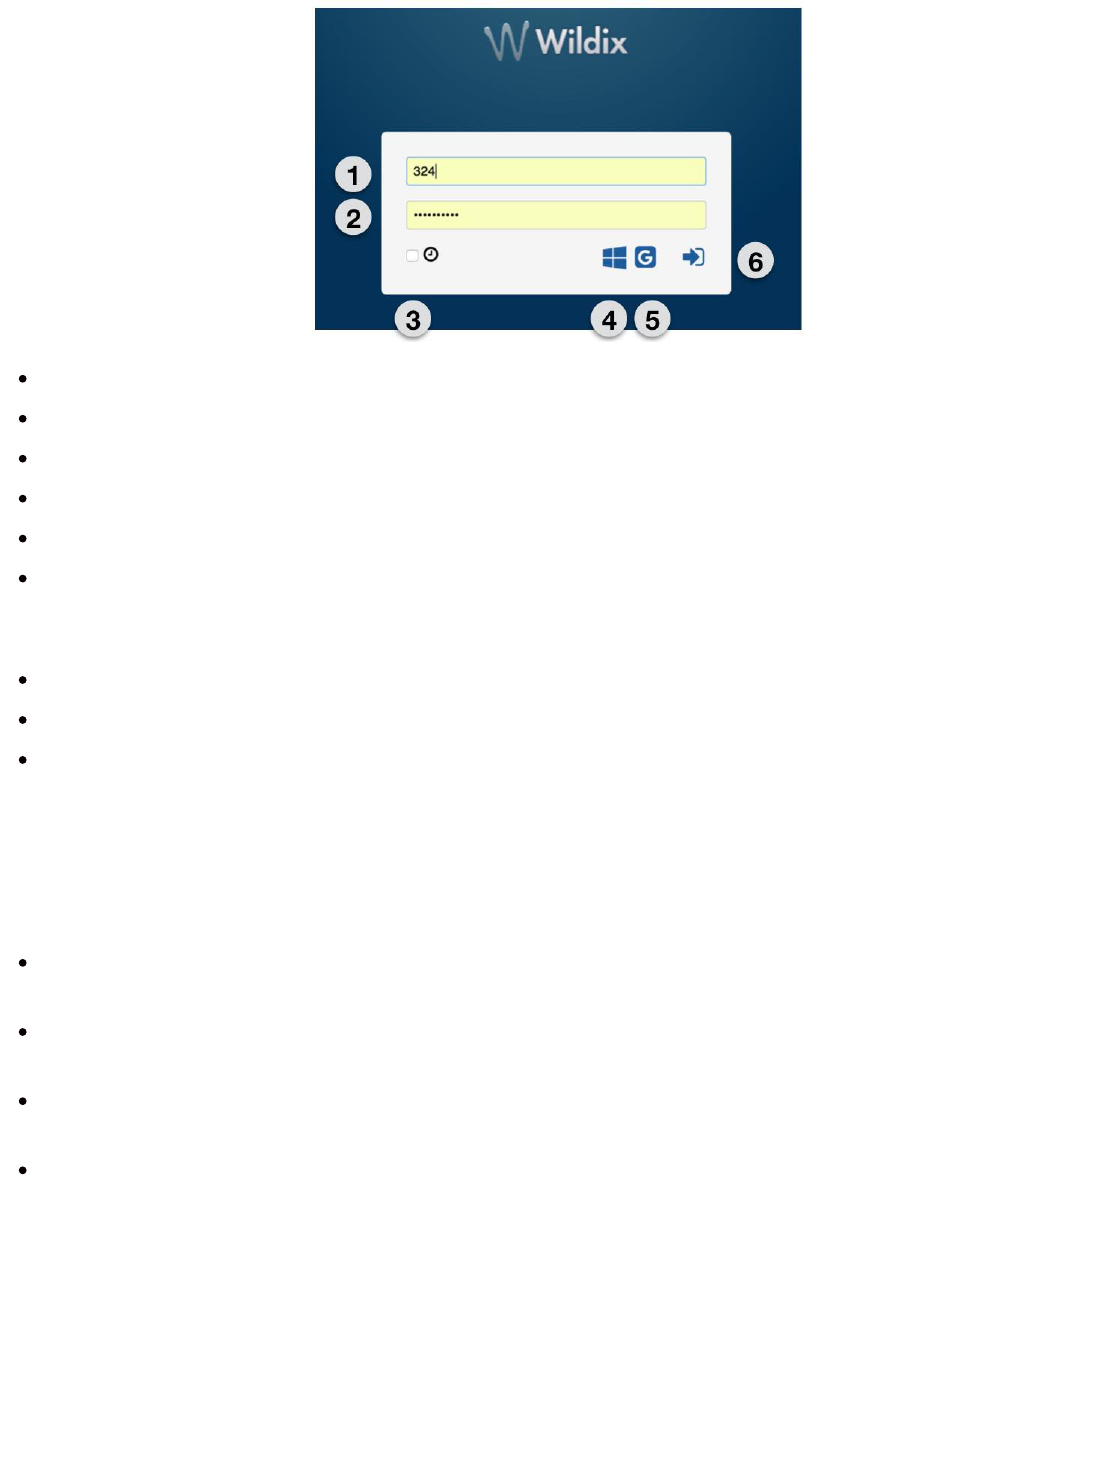
1 – Login
2 – Password
3 – “Remember me” option
4 – Single sign-on with Office 365
5 – Single sign-on with Google
6 – Click to log in
Once you access Wildix Collaboration, follow the popup notifications which help you:
edit colleagues
enable desktop notifications (incoming call / chat and other popup notifications)
enable location sharing
Video tutorial: https://www.youtube.com/watch?v=iw6jkhIDzCI
Basic settings
Select “Settings” in the top menu > Personal:
E-mail address: used for email notifications about new Voicemails, missed calls, unread chat messages, call
recordings, fax reports etc
Mobile: mobile number for Mobility extension which allows you to make and receive calls via Wildix PBX
using your mobile phone
Language: selected language is used for Collaboration user interface, system sounds (Voicemail, IVR
prompts, etc), WP4X0
Date/time format: applied to Wildix devices except W-AIR handsets (must be set up on device)
Quick menu introduction
Top menu:
4/37
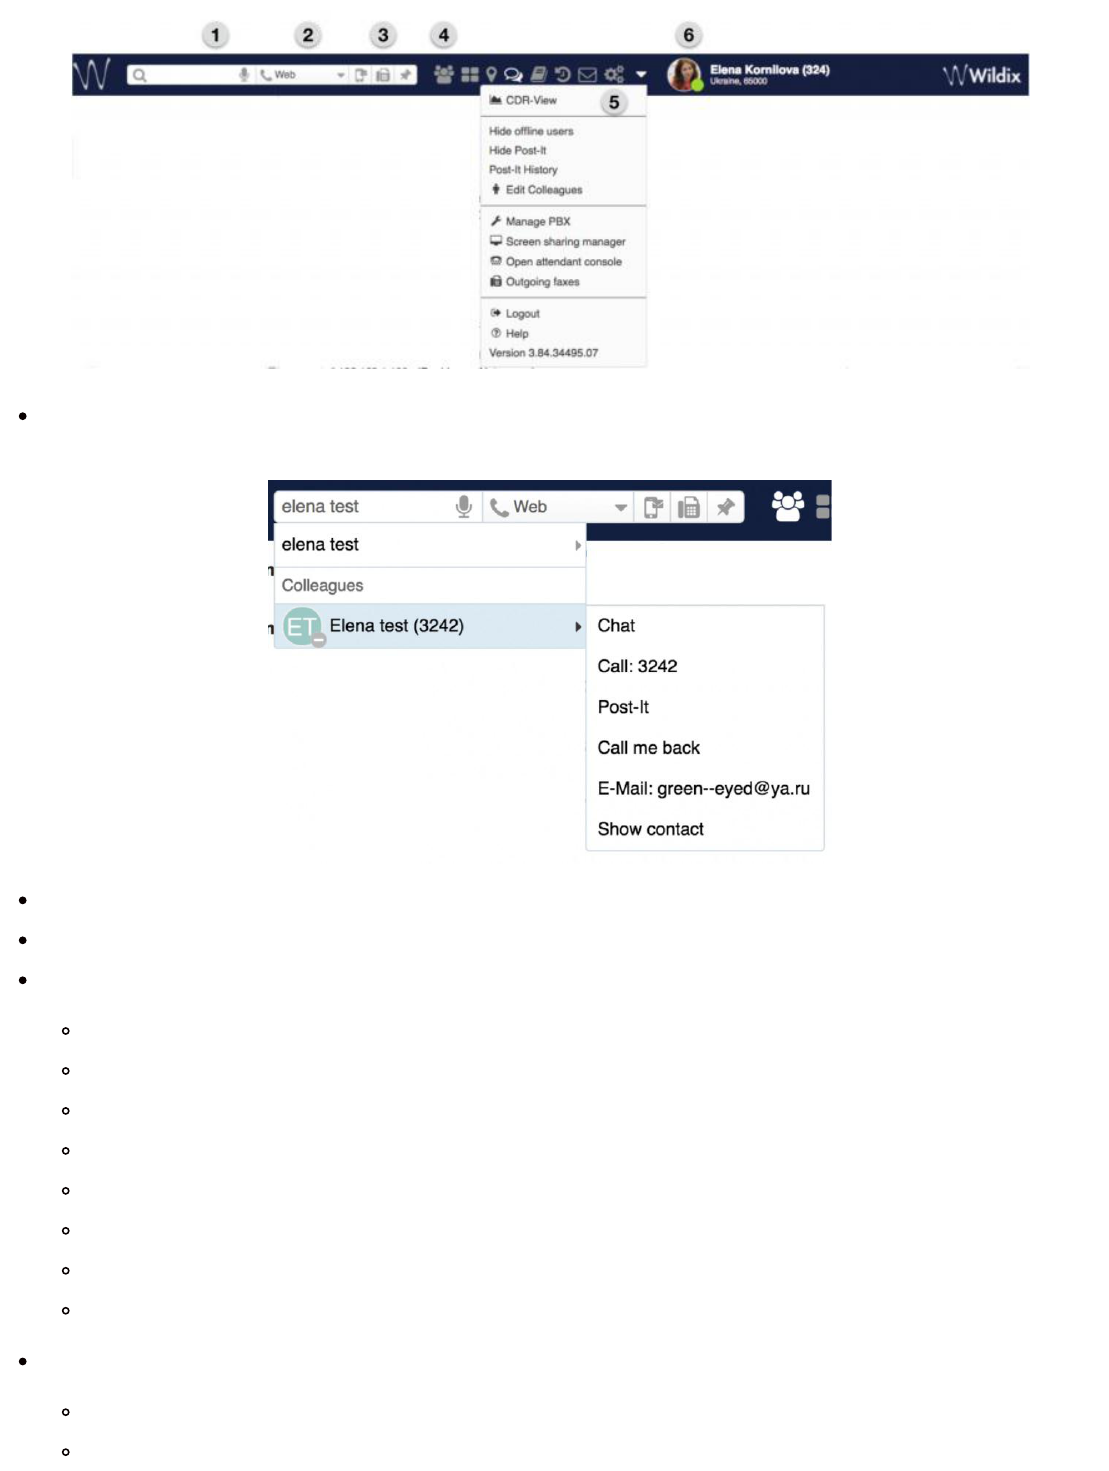
1 – Search field with speech recognition: search for colleagues and contacts and perform quick actions
from drop-down list: call, chat, send a fax etc:
2 – Device selection: active device to place and answer using Collaboration
3 – SMS / Fax / Post-It: quick buttons to access SMS, Fax, Post-It dialog windows
4 – Other tabs of Collaboration:
Colleagues: list of colleagues with presence status and geolocation
Function keys: monitoring / management of colleagues / features (same as BLF keys of phone)
Map view: geographical map with location of colleagues
Messaging: active chat sessions
Phonebook: PBX shared and personal phonebooks
History: history of calls (synced with other Wildix devices), faxes, notes
Voicemail: access to Voicemail messages
Settings: user settings, call features, feature keys settings and more
5 – Other (expanded):
CDR-View access (if not restricted by license)
Show / hide offline users
5/37

Show / hide Post-It
Post-It history
Edit colleagues list
Manage PBX: access to WMS (restricted to users of “admin” type)
Open Attendant Console (if not restricted by license)
Outgoing faxes: outgoing faxes queue
Logout: exit Collaboration
Help: link to Wildix Collaboration guide (this guide)
Version: current WMS version
6 – User name, extension, location (if available), User status, status message (if available) and picture.
Colleagues (roster)
Select “Colleagues” in the top menu.
Users are subdivided by work teams (managed on the WMS side).
User status, user name and user picture is displayed for each colleague.
Right-click on a colleague opens a drop-down list with available actions (Call / Chat / Post-It / Call me back etc):
Edit colleagues list
User is prompted to edit colleagues upon the first login to Wildix Collaboration.
1. Select “Other” in the top menu > Edit Colleagues
6/37

2. Select the colleagues (or work teams) that you want to add to your roster:
3. Click “Save”
Other options to add / delete colleagues from roster
Add colleagues via Search field:
Find a colleague by name / number and click on “+” icon
Delete colleagues via Colleagues tab:
Right-click on a colleague and select “Remove”
7/37

User status icons explanation
User status is synced over all Wildix devices registered to your account.
– available (user is connected to Collaboration)
– offline (user is not connected to Collaboration and has no active
devices)
– reachable by phone (user is not connected to Collaboration but has an active device)
– talking (device status)
– ringing (device status)
– away (user-defined status, if grey = offline)
– DND (user-defined status, if grey = offline)
Colleagues status information
To view additional information (extension, who is calling, status information, location):
Go to Colleagues tab and focus the mouse cursor on the colleague:
Same information can be consulted from Messaging / Feature keys
tabs.
Call pickup / see who is calling
See who is calling:
Go to Colleagues tab and focus the mouse cursor on the user who has a ringing call / is talking on the phone
(same option is available in Feature keys / Messaging tab)
Call Pickup:
1. Go to Colleagues tab
2. Right-click on a colleague who has a ringing call
3. Select “Pick up”
Map view of colleagues
It is possible to view all the colleagues who are
connected to Wildix Collaboration and who have
enabled location sharing in their browsers, on the
geographical map.
Select “Map view” in the top menu:
8/37

User status
User status and status message
To add a status message:
1. Click on your user status in the top menu
2. Enter the status message into the field:
3. Click “OK”
To set up DND / Away status:
1. Click on “available”
2. Select DND (Do not disturb) or Away
3. Select “until” date and time (if not defined, user status switches back
to “available” after one hour)
4. Click “OK”
It is possible to disable /
enable call / chat popup
notifications when in DND:
Collaboration Settings >
Personal > “Show
notifications in DND
status”
It is possible to set up the
system to manage
incoming calls based on
your current user status (available, DND, away) and on call type (internal, external, whitelist, blacklist). See chapter:
Call features
User picture
9/37

Users who have not set up their user picture, are displayed with initials (default avatar).
1. To set up / edit user picture:
2. Click on your user status in the top menu
3. Click “Edit picture”
4. Choose the File on your PC (the picture is loaded)
5. Resize the picture (optional)
6. Click “Save”
Geolocation
You are prompted to enable location sharing in your browser
permissions, upon your first login to Collaboration. Check
your browser settings to enable / disable location sharing.
It is possible to manually define geolocation:
1. Click on your user status in the top menu
2. Click on “Set location on map”
3. Select “Custom” to set up your location manually: enter the
address into the field or move the red indicator (otherwise
select “auto detect” to enable the browser to automatically
detect your location)
4. Click on “Save”
Instant Messaging
Start a chat session
From Search field:
10/37

Enter the colleague name / extension and select “Chat” from the drop-down menu
From Colleagues / Feature keys / History:
Right-click on a colleague and select “Chat”
From call dialog during a call:
Select “Other” -> “Chat” in call dialog (See Chapter: Call Management)
Messaging tab opens and you can start typing your message:
Use
speech
recognition: click the microphone icon in the lower right section of the chat session window and start talking, the
system transforms your speech into text.
Use emoticons: click on the smile icon in the lower right section of the chat session window to open the list of
emoticons.
All open chat sessions are displayed in the “Recents” section (left section of the screen).
You can continue a previously started chat session by clicking on a user in the “Recents”
section.
Close chat session:
1. Right-click on a user in the “Recents” section
2. Select “Remove”
Chat history
To load chat history with a user, open the chat session with this user and scroll up to
the top of the chat session window and select the period (up to 30 days):
File transfer
WMS version
3.84 introduces
the following features:
11/37

file sharing on Safari / IE / Edge web browsers (for files up to 100 Mb)
file preview (for files up to 100 MB)
file remains available for download in the chat window (for files up to 100 MB)
Current WMS version 3.83 implements point-to-point file sharing, which:
is supported only by Chrome / Firefox web browsers
once the file has been downloaded, does not give you the possibility to download it again
requires the recipient to accept the file transfer, before the download starts:
Send a
file:
1. Open
a chat session with user
2. Click on the paperclip icon in the lower right section of the chat session window
3. Choose file on your PC
Drag&Drop file transfer
During a chat session:
Drag the file from your PC and drop it into the chat session window.
From Messaging tab “Recents” section” / Colleagues tab:
Drag the file from your PC and drop it onto the colleague
Screen Sharing and remote control
OS requirements (for presenter)
Mac OS X 10.8 and higher
Windows XP and higher
Download and install the component:
Collaboration > Settings > Extensions, “Screen Sharing Component”
Start Screen Sharing
1. Open a chat session with a user
2. Click on the screen icon in the upper right section of the screen
3. Screen sharing launches (screen sharing icon is displayed on the menu bar of your PC)
4. The other party must accept incoming screen sharing stream:
12/37

Popups (if enabled) notify you
each time viewers are connected
and disconnected.
Start screen sharing during a call:
Select “Other” -> “Screen sharing” in call dialog (See Chapter: Call Management)
Remote control and monitor selection
Remote control is enabled by default, to close it, uncheck the “Remote Control” in the menu bar.
If you have extra monitors connected to your PC, you can select the monitor from the menu bar.
Screen sharing management
Screen sharing to multiple users is supported.
See who is connected and stop screen sharing:
1. Select “Other” in the top menu > “Screen sharing manager”:
2. You can see the viewers who are currently connected
Click “x” in front of the viewer to disconnect this user
Click “Stop” to disconnect all users
Multiuser chat conference
Multiuser chat room with possibility to join a conference call directly from
the chat room.
For ubiconf videoconference based on WebRTC, read the guide:
13/37

https://manuals.wildix.com/wildix-mcu-videoconference-guide/
Create a chat room:
1. Go to Messaging tab
2. Click on the conference icon in the upper right part of the “Recents” section and select “+ Chat conference”:
3. Edit the conference title (optional)
4. Add participants
5. Click “Create”
Participants receive conference invitation via chat.
Multiuser chat starts automatically once the
participants join the conference.
Add / remove users:
Only conference manager can add and remove
users.
Add user: click on the “+” icon in the conference
management section.
Remove user: click on the “x” icon in front of the
participant’s name.
Start
audio:
1. Click
on
the
microphone icon in front of your name to open an audio conference room
2. You receive an incoming call from the conference room; answer the call
3. Click the microphone icon in front of the participants’ names to invite them to join the conference call
4. Participants join the conference as soon as they answer the call from the conference room
Call the conference room:
(available for users registered to the same PBX as the conference manager)
Dial 98*(conference PIN), e.g.: 98*1502
14/37

Conference PIN is displayed in the conference management window:
Close the chat room:
Only the conference manager can close the chat room.
Other participants can leave the chat room and can join back only after the
conference manager adds them again.
1. Click on the “x” icon in the conference management section.
2. Click “OK” to confirm
Post-It & Call me back
Post-It
It is possible to send virtual sticky notes to users or post them on your screen as a personal reminder.
From Top menu:
Click “Post-It” icon:
To: select the Post-It recipient
enter the user name / extension
otherwise tick off “Personal reminder” to post a note on your Collaboration interface
Input field: enter your text
Send Post-It as SMS: option is available for Post-It to user and requires a GSM media gateway
Normal / Important: select the color based on importance:
Green (Post-It to user) / Yellow (personal reminder): normal
Red: important
Click the paper plane icon to post a note
15/37

From
Search
field:
Enter
the
colleague name / extension and select “Post-It” from the drop-down menu
From Colleagues / Feature keys / History:
Right-click on a colleague and select “Post-It”
From Messaging:
Click “Post-It” icon in the lower right part of the chat session window
Right-click on a colleague from “Recents” section and select “Post-It”
Show / Hide Post-It
Select “Other” in the top menu > “Hide Post It” / “Show Post-It”
Post-It history
Select “Other” in the top menu > “Post-It History”
It is
possible to:
show / hide any Post-It previously received from users or sent as personal reminders
clear Post-It history
Call me back
16/37

From Search field:
Enter the colleague name / extension and select “Call me back” from the drop-down menu
From Colleagues / Feature keys / Messaging / History tab:
Right-click on a colleague and select “Call me back”
“Call me back” Post-It is displayed to the recipient:
Recipient can call back the sender by clicking the green button.
Call
Active device for calls
You can make and receive calls directly from Collaboration or control other devices registered to your account,
including hardware phones (WP, W-AIR), smartphone apps (iOS / Android) and mobility extension (mobile phone).
Select the active device for making and receiving calls in the top menu:
Supported devices:
Web: make and receive calls directly from Collaboration
Note: Web is an embedded WebRTC-based softphone on
Chrome browser and a plugin (which must be installed separately,
on other supported browsers, read chapter: Extensions)
WP, W-AIR: hardware phones
Wildix iOS/Android client: apps installed on smartphones
Mobile number: mobility extension number of user
Any: possibility to select an active device upon placing / receiving a call
Incoming calls
If you have several devices registered to your account, it is possible to decide whether all your devices must ring or
only the active one:
Go to Collaboration Settings > Personal
“Ring only active device” enabled: only active device selected in Top menu of Collaboration rings (ringer is
muted on other devices)
“Ring only active device” disabled: all active devices ring
Demo video: https://www.youtube.com/watch?v=KYxlvfWmp5g
“Any” option makes it possible to select the device by clicking on the green button, the moment you receive an
incoming call:
17/37

Outgoing calls
In case you have selected WP / W-AIR / iOS/Android / Mobility device:
outgoing calls are made using this device.
In case you select “Any” option, once you place an outgoing call from
Collaboration interface:
1. you receive an incoming call to all your devices (answer the call from your
preferred device)
2. after you answer, an outgoing call is placed to the number you dialed
Make a call / Search for contact
Before making a call, make sure the correct active device is selected in the top menu.
From search field:
Enter the name or number and select “Call:[number]” from the drop-down menu:
It is possible to use speech recognition for
search: click the microphone icon (make sure the
microphone is connected to your PC) and start
talking, the system transforms your speech into text.
From Colleagues / Feature keys:
Right-click on a colleague and select “Call”
From Messaging:
Click “Call” icon in the upper right part of the chat session window
Right-click on a colleague from “Recents” section and select “Call”
From History:
Right-click on an entry and select “Call” / “Call the mobile”
From Phonebook:
Find a contact and click on the number you wish to call
Otherwise right-click on a contact from the right section of the
screen and select “Call”
Answer a call
In case you have several devices registered to your account, you can decide whether all your devices must ring, or
only the active one. See chapter: Active device for calls
A call dialog window is displayed when there is an incoming call:
18/37

To
answer a call:
click the green
icon
To decline a call:
click the “Hang
up” (red) icon
To forward a call
without
answering: click the
arrow icon, select the
contact to forward a call
to (using search):
You can set up automatic
call forwarding based on
user status (available, DND, away) and call type (internal, external,
whitelist, blacklist). See chapter: Function keys
Call management
You can manage a call directly from call dialog window:
1 – Hang up
2 – Hold / resume
3 – Transfer
4 – Call recording
5 – Dialpad / Send DTMFs
6 – Other (expanded):
7 – Add notes, not available for calls between colleagues (See chapter: Contact notes)
8 – Add tags (See chapter: Setting tags)
9 – Hide / display call dialog window:
19/37

10 – Mute / unmute your microphone
Hold / second call
Click “Hold” icon during a call to put a call on hold / to resume a call. The second party hears music on hold (set up
on the WMS side).
You can make / receive more than one call at a time if “Call waiting” is enabled in Collaboration Settings > Features
for the current call type and user status.
During a call you are notified of a new incoming call by call waiting tone (short beeps).
When you make / answer a second call, the current call is automatically put on hold.
It is possible to swap between an active call and a call on hold by pressing the “Hold” icon (“Hold” icon is blinking in
for the call which is currently on hold):
Call transfer
1. During a call, press the “Transfer” icon
2. Enter the contact name / number ( user status and additional phone numbers are
displayed).
3. Click “handset” icon for attended, “arrow” for blind transfer, in front of the number you wish to dial:
Drag&Drop Call transfer
Drag the Caller Name from the call dialog window and drop it
onto the desired user in Colleagues / Messaging tabs.
Video tutorial: https://youtu.be/7A2Vqb9YjP0
Conference call
It is possible to add users to call conference via Wildix
Collaboration.
1. When you have two calls, click “Other” -> “Conference” from one of the call dialogs to merge calls
2. To invite more parties: make a new call and click “Conference” from the call dialog window
20/37

To close the conference, wait till other parties hang up. Otherwise the conference
manager receives an automatic callback after 5 seconds from each party who has not
hung up.
Video call
Video in Collaboration is fully supported on Chrome browser (WebRTC video).
2-way video is currently fully supported between Collaboration on Chrome and:
Collaboration on Chrome
Kite user on Chrome
Kite user on Firefox
WP600ACG
iOS / Android client
Video intercoms / IP webcams
Start video streaming during a call:
Click “Other” -> “Video” from the call dialog:
Start video call during chat:
“Video” icon is available in Messaging menu (upper right corner) in
Chrome browser. By clicking “Video”, audio call is started automatically
with video.
Record a call
During a call click “Call recording” icon to
start / stop call recording.
Call recordings are sent to user via email and can be accessed later on
via CDR-View and Collaboration > History.
Attendant Console
Attendant Console is an extension for call agents allowing them to monitor and manage of up to 20 lines
simultaneously using a mouse or a keyboard.
Open Attendant Console:
Click “Other” from top menu and select “Attendant Console”:
21/37

Set up a shortcut to open Attendant Console:
Collaboration Settings > Personal, “Open Attendant Console” (enter a combination
of keys). By default is set to “Alt+Shift+A”.
Call management via soft keys:
When you have active calls, click on the quick buttons (Answer, Hangup, Hold,
Transfer, Resume, Record) relative to each line to manage the call:
Call management via numeric keypad:
Click “Help” to view the list of the hotkeys that allow you to manage calls via a numeric keypad
Make a call
1. Press “+”
2. Enter the name / number (internal / external) into the search field
3. Press “Enter”
If a contact has several phone numbers, use the arrow keys of your keyboard
to select the right one:
22/37

Answer a call
Press “Enter” to answer an incoming call in case you
do not have active calls or your calls are on hold
Line management
1. Press “0” to put a call on hold
2. Press the digit corresponding to the line to resume a call / to answer a new incoming call:
1-9 for lines 1-9
Ctrl+(0-9) for lines 10-19
Hang up
Press “-” to hang up an active call
Attended transfer
Transfer a call after consulting the recipient:
1. During a call make a new call to the recipient of call transfer
2. Wait till the third party answers
3. Press “*” and select the call using arrow buttons of your keyboard
4. Press “Enter” to transfer the call
Blind transfer
Transfer a call without consulting the recipient:
1. During a call press “*”
2. Enter the name / number into the field
3. Press “/” to transfer the call
Record a call
Press “Alt+Shift+R” to start / stop call recording during a call
Fax / SMS
Prerequisites: Fax Server settings must be configured on the WMS side; for SMS sending, GSM gateway is
required.
Fax
From Top menu:
Click “Fax” icon:
23/37

Fax number: enter the fax recipient name / number (it is possible to enter multiple numbers
separated by comma)
Fax file: choose file on your PC
Faxcover: check the box to include the fax cover page and edit fax cover settings (See chapter: Fax Server)
Postpone delivery: tick the box and select the date to schedule fax sending
Click “Send” to send a fax
Notes:
fax delivery status is
notified via email
history of faxes can be
consulted in Collaboration
> History
From Search field:
Enter the contact name /
number and select “Fax:
[number]” from the drop-
down menu
From Phonebook:
Select a contact and click
on the fax number
From History:
Right-click on an entry and
select “Send fax”
SMS
From Top menu:
Click “SMS” icon:
Mobile number: enter the contact name / number (it is possible to enter multiple numbers
separated by comma)
Message: enter your message
Postpone delivery: tick the box and select the date to schedule fax sending
Click “Send” to send SMS
24/37

From Search field:
Enter the contact name / number and select
“SMS:[number]” from the drop-down menu
From History:
Right-click on an entry and select “Send SMS”
From Messaging:
Click “SMS” icon in the lower right part of the
screen of the chat session with user
Settings
Go to Wildix Collaboration > Settings.
To apply changes, click “Save” on each page of Collaboration Settings.
Personal
Password: edit your password for access to Collaboration
E-mail: used for email notifications about new Voicemails, missed calls, unread chat messages, call
recordings, fax reports etc
Mobile: mobile number for Mobility extension which allows you to make and receive calls via Wildix PBX
using your mobile phone
Language: selected language is applied for Collaboration user interface, system sounds (Voicemail, IVR
prompts, etc), WP4X0
Picture: edit picture (See chapter: User picture)
Show notifications in DND status: enable / disable chat / call popup notifications in DND status
Date format: select date and time format to be used on Wildix devices except W-AIR handsets (must be set
up on device)
Ring only active device: check the box to make only the active device ring (ringer is muted on other devices;
see chapter: Active device for calls)
Popup URL / APP: enable the system to open an application / a web page upon receiving / placing a call;
click on the question mark to view the prompt (more info: https://manuals.wildix.com/how-to-set-up-popup-url-
app/)
Dialing hot key (only on Windows): set up shortcut for click2call from applications / web pages (F11 by
default)
To enable: install Integration Service from Collaboration Settings > Extensions and refresh
Collaboration
To make a call: select a phone number and press the key combination (external line prefix is added to
25/37

phone numbers longer than 7 digits which do not start with “+”)
Open attendant console: shortcut to open Attendant Console
Web CRM: integration with Web applications allows opening of a web application inside Collaboration
(integration information for web developers: https://github.com/Wildix/WebCRM)
Call features
Call features can be set up based on user status and on call class.
Go to Collaboration Settings > Features:
The
upper
menu
(internal / external / blacklist / whitelist) allows you to set up call features for different call types.
In this way it is possible to set up different behavior based on the type of call. It is possible to define type of call:
based on type of contact: In Collaboration > Phonebook > “Type of contact”
based on type of call, set up on WMS side (Dialplan)
For each call type it is possible to set up call features based on user status (Available / Do not disturb / Away).
Activate class: activated by default for “internal” call type and “Available” user status
Call reject: if enabled, you do not receive incoming calls
Call Forward Busy: check the box and enter the number or VOICEMAIL, to enable call forwarding when busy
on the phone
Call Forward No Answer: check the box and enter the number or VOICEMAIL, to enable call forwarding in
case of no answer
Call Forward All: check the box and enter the extension number or VOICEMAIL, to enable the forwarding of
all the incoming calls
Call waiting: enable to be able to receive more than one call at a time
Call timeout: if enabled, the call is terminated in case there is no answer within a specified timeout
26/37

Enable mobility with timeout: if enabled, you receive incoming calls also to your Mobility extension number
(mobile number) after the specified timeout; mobile number must be configured in Collaboration Settings >
Personal
Mobility confirmation: if enabled, the user is notified on who the caller is when he receives the call on mobility
extension number
Missed calls notification via email / via SMS: enable to receive missed calls notifications
Custom ring: select the ringtone for WP4X0 and Collaboration
Function keys
Function keys configured in this tab allow you to monitor colleagues and features from WP600AXX, WP4X0 and
Collaboration > Function Keys tab.
Read the guide: https://manuals.wildix.com/function-keys-blf-keys-wp/
Fax Server
Fax cover settings:
Company logo: choose the file on your PC
Company: company name
Fax machine id: ID of the local fax machine (default value: Fax Server)
Fax header: fax header to identify the fax source (default value: Wildix PBX)
Web Phone
Select active device for calls via web
(Chrome)
Speakers: select audio device for speakers
Ringing: select audio device for ringtone playback
Microphone: select audio device for microphone
Auto adjust mic: check the box for auto adjustment of microphone level
Autostart: uncheck the box if you wish to disable Web phone from the list of active devices
Echo test: click the button to perform an echo test
(Other browsers)
Speakers: select audio device for speakers
Play Gain: adjust the play gain level
Microphone: select audio device for microphone
Mic Gain: adjust the microphone gain level
Autostart: uncheck the box if you wish to disable Web phone from the list of active devices (in case you have
27/37

other devices registered to your account)
Outlook integration
Available only on Windows after installing “Outlook integration” from Collaboration Settings > Extensions
This menu allows you to enable Outlook calendar sync.
Read the guide: https://manuals.wildix.com/outlook-integration/
Extensions
Extensions and plugins that can be downloaded and installed on PC:
Web Phone (available for browsers other than Chrome): plugin for making and receiving calls via
Collaboration on web browsers other than Chrome (WebRTC Phone is built-in on Chrome)
Browser Extension (Chrome browser only): adds quick access to Collaboration from Chrome toolbar (click
“W” icon to show the browser tab where Collaboration is running / to open Collaboration in the web browser in
case it’s not running) and click2call (right-click on a phone number or a link on a web page and select “Call”)
It is possible to use the “W” icon to open Collaboration as a standalone application; download Chrome
extension: https://chrome.google.com/webstore/detail/wildix-collaboration-
app/klaamdejgopombbjfpfhlebpjlmokgna
Fax Printer: this component allows sending faxes from Windows / Mac OS X applications
Read the guide: https://manuals.wildix.com/fax-printer/
TAPI driver (Windows only): component for making and receiving calls via Microsoft Outlook and TAPI
enabled applications; also adds support for call generation by clicking on a web page link containing a phone
number (URI support)
Read the guide: https://manuals.wildix.com/integration-utility-for-microsoft-windows/
Integration service: this component is required by CDR-View, Popup App and adds support for additional
features:
Mac OS X: call generation by clicking on a web page link containing a phone number (support of
“sip:”, “wildix:” URI)
28/37

Mac OS X: call generation by right-clicking on a phone number and selecting “Call via Wildix PBX”:
Windows: call via shortcut (“Dialing hot key”, configured in Collaboration Settings > Personal)
Outlook Integration (Windows only): adds support for Calendar Sync, Presence, click2call, IM, call popup
from OutlookRead the guide: https://manuals.wildix.com/outlook-integration/
Screen sharing component: install the component to share your desktop and provide remote access to your
desktopSee chapter: Screen Sharing and remote control
Headset integration: adds support for remote call answer / hangup and volume control from supported
headsets via USB connector on Mac OS X / Windows
Headset compatibility matrix and Wildix headsets: https://manuals.wildix.com/headsets/Also adds support for
Kuando Busylight (https://www.wildix.com/portfolios/kuando-busylight/)
Important: Headset Integration component is not compatible with SfB (skype for business)
Phonebook
Import of PBX shared phonebooks is set up on WMS side.
Via Collaboration it is impossible to:
Edit contacts of “Colleagues” phonebook
Add / delete / edit names of PBX shared phonebooks
Via Collaboration it is possible:
Add / edit / delete contacts of PBX shared phonebooks
Create and manage personal phonebooks
Once a new contact is added to a PBX shared phonebook via Collaboration, it becomes visible by other PBX users.
Create / edit a contact
Go to Collaboration > Phonebook
29/37

1. Click “+” in the upper left section
2. Fill in the fields:
Name: contact’s full name
Phonebook: select the phonebook to which the contact must belong (it is impossible to add contacts
to “Colleagues” phonebook); it is also possible to select the phonebook in the upper left section of the
screen
Other important fields (optional):
Organization: company name
data/images/default_avatar.png: you can upload the contact image on your server and indicate the
path to the image in this field (image must be square, otherwise it appears distorted)
Extension: this field is normally used for “Colleagues”
Work / Mobile / Home / Home Mobile / Main: phone numbers of contact by priority
Short number: if this field is filled in, it is possible to call this contact via Feature Code 80 “Speed dial”
(Feature codes are defined in WMS > Dialplan > Feature codes)
Example: dial 80*3241, where “80” is “Speed dial” Feature code, “3241” is “Short number” defined for the
contact
Type of contact (internal / external / whitelist / blacklist): in case contact type is defined, the rules of
call features selected in Collaboration Settings > Features is applied for calls from this contact (it is
also possible to define rules for call routing based on call type in WMS > Dialplan)
Custom ring: it is possible to select a custom ringtone for the contact
Notes: notes entered here are visible and can be edited by other PBX users
Important: these notes can be consulted only from Phonebook; for contact notes that can be displayed and
added to contact during a call, see chapter: Contact notes
3. Click on “tick” icon (Save):
Add/edit contact during a call:
Click on the Contact name / number during a call to edit the contact (if it exists) or create a new one:
30/37

Add a
new
contact before making a call:
1. Enter a number into the search field
2. Select “Add contact” from the drop down menu
3. Add a new contact
Add a new contact after a call:
1. Go to Collaboration > History
2. Right click on the number and select
“Add contact”
3. Add a new contact
To delete a contact:
1. Go to Collaboration > Phonebook
2. Find the contact using Search
3. Click
“-” in
the
upper left section to delete the contact and click “OK” to confirm (otherwise click “x” to close the window)
31/37

Otherwise right-click on a contact and select
“Remove”:
To edit a contact:
Go to Collaboration > Phonebook
1. Find the contact using Search
2. Click the pencil icon (Edit) to edit the
contact
3. Edit the fields
4. Click the tick icon (Save) to save the
changes
Personal phonebook
Go to Collaboration >
Phonebooks
Click on “All” in the upper left
section, then click on “Edit
phonebooks”:
Add a personal
phonebook:
1. Click “+”
2. Enter the name of the
phonebook
3. Now you can
proceed with
adding
contacts
Delete a
personal
phonebook:
1. Select a
phonebook
2. Click “-”
3. Click “OK” to confirm (otherwise click x to close the window)
Edit the name of the personal phonebook:
1. Select a phonebook
2. Click the pencil icon
3. Enter the new name
32/37

4. Click “Save”
Contact notes
There are two types of notes that
can be added to contacts:
Notes that can be added and
consulted in Phonebook contact
information and can be imported
during import of phonebooks
(see chapter: Create / edit a
contact)
Contact notes that can be added
and consulted during a call (read
further)
Note: Contact notes must be enabled
on WMS side
Notes cannot be added for
colleagues.
Add / display notes added to
contact
During a call:
Click “Notes” icon
From Phonebook:
Right-click on a contact from the left
section of the screen and select
“Notes”
“Delete” option is available only for
notes added by you.
View history of notes added by
users of the system:
go to Collaboration > History
and click “Notes” in the upper
section of the screen.
View only the notes added before
a certain date:
1. Click on the date
2. Select a new date
3. Click “Apply”:
33/37

Calls / faxes history
Pre-requisites to store and access CDR (Call detail record):
CDR backend must be configured and selected on WMS side
Partition for storing CDR must be defined on WMS side on storage device
History of calls and missed calls notifications is synced over WMS on all Wildix devices: Collaboration, WP4X0,
WP600AXX, Android / iOS client, except for W-AIR handsets (W-AIR handsets display only local call history).
Go to Collaboration > History
By default incoming / outgoing / missed calls are displayed.
Failed events are displayed with red color.
Events filtering:
Filter the events by contact name / number:
Filter
by
incoming / outgoing / missed calls / fax in / fax out / archived events:
34/37

Filter
by
date
(only
the
events that took place up to the date selected are displayed):
For
detailed analysis of call activity of users and groups, click “CDR-View” (read the guide
https://manuals.wildix.com/cdr-view-user-guide/).
Delete / archive events
To archive an event:
Right-click on an entry and select “Archived”
To
recover
an
archived event:
1. Filter events by “Archived”
2. Right-click on an entry
3. Select “Recover”
35/37

To delete an event:
1. Right-click on an entry
2. Select “Delete”
3. Click “Delete” to confirm
NOTE: Deleted events cannot be recovered.
Download faxes and call recordings
Faxes / fax reports can be downloaded by clicking on PDF icon:
Call
recordings can be downloaded by clicking on the audio file icon):
At the
moment it is not possible to filter calls containing call recording. In case a call contains a call recording file, the audio
file icon is displayed for this entry in Collaboration > History.
Setting tags
Tags are implemented for filtering of calls by tag in CDR-View.
Tags must be enabled and added on WMS side (WMS Settings > PBX > CDR, “CDR Settings”, enter tags separated
by commas into “Tags” field). Once added, “Tags” column is displayed in Collaboration > History.
It is possible to set tags via WMS > Dialplan (“Set” application) or via Collaboration. Tags edited via Collaboration
rewrite tags added via Dialplan.
Set / edit tags for past calls:
1. Go to Collaboration > History
36/37

2. Right-click on an entry
3. Select “Tags”
4. Tick off the tags that you wish to set for this entry:
Set
tags
during
a call:
1. Click
the
“Tags” icon
2. Tick off the tags that you wish to set for this call:
Voicemails
Select “Voicemail” in the top menu to access the graphical menu
allowing you to listen to Voicemails.
Listen to Voicemails:
Click the download icon
Mark Voicemail as read:
1. Select one or multiple Voicemails
2. Click “Mark as read” icon in the
upper part of the screen
Delete Voicemails:
1. Select one or multiple Voicemails
2. Click “Remove” icon in the upper part of the screen
37/37
