
Student Financials - Inquiry
Group Post Entries
Finance and Accounting
Student Accounts
5/7/2009

Training Guide
Student Financials – Inquiry
Page ii
Table of Contents
Introduction ...................................................................................................................... iii
Creating a Group Post Entry ........................................................................................... 1
Posting a Group Post Entry ............................................................................................. 8
Viewing Posted Financial Aid Entries ........................................................................... 12

Training Guide
Student Financials – Inquiry
Introduction Page iii
Introduction
UPK General Information
This course uses a User Productivity Kit (UPK) format. This format uses a choice of playback
modes selected from topics in an outline. These playback modes are different methods that you
can use to learn about a topic.
Outline Levels
The structured outline upon which this course is built contains three levels.
• Module (represented in the outline by a purple book icon) is the highest level.
• Lessons (an icon resembling a stack of papers) comprise the second outline level.
• Topics (an icon resembling a single sheet of paper) comprise the third outline level.
Use the plus (+) and minus (-) symbols to expand or collapse the levels.
Playback Modes
To begin the course, expand the outline to the topic level. Then, select a topic, which will activate
the three playback modes near the top of the screen.
• See It! Learn by watching an animated demonstration of the steps needed to perform a task. All
activities, such as moving the mouse, will be completed automatically for you.
• Try It! Learn interactively in a simulated environment. The system will prompt you with the
actions you should perform to complete a task.
• Do It! Learn interactively using live data. Test the knowledge you gained from training by
completing the task on your own.
Click the icon for the playback mode you selected to launch the UPK Player in a new window. If
you need to pause a screen in the See It! mode, click the Pause link in the lower right corner of
the text bubble. To resume playback, click the blinking Resume link in the text bubble.
Links
When the instructions in a topic frame say, “Click here,” you must be in either the Try It! mode
or the Do It! mode for the link to become active. Links are inactive in the See It! mode.
Jump-in Points
An arrow icon displays to the right of the player modes. Click this icon to open a pop-up window
with jump-in points. These points allow you to start a topic at a point other than at the beginning,
which is helpful if you need to review a portion of a task.
Concept Pane
The concept pane, which is found at the beginning of the module, lessons, and topics, contains an
overview of the particular module, lesson, and topic. Topic concept panes contain additional
information about the topic.
Introduction Pane
Each topic’s Introduction pane displays a list of the topic’s objectives.

Training Guide
Student Financials – Inquiry
Introduction Page iv
Exiting the Player
If you need to return to the outline view before the topic’s playback concludes, press the ESC key
to terminate the player.
At the conclusion of the topic, the UPK Player window will close automatically and return you to
the outline. You can then select another topic from the outline or close the window containing the
UPK page.
Topics
This module contains the following topics:
• Creating a Group Post Entry
• Posting a Group Post Entry
• Viewing Posted Financial Aid Entries
Sandbox
The Student Financials training sandbox is available for you to practice what you have learned.
To access the sandbox, navigate to https://he90dev.net.ucf.edu/psp/HE90TRN/?cmd=login. When
the Oracle PeopleSoft Enterprise page opens, you will log in just as you log into the myUCF
portal. Enter your PID in the User ID field and your PID password in the Password field.
Lookup Icon
Whenever you see a lookup icon (represented by a small magnifying glass) next to a field, you
can click the icon. You can then select a value from the list of available values that displays.
Menu
You can collapse or expand the menu on the left side of the page while you are using the
sandbox.
• To collapse the menu, click the Minimize Menu icon (represented by a minus symbol) in the
upper right section of the menu bar.
• To expand the menu, click the Expand Menu icon in the upper left area of the page.

Training Guide
Student Financials – Inquiry
Creating a Group Post Entry Page 1
Creating a Group Post Entry
This topic will explain the steps needed to create a group post entry.
Procedure
In this topic, you will learn how to:
• Create a group post entry.
Step Action
1. Log into the myUCF portal and navigate to Staff Applications > PeopleSoft
SA/HR.
2. Click the Student Financials link.
3. Next, click the Charges and Payments link.
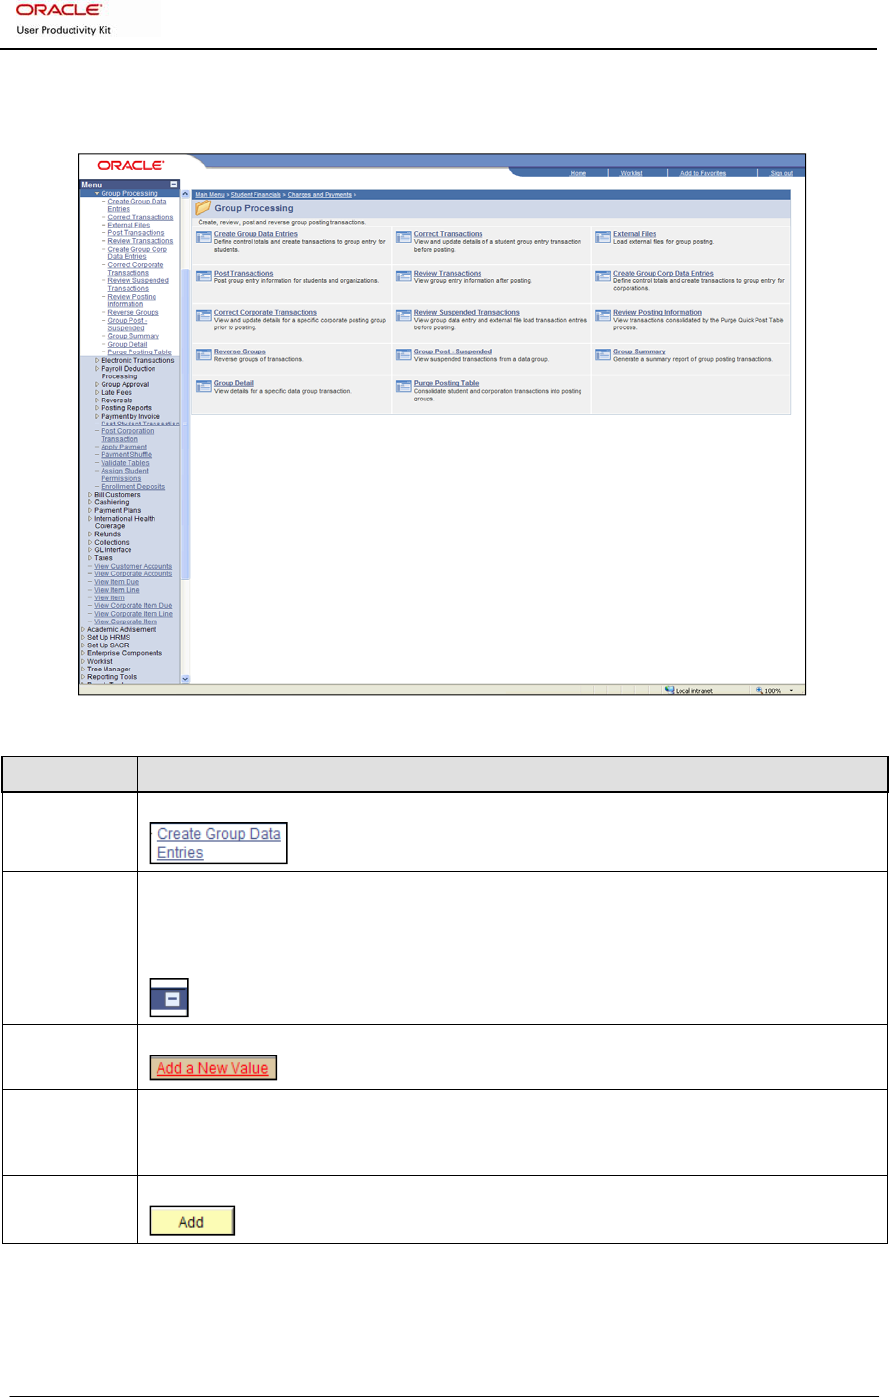
4. The available folders in Group Processing will display. Depending on your
security level, the folders that display may vary from the ones in this example.
Of the folders in this group, the ones listed below are used the most often. This
topic will focus on the Create Group Data Entries folder.
• Create Group Data Entries – Use the links in this folder for charges and
credits made to student accounts, such as late fees or payments.
• Post Transactions – Use this folder’s links to apply a set of transactions that
have been created to a student’s account.
• Reverse Groups – Use the links in this folder to create a group for the purpose
of reversing an entry that has already been posted. The group number generated
when the entry was created is used to post to the reverse group.
• Review Transactions – Use these links to view transactions.
• Review Suspended Transactions – After the transactions for a group have
posted, use the links in this folder to view any unposted transactions. This
information is helpful for navigating to a specific location within the group.
• External Files – Use these links to convert data from another format, such as
data from housing or the health center, and then use the converted data to populate
a Group Data Entry.
• Create Group Corp Data Entries – Use the links in this folder when
conducting business with an entity outside UCF.
Training Guide
Student Financials – Inquiry
Creating a Group Post Entry Page 2
Step Action
5. Click the Create Group Data Entries link.
6. The Group Data Entry search page will display.
To provide more room on your screen, click the Collapse Menu icon located in
the upper left area of your screen.
7. Click the Add a New Value tab.
8. The Group Data Entry page will display.
Do not change any of the values on this page.
9. Click the Add button.

Training Guide
Student Financials – Inquiry
Creating a Group Post Entry Page 3
Step Action
10. The Group Data Entry header page will display.
• First, you will first complete the Group ID and Origin ID fields on this page.
• Next, you will click the Group Line Entry tab and complete the fields under
that tab.
• Then, you will return to the Group Entry tab and complete the Control Totals
section.
11. Begin the first phase of creating your entry process by clicking the down arrow to
the right of the Group Type field.

Training Guide
Student Financials – Inquiry
Creating a Group Post Entry Page 4
Step Action
12. Select an item from the drop-down menu that displays.
Financial Aid entries involving short-term loans require specific values be
selected. These entries will be discussed in a later topic.
For this example, which does not involve a Financial Aid entry for a short-term
loan, select Charges.
13. The Origin ID field is used to determine the originator of the group.
Click the lookup icon beside the Origin ID field.
14. Click the Look Up button.
15. Select a value from the list that displays.
For this example, select Student Accounts.
16. After completing the Group Data Entry header page, begin the second phase of
creating your entry by clicking the Group Line Entry tab.
17. The Group Line Entry tab fields that display are used for entering the transaction
data.
When you enter the data, to reduce the possibility of making an incorrect entry, do
not enter payments and charges in the same group.
18. Note the following items pertaining to the Group Line Entry tab fields:
• Academic Information – This link is used to view information about the
student’s enrollment, such as enrollment dates and current status.
• Charge Priority – This field is used for certain charges and certain terms. For
example, the FAALLTIV code is used for payments and indicates a payment
should be applied to all items that Financial Aid allows to be paid.
• Restrict Payment to Account – This box is selected when the payment needs to
be restricted to a specified account, such as Abandoned Property.
19. Enter the student’s seven-digit ID in the ID field, or click the lookup icon and
select the ID from the list that displays.
For this example, enter 0123456.

Training Guide
Student Financials – Inquiry
Creating a Group Post Entry Page 5
Step Action
20. The student’s name will populate beside his or her name in the ID field.
Notice the Account Type and Item Type fields. The values entered in these fields
should complement each other and should not conflict.
21. Click the lookup icon beside the Account Type field.
22. Click the Look Up button.
23. Select a value from the list that displays.
For this example, select TUT - Tuition & Fees.
24. Click the lookup icon beside the Item Type field.
25. Click the Look Up button.
26. Select an item from the list that displays.
For this example, select 200000001010 - Health Fee.

Training Guide
Student Financials – Inquiry
Creating a Group Post Entry Page 6
Step Action
27. Enter an amount in the Amount field.
For this example, enter 25.00.
28. Click the Term field lookup icon.
29. Click the Look Up button.
30. Payments will be applied according to the value entered in the Term field.
Select a term from the list that displays.
For this example, select 1350 – Spring 2009.
31. The optional Due Date field is used to specify when payment for a charge is due;
for example, a date 14 days from a charge.
Click the calendar icon in the Due Date field.
32. Select a date from the calendar that displays.
For this example, select April 3.
33. Finish the second phase of your posting by clicking the Save button.
34. As soon as you press the Save button, the Group ID field will display a Group
ID number.
Record this number, as you will use it later.
35. To begin the third phase of creating your entry, click the Group Entry tab.
36. In this phase, you will complete three items in the Control Totals section, the
Balance Group selection and the amount and quantity Control Total fields.
37. Before you begin, however, notice that the Entered Total field displays negative
values.
After you complete your entries in the Control Totals section, these fields will
both display 0.

Training Guide
Student Financials – Inquiry
Creating a Group Post Entry Page 7
Step Action
38. First, select the box for Balance Group.
When this box is selected, the Deposit Balance field will show “Balanced” when
the entry is posted, if the items balance.
In this example, no entries have been made and the posting status is incomplete,
so the field displays "Not Balanced."
39. Second, enter an amount in the Control Total field. The amount you enter should
match the amount in the Entered Total field.
For this example, enter 25.00.
40. Notice that the Difference field now displays 0.00 instead of -25.00.
41. Third, enter the amount of data records. Like the Control Total field, this amount
should match the amount shown in the Entered Total field.
For this example, since one item was entered, enter the number 1.
42. Finish by clicking the Save button.
43. Notice that the Difference field now displays 0.
44. Click the Home link.
45. Choose an option from the main menu, or click the Sign out link to terminate your
session.
46. In this topic, you learned how to:
• Create a group post entry.
End of Procedure.

Training Guide
Student Financials – Inquiry
Posting a Group Post Entry Page 8
Posting a Group Post Entry
This topic will explain the steps needed to post a group post entry and how to confirm that the
entry balanced.
Procedure
In this topic, you will learn how to:
• Post a group post entry.
• Confirm that the posted entry balanced.
Step Action
1. Log into the myUCF portal and navigate to Staff Applications > PeopleSoft
SA/HR.
2. Click the Student Financials link.
3. Next, click the Charges and Payments link.
4. Then, select Group Processing > Post Transactions.
5. The Post Transactions page will display.
To begin the process of posting an entry, you will need a Run Control.
If you do not have a Run Control:
• First, click the Add a New Value tab.
• Second, enter a name for your Run Control in the Run Control ID field. Choose
a name carefully, because the system will not allow you to change or delete the
name after it is saved. Run Control IDs are case-sensitive and should be entered
without using spaces.
• Last, click the Add button.
If you have already created a Run Control, on the Post Transactions search page
that displays, click the Search button.
6. Select a Run Control ID from the list that displays.
For this example, select SA_GROUP_POST.

Training Guide
Student Financials – Inquiry
Posting a Group Post Entry Page 9
Step Action
7. On the Post Transactions page that displays, substitute the Group ID number,
which you recorded earlier, for the number that appears in the Starting Group ID
and Ending Group ID fields.
For this example, substitute 000000000053253 for 000000000041673 in both of
these two fields.
8. After entering the Group ID number in the Starting and Ending fields, click the
Run button.
9. On the Process Scheduler Request page that displays, select the Group Posting
Process box.
10. Click the OK button.
11. The Post Transactions page will display with a Process Instance number.
12. Click the Process Monitor link.

Training Guide
Student Financials – Inquiry
Posting a Group Post Entry Page 10
Step Action
13. Enter your User ID in the User ID field.
For this example, enter jdoe.
14. Click the Refresh button.
15. The screen will redisplay to show the process information. If your process ran
successfully, the Run Status field will display Success.
16. In the next phase, you will confirm that your posted entry balanced.
Click the Expand Menu icon.

Training Guide
Student Financials – Inquiry
Posting a Group Post Entry Page 11
Step Action
17. The main menu will redisplay.
Click the Create Group Data Entries link.
18. The Group Data Entry search page will display.
Click the Collapse Menu icon to collapse the menu.
19. Enter the Group ID, which you recorded earlier, in the Group ID field and then
click the Search button.
20. The Group Entry tab fields will display.
Notice the Deposit Balance and Posting Status fields now both display
“Balanced.”
21. If an error had occurred during the posting process, the Process Instance field
would display a number.
For this example, the process ran without errors, so no number displays.
22. Click the Home link.
23. Choose an option from the main menu, or click the Sign out link to terminate your
session.
24. In this topic, you learned how to:
• Post a group post entry.
• Confirm that the posted entry balanced.
End of Procedure.

Training Guide
Student Financials – Inquiry
Viewing Posted Financial Aid Entries Page 12
Viewing Posted Financial Aid Entries
Financial aid entries for short-term loans have specific requirements. Distinct values must be
entered in designated fields. This topic will teach you how to view a financial aid entry and
complete the required fields for this type of entry.
Procedure
In this topic, you will learn how to:
• View a posted financial aid entry for a short-term loan.
• Complete the required fields for this type of entry.
Step Action
1. Log into the myUCF portal and navigate to Staff Applications > PeopleSoft
SA/HR.
2. Click the Student Financials link.
3. Next, click the Charges and Payments link.

Training Guide
Student Financials – Inquiry
Viewing Posted Financial Aid Entries Page 13
Step Action
4. Then, click the Create Group Data Entries link.
5. The Group Data Entry search page will display.
To provide more room on your screen, click the Collapse Menu icon located in
the upper left area of your screen.
6. On the Group Data Entry search page that displays, click the Group Type
lookup icon.
7. Click the Look Up button.
8. Select Short-Term Loan Credits from the Look Up Group Type list.
9. The letter T will populate the Group Type field.
Click the Entry Date field calendar icon.

Training Guide
Student Financials – Inquiry
Viewing Posted Financial Aid Entries Page 14
Step Action
10. Select a date from the calendar that displays.
For this example, click the down arrow beside the month.
11. Select a month from the list that displays and then select a day.
12. The date you selected will populate in the Entry Date field.
Click the down arrow beside the Entry Date field.
13. As you may have noticed, many search pages contain operator fields. These fields
contain a list of drop-down predefined values, which help define a specific range
or value and work in conjunction with a value that you specify.
The drop-down list that displays contains the following operators:
• = (equal to the specified value)
• not = (not equal to the specified value)
• < (less than the specified value)
• <= (less than or equal to the specified value)
• > (greater than the specified value)
• >= (greater than or equal to the specified value)
• between (falls between the specified range of values)
• in (value appears in a list of items)
For this example, select the > operator (greater than the specified value).
14. Click the Search button.
15. Select a Group ID from the list that displays.
For this example, select 000000000052629.

Training Guide
Student Financials – Inquiry
Viewing Posted Financial Aid Entries Page 15
Step Action
16. The Group Entry tab fields will display.
When financial aid entries for short-term loans are created, the Group Entry tab
fields listed below must always contain these values:
• Group Type: Short-Term Loan Credit (an advance)
• Origin ID: 00015 – Short-Term Loans
17. Click the Group Line Entry tab.
18. The Group Line Entry tab fields will display.
When a Financial Aid entry for a short-term loan is created, the fields below must
be completed as follows:
• Account Type: STL
• Item Type: 271000002010
• Charge Priority: STLREFND. This code designates that the payment is to be
applied to the short-term loan account.
19. When the entry is made, the Amount, Term, and Due Date fields must also be
completed.
The Ref Nbr field in this example contains the FINA code. This code, which is
frequently used in this field, indicates how the short-term loan will be paid back.
20. Click the Home link.
21. Choose an option from the main menu, or click the Sign out link to terminate your
session.
22. In this topic, you learned how to:
• View a posted financial aid entry for a short-term loan.
• Complete the required fields for this type of entry.
End of Procedure.
